1
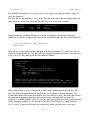
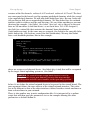
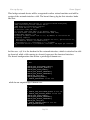
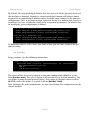
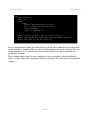
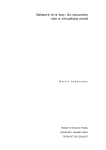
Xen stepbystep Tomas Karpati Xen stepbystep by Tomas Karpati Preface Why Xen ? Through the last years I have been playing around with many virtual engines. There are many of them, each with its own advantages and disadvantages. There are very good virtualization software developed as commercial products and as opensource. I have tested VMWare (in its very initial versions), dosemu, Bochs, UserModeLinux (UML) and Xen. To be faire, I think that all of them are good. However, I don't think that all them are suitable for same projects. Before a month and half, I had been involved in a new project that demmanded a very specific configuration, with specialized servers. The most logical solution was to setup three or four machines each running safely isolated in an intranet and protected with a firewall. The problem was that the budget was scare, but the bandwich and demmanding usage of the system did not justify the high costs it may carry. In this context I begun to think on the use of one machine running many virtual machines, each independent from the others, with their own resources managed independently. At the beginning I planned to use UML, as it was the one I thought may comply with most of the requirements. However, its use falled down because I needed that some of the virtual servers had direct access to some hardware components, while those components where not necessary for the other servers. I searched in the UML discussion groups for someone who had tried such setup, and found a comment that said it was possible, but needed some hack on the kernel. As I had not as much time nor the expertice to do that, I begin my search for an alternative. I rapidly found the link to the Xen homepage. I heard of Xen before, but never tried it. When reading the user manual and the latests threads on the discussion group, I found that Xen was the perfect match for my project. So I give it a try. The beginning was a little troublesome, but relatively fastly (in about a month and half) I had all my project completted. I have to thank the developers of Xen for the well done piece of gold, and the people at the discussion group which are very active and helpful responding to the questions posted even by newbees. The only problem I 1/21 Xen stepbystep Tomas Karpati saw was the lack of documentation and examples for those who want to try Xen, but without having to get into the intrincated source code. So, I dedicate this guide for the newbees wanting to play with Xen. This guide is dedicated to the Xen newbee and to those who want to get into a production ready system without the pains of learning the intrincated code and obscure theories behind Xen. However, the reader has to have some degree of experience in working and maintainig linux to successfully get Xen running. An Introduction to Xen The model of virtualization used in most of projects are based on creating a virtualization engine running in the base system, which permits running unmodified operating systems on it. This model is based on full virtualization. In contrast, Xen is based on a slight modification of the base operating system to achieve better performance, and need that the virtualized systems run also a modified operating systems. However, the user's applications run unmodified on those systems. This approach has been called “paravirtualization”. I think of a machine running Xen as the hardware equivalent of partitioning a hardisk. When we make a disk partition, we virtualy divide one physical disk into many disks. If we look at a partitioned disk he have the impression of having many disks, each independent of the other, and even formated with different filesystems that will contain different operating system files. In the same way, Xen divide the computer into many virtual machines, giving the impression of many computers running on it. If we run a network scanning program we can find that each virtual server is recognized as a different and independent machine. One of the most powerfull characteristics of Xen is compatmentalization. Xen isolates each of the virtual machines running on it and give them the posibility to control their own real resources besides of the virtualized ones. For example, if you have two network interfaces, you can asign one to Xen, that will be used to connect all the virtual machines with themselves, and those with other real machines in your intranet. The other interface could be asigned to another virtual machine that may act as a router that securely connect to the internet your whole intranet network. Another example of isolation is the use of two graphic cards, two usb mouses and two usb keyboard asigned to two independent virtual machines, each running X with its own set of harware. When running Xen, we actualy run at least two kernels. The first one is xen.gz, which is the kernel implementation of the virtualization engine. The other one is the priviledged kernel called vmlinuzx.x.xxen0. This is the kernel that will control most of the hardware, generating virtual frontends of them for the other virtual machines. This kernel will run the linux distribution called domain0. Under this domain Xen 2/21 Xen stepbystep Tomas Karpati has to run xend, the Xen control daemon. xend is the responsible of creating and destroying domains. It also is the responsible of managing the resources of those domains. xend is writen in the python scripting language and its communication signals are managed through the Twisted network framework, also based on python. Those signals are transmitted using the HTTP protocol. The HTTP interface is present in all the most commonly used programming languages (Python, Perl, Java, C, C++, Rubi, etc), letting programmers to use their preferred language for interfacing with Xen. Preparing Xen to run For running Xen, we have to prepare our system. The first step is to create a fresh pristine linux distribution. We will base our pristine distribution on Debian Sarge. You can use the technique you preferre, but we recommend the use of debootstrap. You can install debootstrap by downloading it from 'http://people.debian.org/~blade/install/debootstrap/'. To install debian for our system, you need a partition of at least 1.5GB. Format this partition (be carefull to check if there is some important data on this partition before proceding) using mke2fs. Now mount the formatted partition as following: mount /dev/hdaX /mnt t ext2 where hdaX is the name of the formatted partition (substitute it to the correct values). If you have not installed linux on your test computer, you can run linux from your cdrom drive using any live distribution (like Knoppix), install debootstrap locally in your home directory (that is saved into your C:\ drive as an image file, or on other media). When installing debootstrap, you are asked for a passprase. Write the following phrase as the password: Yes, I know that this data may be harmful! Be carefull to write all the words, spaces and signs as written here, any change you made will return an incorrect passphrase error. After that, extract and install debootstrap. Creating a pristine debian distribution Now we will procede to install a base Debian system on /mnt. debootstrap arch i386 sarge /mnt \ http://ftp.<countrycode>.debian.org/debian 3/21 Xen stepbystep Tomas Karpati where <countrycode> is the two letters code of your country, or in defect, of the nearest country having a Debian mirror. The installation of Debian will take a while, thus enjoy your time reading this book or playing... debootstrap will make the work for you. After debootstrap finished without errors, logout from the chrooted archive: logout At this point we have created a distribution that we will use as our template. Before configuring it for using as our domain0, we can generate a filesystem on a file, and copy the distribution to it, so we can use it for the creation of our virtual machines. To do that we procede as follows: dd if=/dev/zero of=/opt/vserver.img bs=1024k count=1.5MB mke2fs /opt/vserver.img dd if=/dev/zero of=/opt/swap.img bs=1024k count=256MB mkswap /opt/swap.img Now change to root and procede with the following: su root mount /opt/vserver.img /cdrom o loop cd /mnt cp rp boot bin dev etc lib root sbin usr var /cdrom cd /cdrom mkdir cdrom floppy home mnt opt proc tmp umount /cdrom Now we have two copies of the filesystem, one on a hardisk partition, and the second on a virtual filesystem. I recommend you to use gzip or bzip2 to compress the vserver.img and record it into a cdrom, so you can always have a copy of it in case you want to create a new virtual server on another machine. Configuring domain0 We are now ready to procede with the system configuration. We begin with domain0. On the command line write: 4/21 Xen stepbystep Tomas Karpati chroot /mnt /bin/bash We have to change the following files: echo “vserver” > /etc/hostname In /etc/hosts we write the following: 127.0.0.1 192.168.168.1 192.168.168.2 192.168.168.3 localhost domain0 mailserver smoothwall In /etc/resolv.conf we add the address of our DNS server (ask your internet service provider for the address of their DNS servers). In my case it looks like: nameserver 194.90.1.5 nameserver 192.115.106.10 In /etc/network/interfaces you must specify the network interface existent in your system and the method for obtaining their addresses. In our example we present two ethernet interfaces, one configured to obtaine its address from a dhcp server, the second with a static address. auto lo eth0 eth1 iface lo inet loopback iface eth0 inet dhcp hostname vserver iface eth1 inet static address 10.1.0.2 netmask 255.255.255.0 The next file to modify is /etc/apt/sources.list. We add here the address of the Debian mirror we used with debootstrap. 5/21 Xen stepbystep Tomas Karpati deb http://ftp.<countrycode>.debian.org/debian sarge main contrib nonfree The last file we will modify is /etc/fstab. This file must reflect the mounting points of our system: /dev/hda1 / ext2 errors=remountro 0 1 /dev/hda2 none swap sw 0 0 proc /proc proc defaults 0 0 Substitute /dev/hda1 and /dev/hda2 for the correct values for your system. As we explained before, Domain0 is the responsible of running the Xend server. So we have to install the Xen binaries on it. Before procedding, we have to install some software libraries and applications which are prerequisite for Xen. The packages we need are: iproute2 bridgeutils python Twisted libcurl zlib If you want to build Xen from source you will also need: gcc v3.3.x binutils GNU make libcurldevel zlibdev pythondev LATEX, transfig and tgif You can install them using aptget or dselect. I recommend the use of dselect, as it can show you the version of the packages, their dependencies and the recommended package associated with them. 6/21 Xen stepbystep Tomas Karpati After completing the installation of the required packages, we procede to download and install Xen. Download the last binary distribution of Xen from the Xen web site (http://www.cl.cam.ac.uk/Research/SRG/netos/xen/downloads.html). Unpack the package and install: cd /usr/src untar xzf xeninstall.tgz cd xen2.0.1install ./install.sh This will check for the needed dependencies and will install Xen. The installed files are: the Xen kernels (in /boot), the Xen module (in /lib/modules), the Xen tools (in /usr), some python libraries (in /lib/python and in /var/xen), and the Xen scripts that run the Xen virtualization engine (in /etc). In order to run Xen, it is needed to boot using grub. However, grub is not installed by default in Debian, so we install it into Debian: aptget install grub this will install grub on the system. Now we have to create or modify the file /boot/grub/menu.lst. title Xen 2.0 / XenoLinux 2.4.27 kernel /boot/xen.gz dom0_mem=65536 module /boot/vmlinuz2.4.27xen0 root=/dev/hda1 console=tty0 title Xen 2.0 / XenoLinux 2.6.9 kernel /boot/xen.gz dom0_mem=65536 module /boot/vmlinuz2.6.9xen0 root=/dev/hda1 console=tty0 This file says grub the sequence of actions and the parameters it has to pass to the kernel on booting. For those used to boot with lilo, it is the equivalent of lilo.conf. For the moment, Lilo is not supported by Xen. In this file we have two booting options: botting Xen with a 2.4.27 kernel, or booting with a 2.6.9 kernel. The first line defines the title of the boot option. The second line is identical in both options. It says the bootloader to use the file /boot/xen.gz as the booting kernel, and to assign to it a total of 64MB of RAM. No matter if you have 1000MB RAM, you assigned to domain0 only 64MB. The restant memory may be used later when assigning memory to other virtual servers. xen.gz is the control layer of Xen and is 7/21 Xen stepbystep Tomas Karpati first runned. The third line is the name of the kernel that will run the virtual machine domain0. This is passed by grub to the xen.gz kernel with the descriptor module, and the parameters for the location of the root directory and the console to be used for logging in. In this case the root directory is /dev/hda1 (change it to reflect your system configuration), and the console will be /dev/tty0. If you have installed lilo and don't want to change bootloader, you can create a floppy booting disk (or even a booting cdrom, see the grub manual): cd /usr/share/grub/i386pc dd if=stage1 of=/dev/fd0 bs=512 count=1 dd if=stage2 of=/dev/fd0 bs=512 seek=1 To install grub into the master boot record run the following: grubinstall /dev/hda where /dev/hda is the master disk. WARNING: if you use the command bellow without adding the corresponding configuration definitions for the rest of yor system, the system will not boot your original operating systems on this machine. Please referre to the grub manual ! We are ready with our installation, logout from the chrooted directory and umount the /mnt directory. Booting Xen for the first time Now we are ready to reboot our system for the first time. You can try it by rebooting your computer (insert the floppy if you decided to make one). If it boots successfully, CONGRATULATIONS, you are running your first Xen Virtual machine, and you are running domain0. You have now to login as root. Being a fresh install, no password will be required. This is the moment to create the root password for domain0. Type: passw 8/21 Xen stepbystep Tomas Karpati and follow the instructions. You may also want to create a new non priviledged user (for security reasons, it is recommended to logging as this unpriviledged user and not as root). Use the command adduser, and follow the instructions. If you are a curious, you can now check the system, which processes are running, which devices are recognized, check the log files, etc. You will note that it runs like any regular distribution. Take a look at the memory statistics (cat /proc/memstat), you will note that the reported memory is not the real memory of the system. It is the memory we assigned to domain0 when grub was configured. Everithing looks wonderfull, but we are interested to run more virtrual machines. At this point we cannot run any other virtual machine. We have before to run the Xen daemon, /etc/init.rd/xend start If you check now the network interfaces (ifconfig), you will find that there is a new network interfaces added. domain0> /sbin/ifconfig lo Link encap:Local Loopback inet addr:127.0.0.1 Mask:255.0.0.0 inet6 addr: ::1/128 Scope:Host UP LOOPBACK RUNNING MTU:16436 Metric:1 RX packets:1002 errors:0 dropped:0 overruns:0 frame:0 TX packets:1002 errors:0 dropped:0 overruns:0 carrier:0 collisions:0 txqueuelen:0 RX bytes:72584 (70.8 Kb) TX bytes:72584 (70.8 Kb) eth0 Link encap:Ethernet HWaddr 00:50:8D:A6:10:19 inet addr:192.168.168.254 Bcast:192.168.168.255 Mask:255.255.255.0 inet6 addr: fe80::250:8dff:fea6:1019/64 Scope:Link UP BROADCAST NOTRAILERS RUNNING MULTICAST MTU:1500 Metric:1 RX packets:13283 errors:0 dropped:0 overruns:0 frame:0 TX packets:13504 errors:0 dropped:0 overruns:0 carrier:0 collisions:0 txqueuelen:1000 RX bytes:8909969 (8.4 Mb) TX bytes:1954311 (1.8 Mb) Interrupt:11 Base address:0xa800 xenbr0 Link encap:Ethernet HWaddr 00:50:8D:A6:10:19 inet addr:192.168.168.254 Bcast:192.168.168.255 Mask:255.255.255.255 UP BROADCAST RUNNING MULTICAST MTU:1500 Metric:1 RX packets:94 errors:0 dropped:0 overruns:0 frame:0 TX packets:20 errors:0 dropped:0 overruns:0 carrier:0 collisions:0 txqueuelen:0 RX bytes:16360 (15.9 KiB) TX bytes:1313 (1.2 KiB) After xend is running we are now able to run the virtual machines. We can communicate with xend through the command xm. This command passes the instructions we have give to it as parameters. 9/21 Xen stepbystep Tomas Karpati xm create f /etc/xen/xmexample1 will create the virtual machine as described in the configuration file /etc/xen/xmexample1. However, to run a new virtrual machine we have to configure a new pristine distribution. We will copy our previously generated template into the file / opt/domain1: cp /opt/vserver.img /opt/domain1.img cp /opt/swap.img /opt/ms_swap.img mount /opt/domain1.img /mnt o loop chroot /mnt /bin/bash We will configure now domain1 in a similar way we configured domain0. We also created a swap file for this domain. echo “mailserver” > /etc/hostname In /etc/hosts we write the following: 127.0.0.1 192.168.168.1 192.168.168.2 192.168.168.3 localhost domain0 mailserver smoothwall In /etc/resolv.conf copy the same configuration values than in domain0. In /etc/network/interfaces you specify the network interface passed on by domain0. Our system recognize this interface as eth0, and the driver loaded is the same driver that we loaded in domain0. auto lo eth0 iface lo inet loopback iface eth0 inet static address 192.168.168.2 netmask 255.255.255.0 10/21 Xen stepbystep Tomas Karpati The next file to modify is /etc/apt/sources.list. Again, we copy the same values as used in domain0. The last file we will modify is /etc/fstab. This file will reflect the mounting points of the system as passed by domain0 (we will define it in the next section): /dev/hda1 / ext2 errors=remountro 0 1 /dev/hda2 none swap sw 0 0 proc /proc proc defaults 0 0 Logout from the chrooted directory. In order to boot this distribution without problems, we have to copy to the system the kernel modules for the xenized kernels. cp rp /lib/modules/* /mnt/lib/modules/ umount /mnt Now, we are ready with our first independent virtual machine. To run it we have to create a configuration file. We will call this configuration file mailserver.xsp and save it on /etc/xen. The content of this file looks as follows: (vm (name mailserver) (memory 128) (image (linux (kernel /boot/vmlinuz2.4.27xenU) (ip ::::mailserver:eth0:192.168.168.2) (root /dev/hda1) (args 'ro fastboot 2') ) ) (device (vif (@ (id vif1)) (mac aa:00:00:00:22:22))) (device (vbd (uname file:/opt/mailserver.img) (dev hda1) (mode w))) (device (vbd (uname file:/opt/ms_swap.img) (dev hda2) (mode w))) ) Files ending with .xsp are considered as the native configuration files in Zen. The first line of the configuration tell xm that we are defining a virtual machine. The second line define the name that will be used to call our server. The third line define the amount of memory that Xen will assign to this machine. We assigned to mailserver 128MB of RAM. Lines 411 represent the equivalent of the grub definition of the booting parameters. We tell xm to use the kernel found in /boot/vmlinuz 2.4.27xenU. If you had checked the content of /boot you may have seen two 11/21 Xen stepbystep Tomas Karpati versions of the Xen kernels: vmlinuz2.4.27xen0 and vmlinuz2.4.27xenU. The first one correspond to the kernel used for running priviledged domains, while the second is for unpriviledged domains. We will talk about both types later. By now, I only will tell you that we will run an unpriviledged domain. We also define here the network interface with its address and the root directory. We can define anything as our root directory (for example: /dev/hdb4, /dev/sda2, /dev/sr0, etc) as long as in the next lines we tell xm where to find that device, as we do in lines 1314. We designed / dev/hda1 to a virtual file that contains the domain1 linux distribution (/opt/mailserver.img). In the same way we assigned /dev/hda2 to the swap file (take now a look at the /etc/fstab we created for this distribution). We may also define here a real harddisk partition, like in this example: (vm (name mailserver) (memory 128) (image (linux (kernel /boot/vmlinuz2.4.27xenU) (ip ::::mailserver:eth0:192.168.168.2) (root /dev/hda1) (args 'ro fastboot 2') ) ) (device (vif (@ (id vif1)) (mac aa:00:00:00:22:22))) (device (vbd (uname phy:hda4) (dev hda1) (mode w))) ) where we assign a real physical device /dev/hda4 (phy:hda4) that will be recognized by the target virtual operating system as /dev/hda1. WARNING: Be carefull to not assign block devices in use by other domains to any new domain, because this may corrupt the filesystem and will cause troubles to the operating systems. In line 12 we define the virtual network device to be passed to the virtual kernel. The mac argument defines the mac address of the virtual network interface. This value has to be different to that of the other interfaces defined in other virtual machines or from real machines in your network. There is also another way to write configuration files. It is interpreted by a python script that will then pass the parameters to xm. An example showing the same parameters as defined bellow is: 12/21 Xen stepbystep Tomas Karpati # This script sets the parameters used when a domain is created using 'xm create'. # You use a separate script for each domain you want to create, or # you can set the parameters for the domain on the xm command line. #============================================================================ # # Kernel image file. kernel = "/boot/vmlinuz2.4.27xenU" # Initial memory allocation (in megabytes) for the new domain. memory = 128 # A name for your domain. All domains must have different names. name = "mailserver" # # Define network interfaces. ip='192.168.168.2' # Optionally define mac and/or bridge for the network interfaces. # Random MACs are assigned if not given. vif = [ 'mac=aa:00:00:00:22:22 , bridge=xenbr0' ] # # Define the disk devices you want the domain to have access to, and # what you want them accessible as. # Each disk entry is of the form phy:UNAME,DEV,MODE # where UNAME is the device, DEV is the device name the domain will see, # and MODE is r for readonly, w for readwrite. #disk = [ 'phy:hda1,hda1,r' ] disk = ['file:/opt/mailserver.img,hda1,w'] disk = ['file:/opt/ms_swap.img,hda2,w'] # # Set the kernel command line for the new domain. # You only need to define the IP parameters and hostname if the domain's # IP config doesn't, e.g. in ifcfgeth0 or via DHCP. # You can use 'extra' to set the runlevel and custom environment # variables used by custom rc scripts (e.g. VMID=, usr= ). root = "/dev/hda1 ro" # Sets runlevel 2. extra = "2" # # Set according to whether you want the domain restarted when it exits. # The default is 'onreboot', which restarts the domain when it shuts down # with exit code reboot. # Other values are 'always', and 'never'. restart = 'never' #============================================================================ 13/21 Xen stepbystep Tomas Karpati This file is self explained, and may be more clearly understood if compared in parallel with its XSP counterpart. After we have our disk image and its configuration ready, we will run our new virtual machine. Try this: xm create F /etc/xen/mailserver.xsp c or this xm create f /etc/xen/mailserver.conf c the F option tells xm we are using the native configuration format, while the f option tells xm we are using an alternative format. The c option tells xm to assign the actual console to the new virtual machine. You will see now an almost normal linux kernel booting that will get you to the login command prompt. Type root and you are in. The first thing to do is to add a root password and to create a new unpriviledged user, as done bellow in domain0. Now you can play a little with the new system, and install the server applications you want it to run. I recommend you to start with a mail gateway, with antivirus and antispam protection, an openLDAP server, and an NFS server. The same steps should be used to generate domain2, installing on it a web server, like apache with perl and/or php4, a database server like MySQL or Postgress, and so on. CONGRATULATIONS! You are now running your own superultrafantastic virtual server system. And you have all the servers you ever dreamed without consuming all that power a network of servers consume, without the need of special refrigeration meassures, without a hole in your pocket, and without your wife reclaiming your computers are invading your home ;) Customizing Xen Until now we have been running Xen in a very basic way. Xen could be used with more specialized and cumtomized configurations. Lets say you want to create a Xen based system that will include a router/firewall virtual machine (based on Smoothwall), a LAMP system (Linux, Apache, MySQL and PHP4), a mail gateway (Postfix + Amavis) with antivirus (ClamAV) and antispam (SpamAssassin) protection, and an internet radio server (Icecast). Such a system can not be ran successfully on the Xen configuration described before. This configuration requires some of the systems to have direct access to some hardware. However, all the hardware is only available to domain0. In the following diagram we show the conguration we are trying to achieve. 14/21 Xen stepbystep Tomas Karpati Hub (intranet) Virtual Ethernet card (vif0:1) Virtual Ethernet card (eth0) Real Ethernet card (eth0) domain0 ADSL/Cable Modem (internet) LAMP Virtual Ethernet card (eth0) – green interface Real Ethernet card (eth1) – red interface Virtual Ethernet card (eth0) Sound Card iRadio Smoothwall . Computer Box . The computer used for running this Xen example has the following configuration: • AMD Athlon 1900+ (1600MHz) processor • 1GB SDRAM • Asus AT7 motherboard w/Realtek 8139 network card and Via VT8233A AC97 Audio Controller (both on board) • An additional 3Com 905b (typhoon) ethernet card. We have to assign One of the ethernet cards to domain0, the other to Smoothwall, 15/21 Xen stepbystep Tomas Karpati and the soundcard to iRadio server. However, the module drivers corresponding to those hardware are not included in the binary distribution of Xen. So we have to customize Xen for our needs. Compiling Xen Our first step in the customization of Xen is to download the source code for Xen and a vanilla linux kernel (ftp://ftp.kernel.org). We will make all this work on domain0. Decompress the Xen source into /usr/src, and the linux kernel source into the / usr/src/xen2.0.1 directory. Change the name of the kernel source as following: cd /usr/src/xen2.0.1 mv linuxx.y.z pristinelinuxx.y.z Now, if you have a configuration file that works for your computer, copy that to the boot directory (the Xen Makefile will check if the configuration files exist in the / boot directory, and if true, will use those configuration files for compiling the kernels). cp /usr/linux/myconfig /boot/configx.y.zxen0 Another way to customize your kernel is to get into the vanilla kernel source and run make mrproper make menuconfig after done save the config file and copy it to the /boot directory as explained before. Now run make and wait for a while. First make will check if you has all the required dependencies needed for compilation. Next it will compile the Xen utilities. Then make will patch your vanilla kernel as needed and will run the following: make ARCH=xen oldconfig At this point you may be required to answer some questions related to the kernel 16/21 Xen stepbystep Tomas Karpati configuration. For those parameters related to Xen, we recommend to accept the defaults. For the other parameters, it is up to you if you want to make any addition or deletion. Now make will procede with the compilation of the linuxx.y.zxen0 kernel and modules, and later it will repeat the same steps to compile the linux x.y.zxenU kernel tree. At the end of this process we will have new kernels and modules that will be automatically installed into domain0. To have our distributions booting without problems we have to copy the modules into them. To do that mount the virtrual images we created and copy the modules from /usr/src/xen install/install/lib/modules into /mnt/lib/modules, Now we have to reconfigure some of the system configurations, but before lets talk a little about priviledged and unpriviledged domains. Priviledged vs Unpriviledged domains Virtual machines running under Xen are runned in two ways: as priviledged domains or as unpriviledged domains. The most common example of a priviledged domain is domain0. The term priviledged specify that we are running a domain that has direct access priviledges over part or all the hardware. In the examples we have discused previously we have configured domain0 as the only priviledged domain. However, we can also configure other virtual machines as priviledged domains. The other way to run a virtual machine is configuring it as an unpriviledged domain. Unpriviledged domains are characterized by having no direct access to the physical devices of the system. Their access are made through virtual interfaces managed by domain0. Examples of those interfaces are network and block devices. As we stated before, most of the physical devices are controller by domain0. This domain creates a backend port for each device, which can communicates with other domains having configuration with a frontend driver. This communication is controlled by xend. The reason for this model is that any physical device can be controlled only by one kernel driver. I we permit many kernels to access and controll the same device, misbehaving software may crash or lock all the system and other machines may stop working or responding. The recognition of those virtual drivers by the virtual machine kernel is achieved by modifications introduced into the kernel. For example, when initialising xend in domain0, a virtual network interface is generated, using bridgeutils, and attached to the real network device on the system. On starting xend we will see in the console the following message: device vif1.0 entered promiscuous mode xenbr0: port 2(vif1.0) entering learning state xenbr0: port 2(vif1.0) entering forwarding state xenbr0: topology change detected, propagating 17/21 Xen stepbystep Tomas Karpati This bridge network device will be recognized in other virtual machine and will be assigned the network interface eth0. The kernel dmesg log for this interface looks like this: ... Universal TUN/TAP device driver 1.5 (C)19992002 Maxim Krasnyansky [XEN] Initialising virtual ethernet driver. [XEN] Netfront recovered tx=0 rxfree=0 NET4: Linux TCP/IP 1.0 for NET4.0 IP Protocols: ICMP, UDP, TCP IP: routing cache hash table of 512 buckets, 4Kbytes TCP: Hash tables configured (established 4096 bind 8192) Sending DHCP requests ., OK IPConfig: Got DHCP answer from 0.0.0.0, my address is 192.168.168.252 IPConfig: Complete: device=eth0, addr=192.168.168.252, mask=255.255.255.0, gw=192.168.168.230, host=domain2, domain=, nisdomain=(none), bootserver=0.0.0.0, rootserver=0.0.0.0, rootpath= ip_conntrack version 2.1 (512 buckets, 4096 max) 288 bytes per conntrack ... In this case, vif1.0 is the backend of the network interface, which is attached to eth0 in domain0, while eth0 running in domain2 represent the forntend interface. The kernel configuration that define a priviledged domain are: # # Xen # CONFIG_XEN_PRIVILEGED_GUEST=y CONFIG_XEN_PHYSDEV_ACCESS=y CONFIG_XEN_SCRUB_PAGES=y CONFIG_XEN_NETDEV_FRONTEND=y CONFIG_XEN_BLKDEV_FRONTEND=y CONFIG_NO_IDLE_HZ=y CONFIG_FOREIGN_PAGES=y # CONFIG_NETDEVICES is not set while for an unpriviledged domain are: # # Xen # # CONFIG_XEN_PRIVILEGED_GUEST is not set # CONFIG_XEN_PHYSDEV_ACCESS is not set CONFIG_XEN_SCRUB_PAGES=y CONFIG_XEN_NETDEV_FRONTEND=y CONFIG_XEN_BLKDEV_FRONTEND=y CONFIG_NO_IDLE_HZ=y # CONFIG_FOREIGN_PAGES is not set CONFIG_NETDEVICES=y 18/21 Xen stepbystep Tomas Karpati By default, the only priviledged domain that has access to all the physical devices of the machine is domain0. Running a second priviledged domain will behave almost identical to an unpriviledged domain unless we make some changes to the domains configuration. First, if we want to asign a physical device to a domain that requires a soundcard, we have to hide this device to be recognized by domain0. To achieve this we modify the grub configuration as follows: title Xen 2.0 / XenoLinux 2.4.27 kernel /boot/xen.gz dom0_mem=65536 physdev_dom0_hide=(00:17.5) module /boot/vmlinuz2.4.27xen0 root=/dev/hda1 console=tty0 title Xen 2.0 / XenoLinux 2.6.9 kernel /boot/xen.gz dom0_mem=65536 physdev_dom0_hide=(00:17.5) module /boot/vmlinuz2.6.9xen0 root=/dev/hda1 console=tty0 To know the address of the device you want to hide you can take a look at the pci process using: cat /proc/pci In my machine I get the following information: Bus 0, device 17, function 5: Multimedia audio controller: VIA Technologies, Inc. VT8233/A/8235 AC97 Audio Controller (rev 64). IRQ 10. I/O at 0xc000 [0xc0ff]. The values of the device to be written in the grub configuration should be in the form (bus:dev.func). The values shown in the pci info are in decimal numbers. You can define it using decimal or octal values. If we define in decimal values it will be (0:17.5), while if we define it as octal it will be (0x0:0x11.0x5). After changing the grub configuration, we have also change the configuration for the virtual machine. 19/21 Xen stepbystep Tomas Karpati (vm (name asterisk) (memory 80) (image (linux (kernel /boot/vmlinuz2.4.27xen0) (ip ::::iradio:eth0:192.168.168.4) (root /dev/hda2) (args 'ro fastboot 2') ) ) (device (vif (@ (id vif1)) (mac aa:00:00:00:00:11))) (device (vbd (uname file:/opt/iradio.img) (dev hda2) (mode w))) (device (pci (bus 0) (dev 17) (func 5))) ) In the configuration bellow we defined the pci device that should be passed to that virtual machine. Another differece to the configurations we made at now is the use of the vmlinuz2.4.27xen0 kernel. This kernel defines the virtual machine as a priviledged domain. This example shows how Xen use isolation to run customized virtual machines, which is one of the most important differeces between Xen and other virtualization engines. 20/21