1
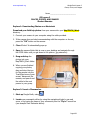
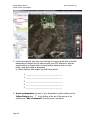
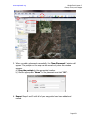
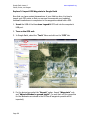
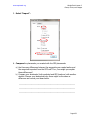
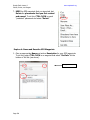
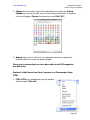
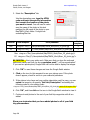
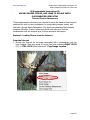
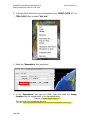
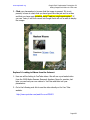
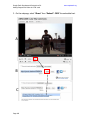
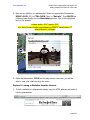
www.mapteach.org Google Earth Lesson 2 Places, Points, and Images GE Lesson 2 INTRODUCTION TO PLACES, POINTS, AND IMAGES IN GOOGLE EARTH TEACHER INFORMATION Lesson Summary: During this lesson, students will make Google Earth placemarks using data they have collected with their GPS units and digital cameras on a local field trip. Students first interpret satellite images as they search for and estimate the location of familiar landmarks in their community. They then download and organize the photos they took with their cameras, create placemarks, add these photos and descriptions, and import waypoints from their GPS unit. This lesson provides students an introduction to virtual globes. Objectives: Students will be able to use placemarkers, import GPS points, and add images to key landmarks in the surrounding community. Estimated Time: 1 hour Correlation to Alaska Standards: Geography A Make and use maps, globes, and graphs to gather, analyze, and report spatial (geographical) information Geography B Utilize, analyze, and explain information about human and physical features of places and regions. Technology A Operate technology-based tools. Technology B Use technology to locate, select, and manage information. Technology C Use technology to explore ideas, solve problems, and derive meaning. BACKGROUND FOR THE TEACHER This lesson teaches students one of the most popular and useful functions of Google Earth, how to prepare site observations from an earlier field trip for inclusion in a Google Earth map of placemarkers with photos. Although the actual Google Earth work needed to accomplish such map-making is fairly straightforward, success requires some attention to changing versions and capabilities of Google Earth as well as collection and organization of data such as photos and field notes prior to the exercise. Google Earth: Adding images from either a computer or the Internet to Google Earth placemarks requires the use of simple HyperText Markup Page 423 Google Earth Lesson 2 Places, Points, and Images www.mapteach.org Language (HTML) coding. HTML is the main markup language for displaying web pages and other information in web browsers. It is written in elements enclosed in angle brackets (like <img src >) within the webpage content, and the purpose of the browser (in this case Google Earth) is to “read” the code and translate the code into visible pages. To make this task easily accessible to students, we provide the specific code they need to type into the “Placemarker Description”. The only caution is that students need to duplicate the code and the pathname exactly, or it won’t work. In other words, any typographical error, extra space or error in capitalization could cause a malfunction. That said, recently Google Earth has created an “Add Image” feature, which automatically links to photos online but not to photos on your desktop. Because we think the ability to add desktop photos is important and because typing in HTML code works in any version of Google Earth, we have chosen to focus this lesson on use of HTML for adding pictures into placemarkers. However, if you and your class are already comfortable with image-sharing applications like Picasa, you might want to investigate Google Earth tutorials to find out more about the “Add Image” option. Data Collection and Organization: The best data is the students’ own data, and students are very excited to see their observations and pictures attached to a Google Earth image. This means that a field trip for data collection is necessary before beginning this lesson. For each site on the field trip, the students need to have marked their location on a topographic map, taken a GPS waypoint and a digital picture of that location, and written notes that will help label and explain what they observed. GPS Lesson 2 with field data sheets serves as a guide for this field trip work. If time or weather issues preclude students being able to make their own field trip observations, you may opt to go out yourself and make observations at a handful of sites along a road, trail or near the school, and then share the pictures and GPS unit with students so they can download and prepare the data. Some important concepts and tips for success: Working with photos requires up-front work and careful attention to file/folder/pathway organization. It is recommended that all students organize their photos using the same file structure, so that both you and they know where data are consistently stored. This is critical when linking to photos via a placemarker. We recommend that you set up a MapTEACH_Work folder on all student computers which would yield the following consistent pathway: Users/student/MapTEACH_Work If there is confusion about the pathname or photo name on a Mac, Click on the photo and then “File/Get Info”, and review “Where” and “Name & Extension” Page 424 www.mapteach.org Google Earth Lesson 2 Places, Points, and Images In generating the link to the photo, the path name is case sensitive. When adding in a link to an image, you will need to make sure that students use a quotation mark " and not two apostrophes ‘’. They will look the same once typed, but will not be interpreted the same by Google Earth, and images will not be displayed if double apostrophes are used. It is also important that the photo used is a jpeg (not a gif or tiff) and is properly labeled “.jpg” o MAC users will need to include full name and file extension, see below o PC users will need to include name. Note that it is called JPEG file but with jpg extension, see below MATERIALS GPS (etrex Legend-H) w/ USB Google Earth Version 6.1.0.5001 installed on each computer. (Note that previous versions of Google Earth will work, but as each new version is added, there are subtle changes and this lesson is written to use all the features in 6.1.0.5001.) Data from field trip including waypoints on the GPS, digital photos, and notes Page 425 Google Earth Lesson 2 Places, Points, and Images www.mapteach.org Topographic map of the surrounding community with marked waypoint locations AA batteries Internet connection with moderate bandwidth Camera with appropriate card readers/USB port Copies of Student Exercise INSTRUCTIONAL PROCEDURES Getting Ready Prior to beginning this activity: Check the student computers to assure that they are loaded with at least Google Earth Version 6.1.0.5001. You can download this version from: http://www.google.com/earth/download/ge/ Be sure to add a MapTEACH Work folder on each student computer as follows: Users/student/MapTEACH_Work. Students will need to collect data about landmarks. Using GPS Lesson 2 as a guide, have students brainstorm a list of community landmarks or places of interest. Select key places from the brainstormed list and take a field trip to collect data. For each place chosen, have students: (a) mark their location on a topographic map; (b) collect a waypoint and photo; and (c) record pertinent information about this place in their notebooks. Gear-up Ask the students whether any of them have added placemarkers or pictures into Google Earth and discuss. Explain that they will be using the waypoints, photos, and notes from their field trip to enhance placemarkers and provide more information about the places they visited. Review the lesson steps with them and explain the precision needed when typing in pathnames and codes. Generalize When students finish comparing placemarkers (Explore 3), they are asked to show you their work. This would be a good time for a discussion of the accuracy/limits of a GPS receiver and of Google Earth. After finishing the entire lesson, and depending upon time and the variety of photos and waypoints used, have students share some of their work with another student or with the class and talk about how these skills might be useful to them in their everyday lives. Page 426 www.mapteach.org Google Earth Lesson 2 Places, Points, and Images TEACHER RESOURCES Places o Creating a new placemark/saving places data http://support.google.com/earth/bin/answer.py?hl=en&answer=148142&from=148150&rd=1# o Reposition placemarkers How to reposition on the earth Use of Edit Placemark box http://support.google.com/earth/bin/answer.py?hl=en&answer=148074&topic=2376990&ctx=topic o Retrieving and moving placemarks files For both PC and Mac users on how to find myplaces.kml file http://support.google.com/earth/bin/answer.py?hl=en&answer=166438&topic=2376990&ctx=topic o Setting icons for places and folders How to change icons size, style, type, and image http://support.google.com/earth/bin/answer.py?hl=en&answer=148077&topic=2376990&ctx=topic o Changing labels Change color, size, and opacity of label in icons/places/placemarks etc http://support.google.com/earth/bin/answer.py?hl=en&answer=148076&topic=2376990&ctx=topic Photos and imagery o Understanding Google Earth Imagery http://support.google.com/earth/bin/answer.py?hl=en&answer=176147&topic=2376200&ctx=topic o Adding photos http://support.google.com/earth/bin/answer.py?hl=en&answer=148126&topic=2376200&ctx=topic o Saving images http://support.google.com/earth/bin/answer.py?hl=en&answer=148146&topic=2376200&ctx=topic General Help o Ferman, Eric J. 2006 .A Google Earth User Manual for Earth Science Teachers. Available online at: http://www2.lhric.org/eastchester/schools/hs/teachers/fermann/documents/GEforESmanual.pdf o Google Earth help online: http://support.google.com/earth/?hl=en o GE Tutorial for Educators – http://sitescontent.google.com/google-earth-for-educators/tutorials-and-tips Page 427 www.mapteach.org Google Earth Lesson 2 Places, Points, and Images Name:_____________________________ GE Lesson 2 PLACES, POINTS, AND IMAGES Student Exercise Explore 1: Downloading Photos on a Macintosh Download your field trip photos from your camera into your MapTEACH_Work directory. 1. Connect your camera to your computer using the cable provided. 2. If the camera does not start communicating with the computer on its own, press the “OK” button on the camera. 3. Close iPhoto if it automatically pops up. 4. Open the camera folder that is now on your desktop and navigate through the DCIM folder until you get down to the photos (.jpg extension). 5. Drag and drop the photos into your MapTEACH_Work folder. 6. When you are finished copying your photos, drag and drop the icon for the camera into the Trash/Eject area of your screen, disconnect the camera, and pass it and the cable to the next person in your group. Explore 2: Insert a Placemarker 1. Start up Google Earth, using 2. Locate your community either by using the navigational tools to pan and zoom, or by typing the name of your community into the “Fly to” search bar (see example from Fairbanks below). Page 429 Google Earth Lesson 2 Places, Points, and Images www.mapteach.org 3. Use the topographic map from your field trip to orient yourself and to find the landmarks you marked on the map and with your GPS. Attempt to find the same locations in Google Earth by using familiar features such as rivers, bluffs, roads and ridges as landmarks. a) Which features most helped you find these places? 1. ______________________________________ 2. ______________________________________ 3. ______________________________________ 4. ______________________________________ 5. ______________________________________ 4. Insert a placemarker for each of your landmarks by either clicking on the Yellow Pushpin icon in the toolbar at the top of the screen or by selecting the “Add >Placemark” from the menu, see below. Page 430 www.mapteach.org Google Earth Lesson 2 Places, Points, and Images 5. When you add a placemark successfully, the “New Placemark” window will appear. The pushpin on the map can be moved only when this window appears. a) Drag the pushpin to the appropriate location. b) Give an appropriate “Name” to the placemark and click “OK”. 6. Repeat Steps 4 and 5 until all of your waypoints have been added and named. Page 431 Google Earth Lesson 2 Places, Points, and Images www.mapteach.org Explore 3: Import GPS Waypoints to Google Earth Now that you have created placemarkers of your field trip sites, it is time to import your GPS points so that you can see how accurate your predicted landmark locations are in comparison to the waypoints created with a GPS. 1. Insert the USB of the blue etrex Legend H GPS unit into the computer’s USB port. 2. Turn on the GPS unit. 3. In Google Earth, select the “Tools” Menu and click on the “GPS” tab. 4. For the device type select the “Garmin” option. Import “Waypoints” only and “Adjust altitudes to ground height” (be sure that only the waypoints for the landmarks are stored in the GPS as all waypoints present will be imported). Page 432 www.mapteach.org Google Earth Lesson 2 Places, Points, and Images 5. Select “Import”: 6. Compare the placemarks you created with the GPS placemarks. a) Are there any differences between the waypoints you created earlier and the waypoints imported from the GPS unit? If so, how might you explain these differences? b) Compare your landmarks (both predicted and GPS locations) with another student. Discuss your ideas about why these might be the same or difference and record your ideas below. __________________________________________________________ __________________________________________________________ __________________________________________________________ Page 433 Google Earth Lesson 2 Places, Points, and Images www.mapteach.org 7. KEEP the GPS waypoints that you imported, but Delete the placemarks that you first created and named. To do this, CTRL-CLICK on each “predicted” placemark and select “Delete” Explore 4: Name and Describe GPS Waypoints 1. Give an appropriate Name and write a Description for your GPS waypoints. To do this, again CTRL-CLICK on a waypoint and select “Get Info” at the bottom of the list (see above). Change icon button Page 434 www.mapteach.org Google Earth Lesson 2 Places, Points, and Images 2. Change the color and/or style of the placemarker by clicking the Yellow Pushpin icon on the top right corner of the window (see above). A selection of icons will appear. Choose the desired icon and Click “OK”. 3. Repeat steps 1 and 2 until all of your waypoints have been named and described and their icons have been changed. Show your instructor that you have been able to add GPS waypoints and edit them. Explore 5: Add Photos from Your Computer to a Placemarker Using HTML 1. CTRL-CLICK on a placemarker you just created, and then select “Get info”. Page 435 Google Earth Lesson 2 www.mapteach.org Places, Points, and Images 2. Select the “Description” tab Into the description area, type the HTML code and insert the specific information that reveals the location of the photo you want to insert. You will need to make sure the name of the photo in this text matches the full name of the photo in your MapTEACH_Work folder. It might look something like this: Platform Html template Mac <img src=”file:/// PC <img src=”file:// Local pathname Html template users/student/MapTEACH_Work/River_09_photo.jpg C:/Users/student/MapTEACH_Work/River_09_photo.jpg ”> ”> Mac: <img src=”file:///users/student/MapTEACH_Work/River_09_photo.jpg”> PC: <img src=”file://C:/Users/student/MapTEACH_Work/River_09_photo.jpg”> BE CAREFUL – this is very picky work. Make sure that you type the code and pathname exactly and that you use a quotation mark “, not two apostrophes’’. If you use two apostrophes, Google Earth will not be able to display the images. 3. Click ”OK” to save these changes and view the Google Earth window. 4. Click on the icon for this waypoint to see your picture open. If the photo doesn’t appear, check for errors in your code and pathname. 5. If the picture is too large and your written description can’t be seen, you can resize the image by re-opening “Get Info/Description” and adding the following code to your existing code: <img src=”file:///users/student/MapTEACH_Work/River_09_photo.jpg width=50% height=50%”> 6. Click “OK”, and then click on the icon in the Google Earth window to view it. 7. Continue to add photos to the rest of your field trip waypoints until all are added. Show your instructor that you have added photos to all of your field trip placemarkers. Page 436 www.mapteach.org Google Earth Supplemental Instructions 2A Adding Images and Video via HTML code GE Supplemental Instructions 2A ADDING IMAGES, VIDEOS, AND LINKS TO GOOGLE EARTH PLACEMARKERS USING HTML TEACHER/STUDENT INFORMATION These supplemental instructions are intended to serve the needs of teachers and students who wish to learn procedures for incorporating images, videos, and links into a Google Earth Placemarker. It is highly recommended that students complete GE lesson 2 before referring to these instructions so that the fundamental tools are acquired prior to these advanced techniques. Explore 1: Loading Photos from the Internet From the Internet 1. Browse the Internet for an image associated with a placemarker that you have created. Once the image of choice has been selected RIGHT-CLICK (PC) or CTRL-CLICK (Mac) and select “Copy Image Location.” Page 437 Google Earth Supplemental Instructions 2A Adding Images and Video via HTML code www.mapteach.org 2. In Google Earth select the correct placemarker icon, RIGHT-CLICK (PC) or CTRL-CLICK (Mac) to select “Get Info” 3. Select the “Description” tab (see below) 4. In the “Description” box type the HTML code and paste the Image Location that you copied earlier in the highlighted area. <img src=“paste image location”/> The result will look something like this: <img src=“http://www.studentsoftheworld.info/sites/animals/img/5838_moose2.jpg”/> Page 438 www.mapteach.org Google Earth Supplemental Instructions 2A Adding Images and Video via HTML code 5. Click your placemarker to be sure that the image is present. If it is not present, be sure to check that you have typed the code just as it is written and that you have used quotation marks “ not two single apostrophes ‘’. If you use ' twice, it will look correct but Google Earth will not be able to display the images. Explore 2: Loading in Videos from the Internet 1. Here we will be linking to YouTube videos. We will use a pre-loaded video from the 2009 Alaska Summer Research Academy Camp for practice, but later you can load your own videos to YouTube and then into your placemarker 2. Go to the following web link to see the video directly on the You Tube website. http://www.youtube.com/watch?v=ernr7B5ifC4 Page 439 Google Earth Supplemental Instructions 2A Adding Images and Video via HTML code www.mapteach.org 3. On the webpage, select “Share” then “Embed”. COPY the embedded text. A B C Page 440 www.mapteach.org Google Earth Supplemental Instructions 2A Adding Images and Video via HTML code 4. Now we can add this in a placemarker. Select the appropriate Placemarker, RIGHT-CLICK (PC) or CTRL-CLICK (Mac) to “Get info”. Then PASTE the following code directly into the Description window. This is the highlighted text on the website <iframe width="420" height="315" src="http://www.youtube.com/embed/ernr7B5ifC4" frameborder="0" allowfullscreen></iframe> 5. Open the placemarker, CLICK on the play arrow in the video, you will be able to view, play, start and stop the video. Explore 3: Linking to Websites from the Internet 1. To link a website to a placemarker simply copy the HTML address and paste it into the placemarker. Page 441 Google Earth Supplemental Instructions 2A Adding Images and Video via HTML code www.mapteach.org 2. Open the placemarker and CLICK on the link to make sure it is functional TEACHER RESOURCES: If there are still questions about using HTML in Google Earth please see the following link. http://www.google.com/earth/outreach/tutorials/annotate.html. This website details other features of placemarkers that are not provided in these supplemental instructions. Page 442