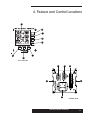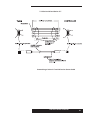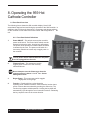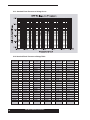
1
959 Hot Cathode Controller OPERATION AND MAINTENANCE MANUAL 959 Hot Cathode Controller PART #100011229 Rev. B Part # 000000000XX __ Serial #_ _ _ _ _ _ _ _ _ Please fill in these numbers and have them readily available when calling for service or additional information. (The part number can be found on your packing slip, and both the part number and serial number are located on the bottom side of the housing.) For more information or literature, contact: MKS Instruments, Inc., HPS® Products 5330 Sterling Drive Boulder, CO 80301 USA Phone: 303-449-9861 800-345-1967 FAX: 303-442-6880 1999 MKS Instruments, Inc., HPS® Products. All rights reserved. Table of Contents Table of Contents 1. Package Contents ................................................................. 1 2. Safety Information.................................................................. 2 2.1 Symbols Used in this Manual ........................................................... 2 2.2 Safety Precautions ........................................................................... 3 3. Specifications ........................................................................ 5 3.1 Controller .......................................................................................... 5 3.2 Standard Pirani ................................................................................. 6 3.3 Convection Enhanced Pirani ............................................................ 7 3.4 Low Power Nude Tube ...................................................................... 8 3.5 Mini BA ............................................................................................. 9 4.1 Front View ....................................................................................... 10 4.2 Rear View ....................................................................................... 10 4. Feature and Control Locations ............................................. 11 4.3 Side View ........................................................................................ 4.4.1 Standard Pirani ..................................................................... 4.4.2 Convection Enhanced Pirani ................................................. 4.4.3 Low Power Nude Tube .......................................................... 4.4.4 Mini BA .................................................................................. 13 13 14 14 15 5. Typical Applications for the 959 Hot Cathode Controller ...... 16 6. About the 959 Hot Cathode Controller ................................. 17 7. Installing the 959 Hot Cathode Controller ............................ 19 7.1 Controller Installation ...................................................................... 7.1.1 Controller Mounting .............................................................. 7.2 Pirani Sensor Installation ......................................................... 7.2.1 General Pirani Information ............................................. 7.2.2 Locating a Pirani Sensor ................................................ 7.2.3 Preventing Contamination in a Pirani Sensor ................. 7.2.4 Cleaning the Pirani Sensor ............................................. 7.2.5 Connecting a Pirani Sensor to a Vacuum Chamber ....... 19 19 19 19 20 20 20 20 7.3 Series 315 / 345 Standard Pirani Sensor Installation ............. 21 7.3.1 Orienting the Series 315/345 Sensor ............................. 21 7.3.2 Connecting the Series 315/345 Sensor ......................... 21 7.3.2.1 Connecting the Series 315 Sensor to the 959 Controller. .......................................................................... 21 7.3.2.2 Connecting the Series 345 Sensor to the 959 Controller. .......................................................................... 22 7.3.3 Testing the Series 315/345 Sensor ................................ 23 7.4 Series 317 Convection Enhanced Pirani Sensor Installation .. 7.4.1 Orienting the Series 317 Sensor .................................... 7.4.2 Connecting the Series 317 Sensor ................................ 7.4.2.1 Connecting the Series 317 Sensor to the 959 Controller ........................................................................... 7.4.3 Testing the Series 317 Sensor ........................................ 7.5 Low Power Nude Tube and Mini BA Hot Cathode Sensor Installation ...................................................................................... 7.5.1 Locating a Hot Cathode Sensor ..................................... 7.5.2 Preventing Contamination in a Hot Cathode Sensor ...... 7.5.3 Cleaning the Hot Cathode Sensor .................................. 7.5.4 Orienting a Hot Cathode Sensor .................................... 7.5.5 Connecting a Hot Cathode Sensor ................................. 7.5.5.1 Connecting a Hot Cathode Sensor to a Vacuum Chamber ............................................................................ 7.5.5.2 Connecting a Hot Cathode Sensor to the 959 Controller ........................................................................... 7.5.6 Testing the Hot Cathode Sensor ..................................... 23 23 23 23 24 25 25 25 25 25 25 25 26 27 7.6 Sensor Cable Diagrams and Pin Outs ........................................ 27 7.6.1 Series 315 ........................................................................ 28 7.6.2 Series 345 and Series 317 ............................................... 28 7.6.3 Low Power Nude Tube ....................................................... 29 7.6.4 Mini BA ............................................................................ 30 7.6.5 Hot Cathode Connector Pin Out ....................................... 30 7.7 Accessory Connector ................................................................. 31 7.8 AC Power ................................................................................. 32 8.1 Front Panel Overview ......................................................... 34 8.1.1 Front Panel Switch Definitions ................................................. 34 8.2 Pressure Measurement Modes ......................................................... 36 8.2.1 Normal Pressure Measurement ............................................... 36 8.2.2 Control Pressure Measurement ............................................... 36 8.2.3 Combined Pressure Measurement .......................................... 36 8.3 Pressure Measurement .................................................................... 37 8.4 Degas Operation ............................................................................... 36 8.5 Set Point Operation ..........................................................................37 8.5.1 Relay Set Point Operation ....................................................... 37 8.5.2 Sensor Module Exceptions and Set Point Operation ............... 38 8.5.3 Set Point Configuration Displays ............................................. 38 8.5.4 Set Point 1 Value Assignment ................................................. 39 8.5.5 Set Point 1 Enable .................................................................. 39 8.5.6 Set Point 2 Value Assignment ................................................. 40 8.5.7 Set Point 2 Enable .................................................................. 40 8.5.8 Control Set Point Operation .....................................................41 8.5.9 Control Set Point Constraints ..................................................41 8.5.10 Control Set Point Assignment ...............................................42 8.5.11 Control Set Point Enable ....................................................... 42 8.5.12 Protect Set Point Operation ..................................................43 8.5.13 Protect Set Point Constraints ................................................ 43 8.5.14 Protect Set Point Assignment ...............................................43 8.6 Set Up Configuration ........................................................................ 44 8.6.1 Filament Select .......................................................................44 8.6.2 Combined Pressure Measurement .......................................... 44 8.6.3 Combined Mode Constraints ................................................... 45 8.6.4 Hot Cathode Sensitivity .......................................................... 45 8.7 Calibration ........................................................................................ 46 8.7.1 Pirani ......................................................................................46 8.7.2 Vacuum Calibration .................................................................46 8.7.3 Atmospheric Calibration .......................................................... 46 8.7.4 Pirani Atmospheric Calibration ................................................ 47 8.7.5 Pirani Vacuum Calibration ....................................................... 47 8.7.6 Degas Time .............................................................................48 8.7.7 Emission Current Assignment ................................................. 48 8.8 Leak Test Operation ..........................................................................49 8.8.1 Entering Leak Test Mode ......................................................... 49 8.8.2 Resetting the Baseline Pressure ............................................. 49 8.8.3 Audible Operation ....................................................................49 8.8.4 Exiting Leak Test Mode ...........................................................50 8.8.5 Leak Test Constraints ............................................................. 50 8.8.6 Using the Series 959 as a Leak Detector. ............................... 50 8.9 Leak Test Displays ........................................................................... 53 8.9.1 Leak Sensor Assignment ........................................................53 8.9.2 Pirani Sensor Leak Test Operation .......................................... 53 8.9.3 Hot Cathode Sensor Leak Test Operation ............................... 54 8.10 Status Readouts .............................................................................55 8.10.1 Under Pressure ..................................................................... 55 8.10.2 Over Pressure .......................................................................55 8.10.3 Low Emission ........................................................................ 56 8.11 Miscellaneous Displays .................................................................. 57 8.11.1 LCD Display Test ................................................................... 57 8.11.2 Factory Reset ........................................................................ 58 8.11.4 Front Panel Lock ................................................................... 58 8.12 Buffered Analog Output .................................................................. 59 8.13 Standard Pirani Pressure to Voltage Curve ............................. 60 8.14 Standard Pirani Pressure to Voltage Table ................................ 60 8.15 Convection Enhanced Pirani Pressure to Voltage Curve .......... 61 8.16 Convection Enhanced Pirani Pressure to Voltage Table ........... 61 8.17 Hot Cathode Curves ................................................................. 62 9. Maintaining The 959 Hot Cathode Controller........................ 63 9.1 Cleaning the Controller Front Panel ................................................... 63 9.3 Servicing the Controller .................................................................... 63 9.3 Replacing the Power Fuse ................................................................ 64 10. Using the 959 Hot Cathode Controller with Other Gases ... 65 9.1 Adjusting System Sensitivity for Another Gas ................................. 65 10.1 Relative Sensitivity Table ................................................................ 66 11. Accessories ........................................................................ 67 12. Product Warranty ............................................................... 70 13. Appendix A Serial Communications ............................................................ A1 13.1 Serial Communications Overview ................................................ A1 13.1.1 Message Format ................................................................. A1 13.1.2 Message Compatibility ........................................................ A1 13.1.3 Serial Communications ....................................................... A1 13.2 Message Syntax ........................................................................... A2 13.2.1 Command Syntax ............................................................... A2 13.2.2 Query Syntax ...................................................................... A2 13.2.3 Response Syntax ................................................................ A2 13.3 Addressed RS232 ........................................................................ A3 13.3.1 Message Syntax ................................................................. A3 13.3.2 Field Definitions .................................................................. A3 13.3.2.1 Attention Character ..................................................... A3 13.3.2.2 Device Address .......................................................... A3 13.4 Message Handling ........................................................................ A4 13.5 ASCII Command Set Definition .................................................... A4 13.6 Setup Messages ........................................................................... A5 13.6.1 Set Point Value - SPx .......................................................... A5 13.6.2 Control Set Point Value - CSP ............................................. A6 13.6.3 Protect Pressure - PRO ....................................................... A7 13.6.4 Gauge Correction - GC ......................................................... A8 13.6.5 Atmospheric Calibration -ATM .............................................. A9 12.6.6 Vacuum Calibration - VAC .................................................. A10 13.6.7 Time to Degas -TD ............................................................. A11 13.6.8 Front Panel Lock - FPL ...................................................... A12 13.6.9 Factory Default - FD ........................................................... A13 13.7 Control Messages ...................................................................... A14 13.7.1 Active Filament - AF .......................................................... A14 13.7.2 Filament Power - FP ......................................................... A15 13.7.3 Degas Power - DG ............................................................ A16 13.7.4 Combined Pressure Measurement - CMB ........................ A17 13.7.5 Set Point Enable - ENx ..................................................... A18 13.7.6 Emission Current - EC ...................................................... A19 13.8 Status messages ........................................................................ A20 13.8.1 Pressure Reading - PRx ................................................... A20 13.8.2 Filament Status - FS ......................................................... A21 13.8.3 Degas Status - DS ............................................................ A22 13.8.4 Set Point Status - SSx ....................................................... A23 13.8.5 Control Set Point Status - CSS ......................................... A24 13.8.6 Units selection - U ............................................................. A25 13.8.7 Manufacturer - MF ............................................................ A26 13.8.8 Model Designation - MD ................................................... A27 13.8.9 Device Type - DTx ............................................................. A28 13.8.10 Serial Number - SNx ....................................................... A29 13.8.11 Firmware Version - FVx .................................................. A30 13.8.12 Hardware Version - HVx .................................................. A31 14. Appendix B Serial Communication Error Codes ......................................... B1 14.1 Error Codes .................................................................................. B1 15. Appendix C Gauge Theory .......................................................................... C1 15.1 Theory of the Thermal Conductivity Gauge .................................... C1 15.2 Theory of the Hot Cathode Ionization Gauge ................................. C3 1. Package Contents Before Unpacking your Series 959 Hot Cathode Controller, check all surfaces of the packing material for shipping damage. Please be sure that your Series 959 package contains these items: 1 - Series 959 Controller 1 - female, 15-pin subminiature D Accessory connector kit 1 - 10-foot power cord 1 - HPS® Products Series 959 Hot Cathode Controller User Manual. A complete Series 959 System includes a Hot Cathode sensor and its connecting cable, and optionally a Pirani sensor and cable, all of which are sold separately. Please refer to page 70 for necessary ordering information. If any items are missing from the package, call HPS® Products Customer Service at 1-303-449-9861 or 1-800-345-1967. Inspect the 959 System for visible evidence of damage. If it has been damaged in shipping, notify the carrier immediately. Keep all shipping materials and packaging for claim verification. Do not return the product to HPS® Products. 959 Hot Cathode Controller 1 2. Safety Information 2.1 Symbols Used in this Manual The first two symbols below, that may be located on your Series 959, identify critical safety concerns. They are used throughout this manual to further define the safety concerns associated with the product. The last two symbols identify other information in this manual that is essential or useful in achieving optimal performance from the 959. CAUTION: Refer to manual. Failure to read message could result in personal injury or serious damage to the equipment or both. CAUTION: Risk of electrical shock. Calls attention to important procedures, practices, or conditions. Failure to read message could result in damage to the equipment. 2 959 Hot Cathode Controller 2.2 Safety Precautions The following general safety precautions must be observed during all phases of operation of this instrument. Failure to comply with these precautions or with specific warnings else where in this manual violates safety standards of intended use of the instrument and may impair the protection provided by the equipment. MKS Instruments, Inc. assumes no liability for the customer’s failure to comply with these requirements. Properly ground the controller: This product is grounded through the grounding conductor of the power cord. To avoid electrical shock, plug the power cord into a properly wired receptacle before connecting it to the product input or output terminals. A protective ground connection by way of the grounding conductor in the power cord is essential for safe operation. Upon loss of the protective-ground connection, all accessible conductive parts (including knobs and controls that may appear to be insulating) can render an electrical shock. Do not substitute parts or modify instrument. Do not install substitute parts or perform any unauthorized modification to the instrument. Return the instrument to an MKS Calibration and Service center for service and repair to ensure that all safety features are maintained. Use proper electrical fittings. Dangerous voltages are contained within this instrument. All electrical fittings and cables must be of the type specified, and in good condition. All electrical fittings must be properly connected and grounded. The Series 959 Controller contains lethal voltages when on. High voltage is present in the cable and a Hot Cathode Sensor when the Controller is turned on. Use the proper power source. This product is intended to operate from a power source that applies a voltage between the supply conductors, or between either of the supply conductors and ground, not more than that specified in the manual. Use the proper fuse. Use only a fuse of the correct type, voltage rating, and current rating, as specified for your product. 959 Hot Cathode Controller 3 Do not operate in explosive environments. To avoid explosion, do not operate this product in an explosive environment unless it has been specifically certified for such operation. Service by qualified personnel only. Operating personnel must not remove instrument covers. Component replacement and internal adjustments must be made by qualified service personnel only. Use the proper power cord. Use only a power cord that is in good condition and which meets the input power requirements specified in the manual. Use only a detachable cord set with conductors that have a cross-sectional area equal to or greater than 0.75 mm2. The power cable should be approved by a qualified agency such as VDE, Semko, or SEV. Caution when handling an installed Hot Cathode sensor. An installed Hot Cathode sensor, especially when installed within a mounting nipple, may have areas exposed to the user that get hot enough to burn skin. 4 959 Hot Cathode Controller 3. Specifications 3.1 Controller Measuring Range * 1.0 x 10⁻¹⁰ to 1.0 x 10+3 Torr 1.3 x 10⁻¹⁰ to 1.3 x 10+3 mbar 1.3 x 10⁻⁸ to 1.3 x 10+5 Pa Set Point Range * 5.0 x 10⁻¹⁰ to 9.5 x 10+2 Torr 6.5 x 10⁻¹⁰ to 1.2 x 10+3 mbar 6.5 x 10⁻⁸ to 1.2 x 10⁵ Pa Control Set Point Range * 1.0 x 10⁻⁴ to 1.0 x 10⁻² Torr 1.3 x 10⁻⁴ to 1.3 x10⁻² mbar 1.3 x 10⁻² to 1.3 x100 Pa Protect Set Point range 1.0 x 10⁻⁶ to 1.0 x 10⁻² Torr 1.3 x 10⁻⁶ to 1.3 x 10⁻² mbar 1.3 x 10⁻⁴ to 1.3 100 Pa Set Point hysteresis 10% of indicated pressure Reproducibility Approximately +5% Operating Temperature Range 50 to 400 C (410 to 1040 F) Storage Temperature Range -100 to 550 C (140 to 1310 F) Relative Humidity 80% max for T < 310 C, decreasing linearly to 50% max at 400 C Altitude 2000 m (6562 ft) max Operating Environment Indoor use only Insulation Coordination Installation (Overvoltage) Category II, Pollution Degree 2 Power Requirement 100-240 VAC, 50-60 Hz Mains Voltage Fluctuations not to exceed + 10% Power Consumption (max) 70 Watts Input Current (max) 1.0 Amp *Range depends upon sensor options selected 959 Hot Cathode Controller 5 Fuse Rating, Size T 1.6 A (5x22mm) Number of Channels 2 Process Control Two nonvolatile, independently set, pressure dependent set point relays Relay contact Rating 2A @ 30 VAC or 30 VDC resistive load, SPDT Relay response < 1000 msec Front Panel Controls Momentary push buttons Range for Sensor Sensitivity 0.1 to 99 Torr-1 Electronic Casing Aluminum, anodized Dimensions (WxDxH) 33/4” x 10” x 33/4” (96 mm x 254 mm x 96 mm) Size 1 Weight 3.17 lb. (1.438 kg) /4 DIN 3.2 Standard Pirani Pressure Range 1.0 x 10⁻⁴ to 1.0 x 10+2 Torr 1.3 x 10⁻⁴ to 1.3 x 10+2 mbar 1.3 x 10⁻² to 1.3 x 10+4 Pa Set Point Range 2.0 x 10⁻⁴ to 9.5 x 10+1 Torr 2.6 x 10⁻⁴ to 1.2 x 10+2 mbar 2.6 x 10⁻² to 1.2 x 10+4 Pa Control Set Point Range 1.0 x 10⁻⁴ to 1.0 x 10⁻² Torr 1.3 x 10⁻⁴ to 1.3 x 10⁻² mbar 1.3 x 10⁻² to 1.3 x 100 Pa Calibration Gas Air/nitrogen Installation Orientation Any Reproducibility 5% of indicated pressure @ Tconst Materials Exposed to Vacuum SS 304, platinum, alloy alumina ceramic, silver brazing alloy, nickel 200 Internal Volume 0.5 in.3 (8.0 cm3) maximum 6 959 Hot Cathode Controller Operating Temperature Range 00 to 500C (320 to 1220F) Maximum Bakeout Temperature 500C (1220F) Diameter 1.3 in. (34 mm) Length 4.4 in. (112 mm) Typical Weight (with KF Flange) 0.5 lb (0.2 kg) Vacuum Connection NW 16 KF, NW 25 KF 1/8” NPT-M, with 1/2” compression seal option 8 VCR®-F (1/2”) 1 1/3” CF (non-rotatable) 2 3/4” CF (non-rotatable) Ø 15.0 mm x 30.0 mm tubulation Ø 18.0 mm x 30.0 mm tubulation 3.3 Convection Enhanced Pirani Pressure Range 1.0 x 10⁻³ to 1.0 x 10+3 Torr 1.3 x 10⁻³ to 1.3 x 10+3 mbar 1.3 x 10⁻¹ to 1.3 x 10+5 Pa Set Point Range 2.0 x 10⁻³ to 9.5 x 10+2 Torr 2.6 x 10⁻³ to 1.2 x 10+3 mbar 2.6 x 10⁻¹ to 1.2 x 10+5 Pa Control Set Point Range 1.0 x 10⁻³ to 1.0 x 10⁻² Torr 1.3 x 10⁻³ to 1.3 x 10⁻² mbar 1.3 x 10⁻¹ to 1.3 x 100 Pa Calibration Gas Air/nitrogen Installation Orientation Horizontal Materials Exposed to Vacuum 304 Stainless steel, platinum, glass, nickel Repeatability 5% of indicated pressure @ Tconst Internal Volume 2.0 in3 (33.0 cm3) maximum Operating Temperature Range 00 to 500C (320 to 1220F) Maximum Bakeout Temperature ` 1500C (3020F), 1000C (2120F) shielded; without cable, connector/electronics subassembly, and Controller 959 Hot Cathode Controller 7 Diameter 1.6 in. (41 mm) Length 4.4 in. (112 mm) Typical Weight (with KF Flange) 0.5 lb (0.2 kg) Vacuum Connection NW 16 KF NW 25 KF 1/8” NPT-M, with 1/2” compression seal option 4VCR®F (1/4”) 8 VCR®F (1/2”) 1 1/3” CF (rotatable) 2 3/4” CF (rotatable) Ø 15.0 mm x 30.0 mm tubulation Ø 18.0 mm x 30.0 mm tubulation 3.4 Low Power Nude Tube Pressure range 1.0 x 10⁻¹⁰ to 1.0 x 10⁻² Torr 1.3 x 10⁻¹⁰ to 1.3 x 10⁻² mbar 1.3 x 10⁻⁸ to 1.3 x 100 Pa Set Point Range 5.0 x 10⁻¹⁰ to 9.5 x 10⁻³ Torr 6.5 x 10⁻¹⁰ to 1.2 x 10⁻² mbar 6.5 x 10⁻⁸ to 1.2 x 100 Pa Protect Set Point Range 1.0 x 10⁻⁶ to 1.0 x 10⁻² Torr 1.3 x 10⁻⁶ to 1.3 x 10⁻² mbar 1.3 x 10⁻⁴ to 1.3 x 100 Pa Sensor Type Bayard-Alpert Filament Type W or Y 203 Sensitivity 9 Torr-1 (+20%) Degas Power 20 W max Operating voltages: Grid Filament bias Filament 180 VDC 30 VDC 3 VDC @ 1.8 A X-ray limit 3 x 10⁻¹⁰ Torr Calibration Gas Air/nitrogen Installation Orientation Any Materials Exposed to Vacuum 304 SS, Inconel X-750, glass, tungsten, platinum, nickel, either yttria-coated iridium or tungsten 8 959 Hot Cathode Controller Operating Temperature Range 00 to 500 C (320 to 1220 F) Bakeout Temperature 600 C (with cable attached) 3000 C max, with CF, cable removed 1500 C max, with KF and Viton Seal, cable removed Typical Weight (with CF Flange) 0.9 lb (0.4 kg) Vacuum connection 2 3/4” CF (non-rotatable) NW 40 KF 3.5 Mini BA Pressure range 1.0 x 10⁻¹⁰ to 1.0 x 10⁻² Torr 1.3 x 10⁻¹⁰ to 1.3 x 10⁻² mbar 1.3 x 10⁻⁸ to 1.3 x 100 Pa Set Point Range 5.0 x 10⁻¹⁰ to 9.5 x 10⁻³ Torr 6.5 x 10⁻¹⁰ to 1.2 x 10⁻² mbar 6.5 x 10⁻⁸ to 1.2 x 100 Pa Protect Set Point Range 1.0 x 10⁻⁶ to 1.0 x 10⁻² Torr 1.3 x 10⁻⁶ to 1.3 x 10⁻² mbar 1.3 x 10⁻⁴ to 1.3 x 100 Pa Sensor Type Bayard-Alpert Filament Type Y203 Sensitivity 12 Torr--1 (+20%) Degas Power 5 W max Operating voltages: Grid Filament bias Filament 180 VDC 30 VDC 1.8 VDC @ 2A X-ray limit 3 x 10⁻¹⁰ Torr Calibration Gas Air/nitrogen Installation Orientation Any Materials Exposed to Vacuum 304 SS, glass, tungsten, platinum clad molybdenum, yttria-coated iridium Operating Temperature Range 00 to 500 C (320 to 1220 F) 959 Hot Cathode Controller 9 Bakeout Temperature 600 C (with cable attached) 3000 C max, with CF, cable removed 1500 C max, with KF and Viton Seal, cable removed Typical Weight (with CF Flange) .816 lb (.36 kg) Vacuum connection 1” OD Tube 1 1/3” mini CF 2 3/4” CF NW 25 KF NW 40 KF NW 16 KF 3 4 / ” OD Tube Design and / or specifications subject to change without Notice. 10 959 Hot Cathode Controller 4. Feature and Control Locations 1 8 7 6 5 4 2 3 4.1 Front View 9 10 11 13 13 12 4.2 Rear View 959 Hot Cathode Controller 11 14 4.3 Side View 12 1 Liquid Crystal Display (LCD) 2 Power On/Off Push Button Switch 3 Filament Power Push Button Switch 4 Degas Power Push Button switch 5 Function Menu Push Button Switch 6 Item Selection Push Button Switch 7 Decrement/Leak Test Zero Push Button Switch 8 Increment/Leak Test Beeper Push Button Switch 9 Pirani Sensor Connector, Female, 9 pin, “D” 10 Accessory Connector, Male, 15 pin “D” 11 Hot Cathode Sensor Connector, Female, 13 pin “D” 12 AC Power Connector with fuse holder, IEC 320 13 Panel Mounting Fastener Holes 14 Slots for optional rack mounting brackets 959 Hot Cathode Controller 4.4.1 Standard Pirani 1 2 315 Standard Pirani Sensor 1 2 1 Sensor Vacuum Port 2 Male Octal Socket 345 Standard Pirani Sensor 1 2 2 1 11 Sensor Vacuum Port 22 Male 9 Pin “D” connector 959 Hot Cathode Controller 13 4.4.2 Convection Enhanced Pirani 1 2 317 Convection Enhanced Pirani 1 Male, 9-pin “D” connector 2 Sensor Vacuum Port 4.4.3 Low Power Nude Tube 2 1 4 3 1 5 4 3 14 1 Filament 1 2 Filament 2 3 Grid and Supports 4 Ion Collector 5 Sensor Vacuum Port and Flange 959 Hot Cathode Controller LPN Hot cathode sensor 4.4.4 Mini BA 1 2 3 Mini BA Sensor Call outs 1 Sensor Vacuum Port 2 Sensor Cable Connection 3 Male Sensor Socket Pins 959 Hot Cathode Controller 15 5. Typical Applications for the 959 Hot Cathode Controller Measurement of Base Vacuum Control of high vacuum systems and process sequencing using relay setpoints Sensing abnormal pressure and taking appropriate security measures using relay set points Controlling system pressure using analog output as input to an automatic pressure controller Starting or stopping system processes with relay set points Measuring pressures of backfilled gases Leak checking the vacuum system 16 959 Hot Cathode Controller 6. About the 959 Hot Cathode Controller The HPS® Products Series 959 Hot Cathode Controller provides accurate and reliable pressure measurement from 10-10 Torr up to 10-2 Torr, or to 1000 Torr with the optional Convection Enhanced Pirani module. Designed with versatility and ease-of-use in mind, the large liquid crystal display (LCD) shows the Pirani and Hot Cathode readouts simultaneously. Standard features of the Series 959 Controller include two nonvolatile set points for reliable system control, remote enable for Hot Cathode filament and degas, and burnout protection for the Hot Cathode filament. The protection feature guards the sensor’s filament against damage in case of overpressure or a short circuit. The protect pressure at which the filament is turned off is adjustable. The Series 959 can power either the HPS® Products Low Power Nude tube or the new HPS® Products Mini BA Gauge. With the Pirani option, the controller can power either a standard Pirani or ConvectionEnhanced Pirani, with automatic detection of the gauge type. The controller’s electron beam (EB) degas conveniently and effectively removes adsorbed gas from the sensor. The controller displays the system pressure during degas. Relay contacts and an analog output signal are accessible from the Accessory port on the rear panel. The combined analog output signal includes a smoothing function for the decade where the Pirani and Hot Cathode read simultaneously. 959 Hot Cathode Controller 17 Set Points Two independently adjustable relay set points are available. They may be set or disabled from either the front panel or by RS232. The set points are nonvolatile, remaining unchanged after powering down or during a power failure. Leak Test With the Leak Test mode, medium to gross leaks can be found by utilizing the indirect measurement properties of the Hot Cathode and Pirani sensors and a tracer gas other than air. The Leak Test mode consists of a digital display and variable rate beeper to locate system leaks. The mode operates with either Hot Cathode or Pirani sensors. Computer Interface Direct computer communication via RS232 is available on the accessory connector to control front panel functions or read pressure and other information remotely. 18 959 Hot Cathode Controller 7. Installing the 959 Hot Cathode Controller 7.1 Controller Installation 7.1.1 Controller Mounting The Series 959 Hot Cathode Controller is designed for either panel mounting or for stand-alone use. Regardless of the method you choose, assure adequate ventilation to the Controller with at least a 1/2 of an inch left open above and below the perforated panels. An optional hardware kit is also available for mounting the Controller into a standard 1/4 DIN cutout in a panel up to 3/16-inch thick. A dimensioned illustration shows the required cutout. Leave at least 3 inches of clearance behind the Controller to accommodate the connectors and cables. Mount the Controller into the panel by slipping it through the cutout from the front. Slide the panel mounting brackets into the slots on either side of the Controller from the rear, and secure them with the thumbscrews provided. Adhesive backed rubber feet for bench top use are provided with the mounting kit. Remove the adhesive backing from each foot and apply one to each corner of the aluminum bottom surface. 7.2 Pirani Sensor Installation 7.2.1 General Pirani Information Two types of Pirani sensors can be used with the Series 959 Controller standard and Convection Enhanced. In both, measurement is based on thermal conductivity of the gas. The sensors contain a filament, maintained at a constant temperature. Heat loss from the filament depends on the amount of gas present. Additional information on the theory of these gauges is presented in Appendix C. The standard Pirani sensor will read continuously from 1x10⁻⁴ to 100 Torr. The 959 supports two series of standard Piranis, the 315 and the 345. The Series 315 sensor is not CE marked and uses the traditional octal connector interface on the sensor. The Series 345 sensor is CE marked, and uses a 959 Hot Cathode Controller 19 DB9 connector on the sensor. The two series also have different bakeout temperature ranges, with versions of the 315 able to withstand temperatures up to 2800C The Convection Pirani sensor design enhances heat transfer at higher pressures through convection. This sensor will read continuously from 1x10⁻³ to 1000 Torr. The 959 supports the Series 317 Convection Pirani sensors. The 317 is available in both a CE and a non-CE marked version. 7.2.2 Locating a Pirani Sensor Locate a Pirani sensor where it can measure chamber or manifold pressure. Installing a sensor away from pumps and gas sources gives the most representative values. Place a sensor where vibration is minimal. 7.2.3 Preventing Contamination in a Pirani Sensor Locate and orient a Pirani sensor to avoid contamination which might affect the sensor’s calibration. For example, if installed directly above a roughing pump in the system, oil vapor could contaminate the tube’s filament wire and cause the calibration to shift. Whenever possible, install a Pirani sensor with the vacuum port facing downward to help prevent particulates and liquids entering it. Using a screen or porous filter at the port can also be helpful. If the gauge has a KF type flange, try a HPS® Products seal and centering ring assembly with a screen (see Accessories, page 70). 7.2.4 Cleaning the Pirani Sensor Roughing pump oils and other fluids condensing or decomposing on the filament can contaminate the sensor. This changes the emissivities of the filament, which in turn causes the calibration to change, especially at low pressure. It is not advisable to clean the sensor. Trying to clean it may either deform or break the filament. A deformed filament would then cause additional error from a shift in the sensor’s output. Replace the sensor if it becomes contaminated (see Spare Parts and Accessories, page 67). 7.2.5 Connecting a Pirani Sensor to a Vacuum Chamber To fit a NW 16 KF flanged port to an NW 10 KF flanged port, use an HPS® Products adaptive centering ring (HPS® Products PN 100315821). (See Accessories, Page 70). 20 959 Hot Cathode Controller To install a Sensor fitted with a 1/8” NPT, do not use the case for tightening. Use the 9/16” hex flats on the sensor’s tubulation with a wrench for tightening. Wrap about two turns of Teflon® seal tape on the threads of the sensor in the direction of the threading to ensure a leak-free seal. Do not use a compression adaptor (quick connect) to attach the Sensor to a system in positive pressure applications. Positive pressures might blow the Sensor out of a compression adaptor, damaging equipment a possibly injuring personnel. A solid electrical connection between the Sensor and the grounded vacuum system must be provided to shield the tube filament from external radiation sources. In applications where the system may be exposed to large voltage fluctuations, a KF type flange with centering ring containing a screen should be installed (see Accessories, Page 70). The KF clamp must be tightened properly so the flange contacts the centering ring. The flange/clamp assembly and gauge tubulation must then be grounded. 7.3 Series 315 / 345 Standard Pirani Sensor Installation 7.3.1 Orienting the Series 315/345 Sensor The Pirani sensor was designed to minimize the effects of convection. As a result, the indicated pressure changes very little between the horizontal and vertical position and it may be oriented in any position. Still, the Series 315/ 345 Pirani sensor exhibits slight convection characteristics near atmosphere. Therefore, the best accuracy can be achieved above 30 Torr by operating the sensor with it oriented vertically and the port facing down. 7.3.2 Connecting the Series 315/345 Sensor 7.3.2.1 Connecting the Series 315 Sensor to the 959 Controller. A sensor cable with a standard octal socket (see Accessories, page 67) is required for operation but is purchased separately from the Pirani System. This socket has an integrated polarizing tab. The socket has sufficient contact pressure so that strain relief is unnecessary in most applications, but when exerting excessive stress on the cable, use separate strain relief to prevent damage to the Sensor or Controller. Cables are available in standard lengths of 10, 25, and 50 feet and in custom lengths up to 500 feet. Connect the cable to the rear of the Controller at the Gauge port. Tighten the connector jackscrews into the mating screw locks to ensure proper electrical connection and to prevent stress on the connectors. 959 Hot Cathode Controller 21 Turn off the Controller before connecting or disconnecting the cable from the Sensor or Controller. Pin 6 of the octal socket is intentionally shorter as a safety measure. When the cable is connected or disconnected from the Sensor, this feature prevents a voltage overload on the Sensor in case the Controller has not been shut off. However, it is not possible for this preventative feature to always work, so avoid any possible damage by always turning off the Controller before any connections are made. In applications for which special cables are required, i.e., where the connection must be routed through restrictive barriers or through a conduit, customize a cable using the figures shown the following pages. Use a D-sub connector with jackscrews for strain relief in all applications. 7.3.2.2 Connecting the Series 345 Sensor to the 959 Controller. A sensor cable with 9-pin D-sub connectors (see Accessories, page 67) is required for operation but is purchased separately from the 959 system. When exerting excessive stress on the cable, use separate strain relief to prevent damage to the Sensor or Controller. Cables are available in standard lengths of 10, 25, 50 and in custom lengths up to 500 feet. Connect the cable to the rear of the Controller at the Gauge port. Tighten the connector jackscrews into the mating screw locks to ensure proper electrical connection and to prevent stress on the connectors. Turn off the Controller before connecting or disconnecting the cable from the Sensor or Controller. In applications for which special cables are required, i.e., where the connection must be routed through restrictive barriers or through a conduit, customize the cable using the figure shown below. For short lengths, any cable wired straight through, e.g., pin 1 to pin 1, will suffice. For longer lengths, a cable with three twisted pairs and an overall shield is recommended. Use a D-sub connector with jackscrews for strain relief in all applications. 22 959 Hot Cathode Controller 7.3.3 Testing the Series 315/345 Sensor This test is for function only. Slight damage by contamination or rough handling can affect calibration, but the sensor may still indicate pressure. The most common cause of sensor failure is a broken filament due to improper handling. Test the sensor with an ohmmeter with less than 5 mA of current. The resistance readings of a normal Series 315/345 sensor measured at atmospheric pressure and at room temperature (200C) are shown here. Of particular importance is the filament resistance [pins 6 to 7 Series 345, pins 4 to 6 series 315]. Series 315 Pin Numbers (Octal Connector) 1 to 4 1 to 5 4 to 6 5 to 6 6 to 7 7 to 8 Series 345 Pin Numbers (D-sub connector) 4 to 7 4 to 8 6 to 7 6 to 8 5 to 6 3 to 5 Resistance (Ω) (good sensor) 39 114 31 114 62 345 Resistance (Ω) (sensor with broken filament) 345 7.4 Series 317 Convection Enhanced Pirani Sensor Installation 7.4.1 Orienting the Series 317 Sensor When measuring pressures greater than 1 Torr, the Series 317 sensor must be mounted with the tube axis horizontal. Measurements below 1 Torr are unaffected by position, but readings will be incorrect at higher pressures. These readings could result in under - or overpressure, damaging equipment or injuring personnel. The sensor is calibrated at the factory in this position. As with any gauge, mount the sensor with the vacuum port facing downward to help prevent particulates and liquids entering it. 7.4.2 Connecting the Series 317 Sensor 7.4.2.1 Connecting the Series 317 Sensor to the 959 Controller A sensor cable with 9-pin D-sub connectors (see Accessories, page 70) is required for operation but is purchased separately from the 959 system. 959 Hot Cathode Controller 23 When exerting excessive stress on the cable, use separate strain relief to prevent damage to the Sensor or Controller . Cables are available in standard lengths of 10, 25, 50 and in custom lengths up to 500 feet. Connect the cable to the rear of the Controller at the Gauge port. Tighten the connector jackscrews into the mating screw locks to ensure proper electrical connection and to prevent stress on the connectors. Turn off the Controller before connecting or disconnecting the cable from the Sensor or Controller. In applications for which special cables are required, i.e., where the connection must be routed through restrictive barriers or through a conduit, customize the cable using the figure shown below. For short lengths, any cable wired straight through, e.g., pin 1 to pin 1, will suffice. For longer lengths, a cable with three twisted pairs and an overall shield is recommended. Use a D-sub connector with jackscrews for strain relief in all applications. 7.4.3 Testing the Series 317 Sensor The most common cause of sensor failure is a broken filament. This can be caused by physical abuse or sudden venting of the sensor’s inlet port to atmosphere. Disconnect cable 24 1. With a #1 Phillips head screwdriver, remove the two screws to separate the connector/electronics subassembly from the body of the sensor as shown below. 2. Check the resistance on the sensor’s pins listed in the first column on the table below. Use an ohmmeter with less than 5 mA of current. The resistance readings of a normal sensor measured at atmospheric pressure and at room temperature (200C) are listed in the middle column. If any resistances are greatly out of these bounds, the sensor should be replaced. CHECK Ω) RESISTANCE (Ω) F1 to F2 18 to 30 F1 to Sensor body F2 to Sensor body >20 x 106 TC1 to Tc2 24 to 36 TC1 to Sensor port >20 x 106 959 Hot Cathode Controller 7.5 Low Power Nude Tube and Mini BA Hot Cathode Sensor Installation 7.5.1 Locating a Hot Cathode Sensor Locate the sensor where it can measure chamber or manifold pressure. Installing the sensor away from pumps and gas sources gives the most representative pressure measurement. In the case of a nude gauge, ensure that there is nothing in the system or mounting location that could damage the electrode structure of the gauge. Special consideration should be given to any moving mechanisms within the vacuum system to insure they cannot inadvertently damage the sensor. 7.5.2 Preventing Contamination in a Hot Cathode Sensor Locate and orient the sensor where contamination is least likely. For example, if the sensor is mounted directly above a source of evaporation, the vapor could contaminate the gauge structure or feed through and cause the calibration to shift. 7.5.3 Cleaning the Hot Cathode Sensor Roughing pump oils and other fluids condensing or decomposing on the gauge structure can contaminate the sensor and cause calibration to shift. Although the feed through insulators are shielded, in some applications conducting films or paths may form on the insulators. In either case, the sensor should be replaced. (See Spare Parts and Accessories, page 70). It is not advisable to clean the sensor. Trying to clean it may either deform or break the gauge structure. 7.5.4 Orienting a Hot Cathode Sensor The HPS® Products Hot Cathode Sensors can be installed and operated in any position without compromising accuracy. However, it is recommended to install the sensor with the vacuum port facing down whenever possible to keep particulates or liquids from entering the sensor. 7.5.5 Connecting a Hot Cathode Sensor 7.5.5.1 Connecting a Hot Cathode Sensor to a Vacuum Chamber The HPS® Products sensors are available with either a CF type metal sealed flange, KF type flange or a tubulation. Attaching gauges with compression type (quick connect) adaptors on a tubulation is discouraged. In the case of over pressure, the gauge could be forced out of the adaptor posing a safety hazard. Additonally, use of an elastomer 959 Hot Cathode Controller 25 seal is discouraged because outgassing and/or permeation through the elastomer can cause errors in the pressure measurement. A sensor with a KF flange and an elastomer O-ring is suitable only for pressure measurement down to 1 x 10⁻⁷ Torr. When inserting a nude type sensor into a port, do not bend, damage, move the electrodes or feed through pins. Do not short the elements to one another, the chamber, or any components inside the chamber. If there is any question about clearance for the electrode structure or the possibility of damage to the electrode structure, it is recommended that the nude gauge be mounted in a nipple, such as HPS® Products Part number 100883069 (see Accessories, Page 70). This nipple includes a screen to help prevent ion coupling. Use of this mounting is also recommended to assure the nominal rated sensitivity of the gauge. The outside of the nipple can get hot and may burn skin. 7.5.5.2 Connecting a Hot Cathode Sensor to the 959 Controller A sensor cable with a 13 pin D-sub connector (See Accessories, Page 70) is required for operation but is purchased separately from the 959 Controller system. When exerting excessive force on the cable, use a separate strain relief to prevent damage to the sensor or Controller. Cables are available in standard lengths of 10, 25 & 50 feet only. Connect the cable to the rear of the Controller at the sensor port labeled “Hot Cathode”. Tighten the cable jackscrews into the mating screw locks to ensure proper electrical connection and to prevent stress on the connectors. Remove power from the Controller before connecting or disconnecting the cable from the sensor or Controller. Hot Cathode cables have several special requirements including lethal voltages and therefore, only cables supplied by HPS® Products should be used. 26 959 Hot Cathode Controller 7.5.6 Testing the Hot Cathode Sensor This test will only identify a nonfunctioning sensor. This will not detect damage from contamination, misuse or rough handling that affects calibration of a functioning gauge. The most common cause of sensor failure is filament failure. To check for this failure, test the sensor using an ohmmeter with less than 5 mA of current. The resistance readings of a normal Hot Cathode sensor are shown here. Of particular importance is the resistance between the two pins of each filament. This applies to any sensor Hot Cathode sensor operated by the 959. Pin Numbers Ω) Resistance (Ω (good sensor) Ω) Resistance (Ω (non-functioning) Between F1 pins Between F2 pins Any pin to ground/shell 0-5 0-5 >106 Ohms open (>100 Ohms) open (>100 Ohms) <106 Ohms F1 and F2 are identified on the Low Power Nude gauge itself. Use the drawing below to locate F1 and F2 on the Mini BA gauge. F1 F2 Locator Key Slot Filament pin locator, Mini BA gauge 959 Hot Cathode Controller 27 7.6 Sensor Cable Diagrams and Pin Outs 7.6.1 Series 315 28 959 Hot Cathode Controller 7.6.2 Series 345 and Series 317 Customizing a Series 317 and 345 series Sensor Cable 959 Hot Cathode Controller 29 7.6.3 Low Power Nude Tube 7.6.4 Mini BA 30 959 Hot Cathode Controller 7.6.5 Hot Cathode Connector Pin Out 4 3 2 1 A6 A5 A4 A3 A2 A1 7 6 5 HOT CATHODE Pin # Description 1 Emission Current Out 2 Emission Current In 3 Factory Test 4 Factory Test 5 LPN Sensor Detect 6 Sensor Detect Common 7 Mini BA Sensor Detect A1 Not Used A2 Collector Current A3 Grid A4 Filament 2 A5 Filament Common A6 Filament 1 959 Hot Cathode Controller 31 7.7 Accessory Connector Pin # Description 1 Relay 1 NC 2 Relay 1 NO 3 Relay 2 common 4 RS232 RCV 5 Analog Ground 6 Pirani Analog Output 7 Not Used 8 Digital Ground 9 Relay 1 Common 10 Relay 2 NC 11 Relay 2 NO 12 RS232 TX 13 Combined Analog Output 14 Hot Cathode Analog Output 15 Not Used 7.8 AC Power The Series 959 Controller is shipped with a North American, standard 120 VAC, 50/60 Hz power cord with a female IEC 320 connector. If a different power cord is required, use only a harmonized, detachable cord set with conductors having a cross-sectional area equal to or greater than 0.75 mm2. The power cord should be approved by a qualified agency such as VDE, Semko, or SEV. Properly ground the Controller and vacuum system. 32 959 Hot Cathode Controller The Controller is grounded through the ground conductor of the power cord. If the protective ground connection is lost, all accessibly conductive parts may pose a risk of electrical shock. Plug the cord into a properly grounded outlet only. Do not exceed the rated line voltage of your unit. Electrical shock may result. 959 Hot Cathode Controller 33 8. Operating the 959 Hot Cathode Controller 8.1 Front Panel Overview The following picture shows the 959 controller display. Not all LCD annunciators depicted are used during the operation of the 959 Controller. In addition to the LCD, there is a keypad of 7 momentary push button switches on the controller’s Front Panel for manual control and configuration of the unit. 8.1.1 Front Panel Switch Definitions 1. Power ON/OFF - This switch serves as the controller power on/off switch. The Power On/Off switch must be pressed on before the other function keys will operate. The power on/off operation is actuated when the switch is released by the user. The power on/off switch is a momentary switch that is used only to toggle power to the controller. Full AC power will be removed when the AC power cord is unplugged from the unit. 2. Filament Power - This momentary switch toggles power on and off to the currently selected filament. Never attempt to turn the filament on when the system pressure is above 1.0 x 10⁻² Torr. Sensor damage will result! 3. Degas Power - This momentary switch toggles degaspower to the gauge. 4. Function - Pressing this key cycles through a repeating set of controller functions. Each controller function has a series of menus that are selected by pressing the Select key. The Function key supports a hold operation - holding the key down will automatically cycle through the set of controller functions. Releasing the key stops the menu at the current function. 34 959 Hot Cathode Controller 5. Select - Pressing this key cycles through a repeating set of menu items. Each set of menus is unique for the particular Function key setting currently selected. The Select key supports a hold operation - holding the key down will automatically cycle through the menu items appropriate for the current function. Releasing the key stops the menu at the current item. 6. Increment - Pressing the increment adjusts the currently selected menu item by 1 positive measurement unit. The units are unique to the type of value being adjusted. The Increment key supports a hold operation - holding the key down will automatically increment the selected value. The rate of automatic increment increases the longer the INC key is pressed. The Increment key has a special definition when the controller is operation in the Leak Test Function mode. In this case the Increment key toggles between enabling and disabling the audio operation during a Leak Test. 7. Decrement - Pressing the decrement adjusts the currently selected menu item by 1 negative measurement unit. The units are unique to the type of value being adjusted. The Decrement key supports a hold operation - holding the key down will automatically decrement the selected value. The rate of automatic decrement increases the longer the DEC key is pressed. The Decrement key has a special definition when the controller is operating in the Leak Test Function mode. In this case, pressing the Decrement key zeros the leak test pressure measurement. That is, the current pressure measurement becomes the baseline against which subsequent pressures are compared. 959 Hot Cathode Controller 35 8.2 Pressure Measurement Modes The controller supports 3 kinds of pressure measurement. 8.2.1 Normal Pressure Measurement In normal Pressure Measurement mode, each sensor operates independently and each has its pressure displayed upon the LCD. The two sensors are not linked in any way, and can exist in completely separate vacuum chambers. When the optional Pirani sensor is not present only a single pressure, representing the Hot Cathode, is displayed upon the LCD. 8.2.2 Control Pressure Measurement In control pressure measurement, the Pirani sensor controls the Hot Cathode sensor. That is, the pressure value measured by the Pirani sensor determines whether or not the Hot Cathode sensor is turned on for pressure measurement. This mode facilitates process control by utilizing the Pirani sensor as a control sensor to automatically turn on and turn off the Hot Cathode without user intervention. The user can assign the pressure value that turns on and off the cold cathode sensor (see Control Set Point Operation). Both sensors must be located on the same process chamber for this mode to be effective. Each sensor has its own pressure displayed on the LCD. Refer to control setpoint operation section. 8.2.3 Combined Pressure Measurement Evaluated and combined into a single pressure measurement. Only the single, combined pressure measurement is displayed on the LCD. This mode allows the user to have a single, smooth output continuously available from UHV through atmosphere. At low pressure, the hot cathode’s pressure is displayed, and at high pressure, the Pirani’s pressure measurement is displayed. At pressures within the overlap range of the two sensors (1x10⁻² Torr to 1x10⁻³ Torr) the two sensor’s readings are combined and averaged into a single display on the LCD (See Combined Pressure Operation). This is an automated mode of operation where the Pirani sensor controls the Hot Cathode sensor. The user cannot assign the control set point in this mode because the algorithm used for calculating the combined pressure value requires the Hot Cathode turn on and off at a specific pressure value. Both sensors must be located in very close proximity to each other for this mode to be effective. 8.3 Pressure Measurement As soon as power to the 959 is turned on the Pirani or Convection Pirani (if installed ) will be measuring pressure. A pressure value or over/under range condition will be indicated on the display. The pressure is dispayed on the second display line unless the controller is in the combined pressure mode (8.2.3). 36 959 Hot Cathode Controller Because the hot cathode sensor will be damaged if operated at too high of a pressure, the hot cathode remains off until turned on by the front panel “filament” button or a RS232 command. Always make sure the system pressure is below 1x10 -2 Torr before turning on a hot cathode sensor. Once turned on, the pressure is displayed on the top display line. 8.4 Degas Operartion The sensor can become contaminated, by process gasses, which causes the pressure readings to be inaccurate. This is most important when measuring very low pressures (<10-8 Torr). Degassing the sensor drives the gasses off of the sensor elements, improving the sensors accuracy. Degassing at high pressures can destroy or damage the sensor so never start a degas operation at pressures above 1x10⁻⁵ Torr. To degas the sensor, the filament must already be on, simply pusth the degas button. There will probably be a large pressure burst as the sensor elements heat up which may cause the protect set point to turn off the sensor. Degas may need to be started multiple times until enough gas has been driven off the elements so the pressure burst does not exceed the protect set point. Pressure is indicated during degas but the reading is very inaccurate and is not intended to be a pressure measurement but to indicate when the sensor has been adequately degassed. When the pressue stops changing, or is changing very slowly, further degassing will be of little benefit and dega should be terminated. The degas timer terminates the degas operation after a specified amount of time (3 to 30 minutes). Refer to section 8.11.6. The degas operation may shorten filament life so it is recommended that degas only be used when necessary. 8.5 Set Point Operation 8.5.1 Relay Set Point Operation Two relay set points are available for applications requiring pressure process control. The set point pressure range for the Hot Cathode is 5 x 10⁻¹⁰ Torr through 9.5 x 10⁻³ Torr. If a Pirani module is installed the set point range extends to 9.5 x 10² Torr or 9.5 x 101 Torr depending upon the type of Pirani sensor in use (Convection Enhanced or Standard). Set point pressures are automatically assigned to the appropriate sensor. When both sensors are present and the set point pressure is within the measurement overlap range (10-4 torr to 10-2 Torr), the user is given the option of selecting the sensor that detects the set point pressure. The SPDT relay signals are available on the back panel Accessory connector. (See section 7.6 for the connector pin outs). The relays are energized when the measured pressure falls below the set point pressure. When energized, the Normally Closed relay contact is open and the Normally Open contact is closed. Two indicators (SP1 and SP2) appear on the LCD display when the set points relays are energized. 959 Hot Cathode Controller 37 The set point operation can be both enabled and disabled. Disabling the set point operation maintains the set point pressure value in nonvolatile memory. Set point pressure values, as well as their enable/disable state are maintained in nonvolatile memory between power cycles. Set Points are always disabled after assignment and must be enabled before becoming active. Set Point hysteresis is 5% of measured pressure. It is not user adjustable. 8.5.2 Sensor Module Exceptions and Set Point Operation When the Hot Cathode filament power is removed, set point relays assigned to the Hot Cathode sensor module are de-energized. When filament power is reasserted, enabled set point relay signals are driven based on the value of subsequent Hot Cathode pressure readings. If the Hot Cathode sensor is disconnected from the controller, set point relays assigned to that sensor are de-energized. If the Hot Cathode pressure reading goes below its measurement range, the set point signal state remains at the value determined by the last valid pressure reading. If the Pirani sensor is disconnected from the controller, set point relays assigned to that sensor are de-energized. If the Pirani controller detects a broken filament, the set point signals relays are de-energized. If the Pirani pressure reading goes above or below its measurement range, the set point signal state remains at the value determined by the last valid pressure reading. 8.5.3 Set Point Configuration Displays Pressing the FUNCTION key once while the controller is in Pressure Measurement mode, places the controller in Set Point configuration mode and provides the user access to the numerous Set Point configuration displays. While in Set Point configuration mode, the user uses the SELECT push button to sequence through the list of configured set point attributes. That is, after assigning a value to a parameter, the user presses the SELECT button to sequence on to the next attribute in the list. The list is dynamic, and only those parameters that are appropriate for the controller’s configuration are displayed. The range of allowable assignment values is also dynamic, based on the controller configuration. The INC and DEC button are used to modify individual parameter values. The following displays are listed in the order the user would sequence through them by repeatedly pressing the SELECT button. The Set Point configuration mode is indicated with the text string “SET POINTS” on the LCD. 38 959 Hot Cathode Controller 8.5.4 Set Point 1 Value Assignment This display is depicted when the user first enters the Set Point configuration mode. It allows the user to assign a pressure value to Set Point 1. Each time this menu is entered, the current default Set Point 1 value is displayed. A value of 5.0x10⁻¹⁰ Torr is the factory default value. After an assignment by the user, that assignment becomes the default set point value. The pressure range available for the set point is dependent upon the sensor modules installed in the controller. Typically, set points are independent of a particular sensor, that is, the user selects a pressure and the controller determines the sensor to be used to detect that pressure. This display comes up depicting the current set point name and value. Pressing the INC and DEC buttons modifies the bottom display through the range of pressures available to the controller, based on the modules present, until the maximum or minimum values are reached. Pressing the INC and DEC keys simultaneously resets the set point value back to the factory default value (5.0 x 10⁻¹⁰ Torr). After the user has assigned the set point value, pressing the SELECT button brings up the next configurable set point parameter. 8.5.5 Set Point 1 Enable This display allows the user to enable Set Point 1 operation. Additionally, depending upon the pressure value assigned to the set point, the user may also need to assign the set point to a specific sensor. That is, only when the selected sensor detects the pressure assigned to Set Point 1 will the relay energize. This aspect of the display is conditional, in that the user only needs to associate a set point with a specific sensor under certain operational conditions. When these conditions are not present, the display operation only allows the user to enable or disable Set Point operation. Turning a set point off maintains the assigned value in memory, but disables its operation. The display depicts the current state of the set point operation (enabled = ON, disabled = OFF). Pressing the INC and DEC buttons toggles the bottom display between ON and OFF. Additionally, the display may allow the user to assign the set point to a specific sensor. In this case, pressing the INC and DEC buttons will sequence the lower read out through the options of ON, OFF, PIR & Hot Cathode. Sensor assignment is only possible if the following conditions are true: Both sensor modules are present Set Point 1 has been assigned a pressure within the sensors’ overlap range: 2.0 x 10⁻³ through 9.5 x 10⁻³ Torr with Convection Enhanced Pirani Sensor. 2.0 x 10⁻² through 9.5 x 10⁻⁴ Torr with Pirani Sensor 959 Hot Cathode Controller 39 8.5.6 Set Point 2 Value Assignment This display allows the user to assign a pressure value to Set Point 2. Each time this menu is entered, the current default Set Point 2 value is displayed. A value of 5.0 x 10⁻¹⁰ Torr is the factory default value. After an assignment by the user, that assignment becomes the default set point value. The pressure range available for the set point is dependent upon the sensor modules installed in the controller. Set Point 1 and Set Point 2 are completely separate. This display depicts the current set point name and value. Pressing the INC and DEC buttons modifies the bottom display through the range of pressures available to the controller, based on the modules present, until the maximum or minimum values are reached. Pressing the INC and DEC keys simultaneously, resets the set point value back to the factory default value (5.0 x 10⁻¹⁰ Torr). After the user has assigned the set point value, pressing the SELECT button brings up the next configurable set point parameter. 8.5.7 Set Point 2 Enable This display allows the user to enable Set Point 2 operation. Additionally, depending upon the pressure value assigned to the set point, the user may also need to assign the set point to a specific sensor. That is, only when the selected sensor detects the pressure assigned to Set Point 2 will the relay energize. This aspect of the display is conditional, in that the user only needs to associate a set point with a specific sensor under certain operational conditions. When these conditions are not present, the display operation only allows the user to enable or disable Set Point operation. Turning a set point off maintains the assigned value in memory, but disables its operation. The display depicts the current state of the set point operation (enabled = ON, disabled = OFF). Pressing the INC and DEC buttons toggles the bottom display between ON and OFF. Additionally, the display may allow the user to assign the set point to a specific sensor. In this case, pressing the INC and DEC buttons will sequence the lower read out through the options of ON, OFF, PIR & Hot Cathode. Sensor assignment is only possible if the following conditions are true: Both sensor modules are present Set Point 2 has been assigned a pressure within the sensors’ overlap range: 2.0 x 10⁻³ through 9.5 x 10⁻³ Torr with Convection Enhanced Pirani Sensor. 2.0 x 10⁻² through 9.5 x 10⁻⁴ Torr with Pirani Sensor 40 959 Hot Cathode Controller 8.5.8 Control Set Point Operation The Pirani sensor can be configured to control the Hot Cathode sensor. This mode of operation is only available when both sensors are connected and operational. The control function is implemented by having the Pirani turn on or off the Hot Cathode’s filament power. The Control Set Point is the pressure measurement value used by the Pirani to make its decision. At pressures above this value the Pirani removes the Hot Cathode’s filament power. At pressure readings below this value, the Pirani turns on filament power. The Control Set Point can range from 1.0 x 10⁻² Torr through 1.0 x 10⁻⁴ Torr, depending upon which Pirani sensor is attached. The Control SP indicator appears on the LCD when the Hot Cathode filament power has been turned off by the Pirani sensor control function. The Control Set Point operation can be both enabled and disabled. Disabling the Control Set Point maintains the set point pressure value in nonvolatile memory. The Control Set Point pressure value, as well as its enable/disable state is maintained in nonvolatile memory between power cycles. When Control Set Point is enabled, neither the Front Panel Filament Power switch nor ASCII serial commands can be used to turn filament power on or off. When Control Set Point is disabled the Hot Cathode filament power remains in its previous state. Control Set Point hysteresis averages 5% of measured pressure. Hysteresis is not user adjustable. 8.5.9 Control Set Point Constraints The Control Set Point operation is not allowed if the Pirani module is not installed. User adjustment of the Control Set Point is not allowed if the controller is in Combined mode. In Combined mode the Control Set Point defaults to 1.0 x 10⁻² Torr. 959 Hot Cathode Controller 41 8.5.10 Control Set Point Assignment This display allows the user to assign a Control Set Point. Each time this menu is entered, the current default Control Set Point value is displayed. A value of 1.0 x 10⁻² Torr is the factory default value. After an assignment by the user, that assignment becomes the default Control Set Point value. This display depicts the current Control Set Point value. Pressing the INC and DEC buttons modifies the bottom display through the range of allowable Control Set Point pressures, until the maximum or minimum values are reached. Pressing the INC and DEC keys simultaneously resets the set point value back to the factory default value of 1.0 x 10⁻² Torr. This Display is only visible if: Both sensor modules are present The unit is not in Combined mode 8.5.11 Control Set Point Enable This display allows the user to enable Control Set Point operation. Turning the Control Set Point off maintains the assigned value in memory, but disables its operation. The display depicts the current state of the Control Set Point operation (enabled = ON, disabled = OFF). Pressing the INC and DEC buttons toggles the lower readout between ON and OFF. 42 959 Hot Cathode Controller 8.5.12 Protect Set Point Operation The Protect Set Point is the pressure value that automatically turns off the Hot Cathode’s filament power. The Protect Set Point prevents damage to the Hot Cathode sensor from exposure to high pressure. The Protect Set Point can range from 1.0 x 10⁻⁶ Torr through 1.0 x 10⁻² Torr. The default Protect Set Point value is 1.0 x 10⁻² Torr. The Protect Set Point cannot be disabled; it is always active. Each Hot Cathode pressure reading is tested against the protect value, and filament power is removed whenever a pressure reading is greater than the protect value. When the Protect Set Point has removed filament power, it can only be reapplied via the Front Panel switch or the filament power ASCII command. The Hot Cathode sensor will never be automatically turned back on unless the controller is in Control Set Point or Combined mode of operation. The controller displays PROT to inform the user that the Hot Cathode has been turned off as a result of reaching the Protect pressure Set Point. The Protect Set Point value is stored in nonvolatile memory and recalled after a controller power cycle. 8.5.13 Protect Set Point Constraints The Protect Set Point value is not adjustable if the controller is in Combined mode or if a Control Set Point is active. 8.5.14 Protect Set Point Assignment This display allows the user to assign a Protect Set Point. The display depicts the currently active protect pressure. Pressing the INC and DEC buttons modifies the bottom display through the range of allowable Protect Set Point pressures, until the maximum or minimum values are reached. The Protect Set Point can never be turned off. The INC and DEC buttons provide for the selection of a specific protect pressure within the range of allowable pressures. Pressing the INC and DEC keys simultaneously resets the set point value back to the factory default value of 1.0 x 10⁻² Torr. This display is only visible if: The controller is not in Combined mode A Control Set Point is not enabled 959 Hot Cathode Controller 43 8.6 Set Up Configuration Pressing the FUNCTION key while in Set Points mode places the Controller in Set Up mode. Set Up mode provides access to the controller’s non-set point configuration parameters. While in Set Up configuration mode, the user uses the SELECT push button to sequence through the list of configurable set up attributes. That is, after assigning a value to a parameter, the user presses the SELECT button to sequence on to the next attribute in the list. The list is dynamic, and only those parameters that are appropriate for the controller’s configuration are displayed. The INC and DEC button are used to modify individual parameter values. The following displays are listed in the order the user would sequence through them by repeatedly pressing the SELECT button. The Set Up configuration mode is indicated with the text string “SET UP” on the LCD. 8.6.1 Filament Select This is the first controller parameter that is displayed upon entering Set Up mode. It allows the user to select one of two Hot Cathode filaments. The current or default filament selection is displayed on the bottom read out. Pressing the INC and DEC buttons toggles the lower readout between 1 & 2. Pressing the SELECT key advances the display to the next item in the menu list. 8.6.2 Combined Pressure Measurement The Combined mode of operation is an optional mode of operation that combines the Hot Cathode and Pirani pressure measurement reading into one smoothed (combined) value. It is intended to be used when the two sensors are located in the same pressure chamber. It provides a smooth and continuous pressure measurement from atmosphere to high vacuum. When the user enables combined pressure, a single pressure display on the LCD represents, the combined pressure reading, and generates the corresponding smoothed DAC output at the Combined Analog Output signal on the Accessory connector. The smoothing algorithm uses weighted values (more Pirani pressure influence towards 1.0 x 10⁻² Torr & more Hot Cathode pressure influence towards 1.0 x 10⁻³ Torr). The algorithm only modifies pressure readings where the two sensor modules’ measurement is used. Below 1.0 x 10⁻³ Torr only the Hot Cathode measurement is used. Above 1.0 x 10⁻² Torr only in Pirani measurement issued. This display allows the user to enable or disable the combined Pressure 44 959 Hot Cathode Controller Measurement mode. The lower read out depicts the current value. Pressing the INC and DEC button toggles the bottom display between ON and OFF. Pressing the SELECT key advances the display to the next item in the menu list 8.6.3 Combined Mode Constraints The controller can only be put into Combined mode when both sensors (Hot Cathode and Pirani) are installed and operational. When in Combined mode, the Pirani functions as a control sensor and turns the Hot Cathode on and off, based on the Pirani’s pressure reading. The Combined mode control set point is not adjustable. Relay Set Points are disabled upon entering Combined mode. Previously assigned pressure values are still valid but the set points need to be re-enabled before the relays will actuate. The Combined mode Analog Output voltage is only active while in Combined mode; The analog output is maintained at 0 volts when not in Combined mode. 8.6.4 Hot Cathode Sensitivity This display allows the user to assign a controller sensitivity value for use with the Hot Cathode sensor readings. The value entered is the product of a gas sensitivity times the gauge sensitivity. Pressing the INC and DEC buttons modifies the lower display from the current (or default) Hot Cathode gauge sensitivity value through the range of allowable sensitivity values. Valid values range from 0.1, 0.2, 0.3...0.9, 1, 2, 3...99. See section 10 on Gas Correction and Gauge Sensitivity. 959 Hot Cathode Controller 45 8.7 Calibration 8.7.1 Pirani Calibration may be necessary if the vacuum or atmospheric reading of the sensor has drifted or the sensor has been replaced. The calibration provided by the 959 controller is designed to improve accuracy of the sensor reading; however, it does not provide NIST traceable calibration. Also, this feature is not intended to correct the output of the sensor for different gases. There are two types of calibration, Factory and User. Factory calibration resets the sensor correction back to the factory default values. User calibration utilizes the current or assigned pressure values as correction factors applied against subsequent readings. When user calibration is in effect for either vacuum or atmosphere, a U is displayed on the LCD near the Pirani pressure readout. 8.7.2 Vacuum Calibration The user places the sensor into a chamber of low pressure (10-4 Torr decade for a Convection Enhanced Pirani and 10-5 Torr decade for the standard Pirani) and instructs the controller to do a pressure measurement. The measurement value is used to calculate a correction factor that is applied against subsequent pressure readings. The vacuum calibration value is treated as a graduated offset from the raw data. There is an upper limit to the calibration value. If the pressure read by the sensor during calibration is greater than this limit, the calibration is not allowed. The user must lower the pressure in the chamber before the sensor can be calibrated. The user requests a user vacuum calibration either with an ASCII command or via the Front Panel switches. 8.7.3 Atmospheric Calibration Atmospheric Calibration requires the Controller be given a pressure value that the user chooses to represent atmospheric pressure. The Pirani module uses this pressure to calculate a correction ratio that is applied against subsequent pressure readings. There is a lower limit to the atmospheric calibration. If the user selected pressure calibration value is below this limit the user must raise the desired pressure value before a calibration can take place. The user requests a user atmospheric calibration either with an ASCII command or via the Front Panel switches. 46 959 Hot Cathode Controller 8.7.4 Pirani Atmospheric Calibration This display allows the user to calibrate the Pirani sensor reading for atmospheric pressure. This operation is only available when the Pirani module is installed in the controller. The calibration operation makes use of the display’s U indicator to depict atmospheric calibration. When illuminated, the Pirani sensor has been calibrated for atmosphere by the user. When in Pressure Measurement mode, the U on the display indicates if the controller has been calibrated for either atmosphere or vacuum. The lower readout depicts either the default calibration pressure value if not calibrated or the current atmospheric calibration value. Pressing the INC and DEC buttons increments or decrements the lower display value. Pressing the SELECT or FUNCTION key will apply the calibration value to the Pirani sensor. Limits exist on the allowable range of atmospheric adjust and attempts to calibrate to a pressure outside these limits are not permitted. The previous calibration value (or default value if not calibrated) will be displayed if the user attempts to calibrate the Pirani sensor to a pressure reading outside the allowable limits. Valid calibration values will advance the display to the next item in the menu list. After a successful calibration each subsequent pressure reading is corrected by the calibration value. Pressing INC and DEC simultaneously will reset the Pirani atmospheric calibration back to the factory default value. 8.7.5 Pirani Vacuum Calibration This display allows the user to calibrate the Pirani sensor for reading vacuum. This operation is only available when the Pirani module is installed in the controller. The calibration operation makes use of the display’s U indicator to depict vacuum calibration. When illuminated, the Pirani sensor has been calibrated for vacuum by the user. When in Pressure Measurement mode, the U on the display indicates if the controller has been calibrated for either atmosphere or vacuum. The lower readout depicts the current vacuum pressure reading. Pressing either the INC or DEC button instructs the controller to use the current pressure reading as vacuum. Each subsequent pressure reading is corrected by the calibration value. Limits exist on the allowable range of vacuum adjust. Attempts to calibrate to a pressure beyond these limits are not permitted. Valid calibration values will advance the display to the next item in the menu list. If the menu display does not advance, the user must adjust the vacuum chamber’s pressure, or use the factory default vacuum calibration value. Pressing INC and DEC 959 Hot Cathode Controller 47 simultaneously will reset the controller’s Pirani vacuum calibration back to the factory default value. 8.7.6 Degas Time This display allows the user to adjust the length of time Degas power is applied to the filament. Degas time has minimum and maximum limits. The lower read out displays the current degas time, in minutes. The INC and DEC buttons adjust this time up or down, with 1 minute resolution. Simultaneously pressing INC and DEC together will reset the controller degas time back to the factory set default value of 3 minutes. 8.7.7 Emission Current Assignment This display allows the user to assign the Hot Cathode’s emission current mode of operation. The controller supports two modes. In auto mode, the controller determines the optimal emission current based on the pressure conditions. Alternatively, the user may assign the emission current to be always 100uA. The lower readout depicts the current mode. Pressing the INC and DEC toggles the bottom display between the two emission current options, Auto (Auto mode) or 100 (always 100uA). In Auto mode the Controller determines the proper emission current based on real time pressure measurements. The Controller uses a 100 µA emission current at higher pressures, and a 1mA emission current at lower pressures. The emission current switches to 1mA at 8.0 x 10⁻⁵ Torr going from high pressure to low pressure. Emission current switches to 100 µA at 1.0 x 10⁻⁴ Torr going from a low pressure to a higher pressure. When utilizing a Set Point within the pressure range from 8.0 x 10⁻⁵ Torr to 1.0 x 10⁻⁴ Torr, the Controller should be placed in the non-Auto emission current mode for best results. 48 959 Hot Cathode Controller 8.8 Leak Test Operation 8.8.1 Entering Leak Test Mode Leak Test mode is entered when the user has pressed the Front Panel function key until it selects Leak Test mode. Leak Test mode can only be entered via the front panel; Serial communications does not support Leak Test mode. When the Leak Test mode selection has been detected a display is depicted that allows the user to select the leak test sensor. This is the only configured leak test parameter. Pressing the INC and DEC buttons while in Leak Test mode toggles the lower LCD 16 segment display between PIR and Hot Cathode. If only the Hot Cathode sensor module is present or operational, the leak test sensor defaults to the Hot Cathode sensor, and pressing the INC or DEC buttons has no affect. After the leak test sensor has been determined, pressing the SELECT button initiates the leak test operation. The appropriate Hot Cathode or PIR indicator is illuminated to identify the selected leak test sensor. The leak test value is displayed on the lower read out. The leak test value is the difference between the leak test sensors A/D value and the baseline pressure’s A/D value. It is displayed as a digital number. A positive difference (i.e. the leak test value is greater than the baseline pressure) illuminates the ▲ symbol on the LCD. A negative difference (i.e. the leak test value is less than the baseline pressure) illuminates the ▼ symbol on the LCD. 8.8.2 Resetting the Baseline Pressure While in Leak Test mode, the user can press the ZERO key to re-zero the basiline reference pressure. Detection of this key press updates the leak test sensor’s current pressure on the display and resets this pressure’s A/D value as the baseline A/D value. Immediately after this key is pressed, the leak test value LCD display is Zero. Leak testing then resumes using the new baseline reference values. 8.8.3 Audible Operation While in Leak Test mode, the user can press the AUDIO key to enable or disable an audible leak test beeper. When this option is enabled the controller generates a repetitive beeping tone at a frequency that increases or decreases as the leak measurement increases and decreases. The beep frequency is based upon the difference between the baseline A/D value and the current A/D reading. The greater the difference, the faster the beep. Above a maximum difference, the beep is on constantly. 959 Hot Cathode Controller 49 8.8.4 Exiting Leak Test Mode The user terminates the leak test operation by pressing either the SELECT key or the FUNCTION key. Pressing the SELECT key terminates the operation and re-displays the leak test sensor selection display on the LCD. The Controller remains in Leak Test Mode and the user can again select the leak test sensor. Pressing the FUNCTION key returns the Controller to Pressure Measurement mode. The LCD display reflects the Controller’s most recent set up parameters, and normal pressure measurement operation resumes. 8.8.5 Leak Test Constraints Degas is not allowed while in Leak Test Mode. If Degas is active when Leak Test Mode is entered, it is automatically terminated. Degas can not be invoked while in Leak Test Mode. The Hot Cathode filament can be powered on and off during leak test operation. If the Hot Cathode sensor is the leak test sensor, and the filament is powered off, the LCD display indicates the Hot Cathode sensor is off. The leak test operation is suspended until the filament is turned back on. Relay Set Points are disabled while in Leak Test Mode. The controller cannot operate in Combined mode during leak test. If Combined mode is active when the Leak Test Mode is entered, the controller is automatically placed into normal Pressure Measurement mode. The user must re-enable Combined mode after the leak test operation. 8.8.6 Using the Series 959 as a Leak Detector. Leaks in vacuum systems are often difficult to locate and often require the use of mass spectrometer leak detectors and skilled operators. While the Series 959 is not intended to replace mass spectrometer leak detectors, it offers an ideal, inexpensive, and simple method for locating leaks in high vacuum systems. The leak test sensitivity depends on the pumping system and the location of the sensor with respect to the leak, as well as the difference in ionization probability between the probe gas and the system background gas. Since the indicated pressure of a Pirani or Hot Cathode gauge is dependent upon the type of gas being measured, introducing a probe gas through the leak into a steady state system will change the indication. The Series 959 Controller uses a zero centered numerical display with increased sensitivity to indicate gas leaks in high vacuum systems. 50 959 Hot Cathode Controller This is activated when the controller is switched to the leak test mode. The pressure indication remains visible. Audible indication of leak signals is user selectable from the front panel. While the leak test sensitivity varies with the pressure range, in the best case, it is as low as 10-8 Torr-liters/second. To use the Leak Test function of the HPS® Series 959, pump the system to its base pressure then enter the LEAK TEST mode. An audio indicator emits beeps with a repetition rate proportional to the amplitude of the leak signal. The audio indicator can be silenced or reactivated by pressing the Audio push-button. A probe gas entering the gauge through a leak will cause a change in the numerical value of the digital Leak display. To locate a leak in the vacuum system, probe the suspect areas with a search gas which has an ionization probability different than the system gas. Helium or argon gas are suitable for probing a system pumping air or nitrogen. The probing should be done slowly and methodically with a small amount of search gas. Flooding the leak with gas or moving the gas source quickly past the leak can confuse the search, since system time lags may be significant. While probing the suspect components, observe the numerical display. The largest value of the numerical display indicates that the search gas is nearest the leak location. Once the leak location is determined, repeat the test to confirm. As with any leak testing, many factors can influence the sensitivity of the test. These factors include system volume, system pressure, search gas, type of vacuum pump, location of the gauge, location of the pump, and size of tubulation in the system. Reducing the search area by minimizing the chamber volume will increase the efficiency of the test. Placement of the gauge and the pump in relation to the leak can also be a major factor in optimizing the sensitivity of the leak detection. Placing the pump away from the suspected leak source and placing the gauge between the leak and the pump will reduce the gauge response time allowing most accurate pinpointing of the leak location. Tubulation between the suspected leak and the gauge tube should be as short and wide as possible to minimize the time required for the search gas to reach the gauge. The Series 959 LEAK TEST mode is sensitive to any gas either with a lower or higher thermal conductivity or ionization probability than the gas in the user’s system, however for optimal sensitivity, the search gas should be selected to maximize the difference between its thermal conductivity or ionization probability and that of the system gas. Always use a search gas in small quantity to aid in pinpointing the leak. In general, the sensitivity of the leak test is greater for lower system pressures. 959 Hot Cathode Controller 51 If the leak test method outlined above fails to indicate the location of a leak, consider that unexpected high pressures may be caused by a virtual leak, that is, outgassing of a system component. The Series 959 can be used effectively to locate outgassing parts or virtual leaks as well as true gas leaks using the “rate of pressure rise” method. With the gauge controller in Pressure Measurement or Leak Test mode, the system is pumped down to a base pressure. Then the pump is valved off. The rise of the pressure indication over a time interval is then measured. By valving off or removing suspect components from the system and repeating this procedure, the leaking component is isolated. 52 959 Hot Cathode Controller 8.9 Leak Test Displays The Leak Test mode is entered by pressing the FUNCTION key until the LEAK TEST display appears on the bottom of the LCD. While in Leak Test mode, the user uses the SELECT push button to sequence through the list of configured leak test attributes. The INC and DEC button are used to modify individual parameter values. The following displays are listed in the order the user would sequence through them by repeatedly pressing the SELECT button. 8.9.1 Leak Sensor Assignment This display is depicted when the user first enters Leak Test mode. It allows the user to select the leak test sensor. This is the only configured leak test parameter. Pressing the INC and DEC buttons toggles the lower display between PIR and Hot Cathode. If only the Hot Cathode sensor module is present or operational, the leak test sensor defaults to the Hot Cathode sensor, and pressing the INC or DEC buttons has no affect. After the leak test sensor has been determined, pressing the SELECT button initiates the leak test operation. 8.9.2 Pirani Sensor Leak Test Operation This display is depicted after the leak test sensor has been defined. It is the display that is visible during the leak test operation. The current pressure measurement is displayed on the upper read out. The leak test value is displayed on the lower read out. This example is when the leak test sensor is the Pirani sensor. The leak test value is initially all zeros. As the leak sensing progresses the value changes. The display can be re-zeroed at any time (and a new base line pressure established) by pressing the ZERO button. Pressing the AUDIO button activates the audio beeper. 959 Hot Cathode Controller 53 8.9.3 Hot Cathode Sensor Leak Test Operation This example is for when the leak sensor is the Hot Cathode sensor. If the Hot Cathode sensor is off (e.g. the filament is off) the sensor display indicates the sensor is off, and the leak display read out does not function. The count value on the lower readout indicates the sensor pressure relative to the base line pressure. The larger the number, the greater the difference. The up and down arrows indicate whether the difference is positive (up) or negative (down). Pressing the SELECT button again while the leak test is operating will halt the leak test operation, and cycle back to the first leak test display that allows the user to select the leak test sensor. Pressing the FUNCTION button will change the Controller’s mode back to Pressure Measurement mode. 54 959 Hot Cathode Controller 8.10 Status Readouts Normal pressure measurement operation of the controller may occasionally generate status information on the 16 segment displays other than the typical numeric pressure measurement values. This information reflects internal operational status or errors, pressure over or under range conditions or other situations that do not normally occur, and so do not have dedicated annunciators. Some examples follow. 8.10.1 Under Pressure This example demonstrates the LCD display when both the Pirani and Hot Cathode sensor are located in the same chamber at high vacuum. The unit is not in Combined mode of pressure measurement. Because the Pirani module is returning a signal (analog voltage) that indicates it is exposed to a pressure that is beneath its pressure measurement range, a LOW is displayed on the Pirani’s readout. The Hot Cathode readout may display LOW when the sensor is exposed to ultra high vacuum. 8.10.2 Over Pressure This example demonstrates the LCD display when both the Pirani and Hot Cathode sensors are located in the same chamber near or above atmosphere. The unit is not in Combined mode of pressure measurement. This display depicts the read out when the Pirani is exposed to a pressure that is above its pressure range . Note the Hot Cathode sensor readout indicates OFF, when the user or a Pirani Sensor has turned the filament off. The Hot Cathode readout could also indicate PROT, if the sensor’s protect set point has been reached and the controller automatically (rather than the user manually) removed filament power. The Hot Cathode read out will never display HI. 959 Hot Cathode Controller 55 8.10.3 Low Emission The controller will automatically remove filament power from the Hot Cathode sensor when it detects a low emission current. The following display is depicted to inform the user this event has occurred. Only the Hot Cathode module’s read out is affected. The LCD display indicates power is removed from the Hot Cathode filament. The Pirani module continues with pressure measurement. 56 959 Hot Cathode Controller 8.11 Miscellaneous Displays The following menu displays are used to display and modify controller parameters that do not need to be accessed by the user under normal operating conditions. The displays are accessed by pressing pairs of key combinations simultaneously while in Pressure Measurement mode. Pressing the FUNCTION key at any time returns the controller to the Pressure Measurement mode. 8.11.1 LCD Display Test The Display Test displays is invoked by pressing the FUNCTION and SELECT keys simultaneously while in Pressure Measurement mode. This display depicts all possible LCD segments Not all LCD segments are used during the operation of the 959 Controller. 959 Hot Cathode Controller 57 8.11.2 Factory Reset The display is invoked by pressing the INC and DEC keys simultaneously while in Pressure Measurement mode. This menu display allows the user to reset the controller back to ALL factory set parameter values. The controller will lose all the set up values entered by the user after this reset has executed. The menu queries to ensure the user really wants to reset the controller. Pressing INC or DEC will toggle the lower readout to display YES or NO. Pressing the Function or Select key will either reset the controller to factory default values, or not, depending on whether a YES or NO is displayed upon the lower readout, and return the controller to Pressure Measurement mode. 8.11.4 Front Panel Lock The Front Panel Lock key sequence allows the user to enable or disable the front panel key press operation. When the Front Panel is enabled, all of the previous described key press operations are functional. When the Front Panel is disabled (locked) all Front Panel key press operations are ignored. The LCD continues to display the results of the controller operation, but controller set up and parameter assignments can not be modified through the Front Panel keys. Serial Communications is still functional and the user can utilize this mechanism to modify the controller’s setup parameters. The purpose of the Front Panel Lock is to allow the controller to be set up into a configuration suitable for a particular operation, and then lock it so that the setup parameters can not be modified from the Front Panel. The feature offers a measure of security, particularly when the controller is being operated remotely by a process controlling host computer When the Front Panel is locked, the annuciator FPLOCK is illuminated on the LCD display. Activation of the Front Panel Lock requires the simultaneous pressing of both the FUNCTION and INC keys while in Pressure Measurement mode. It is a toggle operation: Pressing the pair of keys once locks the controller; pressing the pair a second time unlocks the controller’s Front Panel. 58 959 Hot Cathode Controller 8.12+ Buffered Analog Output Up to three separate analog outputs are provided, the Hot Cathode sensor’s analog output, the Pirani sensor’s analog output and the combined sensors’ analog output. All analog outputs are log-linear. (I.e. the output will be linear on a semilog plot of pressure vs. output voltage). All output voltages have identical volts/decade scales. An analog output representing a valid pressure ranges from 1 to 7.5 VDC with the scale being 0.5V per decade (Torr). 0 volts shall indicate the sensor is off. 0.5 volts represents a pressure that is below the useful measurement range of the sensor. 8.0 volts will indicate the pressure is above the useful measurement range of the sensor. In the table below, the “X” indicates the voltage and useful pressure ranges of the different analog outputs. Voltage (volts) Hot Cathode 0.0 0.5 1.0 1.5 2.0 2.5 3.0 3.5 4.0 4.5 5.0 5.5 6.0 6.5 7.0 7.5 8.0 X X X X X X X X X X X 1. 2. X Pirani Pressure (Torr) Combined X X X X X X X X X X2 X X X X X X X X X X1 X X X X X X X2 X Off Under Pressure 1.0E-10 1.0E-9 1.0E-8 1.0E-7 1.0E-6 1.0E-5 1.0E-4 1.0E-3 1.0E-2 1.0E-1 1.0E+0 1.0E+1 1.0E+2 1.0E+3 Over Pressure Standard Pirani only Convection Pirani only One equation is used to convert any analog output to pressure: Pressure = 10(2v-12) Torr Where V is 1 to 7.5V and the pressure is in Torr. No other unit of measure is available on the analog outputs. 959 Hot Cathode Controller 59 8.13 Standard Pirani Pressure to Voltage Curve 8.14 Standard Pirani Pressure to Voltage Table Pressure Vout Pressure Vout Pressure Vout Pressure Vout Pressure Vout Pressure Vout 0.00010 0.00012 0.00014 0.00016 0.00018 0.00020 0.00025 0.00030 0.00035 0.00040 0.00045 0.00050 0.00055 0.00060 0.00065 0.00070 0.00075 0.00080 0.00085 0.00090 0.00095 0.00100 60 4.00 4.04 4.07 4.10 4.13 4.15 4.20 4.24 4.27 4.30 4.33 4.35 4.37 4.39 4.41 4.42 4.44 4.45 4.46 4.48 4.49 4.50 0.0010 0.0012 0.0014 0.0016 0.0018 0.0020 0.0025 0.0030 0.0035 0.0040 0.0045 0.0050 0.0055 0.0060 0.0065 0.0070 0.0075 0.0080 0.0085 0.0090 0.0095 0.0100 4.50 4.54 4.57 4.60 4.63 4.65 4.70 4.74 4.77 4.80 4.83 4.85 4.87 4.89 4.91 4.92 4.94 4.95 4.96 4.98 4.99 5.00 0.010 0.012 0.014 0.016 0.018 0.020 0.025 0.030 0.035 0.040 0.045 0.050 0.055 0.060 0.065 0.070 0.075 0.080 0.085 0.090 0.095 0.100 5 5.04 5.07 5.10 5.13 5.15 5.20 5.24 5.27 5.30 5.33 5.35 5.37 5.39 5.41 5.42 5.44 5.45 5.46 5.48 5.49 5.50 959 Hot Cathode Controller 0.100 0.120 0.140 0.160 0.180 0.200 0.250 0.300 0.350 0.400 0.450 0.500 0.550 0.600 0.650 0.700 0.750 0.800 0.850 0.900 0.950 1.0000 5.50 5.54 5.57 5.60 5.63 5.65 5.70 5.74 5.77 5.80 5.83 5.85 5.87 5.89 5.91 5.92 5.94 5.95 5.96 5.98 5.99 6.00 1.00 1.20 1.40 1.60 1.80 2.00 2.50 3.00 3.50 4.00 4.50 5.00 5.50 6.00 6.50 7.00 7.50 8.00 8.50 9.00 9.50 10.0 6.00 6.04 6.07 6.10 6.13 6.15 6.20 6.24 6.27 6.30 6.33 6.35 6.37 6.39 6.41 6.42 6.44 6.45 6.46 6.48 6.49 6.50 10.0 12.0 14.0 16.0 18.0 20.0 25.0 30.0 35.0 40.0 45.0 50.0 55.0 60.0 65.0 70.0 75.0 80.0 85.0 90.0 95.0 100.0 6.50 6.54 6.57 6.60 6.63 6.65 6.70 6.74 6.77 6.80 6.83 6.85 6.87 6.89 6.91 6.92 6.94 6.95 6.96 6.98 6.99 7.00 8.15 Convection Enhanced Pirani Pressure to Voltage Curve 8.16 Convection Enhanced Pirani Pressure to Voltage Table Pressure Vout Pressure Vout Pressure Vout Pressure Vout Pressure Vout Pressure Vout 0.0010 0.0012 0.0014 0.0016 0.0018 0.0020 0.0025 0.0030 0.0035 0.0040 0.0045 0.0050 0.0055 0.0060 0.0065 0.0070 0.0075 0.0080 0.0085 0.0090 0.0095 0.0100 4.50 4.05 4.57 4.60 4.63 4.65 4.70 4.74 4.77 4.80 4.83 4.85 4.87 4.89 4.91 4.92 4.94 4.95 4.96 4.98 4.99 5.00 0.0100 0.0120 0.0140 0.0160 0.0180 0.0200 0.0250 0.0300 0.0350 0.0400 0.0450 0.0500 0.0550 0.0600 0.0650 0.0700 0.0750 0.0800 0.0850 0.0900 0.0950 0.1000 5.00 5.04 5.07 5.10 5.13 5.15 5.20 5.24 5.27 5.30 5.33 5.35 5.37 5.39 5.41 5.42 5.44 5.45 5.46 5.48 5.49 5.50 0.100 0.120 0.140 0.160 0.180 0.200 0.250 0.300 0.350 0.400 0.450 0.500 0.550 0.600 0.650 0.700 0.750 0.800 0.850 0.900 0.950 0.1000 5.5 5.54 5.57 5.60 5.63 5.65 5.70 5.74 5.77 5.80 5.83 5.85 5.87 5.89 5.91 5.92 5.94 5.95 5.96 5.98 5.99 6.00 1.00 1.20 1.40 1.60 1.80 2.00 2.50 3.00 3.50 4.00 4.50 5.00 5.50 6.00 6.50 7.00 7.50 8.00 8.50 9.00 9.50 10.00 6.00 6.04 6.07 6.10 6.13 6.15 6.20 6.24 6.27 6.30 6.33 6.35 6.37 6.39 6.41 6.42 6.44 6.45 6.46 6.48 6.49 6.50 10.0 12.0 14.0 16.0 18.0 20.0 25.0 30.0 35.0 40.0 45.0 50.0 55.0 60.0 65.0 70.0 75.0 80.0 85.0 90.0 95.0 10.0 6.50 6.54 6.57 6.60 6.63 6.65 6.70 6.74 6.77 6.80 6.83 6.85 6.87 6.89 6.91 6.92 6.94 6.95 6.96 6.98 6.99 7.00 959 Hot Cathode Controller 100.0 120.0 140.0 160.0 180.0 200.0 250.0 300.0 350.0 400.0 450.0 500.0 550.0 600.0 650.0 700.0 750.0 800.0 850.0 900.0 950.0 1000.0 7.00 7.04 7.07 7.10 7.13 7.15 7.20 7.24 7.27 7.30 7.33 7.35 7.37 7.39 7.41 7.42 7.44 7.45 7.46 7.48 7.49 7.50 61 8.17 Hot Cathode Curves 62 959 Hot Cathode Controller 9. Maintaining The 959 Hot Cathode Controller 9.1 Cleaning the Controller Front Panel The 959 Controller front panel is designed to resist most Laboratory solvents. It can be cleaned with water or isopropyl alcohol. Do not use acetone on the front panel. 9.3 Servicing the Controller The 959 Controller is designed to be maintenance-free under normal operation. If a problem should occur, the following chart lists symptoms, possible causes, and their remedies. With this guide, you should be able to diagnose some problems and correct them. Those that fall outside the scope of this chart are generally not serviceable by the user and the unit should be returned to HPS® Products for repair. 959 Controller Trouble Shooting Chart Sympton No indication on display Remedy Possible Cause 1. Controller not plugged into proper power source. 2. Power switch is off 3. Power fuse blown. 1. Verify power source and plug the Controller into the correct one. 2. Press the Power On front panel push button. 3. Replace the fuse 1. Improper power source 2. Incorrect fuse rating. 3. Defective power supply in the Controller 1. Use correct power source 2. Use the properly rated fuse 3. Return to HPS® Products for repair. Pressure reading is inaccurate 1. System pressure outside of normal measurement range. 2. Sensor not attached to cable or controller. 3. Filament is burned out. 4. Sensor needs degassing. 5. Sensor needs calibration. 6. Controller set to wrong sensitivity. 7. System gas neither air nor nitrogen. 8. Degas is active. 9. Contaminated or leaking sensor. 10. Sensor interference from external magnetic force. 1. Range is 10-10 through 10+3 Torr. 2. Ensure all sensors are properly connected to their cable and that the cables are securely attached to the Controller. 3. Switch active filaments. 4. Degas the Hot Cathode sensor. 5. Calibrate the Pirani sensor. 6. Change the sensitivity for the sensor type. 7. Assign the proper sensitivity for the gas being used. 8. Turn off Degas. 9. Replace sensor. 10. Remove the magnetic field source Degas does not turn on. 1. Pressure above protection threshold. 2. Open grid circuit in sensor or cable. 3. Filament power not switched on. 1. Lower system pressure before turning on Degas. 2. Switch active filaments or replace sensor or cable. 3. 3 Turn on filament power. Fuse blows repeatedly 959 Hot Cathode Controller 63 9.3 Replacing the Power Fuse The Series 959 controller has a combined fuse holder and power inlet on the rear panel. Replace the fuse following the steps below. 1. Unplug the power cord from the power source and the Controller. 2. Snap out the fuse holder drawer. 3. Replace the fuse(s) with the following time-lag fuse: ♦ 4. 64 T 1.6 A (5 x 22 mm) Close and secure the fuse holder drawer. 959 Hot Cathode Controller 10. Using the 959 Hot Cathode Controller with Other Gases A Hot Cathode ionization sensor measures pressure by the degree of ionization of a gas, so the pressure reading depends on the type of gas in the system. The Series 959 System is calibrated to read pressure for air or nitrogen. The Series 959 System displays a pressure for other gases corresponding to the equivalent degree of ionization of nitrogen. This pressure reading is the nitrogen equivalent pressure of the gas, and it can be higher or lower than the true gas pressure, depending upon the ionization characteristics of the gas at that pressure. Air calibration is indistinguishable from nitrogen. The Series 959 Controller can be calibrated to directly indicate pressures of gases other than air or nitrogen. The relative sensitivity of the gas measured is multiplied by the sensor’s nitrogen sensitivity. The calibrated sensitivity range is between 0.1 and 99 Torr-1. 9.1 Adjusting System Sensitivity for Another Gas To adjust the sensitivity control for direct pressure reading of gases other than nitrogen, calculate the sensitivity S with the following equation; S = S r x S SENSOR where, Sr is the sensitivity of the gas used relative to nitrogen S SENSOR is the sensitivity of the sensor used (e.g., 9 Torr-1 for Series 959 System’s Hot Cathode Low Power Nude sensor). Approximate values of the relative sensitivities for various gases are shown in the table on the next page. To determine more precisely the nitrogen equivalent pressure or the direct pressure reading of gases, it is necessary to calibrate the Series 959 System with the gas to be measured. This calibration requires a direct pressure sensor such as a spinning rotor gauge to act as the calibration standard. Note the above procedure is for a Hot Cathode gauge only. Pirani gauges can only read air/nitrogen. 959 Hot Cathode Controller 65 10.1 Relative Sensitivity Table Gas Symbol Sensitivity Air Argon Carbon Dioxide Deuterium Helium Hydrogen Krypton Neon Nitrogen Nitrogen Oxide Oxygen Sulfur Hexafluoride Water Xenon Ar CO2 D2 HE H2 Kr Ne N2 NO O2 SF6 H2O Xe 1.00 1.29 1.42 0.35 0.18 0.46 1.94 0.30 1.00 1.16 1.01 2.50 1.12 2.87 Hot Cathode Sensitivities Relative to Nitrogen 66 959 Hot Cathode Controller 11. Accessories Accessory Connector Kit 100005087 Sensor, Hot Cathode, Mini BA Gauge, Yr Coated Ir Filaments 1” OD Tube 100011085 Mini CF 100011111 100011112 2-3/4 CF KF25 100011113 KF40 100011114 KF16 100011118 3 /4” OD Tube 100011127 Sensor, Hot Cathode, Low Power Nude KF40, Tungsten Filaments 2-3/4” CF, Tungsten Filaments KF40, Yr coated Ir Filaments 2-3/4” CF, Yr coated Ir Filaments 100005987 100005980 100006841 100006842 Sensor, Pirani (315) KF16 1/8” NPT-M 8 VCR-F (1/2”) 1-1/3” CF (non-rotatable) 2-3/4” CF (non-rotatable) Ø15mmx30mm tubing Ø18mmx30mm tubing 103150010 103150011 103150012 103150013 103150014 103150016 103150018 Sensor, Pirani, shielded (345) KF16 1/8” NPT-M 8 VCR-F (1/2”) 1-1/3” CF (non-rotatable) 2-3/4” CF (non-rotatable) Ø15mmx30mm tubing Ø18mmx30mm tubing 103450010 103450011 103450012 103450013 103450014 103450016 103450018 Sensor, Convection-Enhanced Pirani, Shielded KF16 1/8” NPT-M 8 VCR-F (1/2”) 1-1/3” CF (non-rotatable) 2-3/4” CF (non-rotatable) Ø15mmx30mm tubing Ø18mmx30mm tubing 103170010SH 103170011SH 103170012SH 103170013SH 103170014SH 103170016SH 103170018SH 959 Hot Cathode Controller 67 Cable, Hot Cathode, Mini BA Gauge 10 ft (3.0m) 25 ft (7.6 m) 50 ft (15.2 m) 100011106 100011107 100011108 Cable, Hot Cathode, Low Power Nude 10 ft (3.0m) 25 ft (7.6 m) 50 ft (15.2 m) 100010909 100010910 100010911 Cable for 315 Pirani 10 ft (3.0m) 25 ft (7.6 m) 50 ft (15.2 m) 100 ft (30.5 m) Custom to 500 ft (152.4m) 103150006 103150007 103150008 103150017 103150009 Cable for 345 Pirani and 317 Convection-Enhanced Pirani 10 ft (3.0m) 103170006SH 25 ft (7.6 m) 103170007SH 50 ft (15.2 m) 103170008SH Custom to 500 ft (152.4m) 103170009SH Mounting Hardware Kit, 1/4 DIN 100005761 Power Cord, 115 VAC 103150001 HPS® Products Series 959 Hot Cathode Controller User’s Manual 100011229 Please call the HPS® Products Customer Service Department of MKS Vacuum Products Group at 303-449-9861 or 800-345-1967 to order any of these parts or to receive catalogs for other MKS Products. 68 959 Hot Cathode Controller 959 Hot Cathode Controller 69 12. Product Warranty Extent of the Warranty MKS Instruments, Inc., Vacuum Products Group (MKS), warrants the HPS® Products Series 959 Hot Cathode Controller System and its accessories to be free from defects in materials and workmanship for one (1) year from the date of shipment by MKS or authorized representative to the original purchase (PURCHASER). Any product or parts of the product repaired or replaced by MKS under this warranty are warranted only for the remaining unexpired part of its one (1) year original warranty period. After expiration of the applicable warranty period, the PURCHASER shall be charged MKS’ current prices for parts and labor, plus any transportation for any repairs or replacement. ALL EXPRESS AND IMPLIED WARRANTIES, INCLUDING THE IMPLIED WARRANTIES OF MERCHANTABILITY AND FITNESS FOR A PARTICULAR PURPOSE, ARE LIMITED TO THE WARRANTY PERIOD. NO WARRANTIES, EXPRESS OR IMPLIED, WILL APPLY AFTER THIS PERIOD. Warranty Service The obligations of MKS under this warranty shall be at its option: (1) to repair, replace, or adjust the product so that it meets applicable product specifications published by MKS or (2) to refund the purchase price. What Is Not Covered The product is subject to above terms only if located in the country of the seller from whom the product was purchased. The above warranties do not apply to: I. Damages or malfunctions due to failure to provide reasonable and necessary maintenance in accordance with MKS operating instructions. II. Damages or malfunctions due to chemical or electrolytic influences or use of the product in working environments outside the specification. III. Fuses and all expendable items which by their nature or limited lifetime may not function for a year. If such items fail to give reasonable service for a reasonable period of time within the warranty period of the product: they will, at the option of MKS, be repaired or replaced. IV. Defects or damages caused by modifications and repairs effected by the original PURCHASER or third parties not authorized in the manual. Condition of Returned Products MKS will not accept for repair, replacement, or credit any product which is asserted to be defective by the PURCHASER, or any product for which paid or unpaid service is desired, if the product is contaminated with potentially corrosive, reactive, harmful, or radioactive materials, gases, or chemical. When products are used with toxic chemicals, or in an atmosphere that is dangerous to the health of humans, or is environmentally unsafe, it is the responsibility of the PURCHASER to have the product cleaned by an independent agency skilled and approved in the handling and cleaning of contaminated materials before the product will be accepted by MKS for repair and/ or replacement. In the course of implementing this policy, MKS Customer Service Personnel may inquire of the PURCHASER whether the product has been contaminated with or exposed to potentially corrosive, reactive, harmful, or radioactive materials, gases, or chemicals when the PURCHASER requests a return authorization. Not with standing such inquiries, it is the responsibility of the PURCHASER to ensure that no products are returned to MKS which have been contaminated in the aforementioned manner. Other Rights and Remedies I. These remedies are exclusive. HPSTM SHALL NOT BE LIABLE FOR CONSEQUENTIAL DAMAGES, FOR ANTICIPATED OR LOST PROFITS, INCIDENTAL DAMAGES OR LOSS OF TIME, OR OTHER LOSSES INCURRED BY THE PURCHASER OR BY ANY THIRD PARTY IN CONNECTION WITH THE PRODUCT COVERED BY THIS WARRANTY, OR OTHERWISE. Some states do not allow exclusion or limitation of incidental or consequential damage or do not allow the limitation on how long an implied warranty lasts. If such laws apply, the limitations or exclusions expressed herein may not apply to PURCHASER. II. Unless otherwise explicitly agreed in writing, it is understood that these are the only written warranties given by HPS® . Any statement made by any persons, including representatives of MKS, which are inconsistent or in conflict with the terms of the warranty shall not be binding on MKS unless reduced to writing and approved by an authorized officer of MKS. III. This warranty gives PURCHASER specific legal rights, and PURCHASER may also have other rights which vary from state to state. IV. For MKS products sold outside of the U.S., contact your MKS representative for warranty information and service. Warranty Performance To obtain warranty satisfaction, contact the following: MKS Instruments, Inc., Vacuum Products Group, 5330 sterling Drive, Boulder, CO 80301, USA, at phone number (303) 449-9861. You may be required to present proof of original purchase. 959 Hot Cathode Controller 70 13. Appendix A Serial Communications 13.1 Serial Communications Overview The 959 controller implements a software command set to allow its features to be programmatically controlled. The user initiates all communication with the controller. The controller only responds to commands or requests for information; it never initiates communication with the user’s host computer. All messages are composed of variable length ASCII characters. 13.1.1 Message Format The basic message format from the host to the controller contains a command or request field, an optional parameter field and a message-terminating field. The basic response to the host from the controller contains a response field and a response-terminating field. All terminating fields are defined to be the 3 character ASCII sequence “;FF”. Blank spaces are not allowed between fields. The controller is case insensitive, allowing upper and lower case characters to be intermixed in messages sent to it without changing the message meaning. All responses generated by the controller are in upper case. 13.1.2 Message Compatibility The message format used for the 959 controller mimics that used by the MKS 689 transducer. Whenever possible, identical commands are used to reference identical operations. Commands for new or enhanced 959 capabilities are defined using the same 2 or 3 character keyword philosophy established for the 689. The intent of this message compatibility is to allow a user’s host computer to send the same device identifying commands to either the 689 or the 959 without generating syntactical errors. Once identified, the host computer can then send only commands appropriate for the specific device’s capabilities, and in a fashion with which it is already accustomed. 13.1.3 Serial Communications The 959 controller supports 3 wire RS232 serial communications. The three signals are: Transmit (data from the host computer to the controller), Receive (data from the controller to the host computer), and signal ground. The RS232 communication protocol is point to point with the user’s host computer communicating with one device at a time. The 959 Controller implements RS232 serial communications using the following protocol: 9600 baud 1 -Stop Bit No parity These parameters are not user configured. 959 Hot Cathode Controller A-1 13.2 Message Syntax In the following descriptions, the ‘<‘ and ‘>’ characters are used as message field delimiters. They are not part of the commands, and serve only to enhance readability. 13.2.1 Command Syntax The basic command syntax to the controller from the host is as follows: <command field> <optional parameter field> <terminator field> The command field is delimited with an exclamation point (!). Any required parameter data immediately follows the exclamation point. The command message is terminated with ;FF. Command!Parameter; FF or Command!;FF 13.2.2 Query Syntax The basic query format to the controller from the host is as follows: <query field> <optional parameter field> <terminator field> The query field is delimited with a question mark (?). Any required parameter data immediately follows the question mark. The message is terminated with ;FF. Query?Parameter;FF or Query?;FF 13.2.3 Response Syntax The basic command response format from the controller back to the host is as follows: <response field> <terminator field> The response field is prefaced with either the ASCII characters ‘ACK’ or ‘NAK’. The ACK sequence signifies the message was processed successfully. The NAK indicates there was an error. The response to a command, if successful, is an ACK, followed by the terminator. The response to a query is an ACK followed by data, and then a terminator. Messages with errors are responded to with an NAK, followed with an error code and a terminator. The response message terminator is ;FF. ACK;FF or ACKdata;FF A.2 or NAKerror_code;FF 959 Hot Cathode Controller 13.3 Addressed RS232 Traditional RS232 communications depends on serial UARTs to detect communications failures with stop bits, parity bits and bit transfers rates. This mechanism doesn’t always detect data bit errors that generate valid characters, but garbled messages. Additional robustness can be added to the communications by defining a formal message syntax that unambiguously identifies the start of each new message. This can be particularly useful in noisy environments where process operations may occasionally cross-couple spurious signals onto the communications lines. The 959 Controller implements this addressed RS232 protocol. The protocol is essentially the same as in RS485, except the physical connection is point to point and the host computer is only ever communicating with one device. 13.3.1 Message Syntax In an addressed RS232 environment, the basic command/query message format from the host is as follows: <attention character> <device address> <message><parameter><terminator> In an addressed RS232 environment, the basic response message from the 959 is as follows: <attention character> <message> <terminator> 13.3.2 Field Definitions The message field is the actual command or query information being sent to the device. The parameter field is the optional parameter data for the message. The terminator field signals the end of the message. These 3 fields are the same as described above. The attention character field announces the beginning of a new message. The device address field identifies the device the message is intended for. 13.3.2.1 Attention Character A single attention character is required for the controller to detect the start of a message. The attention character is ‘@’ (40h). The 959 will accept an unlimited number of sequential attention characters. As each attention character resets the controller’s parser, an attention character in the middle of a message will reset the parser and generate an unrecognized command error. The 959 controller will preface each of its responses with just 1 attention character. 13.3.2.2 Device Address The device address for the 959 is “1”. It cannot be changed. Address must be “1” @1PRP?;FF. 959 Hot Cathode Controller A-3 13.4 Message Handling A message is defined to begin with an attention character and end with a valid terminator. There is no time limit between characters. Whenever an attention character is detected, any current characters in a device receive buffer are flushed and a new message handling sequence is begun. Whenever a terminator is detected, the current receive buffer is passed on to the message parser. If the terminator is not received and the controller’s receive buffer becomes full, additional characters are ignored until a terminator (or an attention character) is received. 13.5 ASCII Command Set Definition The following template is used to define the controller’s commands, queries and responses: Description: Verbose description of the purpose of the command or query (message). Keyword: The actual ASCII characters comprising the command or query field of the message. Type: ‘Command’ - message item supports the command format. ‘Query’ - message item supports the query format. Parameters: A verbose description of the associated data required to complete the message. This information comprises the parameter field in the message. Parameters may be ASCII numerals representing numbers, or ASCII alpha-numeric characters, representing a phrase. Limits: The allowable limits of the parameter values. If the parameters are numeric, then the minimum and maximum values are listed. If the parameters are phrases, then the set of allowable phrases are listed. Reset Value: If the message represents a setup or control value, the factory default value for the message is specified here. Query Response: If the message supports a query format, the controller’s allowable responses are listed here. Related keywords; A list of related commands or queries for reference. Examples: Example uses of the command or query are listed here. A.4 959 Hot Cathode Controller In the following command definitions, words in boldface type indicate exact ASCII text messages, parameters or responses issued between the host and the controller. Each of the command examples has an assumed ‘ACK;FF’ response. To enhance readability that response is not shown. The actual terminator in the following examples is ‘;FF’. To enhance readability only the semicolon is depicted. 13.6 Setup Messages The Setup commands allow the user to configure various aspects the controller’s operation. 13.6.1 Set Point Value - SPx Description: Assigns the set point pressure value. Pressures below this value assert the set point signal. Pressures above this value de-assert the set point signal. The set point signal drives a relay with normally open and normally closed outputs. The ‘x’ in the keyword reference refers to the set point being set up. Valid values are 1 or 2. The query response returns the current set point. Keyword: SP1, SP2 Type: Command and Query Parameter: numerical value expressed in scientific notation Limits: Min = 5.0 x 10⁻¹⁰ Torr Max = Hot Cathode: 9.5 x 10⁻³ Torr. Max = Pirani: 95 Torr (standard) Max = Pirani: 950 Torr (convection) Reset Value: 5.0E-10Torr Query Response: numerical value expressed in scientific notation Related Keywords: CSP Examples Query: Query Response: Command: Query: Query Response: SP1?; ACK1.0E-9; SP1!5.0E-5; SP1?; ACK5.0E-5; 959 Hot Cathode Controller A-5 13.6.2 Control Set Point Value - CSP Description: Assigns the Control Set Point value. This is the value at which the controller will supply power to the Hot Cathode sensor filament. At pressures above this value, power is removed from the Hot Cathode filament; at pressures below this value, power is applied to the Hot Cathode filament. The query response returns the current set point. The Control Set Point operation is not available when to controller is in the Combined mode of operation, or when the Pirani sensor is not installed and operational. Keyword: CSP Type: Command and Query Parameter: numerical value expressed in scientific notation Limits: Min = 1x10⁻⁴ Torr Max = 1x10⁻² Torr. Reset Value: 1.0E-2Torr Query Response: numerical value expressed in scientific notation Related Keywords: SPx Examples Query: Query Response: Command: Query: Query Response: CSP?; ACK1.0E-2; CSP!2.0E-3; CSP?; ACK2.0E-3; A.6 959 Hot Cathode Controller 13.6.3 Protect Pressure - PRO Description: Assigns the protection pressure for the Hot Cathode sensor. This is the value at which the Hot Cathode sensor’s filament will automatically have power removed from it so that it can be protected from exposure to high pressures. At pressures above this value, power is removed from the Hot Cathode filament and can not be reapplied by the user; at pressures below this value, power may applied to the Hot Cathode filament. The query response returns the current protect pressure. A default protect pressure exists at 1x10⁻² Torr. The PRO command overrides the default protect pressure with a user selectable value that may be more appropriate for the user’s application. The protect pressure is not user assignable when the Controller is in the Combined or Control Set Point mode of operation. Keyword: PRO Type: Command and Query Parameter: numerical value expressed in scientific notation Limits: Min = 1x10⁻⁶ Torr Max = 1x10⁻² Torr. Reset Value: 1.0E-2 Torr Query Response: numerical value expressed in scientific notation Related Keywords: SPx, CSP Examples Query: Query Response: Command: Query: Query Response: PRO?; ACK1.0E-2; PRO!2.0E-3; PRO?; ACK2.0E-3; 959 Hot Cathode Controller A-7 13.6.4 Gauge Correction - GC Description: Assigns the sensitivity value for the Hot Cathode controller. The 959 controller is calibrated for air/ nitrogen (gas correction factor = 1.0) and has a nominal Hot Cathode gauge sensitivity factor of 9.0/ Torr. The Gauge Correction factor is used to modify the controller sensitivity for gases other than nitrogen. The Gauge Correction value is the product of the Hot Cathode gauge sensitivity and the gas correction factor. The raw pressure measurement is adjusted by the Gauge Correction factor to determine the appropriate pressure measurement for the gas in use. The corrected pressure value is reflected in the controller voltage output, the programmed response to the Pressure Measurement command and the Set Point signal operation. Keyword: GC Type: Command and Query Parameter: Numerical value in floating point format Limits: Min = 0.1 Max = 99 Allowable values: 0.1, 0.2, 0.3,...0.9, 1,2,3,4,...99 Reset Value: 9/Torr LPN 12/Torr mini BA Query Response: Numerical value in floating point format. Related Keywords: ATM, VAC Examples Command: Query: Query Response: GC!12; GC?; ACK12; EXAMPLE A.8 Argon has gas correction factor of 1.3. If gauge sensitivity = 9, then (9 x 1.3 = 11.7) so user enters 12). 959 Hot Cathode Controller 13.6.5 Atmospheric Calibration -ATM Description: Calibrates the pirani sensor to use the assigned pressure as atmospheric pressure. The corrected pressure value is reflected in the controller voltage output, the programmed response to the Pressure Measurement command and the Set Point signal operation. The calibration is implemented by inputting the desired atmospheric pressure. The input pressure value is translated into a voltage adjustment that is applied against the pirani’s raw pressure measurement. Valid atmospheric pressure calibration values vary with the type of pirani sensor (standard or convection enhanced). Keyword: ATM Type: Command and Query Parameter: Numerical value expressed in scientific notation Limits: Min = 10, 100 Torr Max = 100, 1000 Torr Reset Value: 7.60 E+2 Torr Connection Enhanced 1.00 E+2 Torr standard Query Response: Current pressure reading expressed in scientific notation Related Keywords: VAC Examples Command: Query: Query Response: ATM!6.30E+2; ATM?; ACK6.30+2; 959 Hot Cathode Controller A-9 12.6.6 Vacuum Calibration - VAC Description: Calibrates the Pirani sensor for a baseline vacuum pressure. The user places the sensor into a chamber of low pressure and uses this command to signal the controller to perform a vacuum measurement. The sensor readings are then calibrated to use the current pressure value as vacuum. Each subsequent pressure reading is corrected by the calibration value. There is an upper limit to the calibration value. If the pressure read by the sensor during calibration is greater than this limit, the calibration is not allowed, and an error is returned. The user must lower the pressure in the chamber before the sensor can be calibrated. The pressure should be in the 10-4 Torr decade for a Convection Enhanced Pirani and in the 10-5 Torr decade for a standard Pirani. Vacuum pressures too low, however, prevent proper sensor operation and return an error. Keyword: VAC Type: Command Parameter: ON,OFF ON=USER CAL, OFF=FACTORY CAL Limits: N/A Reset Value: No adjustment applied to the raw measurement Query Response: N/A Related Keywords: ATM Examples Command: VAC!ON; A.10 959 Hot Cathode Controller 13.6.7 Time to Degas -TD Description: Assigns the length of time of the Degas operation, in minutes. The Time to Degas query returns the assigned time in minutes. The Degas Status query returns the amount of time remaining in the current Degas operation, in minutes. Keyword: TD Type: Command and Query Parameter: 1 to 2 digit integer Limits: Min = 3 (3 minutes) Max = 30 (30 minutes) Reset Value: 3 minutes Query Response: 1 to 2 digit integer Related Keywords: DG, DS Examples Command: Query: Response: TD!15; TD?; ACK15; 959 Hot Cathode Controller A-11 13.6.8 Front Panel Lock - FPL Description: This command enables or disables the Controller’s front panel set up switches. When the front panel is locked, the front panel set up switches are disabled, and the user can only enter controller set up parameters remotely via the RS232 serial communications link. When the front panel is unlocked, the user may enter controller set up parameters locally via the front panel switches, or remotely with the RS232 serial link. The query version of the command returns the current front panel lock state. Keyword: FPL Type: Command and Query Parameter: Enumerated ASCII text Limits: ON - front panel lock is on (switches disabled) OFF - front panel lock is off (switches enabled) Reset Value: Off Query Response: N/A Related Keywords: N/A Examples Command: Query: Response: FPL!ON; FPL?; ACKON; A.12 959 Hot Cathode Controller 13.6.9 Factory Default - FD Description: Places the controller into a known state. This command modifies many device operation setup values and should only be used with caution. After the Factory Default command has been issued, the device has the following configuration set values: Front Panel unlocked Filament Power: Off Degas Power: Off Active Filament: 1 Degas Time: 3 minutes Hot Cathode Gauge Correction: 9/Torr or 12/Torr Pirani Calibration: No Correction Set Point Value: OFF Control Set Point Value: OFF Combined Mode: OFF Protect Pressure: 1x10⁻² Torr Keyword: FD Type: Command only Parameter: none Limits: N/A Reset Value: N/A Query Response: N/A Related Keywords: N/A Examples Command: FD!; This command removes power from the filament. 959 Hot Cathode Controller A-13 13.7 Control Messages These messages are used to coordinate the actual run time operation of the controller. 13.7.1 Active Filament - AF Description: Selects the active filament. Switching filaments can only take place with power removed from the filament circuitry. Attempts to switch filaments with power applied will automatically remove power from the filament and the user will have to resend the filament power on command (FP). Selecting the currently active filament has no affect on the device operation. The query returns the currently selected filament. Keyword: AF Type: Command and Query Parameter: Single digit integer Limits: Min = 1 Max = 2 Reset Value: 1 Query Response: single digit integer Related Keywords: FP,FS Examples Command: Query: Response: AF!1; AF?; ACK1; A.14 959 Hot Cathode Controller 13.7.2 Filament Power - FP Description: Turns power on and off to the Hot Cathode emission filament. Keyword: FP Type: Command only Parameter: Enumerated ASCII text Limits: OFF ON Reset Value: Off Query Response: N/A Related Keywords: AF, FS Examples Command: FP!ON; FP!OFF; 959 Hot Cathode Controller A-15 13.7.3 Degas Power - DG Description: Turns gauge Degas on and off. Once initiated, the Degas operation will automatically complete and turn itself off. Degas can be arbitrarily turned off with this command. The query returns the current state of the Degas operation, on or off. Degas power cannot be turned on if the filament power has not been turned on. Keyword: DG Type: Command and Query Parameter: Enumerated ASCII text Limits: OFF ON Reset Value: Off Query Response: OFF ON Related Keywords: TD, DS Examples Command: Query: Response: DG!ON; DG?; ACKON; A.16 959 Hot Cathode Controller 13.7.4 Combined Pressure Measurement - CMB Description: Enables or disables the combined sensor pressure measurement operation. When enabled, a smoothing algorithm is applied to the pressure measurements in the overlap range of the two sensors. This mode can only be enabled if the Pirani sensor is installed and operational. The query returns the current state of the combined sensor pressure measurement operation, on or off. Keyword: CMB Type: Command and Query Parameter: Enumerated ASCII text Limits: OFF ON Reset Value: Off Query Response: OFF ON Related Keywords: PRC Examples Command: Query: Response: CMB!ON; CMB?; ACKON; 959 Hot Cathode Controller A-17 13.7.5 Set Point Enable - ENx Description: Enables or disables the referenced set point. The ‘x’ in the key word refers to the set point being enabled or disabled. Valid values for ‘x’ are ‘1’ for set point one, ‘2’ for set point two, or ‘C’ for control set point. The query returns the current enable state of the referenced set point, on or off. Keyword: EN1, EN2 or ENC Type: Command and Query Parameter: Enumerated ASCII text Limits: OFF, ON Reset Value: Off Query Response: OFF ON Related Keywords: SP1, SP2, CSP Examples Command: Query: Response: EN1!ON; EN1?; ACKON; A.18 959 Hot Cathode Controller 13.7.6 Emission Current - EC Description: Assigns the emission current to be used on the sensor during pressure measurement. The Auto setting allows the transducer to automatically control the emission current based on its real time pressure measurement. To take the transducer out of Auto emission current mode, reprogram the device to the low emission current. The low emission current = 100uA. The query response returns the emission current at the time of the query, as well as the ASCII string ‘AUTO’ if the transducer is in Auto mode. Keyword: EC Type: Command and Query Parameter: Enumerated ASCII text Limits: 100UA AUTO Reset Value: N/A Query Response: 100UA 100UA AUTO 1MA AUTO Related Keywords: N/A Examples Command: Query: Response: EC!100UA; EC?; ACK100UA; Command: Query: Response: EC!AUTO; EC?; ACK1MA AUTO; 959 Hot Cathode Controller A-19 13.8 Status messages These query-only messages return factory preset or operational status information about the controller. 13.8.1 Pressure Reading - PRx Description: Returns the current pressure reading in scientific ‘E’ notation or the current sensor status. The ‘x’ in the keyword reference refers to the sensor being read. Valid values are ‘H’ for the Hot Cathode, ‘P’ for the Pirani or ‘C’ for the Combined pressure. The returned pressure value is the linearized version of the raw voltage from the sensor(s). With the Hot Cathode pressure reading, the returned value reflects any user assigned sensitivity factors. With the Pirani pressure reading, the returned value reflects any user assigned calibration factors. With the Combined pressure reading, the returned value reflects the internally applied smoothing algorithm for the overlap pressure range. If a valid pressure reading can not be made, a NAK response is returned with the corresponding sensor error code. Keyword: PRH, PRP, PRC Type: Query only Parameter: None Query Response: Numerical value expressed in scientific notation, OFF, Over, Under, Protect Reset Response: N/A Related Keywords: N/A Examples Query: Response: PRH?; ACK5.2E-7; Query: Response: PRP?; NAK4; (Pirani Sensor reading LOW) Query: Response: PRC?; ACK 1.0E-2; A.20 959 Hot Cathode Controller 13.8.2 Filament Status - FS Description: Returns the operational status of the active Hot Cathode filament. ‘Off’ indicates the filament is powered down. ‘Normal’ indicates the filament is powered up and operating normally. ‘High’ indicates the filament is powered up but is requiring an abnormally large amount of power to sustain the emission current. This may mean the filament is near failure and should not be used. Keyword: FS Type: Query only Parameter: None Query Response: OFF NORMAL HIGH Reset Response: OFF Related Keywords: AF, FP Examples Query: Response: FS?; ACKOFF; Command: Query: Response: FP!ON; FS?; ACKNORMAL; 959 Hot Cathode Controller A-21 13.8.3 Degas Status - DS Description: The Degas Status query returns the amount of time remaining in the current Degas operation, in minutes. Keyword: DS Type: Query only Parameter: None Query Response: 1 to 2 digit integer Reset Response: 0 Related Keywords: DG, TD Examples Command: Command: Query: Response: TD!15; DG!ON; DS?; ACK15; A.22 959 Hot Cathode Controller 13.8.4 Set Point Status - SSx Description: The Set Point Status query returns the state of the set point signal, indicating whether or not the set point pressure has been detected. The SET response indicates the set point signal is asserted. The CLEAR response indicates the set point signal is de-asserted. The ‘x’ in the keyword reference refers to the set point being queried. Valid values are 1 or 2. Keyword: SSx Type: Query only Parameter: None Query Response: SET CLEAR Reset Response: CLEAR Related Keywords: SPx Examples Query: Response: SS1?; ACKCLEAR; 959 Hot Cathode Controller A-23 13.8.5 Control Set Point Status - CSS Description: The Control Set Point Status query returns the current state of the control set point interlock. The SET response indicates the control set point pressure is currently present, implying the Hot Cathode is currently off. The CLEAR response indicates the control set point pressure is not currently present, implying the Hot Cathode sensor is currently on. Keyword: CSS Type: Query only Parameter: None Query Response: SET CLEAR Reset Response: CLEAR Related Keywords: SPx Examples Query: Response: CSS?; ACKCLEAR; A.24 959 Hot Cathode Controller 13.8.6 Units selection - U Description: Returns the pressure units to be used when referencing pressure data. The units affect all pressure measurements, including set value assignment. The supported units are TORR, mBAR (millibar) and PASCAL. Units are NOT user selectable. This query returns the type of units for which the controller is factory configured. Keyword: U Type: Query only Parameter: None Query Response: TORR mBAR PASCAL Reset Response: Factory configured units Related Keywords: N/A Examples Query: Response: U?; ACKmBAR; 959 Hot Cathode Controller A-25 13.8.7 Manufacturer - MF Description: Returns the identifier for the controller manufacturer as a constant ASCII text string. Keyword: MF Type: Query only Parameter: None Query Response: HPS Reset Response: HPS Related Keywords: MD Examples Query: Response: MF?; ACKHPS; A.26 959 Hot Cathode Controller 13.8.8 Model Designation - MD Description: Returns the device controller information. Keyword: MD Type: Query only Parameter: None Query Response: 959 Reset Response: 959 Related Keywords: MF Examples Query: Response: MD?; ACK959; 959 Hot Cathode Controller A-27 13.8.9 Device Type - DTx Description: Returns constant ASCII text string identifying the sensor type. Because the 959 support two sensor modules, two forms of this query exist, one for the Hot Cathode sensor, and one for the Pirani sensor. The ‘x’ in the keyword is either ‘H’ for the Hot Cathode, or ‘P’ for the Pirani. Keyword: DTH, DTP Type: Query only Parameter: None Query Response: LPN (Low Power Nude) MIG (Mini ion gauge) CEP (Convection Enhanced Pirani) STP (Standard Pirani) Reset Response: N/A Related Keywords: MD, MF Examples Query: Response: DTH?; ACKLPN; Query: Response: DTP?; ACKCEP; A.28 959 Hot Cathode Controller 13.8.10 Serial Number - SNx Description: Returns the serial number of the selected module as a constant ASCII numeric integer. The ‘x’ in the keyword refers to the module in question - ‘D’ for Display module, ‘H’ for HOT CATHODE, ‘P’ for Pirani. Keyword: SND, SNH, SNP Type: Query only Parameter: None Query Response: Controller dependent decimal integer Reset Response: Controller dependent decimal integer Related Keywords: MD, DTx, MF Examples Query: Response: SND?; ACK0000001234; 959 Hot Cathode Controller A-29 13.8.11 Firmware Version - FVx Description: Returns revision number of a controller module’s firmware. The ‘x’ in the keyword refers to the module in question, ‘D’ for Display module, ‘H’ for Hot Cathode, ‘P’ for Pirani. Keyword: FVD, FVH, FVP Type: Query only Parameter: None Query Response: Controller dependent ASCII alpha-numeric text Reset Response: Controller dependent ASCII alpha-numeric text Related Keywords: HVx Examples Query: Response: FVH?; ACK0100; A.30 959 Hot Cathode Controller 13.8.12 Hardware Version - HVx Description: Returns revision number of a controller module’s hardware. The ‘x’ in the keyword refers to the module in question, ‘D’ for Display module, ‘H’ for Hot Cathode, ‘P’ for Pirani. Keyword: HVD, HVH, HVP Type: Query only Parameter: None Query Response: Controller dependent ASCII alpha-numeric text Reset Response: Controller dependent ASCII alpha-numeric text Related Keywords: FVx Examples Query: Response: HVP?; ACK0100; 959 Hot Cathode Controller A-31 Notes A.32 959 Hot Cathode Controller 959 Hot Cathode B-1 14. Appendix B Serial Communication Error Codes 14.1 Error Codes The 959 Controller may generate the following error codes during serial communications with a host computer. These error codes (other then ‘0’) would appear in a ‘NAK’ responses from the Controller. Error Code B-2 Meaning 0 No Error 1 No sensor attached. Power down the Controller and attach the cable and sensor. 3 The Pirani pressure measurement hardware returns a reading that is above the measure range of the sensor (HI). 4 The Pirani pressure measurement hardware returned a reading that is below the measure range of the sensor (LOW). 5 Invalid vacuum calibration pressure. The user must lower the vacuum chamber’s pressure before a valid vacuum calibration can occur. 6 Invalid atmospheric calibration pressure. The user must increase the pressure parameter before a valid atmospheric calibration can occur. 7 The Pirani pressure measurement hardware returns a reading that indicates the Pirani sensor has a broken filament. 22 Hot Cathode filament over power. The filament is drawing too much current. The user should switch to the alternate filament. 23 The Hot Cathode sensor has detected a low emission current and automatically removed filament power. 24 The Hot Cathode sensor has detected a pressure above it’s protect pressure threshold and automatically removed filament power. 25 The Hot Cathode pressure measurement hardware returned a reading that is below the measure range of the sensor (LOW). 959 Hot Cathode 100 Pirani module is not installed 154 Internal 12C communications failure. Contact Factory 160 Controller received an unrecognized message. Check syntax of command. 161 ASCII Message to Controller missing address field. 162 ASCII Message to Controller missing terminator field 0 (;). 163 ASCII Message to Controller missing terminator field 1 (F). 164 ASCII Message to Controller missing terminator field 2 (F). 165 ACSII Message field contains too many characters. Check syntax of command. 166 ASCII Message argument field contains too many characters. Check syntax of command. 169 ASCII Message contains invalid argument value. Review command parameter limitations. 170 ASCII Message contains invalid exponent value. Review command parameter limitations. 171 ASCII Message contains invalid real value. Review command parameter limitations. 172 ASCII Message contains a argument value outside of allowable range for the given operating conditions 174 Controller can not accept any set up commands in its current mode of operation. The Controller can only accept set up commands when it is in Pressure Measurement mode. 959 Hot Cathode B-3 B-4 175 Controller cannot accept selected set up commands in its current mode of operation. Filament Power cannot be externally enabled if the Controller is in Combined or Control Set Point mode. Protect Set Points cannot be assigned when the Controller is in Control Set Point mode. 184 The Controller is in an operational mode that does not allow use of the Control Set Point. The Controller may be in Combined mode or the Pirani module may not be present. 185 The Controller is in an operational mode that does not allow use of Combined mode. The Controller may be in Control Set Point mode or the Pirani module may not be present. 190 The Hot Cathode module is inactive. The user attempted to read the Hot Cathode’s sensor pressure without filament power. The user attempted to activate degas without first turning on the filament power. 192 The user attempted to enable a Set Point that has been assigned a pressure value that is within the overlap range of the Hot Cathode and the Pirani. Set Points in this range must first be assigned to a sensor. 193 The user attempted to assign a Set Point to a sensor that is not present, or when the Set Point value is not within the overlap range. 194 The user attempted to assign a Set Point to a sensor while the Controller was in combined mode. 195 12C communication verification operation failure. Contact Factory 959 Hot Cathode Notes 959 Hot Cathode B-5 B-6 959 Hot Cathode 15. Appendix C Gauge Theory 15.1 Theory of the Thermal Conductivity Gauge The HPS® Series 959 Hot Cathode Controller is designed for use with Pirani, and Convection Enhanced Pirani gauges. These sensors are heat loss manometers, inferring the pressure of a gas by measuring thermal loss of a heated wire. A hot wire suspended from supports in a partial vacuum loses thermal energy in three ways: 1) end loss to the supports, 2) radiation to surrounding surfaces, and 3) gas transport. The latter mode, gas transport, is pressure dependent. It is the pressure dependence of thermal energy transport from a hot wire which is utilized in the Pirani, and Convection Enhanced Pirani gauges. The end loss and radiation terms are constant for a wire at constant temperature, and they provide a masking signal which largely determines the low pressure limit of these type gauges. Optimizing parameters such as length of wire diameter, thermal emissivity, thermal conductivity and wire temperature these terms can be controlled, although not eliminated. The Pirani gauges use the wire as one arm of a balanced Wheatstone bridge. A bridge amplifier output is related to the energy loss. The mechanism of energy transfer between the wire and the gas is dependent upon the pressure range. For pressures below 10 Torr, it is possible to derive an equation showing a linear relationship between the thermal energy loss to the gas, Egas, and the pressure, P. Egas = const. 1 δ+1 TwTg α 4 δ-1 MTg P √ Where for the particular gas: α is the accommodation coefficient; δ is the ratio of the specific heat at constant pressure to that at constant volume; M is the molecular weight of the gas; Tw is the temperature of the wire; Tg is the temperature of the gas; P is the pressure. At pressures above about 100 Torr for nitrogen, and widely differing values for other gases, the gas acts like a insulating layer. At still higher pressures, and in a large enclosure, convection contributes to energy transport. In the Convection Enhanced Pirani, convection currents are encouraged above 200 Torr and contribute to increased energy transport from the filament, for additional sensitivity at these pressures. The pressure range between 10-1 Torr and 100 Torr is a transition region, where the slope of the energy loss 959 Hot Cathode C-1 curve decreases continuously. Figure 16 (below) shows an energy loss curve for a constant temperature Pirani transducer over the range from 10-4 Torr to atmosphere (Egas), and a horizontal line indicating the energy loss due to the end loss and radiation terms (Eend + Erad). Note the sum of end and radiation losses is about 10 times the gas transport at a pressure of 10-3 Torr. This determines the practical lower limit for thermal conductivity gauges. Measurement of lower pressures is possible, however long term stability becomes a serious problem. From the energy loss equation above it is clear that the signal from a thermal conductivity gauge is not calculable from first principles and is dependent upon gas type. Because the energy transfer is dependent upon the rate of molecular collision with the wire surface and upon the energy transfer by each molecule, the gas transport is dependent upon the molecular weight, the internal degrees of vibrational freedom of the molecule, and the accommodation coefficient of the gas. For pressures greater than 10-1 Torr, it is not possible to write an equation for the energy transfer by the gas. However, since the indications of thermal conductivity gauges are reproducible for a given gas in this range, they may be calibrated against absolute standards for pressure measurements applications. A Pirani type gauge may be operated at constant current, constant voltage, or constant resistance (equivalent to constant temperature) at the sensor wire. At constant current or voltage, the wire temperature at high pressures is much less the an the value at vacuum, reducing the high pressure sensitivity. The HPS® Series 959 control circuit maintains the sensor wire at a constant temperature, extending the useful pressure range. Energy Loss Curve for Constant Temperature Pirani Filament C-2 959 Hot Cathode 15.2 Theory of the Hot Cathode Ionization Gauge Hot cathode ionization gauges use electrons emitted from a hot filament (thermionic electrons) to create ions whose number is proportional to pressure. The electrons are accelerated through the gauge by a potential difference between the hot filament and the grid (anode). The energy acquired by the electrons on their passage through the gauge is sufficient to ionize resident gas molecules. The positively charged ions are consequently attracted to the negatively charged ion collector electrode where they are neutralized by an electron current. Since the gas molecules are singly ionized, there is a one to one correspondence between the number of ions neutralized and the neutralizing electron current. Hence the electron current is often called the “ion current” which is proportional to the pressure in the gauge. The “ion current” is measured by the 959’s electrometer and converted to a pressure indication on the 959 display and an analog output accessible from the rear panel (see Accessory Connector, section page 67). Many types of hot cathode gauges have been developed for commercial use since the 1950’s; however, the Bayard Alpert (BA) gauge has been the most successful. Bayard Alpert gauges are available in glass envelopes or mounted on a flange which is often referred to as a nude tube. The main reason for the success of the BA configuration is due to its reduced vulnerability to x-rays. By virtue of its small diameter, the ion collector minimizes the area exposed to the soft x-rays emitted from the grid. X-ray emission from the grid is an undesirable side effect of electron impact upon the grid surface. Some of these x-rays strike the ion collector releasing electrons via the photoelectric effect. This photoelectric current is added to the pressure dependent ion current and is indistinguishable to the electrometer making the measurement. Ultimately, at low pressures (approximately 1x10¹⁰ Torr) the photoelectric current can fully mask the ion current which establishes a useful low pressure measurement limit known as the x-ray limit. Another important characteristic that limits practical low pressure measurement is the sensitivity of the gauge. The sensitivity (k) is a constant of proportionality relating the measured pressure (P) to the ratio of the “collector current” (i) to the number of electrons emitted from the filament (e): P = i / (k*e) Sensitivity includes such factors as ionizing efficiency and temperature and is usually expressed in units of inverse pressure. It can be seen that a constant value of sensitivity is required for the gauge tube to have a linear relationship with pressure. A gauge with a high sensitivity provides a “larger” signal (ion current) for a given emission current which increases the minimum signal available for measurement. 959 Hot Cathode C-3 Notes C-4 959 Hot Cathode