1
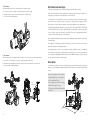
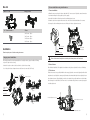
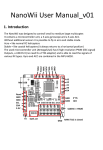
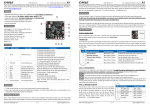
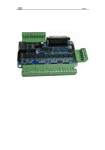
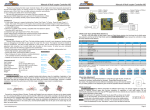
User Manual
(V1.0 2015.07)
Gimbal and landing gear installation
Mount the gimbal on the multicopter as below, move forwards or backwards to balance the gimbal.
Back
Back
Front
Front
Connection
There are 2 modes for the gimbal before leaving our factory, just connect and set properly to use.
1. Pitch mode
2. Follow Pitch and Yaw mode
Connect with receiver to control the
camera pitch and rotation angle.
4S 14.8V Power cable
Pitch and Roll cannot rotate 360° freely, it just can turn 360° and recover, otherwise the connection cable will twist off.
5
2) Roll balance
Disclaimers and warnings
After finished pitch balance, the camera will stay in the position you turn.
a. Loosen the two screws as picture to allow the camera move to left or right;
b. Adjust to make the camera can remain level after removed your hands;
c. Lock the screw to finish adjustment.
Thanks for purchasing this product. Please read this manual and disclaimer carefully.
Please read this instruction manual carefully before using the product. By using this product, you
hereby agree to this disclaimer and signify that you have read it in full.
You agree that you are responsible for your own conduct and any content created while using this
product, and for any consequence thereof. You agree to use this product only for purposes that are
proper and in accordance with local regulations, terms and any applicable polices and guidelines.
This gimbal already finished calibration for camera Panasonic GH4, Olypus M.ZUKIKO DIGITAL ED
12-40mm f/2.8 PRO before leave factory. While installed the camera and lens, mount on the multicopter
to use it. Please do not use the other device such as filter. Please use the equipped battery with the
camera to avoid the performance lost or circuit damage.
Please be attention that take apart the propellers while calibrating the gimbal. Keep the children away
of the flight range.
No modification or amending to the gimbal is allowed. Please make sure the camera mounted on the
gimbal firm enough before installing the battery.
3) Pan balance
After second step, invert the gimbal to anti-clockwise 90°, the camera can stay in the position you turn.
a. Loosen the 4 screws as picture to move the camera forwards or backwards;
As manufacturer has no control over use, setup, final assembly, modification or misuse, no liability shall
be assumed nor accepted for any resulting damage or injury. By the act of use, setup or assembly, the
user accepts all resulting liability. Manufacturer assumes no liability for damage(s) or injuries incurred
directly or indirectly from the use of this product.
b. Adjust forwards or backwards to make the camera can remain level while removed your hands;
Description
c. Lock the screw to finished pan balance.
The gimbal comes with the exclusive camera fixed board, easy to install or take apart the camera and
balance. It can be compatible compatible well with Sony A7S and GH4, or other similar size and weight
camera.
Camera size requirement: The maximum
horizontal length from camera gravity to
roll axis should within 75mm;
360°
rotation freely
Camera width less than 147mm, height
within 157mm as the pic shows,
Please keep the power off while mounting
the camera.
75
157
147
232
4
Unit:mm
1
Box list
Gimbal
Camera installation and gimbal balance
x 1set
1. Camera installation
Hanging mount
a. Mount the camera on the quick release plate with 1/4'' camera screw. Adjust the camera forwards or
backwards with quick release plate as per the gravity;
b. Insert the fixed block to fixed board and lock with adjustment screw;
c.Mount the quick release plate with camera to the chute of fixed board and balance the camera;
d Screw up the block with adjustment screw to fix the quick release plate and camera.
1/4'' Camera screw x1
Others
3x8 Screws 10pcs
3x6 Screws 10pcs
3x10 Screws 10pcs
Adjustment screw
2x8 Screws 10pcs
1/4'' screw
Installation
Chute
Fixed board
Fixed block
Quick release plate
Please keep the power off while mounting the camera.
Hanging mount installation
The hanging mount is packed separately before leaving the factory, please install as following:
a. Open the quick release clamp;
Please fix the camera firmly before mount the quick release plate on the fixed board.
2. Gimbal balance
b. Insert the location column to the location hole of quick release clamp;
c. Lock the quick release clamp and ensure the Yaw motor can rotate 360° freely.
After finished installation, if the gimbal do not balance well, please adjust the 3 axises as followings.
1) Pitch balance
Rotate the camera to one position (within the lens range), adjust the camera vertical gravity with vertical
Location hole
adjustment screw; Adjust the camera gravity forwards or backwards with quick release plate by loosen
Location column
the adjustment screw. Adjust slightly to make the lens stand in the position while removed the hands,
then screw up the vertical fixed screw.Turn over to check whether the pitch motor can work properly or
not after adjustment.
Quick release
clamp
Open
Yaw motor
Vertical adjustment screw
Vertical adjustment screw
Lock
Adjustment screw
2
3