1
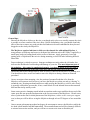
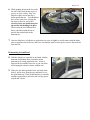
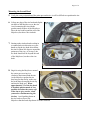
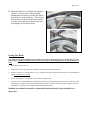
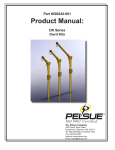
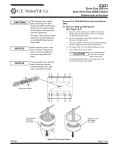
Mojolever Tire Mount/Demount Tool
User’s Manual
CAUTION: The Mojolever is a heavy tool and may cause injury if dropped or broken during use. Steel-toed
safety boots and ANSI Z87.1-rated protective eyewear are strongly recommended.
DISCLAIMER: By using this product, you assume all risk and responsibility for any injuries to yourself or
others, related to your use or misuse of this equipment. You also agree to release and discharge any and all
liability and claims against the manufacturer for any damages or injury of any kind.
The Mojolever is intended for use on motorcycle tires only. Do not attempt to use the Mojolever to remove or
install automotive tires.
Page 2 of 8
General tips:
- Because the Mojolever slides over the rim, even though only nylon ever actually contacts the rim it
is possible to create scratches if the rim is dirty. Before demounting a tire, you should clean both
sides of the rim to remove any road grit that could otherwise become embedded in the nylon and
dragged over the rim by the Mojolever.
-
The Mojolever requires lubricant to slide over the rim and tire with minimal friction. A
strong mixture of dish soap and water (or dedicated tire lubricant such as RU-Glide™ applied by a
small spray bottle (or basting brush) works well as a lubricant. Apply generously, but avoid
getting pools of liquid inside the new tire during mounting, as this will make balancing difficult
afterwards.
-
Proper technique is critical to success. Improper technique not only makes the job harder, but
increases the likelihood of tool breakage and damage to your rim. The most important part of
the technique – this cannot be emphasized enough – is to keep as much of the tire bead as
possible pushed down off of the rim’s bead seat, and into the center well of the rim; this
ensures that the tire has enough slack to allow it to move wherever the Mojolever is pushing on it.
You should never have to use two hands to move the Mojolever during a mount or demount
procedure!
-
On rare occasions when mounting a tire, the portion of mounted bead that is far from the
Mojolever will unmount itself as fast as you move the Mojolever so that you end up “chasing” it
around the rim. Keeping one hand on this area while moving the Mojolever (with the other hand)
is generally sufficient to prevent this; if not, a small block of wood inserted between the mounted
bead and the rim lip usually works.
-
Some center-post tire changing stands include an arm that reaches up to stabilize the top end of the
center post; this arm presents an obstruction to the free movement of the Mojolever. In such cases,
select a point on the rim for initial placement of the Mojolever (relative to the center post support
arm) so that you will be able to swing the Mojolever through at least 270 degrees of arc around the
rim.
-
Once a mount or demount procedure has begun, do not attempt to remove the Mojolever while the
tire bead is half installed and half uninstalled. The mount/demount end will be extremely difficult
to reinsert between tire and rim, and you will have to resort to tire irons to finish the job.
Page 3 of 8
These instructions assume you already have deflated the tire and broken both
beads loose; the rim is securely mounted on a centerpost-equipped tire changing
stand; and the tire has been generously lubricated with soapy water (or other
dedicated tire-changing lubricant).
Demounting First Bead
1. With the tire bead well-lubricated, place the
“demount” end of the Mojolever on the tire,
approximately ½” from the rim, with the other
end of the bar pointing away from the rim.
2. Press down on the Mojolever until the tire is
below the bead seat of the rim. There should
now be a gap between the tire bead and the
center well of the rim. If not, it may be helpful
to place your fingers (or those of an assistant)
between the tire and the rim to pull on the tire
slightly.
3. Slide the nylon knob tip into the gap, and while
pressing the nylon knob tip downward, tilt the bar
up so as to hook the nylon knob tip under the tire
bead.. Use caution, as it is possible to scratch
your rim with the exposed bolt head at the tip of
the Mojolever.
4. Tilt the free end of the Mojolever up until the nylon
shaft contacts the rim lip. Do not allow the
powdercoated portion of the Mojolever to
contact your rim.
5. Lift up on the Mojolever to
bring the nylon knob tip as
close to the rim lip as the tire
bead will allow.
⇒
Page 4 of 8
6. While pushing down on the tire at the
far side of the rim from the tool (see
picture at right), slowly “flop” the
Mojolever past vertical and lay it
down against the rim. You should not
have to use much force to bring the
bar down to the rim, and in fact
excessive force can break the nylon
tip and the bolt holding it in place.
The tire must be well-lubricated so
that it can slide around the rim to
provide the needed slack at the
demount tip.
7. Once the Mojolever is folded over against the rim, raise it slightly to avoid contact with the brake
rotor or opposite side of the rim, and lever it around the stand’s center post to remove the tire bead
from the rim.
Demounting Second Bead
8. Hold the Mojolever vertically in one hand, with the
demount end pointed down, so that the nylon
demount tip is resting against the rim. Lower it
between the tire and the rim as far as you can while
still keeping the nylon in contact with the rim.
9. With your free hand, grab the lower tire bead (from
below), pull it away from the rim, and hook it over
the nylon knob tip. Then lift the Mojolever vertically
until the nylon knob is just below the rim lip; repeat
steps 6 and 7 above.
Page 5 of 8
Mounting the First Bead
1. Set the tire on top of the rim. Verify the correct
direction of rotation, and orient the tire so that the
sidewall paint mark (if any) is approximately
aligned with the rim’s heavy spot (usually the
valve stem).
2. Lift up one edge of the tire and slip the
rim hook of the tire bar over the rim.
Avoid contacting the rim with the
powdercoated surfaces of the
Mojolever. Place the tire bead beyond
the end of the Mojolever, but above the
rim hook.
3. Starting at the rim hook and working in a
counterclockwise direction, use one hand to
slip the tire bead over the rim for about 180
degrees around the perimeter of the rim.
Keep your other hand on the Mojolever to
stabilize it. As in step 2, the tire bead should
still be beyond the end of the Mojolever, but
above the rim hook.
4. Begin levering the Mojolever around the center post, moving the “mount” end in a clockwise
direction around the rim. As you get near the end, the last part of the tire bead should suddenly fall
into place; be ready for this so that the bar doesn’t suddenly shift and scratch your rim.
Page 6 of 8
Mounting the Second Bead
5. Verify the correct orientation of the paint spot on the tire; it will be difficult to reposition the tire
once the second bead is installed.
6. Lift up one edge of the tire bead and slip the
rim hook of the Mojolever over the rim.
Avoid contacting the rim with the
powdercoated surfaces of the Mojolever.
Place the tire bead beyond the end of the
Mojolever, but above the rim hook.
7. Starting at the rim hook and working in
a counterclockwise direction, use your
hands to slip the tire bead down below
the rim for about 180 degrees around the
perimeter of the rim. As in step 2, the
tire bead should still be beyond the end
of the Mojolever, but above the rim
hook.
8. Begin levering the Mojolever around
the center post, moving in a
clockwise direction around the rim.
As the Mojolever pushes the tire
bead out past the rim lip, make sure
the bead drops down past the rim lip
and into the bead seat. When
approximately 2/3 of the tire bead
is installed, push as much of it as
possible down into the center well
of the rim to give you the “slack”
you need to continue moving the
tire bar. Avoid pushing down on
the tire bead so close to the
Mojolever that the bead slips down off of the rim hook.
Page 7 of 8
9. When the Mojolever can finally be rotated no
further (i.e. the rim hook is the only thing
holding the tire bead up), raise the free end of
the bar up to a vertical position. The tire bead
should slip off of the rim hook and into place;
you may need to then press down on the tire
bead slightly to free the rim hook.
↓
Seating The Beads
CAUTION: Eye protection should be worn during this procedure. Bead-seating can be a violent event; to avoid
bodily injury, at all times during the fill process keep your fingers out of the gap between the rim lip and the tire
bead.
1.
Reinstall the valve stem core.
2.
Apply a fresh coat of tire lubricant (if needed) to the exposed tire beads and rim lips.
3.
fill the tire with air. You should hear two “pop” sounds, one sound as each bead seats against its corresponding rim
lip; the sound may be very loud.
4.
Once both beads have seated, fill the tire to the desired final pressure.
5.
Check for leaks. Small amounts of air trapped between the tire bead and rim lip may leak out for a short time after
bead-seating; if leakage is still evident 5-10 minutes later (look for bubbles when soapy water is applied to the rim
lip/bead area), you may need to break the beads and reseat them again.
Mounted tires should be statically or dynamically balanced before being reinstalled on a
motorcycle.
Page 8 of 8
• Care of the Mojolever
-
After use, remove any dirt and excess moisture from the bar with a soft cloth.
-
If the powdercoat should become damaged to the point that it exposes bare metal, coat the exposed
metal with an automotive wax to prevent rust.
-
Screw holes in the Mojolever are not powdercoated and are susceptible to rust if water is allowed
to enter them. The Mojolever is shipped with a coating of grease inside the small screw hole
through the rim hook, and also between the nylon demount tip and the powdercoated bar:
-
•
If the nylon rim hook protector is removed, apply a generous coating of grease to the small
screw before reinstalling. Tighten only enough to secure the nylon rim hook protector;
excessive tightening will pull the screwhead through the nylon.
•
If the nylon demount tip is removed, a small amount of grease should be applied around but
not in) the threaded bolt hole at the end of the Mojolever. Also apply a small amount of
Loctite to the screw threads, and tighten only enough to prevent the nylon demount tip from
spinning on the bar; excessive tightening will crush the nylon.
The nylon parts should last for many tire changes, but are susceptible to wear, especially if rims
are severely gouged or rough. Replacement parts (including stainless steel screws) are available
for purchase; please email [email protected] for details.