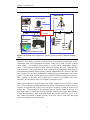
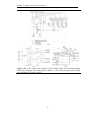
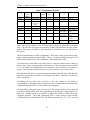
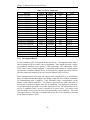
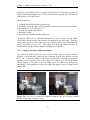
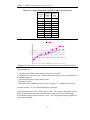
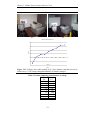
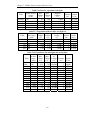
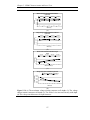
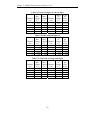
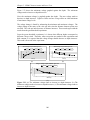
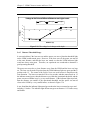
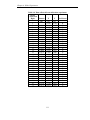
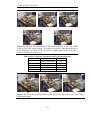
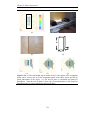
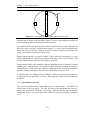
1
To the Graduate Council:
I am submitting herewith a thesis written by Julie Anne Morris entitled “Design of an
Active Stereo Vision 3D Scene Reconstruction System Based on the Linear Position
Sensor Module.” I have examined the final electronic copy of this thesis for form and
content and recommend that it be accepted in partial fulfillment of the requirements for
the degree of Master of Science, with a major in Electrical Engineering.
M. A. Abidi, Major Professor
We have read this thesis
and recommend its acceptance:
D. Page
B. Blalock
D. Bouldin
Accepted for the Council:
Vice Chancellor and
Dean of Graduate Studies
DESIGN OF AN ACTIVE STEREO VISION 3D SCENE
RECONSTRUCTION SYSTEM BASED ON THE LINEAR
POSITION SENSOR MODULE
A Thesis
Presented for the
Master of Science
Degree
University of Tennessee, Knoxville
Julie Morris
August 2006
ACKNOWLEDGEMENTS
I would like to thank my parents for their constant support, advice, and patience. God
has truly blessed me to have you as parents. Thank you for putting up with me.
Sincere thanks to Dr. Abidi for his support, both financially and through technological
resources. Also thanks to the entire IRIS lab for the use of their facilities and especially
Dr. Page for his help in the research process. Thank you also to Dr. Blalock and Dr.
Bouldin for serving on my graduate committee.
Finally, I accept sole responsibility for any errors found in this document.
ii
ABSTRACT
Active visions systems and passive vision systems currently exist for three-dimensional
(3D) scene reconstruction. Active systems use a laser that interacts with the scene.
Passive systems implement stereo vision, using two cameras and geometry to reconstruct
the scene. Each type of system has advantages and disadvantages in resolution, speed,
and scene depth. It may be possible to combine the advantages of both systems as well as
new hardware technologies such as position sensitive devices (PSDs) and field
programmable gate arrays (FPGAs) to create a real-time, mid-range 3D scene
reconstruction system.
Active systems usually reconstruct long-range scenes so that a measurable amount of
time can pass for the laser to travel to the scene and back. Passive systems usually
reconstruct close-range scenes but must overcome the correspondence problem.
If
PSDs are placed in a stereo vision configuration and a laser is directed at the scene, the
correspondence problem can be eliminated. The laser can scan the entire scene as the
PSDs continually pick up points, and the scene can be reconstructed. By eliminating the
correspondence problem, much of the computation time of stereo vision is removed,
allowing larger scenes, possibly at mid-range, to be modeled.
To give good resolution at a real-time frame rate, points would have to be recorded very
quickly. PSDs are analog devices that give the position of a light spot and have very fast
response times. The cameras in the system can be replaced by PSDs to help achieve realtime refresh rates and better resolution. A contribution of this thesis is to design a 3D
scene reconstruction system by placing two PSDs in a stereo vision configuration and to
use FPGAs to perform calculations to achieve real-time frame rates of mid-range scenes.
The linear position sensor module (LPSM) made by Noah Corp is based on a PSD and
outputs a position in terms of voltage. The LPSM is characterized for this application by
testing it with different power lasers while also varying environment variables such as
background light, scene type, and scene distance. It is determined that the LPSM is
sensitive to red wavelength lasers. When the laser is reflected off of diffuse surfaces, the
laser must output at least 500 mW to be picked up by the LPSM and the scene must be
within 15 inches, or the power intensity will not meet the intensity requirements of the
LPSM. The establishment of these performance boundaries is a contribution of the thesis
along with characterizing and testing the LPSM as a vision sensor in the proposed scene
reconstruction system.
Once performance boundaries are set, the LPSM is used to model calibrated objects.
LPSM sensitivity to power intensity changes seems to cause considerable error. The
change in power appears to be a function of depth due to the dispersion of the laser beam.
The model is improved by using a correction factor to find the position of the light spot.
Using a better-focused laser may improve the results. Another option is to place two
PSDs in the same configuration and test to see whether the intensity problem is intrinsic
to all PSDs or if the problem is unique to the LPSM.
iii
TABLE OF CONTENTS
INTRODUCTION ........................................................................................................................................ 1
1.1
1.2
1.3
1.4
2
SURVEY OF 3D SCENE RECONSTRUCTION SYSTEMS ......................................................... 7
2.1
2.2
2.3
2.4
2.5
2.6
3
GENERAL EXPERIMENTS AND PREPARATION.............................................................................. 54
TESTS WITH WHITE POSTER ....................................................................................................... 60
TESTS WITH MIRROR .................................................................................................................. 77
TESTS AT CLOSE RANGE ............................................................................................................ 92
SLIDER EXPERIMENTS ............................................................................................................. 104
6.1
6.2
6.3
6.4
6.5
6.6
6.7
6.8
6.9
6.10
7
LENS FIELD OF VIEW .................................................................................................................. 50
FOCUSING GLASS EXPERIMENT .................................................................................................. 51
LENS FILTER CHARACTERIZATION ............................................................................................. 51
LPSM CHARACTERIZATION AND LASER TESTS................................................................. 54
5.1
5.2
5.3
5.4
6
LASER TRIANGULATION ............................................................................................................. 20
STEREO VISION .......................................................................................................................... 24
PSD OPERATION ........................................................................................................................ 28
FIELD PROGRAMMABLE GATE ARRAYS ..................................................................................... 33
HARDWARE SELECTION ............................................................................................................. 41
SUMMARY .................................................................................................................................. 49
LENS CHARACTERIZATION ...................................................................................................... 50
4.1
4.2
4.3
5
BACKGROUND .............................................................................................................................. 7
LASER TRIANGULATION ............................................................................................................... 8
STEREO VISION .......................................................................................................................... 11
PSD SYSTEMS ............................................................................................................................ 12
FPGA SYSTEMS ......................................................................................................................... 15
SUMMARY .................................................................................................................................. 18
BACKGROUND AND SYSTEM THEORY .................................................................................. 20
3.1
3.2
3.3
3.4
3.5
3.6
4
MOTIVATION ................................................................................................................................ 1
PROBLEM DEFINITION AND APPLICATIONS................................................................................... 4
CONTRIBUTIONS ........................................................................................................................... 5
ORGANIZATION ............................................................................................................................ 6
SLIDER SETUP .......................................................................................................................... 104
MANUAL DATA POINT COLLECTION ........................................................................................ 104
EDGE DISTORTION ................................................................................................................... 107
INTENSITY VS VOLTAGE PROBLEM........................................................................................... 114
FIFTEEN POINT STEREO WITH ABSOLUTE ERROR ..................................................................... 118
SCOPE STEREO WITH ABSOLUTE ERROR .................................................................................. 121
NINE POINT STEREO WITH DIFFERENTIAL ERROR .................................................................... 122
PIPE WELD ............................................................................................................................... 124
OBJECT MODELING .................................................................................................................. 128
OBJECT MODELING CORRECTION............................................................................................. 144
SYSTEM EXPERIMENTS ............................................................................................................ 150
7.1
7.2
7.3
7.4
7.5
LASER SCANNING SYSTEM ....................................................................................................... 150
A/D CONVERTER...................................................................................................................... 168
FPGA ALGORITHM .................................................................................................................. 170
COMPUTER SOFTWARE ............................................................................................................. 171
CONCLUSIONS .......................................................................................................................... 171
iv
8
CONCLUSIONS ............................................................................................................................. 173
8.1
8.2
8.3
8.4
SUMMARY ................................................................................................................................ 173
LESSONS LEARNED................................................................................................................... 174
FUTURE WORK ......................................................................................................................... 175
CONCLUSIONS .......................................................................................................................... 176
REFERENCES ......................................................................................................................................... 177
VITA.......................................................................................................................................................... 184
v
LIST OF TABLES
Table 1.1. Comparison of vision systems. ......................................................................... 2
Table 3.1. Hamamatsu 2D PSDs ......................................................................................43
Table 3.2. Summary of lasers ...........................................................................................44
Table 3.3. FPGA comparison ...........................................................................................48
Table 5.1. LPSM rise time at different distances ..............................................................57
Table 5.2. Experiment with no lens filter, no background light, white transparency........63
Table 5.3. Experiment with no lens filter, daylight, clear transparency............................63
Table 5.4. Experiment with lens filter, daytime, clear transparency.................................64
Table 5.5. Experiment with no lens filter, no background light, clear transparency.........64
Table 5.6. Data with background light, no lens filter........................................................68
Table 5.7. Data with background light and lens filter.......................................................68
Table 5.8. Data with dimmed lights and no lens filter ......................................................69
Table 5.9. Data with no lights and no lens filter ...............................................................69
Table 5.10. Voltage of same point on different surfaces and distances ............................73
Table 5.11. Data comparing poster distance to voltage ....................................................74
Table 5.12. Various lasers tested ......................................................................................76
Table 5.13. Data on laser power behind lens ....................................................................79
Table 5.14. Data comparing power at different light levels..............................................82
Table 5.15. Data of laser power levels varying background light and distance ................83
Table 5.16. Data for experiment with lights .....................................................................86
Table 5.17. Experiment with lens filter and lights on .......................................................86
Table 5.18. Experiment with dim lights and no lens filter................................................86
Table 5.19. Data with no background lights .....................................................................87
Table 5.20. Voltage of set point at different distances......................................................90
Table 5.21. Power at different distances and light levels..................................................93
Table 5.22. Data with lights on.........................................................................................95
Table 5.23 Data with lights on and lens filter ...................................................................95
Table 5.24. Data with half lights on..................................................................................95
Table 5.25. Data from no background lights ....................................................................95
Table 5.26. Data with lights on.........................................................................................98
Table 5.27. Data with lights on and lens filter ..................................................................99
Table 5.28. Data with half lights on..................................................................................99
Table 5.29. Data with no background lights .....................................................................99
Table 5.30. Data from experiment ..................................................................................101
Table 6.1. Response time with 1 mW laser ....................................................................109
Table 6.2. Maximum voltage with 1 mW laser directly into LPSM ...............................109
Table 6.3. The max and min voltages are recorded at different lens apertures. ..............110
Table 6.4. Data collected from calibration experiment...................................................111
Table 6.5. Stereo vision calculations 1 ...........................................................................113
Table 6.6. Stereo vision calculations 2 ...........................................................................115
Table 6.7. The maximum voltage is recorded at different distances...............................116
Table 6.8. The voltage was recorded for different colored surfaces ...............................117
vi
Table 6.9. Voltage readings at different white surfaces..................................................118
Table 6.10. Data with calculates X, Y, and Z positions..................................................120
Table 6.11. Data with calculated error by percent and distance......................................120
Table 6.12. Average error for each vertical scan ............................................................121
Table 6.13. Data collected from experiment...................................................................123
Table 6.14. Position calculated with point 1 as reference...............................................123
Table 6.15. Error in calculated positions ........................................................................123
Table 6.16. Error recalculated with point 5 as reference ................................................124
Table 6.17. New constants used to change voltages from LPSM to distances ...............145
Table 7.1. Resolution and frame rate trade off at 1000 positions per second .................165
Table 7.2. Comparison of the three proposed laser scanning systems. ...........................167
vii
LIST OF FIGURES
Figure 1.1: Different active and passive visions systems are used for different distance
ranges................................................................................................................................. 3
Figure 1.2: The proposed system can be viewed as (a) a physical block diagram and (b)
as a logical block diagram. ................................................................................................ 5
Figure 2.1: Chapter 2 surveys current 3D vision systems.................................................. 7
Figure 2.2: Laser beams reflect at one angle when striking specular surfaces and reflect
uniformly in all directions when striking diffuse surfaces [Kennedy, 1998]. ...................10
Figure 2.3: Occlusion causes part of the scene to be hidden from the laser [IVP Ranger,
2000].................................................................................................................................11
Figure 3.1: A typical laser triangulation setup contains a laser, camera, and lens. ...........21
Figure 3.2: (a) A coordinate system can be placed on the laser triangulation setup and (b)
the variables can be superimposed on the system.............................................................22
Figure 3.3: (a) Similar triangles can be superimposed on the system setup and (b) used to
create a ratio. ....................................................................................................................23
Figure 3.4: An array of PSDs can be used with a line laser..............................................24
Figure 3.5: A typical stereo vision setup has two PSDs facing the scene. ........................25
Figure 3.6: Stereo vision uses similar triangles, (a) in the system and (b) showing
relationships, to find the depth. The X coordinate is found using triangles, shown (c) in
system and (d) the relationships........................................................................................26
Figure 3.7: One or both of the PSDs in stereo vision can be rotated. ...............................28
Figure 3.8: (a) A PSD is a p-n junction separated by an insulator. (b) When incident light
hits the PSD, current is generated. ....................................................................................29
Figure 3.9: The 1D PSDs act like potentiometers [Hamamatsu, 2003]. ...........................30
Figure 3.10: The 2D duolateral PSDs create four currents [Hamamatsu, 2003]...............31
Figure 3.11: The 2D tetralateral PSDs create four currents in the p-layer [PSDs,
Hamamatsu]......................................................................................................................32
Figure 3.12: (a) FPGAs are comprised of logic blocks laid out in a 2D array. (b)
Connections in FPGAs can be programmed by antifuses (c) or by SRAM [Brown, 1996].
..........................................................................................................................................35
Figure 3.13: The Xilinx CLB is made up of 4 slices. [Xilinx, 2005b].............................36
Figure 3.14: (a) SliceM of a Virtex4 [Xilinx, 2005b] has different logic than (b) SliceM
of a Spartan[Xilinx, 2005a]. .............................................................................................37
Figure 3.15: (a) The Atmel “Cell” contains 2 LUTs [Atmel, 2004]. (b) The main
building block of the Altetratix is the ALM [Altera, 2005b].. (c) The Altera Cyclone
ALM is based on a four-input LUT[Altera, 2005a]..........................................................38
Figure 3.16: Routing in Xilinx FPGAs has many multiple-length wires[Brown, 1996]...39
Figure 3.17: Atmel’s routing scheme contains 5 (a) bus planes and is laid out as seen in
the (b) floor plan [Atmel, 2004]........................................................................................40
Figure 3.18: Altera LAB interconnections usually carry control siganls[Altera, 2005a]..41
Figure 3.19: Altera Routing Structure is divided into (a) Rows and (b) Columns [Altera,
2005a]. ..............................................................................................................................42
Figure 4.1: Geometry can be used to find the lens field of view. .....................................50
viii
Figure 4.2: As the white film is pulled further away from the lens, the laser point goes
from (a) out of focus, (b) to in focus at distance f, (c) and then out of focus, but cannot be
seen well. As the more clear transparency is pulled away from the lens, the laser point
goes from (d) out of focus, (e) to more in focus, (f) to focused at distance f, (g) to out of
focus, (h) and then completely out of focus......................................................................52
Figure 4.3: (a) A filter is placed on the lens to help with background light (b)The
spectrophotometer shows what wavelengths pass through the filter. (c) The spectral
analysis was input into Excel for a clearer graph..............................................................53
Figure 5.1: The response time can be found from the frequency response diagram. ........54
Figure 5.2: (a) A piece of foam blocks the laser so that the LPSM does not see anything.
(b) As soon as the piece of foam is removed, the laser is present, acting like a step
function. The rise time can then be measured using the oscilloscope..............................56
Figure 5.3: The oscilloscope measures the rise time of the signals, as shown for the
waveforms at (a) 3 inches, (b) 7 inches, and (c) 11 inches. (d) The rise time is plotted
again the distance..............................................................................................................57
Figure 5.4: (a) The <500mW laser from LASIRIS is used to perform experiments. (b)
The spectral meter shows the characterization of the laser...............................................58
Figure 5.5: (a) The filters were printed on a white film transparency and (b) on a clear
transparency. (c) The filter attached to the laser using foam board. .................................59
Figure 5.6: The filter caused the laser beam light to scatter, although there was a more
intense spot in the middle. ................................................................................................60
Figure 5.7: (a) The system is setup so that the LPSM and laser are 6 feet from the poster.
Two lux readings were taken with the meter (b) sitting on the tabletop and (c) facing the
scene. ................................................................................................................................61
Figure 5.8: Laser power meter was used to read laser power at (a) the laser, (b) the poster
board, and at the lens, as can be seen from (c) the front and (d) the back. .......................62
Figure 5.9: (a) As the laser power decreases, the minimum voltage increases. (b) The
maximum voltage stayed fairly constant. .........................................................................65
Figure 5.10: (a) The chart compares laser power at the source with voltage change. (b)
Distance between minimum and maximum voltages remain fairly constant regardless of
laser power. (c) As the laser power decreases, the rate of change in voltage decreases,
giving worse resolution.....................................................................................................66
Figure 5.11: The minimum voltages tends to decrease as laser power increases..............70
Figure 5.12: (a) The maximum voltage tends to decrease as laser power increases. (b)
The voltage change increases as laser power increases. (c) As the laser power increases,
the volts per inch increase, giving better resolution..........................................................71
Figure 5.13: The box was moved to different distances, like the set point, different
distances experiment with poster board. ...........................................................................72
Figure 5.14: The voltages are not the same for different distances and different points...73
Figure 5.15: Voltages were taken starting at (a) close distances and then moved (b)
further away. (c) The voltage changed dramatically as distance changed. .......................74
Figure 5.16: (a) When a laser hits a diffuse surface, the reflected light is spread out
uniformly. (b) The blue triangle shows how the closer lens picks up more light, while the
green triangle of the farther away lens picks up less light. ...............................................75
ix
Figure 5.17: A large mirror was mounted on a hand truck so that it would sit
perpendicularly to the ground and could be moved easily. (a) Front. (b) Back. (c) The
lens/LPSM, power supply, laser, and other materials were placed on a filing cabinet. (d)
Tape marks on the floor showed six inch increments in distance from the file cabinet....78
Figure 5.18: When the laser reflection from the mirror hits the lens, then it records a
higher laser power than with the poster. ...........................................................................80
Figure 5.19: (a) The laser can be directed so that the reflection hits the lens. (b) The
power of the light getting through the lens can be measured. (c)When laser light is
reflected into the lens, then the light can be seen. (d) If the laser light is reflected
elsewhere, then no laser light can be seen. (e) The laser is targeted so that the reflection
hits the tape instead of the lens. ........................................................................................81
Figure 5.20: The laser power behind the lens depends on the laser power source and
background lights. ............................................................................................................83
Figure 5.21: As distance increases, the laser power tends to decrease..............................84
Figure 5.22: White paper was taped to the mirror to indicate the two points where the
laser should be directed. ...................................................................................................85
Figure 5.23: The minimum voltage tends to be higher with no background lights...........87
Figure 5.24: (a) The maximum voltage decreases as laser power increases. (b) The
voltage change tends to decrease as laser power increases. (c) The resolution becomes
worse with no light and as laser power increases. ............................................................88
Figure 5.25: The set point was marked by an arrow on the white paper...........................89
Figure 5.26: The voltage tends to increase as distance increases......................................90
Figure 5.27: The voltage level jumps from (a) just inside the green light area to (b) just
outside the green light area. ..............................................................................................91
Figure 5.28: All power levels within fifteen inches is above 1 uW. .................................93
Figure 5.29: (a) Move the laser all the way to the left while still staying in the valid
threshold. (b) Move the laser all the way to the right while still staying in the valid
threshold range. ................................................................................................................94
Figure 5.30: The minimum voltage remains constant at all depths...................................96
Figure 5.31: (a) The maximum voltage remains constant at all depths. (b) The voltage
change remains constant at all depths. (c) The field of view increases linearly with depth.
(d) The volts per inch decreases as depth increases..........................................................97
Figure 5.32: Two points, one inch apart, were marked.....................................................98
Figure 5.33: (a) The minimum voltage tends to increase as depth increases. (b) The
minimum voltage tends to increase as depth increases. (c) The minimum voltage tends to
increase as depth increases. ............................................................................................100
Figure 5.34: A point was marked on the poster so that the x distance would remain
constant...........................................................................................................................101
Figure 5.35: The voltage level changes with depth.........................................................102
Figure 5.36: The distance in (a) is within the operational threshold, while the distance in
(b) is outside of the operational threshold.......................................................................103
Figure 6.1: (a) The LPSM is mounted on a metal piece that slides along a metal bar with
half inch increments marked to make data collection easier. Two bars are placed
perpendicular to the LPSM bar and have half inch increments marked. The bars can be
x
slid (b) closer or (c) farther from the LPSM bar, depending on where the poster is placed.
........................................................................................................................................105
Figure 6.2: The setup for the experiment had a poster held next to the two distance bars,
the slider setup, the laser deflected off of a mirror, the power supply, and oscilloscope.
........................................................................................................................................106
Figure 6.3: The LPSM starts in (a) the original position, producing (b) a waveform. The
LPSM is (c) moved over a small distance, such as 0.5 inches, producing (d) another
waveform. The process is repeated, (e) moving the LPSM and (f) recording the
waveforms. .....................................................................................................................106
Figure 6.4: A possible light spot and voltage values are noted as the light spot enters the
field of view. The pictures are ordered from top to bottom and then from left to right. 107
Figure 6.5: As the light spot moves through the field of view, the voltage should
decrease. The voltage will probably decrease at different slopes depending on whether or
not the entire light spot is in the field of view. ...............................................................108
Figure 6.6: (a) The voltage can be plotted against the distance on the poster. (b) The
voltage can be plotted against the distance on the poster between the minimum and
maximum voltages, giving a linearly decreasing line. ....................................................112
Figure 6.7: As the laser moves across the LPSM face, it first hits (a) black plastic, then
(b) a gold ring where the light is scattered, and then (c) the active area. ........................114
Figure 6.8: The 1 mW laser is pointed directly into the LPSM to ensure a focused point.
........................................................................................................................................115
Figure 6.9: The laser was reflected off of different color surfaces to see if the LPSM
would give the same voltage reading. The surfaces used were (a) white poster board, (b)
brown cardboard, (c) yellow plastic, (d) dark blue slightly glossy book cover, and (e)
light blue slightly glossy book cover. .............................................................................117
Figure 6.10: The surfaces tested included (a) white poster board, (b) a glossy book cover,
and (c) metal painted white.............................................................................................117
Figure 6.11: (a) Fifteen points were taken on the poster board sitting 9 inches from the
LPSM. The error is placed into the area of the field of view where it occurs and colorcoded for better readability. The percentage area is shown for (b) X, (c) Y, and (d)Z, and
the inches error is shown for (e) X, (f) Y, and (g) Z. ......................................................119
Figure 6.12: (a) A calibrated object was placed in the field of view. (b) The object was
placed in front of the LPSM and points were recorded. .................................................122
Figure 6.13: A pipe weld was to be modeled..................................................................125
Figure 6.14: (a) The manually collected data points were entered into RapidForm 2004.
(b) Functions in RapidForm allowed the points to be connected to form a 3D shape. (c)
Extraneous points were deleted to try to create a better 3D shape..................................126
Figure 6.15: (a) The oscilloscope was used to take data at a high density. (b) Functions in
RapidForm connected the dense points to form a 3D shape. ..........................................127
Figure 6.16: Six wooden objects were modeled including (a) a rectangular prism, (b) a
triangular prism, (c) a cylinder, (d) a cone, (e) a pyramid, and (f) a cone with the top cut
off. (g)In the final system setup, a board was placed ten inches from the slider. The
object was placed directly in front of the board for modeling. .......................................129
Figure 6.17: (a) The color depth map in inches and (b) visual photo of the triangular
prism can be seen as well as (c) the triangular prism in the entire system and the (d)
xi
actual dimensions of the object. (e) The best fit plane is calculated and placed in
RapidForm. Since the best fit plane is skew, the (f) measured plane is also created in
RapidForm and (g) can be compared to the best fit plane. .............................................132
Figure 6.18: The average error or the background plane is graphed against (a) the x
distance and (b) the y distance........................................................................................133
Figure 6.19: (a) The color depth map in inches and (b) visual photo of the rectangular
prism can be seen as well as (c) the rectangular prism in the entire system and the (d)
actual dimensions of the object. (e) The best fit plane is calculated and placed in
RapidForm. Since the best fit plane is skew, the (f) measured plane is also created in
RapidForm and (g) can be compared to the best fit plane. .............................................134
Figure 6.20: The percent error is graphed against (a) the (x,y) position, (b) the x distance,
(c) the y distance, and (c) the depth for the rectangular prism........................................135
Figure 6.21: (a) The color depth map in inches and (b) visual photo of the triangular
prism can be seen as well as (c) the triangular prism in the entire system and the (d)
actual dimensions of the object.......................................................................................136
Figure 6.22: The percent error is graphed against (a) the (x,y) position, (b) the x distance,
(c) the y distance, and (d) the depth for the triangular prism. .........................................137
Figure 6.23: (a) The color depth map in inches and (b) visual photo of the cylinder can be
seen as well as (c) the cylinder in the entire system and the (d) actual dimensions of the
object. .............................................................................................................................138
Figure 6.24: The percent error is graphed against (a) the (x,y) position, (b) the x distance,
(c) the y distance, and (c) the depth for the cylinder.......................................................139
Figure 6.25: (a) The color depth map in inches and (b) visual photo of the cone can be
seen as well as (c) the cone in the entire system and the (d) actual dimensions of the
object. .............................................................................................................................140
Figure 6.26: (a) The color depth map in inches and (b) visual photo of the pyramid can be
seen as well as (c) the pyramid in the entire system and the (d) actual dimensions of the
object. .............................................................................................................................141
Figure 6.27: (a) The color depth map in inches and (b) visual photo of the cone with the
top cut off can be seen as well as (c) the cone with the top cut off in the entire system and
the (d) actual dimensions of the object. ..........................................................................142
Figure 6.28: Calculated depth is plotted against measured depth for (a) the triangular
prism and (b) the cylinder...............................................................................................143
Figure 6.29: The color depth plots show the percent error according to the point for (a)
the original model and (b) the corrected model for the rectangular prism. .....................145
Figure 6.30: The color depth plots show the percent error according to the point for (a)
the original model and (b) the corrected model for the triangular prism. .......................146
Figure 6.31: (a) The original model for the triangular prism can be compared to (b) the
corrected model. (c) The original model for the cylinder can be compared to (d) the
corrected model. .............................................................................................................147
Figure 6.32: The error for the corrected model is compared to the error in the original
model for (a) the rectangular prism, (b) triangular prism, and (c) cylinder. ...................148
Figure 7.1: A stepper motor has a stator with poles and a rotor. ....................................151
xii
Figure 7.2: (a) The first motor/mirror setup had four places to attach the motor to the
mirror. (b) The stepper motor had four wires, corresponding to (c) the outputs of a
stepper motor driver card................................................................................................152
Figure 7.3: (a) The driver has 12 pins, corresponding to (b) the inputs and outputs listed.
........................................................................................................................................153
Figure 7.4: (a) The driver is set to half step when the H’/F signal is tied to ground. (b)
The driver is set to full step when the H’/F signal is tied to power.................................154
Figure 7.5: The waveform is generated at a distance of 3 inches and a speed of ms with
the motor at (a) full speed and (b) half speed. The waveform is generated at a distance of
12 inches and a speed of 6 ms with the motor at (c) full speed and (d) half speed. ........155
Figure 7.6: Waveforms are gathered at a distance of 6 inches at half step with a speed of
(a) 20ms, (b) 10ms, and (c) 6ms. Waveforms are gathered at a distance of 15 inches at
half step with a speed of (d) 20ms, (e) 10ms, and (f) 6ms. .............................................156
Figure 7.7: Waveforms were generated at 6 inches using (a) the stepper motor at a speed
of 6ms, (b) by hand moving slowly, and (c) by hand moving fast. Waveforms were
generated at 15 inches using (d) the stepper motor at a speed of 6ms, (e) by hand moving
slowly, and (f) by hand moving fast. ..............................................................................157
Figure 7.8: (a) A second motor was mounted to a mirror with a ratio of 1:1. The (b)
stepper motor was controlled with a (c) driver that accepted inputs from the computer via
(d) a USB to serial port converter. ..................................................................................158
Figure 7.9: The setup for System 2 was the same as the setup for System 1 except that the
motor/mirror system was replaced..................................................................................160
Figure 7.10: As the speed of the motor increases, the time between pulses decreases, as
can be seen in the (a) 9000r waveform, (b) 13000r waveform, and (c) 17000r waveform
at a distance of 9 inches. At a constant speed, the time between minimum and maximum
voltages increased with distance, as can be seen in (d) the waveform at 3 inches, (e) the
waveform at 9 inches, and (f) the waveform at 15 inches at a rate of 17000r, where each
interval in the x direction corresponds to 2.0ms. ............................................................161
Figure 7.11: At a constant distance, the time between minimum and maximum voltages
decreased with increased speed, as can be seen in (a) the waveform at 9000r, (b) the
waveform at 13000r, and (c) the waveform at 17000r at a distance of 6 inches, where
each interval in the x direction corresponds to 2.0ms. ....................................................162
Figure 7.12: (a) A 0.5 inch black object was taped to the poster in the field of view of the
LPSM. (b) A 1 inch black object was taped to the poster in the field of view of the
LPSM. Using a 0.5 in black object, the waveforms were gathered when the motor rotated
at (c) 9000r, (d) 13000r, and (e) 17000r, at a distance of 9 inches, with the x interval set
at 2.0ms. At a rate of 13000r and a distance of 9 in, (f) the waveform with a 0.5 in object
with an x interval of 2.0ms should have a 0 V region of about half the time length as (g)
the waveform with a 1 inch object at an x interval of 5.0ms. .........................................163
Figure 7.13: The scanning system is comprised of (a) 15 vertically placed polygonal
mirrors and lasers placed (b) in a wheel-spoke configuration. .......................................165
Figure 7.14: (a) The polygonal mirror and laser can be mounted to the top circular base.
The top base is attached to a servo motor so that the top base can rotate horizontally,
while the bottom base remains stationary. (b) The second system proposal uses a servo
motor to rotate the base horizontally and changes direction based on a switch..............166
xiii
Figure 7.15: The A/D chip was mounted on a bread board. ...........................................169
Figure 7.16: A function generator was used to create the control signals.......................169
Figure 7.17: (a) An oscilloscope was used to see the R/C’ signal on the bottom of the
screen, and the BUSY’ signal on the top of the screen. (b) When moved to overlap, it can
be seen how the BUSY’ signal follows the R/C’ signal, as expected. ............................170
Figure 7.18: The FPGA algorithm could be split up into smaller state machines controlled
by a main state machine using enable and done bits.......................................................171
xiv
Chapter 1: Introduction
1 INTRODUCTION
Machine vision allows a robot to see its surroundings. Robot vision describes the ability
of a robot to reconstruct the scene surrounding the machine in three dimensions (3D) so
that it can recognize objects in the scene and react accordingly. As research has been
done to use robots in more applications, the importance for robots to “see” their
surroundings has increased. For example, the Defense Advanced Research Projects
Agency (DARPA) project challenges research teams to make a car autonomous and then
navigate a roadway [DARPA, 2005]. In the competition, students faced problems when
their visions systems had to deal with fog, shadows, or glare [Russell, 2005]. Many 3D
robot vision systems also cannot currently provide real-time reconstruction rates of 30
frames per second (fps) or better. The Carnegie-Mellon University (CMU) camera has a
refresh rate of 16.7 fps [Carnegie, 2005]. If a car used the CMU camera and was moving
at 30 miles per hour, then it would see one frame every 2.63 feet, giving it very little time
to process the information from the scene and react. If robot vision scene reconstruction
could be made real-time and accurate for a wide range of distances, then the robot would
have time to make good decisions and react accordingly.
This thesis focuses on the design and development of a 3D, real-time, mid-range scene
reconstruction system. Contributions include the design of a 3D scene reconstruction
system based on two position sensitive devices (PSDs) in a stereo vision configuration
and using field programmable gate arrays (FPGAs) to perform computations, and
characterization and testing of the linear position sensor module (LPSM) from Noah
Corp as a vision sensor.
1.1 Motivation
One popular method of 3D scene reconstruction is to use an active vision system which
interacts with the scene. A beam is emitted from the vision system. The beam hits an
object in the scene and bounces back to the system. The amount of time that it takes for
the beam to return is recorded and used to calculate the depth of the object. Since the
beam travels at the speed of light, or 3.0x10⁸ m/s, scenes that lie too close to the system
are unable to accurately measure the time of flight of the beam. Therefore, active
systems tend to be more accurate for long-range scenes.
Another active system, laser triangulation, places a laser and a camera near each other,
both facing a scene. The laser highlights a point in the scene and the camera captures the
picture. Geometry allows the depth of the point to be calculated. Laser triangulation is
usually used for mid- to close-range systems.
Passive stereo systems are also popular for close-range scenes. These vision systems
attempt to model human vision. Two cameras are placed in the same configuration as the
1
Chapter 1: Introduction
Table 1.1. Comparison of vision systems.
Company
Product
Range (meters)
3D Digital Corp. [2005]
Optix 400L
0.3 – 0.9
Minolta [2005]
Vivid 9i
0.6 – 2.5
Callidus Precisions Systems Callidus CP 3200
40 – 80
[2005]
Leica Geosystems [2005]
HDS3000
Up to 50m
PTGrey [2005]
Bumblebee
1.2
Videre Design [2005]
STH-MDCS/-c
0.8 to 2.4
Stereo Head
Technology
Triangulation
Triangulation
Time of Flight
Time of Flight
Stereo
Stereo
camera and laser in laser triangulation. Both cameras take a picture of the scene.
Equations determine which point in one picture corresponds to the same point in the other
picture. Geometry then calculates the depth of the point. Since passive stereo systems
face the problem of figuring out which points in each picture correspond to each other,
stereo is more accurate for close-range scenes. If the scene becomes too large, then the
correspondence problem increases and the time to determine a pair of points dramatically
increases. Table 1.1 compares various vision systems currently available.
Each vision system has a recommended range of use. The majority of time of flight
systems are usually recommended for use when a scene is greater than five meters away
from the system. Laser triangulation systems tend to be recommended for use when
scenes are within one meter of the system. Larger scenes become cumbersome for the
laser triangulation system because the laser must travel to each point in the scene. Stereo
vision systems also tend to be used for close-range scenes within one meter, but can be
used for larger scenes. The correspondence problem limits stereo vision’s ability to
resolve larger scenes. Figure 1.1 shows how these visions systems fit together on a
distance scale.
As can be seen from Figure, a gap exists for systems that can reconstruct mid-range
scenes, or scenes ranging from one meter to five meters away. A good mid-range system
could be used in such applications as indoor navigation. For example, a mid-range realtime vision system could be placed on a cart at a nursing station. The machine could then
successfully navigate a hallway full of patients, carts, and other items, to carry supplies to
a patient’s room.
A mid-range system could also be used for reverse engineering applications for such
groups as Automotive Research Center (ARC) or the Department of Energy (DoE). For
example, automotive parts or other items could be placed in front of the system and
modeled without probing or hurting the original item. With good resolution, complex
parts such as propellers would have less error and the angles and curves of the item
would be more exact.
2
Chapter 1: Introduction
Callidus CP 3200
http://www.3ddigitalcor
p.com/products.htm
40 - 80
http://kmpi.konicaminolta.us/
Laser
Triangulation
3D Digital Corp.
Optix 400L
0.3 – 0.9
0.1
Stereo Vision
MEMS System
http://www.callidus.de
Minolta Vivid 9i
0.6 – 2.5
1
Time of Flight
Gap in Mid-Range
~ 1m to 5m10
Videre’s Stereo Head
100
(meters)
Leica
Geosystems
0.8 – 2.4
HDS3000
0.2-0.4nm
Up to 50
http://www.leicageosystems.com
http://users.rcn.com/mclaughl.
dnai/sthmdcs.pdf
Riegl LMSZ420i
350 - 1000
http://www.riegl.co.at
http://www.imaging.utk.edu/research/kammerud/icecs2005-k.pdf
Figure 1.1: Different active and passive visions systems are used for different distance
ranges.
Therefore, an accurate, real-time system needs to be developed for mid-range scenes.
Advantages from laser triangulation and stereo vision can be used to create a hybrid
vision system. Two cameras can be placed in a stereo vision configuration, facing a
scene. A laser can be placed between the cameras, also facing the scene. When the laser
is in the field of view of both cameras, then a single point is highlighted, eliminating the
correspondence problem, thereby greatly reducing computation time. However, the laser
also provides only one point of information instead of giving information for the entire
picture. The laser must scan the entire scene while the cameras constantly pick up the x
and y position of the beam until enough data is collected to reconstruct the scene.
Therefore, special cameras with a low response time must be used.
Many active and passive systems tend to use charge coupled devices (CCDs) to collect
data. CCDs are digital, dividing the picture into pixels. Digital devices result in a loss of
accuracy in resolution due to pixel size, and loss of accuracy in each pixel due to bit
storage size. The resolution of the acquired picture is directly related to the size of a
pixel in the camera. Smaller pixels result in higher resolution, but require more memory
to store the information. Each pixel holds digital data, usually stored in 8, 10, 12, or 16
bits. More bits translate to higher accuracy in the true color of each pixel, but again
require more memory to store the value.
3
Chapter 1: Introduction
Two PSDs can replace the cameras of a passive stereo vision system. When enough
incident light hits the active area of a PSD, current is generated. According to the
characteristic equation of a PSD, the position of the light spot can be calculated from the
current. PSDs have very low response times, usually between 0.8 µs and 10 µs. The
output current is analog, giving more data at a faster rate than conventional CCDs.
After collecting data at a fast rate, the data sets must be plugged into stereo equations and
the world coordinates of each point must be calculated. In traditional vision systems,
software computes the equations. In the proposed system, FPGAs could perform the
computations. Since FPGAs can do several operations in parallel, they should decrease
computation time. However, since FPGAs are digital, the information will face the same
accuracy problem that is faced by digital cameras. The number of bits used to store
information will determine the accuracy of the output, with a higher number of bits
meaning higher accuracy, but requiring more computation time and memory.
1.2 Problem Definition and Applications
It may be possible to combine the advantages of active triangulation systems and passive
stereo vision along with new technologies to create a real-time, mid-range 3D scene
reconstruction system. Two PSDs can replace the cameras in a stereo vision system
configuration. A laser can be directed toward the scene to highlight a point, eliminating
correspondence.
Since only one point can be highlighted at a time, data for the points in a scene must be
collected at a high rate. Calculations on the data to give the depth must also be computed
quickly. FPGAs can be used for computations by taking advantage of the parallelism that
hardware can offer. The output can be sent to a computer via USB 2.0 or other high-rate
technology to be displayed on a computer. Figure 1.2 gives a logical and physical block
diagram of the proposed system.
Applications of the system would be determined by the performance boundaries. If the
scene refresh rate is fast enough, then the system could be used for robot navigation. For
example, the system could be placed on a robot that must go from a nursing station to a
patient’s room, navigating a hallway.
If the resolution is high enough, then the system can be used in reverse engineering
applications. An object could be placed in the field of view and the system would give a
3D reconstruction of the object in CAD. Current reverse engineering systems, such as a
coordinate measuring machine, require previous knowledge of the object, active
interaction with the object, and a skilled operator. With this system, the object could be
modeled without prior knowledge and without causing harm to the object.
4
Chapter 1: Introduction
Laser
Controller
Laser
(a)
Right Linear
Position Sensor
Module
INPUT
Scene in
front of
setup
xR
yR
xL
yL
Analog to
Digital
Converter
XR
YR
XL
YL
OUTPUT
Development
Board and
FPGA
USB
2.0
GUI on
Computer
Screen
Left Linear
Position Sensor
Module
Laser
Calibration
INPUT
Right Linear
Position Sensor
Module
Scene in
front of
setup
f0
xR
yR
xL
yL
Analog to
Digital
Converter
XR
YR
XL
YL
d
OUTPUT
Development
Board and
FPGA
(X, Y, Z)
coordinates
(b)
Left Linear
Position Sensor
Module
Figure 1.2: The proposed system can be viewed as (a) a physical block diagram and (b)
as a logical block diagram.
1.3 Contributions
Contributions include:
• design and development of a 3D scene reconstruction system based on PSDs
placed in a stereo vision configuration and FPGAs, and
• characterization and testing of the LPSM as a vision sensor in the proposed
system.
A 3D scene reconstruction system is designed and developed to try to achieve real-time
frame rates of scenes at mid-range distances. Two PSDs sit in a stereo vision
configuration. As a laser scans the scene, the PSDs output the position of the laser point,
giving two points to be applied to stereo vision equations. PSDs have already been used
in active vision systems, but have not been applied to stereo vision systems since they
require a light spot to be present in the field of view.
The LPSM is based on a PSD. Using the LPSM may reduce some of the problems faced
by a stand-alone PSD because it already mounts the PSD in a case, amplifies the current
5
Chapter 1: Introduction
outputs, reduces noise in the output currents, and computes the position of the light spot.
The LPSM is usually used in situations where a laser is shined directly into the LPSM, or
is shined off of very reflective surfaces into the LPSM. In this thesis, the LPSM will be
used in situations where a laser is shined off of diffuse surfaces at a variety of distances.
Characterization and testing of the LPSM in these new conditions is analyzed.
1.4 Organization
In this paper, the proposed system is studied and the data acquisition system
implemented. A literature review of current systems that use similar concepts and
hardware is surveyed (Chapter 2). The theory behind active and passive systems is then
studied, as well as background on the hardware and how it works (Chapter 3). The
system choices are then implemented, tested, and analyzed (Chapter 4). The paper
concludes with an analysis of the experiments and gives ideas for improvements (Chapter
5).
6
Chapter 2: Survey of 3D Scene Reconstruction Systems
2 SURVEY OF 3D SCENE RECONSTRUCTION SYSTEMS
In this chapter, different approaches to 3D robot vision are surveyed. Some background
information (Section 2.1) is provided before surveying current systems. Active robot
vision systems using laser triangulation (Section 2.2) are explored. Specific types of
laser triangulation, including systems that use point lasers and line lasers are studied.
Passive stereo vision systems (Section 2.3) are also explored as an alternative solution to
active vision systems. After the broad overview of active and passive systems, systems
that use PSD devices are surveyed (Section 2.4). The interest in PSDs is due to their
ability to potentially offer higher capture rates. Additional attempts at reducing
computation time in vision systems with hardware is also explored (Section 2.5).
Hardware can take the form of a CMOS solution or an FPGA solution. The survey
concludes with a proposal for a new, real-time, accurate 3D scene reconstruction system
(Section 2.6). Figure 2.1 shows a block diagram of the organization of the survey.
2.1 Background
Using laser triangulation, a laser and a PSD are pointed at a scene. The laser hits a point
in the scene and a triangle can be drawn connecting the laser, the PSD, and the point in
the scene. Given the distance between the laser and PSD and the angle that the laser is
pointing, the depth of the point can be determined by:
3D Vision Systems
Active Vision
Point
Laser
Systems
Line
Laser
Systems
Passive Vision
Laser
Triangulation
Applications
Laser
Problems
Computation
Time
Correspondence
Problem
PSDs
2D duolateral,
2D tetralateral,
and 1D
Point Laser
Applications
Line Laser
Applications
System
Problems
Real-Time Systems
with Hardware
Software
Replacement
CMOS
Solutions
FPGA
Solutions
Figure 2.1: Chapter 2 surveys current 3D vision systems.
7
FPGA
Problems
Chapter 2: Survey of 3D Scene Reconstruction Systems
Z=
f0 ∗ d
,
x + f 0 ∗ tan(θ )
(1)
where Z is the depth, f0 is the focal length, d is the baseline, θ is the laser angle, and x is
the position from the PSD.
In stereo vision, two PSDs face a scene. If the same point can be found in the picture by
the left PSD and the picture by the right PSD, then two sets of coordinates, xR, yR, and xL,
yL, can be found. A triangle can be drawn from the two PSDs to the point in the scene.
Knowing the two coordinate points, the distance between the two PSDs, and the focal
length of the PSDs, the point coordinates can be determined by:
Z = f0
X =
d
,
xL − xR
(2)
Z
d
x L − , and
f0
2
(3)
Z
yL .
f0
(4)
Y=
where X, Y, and Z are the coordinates, f0 is the focal length, d is the baseline, and xL, xR,
and yL are the positions from the PSDs.
PSDs are devices made up of an n-layer and a resistive p-layer. When light hits the
active area of a PSD, the photovoltaic effect causes a current to be created in the p-layer,
which travels to electrodes. The current from the electrodes is input into a characteristic
equation, giving an x and y position of the incident light.
Once a data set comprising the x and y positions of a point from the left and right PSDs,
the baseline, and the focal lengths, is found, then the stereo equations can be used to
calculate the coordinates of the point in 3D space. An FPGA can be used to implement
the equations in hardware. An FPGA is a chip made up of an array of logic blocks.
Different FPGAs have different configurations of logic in their unique logic blocks.
Between the blocks run a grid of wires. The desired function can be coded in a hardware
description language, and then programmed on an FPGA by connecting specific wires
together and enabling certain parts of logic blocks.
2.2 Laser Triangulation
Active vision systems interact with a scene. In a point laser triangulation system, the
laser sends a single beam to the scene. The point can be controlled either by tilting a
mirror or by aiming the laser directly at the desired location. While the point sits at one
8
Chapter 2: Survey of 3D Scene Reconstruction Systems
spot of the scene, the rest of the system calculates the coordinates of the spot. The point
is then moved a very small distance, and the system calculates the coordinates of the new
position. Once the laser has been moved over the entire scene and the point coordinates
have been calculated, a 3D picture of the scene can be formed.
Beraldin [2000] uses laser triangulation for many applications. Artifacts and exhibits in
museums, such as paintings or sculptures, can be scanned to create a 3D digital model,
helping with documentation and research. He has also worked to develop portable
systems for easier scanning and modeling of remote sites. These sites also add extra
issues such as unknown terrain and sunlight. Laser triangulation has also been used to
help scan scenes that are used in virtual reality simulators.
Point laser systems have the slowest data acquisition speeds of laser triangulation
systems. The point laser must scan over each point in the scene before the entire scene
can be reconstructed. The point must also stay at a specific spot for a period of time long
enough for the camera to gather data before going on to the next point. Therefore, to
reduce scene reconstruction time, a system can use a line laser instead of a point laser.
[IVP Ranger, 2000]
Oike, et al. [2003] attempt to use a line laser along with a fabricated CMOS chip to
achieve real-time 3D data acquisition rates. They also use a specialized image sensor
comprised of one photodiode and three transistors to increase data acquisition speed. The
data feeds into the CMOS image processing chip to recreate the image.
Konodo [2004b] uses the laser line method in his experiments with undersea vehicles. A
navigation system which utilizes sheet laser beam light-sectioning allows the robot to
find the general shape of an object. Only the shape of the object and the distance away
need to be found to allow the robot to correctly navigate its surroundings. Konodo also
uses [2004a] a sheet laser beam in his experiment with relative navigation. He
determines which areas along the laser line are necessary for the robot to successfully
navigate a scene. The areas usually have objects in the way of the robot’s path. He then
only calculates the depths in this region of interest instead of for the entire scene. This
method helps the robot to save time in its calculations and in its decisions for navigation.
Besides point and line lasers, patterns can also be created on a given scene. Machines
tend to use pattern lighting in conjunction with passive stereo vision. The major problem
of stereo vision is correspondence, or matching a given point in one picture to the correct
point in another picture. By using a pattern on a scene, the user can use the lines and
edges created by the pattern lighting to solve the correspondence problem. Kim, et al.
[2004] utilize structured lighting on an autonomous robot for easier extraction of specific
features from a scene.
When using laser triangulation, certain problems arise due to the equipment. Lasers
usually encounter three main problems: non-diffusing surfaces, shiny objects, and
occlusion.
9
Chapter 2: Survey of 3D Scene Reconstruction Systems
Figure 2.2: Laser beams reflect at one angle when striking specular surfaces and reflect
uniformly in all directions when striking diffuse surfaces [Kennedy, 1998].
Two types of surfaces exist in a scene. Specular surfaces completely reflect a laser beam
at the incident angle, according to Snell’s Law. A specular surface could be a mirror,
window, or lake. Diffuse surfaces usually cause a Gaussian distribution of a laser beam,
as seen in Figure 2.2, with the peak occurring at the incident angle governed by Snell’s
Law. Different cameras look for different measures of reflectivity. Therefore, a diffuse
sensor picks up a signal from a diffuse surface better than from a specular surface.
Usually, surfaces display both specular and diffuse properties, although one is more
dominant than the other.
Chen, et al. [1998] attempt to find a method to avoid spurious reflections. They explain
that traditional algorithms assume that the light intensity around the center of a laser
approaches zero. However, since surfaces are not ideal, the light intensity around the
center is not zero, causing the calculated center to be shifted. Chen, et al. scan the scene
once to find general shapes and then delete points that do not lie on the objects. They
also use a look up table for comparison of shapes in the scene to known objects.
Another problem occurs when shiny objects lie in the scene. Lasers give off light at a
specific frequency. Usually, lasers are at a much higher frequency than background light
in a scene. Filters are used to pass through only the laser light to the camera and to better
focus the laser beam on the device. Removing extra light reduces noise, improving
accuracy. Some shiny objects reflect almost all light, causing them to appear white. This
white light tends to have a much higher frequency than the rest of the background light in
a scene, therefore appearing like another laser. PSDs have more trouble than CCDs when
multiple lasers are present. If multiple light spots are present, then the PSD takes an
average of the light spots. Therefore, if some white light is present along with the laser,
the output of the PSD will be a point between the two objects.
Finally, the problem of occlusion is prevalent with lasers [IVP Ranger, 2000]. A laser
beam originates from a point and cuts through air until it strikes an object. If an object
10
Chapter 2: Survey of 3D Scene Reconstruction Systems
Figure 2.3: Occlusion causes part of the scene to be hidden from the laser [IVP Ranger,
2000].
protrudes too far from surrounding objects in the scene, then it can obstruct the laser. If
this happens, then the laser cannot hit a point on the scene because it is hidden, as shown
in the Figure 2.3. The occlusion problem can be solved by using multiple lasers or by
using multiple sensors. An array of PSDs solves the problem from the sensor point of
view, but increases cost and system complexity. A PSD array also causes the system to
have a fixed resolution.
Chen, et al. [1999] attempted to reduce the occlusion problem. They decided that
occlusion was based on the shape of the object and created an algorithm to find the best
position of the camera compared to the position of the scene. The algorithm looks at an
average of the contour of the object, checking convex and concave areas. Chen, et al.
conclude that there will be some occlusion due to the nature of triangulation, but the lowocclusion method helps to reduce the problem as much as possible.
2.3 Stereo Vision
Laser triangulation is very good for close-range distances. Time of flight active systems
are very good for determining 3D coordinates if the scene is long range. For mid-range
scenes, stereo vision is the most common scene reconstruction system. Stereo vision is a
mature subject that can be studied in textbooks [Faugeras, 1993; Hartley, 2000; Klette,
1998].
Progress has been made on bringing down the computation time of stereo vision systems
by attempting to do preprocessing on the data [Silva, 2003]. Ferrari [1990] attempted an
11
Chapter 2: Survey of 3D Scene Reconstruction Systems
algorithm where he runs through a scene twice – the first time building a coarse view of
the scene, and then a second time to add detail to specific flagged areas of the scene.
Besides fighting with computation time, stereo vision also presents the problem of
correspondence. Once the two pictures are found from the two cameras, it is difficult to
determine which point from the first picture is the same point in the second picture.
More computation must be done during calibration to determine extrinsic and intrinsic
parameters, which must then be applied to the picture for every point to determine the
corresponding point in the second picture. This algorithm elongates the computation
time.
2.4 PSD Systems
Vision systems contain a camera, such as a CCD or a PSD, to determine the position of a
light spot. CCDs are digital machines, divided into pixels, and therefore are only able to
resolve an image to an accuracy level the same as the pixel size or pixel density. Unlike
CCDs, PSDs are analog devices and are able to acquire data quicker. Since PSDs are
analog, all of the data in a scene is in tact, allowing the accuracy of the equations to
determine the accuracy of the system. PSDs have become popular, replacing the camera
in many laser triangulation systems.
Three types of PSDs exist: one-dimensional, two-dimensional duolateral, and twodimensional tetralateral. The type of system needed determines the type of PSD used.
Each PSD calculates the position slightly differently due to their unique architectures
[Hamamatsu, 2003].
Point lasers are the slowest system that uses PSDs, because the laser point must trace
through the entire system. The laser points at one spot and the data for that spot is taken.
The laser moves a very small amount to the next spot, and the system must take the data
again. This process iterates through the entire scene.
Though the process for a point laser system is slow, people still use the system depending
on the needs of the application. Beraldin, et al. [2003] create a system using a point laser
to create a color image. An RGB laser reflects off of an object onto a diffracting optical
element, splitting the laser into four separate beams: white, red, green, and blue. The
white beam hits a discrete response position sensor, and the other three beams hit three
separate continuous response position sensors. The data gathered from these four PSDs
are fed into a chip which can calculate the color based on the proportions of the
intensities of the colors.
Beraldin, et al. [2000] also found applications for point laser PSD systems by taking 3D
images of artifacts and artwork, creating portable systems for rugged areas for 3D data
acquisition, and helping to create virtual reality pictures. He takes pictures of artifacts for
digital records and research, so the 3D model needs to be of archival quality, having very
12
Chapter 2: Survey of 3D Scene Reconstruction Systems
high accuracy. Rugged systems need to be
must also deal with ambient light since they
systems need to have more flexibility in the
might have to represent objects with a wide
dimensions.
set up quickly, moved around easily, and
are usually used outdoors. Virtual reality
objects they are able to depict, since they
range of sizes, colors, transparencies, and
PSDs can only accurately measure the position of light when one spot is in the active
area. If multiple spots of light hit the active area of the PSD, then the position will
actually be an average of the intensity of the two spots.
Research has been done to attempt to make systems that offer higher accuracy. Marques
et al. [1998] attempt to create a system using three lasers and a 2D tetralateral PSD. The
lasers are parallel to one another in a triangular configuration. Since PSDs can only
accurately measure one spot of light at a time, Marques et al. turn the lasers on
sequentially, only taking data for one laser at a time. Once the system has gone through
one iteration, data for three points around a given pixel is known. Vectors can be drawn
between the points and the cross product is used to determine the incremental change in
the position, giving a higher accuracy reading of the pixel.
Marques et al. [1994] also attempt to use three lasers in a similar configuration for
another project. They attach a pre-processing unit to the system to do signal processing,
reducing noise and computation time. The lasers switch on and off so that only one laser
is on at any given time. The data acquired from the PSDs runs through a DC circuit,
giving a discrete position. In this system, Marques et al. basically attempt to create a
simple system for acquiring 3D images at a medium speed with average accuracy.
Funabiki and Tanaka [2002] use a single laser and two PSDs in their system. The laserPSD system mounts onto a mobile robot which attempts to follow moving objects. A
laser shines on an object, and both PSDs calculate the position of the object. Since both
PSDs give a position, the angle from the PSD to the object can be calculated. If the
object is not centered in the field of view, then the robot moves to center the object, and
the process repeats. The measurable region of the PSD limits the field of view, so the
object must stay within a narrow range for the configuration to work properly.
If only one 1D or 2D PSD is used in a system, then only a point laser can be used.
However, this process can be slow since the point laser must be moved over the spots in
the scene. To decrease data acquisition time, the point laser is often replaced by a line
laser. PSDs can only pick up one light spot at a time. Therefore, if a line laser is used,
then multiple PSDs must be used, creating an array. Only 1D PSDs can be used to create
the array, with its respective equations used to calculate positions. The number of PSDs
in the array dictates the number of “pixels” in the line laser. Therefore, more PSDs in the
array correspond to higher resolution.
Araki, et al. [1992] attempt to use a line laser to speed up data acquisition, making a high
speed, 3D scene reconstruction system. An array of PSDs is arranged in a vertical line.
13
Chapter 2: Survey of 3D Scene Reconstruction Systems
The laser, also aligned vertically, sweeps from left to right across the scene. A rotating
mirror controls the position of the laser beam. The analog current from the PSDs feed
into analog-to-digital converters so that the information can be stored in memory.
De Bakker, et al. [1996] also use a line laser in their system. They attempt to improve
speed by integrating the PSD onto the same piece of silicon that does signal processing,
amplification, and demultiplexing. The system contains a digital part which outputs data
for a 12-bit resolution picture. The PSD chip actually contains an array of 128 PSDs, but
allows for concatenation of more devices, if needed.
Mizuno et al. [1994] utilize a line laser much like de Bakker’s system. The laser and
PSD array are arranged vertically, with the laser being directed by a rotating mirror.
Mizuno et al. try to decrease image reconstruction time by using an analog chip to
compute positions. The system has two CMOS chips per PSD, attempting to speed up
the computation time. Four stages take place: “rough extraction for the background
illumination,” “first integration by charge amplifier without LED illumination,” “second
integration with LED illumination,” and “selecting one array with the shift register.”
After the fourth stage, a signal from the PSD is selected and used as the final position.
Lasers introduce some error into a triangulation system in the form of occlusion and
surface refracting problems, but PSDs can also introduce error into the system. One
problem occurs when multiple light spots appear in the active area, causing the resulting
position to be an average of the spots. PSDs also introduce noise and accuracy problems.
Since people want to take pictures of different scenes, portability has also become an
issue to overcome.
Beraldin, et al. [1999] attempt to create a portable, outdoor system for 3D image
acquisition. Since the outdoors contain the sun, lakes, and other shiny, light-filled
objects, PSDs can have trouble filtering out background light. Portable systems also have
to be very rugged because their environment is unpredictable. Therefore, Beraldin, et al.
decide to use a Biris camera comprised of a laser line, lens, and CCD camera. The
camera is more rugged than a PSD and can filter out the background light using a
developed algorithm. However, CCD cameras limit the accuracy of the final image and
have slower computation times.
PSDs introduce speckle noise into the system. Gonzo [2003] tries to optimize PSDs to
reduce speckle noise by creating a system that combines continuous and discrete reponse
PSDs. Discrete response PSDs have better accuracy than continuous PSDs, but have a
higher measurement uncertainty and have longer computation times. Continuous PSDs
are faster and give a better value for the central location of the light spot. After the
continuous PSDs pinpoint the center of the light spot, the point is sent to a discrete PSD
chip, selecting a small, specific area of the discrete PSD dataset to calculate, reducing the
amount of computation time necessary while providing the most accurate response
possible.
14
Chapter 2: Survey of 3D Scene Reconstruction Systems
Gonzo attempted a similar setup [2001] for further reduction of speckle noise. An RGB
laser illuminates a point spot. The lens breaks up the laser beam into four beams: white,
red, blue, and green. A discrete PSD picks up the white beam, while three separate,
continuous PSDs are hit by the other three beams. He again uses the best of both worlds
approach by combining the best features of both types of PSDs to calculate the smallest
pixel size with the least speckle noise and fastest computation time.
Fujita and Idesawa [1999] attempt to fix the accuracy problem by changing the PSD
architecture. They create a comb-structure PSD, which improves the uniformity of the
resistive p-layer, by fabricating the photosensitive area separately from the rest of the
photodiode. Since background light affects the apparent intensity of the light spot, they
also create a circuit that subtracts the background light from the system before calculating
the light spot.
Wang and Busch-Vishniac [1989] also attempt to improve the PSD itself to fix accuracy
and sensitivity. They develop a “clover” shaped PSD, trying to get better linearity,
resolution, and sensitivity than the tetraleteral and duolateral designs. The clover design
contains eight point contacts and four short contacts at the corners of the active area,
canceling noise and crosstalk between currents.
In an effort to continue to improve sensitivity and accuracy, people have experimented
with using digital signal processing with analog position sensitive detectors or making the
PSD itself digital. Makynen, et al. [2004] attempt to make a digital PSD. The system
outputs a low-resolution binary image. Preprocessing hardware helps to reduce the
computation time. The circuitry is also shielded from direct illumination in an effort to
reduce computation time. Makynen, et al. separate the PSD itself into an array of 16 by
16 pixels to improve sensitivity. Makynen, et al. [1998] also attempt to make PSDs
better by increasing the resisitivity of the p-layer. They demonstrate that the “best
resolution is achieved by using the highest resistance that ensures the sensor bandwidth to
be larger than signal bandwidth.”
Simoni, et al. [2002] use both continuous and discrete PSDs to improve sensitivity and
accuracy in his laser triangulation system. Two arrays of PSDs are in the system, one
comprised of discrete response PSDs and one comprised of continuous PSDs. The
continuous PSDs locate the light spot and tell the discrete response PSDs on which area
to focus resolution. Therefore, the amount of computation needed by the discrete
response array is decreased.
2.5 FPGA Systems
In a point laser triangulation system with PSDs, position data is acquired for each point.
The system also contains constant characteristics such as the baseline and the focal
length. Depending on the type of PSD used, two or four currents may be present. The
laser controller supplies the angle that the laser points. As seen from the previous
15
Chapter 2: Survey of 3D Scene Reconstruction Systems
sections, this data set must now be applied to equations to find the coordinates of the
current point. If a stereo vision setup is used, then even more complex equations must be
computed to find the coordinates of points in the scene. If a computer is placed in the
system, the data can be fed into software programs to calculate the point. Another option
is to use hardware to calculate the point, using either application specific integrated
circuits (ASIC) chips or FPGAs.
Reves, et al. [2001] attempt to improve their software radio by integrating FPGAs.
Reves, et al. use FPGAs separated into the functions of transmitter base station, receiver
base station, mobile transmitter, and mobile receiver. The circuitry in each block is very
complex. Therefore, to save space, the FPGAs are reconfigured while in use. Using
FPGAs to do computations saves time; however, it requires a lot of space. The ability to
reconfigure the FPGA in real-time allows the space to be reused. This process adds
computation time back into the system, but not enough to greatly affect performance.
Software was also replaced by FPGAs in a machine by Donninger, et al. [2004] that
plays chess. Donninger, et al. implement the search algorithm from previous softwarebased chess-playing computers on an FPGA to take advantage of the parallelism
available in hardware. This greatly reduces the search time for the next move.
Information gathered by the machine during games can be added into the system, but
requires more space on the FPGA.
Since its invention in the 1980s, many chips are based on complimentary metal oxide
semiconductor (CMOS) technology. In CMOS, a chip is fabricated based on NMOS
transistor logic. The compliment of the NMOS transistor configuration is created and
implemented using PMOS transistors.
By attaching the output of these two
configurations, a system is created which gives strong zero and strong one signals
according to the logic equation it implements.
Viarani, et al. [2004] attempt to change the PSD pixel itself using CMOS technology.
CMOS allows readout and processing electronics to be fabricated on the same die.
Viarani, et al. found that this integration reduces system cost. However, the laser in the
system needs to have higher power due to the change in the gain of the CMOS
photodetector. Viarani, et al. also found that the CMOS pixel has less noise.
Nisi, et al. [2003] also integrate CMOS technology into his triangulation system. Two
arrays of photodetectors are used, one of continuous PSDs, and the second of discrete
PSDs. Each array collects information at the same time. A CMOS chip processes all of
the signal information in parallel to find both spot intensity estimation and spot position
detection. The CMOS chip also allows color detection in the scene.
Oike, et al. [2002] utilize CMOS 3-Metal 1-Poly-Si technology to fabricate a PSD
comprised of a 64 by 64 matrix of photodetectors to solve the problem of background
illumination. Each pixel contains 24 transistors and is controlled by signals that run the
16
Chapter 2: Survey of 3D Scene Reconstruction Systems
length of the pixel array. During test, the pixels were able to suppress extra noise from
even harmonics, but were unable to fully suppress noise from odd harmonics.
Oike, et al. used a similar design when attempting to make real-time VGA quality 3D
images [2004b]. The photodiodes made up a 640 by 480 pixel array fabricated using 0.6
µm CMOS technology. A laser line was used for triangulation instead of a point line to
acquire data faster. The system achieved 65.1 range maps per second and 0.87 mm
resolution at 1200 mm.
In trying to again increase frame rate, Oike, et al. [2004a] used a chip that contained “a
pixel array, bit-streamed column address generators, row-parallel processors with 18b
registers and output buffers, and an on-chip controller with a PLL.” The chip was
fabricated with 0.18 µm 1-poly 5-metal CMOS technology, where each pixel had 24
FETs. The controller was built on-chip to increase speed. Oike, et al. also implemented
a search algorithm for the row and column pixels to reduce time.
CMOS circuits tend to be realized in either ASIC chips or FPGAs. In an ASIC chip, the
designer must manually place every transistor on the silicon. Therefore, timing, routing,
and space are minimized. Many of the above mentioned vision systems used ASIC chips
to increase system speed. FPGAs began to gain popularity because they were able to be
reprogrammed on the fly in the field and were able to be used for a wide variety of
projects. Therefore, one type of chip could be fabricated and be put in a much larger
number of systems, reducing cost and time to market. Although FPGAs are not as spaceefficient, the density of gates on a chip continued to increase, reducing the difference in
space for FPGAs and ASICs. Now, FPGAs tend to be preferred over ASICs due to their
lower cost and comparable performance. Routing, timing, and other factors continue to
try to be improved on FPGA chips.
Many people have conducted studies to attempt to optimize routing on chips and on
systems with multiple FPGAs. Ejnioui and Ranganathan [2000] attempt to find a better
algorithm for routing. Many routing systems have evolved into a switch matrix,
comprised of horizontal and vertical wires that can be programmed using SRAM. The
proposed algorithm creates several vectors with many possible vertexes. The vertexes
are mapped to a constraint satisfaction problem and the optimal solution is chosen. The
algorithm helps to minimize CPU processing time to find routing.
FPGAs have already been integrated into some 3D vision applications. The chips are
especially popular with stereo vision systems due to the large computations necessary in
passive systems. Rajda [2001] uses a Xilinx FPGA in his stereo vision system. The
algorithm contains four main steps: “compute census values for each pixel in left and
right image, compute Hamming distance for each pair of pixels, sum over a larger
window to improve statistics,” and “find the maximum of the array of similarity
measures.” Rajda worried about time delay, but only ran into this problem when
pipelining was necessary. He also reconfigured the FPGA at real-time to conserve space.
17
Chapter 2: Survey of 3D Scene Reconstruction Systems
Rose, et al. [1999] combine FPGAs and PSDs in his system. The system contains several
FPGAs, labeled even and odd. All of the even FPGAs contain a program, and all of the
odd FPGAs contain a second program. The system goal is to set flags to know when data
is ready and then to read the data. Two modes are available, time of flight and PSD. The
PSD mode calculates which events should be digitized and recorded. Although the PSD
is not being used for 3D reconstruction, the FPGAs are still used to reduce PSD equation
computation time.
Filho, et al. [2005] also created a system combining PSDs and FPGAs. The PSD is used
in conjunction with a Gas Electron Multiplier. The PSD acquires data at specified times.
The FPGA controls the system and tells the PSD at what times to take data. X-ray
images can then be acquired with 512 by 512 pixel resolution.
Although FPGAs tend to be faster than software and can process in parallel, they still
have some problems. FPGAs are able to implement addition and subtraction. Many
FPGAs have built in carry-chains to aid in the speed of addition and subtraction.
However, many chips still have trouble implementing multiplication and division.
Companies have tried adding multiplier chains to their logic blocks, but the arithmetic
still has limited capability. If the multiplication or division necessary is small, then lookup tables are sometimes more efficient than carrying out the arithmetic.
Programming FPGAs also presents a problem because FPGAs are not under strict
regulations. Each company provides their own software for their products, putting a
slight twist on their own designs. In other words, a Xilinx chip cannot be programmed
unless the user also has the software made by Xilinx. Software determines the efficiency
of place and route, how close logic blocks are to each other on the chip, and many other
important features. The user interface to the software can also be confusing and must be
relearned if chips from different companies are used, or if the company decides to switch
to newer software.
Benkrid, et al. [2000] attempt to improve the software tools used with FPGAs in image
processing applications. By looking at the type of arithmetic needed for image
processing, Benkrid, et al. found ways of improving the mapping of operations to the
FPGA. For example, they found that parallel addition is better than serial addition.
Therefore, if addition is implemented, it is mapped in a parallel fashion to the FPGA. For
division, Benkrid, et al. decide between look-up tables or a multiplication combined with
a shift operation, depending on the size of the inputs.
2.6 Summary
The focus of this chapter has been current 3D modeling systems. Active systems
implementing laser triangulation and passive stereo vision systems were examined. Next,
the use of PSDs in 3D modeling systems was studied. Finally, the use of FPGAs to
reduce computation time for vision systems was examined.
18
Chapter 2: Survey of 3D Scene Reconstruction Systems
Laser triangulation and stereo vision systems tend to be used for close-range scenes. The
need to scan an entire scene with a laser limits the distance that laser triangulation
systems can operate while the correspondence problem limits the distance that stereo
vision systems can operate. By placing two PSDs in a stereo vision configuration and
using a laser to scan the scene, a mid-range scene reconstruction system may be realized.
The new configuration eliminates the correspondence problem, improving computation
time as compared to normal stereo vision. However, a laser still needs to scan the entire
seen, like in laser triangulation. Since the PSD is an analog device, it has a faster
response time than CCDs, allowing it to gather more points in a shorter amount of time.
Using the LPSM is proposed over the use of a stand-alone PSD. The LPSM is based on a
PSD, but comes pre-mounted and also takes care of signal processing and light spot
position computation. Therefore, the LPSM may eliminate some problems seen by using
a stand-alone PSD.
With the proposed data acquisition system, x and y position data sets from the two PSDs
would be gathered at high rates. The data sets would have to be applied to stereo
equations to find the coordinates of each point. FPGAs can be used to achieve faster
computation rates, possibly allowing for real-time refresh rates. Due to the parallelism in
hardware, the equations can be computed faster. Also, multiple points’ coordinates can
be computed simultaneously. The combination of all of these technologies could help to
realize an accurate, real-time 3D reconstruction system.
19
Chapter 3: Background and System Theory
3 BACKGROUND AND SYSTEM THEORY
The proposed system attempts to achieve two main goals: 1) a hybrid system mixing the
advantages from laser triangulation and stereo vision, and 2) real-time operation using
FPGAs. Therefore, both laser triangulation systems and stereo vision systems need to be
studied to determine the advantages and disadvantages of each system and how their
individual properties can be combined to form a new system. Next, the new system will
have its own challenges in achieving real-time operation. New hardware technologies
need to be studied to overcome these issues.
3.1 Laser Triangulation
Laser triangulation systems are an active vision system that tends to be used for closerange scenes. The main disadvantage of laser triangulation is the time it takes to collect
enough points to create one image of the scene. The number of points collected also
affects resolution.
3.1.1 System Setup
Certain fundamental elements are needed in a system that acquires data to reconstruct a
3D scene. In a passive stereo system, or a system that does not directly interact with the
scene it is capturing, two cameras are used. The two cameras point at a scene and capture
two unique images. It is possible to pick a point in the scene and draw a line from that
point to one camera, another line from the first camera to the second camera, and a final
line from the second camera to the original point, creating a triangle. Since the user is
able to control the cameras, the angles between the camera and the point are known and
the distance between the two cameras, or the baseline, is known. Therefore, geometry
and algebra can be used to determine the distance from the cameras to the point.
In laser triangulation, a laser replaces one of the cameras of stereo vision. The laser
interacts with the scene, so the system is now said to be active. However, similar
principles to stereo vision are used to calculate the depth of the object.
Many types of cameras are able to be used for laser triangulation. CCDs or PSDs are
usually used. PSDs collect information analogously while CCDs are digital. With either
device, a lens must be used to focus the scene onto the active area of the device.
Unlike stereo vision, the laser is usually placed above the lens of the camera instead of
next to the lens. The camera sits behind the lens, and the middle of the lens lines up with
the middle of the camera. The distance from the camera to the lens is referred to as the
focal length, or f0.
20
Chapter 3: Background and System Theory
Figure 3.1: A typical laser triangulation setup contains a laser, camera, and lens.
The user controls the laser and moves it around the scene. The laser can be either a point
laser, meaning that the beam hits one point of the scene at a time and reflects, or it can be
a line, meaning that it illuminates an entire horizontal or vertical line of the scene. Coded
patterns can also be used, but are less common. The user controls the laser by either
directly moving the laser or by deflecting the laser using a mirror, and moving the mirror
to direct the beam. If a mirror is used, then it is placed above the lens of the PSD, and the
laser is placed above the mirror, pointing down towards the lens. The angle at which the
laser points is called θ. The distance from the lens to the mirror is called the baseline,
represented by the variable d. The entire system can be seen in Figure 3.1 [Kennedy,
1998; Dumberger, 2002; Beraldin, 2000].
3.1.2 Laser Triangulation Geometry
Laser triangulation is based on the point laser setup. Equations for a line laser system can
be extracted by applying the point laser equations to the system. The equations are based
on some previous knowledge of the system and also on the acquired data.
First, the user must set a coordinate system. The X-axis lies along the line running from
the laser through the mirror to the lens, as seen in Figure 3.2. The middle of the lens
corresponds to X=0. The Z-axis is the depth of the object, so it lies ninety degrees from
the X-axis, going from the lens-mirror-laser line to the scene. The lens, mirror, and laser
beam lie at Z=0. The Y-axis comes out of the paper, towards the reader. The current
point in the scene that the point laser hits is located at (X, Y, Z).
21
Chapter 3: Background and System Theory
z=0
θ
d
(X, Y, Z)
z
x=0
z
x
f0
x
x
(a)
(b)
Figure 3.2: (a) A coordinate system can be placed on the laser triangulation setup and (b)
the variables can be superimposed on the system.
To derive the point laser equations, certain variables must be set by some type of
calibration or prior knowledge of the system. The focal length, f0, is the distance from
the lens to the PSD. The baseline, d, is the distance from the lens to the mirror. If no
mirror is used, then the baseline is the distance from the lens to the laser origin. The user
finds these variables by either calibrating the system or by estimation.
All other variables are either controlled by the user or acquired by the system. θ is the
angle, in radians, from the Z-axis to the laser beam and is controlled by the user. The
distance from the middle of the PSD to the point where the light hits the device is called
x. Specific equations calculate x according to the type of PSD.
Once the necessary variables are known, two equations can be found from the setup. The
first equation is based on the principle of similar triangles. The first triangle connects the
object to the point on the PSD where the beam hits. The other two lines of the triangle
run parallel to the X- and Z- axis, forming a right angle. The second triangle lies inside
the first triangle. The extra line of the smaller triangle runs from the middle of the lens to
the middle of the PSD, parallel to the Z-axis, as shown in the Figure 3.3.
The length from the lens to the PSD, f0, is known from calibration. The distance from the
middle of the PSD to the light spot is x. Due to the orientation of the coordinate system,
the corresponding edges of the large triangle are known as Z and X, or the coordinates of
the point in the scene. The principle of similar triangles can then be used to create the
ratio:
x
X
= .
f0 Z
(5)
22
Chapter 3: Background and System Theory
d- X
laser beam
θ
d
d
Z
θ
z
x
f0
object
X
x
f0
x
lens
(a)
(b)
Figure 3.3: (a) Similar triangles can be superimposed on the system setup and (b) used to
create a ratio.
The other initial equation comes from the triangle formed by the laser beam. By
connecting the current point on the object to the laser, and drawing lines parallel to the Xaxis and Z-axis, another right triangle is found. The angle from the Z-axis to the laser
beam is already known as θ. From calibration, the distance from the laser to the PSD is
known as d and the distance where the object sits along the X-axis is known as X.
Therefore, the distance along the X-axis in this triangle can be called (d-X). Now, the
tangent of the triangle gives:
tan(θ ) =
(d − X )
.
Z
(6)
3.1.3 Laser Triangulation Equation Derivation
Beraldin [2000] shows the derivation of the depth equation from initial equations () and
(). Algebraic manipulation results in the depth equation in the final form of:
Z=
f0d
.
x + f 0 tan(θ )
(7)
With a point laser system, the Y coordinate equals the point where the lens and laser are
placed along the Y-axis. The PSD is assumed to have a very narrow field of view in the y
direction, only picking up a light point along the X-Z plane where the system sits. To
collect data for the entire scene, the system is moved along the y axis, taking data for
points along the current plane before being moved again.
23
Chapter 3: Background and System Theory
Figure 3.4: An array of PSDs can be used with a line laser.
3.1.4 Line Laser Triangulation
The depth equation for line laser triangulation is the same as the depth equation for point
laser triangulation. A line can be viewed as a set of points lying next to each other. The
user can decide how many points should make up the line. Smaller point size results in
higher resolution, but requires more computation. Each point needs its own PSD instead
of using a single device, as shown in Figure 3.4. The system can then be viewed as a
series of triangles. Therefore, the same geometry rules apply, yielding the same depth
equation. Each point gives its own unique depth due to each device’s unique baseline
and the distance where the light spot hits each device.
3.2 Stereo Vision
Stereo vision provides a passive solution to modeling a 3D scene. The main
disadvantage of stereo vision is known as the correspondence problem, discussed later.
The correspondence problem adds a lot of computation time, affecting resolution and
frame rate.
3.2.1 System Setup
A stereo vision system requires at least two pictures of the same scene, usually from two
different cameras. Unlike laser triangulation, no interaction with the scene takes place.
The coordinates of each point in the scene are calculated from geometry, much like laser
triangulation. [Klette, 1998; Faugeras, 1993; Hartley, 2000; Chapter 9, 2005; Geiger,
2005; Stereo Vision, 2005; Stereopsis, 2005]
24
Chapter 3: Background and System Theory
(X, Y, Z)
Object
Z
xL
xR
f0
Z
OL
d
x
Y
OR
Figure 3.5: A typical stereo vision setup has two PSDs facing the scene.
3.2.2 Base Case Coordinate Derivation
For the stereo vision base case, two PSDs lie along the same plane, facing a scene, as
shown in Figure 3.5. The distance between the lens and the PSD is the focal length, f0.
The distance between the middle of the two lenses is the baseline, d. The focal lengths
and baseline variables are found from calibration of the system. The Z direction runs
from the lens to the object, with Z=0 at the baseline. The X direction runs along the
baseline, with X=0 at the middle of the baseline. The two PSDs are usually placed
equidistant from the point X=0. The Y direction is perpendicular to the X-Z plane, with
the positive Y direction coming out of the page toward the reader.
To find the depth of the scene, each point in the two pictures must be analyzed separately.
Assume a point is chosen in the scene. Lines can be drawn from the middle of each lens
to the point in the scene. The lines intersect the PSDs, giving xR and xL. Connecting
these lines along with the baseline gives two similar triangles, as shown in Figure 3.6.
The principle of similar triangles gives:
d + xL − xR d
= .
Z − f0
Z
(8)
With algebraic manipulation, the depth can be solved, yielding:
d
.
Z = f0
xL − xR
(9)
25
Chapter 3: Background and System Theory
Object
Object
Z-f0
Z
Z
xL
xL
xR
f0
f0
OL
d
xR
d
OL
OR
OR
d+xL-xR
(a)
(b)
Object
Object
d/2d/2-X
Z
Z
xL
xL
xR
f0
OL
d
X
f0
OR
OL
d/2
(c)
(d)
Figure 3.6: Stereo vision uses similar triangles, (a) in the system and (b) showing
relationships, to find the depth. The X coordinate is found using triangles, shown (c) in
system and (d) the relationships.
Geometry can also be used to find equations for the X and Y coordinates. A triangle can
be drawn following the current point in the scene to one of the lenses in the system. The
other two sides of the triangle follow the X-axis and Z-axis to form a right triangle.
Again, similar triangles can be used to give:
(10)
f0
Z
,
=
xL d
−X
2
and manipulation can solve for the X coordinate, giving:
Z
d
X =
xL − .
f0
2
(11)
The Y coordinate is found much like the X coordinate. However, the Y axis begins along
the line where the lenses lie. Therefore, the baseline does not affect the Y value, yielding:
26
Chapter 3: Background and System Theory
Y=
Z
yL .
f0
(12)
3.2.3 Correspondence Problem
The biggest problem in stereo vision is called the correspondence problem. Two pictures
are acquired by two cameras in the system. From these two pictures, the coordinates
must be found for each point. The correspondence problem refers to the difficulty in
determining exactly which points in each picture correspond to the same point in the
scene.
To solve this problem, many systems use calibration. A known scene is placed in front of
the cameras, and the cameras provide two pictures. Since the scene is already known, the
points are already known, and matrices can be found that contain calibrated values.
These matrices are then added into the depth equation for all other scenes.
Calibration is computationally expensive. Active 3D vision systems solve the
correspondence problem by replacing one of the cameras with a laser, creating laser
triangulation. Another way to get rid of the correspondence problem is to place a laser
along the baseline of a stereo vision system. The laser can highlight a single point in the
system. The laser beam highlights a single point in the two images from the cameras.
The highlighted point in each picture represents the same point in the scene.
Stereo
equations can then be used to calculate the coordinates of the point.
3.2.4 Degrees of Freedom
The above equations only hold true for the specific system setup when both cameras lie
along the same plane and both cameras are aligned perpendicularly to the scene. If either
of the PSDs are offset, either by translation or rotation, then the equations quickly
become more complex. For example, one of the cameras may be rotated around its
center by an angle, α, in the X direction, as shown in Figure 3.7.
The value for xL is now skew. If it is possible to find the value that xL would be for a
PSD that is perpendicular to the scene, then the original stereo equations can be used.
Using geometry, xL can be brought back to the basic setup position by:
(13)
f cos(α ) − x LR sin(α )
sin(90 + tan −1 ( 0
) −α)
f 0 sin(α ) + x LR cos(α )
x LR .
xL =
−1 f 0 cos(α ) − x LR sin(α )
sin(90 − tan (
))
f 0 sin(α ) + x LR cos(α )
Then, the original stereo equations can be applied to find the coordinate of a point.
27
Chapter 3: Background and System Theory
Object
α
OLR
OL
d
OR
Figure 3.7: One or both of the PSDs in stereo vision can be rotated.
The PSDs have six degrees of freedom comprising three degrees of rotation and three
degrees of translation. Klette, Schluns, and Koschan [1998] give four simultaneous
equations,
(14)
b
b
[−xL sin(θ ) − f 0 cos(θ )]X + [ xL cos(θ ) − f 0 sin(θ )]Z = −[ xL sin(θ ) + f 0 ] ,
2
2
b
b
[−xR sin(θ ) − f 0 cos(θ )]X + [ xR cos(θ ) + f 0 sin(θ )]Z = −[ ∗ xR sin(θ ) − ∗ f 0 ] ,
2
2
(15)
b
[− y L sin(θ )]X + [− f 0 ]Y + [ y L cos(θ )]Z = [ y L sin(θ )] , and
2
(16)
b
[ y R sin(θ )]X + [− f 0 ]Y + [ y R cos(θ )]Z = −[ y R sin(θ )],
2
(17)
that take all degrees into consideration. When solved, the coordinate of a specific point
in the scene is determined. The equations are very complex and computationally
expensive.
3.3 PSD Operation
Laser triangulation systems sometimes use PSDs in place of a camera. PSDs are used to
find the coordinates of a spot of light. In contrast to CCDs, PSDs provide information
analogously because they are not comprised of discrete elements. Instead, PSDs rely on
the surface resistance of a photodiode.
PSDs are divided into different categories: one-dimensional and two-dimensional. The
two-dimensional PSDs are divided into duo-lateral and tetra-lateral types. All PSDs are
known for their excellent position resolution, high-speed response, and wide spectral
28
Chapter 3: Background and System Theory
response range. Two-dimensional PSDs will usually have more distortion on the edges
of its active area than one-dimensional PSDs [Hamamatsu, 2003; Sitek, 2005].
3.3.1 PSD Basics
A PSD is a p-n junction separated by silicon or some other insulator. The p-layer is
resistive and has two electrodes, as seen in Figure 3.8. A common node connects to the
n-layer, grounding the device. The distance between the two electrodes is called the
resistive length, L, and has a uniform resistance.
When incident light hits the active area of the p-layer, the phenomenon called the
photovoltaic effect occurs. The light energizes an electron on the p-layer. When the
electron gets excited, a hole is created and the electron moves, creating electric current.
The electric current flows to either electrode, where the current can be measured. Since
the layer is uniformly resistive, equations can be used to determine where the light spot
hits the device.
A scene contains a lot of light at different frequencies. Lasers operate at a higher
frequency than background light in a scene. A lens placed in front of the PSD filters out
the majority of the background light, only allowing light at laser frequency levels to pass
through, and focuses the beam onto the PSD. As more background light is filtered out,
the noise decreases.
(a)
(b)
Figure 3.8: (a) A PSD is a p-n junction separated by an insulator. (b) When incident
light hits the PSD, current is generated.
29
Chapter 3: Background and System Theory
Figure 3.9: The 1D PSDs act like potentiometers [Hamamatsu, 2003].
3.3.2 Position Calculation
The 1D PSDs are able to calculate the position of a light spot in one direction only. The
equivalent circuit looks like Figure 3.9.
When the laser light hits the active area, then the PSD acts like a potentiometer. Since
the resistance in the p-layer is uniform, a ratio of the two currents can give the position of
the light spot. This position corresponds to the distance, x, in laser triangulation, and xLor
xR in stereo vision. The equation for finding the position of the light spot is:
I x2 − I X 1 2x
,
=
I x1 + I X 2 L x
(18)
where Ix1 and Ix2 are the currents from the electrodes, x is the position to be found, and Lx
is the resistive length, or the distance between the electrodes.
The 2D PSDs calculate both the x and y positions of a light spot. Therefore, two extra
electrodes are needed. The two electrodes are placed ninety degrees from the first two
electrodes. On a duolateral PSD, they are placed on the n-layer, and the n-layer is
resistive. The light penetrates through the silicon layer of the PSD and the photovoltaic
effect creates current in both the p-layer and n-layer, creating a circuit like the one in
Figure 3.10.
30
Chapter 3: Background and System Theory
Figure 3.10: The 2D duolateral PSDs create four currents [Hamamatsu, 2003].
The current ratios allow the x position to be found by:
I x2 − I X 1 2x
,
=
I x1 + I X 2 L x
(19)
and the y position to be found by:
IY 2 − IY1 2 y
=
,
IY1 + I Y 2 Ly
(20)
where Ix2 and Ix1 are the currents from the p-layer, Iy1 and Iy2 are the currents from the nlayer, x and y are the positions to be found, and Lx and Ly are the resistive lengths on the
p-layer and n-layer, respectively.
The tetralateral PSD also calculates an x and y coordinate for a beam of light. The four
electrodes are placed on the p-layer in a ninety degree configuration from one another.
When the light spot hits the PSD, current is generated in four directions, creating the
circuit in Figure 3.11.
Using the currents acquired, the x position can be found by:
( I x 2 + I Y 1 ) − ( I x1 + I Y 2 ) 2 x
,
=
I x1 + I X 2 + I Y 1 + I Y 2
Lx
(21)
and the y position can be found by:
( I x 2 + I Y 2 ) − ( I x1 + I Y 1 ) 2 y
=
,
I x1 + I X 2 + I Y 1 + I Y 2
Ly
31
(22)
Chapter 3: Background and System Theory
Figure 3.11: The 2D tetralateral PSDs create four currents in the p-layer [PSDs,
Hamamatsu].
where Ix1, Ix2, Iy1, and Iy2 are the currents from the electrodes, x and y are the positions to
be calculated, and Lx and Ly are the resistive lengths between their respective electrode
pairs.
The tetralateral configuration must take into account the four currents to calculate either
the x position or the y position because the currents are generated in the same layer. If all
currents are not considered, then more noise is introduced into the circuit. As the light
beam nears the edge of the active area of the PSD, more distortion occurs.
3.3.3 1D, 2D, and Array PSDs
The requirements of a system determine which type of PSD should be used. Each type of
PSD has different levels of accuracy, distortion, and equation complexity. Also, some
types of PSDs cannot be used for different types of lasers.
The 1D PSDs have the simplest equations to calculate and are therefore the least
computationally expensive. However, they also provide the least amount of information,
only telling the location of a light spot in one direction. The position has the least amount
of noise since only two currents are generated. The active area on a 1D PSD can be as
large as 30 mm, allowing it to pick up light from a larger scene or giving higher
resolution.
The 2D PSDs offer more information since they give both the x and y position of a light
spot. However, the equations are more complex, causing longer computation time. The
extra currents in the photodiode also cause more noise in the circuit. Since the duolateral
configuration spreads the electrodes farther apart than the tetralateral configuration, there
is smaller position detection error and higher position resolution. However, the
32
Chapter 3: Background and System Theory
tetralateral configuration has a higher-speed response time and can accurately find the
position with a low dark current. A special type of tetralateral PSD is being developed
called a pin-cushion type, which improves the active area and electrodes. These
improvements bring the position detection error of the tetralateral PSD to the same level
as the duolateral PSD.
If only one 1D or 2D PSD is used in a system, then only a point laser can be used.
However, this process can be slow since the point laser must be moved over every spot in
the scene. To decrease data acquisition time, the point laser is often replaced by a line
laser. PSDs can only pick up one light spot at a time. Therefore, if a line laser is used,
then multiple PSDs must be used, creating an array. Only 1D PSDs can be used to create
the array. If 2D PSDs are used to create the array, then multiple light spots are present in
either the x or y direction and average out to the middle of the PSD. The number of
PSDs in the array dictates the number of pixels in the line laser. Therefore, more PSDs in
the array correspond to higher resolution.
3.4 Field Programmable Gate Arrays
Computation time remains a problem for many 3D modeling systems due to software’s
limitation of only doing one operation per clock edge. FPGAs offer parallelization of
operations, performing multiple operations per clock edge.
3.4.1 FPGA Origination
In a point laser triangulation system with PSDs, data is acquired for every point. The
system contains constant characteristics such as the baseline and the focal length.
Depending on the type of PSD used, two or four currents may be present. As seen from
the previous sections, this data set must now be applied to equations to find the
coordinates of the current point.
Since some of the variables in the equations depend on other values that must be
calculated, the equations must be solved in a specific order. First, the x and y values
must be calculated using the respective equation for the PSD in the system. Once the x
and y values are known, the Z coordinate can be calculated using the stereo depth
equation. The X and Y coordinate can be calculated once Z is known.
The data can be fed into a software program that calculates these equations. Software is
serially based. In other words, software programs can only do one task at a time.
Therefore, it must process one equation before going on to the next equation. Each
equation has a certain amount of computation time associated with it. Software must
load the equation, perform the calculation, and store the answer elsewhere before it can
go on to the next task, causing long computation times.
33
Chapter 3: Background and System Theory
Engineers began looking for solutions other than software to make systems faster and
more efficient. Hardware started to become a popular way to attempt to solve these
problems. At first, ASIC chips were designed and fabricated, but recently, people have
begun looking to FPGAs for their hardware solution needs.
Both ASIC and FPGA chips provide the same hardware solution to a problem by running
electrical pulses through a series of gates. In hardware, multiple processes can occur in
parallel. Therefore, multiple equations can be calculated at the same time, reducing
computation time. Also, variables and equations do not have to be loaded or stored.
Inputs can be hooked directly to pins on a chip and can be used immediately upon arrival.
In the case of a line laser, the data sets for several points can be available at the same
time. Software has to calculate each equation for a single point before going on to the
equations for the next point. In hardware, data from multiple points can be input to the
chip at the same time, and the equations for each of the points can be calculated
simultaneously.
The two most popular hardware solutions are ASIC chips and FPGAs. Equations can be
found that implement the necessary computations using gates. The gates must then be
laid out onto either the ASIC chip or FPGA. Engineers design ASIC chips by laying out
every transistor individually. The process tends to be more time-intensive, since the
engineer plans where to put each gate and transistor. However, this also allows more
control over the design space and the delay times between gates.
ASIC chips were very popular due to the control over signal propagation time and space.
However, die size has been steadily decreasing, and signal speed has been increasing.
Therefore, size and time delay for FPGAs has begun to rival that of ASIC chips while
supplying other advantages. FPGAs allow for instantaneous implementation because
they can be reprogrammed on the fly. A person can program a design onto an FPGA, test
the implementation, and fix any problems on the same chip. An ASIC chip only allows
one design and must be thrown out if the design does not work. FPGAs can also be
reprogrammed during run-time. Some systems in the field contain embedded FPGAs
which can be easily upgraded instead of taking the entire machine apart to replace a
single chip [Oldfield, 1995; Trimberger, 1994; Brown, 1996].
3.4.2 FPGA Structure
Field programmable gate arrays are comprised of units called logic blocks. The logic
blocks are laid out in a 2D array, surrounded by wires. Each company uses a slightly
different logic block for each FPGA family to provide better density, computations, or
another desired effect. To program the FPGA, wires inside the chip are connected to
create the equations. Input and output pads surround the array, as seen in Figure 3.12.
34
Chapter 3: Background and System Theory
(a)
(c)
(b)
Figure 3.12: (a) FPGAs are comprised of logic blocks laid out in a 2D array. (b)
Connections in FPGAs can be programmed by antifuses (c) or by SRAM [Brown, 1996].
The wire connections can be created either by antifuse technology or controlled by
SRAM. Antifuses contain three layers, top and bottom conductive layers separated by a
middle insulating layer. Before programming, the anitfuse is considered an open circuit
due to the insulating layer. To program, a high electric current runs through the fuse and
the middle layer because a low-resistance link between the top and bottom layers.
Antifuse-based FPGAs are non-volatile, retaining the program even after power is lost,
but cannot be reprogrammed.
In contrast, SRAM controlled FPGAs are volatile, so connections can be programmed by
reprogrammed, but are lost when power is removed. Transistors connect two wires and
the SRAM attaches to the gate of the transistor. To turn the transistor on, the SRAM
gives a high signal to the gate of the transistor, creating a short circuit and connecting the
wires.
3.4.3
Logic Blocks
The main manufacturers of FPGAs include Xilinx, Atmel, and Altera. Due to the quickly
changing market, other companies enter and exit the FPGA market frequently. Each
company carries different families of FPGAs, trying to minimize some aspect of
hardware computation, whether it is density, speed, or a combination of factors. To
35
Chapter 3: Background and System Theory
achieve these different qualities, the building blocks, or logic blocks, of the FPGAs are
unique for each family.
Two main Xilinx families include the Virtex 4 and Spartan chips. The logic blocks are
referred to as configurable logic blocks, or CLBs. The CLBs are separated into four
slices, which are then grouped into two pairs. The two slices on the left are grouped
together to form SLICEM, while the two slices on the right are grouped together to form
SLICEL, as shown in Figure 3.13[Xilinx, 2005a; Xilinx, 2005b].
Each slice contains a number of digital logic elements including flip-flops, Nands,
distributed RAM, shift registers, and look-up tables (LUTs). Look up tables, or function
generators, hold the output values for a given function and can therefore generate the
answer for an equation very quickly. The delay for a LUT is independent of the function.
Multiplexers are present so that LUTs can be combined to implement larger functions.
Muxes also allow CLBs to be connected to each other. The Virtex 4 contains specialized
areas to help with arithmetic logic including fast look ahead carry logic.
SLICEM of the CLB contains both memory and logic functionality, while SLICEL only
contains logic elements. By separating the functions, the CLB retains a lot of
functionality while reducing size, allowing either a decrease in size of the chip, or
allowing more CLBs to be placed on the chip. The Virtex CLB also offers two fast-carry
logic chains to speed up arithmetic operations.
The Spartan CLBs are broken into the same slice configuration as the Virtex 4.
However, the mechanics of the individual slices differ to achieve different qualities, as
can be seen in Figure 3.14. The Spartan is made for digital signal processing and other
data processing applications. Each Spartan CLB also contains three separate LUTs, so
bigger functions can be processed faster. The Virtex has a much higher density, and is
therefore more expensive, offering more computing power and the ability to user
PowerPC or Microblaze [Xilinx, 2005a].
Figure 3.13: The Xilinx CLB is made up of 4 slices. [Xilinx, 2005b].
36
Chapter 3: Background and System Theory
(a)
(b)
Figure 3.14: (a) SliceM of a Virtex4 [Xilinx, 2005b] has different logic than (b) SliceM
of a Spartan[Xilinx, 2005a].
Atmel refers to their logic block as “the cell”, as seen in Figure 3.15. The main Atmel
FPGA, the AT40KAL, is based on a cell containing two three-input LUTs so that either
two functions of three inputs or one function of four inputs can be created. Each cell also
has an extra And gate for more efficient multiplication array implementation. A D-flipflop allows an output to be held and fed back into the system. All of these elements
allow the cell of the Atmel FPGA to be configurable for random logic, arithmetic,
multiplication, and counter implementations [Atmel, 2004].
Altera offers several FPGA solutions, including the Stratix, which offers high density,
and the Cyclone, which offers low cost. The main building block of these FPGAs is
called the logic element or Adaptive Logic Module (ALM). Each ALM in the Stratix
offers multiple LUTs, programmable registers, full adders, a carry chain, a register chain,
and more. These resources allow random logic, extended LUT, arithmetic, and shared
arithmetic implementation. The registers also allow for data storage and easy execution
of state machines [Altera, 2005a; Altera, 2005b].
The Cyclone offers fewer elements than the Stratix in its ALM. It includes one fourinput LUT, one programmable register, a carry chain, and a register chain. Since each
ALM contains less functionality, it offers a lower-cost solution. The Cyclone can still
implement random logic functions and arithmetic. It can also be configured to make D,
JK, T, and SR operation using its register and take up to six inputs.
37
Chapter 3: Background and System Theory
(a)
(b)
(c)
Figure 3.15: (a) The Atmel “Cell” contains 2 LUTs [Atmel, 2004]. (b) The main building
block of the Altetratix is the ALM [Altera, 2005b].. (c) The Altera Cyclone ALM is based
on a four-input LUT[Altera, 2005a].
38
Chapter 3: Background and System Theory
3.4.4 Routing
The individual logic block of each type of FPGA determines the density of the FPGA and
how many functions it can implement. These logic blocks must interact with other logic
blocks on the chip. Therefore, it is very important for the FPGA to manage routing
efficiently to maintain signal integrity and retain high speed. In general, logic blocks are
organized in a 2D array, with blocks lined up horizontally and vertically and wires
running between all of the blocks. The number of wires placed between the logic blocks
can help to make the chip faster by offering more routing options, but also decreases
density. Therefore, each company has a slightly different routing option to make their
chip as efficient as possible.
Xilinx uses wires of different length to maximize speed in their chips, as shown in Figure
3.16. All of the wire connections are SRAM based. Twenty four lines are available for
connections from horizontal lines to vertical lines and are referred to as general routing
matrix wires. Ninety-six wires of smaller length are available to carry signals from one
CLB to another CLB, as long as the CLBs are within six blocks from each other. Twelve
longlines are available to carry signals across the chip in either direction, in case logic
blocks that need each other’s signals are placed far apart. All of these interconnections
allow many options for routing, ensuring fast signal propagation [Xilinx, 2005a; Xilinx,
2005b].
Atmel’s busing network contains five identical planes. Each bus plane contains two
express buses separated by a middle, local-bus resource, as seen in Figure 3.17. The
local-bus lines can carry a signal between logic blocks that are four elements apart or
closer.
Figure 3.16: Routing in Xilinx FPGAs has many multiple-length wires[Brown, 1996].
39
Chapter 3: Background and System Theory
Express bus lines span eight cells. Connections are made with repeaters, dubbed
horizontal or vertical based on the wires that they connect. Express bus lines skip a
repeater using a programmable pass gate to create longer wires with faster propagation
times. Connections between two local wires are made using pass gates, while express to
express connections use separate pass gates [Atmel, 2004].
Altera uses two separate types of interconnections. First, Altera groups their logic
elements into groups of eight ALMs called logic array blocks (LABs). LAB signals tend
to carry control signals, such as clock or synchronous reset. Eight wires run to each
ALM in the LAB, as seen in Figure 3.18. The wires can carry either global control
signals, or up to four non-global control signals.
Altera refers to its general routing matrix as MultiTrack Interconnections. It contains
separate types of wires for row interconnections and column connections, as shown in
Figure 3.19. Within the row and column connections lie different types of wires for
faster signal propagation time. Many wires are available for specific connections
between certain logic blocks. Row connections include direct link, connecting LABS to
adjacent blocks, R4s, connecting blocks within four blocks of each other, and R24s,
providing a high speed solution for signals traveling the length of the chip. Column
(a)
(b)
Figure 3.17: Atmel’s routing scheme contains 5 (a) bus planes and is laid out as seen in
the (b) floor plan [Atmel, 2004].
40
Chapter 3: Background and System Theory
Figure 3.18: Altera LAB interconnections usually carry control siganls[Altera, 2005a].
interconnections include register chains within a LAB, C4s, connecting blocks within
four blocks of each other, and C16s, allowing signals to quickly travel the length of the
chip.
3.4.5 Other Considerations
Through the use of specialized logic building blocks and routing, companies have
attempted to give a variety of FPGA solutions which minimize cost, maximize speed, or
provide high density. These companies have also attempted to provide superior software
for placement of logic on their chips. They give solutions to routing of global clocks to
keep signal integrity and minimize delay. If the clock signal corrupts, then state
machines implemented on the chip do not work. Memory is also placed on chips, giving
storage area options. More onboard memory allows higher speeds so that external
memory does not have to be attached. The package that the chip is placed in also plays
an important role, determining the number of input and output pins and planning the
routing between the pads and the logic on the chip.
3.5 Hardware Selection
For the system to operate in real time, it must produce pictures at 30 frames per second or
better. Therefore, it can take no longer than 0.033 seconds to acquire the data for a pixel
and output it to the screen. The time to move the laser, have stable outputs on the
electrodes of the PSD, allow the FPGA to receive the readings, and calculate the point
using the FPGA all contribute to the total time needed to calculate a single pixel.
41
Chapter 3: Background and System Theory
(a)
(b)
Figure 3.19: Altera Routing Structure is divided into (a) Rows and (b) Columns [Altera,
2005a].
Next, the resolution of the picture must be satisfactory. The system should be able to
acquire good images for scenes ranging from 0.5 feet to greater than 15 feet. The first
point for error in resolution occurs at the PSD. The active area of the PSD and the layout
of the active area contribute to the resolution. Once the currents are fed into the FPGA,
more error can occur depending on the number of bits used to describe the current as a
digital signal. High resolution in the PSD and a larger number of bits used in the FPGA
translate to more expensive parts.
All of the parts chosen also need to be a reasonable cost. If the parts are all expensive,
then the entire system becomes even more expensive and thus unmarketable. However,
as cheaper parts are used, then the computation time increases, slowing down the system,
and the resolution decreases, causing the picture to appear more blurry.
3.5.1 3.5.1 PSDs
First, a choice must be made between 1D PSDs and 2D PSDs. If a line laser is used, then
two arrays of one-dimensional PSDs are needed. If a point laser is used, then either four
one-dimensional PSDs or two two-dimensional PSDs are needed.
On a regular television monitor, a point laser scans through every pixel at a rate of thirty
frames per second. Therefore, it is possible for a point laser in this system to scan a scene
at the same rate, meaning that a line laser is not necessary to achieve real time scanning
speeds. Since an inexpensive PSD is about twenty dollars, and two arrays of these PSDs
would cost much more than two PSDs of any type, it is better to use a point laser and two
PSDs.
42
Chapter 3: Background and System Theory
Table 3.1. Hamamatsu 2D PSDs
Part No.
S1200
S1300
S1880
Active
Area
(mm)
13 x 13
13 x 13
12 x 12
Structure
Rise
Time
Resolut
ion
Error
Package
S1881
S2044
S5990-01
22 x 22
4.7 x 4.7
4x4
Tetra-lateral
Duo-lateral
Pin-cushion
(improved
tetra)
Pin-cushion
Pin-cushion
Pin-cushion
1.5 us
0.8 us
1.5 us
1.4um
1.4um
1.5um
150um
80um
80um
Ceramic
Ceramic
Ceramic
3 us
0.3 us
1 us
2.8um
0.6um
0.7 um
150um
40um
70um
S5991-01
9x9
Pin-cushion
2 us
1.5 um
150um
S7848
2x2
Tetra-lateral
20 us
?
20um
Ceramic
Metal
Ceramic
chip carrier
Ceramic
chip carrier
Plastic
S7848-01
2x2
Tetra-lateral
20 us
?
20um
Plastic
Price
$526.40
$1776.60
$789.60
$3948.00
$180.48
Discontinued
22.56
Min 2 pieces
$57.15
Min 5 pieces
$16.92
Min 5 pieces
$16.92
Next, either four 1D PSDs or two 2D PSDs must be placed on either side of the point
laser. The 2D PSDs are known for good dark current, high resolution, and fast current
output. Since many 2D PSDs are also affordable, it is decided to use two 2D PSDs for
the system.
The main manufacturer of PSDs is Hamamatsu. They carry a range of duo-lateral, tetralateral, and pin-cushion tetra-lateral PSDs. Table 3.1 compares the different types of 2D
PSDs offered. [Hamamatsu, 2001; Hamamatsu, 2004; Hamamatsu, 2005]
All of the errors for the PSDs are less than 150 µm. Since the smallest scene is about six
inches away, 150 µm is undetectable to the human eye. The resolution for the worst PSD
is 1.5 µm, which is also undetectable to the human eye from a distance of six inches or
greater. Therefore, the resolution and error are a big concern for any of these parts.
The amount of time to have a good current on the outputs of the PSD takes away from the
amount of time the FPGA can take to calculate the coordinate. Therefore, a smaller rise
time is preferable.
Considering the rise time, cost, and error, a low end solution of the S7848 is
recommended. A mid-range solution of the S5991-01 is recommended, and a high-range
solution of either the S5991-01 or the S2044 is recommended.
Once the PSD is purchased, it has to be mounted. The outputs also have to be connected
to an FPGA and the FPGA needs to be programmed to calculate the x and y positions of a
light spot. Another option is to purchase a product that includes a PSD and already
calculates positions. The Noah Corporation offers a linear position sensor module
(LPSM) based on a 2D duolateral PSD. The PSD is mounted in a 1.25” x 2.5” case with
43
Chapter 3: Background and System Theory
a bezel plate on the front for a lens. The product outputs the x and y positions as a DC
signal between -10 Volts and +10 Volts. The LPSM is recommended for the system
because it meets all technical requirements and combines tasks for easier implementation
and reduction of the chance for mechanical failure.
3.5.2 Lasers
A point laser needs to be chosen as the source of light for LPSM. The PSD in the module
is sensitive to a specific wavelength and intensity. The specification shows that the PSD
will pick up laser light at a nominal beam power range of 0.001 mW to 1 mW and with a
spectral range of 350nm to 1100nm. The values given in the specification refer to the
reflection of the laser beam off of any object in the scene. Therefore, the actual power
for the laser beam needs to be larger. A laser beam with 5 mW to 10 mW power is
preferred, with a wavelength of about 600 nm. Table 3.2 shows a variety of lasers
available.
Another consideration for the laser is the beam size and fan angle. A laser beam emits
from a point. However, as the beam moves further away from its source, it slowly gets
larger, spreading out over a given distance. The beam can be viewed as a cone instead of
a true beam. The fan angle refers to the angle at which the beam spreads out. The beam
Table 3.2. Summary of lasers
Company
Thorlabs
Thorlabs
Edmund
Optics
Edmund
Optics
Edmund
Optics
Edmund
Optics
Edmund
Optics
Edmund
Optics
Edmund
Optics
Product
CPS184: Visible
Laser Module
CPS196:
Focusable Laser
Module
NT54-006:
Rocket Laser
Pointer
NT52-840: Laser
Pointer - Best
Buy
NT53-546: Laser
Pointer - Spectra
NT47-112: Laser
Diode Premiere
NT57-108: Laser
Diode Premier
NT54-183: Laser
Diode w/ Key
NT54-180: Laser
Diode w/ Key
Beam
Power Wavelength
(mW)
(nm)
Size (mm)
4.5
650
4.4 x 1.2
4.5
635
<5
Fan
Angle
(mRad)
Price
?
$79.50
2.45 x 0.54
0.6 x 1
$143.00
640 +- 10
adjustable
?
$49.95
<5
650
3.6 x 3
?
$49.95
5
650
?
$26.75
5
655
1/8 inch
6x2
(ellipse)
<0.5
$335.00
5
655
5x5
$505.00
10
670
3.8 x 0.9
10
635
3.8 x 0.9
<0.5
0.40 x
0.93
0.40 x
0.93
44
$390.00
$460.00
Chapter 3: Background and System Theory
size is the diameter of the laser beam at the exit face of the laser, but grows larger due to
the fan angle. A smaller beam size and fan angle helps to give better focus and less
power intensity loss. [Edmund Optics, 2005]
3.5.3 Laser Scanning System
Many laser scanning systems direct either a point laser, line laser, or pattern laser. Each
system runs into its unique difficulties in implementation. For this system, a point laser
is being used to scan the entire field of view at very high speeds, bringing such problems
as physical limitations in speed, physical stress on the moving laser, and accurate control
of the laser movement.
In some systems, the laser can be deflected using a mirror which is controlled by a motor.
Stepper motors provide an accurate and repeateable method of moving the mirror.
However, stepper motors usually only rotate up to about 10,000 rpm. According to the
resolution and size of the field of view, the laser may have to move faster, meaning extra
gear ratios would have to be added to the system. Another option is to use servo motors.
Although they are not always as repeatable as stepper motors, they are easy to control and
have variable accuracy.
Since a point laser is being used, the laser will have to move at very high speeds that may
not be able to be reached. Several solutions exist to slow down the necessary speed of
the laser. First, a polygonal mirror can be used to deflect the beam. The mirror reduces
the necessary speed by a factor of the number of sides on the mirror. Another option is to
use a line laser instead of a point laser. A line laser allows the entire scene to be scanned
with one sweep of the laser instead of needing multiple scans. Laser scanning systems
are developed, tested, and hardware decisions made in Chapter 4.
3.5.4 A/D Converter
Analog to digital converters (A/D converters) take an analog signal as its input and
converts it to a binary number. A/D converters have several parameters to define their
specific configuration including resolution, speed, and architecture.
3.5.4.1 A/D Basics
The resolution defines the number of bits in the binary number representation of the
signal. Common resolutions include 8-bit, 16-bit, and 24-bit.
Speed refers to the sampling rate of the chip. The analog input signal contains
continuous information. At a certain time interval, the value of the input signal is
sampled. The sampled value is then converted to a digital signal. A higher sampling rate
45
Chapter 3: Background and System Theory
gives more samples per second for better time resolution. The speed can range from as
slow as 128 samples per second (SPS) to high speed chips of 10 MSPS and higher.
Two of the most popular architectures of A/D converters are the ramp or staircase A/D
converter and the successive-approximation (SAR) A/D converter. For the ramp style
converter, the input voltage is assumed to be positive and a reference voltage internal to
the chip is set to zero volts. At every clock cycle, the internal voltage is increased by one
level and is compared to the input voltage. Once the internal voltage exceeds the input
voltage, then the value is sent to the output.
Since this process must go through every voltage until the correct level is found, the
process can take up to 2n clock cycles. It is also very limiting since it only takes positive
voltages. The SAR architecture helps to eliminate the necessity of positive input voltages
and increases speed.
The SAR architecture acts much like a number-guessing circuit. As an example, say that
the resolution is 8 bits and the internal reference voltage is 2.55 V. Therefore, the most
significant bit would refer to either 0V if set to “0” or 1.28V if set to “1”. The input
voltage is compared to 1.28V. If the input voltage is greater than 1.28V, then the most
significant bit is set to 1. Otherwise, the bit is set to 0. To find the next bit, the input
voltage is compared to 1.28V times the most significant bit plus 0.64V, or one-fourth of
the internal reference voltage. The bit is again set to “0” or “1” based on whether the
input voltage is higher or lower. This process continues until all bits are set.
3.5.4.2 Resolution Validation
The signal from the LPSM is analog. However, the inputs to the FPGA need to be
digital. Therefore, an A/D converter must be used to convert the signals to an appropriate
format.
Many parameters must be considered for the A/D converter. The input voltage levels,
sampling rate, bit resolution, and output voltage levels must all be considered. The
LPSM outputs are the inputs to the A/D converter, so the input voltage levels must go
from approximately -10 V to 10 V. The FPGA inputs need to be between 0 V and 5 V,
so this range is set to the output voltage levels.
The LPSM gives valid outputs every 100 µs, according to the specification. The A/D
converter should sample at a rate greater than 100 µs in the event that the LPSM is able
to give a better data rate. A sampling rate of 10 µs is chosen. If sampled every 10 µs,
then the A/D converter will give a valid data output every 10 samples.
Finally, a resolution must be chosen. Eight bits gives 255 levels, while twelve bits gives
4095 levels, and sixteen bits gives 65535 levels. The smallest necessary distance is the
focal length, corresponding to 13 mm. From the table of possible resolutions versus
46
Chapter 3: Background and System Theory
frame rates, the best resolution makes each pixel 69 mm by 98 mm. The baseline for
stereo vision systems is typically 1/10th of the distance of the distance. Therefore, the
largest baseline is approximately 500 mm, but will probably not reach that level.
Looking at all of the possible inputs, 8 bits should be able to allow for good resolution of
all inputs. Chips from TI, National Instruments, and Analog Devices were surveyed, but
an 8 bit resolution chip with a voltage range of -10 V to 10 V could not be found.
Therefore, the 16 bit chip ADS7805 from TI was chosen. A sample was ordered from TI
and was hooked up on a breadboard to test its functionality before purchasing the
ADS7805 mounted on an EVM board. Only the 8 most significant bits need to be
connected. The lower 8 bits can be disregarded.
3.5.5 FPGAs
Xilinx, Altera, and Atmel provide FPGA solutions. Xilinx and Altera have more options
than Atmel and offer more support, so families from these two companies are considered.
The Virtex 4 and the Spartan 3 are offered by Xilinx while the Stratix II and the Cyclone
II are offered by Altera.
For the basic system, only addition, subtraction, and division need to be implemented.
Using the worst-case PSD choice, the FPGA needs to output a coordinate within 0.33313
seconds, corresponding to a frequency of about 30.02 MHz or faster. Both companies
have low-end chips that run at 40MHz or better, so speed is not a big factor.
Higher-end systems will have to handle sines, cosines, and tangents to allow more
flexibility in the position of the PSDs. The best way to implement these functions in an
FPGA is by using a look-up table. The amount of bits used to store a value in the table
and the number of entries in the table will determine the desired amount of on-board
memory.
Finally, the number of input and output pins is also an important consideration. More I/O
pins means that more information can be sent into and out of the FPGA. If the data for
more points can be given to the FPGA at the same time, then more parallel processing of
the coordinates can occur. This allows the points to be output faster, causing the realtime data rate to increase.
Since Xilinx offers a university support program, free software, and reasonably-priced
development boards, the Xilinx families were chosen. Table 3.3 summarizes the Xilinx
FPGAs. [Williams, 2005]
The Virtex series is much more expensive than the Spartan. Although the Virtex offers a
much higher speed and more logic, the system does not require these resources.
Therefore, the choice is narrowed to a Spartan 3 device.
47
Chapter 3: Background and System Theory
Part No
XC3S50-4VQ100C
XC3S50-4PQ208C
XC3S200-4FT256C
XC3S200-4TQ144C
XC3S400-4FG456C
XC3S400-4TQ144C
XC3S1000-4FT256C
XC3S1000-5FT256C
XC3S1500-4FG320C
XC3S1000-5FG320C
XC3S1000-5FG676C
Table 3.3. FPGA comparison
FPGA
Speed
I/O Pins
Spartan 3
40 MHz
100
Spartan 3
40 MHz
208
Spartan 3
40 MHz
256
Spartan 3
40 MHz
144
Spartan 3
40 MHz
456
Spartan 3
40 MHz
144
Spartan 3
40 MHz
256
Spartan 3
50 MHz
256
Spartan 3
40 MHz
320
Spartan 3
50 MHz
320
Spartan 3
50 MHz
676
XC4VLX15- 10FF668C
XC4VLX25 – 10FF668C
XC4VLX40- 10FF668C
XC4VLX60- 10FF668C
XC4VLX80 – 10FF1148C
XC4VLX100-10FF1148C
XC4VLX160-10FF1148C
XC4VLX200- 10FF1513C
Virtex 4
Virtex 4
Virtex 4
Virtex 4
Virtex 4
Virtex 4
Virtex 4
Virtex 4
100 MHz
100 MHz
100 MHz
100 MHz
100 MHz
100 MHz
100 MHz
100 MHz
668
668
668
668
1148
1148
1148
1513
Price
$5.65
$10.55
$19.35
$11.40
$35.60
$16.60
$35.25
$40.55
$55.95
$43.60
$74.45
$141.56
$274.03
$432.47
$535.00
$1128.58
$1913.25
$3098.80
$5832.53
3.5.6 Development Boards
Several companies offer development boards for FPGAs. Development boards offer a
place to mount an FPGA so that it can be programmed. These boards also offer a variety
of peripherals including extra memory, USB connections, PS2 connections, LCDs,
JTAG, and a variety of other hardware. Components on the boards are already hooked
up and ready to interface with the FPGA. A board can only support one family of FPGA
since the connections and pin layout vary between different types of FPGAs.
Since information needs to be input and output quickly from the FPGA, we would like to
find a development board that supports the Spartan 3 chip and offers USB2.0 connections
for communication with a computer. Trenz Electronics offers a micromodule for the
Spartan 3 with USB2.0 capabilities. The module is powered by the USB connection. If
more power is needed, an adapter must also be purchased. Two high-speed connectors,
one for input and one for output, lie on either side of the FPGA. The micromodule can be
used as a standalone board, or can be attached to a carrier board. The carrier board
provides another source of power to the board and attaches extra peripherals. The board
costs approximately $200 and is recommended for use due to its capabilities and high
speed [Trenz Electronics, 2005].
48
Chapter 3: Background and System Theory
3.5.7 Computer Software and PC Criteria
A computer is needed to display the collected points. The computer needs to have a USB
2.0 port to take input from the FPGA. To properly display the picture, the video card
should have at least 32 bit true color or better. The CPU speed should be at least a
Pentium 4, 1GHz processor or better.
The points can be stored in a text editor, such as notepad, Wordpad, or MS Word. The
data can then be displayed in a program such as RapidForm 2004. Once the data points
are stored on the computer, they can be manipulated to be displayed in a program of the
user’s choice. For more advanced applications, the computer may also need a compiler
for the user’s choice of programming languages.
3.6 Summary
The components of the proposed system have been chosen. The LPSM serves as the
light-collecting device. A lens is used to focus light onto the active area of the PSD in
the LPSM. The lab already has a laser that can be used to scan the scene to be modeled.
The LPSM, lens, and laser comprise the data acquisition system.
The data acquisition system will send x and y datasets to the A/D converter board. The
data should be able to be connected to the EVM board, along with control signals, and
then output the data as digital signals, ready for computation. Once digitized, the data
can be sent to the FPGA on the Tektronics platform.
Now that the system has been designed on paper, the different parts of the system need to
be tested to find performance boundaries. The system is broken into parts for testing
since different sections of the system depend on the performance of other sections. The
data acquisition system, and more specifically the LPSM, is primarily tested because it
will determine scene distance, resolution, and frame rate.
The data acquisition system is based primarily on the LPSM, so the LPSM needs to be
characterized and tested first. Once the LPSM has been characterized, the rest of the data
acquisition system can be built and objects can be modeled. Using calibrated objects, the
accuracy of the system can be studied as well as how to fix error. Then, laser scanning
systems can be evaluated to find the best approach for controlling the laser for the final
system.
49
Chapter 4: Lens Characterization
4 LENS CHARACTERIZATION
A lens is attached to the LPSM using an SM1A10 C-Mount adapter from Thorlabs. The
lens focuses light from a large scene onto the small active area of the LPSM and
determines the field of view. Tests must be conducted to find the distance between the
lens and the LPSM for best focus.
4.1 Lens Field of View
The lens has an associated field of view. As the scene moves farther away from the lens,
a larger area can be seen. The field of view is based on the focal length of the lens, 13
mm, and the size of the active area that the image is trying to be focused on, which is 4
mm by 4 mm for the LPSM.
As seen in Figure 4.1, geometry rules can be used to find the field of view size.
Using similar triangles, a proportion can be found:
s
p
(23)
2 = 2 ,
f
d
where s is the active area of the LPSM, f0 is the focal length, d is the distance from the
lens to the scene, and p is the field of view length. Filling in the known values for
variables and simplifying with algebra, the field of view is approximately equal to onethird of the distance from the lens to the scene.
Field of
View
p/2
Active
Area
s/2
f0
d
Figure 4.1: Geometry can be used to find the lens field of view.
50
Chapter 4: Lens Characterization
4.2 Focusing Glass Experiment
A lens is used to collect light and focus the light on a plane behind the lens. The place
where the light is focused behind the laser depends on the focal length of the lens and the
distance from the lens to the object that needs to be in focus. These three variables are
related by:
(24)
1 1 1
+ = ,
p q f
where p is the distance from the object to the lens, q is the distance from the back of the
lens to the plane where the image is focused, and f is the focal length.
Laser light shines at a much higher intensity than the rest of the background light. The
laser light is also focused at a point. As the point becomes smaller, the light becomes
more intense, and it appears like it is coming from infinity. Therefore, p is approximately
infinity. As p approaches infinity, then q approaches f.
A laser can be reflected off of a surface in front of the lens. If a slightly opaque surface is
placed behind the lens, then the laser light, as focused by the lens, can be seen. As the
surface is held at different distances away from the lens, the laser light goes in and out of
focus. Starting close to the lens, the laser light is unfocused. As the surface is moved
farther away from the lens, the laser light becomes more focused until the surface is
approximately the distance of the focal length away from the lens. At this point, the laser
light appears as a pinpoint of light. As the surface continues to move further away from
the lens, the laser light goes out of focus.
Two types of transparencies were used as a focusing glass to try to see the focused and
unfocused laser light. The white film transparency was too opaque and reduced the
power of the laser too much to see the laser spot unless it was almost perfectly focused,
as seen in Figure 4.2. A slightly less opaque transparency was also used. The more
transparent film allowed more laser power through so that unfocused laser could be seen
better.
4.3
Lens Filter Characterization
A filter can be placed on the lens to try to help reduce the amount of background light
hitting the LPSM. The filter only allows light of specified wavelengths through. All
other light hitting the filter does not pass through.
A spectral meter can be used to find the wavelengths that are allowed to pass through the
filter. With the help of Phil Evans in the University of Tennessee Physics Department,
the Shimadzu Scanning Spectrophotometer UV-250 was used with a wavelength range of
190 nm to 900 nm. The result was printed on thermal paper and shows a peak
wavelength of 690 nm with a tolerance of about ±10 nm.
51
Chapter 4: Lens Characterization
(a)
(b)
(c)
(d)
(e)
(f)
(g)
(h)
Figure 4.2: As the white film is pulled further away from the lens, the laser point goes
from (a) out of focus, (b) to in focus at distance f, (c) and then out of focus, but cannot be
seen well. As the more clear transparency is pulled away from the lens, the laser point
goes from (d) out of focus, (e) to more in focus, (f) to focused at distance f, (g) to out of
focus, (h) and then completely out of focus.
52
Chapter 4: Lens Characterization
To help view the graph, points were taken from the printout graph and were input into
Excel. Figure 4.3 shows a peak wavelength of 690 nm with a tolerance of approximately
±10 nm.
(a)
(b)
Characterization of Lens Filter
60
Intensity
50
40
30
20
10
0
0
200
400
600
800
1000
Wavelength (nm)
(c)
Figure 4.3: (a) A filter is placed on the lens to help with background light (b)The
spectrophotometer shows what wavelengths pass through the filter. (c) The spectral
analysis was input into Excel for a clearer graph.
53
Chapter 5: LPSM Characterization and Laser Tests
5 LPSM CHARACTERIZATION AND LASER TESTS
The specification of the LPSM gives a range of light intensity levels for the operating
region as well as the response time. These factors need to be tested for validation and to
determine the requirements for other parts of the data acquisition system, such as laser
power and wavelength for the point laser. Characterizing the LPSM will give system
performance boundaries such as scene distance and resolution.
5.1 General Experiments and Preparation
Before other characterization experiments can occur, the basic operation of the LPSM
and the laser must be known, such as the response time and the wavelength. Validating
the response time of the LPSM gives a better idea of the possible resolutions. The laser
must be characterized to validate its wavelength. Since the laser is high power, filters can
be made to vary the laser power level for future experiments.
5.1.1 LPSM Response Time from Specification
When light hits the active area of the LPSM, the photovoltaic effect occurs, creating a
current. The currents travel to the electrodes and are then converted into normalized
voltage levels corresponding to the x and y positions. The length of time required for
good values to appear on the outputs once there is a valid input is known as the response
time and can be found from the frequency response diagram shown in Figure 5.1, given
in the specification.
Figure 5.1: The response time can be found from the frequency response diagram.
54
Chapter 5: LPSM Characterization and Laser Tests
To solve for the rise time or the response time, the time it takes for the signal to change
from its 10% voltage value to its 90% voltage value needs to be found. Since the signal
is DC, a step function can approximate the signal. Therefore, the voltage equation is:
t
(25)
−
V = Vin (1 − e τ ) .
To find the time it takes to rise from 10% of the voltage to 90% of the voltage, compute:
(26)
t10%−90% = t 90% − t10% .
At t10%, V=0.1Vin, and at t90%, V=0.9Vin. By plugging these values into the voltage
equation and then plugging those values into the time equation, it can be found that:
(27)
t10%−90% = 2.195τ .
The frequency at the -3dB point is inversely proportional to the time constant according
to:
(28)
1
.
F3dB =
2πτ
Therefore, by substitution:
(29)
0.35
.
t10% −90% =
F3dB
From the above graph, the -3dB point is at approximately 4 kHz. By subbing 4 kHz into
the above equation, the rise time is approximately 88µs. The Noah Corporation claims
that the LPSM has a response time of 100µs. Since the frequency had to be
approximated from the graph, it stands that 100µs seems to be close to the true response
time of the LPSM.
5.1.2 LPSM Response Time from Experiment
If the LPSM responded ideally, then the x and y signals would look perfectly triangular
when the laser sweeps through the field of vision. However, the signal has a curve in it.
The curve could be due to the response time of the LPSM or due to edge distortion.
Therefore, the response time of the LPSM needs to be tested. The procedure followed
was:
1. Place the laser next to the LPSM and aim the laser so that it registers at 5V on the
oscilloscope.
2. Place the poster 3 inches from the LPSM.
3. Set the oscilloscope to trigger on the rising edge.
4. Turn the laser on and hold a thick object between the LPSM and poster to block the
beam, as shown in Figure 5.2.
5. Quickly remove the object. Capture the image on the oscilloscope and measure the
rise time.
6. Move the poster 1 inch further away and repeat.
55
Chapter 5: LPSM Characterization and Laser Tests
(a)
(b)
Figure 5.2: (a) A piece of foam blocks the laser so that the LPSM does not see anything.
(b) As soon as the piece of foam is removed, the laser is present, acting like a step
function. The rise time can then be measured using the oscilloscope.
From the experiment in Section 5.4.5, the LPSM can only pick up the laser at distances
within 11 inches, so the rise time was only recorded for distances between 3 inches and
11 inches. The oscilloscope has a function to measure the rise time of the signal, as seen
in the waveforms in Figure 5.3.
The response time changes with distance. The shape of the curve does not appear to be
linear. Although the spec says that the response time should be approximately 100 µs,
the response time ranges from 480 µs to 900 µs. The response time also increases as
distance increases.
Even though the laser power is within the operation threshold of the LPSM, the power at
different distances may cause the discrepancy in the rise times. Table 5.1 summarizes the
results for all distances.
5.1.3 Laser Characterization
To perform tests on the PSD or LPSM, a single point laser is used. Filters are placed in
front of the laser to create a variety of power levels for testing. The laser used is the
LASIRIS <500mW red laser, as seen in Figure 5.4. The laser is a point laser, but has a
large fan angle. Therefore, if the laser strikes an object more than about two feet from
the source, the beam appears to be a small line, growing larger with distance. Lenses are
available to be placed in front of the laser to create a variety of shapes.
56
Chapter 5: LPSM Characterization and Laser Tests
(a)
(b)
(c)
Rise Time vs. Distance
1000
900
800
700
Rise Time (us)
600
500
400
300
200
100
0
3
4
5
6
7
8
9
10
11
Distance (in)
(d)
Figure 5.3: The oscilloscope measures the rise time of the signals, as shown for the
waveforms at (a) 3 inches, (b) 7 inches, and (c) 11 inches. (d) The rise time is plotted
again the distance.
Table 5.1. LPSM rise time at different distances
Distance (in)
Rise Time (µs)
3
480
4
640
5
700
6
720
7
820
8
820
9
820
10
840
11
900
57
Chapter 5: LPSM Characterization and Laser Tests
Laser Characterization for 500mW Laser
4500
4000
3500
Intensity (counts)
3000
2500
2000
1500
1000
500
1017
985
969
1001
952
935
919
902
884
867
849
832
814
796
778
759
741
722
703
684
665
646
626
606
587
567
547
527
506
486
465
444
423
402
381
360
339
0
Wavelength (nm)
(a)
(b)
Figure 5.4: (a) The <500mW laser from LASIRIS is used to perform experiments. (b)
The spectral meter shows the characterization of the laser.
The Ocean Optics USB 2000 Spectral Meter was used to find the wavelengths that are
emitted from the laser. The beam of the laser is pointed into a collecting area on the
spectral meter. The spectral meter then creates a chart showing how many photons in a
span of wavelengths are hitting the collecting area. A bell curve forms around the peak
intensity wavelength. The laser emits mostly wavelengths at approximately 690nm, but
has a tolerance of about ±10nm.
5.1.4 Filter Creation
The laser used to perform the experiments is rated at <500mW. To lower the power,
filters are created using PowerPoint. A black box is first created and copied to create
four rows of four black boxes each. The opaqueness of the boxes is changed so that the
boxes range from 0% to 100% at 6.25% increments. The filters are placed directly in
front of the laser. Depending on the opaqueness of the box, a different amount of laser
light will be allowed to pass.
The amount of light that is able to go through the transparency also depends on the type
of transparency. Three types of transparencies were tried. The first transparency, seen in
Figure 5.5, was white film. The white film had too much color in it and therefore did not
allow much of the laser light through. The filters were also printed on a clear
transparency especially created for printing on HP printers.
58
Chapter 5: LPSM Characterization and Laser Tests
(a)
(b)
(c)
Figure 5.5: (a) The filters were printed on a white film transparency and (b) on a clear
transparency. (c) The filter attached to the laser using foam board.
The filters were also printed on another clear transparency paper. However, the color on
the third transparency was not very uniform. Therefore, it was decided to use the HP
transparency instead of the third type of transparency.
Next, a way to hold the filter close to the laser was needed. A circle was cut into the
middle of a piece of foam board. The laser could be placed into the circle, and then the
appropriate filter could be pinned to the foam board. Therefore, the correct filter could
lay flat at the origin of the laser beam and could be easily changed.
The filters diffused the beam in multiple directions, as seen in Figure 5.6. There was a
spot that appeared where the majority of the laser beam intensity passed through the
filter, but there was a lot of light scattered around the spot. As the filter allowed less light
through, the light was diffused more and the intense spot was less apparent. By 75%
opacity, the light could barely be seen on the poster, so filters greater than or equal to
75% opacity were not used. The diffusion, if not symmetrical, could cause
inconsistencies in the data since a PSD takes an average of all light in the scene.
59
Chapter 5: LPSM Characterization and Laser Tests
Figure 5.6: The filter caused the laser beam light to scatter, although there was a more
intense spot in the middle.
5.2 Tests with White Poster
According to the specifications for the LPSM, it is expected that a laser can be shown in
front of the LPSM, and as the laser moves across the scene, the voltage output should
vary from -10 V to +10 V, linearly. The laser is first reflected off of a white poster board
so that the LPSM can be tested with a uniform surface that does not absorb much of the
laser power. Environment variables such as background light, laser power levels, and
scene distance are tested to see how the LPSM reacts.
5.2.1 Voltage and Distance Range at Different Light Levels
In order to try to get consistent, reproducible data, some extra steps were taken. First, all
items on the table between the poster board and LPSM/laser setup were removed. Next,
the table was completely wiped down and dried off to remove any extra dirt or dust.
During the testing, other measures were taken, such as the background lux level, before
each filter measurement to ensure comparable light levels.
The poster board was pinned to the cubicle wall to cover as much area as possible. Six
green pins were used on the edges of the poster board and on the overlap of the 2 pieces,
as far away from the field of view as possible. The oscilloscope and power supply were
placed six feet away from the poster board. The LPSM was set on top of the power
supply, allowing it to be about 12 inches off of the table. According to calculations from
the lens, the field of view from six feet should be approximately two feet by two feet, so
holding the LPSM one foot off of the table should not cut off the field of view. Two
multi-meters were attached to the outputs of the LPSM to read the x and y voltage levels.
The laser was set on a tripod next to the LPSM and was controlled with a pan-tilt.
60
Chapter 5: LPSM Characterization and Laser Tests
(a)
(b)
(c)
Figure 5.7: (a) The system is setup so that the LPSM and laser are 6 feet from the poster.
Two lux readings were taken with the meter (b) sitting on the tabletop and (c) facing the
scene.
A set procedure was used:
1. Set the lux meter on the table, as shown in Figure 5.6. Stand somewhere and in a
position that you can remember. Every time this reading is taken, stand in the same
position so that reflections and absorptions of light from your body and clothing remain
fairly constant.
2. Record the reading
3. Hold the lux meter up to the lens, facing away from the lens. Stand somewhere and in
a position that you can remember. Every time this reading is taken, stand in the same
position so that reflections and absorptions of light from your body and clothing remain
fairly constant. These lux meter measurements are to establish that approximately the
same background light level is present for all experiments that are not conducted in the
dark.
4. Record the reading.
5. Ensure correct filter is pinned in front of laser.
61
Chapter 5: LPSM Characterization and Laser Tests
6. Turn on laser.
7. Move laser to the left. Voltage readings should decrease. When they become stable
and begin increasing, mark the point and record the voltage.
8. Move laser to the right. Voltage readings should increase. When they become stable
and begin decreasing, mark the point and record the voltage.
9. Move the laser up. Voltage readings should decrease. When they become stable and
begin increasing, mark the point and record the voltage.
10. Move the laser down. Voltage readings should increase. When they become stable
and begin decreasing, mark the point and record the voltage.
11. Take the ruler and measure the distance between the horizontal points and vertical
points. Record.
12. Move the laser back to the center of the poster board, so that it is in front of the
LPSM.
13. Get the laser power meter and hold the sensor 1 inch from laser. Record.
14. Hold the laser power meter sensor at the poster board, with laser hitting it, as seen in
Figure 5.8. Record value.
15. With the laser hitting the middle of the poster board, hold the laser power meter
sensor at the lens, facing the poster board. Record value.
(a)
(b)
(c)
(d)
Figure 5.8: Laser power meter was used to read laser power at (a) the laser, (b) the poster
board, and at the lens, as can be seen from (c) the front and (d) the back.
62
Chapter 5: LPSM Characterization and Laser Tests
16. Repeat with new filter.
17. Once all measurements have been taken with all filters, then repeat the experiment
with a different light level or with lens filter.
The white film transparency was used in the dark with the results shown in Table 5.2.
The voltage range was so low even with a 0% and 6% filter that it was determined that
the white film took away too much of the laser’s power to give good readings. Therefore,
the white film transparency was disregarded for further tests.
Tables 5.3-5.5 summarize the data for different background light levels and with or
without the lens filter.
Table 5.2. Experiment with no lens filter, no background light, white transparency
Power 1
inch
Power Power Room
Room
at
at
Lux
Lux
from
Min
Max
Voltage
Filter laser
Poster Lens
Table
Lens
Voltage Voltage Change
(mW)
(mW) (mW)
(Lux)
(Lux)
(V)
(V)
(V)
0%
3.73 0.104 0.013
0
0
9.55
10
0.45
6%
1.92 0.059
0.1
0
0
9.63
9.78
0.15
Filter
0%
6%
13%
19%
25%
31%
38%
44%
50%
56%
63%
69%
75%
Table 5.3. Experiment with no lens filter, daylight, clear transparency
Power
Power Room Room
1 in.
from
at
Lux
Lux
Min
Max
Change
Poster Table Lens Voltage Voltage in V
Distance
laser
(mW)
(mW) (lux) (lux) (V)
(V)
(V)
(in)
40
29.9
892
395
-0.5
1.3
1.8
22
40
4.04
898
361
0.1
1.06
0.96
23.5
40
6.55
892
388
-0.16
0.99
1.15
20
40
3.27
890
375
-0.01
0.8
0.81
18.5
28.5
0.722 922
349
0.12
0.65
0.53
18.25
24.01
0.228 860
270
0.22
0.6
0.38
17.75
14.3
0.186 860
291
0.26
0.5
0.24
15.75
8.59
0.188 877
301
0.28
0.48
0.2
15
10.25
0.205 863
294
0.3
0.5
0.2
17.25
8.65
0.168 903
289
0.33
0.49
0.16
15.25
6.8
0.142 858
326
0.31
0.5
0.19
15
7.17
0.19
873
261
0.28
0.44
0.16
19.5
6.04
0.143 872
313
0.36
0.46
0.1
16.5
63
Volt/In
(V/in)
0.0818
0.0409
0.0575
0.0438
0.0290
0.0214
0.0152
0.0133
0.0116
0.0105
0.0127
0.0082
0.0061
Chapter 5: LPSM Characterization and Laser Tests
Filter
0%
6%
13%
19%
25%
31%
38%
44%
50%
56%
63%
79%
75%
Table 5.4. Experiment with lens filter, daytime, clear transparency
Power
Power Room Room
1 in
from
at
Lux
Lux
Min
Max
V
Poster Table Lens Voltage Voltage Change Distance
laser
(mW)
(mW) (lux) (lux) (V)
(V)
(V)
(in)
40 30.93 1023
445
5.13
10
4.87
35.25
40
5.09
978
398
7.07
10
2.93
36
40
7.39 1027
415
6.33
9.86
3.53
35
40
3.97 1016
452
6.74
9.9
3.16
34
24.94 0.678
981
423
7.91
9.9
1.99
34
20.78 0.222 1012
409
8.66
10
1.34
29
12.73 0.148 1007
459
9.08
10
0.92
34.5
10.03 0.162 1012
463
9.24
10
0.76
26
9.19 0.161 1035
445
9.18
9.83
0.65
32.5
8.3 0.195 1030
467
9.32
10
0.68
29.5
6.71 0.152
967
501
9.34
9.92
0.58
31.25
6.52 0.147 1013
512
9.3
10
0.7
33.5
6.38 0.099 1027
458
9.41
10
0.59
30.25
Volts
per
inch
(V/in)
0.1382
0.0814
0.1009
0.0929
0.0585
0.0462
0.0267
0.0292
0.0200
0.0231
0.0186
0.0209
0.0195
Table 5.5. Experiment with no lens filter, no background light, clear transparency
Power
1 in
Power Room Room
at
Lux
Lux
from
Min
Max
Change
Filter laser
Poster Table Lens Voltage Voltage in V
Distance Volt/In
(mW)
(mW) (lux) (lux) (V)
(V)
(V)
(in)
(V/in)
0%
40 30.14
0
0
-0.86
10
10.86
28.5 0.3811
6%
40
4.38
0
0
1.73
9.78
8.05
32 0.2516
13%
40
5.34
0
0
1.11
9.7
8.59
35 0.2454
19%
40
3.45
0
0
2.14
9.68
7.54
31.75 0.2375
25%
33.19
0.42
0
0
4.22
9.85
5.63
33.5 0.1681
31%
21.3
0.12
0
0
5.5
9.82
4.32
31.5 0.1371
38%
12.28 0.103
0
0
7
10
3
29.5 0.1017
44%
10.54 0.105
0
0
7.25
10
2.75
26.25 0.1048
50%
9.65 0.125
0
0
7.36
10
2.64
25 0.1056
56%
8.66 0.106
0
0
7.7
10
2.3
24 0.0958
63%
6.12
0.08
0
0
7.94
10
2.06
34 0.0606
79%
6.4 0.052
0
0
8.1
10
1.9
23.5 0.0809
75%
5.45 0.063
0
0
8.28
10
1.72
25 0.0688
64
Chapter 5: LPSM Characterization and Laser Tests
First, it can be seen that as the power from the output source decreases, the minimum
voltage increases, as seen in Figure 5.9. Next, as the laser power decreases, the
maximum voltage power tended to stay fairly constant, decreasing only slightly. Power
output from the source was compared with amount of voltage change. Figure 5.10 shows
that as power decreases, the amount of voltage change decreases.
Next, the distance where the minimum voltage and the where the maximum voltage were
found was compared to the laser power from the source. The distance tended to remain
constant, regardless of the laser power change.
Finally, the amount of voltage change was compared with the distance that voltage
change occurred. This parameter showed how quickly the voltage changed per inch.
With faster voltage change, the resolution would be better. With slower voltage change,
the resolution would be worse.
Overall, the module does not seem consistent in telling the voltage at a specific point.
The voltage at a point seems to depend on the background light and on the power of the
laser. The lens filter seemed to help give better results than operation in the light;
however, operation in the dark seemed to give the best and most consistent results.
Min Voltage vs Laser Power
10
Voltage (V)
8
6
4
2
0
-2 0
5
10
15
20
25
30
35
40
45
Laser Power (mW)
Light
Lens Filter
Dark
(a)
Max Voltage vs Laser Power
12
Voltage (V)
10
8
6
4
2
0
0
5
10
15
20
25
30
35
40
45
Laser Power (mW)
Light
Lens Filter
Dark
(b)
Figure 5.9: (a) As the laser power decreases, the minimum voltage increases. (b) The
maximum voltage stayed fairly constant.
65
Chapter 5: LPSM Characterization and Laser Tests
Voltage Change (V)
Voltage Change vs Laser Power
8
7
6
5
4
3
2
1
0
0
5
10
15
20
25
30
35
40
45
Laser Power (mW)
Light
Lens Filter
Dark
(a)
Distance (in)
Distance vs Laser Power
40
35
30
25
20
15
10
5
0
0
5
10
15
20
25
30
35
40
45
Laser Power (mW)
Light
Lens Filter
Dark
(b)
Volts per Inch (V/in)
Volts per Inch vs Laser Power
0.25
0.2
0.15
0.1
0.05
0
0
5
10
15
20
25
30
35
40
45
Laser Power (mW)
Light
Lens Filter
Dark
(c)
Figure 5.10: (a) The chart compares laser power at the source with voltage change. (b)
Distance between minimum and maximum voltages remain fairly constant regardless of
laser power. (c) As the laser power decreases, the rate of change in voltage decreases,
giving worse resolution.
66
Chapter 5: LPSM Characterization and Laser Tests
5.2.2 Voltage at Set Distance
Moving the laser as far to the left and right as possible and then checking the voltage
results in a variety of distances. The voltage tends to change linearly in the middle of the
field of view, but as the laser reaches the edges of the active area of the LPSM, the
voltage change reduces, becomes stable, and then begins to change in the opposite
direction. Therefore, a better judge of change in voltage for different environments and
distances would be to pick two points in the field of view of the LPSM and check the
voltages at these two points.
Very similar procedural steps as the voltage and distance range experiment were used:
1. Set the lux meter on the table. Stand somewhere and in a position that you can
remember. Every time this reading is taken, stand in the same position so that reflections
and absorptions of light from your body and clothing remain fairly constant.
2. Record the reading
3. Hold the lux meter up to the lens, facing away from the lens. Stand somewhere and in
a position that you can remember. Every time this reading is taken, stand in the same
position so that reflections and absorptions of light from your body and clothing remain
fairly constant. These lux meter measurements are to establish that approximately the
same background light level is present for all experiments that are not conducted in the
dark.
4. Record the reading.
5. Ensure correct filter is pinned in front of laser.
6. Turn on laser.
7. Move the laser to point on the left mark. Record the voltage.
8. Move the laser to the center point. Record the voltage.
9. Move the laser to the right mark. Record the voltage.
10. Change the filter, light conditions, distance, or other parameter and repeat.
The poster was six feet away from the laser and LPSM for all tests. The first test had all
of the lights on, giving a reading of 1058 lux, and had no lens filter, giving the data in
Table 5.6.
Tables 5.7-5.9 summarize the data for different background light levels and with or
without the lens filter.
67
Chapter 5: LPSM Characterization and Laser Tests
Filter
No
filter
0%
6%
13%
19%
25%
31%
38%
44%
50%
56%
63%
69%
Filter
No
filter
0%
6%
13%
19%
25%
31%
38%
44%
50%
56%
63%
69%
Table 5.6. Data with background light, no lens filter
Power
Change
1 in
from
Min
Max
in
laser
Voltage Voltage Voltage Distance Volt/In
(mW)
(V)
(V)
(V)
(in)
(V/in)
40
40
40
40
40
36.02
24.14
16
14.48
11.8
9.39
7.06
6.5
-0.78
-0.68
-0.4
-0.46
-0.36
-0.21
-0.15
-0.12
-0.09
-0.12
-0.11
-0.09
-0.11
0.74
0.58
0.34
0.39
0.31
0.2
0.13
0.06
0.04
0.03
0.01
0
0
1.5200
1.2600
0.7400
0.8500
0.6700
0.4100
0.2800
0.1800
0.1300
0.1500
0.1200
0.0900
0.1100
10
10
10
10
10
10
10
10
10
10
10
10
10
0.1520
0.1260
0.0740
0.0850
0.0670
0.0410
0.0280
0.0180
0.0130
0.0150
0.0120
0.0090
0.0110
Table 5.7. Data with background light and lens filter
Power
1 in
from
Min
Max
Change
laser Voltage Voltage
in V
Distance Volt/In
(mW)
(V)
(V)
(V)
(in)
(V/in)
40
40
40
40
40
36.02
24.14
16
14.48
11.8
9.39
7.06
6.5
7.73
7.94
8.37
8.22
8.35
8.84
9.12
9.5
9.74
9.68
9.68
9.81
9.8
8.56
8.78
8.91
8.89
8.98
9.14
9.41
9.66
9.88
9.88
9.8
9.9
9.83
0.8300
0.8400
0.5400
0.6700
0.6300
0.3000
0.2900
0.1600
0.1400
0.2000
0.1200
0.0900
0.0300
68
10
10
10
10
10
10
10
10
10
10
10
10
10
0.0830
0.0840
0.0540
0.0670
0.0630
0.0300
0.0290
0.0160
0.0140
0.0200
0.0120
0.0090
0.0030
X
Center
(V)
0.04
0.0200
0.0000
0.0000
0.0100
0.0000
0.0000
-0.0100
0.0000
-0.0200
-0.0400
-0.0400
-0.0500
X
Center
(V)
8.15
8.32
8.64
8.5
8.77
8.97
9.3
9.57
9.75
9.7
9.75
9.86
9.82
Chapter 5: LPSM Characterization and Laser Tests
Filter
No
filter
0%
6%
13%
19%
25%
31%
38%
44%
50%
56%
63%
69%
Filter
No
filter
0%
6%
13%
19%
25%
31%
38%
44%
50%
56%
63%
69%
Table 5.8. Data with dimmed lights and no lens filter
Power
1 in
from
Min
Max
Change
Distance Volt/In
laser Voltage Voltage
in V
(mW)
(V)
(V)
(V)
(in)
(V/in)
40
40
40
40
40
36.02
24.14
16
14.48
11.8
9.39
7.06
6.5
0.5630
0.5300
0.3760
0.4040
0.3310
0.2480
0.2050
0.1560
0.1230
0.1360
0.1240
0.0900
0.0940
4.5
4.6
5.07
4.99
5.36
6.03
6.52
7.2
7.63
7.67
7.72
8.1
8.04
Table 5.9. Data with no lights and no lens filter
Power
1 in
from
Min
Max
Change
laser Voltage Voltage
in V
Distance Volt/In
(mW)
(V)
(V)
(V)
(in)
(V/in)
X
Center
(V)
40
40
40
40
40
36.02
24.14
16
14.48
11.8
9.39
7.06
6.5
1.26
1.7
3.15
2.74
3.65
4.74
5.46
6.51
6.96
6.96
7.12
7.66
7.56
1.87
2.28
3.93
3.45
4.23
5.42
6.41
7.43
7.92
7.87
8.07
8.62
8.5
6.89
7
6.91
6.78
6.96
7.22
7.51
8.07
8.19
8.32
8.36
8.56
8.5
7.78
7.83
7.89
7.76
7.85
8.21
8.56
9.13
9.41
9.45
9.55
9.82
9.6
5.6300
5.3000
3.7600
4.0400
3.3100
2.4800
2.0500
1.5600
1.2300
1.3600
1.2400
0.9000
0.9400
5.9100
5.5500
3.9600
4.3100
3.6200
2.7900
2.1500
1.7000
1.4900
1.5800
1.4800
1.2000
1.1000
69
10
10
10
10
10
10
10
10
10
10
10
10
10
X
Center
(V)
10
10
10
10
10
10
10
10
10
10
10
10
10
0.5910
0.5550
0.3960
0.4310
0.3620
0.2790
0.2150
0.1700
0.1490
0.1580
0.1480
0.1200
0.1100
5.09
5.13
5.97
5.71
6.24
6.9
7.6
8.3
8.59
8.62
8.83
9.18
9.17
Chapter 5: LPSM Characterization and Laser Tests
From the data, it can be seen that the minimum voltage tends to decrease as the laser
power increases, as seen in Figure 5.11. The maximum voltage tends to decrease as laser
power increases, as can be seen in Figure 5.12. It follows that the voltage change would
increase as laser power increases.
The distance between the maximum and minimum voltages was 10 inches. By dividing
the voltage change by 10 inches, the volts per inch is found. High volts per inch means
that the voltage level changes faster as the laser point moves, giving better resolution.
The volts per inch increases as laser power increases.
5.2.3 Voltage at Set Point with Different Surfaces
Different surfaces have different reflectivity. White surfaces reflect light very well. Red
surfaces reflect red light, but absorb most other light. Black surfaces absorb almost all
light. Shiny surfaces reflect light differently than diffuse surfaces. The material also
causes light to reflect in different ways. Therefore, a tan surface on a cardboard box was
tested in comparison to white poster. The same point was marked on both surfaces, so it
is expected that for correct operation, the voltage should be the same regardless of what
surface is present. The same distance grid that was used in the experiment for voltage at
a set point at different distances was used for this experiment.
Min Voltage vs Laser Power
12
Voltage (V)
10
8
6
4
2
0
-2 0
5
10
15
20
25
30
35
40
Laser Power (mW)
Lights
Half Lights
Dark
Lens Filter
Figure 5.11: The minimum voltages tends to decrease as laser power increases.
70
45
Chapter 5: LPSM Characterization and Laser Tests
Max Voltage vs Laser Power
12
Voltage (V)
10
8
6
4
2
0
-2 0
5
10
15
20
25
30
35
40
45
40
45
40
45
Laser Power (mW)
Lights
Half Lights
Dark
Lens Filter
(a)
Voltage (V)
Voltage Change vs Laser Power
4
3.5
3
2.5
2
1.5
1
0.5
0
0
5
10
15
20
25
30
35
Laser Power (mW)
Lights
Half Lights
Dark
Lens Filter
(b)
Voltage per Inch (V/in)
Voltage Change per Inch vs Laser Power
0.4
0.35
0.3
0.25
0.2
0.15
0.1
0.05
0
0
5
10
15
20
25
30
35
Laser Power (mW)
Lights
Half Lights
Dark
Lens Filter
(c)
Figure 5.12: (a) The maximum voltage tends to decrease as laser power increases. (b)
The voltage change increases as laser power increases. (c) As the laser power increases,
the volts per inch increase, giving better resolution.
71
Chapter 5: LPSM Characterization and Laser Tests
The poster was attached to the box so that it could be moved. The point was marked by
pushing a push-pin through the spot. When the poster was removed, a tiny hole showed
what point to use for the box test.
The procedure was:
1. Align the lens/LPSM to point along the table.
2. Set the box so that the edge is on the table and the front sits directly behind one of the
marked distances, as seen in Figure 5.13.
3. Point the laser at the marked point.
4. Record the voltage.
5. Move the box to another distance and repeat.
The data in Table 5.10 was collected and graphed. As seen in Figure 5.14, the voltage
levels differ with surface and with distance, even though it is the same point. Therefore,
if the system was in use and a voltage level was collected, then it would depend on the
surface and distance of the point. This means that the depth cannot accurately be
determined because the voltage cannot be translated to a set distance.
5.2.4 Voltage at Set Point at Different Distances
The poster was again mounted on a box so that it could easily be moved to different
distances. Six-inch distance increments were measured from the lens and laser setup up
to 5.5 feet. A point was marked on the poster near the center. According to projective
geometry, since the point is close to the center of the field of view, the voltage should
change slightly as the poster is moved further away, but should not change very
dramatically. If the point were closer to the edge of the field of view, the voltage would
change more.
(a)
(b)
Figure 5.13: The box was moved to different distances, like the set point, different
distances experiment with poster board.
72
Chapter 5: LPSM Characterization and Laser Tests
Table 5.10. Voltage of same point on different surfaces and distances
Voltage, Voltage,
Distance Poster
Box
(ft)
(V)
(V)
1
-1.67
-1.28
1.5
0.05
0.01
2
0.63
1.21
2.5
0.67
1.66
3
1.47
2.19
3.5
1.98
3.19
4
2.43
3.7
4.5
3.21
4.97
5
3.24
4.75
Voltage at Set Point for Different Surfaces and Distances
Poster
Box
6
5
4
Voltage (V)
3
2
1
0
1
1.5
2
2.5
3
3.5
4
4.5
5
-1
-2
-3
Distance (ft)
Figure 5.14: The voltages are not the same for different distances and different points.
The procedure was:
1. Align the lens/LPSM to point along the same line as the table.
2. Align the box so that one edge is on the table and the front sits directly behind one of
the marked distances.
3. Move the laser beam to hit the marked point.
4. Record the voltage.
5. Move the poster to another distance, as seen in Figure 5.15. Repeat the above steps.
The data in Table 5.11 was collected during the experiment.
As the distance increases, the voltage level increases. The voltage is supposed to remain
fairly constant because the point is near the center of the field of view, but the graph
shows that the voltage increases about 4.5 Volts. The voltage should change slightly due
to projective geometry.
73
Chapter 5: LPSM Characterization and Laser Tests
(a)
(b)
Voltage vs. Distance of Same Point
4
3
Voltage (V)
2
1
0
1
1.5
2
2.5
3
3.5
4
4.5
5
-1
-2
Distance (ft)
(c)
Figure 5.15: Voltages were taken starting at (a) close distances and then moved (b)
further away. (c) The voltage changed dramatically as distance changed.
Table 5.11. Data comparing poster distance to voltage
Distance Voltage
(ft)
(V)
1
-1.67
1.5
0.05
2
0.63
2.5
0.67
3
1.47
3.5
1.98
4
2.43
4.5
5
74
3.21
3.24
Chapter 5: LPSM Characterization and Laser Tests
(a)
(b)
Figure 5.16: (a) When a laser hits a diffuse surface, the reflected light is spread out
uniformly. (b) The blue triangle shows how the closer lens picks up more light, while the
green triangle of the farther away lens picks up less light.
For a diffuse surface, the laser hits the surface and some of the light is reflected and some
of the light is absorbed. The light that is reflected spreads out uniformly in all directions,
as seen in Figure 5.16.
When a lens is placed facing the surface, it sees some of the reflected light. Two lines
can be drawn from the lens to the reflection point, forming a triangular shape. When the
light is closer, this triangle covers more incident reflection lines, meaning that it picks up
more reflected light. If the lens is moved further away from the scene, then the triangle
becomes narrower, and fewer incident rays are picked up, causing less light to hit the
lens. Therefore, the reason that the voltages from the LPSM are different with different
distances seems to be that it is picking up different amounts of light and thus different
amounts of power. At closer distances, more light is picked up, causing a certain voltage
reading. As the distance becomes larger, then less light and less power is picked up,
changing the voltage.
5.2.5 Testing with Various Lasers
The system was tested with a variety of lasers power levels and colors. Testing with
various wavelengths showed to which wavelengths the LPSM was sensitive. Testing
with different power levels helped determine system performance boundaries.
75
Chapter 5: LPSM Characterization and Laser Tests
Laser
Type
Laser
Color
HeCd
HeCd
HeNe
HeNe
Ar+
Blue
Blue
Red
Red
Green
Table 5.12. Various lasers tested
Wavelength
Rated
Actual
Voltage Range
Distance
Power
Power
Range
(nm)
(mW)
(mW)
(V)
(in)
441.6
70
-8.3-10
16.5
325
20
-Did not register
652
5
0.13
Did not register
652
30
13
7.8-10
16.5
514
7
-10.9-11.2
--
The poster was set up six feet away from the laser and lens/LPSM. The lens and LPSM
faced the poster. The laser was pointed to the same height as the lens/LPSM and moved
to the left and right. The voltage change and distance range in the X direction were then
recorded, along with the laser specifications. Lasers of under 40mW were checked for
their true power output at the source. The data is shown in Table 5.12.
The LPSM did not seem to respond well to the blue laser, even though the blue laser was
rated at 70mW. It did respond to the red and green lasers, as long as the power level was
sufficient.
The LPSM responded to the green laser at 7mW, though the voltage readings were above
the -10V to 10V threshold. The Ar+ laser power could be adjusted from 7mW to 2 W.
As the power increased, the laser got brighter. However, if the power was turned up very
high, the laser could not sustain the power level for too long and the brightness would
diminish. When the laser got above 1 W, the voltage readings went from 9V to -9 volts,
although the red indicator light remained red for the entire experiment.
The Ar+ green laser was used last. The green laser could not give readings in the good
threshold range even when the power was greater than 500mW. Therefore, it was
determined that the LPSM must be more sensitive to wavelengths near the red range.
5.2.6 Conclusions
In these tests, the laser power, the background light level, the distance, and the surface
types were varied. Voltage readings were taken at the boundaries of the field of view, as
well as in the middle of the field of view.
It was found that results could only be reliably reproduced in the dark. Background light
had a big effect on the voltage readings. However, none of the readings from three feet
to fifteen feet were within the threshold given on the specification of the LPSM.
Therefore, the same experiments may be able to be performed and give consistent,
expected results if the laser power level is within the LPSM threshold.
76
Chapter 5: LPSM Characterization and Laser Tests
Most of the power of the laser is diffused when it strikes the surface of the poster.
Different methods can be used to increase the laser power. The laser itself can be
changed by either getting a better focused laser, or by increasing the laser power. Since
lasers that are well-focused and high-powered cost thousands of dollars, this option is
probably the most expensive. Another option is to change the poster to a specular
surface, such as a mirror. The mirror will reflect the majority of the laser, but will only
reflect it in one direction.
5.3 Tests with Mirror
The poster board is replaced with a mirror to try to reflect more laser power. By
reflecting more laser power, the light level may be within the specified good operation
region. Conducting similar tests within the good operation region may result in more
consistent results.
5.3.1 Mirror Experiments Setup
More experiments were conducted using a mirror. A mirror is a shiny surface, causing
more than 90% of the incident laser light to be reflected. Almost all of the light is
reflected at one angle instead of spreading out uniformly like a diffuse surface.
A mirror was acquired that was 4 feet tall by 8 feet wide. The mirror was mounted onto a
hand truck, as seen in Figure 5.17, so that it would sit perpendicularly to the floor and be
able to be moved easily. Books were placed on the bottom of the hand truck to ensure
that the back of the hand truck was standing straight.
Next, a file cabinet was moved to the middle of the floor. The cabinet was lined up so
that it sat parallel with the table. The power supply, lens, laser, and other materials were
placed on the cabinet. Tape was used to mark where the cabinet was sitting so that the
setup could be easily replicated.
Some of the experiments required that the mirror be placed at specified distances away
from the lens and laser setup. The mirror also needed to remain perpendicular to the
table so that the angle that the laser hit the mirror at did not change. Therefore, the table
edge was marked on the floor from 1 foot to 8 feet away from the cabinet. Six inch
increments were measured going away from the file cabinet so that the mirror could be
set on the tape marks. Two points at each distance were marked to ensure that the
mirror’s relative angle to the cabinet would be the same.
77
Chapter 5: LPSM Characterization and Laser Tests
(a)
(b)
(c)
(d)
Figure 5.17: A large mirror was mounted on a hand truck so that it would sit
perpendicularly to the ground and could be moved easily. (a) Front. (b) Back. (c) The
lens/LPSM, power supply, laser, and other materials were placed on a filing cabinet. (d)
Tape marks on the floor showed six inch increments in distance from the file cabinet.
78
Chapter 5: LPSM Characterization and Laser Tests
5.3.2 Laser Power Compared to Poster
The mirror was placed three feet away from the setup. With no lights on, the laser was
reflected off of the mirror, into the lens. The laser power behind the lens was then taken,
giving the data in Table 5.13. Different filters were used in this experiment. A similar
experiment was done with poster board instead of with a mirror and those results are
included in the table.
Figure 5.18 gives a chart of the data. The mirror reflects over 90% of the light, and when
directed at the lens, gives a much higher power level than the poster. The reflection of
the laser light from the mirror depends on the distance between the laser and the lens.
The angle at which the laser light reflects depends on the incident angle. No matter
where the laser and lens are placed, the distance that the reflection successfully hits the
lens is a lot smaller than the field of view used for the poster board. Therefore, as soon as
the reflection does not hit the lens, the power goes to zero, so the poster would have a
high power reading.
5.3.3 Laser Power at Different Light Levels
The LPSM was removed from the lens and the lens was placed in the setup, aligned with
the table. The laser reflected almost perfectly off of the mirror at a single angle.
Therefore, the laser can be aligned so that the reflection hit the lens, as seen in Figure
5.19.
Table 5.13. Data on laser power behind lens
Power
Power
Laser Behind Lens Behind Lens
Filter Power
Poster
Mirror
(mW)
(uW)
(mW)
0%
>40
1.24
19.74
6%
>40
1.07
5.72
13%
>40
1.03
3.79
19%
>40
0.76
1.83
25%
40.00
0.46
0.35
31%
30.37
0.34
0.051
38%
21.28
0.23
0.046
44%
16.36
0.17
0.016
50%
15.21
0.15
0.03
56%
14.96
0.12
0.019
63%
12.39
0.12
0.013
69%
11.47
0.11
0.017
79
Chapter 5: LPSM Characterization and Laser Tests
0.5
Lens (mW)
Laser Power Beh
Laser Power Behind Lens for Poster and Mirror
0.4
0.3
0.2
0.1
0
0
5
10
15
20
25
30
35
40
45
Laser Power at Source (mW)
Poster
Mirror
Figure 5.18: When the laser reflection from the mirror hits the lens, then it records a
higher laser power than with the poster.
The lens focuses the light at a certain point behind the lens. The laser power meter can
be used to find the power of the light at its focused point. The sensor is held behind the
lens where the light becomes the smallest possible point. This point should give the
highest power reading because it is the most focused and most intense.
When the laser light reflection is aimed at the lens, then a small light spot can be seen and
focused on the sensor of the laser power meter. However, if the reflection is not hitting
the lens, then no laser light can be seen coming through the lens.
The power behind the lens needs to be measured with different filters and at different
light levels. The following procedure was followed:
1. Line up the lens with the edge of the table.
2. Set up the mirror 6 feet away from the file cabinet.
3. Turn on the laser with desired filter. Using the laser power meter, measure the power
at the source.
4. Point the laser so that the reflection hits the lens.
5. Place the laser power meter sensor behind the lens so that the light is focused on the
sensor.
6. Record the power reading.
7. Move the laser so that the reflection is targeted onto the black piece of tape.
8. Place the laser power meter sensor behind the lens so that the light is focused on the
sensor.
9. Record the power reading.
10. Change the filter on the laser and repeat the above steps.
11. Change the background lighting and repeat the above steps.
The data in Table 5.14 was collected.
80
Chapter 5: LPSM Characterization and Laser Tests
(a)
(b)
(c)
(d)
(e)
Figure 5.19: (a) The laser can be directed so that the reflection hits the lens. (b) The
power of the light getting through the lens can be measured. (c)When laser light is
reflected into the lens, then the light can be seen. (d) If the laser light is reflected
elsewhere, then no laser light can be seen. (e) The laser is targeted so that the reflection
hits the tape instead of the lens.
81
Chapter 5: LPSM Characterization and Laser Tests
Table 5.14. Data comparing power at different light levels
Laser Power
Lights
Half
No
Filter
at Source
On
Lights
Lights
(mW)
(mW)
(mW)
(mW)
0%
>40
6.27
6.73
6.36
6%
>40
0.88
1.51
0.98
13%
>40
0.71
0.83
1.183
19%
>40
0.43
0.39
0.525
25%
40.00
0.084
0.096
0.092
*could
not see
31%
30.37
laser
0.0088
0.011
38%
21.28
-0.016
0.0067
44%
16.36
-0.0138
0.0065
50%
15.21
-0.00491
0.0082
56%
14.96
-0.0179
0.0082
63%
12.39
-0.00673
0.0062
69%
11.47
-0.022
0.0041
When the laser was reflected at the target instead of onto the lens, then no laser light
could be seen. The laser power meter was held at different distances behind the lens, but
a reading of 0.0mW was always read. This supports the fact that almost all laser light
gets reflected at a specific angle.
At the 31% laser light filter, the laser could no longer be seen behind the lens, so no
power measurements were able to be taken. Figure 5.20 shows the laser power readings.
From the graph, it can be seen that the laser power behind the lens tends to increase as the
laser power at the source increases when no lights are present. The power at half light
tends to be more inconsistent. The inconsistencies could be due to the mirror reflections.
If different objects are in the mirror, then the light hitting the lens may be slightly
different. In the dark, there should be no other reflections, giving better data. In
conclusion, the light level does affect the laser power level behind the lens.
5.3.4 Laser Power Levels at Different Distances
Next, the laser power levels at different distances were measured. No filters were used
on the laser. The following procedure was used:
1. Move the mirror to 6 feet and align it with the table and marks on the floor.
2. Point the laser so that the reflection hits the lens.
82
Chapter 5: LPSM Characterization and Laser Tests
Lens (mW)
Laser Power Beh
Laser Power at Source vs. Laser Power Behind Lens at
Different Light Levels
0.12
0.1
0.08
0.06
0.04
0.02
0
10
15
20
25
30
35
40
45
Laser Power at Source (mW)
Half Lights
Dark
Figure 5.20: The laser power behind the lens depends on the laser power source and
background lights.
Table 5.15. Data of laser power levels varying background light and distance
Distance
Lights On
Half Lights
No Lights
(ft)
(mW)
(mW)
(mW)
3
16.24
15.37
17.4
4
10.27
13.03
11.48
5
5.48
4.65
4.17
6
4.63
9.12
8.47
3. Using the laser power meter, find the power of the laser behind the lens and record.
4. Change the background light level and repeat.
5. Move the mirror closer by 1 foot and repeat.
The data in Table 5.15 was collected.
The data was used to create the graph in Figure 5.21. The laser power level tends to
follow the same trend, regardless of light level. However, the laser power does change
according to how much background light is present. This may be due to extraneous
reflections in the mirror when any extra light is present. In general, as distance increases,
the laser power decreases, as expected. This could again pose inconsistencies in the
voltage levels of the LPSM because different power levels seem to cause different
voltage readings.
83
Chapter 5: LPSM Characterization and Laser Tests
Laser Power (mW)
Laser Power Behind Lens at Different Distance and Light
Levels
20
15
10
5
0
2
2.5
3
3.5
4
4.5
5
5.5
6
6.5
Distance (ft)
Lights
Half Lights
Dark
Figure 5.21: As distance increases, the laser power tends to decrease.
5.3.5 Voltage at 2 Set Points at Various Light Levels
The mirror was set six feet away from the lens and laser setup. Two points were marked
and the voltage levels at these points were taken with different filters and at different
light levels. This experiment tests to see how much the background light conditions
affect the LPSM.
Two points were chosen that were 5 inches apart. When the laser was pointed at either
point, the LPSM low light indicator was red. As the laser was moved from one point to
the other, there was a small area where the low light indicator was green. The two points
were always outside of this green light area to ensure consistency in the data.
The procedure followed was:
1. Set up the mirror 6 feet from the lens and laser setup.
2. Turn on the laser on.
3. The laser will only be moving horizontally. Get two pieces of white paper and tape
them to the mirror, above the laser so that no laser light hits the paper. The paper will be
used to mark the two points where the laser will shine, as shown in Figure 5.22.
4. With the correct light level and the correct filter, move the laser to point at the
indicated left point. Record the voltage.
5. Move the laser to point to the right point. Record the voltage.
6. Change the filter and repeat.
7. Change the light level and repeat.
84
Chapter 5: LPSM Characterization and Laser Tests
Figure 5.22: White paper was taped to the mirror to indicate the two points where the
laser should be directed.
The data in Table 5.16 was collected when all lights were on. After the 19% filter, the
light could not be seen, so the laser could not be correctly pointed to the two indicated
points. A filter was then placed on the lens and the experiment was repeated with all of
the lights on. Table 5.17 summarizes the data. The data in Table 5.18 was collected with
half of the lights on. The laser could be seen with all filters. The data in Table 5.19 was
collected with no lights on.
As seen in Figure 5.23, as laser power increases, the minimum voltage decreases. The
minimum voltage tends to be higher with no background lights than with some
background lights. As seen in Figure 5.24, the maximum voltage tends to be lower when
no lights are on. The maximum voltage decreases as laser power increases, regardless of
light level.
Subtracting the maximum and minimum voltage gives the voltage change. As the laser
power increases, the voltage change tends to decrease. This is opposite of the behavior in
diffuse surfaces, which had a larger voltage change at high laser powers.
The filters cause the laser light to spread out more. Therefore, the light is hitting the
mirror at different angles and all of the light is not getting reflected at the same angle.
This means that the LPSM may be picking up spurious reflections that would not be
present with a true point laser. The voltage change may decrease, unlike the diffuse
surfaces, due to the difference in reflections. The inconsistencies in the patterns may be
due to the diffusion from the laser filters.
85
Chapter 5: LPSM Characterization and Laser Tests
Filter
No filter
0%
6%
13%
19%
Filter
No filter
0%
6%
13%
19%
Table 5.16. Data for experiment with lights
Power at laser
Min
Max
Change in
Distance
source
Voltage Voltage
Voltage
(mW)
(V)
(V)
(V)
(in)
>40
0.6
1.98
1.3800
5
>40
-0.16
1.36
1.5200
5
>40
-0.1
0.3
0.4000
5
>40
-0.43
0.23
0.6600
5
>40
-0.55
1.36
1.9100
5
Table 5.17. Experiment with lens filter and lights on
Power at
Min
Max
Change in
Distance
laser source Voltage Voltage
Voltage
(mW)
(V)
(V)
(V)
(in)
>40
-1.05
9.15
10.2000
5
>40
-3.6
2.83
6.4300
5
>40
-4.18
-1.98
2.2000
5
>40
-3.65
-2.12
1.5300
5
>40
-3.83
-2.14
1.6900
5
Table 5.18. Experiment with dim lights and no lens filter
Power
Change
Min
Max
at laser
in
Filter
source Voltage Voltage Voltage Distance Volt/In
(mW)
(V)
(V)
(V)
(in)
(V/in)
No
>40
-2.35
7.67 10.0200
5 2.0040
filter
0% >40
-3.93
-0.35 3.5800
5 0.7160
6% >40
-4.06
-3.34 0.7200
5 0.1440
13% >40
-4.35
-3.1 1.2500
5 0.2500
19% >40
-4.24
-3.28 0.9600
5 0.1920
25%
40.00
-3.73
-2.77 0.9600
5 0.1920
31%
30.37
-3.42
-1.6 1.8200
5 0.3640
38%
21.28
-3.15
-0.67 2.4800
5 0.4960
44%
16.36
-3.47
-0.32 3.1500
5 0.6300
50%
15.21
-3.32
0 3.3200
5 0.6640
56%
14.96
-3.6
-0.53 3.0700
5 0.6140
63%
12.39
-2.9
1.29 4.1900
5 0.8380
69%
11.47
-3.15
0.38 3.5300
5 0.7060
86
Volt/In
(V/in)
0.2760
0.3040
0.0800
0.1320
0.3820
Volt/In
(V/in)
2.0400
1.2860
0.4400
0.3060
0.3380
Chapter 5: LPSM Characterization and Laser Tests
Filter
No
filter
0%
6%
13%
19%
25%
31%
38%
44%
50%
56%
63%
69%
Table 5.19. Data with no background lights
Power
Change
Min
Max
at laser
in
source Voltage Voltage Voltage Distance
(mW)
(V)
(V)
(V)
(in)
Volt/In
(V/in)
>40
>40
>40
>40
>40
40.00
30.37
21.28
16.36
15.21
14.96
12.39
11.47
2.0120
0.8180
0.1660
0.1700
0.2740
0.2900
0.1660
0.4440
0.4580
0.5760
0.5000
0.5120
0.6720
-2.37
-3.83
-4.16
-4.18
-4.06
-3.66
-3.21
-2.96
-3.05
-2.85
-2.85
-2.39
-3.24
7.69 10.0600
0.26 4.0900
-3.33 0.8300
-3.33 0.8500
-2.69 1.3700
-2.21 1.4500
-2.38 0.8300
-0.74 2.2200
-0.76 2.2900
0.03 2.8800
-0.35 2.5000
0.17 2.5600
0.12 3.3600
5
5
5
5
5
5
5
5
5
5
5
5
5
Voltage (V)
Min Voltage vs Laser Power
0
-0.5
-1
-1.5
-2
-2.5
-3
-3.5
-4
0
5
10
15
20
25
30
35
40
45
Laser Power (mW)
Half Lights
Dark
Figure 5.23: The minimum voltage tends to be higher with no background lights.
87
Chapter 5: LPSM Characterization and Laser Tests
Max Voltage vs Laser Power
2
Voltage (V)
1
0
-1
-2
-3
0
5
10
15
20
25
30
35
40
45
35
40
45
35
40
45
Laser Power (mW)
Half Lights
Dark
(a)
Voltage Change vs Laser Power
5
Voltage (V)
4
3
2
1
0
0
5
10
15
20
25
30
Laser Power (mW)
Half Lights
Dark
(b)
Volts per Inch (V/in)
Voltage Change per Inch vs Laser Power
1
0.8
0.6
0.4
0.2
0
0
5
10
15
20
25
30
Laser Power (mW)
Half Lights
Dark
(c)
Figure 5.24: (a) The maximum voltage decreases as laser power increases. (b) The
voltage change tends to decrease as laser power increases. (c) The resolution becomes
worse with no light and as laser power increases.
88
Chapter 5: LPSM Characterization and Laser Tests
The voltage change can be divided by the distance between the two points, or 5 inches in
this case, to determine the volts per inch. A higher volts per inch corresponds to better
resolution. The volts per inch tends to decrease as laser power increases and is usually
lower with no light. This trend is opposite of the trend for the poster experiment.
5.3.6 Voltage at Same Point at Different Distances
A point was marked on the mirror by drawing an arrow on the white paper, as seen in
Figure 5.25.
The procedure was:
1. Line up the lens/LPSM with the table.
2. Line up with the tape on the floor and with the table at 1.5 feet.
3. Turn on the laser and point it directly under the arrow.
4. Record the voltage reading.
5. Move the mirror back by six inches, re-align, and repeat.
The data in Table 5.20 was collected.
Figure 5.26 was generated with the data. The voltage tends to increase as the distance
increases, again opposite of the trend with the poster. As the mirror is moved backwards,
the reflection angle changes. When the reflection angle hits the lens, as indicated by the
green low level indicator light, then the reading is usually higher. If the reflection misses
the lens, then the low level indicator light is red, and the lens picks up a small portion of
the laser light, if any, causing a lower voltage level. Due to the size of the mirror, it is
very difficult to keep it perfectly aligned. Small changes in the angle of the mirror cause
different reflection angles and could be the cause of some inconsistencies in the data.
Like the poster, the voltage at a set point does not remain the same at different depths.
Figure 5.25: The set point was marked by an arrow on the white paper.
89
Chapter 5: LPSM Characterization and Laser Tests
Table 5.20. Voltage of set point at different distances
Red/Green
Distance Voltage
Light?
(ft)
(V)
1.5
-7.33
red
2
-8.59
green
2.5
-5.47
green
3
-6.06
red
3.5
-6.07
red
4
-7.93
green
4.5
-1.73
red
5
-3.13
red
5.5
1.15
red
6
-2.7
red
6.5
-2.51
red
Voltage at Set Point vs. Distance
2
0
1.5
2
2.5
3
3.5
4
4.5
5
5.5
6
Voltage (V)
-2
-4
-6
-8
-10
Distance (ft)
Figure 5.26: The voltage tends to increase as distance increases.
90
6.5
Chapter 5: LPSM Characterization and Laser Tests
5.3.7 Within Threshold Experiments
A mirror is a specular surface. When light hits the mirror at an incident angle, it is
reflected at the same angle, unlike on a diffuse surface where the reflected light is spread
out uniformly in all directions. If the reflected light from the mirror strikes the lens, then
the low level indicator light turns green, meaning that sufficient power is hitting the lens
to provide valid readings on the outputs. The distance between the laser and the lens
affects the angle where the laser reflection will hit the lens.
The laser was placed approximately 9.5 inches from the lens. The laser was then turned
on and the leftmost point where the low light indicator light turned green was found. The
voltage and point on the mirror was noted. The light was then moved to the right until
the light turned red. The voltage and point on the mirror right before the light turned red
was found. This experiment was tested with different distances between the laser and
lens and at different light levels.
It was found that the area on the mirror that reflected onto the lens, giving a green
indicator light, was only about 0.25 inches wide. There was very little variation in this
distance, regardless of the baseline. In this 0.25 inch window, the voltage would change
dramatically, usually between 2 to 3 volts.
The change at the red light to green light edge was studied. Big voltage jumps occurred
between the transition from red to green. When the reflection stayed in the red light level
area or the green light level area, the voltage seemed to change fairly linearly. However,
the transition between the two areas was characterized by a large jump in voltage, as seen
in Figure 5.27.
(a)
(b)
Figure 5.27: The voltage level jumps from (a) just inside the green light area to (b) just
outside the green light area.
91
Chapter 5: LPSM Characterization and Laser Tests
5.3.8 Conclusions
In these tests, the laser power, the background light level, and the distance were varied.
Voltage readings were taken at the boundaries of the field of view, as well as in the
middle of the field of view.
The laser power was within the threshold for the LPSM when the reflection was directed
at the lens. If the reflection did not hit the lens, then the light level was below the LPSM
threshold. The laser light would hit the mirror and reflect at an angle governed by Snell’s
Law. Therefore, as the laser moved through the field of view, there was only about an
inch long area where the reflection would hit the lens. Since the area was so small, the
behavior of the LPSM for several of the tests could not be studied in depth.
Therefore, another method must be used to try to get within the threshold of the LPSM.
It may be possible to move the poster board closer to the LPSM and repeat the same
experiments. By moving the poster closer, the laser may appear more focused, causing
the power to be more concentrated.
5.4 Tests at Close Range
The mirror was replaced with the white poster board. Although the poster board was a
diffuse surface, absorbing more power than the mirror, it uniformly reflected the laser.
To try to increase the apparent laser power, the white poster board was moved much
closer to the LPSM than in the original experiments. If a distance could be found that
increased the laser power to the given good operation region, then tests could be
conducted to try to find consistent behavior of the LPSM.
5.4.1 Laser Power Behind Lens
At all distances up to fifteen inches, the low light indicator light was green when the laser
was in the field of view of the lens. The indicator light turned green when the light was
within the threshold range of 0.001 mW to 1 mW. The laser power behind the lens was
measured for all distances up to fifteen inches to ensure that the power was beyond the
minimum threshold.
The procedure followed was:
1. Align the lens with the table.
2. Align the poster with the 3 inch tape marks and the table.
3. Turn on the laser.
4. Point the laser at the marked point.
5. Hold the laser power meter behind the lens and focus the point.
6. Record the power reading.
7. Move the poster back 3 inches and repeat.
92
Chapter 5: LPSM Characterization and Laser Tests
Table 5.21. Power at different distances and light levels
Power
Power
Lights
Distance Lights On
Off
(in)
(uW)
(uW)
3
100.7
76.3
6
64.8
27
9
62.6
13.5
12
58.3
8.2
15
49.3
5.6
Laser Power Behind Lens vs Depth
Laser Power (uW)
120
100
80
60
40
20
0
0
2
4
6
8
10
12
14
16
Distance (in)
Lights On
Dark
Figure 5.28: All power levels within fifteen inches is above 1 uW.
8. Change the light level and repeat.
The data in Table 5.21 was collected.
The data is graphed in Figure 5.28. All power levels within fifteen inches are above the 1
µW minimum power level, proving that the indicator light should be green for distances
within fifteen inches.
5.4.2 Within Threshold Experiments
All of the experiments up to this point did not have a good operation range within the
valid threshold of the LPSM. When the low light indicator light on the LPSM is red, then
there is not enough light hitting the LPSM to give valid outputs. When the light turns
green, then there is enough light to give valid outputs.
93
Chapter 5: LPSM Characterization and Laser Tests
When the poster, a white diffuse surface, was moved close to the laser/lens setup and the
<500mW laser was used with no filters, then there was enough light incident on the
LPSM to give valid readings. Distances were marked in front of the laser and lens setup
every three inches from three inches to fifteen inches. After fifteen inches, the low light
indicator light became red. Within fifteen inches, there was enough light to give valid
readings for the entire expected field of view.
First, the field of view and voltage range were found for all valid depths to ensure good
operation of the LPSM. The procedure used was:
1. Align the lens/LPSM with the table.
2. Place the poster at the 3 inch marks, aligned with the edge of the table.
3. Turn on the laser.
4. Move the laser as far to the left as possible while still seeing a green indicator light, as
seen in Figure 5.29.
5. Record the voltage.
6. Mark the point on the poster.
7. Move the laser as far to the right as possible while still seeing a green indicator light.
8. Record the voltage.
9. Mark the point on the poster.
10. Measure the distance between the two points and record.
11. Move the poster three inches further away and repeat.
12. Change the light level and repeat.
Tables 5.22-5.25 give the data collected for all experiments.
(a)
(b)
Figure 5.29: (a) Move the laser all the way to the left while still staying in the valid
threshold. (b) Move the laser all the way to the right while still staying in the valid
threshold range.
94
Chapter 5: LPSM Characterization and Laser Tests
Distance
(in)
3
6
9
12
15
Table 5.22. Data with lights on
Change
Min
Max
in
Voltage
Voltage Distance Voltage
(V)
(V)
(in)
(V)
-7.54
6.29
2.75
13.83
-7.5
8.74
3.75
16.24
-7.54
8.03
4.75
15.57
-7.48
8.15
5.25
15.63
-6.96
7.74
5.75
14.7
Table 5.23 Data with lights on and lens filter
Change
Min
Max
in
Voltage Distance Voltage
Distance Voltage
(in)
(V)
(V)
(in)
(V)
3
-8.65
8.76
1.5
17.41
6
-8.8
9.33
3
18.13
9
-8.54
7.91
0.5
16.45
12 *no green ---15 *no green ----
Distance
(in)
3
6
9
12
15
Table 5.24. Data with half lights on
Change
Min
Max
in
Voltage
Voltage Distance Voltage
(V)
(V)
(in)
(V)
-7.98
9.1
2.25
17.08
-8.29
9.36
3.5
17.65
-8.84
9.43
4.75
18.27
-8.77
9.49
5.5
18.26
-8.48
9.5
6.25
17.98
Volts
per
Inch
(V/in)
5.029
4.331
3.278
2.977
2.557
Volts
per
Inch
(V/in)
11.607
6.043
32.900
---
Volts
per
Inch
(V/in)
7.591
5.043
3.846
3.320
2.877
Table 5.25. Data from no background lights
Change Volts
Min
Max
in
per
Voltage Distance Voltage
Distance Voltage
Inch
(in)
(V)
(V)
(in)
(V)
(V/in)
3
-9.05
8.76
2.25
17.81
7.916
6
-8.5
9.44
3.5
17.94
5.126
9
-8.86
9.46
4.5
18.32
4.071
12
-8.71
9.2
5
17.91
3.582
15
-8.52
9.4
6.24
17.92
2.872
95
Chapter 5: LPSM Characterization and Laser Tests
First, it can be seen in Figure 5.30 that the minimum voltage at all distances remains
fairly constant at -9 V. The voltage changes slightly with background light, but all light
levels maintain the same trend at all distances.
Next, the maximum voltage is graphed in Figure 5.31. Like the minimum voltage, the
maximum voltage remains fairly constant at approximately 9 V at all depths, regardless
of light level. Since the minimum voltage and maximum voltage remain constant, the
voltage change also remains fairly constant for all depths.
It is expected that as the depth increases, the field of view should get bigger. The field of
view is directly proportional to the depth by a factor of approximately 1/3, so it is
expected that the field of view should increase linearly. The field of view does increase
at a linear rate.
By dividing the voltage change by the field of view distance, the volts per inch can be
found. Since the lens filter did not seem to help the results, that data is not included in
the graph. It can be seen that the volts per inch decreases as depth increases. This result
is expected because the voltage change remains constant even though the field of view
distance increases with depth. Therefore, at larger depths, the same amount of voltage
levels is describing a larger distance, giving poorer resolution and a smaller volt per inch
reading.
MinimumVoltage of Good Threshold at Different
Light Levels
Lights On
Lens Filter
Half Lights
No Lights
0
Voltage (V)
-2
3
6
9
12
15
-4
-6
-8
-10
Distance (in)
Figure 5.30: The minimum voltage remains constant at all depths.
96
Chapter 5: LPSM Characterization and Laser Tests
MaximumVoltage in Good Threshold at Different
Light Levels
Lights On
Lens Filter
Half Lights
No Lights
Voltage (V)
10
8
6
4
2
0
3
6
9
12
15
Distance (in)
(a)
Voltage Change for Different Distances at Different
Light Levels
Voltage Change (V)
Lights On
Lens Filter
Half Lights
No Lights
20
15
10
5
0
3
6
9
12
15
Distance (in)
(b)
Distance of Good Threshold with Different Light
Levels
Lights On
Lens Filter
Half Lights
No Lights
12
15
Distance (in)
8
6
4
2
0
3
6
9
Distance of Poster (in)
(c)
Voltage Change per Inch at Different Light Levels
Lights On
Half Lights
No Lights
Voltage Change (V)
10.000
8.000
6.000
4.000
2.000
0.000
3
6
9
12
15
Distance (in)
(d)
Figure 5.31: (a) The maximum voltage remains constant at all depths. (b) The voltage
change remains constant at all depths. (c) The field of view increases linearly with depth.
(d) The volts per inch decreases as depth increases.
97
Chapter 5: LPSM Characterization and Laser Tests
5.4.3 Voltage at Set Distance
For this experiment, two points that lie within the good threshold at all depths were
found. Since the 3 inch depth has the smallest field of view, a one-inch wide distance
within the 3 inch field of view was marked, as seen in Figure 5.32.
The procedure followed was:
1. Align the lens/LPSM with the edge of the table.
2. Place poster along 3 inch tape marks and align with table.
3. Turn on the laser and point to the left mark.
4. Record the voltage.
5. Move the laser to the right point.
6. Record the voltage.
7. Move the poster back 3 inches and repeat.
8. Change the light level and repeat.
Tables 5.26-5.29 give the data collected in the experiment.
Figure 5.32: Two points, one inch apart, were marked.
Distance
(in)
3
6
9
12
15
Table 5.26. Data with lights on
Change
Min
Max
in
Voltage Voltage Distance Voltage
(V)
(V)
(in)
(V)
-4.98
8.37
1
13.35
-3.52
5.05
1
8.57
-2.24
3.47
1
5.71
-0.43
2.99
1
3.42
-0.76
2.24
1
3
98
Volts
per
Inch
(V/in)
13.350
8.570
5.710
3.420
3.000
Chapter 5: LPSM Characterization and Laser Tests
Table 5.27. Data with lights on and lens filter
Change Volts
Min
Max
in
per
Distance Voltage Voltage Distance Voltage
Inch
(in)
(V)
(V)
(in)
(V)
(V/in)
3
-3.43
8.88
1
12.31 12.310
6
-3.35
7.1
1
10.45 10.450
9
0.25
5.88
1
5.63
5.630
12 -----15 ------
Distance
(in)
3
6
9
12
15
Table 5.28. Data with half lights on
Change
Min
Max
in
Voltage Voltage Distance Voltage
(V)
(V)
(in)
(V)
-6.36
7.03
1
13.39
-3.23
4.3
1
7.53
-2.37
5.13
1
7.5
-0.56
3.8
1
4.36
-1.24
2.44
1
3.68
Volts
per
Inch
(V/in)
13.39
7.53
7.5
4.36
3.68
Table 5.29. Data with no background lights
Change Volts
Min
Max
in
per
Distance Voltage Voltage Distance Voltage
Inch
(in)
(V)
(V)
(in)
(V)
(V/in)
3
-6.85
7.2
1
14.05
14.05
6
-3.25
4.11
1
7.36
7.36
9
-2.36
2.35
1
4.71
4.71
12
-0.56
3.36
1
3.92
3.92
15
-1.14
2.09
1
3.23
3.23
99
Chapter 5: LPSM Characterization and Laser Tests
Figure 5.33 shows the minimum voltage graphed against the depth. The minimum
voltage tends to increase as depth increases.
Next, the maximum voltage is graphed against the depth. The max voltage tends to
decrease as depth increases. Light level does not have a large affect on either minimum
of maximum voltage levels.
The voltage change is found by subtracting the minimum and maximum voltages. The
voltage change is the same as the volts per inch since the distance between points was
one inch. The volts per inch decreases as distance increases. These results agree with the
results from the green threshold experiment.
From the green threshold experiment, it is shown that different depths correspond to
different volts per inch. Therefore, when two points are marked in this experiment and
held constant, it is expected that the voltage change should decrease as depth increases.
This trend is observed in the experiment.
MinimumVoltage vs Depth at Different Light Levels
1
0
-1
-2
-3
-4
-5
-6
-7
-8
Lens Filter
Half Lights
MaximumVoltage vs Depth at Different Light Levels
No Lights
Lights On
Lens Filter
Half Lights
No Lights
10
3
6
9
12
Voltage (V
Voltage (V
Lights On
15
8
6
4
2
0
3
6
9
12
15
Distance (in)
Distance (in)
(a)
(b)
Change in Voltage vs Depth at Different Light Levels
Voltage Change
Lights On
Half Lights
No Lights
16
14
12
10
8
6
4
2
0
3
6
9
12
15
Distance (in)
(c)
Figure 5.33: (a) The minimum voltage tends to increase as depth increases. (b) The
minimum voltage tends to increase as depth increases. (c) The minimum voltage tends to
increase as depth increases.
100
Chapter 5: LPSM Characterization and Laser Tests
5.4.4 Voltage at Set Point
A point was marked on the poster, as seen in Figure 5.34. For this experiment, the
alignment of the lens and poster had to be kept very constant. Due to projective
geometry, the voltage should change slightly as the poster is moved further away.
However, a 4.5 V change should not occur, as it did in previous setups.
The procedure followed was:
1. Align the lens/LPSM with the table edge.
2. Put the poster on the 3 inch tape marks and align with table edge.
3. Turn on the laser and shine on the point.
4. Record the voltage.
5. Move the poster back three inches, re-align, and repeat steps.
6. Change the light level and repeat.
The data in Table 5.30 was collected.
The data is graphed in Figure 5.35. The voltage increased by about 4 V. A smaller
voltage change was expected.
Figure 5.34: A point was marked on the poster so that the x distance would remain
constant.
Distance
(in)
3
6
9
12
15
Table 5.30. Data from experiment
Voltage
Voltage Half
Voltage No
Lights On
Lights
Lights
(V)
(V)
(V)
-3.27
-3.34
-3.34
-3.49
-3.53
-3.52
-1.46
-1.61
-1.58
0.35
0.39
0.3
0.42
0.51
0.51
101
Chapter 5: LPSM Characterization and Laser Tests
Voltage at Set Point at Different Distances and Light Levels
Lights On
Half Lights
No Lights
1
Voltage (V
0
-1
3
6
9
12
15
-2
-3
-4
Distance (in)
Figure 5.35: The voltage level changes with depth.
5.4.5 Distance Threshold Range
It was noticed that if the laser was on and the poster was moved, that the threshold light
on the LPSM would remain green. However, if the laser was off, the poster was moved
to the same distance, and then the laser was turned on, then the LPSM indicator light
would not always turn green. Therefore, an experiment was conducted to determine a
good operating threshold.
The poster was moved to a given distance away from the LPSM and the laser was kept
on. The laser was focused to a point where the LPSM indicator light was green and the X
position read 0 V. The center of the field of view was used because it should have the
least distortion. The laser was turned off for a few seconds, and then turned back on. If
the indicator turned green, then the distance was within the operational threshold, and the
poster was moved further away by a very small distance. If the indicator light stayed red,
then the distance was outside of the operational threshold, and the poster was moved
closer to the LPSM by a very small distance, as shown in Figure 5.36.
It was found that the indicator light turned green when the laser was turned on up to and
including 11 inches. The indicator light did not turn green at distances 11.25 inches away
and further.
102
Chapter 5: LPSM Characterization and Laser Tests
(a)
(b)
Figure 5.36: The distance in (a) is within the operational threshold, while the distance in
(b) is outside of the operational threshold.
5.4.6 Conclusions
In these tests, the laser power, the background light level, and the distance were varied.
Voltage readings were taken at the boundaries of the field of view, as well as in the
middle of the field of view.
At distances within fifteen inches, the light level was within the threshold of the LPSM.
Once the experiments were performed within the proper threshold, the expected outputs
were seen. Consistent results were seen regardless of background light levels. It was
seen that the laser power needs to be about 500 mW to reach the 15 inch distance, so the
laser filters were no longer used.
Now that the working threshold is found, boundaries can be defined for the system.
103
Chapter 6: Slider Experiments
6 SLIDER EXPERIMENTS
In the final system, two LPSMs will be placed next to each other, facing a scene. When
the laser is present in the scene, an x and y voltage will be output from each LPSM.
Using these voltages, the depth of the scene can be calculated.
The process of acquiring corresponding x and y voltages for a laser point can be
accomplished with one LPSM. The LPSM can face the scene and one x and y voltage
recorded. Keeping the laser at the same spot, the LPSM can be moved to a second
position and the new x and y voltages recorded. Using this system, objects can be
modeled so that the resolution and accuracy of the system can be tested.
6.1 Slider Setup
In stereo vision, two cameras are placed parallel to each other, facing a scene. They are
separated by a distance known as the baseline. Each camera sees a slightly different
picture, and by finding the position of the same point in each picture, the depth of the
point can be determined. For these experiments, only one LPSM is used. If the LPSM
can be moved to a slightly different distance while staying the same distance away from
the scene, then stereo vision can be simulated manually. Therefore, something must be
built so that the LPSM can be moved.
The LPSM and lens were mounted on a piece of metal that slid along a metal bar. Lines
were drawn on the bar 0.5 inches apart to help to move the LPSM known distances
during experiment, as seen in Figure 6.1. Next, something had to be built to ensure that
the scene was parallel to the bar where the LPSM slid.
At either end of the LPSM sliding bar, two mounts were placed ninety degrees to the
LPSM bar. Two more bars were slid into the mounts and were again checked to ensure
perpendicularity. Marks were also placed on these bars in half inch increments. If both
bars are placed to protrude the same distance from the LPSM bar, then the poster could
be placed next to the two bars and be parallel to the LPSM bar.
6.2 Manual Data Point Collection
The lab currently has only one LPSM. Therefore, a test needed to be done to simulate
stereo vision with two LPSMs. The following procedure was used:
1. The slider setup was placed on the table. The laser was deflected off of a mirror onto
the poster board. The two distance bars on the slider were set to 3 inches away from the
front of the LPSM lens. The poster was pushed against the two bars and held in place by
104
Chapter 6: Slider Experiments
(a)
(b)
(c)
Figure 6.1: (a) The LPSM is mounted on a metal piece that slides along a metal bar with
half inch increments marked to make data collection easier. Two bars are placed
perpendicular to the LPSM bar and have half inch increments marked. The bars can be
slid (b) closer or (c) farther from the LPSM bar, depending on where the poster is placed.
two heavy batteries. The LPSM was hooked up to power and the outputs hooked up to an
oscilloscope, as seen in Figure 6.2.
2. Place the laser in the right side of the field of view and make sure that the indicator
light on the LPSM is green. The laser is placed in the right side of the field of view
because the LPSM will be moved to the right, causing the laser to move closer to the left
side of the field of view.
3. Record the x and y voltage levels.
4. Move the LPSM to the right by a quarter of an inch.
5. Record the x and y voltage levels. Repeat at quarter inch increments until the LPSM
has been moved a total of 1.25 inches to the right or until the light spot is out of the field
of view (the indicator light becomes red).
6. Move the two distance bars 1 inch further away. Reset the poster and laser and repeat
up to thirteen inches.
Figure 6.3 shows how the waveforms change as the LPSM is slid over, at the 6 inch
distance.
As the LPSM is moved to the right, the laser appears to move further to the left of the
field of view. Therefore, it is expected to see that the x voltage level should decrease.
The y voltage level is expected to remain fairly.
105
Chapter 6: Slider Experiments
Figure 6.2: The setup for the experiment had a poster held next to the two distance bars,
the slider setup, the laser deflected off of a mirror, the power supply, and oscilloscope.
(a)
(b)
(c)
(d)
(e)
(f)
Figure 6.3: The LPSM starts in (a) the original position, producing (b) a waveform. The
LPSM is (c) moved over a small distance, such as 0.5 inches, producing (d) another
waveform. The process is repeated, (e) moving the LPSM and (f) recording the
waveforms.
106
Chapter 6: Slider Experiments
6.3 Edge Distortion
In the performed experiments, a laser moves through the field of view of the LPSM in the
horizontal direction, from the +10V point to -10V. A triangular wave is expected.
However, the waveform actually appeared to be a curve, where the rise time and fall time
on the edges were much longer than expected.
During the slider experiments, it was noticed that the absolute maximum voltage and
absolute minimum voltage did not always occur at the edge of the LPSM threshold where
the indicator lights turns from green to red. When the voltage readings from the LPSM
are mapped to the corresponding distance on the active area of the LPSM, the voltage
must be multiplied by a constant. The constant was found assuming that the absolute
maximum and absolute minimum voltages occurred at the edges of the LPSM active area
at 2 mm and -2 mm. If the max and min voltages did not really occur at the edges of the
LPSM, then the constant was incorrect, meaning that the mapping of the voltage to a
distance was also incorrect.
6.3.1 Light as Enter Field of View
The laser is not a point when it strikes the poster surface. There may be enough incident
light on the LPSM to get a valid reading before the entire light spot is within the field of
view. Once enough light is within the field of view, the LPSM will give the voltage
reading of the center of light of all light seen, as shown in Figure 6.4.
Figure 6.4: A possible light spot and voltage values are noted as the light spot enters the
field of view. The pictures are ordered from top to bottom and then from left to right.
107
Chapter 6: Slider Experiments
Figure 6.5: As the light spot moves through the field of view, the voltage should
decrease. The voltage will probably decrease at different slopes depending on whether or
not the entire light spot is in the field of view.
It can be seen that once enough light is present, the LPSM should give the maximum
voltage. As the laser spot continues to move into the field of view, the voltage should
decrease, although it may not decrease rapidly. Once the entire light spot is in the field of
view, the voltage should decrease linearly at a faster rate. When the laser spot begins to
exit the field of view, the voltage should continue to decrease until it reaches the
minimum voltage, but at a smaller slope. The expected behavior is graphed in Figure 6.5.
From previous experiments, as the laser moves across the field of view, the voltage
increases to the maximum voltage before decreasing linearly to the minimum voltage.
The problem does not appear to be because the laser spot is not always entirely in the
field of view.
6.3.2 Laser Focus Problem
The 500 mW laser creates an elliptical beam when it strikes a surface. However, the 1
mW point laser creates a small point, about 1 mm wide. To test to see whether or not the
voltage problem is due to the focus of the laser, tests are done using the 1 mW laser
shining directly into the LPSM.
When the laser strikes an object, it diffuses according to a Gaussian curve. The mean of
a Gaussian curve is at its center. Since the LPSM outputs the voltage corresponding to
the center of light, it is expected that the focus of the laser should not affect the output.
Tests are performed to test this theory.
The 1 mW laser is shined directly into the LPSM with lens. The response time is taken
by placing a piece of cardboard between the laser and LPSM and then quickly removing
the cardboard. The experiment is done with the laser sitting 3 inches, 7 inches, and 14
inches away from the LPSM. The lens is then removed from the LPSM and the
108
Chapter 6: Slider Experiments
experiment is repeated. The experiment is repeated several times for the same distance
so that an average response time can be taken. Table 6.1 shows the data collected.
At different distances, the response time changes, as was seen with the 500 mW laser.
However, the response time is closer to the expected response time of 100 µs. The
decrease in response time could be due to the intensity of the laser.
Next, the maximum voltage is tested pointing the 1 mW laser directly into the LPSM.
Table 6.2 shows the data collected.
The maximum voltage never reaches the cited 10V in the LPSM specification. When the
lens is placed on the LPSM, the maximum voltage decreases even more. Since the same
behavior is noted with the 1 mW laser as with the 500 mW laser, then the laser focus is
probably not the cause of the edge error.
6.3.3 Lens Focus Problem
The lens focuses the light onto the LPSM. The lens has been set to focus light coming
form infinity to the LPSM. Although experiments were done to determine how far back
the LPSM should sit from the lens, it cannot be determined if the light is focused or not
since it cannot be seen. Therefore, tests are done to see whether the lens is introducing
blur to the laser light to cause the edge error.
Distance
(in)
3
7
14
Table 6.1. Response time with 1 mW laser
Response Time, no lens
Avg
Response Time, with lens
(µs)
(µs)
1
2
3
(µs)
1
2
3
240
300
220
253
---60
100
120
93
260
200
300
120
200
140
153
280
220
320
Avg
(µs)
-253
273
Table 6.2. Maximum voltage with 1 mW laser directly into LPSM
Distance (in)
Max Voltage with Lens (V) Max Voltage without Lens (V)
5
-9.7
6
4.7
9.7
7
6.1
9.7
8
7.2
9.4
9
6.9
9.2
10
6.9
9.4
11
6.9
9.2
109
Chapter 6: Slider Experiments
Table 6.3. The max and min voltages are recorded at different lens apertures.
Distance (in)
Aperture (m)
Max Voltage (V)
Min Voltage (V)
7
Infinity
3.9
-2.5
7
3
3.9
-2.5
7
1.5
3.9
-2.3
7
1
3.8
-2.3
7
0.7
3.6
-2.3
7
0.5
3.6
-2.3
7
0.4
3.3
-2.3
7
0.3
2.5
-2.8
The lens introduces blur in the form of a Gaussian curve. Again, a Gaussian curve
averages to the center, so even if the light is not in focus when it hits the LPSM, it should
not affect the output voltage reading.
The 1 mW laser was pointed directly into the LPSM with lens. The maximum voltage
reading and minimum voltage reading were recorded. The aperture of the lens was then
changed and the voltages were again found and recorded. The 1 mW laser sat 7 inches
away from the LPSM/lens. Table 6.3 shows the data collected.
The maximum and minimum voltages changed very little as the aperture changed from
infinity to 0.3 meters. If the lens aperture caused the edge error, then different maximum
and minimum voltages should have been seen as the light was focused differently.
Therefore, it can be concluded that the lens focus does not greatly affect the response of
the LPSM at its boundaries.
6.3.4 Light Scattering and Conclusions
The white poster was placed 9 inches away from the lens/LPSM. The laser was placed
on a pan-tilt for easier control. The laser was turned on and shined at the rightmost point
before the indicator light turns from green to red, on the X-axis so that theyY voltage was
0 V. The point was marked on the poster and the voltage recorded. The laser was then
moved slightly to the left, further inside the field of view. The y voltage was checked to
ensure that the laser was still on the X-axis. The voltage was recorded and the point
marked. This process was repeated until the indicator light turned red, meaning that the
laser light was out of the field of view. The data collected can be found in Table 6.4.
110
Chapter 6: Slider Experiments
Table 6.4. Data collected from calibration experiment
Marks
Count from
Right
Distance
X
Y
Red/Green
(in)
(V)
(V)
1
0.588 0.741
R
2
0.0000
3.314 0.017
G
3
0.1250
4.661 0.030
G
4
0.3125
6.137 0.038
G
5
0.5000
6.975 0.040
G
6
0.6875
7.192 0.030
G
7
0.8125
7.313 0.038
G
8
1.0000
7.046 0.039
G
9
1.1250
6.706 0.034
G
10
1.3125
6.022 0.011
G
11
1.4375
5.356 0.041
G
12
1.6250
4.645 0.035
G
13
1.8125
3.582 0.015
G
14
2.0000
2.650 0.039
G
15
2.1875
1.609 0.040
G
16
2.3750
0.499 0.039
G
17
2.5625 -0.223 0.030
G
18
2.7500 -1.220 0.034
G
19
2.8750 -2.037 -0.009
G
20
3.0625 -2.980 0.039
G
21
3.2500 -3.752 0.009
G
22
3.3750 -4.638 0.040
G
23
3.5625 -5.353 0.041
G
24
3.6875 -5.970 0.030
G
25
3.8750 -6.811 0.018
G
26
4.0625 -7.317 0.016
G
27
4.2500 -7.552 0.035
G
28
4.5000 -7.382 0.030
G
29
4.6250 -6.751 0.038
G
30
4.8750 -5.350 0.039
G
31
4.9375 -4.651 0.039
G
111
Chapter 6: Slider Experiments
Once all of the points had been marked, the distance of the marks was measured. The
point on the rightmost part of the field of view was called 0 in. All of the other marks
were measured in comparison to this point. The voltages can be graphed versus the
distance, giving the curve shown in Figure 6.6.
Ideally, it is expected for the voltage to spike to its maximum value as soon as it enters
the field of view and decrease linearly to the minimum voltage. Instead, it is seen that the
voltage slowly increases to the maximum voltage. The voltage then begins to decrease,
fairly linearly, to the minimum voltage before slowly increasing again. The points
between the maximum and minimum voltages can be plotted showing a linearly
decreasing trend, as expected.
It is necessary to find out the distance on the LPSM that the voltage refers to in order to
compute the stereo vision equations. One explaination for the plot having curves is that
there is edge distortion intrinsic to the PSD.
Voltage vs Distance at 9 in
Voltage (
10.0
8.0
6.0
4.0
2.0
0.0
-2.00.0
-4.0
-6.0
1.0
2.0
3.0
-8.0
-10.0
4.0
5.0
6.0
y = -3.3279x + 8.2176
Distance (in)
(a)
Voltage vs. Distance 9 in
Voltage (
10.0
8.0
6.0
4.0
2.0
0.0
-2.00.0
-4.0
-6.0
-8.0
-10.0
1.0
2.0
3.0
4.0
5.0
y = -4.8689x + 12.124
Distance (in)
(b)
Figure 6.6: (a) The voltage can be plotted against the distance on the poster. (b) The
voltage can be plotted against the distance on the poster between the minimum and
maximum voltages, giving a linearly decreasing line.
112
Chapter 6: Slider Experiments
In this case, it is assumed that the 4.9375 in field of view must be mapped to the 4 mm
PSD area. The device acts linearly from approximately 6 V to -6 V, or from 1.3125 in to
3.6875 in. This linear distance, or 2.375 in, is about 48.1% of the entire field of view.
Therefore, 2.375 inches must be mapped to 48.1% of the PSD area, or 1.92 mm. Since
the voltage is linearly decreasing with distance and it is assumed that the center of the
PSD is equivalent to 0 V, the equation for the line mapping voltage to PSD distance
becomes:
(30)
V = 6.23269 D PSD .
Therefore, to map a voltage to a distance on the PSD, the voltage must be between 6 V
and -6 V, and it needs to be divided by the constant 6.23269. To test this, the laser was
pointed within the linear region of the field of view in front of the LPSM. The voltage
was recorded. The LPSM was slid 0.5 in and the voltage recorded. This process was
repeated at 1 in and 1.5 in. The poster sat 9 inches from the LPSM, so the answer given
from stereo vision can be checked.
The voltages can be divided by the previously found constant to give the PSD distance,
and then can be applied to stereo vision equations to give a calculated distance, as shown
in Table 6.5.
As can be seen from the table, the calculated depths are incorrect. Next, the assumption
that the minimum and maximum voltages occur at the edges of the 4 mm PSD area was
tried. The field of view at 9 inches was expected to be approximately 3 inches. The
distance between the maximum and minimum voltages is 3.25 inches, much closer to the
expected value than the distance of the entire field of view.
The lens is removed from the LPSM and a slightly opaque piece of paper was held
behind the lens at about the same distance away as the LPSM. The laser was moved at a
constant rate through the field of view. The light spot on the paper also moved at a
constant rate, with no extraneous reflections seen. Since there were no extraneous
reflections, the behavior cannot account for the slow curve up to the maximum voltage.
A front view of the LPSM can be seen in Figure 6.7. The PSD is centered in the middle
of the device, behind a piece of glass. Around the glass is a small gold-colored circle.
Black plastic fills the area between the gold circle and the C-mount for the lens. As the
laser moves over this area, most of the reflections are absorbed in the black area.
However, when the laser strikes the gold circle, the light is spread out, reflecting into the
PSD area. Once the laser passes the gold area, it begins to hit the active area of the PSD.
Table
Distance Baseline
(in)
(in)
9
0.5
9
1
9
1.5
6.5. Stereo vision calculations 1
V1 Dist V2 Dist
Depth
Depth
Vx1
Vx2 (V) (mm)
(mm)
(mm)
(in)
(V)
3.456
0.985 0.55449 0.158038 416.437523 16.39518
3.456
-1.373 0.55449 -0.22029 426.182282 16.77883
3.456
-4.192 0.55449 -0.67258 403.641652 15.8914
113
Chapter 6: Slider Experiments
(a)
(b)
(c)
Figure 6.7: As the laser moves across the LPSM face, it first hits (a) black plastic, then
(b) a gold ring where the light is scattered, and then (c) the active area.
The green indicator light may be turning green while the laser is on the gold circle,
measuring the reflection of light. When the voltage reaches the maximum value, the laser
may have moved off of the gold circle onto the PSD. The same reflective behavior is
seen as the laser exits the PSD and again hits the gold circle.
Using the minimum and maximum voltages at the edges of the 4 mm area, the same
method from above yields a constant of 3.6565. Points were again collected at several
distances and several baselines, resulting in Table 6.6.
The new constant seems to give good results for the stereo vision calculation. The plot of
the voltage against distance between the minimum and maximum voltages appears fairly
linear, with some discrepancies near the minimum and maximum voltages. The offset of
these points can be attributed to some edge distortion. Points outside of the linear region
need to be ignored since they are actually reflections instead of points taken when the
laser is focused on the PSD.
6.4 Intensity vs Voltage Problem
Different amounts of light have been incident on the LPSM according to the laser used
and the deflection of the laser. In the final system, the object to be modeled will be
unknown, meaning that the color and surface material will also be unknown. The laser
will reflect differently according to the surface, so tests need to be run to ensure that the
intensity of the incident light does not affect the voltage, as long as the amount of light is
within the threshold range of the LPSM.
114
Chapter 6: Slider Experiments
Distance Baseline
(in)
(in)
9
0.5
9
1
9
1.5
6
0.5
6
1
6
1.5
3
0.5
3
1
Table 6.6. Stereo vision calculations 2
V1 Dist V2 Dist
Vx1
Vx2 (V)
(mm)
(mm)
(V)
3.3
0.802 0.902502 0.219335
3.3
-1.949 0.902502 -0.53302
3.3
-4.649 0.902502 -1.27143
5.666
2.024 1.549569 0.553535
5.666
-2.425 1.549569
-0.6632
5.666
-6.256 1.549569 -1.71093
6.868
0.153 1.878299 0.041843
6.868
-7.26 1.878299 -1.98551
Depth
(mm)
241.668595
230.020251
227.835508
165.757317
149.224608
151.909449
89.9014371
85.4598174
Depth
(in)
9.514512
9.055915
8.969902
6.525879
5.874985
5.980687
3.539427
3.36456
Figure 6.8: The 1 mW laser is pointed directly into the LPSM to ensure a focused point.
6.4.1 1mW Laser at Different Distances
The first experiment removes the issues of the laser being well-focused and the lens not
focusing the laser on the LPSM correctly. The 1 mW point laser is pointed directly into
the LPSM without the lens, as shown in Figure 6.8.
The laser was pointed into the LPSM at a distance of 5 inches. The LPSM was manually
moved, while watching the oscilloscope. The LPSM was moved until the absolute
maximum voltage value was read on the oscilloscope, while the indicator light was green.
This voltage value was recorded. The laser was then moved one inch further away, and
the process repeated. Table 6.7 summarizes the results.
As the laser distance increases, the maximum voltage decreases. At larger distances, the
laser must travel further to reach the surface of the LPSM, meaning that it will diverge
more. Higher divergence results in lower intensity. Therefore, as laser intensity
decreases, the maximum voltage decreases.
115
Chapter 6: Slider Experiments
Table 6.7. The maximum voltage is recorded at different distances.
Distance (in) Max Voltage (V)
5
9.7
6
9.7
7
9.7
8
9.4
9
9.2
10
9.4
11
9.2
6.4.2 High Power Laser with Different Colors
In this experiment, the true system setup of a laser reflecting off of an object was used.
The 500 mW laser was deflected off of a mirror onto the surface of an object that sat 3
inches from the LPSM with lens. The voltage was recorded. The object was then
replaced by an object of a different color. The distance from the object to the LPSM
remained constant and the laser remained stationary. Therefore, for correct operation, the
LPSM needed to give the same voltage reading regardless of the object in the field of
view. The objects used can be seen in Figure 6.9.
Table 6.8 summarizes the results.
From this experiment, it can be seen that different color surfaces give different voltage
readings for the same point. Therefore, depending on the object placed in the scene, the
voltage could change. If the voltage reading for a specified point is inconsistent, then the
depth cannot be calculated.
6.4.3 High Power Laser with Different Surfaces
It may be possible to change the object so that it remains the same color. Therefore, an
experiment was performed to test the voltage of the same point when the laser was
reflected off of different surface types that were all the same color.
In this experiment, the laser was reflected off of a mirror onto the given object. The
object sat 3 inches away from the LPSM with lens. The voltage was read from the
oscilloscope and recorded. Four surfaces were tested including white poster board, a
slightly glossy book cover, cast metal painted white, and a magazine cover that was not
glossy, as seen in Figure 6.10.
116
Chapter 6: Slider Experiments
(a)
(b)
(c)
(d)
(e)
Figure 6.9: The laser was reflected off of different color surfaces to see if the LPSM
would give the same voltage reading. The surfaces used were (a) white poster board, (b)
brown cardboard, (c) yellow plastic, (d) dark blue slightly glossy book cover, and (e)
light blue slightly glossy book cover.
Table 6.8. The voltage was recorded for different colored surfaces
Distance (in)
Surface
Voltage (V)
3
White poster board
3.9
3
Brown cardboard
1.1
3
Yellow plastic
2.2
3
Dark blue book cover
6.3
3
Light blue book cover
7.0
(a)
(b)
(c)
Figure 6.10: The surfaces tested included (a) white poster board, (b) a glossy book cover, and (c)
metal painted white.
117
Chapter 6: Slider Experiments
Table 6.9. Voltage readings at different white surfaces
Distance (in)
Surface
Voltage (V)
3
White poster board
3.9
3
White slightly glossy book cover
8.0
3
White-painted cast metal
6.9
3
White cover of magazine, not glossy
4.1
As can be seen in Table 6.9, different surfaces gave different voltage readings even
though the laser position and distance did not change.
6.4.4 Conclusions
The different surfaces and colors result in different voltages. The amount of laser power
that a surface reflects and absorbs is dependent on both color and on the surface material.
Therefore, both the color and surface material affects the intensity of the light incident on
the LPSM. From the above experiments, it is seen that intensity affects the output of the
LPSM. Since the object to be modeled is of unknown color and not necessarily of
uniform material, then the voltage readings when the laser strikes the object will be
inconsistent, giving incorrect values to be applied to the stereo equations.
Even when the laser is shined directly into the LPSM from different distances, the
voltage changes. The LPSM seems to be extremely sensitive to laser intensity, and the
performance changes accordingly. Therefore, even if an object of the same material and
color were being modeled, readings may be inconsistent because the entire object will not
lie the same distance away.
6.5 Fifteen Point Stereo with Absolute Error
Using the slider, it is possible to point the laser a scene, read the x and y voltages, and
then move the LPSM by a pre-determined baseline distance to get another x and y
voltage pair. The four voltages and baseline distance give enough information to use
stereo equations to calculate the depth of the given point in the scene.
The poster can be placed a given distance away from the lens/LPSM. The field of view
for the camera in its first position can be marked. The camera can then be moved by 1
inch, and the new field of view marked. The overlap area is the active field of view for
the entire system.
At 9 inches, the active field of view is about 2 inches wide by 3 inches tall. The laser was
pointed at a spot in the field of view and the voltages were taken. The LPSM was then
slid 1 inch to the right, and the values were taken again. The point was then marked with
a black pen. The laser was moved to a new spot and the process repeated.
118
Chapter 6: Slider Experiments
A total of 15 points were taken, spread throughout the active field of view. The points
were divided into five points in three columns. Table 6.10 shows the collected data and
the calculated X, Y, and Z positions.
Since the true values for X, Y, and Z are known for each point, the error can be found.
The percentage error and actual error in inches can be seen in Table 6.11.
To see where the majority of the error occurs, the calculated errors were placed in a graph
relative to the position of their corresponding points. Figure 6.11 shows the graphs for
the error calculations in relation to where the error occurs in the field of view.
It can be seen that the error seems to be smaller in the middle of the field of view and gets
larger towards the edges. This behavior is expected because the PSD inside the LPSM is
known to have some edge distortion. Overall, the depth seems to have about a 10% error,
or about one inch.
(a)
X Error
Y Error
Z Error
Legend
0-5 %
5 - 10 %
10 - 20 %
> 20 %
Legend
0-0.1
0.1-0.25
0.25-0.5
0.5-1
>1
(a)
(b)
(c)
X Error
Y Error
Z Error
(d)
(e)
(f)
Figure 6.11: (a) Fifteen points were taken on the poster board sitting 9 inches from the
LPSM. The error is placed into the area of the field of view where it occurs and colorcoded for better readability. The percentage area is shown for (b) X, (c) Y, and (d)Z, and
the inches error is shown for (e) X, (f) Y, and (g) Z.
119
Chapter 6: Slider Experiments
Point
1
2
3
4
5
6
7
8
9
10
11
12
13
14
15
Table 6.10. Data with calculates X, Y, and Z positions
Xdist Ydist X1
Y1
X2
Y2
Z
X
(in)
(in)
(V)
(V)
(V)
(V)
(in)
(in)
0
0
-1.7
-5
-6.5
-5
8.938
0
0
0.5
-1.7 -3.8 -6.7 -3.6
8.580
-0.014
0.125 1.25 -0.9 -0.2 -6.1
0
8.250
-0.181
0.125 1.875 -0.7
3.6
-5.9
3.8
8.250
-0.220
0.125 2.625 -0.7
6
-5.3
6
9.326
-0.202
0.875
0
2.5
-5
-2.5
-5
8.580
-0.854
0.875 0.5
2.7
-3.2 -2.5 -3.1
8.250
-0.873
0.875 1.25
2.7
0
-2.5
0.1
8.250
-0.873
0.875 1.875 2.9
3.8
-2.1
4
8.580
-0.934
0.875 2.625 2.7
5.8
-1.9
5.8
9.326
-0.941
1.75
0
5.7
-4.8
1.9
-4.8 11.289 -1.854
1.75
0.5
6.1
-3.2
2.1
-3
10.725 -1.879
1.75 1.25
6.3
0.2
2.1
0.4 10.214 -1.854
1.75 1.875 6.3
4.2
2.3
4.4 10.725 -1.929
1.75 2.625 5.3
5.6
2.1
5.8 13.406 -2.010
Table 6.11. Data with calculated error by percent and distance
Point
X
Y
Z
X
Y
(%)
(%)
(%)
(in)
(in)
1
--0.694444
0.000 0.000
2
-46.11594 4.666667
0.014 0.231
3
44.87179 23.233 8.333333
0.056 0.290
4
75.64103 11.54218 8.333333
0.095 0.216
5
61.5942 14.51376 3.623188
0.077 0.381
6
2.380952
-4.666667
0.021 0.040
7
0.18315 18.45039 8.333333
0.002 0.092
8
0.18315 20.28986 8.333333
0.002 0.254
9
6.761905 8.088889 4.666667
0.059 0.152
10
7.556936 16.09806 3.623188
0.066 0.423
11
5.952381
-25.4386
0.104 0.212
12
7.380952 53.76812 19.16667
0.129 0.269
13
5.952381 16.64596 13.49206
0.104 0.208
14
10.2381 6.705314 19.16667
0.179 0.126
15
14.88095 1.725328 48.95833
0.260 0.045
Average: 18.73676 19.76473 12.09977
0.078 0.196
120
Y
(in)
0.000
0.269
0.960
1.659
2.244
0.040
0.408
0.996
1.723
2.202
-0.212
0.231
1.042
2.001
2.670
Z
(in)
0.063
0.420
0.750
0.750
0.326
0.420
0.750
0.750
0.420
0.326
2.289
1.725
1.214
1.725
4.406
1.089
Chapter 6: Slider Experiments
6.6 Scope Stereo with Absolute Error
Taking points by hand results in a low density of points in the active field of view.
Therefore, a way to collect more points in the field of view must be found.
An oscilloscope, the Tektronix TDS 340A, can output a waveform as a set of points in a
table. The new oscilloscope was hooked up to the LPSM and the poster was placed 9
inches away. The laser was placed on the pan tilt so that it could be moved very
precisely and at the same speed. Starting at the top left of the field of view, the laser was
moved at a constant rate down through the field of view until it reached the bottom edge.
The waveform was captured on the oscilloscope and saved as a table of data points. The
LPSM was moved 1 inch to the right, and the process repeated. The laser was moved to a
point on the vertical line and the voltage was read for both positions. When the data was
moved to the computer, the data in the tables could be correctly aligned using this known
point from both positions.
The maximum and minimum voltages were also taken during the experiment so that the
depth could be calculated. The oscilloscope took data at a faster rate than the LPSM
could provide data. All duplicate entries were discarded. The rest of the entries were
used to find the depth. The depth was then compared to the true 9 inch depth and the
error found. Since each vertical line had at least 100 points, the average error was
calculated and is displayed in Table 6.12 for each vertical scan.
Even with a much faster rate of data collection and with a much higher point density, the
error remains about the same as the 15 point collection error. The percentage error
ranges from about 7% to 16%, or about 1 inch.
Table 6.12. Average error for each vertical scan
Average Z
Average Z
Error (in)
Error %
Scan 1
0.714
7.937
Scan 2
0.813
9.039
Scan 3
0.908
10.097
Scan 4
1.154
12.824
Scan 5
1.499
16.661
Scan 6
0.899
9.997
Scan 7
0.610
6.788
121
Chapter 6: Slider Experiments
6.7 Nine Point Stereo with Differential Error
The absolute error has been found to be approximately 10%. If an object is placed in the
scene that has known depth differences, then points can be collected and a differential
error can be calculated.
The foam poster board is used to create the object. The object is made a total of 2 inches
wide by 2.75 inches tall because the active field of view at a 9 inch depth is 2 in by 2.75
in. The object is made up of 3 steps, each 1 inch apart, as seen in Figure 6.12. The
closest part of the object is placed 8 inches from the LPSM. The field of view at 8 inches
will be smaller than the field of view at further away depths, so it is a concern that the
points chosen on the 8 inch area are still within the field of view.
The object was placed in front of the LPSM and the laser shined at a point. The voltage
was taken and the LPSM moved to the right by 1 inch. The new voltage was recorded.
The point where the laser hit the calibrated object was marked. The laser was then
moved to another point and the procedure was repeated. The points were counted going
from top to bottom and then left to right.
Table 6.13 summarizes the data collected. Point 1 is used as a reference point. The data,
along with the recorded max x and max y values, can be used to calculate the coordinates
of each point. The calculated coordinates are then adjusted so that they represent the
distance from the reference point. Table 6.14 shows the calculation results.
Using the calculated data, the error in the expected results versus the actual results is
found. The error is reported in both inches and percentage difference, as seen in Table
6.15.
(a)
(b)
Figure 6.12: (a) A calibrated object was placed in the field of view. (b) The object was
placed in front of the LPSM and points were recorded.
122
Chapter 6: Slider Experiments
Point
1
2
3
4
5
6
7
8
9
Table 6.13. Data collected from experiment
X
Y
Z
X1
Y1
X2
(in)
(in)
(in)
(V)
(V)
(V)
0
0
0
0.9
-2.5
-2.3
0.125 0.9375
1
1.9
-5.3
-6.1
0.3125
1.75
2
1.1
2.7
-7.8
0.6875
0
0
2.8
-2.5
-0.8
0.6875 0.9375
1
6.1
-5.5
-2
0.875 1.8125
2
6.1
3.3
-3.1
1.25
0.0625
0
4.2
-3.3
0.8
1.125
1
1
8.3
-5.6
1.3
1.3125 1.8125
2
8.6
3.8
0.6
Y2
(V)
-2.7
-5
3.1
-2.7
-5.2
3.4
-3
-5.5
3.9
Table 6.14. Position calculated with point 1 as reference
Adjusted Adjusted Adjusted
Point
Z
X
Y
X
Y
Z
(in)
(in)
(in)
(in)
(in)
(in)
1 15.234 -0.219 0.901
0.000
0.000
0.000
2 6.094 -0.263 0.764
-0.044
-0.137
-9.140
3 5.478 -0.376 -0.350
-0.157
-1.251
-9.756
4 13.542 0.278 0.801
0.497
-0.100
-1.692
5 6.019 0.253 0.783
0.472
-0.118
-9.215
6 5.299 0.163 -0.414
0.382
-1.315
-9.935
7 14.338 0.735 1.120
0.954
0.219
-0.896
8 6.964 0.686 0.923
0.905
0.022
-8.270
9 6.094 0.575 -0.548
0.794
-1.449
-9.140
Point
1
2
3
4
5
6
7
8
9
Table 6.15. Error in calculated positions
X Error X Error Y Error Y Error Z Error
in
%
in
%
in
-----0.387
310.000
0.800
85.431
8.140
0.688
220.44
0.498
28.511
7.756
0.409
59.595
0.099
#DIV/0!
1.692
0.434
63.187
0.819
87.464
8.215
0.711
81.366
0.497
27.454
7.935
0.514
41.176
0.281
450.255
0.895
0.439
39.047
1.022
102.207
7.269
0.737
56.190
0.363
20.050
7.140
123
Z Error
%
-814.025
387.823
#DIV/0!
821.548
396.754
#DIV/0!
726.971
357.012
Chapter 6: Slider Experiments
Table 6.16. Error recalculated with point 5 as reference
Point
X Error X Error Y Error Y Error Z Error Z Error
in
%
in
%
in
%
1
0.468
68.181
0.819
87.366
10.215 1021.54
2
0.300
53.333
0.018
#DIV/0!
0.074
#DIV/0!
3
0.001
0.374
0.320
39.451
1.541
154.147
4
0.277
#DIV/0!
0.919
98.049
8.522
852.267
5
0.253
#DIV/0! 0.0004 #DIV/0! 0.0004 #DIV/0!
6
0.024
13.043
0.321
36.786
1.720
172.008
7
0.172
30.718
0.538
61.496
9.319
931.92
8
0.248
56.734
0.202
324.12
0.945
#DIV/0!
9
0.050
800
0.456
52.123
0.925
92.525
Point 1 was chosen as the reference point in the previous calculations. Point 1 lies in a
corner, where more distortion is probably occurring. Therefore, a new reference point is
chosen, this time in the middle of the field of view. Point 5 is chosen as the reference
point and the error is recalculated, as shown in Table 6.16.
Using a reference point in the middle of the field of view does improve the differential
error. However, the error in both cases is significantly greater than the absolute error
from previous experiments.
6.8 Pipe Weld
One possible application of this system would be to reverse engineer objects. Since the
object must be of the same size and material, a pipe weld is modeled. The laser scanning
system is not yet built, so the point collection has to be done manually. Attempting to
model the pipe weld will help to see flaws in the current data acquisition system and
study test accuracy.
6.8.1 Manual Point Collection
A pipe weld, shown in Figure 6.13, of constant color and material was to be modeled.
The laser was pointed at the pipe weld within the active field of view. The voltages for
both positions of the LPSM were recorded. The laser was moved slightly and the process
repeated. About 200 points were collected for the 3 in by 4 in area.
124
Chapter 6: Slider Experiments
Figure 6.13: A pipe weld was to be modeled.
6.8.2 Manual Point Calculation and Modeling
The points were entered into an excel spreadsheet and the corresponding X, Y, Z
coordinate was found. These points were then entered into a VRML file and imported
into RapidForm 2004, giving Figure 6.14.
Since the points were not very dense, the volume function was used to add points. The
triangulate function could then be used to create a 3D model.
A bump can be seen in the 3D model corresponding to where the weld should be. The
area flattens out away from the bump. The shape is not very good because the points are
not very dense. The program had to add some points and make assumptions to connect
the points. From the model, it can be seen that a way to collect more points needs to be
found.
When looking at the points, it seems that the majority of the points are concentrated in a
small area, along with some extraneous points. These points were deleted and the
remaining points were re-triangulated to try to get a better shape.
The deletion of extraneous points did not seem to help the shape a lot. Sampling points
at a higher density may help to give a better shape.
6.8.3 Scope Point Collection
The Tektronics TDS 340A oscilloscope can save a waveform and output it as a table of
points. The pipe weld was placed in front of the LPSM and the laser scanned a vertical
125
Chapter 6: Slider Experiments
(a)
(b)
(c)
Figure 6.14: (a) The manually collected data points were entered into RapidForm 2004.
(b) Functions in RapidForm allowed the points to be connected to form a 3D shape. (c)
Extraneous points were deleted to try to create a better 3D shape.
line in the field of view, as seen in Figure 6.15. The waveform was captured on the
oscilloscope and saved to a disk as a table of points. The LPSM was moved by 1 inch
and the laser traced the same scan. By taking the voltage of one point along this line at
both positions, the data in the two tables could be aligned.6.8.4 Scope Point Calculation
and Modeling
About 10 scans of data were taken, consisting of about 600+ points per vertical scan. The
oscilloscope outputs points at a faster rate than the response time of the LPSM.
Therefore, not all the data was good data. Duplicate points were removed from the data.
The X, Y, and Z coordinates were calculated for the remaining data. The coordinates
were then sampled every 0.033 inches in the Y direction. The coordinates were filtered
for 4 vertical scans, giving the dataset to be modeled.
The points were imported into RapidForm 2004 and then triangulated. Figure 6.15 shows
the resulting 3D form. The section modeled is about 0.25 in wide by 1 in tall and consists
of 400+ points.
126
Chapter 6: Slider Experiments
(a)
(b)
Figure 6.15: (a) The oscilloscope was used to take data at a high density. (b) Functions in
RapidForm connected the dense points to form a 3D shape.
It can be seen that the shape is not very smooth, even with a denser sampling of points.
As was seen from the poster experiments, the error tends to be about 10%, or 1 inch. The
pipe weld was sitting about 9 inches away from the LPSM, meaning that 10% error
corresponds to 0.9 in. The pipe weld is less than 1 inch in height. Therefore, the average
error seen is actually larger than the change in height.
The expected error is larger than the height change to be detected. Therefore, it is not
surprising that the 3D model is very jagged. It can be seen that there is a bump in the
middle, about where the weld should be. The areas on top of the bump and below the
bump are supposed to be slightly further away and flatter. This general shape can be
seen, but it is not smooth and probably contains considerable error.
127
Chapter 6: Slider Experiments
6.9 Object Modeling
From modeling the pipe weld, a good system using an oscilloscope was found for point
collection. It was also seen that the system seems to have a lot of error. To test the error,
calibrated objects need to be modeled so that the calculated points can be compared to
where the true points lie in space. By analyzing the error of the calibrated objects,
correction methods can be developed and tested.
6.9.1 Final System Setup
The system needs to be tested on calibrated objects to test for performance boundaries
and error. Objects that can easily be modeled are used, such as a rectangular prism and a
triangular prism. The objects also need to be of the same material and the same color as
the background or the constant will be incorrect, as shown from previous experiments.
Since the field of view at a 9 inch distance is only 2 inches by 3 inches, small wooden toy
objects, as seen in Figure 6.16, are used in the final system test. The objects include a
rectangular prism, a triangular prism, a cylinder, a cone, a pyramid, and a cone with the
top cut off.
A wooden board was found that was about the same color as the wooden objects. The
board was placed 10 inches away from the LPSM and aligned to be parallel with the
slider. Books were placed in front of the board so that when an object was placed in front
of the board, it was high enough to be in the field of view of the LPSM. A piece of white
poster board was placed on the top of the books so that any reflections that hit the surface
would be uniformly reflected. The laser was placed on a pan tilt behind the LPSM, a
little to the right of center, so that it did not interfere with the output cable from the
LPSM. When modeling an object, the object was placed on the books and pushed back
until it touched the wooden board.
The laser was then turned on and pointed to hit the board within the field of view of the
LPSM. The laser was moved along the X-axis until the maximum x value was found.
The value was recorded, and the process repeated to find the minimum x value. The laser
was then moved to the middle of the field of view and moved along the Y-axis to find the
maximum and minimum y values. These values would later be used to find the constant
for converting the output voltages from the LPSM to distances.
The x and y outputs of the LPSM were attached to a Tektronics TDS400A oscilloscope.
The oscilloscope was set to take 200 samples per second. Using the pan tilt, the laser
made one vertical scan in the field of view, and the waveform was captured on the
oscilloscope. The output was saved as a table of points to a floppy disk. The laser was
then moved to a set point along the vertical line, and the x and y values were recorded.
The LPSM was slid one inch to the right, and the new x and y values were recorded for
the same point. The laser scanned the original vertical line, and the data was again
128
Chapter 6: Slider Experiments
(a)
(b)
(c)
(d)
(e)
(f)
(g)
Figure 6.16: Six wooden objects were modeled including (a) a rectangular prism, (b) a
triangular prism, (c) a cylinder, (d) a cone, (e) a pyramid, and (f) a cone with the top cut
off. (g)In the final system setup, a board was placed ten inches from the slider. The
object was placed directly in front of the board for modeling.
129
Chapter 6: Slider Experiments
captured and saved. The x and y values recorded were used to find which data points in
each of the vertical line scans corresponded to the same point. The laser was then moved
slightly to the right, and the process was repeated until the entire field of view was
scanned.
6.9.2 Modeling Objects and Data Acquisition
All of the data taken for an object was saved as a spreadsheet. Each vertical scan
contained four columns of data: x from LPSM at position 1, y from LPSM at position 1, x
from LPSM at position 2, and y from LPSM at position 2. Two more points were also
saved for each scan telling an x and y point from position 1 that corresponded to an x and
y point from position 2. Since the laser was moving at a constant speed for both scans
and since data was being sampled at a constant rate, then if these two points could be
lined up, then the rest of the data in the table would also be correctly aligned. Therefore,
this reference point was used to align data from the LPSM at position 1 to data from the
LPSM at position 2.
Assuming linearity, the maximum x value and the maximum y value were divided by 2
mm, the position where the maximum value should occur on the active area of the LPSM,
giving two constants. The voltages in the table were converted to distances by dividing
by the respective constant. The distances, along with the known focal length and
baseline, were applied to stereo vision equations to give an X, Y, Z coordinate for each
set of points in the table.
Since each scan represented one vertical sweep in the field of view, the X distance should
be approximately the same. Therefore, the average X value was found and used for all
points within one vertical sweep. The Y and Z coordinates were filtered so that only
unique points were left. This process was repeated for each vertical scan, leaving
approximately 100 to 150 points per vertical scan.
All of the points from each of the vertical scans were combined and imported into
RapidForm to create a final model of the entire field of view. To easily see the depth of
each point, a color map was to be added to the point cloud. To add a color depth map in
RapidForm, a surface must be present. Therefore, the triangulateÆ3D command in
RapidForm was used to fit a surface to the points. The inconsistent density of points in
the color depth maps appears after RapidForm processing, possibly due to an automatic
redundant data removal algorithm.
Once the surface was created, the contour line command was used to add a color depth
map to the remaining points. Blue colors meant that the point was closer to the LPSM,
while red and yellow colors meant that the point was further away. The map allowed the
viewer to easily see the depth of all points to see whether the object was correctly
modeled.
130
Chapter 6: Slider Experiments
6.9.3 Background
The background wooden board was modeled with no object to create a base of
comparison. Ten vertical scans comprised the entire field of view, an area two inches
wide and three inches tall. Figure 6.17 shows the results.
The position of the board was measured to within 0.0625 inches using a ruler. To attempt
to reduce this error, a plane can be fitted to the data. If the wooden board is not truly
parallel to the slider, this error will also be filtered out by using a best fit plane. The
program lsplane.m from Eurometros was used to find the best fit plane for the data using
Matlab. The plane was then created in RapidForm. It was expected that the plane be
perpendicular to the Z-axis. However, it can be seen in Figure 6.17 that the plane is very
skew. Although the data fits the plane, the data has so much error that the best fit plane
probably contains more error than the plane measured with a ruler. Therefore, the plane
measured by hand that sits perpendicular to the Z-axis at 10 inches was created in
RapidForm for comparison.
To study the error, the calculated depth was compared to the actual depth. The actual
depth was set at the measured distance of the plane, or 10 inches, for all points. The
percent error was calculated as:
⎛ | ActualDepth − CalculatedDepth | ⎞
⎟⎟100 .
% Error = ⎜⎜
(31)
ActualDepth
⎝
⎠
The error was first plotted as a depth map, where the error at each point was plotted at its
X,Y coordinate. Since the laser made vertical sweeps through the scene, many points
were grouped at certain X values. Therefore, all points that occurred at a given X value
were grouped together and the average error was found and graphed. The points were
scattered along the Y axis. Points within 0.2 inches were grouped together and the
average error found and graphed. A similar procedure as to the X values was used to
create the plot for error versus the depth. The error versus the x distance and y distance
can be seen in Figure 6.18. Since all points should have been on a plane at 10 inches, the
error versus the depth was averaged and found to be 6.5%.
The error versus the x distance does not seem to have a pattern. The error versus the y
distance shows that the error remains fairly constant in the middle of the field of view and
increases at the edges of the field of view.
6.9.4 Rectangular Prism
The first object modeled was the rectangular prism. The prism was placed directly in
front of the wooden board background. Ten vertical scans were taken to create the color
depth model. The color depth model is measured in inches.
131
Chapter 6: Slider Experiments
(a)
(c)
2”
3”
(b)
(d)
(e)
(f)
(g)
Figure 6.17: (a) The color depth map in inches and (b) visual photo of the triangular
prism can be seen as well as (c) the triangular prism in the entire system and the (d)
actual dimensions of the object. (e) The best fit plane is calculated and placed in
RapidForm. Since the best fit plane is skew, the (f) measured plane is also created in
RapidForm and (g) can be compared to the best fit plane.
132
Chapter 6: Slider Experiments
Error vs X Distance for Background Plane
10.0
Error (%
8.0
6.0
4.0
2.0
0.0
-1.5
-1.0
-0.5
0.0
0.5
1.0
1.5
X Distance (in)
(a)
Error vs Y Distance for Background Plane
16.0
14.0
Error (%
12.0
10.0
8.0
6.0
4.0
2.0
0.0
-2.0
-1.5
-1.0
-0.5
0.0
0.5
1.0
1.5
2.0
Y Distance (in)
(b)
Figure 6.18: The average error or the background plane is graphed against (a) the x
distance and (b) the y distance.
The depth model can be compared to the visual picture in the field of view and also to the
actual dimensions of the object.
The cluster of blue dots in the center of the color depth map indicates an object close to
the LPSM. The green, yellow, and red dots on either side of the blue cluster represent the
backdrop, which is further away. The inconsistency of the dots is due to processing by
RapidForm.
Since the data points on the object should be on a plane perpendicular to the Z-axis at 9
inches, the best fit plane method was again tried. The best fit plane was created in
RapidForm, along with the expected plane, as seen in 6.19. The best fit plane was even
more skew than the best fit plane for the background, so it was again decided that
absolute error calculations would probably give a better indication of the true error.
The same methods as were used for the background plane were used to compare the error
to the x distance, y distance, and depth. The four graphs can be seen in Figure 6.20.
133
Chapter 6: Slider Experiments
(a)
(c)
3”
1”
1”
(b)
(d)
(e)
(f)
(g)
Figure 6.19: (a) The color depth map in inches and (b) visual photo of the rectangular
prism can be seen as well as (c) the rectangular prism in the entire system and the (d)
actual dimensions of the object. (e) The best fit plane is calculated and placed in
RapidForm. Since the best fit plane is skew, the (f) measured plane is also created in
RapidForm and (g) can be compared to the best fit plane.
134
Chapter 6: Slider Experiments
(a)
Error vs X Distance for Rec Prism
35
Error (%
30
(b)
25
20
15
10
5
0
-1.5
-1.0
-0.5
0.0
0.5
1.0
1.5
2.0
X Distance (in)
Error vs. Y Distance for Rec Prism
60
Error (%
50
(c)
40
30
20
10
0
-2
-1.5
-1
-0.5
0
0.5
1
1.5
2
Y Distance (in)
Error vs Depth for Rec Prism
14
Error (%
12
(d)
10
8
6
4
2
0
8.8
9
9.2
9.4
9.6
9.8
10
10.2
10.4
Depth (in)
Figure 6.20: The percent error is graphed against (a) the (x,y) position, (b) the x distance,
(c) the y distance, and (c) the depth for the rectangular prism.
135
Chapter 6: Slider Experiments
The error against the x distance has less error in the middle of the field of view and has
larger error at the edges. The y distance follows the same trend as the background, with
constant error in the middle of the field of view and larger error at the edges. The error
against depth has smaller error at closer areas and larger error at further away areas of the
scene. From the depth plot, the least amount of error seems to occur on the object, which
is the closest part of the scene.
6.9.5 Triangular Prism
Figure 6.21 shows the modeling of the triangular prism. The color depth map can be seen
compared to the visual photo of the field of view of the LPSM and the actual object
dimensions.
It is known that the back of the triangular prism is 10 inches away from the LPSM. Since
the geometry of the triangular prism is known, the depth of the rest of the shape can be
calculated with three equations, an equation for the background, for the left face, and for
the right face of the prism. Error is then calculated in the same way as the rectangular
prism and is graphed, as seen in Figure 6.22.
(a)
(c)
3”
1”
1”
(b)
(d)
Figure 6.21: (a) The color depth map in inches and (b) visual photo of the triangular
prism can be seen as well as (c) the triangular prism in the entire system and the (d)
actual dimensions of the object.
136
Chapter 6: Slider Experiments
(a)
Error vs X Distance for Tri Prism
30.0
Error (%
25.0
20.0
(b)
15.0
10.0
5.0
0.0
-1.5
-1.0
-0.5
0.0
0.5
1.0
1.5
X Distnace (in)
Error vs Y Distance for Tri Prism
25
Error (%
20
15
(c)
10
5
0
-2
-1.5
-1
-0.5
0
0.5
1
1.5
2
Y Distance (in)
Error vs Depth for Tri Prism
30
Error (%
25
20
(d)
15
10
5
0
9.2
9.3
9.4
9.5
9.6
9.7
9.8
9.9
10
10.1
Depth (in)
Figure 6.22: The percent error is graphed against (a) the (x,y) position, (b) the x distance,
(c) the y distance, and (d) the depth for the triangular prism.
137
Chapter 6: Slider Experiments
It can be seen from the graph that the error does not follow a clear pattern when
compared to the x distance. When compared to the y distance, the error is again constant
in the middle of the field of view, but is less towards the bottom and is larger towards the
top of the field of view. The error versus depth is also not constant or linear, but it can be
seen that there is more error at 10 inches than at 9 inches away. According to the depth
plot, the most error occurs in the middle of the right face of the prism. The least amount
of error occurs on the left face.
6.9.6 Cylinder
The next object modeled was the cylinder, shown in Figure 6.23. Ten vertical scans were
taken to model the entire cylinder. The color depth map can be seen compared to the
visual photo of the field of view of the LPSM and the actual object dimensions.
The error was calculated using the same method as the other shapes. Figure 6.24 shows
the percent error plotted at its x,y point, against the x distance, against the y distance, and
against the depth.
(a)
(c)
1”
3”
(b)
(d)
Figure 6.23: (a) The color depth map in inches and (b) visual photo of the cylinder can
be seen as well as (c) the cylinder in the entire system and the (d) actual dimensions of
the object.
138
Chapter 6: Slider Experiments
(a)
Error vs X Distance for Cylinder
30
Erro (%
25
(b)
20
15
10
5
0
-1.2
-1.0
-0.8
-0.6
-0.4
-0.2
0.0
0.2
0.4
0.6
0.8
1.0
X Distance (in)
Error vs Y Distance for Cylinder
14
Error (%
12
(c)
10
8
6
4
2
0
-1.5
-1
-0.5
0
0.5
1
1.5
Y Distance (in)
Error vs Depth for Cylinder
14
Error (%
12
(d)
10
8
6
4
2
0
8.8
9
9.2
9.4
9.6
9.8
10
10.2
Depth (in)
Figure 6.24: The percent error is graphed against (a) the (x,y) position, (b) the x distance,
(c) the y distance, and (c) the depth for the cylinder.
139
Chapter 6: Slider Experiments
The error against the x distance still shows no clear pattern. The error against the y
distance is still constant in the middle of the field of view and changes at the edges.
Although the maximum error does not occur at the 10 inch point when compared to the
depth, the error is greater at 10 inches than at 9 inches away. From the depth plot, it
appears that the error is more evenly spread throughout the scene than it was for the
rectangular prism or triangular prism.
6.9.7 Cone
Three shapes, a cone, a pyramid, and a cone with the top cut off, were also modeled. The
error was not calculated for these objects since their shape was increasingly difficult to
correctly and accurately model. However, the user should be able to see the shape using
a depth map and subjectively determine how good the model is. The cone was first
modeled and can be seen in Figure 6.25.
Red, yellow and green dots in the upper right corner indicate the background. It was
expected that dark blue dots be at the bottom of the cone, and lighter blue or green dots
be at the top of the cone, since the top is further away than the bottom of the cone.
(a)
(c)
3”
2”
(b)
(d)
Figure 6.25: (a) The color depth map in inches and (b) visual photo of the cone can be
seen as well as (c) the cone in the entire system and the (d) actual dimensions of the
object.
140
Chapter 6: Slider Experiments
However, the depth plot shows a fairly constant mix of blue and green dots along the
entire cone area. Since the cone face is at a different angle than the triangular prism and
cylinder, the laser intensity being reflected back to the LPSM may be different, causing
different error. The top left part of the background may not be seen because the laser was
placed slightly to the right of the center of the scene. Then, when the laser was pointed to
the left part of the scene, some of the beam may have been hitting the cone instead of the
entire beam hitting the background.
6.9.8 Pyramid
A four-sided pyramid was the next shape to be modeled and can be seen in Figure 6.26.
The laser was placed slightly right of the center, so when the beam hit the background to
the right of the pyramid, it was hidden from the LPSM. Therefore, only the left side of
the pyramid was modeled. The upper left area of the plot has green, yellow, and red dots
indicating the background. The pyramid had more blue and green dots. There should
have been more dark blue dots towards the bottom of the pyramid and light blue or green
dots at the top of the pyramid.
(a)
(c)
3”
2”
2”
(b)
(d)
Figure 6.26: (a) The color depth map in inches and (b) visual photo of the pyramid can
be seen as well as (c) the pyramid in the entire system and the (d) actual dimensions of
the object.
141
Chapter 6: Slider Experiments
(a)
(c)
0.8125”
2”
2”
(b)
(d)
Figure 6.27: (a) The color depth map in inches and (b) visual photo of the cone with the
top cut off can be seen as well as (c) the cone with the top cut off in the entire system and
the (d) actual dimensions of the object.
6.9.9 Cone with Top Cut Off
The last object modeled was a cone with the top cut off and can be seen in Figure 6.27.
The cluster of dark blue dots indicates the object. The green, yellow, and red dots
represent the background. There should be more dark blue dots concentrated at the
bottom of the object and lighter blue or green dots at the top. However, all of the dots on
the object seem to be spread out fairly consistently.
6.9.10 Conclusions
The error versus x distance is first studied. When comparing the graphs from the
rectangular prism, triangular prism, cylinder, and background, no pattern seems to
142
Chapter 6: Slider Experiments
Calc Depth vs True Depth for Tri Prism
16.0
Calc Depth (
14.0
(a)
12.0
10.0
8.0
6.0
4.0
2.0
0.0
9.2
9.3
9.4
9.5
9.6
9.7
9.8
9.9
10.0
10.1
Tru Depth (in)
Calc Depth vs True Depth for Cylinder
16
Calc Depth (
14
12
10
(b)
8
6
4
2
0
8.80
9.00
9.20
9.40
9.60
9.80
10.00
10.20
True Depth (in)
Figure 6.28: Calculated depth is plotted against measured depth for (a) the triangular
prism and (b) the cylinder.
emerge. Each object has different depths at different points along the x axis, which could
cause the irregular patterns in each graph.
When the error versus y distance graphs are compared for the same objects, the only
obvious pattern is that the error becomes constant in the middle of the field of view. At
the edges of the field of view, the error changes, but the change at the edge is not
predictable.
The error versus depth plots are not very consistent for intermediate depths. However, it
can be seen that the error at 9 inches is always smaller than the error at 10 inches. This
suggests that error may be a function of depth. To see if there is a fixed constant that can
be applied to correct the calculated depth, the calculated depth is graphed against the
measured depth. These plots for the triangular prism and cylinder can be seen in Figure
6.28.
From the graphs, it can be seen that multiple points occur at the same absolute depth.
Therefore, there is no one-to-one correspondence between the calculated depth and
absolute depth, meaning that a single constant does not exist to correct the calculated
depth.
There have been many problems with laser intensity. From previous experiments, it was
proven that laser intensity changes with depth. Therefore, the LPSM is probably seeing
different levels of intensity of the laser according to the depth of the object. The objects
143
Chapter 6: Slider Experiments
being modeled are also different shapes. The laser hits the face of the object, but
according to the angle of the object surface, the laser is being reflected in different
directions. Unless the object surface is facing the LPSM, not all of the reflections will be
directed back to the LPSM, again affecting laser intensity. Intensity may also be reduced
according to how sharp of an angle the laser beam is directed at the object. If the laser is
perpendicular to the object face, then the amount of the laser beam striking the surface
will be greater than if the beam strikes the surface at a 45º angle.
6.10 Object Modeling Correction
Three methods were tried to correct the models. First, non-linearity of the LPSM was
assumed. Next, multiple new constants were used to try to calculate the depth. Finally,
multiple constants were again used to calculate the depth, but the constants were based on
the original constant found for each model. Only the third attempt created consistently
better models.
6.10.1 Non-Linearity
To create the models, it was assumed that the LPSM was linear throughout the voltage
range. Therefore, the constant used to convert voltages from the LPSM to distances was
based on the maximum voltages found. The maximum voltage for x or y was divided by
2 mm, the farthest away distance of the active area. The constant was used to convert
positive and negative voltages.
When recording the maximum and minimum voltages, it was seen that the two values
were usually different, suggesting that the LPSM may not be linear. Therefore, four
constants were created to convert voltages to distances: a negative x constant using the x
minimum voltage, a positive x constant using the x maximum voltage, a negative y
constant using the y minimum voltage, and a positive y constant using the y maximum
voltage. The depth was then recalculated using the new distances.
The 4-constant attempt was tried on the rectangular prism. The error was calculated in
the same way as for the original model. Figure 6.29 shows the percent error per point of
the corrected model versus the percent error per point of the original model.
The corrected model had more error along the left side of the field of view. The error in
the rest of the corrected model was about the same as the error in the original model.
Therefore, the assumption that the LPSM is linear stands and only two constants are
needed to convert voltages to distances.
144
Chapter 6: Slider Experiments
(a)
(b)
Figure 6.29: The color depth plots show the percent error according to the point for (a)
the original model and (b) the corrected model for the rectangular prism.
Table 6.17. New constants used to change voltages from LPSM to distances
Distance Max X Min X Max Y Min Y Xconst Yconst
(in)
(V)
(V)
(V)
(V)
(V/mm) (V/mm)
10
7
-8.4
6.8
-5.8
3.50
3.40
9.75
7.2
-8.4
7.2
-6.2
3.60
3.60
9.5
7.6
-8.8
7.2
-6.2
3.80
3.60
9.25
7
-8.4
7.4
-6
3.50
3.70
9
7
-8.2
6.6
-5.8
3.50
3.30
6.10.2 Several Constants
From previous experiments, it was seen that the maximum and minimum voltages change
with distance. To create the models, the constant found using data from a 10 inch
distance was used to convert all voltages, regardless of the depth at which the voltage was
taken.
Using the background wooden board, maximum and minimum voltages were recorded
when the board was 10 inches, 9.75 inches, 9.5 inches, 9.25 inches, and 9 inches away.
Using prior knowledge of the depth from where the voltage was taken, the most
appropriate constant was selected and the voltage converted to a distance. The depth was
then calculated with the new distances. The new constants can be found in Table 6.17.
The new constants were applied to the triangular prism. The percent error per point for
the original model along with the percent error per point for the corrected model can be
seen in Figure 6.30.
145
Chapter 6: Slider Experiments
(a)
(b)
Figure 6.30: The color depth plots show the percent error according to the point for (a)
the original model and (b) the corrected model for the triangular prism.
From the plots, it can be seen that much more error is introduced, especially along the
bottom of the field of view. More error was also introduced along specific vertical scans,
as shown by the three columns of yellow and red dots in the corrected model.
It was noticed that the new constant for 10 inch distances was not the same as the original
constant. The constant at 10 inches changed for each model because the maximum
voltage was recorded before the data for the object was taken. Different background light
levels and other environment variables may contribute to a change in the constant.
Therefore, the data for modeling the object would have to be taken at the same time as
when the constants were recorded.
6.10.3 Decreasing Constants
When the minimum and maximum voltages were taken at different distances, it was
expected that the maximum voltages would linearly increase as the board moved closer
and that the minimum voltages would linearly decrease as the board moved closer.
However, the maximum and minimum voltages changed, but without a pattern. Instead
of constantly increasing or decreasing, they increased as the board moved from 10 inches
to 9.5 inches and then began to decrease. The cause of the inconsistency in the constants
was probably due to environment variables, such as background light, reflections, and
shadows.
It was decided to attempt to correct the model by changing the constant, based on the
original 10 inch constant. For every 0.25 inches closer in depth, the constant was
decreased by 0.05 V/mm. All of the calculated depths for a given vertical scan were
averaged. The constant used to change LPSM voltages to distances was changed, and the
calculated depths averaged again. The constant was changed until the calculated depth
was closer to the known depth. Using this method, a 0.05 V/mm decrease in the constant
was decided upon for every 0.25 inch decrease in depth.
146
Chapter 6: Slider Experiments
(a)
(c)
(b)
(d)
Figure 6.31: (a) The original model for the triangular prism can be compared to (b) the
corrected model. (c) The original model for the cylinder can be compared to (d) the
corrected model.
The rectangular prism, triangular prism, and cylinder were all recalculated using the new
formula for the constant. Each object gave less error than the original model. Figure
6.31 shows the original and corrected models for the triangular prism and cylinder.
There is little different between the original and corrected model for the triangular prism.
The left face still has blue dots, indicating the closest part of the object, towards the left
edge. The dots gradually change from blue to green and yellow towards the right edge of
the left face. The background has more red dots, indicating that the background is further
away.
The cylinder has more noticeable differences in the original and corrected model. The
new model has more dark blue dots at the center of the cylinder. The dots go from dark
blue at the center to light blue to green at the edges. The background has green, yellow,
and red dots indicating that it is further away. Unlike the original image, all red and
yellow dots occur on the background instead of on both the cylinder and the background.
The average error per depth was recalculated for the three objects. The corrected object
percent error was graphed along with the original percent error for each object and can be
seen in Figure 6.32. In each graph, the error for the corrected model is better than the
error for the original model.
147
Chapter 6: Slider Experiments
Error vs Depth for Rec Prism
Error (%
20
15
10
(a)
5
0
8.8
9
9.2
9.4
9.6
9.8
10
10.2
10.4
Depth (in)
Original
Corrected
Error vs Depth for Tri Prism
30
Error (%
25
20
15
(b)
10
5
0
9.2
9.3
9.4
9.5
9.6
9.7
9.8
9.9
10
10.1
Depth (in)
Original
Corrected
Error (%
Error vs Depth for Cylinder
14
12
10
8
6
4
2
0
8.8
(c)
9
9.2
9.4
9.6
9.8
10
10.2
Depth (in)
Original
Corrected
Figure 6.32: The error for the corrected model is compared to the error in the original
model for (a) the rectangular prism, (b) triangular prism, and (c) cylinder.
6.10.4 Conclusions
The error in the models seems to be caused by a combination of factors. The main
problem appears to be due to laser intensity. The LPSM is very sensitive to laser
intensity and its behavior changes according to how much power is incident on its active
area.
When pointing a laser directly into the LPSM, different voltages can be seen by changing
the depth at which the laser sits. If the laser is reflected off of a piece of white poster
board, the maximum and minimum voltages change as depth changes. Therefore, even
148
Chapter 6: Slider Experiments
small changes in depth seem to change the laser intensity, causing inconsistencies in the
output of the LPSM.
There are two factors that may be causing the laser intensity to dramatically change.
First, the laser is not well focused. When the laser has a larger fanout angle, the beam
spreads out more quickly and thus the same amount of power is being put into a larger
area, decreasing the intensity. If the laser were more focused, then the beam would
appear more intense because the same amount of power would be concentrated in a
smaller area.
Another cause of the difference in laser intensity is the shape of the object being
modeled. Each object has a surface at a different angle. The laser strikes the object, but
the reflections coming off of the object change due to the angle of the surface. If the
surface is facing the LPSM, then the majority of the reflections will come back to the
LPSM. However, if the surface is at a 45º angle, such as the surface of the triangular
prism, then many of the reflections are being deflected away from the LPSM, reducing
the laser intensity seen by the LPSM.
149
Chapter 7: System Experiments
7 SYSTEM EXPERIMENTS
Performance boundaries for the LPSM are now known. The next step is to create a laser
scanning system using this data to control the area that the laser should scan and the
speed at which the laser moves. Once the laser scanning system is tested, data can be
sent from the data acquisition system to the A/D converter to test the performance of the
A/D board. Finally, the algorithm for the FPGA can be developed and tested using data
sets gathered from the data acquisition tests.
7.1 Laser Scanning System
Now that the LPSM has been characterized and the system boundaries set, the laser
scanning system can be developed. The scanning system must take into account the
speed that the laser will move, the size of the field of view to scan, and other factors. The
LPSM must be tested with the scanning system to make sure it can respond to a moving
light spot, since the laser has been stationary or very slow moving in all previous
experiments.
7.1.1 Stepper Motor Basics
A motor is comprised of two parts: the stator and the rotor. The stator is stationary, with
a hole in the middle. The rotor is a small stick inside of the stator that rotates, as seen in
Figure 7.1. Pairs of poles lie along the stator. Complement pairs lay 180º from each
other. Different motors contain a different number of poles.
The stepper motor is based on the principle of magnetism. When a current is applied
correctly to a pole, then the pole becomes either “North” or “South.” The rotor is
attracted and repelled from these poles to create mechanical movement.
For the motor with two pole pairs to turn, electric current must first be sent to P1a, so that
P1a is “on” or “North”. The complement current signal, or ground, must be sent to P1b
so that it is “off” or “South.” Poles P2a and P2b are also off. Using current to create
poles causes the rotor to begin rotating either clockwise or counterclockwise, until it
becomes aligned with poles P2a and P2b. Then, a signal will be sent to P2a, creating
“North,” and the other three poles will be off. This action continues to push the rotor in
the same direction until it is 180º from its original position. This sequence continues
150
Chapter 7: System Experiments
P1
Stator
Poles
Rotor
P2
P2
P1
Figure 7.1: A stepper motor has a stator with poles and a rotor.
until the user no longer wants the motor to spin. To move in the opposite direction, the
order in which the poles are turned on and off is reversed.
Each rotation of the rotor from one pole to the next pole is known as a step. Therefore, in
the above motor, one step is equal to ninety degrees. As more poles are placed on the
stator, the step size decreases. Smaller step sizes increase resolution and accuracy, but
require more changes in current to turn the rotor.
Stepper motors provide very precise control. Since each step corresponds to a given
degree rotation and a new position, the position of the rotor can be easily controlled. The
speed at which the rotor turns can also be tightly controlled.
Stepper motors can be either unipolar or bipolar, depending on the way the coil is wound
around a pole. Unipolar motors, or four-phase steppers, have two windings on each pole.
The north pole is created when one winding is energized and the south pole is created if
the other winding is energized. Therefore, the current flow is never reversed.
In bipolar motors, one winding exists at each pole. When current flows through the wire
in one direction, the north pole is created. Reversing the current direction creates the
south pole.
7.1.2 Motor/Mirror System 1
The laser can be deflected by a mirror that turns via a stepper motor. The mirror will
reduce some of the laser power. The laser will also be moving through the scene at a
much faster rate than the LPSM has seen before. When moving the laser horizontally
through the field of view, the output of the LPSM is expected to resemble a triangular
wave.
151
Chapter 7: System Experiments
7.1.2.1 Stepper Motor/Mirror System 1
The first motor/mirror system can be seen in Figure 7.2. The stepper motor can be
attached to one of four places. The shaft that the motor attaches to determines the ratio of
motor turns to mirror turns. The motor was connected to the 1:1 shaft, since all of the
other ratios did not turn the mirror through a full turn for every motor turn. The mirror
was attached to the motor shaft using a set screw.
The stepper motor had four wires, red, white, blue, and yellow, coming out of it. The
wires were attached to a 2x4 black connector. Since four wires were protruding from the
motor, it was concluded that the stepper motor was bipolar. To determine which wires
were complements of one another, a multimeter was used. The multimeter was set to
measure Ohms, and the positive and negative terminals were placed to two different
wires. If the multimeter read 0 Ohms, then the two wires were not connected, and were
not complements of one another. If the multimeter read hundreds of Ohms, then the
wires were complements of one another. Using this method, the pinout diagram was
found.
(a)
Signals
Wires
B
A’
Red
Yellow
B’
A
Blue
White
Empty
Empty
Empty
Empty
Empty
Empty
Empty
Empty
(b)
(c)
Figure 7.2: (a) The first motor/mirror setup had four places to attach the motor to the
mirror. (b) The stepper motor had four wires, corresponding to (c) the outputs of a
stepper motor driver card.
152
Chapter 7: System Experiments
A stepper motor driver is needed to create the necessary signals to attach to A, A’, B, and
B’. The driver in Figure 7.3 was found in the IRIS lab. The driver is an IB Series driver
from Intelligent Motor Systems.
The Enable’, Logic ground, and Ground pins are connected to ground. H’/F is tied to
ground for half step operation and power for full step operation. CW’/CCW is tied to
ground for clockwise rotation and tied to power for counterclockwise rotation. Power, or
15 V, is attached to V+. The resistor is placed between the current adjust pin and ground.
The value of the resistor can be found in the IB Series specifications. The step clock is
attached to a function generator which outputs a 0 V to 5 V square wave. The period of
the square wave determines the speed that the driver runs the motor. Pins A, A’, B, and
B’ are outputs and connect to the stepper motor.
The clock step causes the mirror to turn slowly at a period of 20 ms with 50% duty cycle.
As the period is decreased, the angular velocity of the mirror increases. However, the
torque produced by the motor decreases. Therefore, at a certain point, the motor does not
have enough power to turn the mirror. This point is reached at approximately 1.0 ms,
depending on the resistor attached to the Current Adjust pin. Larger resistors allow the
motor to turn at slower periods, but only by a few hundred microseconds.
7.1.2.2 System 1 Test Results
Several variables can change the output of the LPSM. The distance of the poster from
the LPSM, half step versus full step operation of the stepper motor, manual control of the
mirror versus stepper motor control, and the speed of the laser can all be controlled. The
distance of the poster affects the size of the field of view. Half step operation versus full
step operation and the speed of the laser affects how smooth the laser moves through the
scene. Manual control of the mirror allows a signal to be found where the laser moves
smoothly across the scene instead of moving across the scene in steps. However, the
speed cannot be measured for manual control.
Signals
Enable’
A
Logic gnd
A’
H’/F
Step Clk
CW’/CCW
Current
Adjust
B’
B
V+
GND
(a)
(b)
Figure 7.3: (a) The driver has 12 pins, corresponding to (b) the inputs and outputs listed.
153
Chapter 7: System Experiments
The procedure to test all of these variables was:
1. Set up the system so that the LPSM points at a white poster board and the laser shines
at a height within the field of view of the LPSM.
2. Set the function generator to a period of 20 ms.
3. Set the poster 3 inches away from the LPSM.
4. Set up the oscilloscope so that it triggers on the rising edge of the input signal and set
the acquire time so that the signal can be seen for the entire field of view. The time
varies according to how far away the poster sits from the LPSM.
5. Set the driver to half speed operation by connecting the H’/F signal to ground, as seen
in Figure 7.4.
6. Turn on the motor by connecting power. The mirror should begin to rotate, directing
the laser through the scene.
7. Wait for the oscilloscope to trigger and acquire the signal.
8. Save the waveform and record the max and min voltage levels
9. Change the function generator period to 10 ms and repeat.
10. Change the function generator period to 6 ms and repeat.
11. Change the driver setting to full step by connecting the H’/F signal to power
12. Repeat the measurements with the function generator at 20 ms, 10 ms, and 6 ms.
13. Turn the motor off. Turning the mirror with your hand, direct the laser through the
field of view at a constant, slow pace. Record the waveform and min/max voltage levels.
14. Turning the mirror with your hand, direct the laser through the field of view at a
constant, fast pace. Record the waveform and min/max voltage levels.
15. Move the poster 3 inches further away from the LPSM and repeat all of the above
measurements.
First, the difference between running the motor at half step and full step is examined.
Figure 7.5 shows the half step and full step waveforms of the motor at a distance of 3
inches and a speed of 6 ms. The waveforms can be compared to the half step and full
step waveforms of the motor at a distance of 12 inches and a speed of 6 ms.
(a)
(b)
Figure 7.4: (a) The driver is set to half step when the H’/F signal is tied to ground. (b)
The driver is set to full step when the H’/F signal is tied to power.
154
Chapter 7: System Experiments
At the 3 inch distance, the half step waveform remains at the maximum voltage for
approximately 50 ms before decreasing linearly. The full step waveform also waits for
about 50 ms before decreasing linearly, but the signal is increasing to the maximum
voltage during that time. At the 12 inch distance, the signals look almost identical.
The 3 inch field of view is only about 1 inch wide, while the 12 inch field of view is
about 4 inches wide. For both half step and full step, the laser could visually be seen to
jump from step to step. In other words, the laser did not scan through the scene at a
constant rate, but instead move an increment, paused, and then moved another increment.
Depending on where the laser paused as it moved into the field of view could cause the
difference in the 3 inch waveforms. In other waveforms for the other distances, the full
step and half step waveforms look almost identical, so it is concluded that the half and
full step functionality of the stepper motor does not affect the operation of the system.
Next, operation at different speeds is compared. As the speed increases, the laser should
move more smoothly through the scene. However, even at the top speed of 6 ms, the
laser can still be visually seen to jerk through the scene instead of moving at a constant
(a)
(b)
(c)
(d)
Figure 7.5: The waveform is generated at a distance of 3 inches and a speed of ms with
the motor at (a) full speed and (b) half speed. The waveform is generated at a distance of
12 inches and a speed of 6 ms with the motor at (c) full speed and (d) half speed.
155
Chapter 7: System Experiments
rate. Figure 7.6 shows the waveforms at 20ms, 10ms, and 6ms speeds at a distance of 6
inches. Waveforms at various speeds at a distance of 15 inches can also be seen.
The waveforms are expected to decrease linearly. However, the waveforms seem to
decrease in steps. The flat portions of the waveforms tend to decrease slightly as the
speed increases. The flat portions are probably due to the pauses and jumps in the laser
movement. As the pause decreases, the flat portion decreases. Therefore, to get the
expected waveform, the laser needs to move at a constant, smooth rate through the scene.
To compare the irregular laser pattern to a smooth laser pattern, the mirror was rotated by
hand. Since the 6 ms period caused the shortest pauses in laser movement, those
waveforms were compared to the manual control of the laser. Figure 7.7 gives the
waveforms at a distance of 6 inches and shows waveforms generated in the same manner
at a distance of 15 inches.
(a)
(b)
(c)
(d)
(e)
(f)
Figure 7.6: Waveforms are gathered at a distance of 6 inches at half step with a speed of (a) 20ms,
(b) 10ms, and (c) 6ms. Waveforms are gathered at a distance of 15 inches at half step with a speed
of (d) 20ms, (e) 10ms, and (f) 6ms.
156
Chapter 7: System Experiments
(a)
(b)
(c)
(d)
(e)
(f)
Figure 7.7: Waveforms were generated at 6 inches using (a) the stepper motor at a speed of 6ms,
(b) by hand moving slowly, and (c) by hand moving fast. Waveforms were generated at 15 inches
using (d) the stepper motor at a speed of 6ms, (e) by hand moving slowly, and (f) by hand moving
fast.
As can be seen, when the laser moves smoothly and constantly through the scene, the
waveform decreases linearly, as expected. Therefore, it can be concluded that the reason
that the waveforms generated using the stepper motor are not linearly decreasing is due to
the inconsistencies introduced by the motor. To improve the waveform, the motor either
needs a smaller step size, needs to run faster, or another motor needs to be used.
7.1.2.3 Conclusions
The main problems seen in system 1 are the speed of the motor and the step size. The
motor can be physically seen to move in increments instead of moving smoothly. Either
the increment size needs to decrease or the speed of the motor needs to increase. The
current motor does not have enough torque at higher speeds to move the mirror, so
another motor must be found.
The waveforms reflect the jerkiness in the laser movement because the waveform has flat
areas in the area where it should be linearly decreasing. A new motor should fix this
problem.
157
Chapter 7: System Experiments
7.1.3 Motor/Mirror System 2
The waveforms of the first motor and mirror system did decrease, as expected. However,
the movement of the laser due to the jerkiness of the motor caused the waveforms to not
be smooth. The motor could not reach very high speeds, causing only one waveform to
be seen instead of a periodic wave. Therefore, a faster, smoother motor and mirror
system must be developed to test the LPSM.
7.1.3.1 Stepper Motor/Mirror System 2
A motor that had more torque and that rotated at a faster speed was needed. Another
stepper motor was found, already connected to a different driver, along with another
metal bracket. The metal structure only had one place to mount the motor at a ratio of
1:1. The mirror was attached to the shaft, as seen in Figure 7.8.
The motor had four wires, so it was classified as bipolar. The wires were already
attached to a driver controller. The driver accepted inputs from a computer via a serial
port. Therefore, a USB to serial port converter was also necessary.
(a)
(b)
(c)
(d)
Figure 7.8: (a) A second motor was mounted to a mirror with a ratio of 1:1. The (b)
stepper motor was controlled with a (c) driver that accepted inputs from the computer via
(d) a USB to serial port converter.
158
Chapter 7: System Experiments
Power had to be supplied to the motor and to the driver controller. Since both the motor
and driver needed at least 0.5A, separate power supplies were used to power each
component. The power supplies were set to +7.5V.
Next, the driver controller had to be connected to a computer. The Windows XP
operating system comes with a communication device called HyperTerminal, found
under StartÆAll ProgramsÆAccessoriesÆCommunications. HyperTerminal first asks
the user to name the terminal. In the next window, the user needed to choose the correct
COM port in the “Connect using” drop-down menu. A properties window appeared, and
the drop down windows were set to:
Bits per Second: 9600
Data bits: 8
Parity: None
Stop bits: 1
Flow control: None.
Next, the FileÆProperties window was opened. Under the Settings tab, the Emulation
was changed to TTY. The user then clicked the “ASCII Setup…” button, which brought
up another window. The “Echo typed characters locally” checkbox needed to be
selected, and then both properties windows could be closed by clicking the “OK” buttons.
If the driver controller was powered on, a message appeared in the HyperTerminal
window, along with a “*” on the last line, indicating that the driver was ready to accept
commands.
Since two motors could be connected to the driver, the correct motor must be selected.
Either “x” or “y” selected the correct motor, depending on which outputs from the card
were connected to the motor. The driver accepted commands to control the speed of the
motor, position, acceleration, and other parameters.
7.1.3.2 System 2 Test Results
The slow motor/mirror system was taken out of the full system and replaced by the faster
motor/mirror system. The new system ran much faster and much smoother than the old
system, allowing multiple pulses to be seen in a given frame of the oscilloscope. More
consistent waveforms could also be seen since the motion of the laser was much
smoother through the field of view of the LPSM.
The speed of the mirror rotation was controlled by the computer. The driver allowed the
rate to be changed through the “R” command by setting the number of microsteps per
second. A slow speed of 9000r, medium speed of 13000r, and fast speed of 17000r were
tested. The motor could not run above 17000r without getting out of sync and thus
getting stuck. The slow speed corresponded to about three rotations per second, the
medium speed was about five rotations per second, and the high speed was about six
rotations per second.
159
Chapter 7: System Experiments
Figure 7.9: The setup for System 2 was the same as the setup for System 1 except that
the motor/mirror system was replaced.
The distance of the poster could also be changed. The poster was placed from 3 inches to
15 inches away from the LPSM and laser setup and was changed in increments of 3
inches. As the distance increased, the field of view became larger.
The procedure used was:
1. Set up the system the same way as for system test 1 except with the faster mirror/motor
system, as shown in Figure 7.9.
2. Start with the poster at a distance of 3 inches from the LPSM/laser. Start the mirror
rotating at a speed of 9000r.
3. Once the signal appears on the oscilloscope, push the run button on the oscilloscope to
stop to capture the signal.
4. Turn the motor off. Measure the max/min voltages of the signal and the necessary
time intervals of the signal.
5. Change the speed of the motor to 13000r and then to 17000r and repeat.
6. Move the poster back 3 inches and repeat.
As can be seen from the collected data, the time between signals changed with speed but
not with distance, as expected. For a rotation of 9000r, the time between signals was
about 356 ms. For 13000r, the time was 246 ms, and for 17000r, the time was 188 ms, as
seen in Figure 7.10.
The minimum and maximum voltages changed with distance. As the distance increases,
the field of view increases, and the power of the laser incident on the LPSM will
decrease. It was expected that the boundary voltages of the field of view would remain
constant, but the distance at which the boundary was physically located changed.
However, the minimum voltage became smaller as the distance increased, and the
maximum voltage decreased as distance increased, which does not remain consistent with
projective geometry.
160
Chapter 7: System Experiments
(a)
(b)
(c)
(d)
(e)
(f)
Figure 7.10: As the speed of the motor increases, the time between pulses decreases, as can be
seen in the (a) 9000r waveform, (b) 13000r waveform, and (c) 17000r waveform at a distance of 9
inches. At a constant speed, the time between minimum and maximum voltages increased with
distance, as can be seen in (d) the waveform at 3 inches, (e) the waveform at 9 inches, and (f) the
waveform at 15 inches at a rate of 17000r, where each interval in the x direction corresponds to
2.0ms.
The distance between the minimum and maximum voltage was expected to increase as
the distance increased. Therefore, as expected, the time between the minimum and
maximum voltages increased as distance increased, with a constant speed, as seen in
Figure 7.11.
If the distance was held constant and the speed increased, it was expected that the time
between minimum and maximum voltages would decrease.
7.1.3.3 Black Object Test
In this test, the affect of a non-reflective area within the field of view was tested. Any
black object does not reflect any light, so the LPSM should not be able to give a valid
reading when the laser strikes the black area. It is expected to see a linearly decreasing
signal from the maximum voltage to the minimum voltage with a small area where the
signal goes to 0 V before returning to the original decreasing signal.
161
Chapter 7: System Experiments
(a)
(b)
(c)
Figure 7.11: At a constant distance, the time between minimum and maximum voltages decreased
with increased speed, as can be seen in (a) the waveform at 9000r, (b) the waveform at 13000r, and
(c) the waveform at 17000r at a distance of 6 inches, where each interval in the x direction
corresponds to 2.0ms.
The same setup was used for this setup as was used in the System 2 test procedure. The
poster was held at a constant distance of 9 inches from the LPSM/laser. The speed of the
motor was varied between the same three speeds. The procedure followed was:
1. Setup the system the same as the previous experiment, with the poster at a distance of
9 inches.
2. Place the 0.5 inch black object in the field of view of the LPSM, to the right of the
center, as seen in Figure 7.12.
3. Turn the motor on at 9000r and record the waveform.
4. Record the minimum and maximum voltages and the necessary time intervals.
5. Repeat at speeds of 13000r and 17000r.
6. Replace the black object with the 1 inch black object and repeat.
The waveforms for the half inch object can be seen in Figure 7.12. The duration of the 0
V region decreases as the speed increases, as expected. The region occurs in the positive
voltage region of the curve since the black object was placed to the right of the center of
the field of view. The 0 V region was 1.92 ms long at a speed of 9000r, 1.4 ms long at
13000r, and 1.12 ms at 17000r.
Since the 1 in object is double the length of the 0.5 in object, it is expected that the 0 V
region be about twice as long.
At 9 inches, the field of view should be approximately 3 inches long. Therefore, for the
0.5 inch black object, the 0 V region time interval should be about 1/6th of the entire time
interval from minimum voltage to maximum voltage. At 9000r, the time from minimum
to maximum voltage was 10.44 ms, and the 0 V region was 1.92 ms, which is slightly
more than 1/6th of the time interval.
162
Chapter 7: System Experiments
(a)
(b)
(c)
(d)
(e)
(f)
(g)
Figure 7.12: (a) A 0.5 inch black object was taped to the poster in the field of view of the LPSM.
(b) A 1 inch black object was taped to the poster in the field of view of the LPSM. Using a 0.5 in
black object, the waveforms were gathered when the motor rotated at (c) 9000r, (d) 13000r, and (e)
17000r, at a distance of 9 inches, with the x interval set at 2.0ms. At a rate of 13000r and a distance
of 9 in, (f) the waveform with a 0.5 in object with an x interval of 2.0ms should have a 0 V region
of about half the time length as (g) the waveform with a 1 inch object at an x interval of 5.0ms.
163
Chapter 7: System Experiments
For the 1 in object, the 0 V time interval should be about 1/3rd of the time from minimum
to maximum voltage. At 9000r, the time from minimum to maximum voltage was 10.3
ms, and the 0 V region was 3.6 ms, which is slightly more than 1/3rd of the time interval.
7.1.3.4 Conclusions
The motor in this system has a different step size and can move at much faster rates than
the motor in system 1. The human eye cannot observe any jumps in the laser movement.
The waveforms now display the expected shape of a linear decreasing curve. The curve
to the left and right of the linearly decreasing region are due to response time and the
scattering of light due to the gold circle surrounding the PSD in the LPSM.
7.1.4 Final 2D Scanning System
Many 2D laser scanning systems use a polygonal mirror that rotates vertically, moving
the laser in vertical lines. The laser and mirror is then mounted on a base that rotates so
that the laser also scans in the horizontal direction, such as for the Riegl Scanner. [Riegl,
2000]
At high speeds, it is very important that the mirror is well-mounted and balanced.
Therefore, systems can be purchased that already have a polygonal mirror mounted,
along with a controller to turn the mirror. It is recommended to purchase a pre-built kit,
such as the Polygon Mirror Scanner Motor by Samsung Electro-mechanics [Samsung,
2003] for safety reasons.
The bottleneck of the system is the response time of the LPSM. As shown from
experiment, the worst case response time is approximately 1 ms when the scene is 15
inches away from the laser and LPSM setup. The largest scene also occurs at 15 inches,
corresponding to a 3 inches wide by 4 inches tall field of view.
Table 7.1 compares the frame rate and resolution possibilities of the system.
As the frame rate increases, the resolution decreases. Therefore, to get better resolution,
the frame rate must decrease. For good resolution, the laser should also be well-focused.
The first system proposal aims to achieve the 30 fps rate. The polygonal mirror scanner
motor can be mounted vertically on a circular base. The 500 mW laser can be placed
directly under the mirror. The entire base will rotate, controlled by a stepper motor. Of
the entire 360º circle that the base can turn, the laser is only directed into the field of view
for a portion of the circle. Using a 30 inch diameter field of view, it can be calculated
that the laser is in the field of view for about 4% of the sphere. However, at the speed
necessary to achieve 30 fps using a stepper motor, there may be too much inertia in the
system to stop the rotation and change direction.
164
Chapter 7: System Experiments
Table 7.1. Resolution and frame rate trade off at 1000 positions per second
Frame
Resolution
Distance Baseline
Window Size
Rate Pos/Frame Pos/Row
(in)
(in)
(in)
(fps)
or Col
(in)
12
1.2
2.800 x 4.000
1
1000.00
31
0.09 x 0.13
12
1.2
2.800 x 4.000
10
100.00
10
0.28 x 0.40
12
1.2
2.800 x 4.000
20
50.00
7
0.40 x 0.57
12
1.2
2.800 x 4.000
25
40.00
6
0.47 x 0.67
12
1.2
2.800 x 4.000
30
33.33
5
0.56 x 0.80
12
1.2
2.800 x 4.000
35
28.57
5
0.56 x 0.80
12
1.2
2.800 x 4.000
40
25.00
5
0.56 x 0.80
12
1.2
2.800 x 4.000
45
22.22
4
0.70 x 1.00
12
1.2
2.800 x 4.000
50
20.00
4
0.70 x 1.00
12
1.2
2.800 x 4.000
60
16.67
4
0.70 x 1.00
12
1.2
2.800 x 4.000
75
13.33
3
0.93 x 1.33
24º
(a)
(b)
Figure 7.13: The scanning system is comprised of (a) 15 vertically placed polygonal
mirrors and lasers placed (b) in a wheel-spoke configuration.
Therefore, multiple motor and laser systems can be placed on the base in a wheel-spoke
configuration, as seen in Figure 7.13. As the laser exits the field of view from one
system, the next system’s laser should enter the field of view. This system would allow
the base to continually rotate in one direction at a constant rate. The vertically rotating
mirrors would also be able to rotate in one direction at a constant rate. Therefore, there
would be less inertial stresses on the system due to changes in speed and direction. The
wires could be run through the center of the base and strung to the necessary components.
The two main concerns with this system are the cost and the physical constraints.
Although the polygonal mirror and motor are fairly cheap, each system must have its own
laser. A single 500 mW laser costs at least a few hundred dollars, and 15 are needed.
Next, this system has a mirror spinning vertically at a fairly high rate. The mirror is then
turned horizontally. A gyroscope effect may be seen at these speeds. Stress is also
placed on the vertically standing card, so extra precautions must be used to ensure that it
does not move during operation. Calibration of the system could also cause problems.
The cards must be placed at the correct positions so that 2 light spots are not present in
the same field of view. The cards must also be perfectly vertical and the laser must be
165
Chapter 7: System Experiments
pointing directly into the mirror. All of these components must not move during system
operation, or the laser will be deflected in the wrong direction.
Stepper motors also tend to be limited to about 2000 rpm. To achieve various speeds,
gear ratio systems would have to be developed. To change the speed, the entire gear ratio
system would then have to be re-worked. Stepper motors also move in discrete steps,
limiting the resolution.
Another option is to use servo motors. One of the laser and polygonal mirror systems can
be mounted on a horizontally rotating platform, controlled by a servo motor, as seen in
Figure 7.14. Servo motors can commonly reach speeds of up to 10000 rpm. They also
rotate smoothly, so better position resolution can be reached than with stepper motors.
Servo motors change speed and direction according to the applied voltage. [Danaher,
2006]
A switch can be placed on the top, rotating base that hangs down past the bottom,
stationary base. On the bottom, stationary base, two pegs can be placed. As the top
rotates, the switch will hit one of the pegs. When the top has rotated far enough, the
switch causes the voltage to be flipped, causing the motor to spin in the other direction.
When the switch hits the other peg, the voltage and thus the direction will change again.
The two pegs can be manually placed by the user of the system, based on the field of
view desired.
Battery
Screw
Screw
Switch
(a)
(b)
Figure 7.14: (a) The polygonal mirror and laser can be mounted to the top circular base.
The top base is attached to a servo motor so that the top base can rotate horizontally,
while the bottom base remains stationary. (b) The second system proposal uses a servo
motor to rotate the base horizontally and changes direction based on a switch.
166
Chapter 7: System Experiments
This system is a lot cheaper than the first system. It also has better position resolution, if
the speed is desired to be slower. The speed can be easily controlled by changing the
applied voltage. It is also possible to make the system less mechanically dependent by
applying voltage to the servo using a waveform generator instead of using the switch and
screws, allowing for less moving parts and thus a more reliable system.
The calibration of the system can be done fairly easily. By turning the top, rotating base,
the two boundary conditions can be established and the pegs can be inserted. The speed
of rotation can be determined simply by changing the applied voltage. The final
necessary voltage can be found either by experiment or by calculation from the motor
spec.
The major concern for this system is the physical stress placed on the vertical mirror and
card. They will be stopping abruptly and changing direction. Therefore, the card will
have to be mounted more carefully and with more support.
Another system possibility is to use two mirrors. The laser is deflected from one mirror
into another mirror and then onto the scene. One mirror controls the vertical motion of
the laser, while the other controls the horizontal motion of the mirror. Usually one of the
mirrors is flat and rectangular shaped. The other mirror can also be flat and rectangular,
or it can be shaped like a cone.
The 2 mirror system would be very difficult to calibrate. The mirrors would have to not
only be calibrated to hit the field of view, but also calibrated so that their movements
correspond to one another to correctly move the laser. The laser would also lose twice as
much power as in the other systems because it is being deflected off of two surfaces
instead of just one surface. Depending on whether the mirrors were rotated constantly in
one direction or made to change direction, inertia problems may not be as big of a
concern.
Table 7.2 summarizes the pros and cons of the three considered systems.
Table 7.2. Comparison of the three proposed laser scanning systems.
System 1:
System 2:
System 3:
Wheel Spokes
Servo Motor
Two Mirrors
Very Expensive
Reasonable
Medium expense
Cost
Gyroscope Concerns Stress on Motor Card Variable
Physical Stress
Medium Difficulty
Not too difficult
Very difficult
Calibration
Able to get to 30fps
Variable, constrained Variable
Speed
by stress on card
Constrained by
Able to get very good Dependent on mirror
Resolution
stepper motor
resolution
controller
1 Deflection
1 Deflection
2 Deflections
Laser Power
167
Chapter 7: System Experiments
System 2, the servo motor solution, is recommended. System 2 gives the widest range of
frame rate and resolution options. Servos can be easily controlled and are programmable,
allowing for less mechanical parts. The main concern is the stress placed on the mirror
card. Extra support can be built in to the system by mounting the card on PCB or other
material. The main calibration of the system would be in programming the servo, which
could be done by looking at the specification of the motor, or by experiment.
7.2 A/D Converter
The outputs of the LPSM must be converted to binary before they can be sent to an
FPGA. The speed and resolution of the necessary A/D converter cannot be found on a
development board, so a separate chip and board must be used. The TI ADS7805 is a 16bit SAR A/D converter. A sample was requested and received for testing and to validate
the specifications.
7.2.1 A/D Control Line Validation
The ADS7805 User’s Manual from Texas Instruments shows how the chip should be
connected for basic operation. The chip was mounted on a breadboard to make the
necessary connections. The chip is high speed, operating at 100 kHz, so the extra
capacitance added by the breadboard may cause operational problems. Figure 7.15
shows the chip completely connected.
The A/D chip has two control lines, CS’ and R/C’. CS’ can be tied to ground and ignored
for basic operation so that only R/C’ controls the read and conversion cycles. The
BUSY’ signal tells when valid data is present on the outputs and when the chip is doing a
conversion. When the user makes R/C’ go low, then BUSY’ automatically goes low,
meaning that the chip is going into conversion mode. At this time, data on the output
pins is at High-Z. R/C’ can go high again once the chip is in conversion mode. The
conversion cycle take a few microseconds. When finished, the BUSY’ signal goes high,
meaning that the data on the output pins is valid. The cycle can repeat every 10 µs.
A function generator was used to create the R/C’ signal, as shown in Figure 7.16. The
generator was set to a period of 10 µs, frequency of 100kHz, amplitude of 5 V, high
voltage of 5 V, low voltage of 0 V, offset of 2.5 V, type of square, and duty cycle of 80%.
The input analog signal was created using a second function generator set to a period of
10 µs, frequency of 100 kHz, amplitude of 50 mV, high voltage of 0 V, low voltage of 50 mV, offset of -25 mV, type of square, and duty cycle of 80%. The voltage could be
moved up and down to see the changes on the data pins.
168
Chapter 7: System Experiments
Figure 7.15: The A/D chip was mounted on a bread board.
Figure 7.16: A function generator was used to create the control signals.
Figure 7.17 shows the oscilloscope screen with R/C’ connected to signal 1, the bottom
signal, and BUSY’ connected to signal 2, the top signal. It is expected that after the R/C’
signal goes low, the BUSY’ signal should go low. The BUSY’ signal should go high
after a conversion cycle is finished and should remain high until the R/C’ signal goes
low, signaling the beginning of anther conversion cycle.
7.2.2 Conclusions
The A/D converter can be controlled as expected. As shown earlier, the data input to the
FPGA only needs to be 8 bits long. One option is to reduce the input voltage to the A/D
chip using a resistor network and to use a converter that outputs 8 bits. The resistor
network would add more noise into the system. Therefore, it is decided that it is best to
use the 16-bit converter and to only connect the top 8 bits.
A digital logic analyzer is required to study the outputs of the converter. To check that
the outputs are changing as expected and at the speed required, the inputs would need to
become automated. If the LPSM is chosen as the final sensor to be used in the system,
169
Chapter 7: System Experiments
(a)
(b)
Figure 7.17: (a) An oscilloscope was used to see the R/C’ signal on the bottom of the
screen, and the BUSY’ signal on the top of the screen. (b) When moved to overlap, it can
be seen how the BUSY’ signal follows the R/C’ signal, as expected.
then the outputs could be connected to the converter and the rest of the chip functions
tested.
7.3 FPGA Algorithm
Once all of the information from the data acquisition system is collected and digitized, it
will be sent to the FPGA for computation. The FPGA will first need to receive the focal
length and baseline. Next, the minimum or maximum voltages in the x and y direction
for each LPSM must be sent to the FPGA so that the constant to convert voltages to
distances can be calculated. Once this calibration information is setup, the FPGA must
start reading in voltages at a given rate and continuously output 3D points.
It is possible to break up these steps into separate state machines. All of the small state
machines can be combined using a main, overhead state machine. Using this method, if
new procedures are developed, then they can be programmed and easily inserted by
creating a new state in the main state machine.
The entire process can be separated into 4 smaller state machines. An INPUT state
machine can read in the baseline, focal length, maximum voltages, and minimum
voltages. A CALIBRAITON state machine can take the information and create and store
the voltage-to-distance constants. Four SAMPLING state machines can start polling the
data signal from the A/D converter to select when valid voltages are on the FPGA input
170
Chapter 7: System Experiments
MAIN
Baseline, focal length,
max/min voltages
INPUT
max/min
voltages
CALIBRATION
Constants
LPSM1 X
Voltages
SAMPLING
LPSM1 Y
Voltages
SAMPLING
LPSM2 X
Voltages
SAMPLING
LPSM2 Y
Voltages
SAMPLING
GET_COORDS
X, Y, Z
Voltages
Figure 7.18: The FPGA algorithm could be split up into smaller state machines
controlled by a main state machine using enable and done bits.
pins. Finally, a GET_COORDS state machine can take the voltages and calibration
information and output the stereo points.
All of these machines can be controlled by a MAIN state machine, as seen in Figure 7.18.
Each smaller state machine can have an enable bit. When the enable bit is turned on by
the main state machine, then the smaller state machine operates. When the smaller state
machine finishes, it sends a signal back to the main state machine. The main state
machine then turns the enable bit off and turns on the enable bit for the next state
machine.
7.4 Computer Software
The computer will be receiving the points via USB 2.0. USB API’s are available online
for C++. Using the preprogrammed API, data from the FPGA can be read and stored in a
text document. The text document can then be displayed with a program of the user’s
preference. For example, headers can be added to the text to create a VRML file to be
viewed using VRMLPad. Another option would be to keep the data in a text file and use
RapidForm 2004 to view the points. Other options for viewing points that need to be
refreshed for every new scene would have to be looked into.
7.5 Conclusions
The entire 3D scene reconstruction system can be broken into three main parts: the data
acquisition system, the data conversion, and the data computation. The data acquisition,
as studied in previous chapters, determines most of the performance boundaries of the
system. Using data from the testing of the data acquisition system, a laser scanning
system could be designed.
171
Chapter 8: Conclusions
Once the laser scanning system is designed and developed, the entire data acquisition
system can be put together and tested. Data sets from the data acquisition system can be
fed into the data conversion element of the system.
A sample A/D converter was ordered from TI. Although it is not yet possible to connect
the LPSM outputs to the A/D converter, it was possible to check the control signals and
ensure that the A/D converter operated as stated in the specification. Using the converter
on an EVM board instead of on a breadboard should reduce noise and increase
performance.
The FPGA algorithm can also be designed without the data acquisition system. Although
certain variables, such as sampling rates, are not yet determined, they can be changed
once they are known. The algorithm can also be designed to be flexible and allow for
future changes by using a series of state machines. With these state machines, it is easy
to remove, add, or change the existing model to allow for more error correction or other
changes.
172
Chapter 8: Conclusions
8 CONCLUSIONS
The goal of this thesis was to develop a new 3D scene reconstruction system that could
model scenes at mid-range distances in real-time. A physical and logical block diagram
of the proposed system was developed. A literature review was conducted and showed
that no current system exists that uses PSDs in a stereo vision configuration. The system
theory was studied and a hardware overview conducted to choose the best parts for the
system.
The LPSM was purchased as part of the data acquisition system. The focus of the thesis
shifted to characterizing this sensor due to its performance in experiments. The LPSM
was characterized to help determine system performance boundaries and the necessary
hardware for the rest of the system.
The rest of the system was designed and hardware recommendations were offered, as
well as algorithms for developing the necessary code.
8.1 Summary
A survey of current 3D systems was first studied. Background of laser triangulation,
stereo vision, PSDs, and FPGAs was also examined. Then, a survey of available
products was conducted to try to find the appropriate hardware for the system. Criteria to
determine the best hardware choices was developed and hardware recommendations were
made, creating a paper design of the system, and fulfilling the contribution of designing a
3D scene reconstruction system based on PSDs in a stereo vision configuration.
Before the entire system could be built or designed, the data acquisition system needed to
be built to determine performance boundaries and inputs for the rest of the system. It was
decided to base the data acquisition system on the LPSM from Noah Corp.
In
conversations with Noah Corp, the LPSM was found to be used in applications where a
<10mW laser is shined directly into the LPSM or reflected off of a shiny surface that is
very close to the LPSM. However, in this application, a laser was going to be reflected
off of a diffuse surface from 3 feet to 15 feet away.
The LPSM was extensively tested to find out how it performed for this type of
application. At first, a laser was reflected off of a white poster board placed from 3 feet
to 15 feet away. However, even using a <500mW laser did not supply the necessary laser
power for the LPSM to operate within its specified light threshold range. Therefore, a
mirror was used to reflect more laser power. Although the mirror did reflect enough laser
power for the LPSM to register a good threshold from 3 feet to 15 feet away, the
threshold was only reached when the laser’s angle of reflection directly hit the LPSM.
This meant that the distance on the mirror that gave readings within the threshold was
only a few inches wide.
173
Chapter 8: Conclusions
It was decided to try using the white poster board again at a closer distance to try to reach
the good light threshold region. From experiment, it was found that if the poster was
within 15 inches of the LPSM and a red <500mW point laser was used, then the LPSM
gave good readings. The maximum and minimum voltages seemed to be more consistent
throughout this range and linear behavior could be seen when moving the laser in the
field of view. These experiments demonstrated the contribution of characterizing the
LPSM as a vision sensor.
A slider was built so that stereo points could be taken even though only one LPSM was
present. A system of moving the laser with a pan tilt while collecting data points on an
oscilloscope gave high enough point density to model small objects. The modeling of a
rectangular prism, triangular prism, and cylinder were studied in depth.
Data was taken for the rectangular prism and a plane was fitted to the data. It was
expected that the plane be fairly perpendicular to the Z-axis. However, the plane was
almost perpendicular to the Z-axis. Therefore, fitting a plane to the data added more error
than measuring where the object sat with a ruler. Consequently, the error was found
using the absolute distance of the object as measured by a ruler.
The percent error was found for the three objects and compared to the x distance, y
distance, and depth. No correlation could be found between error and x or y distance.
However, there was always more error at the 10 inch depth than at the nine inch depth.
From this observation, three correction models were applied to the data.
The first correction model assumed that the LPSM may not be perfectly linear. In
previous calculations, one constant had been used to convert voltages on one axis to
distances. In this model, two constants were used: one for positive voltages and one for
negative voltages. When applied to the data, this model caused more error.
The next correction models took into account the intensity problems that had been seen.
The LPSM seemed extremely sensitive to even slight changes in laser power level. Even
moving the scene further away or closer by one inch would cause a change in the
minimum and maximum voltages, changing the conversion constant. Therefore, a model
was attempted where the constant changed with depth. For every 0.25 inches closer to
the scene from the original 10 inch distance, the constant was decreased by 0.05 mm/V.
Using this model, the error was improved for each object. These experiments
demonstrated the contribution of testing the LPSM as a vision sensor.
8.2 Lessons Learned
It was determined that the error in the model is probably due to the LPSM sensitivity to
changes in light intensity. Although the LPSM is able to operate within a light power
range of 0.001 mW to 1 mW, the boundaries of the voltage remain inconsistent within
174
Chapter 8: Conclusions
that range. Since the scene is far away and the surface reflecting the laser is diffuse, the
laser intensity changes too much for the LPSM to give consistent readings.
Other factors besides distance could be contributing to the change in intensity. For
example, the rectangular prism face is parallel to the LPSM. When the laser strikes the
rectangular prism, the majority of the reflections bounce directly back to the LPSM.
However, the triangular prism face is at a 45º angle to the LPSM. When the laser hits the
triangular prism face, the majority of the reflections will be directed at an angle away
from the LPSM, so less intensity is seen.
Another factor could be the entry angle of the laser. The largest laser intensity should be
seen when the laser is pointing directly at a surface. However, to scan the entire scene,
the laser must be pointed at different angles. If the reflecting surface is not perpendicular
to the entry angle of the laser beam, then the intensity will be reduced.
Laser intensity is also affected by surface material and color. From experiment, it was
shown that different colored surfaces give inconsistent voltage readings. Even if the
surface is the same color, different materials also cause inconsistent voltage readings.
Therefore, surfaces in the field of view must be the same color and material to get
somewhat consistent readings.
These restrictions along with the amount of error seen in the models severely limits the
possible applications of the system. The system could still be used for reverse
engineering of objects that are the same color and material, such as pipe welds.
However, other systems currently have better error and could probably make better
models.
8.3 Future Work
Several options exist to try to improve the system. First, steps could be taken to try to
make the laser intensity more consistent at different depths. This could be accomplished
by purchasing a more focused laser. Most of the laser power may be getting lost in the
diffusion of the laser beam. Therefore, a more focused laser would cause the power to
stay in a more concentrated area, giving higher apparent laser intensity. Red wellfocused lasers that have an output power of <500 mW are approximately $5000-$10000.
Another option to better focus the laser is to develop a two lens system. The curvature
and placement of the lenses would be found through optics equations. The makers of the
<500mW laser recommended purchasing a new laser rather than building a two lens
system.
Another option would be to change the sensor. The LPSM is based on a PSD made by
UDT Sensors. The main manufacturer of PSDs is Hamamatsu. It may be possible to
purchase a PSD from Hamamatsu and perform similar tests to see if it performs better
than the LPSM for this application. Different PSDs may prove to be less sensitive to
slight changes in light intensity, but that can only be determined through testing. It is
175
Chapter 8: Conclusions
possible to buy a PSD from Hamamatsu for about $30 per piece, usually with a minimum
of a five piece purchase. Using a PSD instead of the LPSM would also mean that the
outputs would be sets of currents. The distance would then have to be computed using
equations found in Chapter 3. These calculations could be done on the FPGA. The
computations could easily be added by coding a new state machine.
Although using a PSD sounds like it may add extra computations, it actually reduces the
amount of computations. The LPSM sees a light spot, takes the outputs of the PSD, and
creates a voltage, with a response time of at least 100 µs. The voltage must then be
changed back to a distance on the FPGA. A PSD outputs the currents so that only one
calculation must be made to determine the distance. Since only one calculation needs to
be made, and the response time of many PSDs is recorded as less than 10 µs, the response
time may improve, allowing for better frame rates and resolutions.
If it is shown that PSDs work well, it may also be possible to change the system to a line
laser system, again improving frame rates. A line laser system may work better than a
point laser system because more of the beam is present in the field of view of the PSD,
possibly helping to keep the laser intensity more constant. Using a line laser would mean
that more PSDs are required. However, if the PSDs are $30 per piece, and the LPSM is
$1700, then using about 56 PSDs would be equivalent to one LPSM. This method would
cause the resolution to be more fixed than using a point laser, but would improve the
frame rate. Using a line laser would also cause the laser scanning system cost to decrease
dramatically because the laser would only have to move in one direction and at a much
slower speed. A less complicated laser scanning system would allow more money to be
put into the sensors.
8.4 Conclusions
For the current system, the LPSM is probably not a good choice for the sensor. It may be
possible to get improved error by purchasing a more focused laser, but other options are
also available. Using PSDs may help reduce the system cost and allow for faster
response times.
The elimination of the correspondence problem is possible by using a laser. However,
the LPSM is too sensitive to light intensity to accurately be used in this application.
176
References
REFERENCES
177
References
3D Digital Corporation, “Optix 400 Series,” 2005,
http://www.3ddigitalcorp.com/products.htm
Altera, “Cyclone II Device Family Data Sheet,” 2005.
Altera, “Stratix II Device Family Data Sheet,” 2005.
K. Araki, M. Shimizu, T. Noda, Y. Chiba, Y. Tsuda, K. Ikegaya, K. Sannomiya, and M.
Gomi, “High Speed and Continuous 3-D Measurement System,” in Conference D:
Architectures for Vision and Pattern Recognition, 1992, pp. 62-65.
Atmel, “5k-50k Gates Coprocessor FPGA with FreeRam,” 2004.
K. Benkrid, D. Crookes, J. Smith and A. Benkrid, “High Level Programming for Real
Time FPGA based Video Processing,” in Acoustics, Speech, and Signal Processing,
2000, pp. 3227-3230.
J. –A. Beraldin, F. Blais, L. Cournoyer, G. Godin and M. Rioux, “Active 3D Sensing,”
April 2000, http://www.iit-iti.nrc-cnrc.gc.ca/iit-publications-iti/docs/NRC-44159.pdf
J.-A. Beraldin, F. Blais, L. Cournoyer, M. Rioux, S. H. El-Hakim, R. Rodela, F. Bernier
and N. Harrison, “Digital 3D Imaging System for Rapid Response on Remote Sites,” in
3-D Digital Imaging and Modeling, 1999, pp. 34-43.
J. –A. Beraldin, F. Glais, M. Rioux, J. Domey, L. Gonzo, F. DeNisi, F. Comper, D.
Stoppa, M. Gottardi and A. Simoni, “Optimized Position Sensors for Flying-Spot Active
Triangulation Systems,” 2003, http://ieeexplore.ieee.org/iel5/8779/27810/01240229.pdf
S. Brown and J. Rose, “Architecture of FPGAs and CPLDs: A Tutorial,” IEEE
Transaction on Design and Test of Computers, vol. 13, pp. 42-57, 1996.
Callidus Precision Systems, “Callidus CP 3200 Technical Specifications,” 2005,
http://www.callidus.de/en/cp3200/techn_daten.html
Carnegie Mellon University, “The CMUcam1 Vision Sensor,” November 2005,
http://www.cs.cmu.edu/~cmucam/qanda.html
“Chapter 9, 3D Vision (Part I): Geometry for 3D Vision,” October 2005,
http://www.icaen.uiowa.edu/~dip/LECTURE/3DVisionP1_2.html
B. Chen, W. Lou, C. Chen and H. Lin, “A 3D Scanning System based on Low-occlusion
Approach,” in 3-D Digital Imaging and Modeling, 1999, pp. 506-515.
178
References
J. Chen, D. Yang, H. Zhou and S. Buckley, “Avoiding Spurious Reflections from Shiny
Surfaces on a 3D Real-Time Machine Vision Inspection System,” in Instrumentation and
Measurement Technology Conference, 1998, pp. 364-368.
Danaher Motion, “Servo Handbook: Stepper versus Brushless,” 2006,
http://www.danahermotion.com/education/learn_about_mc/servohandbook/motor/compar
ison/stepper_vs_brushless.php
“DARPA Grand Challenge Overview,” 2005,
http://www.darpa.mil/grandchallenge/overview.html
M. de Bakker, P. W. Verbeek, F. vandenOuden and G. K. Steenvoorden, “High-speed
Acquisition of Range Images,” in Pattern Recognition, 1996, pp. 293-297.
F. De Nisi, F. Comper, L. Gonzo, M. Gottardi, D. Stoppa, A. Simoni and J.-A Beraldin,
“A Novel CMOS Sensor for Position Detection,” IEEE Transactions on Sensors, vol. 2,
pp. 1277-1282, 22-24 Oct. 2003.
C. Donninger, A. Kure and U. Lorenze, “Parallel Brutus: the First Distributed, FPGA
Accelerated Chess Program,” in Parallel and Distributed Processing Symposium, 2004,
p. 44.
M. Dumberger, “Taking the Pain Out of Laser Triangulation,” July 2002,
http://www.sensorsmag.com/articles/0702/laser/main.shtml
Edmund Optics, “Edmund Optics: Optics and Optical Instruments Catalog,” 2005,
www.edmundoptics.com
A. Ejnioui and N. Ranganathan, “Routing on Switch Matrix Multi-FPGA Systems,” in
Thirteenth International Conference on VLSI Design, 2000, pp. 248-253.
O. Faugeras, Three-Dimensional Computer Vision: A Geometric Viewpoint. Cambridge,
Massachusetts and London, England: The MIT Press, 1993.
F. Ferrari, E. Grosso, G. Sandini and M. Magrassi, “A Stereo Vision System for Real
Time Obstacle Avoidance in Unknown Environment,” IEEE Transactions on Intelligent
Robots and Systems, vol. 2, pp. 703-708, 3-6 July 1990.
L.Md A. Filho, A. F. Barbosa, H. P. Lima, Jr. and P. R. B. Marinho, “A TDC-Based
System for X-Ray Imaging Detectors,” IEEE Transactions for Nuclear Science, vol. 52,
pp. 932-937, Aug. 2005.
R. Fujita and M. Idesawa, “New Types of Position Sensitive Device for Accurate
Sensing,” in Information, Intelligence and Systems, 1999, pp. 141-148.
179
References
S. Funabiki and T. Tanaka, “Binocular-vision-based Position Sensor with PSDs and its
Application to Mobile Robot Following,” IEEE Transactions on Science, Measurement
and Technology, vol. 149, pp. 79-84, March 2002.
D. Geiger, “Binocular Vision,” October 2005,
http://www.cs.nyu.edu/courses/fall02/622.2271-001/stereo.doc
L. Gonzo, A. Simoni, M. Gottardi, D. Stoppa and J.-A Beraldin, “Sensors Optimized for
3-D Digitization,” IEEE Transactions for Instrumentation and Measurement, vol. 52, pp.
903-908, June 2003.
L. Gonzo, A. Simoni, M. Gottardi, D. Stoppa and J.-A Beraldin, “Smart Sensors for 3D
Digitization,” in Instrumentation and Measurement Technology, 2001, pp. 117-122.
P. T. Grey, “Digital Stereo Vision Camera: Bumblebee,” Feb 2005,
http://www.ptgrey.com/products/bumblebee/bumblebee.PDF
Hamamatsu Solid State Division, “PSD (Position Sensitive Detector),” 2003,
http://usa.hamamatsu.com/assets/pdf/catsandguides/Psd.pdf
Hamamatsu, “Two-dimensional PSD, S1200, S1300, S1880, S1881, S2044,” 2004,
http://sales.hamamatsu.com/assets/pdf/parts_S/S1200_etc.pdf
Hamamatsu, “Two-dimensional PSD S5990-01, S5991-01,” 2001,
http://sales.hamamatsu.com/assets/pdf/parts_S/S5990-01_S5991-01.pdf
Hamamatsu, “Two-dimensional PSD S7848 series,” 2005,
http://sales.hamamatsu.com/assets/pdf/parts_S/S7848_series.pdf
R. Hartley and A. Zisserman, Multiple View Geometry in Computer Vision. United
Kingdom: Cambridge University Press, 2000.
W. P. Kennedy, “The Basics of Triangulation Sensors,” May 1998,
http://www.sensorsmag.com/articles/0598/tri0598/main.shtml
M. Kim, H. Cho and H. Lee, “An Active Trinocular Vision System for Sensing Mobile
Robot Navigation Environments,” in Intelligetn Robots and Systems, 2004, pp. 16981703.
R. Klette, K. Schluns and A. Koschan, Computer Vision: Three-Dimensional Data from
Images. Singapore: Springer-Verlag, 1998.
H. Konodo (a), T. Maki, T. Ura, Y. Nose, T. Sakamaki and M. Inaishi, “Relative
Navigation of an AUV Using a Light-section Ranging System,” in Control, Automation,
Robotics, and Vision Converence, 2004, pp. 425-430.
180
References
H. Konodo (b), T. Maki, T. Ura, Y. Nose, T. Sakamaki and M. Inaishi, “Structure
Tracing with a Ranging System using a Sheet Laser Beam,” in Underwater Technology,
2004, pp. 83-88.
Leica Geosystems, “HDS3000 Specifications,” 2005, http://www.leicageosystems.com/hds/en/lgs_6506.htm
A. Makynen, T. Rahkonen and J. Kostamovaara, “Digital Optical Position-Sensitive
Detector (PSD),” in Instrumentaiton and Measurement Technology, 2004, pp. 2358-2360.
L. Marques, F. Moita, U. Nunes, and A. T. de Almeida, “3D Laser-based Sensor for
Robotics,” in Electrotechnical Conference, 1994, pp. 1328-1348.
L. Marques, U. Nunes, and A. T. de Almeida, “A New 3D Optical Triangulation Sensor
for Robotics,” in Advanced Motion Control, 1998, pp. 512-517.
Minolta, “VIVID 9i Specifications,” 2005,
http://kmpi.konicaminolta.us/eprise/main/kmpi/content/ISD/ISD_product_pages/Vivid_9i
?mDetail=Specifications
S. Mizuno, H. Funakoshi and K. Yamamoto, “3D Realtime Imaging System with PSD
Array Combined with Charge Amplifier Array,” in Instrumentation and Measurement
Technology, 1994, pp. 457-460.
H. G. Nguyen and M. R. Blackburn, “A Simple Method for Range Finding via Laser
Triangulation,” San Diego, CA: United States Navy Technical Documentation, Janurary
1995.
Y. Oike, M. Ikeda and K. Asada, “A 375 x 375 3D 1k Frame/s Range-finding Image
Sensor with 394.5 kHz Access Rate and 0.2 Subpixel Accuracy,” in Solid-State Circuits
Conference, 2004, pp. 118-517.
Y. Oike, M. Ikeda and K. Asada, “Design of Real-time VGA 3-D Image Sensor Using
Mixed-signal Techniques,” in Design Automation Conference, 2004, pp. 523-524.
Y. Oike, M. Ikeda and K. Asada, “High-sensitivity and Wide-dynamic-range Range
Finder and its Application,” in World Automation Congress, 2002, pp. 417-422.
Y. Oike, H. Shintaku, S. Takayama, M. Ikeda and K. Asada, “Real-time and Highresolution 3D Imaging System using Light-section Method and Smart CMOS Sensor,”
IEEE Transactions on Sensors, vol. 1, pp. 502-507, 22-24 Oct. 2003.
J. V. Oldfield and R. C. Dorf, Field Programmable Gate Arrays. New York: WileyInterscience Publication, 1995.
181
References
Parks, J. and Evans, P. Personal Visit. February, 2006.
P. J. Rajda, “Optimizatino of Logic Use on Stereo Vision Algorithm Example,” in FieldProgrammable Custom Computing Machines, 2001, pp. 307-308.
X. Reves, A. Gelonch and F. Casadevall, “Software Radio Implementation of a DSCDMA Indoor Subsystem based on FPGA Devices,” in Personal, Indoor and Mobile
Radio Communications, 2001, pp. D-86—D-90.
Riegl Laser Mirror Scanner LMS-Z10 Technical Documentation and User’s Instructions,
May 2000
C. R. Rose, J. P. Hammonds, R. A. Nelson, J. T. Weizeorick, “The LANL Neutron
Science Center TOF/PSD Module: Status and Progress,” in Real Time Conference, 1999,
pp. 137-139.
H. Russell, “Vision Systems Face a Grand Challenge,” October 2005,
http://www.advancedimagingpro.com/publication/article.jsp?pubId=1&id=1939
Samsung Electro-mechanics, “Polygon Mirror Scanner Motors,” 2003,
http://www.sem.samsung.com/
L. C. Silva, A. Petraglia and M. R. Petraglia, “Stereo Vision System for Real Time
Inspection and 3D Reconstruction,” IEEE Transactions on Industrial Electronics, vol. 1,
pp. 607-611, 9-11 June 2003.
A. Simoni, L. Gonzo and M. Gottardi, “2.1: Integrated Optical Sensors for 3-D Vision,”
2002, http://ieeexplore.ieee.org/iel5/8046/22242/01036976.pdf
Sitek, “What’s a PSD”, 2005, http://www.sitek.se/whats_a_psd.htm
“Stereopsis,” October 2005, http://www.cim.mcgill.ca/~siddiqi/308-5582001/danicl_stereo.pdf
“Stereo Vision,” October 2005,
http://www.cs.bris.ac_uk/Teaching/Resources/COMS30121/slides3D/lec2v.pdf
Trenz Electronics, “Spartan-3 FPGA Micromodule,” 2005, http://www.trenzelectronic.de/prod/proden18.htm
S. M. Trimberger, Field Programmable Gate Array Technology.
Boston/Dordrecht/London: Kluwer Academic Publishers, 1994.
182
References
User Documentation MAPP Ranger System. Sweden: IVP, Integrated Vision Products
AB, 1998-2000.
L. Viarani, D. Stoppa, L. Gonzo, M. Gottardi and A. Simoni, “A CMOS Smart Pixel for
Active 3-D Vision Applications,” IEEE Transactions on Sensors, vol. 4, pp. 145-152,
Feb. 2004.
Videre Design, “STH-MDCS/-C Stereo Head User’s Manual,” 2003,
http://users.rcn.com/mclaughl.dnai/sthmdcs.pdf
W. Wang and I. J. Busch-Vishniac, “The Linearity and Sensitivity of Lateral Effect
Position Sensitive Devices—An Improved Geometry,” IEEE Transactions on Electron
Devices, vol. 36, pp. 2475-2480, Nov. 1989.
M. Williams ([email protected]), “FW: University of Tennessee in
Knoxville,” October 21, 2005.
Xilinx, “Spartan-3E FPGA Family: Complete Data Sheet,” 2005.
Xilinx, “Virtex-4 User Guide,” 2005.
183
Vita
VITA
Julie Anne Morris was born in Springfield, VA on June 9, 1983. Her family moved to
Raleigh, North Carolina where Julie attended Jeffrey’s Grove Elementary School and
Pleasant Union Elementary School. They moved to Libertyville, IL, where she attended
Oak Grove Middle School. Julie’s family settled in Brentwood, Tennessee, where she
attended Brentwood High School, graduating salutatorian in 2001.
Julie began attending Virginia Polytechnic Institute and State University in Blacksburg,
VA in August 2001. Julie participated in the Residential Leadership Community, Baptist
Student Union, and intramural basketball program. She also played for the open Ultimate
Frisbee Club. She received her B.S in Electrical Engineering from Virginia Tech in May
2005, graduating suma cum laude. While working on her undergraduate degree, Julie
interned at Sparta in Huntsville, AL, Northrop Grumman Missile Systems in Huntsville,
AL, Micron in Dallas, TX, and IBM in Raleigh, NC.
Julie began working as a graduate research assistant for the Imaging, Robotics, and
Intelligent Systems Laboratory at the University of Tennessee in Knoxville, TN, in
August 2005. She will be graduating with an M.S in Electrical Engineering in August
2006.
After graduation, Julie will move to Raleigh, North Carolina, where she has taken a
position as a hardware engineer with IBM in the Retail Store Solutions group.
184