1
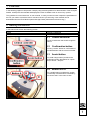
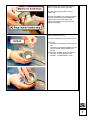
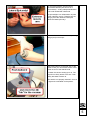
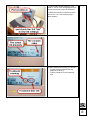
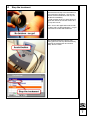
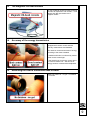
Practical
Guidelines
Sonopuls
StatUS
For the Enraf-Nonius Commercial Training
Copyright: & Exclusive Sales and Service:
Enraf-Nonius B.V.
P.O. Box 12080
3004 GB ROTTERDAM
The Netherlands
Tel: +31 (0)10 – 20 30 600
Fax: +31 (0)10 – 20 30 699
[email protected]
www.enraf-nonius.com
Content
1
Preamble ...................................................................................................................................... 1
2
Naming convention ..................................................................................................................... 1
2.1 Central controller................................................................................................................. 1
2.2 Confirmation button............................................................................................................. 1
2.3 Assist button........................................................................................................................ 1
2.4 Button A to D....................................................................................................................... 1
3
The first StatUS demonstration ................................................................................................. 2
3.1 Prepare the Sonopuls StatUS............................................................................................. 2
3.2 Set up the treatment protocol.............................................................................................. 4
3.3 Stop the treatment............................................................................................................... 7
4
Demonstration fine-tuning features .......................................................................................... 8
4.1 The tiltable screen & viewing angle .................................................................................... 8
4.2 The one-hand operation...................................................................................................... 8
4.3 The magnetic US head console.......................................................................................... 9
4.4 Accuracy of the energy transmission .................................................................................. 9
4.5 Removing the StatUS ultrasound head is clean ................................................................. 9
4.6 The use of the electrotherapy wizard................................................................................ 10
1
1 Preamble
In the following pages we will present a step-by-step practical guideline for demonstration of the Sonopuls
StatUS. All steps are documented and displayed, but don’t hesitate to ask in case of any queries.
This guideline is not an instruction- or user-manual. In case you need to know in depth the possibilities of
the unit you need to consult the User’s manual of the unit you are using. User manuals can be
downloaded from the Enraf-Nonius partnersite (http://www.partnersite.enraf-nonius.org/)
2 Naming convention
In this manual we will use the following names:
US
StatUS
Ultrasound therapy
Stationary Ultrasound
2.1
Central controller
The big round button that scrolls trough the
menu’s
2.2
Confirmation button
The long “mouse” button for confirmation of
the selected item with the central controller
2.3
Assist button
The small orange button just above the
confirmation button that allows for a quick
jump to Home – Stop etc.
2.4
Button A to D
The 4 small buttons just below the screen.
Functionality of these buttons is defined by
the current “tabs” in the menu screen.
1
3 The first StatUS demonstration
3.1
Prepare the Sonopuls StatUS
Turn on the unit
Connecting the StatUS-applicator
Make sure that the logo of the ATUScontroller is pointing upward.
Plug in the left plug of the ATUS-controller
in connection B of the US-module [1].
Connect the right plug to the StatUSmodule [2].
2
StatUS Ultrasound is transmitted with the
aid of a special gel cushion (gel pad)
The gel pad is held in position using a
fixation ring.
To place the fixation ring, press this fixation
ring over the treatment head. Make sure
that the ridge on the inner side of the
fixation ring [A] falls in the groove of the
treatment head [B]
Place a gel pad in the ring.
The StatUS-applicator is now ready for use.
By the way:
• Gel pads are intended for one-time use
only
• Gel pads are supplied standard with the
unit in a limited amount (blister of 8
pieces)
Gel pads are available as accessories as:
• 3442940 - Gel pad StatUS - 48x
• 3442941 - Gel pad StatUS - 240x
3
3.2
Set up the treatment protocol
In the main menu of the unit, select “StatUS
Therapy” with the central controller.
Confirm with the confirmation button
Select “Manual Settings” from the menu
with the central controller.
Confirm with the confirmation button
In order to set the parameter of interest,
select from the menu with the central
controller and confirm with the confirmation
button. Than adjust the parameter of
interest and confirm with the confirmation
button.
For our demonstration we will set the
parameters to:
Treatment Time
2:00
Ultrasound Applicator
B
Ultrasound Frequency
3 MHz
Duty Cycle
50 %
Duty Cycle Modulation
on
Amplitude Modulation
on
Why these settings?
2 minutes treatment time so we can see
how the unit start and stops – with the
vacuum suction maintained
Applicator B – that is standard for the
StatUS applicator (A is the traditional
ultrasound)
Frequency 3 MHz – because we want a
nice mild treatment as we are just
simulating in our demo!
Duty cycle and Amplitude modulation of
course on (no hotspots in a demo!!!)
4
For this demonstration we will treat an
epicondilitis lateralis (also known as a
tennis elbow) – a fairly widespread disorder
that is well treated with ultrasound.
An epicondilytis is an inflammation of parts
of the underarm muscle. Therefore we are
gong to place the ultrasound head just
below the lateral epicondyl.
Place the StatUS Ultrasound head (with ring
and gel pad) on that spot
Now push button D. In the right “tab” of the
menu screen you can see the suction-value
of the vacuum of the StatUS head.
Increase the vacuum setting up to 70. The
cup will now firmly attach to the arm. Than
slowly decrease to about 40.
The head is now properly attached – but not
to tight and comfortable for the patient.
5
In order tot start the US treatment, push
button C. The 3rd “tab” will highlight and you
can set the intensity of the US treatment.
Increase the intensity to a minimum value
(around 0.1 or 0,2 mA) as this is only a
demo situation.
Once the treatment in running you will see:
• A green triangle indicating that the
treatment is running
• A timer countdown for the treatment
time
6
3.3
Stop the treatment
End of treatment
The treatment will stop once the treatment
time is achieved. However – the vacuum
suction will be maintained so the cup will
not fall off immediately.
In order tot take off the cup press button D
again and reduce the vacuum suction to 0,
the cup will com off.
Note – due to this application method with
the aid of gel is a clean application – no gel
or bruises are visible after treatment!
Stop treatment before the time is over
At any point one can stop the treatment by
pressing the assist button and choose
“Stop” from the menu.
7
4 Demonstration fine-tuning features
The following items are imperative in order to convince a potential customer of the ease of use of the
Enraf-Nonius 6-Series. Items that has been proven in practice, and although sometimes very simple and
basic – extremely valuable in the real life daily situation of the therapist.
4.1
The tiltable screen & viewing angle
Tiltable – good view from all angles
But due to the highres tft also visible from
the sides – it has a very wide-angle view.
4.2
The one-hand operation
One hand on the patient and one hand on
the treatment unit – that is how
physiotherapist should work and wants to
work.
Not many units allow this – but the EnrafNonius 6-series does! Full control of the unit
with just one hand – select the item from the
menu with your index finger and confirm
with the thumb – couldn’t be easier!
8
4.3
The magnetic US head console
For the traditional ultrasound head, however
you want to reposition it into it holder – it will
always stick like glue thanks to the
magnetic holder
4.4
Accuracy of the energy transmission
Enraf-Nonius ultrasound units are all
equipped with contact control and with
intensity measurement and feedback.
This assures correct transmission of energy
according to the doses intended.
In traditional US this is confirmed by means
of the contact control light.
In the StatUS unit it is always correct due to
the vacuum fixation unit – the amount of
energy however is measured and adjusted.
4.5
Removing the StatUS ultrasound head is clean
Show how clean it is – no gel – no irritation
– no bruise
9
4.6
The use of the electrotherapy wizard
Always quickly show the therapy guide for
electrotherapy – it is clear, easy to
understand and unique
10