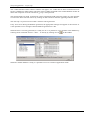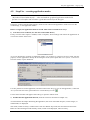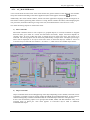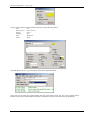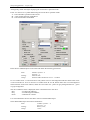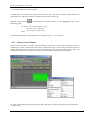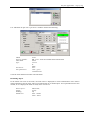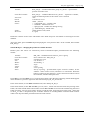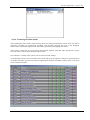
1
asix5
User manual
The First Application
Doc. No ENP5001
Version: 08-10-2007
The first application – step by step
ASKOM® and asix ® are registered trademarks of ASKOM Spółka z o.o., Gliwice. Other brand names,
trademarks, and registered trademarks are the property of their respective holders.
All rights reserved including the right of reproduction in whole or in part in any form. No part of this
publication may be reproduced or transmitted in any form or by any means, electronic or mechanical,
including photocopying, recording, or by any information storage and retrieval system, without prior
written permission from the ASKOM.
ASKOM sp. z o. o. shall not be liable for any damages arising out of the use of information included in the
publication content.
Copyright © 2007, ASKOM Sp. z o. o., Gliwice
ASKOM Sp. z o. o., ul. Józefa Sowińskiego 13, 44-121 Gliwice,
tel. +48 (0) 32 3018100, fax +48 (0) 32 3018101,
http://www.askom.com.pl, e-mail: [email protected]
The first application – step by step
1.
BEFORE YOU BEGIN............................................................................................................................................ 5
1.1.
1.2.
1.3.
MANUAL CONTENTS ........................................................................................................................................... 5
DEMO VERSION ................................................................................................................................................. 5
ASIX VISUALIZATION SYSTEM ............................................................................................................................. 6
2.
IMPORTANT CONCEPTS .................................................................................................................................... 7
3.
DESCRIPTION OF THE ACID FACTORY APPLICATION.......................................................................... 11
4.
DESIGNING THE APPLICATION..................................................................................................................... 15
4.1.
STEP ONE – INPUT DATA OF THE APPLICATION ................................................................................................. 15
4.2.
STEP TWO – CREATING VARIABLES DATABASE IN EXCEL WORKSHEET ............................................................ 16
4.2.1.
Variable attributes .................................................................................................................................. 19
4.2.2.
Alarms sheet............................................................................................................................................ 24
4.2.3.
Alarms_groups sheet............................................................................................................................... 24
4.2.4.
Grouping attributes................................................................................................................................. 25
4.2.5.
Attribute sets............................................................................................................................................ 26
4.2.6.
Conversion function parameters ............................................................................................................ 27
4.2.7.
Attribute captions.................................................................................................................................... 28
4.2.8.
Attribute languages................................................................................................................................. 29
4.2.9.
Attribute aliases ...................................................................................................................................... 30
4.2.10. AsTrend averages.................................................................................................................................... 31
4.3.
STEP THREE – CREATING THE APPLICATION CONFIGURATION FILE ................................................................... 32
4.4.
STEP FOUR – GENERATING THE VARIABLE DEFINITIONS DATABASE ................................................................. 37
4.5.
STEP FIVE – CREATING APPLICATION MASKS .................................................................................................... 39
4.5.1.
AC_MAP.MSK mask .............................................................................................................................. 41
4.5.2.
AC_MENU.MSK mask – application menu .......................................................................................... 42
4.5.3.
ALARMS.msk – the last alarm line........................................................................................................ 49
4.5.4.
ZEGAR.msk mask – displaying the current time................................................................................... 50
4.5.5.
T_FURN.msk mask – furnace and contact device ................................................................................ 50
4.5.6.
T_KOLUM.msk mask – condensation tower ......................................................................................... 61
4.5.7.
Analog Control Window ......................................................................................................................... 62
4.5.8.
Analog Control Window Iinitiated with Parameter............................................................................... 71
4.5.9.
Drive Control Window ............................................................................................................................ 72
4.5.10. KW_D13.msk mask – diagnostic mask................................................................................................... 79
4.5.11. INFO.msk masks – ASKOM company information mask..................................................................... 81
4.5.12. XAL_ACT.msk mask – active alarms table............................................................................................ 81
4.5.13. XAL_HIST.msk mask - historical alarms table ..................................................................................... 82
4.5.14.
Alarms definitions and alarm groups definitions files.............................................................. 83
4.5.15. XKWDIAG.msk mask – system diagnostic mask ................................................................................... 83
4.5.16. XKWREJ4.msk mask – charts mask ...................................................................................................... 84
4.5.17. Trends definition..................................................................................................................................... 89
4.5.18. Measurement tables ................................................................................................................................ 89
4.5.19. Technological limits masks .................................................................................................................... 91
4.5.20. Automatic control systems mask ............................................................................................................ 92
4.5.21. Reports .................................................................................................................................................... 92
4.5.22. Event scheduler....................................................................................................................................... 93
4.5.23. QUERY.msk mask – mask for dialogue with the operator.................................................................... 93
4.6.
STEP SIX – FURTHER CONFIGURATION OF THE APPLICATION ............................................................................. 95
4.6.1.
Start Parameters ..................................................................................................................................... 96
4.6.2.
Masks .................................................................................................................................................... 101
4.6.3.
Current Data ......................................................................................................................................... 106
4.6.4.
Network Server Related Current Data Parameters.............................................................................. 111
4.6.5.
Archival Data ........................................................................................................................................ 113
4.6.6.
Alarm System ........................................................................................................................................ 119
4.6.7.
Network Module.................................................................................................................................... 128
4.6.8.
Application security .............................................................................................................................. 134
4.6.9.
Printout ................................................................................................................................................. 138
4.6.10. Reports .................................................................................................................................................. 143
©ASKOM, Gliwice
October 2007
3
The first application – step by step
4.6.11. Script and Action Parameters............................................................................................................... 145
4.6.12. Miscellaneous Parameters.................................................................................................................... 149
4.7.
STEP SEVEN – CREATING THE MULTILINGUAL APPLICATION ........................................................................... 153
4.8.
STEP EIGTH – CONFIGURING APPLICATION FOR TERMINAL ............................................................................. 155
4.9.
STEP NINE – CREATING ICON RUNNING THE APPLICATION .............................................................................. 156
5.
FINAL WORDS ................................................................................................................................................... 157
5.1.
4
HOW TO LEARN MORE ..................................................................................................................................... 157
October 2007
©ASKOM, Gliwice
The first application – step by step
1. Before you begin
Asix is an HMI / SCADA (Human Machine Interface / Supervisory Control and Data Acquisition) program, i.e. a
suite for visualization, control and computer-aided supervision of the industrial processes.
It enables an effective execution of monitoring and control over devices, technological lines and industrial
processes.
Asix was developed by ASKOM designers and constitutes a successful attempt to create a Polish visualization
suite comparable with foreign applications of such type. Due to its abilities and an affordable price, it allows to
execute tasks related both to small and large facilities.
1.1. Manual contents
The first application - step by step manual is a guide allowing you to learn the tool you have acquired. The
contents of this manual is a step-by-step description of activities performed during development of application
DEMO – Sulfuric Acid Factory, installed together with asix package.
Tracking the way from the original idea to the working application allows you to learn all abilities of the system.
The main purpose of this manual is to present the basic knowledge on program handling and the necessary hints
allowing the user to create and run his first application on their own.
For learning purposes, a part of the real-life application was selected. This application is really operating at one of
multiple objects, where asix enables a secure, reliable and simple handling of industrial process control. Asix.hlp
program – the help program for asix will serve as supplementation of this study. It offers a detailed description of
asix objects parameterization and explains the meaning of declarations in the application’s configuration files.
We believe that The first application – step by step manual will convince you how quickly and easily you can
execute applications in scope of visualization, control and supervision over industrial processes in asix
environment.
1.2. DEMO version
When asix in demo version is installed, Asix item will appear in tab Menu Start -> Programs.
Click options Asix / Application examples / Acid Factory to run as32demo.exe in the application mode.
Launched application presents most of asix system functionalities . Demonstration sequence allows you to switch
masks, control the drives, and register analog values. It is also possible to switch to designer mode, which allows
you to view how the application was developed.
Remember: if you wish to check how the specific masks are created, open Control Panel (keys Alt-Tab). Then
use field Masks→Designer to switch to DESIGNER mode and select option: Masks→ Edit All.
The program in demo version has some limitations regarding the operation only with simulation of process data.
Furthermore, it does not enable saving of designed masks on the disk. The program can be distributed freely
without any restraints. In particular, it can be used to present the created applications to the customer without the
need to use the full version (which requires hardware dongle).
©ASKOM, Gliwice
October 2007
5
The first application – step by step
1.3. Asix visualization system
Asix system operation in application runtime mode is protected with a hardware dongle. The dongle is supplied
together with the software, in a manner appropriate to the purchase license. It allows for operation of application
with the number of variables depending on the license type.
Each license, even the smallest one, includes the designer module allowing for developing applications and
modifying the already operating application.
The Local Engineering Station – WDUW license is provided for designing purposes. It allows to design an
application of custom size, without limitation of the number of variables and allows for two hours of operation in
application runtime mode.
The hardware dongle can be inserted into the parallel port of the printer (LPT1) or into USB port (depending on
the dongle type). The dongle should remain in the port throughout the entire time of asix system operation.
If the user did not utilize the hardware dongle driver installation option during the installation of the entire asix
package, the driver must be installed manually. For this purpose, run HINSTALL.EXE program, available in
directory with asix package, with -i parameter.
After the correct dongle installation, please restart your computer!!!
6
October 2007
©ASKOM, Gliwice
The first application – step by step
2. Important concepts
Application
set of visualization masks, initiating files and data files describing the visualized process or technology. The
application allows for viewing the current condition of the technological process, process control, viewing the
archival data, browsing the alarm lists, etc.
ASIX – Application Visualization and Designing Program
AS32 program serves to design masks used during visualization and executes the data visualization related to the
controlled process. Depending on the start-up method, AS32 operates either in designer mode or application
runtime mode. In version for Windows 2000/NT 4.0/98, AS32 includes modules ASMEN,ASPAD and ASLINK,
which are launched automatically depending on the needs (i.e. the contents of the initiating files and the operating
mode).
ARCHITECT – Application Configuration Program
ARCHITECT is used to create and configure applications. It offers a user-friendly graphical interface, enabling
quick and easy application designing and creation, editing and generation of the Variable Database. The
application operation configuration parameters and the parameters declaring the database used by the application
are saved to one shared XML (eXtensible Markup Language) file located in the application's root directory.
Application configuration, regardless of the number of machines, where it is running, is saved in one only XML
file.
ASMEN – Communication Manager
ASMEN is responsible for transferring data between the machine, where it is launched and the controllers
handling the supervised process. The direct data exchange between the computer and object controller is
performed by drivers operating under control of ASMEN module. Parameters defining the ASMEN module
operation mode are included in ASMEN section and sections of the applied communication drivers.
ASPAD – Data Archiving Program
ASPAD is a module designated for archiving and further restoration of data trends related to the controlled
process.
ASLINK – Local Network Manager
ASLINK network operation module is used in network deployments of asix. It allows other components of asix
system to communicate with each other through LAN, and is responsible for information exchange between
specific system stations. It requires that a software executing NETBIOS services (referred to as NETBIOS
emulator) must be pre-installed. This emulator is not a part of asix package. Only the emulator existing as a
standard in Windows should be installed. It is not necessary to activate ASLINK module in deployments, where
the connection with other asix system machines is not required.
Variable attribute
field of Variable Definitions Database record storing the description of characteristic features of the variable, e.g.:
Name, Description, Unit, etc.
Variable Definitions Database
stores all variable information; each variable has its own record identified by the variable name
Bitmap
image saved in memory as set of screen pixels; bitmaps are saved in files with extension *.dat
©ASKOM, Gliwice
October 2007
7
The first application – step by step
Font
set of letters, digits, punctuation marks of specific size and shape
Transmission channel
- connection executed physically between:
• asix system computer and the controller located in the object,
• asix system computers with use of ETHERNET network
- simulated connection, useful in design and testing stage
Asix directory
a directory, where asix was installed during its installation from the installation disk
Application’s operating directory
a directory, where all application files are located
Mouse click
quick pressing and releasing of the mouse button
Drop-down lists
type of field, containing the list of available possibilities; if listed items cannot be displayed in one field, the scroll
bars are displayed
Mask (or diagram)
graphical presentation of the current condition of the industrial process on the screen; it is a set of objects
designed to present the process variable values in graphical form. The mask structure is stored in files with
extension *.msk
Drive
Each device equipped with engine, which can be turned on or off.
Filename
name given to a file, finished with an appropriate extension
Object
visual structural element of a mask
Static object
an object, which cannot change its status during mask refreshing, it is not related with process variables
Dynamic object
an object changing its status as an effect of process variable value changes or change in time
Dialog box/window
window opened on the screen, used to enter the parameters defining the object operation
Parameterization
defining the behavior of dynamic objects in relation to process variables of the visualization system
Pixel
a single smallest point visible and drawable on the screen
Initiating file
text file defining the application operation (in asix5 it is XML file)
8
October 2007
©ASKOM, Gliwice
The first application – step by step
Double mouse click
double quick pressing and releasing of the mouse button, without moving the mouse itself; this is used to e.g.
select objects
Radio button
small round button in dialog box; only one of the presented options can be selected; the selected option is marked
with black dot
Checkbox
small square box in dialog window, which can be checked or cleared; it represents the option, which is toggled on
or off; if the option next to the box is toggled on, the box is marked with X sign
Dragging
dragging the selected object with pressed mouse button
Selecting the object
selecting the object for editing, copying, deleting or other operation; to select an object, click on its background
Path
definition of file location in the directory tree
Application runtime mode
application execution mode; all mechanism for dynamic handling of the controlled process are toggled on
Designer mode
mode for creation of application description, i.e. visualization masks; it enables inserting, defining and modifying
objects on the masks
Pointing with mouse
moving the cursor on the screen until the desired point is reached
Process/system variable
it is a variable declared in asix system; it has a symbolic name, type and status; it can store values acquired from
the controller, values to be saved in the controller, or other values calculated and stored in relation to objects; a
series of attributes is assigned to the variable, which are used to describe this variable
©ASKOM, Gliwice
October 2007
9
The first application – step by step
10
October 2007
©ASKOM, Gliwice
The first application – step by step
3. Description of the Acid Factory application
First of all, let’s imagine a small production plant, which manufactures e.g. sulfuric acid. Watching from a
side, you see several tanks of different sizes and shapes covered under a multitude of pipes. Here and there,
some mysterious devices, connected with bundles of cables rest upon the pipelines. The control room
contains rows of identical, flickering control lights, uncountable meters with oscillating indicators, buttons,
knobs and technical crew, which struggles to control the entire environment.
Our job as the visualization designers is to present the view of industrial process, part of technology or even
status of a single device on the computer screen. Visualization is a bit like cartoon movie presenting
information about the real condition of the process. The closer to reality is the visualization, the easier is
the operator’s job. On the other hand – the more “picture-based” it gets, the more legible it becomes.
The exemplary Acid Factory – DEMO application is on one hand an image of industrial process on the
computer screen, but on the other hand needs to acquaint the operator with abilities of asix visualization
system.
When the application is started (START menu/Programs/Asix/Demo/AcidFactory), the main application
mask appears.
Bar with MENU keys
Line of the last alarm
Let’s say a few words about the screen layout.
The screen is divided into two parts. The upper one, always visible and unchanging, contains a function key
bar - so called MENU. Keys marked as Esc, F1, F2… up to F12 are associated with appropriate keyboard
©ASKOM, Gliwice
October 2007
11
The first application – step by step
keys. Clicking the menu key or pressing the appropriate keyboard key results in the same reaction. Both
ways are equivalent.
Under the MENU field, the last alarm line is located. This line presents the last (the latest) active alarm in
the system on a red background. Double click the last alarm line to confirm it. Alarm will disappear, and it
will be replaced with last-but-one active and unconfirmed alarm, if any exists. If there are no more alarms,
the last alarm line is empty (black). The system time clock appears next to the last alarm line. Below the
last alarm line, a bigger part of the screen displays – depending on the choice – masks displaying the
technology, presenting the measurement tables, graphs, or alarm table masks.
Let’s focus on the main mask. It contains the general overview of the entire visualized facility, together
with characteristic analog measurements and main drive statuses, but does not allow for any control
actions. It is possible to return to this mask at any moment by clicking Esc button in the menu or on the
keyboard. To open more detailed technological masks, select the drop down menu from key F2.
Those masks display the technology depicted with all details. Analog measurements, with marked signal
acquisition location, drives with signaling of lack of electrical readiness (red LED), readiness for control
(green LED), control location (Z – remote, L – local), and visible work mode (AUTO/MAN/REM). Bistatus signals are displayed as highlighted texts appearing in the appropriate place on the screen. Analog
measurements change the presentation method, when the warning values (red measurement digits) or
critical values (red digits on yellow background) are exceeded, and when the measurement circuit is
damaged (characters ????? appear in place of the digits). Click the selected measurement to open the
measurement station.
The station presents the measurement symbol, its full description, current measured value in form of
number and horizontal bar, true converter current, eight-hour history graph, technological limitation values
and info button allowing for quick access to additional data about the measurement point from the system
variable database.
Click the drive, valve, pump or fan icon to open the control station allowing for full control of the drive
operation. The station enables opening/closing, toggling on/off, increasing/decreasing the operation level,
changing the operation mode AUTO/MAN/REM or displaying the diagnostic data of the drive. Each
control activity, except for increasing/decreasing the operation level must be confirmed with OK button –
F12 on screen menu or keyboard.
Key F3 opens the diagnostic mask of the system. It displays the configuration of the visualization system,
and statuses of power supply and security measures. It is useful in emergency situation, as it enables quick
analysis of failure reasons.
F4 button – Database Editor – is the key launching the tool for browsing and editing the variable database
of the visualization system. The tool is provided in the application for demonstration purposes to present its
abilities. However, the database editor should be unavailable for an operator. We recommend that the
designer (in the start-up stage) and system engineer (during application maintenance and modification)
should utilize Architect module (see Architect – User’s Manual in Architect.pdf file).
Pressing F5 – Reports opens a report window, allowing to run one of two predefined reports: Daily report,
displaying the statement of selected analog values for any 24 hours, or monthly report, grouping the data
for any month in a table.
F6 button – Charts offers two methods to view analog data collected in the archive. The first method is to
use the ready-made chart masks grouping the measurements in a manner depending on the facility
technology. The other one is to view archive according to trends. Trend module allows to compare any
measurements on a graph to analyze them. Current measurement data can be viewed as ready measurement
tables displayed with button F7. The F7 key menu also includes the dynamic tables, with contents
configured depending on the needs.
12
October 2007
©ASKOM, Gliwice
The first application – step by step
Tables of settings, available under key F8, allow to set limitations for analog measurements. When the
declared thresholds are triggered, the analog measurements displayed on technological masks change color,
which is also signaled as an alarm.
F9 opens access to the regulation system masks. Those masks include the automatic control system
structure intertwined with a part of technology, chart of analog values related to regulation system and table
of settings for regulator tuning.
Keys F10 and F11 are the active and historical alarms table. Active alarms table contains all alarms active
in the given moment and visible in the system. The historical alarms table allows for access to all alarms
registered by the system during its operation. The size of historical alarms archive is practically unlimited.
Both tables differentiate alarms in terms of their severity with use of colors. Both tables allow for viewing
the alarms according to different grouping criteria.
Button F12 mentioned before is used to confirm the control activity.
Buttons [-] and [x] imitate the typical system window buttons, allowing to minimize the application to
taskbar or to close it.
These are the basis of DEMO application operation. In the following chapters we will try to explain how it
was constructed – step by step.
©ASKOM, Gliwice
October 2007
13
The first application – step by step
14
October 2007
©ASKOM, Gliwice
The first application – step by step
4. Designing the application
4.1. Step One – Input data of the application
Before you start your work, you need to know what data you have at your disposal.
Input data is a set of information received from the facility, allowing to present what is currently happening
in the technological process, how the pumps or fans are operating, what the regulators do, how the
technological parameters are observed and what is the status of alarm signals.
What is interesting, the control signals to be send in order to toggle the drives on or off, are also the project
input data.
In case of the Sulfuric Acid Factory application (abbreviated as SAF), we have: 28 analog measurements,
15 drives, approx. 169 bi-status signals and 2 regulation systems.
Let’s estimate the number of variables:
28 measurements – assuming 4 limits for each measurement (critical minimum, minimum,
maximum, critical maximum), it makes 112 variables. Each measurement is associated with
converter current and status word, which gives the next 56 variables. To sum up, visualization of 28
analog measurements requires 196 variables.
15 drives – each drive requires 5 variables (status word, control word, diagnostic word, position of
executive unit, required positions). This is 75 variables.
160 bi-status signals grouped into bytes produces 20 variables.
2 regulation devices, each of the including PID regulator parameters such as: amplification factor K,
integration constant Ti, differentiation constant Td, Tmlag, Tf, Deadband, Max, Min, ordered value
Wz, control system output Wy, automatic control system status. This gives 11 16-bit words, which
requires the next 22 variables.
The number should be augmented with variables with alarm signals and variables for handling the
locks and security system.
Altogether this is much more than 300 variables.
The further necessary information on analog measurements are: ranges, units, text description, C&I
symbol, sampling rate, archiving parameters, address to be referenced during identification of the given
measurement and manner of processing. We also need to decide on the meaning of specific bits in the
status word of the measurement.
The next important information is the list of drives with full description and division into types depending
on the control method. The scheme of bits in the drive’s status, control and diagnostic words is also
important.
Automatic regulation systems are utilized. Therefore, it is necessary to learn their structure and parameters
allowing to configure and tune those systems for optimal operation.
The technological schemes allowing understand the technology, which always seems illegible at the
beginning, are the necessary component of the project's input data. These are used to draw the
technological masks, not only in a manner optimal for further handling, but also appropriate to the real
layout.
The remaining thing is to agree on the data exchange method - to select the communication driver,
determine the configuration of visualization system machines - and we can start to create an application.
©ASKOM, Gliwice
October 2007
15
The first application – step by step
4.2. Step Two – Creating variables database in Excel worksheet
Number of mistakes made during application parameterization is reversely proportional to the time
spent for data preparation and creation of univocal variable names.
The application will be created with use of Architect module (started by Start menu -> Programs -> Asix > Architect). This module offers a user-friendly graphical interface allowing to create and configure the
application. The main program window is divided into two blocks:
- the left block allows to switch between the database and application settings, and allows to select
category, for which the parameters will be set.
- the right block contains configuration parameters, which were located on comfortable, subject-oriented
tabs.
Using the Architect configuration environment does not interfere with background operation of the very
application. In general, changes of parameter setting are updated automatically when saved, but some of
them require restarting of the application.
There are at least two reasons, why it is recommended to prepare the data in Excel sheet.
First of all: editing options and the line/column structure offered by Excel make it a perfect tool for orderly
presentation of input data information. Data organized in a worksheet are clear and easily editable.
16
October 2007
©ASKOM, Gliwice
The first application – step by step
Secondly: asix package contains a mechanism allowing to use Excel worksheet as a variable database. This
solution is recommended during application development, when many things are frequently changed until
an optimal solution is found.
Thirdly: asix package (Architect module, to be more precise) includes a tool allowing to convert the
information from Excel worksheet to a variable database in MS SQL Server or Microsoft Jet format. When
the variable database is ready, a database file can be generated and later used. It is recommended to
generate the database in Microsoft Jet format, as it does not require installation of the database server (as it
is in case of MS SQL Server). The base is located in one file (with extension .mdb), which guarantees its
portability. MS SQL base is recommended for large applications constructed from several technological
nodes, where it is possible to create local databases embedded in the central database.
Excel worksheet must be of specific structure to be correctly interpreted by asix system. It is constructed as
separate sheets, where each sheet name is identical as the table name in the target database generated on the
basis of Excel file. The only exception is when the variables attributes are located in more than one sheet.
Then all data from sheets are placed in one table with all variables and their attributes.
Use Architect module to generate a template of correct Excel sheet. For this purpose, open Databases
module and select Varbase. Some tabs will appear on the right. Their number depends on the mode selected
on Type tab. To generate the database template, mode Generator or Data source must be checked – then
the last tab will be named Template. Select this tab. Optional database template sheets will be displayed for
your selection. If our application is not multilingual, the sheets required only for application translation will
not be available for your selection.
If the application is multilingual, all template sheets will be available.
Check the database sheet required for the application, press Save button and select a location to save the
given button.
Sheet structure:
If the sheet data will be processed by the Variable Database Generator, the first line of each sheet must be a
header including, among others, the required column names, which will be discussed in the chapter on
variable attributes.
Column names will be further used in the application, therefore they must be identical as in the example.
Let’s see how Excel sheet with the Acid Factory application data was created. We will analyze its structure
and contents appropriate for the requirements of asix system objects utilizing the data from the Variable
Base.
The discussed sheet is located in directory:
C:\Asix\Applications\ACID_FACTORY\ACID_BASE
©ASKOM, Gliwice
file Acid_base.xls.
October 2007
17
The first application – step by step
One sheet line includes all data assigned for one process variable.
The first sheet column must be column Name. The remaining columns can be sorted in any order. Column
Name contains the names of variables. Variable names can be a custom string of characters, excluding the
special characters, such as: , . : ; " ' ( ) [ ] { } space. It is recommended to use the letters of English alphabet,
underlining _ and digits. Digits should not be the first character of the variable names. Each variable name
must be unique within the entire system (taking into consideration the potential expansion of the
application).
It is possible to assign custom variable names, e.g.: Ala, As, Basia, Temperature, Pressure1, Pressure2, etc.
However, when you proceed without any key, it is hard to come up with several dozens original names for
variables - and more often the number is several hundred or even few thousand variables.
Therefore we propose to name the variables according to the following key:
KW_Xnnn_yy
where: KW
X
nnn
yy
– application symbol (kwas - acid)
– definition of variable type
A – analog measurement
N – drives
B – bi-status signals
C – data for regulation systems
– variable number, formed as address or sequential number
– part added to variables associated with a basic variable
for analog measurements:
LL – critical minimum limit
L – minimum limit
H – maximum limit
HH – critical maximum limit
I – converter current
S – measurement status
I – converter current
for drives:
S – control word
D – diagnostic word
P – position of the executive unit
Z – ordered position of the excutive unit
CP – device operation time
18
October 2007
©ASKOM, Gliwice
The first application – step by step
4.2.1. Variable attributes
Variable represents a controller value located under the address assigned to the given variable. Variable
attributes are nothing more, but some additional variable information (such as, e.g. Description, Address,
Scope, ..., etc.) Some attributes are necessary for correct application operation. Names of these attributes
are predefined and must be identical as in the Sulfuric Acid Factory application. All attributes of one
variable must be located within one sheet.
Information about one variable constitute one record, and each variable attribute is one record field.
Modules such as ASMEN, ASPAD and dynamical objects of the masks utilize the data contained in the
Variable Database. To enable the communication with the base, the names of specific fields are predefined
and must be identical as in the SAF application.
Record keyword:
Polish attribute name
English attribute name
Nazwa
Name
Description
Symbolic name of a process variable
univocally identifying the variable for all
components of asix system.
Another important field is Group1 – it contains the name of variable group, where the given variable
belongs to. Variable, for which the Group field is ignored, will be visible in the system with the standard
groups; however, if the variables are grouped, it is recommended to create a separate group for remaining
variables, so as all created groups would contain the set of all variables.
ASMEN module requires the fields of the following names:
Attribute name
English attribute name
Kanał
Channel
Adres
Address
Liczba elementów
Elements Count
Okres próbkowania
Sample rate
Funkcja przeliczająca
Conversion function
Zakres pomiarowy od
Zakres pomiarowy do
Measurement range from
Measurement range to
Zakres funkcji przeliczającej
od
Zakres funkcji przeliczającej
do
Conversion function range
from
Conversion function range to
Description
Logical name of the transmission channel (one
of the names given in the transmission
channel declaration).
Symbolic address, with format specific for
each asix system driver.
Number of elements comprising the process
variable (a variable can be an array).
Frequency of process variable value updating
(in seconds).
Name of converting function used to
recalculate the value received from controller
to the value passed to asix system
components.
Maximal available range - the minimal value.
Maximal available range - the maximum
value.
Conversion function parameter; input range
from…
Conversion function parameter; input range
to…
ASPAD data archiving module requires fields of the following names:
Attribute name
English attribute name
Archiwum
Archive
Parametry archiwizacji
Archiving parameters
©ASKOM, Gliwice
Description
ASPAD resource name (logical name of
the archive resource).
Archiving parameters for the given
October 2007
19
The first application – step by step
variable.
If the variable will be archived, those fields must be filled. Leaving those fields empty will cause, that the
given variable will be ignored during the archiving process.
Asix objects, such as: number, bar, slider, work point, market, can read the data from the Variable
Definitions Database and parameterize it according to the keyword. They require the following fields in the
Variable Definitions Database:
Attribute name
English attribute name
Zakres wyświetlania od
Display range from
Zakres wyświetlania do
Display range to
Zakres sterowania od
Steering range from
Zakres sterowania do
Steering range to
Baza słupka
Bar base
Minimum krytyczne
Limit LoLo
Minimum
Limit Lo
Maksimum
Limit Hi
Maksimum krytyczne
Limit HiHi
Pomiar uszkodzony
Measurement error
Maska Uszkodzenia
Failure mask
Description
lower limit for displaying of the given analog
measurement – for asix objects
upper limit for displaying of the given analog
measurement – for asix objects
lower limit of the given analog measurement
values, set from asix
upper limit of the given analog measurement
values, set from asix
value loaded from the database by Bar object
name of analog variable of asix system, which
will contain the critical minimum value for the
given analog measurement
name of analog variable of asix system, which
will contain the minimum value for the given
analog measurement
name of analog variable of asix system, which
will contain the maximum value for the given
analog measurement
name of analog variable of asix system, which
will contain the critical maximum value for
the given analog measurement
name of variable representing the status of
analog measurment – one of the status bits
contains information, whether the given
measurement is damaged or operating
indicates a status bit signaling the damage of
the analog measurement
The remaining field names are created in a custom manner for informational purposes. The field (column)
name length is unlimited. Additional attributes used in the Sulfuric Acid Factory application:
Attribute name
English attribute name
Opis
Description
Opis_EN
Description
Grupa1
Group1
Grupa2
Group2
Format
Format
Jednostka
Lp.
Unit
No
DB
DB
20
Description
Custom text containing technological
description of the process variable.
English description of the process variable,
used instead of Description in the English
version
Name of the first group, where the variables
will be grouped
Name of the second group, where the
variables will be grouped
Format of the number, used for displaying in
asix system. Format is defined in convention
of C language (i.e.: %4.2f means 4 characters
with 2 decimal digits)
Physical unit of the analog measurement
Sequential number
Definition of DB (DataBlock) number in the
controller, where the given analog
October 2007
©ASKOM, Gliwice
The first application – step by step
DW
DW
Nazwa AKPiA
C&I
Szafa
Cabinet
Listwa
Terminal strip
Zacisk plus
Zacisk minus
Terminal plus
Terminal minus
measurement is read
DataWord determines the number of word in
DB, where the given analog measurement is
read
C&I symbol of the given measurement
Name of cabinet, where the terminal strip is
installed
Name of cabinet terminal strip, where the
given analog measurement signal is connected
Number of terminal in the terminal strip
Number of terminal in the terminal strip
TEKST object can display the contents of any Variable Definitions Database field.
The following image displays a part of variable data from BASE_AC_measurements sheet.
In the discussed file (C:\Asix\Applications\ACID_FACTORY\ACID_BASE \Acid_base.xls), the
variable attributes are stored in several sheets, which makes the database significantly more legible for
the designer:
• sheet with analog measurements data – BASE_AC_measurements
• sheet with drive data – BASE_AC_drivers
• sheet with bi-status data – BASE_AC_binary
• sheet with automatic control system data – BASE_AC_ACS
These sheets will be discussed below.
BASE_AC_measurements sheet
Sheet BAZA_KW_measurements of Acid_base.xls file contains variables representing the analog
measurements:
Analog measurements inputted from controller to asix system - lines 2-29
Name consists of symbol KW_A and three-character address of analog measurement. Thus, measurement
read from address 0 is KW_A000. All sheet columns are filled for the analog measurement. Conversion
function ANALOG_FP converts an integer variable from the controller to a floating point number on
controller output.
©ASKOM, Gliwice
October 2007
21
The first application – step by step
The next lines include analog variables representing analogs, which are derived from the existing analog
measurements.
Technological limitations
Each analog measurement has four limits displayed on the masks, which can be changed by the operator.
Asix system signals triggering of any of those limits.
Names of analog measurements representing technological limitations are created out of the name of
analog measurement, where they are created and a suffix: _LL for critical minimum,; _L for minimum, _H
for maximum, _HH for critical maximum.
Limit ranges and units are identical as for the respective analog measurements. Only the group and location
in controller’s DB is changed in this case. The description declares, which limit the given variable applies
to.
Converter current
The controller feeds a real value of converter current representing the given analog measurement. The
variable name consists of the basic name and suffix _I. Converter current range is 4-20 mA. Such current
value represents the full physical range of the analog measurement. Conversion function for those variables
is ANALOG_FP.
Analog status
Each analog measurement has a status informing about deformation of the measurement between the
current converter and the controller, and about exceeding the analog limits. In case of our application,
status 1 in the youngest bit signals an incorrect measurement, in bit 4 – critical maximum, in bit 5 –
maximum, in bit 6 – minimum, in bit 7 – critical minimum.
Alarm variable ALARMY1 read from the controller in DB201 in form of 53-bytes tables.
V1 variable is an additional variable, used only to simulate the object for the demo application.
BASE_AC_drivers sheet
BASE_AC_drivers sheet of Acid_base.xls file includes the variables describing the status of system drives.
The meaning of columns is identical as in case of analog measurements. Drives sheet contains the
following variables:
List of drives supported in the application – lines 53-67.
Drives are named with subsequent numbers, preceded with letters KW_N. The only exception are two acid
pumps 8A and 8B. The drive statuses are declared in those lines. Statuses are converted with use of
NOTHING function, which does not change the bit status in the given word. Meaning of specific bits in the
status word:
• Bit 0 – drive enabled
• Bit 1 – drive running forward/opening
• Bit 2 – drive running backwards/closing
• Bit 4 – electrical failure
• Bit 5 – drive operating in maintenance mode REM
• Bit 6 – drive operating in manual mode MAN
• Bit 7 – drive operating in automatic mode AUT
• Bit 8 – limit switch status is open
• Bit 9 – limit switch status is closed
• Bits 11-12 – electrical and technological readiness
• Bit 13 – location of control
Drive positions – lines 2-12.
Analog measurements reflecting the position of valve operating unit. These are converted with use of
ANALOG_FP function. In asix system, the available range is 0-100. The names of those analog
measurements consist of drive name and suffix _P.
22
October 2007
©ASKOM, Gliwice
The first application – step by step
Required drive positions – lines 13-23.
Analog measurements, where the ordered required positions are inputted from asix with use of slider
objects. These are converted with use of SLIDER1_FP function. The names of those analog measurements
consist of drive name and suffix _Z.
KW_N13_CP – line 24 – is an analog measurement storing the fan operation time measured by asix
system.
Drive control words - lines 25-39
Data, to be sent without converting to the controller in the time, when the operator controls the drives. The
name consists of the respective drive name and suffix _S. The meaning of specific bits in the control word:
•
•
•
•
•
•
•
Bit 0 – disabling the drive
Bit 1 – toggle the drive to run forward/opening
Bit 2 – toggle the drive to run backwards/closing
Bit 4 – deleting the electrical failure
Bit 5 – switching the drive to maintenance mode REM
Bit 6 – switching the drive to manual mode MAN
Bit 7 – switching the drive to automatic mode AUT
Drive diagnostic – lines 40-52.
The following word bits record the diagnostic statuses of the drive.
BASE_AC_binary sheet
BASE_AC_binary sheet of Acid_base.xls file includes the variables describing the status of bi-status system
inputs and outputs. The meaning of columns is identical as in case of analog measurements. They contain
definitions of bi-status variables. The 16-bit variables are converted with NIC function. Byte size data are
converted with NIC_BYTE function. All the variables are read and sent without any transformations.
BASE_AC_ACS sheet
BASE_AC_binary sheet of Acid_base.xls file includes the variables required for visualization of Automatic
Control Systems. These are variables set by the operator from the control systems masks. Their names are
derived from their location in the controller’s DB. The meaning of columns is identical as in case of analog
measurements.
©ASKOM, Gliwice
October 2007
23
The first application – step by step
4.2.2. Alarms sheet
Alarms sheet of Acid_base.xls contains definitions of alarms existing in the system. It is used to create the
alarm file used by asix system for generation of various types of alarms. When the controller sets bit
appropriate for the given alarm, sound alarm is generated and alarm text appears on the alarm masks of the
visualization.
Alarms sheet contains the following columns:
• Sequential number of alarm, identifying the alarm in asix system,
• Alarm type – declaration of alarm type Our application includes the following alarms:
o IM – important alarm
o AL - normal alarm
o ME - message
• Alarm start description – text to appear on alarm masks, when the alarm is triggered
• Alarm end description – text to appear on alarm masks, when the alarm is lifted
• Alarm group – each alarm is assigned to a group, according to the file describing the alarm groups.
Sequence of alarms in the sheet reflects its position in the subsequent bytes of the alarm variable. Thus, the
first alarm is the youngest bit in the first alarm byte, etc.
4.2.3. Alarms_groups sheet
Alarmy_grupy sheet of Acid_base.xls file contains the list of alarm groups. Asix system allows to group
alarms according to the designer’s wishes. A number is assigned to each alarm group. It will be available in
asix system and it will be possible to filter alarms according to groups. The sheet contains two columns:
GroupId – group number
GroupDescription – group description
24
October 2007
©ASKOM, Gliwice
The first application – step by step
4.2.4. Grouping attributes
First of all, we need to present the grouping mechanism itself. Each variable can be grouped with use of at
least one grouping attribute, i.e. each variable can be assigned to at least one group. One grouping attribute
allows to create more than one group. In the following screen, the grouping attributes are: Group1 and
Group2.
In BASE_AC_measurements sheet, all variables related to attribute Group1 belong to group
AC_measurements, and the ones related to attribute Group2 belong to groups AC_limit, AC_converter and
AC_status. Grouping mechanism is very helpful for database browsing (in Architect, select Varbase>View… from menu or directly press icon
on the toolbar).
Changing the display
mode according to
groups.
While browsing variables, select the mode of database content displaying in relation to grouped variables.
The groups created during grouping by selected attributes will be displayed.
In the variable definitions part, the variables belonging to the selected group will be displayed.
Let’s return to the grouping attributes. These attributes have to be defined in the sheet of predefined name
(in Polish: AtrybutyGrupujące, in English: GroupingAttributes). The sheet table consists of single column,
also with a predefined name (in Polish: Nazwa, in English: Name). Each line contains the name of
subsequent grouping attribute.
©ASKOM, Gliwice
October 2007
25
The first application – step by step
To group variables, add subsequent variable attributes (subsequent columns) with names identical as the
grouping attributes and assign each variable to the selected group within the given grouping parameter.
4.2.5. Attribute sets
This sheet also has a predefined name (in Polish: ZestawyAtrybutów, in English: AttributeSets). The table
consists of two columns with predefined names (in Polish: Nazwa and Attribute, in English: Name and
Attribute). Name column contains the set name, Attribute column contains the attribute name for the given
set. Attribute sequence is observed.
In this case, info_st is an attribute set name.
26
October 2007
©ASKOM, Gliwice
The first application – step by step
Attribute sets are used to display the selected variable information. This is performed with used of
VARIABLE_DESCRIPTION operator action of the following syntax:
VARIABLE_DESCRIPTION variable_name;attribute_set_name
Name field of the sheet contains the attribute_set_name used in the operator action.
Attribute names used in Attribute column should be identical as the attribute names used in the database or
declared as sheet captions in the caption names sheet, which will be discussed further on.
4.2.6. Conversion function parameters
This sheet also has a predefined name (in Polish: FunkcjePrzeliczające, in English: ConversionFunctions).
Conversion functions is a set of function, which allow to convert the process variables to real values (each
function is precisely described in asix package help file). Conversion functions require input parameters.
For example, ANALOG function requires the conversion input and output range. It is not necessary to enter
the conversion function parameters manually for each variable. There exists a mechanism, which reads the
variable attributes defined in ParametryFunkcji sheet of the database for the variable for which the given
conversion function is called. Thanks to this mechanism, it is sufficient to give a conversion function name
to be used for the variable in the variable attribute sheet for each column in ConversionFunction column.
ConversionFunctions sheet consists of two columns with predefined names (in Polish: Nazwa and
Attribute, in English: Name and Attribute). Column Name contains the name of conversion function.
Attribute column should contain a variable attribute name (identical as the one defined in variable attribute
sheet or the one defined in caption names sheet, which will be discussed further on), which will be the
conversion function parameter. Attribute sequence reflects the sequence of parameters of the given
function, and therefore it is significant.
©ASKOM, Gliwice
October 2007
27
The first application – step by step
4.2.7. Attribute captions
The name of this sheet is also predefined (in Polish: NagłówkiAtrybutów, in English: AttributeCaptions).
This sheet allows to define which names (captions) will be displayed instead of the variable attribute names
– column names defined in the variable attribute sheets. It is also possible to define the attribute names for
various application languages, which is very useful in case of multilingual applications. Names defined in
this sheet will be displayed in variable selection, editing and viewing windows.
Captions must be created according to the following rules:
• all texts constituting the variable attribute captions must be unique
• name of any variable attribute cannot be the caption name of another variable attribute
The sheet consists of three columns. Column names are predefined (in Polish: Nazwa, Język, Nagłówek; in
English: Name, Language, Caption). The first column (Name) should contain the original variable attribute
name (for variables required by asix system, those must be defined in Polish or English, for user-defined
attributes, the attribute name must be identical as the defined one). The second column (Language) should
contain the language code valid for the given caption. Language codes are compliant with ISO marking of
supported languages (e.g. Polish -pl, English – en, etc.). The third column (Caption) should contain the
header names to be displayed in the variable selection, editing and viewing windows.
28
October 2007
©ASKOM, Gliwice
The first application – step by step
4.2.8. Attribute languages
This sheet has a predefined name (in Polish: JęzykiAtrybutów, in English: AttributeLanguages). The sheet
allows to define, for which language the given attribute was defined in the variable attribute sheets. This
information is usually necessary only in multilingual applications. In case of such application, the texts
acquired from the database have to be translated. For this purpose, another variable attribute, containing the
translated text, is created.
For example, attribute Description_PL was created, which contains the variable description in Polish. To
replace the database texts when the application language is switched, define in AttributeLanguages sheet,
which attribute is assigned to which language. Additionally, an appropriate entry in the attribute aliases
sheet also has to be defined, which will be discussed below.
This sheet contains two columns with predefined names (in Polish: Nazwa, Język; in English: Name,
Language). The first column should contain the attribute name (the original one or the one declared in
CaptionNames sheet). The second column should contain the language code valid for the given attribute.
Language codes are compliant with ISO marking of supported languages (e.g. Polish -pl, English – en,
etc.). The above entry, with appropriate entries in AttributeAliases sheet would cause that in Polish version
of the application, field Description would be replaced with Description_PL field.
©ASKOM, Gliwice
October 2007
29
The first application – step by step
4.2.9. Attribute aliases
This sheet has a predefined name (in Polish: AtrybutyZastępcze, in English: AttributeAliases). Definition of
attribute aliases is used in case of multilingual applications, when it is necessary to replace one language
with another one.
For examle, we want to replace Description with Description_PL in the Polish version. Therefore, it was
necessary to define an additional column Description_PL in the variable attribute sheet. This column will
include the translated variable descriptions. Furthermore, it would be necessary to define in the
AttributeLanguages sheet, for which language the defined aliases would be used with appropriate attributes.
AttributeAliases sheet contains two columns with predefined names (in Polish: Nazwa, NazwaZastępcza; in
English: Name, Alias). In the first column, enter the basic attribute, i.e. the one to be changed during the
switching of the language. The attribute has to be identical as the name defined in the variable attribute
sheets or as the caption defined in AttributeCaptions sheet. The second column should contain the attribute
name to be used as a substitute for the basic attribute, if the application language is switched. In our case,
this is Description_PL, which will be used in place of Description attribute, when the language would be
switched to Polish.
30
October 2007
©ASKOM, Gliwice
The first application – step by step
4.2.10. AsTrend averages
This sheet, just as most of the previous sheets, has a predefined name (in Polish: ŚrednieAsTrend, in
English: AsTrendAverages). The data declared in this sheet define the naming convention for application
averages. More precisely, these are information for AsTren program indicating which variables (variables
of which suffix) should be taken into consideration during displaying of graphs of averages. Furthermore,
the names used to display averages available in AsTrend program are defined here.
The sheet consists of two columns with predefined names (in Polish: Nazwa, Przyrostek, in English: Name,
Suffix). The first column should contain a name to be used for this aggregate. The second column should
contain a variable suffix, which will identify a variable with suffix as the average of the same variable
without suffix.
An Excel worksheet constructed in a manner discussed above is the source for Variable Database Generator
program, which generates the variable base for the application.
©ASKOM, Gliwice
October 2007
31
The first application – step by step
4.3. Step Three – creating the application configuration file
Asix software contains Architect module, which offers options for interactive application configuration.
This configuration is saved to .xml (eXtensible Markup Language) file. The file is required to run the
application, as it contains all the necessary settings.
The creation of application configuration file will be commenced by starting Architect (Start menu ->
Programs -> Asix -> Architect). The first step was to create a new application with use of wizard, which
significantly simplifies your work. Wizard can be started by the following commands selected from context
menu: File->New application – wizard... or directly by clicking the icon
in the taskbar.
The following wizard window will appear:
Application tab allows to set the basic application information, such as path to the application's root
directory and application directory names, which will be automatically created. It is also possible to enter a
file name, where all messages displayed in the control paned and helpful for application operation
diagnosing will be saved. The following tabs allow to set other general application features.
32
October 2007
©ASKOM, Gliwice
The first application – step by step
Computers and fields tab requires a more extensive description.
Architect includes a mechanism of fields and computers. Field is a facility, where the created application
will run. In this case, it is the Acid Factory. The given area may contain multiple installed computers
executing the application of the given facility, which possess different functionalities. The examples are:
operator stations, operation control station (KE station), terminals or dedicated data servers in the corporate
network with bigger number of terminals. It is possible to set global application settings for the given Field.
Each Computer in the given Field can have its own settings, which override the global settings - the local
settings take precedence.
As shown on the above picture, Computers and Fields tab allows to mark how many computers will operate
in the given Field. Field name reflects the application name entered in Application tab. In this application,
the parameter sets for two computer types: operator stations and terminals were created. If too many or too
few computers are added, it is always possible to change this setting on Application window, which will be
displayed in a moment. Before that, let’s discuss the remaining creator tabs.
VarDef – type tab allows to select the type of variable database, which will be utilized. The list of
supported databases includes both the bases used in older asix versions (text files of Paradox database files
- .zez and .db) and the databases for the new versions (MS SQL Server 2000/2005 base, Jet/Microsoft
Access bases, virtual bases loaded from .xls files). Databases for this version can be created by one of the
three methods:
1)
Editor mode – this mode allows to create (by selecting commands in the context menu Varbase ->
Create new or clicking an icon on the taskbar) and edit the variables definitions base with use of
Architect. The databases are created in format of MS SQL Server 2000/2005 or Microsoft Jet database. It
is also possible to attach an existing database in one of the mentioned two formats and edit it in Architect.
2)
Generator mode – this mode allows to generate database from external files (e.g. .xls files) with
use of Architect. The database is created in format of MS SQL Server 2000/2005 or Microsoft Jet
database. After each change of external sources, the base needs to be re-generated. List of sources is
defined in Databases window in Varbase module in the Data sources tab.
©ASKOM, Gliwice
October 2007
33
The first application – step by step
3) Data source mode – this mode allows to define the variable definitions from external sources (e.g. in .xls
files). List of sources is defined in Databases window in Varbase module in the Data sources tab.
In the application creation stage, the Data source mode is recommended. It allows to enter changes to
Excel file, and it is not necessary to re-generate the base after each change. If the application is ready to
operate in the facility, it is recommended to generate the base on the basis of .xls file and to utilize the
generated database file.
It is recommended to generate the database in Microsoft Jet format, as it does not require installation of the
database server (as it is in case of MS SQL Server). The base is located in one file (with extension .mdb),
which guarantees its portability.
In our case, we use the database file in Microsoft Jet format, which was generated from Acid_base.xls file
located in directory C:\Asix\Applications\ACID_FACTORY\ACID_BASE. The database generation
operation will be presented in further chapters.
34
October 2007
©ASKOM, Gliwice
The first application – step by step
Presence of the last tab in the creator depends on the database type selected on VarDef – type tab. If Editor
or Generator mode was selected, the last tab is named VarDef – format and location and has the following
layout:
This tab allows to select database format (MS SQL Server 2000/2005 or Microsoft Jet) and to set the
necessary options related to the selected format. If MS SQL Server 2000/2005 database is used, select the
server name and database name to be created (in Generator mode) or used (in Editor mode and in Generator
mode). Furthermore, indicate the directory, where the base will be stored, and define the authorization
mode: Windows (log-in to the base a user logged into the system; does not require any special user name or
password) or MS SQL Server (requires a special user name and password). If Microsoft Jet format database
is used, only the path to .mdb file must be given. In Acid Factory application we used AsixVarbase.mdb
based in ACID_FACTORY\ACID_BASE directory.
Press OK to create the configuration file. Architect will automatically open the created file.
©ASKOM, Gliwice
October 2007
35
The first application – step by step
At the very beginning, change the computer names to shorter ones. To change the name, right-click on
the selected computer and select Change computer name from the context menu.
Computer names will be changed as follows:
- Operator station 1 → Station SO1
- Terminal 1 → Terminal
Further configuration of the file will be discussed in other chapter. Firstly, the application masks need
to be created. However, before we begin, generate the variables database necessary for appropriate
parameterization of application masks.
36
October 2007
©ASKOM, Gliwice
The first application – step by step
4.4. Step Four – generating the variable definitions database
This chapter describes, what should be done to enter the application input data from Excel sheet to asix
Variable Definitions Database. To perform a successful data transfer to the Variable Definitions Database,
the following conditions must be met:
• a correctly filled Excel sheet is required.
The accurate description of requirements for Excel sheet was presented in Step Two of application
development.
To generate the variable database with use of Architect, first switch from the Application settings view to
the Databases settings view. This is performed by pressing the Databases button, located in the lower left
corner of Architect window.
Please make sure that Generator mode is checked on Type tab in Varbase module and that Microsoft Jet
format is checked on Format tab and the appropriate database file path is given. ACID_BASE\
AsixVarbase.mdb
Let's turn to Data sources tab. Select here the data source type and the accurate path to file, from which the
database will be generated.
In our case, this will be Excel worksheet. Therefore, press Excel button.
In
the
file
selection
window,
select
C:\Asix\Applications\ACID_FACTORY\ACID_BASE.
©ASKOM, Gliwice
Acid_base.xls
October 2007
file
located
in
directory
37
The first application – step by step
The variable database tables selection window will appear. It is visible that all sheets contained in Excel
file are available here. Sheet names will be the names of tables generated to the variable database. Select all
tables with exception of Alarms and Alarms_groups. Then press OK.
The selected sheets are listed. To deactivate a sheet, uncheck the field in the first column. It is also possible
to remove the sheet from data sources by clicking on dark red minus character appearing under the sheets.
The next step is to press Generate button. The base will be generated.
If any errors occur during the database generation, the appropriate messages will appear in this window. It
is also possible to save messages related to database generation to a file.
When the base is correctly generated, it is ready for use. It is possible to view variables in the database by
selecting menu commands Varbase->Show… or directly by clicking on icon
on the taskbar.
When the variable database is ready, it is possible to move to creation of application masks.
38
October 2007
©ASKOM, Gliwice
The first application – step by step
4.5. Step Five – creating application masks
“My looks tell much about myself“ – clear and aesthetic graphical application masks build
operator’s work comfort and constitute a good advertisement for the designer.
Until now, we have been describing things, which are not visible in the application. Time to move to the
visible things, i.e. the application masks.
Before we begin, the application must be started. This can be executed in two ways:
1) from the level of Architect (it is the most comfortable choice)
Firstly, in Fields and Computers module, select a computer, whose settings will used in the application. In
our case this will be Station SO1.
As we are interested in creation of application masks, it is necessary to switch to Designer mode. For this
purpose, run the application directly in the Designer mode (select option Run Asix system - Constructor
from File menu) or press button F6.
It is also possible to run the application, and then switch to the Designer. To run the application , select Run
Asix system from File menu, press button F5 or click directly on icon
.
Control Panel window will appear. Select Designer option in Masks menu.
2) double-click the application shortcut (shortcut creation is discussed in chapter 4.9)
As mentioned in the chapter describing the application, the screen is divided into parts, where images, socalled masks, are displayed.
The masks, which are always visible on the screen are: MENU keys mask, the last alarm line and clock.
Below are the technological and auxiliary masks, which can be displayed, when necessary.
©ASKOM, Gliwice
October 2007
39
The first application – step by step
Diagram with MENU button
Last alarm line
Window of analog measurement
Analog
measurement
with selected
station
Signalling of
temperature
exceeding
Information about
measuring point read
from Variable Base
Drive icon
Each of the technological masks contains a yellow triangle, symbol of asix package in the caption line. It is
possible to insert a custom icon identifying a designer or application in place of the asix symbol. The icon
can be created with Bitmap Editor available from the Designer level.
For this purpose, open Designer, and select menu – Tools\Bitmap Editor to open the Bitmap Editor
window. Select menu options Map\New and check Type: Icon. Then draw the icon pixel by pixel and save
it as ASIX3:
40
October 2007
©ASKOM, Gliwice
The first application – step by step
4.5.1. AC_MAP.MSK mask
A few words about the main mask. This mask contains the general scheme of the object. It also includes
many hints related to handling of this demo application (hints mask appear when button
is pressed).
Additionally, this mask contains buttons, which switch the application language (Polish and English). It
also features a button generating alarm with use of script, button to delete this alarm, button displaying the
user passwords, and button allowing to relog-in the user (from administrator to user and vice versa).
Two other interesting objects are used in this mask:
1) Move controller
Movement controller allows to move objects (or grouped objects) in vertical, horizontal or diagonal
direction (data given both for vertical and horizontal movement). Object movement depends on
variable value. An item, within the range of which the given object will move, also needs to be
indicated. The moving object must be univocally identified by a unique name. All objects possessing a
name will be displayed in All objects field. The name of discussed object(s) should be moved to
Controlled objects field with use of button > or button >>, which moves all available object names.
2) Object controller
Object controller allows for full disappearing of the object depending on the variable (a bit mask can be
assigned to a variable) or mouse position within the OBJECTS CONTROLLER object, if such option is
selected.Analogically to MOVE CONTROLLER, the controlled object must have a unique name.
In this case the following objects were grouped: PICTURE, TEXT and RECTANGLE. They were
assigned name of Button_PL. This name appears in Controlled objects field in OBJECTS
CONTROLLER object.
©ASKOM, Gliwice
October 2007
41
The first application – step by step
4.5.2. AC_MENU.MSK mask – application menu
The following chapters will describe in detail the manner of execution of subsequent masks characteristic
for the Sulfuric Acid Factory application. The reader, tracking all activities in a step-by-step approach, will
be able to learn the technique of application mask creation.
The first mask is MENU mask – the upper bar displayed on screen and containing buttons used for
navigation within the entire application.
It consists of button ESC (identical as button Esc on the keyboard), which closes all open stations, 12
buttons F1-F12 (identical as buttons F1 to F12 on the keyboard), which open masks, and 2 additional
buttons described below.
In Designer menu, select options Masks/New mask, and select item Schematic. New scheme mask
definition window will appear (exact description of the function in the mask definition window can be
found in help file).
The following mask parameters should be defined:
Diagram name: MENU_AC
Position:
Background Color:
Icon:
Open mode:
Components:
Operations:
Key Set:
42
Column – 0
Line – 0
Width – 1024
Height – 52
purple
ASIX3,
New,
Border
No Move, No Size, No Close.
AC_MNU
October 2007
©ASKOM, Gliwice
The first application – step by step
Then, define in Architect the path to graphical symbols file, which will be used for mask creation. For this
purpose:
− move to Acid Factory field,
− in the application option module for Acid Factory field, select Masks, and then open tab Files and
Directories,
− check option Graphical symbols file and give path MSK\ACID.DAT,
The subsequent action is to define file with name of AC_MNU.mnu, which will be located in the
application masks directory. This file will include defined operations assigned to selected keys on the
keyboard. Such set is active always, when the its assigned mask is opened.
To create set of keys (AC_MNU file) assigned to menu mask:
− From Designer window, select menu Tools\Key Sets; window Key Set Manager will be open.
−
Press button Create, which will display window Key Set for definition of new key set.
−
Enter Name – AC_MNU. Press button Add and enter action PANEL to the key definition window.
This action will display Control Panel. Then click Enter Key button and press simultaneously Alt and
numerical Insert, and close the key definition window.
−
Add one more key – this will be space button, where action CLEAR_SOUND disabling the
continuous alarm sound will be located.
−
In the last step, save the key sets.
On a such defined mask, insert the asix program logo on the left side. It is made of object of POLYGON
and TEXT type.
To place the object on the mask, in New Type window open the asix objects list and select the necessary
object. In our case, select POLYGON window, press and hold left mouse button and move the cursor down
by 30 pixels, release the mouse for a moment. Then press and hold the button again and move it by 15
pixels to the right and 15 pixels up. Then release the left mouse button and right click once. A polygon will
be drawn.
Double-click the polygon to open its definition window and determine the following parameters:
Line color:
yellow
Filling color:
yellowy
Fill inside
©ASKOM, Gliwice
October 2007
43
The first application – step by step
Overlay object TEXT onto this element. Define it in the following manner:
Text:
asix
Source of text: direct written
Justify:
to left
Docking:
left
Font:
PLMALY
Color:
black
Add ESC button. In New type in Designer panel select object BUTTON.
Then click on the mask and, while holding the left mouse button, draw the size of the entered button.
Double-click on the generated button and open its definition window. Enter the following parameters:
44
October 2007
©ASKOM, Gliwice
The first application – step by step
Action:
Text/line 1:
Button:
Password:
Action_set,ESC
ESC
Font - Dialog2
We mark Frame, 3D, shadowing.
none.
Them press Get a Key button. Press Key Combination window will be opened. Press Esc key on the
keyboard now. The name of entered key will appear in Description window, and its code will be displayed
below. This will define that when Esc is pressed on the keyboard during application runtime mode, this will
equivalent to mouse-clicking on the mask.
We need to define an action set. Switch to Architect window and:
− open the application parameters group – Scripts and actions,
− move to Action sets tab,
− add action definition according to the following description:
Name:
ESC
Component actions:
CLOSE_MASK T*
CLOSE_MASK KW_A*
CLOSE_MASK KW_N*
CLOSE_MASK KW_P*
CLOSE_MASK Y*
CLOSE_MASK X*
OPEN_MASK AC_MAP
Saved entered changes with button
.
Return to Designer and further creation of AC_MENU mask.
Create another button, which will be parameterized in the following manner:
Action:
Picture/flat:
©ASKOM, Gliwice
OPEN_MASK,INFO
select bitmap F1C from the list
October 2007
45
The first application – step by step
The remaining parameters – as for ESC button.
Then use Get a Key button to declare F1 key.
At the end of the mask, a button marked as ‘-‘ is located. It's action is defined as HIDE_ALL, which will
minimize the entire application to system bar.
The last key marked as ‘x’ is a button executing action EXIT – closing of the application.
List of actions performed by MENU keys F1-F12:
F1 – info/help
Enter action OPEN_MASK,INFO, which opens mask with company information and Help button
opening asix help program.
F2 – technological masks
Under key F2, enter an action expanding a menu allowing for selection of the following masks:
T_FURN
T_TOWER
T_MIXER
Button definition:
Action:
Text\line 1:
MENU,Key_F2
Techn.
Action definition results in expansion of the list of technological masks and allows to select one of
them. Click on any line of the expanded menu to perform an action assigned to this line in menu
definition named AC_F2 in the definition of shared parameters for application field – Acid Factory /
in Masks option group/in Menu tab (the steps following after the creation of drop-down menu will be
presented after the presentation of AC_MENU mask buttons).
F3 – opens system diagnostic mask with action: OPEN_MASK,XKWDIAG,GROUP_EXCHANGE
F4 – none action is related to this button
F5 – opens report selection menu window: action MENU,Key_Report
F6 – opens charts and trend selection menu with action MENU,Key_Charts
F7 – opens measurement and dynamic table selection menu with action MENU,Key_Measure
F8 – opens analog measurement settings table selection menu with action MENU,Key_Limits
F9 – opens automatic control system selection menu with action MENU,Key_ACS
F10 – opens active alarm table with action OPEN_MASK,XAL_AKT,NEW
F11 – opens historical alarm table with action OPEN_MASK,XAL_HIST,NEW
F12 – key confirming the controls with action PERFORM_INPUT,ALL
46
October 2007
©ASKOM, Gliwice
The first application – step by step
Let’s discuss now how to define the drop-down menu KW_F2 with use of Architect module:
1. In Architect window, move to application parameters group view (button Fields and Computers
in the left block of Architect window);
2. In the fields and computers list, click on Acid Factory field (in case of multi-instance deployment,
this is a field, where parameters shared by all machines are defined);
3. Open group Masks/Menu tab and add new menu named AC_F2 with use of ‘+’.
4. Run the menu editor with use of
button.
5. In Menu editor window, enter the following values:
name
[pl]TECHNOLOGIA:[en]TECHNOLOGY:
[pl]Piec i Aparat Kontaktowy[en]Furnace and Catalytic
Reactor
[pl]Wieża kondensacyjna[en]Condensation Tower
[pl]Mieszalniki - Receptury[en]Mixers - Recipes
action
nothing
OPEN MASK,T_FURN,EXCHANGE
OPEN_MASK,T_TOWER,EXCHANGE
OPEN_MASK,T_MIXER,EXCHANGE
Menu definitions are saved in the application configuration file.
Define the remaining menu in a similar manner:
For F5: Key_Report
name
[pl]RAPORTY:[en]REPORTS:
[pl] Okno Raportera[en]Report
window
[pl]ARKUSZE
EXCEL:[en]EXCEL SHEETS
[pl] Dane chwilowe CTRaport[en] Momentary data CTReport
[pl] Dane archiwalne HTRaport[en] Archival data HTReport
action
group start
nothing
REPORT
∨
nothing
RUN,c:\Program Files\Microsoft Office\office\EXCEL.exe
C:\Asix\Applications\Excel_Reports\CTRaport.xls
RUN,c:\Program Files\Microsoft Office\office\EXCEL.exe
C:\Asix\Applications\Excel_Reports\HTRaport.xls
For F6: Key_Charts
name
[pl]REJESTRACJA:[en]CHARTS:
action
nothing
[pl]Przepł. i temp. - piec i chł.
atm.[en]Flows and temp. - furnace
and atm. cond.
[pl]Ciśnienia - piec i AK[en]Pressures
- furnace and catalytic reactor
[pl]Temperatury AK[en]Temperatures - AK
[pl]Węzeł cyrkulacji kwasu[en]Acid
circulation node
[pl]Przepł. i ciśn. mediów do
pieca[en]Flows and pressures to
furnace
[pl]Param. kwasu siark.[en]Sulphuric
acid parameters.
[pl]TRENDY:[en]TRENDS:
OPEN_MASK XKWREJ4 GROUP_EXCHANGE
[pl]Przepł. i temp. - piec i chł.
atm.[en]Flows & temp.- furnace &
atm. cond.
ASTREND,TRENDS\Flow-tem-furnacecondenser.TRN,-1,1,0,TRENDS\,ACID_BASE\AsixVarbase.mdb
[pl]Ciśnienia - piec i AK[en]Pressures
- furnace and atm. cond.
ASTREND,TRENDS\Pressure-furnacereactor.TRN,-1,-1,0,TRENDS\,ACID_BASE\
©ASKOM, Gliwice
group start
OPEN_MASK XKWREJ5 GROUP_EXCHANGE
OPEN_MASK XKWREJ6 GROUP_EXCHANGE
OPEN_MASK XKWREJ7 GROUP_EXCHANGE
OPEN_MASK XKWREJ1 GROUP_EXCHANGE
OPEN_MASK XKWREJ2 GROUP_EXCHANGE
∨
nothing
October 2007
47
The first application – step by step
AsixVarbase.mdb
[pl]Temperatury AK[en]Temperatures - atm.
condenser
[pl]Węzeł cyrkulacji kwasu[en]Node
of acid circulation
ASTREND,TRENDS\Temperatures-reactor.TRN,1,-1,0,TRENDS\,ACID_BASE\ AsixVarbase.mdb
ASTREND,TRENDS\Acid-circ-node.TRN,-1,1,0,TRENDS\,ACID_BASE\ AsixVarbase.mdb
For F7: Key_Measure
name
[pl]TABELE
POMIARÓW:[en]MEASUREMENT
TABLES:
[pl]Piec i reaktor[en]Furnace and
reactor
[pl]Wieza kondensac. i
chłodn.[en]Condensation tower and
condenser
[pl]TABELE do
DEFINIOWANIA:[en]TABLES TO
DEFINE:
[pl]Tabela zdefiniowana[en]Defined
table
[pl]Tabela do zdefiniowania[en]Table
to define
action
group start
nothing
OPEN_MASK XKWPOM1
GROUP_EXCHANGE
OPEN_MASK XKWPOM2
GROUP_EXCHANGE
∨
nothing
TABLE Tables\T1 EXCHANGE -1
-1
TABLE T2 EXCHANGE -1 -1
For F8: Key_Limits
name
[p]TABELE NASTAW:[en]LIMITS TABLES:
[pl]Tabela 1[en]Table 1
[pl]Tabela 2[en]Table 2
action
nothing
OPEN_MASK XKWNAS1 GROUP_EXCHANGE
OPEN_MASK XKWNAS2 GROUP_EXCHANGE
For F9: KW_Reg
Name
[pl]UKŁADY REGULACJI:[en]AUTOMATIC CONTROL
SYSTEM:
[pl]TRC_21-temp. w ap.kontak.-Ip.[en]TRC_21-Temp. in
Catal. React.
[pl]FRCZA_10-przep. pow. do pieca[en]FRCZA_10- Air
Flow to Furnace
48
action
nothing
OPEN_MASK Y_TRC21 GROUP_EXCHANGE
OPEN_MASK Y_FRC10 GROUP_EXCHANGE
October 2007
©ASKOM, Gliwice
The first application – step by step
4.5.3. ALARMS.msk – the last alarm line
The last alarm line mask is another mask, which is always visible on the screen. The last alarm line
displays the last unconfirmed alarm in the system. It allows the operator to learn the status of the visualized
process in a quick manner. When the operator confirms all active alarms, the last alarm line does not
contain any alarm and adopts black background color.
In menu Masks/New Mask select Active Alarms option. The next mask definition window will appear.
Declare what follows:
Name:
ALARMS
Items:
Column – 86
Line – 52
Width – 958
Height – 35
Font: alarm
Mask parameters:
Opening mode:
Components:
Toolbar Buttons:
Mask, Description
Operations:
New
Frame, Red Mode
Acknowledge, Criteria, Exclusions, Filters, Signal, Printout,
No Size, No Close.
This mask will display the last active alarm. Declarations of colors related to this mask must be saved in the
application configuration file – for this purpose, the following settings should be made in the Architect
module:
− switch to the application parameters group,
− select Acid Factory field,
− select Alarms system parameter group,
− switch to Look tan and define the following settings in subsequent subtabs:
Background color:
Alarm table background (65,65,65)
Alternative alarm table background (30,30,30)
Red Mode masks:
Red Mode masks background (224,0,0)
Selected alarms:
Selected alarms background (140,140,140)
Alarm text color:
Important (240,0,0)
Alarm (255,128,255)
Warning (44,130,240)
Alarm date color:
Beginning of alarm (240,0,0)
Beginning of acknowledged alarm (240,0,0)
End of alarm (250,250,0)
End of acknowledged alarm (0,250,0)
©ASKOM, Gliwice
October 2007
49
The first application – step by step
4.5.4. ZEGAR.msk mask – displaying the current time
The subsequent mask, which is always visible is the system time clock.
Select Scheme from \Masks\New Mask and create a new declared mask:
Mask name:
Mask description:
Item:
Icon:
Opening Mode:
Components:
Operations:
CLOCK
FURNACE AND CONTACT DEVICE
Column - 0
Line - 52
Width - 86
Height - 35
ASIX3
New
Frame
No Move, No Size, No Close
CLOCK mask should contain one object DATE+TIME, which is parameterized in the following manner:
Attributes:
Type:
Justify:
Date format:
Date division:
Font – c12
Background in window color
Time
to left
European
none
4.5.5. T_FURN.msk mask – furnace and contact device
The second part of the screen, below the masks visible permanently, is a space designated for technological
and auxiliary masks, which are opened and closed depending on the needs. Let’s see how a typical
technological mask is created. It contains analog measurements with openable stations, drive icons with
control possibilities and bi-status signaling.
Start with mask definition. In the Designer menu select Masks\New Mask\Schematic.
Select the background color from the palette (RGB: 167, 172, 176) for the mask, by right-clicking in
Background\Color window.
In the opened mask definition window enter the following parameters:
Mask name:
Mask description:
Item:
Icon:
Opening Mode:
Components:
50
T_PIEC
FURNACE AND CATALYTIC REACTOR
Column - 0
Line – 87
Width – 1024
Height- 681,
ASIX3,
New
Title Line, Border, System Button
October 2007
©ASKOM, Gliwice
The first application – step by step
Operations:
No Move, No Size
Confirm the parameters describing the mask with OK button and an empty mask covering the rest of the
screen will be created. Now start to draw the static parts:
pipeline fragments
pipeline descriptions
tanks
- with use of PIPELINE object
- with use of TEXT object
- with use of PICTURE object
PICTURE object - static bitmaps
In the objects list in New Type window of Designer module, select PICTURE object (or right-click on the
mask field and select Object -> PICTURE from the context menu). Then click within the mask. PICTURE
object will appear. Double-click it to open the PICTURE definition window.
Bitmaps used for drawing tanks in the mask are:
PIEC_1,PIEC_2,PIEC_3,PIEC_4,PIEC_5,CHL_1,CHL_2,CHL_3,CHL_4,CHL_0,CHL_6,CHL_7,CHL_8,
CHL_9,CYKLON_D,REA_1,REA_2,REA_3,REA_4.
Right-click in Map Name field to open the list of bitmaps contained in the file. Select an appropriate
bitmap, e.g. PIEC_1. Place all drawings presenting the furnace, radiator and contact device, and add the
pipelines with use of PIPELINE object. Pipeline colors are compliant with settlements made in advance
with the company ordering the applications.
©ASKOM, Gliwice
October 2007
51
The first application – step by step
PICTURES – dynamic bitmaps
PICTURES object is used for visualization of drive statuses. We assume, that we possess bitmaps
presenting the drive statuses. We need to plan which bitmap will be assigned to specific drive statuses.
Valve/latch image consists of actuator icon, changing with the change of bidirectional drive status and the
valve status determining the status of device terminals (white – closed, medium color, i.e. yellow – open,
white and yellow – intermediate position, red – terminal failure). Next to the drive, notice the symbols
marking the drive operation mode A/M/R (AUTO/MAN/REM), the control location Z/L (Remote/Local)
and green/red light signaling electrical readiness/lack of electrical readiness.
Actuator icon checks six youngest bits of drive status. Place PICTURES object in the mask, double-click to
open the dialogue box and define it in the following manner:
Coding:
52
user-defined code,
October 2007
©ASKOM, Gliwice
The first application – step by step
Status:
First bit
Variable:
Number of states – 6,
0,
KW_N12
To read data from the database, open the object definition window and right-click on Variable item (and
previously uncheck no monitoring field or the selected variable will be "lost") in the object dialogue
window. The variable selection window will open:
Right-click in the window – asix database will open. In the tree on the left side, select AC_drivers and in
the right window select the drive status, which is currently parameterized, e.g.: KW_N12 – status of control
pressure value. Select the variable and return to the picture definition window.
Check option communication errors and enter SRKG_BK picture – a bitmap signaling the lack of
communication.
Then click in the first line of the Picture List window and in the window below enter the name of bitmap
displayed for status 0 (it can be taken from the bitmap list) and press OK.
Then enter the User-defined Code appropriate for this bitmap in Bit Mask window. It is also possible to
right-click on Bit Mask field and use Coder, where a decimal or hexadecimal code of the given number can
be entered and the value of each bit can be "clicked".
While entering the code, place hyphens in the bits, which should not be considered. Enter the code
appropriate for this bitmap in Bit mask code (for Sulfuric Acid Factory application it is --------------------------00000).
Move to the next line in Picture Llist window (respective to status no. 1), and then, analogically as above,
assign a bitmap (SRKG_W) and code ---------------------------00001 for this status.
Define the remaining statuses in the same manner:
Status 2: ---------------------------00010
Status 3: ---------------------------00100
Status 4: ---------------------------01---
©ASKOM, Gliwice
– bitmap SRKG_Y1 – medium color with arrow – drive is
enabled and opening is performed. In our case, the actuator color
is yellow, because the drawn valve is located on the gas pipeline.
– bitmap SRKG_Y2 – medium color with arrow – drive is enabled
and valve closing is performed.
- bitmap SRKG_RY – red and yellow color – signal technological
outage. Statuses of the 3 youngest bits are not taken into
consideration.
October 2007
53
The first application – step by step
Status 5: ---------------------------1----
- bitmap SRKG_R – red color – electrical failure. Bit 4 is superior,
and if it adopts value 1, the remaining bits are not taken into
consideration.
The next step is to place the second PICTURES object in the mask. This time it will signal the terminals of
the drawn drive.
Create PICTURES object with the following parameters:
Coding:
binary code,
State:
Number of states – 4
First bit – 8,
Monitored datum:
KW_N12 – the same valve drive status as for the servomotor.
54
October 2007
©ASKOM, Gliwice
The first application – step by step
Check the communication errors option and assign the following bitmaps to subsequent statuses:
State 0: bits 8,9 – 00 - code for lack of signal from any terminal – bitmap ZAWOR_V_WY in
white-yellow colour
State 1: bits 8,9 – 01 - code for open valve – bitmap ZAWOR_V_Y in yellow colour
State 2: bits 8,9 – 10 - code for closed valve – bitmap ZAWOR_V_W in white colour
State 3: bits 8,9 – 11 - code for valve damage – signals simultaneously from both terminals –
bitmap ZAWOR_V_R in red colour.
TEXTS object - dynamic text
Next to the drive, there are three symbols defining the additional statuses related to drive status: Letter Z –
green on gray background or L – yellow on grey background. Determines the drive control location remote or local. To define this object, place TEXTS object on the mask.
Open TEXT object definitions window and determine the following parameters:
State:
Coding:
Justify:
Position:
Variable:
Number of states – 2
First bit – 13,
binary code,
center
center
KW_N12 – drive status name
Check transmission errors option and define the line color to red and thickness to 2.
Then in Text window enter Z and click on the first line in Texts list window. For this text, set the color to
green on grey background and set the font to dialog2. In the same manner enter letter L – click on the
second line in Texts list window, enter it as the second state and associate it with yellow color and the same
font.
©ASKOM, Gliwice
October 2007
55
The first application – step by step
Analogically, define the object displaying the current drive operation mode.
Letter A or M or R is a symbol determining the current drive operation mode:
A – is the automatic operation mode AUTO
M – is the manual operation mode MAN
R – is the maintenance mode REM
Place the next TEXTS objects in the mask and define the following parameters:
State:
Coding:
Justify:
Number of states – 4
First bit – 5
Natural code
Position and transmission errors – as above
In Text window enter ??? and associate it with yellow color on red background and font dial95. Then click
on the second line of Texts list and in Text window enter 'R'. For R, define white color on red background
and font dial95. In the same manner, define two next states: M—yellow on grey background and A – green
on grey background.
The drive readiness status is displayed on the colored dot next to the drive:
Red
- no electrical readiness,
Grey
- no technological readiness,
Green
- readiness for controls.
It is recommended to achieve this effect with use of PICTURES object.
Select PICTURES object and enter its definitions:
State:
Number of states – 4
First bit – 11
Coding:
Binary code,
Justify:
center
56
October 2007
©ASKOM, Gliwice
The first application – step by step
Position:
Variable:
center
KW_N12 – drive status name
Check transmission errors option and assign the following pictures to specific statuses:
Status 0: bits 11,12 – 00
Status 1: bits 11,12 – 01
Status 2: bits 11,12 – 10
Status 3: bits 11,12 – 11
- code for missing electrical and technological readiness - bitmap LED_R
- code for missing technological readiness - bitmap LED_GR
- code for missing electrical readiness - bitmap LED_R
- code for presence of both ready statuses (drive ready for controls) –
bitmap LED_G.
NUMBER object – analog measurement
The subsequent elements to be placed in the mask are analog measurements. NUMBER object allows to
visualize the analog measurement values in any format, color and font.
Place the NUMBER object in the mask.
Define it in the following manner:
Variable:
KW_A110 – right-click to display the analog measurement group
from the database and select the appropriate variable;
transmission errors
as character ? (in case of error, the number will be finished with ?)
measurement error:
as ?? (in case of error, characters ?? will be displayed instead of the
number)
Colors and fonts:
right-click in the font definition windows and select CYF19,
right-click in the font colors and select colors from palette:
for critical limit excess - red on yellow background
for minimum and maximum excesses – red on window background
for correct measurement value – black on window background
for transmission and measurement errors – white on red
background.
Format:
check Area by Format
Justify:
To right
Position:
To down
Parameters:
check Automatic edition and Init by last value
©ASKOM, Gliwice
October 2007
57
The first application – step by step
Confirm that the analog range, limits, format, control variable and control variable status fields are empty
and press Link button. The variables and values from appropriate columns related to the controlled variable
KW_A110 will be automatically read from the database.
Character @ visible in the parameterization window signals that the window contents were loaded from the
variable definitions base from the appropriate record field containing the name KW_A110.
BUTTON object – execution of actions by the operator
Sulfuric Acid Factory application is constructed in such manner that clicking on an analog measurement
opens the substation of this measurement. Analog measurement station is a mask of decreased size and with
option of moving. Creation of analog measurement station is described in the further part of this manual.
To open such station, overlay BUTTON object, parameterized as a transparent one, onto the NUMBER
object. Let’s assume that the analog measurement station mask is a file named KW_A110.msk. The name
is associated with measurement represented by variable KW_A110.
58
October 2007
©ASKOM, Gliwice
The first application – step by step
Define BUTTON object in the following manner:
Action:
OPEN_MASK,KW_A110,REDUCED_EXCHANGE – opening station KW_A110
and closing all other open stations
Send:
immediate
Button:
transparent
Password:
none
All other buttons on the remaining measurements and drive icons will differ only by the name of opened
station.
PRESENTER object – signaling of the selected measurement
PRESENTER object should be placed under each number. This is used to mark out the analog
measurement associated with the currently open measurement station. It is executed with blue underlining.
Define the PRESENTER object:
Bitmap:
current
– PODKR_GREEN
opened
– PODKR._GREEK – this bitmap will be displayed, when the analog
station is opened
background
– PODR._GREY – this bitmap will be displayed, when the station is
closed
Opening mode: opened mask
Mask name:
KW_A098 – name of station, which displays the underlining when opened
©ASKOM, Gliwice
October 2007
59
The first application – step by step
Remaining objects
There also exists TEXTS objects, located above the furnace picture. It signals the exceeding of maximal
furnace temperature. To define such object, determine the following parameters:
State:
Number of states
–2
First bit
–1
Coding:
Natural code
Justify:
To left
Position:
center
Variable:
KWB172_36 from group AC_binary
Check transmission errors, set the line color to red and thickness to 3. Then enter the following words into
Text window: “Furnace temperature > MAX”, set the font and background color to the same as mask
background, so as the string is invisible, when bit status is 0; select dialog2 as font.
For the second status, enter the same text in different colors – white on red background. Font – Dialog2.
Looking above the parameterized text, notice the PICTURES object parameterized to KW_B002 variable.
Depending on bit 5 of this variable, this signals the presence or absence of flame in the furnace. When bit is
set to 0, bitmap is a box in color of window background – PLOMIEN_0 and is invisible; when bit is 1, the
flame icon – PLOMIEN_1 appears on the mask.
The final step during definition of T_PIEC mask is to distribute the units and media descriptions on the
mask with use of TEXT object.
60
October 2007
©ASKOM, Gliwice
The first application – step by step
4.5.6. T_KOLUM.msk mask – condensation tower
The second technological mask, T_KOLUM, is designed in the same manner. The only new element is the
application of an exemplary script. Right next to PC304 pump, there exists the pump rotation control
station. Clicking on buttons ‘+’ and ‘-‘ runs script indicated in Action line in the button definition. The
script increases (for button ‘+’) or decreases (for button ‘-‘) the pump rotations by 1.
Button parameterization:
− determine the object parameters with the following values:
Action:
Text:
Send:
Button:
Font:
Background:
Frame,
3-dimensional
Password:
SCRIPT,scripts\skryptm – running the script decreasing the rotations by 1
line 1
immediate
TEST4
grey
none
Skryptm.vbs script can be created with any text editor, e.g. Notepad:
Set varobr=Asix.Variables("KW_A112")
If(varobr.value>0) Then
varobr.value=varobr.value-1
End if
Save this script in the special directory Scripts:
©ASKOM, Gliwice
October 2007
61
The first application – step by step
C:\asix\Applications\Acid_factory\Scripts
Variable KW_A112 represent the pump rotations value. The script checks whether pump rotations are
bigger than zero, and if the condition is fulfilled, decreases the rotations by 1.
Rotation increase button
following syntax:
is parameterized in similar manner. It runs skryptp.vbs script of the
Set varobr=Asix.Variables("KW_A112")
If(varobr.value<100) Then
varobr.value=varobr.value+1
End if
The detailed description of script module can be found in "Scripts – user’s manual".
4.5.7. Analog Control Window
Analog control window is a mask containing detailed information on the analog measurement, such as:
technological symbol, measurement description, measurement range, current value presented in form of
number and horizontal bar, current value chart, technological limit values, converter current value, and
additional information contained in the variable record in VarDef variable definitions database.
As usual, start with defining of analog control mask “FRCZAL-14a Gas flow before furnace’ started from
T_FURN mask.
62
October 2007
©ASKOM, Gliwice
The first application – step by step
Mask name:
Mask description:
Position:
Icon:
Opening mode:
Components:
Operations:
Background:
KW_A110
Gas flow before furnace
Column - 385
Line – 357
Width – 395
Height - 338,
ASIX3,
New
Title Line, Border, System Button
No Size, Always on Top
select dark grey from the palette.
Create a separate STAC directory, located inside MSK directory, especially for analog control masks.
STAC directory should be declared in Architect module as an additional directory, where masks
(application parameters /Masks parameters group / Files and folders tab – Mask path).
The created KW_A110.msk control mask should be placed in directory:
C:\asix\Application\Acid_Factory\MSK\STAC
On top of the mask, place TEXT object, which displays the contents of C&I field for KW_A110 analog
measurement and parameterize it in the following manner:
Source of text:
Variable base:
Attribute:
Justify:
Docking:
Parameters:
©ASKOM, Gliwice
Variable base
Variable – KW_A110 – selected from the list
C&I
To left
left
Font – PLMALY
October 2007
63
The first application – step by step
Color Shadow Background – white/black/dark grey
Shadow.
The analog measurement value is displayed with use of NUMBER object – this time, for instance, the
limits are defined as appropriate bit statuses in analog measurement status of the name derived from the
basic analog measurement name with added suffix _S (in this case: KW_A110_S).
Critical maximum check bit 4 of the status, maximum - bit 5, minimum - bit 6, critical minimum - bit 7.
This results in respective records in the variable base for KW_A110 variable.
LimitHiHi: KW_A110_S&10
LimitHi: KW_A110_S&20
LimitLo: KW_A110_S&40
LimitLoLo: KW_A110_S&80
Remaining parameterization:
Variable:
Colors and fonts:
Format:
Justify:
Position:
Parameters:
64
KW_A110 – right-click to display the analog measurement group from
the database and select the appropriate analog measurement;
mark transmission errors as character ? (in case of error, the number will
be finished with ?) and measurement errors as ?? (in case of error,
characters ?? will be displayed instead of the number)
right-click in the font definition windows and select CYF19,
color palettes: right-click on font colors and select - for critical limit
excess - red on yellow background,
for minimum and maximum excesses – red on window background
for correct measurement value – green on window background
for transmission and measurement errors – white on red background.
check Area by Format
To right
To down
check Automatic edition
October 2007
©ASKOM, Gliwice
The first application – step by step
Confirm that the analog range, format, control variable and control variable status fields are empty and
press Link button. The variables and values from appropriate columns related to the controlled variable
KW_A110 will be automatically read from the database.
BAR object – presentation of analog measurement in form of horizontal bar
Presenting the current value in form of bar allows to user to orientate quickly, in which part of the range the
measured value is currently located, assuming that the full bar width reflects the full range of analog
measurement.
Select BAR object from the New Type window of Designer module and place it on the mask. Size it with
use of the cursor.
Parameterization:
Variable:
Line
Colors:
Frame:
Direction:
KW_A110 – right-click to display the analog measurement group from the
database and select the appropriate analog measurement; check the
transmission errors and measurement errors
red, thickness 3
right-click in the font colors and select colors from palette: for correct
measurement value – green on window background
select Frame
Thickness - 1
E (right)
Confirm that the analog range, limits, control variable and control variable status fields are empty and press
Link button. The variables and values from appropriate columns related to the controlled variable
KW_A110 will be automatically read from the database. As our bar does not change the color when limits
are exceeded - their names are deleted.
©ASKOM, Gliwice
October 2007
65
The first application – step by step
LINE object – scale components
Below the bar, there is a scale, which divides the entire bar range into 10 equal parts. This is composed of
11 LINE objects, where each one is defined in the following manner:
Line width:
Type:
Line color:
Specimen type:
1
normal
white
continuous line.
First create three longer lines, with two of them located at the ends of the bar, and the third one - between
them. Select all three lines, and with use of Designer menu command: Edit/Justify/Horizontal and
Edit/Align/To top locate the middle line symmetrically to the end lines. Draw four shorter lines and place
them in the same manner between the longer lines. The lines should be copied from one another, so as they
are of identical length. Before all moving and copying operations, lock the object sizes. For this purpose
use menu: Edit/Lock/Size in the Designer panel. If the object size is locked, it is much easier to move it
around the mask.
Remaining objects
Under the scale, there are the measurement ranges of the analog measurement and the unit – their contents
are loaded from variable base.
The lower scale is a TEXT object of the following definition:
Source of text:
Variable base:
Justify:
Docking:
Parameters:
from variable base
Variable – KW_A110 – selected from the variable list
Attribute - DisplayRangeFrom
To left
left
Font – SMALL2
Color - grey
TEXT objects presenting the upper scale and unit are parameterized in the identical manner. The only
changed attributes are, respectively, DisplayRangeTo and Unit.
On the side of the mask, under the 'Converter current' text, draw a RECTANGLE object constituting a
background for current measurement of the given analog measurement. It is defined in the following
manner:
Line color:
Filling color:
Shadow:
Line width:
Depth:
Frame color:
white
dark grey
black, white
1
2
Corners-top, Corners-bottom: select all four
color - grey
black
Except for the above, check also Fill inside and Contour fields.
Use TEXT object to place the current unit – mA behind the frame.
Current value is displayed with use of NUMBER object, parameterized in the following manner:
Measurement variable: KW_A110_I – enter name from database from AC_converter group
Range:
0 – 20 – enter manually
Format:
%4.1f – number with one decimal point;
66
October 2007
©ASKOM, Gliwice
The first application – step by step
Color:
check Area by Format
Blue – only for values from range.
Place the texts below:
Technological limitations, MNK, MIN, MAX, MXK with use of TEXT object written in yellow with black
shadows.
Below the texts, place 4 NUMBER objects displaying the technological limitations. The numbers are
parameterized for variable from KW_ograniczenia group, and the display format depends on the number
range and is parameterized manually.
Respectively, from the left:
Critical minimum – KW_A110_LL
Minimum – KW_A100_L
Maximum – KW_A110_H
Critical maximum – KW_A110_HH.
Each of the limits is written in a box, identical as the current value.
Above the chart, enter the text, which is the copy of units located under the bar.
CHART object – analog measurement chart
The analog control window chart allows to track changes of the given measurement – in our case, for the
last eight hours. CHART object also allows to check the measurement trend for custom period, if only the
variable was archived. It enables changing the ranges, both in OY and OX axis.
Select chart from the objects list and open its main dialogue window.
CHART object additionally has four auxiliary dialogue windows for defining colors, cursor and variables
definitions.
An exemplary CHART object is parameterized in the following manner:
Axis direction:
©ASKOM, Gliwice
EN
October 2007
67
The first application – step by step
OX axis:
time
Horizon – 8h
Step – 2h
OY axis:
Begin – 0 – lower limit of analog measurement
End – 600 – upper limit of analog measurement
Step - 100
Max. curves number:
1
Axis description:
Date-Time-Value
Description parameters: Font: TYCM
Marker description width – for OX-5, for OY-4
Submarkers number – for OX-4, for OY-2
Power description width - 0
Draw ? check Grid and Axis description for OX, OY
Next, use the upper Colors button to open the color definition and set the following parameters:
Chart title:
Axis description:
Chart background:
Grid:
OXY axis:
white on dark grey
light grey on dark grey
dark grey
black
light grey
Use the next Cursor button to open the cursor definition and set the following parameters:
Mode:
- on request, during application operation, cursor will appear in chart
when the chart is selected (clicked) and Insert button is pressed
Type:
- cross
Curves button, which opens Curve manager window allows to define curves.
68
October 2007
©ASKOM, Gliwice
The first application – step by step
Use Add button to open Curve parameters window. Declare the following:
Check
Process variable:
Chart kind:
Type:
Preconvert:
Line parameters:
Active
KW_A110 – enter the variable name from the base
linear
current
D
MOV
none
color - green
continuous line.
Close the chart definition window with OK button.
Remaining objects
In the bottom left corer of the mask, the mask name is displayed for easier identification of the station
during application start-up stage. This was executed with use of TEXT object. It was parameterized in such
manner, so as it displays the name of mask, where it exists on.
Source of text:
Justify:
Docking:
Parameters:
©ASKOM, Gliwice
Mask name,
To left
left
Font – TEST1
Color - black
October 2007
69
The first application – step by step
In the bottom right corner, BUTTON object is located, which calls information from the database about the
analog measurement. Variables attributes, which will be displayed after this button is pressed, are defined
in the variable definition scheme as set ‘info_st’:
Variable definitions base parameters/Scheme editor/Attributes sets tab
When the variable definitions are loaded directly from Excel worksheet – and so was assumed for the
Sulfuric Acid Factory application – the attributes set must be defined directly in Excel source file, in
AttributeSets sheet.
info_st=Name, C&I, Description, Measurement range from, Measurement range to, Unit, Sampl rate,
Address, Archive.
In the button definition, enter what follows:
Actions:
VARIABLE_DESCRIPTION,KW_A110,info_ST
Text\line 1:
info
Justify:
center
Send:
immediate
Button:
Font – RAPORT_8x8
Background – light grey
Shadow + – white, dark grey
Shadow- – dark grey, white
Frame – black, 3-dimensional
Password:
none
The last step is to place several RECTANGLE objects on the mask, which will separate individual mask
elements. Chart object was also put into frame. To push the selected object (rectangle) to the second plane,
use Ctrl+End keys (keys Ctrl+Home move the selected object to the first plane). The entire mask is filled
with the last big rectangle, which is put as background for the other mask elements.
All analog windows are the same. The only difference is the name of variable, where those are assigned.
Analog windows used in Sulfuric Acid Factory application are located in directory:
C:\asix\Applications\Acid_Factory\MSK\STAC
70
October 2007
©ASKOM, Gliwice
The first application – step by step
4.5.8. Analog Control Window Iinitiated with Parameter
To reduce the big amount of masks (e.g. analog control windows), it is possible to use the template mask
calling mode with reference to the name of file containing the list of variables displayed on the given
station, and the variables for replacement.
Create the template mask, parameterize it according to the assumed scheme and save. The template mask
variables do not have to be kept in the base, as they act as auxiliary variables and as a matter of fact, the
application does not refer to them. When the mask is ready, save it under an appropriate na,e. In case of the
Sulfuric Acid Factory application, this is a mask of meaningful name of STATION
(C:\asix\Aplikacje\Wytwornia_Kwasu\MSK\STAC).
In the next step, create the variable replacement file. For this purpose, open the template mask definition
window and press “Create name replacement file” button. This file is named mask_name.VRT (in our case:
CONTROL.VRT - C:\asix\Applications\Wcid_Factory\MSK\STAC) and is located in the same directory as
the template mask.
The contents of exemplary CONTROL.VRT file:
description
KW_A000;
KW_A000_H;
KW_A000_HH;
KW_A000_L;
KW_A000_LL;
KW_A096_I;
Supplement this file with variables, which should be inserted in place of template mask variables.
For instance (file KW_A094.VRT - C:\asix\Applications\Wcid_Factory\MSK\STAC):
Air flow before furnace
KW_A000;KW_A094
KW_A000_H;KW_A094_H
KW_A000_HH;KW_A094_HH
KW_A000_L;KW_A094_L
KW_A000_LL;KW_A094_LL
KW_A000_S;KW_A094_S
KW_A096_I;KW_A094_I
In the first line, the description, which should replace the template mask description, is recorded. If the line
is left empty, the template mask description will remain unchanged. The following lines contain the list of
variables created according to the following scheme:
template_mask_variable;replacing_variable
The file should be renamed to the represented variable name. Thus, it will be a unique name.
When the variable replacement file is ready, associate the button calling the given station with the
appropriate operator action according to the given scheme:
OPEN_MASK,template_mask_name#name_replacement_file,NEW,-1,-1,0
In our case, the operator action takes the following format:
OPEN_MASK,CONTROL#KW_A094.VRT,NEW,-1,-1,0
©ASKOM, Gliwice
October 2007
71
The first application – step by step
4.5.9. Drive Control Window
The technological masks contain icons reflecting the drive operation condition. Click the drive icon to
display the given drive mask, used for controlling the drives, changing their operating modes and for
deleting failures and, if this is the case, for displaying the drive diagnostics.
The manner of constructing the mask for bidirectional drive will be explained on example of mask
KW_N01 (drive TY-16a “Acid gas flap valve”, called from mask T_PIEC “Furnace and Catalytic
Reactor”).
Create a new scheme mask and define it in the following manner:
Mask name:
Mask description:
Position:
Icon:
Opening mode:
Components:
Operations:
KW_N01
TY-16a
Column - 272
Line – 320
Width – 155
Height -215
ASIX3,
New
Title Line, Border, System Button
No Size Change, On Top
Fill the station with rectangle. Inside, draw an inner frame, also with use of RECTANGLE object. In this
upper frame, place TEXT button containing two drive description lines.
The station contains four rectangles producing the illusion of three-dimensional object. Change the edge
colors to obtain a convex or concave image.
72
October 2007
©ASKOM, Gliwice
The first application – step by step
SELECTOR object – selecting the operation mode
SELECTOR object was used to change the drive operation mode.
It works in the following manner: each clicking on A/M button displays a key for one of the proposed work
modes in the window above: AUT or MAN; REM mode is chosen, when left Ctrl is simultaneously pressed
on the keyboard. The selected work mode will be sent to the controller only when the operation is
confirmed with 'F12 OK' button from MENU mask.
Therefore, create SELECTOR object and parameterize it in the following manner:
Button:
Text – A/M
Font – DIALOG2.
Background – dark blue, black, dark grey, light grey
Frame – black
Check – frame, 3-dimensional, Text frame
Send:
State:
with acknowledge
Number of states: 4
First bit – 5
Coding: natural code
KW_N01 – drive status acquired from KW_drives variable group.
KW_N01_S – drive control word loaded from the same variable group;
check read first, transmission errors
black, thickness 1
Variable:
Controlled variable:
Line:
Declare the following statuses, which will be chosen and selected by means of Selector.
State 0:
In the text-entering line, type ??? (indefinite mode) and press Enter
Parameters section should be defined in the following manner:
Font:
DIALOG2
Color / background:
yellow/red
check Select protection and Select blockade, so as the operator cannot choose this state,
because it is not allowed – it is reflected by state 000.
Justify: center
State 1:
In the text-entering line, enter REM (maintenance mode) and press Enter.
©ASKOM, Gliwice
October 2007
73
The first application – step by step
Parameters section should be defined in the following manner:
Font:
DIALOG2
Color/Background – white/red
check Select protection, so as the operator can select this status only by pressing Ctrl key
during opening mode in the station
Justify: center
State 2:
In the text-entering line, enter MAN (manual mode) and press Enter.
Parameters section should be defined in the following manner:
Font – DIALOG2.
Color/Background – yellow/dark grey
Justify: center
State 3:
In the text-entering line, enter AUT (automatic mode) and press Enter.
Parameters section should be defined in the following manner:
Font – DIALOG2.
Color/Background – yellow/red
Justify: center
The next elements are drive icons, electrical readiness light and control location – those can be copied from
T_PIEC technological mask. These icons are placed on a separate rectangle.
Station offers two buttons, Close and Open, used to control the drive.
Button Close is parameterized in the following manner:
74
October 2007
©ASKOM, Gliwice
The first application – step by step
Action:
Text\line 1:
Justify:
Send:
Button:
SET_BITS,KW_N01_S,1,7
Close
center
with acknowledge
Font – DIALOG2.
Background – light grey
Shadow+ – white, dark grey
Shadow- – dark grey, white
Frame – black
Frame, 3-dimensional, shadowing
Password - none
Press the button does not effect in immediate action execution. It is necessary to confirm the action with
F12 button on the keyboard or menu bar key.
Button Open differs only in scope of the action, which is performed, when it is pressed SET_BITS,KW_N01_S,2,7.
At the bottom of the mask, there exists a failure cancelling button, defined in the following manner:
Action:
Text\line 1:
Justify:
Send:
Button:
SET_BITS,KW_N01_S,10
Failure cancel
center
immediate
Font – small2.
Background – light grey
Shadow+ – white, dark grey
Shadow- – dark grey, white
Frame – black
check Frame, 3-dimensional, shadowing
Password - none
This button cancels the drive failure and enables the drive controls.
In the bottom left corner, there exists TEXT button - inputting the mask name - defined in manner
analogical to the analog station measurement.
As those drives may be of different types, their stations may differ. KW_N03 control window, located on
T_KOLUM mask pertains to the control drive.
©ASKOM, Gliwice
October 2007
75
The first application – step by step
Control drive station do not have the Close and Open buttons. In exchange, they have ‘minus’ and ‘plus’
buttons, used to control the drive in the direction of opening and closing. As long as the button is pressed,
the drive is being controlled. An additional element is a slider, used to determine the control drive position.
SLIDER object – determining the drive position value
The following is the description of slider and 'plus' and 'minus' buttons parameterization. The other station
elements are analogical to KW_N01 drive station.
In this station, SLIDER object is defined as follows:
76
October 2007
©ASKOM, Gliwice
The first application – step by step
Variable:
KW_N03_P – variable loaded from group AC_drivers – represents the
position of control valve
Controlled variable:
KW_N03_Z – variable loaded from AC_drivers – represents a variable,
where the ordered position of the control valve is entered
none
transmission errors
check – full area
= - yellow/light grey – variable value
? - red/black – transmission error
^ - light grey/red – handle color during moving
[] - white/dark grey - handle color
check options Frame, black
E (right)
Password:
Check
Handle:
Colors:
Frame:
Direction:
Delete the contents of Bar limits and Handle limits fields and press Link button to load ranges from the
database.
Above the slider, place NUMBER object displaying the valve position value. As the variable, load variable
KW_N03_P.
SWITCH object – changing the position in CLOSE direction
Buttons ‘plus’ and ‘minus’ are executed by means of SWITCH object parameterized in the following
manner:
Variable:
Controlled variable:
Check
Line:
Button:
Zones:
Justify:
Send:
States:
KW_N03 – loaded from base from AC_drivers group
drive control word – KW_N03_S
transmission errors
red, thickness 1
Surrounding - 7
single
center
with repeating
End of repeating - pressed button opens 'Controls' window; in this
window - select word as Action, and select 1 in Word item. When the
button is releases by the operator, 1 on the control word will be send to
the controller, which will stop the drive.
In line ON pressed and OFF pressed, in the second column, enter the name of bitmap, which should appear
when the button is pressed - right click and select bitmap SI_MI_PU_D from file.
In the same column, in lines OFF and ON normal, enter bitmap SI_MI_D.
In the third column, in lines ON and OFF pressed, enter 1, which will cause that with each pressing of the
button, the word entered under action buttons in lines ON and OFF normal will be send Pressing the action
button will open ‘Controls’word. There, choose to send the word, and set the word value to 4 H , which will
set bit b2 to value 1 interpreted by the controller software as CLOSE_DRIVE command. Both controls
under action keys should be parameterized in the same manner.
©ASKOM, Gliwice
October 2007
77
The first application – step by step
‘Plus’ button, executing the position change in the direction OPEN is parameterized in a following manner
– with a variation that the bitmaps are different - respectively SI_PL_PU_D and SI_MI_D, and instead of
sending the word for drive closing, word 2 H is sent, which sets bit b1 to value 1 interpreted by the
controller software as OPEN_DRIVE command.
In the bottom left corner create a TEXT object, which will contain the mask name.
78
October 2007
©ASKOM, Gliwice
The first application – step by step
4.5.10. KW_D13.msk mask – diagnostic mask
KW_N13 – the fan drive mask, opened from T_PIEC ‘Furnace and Catalytic Reactor’ technological mask
provides an additional button marked as Diagn., which opens the drive diagnostics station. This button
executes action OPEN_MASK,KW_D13.
Drive diagnostics mask allows for quick orientation in the factors impacting the drive operation. The
diagnostic mask displays the possible reasons detected by the system as texts, which, if activated, are
highlighted in red.
©ASKOM, Gliwice
October 2007
79
The first application – step by step
Create a scheme mask and determine the following parameters:
Mask name:
Mask description:
Position:
Icon:
Open mode:
Components:
Operations:
KW_D13
W1 - DIAGNOSTIC
Column - 290
Line – 335
Width – 640
Height -314
ASIX3,
New
Title Line, Border, System Button
No Size Change, On Top
Static texts: Air fan, Interlockings and protections and Electrical diagnostic – these are TEXT objects
entered into RECTANGLE objects. In the bottom left corner there is a TEXT object displaying the mask
name.
All the remaining texts on the mask can change their look and therefore, are objects of TEXTS type. These
are parameterized to drive diagnostic variable KW_N13_D from AC_drivers group.
The left column presents the reasons of interlocking and protection triggering. Each is described with two
states: white font on red background, when bit, for which the object is parameterized is set to 1, or white
font on grey background - when bit is set to 0.
The second column signals, which of the interlockings and protections are currently used. The objects
change the background color from grey to red, when the appropriate bit is set to 1.
Electrical failures, placed in the third column, are parameterized in the same manner.
Two texts in the lower part of the mask inform about the diagnostic status – whether the observerd
diagnostic is a current one, or was saved during triggering of any interlocking or electrical failure. The
object is also parameterized to 2 states:
80
October 2007
©ASKOM, Gliwice
The first application – step by step
State 1:
State 2:
current diagnostic – black on green background
stopped diagnostic – red text color
4.5.11. INFO.msk masks – ASKOM company information mask
Mask opened with F1 key (INFO) is a presentation of the application developer company - in this case,
ASKOM.
Create a scheme mask parameterized in the following manner:
Mask name:
INFO
Position:
Column - 86
Line – 166
Width – 393
Height – 187
Background color:
violet
Icon:
ASIX3,
Open mode:
New
Components:
Title Line, Border, System Button
Text ASKOM is a PICTURE object, displaying the ASKOM_MALY bitmap.
Below is the TEXT object, containing 6 lines of company information. Text asix5 is executed as PICTURE
object.
The last mask element is Help button, which runs Asix.hlp program – asix program help with use of script
saved in Pomoc.vbs file.
Set obiekt = CreateObject("Shell.Application")
obiekt.ShellExecute "ASIX.HLP"
set obiekt = nothing
In Action field enter:
SCRIPT,help
Place Pomoc.vbs script in directory:
C:\asix\Applications\Acid_Factory\Scripts
4.5.12. XAL_ACT.msk mask – active alarms table
The application of alarms system in asix system application requires configuring of the system core
responsible for alarm detecting, saving and definitions (see -> configuration of alarms system for the
Sulfuric Acid Factory application). The visualization part consists of two types of alarm masks: active and
historical alarms.
Alarms existing in the system can be viewed in several manners. The last alarm line has been already
discussed – it displays only one, latest unacknowledged alarm registered by the system.
©ASKOM, Gliwice
October 2007
81
The first application – step by step
To view the full list of alarms, which are active in the current moment in the Sulfuric Acid Factory
application, use the active alarms table associated with F10 button.
In the Designer menu, select options Masks/New mask, select item Active alarms and enter definitions:
Name:
Description:
Position:
Font:
Mask parameters:
Open mode:
Components:
Used keys:
Operations:
XAL_AKT
Active alarms
Column - 25
Line – 142
Width - 965
Height – 594
DIALOG2
New
Title Line, Border, System Button, Toolbar, Status Line
Acknowledge, Criteria, Exclusions, Filters, Signals, Printout, Diagram,
Description
On Top
This mask will display the active alarms list. Declaration of colors related to alarms was discussed during
designing of ALARMS.msk mask.
4.5.13. XAL_HIST.msk mask - historical alarms table
The last alarm-related mask is the historical alarms mask. It allows to view all completed alarms, which
occurred in the system during the application operation. Historical alarms table allows to view and analyze
alarms according to various criteria, to perform alarms filtering and exclusion, and also to print the selected
part of alarms history on a printer.
Historical alarms table is also a special system mask. To create it, in the Designer window open Masks
menu and select New Mask/ Historical alarms command.
Name this mask as XAL_HIST.
The only difference in parameterization is the setting of Used keys option: check: Criteria, Exclusions,
Filters, Signals, Printout, Mask, Definition, Connect.
To use the historical alarms system, it is necessary to declare the alarm storage period. For this purpose:
− in Architect module window, move to application parameter groups view;
− select Acid Factory field,
− select Alarms system group,
− in Archive tab, check option Limitation of alarm files storage/Alarm files storage period (in days) 31.
82
October 2007
©ASKOM, Gliwice
The first application – step by step
Colors defined for active alarms apply also for the historical alarms.
4.5.14. Alarms definitions and alarm groups definitions files
If the alarms and alarms group sheet was created in Excel, it is possible to use them to generate the alarms
definitions and alarm groups definitions file by means of Architect. These files are necessary for alarm
identification. It is especially important in case of multi-station application with the historical alarms
server, when it allows for viewing alarms from the entire facility, and the files are used for correct alarm
identification.
To generate the alarms definitions and alarm groups definitions file, switch to Architect window.
- open Databases module (Databases button in the left Architect window)
- select Alarmbase
- on the Type tab, select option Alarm definitions base is generated from a spreadsheet
- additional two tabs will be displayed - select Data sources tab
- press Excel button and select Excel worksheet, where the alarms sheets are located
- select sheets with alarms definitions and alarm groups definitions
- in File menu select Generate Base of Alarm Definitions option or click directly on icon
in the taskbar
If the sheets were created according to the recommendations, files should be correctly generated and placed
in the application’s root directory.
4.5.15. XKWDIAG.msk mask – system diagnostic mask
The next mask to be executed is the diagnostic mask named XKWDIAG. The diagnostic mask presents the
controller configuration and helps to assess the condition of the entire system and to locate possible errors
resulting mainly from power failures, fuse failures or lack of communication.
©ASKOM, Gliwice
October 2007
83
The first application – step by step
The mask has the same size and parameters as the technological masks. It presents three controller sets,
which consist of bitmaps. Set numbers and their symbols are TEXT objects presented upon rectangles.
The only dynamic mask elements are TEXTS, which is used to present the fuse status. Emergency status is
presented with use of white text on red background. Status information are also fed with texts. All those
object are directed to bi-status variables.
Mask is available in the application under F3 key with use of action:
OPEN_MASK,XKWDIAG,EXCHANGE.
4.5.16. XKWREJ4.msk mask – charts mask
Charts mask serve for group viewing of analog value trends on graphs. Grouping of the specific analog
measurements on masks was agreed during the stage of preliminary application assumptions.
It is assumed that a mask can contain 6 or 8 charts, so as to fill the entire mask area. In our application, the
group charts masks are: XKWREJ4.msk, XKWREJ5.msk, XKWREJ6.msk and XKWREJ7.msk.
Notice, how XKWREJ4.msk mask was created.
Create a new scheme mask with the following parameters:
Mask name:
Mask description:
Position:
Icon:
Background:
84
XKWREJ4
Charts – Sulfuric Acid Plant – Flows and Temperatures - Furnace and
Atm. Cond.
Column - 46
Line – 100
Width – 1110
Height -681
ASIX3,
grey color (RGB 167, 172, 176)
October 2007
©ASKOM, Gliwice
The first application – step by step
Open mode:
Components:
Operations:
New
Title Line, Border, System Button
No Size Change
The mask contains 6 charts. Each chart has width of 484 and height of 123.
To create such chart, perform the following actions:
−
enter CHART object to the mask with left Ctrl key pressed, double-click on the chart area to open
the object coordinate window; declare the chart width and height
−
define the chart:
Axis direction:
OX axis:
EN
Horizon – 8h
Step – 1h
OY axis:
Begin – lower limit of analog measurement
End – upper limit of analog measurement
Step – resulting from the analog measurement range
Max. curves number: 1
Axis description: Date-Time-Value
Description parameters:
Font: small
Marker description width – for OX-5, for OY-resulting from the analog measurement
range
Submarkers number– for OX-4, for OY-resulting from the analog measurement range
Power description width - 0
Draw ? check Grid and Axis description for OX, OY
−
then define the colors, cursor and curves similarly as for the analog station chart.
©ASKOM, Gliwice
October 2007
85
The first application – step by step
−
In the next step, create a chart frame by means of RECTANGLE objects. These are three rectangles
without filling, located inside of the another.
The parameters for the biggest rectangle are defined in the following manner:
− both shadows set to dark grey,
− Line color to white,
− upper and lower corners to white,
− Depth – 3,
− Line width – 1,
− checked option Contour in dark grey.
To define the size, press Ctrl and double-click on the rectangle:
− width: 502,
− height: 160.
The second has the following parameters:
− both shadows set to white,
− Line color to grey,
− upper and lower corners disabled,
− Depth – 3,
− Line width – 1,
− checked option Contour in dark grey.
To define the size, press Ctrl and double-click on the rectangle:
− width: 495,
− height: 155.
To place one object on another in an accurate manner, select both rectangles and with use of menu
function Edit/Put on locate one rectangle in another one.
86
October 2007
©ASKOM, Gliwice
The first application – step by step
The third (the smallest) rectangle has the following parameters defined:
− both shadows set to white,
− Line color to black,
− upper and lower corners disabled,
− Depth – 0,
− Line width – 2,
− checked option Contour in dark grey.
To define the size, press Ctrl and double-click on the rectangle:
− width: 488,
− height: 127.
The smallest rectangle should be placed inside the two previous ones, so as its lower edge touches
the lower edge of white rectangle. In similar manner, place the Chart object in the black frame.
Above the charts, place rectangles of the following parameters:
−
−
−
−
−
−
Line: black
Filling color: light grey
Shadow: white and dark grey
Line width: 1
Depth: 3
Check Fill inside and Contour in black.
Rectangle size: width: 494, height: 22.
This will be the background for chart descriptions. The descriptions are TEXT objects.
Place the appropriate objects in the rectangles defined above.
The first description:
Source of text:
Variable base:
Attribute:
Justify:
Docking:
Parameters:
from variable base
variable – acquired from base
Nazwa AKPiA
To left
left
Font – dialog2
Color – dark blue.
The next text is parameterized the same as the previous one, with difference that the attribute is description
and the font color is black.
The last text is inserted manually according to the physical range.
XKWREJ1 and XKWREJ2 charts mask contain two dynamically parameterized charts each, i.e. the
operator can freely select the variables displayed on the chart during the application operation.
©ASKOM, Gliwice
October 2007
87
The first application – step by step
The parameterization of those charts is supplemented by checking Runtime definition and Legend with
defined font Opis_8. All displayed variables are curves in scale 0-100%. Maximum number of curves is 4.
To call the dialogue box allowing for variable replacement during the application operation, click on the
chart background and press keys Ctrl+D. This sequence will open the curve association change window.
88
October 2007
©ASKOM, Gliwice
The first application – step by step
4.5.17. Trends definition
Except for the charts, the operator also is able to utilize the trends mechanism, which allow for detailed
analysis of analog measurement trends. This is performed with use of AsTrend.exe program. It is started
together with the application, if only Start AsTrend option is used (see: chapter 4.6.1. Start Parameters).
4.5.18. Measurement tables
Key F7 Measurements opens mask allowing for simultaneous viewing of grouped analog measurements
displayed in form of accurate numerical value and horizontal bar with full description of the given item.
Objects used for designing of measurement masks is: NUMBER, BAR, TEXT and LINE_PP. Masks
containing the group analog measurements is: XKWPOM1.msk and XKWPOM2.msk. Numbers are copied
from technological masks. Bars can be copied from analog stations - additionally, use Link button to enter
the technological limit variable names. Measurement description texts are parameterized as on the chart
masks. The second group of measurement masks are the dynamic measurement tables. These tables are
screens presenting the current values of analog measurements selected by the operator. During the
application, it is possible to add and delete variables and save the configured table. Each dynamical
measurement table is defined in the text file.
Directory C:\Asix\Applications\Acid_Factory\Tables contains files T1.tbl and T2.tbl, which define tables
available in the application. In the application configuration file declare the directory, from which the table
definitions will be loaded. To do this:
- switch to the application parameters view,
- click on Acid_Factory, and then on Current data > Advanced 2 and declare ‘Tables’ directory.
Below is T1.tbl describing the table available from F7 menu as the defined table:
[Table]
Title=Sulphuric Acid Plant - Table of measurements before furnace
Position=0,87
ColumnsNumber=4
RowsNomber=27
ValueColumnNo=3
Font=MS Sans Serif,-23,[Bold],EastEurope
Format=%7.2f
ErrorFormat=????.??
Caption=1
Grid=1
Stripes=1
Width=1024
Height=681
Offset=20
[Colors]
Background=192,192,192
Font=0,0,0
Blinking=0
StripeBackground=128,128,128
StripeFont=0,0,0
StripeBlinking=0
LimitHHDefaultBackground=0
LimitHHBackground=255,0,0
LimitHHFont=0,0,0
LimitHHBlinking=0
LimitHDefaultBackground=0
LimitHBackground=255,255,0
©ASKOM, Gliwice
October 2007
89
The first application – step by step
LimitHFont=0,0,0
LimitHBlinking=0
LimitLDafaultBackground=0
LimitLBackground=255,255,0
LimitLFont=0,0,0
LimitLBlinking=0
LimitLLDefaultBackground=0
LimitLLBackground=255,0,0
LimitLLFont=0,0,0
LimitLLBlinking=0
ErrorDefaultBackground=0
ErrorBackground=192,192,192
ErrorFont=255,0,0
ErrorBlinking=1
[Columns]
1=Name,7
2=Description,37
3=Value,7
4=Unit,5
[Rows]
1=KW_A110
2=KW_A108
3=KW_A106
4=
5=KW_A098
6=KW_A102
7=KW_A100
8=KW_A036
9=KW_A032
10=
11=
12=
13=
14=
15=
16=
17=
18=
19=
20=
21=
22=
23=
24=
25=
26=
27=
This file is used to create T2.tbl file in the same directory. The difference between the files is as follows:
section [Rows] is empty, the table does not have any defined variables, and Title item is [Table] section
contains a different text appearing in the table header.
During application operation, the operator is able to configure the table freely and save it.
90
October 2007
©ASKOM, Gliwice
The first application – step by step
4.5.19. Technological limits masks
The technological limits masks enable entering limits for analog measurements. Those limits are used to
signal the exceeding of measurement threshold value through changing the color of the displayed
measurement in the technological masks and result in generation of the appropriate alarms.
Those masks contain the list of all analog measurements together with their C&I, descriptions, ranges,
converter current values and technological limit values.
New element is a number with control, used to enter new limit settings.
All technological limits can be read from those masks and set by the operator. Therefore, parameterization
of number directed to specific limit must be supplemented with the controlled variable, which is the same
as the monitored variable.
©ASKOM, Gliwice
October 2007
91
The first application – step by step
It is important that Limits window must be filled, as they determine in which scope the value of the given
limit can be changed – this is a physical range of the given analog measurement.
As a password, enter level 1. Therefore, a logged-in user with authorizations of at least level 1 will be able
to enter new settings.
4.5.20. Automatic control systems mask
As mentioned in the Sulfuric Acid Factory application description, it is possible to call the automatic
control systems mask from MENU mask by clicking on F9 Control key.
The automatic control systems masks are quite complex scheme masks. Except for a fragment of
technology with ACS structure, they contain a table with settings for parameterization of automatic control
system operation mode, and also a chart with short time horizon, allowing for current checking of the given
system operation.
Additionally, it includes a permanent drive station, parameterized identically as the drive station. It is called
from the drive station, called from the technological mask and allows the operator to control quickly the
operation of the executive element of the automatic control system.
Objects allowing to tune PID control system are NUMBER objects with option of controlling,
parameterized analogically as the numbers on technological limit masks.
At the bottom of the mask, there exists a chart with time horizon of 15 minutes. Chart curves colors are
reflected by analog measurement colors on the mask.
−
−
−
Range of OX axis is 100,
The first variable KW_C192 – ordered value for defined green color, archiving type H – in Excel file
in archiving parameterization, enter type H, not M. It is displayed as current value, with preliminary
recalculation from 0 to 100%.
The second variable KW_A048 is an analog measurement with archiving type M, with recalculation
to 100%. The last variable KW_N05_P – archiving type H, without recalculation, as this is the
position of valve from range 0-100%.
4.5.21. Reports
Asix contains an embedded reporter module allowing for generation of custom reports from the progress of
technological process. The defined reports can be calculated at the operator's request, when the desired
report period is indicated, or can be calculated as predefined reports when the operator performs an
appropriate action.
In case of the Sulfuric Acid Factory application, reports are available when key F5 Report is pressed.
Periodically, the reports remind about themselves and request the operator, whether they should be
recalculated. This is executed with use of event scheduler, which opens QUERY.msk mask initiating
dialogue with the operator.
Description of report definitions creation – including the use of ASTEL and ASTER in asix
system - can be found in Asix - user manual in chapter Reports Generation Module.
Reports are defined in text files with extension *.r. To commence the report file definition, use any text
editor to create file Report2.r in \REPORT directory. At the beginning the file contains the following lines:
{ ACID FACTORY – twenty-four-hour rpt }
name "ACID FACTORY – twenty-four-hour report"
92
October 2007
©ASKOM, Gliwice
The first application – step by step
For further report definition, use the reporter editor available in the Designer window from menu
Tools/Reports window. Open REPORTER window in this manner. Select a report from the list and click on
Pattern\Correct to begin editing. Enter the report definitions according to the requirements of ASTEL and
ASTER language.
It is important that the frame marks must be copied from the system character table. Select font Asix_852
Rom8x16 and copy the character from there. The defined report can be checked (Pattern\Check) and
recalculated (Pattern\Calculate) with use of the reporter window.
Create monthly report named Report1.r/ in the same manner.
4.5.22. Event scheduler
Event scheduler is used to define actions performed periodically, without the operator’s action. Take
caution while defining such actions, which will be executed automatically, so as not to interfere with the
operator’s work and not to introduce chaos to the application operation.
Defining actions performed with use of Event Scheduler.
In case of our application, a mask is generated with a question asking whether the operator wants to
calculate a report with average temperatures.
Mask is opened, when variable V1 changes its value to 1. Variable V1 is located in Excel worksheet for the
purposes of the simulation, it is processed with PILA_FP and takes values from 0 to 1, with step of 0.1.
To related the request mask opening action to the V1 variable value, the abilities of Event Scheduler were
used.
In the Designer menu, select Tools\Action Scheduler\Events and parameterize:
Action: OPEN_MASK,QUERY - opening mask named QUERY.
Variable: V1 – name of variable, which sometimes changes value to 1
operation window: „=”
value window: 1
Shared refreshing period: 1s.
Press Add button, and then Exit button.
The scheduler can be also defined with use of Architect module:
In the application parameter group Scripts and actions / in Scheduler tab
4.5.23. QUERY.msk mask – mask for dialogue with the operator
The next step is to execute a mask, which will be opened, if the condition is fulfilled.
Mask name:
Mask description:
Position:
Icon:
Open mode:
Components:
Operations:
©ASKOM, Gliwice
QUERY
Action scheduler
Column - 154
Line - 151
Width - 311
Height - 140
ASIX3
New
Title Line, Border, System Button
On Top
October 2007
93
The first application – step by step
In the mask, place a framed text with question about the operation execution and two buttons:
YES – declare an action set: ACTION_SET, REPORT_YES.
Action set definition should be entered to the application configuration file with use of Architect module.
Delete parameter causes that the report file will be only displayed and will not be saved on the disk.
NO – the button has an assigned CLOSE_MASK action.
94
October 2007
©ASKOM, Gliwice
The first application – step by step
4.6. Step Six – further configuration of the application
The configuration file describes the operation of the application. If something does not work, please
remember, that your computer does not do what you want, but only what you told him to do.
With the input data and application masks prepared, we can perform the final configuration of the
application. Application can be configured on two levels: on the level of Field and on the level of
Computer. Configuration on the Field level produces global settings for all machines belonging to the given
field, while configuration on the Computer level allows to customize settings depending on the computer
type (different settings for operator stations and different for dedicated data server in the corporate
network). Settings on the Computer level take precedence before the Field level settings, therefore the local
settings can override the global ones.
Application parameters are divided into several groups.
©ASKOM, Gliwice
October 2007
95
The first application – step by step
4.6.1. Start Parameters
Start parameters include the basic information about the status of asix system in the stage of
application start.
Item definitions base tab allows to set the following options:
Items definitions base tab appears only, when Items definitions base in old format - zez/db files option
is declared for the application in the module:
Databases > Varbase > Type tab
−
ZEZ file name – the parameter indicates the Variable Set file, which must be used in the application
operating on the basis of Paradox variable definitions base.
ZEZ is a file with definition of variable grouping arrangement and constitutes an element of Paradox
variable definitions database. This format was used for older versions of asix system;
−
Path to a ZEZ file – this field indicates the default location of *.ZEZ files; if the field is left
undeclared, give the file name together with access path in ZEZ file name parameter.
Standard tab defines:
−
96
Application identifier / Name – allows to assign a name to the application identifying the given
application in the network of stations. If a name is assigned, during end of work, it is checked
whether there exist any machines running the same application in the network. If none such machine
October 2007
©ASKOM, Gliwice
The first application – step by step
−
−
is found, the appropriate information will be displayed. It is then required to confirm the program
exit command.
Default value: no name
Box intro – field indicating to a bitmap, which will be displayed on the screen during the application
start-up.
Default value: none
Action – field indicating to an operator’s action, which shall be executed during the application start
– after opening of all masks declared in parameter:
Start parameters module > Masks tab > Open parameter
Default value
- no start action
To perform several operations, an action set is required.
Programs tab:
−
−
Start AsTrend – allows to declare the start of AsTrend program simultaneously with asix
application; AsTrend program runs minimized and waits for calls from AS program.
Default value: no declaration
Start AsBase – allows to declare the start of AsBase program simultaneously with asix application
with additional options:
− Name of XML configuration file – mandatory parameter; XML file stores the basic
configuration information, such as location and method of access to AsBase application
database; XML files also stores the definitions of archiving conditions and automatic
prescriptions;
− User, Password – optional parameter; results in automatic login of the indicated user at the
program start-up;
− Allow only one instance of application to run – optional parameter; in the situation, when the
program is running, new program instance will not be created; the earlier AsBase instance will
be put on top;
− Run application minimized – optional parameter
This item has an identical effect as operator’s action ASBASE, located in ACTION parameter (Start
parameters> Standard tab > Action parameter); the only important difference is the moment of
execution – Start AsBase parameter is executed before opening of masks indicated in parameter:
Start parameters module > Masks tab > Open parameter; while AUTOSTART action – even if
executed by Action parameter (Start parametes module > Standard tab) is executed after opening of
start masks. This can constitute a serious problem: autostart masks cannot use ASBASE objects.
Default value – none start action
Masks tab defines:
−
−
Open – names of masks, which should be opened automatically at application start-up;
Minimize – names of masks, which should be opened automatically at application start-up and
immediately minimized.
Control panel tab allows to define the basic parameters of Control Panel and Designer:
−
Message file – indicates location, where the Control Panel and Designer messages will be saved and
determines the maximal message file size.
Default value
- system messages are not saved to file.
−
Control panel window position – the starting position of the Control panel window. The coordinates
are given in pixels.
©ASKOM, Gliwice
October 2007
97
The first application – step by step
Default value:
- standard position.
While defining the window position, the designer can use a tool simplifying this activity. Select…
button runs the ‘Window position’ window, which contains Preview button. It allows to determine
coordinates by manual moving of the grey window of the size of Control Panel.
−
−
−
Minimize control panel window at start-up – enables automatic minimizing of the panel to
icon during the application start-up. The position parameters will be used during window
maximizing.
Display control panel window always on top – this item allows to assign an attribute to the control
panel window, which will result in displaying the window above all other system windows. It is
useful to use this parameter, if masks with “on top” parameter are used, which can cover the panel.
Hide – allows to block hiding of the application windows from Designer menu level (command Files
> Hide windows is blocked) and action HIDE_ALL. It is useful, when it is necessary to set a
different mode of operation of the same application on various stations (e.g. operator station and
control station).
Command Files > Hide windows and action HIDE_ALL result in minimization of all open
application windows to an icon in right part of the toolbar. This automatically reduces the CPU load.
To restore the application, double-click on asix icon located in the right part of the toolbar.
−
Silence – this item disables the sound signaling of control panel alarms and messages.
Languages tab is designated for defining the application operation languages:
−
Languages are declared by means of:
− Language code – it is recommended to observe ISO639 standard; the language code is used
for selecting the active language and for selection the appropriate versions of texts used in the
application;
The statement of all language codes supported by Architect is contained in Appendix 2.
−
−
Description – language description;
Code page - parameter, which determines the appropriate code page for the given language;
the parameter is used by the automatic font code page switching function;
Five language items can be declared for the given application, i.e. application built with use of
the package can work in five languages.
The first declared language is of special significance. It describes so-called basic language.
This is the language, in which the application was created.
Language switching system is activated, if at least two application operation languages are
defined in the configuration file.
−
Table of Texts – is used for translation of texts, which are displayed within the application elements
and are embedded into the program code.
The mechanism is launched, if file named TextTable.Lng is placed in the application start directory.
The Table of Texts file is a text file, where individual lines are multilingual texts defining the text
translations. Comment lines, market with semicolon preceding the entire line, are allowed.
98
October 2007
©ASKOM, Gliwice
The first application – step by step
Within asix package, TextTable.Tlt file is supplied, which contains a full table of texts for Polish and
English.
The designer should copy this file to the application directory under the name of TextTable.Lng, and then
fill in the multilingual texts with variant definitions for other used application languages.
−
Table of translation – is used for translation of texts entered by the designer during application
definition. In particular, this pertains to texts from objects located on visualization masks.
The mechanism is launched, when file named TranslateTable.Lng is placed in the application start
directory. The base Table of Translation file can be generated automatically with use of
TRANSLATION_FILE function from TOOLS menu of Designer window.
View of Computers/Fields tab depends on the fact, which element is highlighted in the computer and fields
tree. If it is Field, the window displays a list of computers connected to the given field. If it is Computer, a
tab appears with the statement of areas available and areas, where the given computer is connected.
©ASKOM, Gliwice
October 2007
99
The first application – step by step
Configuration of Start parameters for Sulfuric Acid Factory application:
Parameters defined for field 'Acid Factory'
Declare that AsTrend program should be started together with the application launch:
Start parameters > Programs tab > Start AsTrend option
Declare the following masks, which will be opened automatically after the application launch:
Menu_KW
alarmy
Mapa_KW
zegar
ASBASE_1
Start parameters > Masks tab > Open option.
The location of the Control Panel is set for the following values, with option to minimize the Control Panel to
an icon during startup:
Left: 0
Right: 800
Top: 48
Bottom: 248
Start parameters > Control panel tab > Control panel window position option
Parameters defined for computer 'Station SO1'
Declare panel.log file located in the application's root directory
C:\Asix\Aplikacje\Wytwornia_Kwasu, with maximum size option – 1 MB:
as
the
message
file:
Start parameters > Control panel tab > Message file option.
Disable the sound signaling for Control Panel alarms and messages:
Start parameters > Control panel tab > Silence option.
Declare two languages for application operation:
Language
Pl
En
Description
Polish
English
Code page
EastEurope
EastEurope
Start parameters > Languages tab > Languages option.
Table of texts and Table of translation can be edited when application languages (at least two) and
TextTable.Lng and TranslateTable.Lng files are declared.
Ready TextTable.Lng and TranslateTable.Lng files for the Sulfuric Acid Factory application are located in the
default directory of asix package: C:\asix\Applications\Acid_factory.
100
October 2007
©ASKOM, Gliwice
The first application – step by step
4.6.2. Masks
Masks module includes parameters, which need to be configured in order to guarantee the proper
operation of masks. Those parameters, among others, locate the graphical symbols used for mask design,
indicates directories, from which the masks are acquired during the application runtime, and defines the
selected parameters of objects operation on masks.
Files and Directories tab allows to execute the following functions:
−
Graphical symbols file gives the name of file, where the bitmaps and icons used for the application
are stored. The user may on his own created the graphical symbol files necessary for designed
applications ). The default vale: user can create the.
Default value: bitmaps are by standard added to the package and are colated in AS program
directory.
The instruction for use of bitmaps in asix system application can be found in “Asix –
user manual”, chapter Designer – designing the application.
−
Mask path – this item presents the list of directory names, where the files with visualization masks
are located;
The default value: missing entry means that the mask items will be loaded from application’s root
directory.
©ASKOM, Gliwice
October 2007
101
The first application – step by step
Fonts tab allows to define fonts used in asix system application. Under the list of declared fonts, there is a
font preview window, enabling to check the selected font.
Menu tab is designated for creating menu definitions located on masks performing the function of menu
bars with drop-down selectable items.
To create menu definition, declare the menu name in Menu window and use
editor.
command to open the menu
Text parameters tab allows to define the text constants, which serve for:
−
−
−
−
−
definition of texts displayed by the visualization objects of TEXT class,
definition of texts used by ASTER language for report development (alias instruction),
definition of numeric values (entered as text) used by ASTEL language to handle the process data
(alias functor),
definitions of control codes used for report formatting in the printer (ctrl instruction),
definitions of components of the operator's action set,
The text parameter definition involves the following fields:
−
−
102
Logical name of text parameter;
Text – the parameter can be defined with use of Multilingual text editor, launched with button
October 2007
;
©ASKOM, Gliwice
The first application – step by step
Screen keyboard tab contains the following parameters:
−
−
−
Enable screen keyboard – runs the screen keyboards mechanism, enabling (in the application
runtime mode) the entering of texts to editing fields of dialog boxes and NUMBER and CAPTION
objects;
Default value: screen keyboard mechanism is disabled.
Screen keyboard size – the parameter allows to determine the size of screen keyboard in pixels;
Default value: keyboard window has width of 500 pixels;
Numeric keyboard size – the parameter allows to determine the size of numeric keyboard in pixels;
Default value: window has width of 300 pixels.
Misc tab includes the following parameters:
−
−
−
Blinking period – declaration of blinking period (in miliseconds); this parameter is set on one-time
basis and impacts the operation of all objects using the blinking attribute;
Default value: 333 ms
No hidden controls – parameter allows to block the sending of controls from masks, which are at
least partially hidden under another window;
Default value: by default, the controls from all masks open at the given moment are sent.
Controls validity time - parameter allowing to define a period, measured in seconds since the
moment of the last control setting by the operator until the moment of deleting all active selections
by the system. “0” means that the controls validity time measurement option is disabled; by default,
this option is enabled.
Default value: 0 - once defined control setting is active until the mask is closed – unless it is earlier
removed by the operator.
©ASKOM, Gliwice
October 2007
103
The first application – step by step
Configuration of Masks parameters for Sulfuric Acid Factory application:
Parameters defined for 'Acid Factory'
Declare the graphical symbols file to be used in WKS KWAS.DAT application, if it is still undeclared.
Masks > Files and Directories tab > Graphical symbols file option: MSK\KWAS.dat
(KWAS.DAT file is located in the default directory of DEMO application:
C:\Asix\Applications\Acid_Factory\MSK)
Path to the graphical symbols files should be declared during creation of application masks, therefore
in case of Sulfuric Acid Factory application it was declared during creation of AC_MENU.msk mask.
Indicate directories, where the definitions of technological masks should be stored:
MSK
MSK\STAC
Enter one directory per line.
If option Add basic set of fonts in Computers and fields tab was checked during the creation with use of
wizard, the fonts were automatically added. If otherwise is true, enter the font definitions used by the
Sulfuric Acid Factory application:
PLMAX=Times New Roman,-64,EastEurope
DIALOG2=Asix OEM_DIAL,-12,EastEurope
PLDUZY=Asix RMN7_25,-25,EastEurope
CYF19=Asix RMN7C_19,-19,EastEurope
CYF14=Asix RMN9_14,-13,EastEurope
CYF30=Asix SSF7_30,-31,EastEurope
SEGM24=Asix TTL17_24,-31,EastEurope
BOX41=Asix TTL01_41,-41,EastEurope
NBA46=Asix TTL14_46,-47,EastEurope
NBA48=Asix TTL8_48,-48,EastEurope
CONTEN=Asix TTL06_26,-27,EastEurope
TYCI=MS Serif,-9,EastEurope
SMALL2=Asix OEM_SMAL,-12,EastEurope
PLSREDNI=Asix Rmn7_19,-19,EastEurope
syst95=Asix Oem_syst,-15,EastEurope
rom895=Asix Rom_8x8,-8,EastEurope
rom1695=Asix Rom_8x16,-16,EastEurope
rom1495=Asix Rom_8x14,-15,EastEurope
DIAL95=Asix Oem_dial,-11,EastEurope
MALY=Times New Roman,-12,EastEurope
PLMALY=Times New Roman,-19,Bold,EastEurope
Opis_8_g=MS Sans Serif,-11,Bold,EastEurope
Opis_8=MS Sans Serif,-11,EastEurope
CIEN68=Asix Rmn7_25,-25,Bold,EastEurope
d2=Asix Ssf7_30,-31,Bold,EastEurope
d3=Asix Ssm1_30,-31,Bold,EastEurope
d4=Asix Ssm1_30,-31,Bold,EastEurope
d5=Asix Ssf8_30,-31,Bold,EastEurope
104
October 2007
©ASKOM, Gliwice
The first application – step by step
CYF16=Asix Cyf16,-16,EastEurope
d7=SansSerif,-96,Symbol
d8=SansSerif,-29,Bold,Symbol
D9=Century Gothic,-32,Bold,ANSI
D11=\Verdana,-96,Bold,ANSI
d1=Century Gothic,-35,Bold,EastEurope
D10=Century Gothic,-29,Bold,ANSI
c20=Century Gothic,-27,Bold,EastEurope
c72=Century Gothic,-96,Bold,EastEurope
c36=Century Gothic,-48,Bold,EastEurope
c48=Century Gothic,-64,Bold,EastEurope
c22=Century Gothic,-29,Bold,EastEurope
c14=Century Gothic,-19,Bold,EastEurope
c24=Century Gothic,-32,Bold,EastEurope
c28=Century Gothic,-37,Bold,EastEurope
C16=Century Gothic,-21,Bold,ANSI
c26=Century Gothic,-35,Bold,EastEurope
c12=Century Gothic,-16,Bold,EastEurope
C18=Century Gothic,-24,Bold,EastEurope
NowaCzcionka001=Lucida Console,-24,Bold,EastEurope
alarm=Times New Roman,-16,Bold,EastEurope
PLMAMT=Times New Roman,-12,EastEurope
TESTOWY1=Lucida Console,-11,EastEurope
TESTOWY2=Lucida Console,-19,EastEurope
TESTOWY3=Lucida Console,-11,OEM
TESTOWY4=Lucida Console,-19,OEM
CY14M=Arial CE,-16,Bold,EastEurope
CY16M=Arial CE,-19,Bold,EastEurope
TYCM=Times New Roman,-11,EastEurope
SMALLM=MS Sans Serif,-11,EastEurope
PLDUZM=Times New Roman,-37,EastEurope
CY19M=Arial,-21,Bold,EastEurope
PLSREDMT=Times New Roman,-21,EastEurope
IBM24=Asix Ttl17_24,-32,EastEurope
IBM20=Asix Ttl17_24,-27,EastEurope
Arial20=Arial,-32,Bold,EastEurope
The required Menus were created in stage of application masks creation; however, if any other menu is
necessary, create the menu definition for the menu bar of the main application mask:
Masks > Menu tab.
The manner of menu definition for the Sulfuric Acid Factory application was explained during
creation of AC_MENU.msk mask (see: 4.5.2. AC_MENU.MSK mask – application menu)
Set the blinking period for mask objects to 300 milliseconds:
Masks > Misc tab > Blinking period option
Parameters defined for 'Station SO1'
none
©ASKOM, Gliwice
October 2007
105
The first application – step by step
4.6.3. Current Data
The Current data
parameter group includes the settings of Asmen module settings, including the
detailed parameterization of transmission channels – physically executed connections between asix system
machine and object controllers and the parameterization of communication drivers.
In asix system all operations related with access to process variables are executed by Asmen module. It
supervises the process of cyclical process variable value updating in the database and intermediates all
operations related with sending controls to the object. The direct data exchange between the machine and
object driver is executed by means of drivers operating under control of Asmen.
Basing on the performed parameterization, a repository of current process variable values is create (stored
by Asmen module in the machine’s operating memory). All asix system components can access this
repository. The values of stored process variables are updated on current basis through cyclical object
reading.
Detailed description of Asmen module functionality can be found in “Asix –user manual” in
chapter ASMEN communication module.
Parameters related to current data located on Standard tab include:
−
−
106
Simulation – If option Checking this option will cause that current data module Asmen will not be
loaded is checked, Asmen works in data simulation mode.
Default value: by default, this option is disabled.
Overloads – this parameter allows to register the overload status during process variable refreshing
in the operator panel;
Default value: by default, this option is enabled;
October 2007
©ASKOM, Gliwice
The first application – step by step
The above mentioned overloads pertain to variables – in case when the declared variable refreshing
time exceeds the ability of the transmission channel. (Refreshing frequency is declared in the
variable definition.)
−
Data / Names of files with process variables declarations
The field is available only, when the process variable definitions are loaded from text files,
which was earlier declared in:
Databases module > Type tab > Variable definitions base type: Variable definitions base in an old
format – text files
Tabs Advances and Advanced 2 appear only if the following command was selected:
Fields and computers > Show advanced options
Advanced tab allows to parameterize the following items:
−
−
−
−
−
−
−
−
−
OPC status – declaration of using statuses in OPC-compliant mode; this option must be enabled to
ensure the proper operation of scripting module.
Default value: option enabled
Priority – declaration of Asmen threads priority:
− 0 - THREAD_PRIORITY_NORMAL,
− 1 - THREAD_PRIORITY_ABOVE_NORMAL,
− 2 - THREAD_PRIORITY_HIGHEST.
Default value: 0
Number of attempts of access to a variable – declaration of the number of remote access attempts to
the server variable; after this number of attempts, it is assumed that the variable was not declared on
the given server;
Default value: 1
Number of users – allows to define maximal number of users utilizing Asmen API. This item is used
in multi-port applications with MUZ driver;
Default value: 128
Initial refresh – if the option is declared, the current values of all process variables are read in stege
of Asmen installation;
Default value: option enabled
Time synchronization – item allowing to synchronize the time between asix and S7 (SAPIS7
protocol) and asix and SAIA (S-BUS protocol).
Parameters:
− channel name
- name of Asmen channel utilizing SAPIS7 or S-BUS protocol;
− variable_name
- name of variable belonging to the defined channel (protocoldependent table), which is used for time synchronization;
Default value: no synchronization
Delay of server data – item used in the terminal; defines the time, after which the variable error
status is set; time is calculated as variable refresh time (given in the variable definition) multiplied by
this item’s value; the item is applied to all variables at one time; unit: second.
Default value: 1 second
Refresh period – declaration of the default process variable refresh cycle (in seconds), for variables,
which do not have the appropriate refresh cycle value declared in their declaration;
Default value: 1 second
Table path – declaration of directory name, where the tables used by the TABLE conversion
functions are located;
Default value: no declared path
©ASKOM, Gliwice
October 2007
107
The first application – step by step
Diagnostics tab appears only if the following command was selected:
Fields and computers > Show advanced options
Diagnostics tab includes:
−
Variable description – defines the use of Description field in Asmen process variables declaration;
Use of this option is viable only if the process variables declarations are loaded from text files
−.
−
−
−
Default value: option is enabled
Channel statistics – statement of the number of refreshed and overloaded variables in individual
physical channels; the statement is fed to control panel every second;
Default value: option is enabled
Overload statistics – statement of the number of overloaded variables in physical channels; the
statement is fed to control panel, when an overload occurs;
Default value: option is disabled
Asynchronous control – declaration of use of the asynchronous mode during execution of controls in
the fast transmission channels;
Default value: asynchronous mode is not used
Adding Definitions of Communication channels
Definitions of communication channels are added with use of Add channel command, available after rightclicking on Current data item. ‘Add channel’ window will appear, where the channel name and
communication driver name should be defined.
108
October 2007
©ASKOM, Gliwice
The first application – step by step
Select the driver name from the list of drivers available in asix package. To display the list, press Choose
button in 'Add channel' window.
Having selected the specific driver, an item with the selected driver name will appear in Current data
parameter group. Click this item to open driver parameterization tabs in the parameter window. The tabs
are described below.
Standard and Advanced tabs include standard parameters for channel declaration:
−
−
−
−
−
Channel/Name – defines the channel name;
Channel/Driver – defines the driver name;
Driver used in channel:
− Use driver from channel definition;
− Temporarily use NONE driver – option applied in case of lack of physical connection to the
controller; NONE driver can be used for application testing purposes;
− Temporarily use NETWORK driver – NETWORK driver is a specific type of driver; it does
not establish a physical connection with controller, but only with another machine, which has
such a connection; when connected, network channel driver requests all servers, given the
channel logical name; only the servers with appropriate channel declared respond to such
request; if more than one server responds, the least loaded server is used for connection
establishing; if the server is turned off during operation, the network channel driver will switch
to another server;
Remote read access – if this option is turned on, it will grant the authorization for remote reading of
process variables in the declared logical channel only for the specified machines; other machines will
not be able to read variables from this logical channel;
Default value: by default, the remote reading is not limited;
Remote write access - if this option is turned on, it will grant the authorization for remote
controlling in the declared logical channel only for the specified machines; other machines will not
be able to perform controls in this logical channel;
Default value: none machine is allowed to perform remote controls
Advanced tab appears, when command Fields and computers > Show advanced options in Architect
module window menu is selected.
Advanced tab allows for parameterization of the following items:
−
−
−
−
Alarm in channel – declaration of alarm call in case of lack of transmission in logical channel;
optionally, it is possible to give the alarm number in case, when transmission is switched to a
redundant channel (if only any redundant channel was declared for the logical channel);
Default value: no declaration of basic and redundant channel
Local write denied – blocking of local controls in logical channel;
Default value: no blocking of local controls
Data validity period - period (in seconds), when the process variable values remain valid in the
logical channel, regardless of the declared refresh frequency; process variable values validity is
determined on the basis of refresh cycle;
Default value: 0
Redundancy – declaration of redundant channel for the logical channel. Optionally, the scope of
search may be limited by means of declaration of the list of machine. Enter the redundant channel
name in this field, type comma and follow it names of machine, which the search scope should be
limited to.
Default value: by default, the redundant channel is searched on all network machines
Tab with the declared driver name includes parameters appropriate for configuration of the communication
channel for the given driver.
©ASKOM, Gliwice
October 2007
109
The first application – step by step
Full description of drivers utilized by asix system can be found in ‘Asix – user manual’ in chapter
ASMEN communication manager, Communication drivers manual or “ASMEN – communication
drivers and protocols” manual.
Configuration of Asmen module operation parameters for Sulfuric Acid Factory
application:
Parameters defined for 'Station SO1'
Declare the use of statuses in OPC compliant mode:
Current data > Advanced tab > OPC Status option, Use the status in mode compatible with that of
OPC
Do not allow for registering the overload status during process variable refreshing in the operator panel:
Current data > Standard tab > Overload option – clear checking of the option Register an overload
status of process variable refreshing in the operator panel.
Declare that asix should be started with active Asmen module:
Current data > Standard tab > Simulation option – clear checking of the option.
Determine the number of attempts of remote access to a server variable: 15
Current data > Advanced tab > Number of attempts of access to a variable option.
Declare the directory, where the dynamic measurement tables definitions are kept:
Current data > Advanced2 tab > Table path.
Tabele (this is equivalent to path C:\Asix\Applications\Acid_Factory\Tables as this is a path relative
to the directory with our application configuration file)
Method of designing the measurement table masks, utilizing the indicated definitions is discussed in
part 4.5.18. Measurement tables.
Add two channels:
NONE with the following parameters:
Name: NONE
Driver: NONE
Driver used in channel: Use driver from channel definition
SAPIS7 with the following parameters:
Name: SINEC_KW
Driver: SAPIS7
Driver used in channel: Temporarily use NONE driver
SAPIS7 driver parameters – Channel parameters:
Application name: VFD1
Connection name: S7_connection_name1
Control variable: S7_CONN_1
Alarm number: 1
Error signal – Setting an error status for all variables in given channel in case of the PLC
switching over into the STOP state
110
October 2007
©ASKOM, Gliwice
The first application – step by step
4.6.4. Network Server Related Current Data Parameters
Configuration of parameters from group
Current data – network server is related to setting the
parameters configuring the method of data exchange in the local computer network.
Local computer network may be used for creation of such asix configuration, where only a part of
machines (data servers) have direct connections with controllers. The remaining computers (workstations)
use the information provided by the data servers by means of local network.
Asix system transmission channels used for data acquisition through local network are dubbed ‘network
channels’.
Data exchange in the local computer network between asix stations is executed by NETSERV module.
This module is loaded automatically during asix start-up.
Standard tab covers the configuration of the following options:
−
−
−
Redundant channels – determines the server channel type, which will be accepted by the given
remote computer as redundant channel, available types are:
− ONLY PHYSICAL
- only physical channel,
− ONLY NETWORK - only network channel,
− ALL
- any type of channel;
Default value: ONLY PHYSICAL
Find server period – allows to determine the intervals (in seconds) between server search operations;
Default value: 1 second
Gateway mode – declares the workstation operation in GATEWAY mode.
In configurations, where asix workstation is a gateway between two local computer networks, the
workstation network channels are considered as equal to physical channels in scope of data provision
in local network. Corporate network terminals may join the gateway network channels.
©ASKOM, Gliwice
October 2007
111
The first application – step by step
Default value: GATEWAY mode is not declared
−
Timeout – declares the server response waiting time (in seconds);
Default value: 10 seconds
Advanced/Advanced2 tab appear, when command Fields and computers > Show advanced options
from Architect module window menu is selected.
Advanced tabs:
−
−
−
−
−
−
−
UTC time – requests, that variable values should be marked with UTC time.
Default value: option disabled
Physical links test – declares, whether the server station will automatically disconnect remote
stations in case of communication errors detected in physical communication channels of serwver
station;
Default value: option enabled
Channels excluded from gateway – the list of network channels separated with commas, where the
local network clients WILL NOT be able to connect to;
Profile delay – declaration of the waiting time for server profile datagrams; the period is expressed
as number of cycles, where each cycle is 55 ms.
Default value: 18 (one second)
Refresh limit – determines the time interval (in seconds) for sending the process variables values
belonging to channel defined in Channel field from the data server to the workstation. It is
recommended to use this option for communication on slow links.
Default value: process variable values are sent with interval compliant to the process variable
declaration on the data server.
Priority – declaration of NETSRV threads priority:
−
0 - THREAD_PRIORITY_NORMAL,
− 1 - THREAD_PRIORITY_ABOVE_NORMAL,
− 2 - THREAD_PRIORITY_HIGHEST.
Default value: 0
Connection thread – declaration of separate thread for network connections;
Default value: option enabled
Diagnostics tab:
Diagnostics tab appears, when command Fields and computers > Show advanced options from
Architect module window menu is selected.
−
Log file – declaration of log file name with NETSERV diagnostic messages;
- Name – Default value: log file is not created
- Maximal size – default value: 1 MB; when the declared size is exceeded, the previous contents of
the file are deleted
Detailed information on data exchange through the local network can be found in "Asix – user
manual” in chapter ASMEN communication manager, Data exchange through local computer
network.
−
Log of telegrams from Aslink – declaration of saving messages received from Aslink to log file
declared in the above mentioned Log file option;
Default value: option is disabled
It is not necessary to change any default settings of the parameters discussed above for the Sulfuric Acid
Factory application.
112
October 2007
©ASKOM, Gliwice
The first application – step by step
4.6.5. Archival Data
The parameter group
Historical data contains the settings of Aspad module operation, including the
logging parameters and parameters for further restoration of temporal trend of the variables.
Aspad module enables archiving of variables of any type allowed in Asmen module, on condition that these
are scalar variables. These can be both the process variables, and variables being the result of calculation or
simulation. In the current version, it is impossible to archive tables. Except for value and time, the OPCcompliant value status is also saved. Data are gathered in files of special structure (D, M, Y archive – the
division into daily, monthly and annual files) or in databases (archive B).
Detailed description of the functional ability of Aspad module can be found in “Asix – user
manual” in chapter “ASPAD Data Archiving Program.
Standard allows to determine the following basic archiving parameters:
−
−
Simulation – check this option to skip Aspad loading;
Default value: Aspad is loaded
Find server repeat period – determines, after what time the system should reattempt to seek server
for Aspad resources, if the previous attempts failed;
Default value: 60 seconds.
If a too short period is determined, the network will by overloaded by the operation of seeking
for non-existent server. Too big value will result that after the server is toggled on, it will remain
unnoticed for long time.
−
Conditions – allows to define the files containing the conditions to be used for conditional archiving.
©ASKOM, Gliwice
October 2007
113
The first application – step by step
Detailed description of conditional archiving is contained in “Asix – user manual” in
chapter 7.7.1. Declaration of archiving conditions.
Server profile tab includes the following parameters:
Server profile tab appear after selecting command Fields and computers / Show advanced options
from Architect module window menu.
−
Time for server profile – determines, how long the system should wait for server response after the
initiation of search:
− Minimal time – defines how long the system should wait, regardless of the fact how many
servers had already responded.
− Maximal time – determines the time, after which – when no server response is received – it
should be assumed, that the server for the given resource was not installed in the network.
− Repeat cycle – optional parameter for cycle, where the server search should be repeated if no
response for previous queries was received.
Default value: respectively, 2 s, 10 s, 1 s
Diagnostics tab defines:
−
−
−
Log file name – file, where ASPAD will record diagnostic information;
Default value: log file aspad.log is created by default.
Diagnostic settings – allows to determine, what type of diagnostic information will be recorded in
the log file:
− Network operations diagnostics,
− Time zones diagnostics,
− Aspad queries diagnostics,
− Updates diagnostics
− Historical data merging diagnostics;
Default value: Historical data merging diagnostics
Input trace – option causes that for the given variable, the messages on values received by ASPAD
from data source are fed to the log file (assigned in Log file name declaration);
Default value: no declared items
Historical data tab includes:
−
Time of first merging – this option determines, after what time since the start of the current
archiving, the first gap filling should be commenced;
Default value: 10 seconds
The data merging process requires an information on the length of gap in the archive resulting
from the last archiving shutdown; to gather this information, it is necessary to find the first point
after the gap; time determined in this item should allow to obtain the first datum for each variable.
−
Merging frequency – determines when the cyclical archive gap filling should be activated:
− Cycle length and Cycle phase – these are parameters determining the frequency of archive gap
filling attempts – e.g. 5m, 30s means that 30 seconds after each full 5 minutes, the archive gap
filling will be attempted;
Default value: for cycle length of 1 hour and for cycle phase of 5 minutes, the archive filling
will take place 5 minutes after each full hour; cycle length is measured according to UTC time.
−
114
Gap filling horizon – an additional, optional parameter allowing to determine, how far the
historical data filling attempt should reach backwards; the horizon does not depend on the fact,
whether the filling attempt was already performed; the option is required for data sources,
October 2007
©ASKOM, Gliwice
The first application – step by step
where historical data may emerge with some delay; if no such parameter is given - the lack of
historical data in the data source causes that the restoration attempts are given up.
Default value: none
Archive declaration
In case of archiving the variable values, it is necessary to declare the archive.
Archive is declared with use of Add archive… after right-clicking on Archival data item. ‘Addition of a
new archive’ window will be displayed, allowing to define the archive name.
The basic archive type is STANDARD. The archive is saved in binary files on the disk.
The second archive type is AS BDE and MS SQL. This is an archive saved in database of – respectively Paradox and SQL type.
Aspad collects data in files containing the records from one day, month or year period, respectively, to
archive types:
Archive of D type (day)
Archive of M type (month)
Archive of Y type (year)
Archive of H type (horizon)
Archive of B type (database)
Archive of P type (pattern)
- data gathered in daily files;
- data gathered in monthly files;
- data gathered in annual files;
- data gathered in one file;
- data gathered in typical databases;
- pattern data;
It is also possible to divde the archives according to the data provisioning method:
Writable archive
Read-only archive
Network archive
Slave archive
- basic archive allowing to write and read data from archival files;
- archive only allows to read data from archival files;
- archive allows to read data from another computer through the
network;
- archive allowing to write and read data, used as redundant copy
of a basic archive on another machine.
Slave archive is a writable archive located on the slave server of the given resource. Slave archive should
be a redundant copy of a master archive on basic server. The difference between the slave archive and
master archive consists in preferences for the master archive during connection of network clients. Client
will connect to the slave archive only if no master archive can be found in the network.
Slave archive is use to provide a temporary redundant copy for the time of master server maintenance or
failure. It is possible e.g. to declare the master archive with 100-day horizon and the slave archive with 10day horizon. This will allow to fill the master archive for the downtime of max. 10 days, while during the
presence of the master server, the clients will connect to it, thus allowing the use of 100-day horizon data.
To configure archive with use of Architect module, in the application parameter tree highlight the Archival
data item and right-click - and then select Add archive command.
Click in the created archive to display the tabs for archive configuration in the parameter configuration
window.
©ASKOM, Gliwice
October 2007
115
The first application – step by step
Standard tab includes the following parameters:
−
Archive:
− Name – logical name of the archive (resource);
Default value: Archive1
− Archive type due to data provisioning method:
(local archive):
‘Write archive’
‘Read archive’
‘Slave archive’
or
‘Network archive’
Default value: ‘Write archive’
−
Kinds of archive:
‘STANDARD’
‘MS SQL’
‘AS BDE’
Default value: ‘STANDARD’
−
UTC time – declaration determines the resource archiving according to UTC time;
Management tab allows to determine the following parameters:
116
October 2007
©ASKOM, Gliwice
The first application – step by step
−
−
No merging – toggle this option on to prevent from data merging for the given archive (resource);
Default value: option enabled
Merging limitations – allows to limit the list of stations, from which Aspad will merge data; on
condition that option No merging is disabled:
− Merge data with following stations – list of station names, which can be accessed for data for
the resource during local archive merging; skip this option to accept any server with the given
resource.
- Merge data with all stations except of the following – list of station names, which cannot be
accessed for the data for resource during local archive merging.
Default value: data are merged from any server possessing the given resource
Backup tab pertains to options:
−
Backup – parameterizes the backup creation method:
Default value: backup is not created
− Archive – determines the name of archive, where the backup should be executed; it is the
name of archive defined as slave archive;
Default value: none
− Cycle length – determines, how often the backup execution should be initiated;
Default value: 1 day
− Cycle phase – determines delay between full cycle and backup initiation;
Default value: 1 hour and 30 minutes
− Type and number of copied files – allows to determine what types of files should be backed
up and how many last files of the given type should be backed up:
− Daily archive files (D),
− Monthly archive files (M),
− Annual archive files (Y),
− Archive with horizon files
Default value: no type declaration
Advanced tab defines:
− Synchronization – method of synchronization of B-type archive with data collected in MS SQL
base.
Method of writing:
SYNCHRONIZATION = source_name, target_name, [I] [cycle], phase
or
SYNCHRO = source_name, target_name, [I] [cycle], phase
where:
source_name
- name of resource defined in ARCHIVE declaration, determining
archive, from which the data should be copied;
target_name
- name of resource defined in ARCHIVE declaration, determining
archive, where the data should be copied to;
cycle
- determines, how often the data adding should be initiated; adding letter
I in the beginning causes that the first synchronization will be performed
always during system start-up; I without cycle time causes that
synchronization is performed only at system start-up; if value 0 is given
as cycle parameter, synchronization is not performed cyclically, and this
declaration
will
be
used
only
as
declaration
for
SYNCHRONIZE_ARCHIVE operator action; default value of cycle
parameter is: 24 hours, unless I is given (then no cyclical operation is
executed);
phase
- defines delay between the full cycle and the initiation of data copying;
default value is 0.
Default value: no declared synchronization
©ASKOM, Gliwice
October 2007
117
The first application – step by step
Configuration of Aspad module operation parameters for Sulfuric Acid Factory
application:
Parameters defined for 'Station SO1'
Make sure that Simulation option is not checked:
Historical data > Standard tab
Add a writable archive of the following parameters:
Name: ACID,
Type: STANDARD,
Archive directory: C:\Asix\Applications\Acid_Factory\aspad,
Archival files storage period:
For D type:
min: 100, max: 200
For M type:
min: 499, max: 500
For Y type:
min: 1099, max: 1100
Historical data > Add archive command
Parameterize Aspad module, so as it will not attempt to establish any network connections:
Historical data – ACID > Management tab > No merging option
118
October 2007
©ASKOM, Gliwice
The first application – step by step
4.6.6. Alarm System
Asix system has an embedded, flexible alarm handling system, allowing for full satisfaction of the needs
related to the comprehensive handling of emergency situations and events in the technological process.
Description of the alarm system can be found in "Asix – user manual” in Alarm system chapter.
In general, the alarm system can be divided into two parts:
− system core, responsible for alarm detection, saving and definitions;
− visualization part, including two types of alarm masks (active and historical alarms).
System core configuration consists in appropriate definition of parameters in the application’s XML
configuration file and creation of text files with additional information.
Additional parameters are determined in text files. These are:
− alarm definitions files,
− group definitions files,
− limit definitions files.
Instead of above mentioned text files, alarm definitions and group definitions can be prepared in Excel
spreadsheet and on this basis, the alarm definitions base can be generated.
Current status and alarm history are stored in disk files. Alarm files are stored in “alarms” subdirectory of
the start directory (if no other solution is declared). File alarms.act stores all active alarms. Alarms history
is stored in set of files with names based on pattern: al??????.log. Each file stores the alarms for one day.
Date of the day is coded as characters ??????, and give, in sequence, day, month and year. Alarms history
files can be kept indefinitely. It is possible to limit the alarms storing period.
Most parameters related to configuration alarms is configured by Architect module in application parameter
Alarm system.
group Æ
©ASKOM, Gliwice
October 2007
119
The first application – step by step
Alarms tab enables the configuration of the following parameters:
−
−
Locking the alarms system initiation – item allowing to lock the alarms system initiation;
Default value: alarms system is active
Work mode of alarms system – determines the alarms system work mode:
− Operator mode – is the basic work mode of the alarms system, where all active alarms
handling mechanisms (detection, acknowledgement, etc.) are enabled and the operation of
network-connected stations is possible.
Operator stations collaborate only, when they have same alarms set name give. Alarms set is
identified by 8-character name.
It is important that the system designer shall guarantee the compliance of all elements
comprising the set. In case of alarms and alarms group definition files, the compliance of file
names is sufficient (program automatically transfers the file contents, if any incompliance is
found; the file writing time is checked). The alarms detection strategy parameters must be
unconditionally compliant. This is due to the fact that only one machine within working
operator stations group actively detects alarms and transfers it to other machines. As it is not
determined, which station is active, all stations must be able to undertake the detection of all
alarms.
−
−
−
Historical viewer mode – allows only for passive browsing of alarms collected from operator
stations.
Local mode – is functionally identical to the operator mode except of lack of network services.
Historical server mode – from the operator’s point of view, it is identical to historical viewer
mode. Additionally, an automatic updating of alarms archive from all detected operator
stations is performed. The collected archives may be provided for other machines operating in
historical viewer mode.
Default value: ‘Operator mode’, if the Network name of alarms set is declared; in other case, the
default value is ‘Local mode’ operation.
−
Network name of alarms set – definition of the network name of alarms set supported by AS
program. Name can have max. 8 characters. The set of available characters is the same as for file
names. Network name is important for stations working in operator mode. Stations of the same name
conduct a common, integrated alarm handling. Network name is also used on passive stations for
identification of the alarm origination source.
Default value: no network name. Program can only work in (passive) historical viewer mode or local
mode.
Files tab:
Ability to declare files, which can be accessed for alarms definitions and alarm groups
definitions is possible only, when Database module contains the declaration of database work
mode with files:
Databases module > Alarmbase > Work mode of alarms definitions base: Text files with alarms
definitions are edited only by the developer
−
−
120
Names of files, where alarms are defined – the parameter allows to declare names of file, where
alarms were defined; the names should be separated with commas;
Default value: alarms definitions will be read from ‘alarm.def’ file from the current application
directory
Names of files, where alarm groups are defined – the parameter allows to declare the names of
files, where alarm groups were defined; the names should be separated with commas;
Default value: none
October 2007
©ASKOM, Gliwice
The first application – step by step
Archive tab pertains to the following parameters:
−
−
Alarms archive directory – item used to determine directory, where the alarm log files will be saved;
Default value: by default, the files are created in subdirectory ‘Alarms’ in the application’s start
directory;
Limitation of alarm files storage – item determines, for how many days the alarm files will be kept;
Default value: by default, the files are kept for indefinite period;
Indefinite storage of files will result in filling of the disk, i.e. the need of periodical deletion of
old files. Additionally, big number of alarm files can slow down the alarm browsing function
operation (especially with use of selection criteria).
−
Alarms archive backup directory – this item, when checked, toggles on the historical alarm log
backup mechanism; AS program keeps the copies of log files in the give directory; updating is
performed every hour; backup directory should (optimally) be located on other physical disk than the
working log directory; it is also possible to use the portable disk drives;
Default value: by default, backup is not performed.
Historical log files stored in backup directory are not subject to the limitation imposed by item
Limitation of alarm files storage.
These files are kept for an indefinite period.
Archive 2 tab appears, when command Field and computers > Show advanced options from Architect
program window menu is selected.
Archive 2 tab allows to determine the following parameters:
−
Store alarms to disk files – item allows to block saving of alarms to disk files;
Default value: by default, alarms are stored in the disk files;
Lack of alarms stored to disk files option causes, that only the alarms kept in the computer's
operating memory are available (by standard, 1000 items). Furthermore, the alarm history is lost
when the machine is restarted.
−
−
Number of alarm events of the historical log stored in memory – the item defines the number of
alarm events of the historical log, which are stored in memory; usage of this item may improve the
access times for historical alarms; if operation without disk file log is selected, this item determines
the total number of kept alarms;
Default value: by default, the number of alarms kept in memory is 1000.
Accuracy of time measure in alarm archive – setting the accuracy of time recording in alarm
archives; alarm times can be kept with resolution of miliseconds or with system clock resolution (ca.
55 ms); usage of milisecond resolution additionally changes the time display format on the alarm
masks; the use of this item is important, if non-standard alarm recognition strategies are applied,
which mark the alarms with times of milisecond accuracy;
Default value: standard strategies operate with accuracy of 55 ms.
Changing the Accuracy of time measure in alarm archive requires the deletion of the old
archive (for all connected stations at the same time).
©ASKOM, Gliwice
October 2007
121
The first application – step by step
Except for alarms definition, it is also necessary to determine the alarm detection method. Strategies tab
allows to declare one of the five alarm detection strategies available in asix system:
−
−
−
Bitmap strategy – consists in checking the status of bits in alarm bitmap created by the process
controller software, this requires to declare Asmen data used for reading the alarm bitmap contents;
number of alarms in the bitmap is derived from Asmen data size; if fewer bits are used, their number
can be limited by means of third parameter Alarm count; the period of bitmap status check results
from refresh time given in Asmen data definition;
Default value: by default, the strategy is not used
Limit strategy – the item causes, that the alarm recognition strategy based on limit excess sampling
is installed; sampling period determines the cycle of limit sampling in seconds (default is 1 second);
file list gives the names of files (separated with commas), where the limit descriptions were located;
lack of list means that limits.def file from the current application directory will be used;
Default value: by default, the strategy is not used
Buffer strategy – enables the parameterization of buffer strategy in AS program by declaration of
one or several items of the following syntax:
<buffer_variable>,<synchronizing_variable>,<alarms_variable>,<alarm_number>,
where:
<buffer_variable>
−
- name of Asmen variable used for alarm information exchange; its
size must be equal to controller buffer size;
<synchronizing_variable> - name of Asmen variable used for synchronization of buffer access;
<alarms_variable>
- name of Asmen variable used by PC to issue the alarm bitmap read
request;
<alarm_number>
- determines the alarm number within asix system, assigned to the first
alarm detected by the declared strategy.
Default value: by default, the strategy is not used
Active strategy (SINEC L2) – to use this strategy, it is required to apply a transmission protocol
allowing for initiating transmission from the controller side and the special controller program
sending the data according to the protocol adopted in the active strategy; the strategy requires the
declaration of one or more items of the following syntax:
buffer,synchro,alarm_number,id
where:
buffer
synchro
alarm_number
id
- name of variable used for data exchange,
- name of synchronizing variable,
- number of the first alarm handled by this strategy element,
- identifier (of SINECL2 network, currently 1(SSNR =0) or 2 (SSNR
=8)).
Default value: by default, the strategy is not used
To use this strategy, it is required to apply a transmission protocol allowing for initiating
transmission from the controller side and the special controller program sending the data according
to the protocol adopted in the active strategy.
−
OPC alarms server strategy – allows to declare the alarm recognition strategy, according to which
the driver is located in external dll file; to declare the OPC alarm driver, the line of the following
syntax must be used:
ALOPC.dll, , <server>, <file_al_opc>
where:
<server>
<file_al_opc>
122
- is the name of OPC alarm server;
- is the name of file with OPC conditions translation into asix system
alarm.
October 2007
©ASKOM, Gliwice
The first application – step by step
The tab group Look is used to define the alarm displaying method:
−
−
−
−
−
−
Background color – determines:
− Alarm table background,
− Alternative alarm table background,
− Separating lines;
Alarm text color – depending on the alarm type, allows to define text color and background color
for:
− System alarm,
− Message,
− Warning,
− Alarm,
− Important alarm.
Alarm date color – depending on the alarm status, allows to define the date text color and date
background color for:
− Beginning of alarm,
− Beginning of acknowledged alarm,
− End of alarm,
− End of acknowledged alarm.
Selected alarms – allows to declare the background color for selected alarms;
Red Mode masks – defines the text color and background color for ‘Red Mode' masks;
Options – allows to define additionally:
− Use of 4-digit format of year number in dates on alarm masks and printouts;
− Sort alarms on the list of current and historical alarms;
Signalling tab is used to parameterize the sound signaling of alarms:
−
Sound signalling of alarm detection – allows to determine the method of sound signaling for alarm
detection:
− ‘ENABLED’ – means that alarms are always signaled;
− ‘DISABLED’ – means that alarm signaling is disabled;
− ‘MASTER’ – pertains to network installation; the given station generates sound signals only
if it is the active side in the network;
Default value: ‘ENABLED’
The installation of sound card is required.
−
−
−
−
−
Alarm signal – name of WAV file - declaration of WAV files, which should be played at detection
of alarm event of the given type;
Default value: by default, simple standard signals are generated;
Warning signal – name of WAV file - declaration of WAV files, which should be played at
detection of alarm event of the given type;
Default value: by default, simple standard signals are generated;
Important signal – name of WAV file – declaration of WAV files, which should be played at
detection of alarm event of the given type;
Default value: by default, simple standard signals are generated;
Long alarm – enabling the permanent playing of the signal after alarm detection. Signal will be
disabled only when action SILENCE_SIGNAL is executed;
Default value: option disabled
Action that shall be executed at the moment of alarm detection
Default value: none
It is impossible to differentiate action types for different alarm numbers.
©ASKOM, Gliwice
October 2007
123
The first application – step by step
Security tab enables:
−
to declare password level, which needs to be give to allow specific operations:
− authorization level required to perform the operation of change of filtered alarms,
− authorization level required to perform the operation of change of alarms signaled with
sound,
− authorization level required to perform the operation of change of excluded alarms.
Default value: no control
The method of declaration of the login mode is discussed in chapter 4.6.8.Application security.
−
Additionally, if option Lock of alarms handling by the operator is used, the operations of change of
filters, exclusions and acknowledgement are blocked. It will be only possible to browse alarms;
Default value: handling is not blocked
Maps tab allows to declare:
−
buzzers map; it is a declaration of bitmap areas used for parameterization of sound signaling
executed by the controller, according to the following syntax:
data_name, number_of_the_first[,alarm count]
where:
data_name
- gives the symbolic name of Asmen process variable, where the
controller stores bit information on alarm signals (value 1 for the given
alarm means that it generates buzzer or ring, depending on the map type);
number_of_the_first
- it defines the number assigned to the first alarm in the map; number of
alarms in the map results from Asmen data size; if fewer bits are used,
their number can be limited with use of the third parameter;
Default value: by default, the signal maps are not handled;
−
exclude map; is the declaration of bitmap, which controls the exclusion of alarms executed by the
controller, according to the following syntax:
data_name, number_of_the_first[,alarm count]
where:
data_name
- gives the symbolic name of Asmen variable, where the controller stores
bit information on excluded alarms (value 1 for the given alarm means
that the alarm is excluded);
number_of_the_first
- it defines the number assigned to the first alarm in the map; number of
alarms in the map results from Asmen data size; if fewer bits are used,
their number can be limited with use of the third parameter;
Default value: by default, the exclusions are performed only internally in the machine.
Use of this item results in disabling of the internal exclusion and filter control mechanism.
Advanced tab includes the configuration of the following parameters:
−
−
124
Disable display of excluded alarms – application of the mode consisting in disabling display of
excluded alarms; however, such alarms are registered and saved to log - where all registered events
can be viewed after the exclusion is lifted;
Default value: excluded alarms are displayed
Filter method – selecting the alarm filtering method; it is possible to filter short alarms appearing for
time shorter than declared (method no. 1) or fast sequences alarm appearance- disappearance –
alarm appearance (method no. 2);
October 2007
©ASKOM, Gliwice
The first application – step by step
−
−
Default value: 1
Active station – additional parameterization for stations working in the network in operation mode;
in the group of interconnected operator stations, at each time there is only one machine, which
detects alarms; disabling this option will mean that the given computer will never become an active
station; it is applied in locations, where there exists no direct link to controllers or on supervisory
stations with required access to active alarms;
Default value: station may be active
Computers of historical alarms servers – open declaration of operator stations being the alarm
servers;
Default value: no declared stations
Parameter pertains to application configuration files for machines operating with control alarm
system; the longer is the search time, the bigger probability of finding the requested servers.
−
Computers of historical alarms servers operating as a gateway in the network – open declaration of
historical alarms server ; used for declaration of machines working in historical alarms server mode
as the gateway stations;
Default value: no declared station
Item pertains to application configuration file for machines working with control alarms system. The
longer is the search time, the bigger probability of finding the requested servers.
©ASKOM, Gliwice
October 2007
125
The first application – step by step
Configuration of alarm system on example of the Sulfuric Acid Factory
application includes the following settings:
ASSUMPTION: the alarms definition database for the Sulfuric Acid Factory application is generated out of
spreadsheet.
For method of preparation of spreadsheets with data necessary for generation of alarms definitions
base, see chapter 4.2.2. Alarms sheet.
Parameters defined for 'Acid Factory'
Activate the alarm system, set the alarm system operation mode to Operator and declare the network
name for alarm set: AL_KWAS.
Alarms system > Alarms tab > options:
Locking the alarms system initiation/Alarms system enabled
Work mode of alarms system/Operator
Network name of the alarms set: AL5_ACID.
Declare the alarms archive directory: Alarms; limit the alarm file storage period to 31 days.
Alarms system > Archive tab > options:
Alarms archive directory: Alarms
Limitation of alarm files storage/Alarm files storage period (in days): 31
Determine the alarm detection policy.
The Sulfuric Acid Factory application utilizes bit-based strategy, consisting in checking the bit statuses in
the alarm bitmap created by the process- managing controller software.
In Strategies tab, in Bitmap sub-tab enter the following data:
Data name
KW_AL1
KW_AL2
KW_AL3
KW_AL4
KW_AL5
KW_AL6
KW_AL7
KW_AL8
KW_AL9
KW_AL10
KW_AL11
KW_AL12
KW_AL13
KW_AL14
KW_AL15
KW_AL16
KW_AL17
KW_AL18
KW_AL19
KW_AL20
KW AL21
126
First alarm no
1
9
17
25
33
41
49
57
65
73
81
89
97
105
113
121
129
137
145
153
161
October 2007
©ASKOM, Gliwice
The first application – step by step
KW_AL22
KW_AL23
KW_AL24
KW_AL25
KW_AL26
KW_AL27
169
177
185
193
201
209
Move to Look tab and on the subsequent sub-tabs define the following parameters related to the alarm
display method:
Background color:
Alarm table background (65,65,65)
Alternative alarm table background (30,30,30)
Red Mode masks:
Red Mode masks background (224,0,0)
Selected alarms:
Selected alarms background (140,140,140)
Alarm text color:
Important (240,0,0)
Alarm (255,128,255)
Warning (44,130,240)
Alarm date color:
Beginning of alarm (240,0,0)
Beginning of acknowledged alarm (240,0,0)
End of alarm (250,250,0)
End of acknowledged alarm (0,250,0)
(Configuration of the look of printed alarms is performed in Printout parameter group > in tabs: Alarm
printing > subtabs: Headers and footers, Fonts, Options - if no customized formats are defined, the
printout is defined by default parameter setting.
Enable the sound signaling of an alarm; declare constant signal playback after alarm detection:
Alarms system > Signaling tab > options:
Sound signaling of alarm detection: Enabled
Long alarm: Enable permanent play of signal after alarm detection
In case of the Sulfuric Acid Factory application, neither the authorization control nor operator’s alarm
handling locking mechanism were used.
©ASKOM, Gliwice
October 2007
127
The first application – step by step
4.6.7. Network Module
Parameter group
Network module covers Aslink module operation settings.
ASLINK is a module allowing other asix system components for communication through the local
computer network. Aslink defines the set of network services, which are used by all other asix system
programs parameterized for network operation.
For its operation, Aslink utilizes the services provided by NETBIOS emulator, i.e. program implementing
one of the most common network interfaces in the transport layer. NETBIOS specification was developed
by IBM; ASLINK is based on NETBIOS specification in version 3.0 contained in IBM Local Area
Network Technical Reference (IBM Part Number SC30-3587-00). The basis for Aslink operation are
NETBIOS connection services for (in other words: session-based) data transfer.
The basic service provided for other asix package components, such as Asmen, Aspad or alarm handling
subsystem – is the reliable data transfer between each pair of utility processes operating on any stations
connected to the computer network and executing a common utility protocol. In this scope, Aslink module
services are directed for supporting the communication based on “server” process and “client” process,
utilizing its services.
In particular, Aslink provides:
− searching the network for processes fulfilling the server roles in relation to resources necessary for
client processes,
− establishing of the connection (i.e. transmission channel) between the client and the indicated
resource server,
− bidirectional, reliable data transfer in each channel,
− notifying the processes that the channel was closed as an effect of network failure or by an open
command of one of the partners.
128
October 2007
©ASKOM, Gliwice
The first application – step by step
Detailed description of Aslink module functionality is contained in “Asix – user manual” in
ASLINK – network module chapter.
Standard tab includes the parameterization of the following elements:
−
−
Network protocols – option defines the network protocols used for communication:
− Protocol – available values: ‘TCPIP’, ‘NETBEUI’, ‘IPX’
− All protocols − Selected protocols – allows to declare protocol names or adapter names separated with
commas; if the name is preceded with ‘-‘ character, it means that the given adapter cannot be
used;
Default value: ‘TCPIP’
Station name – system name of the machine; if the name is skipped, it will be generated on the basis
of computer name defined during network parameterization with dot added at the end;
Default value: name assigned automatically
The allowed values: text of max. 15 characters, Character size is important. The name cannot
include character “*” and should not contain character “ ,”
−
Logical adapters used by network module to search for servers – defines the logical adapters used
by the network module to search for servers;
Default value: all adapters used by the network module.
Items used on gateway machines.
Allowed values: adapter numbers separated with commas; if adapter number is preceded with
character '-', the adapter will not be used; if ‘*’is given, all available adapters will be used.
The Time synchronization – Client tab enable the parameterization of time synchronization from client
side:
−
−
−
−
Time synchronization limitation – item allows to declare lack of time synchronization or force the
synchronization with selected time servers:
− Synchronize time only with selected time servers,
− Do not synchronize time
Default value: time is synchronized with all available time servers
Synchronization conditions – allows to determine parameters:
− Difference between server time and time of local station, which, if exceeded, will cause the
synchronization of local time (CMOS); value in seconds;
Default value: 4 seconds
− Number of successive time packets, which station has to receive from single server to
synchronize its clock;
Default value: 3
− Number of time packets, that are omitted after each running of network module on each
adapter;
Default value: 2
Long time difference determines:
− difference (time in miliseconds) between time server time and local station time, which, if
exceeded, will result in special treatment of received time packets, consisting in delayed
synchronization of local station time;
Default value: 3600 miliseconds
− number of packets, which, if received, force the time synchronization;
Default value: 2
Time packets replication – toggling this option on causes that the all time packets received from the
given adapter will be sent to other adapters; additionally it is possible to determine the number of
allowed time packets.
©ASKOM, Gliwice
October 2007
129
The first application – step by step
Default value: time replication is toggled off
Time synchronization – Server tab enables parameterization of time on the side of server:
−
−
−
−
130
Time server – defines, whether the station will operate as time server (i.e. whether it will broadcast
the current time data in the network):
− The station never acts as time server,
− The station always acts as time server – even if the higher priority time server is active in the
network,
− The station acts as time server only if it has the highest priority;
Default value: the station acts as time server only if it has the highest priority
Time server settings – allowing to define:
− Server priority – defines the station priority as time server; the bigger the value, the higher the
priority (0 – 32,768). Priority value is given together with current time in synchronization
packets (BROADCAST). If a time server active at the given moment receives a packet with
higher priority, it ceases to be the active time server.
Default value: 0
− Time interval of broadcast of packets containing the current time – determines the time
interval (in seconds), with which the packets with current station time will be broadcastet to
the network.
Default value: 0
− Maximal time interval of broadcast of packets containing the current time – value in
seconds
Default value: 60 seconds
Condition for time server activation – station will become the time server, where the existing time
server will not provide the user-defined number of subsequent synchronization packets;
Default value: 5
Time packets replication – determines the number of allowed time packet replications; maximum
number of subsequent stations, which may be included in the time packet route. The parameter is
valid only on the station being the time server.
Default value: 2
October 2007
©ASKOM, Gliwice
The first application – step by step
Advanced, Advanced 2, Diagnostics, Diagnostics – AslView tab appears when command Fields and
computers > Show advanced options from Architect program window menu is selected.
Advanced tab allows to set the following options:
−
−
−
Making data available for Asix system modules (AsTrend, AsixConnect, AsBase) – defines the
manner of data provisioning: locally or through the network.
Default value: by default, asix system utilizes the selected network protocol (if only network card is
detected during application start-up); if network card is not detected during application start-up, the
internal protocol is used – data are provided locally;
Station names filtering – defining the text filter, which shall govern the remote station namesl
stations with names incompliant with the filter will not be visible; name can include characters ?
and * (only at the end); to give names of several stations, separate them with commas;
Default value: none (all stations are visible)
Group name – defines the name of group, where the station belongs to;
Default value: default name is: ‘ASIX’
Allowed values: text of max. 15 characters. Character size matters. Name cannot include
character „*”.
−
Session connections – the parameter value is the list of remote station names, with which the
connections will be established. Specific names are separated with commas. If the configuration file
of the remote station does not include the station name definition, the station name defined in the
network settings of the operating system should be given.
Default value: none
1. Connections with stations from outside of the list will not be established.
2. Parameter can be used in ASLINK module in version 5.4.0 or newer.
3. If the parameter is set, datagrams will not be handled and on adapters, where the session
connections will be established, time will not be synchronized.
4. Session connections will be established on adapters specified by Network protocols
parameter.
5. Usage of this parameter will result in lack of communication with ASLINK modules in
version 4.
Advanced 2 tab defines the parameters:
−
−
−
−
−
Send timeout – maximum duration of sending operation; a unit is a time of 500ms;
Default value: 30 (15 seconds)
Receive timeout – maximum duration of receiving operation; a unit is a time of 500ms;
Default value: 30 (15 seconds)
Aslink4 – enables communication with stations controlled by network module in version earlier than
5.00.000; toggle this option on to increase the network load, even if the network does not include
stations operating under control of the older network module versions;
Default value: option is disabled
Aslink domain / Enable communication of stations located in different networks connected via
router – give value Yes, if the connections between stations located in different networks connected
via router should be executed. (Only for NetBIOS over TCP/IP protocol – NetBt).
Default value: option is disabled
Local links / Enable connections between clients and servers located on the same station – it is
possible to establish connections between clients and servers located on the same station without use
of the network software.
Default value: option is enabled
©ASKOM, Gliwice
October 2007
131
The first application – step by step
It is necessary to toggle this option on, if AsixConnect software, acquiring data from local
Asmen and Aspad is used.
Diagnostics tab includes parameters controlling the diagnostic information fed by Aslink module:
−
−
−
Log file – defines the name of file, where the diagnostic information and maximum file size (KB)
will be stored;
Default value: file named ‘aslink.log’ of maximum size of : 500,000 KB
Store information about… – allows to declare the type of information to be stored in the log file; it
is possible to declare storing of information about:
− Received packets,
− Sent packets,
− CALLBACK calls,
− API function calls,
− Data from organizational packets,
− Data packets,
− Data from data packets,
− Broadcasted time packets,
− NetBios NBC operations
Default value: no information type is declared
Data size – defines the maximum length of the data part of network packets, which will be stored in
log file;
Default value: 10 B.
Diagnostics – AslView tab pertains to configuration of diagnostic information passed to AslView programs
connected to the network module:
−
−
History – defines:
− Maximal number of records in history of network module connections;
Default value: 0;
− Maximal number of record in history of time changes;
Default value: 50;
− Maximal number of records in history of client/server connections;
Default value: 300;
Changes lock - parameter defines the authorizations related to change of parameters from the level
of AslView program:
− Enable change of parameters from AslView application;
− Disable change of parameters from AslView application;
− Block with password change of parameters from AslView application;
Password - parameter defines the password to be entered by AslView application user,
who wishes to perform actions resulting in significant changes in network module
operation.
Default value: it is not allowed to change parameters from the level of AslView application.
Parameter Log-in validity period defined in Security module is binding here
132
October 2007
©ASKOM, Gliwice
The first application – step by step
Configuration of network module on example of the Sulfuric Acid Factory
application includes the following settings:
Determine the time synchronization limitations, so as time is not synchronized with any time servers:
Application parameters view for ‘Station SO1’ > Network module > Time synchr. - Client tab / Do not
synchronize time option.
©ASKOM, Gliwice
October 2007
133
The first application – step by step
4.6.8. Application security
Parameter group
Security includes an activation of dynamic system security measures, definition of
level passwords, and in case of usage of login system – definition of users and locking commands, which
may change the application status.
Detailed description of security mechanisms used in asix system (including the usage of level
passwords system and user login mode) can be found in “Asix – user manual” in chapter
Designer – application designing.
Policies tab allows to define the following parameters:
−
−
System policies – allows to activate the dynamic system security mechanism; w hen the application
user system is active – the dynamic policies are switched on only when an operator with
administrator privileges is logged in; if the level password system is active – dynamic policies are
toggled on only when the level 4 password is active;
Default value: system policies are disabled
Work mode of policies system:
− User mode.
− Level passwords mode;
Default value: ‘User mode’
User mode tab – active only then the policies system work mode is set to User mode, allows to define:
−
134
Default user id – the user is automatically logged in (without request for password) during the asix
system application start-up;
Default value: no declared default user
October 2007
©ASKOM, Gliwice
The first application – step by step
−
−
Login validity period – determines the login validity period; after the expiry of the defined time, user
is logged of or the system switches to the default user;
Default value: 0, i.e. login validity time is indefinite – until the application is switched off
List of defined users – allows to create application users items including: user id, name, password
and authorization level;
Default value: there is no list of defined users, i.e. it is impossible to log into asix and to perform
operations protected by a specific security level
User declarations are kept in external ‘Users.ini’ file, located in the application root directory.
If the users mode is declared, Users mode tab allows to define:
− Default user id - the item allows to declare a default user, who is automatically logged in (without
requesting for password) during asix system application start-up;
− Log-in validity period – determines the login validity period; after the expiry of the defined time,
user is logged of or the system switches to the default user;
− List of defined users – allows to create application users items including: user id, name, password
and authorization level;
Level passwords mode tab- active if the policies system work mode is set to Level passwords mode, allows
to define:
−
−
Log-in vailidity period – determines the time (in minutes), for which the set password remains valid;
Default value: 15 minutes
List of defined level passwords – includes items, where the passwords for specific levels are saved.
Default value: passwords are not defined, which means lack of control on the given level (if the level
passwords mode was declared)
Level passwords are stored in external ‘Passwords.ini’ file, located in the application’s root
directory.
Locks tab allows to lock the selected elements related to application handling:
−
−
Change lock – enables blocking all commands, which may result in change of application status in a
manner unplanned by the designer: locking the Designer module, locking reports editing, locking
trend editing and locking the ability to open masks from the level of control panel with use of
MASKS.OPEN command;
Default value: by default, the lock is disabled
Exit lock includes the following variants:
− Allow users to close the application;
− Don’t allow users to close the application;
− Secure closing the application – with a password or authorization level:
− Password or authorization level – if User mode is applied, and application access is
locked with a password, parameter Login validity time defined on User mode tab becomes
valid;
Default value: by default, the exit command is available without any limitations
Lock pertains only to exiting through closing of Designer window or Control Panel. An alternative
exit method is also available - with use of operator action END.
−
Designer lock includes the following variants:
− Allow users to switch to designer mode;
− Don’t allow users to switch to designer mode;
©ASKOM, Gliwice
October 2007
135
The first application – step by step
−
Secure switching to designer mode – with password of authorization level:
− Password or authorization level – if User mode is applied, and access to designer mode is
locked with a password, parameter Login validity time defined on User mode tab becomes
valid;
Default value: by default, designer mode is available without any limitations
−
Control lock – allows to block the execution of control operations in the application; it is used on
remote stations;
Default value: by default, the controls are not locked
Using the control lock does not interfere with operation of CALCULATOR class objects;
even though they are performing controls.
136
October 2007
©ASKOM, Gliwice
The first application – step by step
Configuration of security on example of the Sulfuric Acid Factory application
includes the following settings:
Parameters defined for 'Acid Factory'
Activate the dynamic system security policies:
Security > Policies tab > Activation of dynamic system security policies option
Set the Work mode of policies system to Users mode:
Security > Policies tab
Define users:
ID
MST
Oper
Username
Application
administrator
Operator
Password
Level
askom
5
operator
1
Security > Users mode tab
Declare the administrator as the default user:
Security > Users mode tab > Default user id option
©ASKOM, Gliwice
October 2007
137
The first application – step by step
4.6.9. Printout
Group
Printout – is a place, where user is able to declare the layout of printouts – including the alarm
printouts.
Printing tab allows to declare the use of printer and to define the color changes executed during dumps of
masks or screen:
−
−
Printing permission – item deciding whether the program will execute printouts; all printers
available in the system are accessible; if some operation does not allow for individual printer
selection, the default system printer is used;
Default value: by default, the printouts are executed;
Color change – item allows to define the color changes executed during performing dumps of masks
or screens;
how to record the color change method:
r, g, b, zr, zg, zb, e.g.: 0,0,0,255,255,255 changes black into white,
parameters r, g, b (decimal numbers determining RGB components) define the color, which should
be changed on the printout to color zr, zg, zb.
Default value: no declaration
138
October 2007
©ASKOM, Gliwice
The first application – step by step
Screen printout tab allows to determine the following parameters:
−
−
Automatic dump:
− Ask before execution of screen dump;
− Don’t ask before execution of screen dump;
− Don’t ask before execution of screen dump and don’t show message after it is done;
Default value: by default, prior to each screen dump, a dialog box is opened used to determine the
screen dump parameters
Dump parameters – item determining the screen dump parameters:
− Dump lock – locking the screen dump;
− Window – check this option to dump the active window;
− Screen – check this option to dump the entire screen;
− BMP file – check this option to dump to BMP file;
− Printer – check this option to print in the selected printer format;
Default value: by default, the entire screen is dumped to BMP file format;
Determined parameters may be modified by the operator, unless Automatic dump option is
used.
Printout tab defines the following parameters:
−
−
Headers and footers tab:
− Application name – text displayed in the header and footer line of the created printouts;
− Header – determines the header text for all types of printouts (except on-line alarms – for
which the header text is defined on Alarms printing tab);
Default value: if the user does not declare its own header text, by default, the text defined by
control character: &w | | ASIX will be used.
− Footer – defines the footer text for all types of printouts (except on-line alarms – for which the
footer text is defined in Alarms listing footer on Alarms printing tab);
Default value: footer is defined with control characters &D &T|&p|&c ; control characters
described in Header item are also allowed.
− Margins – allows to set margins for printouts, the item pertains to all printers and most
printouts (except for trends printout and printouts made in text mode); margin unit is 1/10 mm;
Default value: all margins equal 0;
Fonts tab includes the font definitions used in the created printouts (mask dumps):
− Font – definition of font for text information printing; value given in tenth parts of millimeter;
value 0 is automatic scaling to page width;
Default value: Courier New,0;
− Header font – definition of font for header printing; height given in tenth parts of millimeter;
value 0 is automatic scaling to page width;
Default value: Times New Roman,30;
− Footer font – definition of font for footer printing; height given in tenth parts of millimeter;
value 0 is automatic scaling to page width;
Default value: Times New Roman,30.
Report printing tab allows to declare:
−
−
−
Report header – defines the header text to be added to the report printout;
Default value: by default, the text defined in item Header in Printout tab is used.
Report footer – defines the footer text to be added to the report printout;
Default value: by default, the text defined in item Footer in Printout tab is used.
Settings / Reports in text mode – as a standard, reports are performed in graphical mode. If the
option is used, the font controlling sequences placed in the report contents and used in earlier reports
cease to function. Enabling the text mode results in printing reports in a manner compatible with AS
program version earlier than 2.59;
©ASKOM, Gliwice
October 2007
139
The first application – step by step
Default value: printout in graphical mode
Alarms printing tab contains parameters defining the format for historical and active alarms printing:
−
−
−
140
Header and footer tab:
− Historical alarms header – defines the header text for historical alarms printouts;
Default value: by default, the text in Header item (Printout tab) is printed;
− Active alarms header – defines the header text for active alarms printouts;
Default value: by default, the text in Header item (Printout tab) is printed;
− Historical alarms footer – defines the footer text for historical alarms printouts;
Default value: by default, the text in Footer item (Printout tab) is printed;
− Active alarms footer – defines the footer text for active alarms printouts;
Default value: by default, the text in Footer item (Printout tab) is printed
− Alarms listing header – defines the header text used for active alarms printout in the graphical
mode;
Default value: by default, the following text is printed: alarm events listing| |
− Alarms listing footer – defines the footer text used for active alarms printout in the graphical
mode;
Default value: by default, the text defined with the following control characters is printed:
&D &T|&p|&c
Fonts – Alarms tab contains the definitions of fonts used for alarm printing:
− Alarms font – defines fonts for printing alarms in graphical mode; height given in tenth parts
of millimeter; value 0 means automatic scaling to page width;
Default value: Courier New,0;
− Alarms header font – defines fonts used in alarm printout headers; height given in tenth parts
of millimeter; value 0 means automatic scaling to page width;
Default value: if the parameter is not set, the setting from item Header font (Fonts tab) is
valid;
− Alarms footer font – defines fonts used in alarm printout footers; height given in tenth parts of
millimeter; value 0 means automatic scaling to page width;
Default value: if the parameter is not set, the setting from item Footer font (Fonts tab) is valid.
Option tab allows to define:
− Alarm text length – determines the number of characters used for alarm text printing; as a
standard, the length is calculated to approx. 90 characters, so as the entire printout line does
not exceed 120 characters;
− Alarms printout formats:
− Alarm line format – determines the number and sequence of information printing; it is a
character string made up of letters defining the field types
− System alarm line format – item allowing to define the format used for printing system
alarms; characters used for format definition are described in item Alarm line format;
Default value: the default format is the format given in Alarm line format line;
− Settings:
− Print system events– specifies whether the system events should be printed;
Default value: by default the system events are printed
− Immediate alarm listing – item determines the current alarm printout mode; immediate
listing is a text printout identical to the mode used in AS program mode older than 2.59;
alarm lines are printed one by one, in the moment of event occurrence (however, printer
can internally buffer the text and print the page only when its full); in the graphical
printing mode, first a full alarm page is gathered and only then the printing is
performed; printout header and footer are added;
Default value: current alarms printouts are by default performed in the graphical mode;
− Date separator on historical alarms listing – determines whether the historical alarms
printout should include lines signaling the alarms change date;
Default value: by default, the parameter is not used;
− Alarms printing – item enabling immediate alarm printing;
− Print on default printer – usage of the first form item is printing on the default system
printer;
October 2007
©ASKOM, Gliwice
The first application – step by step
−
−
Don’t print alarms;
Print on selected printer – allows to specify any printer installed in the computer.
Default value: print on default printer
Info tab includes the statement of control characters used for definition of header and footer contents for
created printouts (mask dumps) and list of letters defining the number and order of information printing on
the alarms printout.
©ASKOM, Gliwice
October 2007
141
The first application – step by step
Configuration of printouts on example of the Sulfuric Acid Factory application
includes the following settings:
Parameters defined for 'Acid Factory'
1. Define the header to appear on all printouts:
Printout > Printout tab > Headers and footers subtab > Header: SULFURIC ACID FACTORY
2. Define the header font:
Printout > Printout tab > Fonts subtab > Header font: ARIAL
142
October 2007
©ASKOM, Gliwice
The first application – step by step
4.6.10. Reports
Module
Reports includes configuration parameters for reporting module.
Reports tab includes the following configuration parameters:
−
−
−
−
Edit lock – item locking the ability to correct report definitions in the application runtime mode; it
may be recommended to unlock editing for deployment stage (then it is not necessary to switch to
Designer module);
Default value: by default, the parameter is disabled, which means that it is possible to change reports
in the application runtime mode
Scale lock – use the parameter to block the reports window size;
Default value: by default, the operator may freely change the report window size;
Directory containing files with report definitions
Default value: by default, the reports definitions files are located in the application’s current
directory
Maximal number of days by which one can go back while calculating report – gives the time
period, measured backwards from the current moment (in days), by which one can maximally go
back during report calculation; if non-positive period or period bigger than 366 days is given, the
default 366 days is assumed;
Default value: 0 days
The item allows to save some operating memory used for running of reporting module.
Limiting the allowed period may enable calculating reports in situation, when normally the
reporting module would not start due to insufficient memory.
Script reports tab includes:
−
Files of script reports – allows to declare the use of script reports according to the following syntax:
report_name, report_code_file_name [, output_file_name, report_parameters]
where:
report_name
report_code_file_name
output_file_name
parametry_raportu
©ASKOM, Gliwice
- parameter is a custom text describing the report; this name will be
displayed in the report list in Reporter window and will be used to run
the report with use of operator actions;
- parameter is used to give file name with report code; it is possible to
give full path to file or only a file name with extension; in second case,
report file will be searched in directory given in directory indicated in
item Directory with report definitions files and mask path directory;
- parameter is used to give the basic name of files, where the
generated reports will be stored; names of output files are created only
through adding an extension depending on the report creation data to
the basic name; parameter output_file_name should be used only, when
on the basis of the same code file, there will be different reports types
created (see description of report_parameters item); if the parameter is
ignored or character * is inputted, the report output files names will be
created on the basis of report code file name;
- parameter allows to create parameterized report code files; parameter
content is fully passed to the script when it is launched and can be used
to control the script operation; bear in mind, that if the same report
code file is used in many SCRIPT items, give a unique output file
name in each item.
October 2007
143
The first application – step by step
The report parameters may include scripter execution parameters (for more
information on script declaration, see “Scripts – user manual” - file Skrypty.hlp
or Scripts.pdf):
//S
- in the given moment, only one script with parameter //S,
included in the given file can run; parameter is important
only when script is launched as asix operator action;
scripting module will reject the next attempt of script
launch in situation, when the previous script instance with
parameter //S included in the same file is not completed
yet; if the parameter is missing, it is possible to launch at
the same time multiple scripts based on program included
in the same file;
//X
- when the script is launched, a debugger (installed in the
system as the default one) is also started; debugger stops
the script execution on the first script instruction;
//D
- if error in script is found, debugger will be started;
//IT:nnn
- limitation of initialization part execution time, expressed
in milliseconds;
//T:nnn
- limitation of event part execution time, expressed in
milliseconds;
//E:name
- gives the script language name (e.g. //E:JScript);
//Thread:name[,pri] - gives the thread name, where the script is executed and
defines pri priority of the thread; thread name can be
custom and is used to group the scripts executed in one
thread; script thread priorities:
0
1
2
3
4
5
6
IDLE
LOWEST
BELOW_NORMAL
NORMAL - (default),
ABOVE_NORMAL,
HIGHEST,
TIME_CRITICAL;
default thread priority is priority 3 (normal);
//U
- if this parameter is given, “OnRead” events and
temporal event functions defined by SetInterval and
ExecuteAt methods will not be generated, if asix
application windows are hidden (e.g. with use of HIDE
operator action).
Executive parameters are given in convention of cscript program, i.e. they are preceded with double
slash.
Configuration of reports on example of the Sulfuric Acid Factory application
includes the following settings:
Parameters defined for 'Acid Factory'
3. Define the directory containing files with repoert definitions:
Reports > Reports > Directory containing files with repoert definitions
144
October 2007
©ASKOM, Gliwice
The first application – step by step
4.6.11. Script and Action Parameters
Group
Scripts and actions includes parameters related with:
− declaration of application-related scripts, which will be automatically initialized during application
operation;
− declaration of action sets;
− configuration of scheduler;
− setting parameters related with script execution.
Detailed description of scripting module can be found in “Scripts – user manual”.
Scripts tab enables declaration of scripts extending the functional abilities of asix system. Scripts must be
declared in the subsequent items, giving the script name and declaring the file and additional script options
according to the syntax described below.
Script name must be different than the names of other parameters declaring the usage of script. Script name
cannot be the name of script module parameter and cannot be the word “skrypt" or “script".
At the moment, the script module recognizes the VBScript (.vbs) and JScript (.js) language extensions.
Declaration of script file with additional options requires the following syntax:
script_file script_parameters executive_parameters
where:
script_file
©ASKOM, Gliwice
- path and file name containing the script program; file name extension
defines the default script name;
October 2007
145
The first application – step by step
script_parameters
executive_parameters
- parameters passed to the script; script parameters are available in the
script with use of Asix.Script.Parameters object (or
Asix.Script.Arguments object);
- parameters passed to the scripting module (not to the script) and
determining the script execution parameters, which are different than the
default ones;
The executive parameters include: limitation of execution time, debugger activation, declaration of thread,
where the script will be executed and its priority, script type, language etc. Some parameters (e.g.
limitations) are similar to scripting module parameters. They are placed as executive parameters only when
the defined script has special requirements, different than the ones defined with use of parameters defining
the script execution method – see: Scripting parameters tab.
Executive parameters are given in convention of cscript program, i.e. they are preceded with double slash.
Executive parameters:
//S
- in the given moment, only one script with parameter //S, included in the
given file can run; parameter is important only when script is launched as asix
operator action; scripting module will reject the next attempt of script launch in
situation, when the previous script instance with parameter //S included in the
same file is not completed yet; if the parameter is missing, it is possible to
launch at the same time multiple scripts based on program included in the same
file;
//X
- when the script is launched, a debugger (installed in the system as the default
one) is also started; debugger stops the script execution on the first script
instruction;
//D
- if error in script is found, debugger will be started;
//IT:nnn
- limitation of initialization part execution time, expressed in milliseconds;
//T:nnn
- limitation of event part execution time, expressed in milliseconds;
//E:name
- gives the script language name (e.g. //E:JScript);
//Thread:name[,pri] - gives the thread name, where the script is executed and defines pri priority of
the thread; thread name can be custom and is used to group the scripts executed
in one thread;
script thread priorities:
0
1
2
3
4
5
6
IDLE,
LOWEST,
BELOW_NORMAL,
NORMAL - (default),
ABOVE_NORMAL,
HIGHEST,
TIME_CRITICAL;
default thread priority is priority 3 (normal).
//U
- if this parameter is given, “OnRead” events and temporal event functions
defined by SetInterval and ExecuteAt methods will not be generated, if asix
application windows are hidden (e.g. with use of HIDE operator action).
Script parameters tab allows to define:
−
−
146
Log file - parameter determines the file name, where the diagnostic information will be stored;
Default value: if the parameter is not given, the log file will not be created
Debugger settings - parameter determines the scope of cooperation between scripting module and
script debugger
October 2007
©ASKOM, Gliwice
The first application – step by step
−
Run scripts without debugger – if this option is selected, debugger will be never started; in
case of script timeout or error, AS program panel will be fed with error information with line
number and character given; executive parameters //X and //D given in the script declaration
are irrelevant, if option Run scripts without debugger is checked;
− Run scripts with debugger – option allows to run scripts under control of the debugger;
− Run scripts and start debugger at the moment when script module is initialized;
Default value: Run scripts without debugger
Parameter Debugger settings is valid only when Windows operating system includes a proper
script debugger installed.
−
−
Event timeout – parameter determines the maximum time of event handling by the script. If the
parameter value is 0, the event handling time is not limited. The unit is time expressed in
milliseconds.
Default value: 5000 milliseconds
Initialization timeout - parameter determines the maximum time of initialization part handling of the
script. If the parameter value is 0, the initialization handling time is not limited. The unit is time
expressed in milliseconds.
Default value: 15000 milliseconds
Action sets time allows to define for an application an action set, being the sequence of custom operator
actions, assigned to one operator actions.
Scheduler tab allows to define scheduler actions launched on the basis of time conditions or in response to
the change of the selected process variable value.
The meaning of fields in Term area is as follows:
−
−
−
−
Time of execution – field used to determine time (with accuracy of one minute), when the action
should be executed;
Confirmation – check this checkbox to determine that prior to the action, the system should request
the operator for confirmation,
Day of execution – field used to give the number of day in the month, when the action should be
executed; value Daily enables daily execution of the action.
Action – content of action, which should be executed;
The meaning of fields in Event area is as follows:
−
−
−
−
−
Variable name – name of process variable, whose value is the condition of action execution;
Condition – drop-down list used to determine the type of checked condition; there are 4 types of
conditions available:
= - variable equal to the given value,
> - variable bigger than the limitation,
< - variable smaller than the given value,
& - logical multiplication of the variable and the given value,
Value – number used for comparison with the monitored process variable value; it is a decimal
integer number or a floating point number - the program automatically reconciles the data types for
variable and value; it is not possible to use condition of "&" type for floating point data.
Confirmation - check this checkbox to determine that prior to the action, the system should request
the operator for confirmation
Action - content of action, which should be executed;
©ASKOM, Gliwice
October 2007
147
The first application – step by step
Configuration of scripts and action parameters on example of the Sulfuric Acid
Factory application includes the following steps:
Parameters defined for 'Acid Factory'
1. Declare the use of the following scripts:
ANAL1=demo\ANAL1.vbs
N06=demo\N06.vbs
ANAL2=demo\ANAL2.vbs
NAP2=demo\NAP2.vbs
NAP1=demo\NAP1.vbs
POCZNAP=demo\POCZNAP.vbs
N07=demo\N07.vbs
AL30=SCRIPTS\AL30.VBS
al30_obs=SCRIPTS\KW_AL30_obs.vbs
Scripts and actions > Scripts tab
Scripts located in DEMO directory are designed to simulate the values of variables assigned to channel
NONE.
Scripts required for correct operation of the Sulfuric Acid Factory application are located in the default
package directory C:\asix\Applications\Acid_Factory\SCRIPTS.
2. Define the following action sets:
Action set name
ESC
REPORT_YES
Component action names
CLOSE_MASK T*
CLOSE_MASK KW_A*
CLOSE_MASK KW_N*
CLOSE_MASK KW_P*
CLOSE_MASK Y*
CLOSE_MASK X*
OPEN_MASK AC_MAP
CLOSE_MASK
SHOW_REPORT report\report1.r month> DELETE
Scripts and actions > Action sets tab
3. Declare the execution of OPEN_MASK QUERY action in the moment, when variable V1 has
value of 1, without asking the operator for permission for exeuction.
Scripts and actions > Scheduler tab > Event
Variable name: V1
Condition: =
Value: 1
Action: OPEN_MASK QUERY
148
October 2007
©ASKOM, Gliwice
The first application – step by step
4.6.12. Miscellaneous Parameters
Group
Miscellaneous parameters contains parameters not classified to other groups. These are the
following parameter categories:
- Application;
- Calculator,
- Files synchronization,
- Miscellaneous
- Directly entered options.
Application tab allows to declare the following parameters:
−
Application resolution – screen resolution in pixels used by the application; usage of this item means
that in case of work in screen resolution bigger than the one given in this item; point of opening of
masks and other elements will be moved, so as the application works in center of the screen;
Default value: if the value is not declared, the application window will appear in the upper left screen
corner with resolution bigger than the one, in which the application was executed
− Work directory – parameter allows to define application’s work directory; work directory is used,
among others, as a place for storing screen dumps;
Default value: if the item is left unused, the directory active in the moment of application start will be
used as the work directory.
Calculator tab includes the following parameters:
©ASKOM, Gliwice
October 2007
149
The first application – step by step
−
−
Timeout – maximum time (in seconds) for calculation of CALCULATOR and EXPRESSION
objects;
Default value: 30 seconds
Overloads – item allows to lock the diagnostic messages informing about overloads in
CALCULATOR and EXPRESSION objects;
Default value: default messages are generated;
Tabs File synchronization – File synchronization 2 involves parameters related to asix utility software,
application components and frequency of checking the software compliance The operations declared here
allow to unify the utility and application software in an automatic manner:
−
File – if this parameter is used, any files can be updated; for File item, declare the name of file (with
its path), which should be updated, and the pattern directory name, where pattern files are located;
Update is performed when pattern files have later modification time than original files or the
original files were not found
−
−
−
−
−
File of items definitions base – if this parameter is used, Paradox items definitions base files will be
updated; for File of items definitions base, declare the name of file (with its path), which should be
updated and the pattern directory name, where the pattern files are located; at the same time, the
variable definition modification is performed in online mode
Period – is used to give the interval, expressed in minutes, between file synchronizations; lack of
item or value 0 means that synchronization is performed only during the program start-up;
Default value: 0
Report – if the parameter is enabled, the messages are sent to control panel in case of file
synchronization operation execution;
Default value: by default, the parameter is disabled
Directory of Asmen module file pattern – application of this parameter results in updating of Asmen
variable definitions files
Parameter used in situation, where the variable definitions are stored in text files (in older
versions of asix system).
Directory of Aspad module file patterns – application of this parameter results in updating of Aspad
variable definitions files
Parameter used in situation, where the variable definitions are stored in text files (in older
versions of asix system).
Misc tab allows to define:
−
−
Keys by screen – if the item is enabled, interpretation of meaning of pressed buttons depend on the
current mouse position; only the masks located on the same screen as mouse are considered; the item
is important for multi-monitor systems; mechanism allows for different interpretation of key
meaning depending on the screen currently used by the operator;
Default value: option disabled
Time change limit – the item allows to define, what is the maximal allowed one-time change of
time;
Default value: by default, the time changes are not limited
Give negative change limit to completely block the time modification option.
−
150
Load reduction – load reduction can speed up the operation of program operating simultaneously
with AS program and speeds up the operation of system printout spooler; the smaller is the index,
October 2007
©ASKOM, Gliwice
The first application – step by step
the bigger the load reduction, while the impact of index value is non-linear; value 0 means that the
reduction is toggled off and AS utilizes the entire available processor time;
Default value: 4 – equal to load of ca. 75%
Directly entered options tab allows to declare for the given application some items, which cannot be edited
with support from Architect - i.e. these are items used in older asix versions or brand new item.
©ASKOM, Gliwice
October 2007
151
The first application – step by step
The Sulfuric Acid Factory application required the following Misc parameter
settings:
Parameters defined for 'Acid Factory'
1. Disable the option generating diagnostic messages informing about overloads in CALCULATOR and
EXPRESSION objects:
Misc > Calculator tab > Overloads
2. Set the limit of maximal allowed single time change to 60 minutes:
Misc > Misc tab > Time change limit
3. Additionally declare the following items:
Section name: FONTS_FOR_WINDOWS
Option name
DEF_COLOR0
DEF_COLOR1
DEF_COLOR2
DEF_COLOR3
DEF_COLOR4
DEF_COLOR5
DEF_COLOR6
DEF_COLOR7
DEF_COLOR8
DEF_COLOR9
DEF_COLOR10
DEF_COLOR11
DEF_COLOR12
DEF_COLOR14
DEF_COLOR13
DEF_COLOR15
Option value
81,81,81
98,98,98
110,110,110
148,148,148
160,160,160
167,172,176
207,207,207
224,224,224
180,0,180
253,234,2
96,64,0
208,104,0
224,0,0
64,171,61
74,74,255
84,201,245
These are the declared user colors used in the application masks designs.
Parameters defined for 'Station SO1'
4. Declare an additional item:
Section name
aspad
Option name
save_period
Option value
67s
This option determines the duration of the cycle, after which buffered data will be saved to disk.
152
October 2007
©ASKOM, Gliwice
The first application – step by step
4.7. Step Seven – creating the multilingual application
The multilingual application system allows to switch the application operation language at the request of
the operator. All texts inputted by the designer in stage of application creation are subject to change.
Sparametryzowanie aplikacji do pracy w kilku językach wymaga wykonania następujących kroków:
1. To parameterize the application for operation in several languages, perform the following steps:
Start parameters > Languages tab:
pl, Polish, EastEurope
en, English, EastEurope
The order of entered languages is important – the first language is the primary (default) language.
Detailed description of declaring several work languages for the application can be found in
“Asix – user manual” in chapter Multilingual applications.
2. Then create the list of texts used in the application. This is facilitated with Table of Translation
mechanism, which is used for translation of texts entered by the operator during the application
definition. This pertains mostly to texts from objects located on visualization masks.
The mechanism is started, when file TranslateTable.Lng is placed in the application start
directory. This is the text file, where all lines are multilingual texts.
The basic Table of Translation can be generated automatically with use of TRANSLATION_FILE
function from TOOLS menu of Designer window.
When the categories of generated information are selected, use Generate button to save all found
texts in TranslateTable.Tlt file. If file TranslateTable.Lng existed previously, all included
translations will be transferred to the generated file.
Designer shall supplement the missing translations directly in TranslateTable.Lng file or
supplement TranslateTable.Tlt file and rename it to TranslateTable.Lng.
After generating the translation table, supplement the entries according to the following example:
[pl]polish text[en]english text
It is possible to edit texts by means of Architect module editor:
Start parameters > Languages tab> Table of translation, Edit button
3. If application acquires descriptions from variable definitions base, certain modification should be
introduced there. In XLS file, next to Description column in each sheet, create columns with
names in appropriate languages (in which the application is supposed to run), where the
counterparts of descriptions located in Description column should be located.
In case of source sheet for generation of alarms definitions base Alarms, the description is located
in one column according to the format: [pl]polish text[en]english text.
4. The translation of multilingual application texts can be performed also with use of Table of Texts
mechanism, which is used for translation of texts, which are displayed within application elements
and are not given openly by the designer (they are embedded into program code). Mechanisms is
started, when TextTable.Lng file is located in the application start directory.
©ASKOM, Gliwice
October 2007
153
The first application – step by step
Table of Texts file is a text file, where each line is a multilingual text determining the translations
of texts.
Asix package also includes TextTable.Tlt file, containing complete table of texts for Polish and
English language. Designer should copy this file to application directory with name
TextTable.Lng, and then supplement the multilingual texts with variant definitions for other used
application languages.
The functioning of the Table of Texts consists in searching the translation for program-embedded
text among all defined multilingual texts.
Text editing can be also performed with use of Architect module editor:
Start parameters > Languages tab > Table of texts, Edit button
Configuration of multilingual setup for the Sulfuric Acid Factory application:
Parameters defined for 'Acid Factory'
2. The following languages were declared for application operation:
Language
En
Pl
Description
English
Polish
Code page
EastEurope
EastEurope
Start parameters > Languages tab > Languages option.
3. Tables translatetable.lng and texttable.lng used by the presented Sulfuric Acid Factory application are
located in the default directory of asix package:
C:\asix\Applications\Acid_Factory
Those should be copied to the designed application directory Æ Acid_Factory
4. As the Sulfuric Acid Factory application loads variable descriptions from the items definitions base
(Acid_base.xls worksheet) from Description field – take care that Description field has its counterpart
in Polish. For this purpose, field Description_PL with variable descriptions in Polish was created.
Then Description and Description_PL fields are declared in AttributeLanguages table and
SubstituteAttributes tab. Due to this, when the application language is switched from the primary
language (English) into Polish, the Description attribute value will be switched to alias attribute
value – Description_PL.
154
October 2007
©ASKOM, Gliwice
The first application – step by step
4.8. Step Eigth – configuring application for Terminal
Settings for Terminal computer are almost identical as for Station SO1 machine. Only the following details
are different:
1) Alarms system -> Alarms tab -> Work mode of alarm system (check) -> Historical viewer
2) Current data -> SINEC_KW tab -> Standard -> Driver: Network (Name: SINEC_KW)
©ASKOM, Gliwice
October 2007
155
The first application – step by step
4.9. Step Nine – creating icon running the application
An application shortcut is necessary to run the application. Such shortcut may be created manually,
but it is much easier to create a shortcut with use of Architect. Select Shortcut creator in Tools menu.
The following window will appear:
This window allows to select, to which computer the shortcut will be pointing (i.e. which settings will
be applied). It is also possible to decide, whether the work should be performed in a multi-processor
mode, whether the operating systems should be restarted after asix system failure, and whether the
dynamic security policies system should be enabled at the start-up. The user can also decide, where the
created shortcut will be located. The most comfortable solution is to place the shortcut on Desktop to
start the application in an easy manner. Press Create button to place the shortcut on Desktop. Doubleclick on such shortcut to launch the application.
156
October 2007
©ASKOM, Gliwice
The first application – step by step
5. Final words
All situations described in this manual took place in reality. As a matter of fact, one of the industrial
facilities in Poland uses an application, which together with SIMATIC controllers, performs the tasks of
control, supervision and visualization of the sulfuric acid production process.
The Sulfuric Acid Factory application was designed to display the abilities of asix package. True
application is a medium-size solution containing approx. 1000 variables. Asix allows to create even much
bigger applications. A good example would be the applications operating in power plants, which contain
even up to 50,000 variables.
5.1. How to learn more
Detailed information on asix system, communication channel parameterization, data archiving module
parameterization, or description of static and dynamic objects can be found in help files, e.g. asix.hlp
located in directory \HELPPL created as subdirectory of asix folder during package installation. The
printable version of the documentation is contained in respective *.PDF files located in
\DOKUMENTACJA directory.
Furthermore, we would like to invite you to our Web page http://www.asix.com.pl/en/, where we publish
information on new developments of asix package. Check out http://www.asix.com.pl/en/support/ tab
offering hints for some problems, which can occur during execution of uncommon design solutions.
It is always possible to inquire the creators, and at the same time - the first users of asix package – by email: [email protected], [email protected] or by phone: (32) 30 18 100.
We guarantee, that no question will be left unanswered.
The most important thing is up to You - to use learned skills during practical designing.
Best luck!
©ASKOM, Gliwice
October 2007
157