1
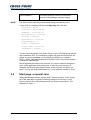
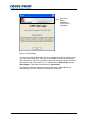
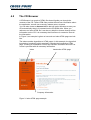
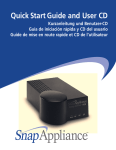
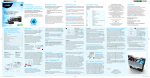
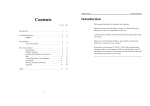
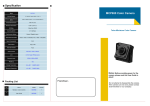
CUSTOMIZING
XM3 Manage
Conditions
Transactions, deliveries et cetera will be according to the general terms of
delivery as deposited at the Chamber of Commerce at Meppel, The
Netherlands. Registration number is K.v.K. 04058425.
Table of Contents
1
Introduction ....................................................................................... 1
1.1 Purpose ................................................................................... 1
2
Items that can be customized ........................................................... 2
3
How to customize XM3 Manage ....................................................... 3
3.1 The file setup.dat..................................................................... 3
3.2 Start page, a special case ....................................................... 4
3.3 About dialog ............................................................................ 5
4
The Installation CD ........................................................................... 7
4.1 Installation via Setup.exe ........................................................ 7
4.2 The CD Browser...................................................................... 8
4.2.1 Structuring information example .................................. 9
1
Introduction
1.1
Purpose
Companies who are selling the Cross Point XM3 Proximity Reader as an
OEM product often wants to change the user interface of XM3 Manage so
that their corporate identity is not lost. This document contains information
about the actions that are necessary to customize the installation CD of XM3
Manage to your corporate identity.
Customizing XM3 Manage, version 1.2
1
2
Items that can be customized
XM3 Manage and its installation program are designed in such a way that the
following information can be changed
Name of the company
The companies name is used everywhere in the application. In the title bar,
the Help menu but also in some dialogs and screens.
Name of the application
Like the company name, the name of the application is used in the title bar
dialogs, but also in the start menu and in the control panel (for deinstallation).
Web-address
Cross Point uses this web address in the about dialog of the application.
Also, a special entry is added to the Help menu stating “Visit
<companyname>” Here the user is redirected to the specified web address.
Number of supported readers
Because some companies wants to limit the number of stand alone readers
here the maximum number of readers can be set.
Start page
When XM3 Manage starts, an html page is shown with some information
about the company and the application. This page can be replaced by one of
your company.
About dialog
Here the company name and application name is displayed, but also a
bitmap on the top of this dialog. This bitmap can be replaced.
2
Customizing XM3 Manage, version 1.2
3
How to customize XM3 Manage
XM3 Manage is delivered on a CD alone with some HTML pages that guide
a user through the installation process. The easiest way to create a
customized CD is to copy the complete CD to a folder and add some files
and folders.
3.1
The file setup.dat
Setup.dat is a file that you should create in a standard text editor like
notepad. It contains the information that the installation of XM3 Manage uses
to display a customized installation. It contains a tag followed by an = sign
and a value:
Tag = <value>
In the following table, an overview of the allowed tags is listed.
Company information
Description
CompanyName
The name of your company as it should be
displayed in the application.
ProductName
The name of your application as it should be
displayed in the application.
WebAddress
The Web address of your company like
www.crosspoint.nl
StartPageLocation
The name of the folder on the CD where the
contents of the start page can be found.
StartPage
The name of the html file that is the entry point of
your start page. Normally this is index.html.
AboutImageFile
The filename of the illustration you created for the
About dialog. This must be a full color BMP file of
300 x 66 pixels.
SupportedReaders
The number of Access Readers that are
supported in your Access Control system. If this
number is reached, scanning is stopped.
ProName
The name extension used for the Pro version of
XM3 Manage (standard Pro).
SingleDoorName
The name extension used for the Single Door
version of XM3 Manage (standard Single Door).
Customizing XM3 Manage, version 1.2
3
StandardName
NOTE
The name extension used for the standard
version of XM3 Manage (standard empty).
The Web address must be entered without being preceded by: http://.
A typical file for company with the name MyComp looks like this
CompanyName = MyComp
ProductName = Reader Manager
WebAddress = www.mycomp.com
StartPageLocation = Startpage
StartPage = index.htm
AboutImageFile = mycomp.bmp
SupportedReaders = 4
ProName = Professional
SingleDoorName = Single Door
StandardName = Standard
This file should be placed in the folder \Setup of your CD-ROM along with the
other installation files. The installation program will read this file and use the
values of it during installation. In the registry an OEM key is created in
HKEY_LOCAL_MACHINE\Software\Cross Point\Talos. Here the information
is stored for XM3 Manage.
Not all tags described above are required. You can for instance change the
name of the application and nothing else. In this case only the name is
changed, but the start page and the name of the company will remain the
same. You can set SupportedReaders to -1 if no maximum number is used.
3.2
Start page, a special case
When XM3 Manage started, it opens with a Welcome screen. In this screen
an HTML start page is opened containing images of Cross Point, Cross
Point’s product name XM3 Manage and Cross Point’s web address. This
displayed in Figure 1.
4
Customizing XM3 Manage, version 1.2
HTML page
Cross Point illustrations
used in the HTML file
Cross Point’s Web
Address
Figure 1: The Application’s start page
If you did not specify a startpage in the setup.dat file, this page is shown with
the product name specified. Because the Cross Point company name is an
image, this is not affected. To allow a company to change this, the total page
can be redesigned. It is a normal HTML page that is embedded in the
software and displayed if no other file is specified in the setup.dat file. You
need to create a HTML page with an HTML editor like frontpage and put
these files into a folder on the CD. This must be a sub-folder of \Setup. The
best place here is \Setup\StartPage. If you name your entry point of this
webpage index.htm than the tag StartPageLocation can be set to StartPage
and the tag StartPage to Index.htm.
The startpage folder on the CD is copied to the folder where the user installs
XM3 Manage.
3.3
About dialog
The XM3 application is provided with an About dialog containing a Cross
Point related illustration. Select from the Menubar Help -> About to display
this dialog. In Figure 2, Cross Point’s About dialog is displayed.
Customizing XM3 Manage, version 1.2
5
Part of the
dialog
containing
Cross Point’s
Illustration
Figure 2: About Dialog
You have to create an illustration for your company that will be used in stead
of Cross Point’s illustration. This should be a BMP file with the dimensions
300 x 66 pixels in full color. It should be placed in the folder \Setup of the CD
and named in the Setup.dat file. If you named this file About.bmp, the tag
AboutImage in Setup.dat should be set to About.bmp.
The product name and company name as well as the web address are
automatically set to the values you specified in Setup.dat.
6
Customizing XM3 Manage, version 1.2
4
The Installation CD
Cross Point delivers XM3 Manage on a CD which automatically starts when it
is inserted into the CD-ROM drive. It starts the default web browser and
displays information to the installer. On one of these pages you can install
the software.
You can create such a CD for your company and extract only the necessary
files from the original XM3 CD-ROM. How to do this is described below.
4.1
Installation via Setup.exe
The way to install the application that requires the least effort is to create a
folder called Setup in the root of your CD. In this folder, you store the
following items:
• The file Setup.dat (see paragraph 3.3)
• The About image (see paragraph 3.2)
• The HTML Start page (see paragraph 3.1)
• Setup.exe (provided by Cross Point)
Write this folder to a CD.
If the CD is inserted into a PC, the installation of the application can take
place by:
1. Selecting the Start button from your taskbar
2. Select Run
The Run edit dialog is displayed
3. Enter the path where the Setup.exe is located in the editbox
For instance: D:/setup/setup.exe
Now the installation takes place.
However, this method may require you the least effort to create it, it is not
very convenient for the end-user. The end-user is not informed about the
application, possible release notes, user manuals et cetera. This can be
solved by creating a CD Browser.
Customizing XM3 Manage, version 1.2
7
4.2
The CD Browser
A CD Browser is a couple of HTML files that will guide you through the
contents of the CD. These HTML files provide the end-user information about
the application, as well user manuals, release notes, et cetera.
You can also create an Autorun.inf file that will cause Windows to start your
CD automatically when it is inserted into the CD-ROM drive. When you
redirect to an index HTML file it can be very helpful to browse through all the
information on the CD. It is necessary that a structure is created to store all
the information.
In Figure 3, an example is given on how such an Index HTML page can look
like.
The Index contains hyperlinks to HTML pages. In this example, the hyperlink
Introduction is selected, which resulted in opening the Introduction HTML
page. Creating an Installation CD this way results in a satisfied end-user: he
or she is provided with all necessary information.
Index
Introduction HTML page
Company information
Figure 3: Index HTML page example
8
Customizing XM3 Manage, version 1.2
4.2.1
Structuring information example
Recommended folders are:
• Misc
This folder can contain miscellaneous items. Think of for instance
the Acrobat Reader in case you want to store pdf files.
• Documentation
This folder can contain for instance a user manual
• Setup
In this folder all the application related files should be stored that
are needed for the installation.
• Contents
This folder can contain all the HTML pages that are used to
provide the user with information as well as to browse through the
different HTML pages. A subfolder in this folder can be created to
store the illustrations of your HTML pages.
In the root of the CD the following files are necessary for automatically startup.
• Autorun.inf
A CD can be organized in such a way that automatically a HTML
page is opened. An Autorun.inf is the file type taking care of this.
This file can be created with Notepad.
An example of an Autorun file is:
[autorun]
OPEN=ShelExec \Contents\index.htm
In this autorun, the Index.htm is automatically opened and shown
in your default browser.
• Shelexec.exe
In this example the autorun.inf enables the Shelexec.exe tool to
call the ShellExecute API from the command line. The
Shelexec.exe is a freeware application that can be downloaded
from: http://www.naughter.com/shelexec.html. This file is also
placed in the root of the original CD-ROM.
Customizing XM3 Manage, version 1.2
9