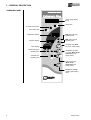
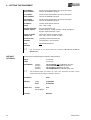
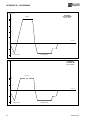
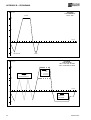
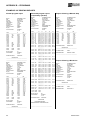
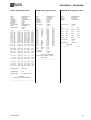
1
STEAM STERILIZER Extrema Plus OPERATING MANUAL 0051 Edition: Revision: Date: 2 2 May 2004 TABLE OF CONTENTS UPDATING The following table lists the updating history of the Operating Manual. The field “Description” shortly explains the modifications. Edit. Rev. Date 1 0 09-99 First issue Description 1 1 11-99 General amendment 1 2 05-01 Pages 3 and 4 1 3 06-01 Pages 11, 12, 14, 62, 66, 68 1 4 08-01 Declaration of Conformity 2 0 11-01 Updating to EPROM release 2 2 1 08-02 New phone number and e-mail address (page 83) 2 2 05-04 A few text changes TABLE OF CONTENTS 1. FOREWORDS ............................................................................................................ 1 Symbols used through the manual .............................................................................................1 APPLICABLE EUROPEANS DIRECTIVES.........................................................................1 USE IDENTIFICATION .......................................................................................................1 Important notes ..........................................................................................................................1 SCOPE OF THE MANUAL ..................................................................................................2 GENERAL WARNINGS ......................................................................................................2 2. PACKAGE CONTENT................................................................................................ 3 DIMENSIONS AND WEIGHT ..............................................................................................3 PACKING CONTENTS ........................................................................................................3 LIFTING AND TRANSPORT ...............................................................................................4 3. GENERAL DESCRIPTION ......................................................................................... 5 INTRODUCTION .................................................................................................................5 GENERAL FEATURES........................................................................................................5 FRONT DEVICES................................................................................................................6 REAR DEVICES ..................................................................................................................7 COMMAND PANEL .............................................................................................................8 OPERATING CYCLE EXAMPLE........................................................................................9 4. INSTALLATION........................................................................................................ 10 INTRODUCTION ...............................................................................................................10 Dimensions and weight ............................................................................................................10 Power supply............................................................................................................................10 DIMENSIONS FOR BUILD MOUNTING ...........................................................................10 GENERAL INSTALLATION DIRECTIONS........................................................................11 ELECTRICAL CONNECTIONS .........................................................................................11 CONNECTING THE DRAINING TANK .............................................................................12 CENTRALIZED DRAINING SYSTEM CONNECTION ......................................................13 Extrema Plus 1 TABLE OF CONTENTS EXTERNAL FILLING TANK CONNECTION..................................................................... 14 CONNECTION TO A PRINTER........................................................................................ 15 ACQUIRING THE ENVIRONMENT PRESSURE VALUE ................................................ 15 5. FIRST START-UP.....................................................................................................16 SWITCHING ON ............................................................................................................... 16 INITIAL SELF-TEST.......................................................................................................... 16 ACQUISITION AND AUTOMATIC UPDATING OF THE ENVIRONMENTAL PRESSURE VALUE............................................................................................................................... 16 STAND-BY STATE............................................................................................................ 17 FILLING THE DISTILLED WATER ................................................................................... 17 Manual filling ........................................................................................................................... 17 Automatic filling ....................................................................................................................... 18 DRAINING TANK WATER LEVEL SIGNALING ............................................................... 18 6. SETTING THE EQUIPMENT ....................................................................................19 INTRODUCTION............................................................................................................... 19 STARTING THE SETUP PROGRAM ............................................................................... 19 FUNCTION OF THE KEYS IN SETUP MODE ................................................................. 19 DESCRIPTION OF THE MENU OPTIONS ...................................................................... 21 DEFAULT SETTINGS....................................................................................................... 22 SETTING THE OPTIONS IN SETUP MODE.................................................................... 23 Language option...................................................................................................................... 23 Date option .............................................................................................................................. 23 Time option.............................................................................................................................. 23 Setting the preset sterilization Programs ................................................................................. 24 Setting the STAND-BY modes ................................................................................................ 26 Setting the Drying Options....................................................................................................... 27 Setting the Printer Options ...................................................................................................... 28 Setting the tank Filling mode ................................................................................................... 29 Acquisition of the environment pressure.................................................................................. 29 Manual activation of the door-locking mechanism ................................................................... 30 Adjusting the LCD contrast...................................................................................................... 30 EXIT THE SETUP MODE ................................................................................................. 30 7. PREPARING THE MATERIAL TO BE STERILIZED ...............................................31 INTRODUCTION............................................................................................................... 31 HANDLING THE MATERIAL BEFORE STERILIZING ..................................................... 31 ARRANGEMENT OF THE LOAD ..................................................................................... 32 8. SELECTING THE STERILIZATION PROGRAM......................................................34 INTRODUCTION............................................................................................................... 34 ABOUT THE SELECTION ................................................................................................ 34 9. RUNNING THE STERILIZATION PROGRAM..........................................................35 GENERAL ......................................................................................................................... 35 STARTING THE STERILIZATION PROGRAM ................................................................ 35 SEQUENCE OF PROCESS ............................................................................................. 35 MANUAL INTERRUPTION OF THE PROGRAM ............................................................ 39 RESULT OF THE PROGRAM .......................................................................................... 40 PRINTING THE DATA OF THE CYCLE........................................................................... 40 10. PRESERVING THE STERILIZED MATERIAL .......................................................41 GENERAL ......................................................................................................................... 41 HANDLING........................................................................................................................ 41 STORING .......................................................................................................................... 41 2 Extrema Plus TABLE OF CONTENTS 11. TEST PROGRAMS................................................................................................. 42 OVERVIEW........................................................................................................................42 HELIX TEST (HT) ..............................................................................................................42 VACUUM TEST (VT) .........................................................................................................43 APPENDIX A – TECHNICAL CHARACTERISTICS .................................................... 45 OVERVIEW TABLE ...........................................................................................................45 SAFETY DEVICES ............................................................................................................46 CHARACTERISTICS OF THE FEEDING WATER ...........................................................47 APPENDIX B - PROGRAMS........................................................................................ 48 INTRODUCTION ...............................................................................................................48 OVERVIEW OF THE AVAILABLE PROGRAMS...............................................................49 DIAGRAMS OF THE STERILIZATION PROGRAMS .......................................................50 DIAGRAM OF THE TEST PROGRAMS............................................................................55 EXAMPLES OF PRINTING REPORTS.............................................................................56 APPENDIX C - MAINTENANCE .................................................................................. 58 INTRODUCTION ...............................................................................................................58 ORDINARY SCHEDULED MAINTENANCE .....................................................................58 MAINTENANCE OPERATIONS ........................................................................................59 Cleaning the gasket and parabola............................................................................................59 Cleaning the external surfaces .................................................................................................59 Cleaning the sterilization chamber and accessories.................................................................59 Disinfecting the external surfaces.............................................................................................59 Lubricating the door locking mechanism ..................................................................................59 Maintenance of the safety valve ...............................................................................................60 Cleaning (or replacement) the draining filter ............................................................................60 Sterilization of the bacteriological filter .....................................................................................60 Replacement of the bacteriological filter...................................................................................60 PERIODIC VALIDATION OF THE STERILIZER ...............................................................61 APPENDIX D - GENERAL PROBLEMS ...................................................................... 62 OVERVIEW........................................................................................................................62 ANALYSIS AND RESOLUTION OF THE PROBLEMS.....................................................62 MANUAL RELEASE OF THE DOOR LOCKING MECHANISM........................................65 APPENDIX E - ALARM SIGNALING ........................................................................... 66 OVERVIEW........................................................................................................................66 ALARM PROCEDURE.......................................................................................................66 Alarm occurring during the sterilization cycle ...........................................................................66 Alarm occurring out the sterilization cycle ................................................................................67 RESET OF THE SYSTEM .................................................................................................67 LIST OF THE ALARM CODES ..........................................................................................68 ANALYSIS AND RESOLUTION OF THE PROBLEMS.....................................................70 APPENDIX F – DRAWINGS......................................................................................... 77 ELECTRICAL DRAWING ..................................................................................................77 HYDRAULIC DRAWING....................................................................................................78 APPENDIX G – DECLARATION OF CONFORMITY................................................... 79 APPENDIX H –OPERATOR’S NOTES ........................................................................ 80 APPENDIX Z – CUSTOMER SERVICE ....................................................................... 81 Extrema Plus 3 1 - FOREWORDS FOREWORDS On thanking for the preference granted, M.O.COM. Ltd. Co. hopes that the performances of this product can result of Your complete satisfaction. In this manual you will find all the procedures for the correct use and the indications for the complete exploitation of the equipment performances. We remain at your disposal for any more explanation, as well as suggestions turned to improve the product and the service. Symbols used through the manual e PAY PARTICULAR ATTENTION TO THE PARAGRAPHS MARKED BY THE FINGER SYMBOL. ATTENTION! THIS SYMBOL POINTS OUT A POTENTIAL DANGER FOR PEOPLE. PLEASE OPERATE ACCORDING TO THE SUITABLE PROCEDURES OF THE MANUAL IN ORDER TO PREVENT POSSIBLE DAMAGES TO THE USER AND/OR TO THIRD PARTIES. CAUTION! THIS SYMBOL POINTS OUT A POTENTIAL DANGER FOR PROPERTY. ACT ACCORDING TO THE SUITABLE PROCEDURES OF THE MANUAL IN ORDER TO PREVENT POSSIBLE DAMAGES TO MATERIAL, EQUIPMENT AND/OR PROPERTIES. CAUTION! This symbol points out a potential danger due to the presence of high temperature. APPLICABLE EUROPEANS DIRECTIVES The product described in this manual is manufactured in accordance with the highest safety standards and doesn't represent any danger for the operator if used according to the following instructions. The product is in accordance with the following European Directive as applicable: USE IDENTIFICATION 73/23/CEE, for the approximation to the legislation of the Members States related to low voltage equipment (and following modifications). 89/336/CEE, for the approximation to the legislation of the Members States related to the electromagnetic compatibility (and following modifications); 93/42/CEE, concerning the medical devices (and following modifications); The product described in this manual is exclusively intended for the sterilization of re-usable surgical instruments and material. THE USE OF THE EQUIPMENT IS STRICTLY LIMITED TO QUALIFIED PERSONEL. NO GROUNDS JUSTIFY THE EQUIPMENT USE OR HANDLING BY UNSKILLED AND/OR UNAUTHORISED PERSONEL. THE DEVICE MUST NOT BE USED FOR THE STERILIZATION OF FLUIDS, LIQUIDS OR PHARMACEUTICAL PRODUCTS. Important notes e e e Extrema Plus THE INFORMATION INCLUDED IN THIS MANUAL ARE SUBJECT TO CHANGES WITHOUT ANY NOTICE. MO.COM. LTD. CO. WON'T BE RESPONSIBLE FOR DIRECT, INDIRECT, ACCIDENTAL, CONSEQUENT DAMAGES OR OTHER DAMAGES RELATED TO THE SUPPLY OR THE USE OF SUCH INFORMATION. ANY REPRODUCTION, MODI FICATIONS OR TRANSLATION OF THIS MANUAL OR PARTS OF IT IS FORBIDDEN WITHOUT PREVIOUS WRITTEN AUTHORIZATION BY M.O.COM. LTD. CO. 1 1 - FOREWORDS SCOPE OF THE MANUAL The present manual has the scope to supply instructions for: – general knowledge of the product; – correct installation and configuration; – sure and efficient use; – correct treatment of the material before and after the sterilization. In the appendix you will find: GENERAL WARNINGS – technical characteristics of the product; – specifications of the sterilization programs; – maintenance procedures; – analysis and solution of the problems; – additional documentation. The product should be used in compliance with the procedures described in the manual and never for purposes differing from the foreseen ones. THE USER IS RESPONSIBLE FOR THE LEGAL FULFILLMENTS CONCERNING THE INSTALLATION AND USE OF THE PRODUCT. IF THE PRODUCT IS NOT CORRECTLY INSTALLED AND USED, OR A SUITABLE MAINTENANCE IS NOT OPERATED, THE MANUFACTURER CANNOT BE CONSIDERED RESPONSIBLE OF POSSIBLE BREAKS, MALFUNCTIONS, DAMAGES, LESIONS TO PROPERTY AND/OR PEOPLE. In order to avoid any danger situations, with possible consequent damages or lesions to property and/or people, the following precautions should be followed: – Use high quality distilled water only. The use of water of inadequate quality could seriously damage the equipment. See Appendix A, Technical Characteristics. – Do not pour any water or liquids over the equipment; – Do not pour inflammable substances over the equipment; – Do not operate on the equipment in presence of explosive or inflammable gas; – Before any maintenance or cleaning action ALWAYS REMOVE the power mains. If this precaution is impossible or the external mains breaker is far or not visible from the people performing the maintenance, affix the poster WORKS IN PROGRESS on the external breaker after having positioned it on OFF. – Make sure that the electric plant is provided with the earth connection in accordance with the current laws; – Do not remove any label or plate from the equipment; in case call for new ones. – Use exclusively original spare parts. THE NOT OBSERVANCE OF WHAT MANUFACTURER TO DECAY . 2 ABOVE DESCRIBED MAKES ANY RESPONSIBILITY OF THE Extrema Plus 2 –PACKAGE CONTENT PACKAGE CONTENT Height Width Depth 610 mm 880 mm 570 mm DIMENSIONS AND WEIGHT Total weight about 70 kg 610 e ON RECEIVING THE PRODUCT, PLEASE VERIFY THAT THE PACKING IS INTACT IN EVERY PART. Open the pack and check that: – The supply corresponds to specifications (see delivery note); – 880 the order 570 there are not evident damages on the product. e IN CASE OF WRONG SUPPLY, MISSING PARTS OR DAMAGES OF WHATEVER TYPE, PLEASE IMMEDIATELY INFORM AND IN DETAIL THE RETAILER AND THE FORWARDER THAT HAS CARRIED OUT THE DELIVERY. PACKING CONTENTS In the box of the accessories The packing contains the following items: Extrema Plus – Extrema Plus steam sterilizer; – Three stainless steel wire trays (Ref. 1); – One stand stainless steel tray-holders (Ref. 2); – Operating Manual (Ref. 3); – Warranty certificate (Ref. 4) (see note). – Box for supplied accessories containing: • Tray removal tong (Ref. 5); • Tank of 2 litres provided with fast fitting for manual distilled water filling (Ref. 6); 3 2 – PACKAGE CONTENT • Additional bacteriological filter (Ref. 7); • Draining tank (10 l) (Ref. 8); • Silicone pipes for sterilizer - draining tank connection (Ref. 9); • External filling tank (10 l) (Ref. 10) and tap (Ref. 11); • Tube fitting, teflon tape and plastic clips (Ref. 12); • Special tool for door mechanism unlocking (Ref. 13). • Hexagonal spanner Ø 14 mm (Ref. 14) e LIFTING AND TRANSPORT KEEP HOME THE GUARANTEE CERTIFICATE TOGETHER THE INVOICE. The packed product should be handled by using, where possible, suitable mechanic tools (cart elevator, transpallet, etc.) and following the indications printed on the packing. In case of manual handling, the product should be moved by two people and using the proper handles provided on the box. The sterilizer should be lifted out the box by two people and moved through a cart or similar means. WE RECOMMEND TO TRANSPORT AND STORE THE EQUIPMENT AT A TEMPERATURE HIGHER THAN 5°C. A PROLONGED EXPOSURE AT LOWER TEMPERATURE COULD CAUSE DAMAGES TO THE PRODUCT . e STORE THE ORIGINAL PACK THAT WILL BE USED FOR A POSSIBLE FUTURE TRANSPORT OF THE EQUIPMENT. USE OF DIFFERENT PACK COULD CAUSE DAMAGES TO THE PRODUCT ON SHIPPING. BEFORE MOVING THE STERILIZER IT IS NECESSARY TO EMPTY THE DISTILLED AND RECOVERY WATER TANKS, AFTER THE EQUIPMENT HAS BEEN SWITCHED OFF FOR ABOUT 30 MINUTES FROM THE LAST CYCLE, IN ORDER TO ALLOW THE COOLING OF ALL THE INTERNAL HOT ELEMENTS. 4 Extrema Plus 3 – GENERAL DESCRIPTION GENERAL DESCRIPTION Extrema Plus is the MO.COM. proposal for the new millennium and represents the "state of art" concerning safety and performances as well as the technological frontier in the field of the small steam sterilizers. INTRODUCTION Extrema Plus is a sophisticated equipment but of very friendly use, adaptable to the different demands thanks to the wide possibilities of configuration and choice of the cycles. The equipment is able to treat in fast way every type of load through various patented systems and the operation completely microprocessor controlled. Besides, Extrema Plus allows a better approach by the user, that, rather than to conform himself to the machine characteristics, can “communicate” with it for configuring the performances to the different job requirements. Extrema Plus, thanks to the friendly use, reduced dimensions and agreeable design, represents the ideal partner for the professional requiring the maximum sterilization safety. GENERAL FEATURES Extrema Plus is a completely microprocessored steam sterilizer, with a 17 litres sterilization chamber. It is characterized by an advanced fractionated vacuum system for the complete air removal also from hollow and porous materials as well as by an effective final vacuum drying phase able to eliminate any trace of condensation from the load. An exclusive steam generation system, combined with the electronic management and high accuracy sensors, guarantees an high process speed and high stability of the thermodynamic parameters during the whole sterilization process. All this guarantees a perfect result ! Extrema Plus offers 11 sterilization programs (including one program completely programmable), optimized for an effective and fast sterilization of different tools and materials used in medical environment, particularly the dental one. Four programs is directly recalled through a proper selection key on the command panel. Program 1 is preset and not modifiable (cycle at 134°C for porous material), whereas the programs 2, 3 and 4 can be modified by the user in order to have at one’s disposal those more proper to the needs. Besides the sterilization programs, the sterilizer offers the facility to choice the preheating modes (STAND-BY) according to the frequency usage and the drying modes according to the selected program type and possible problems occurring with some loads or special materials. The print options of the cycle reports, the water filling possibilities and other features can be completely configurable. For more information, refer to Chapter “Setting the equipment”. Finally Extrema Plus has the most sophisticated and advanced safety systems in order to guarantee the user against possible operation anomalies, both electric, mechanics, thermal and biologic type. e Extrema Plus FOR THE DESCRIPTION CHARACTERISTICS). OF THE SAFETY DEVICES REFER TO APPENDIX A (TECHNICAL 5 3 – GENERAL DESCRIPTION FRONT DEVICES Door handle Command panel Door Parallel printer interface 25-pin connector Serial interface 9-pin connector Bacteriologic filter Filling point of the distilled water reservoir Sterilisation chamber Door status microswitch Door-locking Water stopper Draining point of the distilled water reservoir Resin sponge Porthole 6 Extrema Plus 3 – GENERAL DESCRIPTION REAR DEVICES Vent-hole of the distilled water reservoir Automatic water filling point Safety valve Heat exchanger Manufacturing plate Mains switch Mains fuses Adjustable rear foot Inlet of draining tank level probe Pipe fitting for steam draining Power supply cord Manually resettable thermostat Pipe fitting for condensation draining Extrema Plus 7 3 – GENERAL DESCRIPTION COMMAND PANEL Liquid crystal display (LCD) Alarm LED Process running LED Door status LED Temperature display Pressure display Timer display Selected program signalling LED Selected Test signalling LED MAX reservoir level signalling LED MIN reservoir level signalling LED Start/Stop key (Enter key in the Setup phase) Sterilisation program (1÷4) key (Menu scroll upward key in the Setup phase) Test program key (Menu scroll downward in the Setup phase) Escape key (Setup enabling with relating LED) 8 Extrema Plus 3 – GENERAL DESCRIPTION OPERATING CYCLE EXAMPLE The sterilization program of Extrema Plus can properly be described by a sequence of phases, each with a well defined activity. Considering the example of the most complete program (i.e. program 1 at 134°C for porous material), after having loaded the material in the chamber, closed the door, selected the program and started the cycle by the START key, with consequent blocking of the door locking mechanism, the following sequence will run: 1. Pre-heating of the steam generator and sterilization chamber; 2. Chamber air removal and steam penetration inside the load through a series of vacuum (fluid exhaustion from the sterilization chamber) and pressure phases (steam entering into the chamber); 3. Pressure increasing, with consequent steam temperature increasing up to the preset sterilization conditions (for the example, 134°C); 4. Stabilization of the pressure and temperature conditions inside the sterilization chamber; 5. Run of the sterilization process for the preset time (for the example, 4 minutes); 6. Chamber pressure decreasing through steam discharge; 7. Vacuum drying phase; 8. Venting phase through sterile air; 9. Chamber pressure leveling up to atmospheric value. As reached this last phase the door locking mechanism will be released and the door can be opened to recovery the load from the sterilization chamber paying attention to use proper precautions. Whereas the phases 1, 3, 4, 6 and 9 are essentially identical for all the cycle types, with little time differences depending on the quantity and consistence of the load and heating conditions, the phases 2, 5, 7 and 8 sharply vary their configuration and duration depending on the selected cycle (and accordingly on the load typology) and on the choices operated by the user. A standard program can be outlined with the following graph: Pressure (bar) EXTREMA Plus PROCESS 2.10 2.00 1.00 Time (min 0.00 -0.80 -0.90 -1.00 FRACTIONATED VACUUM e Extrema Plus VACUUM DRYING FOR DETAILS ABOUT THE AVAILABLE PROGRAMS, REFER TO APPENDIX B (PROGRAMS) 9 4 – INSTALLATION INSTALLATION INTRODUCTION For the right operation, features exploitation and life extension of the sterilizer, the first and basic step is the correct and careful installation. Such precaution besides avoids possible malfunctions or damages to the equipment, as well as possible danger situations for property and people. We suggest to meticulously follow the warnings reported on this chapter. e e “ASSISTENZA CLIENTI” M.O.COM. (SEE APPENDIX QUESTION OR FURTHER INFORMATION. Z) IS AT YOUR DISPOSAL FOR ANY THE STERILIZER IS FORWARDED AFTER HAVING PASSED A SET OF PROGRAMMED CONTROLS. THEREFORE FURTHER CALIBRATIONS FOR THE OPERATION ARE NOT NECESSARY ANY MORE . Dimensions and weight – Height (total) 400 mm – Width (total) 456 mm – Depth (excluded rear fittings) 515 mm Weight (total) about 55 kg – 400 515 456 Power supply The electric plant to which the sterilizer is connected has to correctly be sized according to the electric characteristics of the equipment. The rating data are reported on the plate on the rear panel of the machine. e INSTALL THE EQUIPMENT SO THAT THE PLUG OF THE MAINS CABLE CAN BE EASILY ACCESSIBLE. VERIFY THE ADEQUACY OF THE ELECTRIC PLANT, PARTICULARLY FOR THE EARTH CONNECTION. DIMENSIONS FOR BUILD MOUNTING In case the sterilizer has to be set into a piece of furniture it is necessary to provide a suitable space all around the equipment in order to assure an effective ventilation, as well as a free space in the rear in order to allow the passage of the draining pipelines and power supply cord, and to assure an adequate air flow for the cooling of the heating exchanger. Accordingly it is important that the build for the installation has the minimum dimensions as in figure: BUILD DIMENSIONS SMALLER THAN THE INDICATED ONES CAN JEOPARDIZE THE AIR CIRCULATION AROUND THE EQUIPMENT AND NOT GUARANTEE A SUITABLE COOLING, WITH CONSEQUENT REDUCTION OF THE PERFORMANCES AND/OR POSSIBLE DAMAGES. e 500 IN CASE THE STERILIZER INSTALLATION MAKES THE MAINS BREAKER INACCESSIBLE, USE A MAINS SOCKET INCORPORATING A SWITCH. DON'T REMOVE THE CARTER NEITHER OTHER EXTERNAL ELEMENTS. ARRANGE INTO THE BUILD THE EQUIPMENT COMPLETE IN EVERY PART. e 10 570 550 FOR THE COMPLETE TECHNICAL DATA REFER TO APPENDIX A. (TECHNICAL CHARACTERISTICS). Extrema Plus 4 – INSTALLATION GENERAL INSTALLATION DIRECTIONS In order to assure the correct operation of the equipment and/or avoid situations of risk, observe the following directions: – Install the sterilizer on a plain surface; eventually adjust the rear feet to match possible irregularities. Verify that the plan is able to support the weight of the equipment (abt. 55 kg); – Allow a suitable space for the ventilation (at least 10 cm each side) all around the sterilizer, particularly on the back side. In case the equipment is set into a piece of furniture, verify the respect of the warnings as above indicated, avoiding possible obstruction of the air slots; – Do not install the sterilizer near tubs, sinks or analogous places, avoiding the contact with water or liquid. Otherwise, short circuits and/or situations of potential danger for the operator could occur; – Do not install the sterilizer in environments characterized by the presence of excessive humidity or in rooms with poor ventilation; – Do not install the sterilizer in environments characterized by the presence of inflammable and explosive gas or vapors; – Install the equipment in such a way the power supply cable could not be bent or crushed. The cable should run freely to A.C. socket. Install the equipment in such a way the draining pipelines could not be bent or crushed. They should run freely to the external draining tank. – ELECTRICAL CONNECTIONS The sterilizer should be connected, in compliance with the laws and/or directives in-force, to a mains socket of the electric plant with a power rate suitable for the equipment consumption, and provided with earth connection. The mains socket should be suitably protected through differential switch having the following characteristics: Mains socket Differential switch – Rating current In 16 A – Differential current I∆n 0,03 A with earth pin Mains switch e THE MANUFACTURER IS NOT LIABLE FOR THE DAMAGES CAUSED BY AN INSTALLATION WHERE A NOT SUITABLE ELECTRIC PLANT AND/OR EARTH CONNECTION ARE PROVIDED. In case the mains plug doesn’t match the socket, replace the cable plug with a suitable type of same electrical characteristics or anyway suitable for the electrical requirements of the equipment. The plug choice and replacement is on care and responsibility of the user. e Extrema Plus DIRECTLY CONNECT THE CABLE TO THE MAINS SOCKET. DON'T USE EXTENSIONS, ADAPTERS OR OTHER ACCESSORIES. 11 4 – INSTALLATION CONNECTING THE DRAINING TANK During the program running, the steam and condensation water is conveyed in a special supplied tank external to the equipment. e CHECK FOR THE CORRECT INSTALLATION OF THE SILENCER ON THE FITTING A OF THE DRAINING TANK For the correct connection of the tank, proceed as follows: – Mount the ends of two supplied pipes on the fittings marked A and B, taking care to plug in completely the pipes. – Lock the pipes on the fittings by using the supplied plastic clips; – Cut the pipes according to the desired distance and mount the opposite ends on the two fittings of the draining tank, taking care to match the correct connection (A-A and B-B), as shown in the figure; – Lock the pipes on the fittings by using the supplied plastic clips; e – Plug the jack of the level probe in the socket mounted on the rear side of the equipment (see figure); e – CHECK THAT THE CONNECTED PIPES ARE RUNNING FREELY FROM THE UNIT TOWARDS THE DRAINING TANK WITHOUT ANY BEND, CRUSH OR OBSTRUCTION. CHECK FOR THE CORRECT MOUNTING OF THE PLUG. IF NOT CONNECTED, THE EQUIPMENT WILL DETECT A FALSE MAX LEVEL IN THE DRAINING TANK, WITH CONSEQUENT LIGHTING OF THE LED ON THE COMMAND PANEL (SEE CHAPTER 5 “FIRST START-UP”) AND ALARM SIGNALING GENERATION IF THE START COMMAND IS ENTERED. Fill the tank of normal tap water up to the level marked on the tank. e PERIODICALLY EMPTY THE TANK HAVING CARE TO LET ALWAYS A MINIMUM OF WATER INSIDE THE TANK CORRESPONDING TO THE MARKED LEVEL, OTHERWISE THE NOISE CAUSED BY THE STEAM DISCHARGE AND THE STEAM EXHAUSTION FROM THE VENT HOLE WILL INCREASE NOTICEABLY. NORMALLY HOT WATER AND PRESSURIZED STEAM GOES OUT FITTINGS. CAREFULLY CONNECT ALL ELEMENTS OF THE DRAINING AVOID DAMAGES AND INJURIES TO PROPERTY AND/OR PEOPLE . 12 FROM THE DRAINING CIRCUIT IN ORDER TO Extrema Plus 4 – INSTALLATION CENTRALIZED DRAINING SYSTEM CONNECTION To avoid the recurrent emptying of the draining tank it is possible to directly connect it to a centralized draining system. In this case, proceed as follows: – Remove the pipe fitting from the free venthole, remove the screw plug from the side fitting of the tank and screw it on the previous vent-hole; – Screw a supplied 1/8" pipe fitting on the side fitting; – Use teflon ribbon or fitting sealing to get a perfect seal; – Use one spanner for holding the nut and a second spanner for tightening the pipe fitting. – Mount on the fitting a pipe of suitable material and sizes (not supplied), taking care to plug in it completely. – Lock the pipe on the fitting by using the supplied plastic clips. – Adapt the centralized draining circuit to match this new link (consult a specialized plumber); – – Connect the opposite end of the pipe to the draining plant and verify the sealing. Check that the pipe is running freely from the external tank to the centralized draining plant, without any bend, crush or obstruction. Free tube fitting To the draining plant Tube fitting The elements should be arranged according to the following scheme (example): Connection point to the centralized system Sterilizer CENTRALIZED SYSTEM Connection point to the draining tank Draining tank e Extrema Plus STATED “X” THE GROUND-FITTING POINT HEIGHT ON THE TANK, THE CONNECTION POINT TO THE CENTRALIZED DRAINING SYSTEM MUST BE AT A QUOTA < X+30 MM. HIGHER QUOTAS CAN JEOPARDIZE THE CORRECT EMPTYING OF THE TANK. 13 4 – INSTALLATION EXTERNAL FILLING TANK CONNECTION (automatic filling feature) In order to eliminate the recurrent manual distilled water topping up (see Chapter, First start-up), it is possible to connect the sterilizer to the supplied external filling tank (10 l) that should be periodically filled by the user. In this case the filling of the internal reservoir will be automatically controlled by a pump as soon as the water level of the internal reservoir reaches the MIN level. For the correct connection of the filling tank, proceed as follows: – Mount the supplied tap on the bottom hole of the filling tank; use the teflon rubber or other sealing to get a perfect seal. – Mount the supplied silicone pipe on the filling point on the rear of the equipment, taking care to plug in it completely. Tap – Lock the pipe by using a supplied plastic clip. – Cut the pipe according to the desired distance and mount the opposite end on the output of the tap of the filling tank. – Check that the pipe is running freely from the unit towards the filling tank without any bend, crush or obstruction. – Loosen the top cup to let the water to flow (take care to also remove the possible gasket or under-cup); – Turn in open position the tap of the filling tank. e FOR THE SETTING OF THE AUTOMATIC FILLING REFER TO CHAPTER “SETTING THE EQUIPMENT”). PLEASE TAKE CARE TO ACTIVATE THIS FUNCTION ONLY AFTER THE TANK HAS BEEN FILLED WITH DISTILLED WATER. e WHERE AVAILABLE, THE EXTERNAL FILLING TANK CAN DIRECTLY BE FED BY A WATER DEPURATION PLANT (AN INVERSE OSMOSIS SYSTEM IS RECOMMENDED) PROVIDED WITH THE NECESSARY CONTROLS AND OPPORTUNELY CONNECTED. Please contact “Assistenza Clienti” M.O.COM. (see Appendix Z) for further in-formations and advice about the connection of different water purification systems to the sterilizer. 14 Extrema Plus 4 – INSTALLATION CONNECTION TO A PRINTER To get a control with the most significant data, a standard needle (i.e. IBM Proprinter or Epson 70) or thermal printer equipped with Centronics parallel interface can be connected to the sterilizer printer port. This strip can be filed as tracability report of the carried out sterilization process. e IN CASE OF THERMAL PRINTER, STORE THE STRIP IN PLACE ADEQUATE FOR PROTECTING IT FROM LIGHT AND/OR HEAT SOURCES. Connect the printer to the sterilizer port through a parallel cable (maximum length = 2m), provided one side with DB 25 male connector (sterilizer side). For setting the printer and choice the report characteristics refer to Chapter “Setting the equipment”. e ACQUIRING THE ENVIRONMENT PRESSURE VALUE THE EQUIPMENT IS ABLE TO MANAGE ALSO LASER OR INKJET PRINTERS. HOWEVER THESE TYPES OF PRINTERS REQUIRE AT THE END OF EACH PRINTED PAGE A FORM FEED (FF) INSTEAD OF LINE FEED (LF) COMMAND THAT IS NOT MANAGED BY THE STERILIZER. TO GET THE PRINTOUT WILL BE THEREFORE NECESSARY TO ENABLE THE FORM-FEED KEY NORMALLY PROVIDED ON THE PRINTER. For the correct operation of internal auxiliary systems, it is necessary that the sterilizer acquires the environment pressure value of the installation site before starting the first operation cycle. The procedure is described in the Chapter “Setting the equipment” (see paragraph Option selection in the SETUP program). Please read carefully the indications supplied. e THE EQUIPMENT LEAVES THE FACTORY WITH THE PRESSURE VALUE RELATING THE PRODUCTION ENVIRONMENT STORED INTO THE MEMORY. IF THE PRESSURE ACQUISITION PROCEDURE IS NOT PERFORMED, THE EQUIPMENT WOULD NOT CORRECTLY WORK, WITH DIFFICULT OR IMPOSSIBLE DOOR OPENING AT THE END OF THE PROGRAM . Extrema Plus 15 5 – FIRST START-UP FIRST START-UP SWITCHING ON Once the sterilizer has correctly been installed, you can proceed to the switching on and equipment configuration. Switch on the sterilizer through the mains switch mounted on the rear side. e INITIAL SELF-TEST PERFORM THIS ACTION WITH THE DOOR OF THE STERILIZER IN OPEN POSITION IN ORDER TO ALLOW THE INITIAL CONTROL OF THE SAFETY SYSTEM TO OPERATE CORRECTLY. At the switching on, the equipment turns on in sequence all the front indicators of the command panel, allowing a visual check by the user for possible anomalies. The turn on of the signaling is accompanied by an acoustic signal. Ended this check phase the machine performs the automatic test of the safety block of the closing system. On the liquid crystal display (LCD) the following message will appear: E X T R E M A P L U S S E L F T E S T e IF THE DOOR WAS CLOSED, THE AUTOMATIC TEST OF THE SAFETY BLOCK CANNOT OCCUR AND THE SELF-TEST IS INTERRUPTED. ON THE LCD DISPLAY THE FOLLOWING MESSAGE APPEARS, ACCOMPANIED BY ACOUSTIC SIGNALS: O P E N T H E D O O R T O C O N T I N U E Open the door to allow the test continuation. At the end of self-test the display shows: E X T R E M A P L U S S E L F T E S T P A S S E D ACQUISITION AND AUTOMATIC UPDATING OF THE ENVIRONMENTAL PRESSURE VALUE At the switching on, the unit provides for the automatic reading of the environmental pressure value. If the difference between currently read and stored pressure values (see Chapter “Setting the equipment”, par. Setting the option in SETUP mode) is higher than a preset value, the unit will update automatically the stored value after a short waiting time, otherwise the stored value remains unchanged. Subsequently, the unit will run the initial self-test (see previous paragraph), and later on the LCD will display the following message accompanied by acoustic signal : 0 ⇑ b a r U P D A T E D = C O N T I N U E Pushing key ESC ⇑ the unit will enter in STAND-BY mode (see next paragraph). e 16 THE ACQUISITION PROCEDURE (AND POSSIBLE UPDATING) OF THE ENVIRONMENTAL PRESSURE VALUE WILL BE PERFORMED EACH TIME THE UNIT IS SWITCHED ON (THROUGH THE MAINS SWITCH). Extrema Plus 5 – FIRST START-UP STAND-BY STATE Over the self-test procedure the sterilizer goes in STAND-BY state, and the LCD display will show: 3 1 / 0 5 / 1 9 9 9 1 1 : 0 5 C n t r 0 0 0 0 0 / 0 0 0 0 0 with the current date and time on the upper line and the cycle counter on the lower line reporting two values: the number of correctly completed cycles on the left and all those that was initiated on the right. e THE CYCLE IS CONSIDERED INITIATED AT THE START COMMAND OF THE STERILIZATION CYCLE (FIRST VACUUM PHASE), EXCLUDING THE PREHEATING PHASE. THE CYCLE IS CONSIDERED COMPLETED IF THE END OF THE PROGRAM IS REACHED (SEE CHAPTER “RUNNING THE STERILIZATION PROGRAM”). At regular intervals the following message alternates on the display: S T A N D B Y H I G H M A N U A L F I L L I N G where the upper line shows the setting of the preheating mode (STAND-BY) and lower line the filling mode of the distilled water reservoir (FILLING). e FOR THE DATE AND TIME SETTING AS WELL AS THE (STAND-BY) AND RESERVOIR FILLING (FILLING) EQUIPMENT”. CHOICE OF THE PREHEATING MODES REFER TO CHAPTER “SETTING THE The command panel shows all the LED’s turned off (apart the door status and water MIN/MAX level signaling). At the switching on of the equipment the led MIN will normally be turned on. The displays will show: – Temperature display (°C): current sterilization chamber temperature – Pressure display (bar): current sterilization chamber pressure – Timer display ( --- ): The equipment is frozen waiting for the selection by the user of the desired sterilization program (see Chapter “Selecting the sterilization program”). FILLING THE DISTILLED WATER Before using the sterilizer the first time and all the next times the red indicator MIN of the water level turns on, it is necessary to fill or top up the distilled water reservoir. Manual filling Operate in the following way (with open door) on referring to the figure: water levelA 1. Hold horizontally the manual filling tank and fill it of distilled water (2 l); 2. Connect the fast fitting of the rubber pipe to the inlet mounted on the top right front of the equipment, pushing for a click; 3. Position vertically the tank and loosen the cap taking care do not upset water on the machine. 4. Now the water will start to flow into the internal reservoir; 5. On continuing the filling the MIN level indicator turns off. 6. Continue up to dry out the tank; Extrema Plus 17 5 – FIRST START-UP 7. Take the tank and lower it below the connection point, holding it horizontally; 8. Push on the metallic clip of the fitting and remove the rubber pipe; 9. Fill again the tank (2 l) and repeat once again the steps 2, 3 and 4; 10. As the Led MAX turns on (accompanied by an acoustic signal) interrupt the filling and operates as described at the steps 7 and 8. e Automatic filling TO START THE STERILIZATION PROGRAM IS NOT NECESSARY THAT THE LED TURNED ON. IT IS SUFFICIENT THAT THE LED MIN IS TURNED OFF. MAX IS When the automatic filling system through external tank is installed (see Chapter “Installation”), the filling will occur automatically since the automatic filling option is selected. Obviously, for the correct operation, the user has to prior fill the external tank. e ONLY USE HIGH QUALITY DISTILLED WATER. FOR THE INDICATIONS CONCERNING THE WATER SEE APPENDIX A (TECHNICAL CHARACTERISTICS). For the setting of the automatic filling option refer to Chapter “Setting the equipment” THE AUTOMATIC FILLING SYSTEM NEVER HAS TO WORK “DRYED”, A PREMATURE USURY OF THE AUXILIARY WATER INJECTION POMP MIGHT OCCUR. PERIODICALLY VERIFY THE LEVEL OF THE WATER INTO THE EXTERNAL TANK. DRAINING TANK WATER LEVEL SIGNALING The max water-level value in the draining tank is properly signaled by the alternate turning on of the red Led MIN and green Led MAX on the command panel of the unit. Provide for the draining of the external tank. e Min e DO NOT DRAIN COMPLETELY THE TANK, BUT LEAVE A LAYER OF WATER CORRESPONDING TO THE SIGN STAMPED ON THE TANK. OTHERWISE, THE SOUND LEVEL OF THE WATER DISCHARGE AND THE OUTFLOW OF THE STEAM FROM THE VENT-HOLE WILL INCREASE CONSIDERABLY. IN CASE OF WRONG MAX LEVEL SIGNALING ON THE COMMAND PANEL (THE WATER LEVEL IN THE DRAINING TANK IS LOWER THE MAX LEVEL), CHECK FOR THE CORRECT CONNECTION OF THE PROBE’S PLUG INTO THE REAR SOCKET OF THE UNIT. A FALSE CONNECTION CAUSES THIS WRONG SIGNALING. Max 18 Extrema Plus 6 – SETTING THE EQUIPMENT SETTING THE EQUIPMENT INTRODUCTION Extrema Plus offers new and wider customization possibilities. The configuration of the sterilizer can be suited to user’s demands, by adapting, for instance, the characteristics of the machine depending on the use frequency and the type of material to be treated. Through a sophisticated SETUP program a lot of options can be selected by the user through a friendly and easy menu. STARTING THE SETUP PROGRAM e USE THE SETUP PROGRAM EVERY TIME YOU NEED. A CORRECT CUSTOMIZATION OF THE e “ASSISTENZA CLIENTI” M.O.COM. (SEE APPENDIX Z) EQUIPMENT ALLOWS TO GET THE BEST PERFORMANCES AND THE MAXIMUM SATISFACTION FOR THE USE. IS AT DISPOSAL OF THE USERS TO SUPPLY SUGGESTIONS OR ADVICES FOR THE BETTER USE THE OPTIONS AVAILABLE IN THE SETUP PROGRAM. To enable the SETUP program push for a few seconds on the SETUP key (the lowest key on the command panel), up to the liquid crystal display shows: E X T R E M A P L U S S E T U P The Led closed the key turns on and stays on for all the setup phase to signal this operating status. After a moment the display will show: P R E S S ↵ = O K ⇑ = E S C Press the key ENTER ↵ to enter the SETUP program. Now the display is showing the first level options of the menu (see paragraph Flowchart of the SETUP program). On the contrary, press the key ESC ⇑ to exit the SETUP program and return to the normal operation. e FUNCTION OF THE KEYS IN SETUP MODE THE SETUP PROGRAM CAN ONLY BE RECALLED FROM STAND-BY STATE. DURING THE EXECUTION OF THE PROGRAM THE SETUP MODE CANNOT BE ACCESSED. In the SETUP mode the keys have the function indicated on the right of the key on the background of the command panel and differs from the normal operation as follows: – Symbol ↵ ENTER function, to confirm the data (START/STOP key) – Symbol + increment/scrolling up function (program selection key) – Symbol — decrement/scrolling down function (test selection key) – Symbol ⇑ ESC function, to exit the option (SETUP key ) This key configuration remains valid for the SETUP mode. Extrema Plus 19 6 – SETTING THE EQUIPMENT MAIN MENU 2nd Level 3rd Level 9th Level ENGLISH other languages BASIC LANGUAGE dd/mm/yy DATE TIME hh:mm EXIT ADVANCED 2nd PRESET PROGRAMS 3rd PRESET 134c SOLID 4th PRESET 121c SOLID EXIT 134c WRAP 121c WRAP 134c HANDPC 121c HANDPC 134c EMERGN 121c POROUS 134c PRION STAND BY XXXc CUSTOM 134c TIME: XX min LOW EXIT 121c =OK =ESC INTELLIGENT FRACTIONAT. SINGLE EXIT OFF EXIT EXIT EXTRA LONG EXTRA LONG DRY SHORT DRY STANDARD EXIT STANDARD INTELLIGENT DRYING OPT. STANDARD HIGH FAST EXTRA: XX min =OK =ESC EXIT SHORT STANDARD EXIT FAST EXIT CR CR+LF PRINTER PRINT OPT. OFF REPORT EXIT EXIT COPIES: X =OK =ESC NR. COPIES FILLING AUTOMATIC PRINT LAST NORMAL EXIT MANUAL EXIT EXTENDED SET 0 bar SET VALUES? =OK DOOR LOCK =ESC IF THE DOOR CURRENT VALUE IS OPEN SETINTOMEMORY IF THE DOOR OPEN THE DOOR IS CLOSED TO CONTINUE LCDCONTRAST EXIT PRINT REPORT EXIT EXIT SPECIAL NOW PRINTING PLEASE WAIT.. TIMED MESSAGE UNTIL DOOR OPENING LOCK UNLOCK ESC TO EXIT INCREASE DECREASE SERVICE REVIEW ACCESSIBLE BY TECHNICAL SERVICE ONLY LANGUAGE XX/XX/XXXX FLOWCHART OF THE SETUP MENU DATE XX/XX/XXXX TIME XX:XX In SETUP mode various menu options are available and organized on more levels through-connected in logical way. 2nd PRESET XXXc XXXXXX 3rd PRESET XXXc XXXXXX e 4th PRESET XXXc XXXXXX STAND BY XXXX OFF, LOW, HIGH DRYING OPTIONS Long Drying: STND, INTEL, EXTRA Short Drying: STND, FAST XXXXX/XXXXX PRINT OPTIONS XXXXXXX/XX Printer TYPE (TYPE1, TYPE 2, .....) Nr. of copies (01 ..... 05) AUTOFILLING XXX ON, OFF EXIT REVIEW EXIT 20 EXTREMA PLUS SETUP COMPLETE PRESS TO EXIT REVIEW USE KEY + AND — TO SCROLL THE OPTIONS, THE KEY e e ↵ TO CONFIRM (STORE) THE CHOICE. SELECT EXIT ITEM AND CONFIRM WITH KEY ↵ (OR USE KEY ⇑) TO COME BACK ONE MENU LEVEL. CONFIRMING (STORING) THE LAST OPTION YOU ND RD COME BACK AT THE CORRESPONDING 2 OR 2 MENU LEVEL. EXIT SETUP MODE AND RETURN TO STAND-BY MODE Extrema Plus 6 – SETTING THE EQUIPMENT DESCRIPTION OF THE MENU OPTIONS On the following the meaning of the main menu and second level options are described. MAIN MENU The main menu of the SETUP program has 6 options that recall further menus (second level): BASIC ADVANCED SPECIAL SERVICE REVIEW EXIT e THE (basic options) (advanced options) (special options) (not user available) (review of the selected options) (exit the SETUP mode and return to normal operation. See paragraph Exit the SETUP mode) WAY FOR SETTING THE DIFFERENT OPERATING MODES IS DESCRIBED ON THE PARAGRAPH SETTING THE OPTIONS IN THE SETUP MODE. BASIC Menu BASIC menu (basic options) is formed by the following options: LANGUAGE DATE TIME EXIT (current language setting) (current date setting); (current time setting) (exit the BASIC menu and return to main menu) ADVANCED menu ADVANCED menu (advanced options) is formed by the following options: PROGRAMS STAND-BY DRYING OPT. PRINT OPT. FILLING EXIT (preset sterilization programs selection, as shown on the front panel by LED’s 2, 3 and 4) (stand-by mode setting) (dry mode setting) (printer and printing option setting) (reservoir filling mode setting) (exit the ADVANCED menu and return to main menu) SPECIAL menu SPECIAL menu (special options) is formed by the following options: SET 0 bar DOOR LOCK LCD CONTRAST EXIT (local pressure acquiring) (door locking mechanism activation) (display contrast adjustment) (exit the SPECIAL menu and return to main menu) SERVICE menu SERVICE menu can be accessed by M.O.COM. Service ONLY. REVIEW menu REVIEW menu recall the current settings of the machine, allowing the user to verify the exactness. The following screens are available (each formed by two lines): Extrema Plus LANGUAGE XXXXXXX DATE dd/mm/yyyy language that has been set ENGLISH – (other language) date that has been set day/month/year TIME hh:mm time that has been set hour:minutes 21 6 – SETTING THE EQUIPMENT 2nd PRESET XXXc XXXXXX preset program associated to Led 2 of the front panel name of the sterilization program 3rd PRESET XXXc XXXXXX preset program associated to Led 3 of the front panel name of the sterilization program 4th PRESET XXXc XXXXXX preset program associated to Led 3 of the front panel name of the sterilization program STAND-BY XXXX stand-by mode that has been set OFF - LOW - HIGH DRYING OPTIONS XXXXX / XXXXX dry type that has been set (LONG / SHORT) - STND (standard) - INTEL (intelligent) EXTRA / STND (standard) - FAST PRINT OPTIONS XXXXX / XX printer type selected / printout number OFF - CR - CR+LF / number of copies AUTOFILLING XXXXXX tank filling mode that has been set ON (automatic) – OFF (manual) EXIT REVIEW exit the REVIEW menu e DEFAULT SETTINGS FOR THE MEANING SETUP MODE”. OF THE ABOVE TERMS SEE PARAGRAPH THE OPTIONS IN Extrema Plus is delivered with the following default settings: DATE: TIME: current date current hour PROGRAMS: e Preset 1: Preset 2: Preset 3: Preset 4: 134°C POROUS (not modifiable by the user) 134°C HOLLOW (modifiable by the user) 134°C SOLID (modifiable by the user) 134°C EMERGENCY (modifiable by the user) THE PROGRAMS UNDER THE PRESETS 2, 3 AND 4 ARE PREFERRED SETTINGS. COMBINATIONS ARE POSSIBLE FOR DIFFERENT MARKETS. STAND-BY: OTHER HIGH DRYING: Long: Short: STANDARD STANDARD PRINT OPT.: Printer: Nr. of copies: OFF 1 FILLING: 22 “SETTING MANUAL Extrema Plus 6 – SETTING THE EQUIPMENT SETTING THE OPTIONS IN SETUP MODE We now analyze in detail how to enable the different available options, proceeding with the order as shown in the previous paragraph (Description of the menu options). Language option Select the option LANGUAGE with the key ↵, the following screen will be shown: (LANGUAGE option in the BASIC menu) → E N G L I S H + ↑ ( o t h e r l a n g u a g e ) - ↓ Select the desired language. Scroll the list by the key + or – and confirm with the key ↵ to store the choice. With the confirmation command you re-enter in the second level menu. e Date option (DATE option in the BASIC menu) FROM NOW ON, THE SETUP MENU WILL BE SHOWN IN THE SELECTED LANGUAGE. As selected the option DATE through the key ↵, the following screen will be shown: d d / m m / y y ↵ → + ↑ - ↓ Carry out the following operations: – Day indication is flashing: adjust for the current date through the keys + and -. Confirm through the key ↵. – Month indication is flashing: adjust for the current month through the keys + and -. Confirm through the key ↵. – Year indication is flashing: adjust for the current year through the keys + and -. Confirm through the key ↵. With the last confirmation the set date will be stored and the second level of the menu returned. Time option (TIME option in the BASIC menu) As selected the option TIME through the key ↵, the following screen will be shown: h h : m m ↵ → + ↑ - ↓ Carry out the following operations: – Hour indication is flashing: adjust for the current hour through the keys + and -. Confirm through the key ↵. – Minute indication is flashing: adjust for the current minutes through the keys + and -. Confirm through the key ↵. With the last confirmation the set time will be stored and the second level of the menu returned. Extrema Plus 23 6 – SETTING THE EQUIPMENT Setting the preset sterilization Programs (PROGRAMS option of the ADVANCED menu) The selection of the programs and their storing under the preset key of the command panel occurs by performing the following steps through different menu sequence. It is possible to choose both the preset programs and the user configurable program (CUSTOM). We will see the two cases. To select a PRESET program operate as follows: 1. As selected the PROGRAMS option through the key ↵, the following menu appears: → 2 n d 3 t h 4 t h + ↑ - ↓ P R E S E T P R E S E T P R E S E T Choice the position on the command panel (2, 3 or 4) the preset sterilization program has to be associated and select the item through the keys + and -. Confirm by the key ↵. 2. Now the display is showing the list of the available cycles (two lines in turn): → . 1 1 1 1 1 1 1 1 1 X 3 2 3 2 3 2 3 2 3 X 4 1 4 1 4 1 4 1 4 X c c c c c c c c c c S S W W H H E P P C O O R R A A M O R U L I D L I D A P P A P P N D P N D P E R G R O U I O N S T O + ↑ - ↓ E D E D C C N S M Through the keys + and - scroll the list to find the desired sterilization program. 3. Confirm the choice by the key ↵. The program will be stored at the selected position. e IF AN IDENTICAL STERILIZATION PROGRAM IS ALREADY PRESENT IN A DIFFERENT PRESET POSITION, THE CHOICE WON'T BE ACCEPTED. ON THE SCREEN THE FOLLOWING WARNING APPEARS, ACCOMPANIED BY ACOUSTIC SIGNALINGS: T H I S P R O G R A M I S A L R E A D Y P R E S E T ! e THE SELECTION CAN BE WHENEVER MODIFIABLE BY PERFORMING AGAIN THE PROCEDURE ABOVE DESCRIBED. To configure a CUSTOM cycle, proceed as follows: 1. As selected the PROGRAMS option through the key ↵, the following menu appears: → 2 n d 3 t h 4 t h P R E S E T P R E S E T P R E S E T Choice the position on the command panel (2, 3 or 4) the CUSTOM sterilization program has to be associated and select the item through the keys + and -. Confirm by the key ↵. 2. Once entered in the available program list, select the item XXXc CUSTOM through the keys + and -: → X X X c … … … C U S T O M + ↑ - ↓ Confirm through the key ↵. 24 Extrema Plus 6 – SETTING THE EQUIPMENT 3. Now the new menu allowing the choice of the sterilization temperature appears: → + ↑ - ↓ 1 3 4 c 1 2 1 c Select 121c for a CUSTOM program with a sterilization process at 121°C, or 134c for a program at 134°C. Move on the choice by using the keys + / - and confirm by the key ↵. 4. Then the following screen will be shown: T I M E : X X m i n ↵ = O K ⇑ = E S C + - ↑ ↓ requiring to choice the duration of the sterilization process. Use the key + / - to adjust the value, then confirm by the key ↵. e THE STERILIZATION PROCESS TIME RANGES BETWEEN 4 AND 30 MINUTES FOR THE PROGRAM AT 134°C, AND BETWEEN 20 AND 30 MINUTES FOR THE PROGRAM AT 121°C. 5. As set the time, appear the menu for selecting the type of the initial vacuum: → F R A C T I O N A T E D S I N G L E + ↑ - ↓ Choice FRACTIONATED to perform a fractionated vacuum, or SINGLE for one prevacuum phase only. Use the key + / - then confirm by the key ↵. 6. Now a next menu is shown where the drying modes can be selected: → L O N G D R Y S H O R T D R Y + ↑ - ↓ Choice LONG to dry in properly way the porous and/or wrapped instruments or SHORT in case of load with unwrapped (or hollow) instruments. Use the key + / - then confirm by the key ↵. 7. Depending on the option selected (LONG or SHORT), two different menus will be prompted: a) Mode LONG The following options are available: → S T A N D A R D I N T E L L I G E N T + ↑ - ↓ E X T R A Select STANDARD option for a long preset time drying (about 10 minutes). e WITH BIG LOAD OR SPECIAL MATERIAL, THE STANDARD OPTION MIGHT NOT GUARANTEE SOMETIMES A CORRECT RESULT. IN THIS CASE, EXTEND THE DRYING PHASE WITH THE EXTRA OPTION. Select INTELLIGENT to enable an automatic drying characterized with a duration (higher or lower the standard one) depending on the load volume, quantity and typology. e Extrema Plus WITH COMPLEX LOAD (E.G. WRAPPED INSTRUMENTS IN STERILIZATION “CONTAINER”) THE “INTELLIGENT” OPTION MIGHT NOT CORRECTLY OPERATE, WITH RESULTS LOWER THE EXPECTATION. IN THIS CASE USE THE STANDARD OR EXTRA OPTIONS AS NECESSARY. 25 6 – SETTING THE EQUIPMENT Select EXTRA option for extending the drying phase of a selectable time period (e.g. for particularly difficult load). Enabling this option, the following choice will be prompted: E X T R A : X X ↵ = O K m i n ⇑ = E S C + ↑ - ↓ allowing to set the time period of the extra drying. The extended time ranges from 1 to 15 minutes. b) Mode SHORT The following options are displayed: → S T A N D A R D F A S T + ↑ - ↓ Select STANDARD option for a preset time period drying (about 4 minutes). Select FAST option for a very short drying phase but forgoing the complete removal of the residual humidity. Use the key + / - then confirm by the key ↵. 8. Confirm the choices by the key ↵. The program is stored at the selected position. e IF THE PROGRAM CUSTOM IS ALREADY PRESENT IN A DIFFERENT PRESET POSITION, THE CHOICE WON'T BE ACCEPTED. ON THE SCREEN THE FOLLOWING WARNING APPEARS, ACCOMPANIED BY ACOUSTIC SIGNALING: T H I S P R O G R A M I S A L R E A D Y P R E S E T ! e e THE SELECTION CAN BE WHENEVER MODIFIABLE BY PERFORMING AGAIN THE PROCEDURE ABOVE DESCRIBED. THE LIST OF THE AVAILABLE PROGRAMS, THEIR DIAGRAMS AND THE CHARACTERISTICS OF THE AUTOCLAVABLE MATERIAL (DEPENDING ON THE PROGRAMS) CAN BE FOUND IN APPENDIX B (PROGRAMS). Setting the STANDBY modes The heating stage in STAND-BY status (pre-heating) can be set according to the high- or low-use of the unit and others possible considerations. (STAND-BY option of the ADVANCED menu) As selected the STAND-BY option by the key ↵, the following menu will appears: → H I G H L O W O F F + ↑ - ↓ Select HIGH (high preheating stage) for intensive use and to reduce however the waiting time between one cycle and the other. Select LOW (low preheating stage) for normal use, maintaining an acceptable waiting time. Select OFF (preheating switched off) for non-continuous use. In this case the waiting time will be longer (10-12 minutes starting from the “cold” start condition). Use the key + / - then confirm by the key ↵. e 26 THE STAND-BY OPERATING MODE (HIGH OR LOW) IS TIMED IN ORDER TO AVOID HIGH POWER CONSUMPTION OF THE HEATER. SO, AFTER 30 MINUTES WITH THE UNIT NOT HANDLED, THE HEATER WILL BE DISABLED (EQUIVALENT TO THE MODE STAND-BY OFF). OPERATING ANY CYCLE KEY (STERILIZATION OR TEST KEY), OR SWITCHING OFF/ON THE UNIT VIA THE MAINS SWITCH, THE ORIGINAL STAND-BY MODE (HIGH OR LOW) WILL BE RESTORED. Extrema Plus 6 – SETTING THE EQUIPMENT Setting the Drying Options (DRYING OPTions of the ADVANCED menu) To allow the effective drying for the different types of load and in all the conditions, the drying modes must be correctly selected. Operates as follows: 1. Select DRYING OPT. and confirm by the key ↵ to access the following menu: → L O N G S H O R T + ↑ - ↓ Choice LONG (long drying, typical in cycles for WRAPPED and POROUS materials) or SHORT (short drying, typical in cycles for SOLID, UNWRAPPED and HOLLOW materials). Use the key + / - then confirm by the key ↵. 2. Depending on the choice (LONG or SHORT) two different menus are displayed: a) LONG option → S T A N D A R D I N T E L L I G E N T E X T R A + ↑ - ↓ Select STANDARD to enable, for WRAPPED and POROUS cycles, a fixed time drying. e WITH HEAVY LOADS OR PECULIAR MATERIALS THE STANDARD OPTION MIGHT SOMETIMES NOT GUARANTEE A PERFECT RESULT. IN THIS CASE EXTEND THE DRYING PHASE BY USING THE EXTRA MODE. Select INTELLIGENT to enable an automatic drying characterized with a duration (higher or lower the standard one) depending on the load volume, quantity and typology. e WITH COMPLEX LOAD (E.G. WRAPPED INSTRUMENTS IN STERILIZATION “CONTAINER”) THE “INTELLIGENT” OPTION MIGHT NOT CORRECTLY OPERATE, WITH RESULTS LOWER THE EXPECTATION. IN THIS CASE USE THE STANDARD OR EXTRA OPTIONS AS NECESSARY. Select EXTRA option for extending the drying phase of a selectable time period (e.g. for particularly difficult load). Enabling this option, the following choice will be prompted: E X T R A : X X m i n ↵ = O K ⇑ = E S C + ↑ - ↓ where the duration of the extra drying can be set in the range of 1 ÷ 15 minutes. b) SHORT option → S T A N D A R D F A S T + ↑ - ↓ Select STANDARD to enable, for SOLID and HOLLOW cycles, a fixed-time drying. Select FAST to minimize the drying time, forgoing however a perfect removal of the residual humidity. Scroll the options through the key + / - then confirm by the key ↵. Extrema Plus 27 6 – SETTING THE EQUIPMENT Setting the Printer Options If the sterilizer is connected to a printer for the recording of the sterilization data, set the necessary parameters in order to guarantee the correct operation. (PRINT OPTions of the ADVANCED menu) Proceed as follows: 1. By selecting the item PRINT OPT. and confirming it by the key ↵, appear the following menu: → P R I N T E R R E P O R T + ↑ - ↓ The item PRINTER opens a next menu for selecting the line feed mode accordingly with the printer used, whereas the item REPORT is used to set the number of the printouts and to enable the reprint of the last performed program. a) PRINTER menu By selecting the item PRINTER the following screen is proposed: → C R C R + L F O F F + ↑ - ↓ Choice CR if you are using printers that carry out the form feed through a CR command (Carriage Return), choice CR+LF for printers needing a CR+LF command (Carriage Return + Line Feed) or OFF to disable the data printout. e LOOK UP IN THE PRINTER MANUAL FOR FINDING THE COMMANDS USED (CR OR CR+LF). IF THIS INFORMATION ARE NOT AVAILABLE, CARRY OUT A TEST PRINTOUT WITH BOTH THE OPTIONS TO INDIVIDUALIZE THE CORRECT OPERATING SETTING. b) REPORT menu By selecting REPORT the following choice is proposed: → N R . C O P I E S P R I N T L A S T + ↑ - ↓ Select NR. COPIES to set the number of the printout copies of the data at the end of the sterilization process (if the printer is connected). Appears the following screen: C O P I E S : X ↵ = O K ⇑ = E S C + ↑ - ↓ Use the key + / - to set the desired number of copies (maximum 5). Confirm through the key ↵. The item PRINT LAST allows to reprint the report of the last performed cycle (both correctly terminated or interrupted due to an alarm). The following choice is proposed: → N O R M A L E X T E N D E D + ↑ - ↓ The option NORMAL enables a normal printout (that is the reduced one, with the meaningful data of the cycle, and outputted at the end of a cycle correctly performed), whereas the item EXTENDED enables the complete printout (that is a report containing all the data, typical for a cycle interrupted by an alarm). e 28 IF THE LAST CYCLE HAS BEEN CORRECTLY COMPLETED (OR INTERRUPTED THROUGH A MANUAL STOP) THE REPRINT IN NORMAL OR EXTENDED MODE CAN BE PERFORMED. IF THE LAST CYCLE HAS BEEN INTERRUPTED DUE TO AN OCCURRED ALARM (EXCLUDED A MANUAL STOP) ONLY THE EXTENDED MODE WILL BE AVAILABLE. Extrema Plus 6 – SETTING THE EQUIPMENT By entering the reprint command, the display will show the following message: N O W P R I N T I N G P L E A S E W A I T … that will remain on until the end of the print. Use the key + / - to move through the menu and confirm by the key ↵. Setting the tank Filling mode (FILLING option of the ADVANCED menu) Extrema Plus allows to perform both manually and automatically the topping up of the internal distilled water reservoir; in automatic mode the water will be drawn from an external tank properly connected to the equipment (see Chapter “Installation”). As selected the option FILLING the following choice is proposed: → A U T O M A T I C M A N U A L + ↑ - ↓ Select the item AUTOMATIC to enable the automatic filling. In this operation mode, as the minimum water level of the internal reservoir is reached (red Led MIN turns on), the system will provide to supply the reservoir with water for a preset time. However, if the maximum level is reached (green Led MAX turns on) before the expiration of the preset time the automatic filling will be disabled in advance. e ACTIVATE THE AUTOMATIC FILLING OPTION ONLY AFTER THE EXTERNAL TANK HAS BEEN FILLED WITH HIGH QUALITY DISTILLED WATER. PLEASE ALSO REMEMBER TO OPEN THE TAP PUT ON THE TANK. In MANUAL mode the topping up have to be made manually. Use the key + / - to move through the option and confirm by the key ↵. Acquisition of the environment pressure At the first set-up and after each new installation of the sterilizer, the user must activate the acquisition of the environment pressure value. This operation is necessary for the correct operation of the internal auxiliary systems of the equipment. (SET 0 bar option of the SPECIAL menu) By selecting the option SET 0 bar the following screen will show: S E T ↵ = O K e V A L U E ? ⇑ = E S C VERIFY THAT THE DOOR OF THE STERILIZER IS COMPLETELY OPEN. ON THE CONTRARY, IF YOU ATTEMPT TO PERFORM THE PRESSURE ACQUISITION WITH THE DOOR CLOSED, THE FOLLOWING MESSAGE WILL BE PRODUCED AND MAINTAINED UNTIL THE DOOR IS NOT OPEN: O P E N T H E D O O R T O C O N T I N U E Confirm the command by the key ↵ to acquire data. The following message will appear: C U R R E N T V A L U E S E T I N T O M E M O R Y followed by an acoustic signal. e Extrema Plus TO RENDER EFFECTIVE THE ACQUIRED AMBIENT PRESSURE VALUE IT IS NECESSARY TO EXIT THE SETUP MODE, SWITCH OFF AND THEN ON THE DEVICE BY USING THE MAINS SWITCH. 29 6 – SETTING THE EQUIPMENT Manual activation of the door-locking mechanism This option may be used to manually activate the door-locking mechanism, for instance to check its correct operation or to unlock, at the end of the cycle, the door of the sterilization chamber remained blocked for the failure of the electromagnet. (DOOR LOCK option of the SPECIAL menu) By selecting the option DOOR LOCK the following choice is proposed: L O C K U N L O C K + - By the option LOCK (key +) a command pulse is generated to disable the door-lock, whereas by the option UNLOCK (key -) a reverse command is generated, that is to enable the door-lock mechanism. Use the key ⇑ to exit the option as the item EXIT is not available in this screen. e Adjusting the LCD contrast (LCD CONTRAST option of the SPECIAL menu) ON EXITING THE SETUP MODE THE DOOR-LOCKING SYSTEM WILL BE AUTOMATICALLY RELEASED.. Adjust the contrast of the LCD display to compensate different environmental lighting conditions. By selecting the option LCD CONTRAST the following choice is proposed: I N C R E A S E D E C R E A S E + - Use the option INCREASE (key +) or DECREASE (key -) to change the contrast accordingly. Face the LCD display in normal working position and adjust the contrast for the better neatness of the writings. Use the key ⇑ to exit the option as the item EXIT is not available in this screen. EXIT THE SETUP MODE After having properly set all the options of the sterilizer, proceed as follows to return in the normal operation mode: – Move to main menu (see Flowchart of the SETUP menu). e TO RETURN AT THE MAIN MENU, FROM WHATEVER PART OF THE PROGRAM YOU ARE, DISPLAYED IN THE CURRENT MENUS. MORE TIMES. – EXIT (CONFIRMING THROUGH THE KEY ↵)) ALTERNATIVELY PUSH ON THE KEY ⇑ (ESC) ONE OR SIMPLY SELECT ONE OR MORE TIMES THE ITEM Select the item EXIT and confirm by the key ↵. The display will show the message: E X T R E M A P L U S S E T U P C O M P L E T E After a few seconds the equipment returns to the normal operation mode and in STANDBY state. 30 Extrema Plus 7 – PREPARING THE MATERIAL TO BE STERILIZED PREPARING THE MATERIAL TO BE STERILIZED INTRODUCTION The process sterilization can consider effective, reliable and repeatable on condition that the material is first suitably treated and subsequently tidy and correctly arranged into the sterilization chamber. We notice that the organic residues or deposits of substances used in the medical practice are obviously receptacles of microorganisms and can hamper the contact of the steam with the instrument surfaces, inactivating, at least locally, the lethal process that the sterilization normally guarantees. An incorrect arrangement of the load can lead to a difficult and sometimes impossible flowing and/or penetration of the steam on the material, with imaginable consequences. The drying process can strongly be also affected by this factor. Therefore we suggest some basic directions concerning this aspects, leaving the user to deepen the problem in the most opportune way. HANDLING THE MATERIAL BEFORE STERILIZING Before everything we remember some precautions that are basic for the handling and moving the contaminated material: – Wear rubber gloves of suitable thickness; – Wash one’s hands, already covered by the gloves, with a germicide detergent; – Always use a tray to move the tools; – Do never transport them directly picking up by hand; – Protect the hands from the contact of possible sharpened or cutting parts in order to avoid the risk of dangerous infections; – Immediately separate each item that has not to be sterilized or is not be able to support this process; – Wash carefully one’s hands covered with the gloves as the handling the not sterile material is over. All the material and/or instruments to be sterilized should be then perfectly cleaned and deprived of whatever kind residues (organic and inorganic deposits, fragments of paper, buffer of cotton or gauze, calcareous residues etc.). e THE LACK OF THE CLEANING AND REMOVAL RESIDUE PROCEDURE, BESIDES TO CAUSE PROBLEMS DURING THE STERILIZATION PROCESS, CAN PROVOKE DAMAGES TO THE TOOLS AND/OR THE VERY SAME STERILIZER. For an effective cleaning, proceed as follows: 1. Rinse the tools under a throw of running water, immediately after the use; 2. Separate the metallic instruments according to the material type (carbon steel, stainless steel, brass, aluminum, chrome, etc.) in order to avoid electrolyte oxidation; 3. Wash by using an ultrasonic equipment with a mixture of water and germicidal solution, taking care to follow the recommendations of the manufacturer. 4. For the best results use a neutral pH detergent specifically studied for the ultrasonic washing. e SOLUTIONS CONTAINING FENOLIS OR QUATERNARY AMMONIUM MIXTURES COULD CAUSE CORROSION ON THE TOOLS AND METALLIC PARTS OF THE ULTRASONIC EQUIPMENT. 5. After the washing, carefully rinse the tools and verify the complete elimination of the residues; if necessary repeat the washing cycle or operate manually. e IF POSSIBLE, USE DEJONIZED OR DISTILLED WATER FOR THE RINSING OPERATION IN ORDER TO PREVENT THE FORMATION OF CALCAREOUS STAINS. IF HIGH HARDNESS TAP WATER IS USED FOR THIS OPERATION, IT IS ADVISED TO ALWAYS DRY THE INSTRUMENTS. For the handpieces (turbines, contrangles, etc.), integrate what above described with a treatment in special equipment for the internal cleansing and wiping (sometimes including the lubrication operation). Extrema Plus 31 7 – PREPARING THE MATERIAL TO BE STERILIZED e AT THE END OF THE STERILIZATION PROGRAM, REMEMBER TO LUBRICATE THE HANDPIECES INTERNAL MECHANISMS BY USING THE SPECIAL STERILE OIL. THIS PRECAUTION GUARANTEES THAT THE USEFUL LIFE OF THE TOOL DOESN'T RESULT IN ANY WAY REDUCED. CONSULT THE INDICATIONS SUPPLIED BY THE MANUFACTURER OF THE INSTRUMENT/MATERIAL TO BE STERILIZED BEFORE TREATING IT INTO THE AUTOCLAVE, VERIFYING POSSIBLE INCOMPATIBILITIES. METICULOUSLY FOLLOW THE USE INSTRUCTIONS OF THE CLEANSING OR DISINFECTANT PRODUCTS AND THE OPERATING MANUAL OF THE WASHING AND/OR LUBRICATION AUTOMATIC EQUIPMENT . As regards the textile material (or in general the porous material), as white uniforms, napkins, caps and other, provides for a careful wash and dry before treating it in autoclave. e ARRANGEMENT OF THE LOAD DON’T USE DETERGENTS WITH HIGH CONTENT OF CHLORINE AND/OR PHOSPHATES. DON'T BLEACH WITH CHLORINE PRODUCTS. SUCH COMPONENTS COULD DAMAGE THE TRAYHOLDER, TRAYS AND METALLIC TOOLS ARRANGED INTO THE STERILIZATION CHAMBER. To get the better effectiveness of the sterilization process and to preserve the material in time, follow the indications below reported. General notes for the arrangement of the load on the trays. – Arrange the tools of different metal (stainless steel, moderate steel, aluminum, etc.) on different trays or however well separate between them. – In case of not stainless steel tools, interpose a sterilization paper napkin or muslin cloth between tray and tool, avoiding direct contacts between the two different materials; – Arrange however the objects sufficiently outdistanced, in order they maintain the layout for the whole sterilization cycle; – Verify all the tools are sterilized in open position; – Arrange the cutting tools, (scissors, lancets, etc.) so they cannot come in contact during the sterilization process; if necessary use a cotton cloth or gauze to isolate and protect them; – Arrange the containers (glasses, cups, test-tubes, etc.) on one side or inverted position, avoiding possible water stagnation; – Don’t overload the trays over the stated limit (see Appendix A). In a lot of situations, this maximum admitted value might be excessive; in this case always use a bit of common sense. – Don’t stack the trays one above the other or put them in direct contact with the walls of the sterilization chamber. Always use the supplied tray-holder. – To introduce and extract the trays from the sterilization chamber, always use the supplied special tray removal tong. OK OK e 32 TO DETECT THE PROCESS RESULT, SET A STERILIZATION INDICATOR TEST PER EACH TRAY: THIS PRECAUTION AVOIDS FROM PROCESSING ONCE AGAIN THE SAME LOAD OR, FOR THE WORSE, FROM USING A NOT STERILIZED MATERIAL. IF WRAPPED MATERIAL HAS TO BE TREATED, SET THE INDICATOR TEST INSIDE ONE OF THE WRAPS. Extrema Plus 7 – PREPARING THE MATERIAL TO BE STERILIZED Indications for rubber and plastic pipes OK – Always rinse with pyrogen-free water before the use; don't dry them; – Arrange the pipes on the tray so that the extremities are not obstructed neither crushed. – Don't provoke pleats neither winds, but leave stretched more linearly as possible. Indications for packets and wrappings – Arrange the wrappings one close to the other, suitably outdistanced and absolutely not piled up, avoiding that they come to contact with the walls of the chamber. – In case special objects have to be wrapped, always use a suitable porous material (sterilization paper, napkins of muslin, etc.) closing the wrap with autoclave adhesive ribbon. OK Indications for wrapped material – Wrap the tools one by one or, if more tools have to be set in the same wrap, verify that they are of the same metal; – Seal the wrap with autoclave adhesive ribbon or by a thermal sealer. – Don't use metallic clips, pins or other, as this jeopardizes the maintenance of the sterility; – Arrange the envelopes in order to avoid the formation of air pockets that potentially could hamper the correct penetration and removal of the steam. – Turn the envelopes in order to set the plastic part downward (tray side) and the paper part upward. Verify the correctness of this position, reversing it if necessary. – If possible, arrange the envelopes on the edge by using a proper stand. – Never pile up the envelopes. ALWAYS WRAP THE TOOLS IN CASE OF PROLONGED “PRESERVING THE STERILIZED MATERIAL” . Extrema Plus STORE. SEE ALSO THE CHAPTER 33 8 – SELECTING THE STERILIZATION PROGRAM SELECTING THE STERILIZATION PROGRAM INTRODUCTION ABOUT THE SELECTION The program choice is fundamental for the success of the sterilization process. Since every tool or material has conformation, consistence and different characteristics, it is very important to individualize the more suitable program, both to preserve its physical characteristics (avoiding or however limiting any alterations) and to guarantee the better sterilization effectiveness. e A GUIDE FOR SELECTING THE PROPER PROGRAM VERSUS THE LOAD IS SHOWN IN THE APPENDIX B (PROGRAMS). Switch on the equipment as described in the Chapter “First start-up”. The display doesn't propose any active pre-selection. The equipment is waiting for the program selection by the user. Operate on the Program Selection key, pressing it one or more times up to the desired program (preset program 1, 2, 3 or 4, signaled by the turning on of the relative Led). The temperature (°C), pressure (bar) and time ( ) displays will show the set-point values of the selected cycle, whereas the LCD display is showing the description of the selected sterilization program and the active status of the machine, i.e. STAND-BY. e ON PRESSING THE SELECTION KEY, THE FIRST PROPOSED STERILIZATION PROGRAM IS THE LAST PERFORMED CYCLE. For example, LCD will show the cycle indication: 1 3 4 c P O R O U S S T A N D A R D The second row of the LCD is showing for about 10 seconds the currently set drying mode of the cycle. Subsequently, LCD changes to show the operating status of the unit: 1 3 4 c P O R O U S S T A N D - B Y To cancel this selection press shortly the ESC key (⇑) on the command panel. e WHEN YOU ARE SELECTING THE CUSTOM CYCLE, THE LCD WILL SHOW, IN ADDITION TO THE DRYING MODE AS ABOVE, THE INITIAL VACUUM MODE, FRACTIONATED (F) OR SINGLE (S): 1 3 4 c C U S T O M F E X T R A ( + 0 5 ) THE SECOND ROW, AFTER ABOUT TEN SECONDS, CHANGES TO SHOW THE OPERATING STATUS OF THE UNIT: 1 3 4 c C U S T O M S T A N D - B Y e F IF NONE SELECTION IS ENTERED THE EQUIPMENT CANNOT START ANYWAY. BY PUSHING ON THE START KEY WITHOUT HAVING SELECTED A PROGRAM, THE LCD DISPLAY WILL SHOW THE FOLLOWING MESSAGE ACCOMPANIED BY AN ACOUSTIC SIGNAL: S E L E C T P R O G R A M , P L E A S E … CONTEMPORARILY, ALL LED’S RELATING THE STERILIZATION AND TEST PROGRAMS WILL FLASH. THE USE OF IMPROPER PROGRAM FOR THE TYPE OF MATERIAL APPENDIX B) DOESN'T GUARANTEE THE EFFECTIVENESS PROCESS. 34 TO BE STERILIZED (SEE OF THE STERILIZATION Extrema Plus 9 – RUNNING THE STERILIZATION PROGRAM RUNNING THE STERILIZATION PROGRAM The sterilization program runs along a cycle characterized by a lot of phases. GENERAL The electronic control system monitors the running of the different phases, verifying at the same time if the parameters are correctly respected; if whatever type of anomaly is detected during the cycle, the program will immediately be interrupted and enter in alarm status identified by code and proper message showing the nature of the problem. The number and the duration of the phases can differ between the programs depending on the air exhausting, sterilization process and drying modes. With this type of control, the perfect sterilization in every condition will be guaranteed whatever is the sterilization program selected. STARTING THE STERILIZATION PROGRAM Now that the load is arranged into the sterilization chamber (with the precautions described on the Chapter “Preparing the material to be sterilized” and the desired program selected, close in right way the door. The Door Status Led is flashing (door closed). Push on the key START. The door-locking mechanism is engaged. The Door Status Led changes to ON state (door locked). After the START command and for all the sterilization cycle the displays will show the following values: – Temperature Display (°C): temperature of the sterilization chamber (°C) – Pressure Display (bar): pressure of the sterilization chamber (bar) – Timer Display ( running time of the sterilization cycle (mm:ss) The signaling led e SEQUENCE OF PROCESS Preheating ): of the selected program flashes for all the cycle. THE COUNTING OF THE TIME STARTS FROM THE START COMMAND (FIRST VACUUM PHASE), EXCLUDING THE PREHEATING PHASE. It follows the description of the sterilization cycle, phase by phase. As example, we will use the most complete and meaningful cycle, i.e. the cycle relating the program 134°C POROUS (preset 1 on the command panel), provided with fractionated pre-vacuum. As entered the START command, the first phase is represented by the preheating phase (WARMUP) in order to set the heating resistors on the preset condition foreseen for the start of the cycle. The LCD display is showing: 1 3 4 c P O R O U S W A R M U P The process signaling Extrema Plus is off. 35 9 – RUNNING THE STERILIZATION PROGRAM First vacuum phase Reached the stated heating conditions, starts the first vacuum phase (1 VACUUM PULSE) that reduce the pressure into the chamber at the preset value. The following message appears on the screen: 1 3 4 c 1 The process signaling First pressure raising Reached the preset vacuum value, the steam enters into the chamber and the pressure increases (1 PRESSURE PULSE) up to reach the preset value. LCD display shows: 1 3 4 c P O R O U S P R E S S U R E P U L S E The process signaling remains turned off. At the end of the pressure phase the steam is discharged and starts the second vacuum phase of the sterilization chamber (2 VACUUM PULSE). LDC display shows: 2 The process signaling Second pressure raising The second vacuum phase is followed by a new steam enter into the sterilization chamber, and consequently the pressure raises once again (2 PRESSURE PULSE). LCD display shows: 1 3 4 c P O R O U S P R E S S U R E P U L S E The process signaling remains turned off. Follows a new discharge of the steam and the start of a third vacuum phase (3 VACUUM PULSE). LCD display shows: 3 The process signaling Third pressure raising 1 3 4 c P O R O U S V A C U U M P U L S E remains turned off. This vacuum phase is followed by a last steam enter into the sterilization chamber, and the pressure increases once again (3 PRESSURE PULSE) up to the value preset for the sterilization process. On the LCD display appears: 3 The process signaling 36 1 3 4 c P O R O U S V A C U U M P U L S E remains turned off. 2 Third vacuum phase P U L S E remains turned off. 1 Second vacuum phase P O R O U S V A C U U M 1 3 4 c P O R O U S P R E S S U R E P U L S E remains turned off. Extrema Plus 9 – RUNNING THE STERILIZATION PROGRAM Thermodynamic equilibration On reaching the pressure and temperature values for the selected program, the program waits few seconds to allow the homogenization of the temperature inside the chamber and load (EQUILIBRATION). LCD display is now showing: 1 3 4 c P O R O U S E Q U I L I B R A T I O N The process signaling Sterilization process remains turned off. On the stabilization of the thermodynamic parameters begins the real sterilization phase of the material (PROCESS). Thanks to the continuous monitor of the thermodynamic parameters and the complex management of the hydraulic circuit, the pressure and temperature are maintained constant within the range stated by the program. The countdown of the sterilization time starts and the time value is displayed on LCD with the following screen: 1 3 4 c P O R O U S P R O C E S S 0 4 : 0 0 Now the process signaling progress. e is flashing to signal that the sterilization process is in AS THE PROCESS PHASE IS OVER, THE PROCESS SIGNALING LED ON STEADY STATE TO INDICATE THE COMPLETION OF THE STERILIZATION. IF, CHANGES TO FOR WHATEVER REASON, THE STERILIZATION CYCLE IS INTERRUPTED BEFORE THE COMPLETION OF THE PROCESS PHASE, THE SIGNALING REMAINS FLASHING . IN THIS CASE THE MATERIAL INTO THE STERILIZATION CHAMBER CANNOT BE ANYWAY CONSIDERED STERILE AND MUST NOT ABSOLUTELY BE USED. Steam discharge After the sterilization phase follows the steam exhausting from the sterilization chamber (DEPRESSURIZATION). The following screen appears: 1 3 4 c P O R O U S D E P R E S S U R I Z A T I O N The process signaling Vacuum drying remains ON. The natural depressurization is followed by a steam forced removal through the vacuum pump action (VACUUM DRYING) that generates into the chamber an internal negative pressure to facilitate the steam exhausting. Now the LCD display will show: 1 3 4 c P O R O U S V A C U U M D R Y I N G The process signaling Extrema Plus remains ON. 37 9 – RUNNING THE STERILIZATION PROGRAM Ventilation The vacuum drying phase is then followed by the ventilation phase (VENTILATION) during which, on maintaining the vacuum into the chamber, sterile and fresh air is entered to eliminate the condensation and cool the load. On the LCD display appears: 1 3 4 c P O R O U S V E N T I L A T I O N The process signaling Ambient pressure levelling remains ON. Ended the ventilation phase the chamber will be vented by letting the sterile air enter the chamber (LEVELLING) that will reach the atmospheric pressure value, and allow the door opening to recovery the load. LCD display changes to: 1 3 4 c P O R O U S L E V E L L I N G The process signaling Cycle completed remains ON. As the pressure into the sterilization chamber reaches the pre-set safety limits, the door locking mechanism will be released. Consequently the door status signaling starts to flash and contemporary an acoustic warning signaling is generated. Now the screen will show: 1 3 4 c C Y C L E The process signaling P O R O U S C O M P L E T E is still ON. Open the door and recover the sterilized material by using the supplied tray removal tong. e ON OPENING THE DOOR, AND IF A PRINTER IS INSTALLED, A REPORT OF THE STERILIZATION CYCLE WILL BE PRINTOUT. CHECK THIS REPORT, SIGN ON THE PROPER LINE AND FILE IT IN A SURE PLACE. REFER TO THE REPORT EXAMPLES IN APPENDIX B, PROGRAMS. ON OPENING THE DOOR, THE EQUIPMENT GOES IN THE STAND-BY STATE. REPEAT THE PROCEDURES DESCRIBED IN THE CHAPTER “SELECTING THE STERILIZATION PROGRAM” IF A NEW STERILIZATION CYCLE HAS TO BE PERFORMED. THE PROGRAM, AND UNTIL THE DOOR IS NOT OPENED, THE HEATING RESISTORS ARE DISABLED. ACCORDINGLY THE EQUIPMENT, WHATEVER IS THE CURRENT STAND-BY MODE, COOLS DOWN SLOWLY. COMPLETED Now the equipment is ready to perform a new cycle. e COMPLETED THE PROGRAM, WHENEVER THE DOOR IS NOT OPENED, THE VACUUM PUMP IS PERIODICALLY ACTIVATED TO REMOVE ANY TRACE OF CONDENSATE FROM THE STERILIZATION CHAMBER. ON THE LCD IT APPEARS: A C T I V E S U C T I O N ⇑ T O S T O P P U M P 38 Extrema Plus 9 – RUNNING THE STERILIZATION PROGRAM MANUAL INTERRUPTION OF THE PROGRAM If necessary, the program can be manually interrupted by the operator in whatever moment by holding pressed START/STOP key for three seconds. This command is detected by the equipment as an alarm, for the program is not correctly completed. Accordingly and until the safety conditions are not reached the LCD display is showing: M A N U A L S T O P L E V E L L I N G … whereas the timer display () is showing the error code E999 and an acoustic signaling sounds. Reached the safety conditions, the machine activates a special procedure asking for a manual door unlocking by the user: P R E S S ⇑ T O U N L O C K T H E D O O R Push on the key ⇑ to release the locking mechanism. The message changes to: M A N U A L S T O P O P E N T H E D O O R Finally, on opening the door it is asked for resetting the equipment: M A N U A L S T O P R E S E T S Y S T E M > 3s The system RESET is performed by holding pressed for 3 seconds and more the key PROGRAM SELECTION until a confirmation acoustical signal. On opening the door, and if a printer is installed, the report of the performed sterilization cycle will be printout, containing the error signaling (E999). Check this report, sign and file it in a sure place. Refer to the report examples in Appendix B, Programs. After the RESET the equipment enters in STAND-BY state and now will be ready to perform a new program. e FOR THE COMPLETE DESCRIPTION OF THE ALARMS SEE APPENDIX E (ALARM INDICATIONS). AFTER A MANUAL INTERRUPTION OF THE PROGRAM THE STATE OF THE LED PROCESS (MANUAL STOP) ALWAYS VERIFY BEFORE USING THE TREATED MATERIAL OF THE STERILIZATION CHAMBER. IF THE SIGNALING IS STEADY ON THE LOAD CAN BE CONSIDERED STERILE AND CONSEQUENTLY USED. WE RECOMMEND ITS IMMEDIATE USE. OFF, THE MATERIAL CONTAINED INTO THE CANNOT BE CONSIDERED STERILE AND MUST NOT ABSOLUTELY BE USED. ON THE CONTRARY, IF THE LED IS STERILIZATION CHAMBER Extrema Plus 39 9 – RUNNING THE STERILIZATION PROGRAM RESULT OF THE PROGRAM After the completion of the cycle we recommend to verify the result of the sterilization If the cycle is over (indication CYCLE COMPLETE) without interruption caused by whatever alarms, the complete asepsis of the material will be guaranteed. A further verification tool is represented by the printout of the sterilization parameters. PRINTING THE DATA OF THE CYCLE It is a good rule, if a printer is connected to the sterilizer, to verify that the data printed on the report issued at the end of the sterilization program have a positive checking. The print of the meaningful data relating the thermodynamic parameters, pressure and temperature (bar and °C), and time (minutes) of the sterilization cycle, with special care on the sterilization phase, will be automatically performed at the end of every cycle simply by opening the door. Check the values on the report and the possible additional information to have further confirmation of the quality of the performed sterilization process. Sign on the proper line and file the document for a possible future use. Copies of the document can be eventually used for identifying the load (or parts of it) with sterilization date/hour and details relative to the type of the performed cycle. To choice the number of copies refer to the Chapter “Setting up the equipment”. e ON REQUEST BY THE OPERATOR IT IS POSSIBLE TO GET THE EXTENDED REPORT OF THE STERILIZATION PROCESS DATA, INCLUDING THE VALUES OF ALL THE SENSORS INSTALLED ON THE EQUIPMENT. TO START THIS PRINTING OPTION HOLD DOWN THE KEY ESC ⇑ ON THE COMMAND PANEL WHILE OPENING THE DOOR. For the details concerning the printing options, refer to the report examples in Appendix B, Programs. 40 Extrema Plus 10 – PRESERVING THE STERILIZED MATERIAL PRESERVING THE STERILIZED MATERIAL The sterilized material has to adequately be handled and preserved to maintain own sterility in time until its use. GENERAL However this provokes an hazardous situation, as the alternative is to use the contaminated material (unconsciously in many cases) with risk for both operator and patient, or to perform a new sterilization process with inevitable waste of time and resources. An improper maintenance can provoke its fast recontamination. Therefore we retain useful to give some basic advice, letting the operator make further carefully investigations. HANDLING By assuming that the sterilizer is arranged in a clean place, without dust and damp, pay attention to the following indications when handling and moving the sterile material: 1. Remove the load from the sterilization chamber by wearing cleaned, or better, sterile gloves and white uniform. For greater precaution put a protective mask on the face; 2. Place the trays on a dry table, suitably cleaned and disinfected. Pay attention to outdistance or however separate the sterile material from the area of the contaminated material to be sterilized; 3. Touch the material and/or the tools as less is possible, paying very much attention do not lacerate or damage the wraps; 4. Let the tools cool before transporting (and storing). If necessary, use dry, clean and disinfected containers to move the material. The containers must be closed or, if open type, covered with clean cloths. STORING The sterile material, on waiting for the use, must be stored by taking opportune measures in order to slow as possible the contamination process: 1. Preserve the material and/or tools inside the protective wraps used for the sterilization. Don’t wrap the tools after the sterilization as such practice, besides to be useless, is completely without meaning; 2. Store the material in a dry place, suitably clean and disinfected, away from areas where the infected material transits. If possible, prefer the closed areas provided with ultraviolet illumination; 3. Identify the sterile material by affixing the sterilization date (use a copy of the printed report or an adhesive labels); 4. In the first place use the material stored for longer time (by using a FIFO criteria, "first in first out"). This allows to have homogeneously stored material, avoiding too long storing periods with consequent risks. 5. Don’t store for long time the material. Do not neglect that, even if the above indications have been followed, the material tends however to degrade, with a new contamination within a certain time. e Extrema Plus CHECK ON THE SPECIFICATIONS SUPPLIED BY THE MANUFACTURER OF THE PACKING MATERIAL FOR THE MAXIMUM STORING TIME ADMITTED. 41 11 – TEST PROGRAMS TEST PROGRAMS OVERVIEW For protecting both operator and patient safety, the functionality and effectiveness of an important process as the sterilization of medical devices must be periodically verified. For this reason, Extrema Plus offers the possibility to perform in simple and automatic way two different test programs: • Helix Test (HT) • Vacuum Test (VT) Helix Test (HT) allows to perform a cycle at 134°C characterized by a special time of the sterilization phase (3.5 min.); the cycle is provided with fractionated vacuum like the POROUS and HOLLOW programs. Through a proper device it is possible to value the correct penetration of the steam inside the porous loads (see next paragraph). Such cycle is also proper to measure the penetration of the steam inside the porous loads (standard Bowie & Dicks test packet). Vacuum Test (VT) allows to verify the perfect watertight of the hydraulic circuit of the sterilizer. By measuring the vacuum offset within a stated time and comparing it with preset limit values, it is possible to determine the quality of the sterilization chamber and connecting pipelines watertight. HELIX TEST (HT) For selecting the HT program press one or two times the TEST SELECTION key until the relative signaling turns on. LCD display visualizes: H E L I X T E S T S T A N D - B Y – Temperature display (°C) shows the nominal value: 134 – Pressure display (bar) shows the nominal value: 2,10 – Timer display () shows the foreseen time of the process: 3.30 (mm:ss) The test device is a PTFE pipe, long 1.5 m and of internal diameter of 2 mm, with a small watertight screw capsule mounted on one end containing an opportune chemical indicator. The other end of the pipe is free to allow the penetration of the steam. For performing the test, insert the chemical indicator, consisting of a paper strip with a special reacting inch, inside the capsule of the device (that must be always perfectly dried). Close the capsule in such a way no leakage through the gasket is possible. e THE DEVICE AND THE CHEMICAL INDICATORS FOR THE HELIX TEST (HT) ARE NOT SUPPLIED WITH THE EQUIPMENT. FOR MORE INFORMATION CONTACT “ASSISTENZA CLIENTI” M.O.COM. (SEE APPENDIX Z) Set the device on the middle tray of the equipment, approximately in the center. Don't introduce other material inside the chamber. Close the door and start the program through the key START. The program Led (HT) will flash for all through the program. e ALL THE INDICATIONS DISPLAYED DURING THE CYCLE ARE THE SAME AS DESCRIBED ON THE CHAPTER “RUNNING A STERILIZATION PROGRAM”. At the end of the program, recovery the test device from the sterilization chamber, open the capsule and remove the indicator from its place. 42 Extrema Plus 11 – TEST PROGRAMS If the steam is correctly penetrated, the ink color on the whole length of the strip will be completely turned compared to the start conditions; on the contrary (insufficient penetration) the change will be only partial or missing. e NORMALLY THE TURNING OCCURS FROM A CLEAR COLOR (BEIGE, YELLOW, ETC.) TOWARD A DARK COLOR (BLUE, VIOLET OR BLACK). IN EVERY CASE, METICULOUSLY FOLLOW THE INSTRUCTIONS SUPPLIED BY THE MANUFACTURER ABOUT THE WAY FOR USING AND INTERPRETING THE INDICATOR DEVICE. The time of the test is about 22 minutes. If a printer is installed, on opening the door at the end of the program a report of the performed test will be released, including the main data. Affix the chemical indicator in the foreseen area, sign the document and file it. For more details about the printing reports, refer to the examples in Appendix B, Programs. VACUUM TEST (VT) For selecting the VT program press one or more times the SELECTION TEST key until relative signaling turns on. LCD display visualizes: V A C U U M T E S T S T A N D - B Y – Temperature display (°C) shows: ---.- – Pressure display (bar) shows the value of the maximum vacuum reached with the sterilization cycle: -0.90 Timer display ( 00.00 – ) shows: The Vacuum Test (VT) program must be carried out with the sterilization chamber unloaded and with trays and tray-holder only. e e CARRY OUT THE EQUIPMENT. VACUUM TEST AS FIRST CYCLE AT THE SWITCHING ON OF THE IN ORDER TO AVOID THAT THE HEATING EFFECT INFLUENCES THE VACUUM CHANGE VALUE READ DURING THE VACUUM TEST, THE SYSTEM IS PROGRAMMED TO DISABLE THE TEST IF THE CHAMBER TEMPERATURE SENSOR IS READING A VALUE HIGHER THAN 50° C. If you are trying to launch the test program with chamber temperature higher than the above preset value, LCD will show the following: W A R N I N G ! P T 1 T O O H I G H After a few seconds, the unit will automatically return in STAND-BY mode, and will be ready for a new command. To quickly fall the chamber temperature and allow the Vacuum Test, left open the door until a lower temperature is reached. Close the door and launch the program through the START key. The program Led (VT) will flash for all through the program. The vacuum phase immediately starts and the LCD display will show: V A C U U M T E S T V A C U U M P U L S E Extrema Plus 43 11 – TEST PROGRAMS The Temperature display (°C) will visualize ---. -, while the Pressure (bar) and Timer () displays will show respectively the real-time updated value of the pressure and the total time from the start of the cycle. As soon as the preset pressure value (-0.90 bar) is reached the vacuum pump is arrested and the pressure stabilization phase (WAITING) activated for 5 minutes. LCD display is showing the following message: V A C U U M W A I T I N G T E S T 0 5 : 0 0 During this phase an offset of only 10% of the vacuum maximum value is admitted without bearing a test failure. The time is counted down up to the completion of the phase. Expired this time the effective pressure detection phase (LEAKAGE) starts with a duration of 10 minutes. The LCD display will show: V A C U U M L E A K A G E T E S T 1 0 : 0 0 During this phase an offset of only ±0.02 bar of the start value is admitted. Higher variations lead to the test failure. The time is counted down up to the completion of the phase. Expired this time the pressure is returned to the atmospheric value and the LCD display will show: V A C U U M T E S T P A S S E D An acoustic signaling points out the end of the program. e IF THE PROGRAM IS INTERRUPTED FOR A PRESSURE OFFSETS EXCEEDING THE PRE-SET LIMITS, AN ALARM MESSAGE WILL BE PRODUCED. FOR THE DESCRIPTION OF THE ALARMS SEE APPENDIX E ,SOLUTION OF THE PROBLEMS . The test lasts for about 18 minutes. If a printer is installed, on opening the door at the end of the program a report of the performed test will be released, including the main data. For more details about the printing reports, refer to the examples in Appendix B, Programs. 44 Extrema Plus APPENDIX A – TECHNICAL CHARACTERISTICS APPENDIX A – TECHNICAL CHARACTERISTICS OVERVIEW TABLE Equipment Steam sterilizer Model Extrema Plus Type B (according to prEN 13060) Manufacturer M.O.COM. S.r.l. Via delle Azalee, 1 - 20090 BUCCINASCO (MI) - ITALY Power supply 220/230 V (other voltages on request) Mains frequency 50 Hz Mains fuses (6,3 x 32 mm) F 16A 250V Power supply board fuses (5 x 20 mm) F1: T 3,15A 250V (on loads 230V) F2: T 2A 250V (on primary winding 230V of the mains transformer) F3: T 2A 250V (on winding +5V of the mains transformer) F4: T 2A 250V (on winding +8V of the mains transformer) F5: T 1A 250V (on winding ±12V of the mains transformer) F6: T 6,3A 250V (on loads 24V) External dimensions (LxDxH) 445 x 425 x 388 mm (rear connections excluded) Nominal power 2800 W Insulation class Class I Installation category Cat. II Utilization Internal use Environmental operating conditions Temperature: Relative humidity: Height: Net weight about 55 kg Sterilization chamber dimensions (Ø x D) 241 x 350 mm Total volume of the sterilization chamber 3 17 l (0.017 m ) Utilization volume of the chamber 3 10 l (0.010 m ) with tray-holder installed Capacity of the distilled water reservoir about 4,6 l (at level MAX) about 0,8 l (at level MIN) Sterilization programs Available: Preset: Test programs Helix Test Vacuum Test Total sterilizable mass Solid/hollow unwrapped material: Solid/hollow wrapped material: Porous material: 6 kg 3 kg 1 kg Solid/hollow unwrapped material: Solid/hollow wrapped material: Porous material: 2 kg 1 kg 0.5 kg Sterilizable mass per each item (max) Solid/hollow unwrapped material: Solid/hollow wrapped material: Porous material: 0,5 kg 0,25 kg 0,125 kg Pre-heating time (from cold) about 12 min. Parallel interface (printer) DB-25 pin connector (female) Serial interface DB-9 pin connector (female) Bacteriologic filter (PTFE) Porosity: Connection: (max) Sterilizable mass per tray (max) Extrema Plus +15°C ÷ +35°C 80% (max) without condensation 3000 m above see-level. 11, (see Appendix B) 4, (1 fixed + 3 selectable) 0,2 µm 1/8" NPT male connector 45 APPENDIX A – TECHNICAL CHARACTERISTICS SAFETY DEVICES Extrema Plus is provided with the followings safety devices; a brief description of their function is given on the following: – Mains fuses (see the data on the overview table) Protection of the whole equipment against possible failures of the heating resistors. Action: interruption of the electric power supply. – Protection fuses on electronic circuits (see the data on the overview table) Protection against possible failures of the mains transformer primary circuit and low voltage loads. Action: interruption of one or more low voltage circuits. – Thermal cutouts on the mains transformer windings Protection against possible vacuum pomp and mains transformer primary winding overheating. Action: temporary interruption (up to the cooling) of the winding. – Safety valve (2,4 bar) Protection against possible sterilization chamber over-pressure. Action: release of the steam and restoration of the safety pressure. – Manually resettable thermostat on steam generator (270°C) Protection for possible steam generator overheating. Action: interruption of the steam generator power supply. – Manually resettable thermostat on chamber heating resistors (200°C) Protection for possible overheating of the chamber heating resistors. Action: interruption of the power supply of the chamber resistors. – Safety micro-switch for the door status Comparison for the correct closing position of the sterilization chamber door. Action: signaling of wrong position of the door. – Door locking mechanism with bistable electromagnet Protection against accidental opening of the door (also in case of black-out). Action: impediment of the accidental opening of the door during the program. – Safety micro-switch on the door locking mechanism Comparison for the correct closing position of the locking system. Action: signaling of the unsuccessful or incorrect operation of the door locking mechanism. – Self-leveling hydraulic system Hydraulic system for the natural pressure leveling in case of manual cycle interruption, alarm or black-out. Action: automatic restoration of the atmospheric pressure inside the sterilization chamber. – On-board system for the sterilization process evaluation Continuous monitor of the sterilization process parameters, fully microprocessor managed. Action: immediate interruption of the program (in case of anomaly) and generation of alarms. – Monitoring of the sterilizer operation Real time monitoring of all the meaningful equipment parameters. Action: generation of alarm messages (in case of anomaly) with possible interruption of the cycle. 46 Extrema Plus APPENDIX A – TECHNICAL CHARACTERISTICS CHARACTERISTICS OF THE FEEDING WATER DESCRIPTION VALUES IN THE DISTILLED WATER VALUES IN THE CONDENSED DRY RESIDUE < 10 mg/l < 1 mg/l SILICON MONOXIDE SiO2 < 1 mg/l < 0,1 mg/l < 0,2 mg/l < 0,1 mg/l CADMIUM < 0,005 mg/l < 0,005 mg/l LEAD < 0,05 mg/l < 0,05 mg/l HEAVY METAL RESIDUES (except iron, cadmium and lead) < 0,1 mg/l < 0,1 mg/l < 2 mg/l < 0,1 mg/l PHOSPHATES < 0,5 mg/l < 0,1 mg/l CONDUCTIVITY AT 20°C < 15 µs/cm < 3 µs/cm 5-7 5-7 colorless, transparent, without sediments colorless, transparent, without sediments < 0,02 mmol/l < 0,02 mmol/l IRON CHORIDES VALUE of pH ASPECT HARDNESS THE USE OF STEAM GENERATED WATER WITH CONTAMINANTS EXCEEDING THE VALUES INDICATED ON THE ABOVE TABLE CAN NOTABLY SHORTEN THE LIFE OF THE STERILIZER. BESIDES THIS CAN PRODUCE AN INCREASE OF THE OXIDATION ON THE MOST SENSITIVE MATERIALS AND AN INCREASE OF THE CALCAREOUS RESIDUES ON GENERATOR, CHAMBER, INTERNAL SUPPORTS, TRAYS AND TOOLS. Extrema Plus 47 APPENDIX B – PROGRAMS APPENDIX B - PROGRAMS INTRODUCTION The steam sterilization is suggested for nearly all the materials and tools on condition that these are able to support without damages a minimum sterilization temperature of 121°C (on the contrary other sterilization systems at lower temperature should be used). The material normally autoclavable into a steam sterilizer is as follows: – Stainless steel surgical instruments; – Stainless steel generic tools; – Carbon steel generic tools; – Dynamic instruments, motorized by air or gears (turbines, contrangles, ablation tools, etc.); – Glass articles; – Mineral basis articles; – Heat-proof plastic articles; – Heat-proof rubber articles; – Heat-proof textile articles; – Treatment material (gauze, tampons, etc.); – Other autoclavable generic material. e 48 DEPENDING ON THE PAPER, CONTAINER, CONFORMATION (SOLID, HOLLOW OR POROUS), PACKING (PAPER/PLASTIC WRAPPING, STERILIZATION MUSLIN ETC.) AND HEAT-PROOF CHARACTERISTIC OF THE MATERIAL, THE CORRECT STERILIZATION PROGRAM MUST BE SELECTED BY REFERRING TO THE TABLE OF THE NEXT PAGE. Extrema Plus APPENDIX B – PROGRAMS OVERVIEW OF THE AVAILABLE PROGRAMS Process time (min) Pre-vacuum (F = fractionated S = single) Standard drying (E = extended S = short) Total cycle time (minutes) (medium load ÷ max. load) Average H2O consumption (l / cycle) 134c POROUS 134 2,10 4 F E 28÷ 34 0,50 Porous material Wrapped hollow instruments 134c PRION 134 2,10 18 F L 42÷48 0,50 Porous material Wrapped hollow instruments 121c POROUS 121 1,10 20 F E 42÷ 48 0,45 Porous material Wrapped hollow instruments 134c HOLLOW 134 2,10 4 F S 23÷26 0,50 Unwrapped hollow instruments 121c HOLLOW 121 1,10 20 F S 37÷40 0,45 Unwrapped hollow instruments 134c WRAPPED 134 2,10 4 S E 21÷23 0,30 Wrapped solid instruments 121c WRAPPED 121 1,08 20 S E 35÷ 37 0,25 Wrapped solid instruments 134c SOLID 134 2,10 4 S S 16÷18 0,30 Unwrapped solid instruments 121c SOLID 121 1,10 20 S S 30÷32 0,25 Unwrapped solid instruments 134c EMERGENCY 134 2,10 3 S 134c CUSTOM 134 or 121 2,10 or 1,10 4> or 20 > F/S L/C n.d. n.d. Material and instruments according to the configured cycle HELIX TEST 134 2,10 3,5 F C 22 500 Test device (without other load) VACUUM TEST - -0,90 - - - 18 - Empty chamber PROGRAM NAME Extrema Plus FAST Pressure (bar) MAIN DATA OF THE PROGRAM Temperature (°C) NOMINAL VALUES 12÷10 0,30 (with dry Off) AUTOCLAVABLE MATERIAL NOTES Fixed on preset nr. 1 (not changeable) MAX LOAD 0,5 kg Unwrapped solid instruments Cycle duration depending on the setting up 49 APPENDIX B – PROGRAMS DIAGRAMS OF THE STERILIZATION PROGRAMS Pressure (bar) PROGRAM 134c POROUS 134°C - 4' 00'' PROCESS 2.10 PROGRAM 134c PRION 134°C - 18' 00'' 2.00 1.00 Time (min) 0.00 -1.00 FRACTIONATED VACUUM EXTENDED DRYING Pressure (bar) PROGRAM 121c POROUS 121°C - 20'00'' PROCESS 1.10 1.00 Time (min) 0.00 -1.00 50 FRACTIONATED VACUUM EXTENDED DRYING Extrema Plus APPENDIX B – PROGRAMS PROGRAM 134c HOLLOW 134°C - 4'00'' Pressure (bar) PROCESS 2.10 2.00 1.00 Time (min) 0.00 -1.00 FRACTIONATED VACUUM SHORT DRYING Pressure (bar) PROGRAM 121c HOLLOW 121°C - 20'00'' PROCESS 1.10 1.00 Time (min) 0.00 -1.00 Extrema Plus FRACTIONATED VACUUM SHORT DRYING 51 APPENDIX B – PROGRAMS Pressure (bar) PROGRAM 134c WRAPPED 134°C - 4'00'' PROCESS 2.10 2.00 1.00 Time (min) 0.00 -1.00 EXTENDED DRYING SINGLE VACUUM Pressure (bar) PROGRAM 121c WRAPPED 121°C - 20'00'' PROCESS 1.10 1.00 Time (min) 0.00 -1.00 SINGLE VACUUM 52 EXTENDED DRYING Extrema Plus APPENDIX B – PROGRAMS PROGRAM 134c SOLID 134°C - 4'00'' Pressure (bar) PROCESS 2.10 2.00 1.00 Time (min) 0.00 -1.00 SHORT DRYING SINGLE VACUUM PROGRAM 121c SOLID 121°C - 20'00'' Pressure (bar) PROCESS 1.10 1.00 Time (min) 0.00 -1.00 SINGLE VACUUM Extrema Plus SHORT DRYING 53 APPENDIX B – PROGRAMS Presure (bar) PROGRAM 134c EMERGENCY 134°C - 3'00'' PROCESS 2.10 2.00 1.00 Time (min) 0.00 -1.00 SINGLE VACUUM DRYING PROGRAM XXXc CUSTOM 134°C - from 4'00'' to 30'00'' 121°C - from 20'00'' to 30'00' Pressure (bar) 2.10 2.00 SELECTION Temperature: SELECTION SINGLE VACUUM Time: 134°C 121°C 4’÷30’ (134°C) 20’÷30’ (121°C) or FRACTIONATED VACUUM 1.10 1.00 Time (min) 0.00 SELECTION EXTENDED DRYING or SHORT DRYING -1.00 54 Extrema Plus APPENDIX B – PROGRAMS DIAGRAM OF THE TEST PROGRAMS Pressure (bar) PROGRAM HELIX TEST (HT) 134°C - 3'00'' PROCESS 2.10 2.00 1.00 Time (min) 0.00 -1.00 SHORT DRYING FRACTIONATED VACUUM PROGRAM VACUUM TEST (VT) -0.80 bar Pressure (bar) 1.00 Intermediate condition for the continuation of the test (P2-P1) < (P0-P1)/10 P0 (P3-P2) < 0.02 bar t3 = t2+600 s t2 = t1+300 s t1 0.00 End condition for positive test result 5 minutes 10 minutes WAITING LEAKAGE Time (min) VACUUM PHASE P2 -0.80 P3 P1 Extrema Plus 55 APPENDIX B – PROGRAMS EXAMPLES OF PRINTING REPORTS Normal program report Extended program report (required by operator) Report following a Manual Stop Model S/N Counter Selection Temperature Pressure Process time Stand-by Vacuum Pulses Drying EXTREMA PLUS 99 XP 0000 0007/0015 134c SOLID 134 C 2.10 bar 4 min LOW SINGLE FAST Model S/N Counter Selection Temperature Pressure Process t ime Stand-by Vacuum pulses Drying EXTREMA PLUS 99 XP 0000 0007~0015 134c POROUS 134 C 2.10 Bar 4 min HIGH FRACTIONATED STANDARD Model S/N Counter Selection Temperature Pressure Process time Stand-by Vacuum Pulses Drying EXTREMA PLUS 99 XP 0000 0007/0015 134c POROUS 134 C 2.10 bar 4 min HIGH FRACTIONATED STANDARD CYCLE START 23/06/99 12:14 CYCLE START 25/06/99 09:52 CYCLE START 24/06/99 11:13 Time C bar ---------------------------------------------------------00:01 CS 079.4 +0.00 02:02 1PV 093.7 -0.89 05:48 ET 135.6 +2.15 06:02 SS 135.9 +2.17 07:02 135.6 +2.14 08:02 135.5 +2.14 09:02 135.4 +2.14 10:02 135.5 +2.15 10:03 SE 135.5 +2.15 10:37 DS 104.1 +0.00 11:41 SPD 047.5 -0.90 12:08 DE 047.6 -0.84 13:12 CE 084.6 -0.04 06:02 09:59 MAX MIN Drying PuIses CYCLE END STERILIZATION: 136.0 135.4 01 23/06/99 12:27 ---------------------------------------------------------Model S/N Counter Selection 1 Temperature Pressure Process time Stand-by Vacuum Pulses Drying EXTREMA PLUS 99 XP 0000 0007/0015 34c POROUS 134 C 2.10 bar 4 min HIGH FRACTIONATED STANDARD CYCLE START 25/06/99 09:52 Time C bar ---------------------------------------------------------00:01 CS 075.1 -0.00 01:57 1PV 047.S -0.90 04:53 1PP 120.5 +1.00 06:00 2PV 061.1 -0.80 07:15 2PP 120.4 +0.98 08:22 3PV 061.1 -0.79 11:04 ET 135.5 +2.15 11:18 SS 135.9 +2.17 12:18 135.4 +2.14 13:1B 135.5 +2.15 14:18 135.4 +2.14 15:18 135.5 +2.15 15:19 SE 135.5 +2.15 15:53 DS 104.4 +0.00 16:57 SPD 048.4 -0.90 22:55 EPD 094.9 -0.86 Z4:55 DE 112.6 -0.47 5:BB CE 115.8 -0.04 MAX MIN 135.9 135.4 Drying Pulses CYCLE END 05 25/06/99 10:17 STERILIZATION: POSITIVE OPERATOR ---------------------------------------------------------- 56 Time C bar ---------------------------------------------------------00:01 CS 077.6 +0.01 01:40 1PV 088.7 -0.89 04:40 1PP 120.6 +1.00 05:40 2PV 062.9 -0.79 07:10 2PP 135.6 +1.00 08:20 3PV 135.5 -0.79 11:20 ET 135.4 +2.15 11:39 SS 135.5 +2.17 12:39 135.5 +2.14 13:39 104.1 +2.15 14:39 047.5 +2.15 02:07 6F 02:17 6F 149.9 105.2 142.1 104.6 095.1 094.6 STERILIZATION: 151.8 104.7 153.6 104.5 102.3 101.7 ALARM CODE: E999 097.4 +0.01 154.7 104.0 104.6 +0.24 148.9 103.7 …………… …………… 135.5 +2.15 143.3 111.7 100.8 101.0 DESCRIPTION MANUAL STOP 132.6 133.0 15:19 SE 135.9 +2.17 148.5 113.5 135.3 +2.16 153.6 115.9 …………… …………… 135.5 +2.15 157.4 126.5 15:34 12F 15:49 12F 15:53 DS 134.4 +1.07 157.0 126.8 108.3 +0.25 156.4 126.8 104.4 +0.00 156.1 126.6 131.2 119.9 116.2 16:04 16:19 16:34 16:49 16:57 094.2 069.2 059.2 053.8 048.4 125.9 124.5 123.4 122.9 122.7 112.4 112.9 113.5 113.6 113.5 151.0 122.5 153.3 122.0 153.5 122.1 113.5 112.2 112.2 153.3 121.7 112.3 112.3 112.3 24:55 DE 101.4 -0.67 154.0 121.7 105.4 -0.57 153.7 121.5 …………… …………… 112.6 -0.47 149.6 119.1 25:28 E15 25:33 CE 115.2 -0.10 143.0 118.4 115.8 -0.04 147.4 110.1 110.7 110.7 11:20 MAX 15:11 MIN 135.9 135.4 08:15 9F3 08:22 3PV 08:32 10F 08:42 10F POSITIVE OPERATOR ---------------------------------------------------------- 11:20 15:11 Time T1 P T2 T3 T4 ------------------------------------------------------------------00:01 CS 075.1 -0.00 130.9 115.2 093.4 00:11 2F 074.9 -0.28 133.3 114.2 094.0 00:21 2F 074.4 -0.46 146.3 113.2 094.5 00:31 2F 074.3 -0.57 152.6 112.2 095.0 00:35 E2 074.3 -0.59 154.2 111.9 095.2 00:51 E3 078.9 -0.62 152.2 110.4 095.6 01:01 4F 074.9 -0.73 146.6 109.6 095.7 01: 11 4F 058.5 -0. 82 146.8 108.9 095.7 01:21 4F 051.3 -0.83 148.2 108.2 095.7 01:27 E4 047.8 -0.89 149.3 107.7 095.7 01:57 1PV 047.8 -0.90 155.3 105.8 095.4 11:04 ET 11:18 SS 11:28 11F 12F 12F 12F 12F SPD 17:04 13F 19:31 13F 19:38 13F 22:55 EPD 23:10 14F 23:25 14F 076.5 -0.57 081.1 -0.49 …………… …………… 068.4 -0.76 061.1 -0.79 - 0.50 -0.73 -0.81 -0.87 -0.90 047.1 -0.80 042.3 -0.89 042.4 -0.79 …………… …………… 094.9 -0.90 Drying pulses CYCLE END 155.1 153.7 152.3 151.2 150.9 NEGATIVE OPERATOR ---------------------------------------------------------- ---------------------------------------------------------- 131.7 132.5 Report following a Black-Out Model S/N Counter Selection Temperature Pressure Process time Stand-by Vacuum pulses Drying EXTREMA PLUS 99 XP 0000 0006/0012 134c CUSTOM 134 C 2.10 bar 07 min HIGH FRACTIONATED FAST CYCLE START 24/06/99 15:31 24/06/99 15:45 BLACK OUT STERILISATION NEGATIVE OPERATOR ---------------------------------------------------------- 111.2 ALARM CODE: E000 DESCRIPTION BLACK-OUT 05 25/06/99 10:17 STERILIZATION: POSITIVE OPERATOR EXTENDED REPORT REQUESTED BY THE OPERATOR ---------------------------------------------------------- Extrema Plus APPENDIX B – PROGRAMS Report following an Alarm HELIX TEST program report VACUUM TEST program report Model S/N Counter Selection Temperature Pressure Process t ime Stand-by Vacuum pulses Drying EXTREMA PLUS 99 XP 0000 0007~0015 134c POROUS 134 C 2.10 Bar 4 min HIGH FRACTIONATED STANDARD Model P/N Counter Selection Temperature Pressure Process time EXTREMA PLUS 99 XP 0000 0011/0019 ELIX TEST 134 C 2.10 bar 3.5 min Model P/N Counter Selection EXTREMA PLUS 99 XP 0000 0011/0019 VACUUM TEST CYCLE START 25/06/99 16:38 CYCLE START 29/06/99 11:37 CYCLE START 26/06/99 11:30 Time C bar ---------------------------------------------------------00:01 CS 076.4 +0.00 02:06 1PV 089.3 -0.89 04:35 1PP 120.4 +0.99 05:45 2PV 062.5 -0.78 07:02 2PP 120.2 +0.97 08:15 3PV 061.1 -0.79 11:00 ET 135.6 +2.15 11:14 SS 136.0 +2.17 12:14 135.6 +2.14 13:14 135.6 +2.15 14:14 135.5 +2.14 14:45 SE 135.4 +2.14 15:20 DS 111.5 +0.00 16:34 SPD 047.8 -0.89 18:21 EPD 059.5 -0.86 19:21 DE 075.4 -0.50 20:06 CE 078.7 -0.04 Time T1 P T2 T3 T4 ------------------------------------------------------------------00:01 CS 075.1 -0.00 130.9 115.2 093.4 00:11 2F 074.9 -0.28 133.3 114.2 094.0 00:21 2F 074.4 -0.46 146.3 113.2 094.5 00:31 2F 074.3 -0.57 152.6 112.2 095.0 00:35 E2 074.3 -0.59 154.2 111.9 095.2 00:51 E3 078.9 -0.62 152.2 110.4 095.6 01:01 4F 074.9 -0.73 146.6 109.6 095.7 01: 11 4F 058.5 -0. 82 146.8 108.9 095.7 01:21 4F 051.3 -0.83 148.2 108.2 095.7 01:27 E4 047.8 -0.89 149.3 107.7 095.7 01:57 1PV 047.8 -0.90 155.3 105.8 095.4 02:07 6F 02:17 6F 149.9 105.2 142.1 104.6 095.1 094.6 151.8 104.7 153.6 104.5 102.3 101.7 097.4 +0.01 154.7 104.0 104.6 +0.24 148.9 103.7 …………… …………… 135.5 +2.15 143.3 111.7 100.8 101.0 132.6 133.0 15:19 SE 135.9 +2.17 148.5 113.5 135.3 +2.16 153.6 115.9 …………… …………… 135.5 +2.15 157.4 126.5 15:34 12F 15:49 12F 15:53 DS 134.4 +1.07 157.0 126.8 108.3 +0.25 156.4 126.8 104.4 +0.00 156.1 126.6 131.2 119.9 116.2 08:15 9F3 08:22 3PV 08:32 10F 08:42 10F 11:04 ET 11:18 SS 11:28 11F 076.5 -0.57 081.1 -0.49 …………… …………… 068.4 -0.76 061.1 -0.79 131.7 11:13 14:44 MAX MIN Drying pulses CYCLE END 136.0 135.4 Time C bar ---------------------------------------------------------00:00 CS 035.0 +0.02 01:39 E1F 037.4 -0.90 6:39 E2F 038.4 -0.90 16:39 E3F 042.0 -0.90 17:54 CE 045.5 -0.10 CYCLE END 29/06/99 11:41 VACUUM TEST: POSITIVE OPERATOR ---------------------------------------------------------- 01 25/06/99 16:38 HELIX TEST COMPLETE Please attach the indicator hereunder OPERATOR ---------------------------------------------------------- 132.5 STERILISATION NEGATIVE ALARM CODE: A112 DESCRIPTION PTC SHORTCIRCUIT CAUTION ! PLEASE REFER TO USER MANUAL ---------------------------------------------------------- Extrema Plus 57 APPENDIX C – MAINTENANCE APPENDIX C - MAINTENANCE INTRODUCTION In order to guarantee a sure and efficient operation for the whole life of the equipment, a regular maintenance by the user as well as the correct use are necessary. e FOR A BETTER QUALITY OF THE MAINTENANCE, IT IS NECESSARY TO INTEGRATE THE ORDINARY CONTROLS WITH PERIODIC CHECK-UP BY THE SERVICE (REFER TO APPENDIX Z). In addition, a periodic validation of the sterilizer, i.e. the check of the thermodynamic process parameters comparing them to the reference values measured by tools suitably adjusted, is fundamental. Refer to the paragraph Validation of the sterilizer, in the following of this appendix. The ordinary maintenance, as described below, consists of easy manual operations and preventive interventions by the use of simple tools. IN CASE OF REPLACEMENT OF COMPONENTS OR EQUIPMENT PARTS REQUIRE FOR AND/OR USE ONLY ORIGINAL SPARE PARTS. ORDINARY SCHEDULED MAINTENANCE The following table reports an overview of the maintenance actions and frequency to be performed on the sterilizer in order to maintain it always efficient. We suggest to shorten the maintenance interval in case of heavy use: Cleaning of the gasket and parabola. DAILY Cleaning of the external surfaces Cleaning of the sterilization chamber and accessories WEEKLY Desinfection of the external surfaces Lubrication of the door locking mechanism Maintenance of the safety valve MONTLY Cleaning (or replacement) of the draining filter Sterilization of the bacteriologic filter EVERY 3/6 MONTHS (depending on the use frequency) YEARLY Replacement of the bacteriologic filter Validation of the sterilizer (see proper paragraph) Always refer to the following general directions: 58 – Do not wash the sterilizer with direct pressurized or rain throw water. Possible water penetrations on electric and electronic components could jeopardize, also irreparably, the operation of the equipment or internal parts; – Do not use metal cleaning abrasive cloths, metallic brushes (or other abrasive materials) or both solid and liquid products for cleaning the equipment or the sterilization chamber; – Do not use chemical products or disinfectant substances for cleaning the sterilization chamber. These products could provoke possible damages, sometimes irremediable, to the sterilization chamber; – Do not let the calcareous or dirty residues accumulate on the sterilization chamber, door and gasket, but provide for their periodic removal. In the course of the time these residues could cause damages to the elements, and jeopardize the operation of the components installed on the hydraulic circuit. Extrema Plus APPENDIX C – MAINTENANCE e THE PRESENCE OF WHITE SPOTS AT THE BASE OF THE INSIDE WALL OF THE CHAMBER MEANS THE USE OF POOR QUALITY DEMINERALIZED WATER. BEFORE CARRYING OUT THE ORDINARY MAINTENANCE OPERATIONS, CHECK THAT THE MAINS SWITCH OF THE STERILIZER IS IN OFF POSITION (EQUIPMENT SWITCHED OFF) . IF THE DISCONNECTION OF THE ELECTRIC POWER SUPPLY OF THE EQUIPMENT IS NOT POSSIBLE AND THE EXTERNAL MAINS BREAKER IS FAR OR HOWEVER NOT VISIBLE TO THE PERSON IN CHARGE OF THE MAINTENANCE, THE NOTICE WORK IN PROGRESS MUST BE POSITIONED ON THE BREAKER AFTER HAVING SWITCHED IT IN OFF POSITION. MAINTENANCE OPERATIONS With reference to the previous table, the operations concerning the different maintenance actions are here synthetically described. Cleaning the gasket and parabola In order to eliminate the calcareous residues, cleanse the chamber and parabola gasket with a clean cotton cloth soaked with bland water and vinegar solution (or analogous products, verifying in advance the content reported on the label). Dry the surfaces and remove every possible residue before using the equipment. Cleaning the external surfaces Clean all the external parts by using a clean cotton cloth dampened with water, eventually added with some neutral detergent. Dry the surfaces and remove every possible residue before using the equipment. Cleaning the sterilization chamber and accessories Clean sterilization chamber, tray-holder and trays (and all the internal surfaces) with a clean cotton cloth soaked with water, eventually added with a bland neutral detergent. Rinse carefully with distilled water, paying attention do not let any residue remain on the chamber or accessories. e DO NOT USE POINTED OR SHARP TOOLS TO REMOVE THE CALCAREOUS SPOTS FROM THE STERILIZATION CHAMBER. IN CASE OF EVIDENT RESIDUES, IMMEDIATELY VERIFY THE QUALITY OF THE DISTILLED WATER YOU ARE USING (SEE APPENDIX A., TECHNICAL CHARACTERISTICS). Disinfecting the external surfaces Lubricating the door locking mechanism For the desultory disinfection of the external surfaces both methylated spirit and detergents with a minimum percentage of sodium hypochlorite (or equivalent) can be used. For a good maintenance of the equipment periodically perform the cleaning of all the external parts, by using a cloth dampened with normal neutral cleansers or simply with water. Carefully lubricate the mobile parts and articulations of the door locking mechanism using silicone oil or analogous spray product. Pay attention do not sprinkle the lubricant on sterilization chamber, gasket and the inside part of the parabola. e Extrema Plus DO NOT USE GREASE OR OTHERS SOLID PRODUCTS, AS THEY COULD PRODUCE IN THE COURSE OF THE TIME INCRUSTATIONS AND CONSEQUENT JAMS OF THE MECHANISM. 59 APPENDIX C – MAINTENANCE Maintenance of the safety valve Access the safety valve on the back side of the sterilizer. Loosen the grained ferrule with the fingers (or with a proper tool inserted in the two holes of the ferrule) and turn counterclockwise until you get the stop and the idle stroke. Screw the ferrule again. Repeat the operation at least for a couple of times. At the end tighten the ferrule definitively. THIS OPERATION IS NECESSARY TO GUARANTEE THE CORRECT OPERATION OF THE VALVE IN THE COURSE OF THE TIME . At the end of the maintenance verify that the ferrule is completely tighten and locked. Cleaning (or replacement) the draining filter During the use, the accumulation of residues within the filter could gradually obstruct the lower draining duct. For cleaning (or replace) the filter, open the door of the sterilizer and remove the nut 1 with a hexagonal wrench n. 14. Then remove the water stopper 2 and the relative gasket and, by the same wrench, unscrew the fitting 3 for accessing the filter 4. Remove the filter from the support and carefully clean it under a throw of running water, using if necessary a pointed tool to remove possible extraneous bodies of greater dimensions. If the filter cannot be recovered provide for the replacement with a new one. Plug the filter in the support blocking it with a drop of pipe-fitting sealing (if available). Reassemble all the parts following in opposite order the procedure, paying attention to let the draining holes 5 remain at the level of the chamber wall. Sterilization of the bacteriological filter Periodically eliminate the bacterial charge of the bacteriological filter by means of a sterilization process at 121°C for porous material (program 121c POROUS). At the end of the program screw it completely on the support. e Replacement of the bacteriological filter At the expiration of the stated interval or whenever a visible obstruction of the filter is noticed (signaled by a color markedly tending towards the grey) unscrew the bacteriologic filter from the support, replace it with a new one that must be screwed completely on the fitting. e 60 THE PROCESS STERILIZATION DOESN'T REMOVE THE OBSTRUCTION OF THE FILTER, NEITHER PROLONGS IN ANY WAY ITS LIFE. THEREFORE PLEASE FOLLOW THE REPLACEMENT INTERVALS AS REPORTED ON THE SCHEDULED MAINTENANCE TABLE. A SPARE BACTERIOLOGICAL FILTER IS SUPPLIED WITH THE EQUIPMENT. ADDITIONAL FILTERS REFER TO THE APPENDIX Z, SERVICE. TO REQUIRE Extrema Plus APPENDIX C – MAINTENANCE PERIODIC VALIDATION OF THE STERILIZER As for every equipment, a decadence of the performances and components during the life, depending on the utilization type and frequency, is inevitable. In order to guarantee a constant process safety it is necessary to verify, at periodic expiration (possibly yearly), the process thermodynamic parameters (pressure and temperature), checking if these are remaining within admitted limits or not. The performance validation of the sterilizer is at care and responsibility of the user. The reference European standards EN 554 (Sterilization of the medical devices - Method for the validation and systematic control of the steam sterilization) and EN 556 (Sterilization of the medical devices – Requirements for the medical devices marked with “STERILE” indication) supply an effective guide tool for carrying out the verifications on the steam sterilizers. Since these controls require, besides a specific experience and knowledge, the use of a special tools (high accuracy sensors and probes, data logger, dedicated software, etc.), properly verified and adjusted, it is necessary to address to companies specialized in this activity. “Assistenza Clienti” M.O.COM. (see Appendix Z) is at your disposal to supply every possible information concerning the periodic validation of the sterilizers. Extrema Plus 61 APPENDIX D – GENERAL PROBLEMS APPENDIX D - GENERAL PROBLEMS OVERVIEW If during the equipment use a problem or an alarm signaling occurs, it is not the case to immediately worry. This could not be caused by a breakdown, but more probably by an abnormal situation, often only transitory (for instance a black-out), or by an incorrect use. In any case, it is important to individualize beforehand the cause of the anomaly and to carry out the opportune corrective actions autonomously or by calling the Customer Service. To this purpose, the indications for the diagnosis and resolution of the general problems, as well as an accurate description of the alarm codes, their meaning and the consequent actions for their solution are supplied in the following. ANALYSIS AND RESOLUTION OF THE PROBLEMS If Your sterilizer doesn't work correctly, please perform the followings verifications before contacting the Customer Service: PROBLEM The sterilizer doesn’t switch on. POSSIBLE CAUSE PROPOSED SOLUTION The plug of the power supply cable is not correctly plugged in the socket. Plug in correctly the power supply cable. Voltage lack at the output socket. Verify the cause of the voltage lacking and try to recovery it. Set the switch in ON position. The mains switch and/or the automatic circuit breaker are in OFF state. The mains fuses are burned. Replace the fuses with others of the same type and value. (See Appendix A, Technical characteristics). After the START command, the sterilization cycle doesn’t start. The equipment is performing the pre-heating phase (WARMUP). The red Led MIN turns on. The distilled water level of the internal reservoir is lower the minimum level. Topping up the reservoir with distilled water until the lighting of the green Led MAX (or at least the turning off of the red Led MIN). The red Led Alarm turns on. An alarm signaling has been generated with a proper code (see TIMER display) and message (see LCD display). Verify the alarm code and operate consequently. The safety valve intervenes. Anomalous over-pressure inside the chamber. Verify the correct top ferrule locking of the safety valve. 62 Wait for the sterilizer reaches the correct thermal conditions for the start of the sterilization cycle. NOTE: Under normal operating conditions, the preheating average time is about 12 minutes. (See following paragraphs, Alarm signaling, Alarm codes and Troubleshooting). NOTE: Let the equipment cool or use gloves to avoid from burning oneself when you are touching the valve. Extrema Plus APPENDIX D – GENERAL PROBLEMS PROBLEM At the end of the program (CYCLE COMPLETE) it is impossible to open the door. POSSIBLE CAUSE Residual pressure inside the chamber. PROPOSED SOLUTION Wait for some minutes until the pressure return to the 0.00 bar, and retry to open the door. NOTE: LCD displays the message: Verify that the bacteriologic filter is not obstructed and, if necessary, replace it. NOW LEVELLING PLEASE WAIT… The procedure for storing the environment pressure value (function SET 0 bar) has not been correctly performed. Call for the Customer Service (see Appendix Z). The safety friction of the handle is loosen. Push on the handle (pay attention to not damage it) against the equipment until to set it in the position parallel with the door. Retry to open the door. The door-locking system is After having reset the alarm (code E021), verify that remained engaged at the end of the the handle is in the correct closing position. cycle. Call the SETUP program and the DOOR LOCK option in the menu SPECIAL for the manual command of the mechanism. (see Chapter “Setting the equipment”). NOTE: In case of unsuccessful, carry out the manual unlocking through the supplied tool. (see note at the end of this appendix). Presence of water on the table of the sterilizer. Fittings or draining pipelines not correctly connected. Verify the locking of the fittings; if necessary perform the assembly with greater attention to the sealing (see Chapter - Installation) Check that the pipelines towards the draining tank are completely fitted; verify that the proper clamps are positioned on the pipes. Feeding water pipe coming from the Verify the locking of the pipe; if necessary perform the assembly with greater attention to the sealing (see external reservoir not correctly connected. Chapter - Installation). Check that the pipelines coming from the external tank is completely fitted; verify that the proper clamp is positioned on the pipe. Steam leakage from the gasket. At the end of the cycle clean with a dampened cloth the gasket and the parabola of the chamber. Check for possible damages on the gasket. Carry out a new cycle and verify the condition. Presence of water around the draining tank. Difficulty for reaching the correct vacuum in the chamber (problems of drying, presence of water in the sterilization chamber at the end of the cycle, etc.). Extrema Plus Draining pipes not correctly connected to the tank. Check that the pipelines towards the draining tank is completely fitted; verify that the proper clamps are positioned on the pipes. Lack of the closing tap of the tank. Arrange the plastic screw tap on the tank, in order to avoid accidental water escape. Sterilization chamber draining filter obstructed. Provide for the cleaning or replacement of the draining filter. (see Appendix C “ Maintenance”). Draining circuit obstructed or draining pipes obstructed. Verify the draining pipes (and the fittings on which they are fitted) are without obstructions and runs freely from the equipment to the condensation recovery tank. Air slots on the sides and/or on the rear obstructed or heat exchanger insufficiently aired. Remove every possible obstruction from the air slots and from the heat exchanger. Verify the equipment is not on direct contact with walls or surfaces (see Chapter “Installation”). 63 APPENDIX D – GENERAL PROBLEMS PROBLEM POSSIBLE CAUSE Excessive damp on the Excess of material inside the material and/or the tools chamber. at the end of the program. Load not correctly arranged. PROPOSED SOLUTION Verify the quantity of sterilized material and make sure do not overcome the maximum admitted quantities, according to the typology of the load. (See overview table in Appendix A, “Technical characteristics”). Arrange the load, particularly the wrapped one, according to the indications. (See Chapter “Preparing the material to be sterilized”). Wrong selection of the sterilization program Choose the proper sterilization program for the type of material to be sterilized. (See Table in Appendix B, “Programs”). Oxidation traces or spots on the tools Obstruction on the sterilization chamber draining filter. Provide for cleaning or replacing the draining filter. Poor quality of the tools. Check the quality of the tools showing the problem, make sure that the material of the tools is autoclavable. Poor quality of the distilled water. Empty the reservoir and fill it with high quality distilled water (possibly obtained by inverse osmosis). (See Appendix C, “Maintenance”). (See Characteristics of the feeding water in Appendix A, “Technical characteristics”). Organic or inorganic residues on the tools Carefully clean the material before the sterilization cycle. (See Chapter “Preparing the material to be sterilized”). Contact among tools of different metal. Separate the tools of different metal with proper expedients. (See Chapter “Preparing the material to be sterilized”). Presence of calcareous residues on Perform the cleaning of the equipment and parts as the wall of the sterilization chamber indicated. and/or accessories. (See Appendix C, “Maintenance”). Bluing or blackening of the materials. Wrong selection of the sterilization program. Verify the adequacy of the temperature of the sterilization program selected according to the material to be treated. (See Table in Appendix B, “Programs”). The printer (if installed) doesn't print the report. Printer not switched on. Switch on the printer. Parallel cable not correctly connected or wrong model. Verify that the cable used is suitable for the printer and correctly connected. Sterilizer not correctly configured for the use of the printer. Provide for setting the equipment according to the used printer. (See Chapter “Setting the equipment”). e 64 IF THE PROBLEM PERSISTS, CALL FOR THE CUSTOMER SERVICE (SEE APPENDIX Z) BY COMMUNICATING THE MODEL AND THE SERIES NUMBER OF THE STERILIZER. THESE DATA MAY BE FOUND ON THE MANUFACTURING PLATE ON THE REAR SIDE OF THE EQUIPMENT AND ON THE GUARANTEE CERTIFICATE. Extrema Plus APPENDIX D – GENERAL PROBLEMS MANUAL RELEASE OF THE DOOR LOCKING MECHANISM In case of failure of the door safety lock it is possible to release it manually, through the supplied tool. Operate as follows: 1. Move forward the sterilizer, putting it out the support plane of some centimeter in order to access the hole corresponding to the mechanism movement axle; 2. Firmly hold the equipment, pay attention do not fall it down avoiding damages or injuries to property and/or people; 3. Insert the special supplied tool (Ref. 15 – see page 3) into the hole below the frame; 4. Screw the tool on threaded shaft of the electromagnet without tightening; 5. Pull downward the tool until the mechanism is unlocked; 6. Unscrew the tool and remove it; 7. Arrange the equipment on the support plane; 8. Open the door and recover the load. Extrema Plus 65 APPENDIX E – ALARM SIGNALING APPENDIX E - ALARM SIGNALING OVERVIEW Each time an anomalous condition occurs during the sterilizer operation an alarm signaling with a specific code (formed by one letter and three figures) will be generated. The alarm codes are divided in three categories: • E = ERROR Wrong action and/or use, or external equipment cause. Problem generally recoverable by the user. Code format: Exxx (xxx = identification number 000 ÷ 999) • A = ALARM Failure of first level, not concerning the safety. Problem generally recoverable on site by a specialized technician. Code format: Axxx (xxx = identification number 000 ÷ 999) • H = HAZARD Failure of second level, involving the safety. Problem generally recoverable by the Customer Service. Code format: Hxxx (xxx = identification number 000 ÷ 999) ALARM PROCEDURE The intervention of the alarm procedure causes the interruption of the program (or the normal operation), associated with the alarm code displaying, a message on LCD display (see table below), an acoustic signaling and the lighting of the alarm red led (steady or intermittent). e DURING THE ALARM PROCEDURE THE TEMPERATURE (°C) AND PRESSURE (BAR) DISPLAYS WILL SHOW ALWAYS THE CURRENT VALUES OF THE STERILIZATION CHAMBER. The alarm procedure is designed in order to avoid the user from any possible confusion between an anomalous cycle and a cycle correctly completed, and consequently from unintentionally using of the not sterile material. The performing of the alarm procedure differs according to whether it occurs during or out the program execution, and is structured for driving the user until the final RESET of the sterilizer. Alarm occurring during the sterilization cycle If the alarm occurs during the sterilization or test program the LCD will show: A l a r m m e s s a g e L E V E L L I N G … Reached the safety conditions, the equipment enables a special procedure, on the first asking the user for manually unlocking the door with the following message: P R E S S ⇑ T O U N L O C K T H E D O O R Press the key ⇑ to unlock the door locking mechanism. The following message appears: A l a r m O P E N m e s s a g e T H E D O O R Opened the door, the user is required to reset the equipment: A l a r m m e s s a g e R E S E T S Y S T E M 66 Extrema Plus APPENDIX E – ALARM SIGNALING or, according to the preset RESET modes: A l a r m m e s s a g e A L A R M ! e Alarm occurring out the sterilization cycle IF A PRINTER IS INSTALLED, ON OPENING THE DOOR AT THE END OF THE CYCLE THE REPORT (NORMAL OR EXTENDED ACCORDING TO THE TYPE OF THE OCCURRED ALARM) RELATIVE TO THE STERILIZATION PROGRAM JUST PERFORMED, AND INCLUDING THE ERROR SIGNALING WILL BE PRINTED. VERIFY THE PRINTOUT, SIGN IT ON THE SPECIAL SPACE AND FILE IT IN A PROPER PLACE. REFER TO THE PRINTOUT EXAMPLES IN APPENDIX B “PROGRAMS”. If the alarm occurs out the sterilization or test program the following message will be shown: A l a r m m e s s a g e A L A R M ! or, according to the foreseen RESET modes, A l a r m m e s s a g e W A R N I N G ! which will automatically change with the message: A l a r m m e s s a g e R E S E T S Y S T E M e RESET OF THE SYSTEM >3s THE ALARMS OCCURRED OUT OF THE PROGRAM WILL NOT PRODUCE ANY REPORT. The RESET of the system can be performed in two alternative ways, according to the type of alarm occurred (see table of the paragraph “List of the alarm codes” following this appendix): – By pressing for about 3 seconds the PROGRAM SELECTION key. An acoustic signal will be generated as RESET confirmation; – By switching off and on the equipment through the mains switch. On turning on the sterilizer the normal initial autotest will be performed. e IF THE EQUIPMENT HAS SWITCHED OFF (MAINS SWITCH IN OFF) BEFORE THE RESET THROUGH THE PROPER KEY WILL CAUSE A FURTHER ALARM (BLACK-OUT, CODE E000) AT THE NEXT SWITCHING ON. IN FACT, THE ALARM PROCEDURE WILL BE CONSIDERED NOT COMPLETED IF MISSED THE CORRECT AND COMPLETE RESTORATION. After the RESET, and the possible technical service, the equipment will go in STAND-BY status, ready to perform a new program. e IF THE CYCLE INTERRUPTION OCCURS DURING PARTICULAR PHASES, A CLEANING PROCEDURE OF THE HYDRAULIC CIRCUIT WILL START ON THE NEXT CYCLE, WITH THE FOLLOWING MESSAGE ON LCD: 1 3 4 c P O R O U S C I R C U I T C L E A N I N G Over the cleaning procedure, the sterilization cycle selected will start automatically. Extrema Plus 67 APPENDIX E – ALARM SIGNALING LIST OF THE ALARM CODES The alarm codes, LCD messages and consequent RESET modes are listed in the following.: CODE ALARM DESCRIPTION LCD MESSAGE RESET MODE ERRORS (category E) E000 Black-out BLACK-OUT E010 Door open DOOR OPEN E020 Door unlocked E021 Door locked E030 Minimum water level in the filling tank (MIN) WATER MIN E031 Maximum water level in the filling tank (MAX) EXHAUST MAX E041 Too much frequent filling up of the tank (automatic filling) E900 Unsuccessful Vacuum Test (during the LEAKAGE phase) TEST FAILED E901 Unsuccessful Vacuum Test (during the WAITING phase) TEST FAILED E902 Unsuccessful Vacuum Test (timeout vacuum pulses exceeded) TEST FAILED E999 Manual interruption of the cycle DOOR UNLOCKED DOOR LOCKED FILLING PROBLEM PROGRAM SELECTION key MANUAL STOP ALARMS (category A) 68 A022 Problem of the door locking mechanism LOCKING PROBLEM A032 Problem of the level probes LEVEL PROBLEM A040 Unsuccessful reservoir filling (automatic filling) FILLING PROBLEM A101 Failure of the thermo-resistor PT1 (sterilization chamber) PTC BROKEN A102 Failure of the thermo-resistor PT2 (steam generator) PTC BROKEN A103 Failure of the thermo-resistor PT3 (heating resistor) PTC BROKEN A104 Failure of the thermo-resistor PT4 (on the wall of the sterilization chamber) PTC BROKEN A111 Short-circuit of the thermo-resistor PT1 (sterilization chamber) PTC SHORTCIRCUIT A112 Short-circuit of the thermo-resistor PT2 (steam generator) PTC SHORTCIRCUIT A113 Short-circuit of the thermo-resistor PT3 (heating resistor) PTC SHORTCIRCUIT A114 Short-circuit of the thermo-resistor PT4 (on the wall of the sterilization chamber) PTC SHORTCIRCUIT A121 Instability of the thermo-resistor PT1 (sterilization chamber) A200 Pre-heating not performed within the timeout (heating resistor problem). A250 1° vacuum pulse not performed within the timeout A251 1° raising towards the atmospheric pressure not performed within the timeout Switching off the equipment (OFF) PTC FLICKERING HEATING PROBLEM PV1 TIMEOUT ATM1 TIMEOUT PROGRAM SELECTION key Extrema Plus APPENDIX E – ALARM SIGNALING CODE ALARM DESCRIPTION LCD MESSAGE A252 1° vacuum pulse not performed within the timeout A253 2° vacuum pulse not performed within the timeout A254 2° raising towards the atmospheric pressure not performed within the timeout A255 2° vacuum pulse not performed within the timeout PP2 TIMEOUT A256 3° vacuum pulse not performed within the timeout PV3 TIMEOUT A257 3° raising towards the atmospheric pressure not performed within the timeout A258 3° vacuum pulse not performed within the timeout A259 PROCESS phase not started within the timeout RESET MODE PP1 TIMEOUT PV2 TIMEOUT ATM2 TIMEOUT PROGRAM SELECTION key ATM3 TIMEOUT PPP TIMEOUT PROCESS TIMEOUT HAZARDS (category H) H150 Failure of the pressure probe MPX H160 Short-circuit/disconnection of the pressure probe MPX H170 Instability of the pressure probe MPX H400 Ratio Pconv/T unbalanced (Pconv>T) (PROCESS phase) P/T PROBLEM H401 Ratio T/Pconv unbalanced (T>Pconv) (PROCESS phase) T/P PROBLEM H402 Temperature over the MAX limit (PROCESS phase) T OVER LIMIT H403 Temperature under MIN limit (PROCESS phase) H404 Temperature fluctuating over the limit (PROCESS phase) H405 Pressure over the MAX limit (PROCESS phase) P OVER LIMIT H406 Pressure under the MIN limit (PROCESS phase) P UNDER LIMIT H990 Over-pressure (sterilization chamber, MPX) OVERPRESSURE H991 Over-heating (sterilization chamber, PT1) OVERHEATING PT1 H992 Over-heating (steam generator, PT2) OVERHEATING PT2 H993 Over-heating (band heating resistor, PT3) OVERHEATING PT3 Extrema Plus MPX BROKEN MPX SHORTCIRCUIT Switching off the equipment (OFF) MPX FLICKERING T UNDER LIMIT PT1 FLUCTUATING PROGRAM SELECTION key 69 APPENDIX E – ALARM SIGNALING ANALYSIS AND RESOLUTION OF THE PROBLEMS Depending on the occurred alarm type, the indications to find the possible causes and restore the correct operation are listed on the following table: CODE POSSIBLE CAUSE SUGGESTED SOLUTION ERRORS (category E) E000 Sudden interruption of the electric power supply (black-out). Wait for the return of the electric power supply and perform the RESET according to the instructions. Verify the correct sterilization of the load before using the treated material. Accidental switching off of the main switch and/or disconnection of the plug from the a.c. socket. Mains fuses burned. Reconnect the plug and/or switch on the equipment, and perform the RESET according to the instructions. Verify the correct sterilization of the load before using the treated material. Replace the fuses of same type and value (see Table in Appendix A, “Technical characteristics”). Switch on the equipment and perform the RESET according to the instructions. Verify the correct sterilization of the load before using the treated material. E010 E020 E021 Door open (or not correctly close) on the start of the cycle (START). Perform the RESET according to the instructions. Failure of the door micro-switch. Call for the Customer Service (see Appendix Z). Door locking mechanism not correctly activated on the start of the cycle (START). Perform the RESET according to the instructions. Correctly close the door and restart the cycle. Correctly close the door, pushing completely the handle, and try to restart again the program Failure of the door locking mechanism. Call for the Customer Service (see Appendix Z). Door locking system not released at the end of the cycle (CYCLE COMPLETE). Perform the RESET according to the instructions. Call the SETUP program and select the DOOR LOCK option in the menu SPECIAL in order to operate manually the mechanism. (see Chapter “Setting the equipment”). NOTE: In case of unsuccessful result, manually perform the releasing of the mechanism through the supplied tool. E030 E031 70 Failure of the door locking mechanism. Call for the Customer Service (see Appendix Z). Internal reservoir water level under the minimum (MIN). Perform the RESET according to the instructions. Failure of the MIN level signaling. Call for the Customer Service (see Appendix Z). Draining tank water level over the MAX level. Perform the RESET according to the instructions. Cable of the draining tank level signaling disconnected from the equipment. Perform the RESET according to the instructions. Failure of the MAX level signaling. Call for the Customer Service (see Appendix Z). Provide for filling up the water until the turning on of the Led MAX (or turning off at least of the Led MIN). Provide for draining the tank, letting a minimum level of water as marked to remain. Connect the jack of the level signaling cable to the inlet on the back of the sterilizer. Extrema Plus APPENDIX E – ALARM SIGNALING CODE E041 E900 E901 E902 POSSIBLE CAUSE SUGGESTED SOLUTION Connecting pipe between external tank and sterilizer not correctly connected. Perform the RESET according to the instructions. Verify the connection of the water filling pipe, tighten both ends on the fitting through the supplied plastic clips. Eliminate possible obstructions on the pipe route. Failure of the water pump. Call for the Customer Service (see Appendix Z). Problem on the hydraulic circuit. Call for the Customer Service (see Appendix Z). Air leakage on the gasket Perform the RESET according to the instructions. Carefully clean the gasket with a clean cloth of cotton dampened with water. Restart the program. Sterilization chamber too much warm. Perform the RESET according to the instructions. Problem on the hydraulic circuit. Call for the Customer Service (see Appendix Z). Excess of damp inside the sterilization chamber. Perform the RESET according to the instructions. Air leakage on the gasket Perform the RESET according to the instructions. Carefully clean the gasket with a clean cloth of cotton dampened with water. Restart the program. Problem on the hydraulic circuit. Call for the Customer Service (see Appendix Z). Excess of damp in the sterilization chamber. Perform the RESET according to the instructions. Air leakage on the gasket Perform the RESET according to the instructions. Carefully clean the gasket with a clean cloth of cotton dampened with water. Restart the program. Failure of the vacuum pump. Call for the Customer Service (see Appendix Z). Carry out the test with the sterilization chamber at moderate temperature (for instance in the morning, at the first switching on of the equipment). Carefully dry the sterilization chamber and restart the program. Carefully dry the inside of the sterilization chamber and again restart the program. Problem on the hydraulic circuit. E999 Manual interruption of the sterilization or test program. (see also Chapter “Running the sterilization program”) Perform the RESET according to the instructions. Verify the correct load sterilization before using the treated material. ALARMS (category A) A022 Door not completely open during the initial automatic self-test. Open completely the door, verifying the closing hook doesn't prevent the activation of the mechanism. Switch off (RESET) and switch on again the equipment. A032 Failure of the door locking mechanism Call for the Customer Service (see Appendix Z). Door locking mechanism released (erroneously) during the cycle Perform the RESET according to the instructions. Water level signaling connector not plugged in. Call for the Customer Service (see Appendix Z). Call for the Customer Service (see Appendix Z). Failure of the level signaling(s) Extrema Plus 71 APPENDIX E – ALARM SIGNALING CODE A040 POSSIBLE CAUSE SUGGESTED SOLUTION Lacking of water in the external tank Perform the RESET according to the instructions. (automatic filling). Fill the tank with sufficient distilled water, and remember to periodically verify the level. Connecting pipe between the external tank and sterilizer not correctly connected. Perform the RESET according to the instructions. Verify the connection of the water filling pipe, tighten both ends on the fitting through the supplied plastic clips. Eliminate possible obstructions on the pipe route. Failure of water pump. A101 Failure of the temperature probe of the sterilization chamber (PT1). A102 Failure of the temperature probe of the steam generator (PT2). A103 Failure of the temperature probe of the heating resistor (PT3). A104 Failure of the temperature probe of the chamber wall (PT4). A111 Wrong connection of the temperature probe (sterilization chamber) to the pcb connector. Call for the Customer Service (see Appendix Z). Short-circuit of the temperature probe (sterilization chamber). A112 Wrong connection of the temperature probe (steam generator) to the pcb connector. Call for the Customer Service (see Appendix Z). Short-circuit of the temperature probe (steam generator). A113 Wrong connection of the temperature probe (heating resistor) to the pcb connector. Short-circuit of the temperature probe (heating resistor). A114 Wrong connection of the temperature probe (chamber wall) to the pcb connector. Short-circuit of the temperature probe (chamber wall). A121 Instable operation of the temperature probe (sterilization chamber). A200 Release of the steam generator safety thermostat. Provide for the manual reset of the thermostat installed on the rear side of the equipment (see Chapter “Product description”). Unscrew the protection plastic cap, push on the red button for a click and replace the cap. Switch off (RESET) and switch on again the equipment. Release of the heating resistor safety thermostat. Wrong operation of the steam generator or heating resistor. 72 Call for the Customer Service (see Appendix Z). Extrema Plus APPENDIX E – ALARM SIGNALING CODE POSSIBLE CAUSE A250 Presence of water or condensation inside the sterilization chamber. SUGGESTED SOLUTION Perform the RESET according to the instructions. Carefully dry the sterilization chamber and restart the program. Do not introduce material soaked by water or liquid into the chamber. Obstruction on the sterilization chamber draining filter. Provide for cleaning or replacing the draining filter. Air leakage on the gasket Perform the RESET according to the instructions. Carefully clean the gasket with a clean cloth of cotton dampened with water. Restart the program. Failure of the vacuum pump. Problem on the hydraulic circuit. A251 Wrong operation of the water pump. Problem on the hydraulic circuit. Release of the steam generator safety thermostat. (See Appendix C, “Maintenance”). Call for the Customer Service (see Appendix Z). Call for the Customer Service (see Appendix Z). Provide for the manual reset of the thermostat on the rear side of the equipment (see Chapter “Product description”). Unscrew the protection plastic cap, push on the red button until a click and replace the cap. Switch off (RESET) and switch on the equipment. Release of the heating resistor safety thermostat. Wrong operation of the steam generator or heating resistor. A252 Call for the Customer Service (see Appendix Z). Air leakage on the gasket Perform the RESET according to the instructions. Carefully clean the gasket with a clean cloth of cotton dampened with water. Restart the program. Too much load. Perform the RESET according to the instructions. Verify the quantity of material into the sterilization chamber and pay attention to not exceed the maximum admitted quantity according to the load typology. (see Table in Appendix A, Technical characteristics). Problem of the hydraulic circuit. Call for the Customer Service (see Appendix Z). Release of the steam generator safety thermostat. Provide for the manual reset of the thermostat on the rear side of the equipment (see Chapter “Product description”). Unscrew the protection plastic cap, push on the red button until a click and replace the cap. Switch off (RESET) and switch on again the equipment. Release of the heating resistor safety thermostat. Wrong operation of the steam generator or heating resistor. Extrema Plus Call for the Customer Service (see Appendix Z). 73 APPENDIX E – ALARM SIGNALING CODE POSSIBLE CAUSE SUGGESTED SOLUTION A253 Presence of water or condensation into the sterilization chamber. Perform the RESET according to the instructions. Carefully dry the sterilization chamber and restart the program. Do not introduce material soaked with water or liquid into the chamber. Air leakage on the gasket Perform the RESET according to the instructions. Carefully clean the gasket with a clean cloth of cotton dampened with water. Restart the program. Failure of the vacuum pump. Problem on the hydraulic circuit. A254 Call for the Customer Service (see Appendix Z). Wrong operation of the water pump. Problem on the hydraulic circuit. Call for the Customer Service (see Appendix Z). Release of the steam generator safety thermostat. Provide for the manual reset of the thermostat on the rear side of the equipment (see Chapter “Product description”). Unscrew the protection plastic cap, push on the red button until a click and replace the cap. Switch off (RESET) and switch on again the equipment. Release of the heating resistor safety thermostat. Wrong operation of the steam generator or heating resistor. A255 Call for the Customer Service (see Appendix Z). Air leakage on the gasket Perform the RESET according to the instructions. Carefully clean the gasket with a clean cloth of cotton dampened with water. Restart the program. Excess of load. Perform the RESET according to the instructions. Verify the quantity of material in the sterilization chamber and pay attention to not exceed the maximum admitted quantity according to the load typology. (see Table in Appendix A, Technical characteristics). Problem of the hydraulic circuit. Call for the Customer Service (see Appendix Z). Release of the steam generator safety thermostat. Provide for the manual reset of the thermostat on the rear side of the equipment (see Chapter “Product description”). Unscrew the protection plastic cap, push on the red button until a click and replace the cap. Switch off (RESET) and switch on again the equipment. Release of the heating resistor safety thermostat. Wrong operation of the steam generator or heating resistor. A256 Call for the Customer Service (see Appendix Z). Presence of water or condensation in the sterilization chamber. Perform the RESET according to the instructions. Carefully dry the sterilization chamber and restart the program. Do not introduce material soaked with water or liquid into the chamber. Air leakage on the gasket Perform the RESET according to the instructions. Carefully clean the gasket with a clean cloth of cotton dampened with water.Start again the program. Failure of the vacuum pump. Problem on the hydraulic circuit. 74 Call for the Customer Service (see Appendix Z). Extrema Plus APPENDIX E – ALARM SIGNALING CODE POSSIBLE CAUSE A257 Wrong operation of the water pump. SUGGESTED SOLUTION Problem on the hydraulic circuit. Call for the Customer Service (see Appendix Z). Release of the steam generator safety thermostat. Provide for the manual reset of the thermostat on the rear side of the equipment (see Chapter “Product description”). Unscrew the protection plastic cap, push on the red button until a click and replace the cap. Switch off (RESET) and switch on again the equipment. Release of the heating resistor safety thermostat. Wrong operation of the steam generator or heating resistor. A258 Air leakage on the gasket Call for the Customer Service (see Appendix Z). Perform the RESET according to the instructions. Carefully clean the gasket with a clean cloth of cotton dampened with water. Restart the program. Excess of load. Perform the RESET according to the instructions. Verify the quantity of material in the sterilization chamber and pay attention to not exceed the maximum admitted quantity according to the load typology. (see Table in Appendix A, Technical characteristics). Problem on the hydraulic circuit. Call for the Customer Service (see Appendix Z). Release of the steam generator safety thermostat. Provide for the manual reset of the thermostat on the rear side of the equipment (see Chapter “Product description”). Unscrew the protection plastic cap, push on the red button until a click and replace the cap. Switch off (RESET) and switch on again the equipment. Release of the heating resistor safety thermostat. Wrong operation of the steam generator or heating resistor. A259 Excess of load. Call for the Customer Service (see Appendix Z). Perform the RESET according to the instructions. Verify the quantity of material in the sterilization chamber and pay attention to not exceed the maximum admitted quantity according to the load typology. (see Table in Appendix A, Technical characteristics). Air leakage from the gasket Perform the RESET according to the instructions. Carefully clean the gasket with a clean cloth of cotton dampened with water. Restart the program. Problem on the hydraulic circuit. Extrema Plus Call for the Customer Service (see Appendix Z). 75 APPENDIX E – ALARM SIGNALING CODE POSSIBLE CAUSE SUGGESTED SOLUTION HAZARDS (category H) H150 Break of the pressure probe (MPX). H160 Wrong connection of the pressure probe cable (MPX) to the p.c.b. connector. Short-circuit of the pressure probe (MPX). H170 Instable operation of the temperature probe (sterilization chamber). H400 Problem of the hydraulic circuit. H401 Problem of the hydraulic circuit. H402 Wrong operation of the steam generator. Problem of the hydraulic circuit. H403 Wrong operation of the steam generator. Call for the Customer Service (see Appendix Z). Problem of the hydraulic circuit. H404 Wrong operation of the steam generator. Problem of the hydraulic circuit. H405 Wrong operation of the steam generator. Problem of the hydraulic circuit. H406 Wrong operation of the steam generator. Problem of the hydraulic circuit. H990 General operation problem. H991 General operation problem. H992 General operation problem. H993 General operation problem. 76 Extrema Plus Extrema Plus PARALLE CENTRONICS PORT FROM POWER BOARD FLAT CABLE FLAT CABLE FLAT CABLE FLAT CABLE +12V FLAT CABLE PRESSURE PROBE FROM POWER BOARD VAPOR GENERATOR VAPOR GENERATOR THERMOSTAT BAND RESISTANCE BAND RESISTANCE THERMOSTAT TO CPU BOARD +24V +24V +12V TO CPU BOARD FLAT CABLE TOROIDAL TRANSFORMER APPENDIX F – DRAWINGS APPENDIX F – DRAWINGS ELECTRICAL DRAWING 77 APPENDIX F – DRAWINGS HYDRAULIC DRAWING Safety valve Fan 78 Extrema Plus APPENDIX G – DECLARATION OF CONFORMITY APPENDIX G – DECLARATION OF CONFORMITY DECLARATION OF CONFORMITY Application of the EEC Directives 93/42 - 89/336 - 73/23 Name of the Manufacturer: M.O.COM. S.r.l. - Manifattura Odontoiatrica Complementare Address of the Manufacturer: Via delle Azalee, 1 - 20090 Buccinasco (MI) - ITALY Product description: Steam sterilizer Model: EXTREMA PLUS Made in: ITALY The undersigned hereby declares that the above mentioned goods entirely conform to the EEC Directives 93/42 - 89/336 - 73/23 (and following updates). Reference standards: EN 61010-1 EN 61010-1-A2 EN 61010-2-041 CEI EN 50081-1 CEI EN 50082-1 EN 55014 EN 55022 EN 60555-2 (CEI 77-3) EN 60555-3 (CEI 77-4) EN 61000-4-2 EN 61000-4-3 EN 61000-4-4 ASME VIII Div. 1 (Add. 1999) DIN 58946 T5 TRD 421 TRD 511 01/01/2000 Date Signature Alfio VILLA Name and Surname Legal Agent Function Extrema Plus 79 APPENDIX H – OPERATOR’S NOTES APPENDIX H –OPERATOR’S NOTES 80 Extrema Plus APPENDIX Z – CUSTOMER SERVICE APPENDIX Z – CUSTOMER SERVICE FOR ANY SERVICE INTERVENTION BOTH DURING AND OUT THE PRODUCT WARRANTY PERIOD PLEASE CALL DIRECTLY THE CUSTOMER SERVICE OF THE AGENT OR RETAILER THAT SUPPLIED THE EQUIPMENT M.O.COM. Ltd. Co. is at complete disposal of the Customers for any technical additional information concerning the product, as well as for any suggestions on the steam sterilization procedures. Please contact at the following address: M.O.COM. Srl Assistenza Clienti Via delle Azalee, 1 20090 Buccinasco (MI) ITALY Tel. (+39) 02-45701505 Fax (+39) 02-45701258 e-mail [email protected] To help us in product quality and service improving, please send Your comments and/or suggestions to the followings email addresses: [email protected] (marketing and sales) Besides, You can send comments and/or suggestions by letter or fax to the above indicated address. Thanks in advance for the valuable assistance that you would supply to us. Extrema Plus 81