1
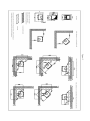
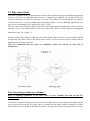
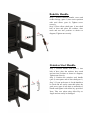
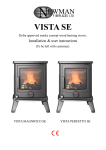
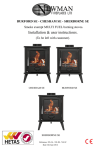
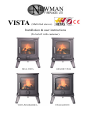
VISTA (Multi fuel stoves). Installation & user instructions (To be left with customer). Contents Pre-installation checks & general safety notes. Installation introduction with technical data. 1.0 Technical data 2.0 Installation introduction 2.1 2.2 2.2.1 2.2.2 2.3 2.4 2.5 2.6 2.7 2.8 2.9 2.95 Unpacking the stove Installing the stove Assembling the tertiary air control Assembling the baffle Stove placement / clearance requirements The chimney Pipe connections Connecting to a masonry chimney Connecting to a steel chimney Draft conditions Assembling the handle Commissioning and handover 3.0 User Manual 3.1 3.2 3.2.1 3.2.2 3.2.3 3.3 3.3.1 3.3.2 3.3.3 3.4 3.5 Choice of fuel Use Use with wood Use with solid fuel Ash Removal Maintenance Cleaning glass External surface cleaning Gaskets Operational problems – troubleshooting Replacement parts Pre-installation checks & general safety notes Installation of this stove must be completed in accordance with current local codes and regulations in each country. All local regulations & any rules in force, including those which refer to national and European standards, must be observed when installing this product. Reference must be made to current issues of British Standard BS 8303, code of practice for installation of domestic heating and cooking appliances burning solid mineral fuel and BS EN 15287-1:2007 design, installation and commissioning of chimneys. Note: Please note that it is a legal requirement under England & Wales Building Regulations that the installation of this stove is undertaken under Local Authority Building Control or is installed by a competent person registered with a Government Approved Competent Persons Scheme. Hetas Ltd operate such a scheme and a listing of their registered Competent Persons can be found on their website at www.hetas.co.uk An approved Carbon Monoxide alarm must be installed into the room into which the stove is installed. This stove must not be installed into a flue that shares any other appliance. Extractions fans or units must not be installed into the room of stove installation. The installer has a responsibility to ensure that all requirements of Health & Safety At Work Act are observed & implemented. Due to the weight of this stove adequate facilities must be available for loading, un loading & installation. Always ensure that there is an adequate air supply into the room containing the stove. It is very important that flue ways are regularly swept & checked by an approved person. It is recommended that sweeping and checking should be done at least twice each year. The installer must ensure that the chimney is examined for soundness and suitability before the appliance is installed. Remedial action should be taken if required, seeking expert advice if necessary. Where the chimney is believed to have previously served an open fire installation it is possible that the higher flue gas temperatures from a closed appliance may loosen deposits that were previously firmly adhered, with the consequent risk of flue blockage. It is therefore recommended that the chimney be swept a second time within a month of regular use after installation. All dampers or restrictors must be removed from the flue. This stove must be maintained to ensure safe operation & efficiency. Never use aerosol sprays or any other combustible products in the vicinity of the stove when it is in operation or whenever the stove is hot. The stove will remain hot for some time even after the fire is extinguished. The stove is hot while in operation and retains it heat for a long time after use. When using this stove in situations where children, aged & or infirm persons are present a fireguard manufactured in accordance with BS 8423 : 2002 must be used & such persons must be supervised at all times. Fire cement can be caustic & should not be allowed to come into contact with skin. Refer to manufacturers instructions. This stove contains no asbestos. If there is any situation or possibility of disturbing any asbestos during installation seek professional advice. Both an installation manual with technical data and a manual on general use and maintenance are enclosed with this product. The installation can only be used after it has been inspected by a qualified inspector. A name plate of heat-resistant material is affixed to this product. This contains information about identification and documentation for the product. Installation introduction with technical data Important note: These instructions combine several models of stoves, therefore certain sections in this manual relating to the installation & technical data for each stove will vary. 1.0 Technical data. (Bela Vista, Grande Vista, Vista Panoramica, Vista Quente). Material: Cast iron Finish: High-temp resistant paint Fuel: Multi-fuel (Approved wood logs & smokeless fuels) Log length: 32cm maximum Stove outlet collar positions: Top and rear Stove collar dimension: Internal diameter 125mm / 113cm2 cross section Approx. weight: 89kgs Dimensions, distances etc: Figure 2 Technical data according to EN 13240+A2:2004. (Bela Vista, Grande Vista). Nominal heat output: 7.5kw (wood) 7.0kw (smokeless fuel) Flue gas mass flow: 5.3 g/sec (wood) 5.6g/sec (smokeless fuel) Recommended chimney draught: 12 Pa Efficiency: 75.6% (wood) 73.5% (smokeless fuel) CO emission (13% O2): 0.68% (wood) 0.08% (smokeless fuel) Flue gas temperature: 3220C (wood) 3310C (smokeless fuel) Operational mode: Intermittent Technical data according to EN 13240+A2:2004. (Vista Panoramica, Vista Quente). Nominal heat output: 4.9kw (wood) 4.9kw (smokeless fuel) Flue gas mass flow: 3.4 g/sec (wood) 3.4 g/sec (smokeless fuel) Recommended chimney draught: 12 Pa Efficiency: 82.1% (wood) 74.9% (smokeless fuel) CO emission (13% O2): 0.40% (wood) 0.33% (smokeless fuel) Flue gas temperature: 2440C (wood) 2610C (smokeless fuel) Operational mode: Intermittent 2.0 Installation 2.1 Unpacking the stove After removing the outer packaging, unbolt the combustion chamber from the wooden pallet and place it gently on its back. The cardboard packaging can be placed underneath to prevent marring. Remove the leg pack from the stove and bolt each leg securely to the underside of the base on the combustion chamber, using the bolts provided (found inside the stove). Note: There are lower bolts supplied for fitment into holes in the base of each leg, these are adjustable to allow level adjustment of stove to uneven surfaces. We recommend that two people perform the assembly and installation procedure. 2.2 Installing this stove The stove and chimney installations MUST comply with all current National and Local Building Regulations and any rules in force including current issues of British Standard BS 8303 code of practice for installation of domestic heating and cooking appliances burning solid mineral fuel and British Standards BS EN 15287-1:2007 design, installation and commissioning of chimneys; your approved dealer or your local building control officer can advise regarding this. Ultimately, it is you and your installer who is responsible to ensure that the installation complies with all relevant regulations and any rules in force. 2.2.1 Assembling the Tertiary air control. (See figure 1). The Tertiary air control is an optional part. After assembling the control, check for easy operation and check for complete seal when the plate is closed. 2.2.2 Assembling the baffle. See figure 1.1 After the stove is located, check the baffle is in correct position. See figure 1.1. This shows how to locate the baffle. Before lighting the stove for the first time, confirm the baffle is in correct location. 2.3 Stove placement / clearance requirements This stove must only be installed onto floors with an adequate load-bearing capacity. If an existing construction does not meet this requirement, suitable measures (e.g. load distributing plate) must be taken. Wooden floor protection. The product can be placed directly onto a wooden floor providing that it is covered by a metal plate or other suitable, non-inflammable material. The minimum thickness is 12mm.Any flooring made of combustible material, such as linoleum, carpets, etc. must be removed from under the floor plate. Requirements for protecting combustible flooring in front, rear & sides of the stove must be in accordance with national laws and regulations & any rules in force, including BS 8303 and BS EN 15287-1:2007. See figure 2. Contact your local building authority regarding restrictions and installation requirements. Walls protection Note: The side load door must not be used in corner installations if this product is a side load door version. Distance to wall made of combustible material See figure 2 & refer to building regulations & any other rules in force, including BS 8303 and BS EN 15287-1:2007. Distance to walls covered by a firewall See figure 2 & refer to building regulations & any other rules in force, including BS 8303 and BS EN 15287-1:2007. Firewall requirement. Refer to building regulations & any other rules in force, including BS 8303 and BS EN 15287-1:2007. The firewall must be at least 100 mm thick and be made of brick, concrete-stone or light concrete. Other materials and structures with satisfactory documentation may also be used. Note: When installing this stove into a non combustible chimney or non combustible wall, providing all surrounding non combustible walls have a minimum thickness of 200mm the clearance between the rear & sides of stove can be reduced to 50mm, refer to building regulations & any rules in force. However it is recommended that the measurement between the sides & rear of stove to be as large as possible above this dimension, as the efficiency of this stove is dependent on the clearances as shown in figure 2. Ceiling protection. Refer to building regulations & any other rules in force, including BS 8303 and BS EN 15287-1:2007. There must be a minimum distance of 1200 mm to any combustible ceiling above the fireplace. Clearances to furniture and soft furnishings We recommend that the stove be installed 115 cm from furniture. Serious consideration should also be given to positioning of any furniture that could be adversely affected by heat. The clearances to combustible materials in front of the stove should be a minimum of 115 cm. When lit, a wood-burning stove gets hot and therefore adequate protection must be provided, particularly in situations where there is a safety risk to children or the infirm. When using this stove in situations where children, aged and / or infirm persons are present a fireguard manufactured in accordance with BS 8423:2002 must be used and such persons must be supervised at all times. It is also recommended that all other people should use a fireguard in accordance with BS 8423:2002 at all times when the stove is alight or hot. 2.4 The chimney. Refer to current building regulations & any other rule in force, including British standard BS EN 15287-1:2007 and BS 8303 This product must never be connected to any shared chimney. An efficient modern stove places heavy demands on the chimney, and you should have the chimney regularly swept and inspected by your approved chimney sweep. The installer must ensure that the chimney is examined for soundness and suitability before the appliance is installed. Remedial action should be taken if required, seeking expert advice if necessary. Where the chimney is believed to have previously served an open fire installation it is possible that the higher flue gas temperatures from a closed appliance may loosen deposits that were previously firmly adhered, with the consequent risk of flue blockage. It is therefore recommended that the chimney be swept a second time within a month of regular use after installation. The cross-sectional area of the chimney (at its narrowest point) must comply with National and Local Building Regulations. Generally, the area needed for a wood-burning stove installation should measure at least 150 mm internal diameter. An over-sized chimney is generally hard to keep warm and results in poor draft. In cases where there is an oversized masonry chimney, it is recommended that the chimney be lined using an appropriate chimney lining system with the correct internal diameter. With respect to the chimney termination, all chimneys should terminate in accordance with national and Local Building Regulations. Note that National and Local Regulations also apply with regard to the placement of chimneys and flues in connection with thatched roofs. The chimney or flue system must be equipped with access doors for inspection and cleaning. The size of the cleaning door in the chimney must at least equal to that of the cross-sectional area of the chimney. In the event that a chimney fire occurs resulting from faulty operation or prolonged use of damp wood fuel, close the air vents completely and contact your local fire department immediately. 2.5 Pipe connections The stove is supplied with a 125mm diameter outlet collar to which an approved suitable gauged metal rigid stove flue pipe of compatible and correct size is installed (not supplied), this rigid stove flue pipe must be connected correctly to the chimney or flueway. The chimney or flueway that the stove pipe is connected must be of at least 150mm internal diameter. Refer to current Building regulations, any rules in force including BS 8303 and BS EN 15287-1:2007. The flue outlet collar for this product is inside the burn chamber during transportation. You can choose between a top or rear outlet position for the flue outlet collar. There is a bag supplied containing the fastening screws. See (Figure 3) The flue collar is placed directly onto the selected flue outlet. There are three screws provided to attach & fasten the flue outlet collar to the selected stove outlet. The flue outlet not used is sealed with the blanking plate & fixings provided. Note! It is important that the joints are completely sealed. Air leakage etc, may lead to malfunction. 2.6 Connecting to a masonry chimney Refer to building regulations & any other rules in force, including BS 8303 and BS EN 15287-1:2007. A wall sleeve should be bricked securely into the wall of the chimney at the appropriate height and the stove pipe inserted centrally. The pipe must not extend into the actual chimney opening, but rather must reach only to the inside of the chimney aperture. The gap between the stove pipe and sleeve must be sealed using suitable sealing packing rope. The chimney flue must be at least 150mm internal diameter. 2.7 Connecting to a steel chimney Refer to building regulations & any other rules in force, including BS 8303 and BS EN 15287-1:2007. If your installation involves taking the chimney straight up and through the ceiling, you must comply with National, Local Building Regulations or flue manufacturer‟s instructions concerning clearances to combustible materials such as walls, floor joists and ceilings. The joint between the stove flue collar and the stove pipe must also be sealed using the glass fibre rope provided. It is important that the insulated flue system is properly supported both at ceiling level and at roof level. The Stove must not bear the weight of the chimney system (See chimney manufacturer‟s instructions). Excessive weight on the stove will inhibit expansion and could lead to damage of the stove top. Damage caused to the stove in this way would not be covered by the manufacturers guarantee. The chimney flue must be at least 150mm internal diameter. CAUTION: In the event that a chimney fire occurs resulting from faulty operation or prolonged use of damp wood fuel, evacuate all people from the house, if safely possible close the air vents completely and contact your local fire department immediately. Cleaning procedure: Discuss this with chimney sweep or qualified installer prior to or during the stove installation Chimney draft: If the chimney draft is naturally poor it is better to install the flue from the top of the stove so as to minimize any internal resistance of the flue gases. Avoid having any more than 2 bends in the flue system and limit the length of the offset between bends. Refer to building regulations and any other rules in force. Fresh air supply: Refer to building regulations & any other rules in force, including BS 8303 and BS EN 15287-1:2007. (Vista Panoramica & Vista Quinte, nominal heat output 4.9kw). A wood-burning stove requires air for combustion and therefore you may need to install additional ventilation to the room. An adequate air supply for ventilation & combustion is required to the room into which the stove is installed. As this stove is CE tested to 4.9KW nominal heat output. (Refer to Building Regulations Document J) a purpose provided air vent is not normally required. However in certain circumstances a purpose provided air vent may be required such as insufficient natural ventilation or date of building construction etc. Purpose provided air vents must be of the correct size and be non closable and unrestricted, refer to building regulation & any other rules in force. Do not use any extractor fans or any other similar devices in the room into which the stove is installed. Air inlet vents should be positioned in the room at locations to avoid them becoming blocked. If the air supply is inadequate the chimney draft may be too weak, with the possible result that the stove will not burn properly leading to a potentially dangerous situation. Smoke spillage may also occur during the refueling process. When determining the ventilation requirements account will need to be made for any other combustion devices in the room. Fresh air supply: Refer to building regulations & any other rules in force, including BS 8303 and BS EN 15287-1:2007. (Bela Vista & Grande Vista, nominal heat output 7.5kw). A wood-burning stove requires air for combustion and therefore you may need to install additional ventilation to the room. An adequate air supply for ventilation & combustion is required to the room into which the stove is installed. As this stove is CE tested to 7.5KW nominal heat output. (Refer to Building Regulations Document J) a purpose provided air vent is required with a minimum free flow area of 1375mm. Purpose provided air vents must be of the correct size and be non closable and unrestricted, refer to building regulation & any other rules in force. Do not use any extractor fans or any other similar devices in the room into which the stove is installed. Air inlet vents should be positioned in the room at locations to avoid them becoming blocked. If the air supply is inadequate the chimney draft may be too weak, with the possible result that the stove will not burn properly leading to a potentially dangerous situation. Smoke spillage may also occur during the refueling process. When determining the ventilation requirements account will need to be made for any other combustion devices in the room. 2.8 Draft conditions If smoke spillage occurs when the fire door is opened, it is probably due to poor chimney draft. This type of stove requires at least 12 pa of chimney draft to achieve satisfactory combustion and smoke spillage prevention. However, in cases where the stove door is opened too vigorously you could expect that slight smoke spillage may occur. If you have any doubts, you may want to have your installer measure the draft in the chimney. Draft conditions The chimney‟s draft is the resulting effect within the flue caused by the difference in temperature within the flue and the cooler temperature outside. Other factors that can influence the level of draft include the length of the flue, insulation of the chimney, adverse weather conditions or tall buildings or trees nearby the flue terminal. Poor draft occurs when: The atmospheric temperature difference is too low, e.g. a poorly insulated chimney. If the chimney is excessively cool, it may help to „prime‟ the flue before the fire is lit. Just place a screwed-up sheet of newspaper in the flue way of the stove and ignite. The outside temperature is too high, e.g. during the summer months. There is no air movement (wind) outside. The chimney is not tall enough, with the result that the terminal sits in the lee of the roof surface or in the vicinity of tall trees or neighboring buildings. These conditions are also associated with downdraft where the flue gases are pushed back down the chimney. Flue draft is diluted by residual air entering the chimney, e.g. due to inadequate fluepipe joints or leaks at the cleaning door or flue collar. Unsealed, unused fireplaces are connected to the chimney. The flue is blocked, e.g. by soot, due to inadequate cleaning, loose debris or even a birds nest. The room to which the stove is installed is too tightly sealed. (See section on Fresh air supply). A good draft is achieved when: The temperature difference between the flue way or chimney and outside atmosphere is high. (Higher temperature in flue way or chimney and cooler temperature to external atmosphere). This also applies during firing, when the need is greatest. The weather is clear and there is a good wind. The chimney is of the proper height, i.e. minimum 4 meters over the stove and the termination adequately clear of the roof line. The room that the stove is installed is adequately ventilated. 2.9 Handle This stove is supplied with two handles for customer preference. One is a Bakelite handle & the other is a stainless steel tube handle. Handle assembly This stove is assembled with one type of handle when manufactured. If your preference is to use the other handle supplied then please refer to the handle assembly picture for instructions on how to change. It is recommended that an approved five fingered heat proof glove of the correct size for each users hand is used to operate this stove. Bakelite Handle. Step 1: Position Bakelite handle, screw and washer fixings, (parts 3) into correct position with steel elbow (part 4). Tighten screw securely. Step 2: Place elbow shaft (part 1) into shaft hole of door and place the washers, door catch and nut into position as shown to diagram, Tighten nut securely. Stainless Steel Handle. Step 1: Position handle shaft (part 1) into hole of door, place the washers, door catch and nut into position as shown to diagram, Tighten nut securely. Step 2: Position the stainless steel handle (part 3) onto square end of door shaft (part 1) Step 3: If your preference is for the handle to be fixed and not easily removable place the grub screw (part 4) into hole to underside of handle and tighten with Allen key provided. Note: Take care when using Allen Key as fragile and can easily be damaged. 2.95 Commissioning and handover Ensure all parts are fitted in accordance with these instructions. On completion of the installation allow a suitable period of time for any fire cement and mortar to dry out, before lighting the stove. Once the stove is under fire check all seals for soundness and check that the flue is functioning correctly and that all products of combustion are vented safely to atmosphere via the chimney terminal. On the completion of the installation and commissioning ensure that the operating instructions for the stove are left with the customer. Ensure to advise the customer on the correct use of the appliance and warn them to use only the recommended fuel for the stove. Advise the user what to do should smoke or fumes be emitted from the stove. 3.0 User Manual WARNING: This stove is a high heat producing appliance and may cause severe burns & injury if touched to any part. Do not touch the surface of this stove when hot. This stove may still be hot even after the fire is extinguished. This stove gets very hot when burning and also remains very hot for some time even when the fire is extinguished, therefore adequate protection must be provided, particularly in situations where there is a safety risk to children, aged and the infirm. When using this stove in situations where children, aged and / or infirm persons are present a fireguard manufactured in accordance with BS 8423:2002 must be used and such persons must be supervised at all times. It is also recommended that all other people should use a fireguard in accordance with BS 8423:2002 at all times when the stove is alight or hot. Use the long key provided for operating and adjusting all air controls, including the riddling control & removal & replacement of ash pan when necessary. It is recommended that when operating this stove an approved heat resistant five fingered glove is used of the correct size for the user. Where the chimney is believed to have previously served an open fire installation it is possible that the higher flue gas temperatures from a closed appliance may loosen deposits that were previously firmly adhered, with the consequent risk of flue blockage. It is therefore recommended that the chimney be swept a second time within a month of regular use after installation. Chimneys and connectors should be cleaned at least twice a year, by an approved Chimney Sweep. At least once before heating season and at least once after. If the stove is to be left unused for a prolonged period of time then it should be given a thorough clean to remove ash and unburned fuel residues. To enable a good flow of air through the appliance to reduce condensation and subsequent damage, leave the air controls fully open. It is important that the flue connection, any appliance baffles or throat plates and the chimney are swept prior to lighting up after prolonged shutdown periods. An approved Carbon Monoxide detector must be installed into the room of stove installation. If the alarm sounds unexpectedly, follow the instructions given under “Warning note” above. WARNING NOTE. Properly installed, operated and maintained this stove will not emit fumes into the dwelling. Occasional fumes from de-ashing and re-fueling may occur. However, persistent fume emission is potentially dangerous and must not be tolerated. If fume emission does persist, then the following immediate action should be taken:(a) Open doors and windows to ventilate the room and then leave the premises. (b) Let the fire go out. (c) Check the flue for chimney blockage and clean if required. (d) Do not attempt to relight the fire until the cause of the fume emission has been identified and corrected. If necessary seek expert advice. The most common cause of fume emission is flueway or chimney blockage. For your safety these must be kept clean at all times. Never use aerosol sprays or any other combustible products in the vicinity of the stove when it is in operation or whenever the stove is hot. The stove will remain hot for some time even after the fire is extinguished. Fire Safety: Serious consideration should be given for the following: The installation of smoke detectors. A conveniently located approved fire extinguisher to contend with small fires resulting from burning embers. A practical evacuation plan. A plan to deal with a chimney fire as follows: a. Notify the fire department. b. Prepare all occupants for immediate evacuation. c. If safely possible, close all air openings into the stove. 3.1 Choice of fuel Recommended fuel: Wood Use hard wood logs. Although you can fire this product with almost all kinds of wood, you should not fire with wet wood, or unseasoned wood. Wood should to be stored under a roof for at least 1 year, and preferably 2 years, with free access to wind ventilation. Wood should be chopped as soon as possible after felling if it is to dry quickly. The wood can be used once the moisture content is less than 20%. During the EN test, all stoves are tested with wood with a moisture content of (16 ± 4) %. Hardwood has a higher calorific value as the same volume (oak, ash, maple, birch, elm, beech, etc). Pieces of wood with a diameter greater than 10 cm should always be chopped. The pieces of wood should be short enough to be able to lie flat over the layer of embers, with air at both ends. The maximum length of wood to be no more than 32 cm. Recommended fuel: Smokeless Coal Smokeless fuels, including Coalite Nuts, Phurnacite, Ancit and Extracite. Not recommended as fuel: Green or damp wood reduces stove efficiency and soils the glass, the internal walls and the flue (soot, tar, etc.). Used timber. Burning treated wood (railway sleepers, telegraph poles, off cuts of plywood or chip board, pallets, etc.) quickly clogs the flue ways (soot, tar,) etc, pollutes the environment (pollution and smell,) etc, and cause the fire to burn too quickly and overheat. “Green wood” and “recovered wood” can eventually cause a chimney fire. Prohibited fuel: Plastic bags and any form of bituminous coal or petroleum based coke. Do not use the appliance as an incinerator or use any liquid fuels. This is very dangerous, may damage the product and pollute the atmosphere. 3.2 Use Odours when using the stove for the first time Painted products: The stove may emit an irritating gas when used for the first time, and it may smell a little. The gas is not toxic, but the room should be thoroughly ventilated. Let the fire burn with a high draught until all traces of the gas have disappeared and no smoke or smells can be detected. Evacuate all people from the room until all odours have cleared. If for any reason the odours do not clear, extinguish the fire & seek professional assistance. Enameled products: Condensation may form on the surface of the stove the first few times it is used. This must be wiped off to prevent permanent stains forming when the surface heats up, taking adequate precautions and protection from the hot stove surface. Air Control: See figure 4 Always use the key provided to operate the air controls The amount of heat emitted by the stove is regulated using three air controls. The primary air supply, where air passes up through the riddling grate, is controlled using the rotating air control situated below the glass on the front door, turn clockwise to close and anti clockwise to open. The secondary air (air wash system), which is supplied to the combustion over the glass, is controlled using the upper air control lever, move to the left to close and to the right to open. A third air inlet (normally named tertiary air) provides a constant, pre-heated air supply to the combustion just above the fire, this is controlled using the push, pull air control below the ash lip between the legs of the stove. This air supply normally does not require to be regulated. Normally it will be necessary to keep this air supply open. 3.2.1 Use with wood: See figure 4 Lighting • Slide the top secondary air control to open. Open the primary air control. • Open the door & lay a reasonable quantity of firelighters or rolled up newspapers on the grate, if necessary also use dry kindling wood. Place 2 or 3 small logs on top. • Light the newspaper or firelighters using a long taper and close the door. • When the fire is burning fiercely, add further logs of a diameter up to 10 cm. • When the stove body is very hot, close the primary control. • The burning rate can now be lowered by moving the top secondary air control to a smaller air inlet. Re-fuelling: See figure 4 • Slide the top secondary air control to open. Open the primary air control. • Open the glass door and add logs. (To load fuel, the door should be opened slowly, avoiding a sudden rush of intake air, so that smoke does not escape into the room). • Close the glass door. • Leave the primary air control open for a few minutes to allow the initial volatiles in the wood to burn. • Close the primary air control. Very Important: Wood is a material that contains a great deal of gas (approximately 75 %). The gases are released when the wood is ignited and heated up. For this reason, it is important that the gases are ignited quickly after stoking. If the wood just lies smoldering, especially after re-stoking, a lot of smoke is created, which, in the worst case, may cause an explosive ignition of the gasses, resulting in damage to the stove. In order to ignite the gases that are released from the wood, and to keep clear, lasting flames during the combustion process, it is important to let in the required quantity of oxygen (air supply) at all times. The setting of the air supply, the method of ignition and the lighting intervals depend on the draught in the chimney, the wind and weather, the amount of heat required & fuel, etc. This means that it may take some time before you get to know the correct functioning of the stove under any given circumstances. 3.2.2 Use with solid fuel. See figure 4 Lighting • Slide the top secondary air control to open. Open the primary air control. • Lay a reasonable quantity of firelighters or rolled up newspapers on the grate, if necessary also use dry kindling wood. Place a small quantity of solid fuel on top. • Light the newspaper or firelighters using a long taper and close the door. • When the fire is burning fiercely, add further fuel. • When the stove body is hot, close the top secondary air control. • The burning rate can now be adjusted by the primary air control. Re-fuelling. See figure 4 • Open the primary air control. • Open the glass door and add fuel. (To load fuel, the door should be opened slowly, avoiding a sudden rush of intake air, so that smoke does not escape into the room.). • Leave the primary air control open for a few minutes to allow the initial volatiles in the fuel to burn. • Adjust the primary air control to the desired position. Very Important: The stove door should never be opened when the stove is being fired vigorously. We would strongly recommend that you do not leave your stove alight at night. It harms the environment, and constitutes very poor use of the wood, as the gases in the wood do not ignite at the low temperature, but settle as soot (unburned gases) in the chimney and stove. Extreme conditions, such as poor draught in the chimney, large quantities of wood or wet wood, may, in the worst-case scenario, cause an explosive ignition. When firing in the summer period, when there is minimal need for heat, the combustion will be poor. The stove provides too much heat, so the combustion should be reduced. But always remember to make sure that there are lasting flames until the wood becomes charcoal. If you want a weaker fire, stoke up using less wood. After a prolonged shut-down period the stove and chimney system should be checked to ensure that there is no blockage. For example, a bird may have nested at the top of the chimney. If you fire the stove using wet wood, a lot of the fuel‟s thermal energy will be spent forcing the water out of the wood, without releasing any heat to the stove. This incomplete combustion results in a layer of soot being left in the stove, pipe and chimney. 3.2.3 Ash removal Figure 5 (How to remove ash pan) Always use the key provided to operate the riddling control and to lift ashpan. It is essential to keep the grate free from a heavy build up of ashes. This product is equipped with a grate riddling device which is used to “shake” ashes off the grate into the ash pan. Whenever the stove is burning without life, when the mid primary air control is open, use the key provided to operate the riddling lever to clear the grate of surplus ashes. If burning solid fuel, always empty the ash pan at least once a day or whenever it is full of ashes. Use the key provided to remove and replace ash pan into position. Never allow the ash pan to overfill allowing ash to be in contact with the underside of the grate. If this condition is allowed, the grate will wear out pre-maturely. Disposal of ash Ashes should be placed in a metal container with a tight fitting lid. The closed container of ashes should be on a non combustible floor or ground well away from all combustible materials pending final disposal. If the ashes are disposed of by burial in soil or otherwise locally dispersed they should be retained in the closed container until all cinders have completely cooled. 3.3 Maintenance The stove should be regularly serviced by an approved and competent engineer but some simple procedures are given below which the user can also adopt. 3.3.1 Cleaning glass This product is equipped with an air wash for the glass. Air is sucked in through the air vent above the stove and down along the inside of the glass. However, some soot will always stick to the glass, but the quantity will depend on the local draught conditions and adjustment of the air wash vent. Most of the soot layer will normally be burned off when the air wash vent is opened all the way and a fire is burning briskly in the stove. Good advice! For normal cleaning, when the stove is extinguished and cold, moisten a paper towel with warm water and add some cooled ash from the burn chamber. Rub it over the glass and then clean the glass with clean water & then dry. If it is necessary to clean the glass more thoroughly we recommend using a glass cleaner (follow manufacturer‟s instructions). 3.3.2 External surface cleaning The cast surface of the stove is painted with heat-resistant paint. It is best maintained by simply vacuuming it with a soft brush attachment or wiping it down with a dry, dust-free cloth, but only when the stove is not in use & cold. If the stove is used too vigorously, the painted surface may assume a grey tinge over time, but the stove can easily be freshened up with heat resistant spray paint but only when the stove is not in use and cold, refer to manufacturer‟s instructions, which is available from your local retailer. 3.3.3 Gaskets The gaskets in the door will wear out over time, and should be replaced as required in order to prevent runaway combustion. Seek advise from a qualified stove engineer. 3.4 Operational problems – troubleshooting Seek advice from a qualified chimney & stove specialist. Problem Fire difficult to start Fire goes out Probable causes Wood green, too damp or poor quality. Logs are too big. Air starvation. Insufficient draught. Fire burns too quickly. Too much draught. Excessive draw. Poor quality wood. Action Use the recommended fuel. To light the fire, use small, very dry twigs. To maintain the fire, use split logs. Open lower spin wheel and top air control lever. Check that the flue is not obstructed, sweep it if necessary Ensure that the lower spin wheel is closed Partially close the top air control lever. Install a draught stabilizer. Consult your Dealer. Do not continuously burn small wood, sticks, bundles, carpentry off cuts (plywood, pallets), etc. Smokes when lighting up. Smokes Flue duct is cold. Room decompression while Ventilation insufficient burning. Down draught. Room decompression Low heat output. Incorrect Fuels. Burn paper and kindling wood to increase heat. In houses equipped with mechanical ventilation, open a window until the fire is well established. Consult a chimney specialist. Check that the flue is not obstructed, sweep if necessary. Install an anti-down draught cowl. Consult your Dealer. In houses equipped with Mechanical Ventilation, an outside air intake must be installed for the chimney. Use fuel Recommended. 3.5 Replacement parts Only use replacement parts recommended by the manufacturer. Modifications to this appliance must not be made. Address: Units 6 & 7, Rawreth Barns, Dollyman's Farm, Doublegate Lane, Rawreth, Wickford, Essex. SS11 8UD. Tel: 01268 763586. Fax: 01268 762366