1
ActivePresenter User Manual
Version 4.0
Table of Contents
Table of Contents............................................................................................................................ 2
About This Manual ........................................................................................................................ 11
Structure Of The Manual ........................................................................................................... 11
Intended Audience .................................................................................................................... 12
How To Use This Manual .......................................................................................................... 13
Terms Used............................................................................................................................... 13
Disclaimer ................................................................................................................................. 13
Copyrights ................................................................................................................................. 14
Version Numbers....................................................................................................................... 14
Getting The Latest User Manual ............................................................................................ 14
What's New In This Version Of User Manual ............................................................................. 14
General ......................................................................................................................................... 15
Basic Screencasting Concepts .................................................................................................. 15
Screenshot ............................................................................................................................ 15
Screencasting ........................................................................................................................ 15
Capture Profile ....................................................................................................................... 16
Slide Background ................................................................................................................... 17
Slide Index ............................................................................................................................. 18
Resources ............................................................................................................................. 18
How Resources Come Into A Project ................................................................................. 18
Objects .................................................................................................................................. 18
Object Style ........................................................................................................................... 19
Library.................................................................................................................................... 19
How ActivePresenter Manages The Resources ................................................................. 20
Annotation ............................................................................................................................. 20
Annotation During Capture Phase ...................................................................................... 21
ActivePresenter And LMS ...................................................................................................... 22
SCORM .............................................................................................................................. 23
Interactive Presentation Modes .............................................................................................. 23
Demonstration Mode .......................................................................................................... 23
Tutorial Mode ..................................................................................................................... 23
Practice Mode .................................................................................................................... 23
Table of Contents
2
ActivePresenter User Manual
Version 4.0
Test Mode .......................................................................................................................... 24
Frame Rate ............................................................................................................................ 24
Reporting ............................................................................................................................... 24
HTML5 ................................................................................................................................... 24
Overview Of ActivePresenter..................................................................................................... 24
ActivePresenter Editions ........................................................................................................ 25
Feature Comparison .............................................................................................................. 25
System Requirements ............................................................................................................... 26
Installing ActivePresenter .......................................................................................................... 26
The Multi-tier Help System ........................................................................................................ 27
Creating A New Project ................................................................................................................. 29
Planning A Project ..................................................................................................................... 29
Find The Success Factors ..................................................................................................... 29
Prepare An Outline And Storyboard ....................................................................................... 30
Identify Your Sources For Presentation.................................................................................. 31
Selecting The Content-Generation Method................................................................................ 31
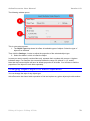
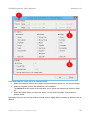
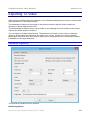
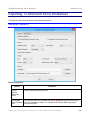
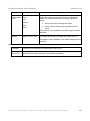
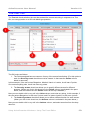
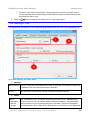
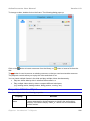
Creating A Capture Project ........................................................................................................ 32
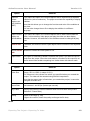
The Capture Area Section...................................................................................................... 34
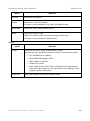
The Audio Input Section ......................................................................................................... 35
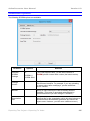
The Start Capture and More Options... Section ...................................................................... 36
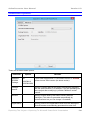
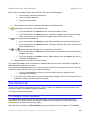
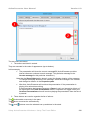
Creating A Project From PowerPoint Presentation .................................................................... 37
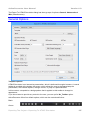
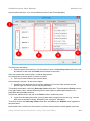
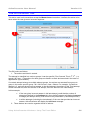
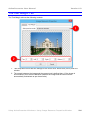
Creating A Project From Images ............................................................................................... 40
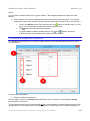
Creating A Blank Project ........................................................................................................... 41
Saving A Project ........................................................................................................................ 43
Closing The Project Without Saving ....................................................................................... 43
Shrinking A Project ................................................................................................................ 43
Opening An Existing Project ...................................................................................................... 45
Opening Multiple Projects Simultaneously ............................................................................. 45
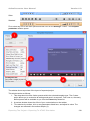
Editing A Project ........................................................................................................................... 46
Overview Of The Editing Process .............................................................................................. 46
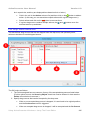
The Editing Window ............................................................................................................... 47
The Editing Process ............................................................................................................... 48
Project-Level Editing ................................................................................................................. 50
Naming The Slides................................................................................................................. 50
Sorting The Slides.................................................................................................................. 52
Inserting Slides ...................................................................................................................... 54
Inserting A Blank Slide ....................................................................................................... 54
Inserting New Slides By Fresh Capturing ........................................................................... 57
Table of Contents
3
ActivePresenter User Manual
Version 4.0
Inserting Images As Slides ................................................................................................. 57
Inserting Slides From Another Project ................................................................................ 57
Inserting Slides From A PowerPoint Presentation .............................................................. 58
Removing A Slide .................................................................................................................. 58
Editing Project Properties....................................................................................................... 59
Editing A Slide ........................................................................................................................... 61
Inserting Objects .................................................................................................................... 61
Arranging The Objects ........................................................................................................... 61
Basic Movement Of Objects ............................................................................................... 62
Aligning Objects With Each Other (Snapping) .................................................................... 63
Aligning Objects With A Reference Object.......................................................................... 64
Resizing Objects To A Reference Object ........................................................................... 64
Setting The Z-Order Of Objects .......................................................................................... 65
Removing Objects.................................................................................................................. 67
Editing Objects....................................................................................................................... 67
Moving The Objects In Timeline ............................................................................................. 67
Slide Background ................................................................................................................... 67
Find And Replace Text .......................................................................................................... 67
Removing Objects From Multiple Slides ................................................................................. 68
Inserting Objects Into Multiple Slides ..................................................................................... 69
Changing Object Style In A Batch-Operation ......................................................................... 70
Changing Object Transitions In A Batch-Operation ................................................................ 71
Undo ...................................................................................................................................... 73
Redo ...................................................................................................................................... 73
Previewing A Slide ................................................................................................................. 73
Adding A Voice-over/Commentary (or Dubbing) .................................................................... 73
Choosing A Quiet And Comfortable Location ..................................................................... 74
Eliminating (And Preventing) Any Disturbing Sounds ......................................................... 74
Selecting Your Recording Equipment ................................................................................. 74
Setting Up Your Equipment Correctly ................................................................................. 75
General Tips For Recording ............................................................................................... 75
Splitting A Slide ...................................................................................................................... 75
Adding Navigational Elements ............................................................................................... 76
Advanced Editing ...................................................................................................................... 76
Making The Project Interactive ............................................................................................... 76
How Interactive Objects Behave ......................................................................................... 76
The Trigger Conditions (a.k.a. Events) ............................................................................... 77
The Actions ........................................................................................................................ 78
Table of Contents
4
ActivePresenter User Manual
Version 4.0
Setting Up The Interactions ................................................................................................ 80
Creating Drag and Drop Interactions ...................................................................................... 80
Drag Source ....................................................................................................................... 80
Drop Target ........................................................................................................................ 81
Drop Area ........................................................................................................................... 83
Drag-n-Drop Question ........................................................................................................ 83
Drag Drop Connector ......................................................................................................... 84
Tips for Creating Drag and Drop Interactions ..................................................................... 85
Making The Project Accessible .............................................................................................. 85
Tips for Creating Accessible Projects ................................................................................. 86
Customizing Accessibility Text for Slides ............................................................................ 86
Customizing Accessibility Text for Objects ......................................................................... 87
Localizing The Project ............................................................................................................ 88
Localizing Process ............................................................................................................. 88
Exporting To XLIFF ............................................................................................................ 89
Replacing Slide Backgrounds ............................................................................................. 90
Importing From XLIFF ........................................................................................................ 92
Right-To-Left Language ......................................................................................................... 92
Active Window ....................................................................................................................... 94
Exporting The Project ................................................................................................................... 97
Overview Of Exporting Options ................................................................................................. 97
Exporting To Images ................................................................................................................. 99
General Options ..................................................................................................................... 99
SCORM Options .................................................................................................................. 101
Exporting To Video .................................................................................................................. 102
General Options ................................................................................................................... 102
Advanced Options................................................................................................................ 105
Exporting To Flash Video ........................................................................................................ 107
General Options ................................................................................................................... 107
Advanced Options................................................................................................................ 109
Exporting To HTML SlideShow ................................................................................................ 111
General Options ................................................................................................................... 111
Advanced Options................................................................................................................ 113
Exporting To Adobe PDF Document........................................................................................ 115
General Options ................................................................................................................... 115
Advanced Options................................................................................................................ 117
Text Style Options................................................................................................................ 119
Exporting To Microsoft Word Document .................................................................................. 121
Table of Contents
5
ActivePresenter User Manual
Version 4.0
General Options ................................................................................................................... 121
Advanced Options................................................................................................................ 124
Creating Custom Word template .......................................................................................... 125
Exporting To Microsoft Excel Worksheet ................................................................................. 126
General Options ................................................................................................................... 126
Advanced Options................................................................................................................ 129
Exporting To Microsoft PowerPoint Presentation ..................................................................... 131
General Options ................................................................................................................... 131
Advanced Options................................................................................................................ 134
Exporting To HTML5 Simulation .............................................................................................. 136
General Options ................................................................................................................... 137
Advanced Options................................................................................................................ 141
Misc Options ........................................................................................................................ 144
Exporting To Flash Simulation ................................................................................................. 146
General Options ................................................................................................................... 146
Advanced Options................................................................................................................ 150
Misc Options ........................................................................................................................ 152
Reporting Options ................................................................................................................... 153
Content Of The Report ......................................................................................................... 153
Report Formats .................................................................................................................... 154
Report In Plain Text .......................................................................................................... 154
Report In CSV Format ...................................................................................................... 155
Report In XML Format ...................................................................................................... 155
Report In JSON Format .................................................................................................... 156
Transmission Of Report ....................................................................................................... 157
Other Uses Of ActivePresenter ................................................................................................... 158
ActivePresenter As Image Editor ............................................................................................. 158
ActivePresenter As Image Format Converter .......................................................................... 159
ActivePresenter As Screenshot Software ................................................................................ 159
ActivePresenter As Audio Editor .............................................................................................. 159
ActivePresenter As TTS Generator ......................................................................................... 160
ActivePresenter As Video Editor .............................................................................................. 160
ActivePresenter As Format Converter ..................................................................................... 161
Appendices ................................................................................................................................. 162
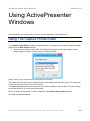
Using ActivePresenter Windows ................................................................................................. 163
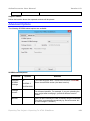
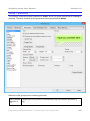
Using The Capture Profile Editor ............................................................................................. 163
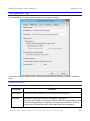
The General Tab .................................................................................................................. 164
Capture Profile ................................................................................................................. 164
Table of Contents
6
ActivePresenter User Manual
Version 4.0
Capture Type ................................................................................................................... 165
Automatic Panning ........................................................................................................... 165
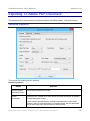
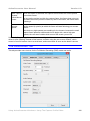
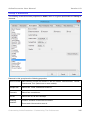
The FMR/Audio Tab............................................................................................................. 166
FMR Settings ................................................................................................................... 167
Audio Settings .................................................................................................................. 168
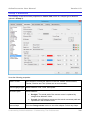
The Cursor Tab.................................................................................................................... 169
Cursor Highlight................................................................................................................ 170
The Annotation Tab ............................................................................................................. 170
The Hotkeys Tab ................................................................................................................. 172
Using The Event Editor............................................................................................................ 173
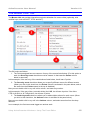
The Mouse Click Tab ........................................................................................................... 175
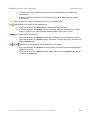
The Key Stroke Tab ............................................................................................................. 177
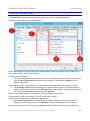
The Text Tab ....................................................................................................................... 179
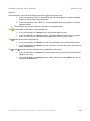
The Choice Tab ................................................................................................................... 180
For Multiple Choice Question ........................................................................................... 180
For Multiple Response Question ...................................................................................... 182
The Accepted Drag Sources Tab ......................................................................................... 183
For Drop Target Object..................................................................................................... 183
For Drop Area Interaction ................................................................................................. 185
The Answer Tab (for Drag-n-Drop Question) ....................................................................... 186
The Settings Tab ................................................................................................................. 188
The On Correct Tab ............................................................................................................. 189
The On Incorrect Tab ........................................................................................................... 191
The On Incomplete Tab ....................................................................................................... 192
The On Timeout Tab ............................................................................................................ 193
The On Rollover Tab............................................................................................................ 194
The On Rollout Tab.............................................................................................................. 194
The On Accept Tab .............................................................................................................. 195
The On Reject Tab............................................................................................................... 196
Using The Image Editor ........................................................................................................... 197
Using Image Resource Properties Window ............................................................................. 202
General Tab ......................................................................................................................... 202
The Text Margin Tab............................................................................................................ 204
Using The Properties Window ................................................................................................. 205
The Fill Section .................................................................................................................... 206
The Line Section .................................................................................................................. 209
The Text Section .................................................................................................................. 211
The Shadow Section ............................................................................................................ 211
Table of Contents
7
ActivePresenter User Manual
Version 4.0
The Audio Section................................................................................................................ 212
Using The Resources Pane ..................................................................................................... 214
The Images Tab................................................................................................................... 215
The Audio & Video Tab ........................................................................................................ 216
The Style Tab ...................................................................................................................... 218
Using The Timeline ................................................................................................................. 219
The Toolbar In Timeline ....................................................................................................... 222
The Time Bar ....................................................................................................................... 225
Position Of A Drag-n-Dropped Resource .......................................................................... 225
Changing The Timing/Duration Of An Object .................................................................... 225
Using The Markers On Time Bar ...................................................................................... 226
Snapping In Timeline ........................................................................................................... 229
Using The Range-Edit Commands....................................................................................... 230
The Cut Command ........................................................................................................... 231
The Delete Command ...................................................................................................... 233
The Crop Command ......................................................................................................... 233
The Copy Command ........................................................................................................ 234
Using The Join Command.................................................................................................... 235
Using The Adjust Volume Control ........................................................................................ 236
Productivity Tips For Timeline .............................................................................................. 238
Using Calibrate Audio Input dialog .......................................................................................... 240
Using Output Language Editor ................................................................................................ 241
Objects ....................................................................................................................................... 243
Overview Of Objects ............................................................................................................... 243
Annotation Objects............................................................................................................... 243
Interaction Objects ............................................................................................................... 244
General Properties Of Objects................................................................................................. 245
Object Styles........................................................................................................................ 248
Introduction To Objects ........................................................................................................... 249
Mouse Click ......................................................................................................................... 250
Text Box .............................................................................................................................. 250
Key Stroke ........................................................................................................................... 251
Mouse Hover ....................................................................................................................... 252
Drop Area ............................................................................................................................ 253
Question – True/False ......................................................................................................... 253
Question – Multiple Choice .................................................................................................. 255
Question – Multiple Response ............................................................................................. 256
Question – Essay ................................................................................................................. 258
Table of Contents
8
ActivePresenter User Manual
Version 4.0
Question – Fill In The Blank ................................................................................................. 260
Question – Fill In Multiple Blank ........................................................................................... 261
Question – Sequence .......................................................................................................... 263
Question – Drag-n-Drop ....................................................................................................... 265
Shape .................................................................................................................................. 266
Text Caption ........................................................................................................................ 267
Highlight............................................................................................................................... 267
Spotlight............................................................................................................................... 267
Feedback ............................................................................................................................. 267
Gesture Effect ...................................................................................................................... 268
Cursor Path.......................................................................................................................... 269
Adding A Click Point ......................................................................................................... 273
Composing A Mouse Path ................................................................................................ 273
Continuation Of Cursor Path Between Slides ................................................................... 273
Zoom-n-Pan ......................................................................................................................... 274
Closed Caption .................................................................................................................... 276
Adjusting Closed Captions In The Slide ............................................................................ 280
Converting All Closed Captions To Speech ...................................................................... 282
Miscellaneous Tips ........................................................................................................... 284
Image................................................................................................................................... 284
Screenshot .......................................................................................................................... 284
Capturing A Window ......................................................................................................... 285
Capturing An Object ......................................................................................................... 285
Capturing The Full Screen ................................................................................................ 285
Capturing An Application or Region .................................................................................. 286
Screenshot Options .......................................................................................................... 287
Audio ................................................................................................................................... 287
Display Styles of Audio Objects ........................................................................................ 289
Properties Of Audio Object ............................................................................................... 290
Video ................................................................................................................................... 291
Properties Of Video Object ............................................................................................... 292
Freeze-Frame ...................................................................................................................... 293
Pausing A Video Track (Freezing The Scene) .................................................................. 294
Pausing An Audio Track (Inserting Silence)...................................................................... 295
Menus And Shortcuts .................................................................................................................. 296
Project Menu ........................................................................................................................... 296
Edit Menu ................................................................................................................................ 297
View Menu .............................................................................................................................. 298
Table of Contents
9
ActivePresenter User Manual
Version 4.0
Slide Menu .............................................................................................................................. 299
Annotation Menu ..................................................................................................................... 300
Interaction Menu...................................................................................................................... 301
Export Menu ............................................................................................................................ 302
Localize Menu ......................................................................................................................... 303
Window Menu ......................................................................................................................... 303
Help Menu ............................................................................................................................... 304
Customizing ActivePresenter ...................................................................................................... 305
Changing The Language ......................................................................................................... 305
Customizing The User Interface .............................................................................................. 305
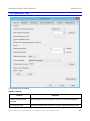
Customizing The Preferences ................................................................................................. 305
The General Tab .................................................................................................................. 307
The Interaction Tab .............................................................................................................. 309
The Annotation Tab ............................................................................................................. 312
Group 1 Elements ............................................................................................................ 313
Group 2 Elements ............................................................................................................ 315
Group 3 Elements ............................................................................................................ 316
The Auto-Annotation Text Tab ............................................................................................. 318
The Hot keys Tab................................................................................................................. 320
The Miscellaneous Tab ........................................................................................................ 322
What's New ................................................................................................................................. 325
Table of Contents
10
ActivePresenter User Manual
Version 4.0
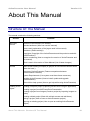
About This Manual
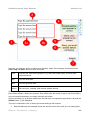
Structure Of The Manual
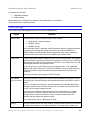
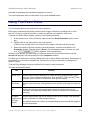
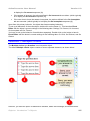
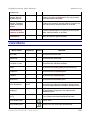
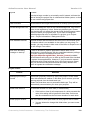
The manual contains the following sections:
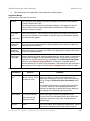
Section
About this
manual
Contents
Structure of the manual (This section)
Intended audience (Who can use this manual)
Terms used (explanation of the jargon used in this manual)
Disclaimer (Read carefully!)
Copyrights (Copyright of the ActivePresenter and the products used with
ActivePresenter)
Version numbering (How to recognize the version of ActivePresenter and
this manual)
What is new in this version of User Manual (List of latest changes)
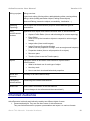
General
Basic Screen-casting Concepts (A glimpse of how ActivePresenter works
under the hood.)
Overview of ActivePresenter (Feature-comparison between
ActivePresenter versions)
System Requirements (Your system must have these resources)
Installing ActivePresenter (How to install, update and upgrade
ActivePresenter)
The multi-tier help system (How to get help while using ActivePresenter)
Creating a new
project
Creating a Capture project (Capturing screen while using an application)
Creating a project from MS PowerPoint Presentation
Creating a project from Images (Create a project by importing images as
slides)
Creating a blank project (Start with a blank canvas and add items)
Saving a project (How to save an ActivePresenter project)
Opening an existing project (How to open an existing ActivePresenter
project)
About This Manual> Structure Of The Manual
11
ActivePresenter User Manual
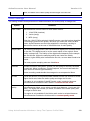
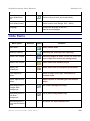
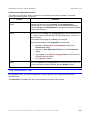
Editing a project
Version 4.0
Editing overview
Project-level editing (Sorting slides, adding/deleting slides, naming slides)
Editing a slide (Adding annotation objects, editing those objects)
Advanced Editing (Interactive objects, accessibility, localization…)
Rendering
(Exporting)
How to export the ActivePresenter project to create different types of
presentations.
Using
ActivePresenter
windows.
Appendices that explain how different windows work in ActivePresenter:
Objects
Capture Profile Editor (How to edit all settings for screen-capturing)
Event Editor
(How to set up the interaction objects to respond to various trigger
events)
Image editor (How to edit images)
Image Resource Properties Window
(How to edit the properties of image, such as margins and hotspots)
Properties window (How to edit properties of an object)
Resource pane
Timeline (How to use the Timeline pane)
Explanation about all annotation and interaction objects used in
ActivePresenter.
What is the basic use of each type of object
How they work
How to set their visual and behavioral properties
Menus and
Shortcuts
Summary of all menus and hot keys
Customizing
ActivePresenter
Customizing the interface and behavior.
What's new
What is new in this edition of the User Manual.
(Covers changes in the software and the manual itself.)
Intended Audience
ActivePresenter is directly and indirectly used by two different kinds of users:
1. Presenters/teachers: They are the direct users of ActivePresenter.
They use ActivePresenter to prepare a presentation and export it to various formats.
About This Manual> Intended Audience
12
ActivePresenter User Manual
Version 4.0
2. Viewers/students: They are the indirect users of ActivePresenter.
They watch the exported presentation, practice and take a test.
In some cases, the presentation is run and moderated by the presenter. In other cases, the
viewers/students run the presentation in self-paced mode, as guided by the presentation itself.
In this context, this manual is meant for the direct users of ActivePresenter (i.e., for the
presenters/teachers).
No previous experience of screencasting is assumed. All terms are explained within this manual.
How To Use This Manual
It is best to read the main chapters of this manual from start to finish. Then you can read the
Appendices in any order.
This manual has hyperlinks that are displayed in bold red, NOT in blue text with underline.
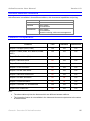
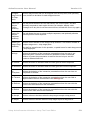
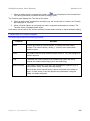
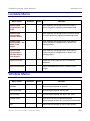
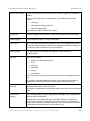
Terms Used
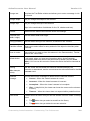
Some technical jargon (especially terms related to video encoding) terms are explained below. For
more details, please refer to the Wikipedia.
Term
Meaning
Key frame To reduce the size of the video file, a compression technique is used, in which the
computer stores the whole visual information for only a few frames (called key
frames). For the rest of the frames, it only stores the differential information with
reference to the preceding key frame (in some compression schemes, a frame's
content is derived from key frames on both side of it).
LMS
A Learning Management System.
Disclaimer
This manual is written by volunteers. Please use it in the same spirit.
No guarantees are made regarding accuracy.
The author assumes no responsibility for any loss of data; or for any direct or indirect damages that
arise out of use, misuse or misapplication of the information provided in this manual.
Please exercise caution and use it at your own risk.
About This Manual> How To Use This Manual
13
ActivePresenter User Manual
Version 4.0
Copyrights
All copyrights for the ActivePresenter software belong to Atomi Systems, Inc.
The copyrights of the other applications mentioned in this manual (e.g. Microsoft PowerPoint,
Adobe Acrobat Reader, LibreOffice, etc.) belong to their respective developers.
Due care is taken to use original material in this manual. Nevertheless, if you see any copyright
infringement in the manual, please send us an e-mail, so that immediate actions can be taken.
Version Numbers
The version of ActivePresenter software is denoted with a three-part version number, such as
3.7.0.
The version number of this manual is derived from the software's version number by placing a
serially incrementing number as a suffix.
For example, the second User Manual written for version 3.7.0 of ActivePresenter will have version
number 3.7.0-2.
Getting The Latest User Manual
The header of each page (right corner) carries the version number of the manual. If you want to
check whether you have the latest version of the manual, click on the header. This will launch a
browser and load the manual download page. Compare the version numbers, and if your version
is outdated, download the latest version.
To replace the old version with a later version you have to move the downloaded file to the
installation folder of ActivePresenter and named it in the form: “Help_<langcode>.pdf”, where
<langcode> is the standard language code, default is “en” for English version.
After this, whenever you press F1, the latest User Manual file will open.
What's New In This Version Of User Manual
Appendix What's New describes what's new in this version of the manual, so that if you have
already read the previous version, you can update yourself with minimal effort.
The appendix provides links, so that you can directly jump to the changed portions and catch up.
About This Manual> Copyrights
14
ActivePresenter User Manual
Version 4.0
General
Basic Screencasting Concepts
Before using ActivePresenter, you must first understand some basic concepts.
Screenshot
Just imagine that we have a camera to take a photo of the whole screen of your PC, an
application's window or any part of it. Such an image is called “screenshot”.
This manual contains a lot of screenshots of the ActivePresenter windows.
Screencasting
A screencast (also known as “screen capture”) is a digital recording of what happens dynamically
on your computer screen. A screenshot is like a still photo taken of your screen, while a screencast
is like a video of your screen.
In the context of ActivePresenter, the entire process is as follows:
1. Capturing
The teacher/presenter works on the target application, and captures the screen. The outcome of
this step is a video or a slide-show.
2. Editing and annotating
The teacher/presenter edits the video or slide-show, and adds annotations, commentary, images,
audio/video clips, etc.
3. Making it interactive (Optional)
Optionally, the teacher/presenter adds interactive elements (typically questions and quizzes); and
also defines how the presentation should behave when the student gives a correct answer, an
incorrect answer, or does not respond within the stipulated time.
A presentation behaves differently to the user, depending upon his previous answer, and what he
is doing on the screen at that moment.
4. Exporting (Rendering)
The teacher/presenter renders the output (=exports the files).
Broadly, the outputs fall in three different categories:
Interactive presentation: HTML5/Flash (viewed in a browser)
Video (with audio)
Documents: Excel/Word/PowerPoint, PDF, Images, HTML slide-show.
General> Basic Screencasting Concepts
15
ActivePresenter User Manual
Version 4.0
5. Actual delivery
Depending upon the output, it is used by either the teacher/presenter himself to teach his course,
or by the students or course-participants to study/practice the subject on their own.
The actual delivery may be in a classroom setting (on a projector), or via a remote network, where
the student goes through the presentation using his browser, and/or reads the documents using a
PDF reader or Microsoft Office/LibreOffice.
6. Assessment (Optional)
The students may be required to take tests.
These may be used by the teacher/presenter to rank the students, or to screen them for promotion
to the next class.
Alternatively, they may allow the student to obtain the results for a self-assessment, so that the
student can improve in his weak areas.
The results are produced either directly by the interactive module, or by the LMS. Reporting is only
available when the project is exported in an interactive format (HTML5/Flash).
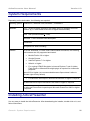
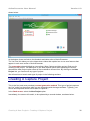
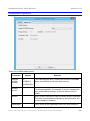
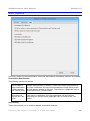
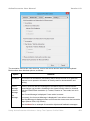
Capture Profile
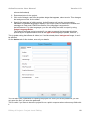
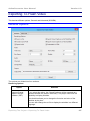
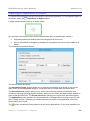
Capture profile is a set of various options which used during a capture session. The primary option
in a capture profile is the capture type (mode). There are two capture types:
1. Full Motion Recording (FMR): ActivePresenter will record the screen like a video camera.
The result is a slide which contain a video/video show exactly what you have done on
screen. This capture type is mainly used for creating the demonstration video.
2. Smart Capture: ActivePresenter will take a screenshot each time a mouse button is clicked
or a key is pressed. The result is a series of slides (steps) describes how to achieve a
specified purpose with the application that you are capturing. This capture type is used for
creating both interactive content (software simulation) and demonstration video.
The other options in a capture profile are: audio/video codecs and parameters, cursor, annotations,
and hotkeys settings...
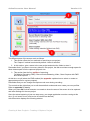
ActivePresenter offers four default capture profiles as below (note that some of them have names
similar to capture types).
1. Full Motion Recording (FMR): When use this capture profile, ActivePresenter records the
screen like a video. It produces a video clip that captures all actions on the screen faithfully.
So, the FMR is the most suitable profile when you want to capture the motion effects
exactly (movement of the mouse, resizing of windows, animated content, etc.).
This profile uses a lossless Flash Screen Video codec to record the movie so it has
following advantages and disadvantages:
The quality is preserved.
It is suitable for recording the software demonstration because the screenshots of a
software usually have many blocks of contiguous color.
It is not suitable for recording movies, games because they have many scene
pictures so it take much time to encode to video and the recorded file size is large.
The frame rate is not high, especially in cases of recording movies and games.
2. Record movie/Streaming video: This capture profile is very similar to the FMR capture
profile, but it uses a lossy encoder to record the video, with a choice between MPEG1 and
General> Basic Screencasting Concepts
16
ActivePresenter User Manual
Version 4.0
MPEG2.
Using this capture profile has following advantages and disadvantages:
The quality is not preserved, it depends on the quality option which can be set in
range [1, 100].
It is suitable for recording any applications.
The frame rate is high and the recorded file size is not too large.
3. Smart Capture: When use this capture profile, ActivePresenter captures screenshots when
there is an input from mouse or keyboard. At the same time, ActivePresenter keeps track of
the actual elapsed time. This profile produces multiple screenshots (slides) and/or multiple
videos.
While recording, you can manually switch between the FMR and Smart Capture capture
types using hot keys (defaults are F9 and F10). This is very useful when capturing a text
typing operation or a mouse drag-n-drop operation.
Using Smart Capture has several advantages:
It is possible to create interactive and branching content (HTML5/Flash).
High quality output when export to HTML5/Flash but small output size (thanks to
PNG loss-less compression)
Smooth cursor path
The presentation is divided into steps so it is easier to manage and edit.
4. Smart Capture with Auto FMR: When use this capture profile, ActivePresenter switches
automatically between the two capture types mentioned above: It captures in the Smart
Capture capture type, but will temporarily switch to the FMR capture type when you start
dragging the mouse; and switch back to the smart capture capture type when you stop
dragging the mouse.
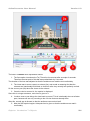
You can also create your own capture profiles to use in your authoring process.
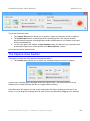
Slide Background
Slide background in ActivePresenter displays the image of a step (where to click, what key is
pressed) in interactions chain when creating a tutorial.
It is also used to display some form of corporate identity throughout the presentation. This could be
in the form of a corporate logo or simply corporate colors in the backdrop of each slide. This can be
achieved by inserting a background image that is shared among multiple slides.
The slide you see is made up of several objects that form a stack. When an object is added to a
slide, it is placed at the top of the pile, and covers the objects placed beneath it. In this context, the
background image remains at the bottom of the objects' stack, regardless of when it is added.
Background is an optional item (some slides may not have it). A given slide can not have multiple
backgrounds.
ActivePresenter has the facility to flatten any stack of objects and turn them into a single
background image.
A background image can be edited like any other image.
General> Basic Screencasting Concepts
17
ActivePresenter User Manual
Version 4.0
Slide Index
The slide index denotes the order of any given slide in the slide list: The first slide has index 1, the
second slide has index 2, etc...
The index numbers of slides change when slides are added, deleted or shuffled.
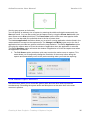
Resources
We need multiple items for annotation: shapes for the annotation, styles for shapes, background
music, pre-recorded sounds (such as mouse-clicks), additional video clips, etc.
These are collectively known as “resources”.
The resources can be divided into two categories, based on their source: Preset resources and
User resources.
The Preset resources are predefined and get installed with the ActivePresenter. They
cannot be moved, renamed or deleted.
The User resources are the resources added by the user to the library.
The User resources can be further divided into two categories, based on their availability: global
and project-level.
The global resources are available to all ActivePresenter projects.
The project-level resources are assigned to a particular project; and are not available to the
other projects.
How Resources Come Into A Project
Resources get into a project in five different ways:
1. Pre-installed resources (bundled with ActivePresenter)
2. Resources added by the user, from the file system to the Library (e.g. audio/video files).
3. Resources added by the user, from the file system to the canvas directly (e.g. audio/video
files). If you insert the same file multiple times in the same project, the project treats each
copy as a different resource; and does not try to find duplicates.
4. Audio objects created by the user in a slide
(e.g. recorded voice, Text-To-Speech track created from a Closed Caption, etc.)
5. Logical resources created by certain operations: Splitting of an audio/video, splitting of
slide, deletion/cutting of a portion, joining with other object, changing the volume, or
inserting a freeze-frame/silence.
All these resources appear in the Resources pane, from where you can use them in the current
project.
Objects
Object is a generic name for any structured item that is placed in a slide to add annotation, or to
make it interactive.
Examples of Objects are images, different shapes (such as rectangles, circles, ovals, arrows and
General> Basic Screencasting Concepts
18
ActivePresenter User Manual
Version 4.0
call outs), text captions, closed captions, highlights, vector curves that represent the path of the
cursor, zoom-n-pan frames, audio clips and video clips.
See Appendix Objects for more details.
Note that the term “objects” is also used in a totally different context when you are taking a
screenshot: There, an “object” means any part of a window that can be captured in a screenshot,
such as toolbars, toolbar buttons, panes, menus, scroll bars, controls, etc.
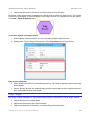
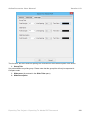
Object Style
Style is a preset of object properties (fill, line, text, graphics effects).
Several options are available in the Styles tab in the Resources pane (select any style listed in
the pane and use the context menu): Add a new style, Clone from selected style, Copy the
selected style to project and Delete the selected style.
When a new style is added, ActivePresenter provides it with a temporary name with an internally
incremented number. The author should always provide a meaningful name to the newly created
style.
Library
A library is a virtual storage area that contains the often-used resources.
The Library provides ready resources to all projects.
Note that the Library contains two different types of resources:
Preset resources (bundled with ActivePresenter).
User resources (Added to the Library by user).
Once a resource is placed in the Library, you can delete/move/rename the original.
The author can also insert resources directly from the disk, rather than placing it in the Library first.
But there are two major disadvantages:
1. The resource is used by a particular project only: To use it in another project, you will have
to insert the resource again from disk.
General> Basic Screencasting Concepts
19
ActivePresenter User Manual
Version 4.0
2. ActivePresenter does not check whether the new resource is already being used in the
current project: It will go on adding each copy independently. Thus the project size grows
tremendously if you use the same resources multiple times.
Therefore, if you want to re-use a resource in multiple projects, it is always best to first add the
resource to the Library, and then use it in your projects from there.
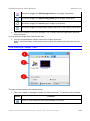
There is only one physical file that stores all library contents. This file is located at:
C:\Users\<Username>\AppData\Roaming\ActivePresenter\ActivePresenter.aplib (Windows Vista or
Windows 7)
or
C:\Documents and Settings\<Username>\Application Data\ActivePresenter (Windows XP)
How ActivePresenter Manages The Resources
ActivePresenter reads the file content and saves it to the Library file (see above). It creates a
resource entry that points to this imported content.
This entry has a name, and that name is used to refer to a resource in the library.
If the file size is bigger than a pre-defined value in Preferences, ActivePresenter does not store file
content directly in the Library file, but maintains its own local copy of the imported file. By default,
this limit is 50 MB, but you can freely adjust it any time in Preferences.
The original file leads an independent life: If you rename or delete it, the copy in the Library will not
be affected.
When you use a library resource in any project, ActivePresenter only creates a link with its file.
(That means, if the resource file is modified in a future version of ActivePresenter, all projects using
it will use the modified resource automatically.)
Annotation
Just recording a screen is not enough as a training resource: You also have to add some
explanatory elements (Objects) to the video. Adding these objects to the original screen-recording
is called annotation.
You have the option to insert annotations at two stages:
1. Annotation during capture phase
In a typical capture project, you would be interacting with the target application by clicking on its
menus and buttons, pressing hot keys and entering text.
ActivePresenter has the option to automatically insert annotation shapes where you have clicked
or when you press any keys on the keyboard. Optionally, ActivePresenter can actually insert the
description of your actions (e.g. “left click”, “right click”) in the inserted shape.
2. Annotation during edit phase
Annotation during edit phase is done by various methods:
Superimposing different shapes on the video (e.g. a circle/ellipse around a button, a
rectangle around a control, etc.)
Inserting comments with call outs and text boxes
Inserting audio/video clips
General> Basic Screencasting Concepts
20
ActivePresenter User Manual
Adding your own commentary (also called “voice-over”)
Adding subtitles and closed captions
Version 4.0
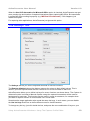
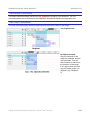
Annotation During Capture Phase
ActivePresenter has the ability to create appropriate annotations for mouse and keyboard
operations while capturing. Along with how to generate the annotation content, one of the main
issues is choosing the right shape and placing it at the right position.
From version 3.0, ActivePresenter has built-in Shape objects, which have a flexible hotspot
(=anchor point). Because of this, ActivePresenter can easily place annotations properly, and you
don't need to care about this.
However, if you want to use your own drawings or images as annotations, please read this section
carefully.
As mentioned above, ActivePresenter inserts a shape where you click, and enters a self-generated
comment that describes the interaction (e.g. “Left click on New menu”) in that shape and sets the
hotspot (=anchor point) at the click spot.
If you want to use a different shape from the set of ActivePresenter's shapes or a beautiful image
for annotating, ActivePresenter allows you to define the image properties (hotspot, text margin,
group) for this purpose.
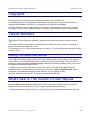
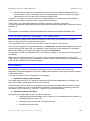
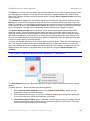
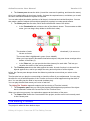
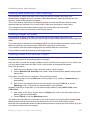
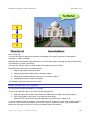
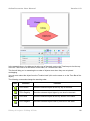
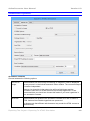
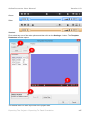
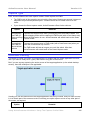
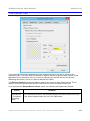
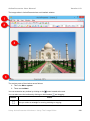
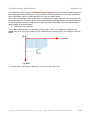
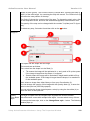
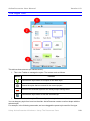
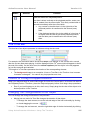
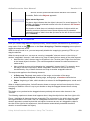
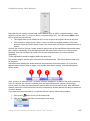
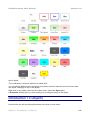
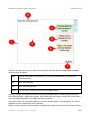
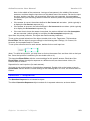
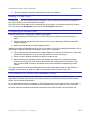
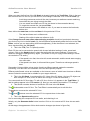
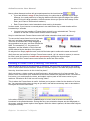
In the following figure, the anchor point is marked as x (This is just for illustration: In actual
practice, an anchor point is not visible.)
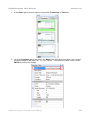
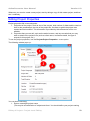
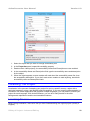
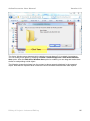
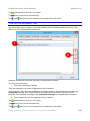
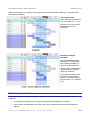
To use that image as annotation, you need to do following steps:
1. Import the image into Library, define the hotspot (=anchor point) at the tip of the arrow and
define the text margin (to let ActivePresenter know where to place its comment inside that
image).
2. Define a new style, in which the Fill property must use this image as stretched background.
3. In Preferences, change the default shape to Rectangle and the newly created style as the
default shape style.
When you click anywhere, ActivePresenter inserts this shape in such a way that its anchor point is
placed exactly at the spot where you clicked.
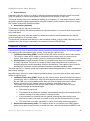
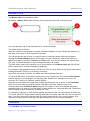
But this strategy often runs into problem: If the click-spot is too close to the border of the canvas, a
part of the inserted image may lie outside the canvas. When rendered, such images would get
truncated.
General> Basic Screencasting Concepts
21
ActivePresenter User Manual
Version 4.0
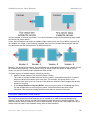
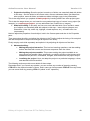
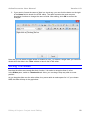
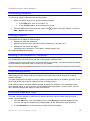
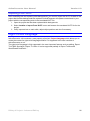
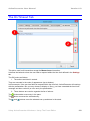
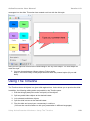
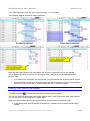
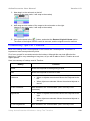
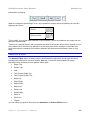
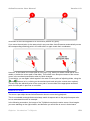
In some shapes, a solution is possible: You can use another variant of the shape that stays inside
the canvas, as shown above.
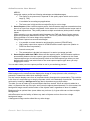
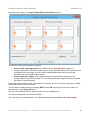
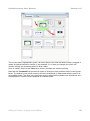
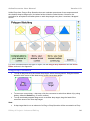
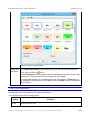
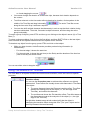
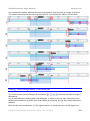
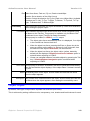
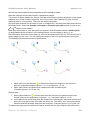
In fact, ActivePresenter can select a suitable shape variant on its own if you define a group of all
the variants of a shape. In the following example, there are four similar-looking images, with the
only difference that the arrow points in a different direction.
Based on the anchor-point location, ActivePresenter will automatically decide which variant should
be inserted while capturing. The selection criteria is simple: When the shape is placed on the
screen, no part of it should project outside the slide canvas.
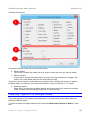
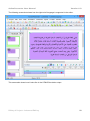
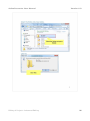
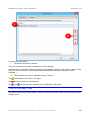
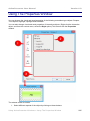
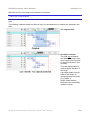
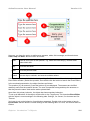
To create a group of related shapes, follow this process:
Add the variant shapes to the ActivePresenter Library.
Take care to include variants that have anchor points in all possible directions, so that at
least one variant will match a given click spot. For example, the group above is not
sufficient if the click spot is in a corner of the slide (we need four more shapes with arrows
pointing to corners).
In the Image Resource Property Editor, enter a common name in the Group input box.
If a few images share a common group name, ActivePresenter treats them all as
equivalent, and selects the image that fits in the slide for the given click spot.
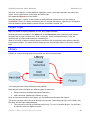
ActivePresenter And LMS
The outputs produced by ActivePresenter can be hosted on an LMS (Learning Management
System), as an online course. An LMS can manage multiple courses on different subjects. The
LMS also allows multiple students to have multiple sessions of the course, and keeps track of the
marks scored by each of the students during each of those sessions.
General> Basic Screencasting Concepts
22
ActivePresenter User Manual
Version 4.0
SCORM
SCORM is a standard for describing and packing materials so that the LMS can understand. So
virtually anything can be packed into a SCORM-compatible package.
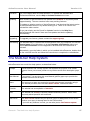
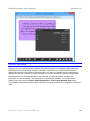
Interactive Presentation Modes
ActivePresenter is capable of generating a presentation in interactive mode, in which the
generated output uses either HTML5 or Flash technology.
This is a self-running presentation and normally consists of multiple files:
HTML5: They are HTML, JavaScript, CSS and media resource files which will be run by a
web browser.
Flash: The main file is a SWF Flash file, and HTML index page which embed that SWF file
so it can run inside a web browser.
The user runs the interactive presentation with a web browser.
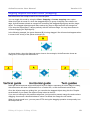
The interactive presentation can run in four different modes: Demonstration, Tutorial, Practice and
Test.
The Demonstration and Tutorial modes are appropriate for teacher to lecture automatically or
manually. The Practice and Test mode are appropriate for the student to take exercise or
examination.
ActivePresenter allows to you to display/hide each object in specific modes. For example, you
might use two different audio narrations for the Demo and the Test modes.
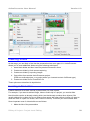
A brief overview of each mode is given below:
Demonstration Mode
The simulation will automatically run based on your time settings for slides and slide objects in your
project. When the elapsed time for each slide reaches the slide's duration, the presentation jumps
to next slide if the current slide is not the last one. If toolbar and slides list are available, user can
navigate to a certain slide, pause/resume or exit the simulation.
Note a special case: If you export the presentation as a video (AVI, WMV, MP4, MKV or WebM),
ActivePresenter checks each object's Demo mode settings to decide whether to include it in the
video. In other words, ActivePresenter treats a video like an interactive presentation that is running
in demo mode.
Tutorial Mode
In this mode, the simulation not only runs based on slides and slide objects time setting but also
supports interactive capability. User must use mouse or keyboard to interact with interactive
objects on each slide. ActivePresenter will assess user response and execute associated actions
which are defined in authoring time.
Practice Mode
This mode is similar to Tutorial mode except it has options to create and send report about user
result to specified Email or HTTP address. Besides, if user fails to perform expected interaction,
the interactive object will be displayed if it is hidden before.
General> Basic Screencasting Concepts
23
ActivePresenter User Manual
Version 4.0
Test Mode
This is similar to the Practice mode, but when user fails to perform properly, the interactive object
won’t be displayed if it is hidden before. Furthermore, the author can limit the maximum time which
users are allowed to complete the test.
Frame Rate
To create an illusion of animation, consecutive images (“frames”) show the action in small
progression in quick succession. The brain is tricked into believing that these discrete images show
a single continuous motion. This is the technique behind motion video.
The frequency (rate) at which the frames are displayed is called the Frame Rate. The normal frame
rate is in the range of 20-30 frames/s. The three commonly used frame rate standards in the TV
and movie-making business are: 24, 25, and 30 fps.
Higher rates means more frames are required per second to produce the same animation;
which in turn will increase the file size.
Lower rates result in smaller file size, but make the movement jerky.
Sometimes, the main power supply (which has 50/60 Hz AC) causes the room lighting to
flicker at this rate. Normally this is unnoticeable to the naked eye, but sometimes a small
difference in the frequencies causes a beat frequency, and appears as a large flickering in
display. This can be avoided by changing the frame rate by a few Hz.
Reporting
Even if an ActivePresenter interactive presentation is not running on a SCORM-compliant LMS, it
can still create a report, and optionally send it to a valid email or HTTP address.
Typically, the report contains the data related to the performance of the student under Demo or
Test modes. For example: Time taken to take the test, points obtained, passing criteria, overall
result (pass/fail), details of the tests taken, etc.
HTML5
HTML5 is a new standard for structuring and presenting content on the web. It contains several
features which are designed to include and handle multimedia and graphical content on the web
easily without having to install proprietary plugins. If you want to create the content which can run
on various platforms and devices, you should consider using HTML5 Simulation output in
ActivePresenter.
Overview Of ActivePresenter
Using ActivePresenter, you can capture the live action on the screen, and also record your
commentary as voice-over. Then you can edit the result and then add annotations (text boxes, call
outs, arrows, circles, boxes, etc), images, navigational controls and video/audio clips.
General> Overview Of ActivePresenter
24
ActivePresenter User Manual
Version 4.0
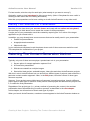
ActivePresenter Editions
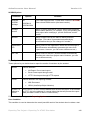
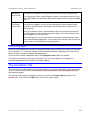
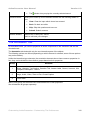
ActivePresenter is available in three different editions, with incremental capabilities and pricing:
Edition
Free
Standard
Professional
Main uses
Demo videos
Demo videos
Documentation
Demo videos
Documentation
Interactive training, with score-management
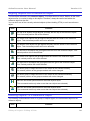
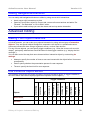
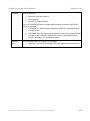
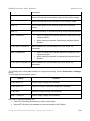
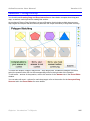
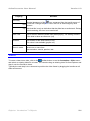
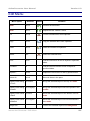
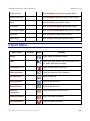
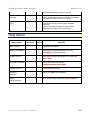
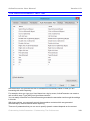
Feature Comparison
Features
Free
Standard
Professional
Export To Images (JPEG, PNG)
Yes
Yes
Yes
Export To Video (WMV, AVI, MPEG4, WebM,
MKV)
Yes
Yes
Yes
Export To Flash Video (FLV)
No
Yes
Yes
Export To Microsoft Word
No
Yes
Yes
Export To Microsoft Excel
No
Yes
Yes
Export To PDF Document
No
Yes
Yes
Export To HTML Slide Show
No
Yes
Yes
Export To Microsoft PowerPoint
No
Yes
Yes
Export To HTML5 Simulation
No
No
Yes
Export To Flash Simulation
No
No
Yes
Export To SCORM 1.2, SCORM 2004
Yes
Yes
Yes
Import From PowerPoint
No
Yes
Yes
Note:
The above table only lists the features which are different between editions.
The interactive feature is not available in the video and document outputs due to the nature
of these formats.
General> Overview Of ActivePresenter
25
ActivePresenter User Manual
Version 4.0
System Requirements
Depending on the deliverable, the following are required:
Operating system Windows XP, Windows Vista, Windows 7, Windows 8.
Hardware
CPU: 1.0 GHz or faster processor with SSE2 (which is available from Intel
Pentium 4) (1.2 GHz recent multi-core or higher recommended)
RAM: 1 GB (Recommended > 2 GB).
Hard disk: 1 GB of available hard disk space.
Sound card
Microphone for audio recording.
Software
For HTML slideshow, or Flash- and HTML5-based simulations, the following
web browsers are fully supported and tested:
Mozilla Firefox 3.0 or higher.
Google Chrome.
Internet Explorer 7.0 or higher.
Safari 4 or higher.
For running HTML5 Simulation in Internet Explorer 7 and 8, Adobe
Flash Player or Microsoft Silverlight plugin is required for multimedia
playback.
Opera 9.50 or higher (not recommended because Opera doesn’t allow to
simulate right-click by default)
For Microsoft Word export: Microsoft Word 2003 or higher is required.
For Microsoft Excel export: Microsoft Excel 2003 or higher is required.
For Microsoft PowerPoint import/export: Microsoft PowerPoint 2003 or higher
is required.
Installing ActivePresenter
It is very easy to install the ActivePresenter: After downloading the installer, double-click on it, and
follow instructions.
General> System Requirements
26
ActivePresenter User Manual
Version 4.0
Activation
The Free Edition does not need activation. To activate the Standard and
Professional Editions, use the Help > Activate Product menu item.
Updating
New versions of ActivePresenter are posted at the website on a quarterly basis
(approximately). The new versions have many exciting features.
To update an existing version of ActivePresenter, just download the latest version
of the executable and run it by double-clicking on it. There is no need to first
uninstall the older version.
Or you can simply use the Check for Updates function in the Help Menu,
ActivePresenter will check if there are new updates and do the updating
automatically.
Upgrading
To upgrade your license, please contact the support group.
Uninstalling
The standard way to uninstall the ActivePresenter from your computer is to use the
Control pane of your Windows, go to the Programs and Features option and
select ActivePresenter from the application list and follow the instructions to
uninstall.
Alternatively, open the folder in which you've installed ActivePresenter, double-click
on the unins000.exe file and follow the instructions to complete the uninstallation.
The Multi-tier Help System
ActivePresenter has a multi-tier help system, as described below:
Tooltips
ActivePresenter has a tooltip system that explains the purpose of all toolbar
buttons. Hover your mouse pointer on any button and a short description pops
up.
User Manual
If you press F1 at any time, this user Manual (pdf file) pops up to provide the
ultimate reference on all topics.
Demo
The best way to learn any product is to watch as someone is actually using it.
The website provides some excellent demo videos. Watch and learn!
Tutorials
The website has a compilation of tutorials.
FAQ
The website has a FAQ (Frequently Asked Questions) section, where most
frequently asked question are answered.
User forum
The User Forum answers all your queries. (But it is always best to first check
whether your query is already listed in the FAQ section).
If you have any features in mind, you can also post a new feature request.
General> The Multi-tier Help System
27
ActivePresenter User Manual
Email support
Version 4.0
If everything else fails, you can send an email to the support team.
Phone support For urgent support needs, contact +844-3755-8373.
General> The Multi-tier Help System
28
ActivePresenter User Manual
Version 4.0
Creating A New Project
In this chapter, we will see how to launch a new project.
Planning A Project
You begin a project with certain deliverable items in mind.
Here are a few sample outcomes:
1. Video: Presentation, group training, demo, teaser video, kiosk-based interactive mode.
2. Flash: Banner for a website, flash screen
3. PDF: Brochure, handout for a lecture/exhibition.
4. PowerPoint: Presentation,
5. E-Learning Course for LMS: Interactive training course with score-management.
6. Images: Material to create further documents
Note that often you will want more than one outcomes from a single project. For example, you may
want to create a video, a flash banner for a website and a pdf brochure.
If you miss any of the expected outputs (or if your client adds a requirement later), you may have to
repeat the project with different settings. Therefore you must begin with a careful planning of what
is expected out of it.
Find The Success Factors
Depending on the expected outcome for the given project, you have to consider various success
factors. The following is only a sample list of considerations:
1. What is the mode of delivery? Will the user interact with you?
(Will you need to embed all the information in the product, or deliver some of the
information in person?)
2. Is it a simple “start-to-finish” presentation, or will it have branches?
(Is there additional content that is presented only if/when needed?)
3. Do you want audio?
(not if the kiosk is in a shared, noisy exhibition hall)
4. What is the size and resolution of your target device?
(low-resolution devices won't run high-resolution presentation)
5. What is the user's preferred device?
(Some high-value presentations may be specially created for iPad or HD monitor screens)
6. Does the situation allow interaction?
(not if the viewers have to walk past the terminal in groups)
Creating A New Project> Planning A Project
29
ActivePresenter User Manual
Version 4.0
7. Will your audience include visually impaired people?
(The presentation will need Closed Caption and longer duration slides)
8. Is it meant for international audiences?
(The text and Closed captions will need to be translated later, called “Internationalization”)
(You may also have to dub the audio tracks in the other language.)
9. Will you need a background for your slides?
(Corporate logo in a corner? Borders in corporate colors?)
Make a note of these settings, and use them in the next steps.
Prepare An Outline And Storyboard
Prepare the outline for your presentation.
First think of only the top-level topics, and make a bullet list, like this:
Point-1
Point-2
Point-3
Next, break down each topic into sub-topics. Repeat till you have visualized the project in sufficient
details. This will create a hierarchical outline for your presentation, like this:
Point-1
◦
Point 1-1
▪
▪
◦
Point 1-1-1-1
Point 1-1-1-2
Point 1-1-1-3
Point 1-1-2
Point 1-2
Point-2
◦
◦
Point 1-1-1
Point 2-1
▪
Point 2-1-1
▪
Point 2-1-2
Point 2-2
Point-3
Tip: Initially, when you are marshaling your thoughts on the subject, you will change your mind
very rapidly. This means you need to amend your outline rapidly without creating a mess. For
best results, use Microsoft PowerPoint (or LibreOffice Impress) in outline mode. This allows
you to move the topics up/down, insert new topics in the list, delete them, edit the text, etc.
This “top-down” method will save you from a writer's block and also help you stay focused on the
main subject, and prevent you from straying into unrelated topics.
Next, think what material you need for each of the lowest-level topics: images, icons, screenshots,
or a live screen-capture with annotation, etc. Make a note of this against each topic.
Creating A New Project> Planning A Project
30
ActivePresenter User Manual
Version 4.0
For best results, write the script for each topic (what exactly do you want to convey?)
Optionally, create a visual storyboard to bring more clarity. (Note: A Storyboard is more useful in
creating a video rather than for creating documents.)
Note that your preparations so far have nothing to do with ActivePresenter or any other tools!
Identify Your Sources For Presentation
Now that you are clear about your success factors and ready with an outline and storyboard,
the next step is to think about how to create the content for that presentation.
A major part of your presentation would be created by capturing the “live” action of the target
application as you interact with it.
In addition, you may already have some resources that can be readily used in your presentation:
PowerPoint presentations
Images/photos/screenshots
Video/audio clips
In your outline and storyboard, mark the places where each of these resources would be used.
This completes the visualization of your project.
Selecting The Content-Generation Method
Typically, only one of these sources plays a predominant role in your presentation:
1. Screen action of a target application captured “live”.
2. A PowerPoint presentation.
3. Slide show created from multiple images.
4. Start with a blank project, and add images, video clips and other ActivePresenter projects.
With this in mind, ActivePresenter lets you launch four different types of projects, each suited for a
particular content-creation approach. Later, in the Edit phase, insert the content of other types
wherever required.
However, if your project uses multiple types of resources in equal proportions, launch a different
project type for each type of resource. Finally launch a blank project and add all those projects into
it, to create the final presentation.
Regardless of the project type (i.e., primary method of generating the content), the resultant
presentation has to be edited using a common process, as described in the next chapter.
In this chapter, we will see how to launch each type of project.
When you launch ActivePresenter, a welcome screen appears in the ActivePresenter window as
Creating A New Project> Selecting The Content-Generation Method
31
ActivePresenter User Manual
Version 4.0
shown below:
At the bottom, there are links to the facebook and twitter sites of ActivePresenter.
The YouTube link takes you to the latest demo videos that explain how to use new features that
appear in each new version of ActivePresenter.
The screenshot shows highlight on two options (New Capture and New project). Both are for
creating a new project. The difference is, the New capture option starts capturing the screen,
whereas the New project option offers all four methods to choose from. By clicking on the New
Project link, you can launch any type of project.
We will see how to launch each type of project in the following sections.
Creating A Capture Project
This is the first (and most prevalent) content-generation method. This type of project captures
the “live” action on the screen while you are interacting with the target software. Typically, your
mouse and keyboard actions would also be captured.
In the flash screen, select the New Project option.
Immediately, the screen will vanish, to be replaced by a second window, as shown below:
Creating A New Project> Creating A Capture Project
32
ActivePresenter User Manual
Version 4.0
The different parts of the screen work as follows:
1. This section offers the four methods of launching a new project.
The “Capture” method is selected by default. Leave it selected.
2. In this section, give a name to the new project and select the folder to store it.
Remember that if you plan to insert any videos in this project, the disk must have enough space for
those videos apart from the captured project's size.
3. This section lists the four profiles of capturing:
Full Motion Recording (FMR), Record movie/Streaming Video, Smart Capture with FMR
and Smart capture.
At this time, we will select the FMR method (the appendix explains how to select or create an
appropriate profile for a given purpose).
Remember that you can change the capture mode even during recording.
The controls at the right allow you to edit these default modes and even create your own profiles.
Refer to appendix for details.
When you press OK, ActivePresenter now needs to know the area of the screen is to be captured
and other settings for the new project.
Since the actual capturing is just one step away, your target application must be running at this
time. (If not, launch it now, and re-size its window as desired.)
ActivePresenter displays the following window:
Creating A New Project> Creating A Capture Project
33
ActivePresenter User Manual
Version 4.0
The screen has three parts:
1. The Capture Area section allows you to specify a region on computer screen to capture.
2. The Audio Input section contains options for recording audio in the capture session.
ActivePresenter supports recording system audio and Microphone (or another audio input
device) simultaneously.
3.
On the very right of the window, a Start Capture button (the big red one) is provided, and
at the bottom-right corner of the window is the More Options... button.
Let us see how these sections work:
The Capture Area Section
This section include two main options are described below:
1. The Custom option allows you to select any rectangle region on screen to capture.
In this mode, a floating green rectangle shows the capture area. (The fancy cross-hair in the
middle is just a visual reminder that this is a target-seeker window.)
ActivePresenter will capture only the screen enclosed in this frame, and ignore the rest of the
screen. You can drag this rectangle around, and re-size it as desired by dragging on its handles
Creating A New Project> Creating A Capture Project
34
ActivePresenter User Manual
Version 4.0
(the tiny gray squares on its border).
You can specify an arbitrary size to capture by entering the width and height consequently into
Size spin boxes. You can also quickly set the capture size by using the Preset sizes button (the
down-arrow next to Size spin boxes). The Preset sizes button offers some most popular video
sizes. You can also add your preferred sizes to the list of preset sizes.
The Lock to application check-box allows you to select a running application window listed in the
underneath box to snap into the capture area. The Change Lock Mode button next to the list of
applications box provides two options to define the snap behavior. The Fit To Application option
will resize the capture area to fit into the window of application when the application is selected.
The Fit To Boundary option will resize the window of application to fit into the capture area when
the application is selected.
2. The Full Screen option provides a quick way to select the entire screen to capture. This
mode allows you to temporarily change the resolution of the screen before doing the
capture and automatically revert to the previous setting when you finish the capturing.
The Audio Input Section
ActivePresenter allows you to record the system audio and one other audio input device
simultaneously. Recording the system audio and Microphone at the same time is the most
common in practice.
Creating A New Project> Creating A Capture Project
35
ActivePresenter User Manual
Version 4.0
The Device box shows the list of audio input devices detected. If you want to record the audio from
your Microphone, let select it in this list. On some computer, selecting Stereo Mix, What U Hear,
Wave Out, Playback will also record the system audio but using Record System Audio check-box
is much easier.
The Volume slider displays the input audio signal level for the audio input device selected in the
Device box. You can also change the input volume level of selected audio input device with this
slider. For example, you are selecting the Microphone as the input device and speaking something
on Microphone to test. If the Volume slider displays the signal in red color, you should reduce the
input volume value, otherwise the audio quality will be low because the signal is clipped.
The Record System Audio check-box allows you to select recording the system audio while
capturing screen. If ActivePresenter cannot detect the way to record the system audio on your
computer, this check-box will be disabled. Note that on Windows Vista or later, the system audio
and audio recorded from selected device in Device box are independent from each other so you
can see two audio objects in recorded project. While in Windows XP, they are dependent so there
is only one audio object in recorded project.
You may also wonder why there is no volume slider for system audio. There are some reasons for
that. The volume of system audio can be changed easily by clicking the sound icon on the very
right of the taskbar so we did not add it to avoid flooding the user interface. In additional, you can
always change the volume of recorded audio in the editor by using the Adjust Volume tool in
Timeline.
The Start Capture and More Options... Section
The Start Capture button is a big button with the red color. Click on this button to start a capture
session.
The More Options… button provides the following options:
1. Select Audio & Video Settings to launch the Capture Profile Editor, where you can
change the settings for audio and video.
2. Select Calibrate Audio Input... to open the Calibrate Audio Input dialog which allows you
to turn the audio input volume automatically or manually.
3. If Show Recording Toolbar option is selected, ActivePresenter pops up a toolbar with all
controls necessary to start and stop the recording, and adjust the sound level. The large
counter shows the duration of the recording.
Creating A New Project> Creating A Capture Project
36
ActivePresenter User Manual
Version 4.0
Note: If this toolbar is placed inside the capture area, it is also captured, so please be
careful when placing this toolbar on screen. For this same reason, this toolbar should not
be used when you capture full screen.
Once you are satisfied with all settings, click on the Start Capture button (the big red button).
Now ActivePresenter hides in the system tray and captures the target application.
Work with the target application as usual.
After you have finished the action to be captured, click on the
action pops up the ActivePresenter recording pane.
button in the system tray. This
You have now the following options:
1. Click on the Pause button to pause the recording.
The idea is to skip recording for a while and resume later.
2. Click on the Stop button.
This ends the recording, and lets you edit the recorded project.
3. Click on the Discard button.
This aborts the current recording and discards the recorded project.
When you press the Stop button, ActivePresenter automatically enters edit mode. The editing
techniques are described in the next chapter.
Creating A Project From PowerPoint
Presentation
This is the second content-generation method, where slides from a PowerPoint presentation are
used instead of recording the target application.
We will again launch ActivePresenter, and on the welcome screen, select the third (New Project)
option.
A New Project window pops up.
Creating A New Project> Creating A Project From PowerPoint Presentation
37
ActivePresenter User Manual
Version 4.0
Enter the following details:
1. Select the Import PowerPoint option.
The right side of the window changes as shown above.
2. In this section, enter the project's name, and also select the folder where the project is to be
saved.
3. In this section, select the PowerPoint file from where the slides are to be imported.
Note that ActivePresenter cannot handle the odp files used by OpenOffice and LibreOffice.
Therefore, you will have to save these files as pptx first, and then import them into ActivePresenter.
Creating A New Project> Creating A Project From PowerPoint Presentation
38
ActivePresenter User Manual
Version 4.0
ActivePresenter pops up an Import PowerPoint Presentation window.
This window offers the following two options:
Import slides as backgrounds: Each slide turns into a background image for a
corresponding slide in ActivePresenter project. All the separate objects in the pptx slide will
be flattened into one image, and you cannot manipulate/animate them. But can add
annotations in the ActivePresenter project.
Process objects in slides: All the objects present in each slide are imported in the
corresponding ActivePresenter slide. You can manipulate these objects and then annotate
the slides in ActivePresenter.
Remember that by default, none of the slides are selected. If you do not select any slides, nothing
will be imported into ActivePresenter.
You can select multiple slides by pressing SHIFT and CTRL keys as you click on the slides. Or
else just click on the Select All button.
Once you are satisfied with the slide selection, click on the OK button.
This imports the pptx file into ActivePresenter.
The next step is to edit this project. The editing techniques are described in the next chapter.
Creating A New Project> Creating A Project From PowerPoint Presentation
39
ActivePresenter User Manual
Version 4.0
Creating A Project From Images
This is the third content-generation method, where images are used to create slides in
ActivePresenter, instead of recording a target application.
We will again launch ActivePresenter, and on the welcome screen, select the third (New Project)
option.
A New Project window pops up. Select the third (Image Project) option. Immediately the right side
of the window changes to show the relevant options, as shown below:
The various parts of this window work as follows:
1. The Image Project option
2. In this section, select a name for the new project. Also the folder where the project is to be
saved.
Keep in mind that a copy of all images will be saved in the project folder (and also any videos you
may add to the project later). The disk must have enough space to accommodate these items.
3. In this section, select a size for the project's canvas. The Preset sizes button offers
multiple popular video sizes (including the VGA, 720p and 1080p).
While selecting the canvas size, keep in mind the size of images you would be using. If the canvas
is too small for the image, the image will be clipped.
You can re-adjust the canvas size after inserting all the images. (ActivePresenter displays the size
of all images, which makes it easy to find the largest height/width and set the canvas size
accordingly.)
Creating A New Project> Creating A Project From Images
40
ActivePresenter User Manual
Version 4.0
4. This section lets you insert images.
First click on the button to insert an image. This pops up a browse window. You can navigate to
the desired folder and select an image file.
The list of all images appears in the left pane, as shown. Note that ActivePresenter displays the
size of each image. This lets you adjust your canvas size to fit the largest of the images (to avoid
clipping).
To remove any image from the list, click on it and then click the
button.
To change the order of the images, select any image and then click on the
move it up or down in the list.
or
buttons to
ActivePresenter shows a preview of the selected image in the right pane. You can flip or rotate the
image using the four buttons at the bottom of the right pane.
If you select the Use images as objects option, each image will be inserted on a different slide as
an object. But if you do not select this option, then ActivePresenter will place each image as the
background of each slide.
Click the OK button. A new project is launched, with all the selected images.
The next step is to edit this project. The editing techniques are described in the next chapter.
Creating A Blank Project
This is the fourth content-generation method, where you get a blank canvas.
Now wait a minute! Why would you need a blank project (without any content)?
The answer is, to create a “hybrid” project, that has a bit of everything: Slides from other
ActivePresenter projects, images, video/audio clips, etc.
To launch a blank project, launch ActivePresenter, and in the welcome screen, select the third
(New Project) option.
Creating A New Project> Creating A Blank Project
41
ActivePresenter User Manual
Version 4.0
A New Project window pops up. Select the fourth (Blank Project) option. Immediately the right
side of the window changes to show the relevant options, as shown below:
The various sections of this window work as follows:
1. The Blank Project option
2. In this section, select a name for the new project. Also the folder where the project is to be
saved.
Keep in mind that you are likely to insert a wide variety of objects (images, video clips, etc.) in a
blank project. All these files will be saved in the project folder. The disk must have enough space to
accommodate these items.
3. In this section, select a size for the project's canvas. The Preset sizes button offers
multiple popular video sizes (including the VGA, 720p and 1080p).
Keep in mind the largest item you would be inserting in the project, and adjust the canvas size
accordingly.
4. This section lets you insert any number of slides. This is just for convenience: You can add
new slides at any time later.
Click the OK button to launch the project.
Since this type of project does not have any content, all content has to be added using editing
techniques described in the next chapter.
Creating A New Project> Creating A Blank Project
42
ActivePresenter User Manual
Version 4.0
Saving A Project
You can save a project by clicking on the
Project>Save menu option.
button, or using the CTRL+S shortcut, or the
Note that when you save a project that was created with an older version, ActivePresenter
automatically saves it in the new format. Such files cannot be opened with the older version of
ActivePresenter. However, most users use the latest version of ActivePresenter, so usually this is
not a problem.
ActivePresenter warns you when you try to save such a project:
Closing The Project Without Saving
When you try to close a project, ActivePresenter checks if there are any changes vis-a-vis the last
saved version. If so, it will alert you whether you want to save the changes made to the project.
Just select No.
Shrinking A Project
Often a project has many unused resources, including some new resources that you create
during the course of the project.
You may choose to get rid of those unused resources and reduce the size of the project.
Use the Project > Shrink Project menu option.
A window pops up:
Creating A New Project> Saving A Project
43
ActivePresenter User Manual
Version 4.0
This sample shows that there are three unused resources.
You can select the Delete all unused resources check box and click on the Shrink button. This
removes the unused storage space and reduces the file size on disk.
You also have the option to manually check all the unused resources before deciding whether to
delete them. In fact, if this is a new resource created within this project, you may want to export it
as a file, to create an asset for yourself. In that case, click on the Delete Manually button.
This pops up another window:
You can also click on the Select unused resources
button (1). ActivePresenter will select all
such resources (2) for you. Check them out visually and decide whether you would like to save
(export) them.
Pressing the
Pressing the
button in the Audio and video tab exports all selected audio/video
resources at once.
Remember that if you don't export any unused resource, it will be lost when you shrink the
project.
button in the Image tab exports all selected images at once.
Creating A New Project> Saving A Project
44
ActivePresenter User Manual
Version 4.0
Opening An Existing Project
You can open an existing project in various ways: Press CTRL+O, or use the Project>Open
menu, or click on the
button in the toolbar.
You can also click on the Open option on the flash screen that appears when ActivePresenter is
launched.
All these options allow you to browse your folder system to select a project file.
Opening Multiple Projects Simultaneously
You can open multiple projects in ActivePresenter. By default, ActivePresenter shows only the last
opened project. However, you can use the options in the Window menu to view the projects in
cascade mode, horizontally tiled mode or vertically tiled mode.
The tiled modes are useful if you want to copy-and-paste slides from one project to another.
You can also minimize any/all projects by clicking on the Minimize
button of the Project
Window (not of the ActivePresenter window). The project collapses to a small icon, as shown
below:
You can drag this icon anywhere on the screen.
If you have opened and minimized multiple projects this way, their icons would be floating in the
ActivePresenter window.
If you want to line up all icons in one place, use the Window>Arrange icons menu command.
(Note that the icon for the current project looks darker than the other icons.)
Now you can restore any of these project window by clicking on its
project window by clicking on its
button.
Creating A New Project> Opening An Existing Project
button, or maximize the
45
ActivePresenter User Manual
Version 4.0
Editing A Project
The previous chapter describes how to create a new project by capturing an application, or by
importing slides from PowerPoint file, or by importing images. (As discussed, each “type” of project
refers to what kind of content is added to the project.) Finally we saw how to combine these
different types of projects into a blank project.
At this point, the captured content is “raw”, and usually not presentable to your target audience.
In fact, the content may not be even complete, because each project type can only capture only
one type of content. You have to add the other types of content to complete the project.
The real value-addition comes only when we edit the project to add annotations (shapes,
audio/video clips, voice narration, closed captions, etc.), and (optionally-) make the presentation
interactive.
All this is done in the edit phase of the project. These editing techniques are common for all types
of projects.
The following sections show how to edit a project.
Overview Of The Editing Process
All editing is done in the Edit Window, which pops up automatically when1. You finish creating a new project, or2. You open an existing project.
Therefore, first let us familiarize ourselves with the Edit window and then see the actual editing
process.
Editing A Project> Overview Of The Editing Process
46
ActivePresenter User Manual
Version 4.0
The Editing Window
The Edit window is shown below:
The window has eight interlinked areas. If you carry out any activity in one area, the result is
reflected instantly in the other areas (as applicable).
The window works as follows:
1. The menu system provides all the commands that are needed for editing purpose.
2. The toolbars provide buttons for the frequently used commands.
3. The Resources pane shows the global and project-level resources.
To add any resource to the current slide, drag-n-drop it from here into the Canvas pane (4).
Editing A Project> Overview Of The Editing Process
47
ActivePresenter User Manual
Version 4.0
4. The Canvas pane shows the slide. (It acts like a canvas for painting, and hence the name.)
All of your spatial editing is done here visually: It shows the captured scene, and allows you to add
the other annotation/interaction objects as required.
You can also adjust the relative positions of all items in horizontal and vertical directions. You can
also make a stack of objects (where objects partly/fully overlap) to create special effects.
5. The Slides pane has two tabs, which show two different views of the slides:
In the Thumbnails tab, miniature view of the slides is shown. This area acts as slide
sorter (you can drag-n-drop slides to shuffle their order).
The duration of each slide is marked in the top corner of the thumbnail (1) in mm:ss or
hh:mm:ss format.
The current slide is highlighted in green (here, slide#2).
When you insert specific annotation/interaction objects, this pane shows overlays at the
bottom of the slide (2).
In the Titles tab, you can provide the titles (names) for each slide. This lets you
visualize the outline of the entire presentation.
6. The Timeline pane shows the slide against time axis. Its main function is to show all the
objects against time, and let you adjust the entry and exit points of all the objects.
In fact, the Canvas pane always shows the slide at a particular moment that you select on the
Timeline.
Timeline also lets you play the current slide to check the effect of your adjustments. You can play
the slide for only a selected portion of the Timeline to focus on what happens during that slice of
time. You can also play the slide in loop mode (endless play).
You can play the slide and record your voice in real time.
The Using The Timeline appendix explains the functioning of Timeline in detail.
7. The Properties pane lets you edit all the physical and behavioral properties of the object
that is selected in either the Canvas Pane or the Timeline Pane.
When you select any property, its explanation appears at the bottom of the pane.
8. The Status Line shows the current state of the project, and the zoom level currently used
in the Canvas pane.
The Editing Process
The project is edited in three distinct steps:
Editing A Project> Overview Of The Editing Process
48
ActivePresenter User Manual
Version 4.0
1. Project-level editing: Since the project is made up of slides, we essentially deal with slides
in this step – Sort the slides in the correct order, remove redundant slides, get slides from
other projects, name all slides, and add new slides to bridge a gap in the presentation.
This is the stage where you populate a blank project by inserting slides from other project types.
This is also the stage where you can insert the non-predominant type of content in any project (for
example, in a capture type project, you can add slides from PowerPoint or images).
2. Slide-level editing: In this step, we fine-tune each individual slide. Since a slide is made
up of objects, we essentially deal with objects in this step – Insert objects (shapes, text,
interactions, video clip, audio clip, highlight, closed captions, etc.), and add voice over
(commentary).
Next we adjust the properties of each object, both in the Canvas pane and also in the Properties
pane.
Then we preview the slide, and adjust the objects on the Timeline (adjust the timing of its entry/exit
and also manipulate its sequence amongst all objects of the slide).
Finally we play each slide separately and optimize it by adjusting all objects one final time.
3. Advanced editing:
Making the project interactive: This involves inserting questions, and also adding
actions that deal with correct and incorrect responses from the viewer.
Making the project accessible: This means making the project available to as
many people as possible. More specifically, we edit the project so that viewers with
disabilities can perceive, understand, navigate, and interact with the project output.
Localizing the project: Here, we adapt the project to a particular language, culture,
and desired local look-and-feel.
The following sections provide more details of these steps.
Remember that if you commit any mistake, you can reverse any number of steps by pressing
CTRL+Z for the required number of times. And in case you have pressed CTRL+Z too many times,
you can cancel them by pressing CTRL+Y (called “re-do” operation).
Editing A Project> Overview Of The Editing Process
49
ActivePresenter User Manual
Version 4.0
Project-Level Editing
As mentioned before, this is the start of the edit cycle, in which we take a bird's eye view at the
project and make coarse adjustments.
Naming The Slides
Before you can do anything, you must name the slides based on their function. This helps in the
next step of sorting the slides, and later inserting navigational controls (for example, to enable
jumping to a particular slide, etc.).
To name a slide, follow these steps:
Editing A Project> Project-Level Editing
50
ActivePresenter User Manual
Version 4.0
1. In the Slides pane, select a slide by using either Thumbnails or Titles tab.
2. Go to the Properties panel and click in the Name field and type a new name. You can also
use some simple HTML tags (<b>, <i>, <u>, <span>…) to format the name of slide. Press
ENTER to confirm the change.
Editing A Project> Project-Level Editing
51
ActivePresenter User Manual
Version 4.0
3. If you want to format the name of slide in a visual way, you can click the button on the right
of the Name field to launch the HTML editor. The editor contains the most common
formatting functions to change the name of slide. After editing, click OK to confirm the
changes.
Note that you can select multiple slides to rename at once. To rename a single slide, you can also
double-click the slide in the Titles window to launch the HTML editor.
Sorting The Slides
Now that the slides are named after their function, it is easier to recognize them in a list.
In the Slides pane, switch to Thumbnails tab. Here, you can drag-n-drop any slide to a new
position.
As you drag the slide over the other slides, they move aside to make space for it. If you release
LMB, the slide will drop in the gap below.
Editing A Project> Project-Level Editing
52
ActivePresenter User Manual
Version 4.0
The current slide is highlighted in green, as shown above. Also note that while a slide is dragged, it
retains its original sequence number (in this example, 2). In case you change your mind, this
number will help you remember where to drop it back.
Once in a while, switch to the Titles tab to check if all slides are ordered correctly.
Note that the Thumbnails tab provides an option to change its view mode as shown in two figures
below. The default is one column mode in which the thumbnails of slides automatically resize to fit
the available width. The other is the fixed size mode in which the thumbnails have a fixed size and
are displayed in several columns depends on available width.
Editing A Project> Project-Level Editing
53
ActivePresenter User Manual
Version 4.0
Inserting Slides
At this stage, you are likely to find that the presentation has some gaps in it. ActivePresenter
allows you to insert additional slides using the following techniques:
1. Insert blank slides and then insert any desired elements in them
2. Create new slides by fresh screen-capturing
3. Create new slides by importing images
4. Copy slides from another ActivePresenter project.
(Either an archived project, or a project where you inserted content of different type.)
5. Create new slides from a PowerPoint file
These options are described in depth below.
Inserting A Blank Slide
A blank slide acts as a blank canvas (a placeholder) for other objects.
For example, if you want to add an image, video or audio clip in a project, you need a slide.
Now this slide can be an already existing slide (one that already contains other objects). But
usually objects like a video clip do not share screen space with other objects (unless you want to
show the video in a part of a screen, like Picture-in-Picture). Therefore you need a blank slide.
Some important uses of a blank slide are as follows:
1. Make the title of the presentation
Editing A Project> Project-Level Editing
54
ActivePresenter User Manual
Version 4.0
2. If you have divided your presentation in different chapters/topics, make title of the chapters.
3. In a long presentation, insert “coffee break” slides.
4. At strategic points during the presentation, insert blank slides to allow audience
participation.
5. At the end of the presentation, insert an “Any questions?” slide.
6. The final “Thank you!” slide, with your corporate logo and address.
7. Insert an external video
8. Insert two comparative videos side by side and run them in parallel
(e.g. a “before vs. after” comparison, a “wrong vs. right” demo)
To add a blank slide:
1. Click on the
button in the main toolbar, or use the Slide>Blank Slide menu option. The
new slide is inserted after the current slide. ActivePresenter keeps displaying the current
slide. You may switch to the new slide manually.
2. In the Slides pane, right click on an existing slide. From the context menu that appears,
select the New blank slide option.
This method works in both Thumbnails and Titles tabs of the pane.
A blank slide has the following properties:
Property
Name
Default
value
Blank
Remarks
Title of the slide.
When planning navigational jumps amongst slides, their titles are very
useful. Base it on the content of the slide.
Description
Blank
Your comments about the content. While exporting the project to
document formats (PDF, MS Word, Excel, PowerPoint), you can
choose whether to export slide description. For example, if you plan to
present the slides personally, you can enter your speech associated
with the slide in this field (equivalent to the “Notes” field in
PowerPoint).
Group Title
Blank
For creating groups. Slides with the same group title will automatically
belong to the same group. (ActivePresenter does not have a separate
mechanism to define slide groups.)
Take care in entering names: A small spelling change will put the slide
in a different group! (White spaces also count.) It's better to select
several slides and change group title at once in Properties pane.
This is used if you export the project to document formats (PDF, Word,
Excel) in compact mode. In compact mode of export, only one image
is exported for each slide group.
Background
Image
None
Slide background in ActivePresenter is mainly used for the image of a
step (where to click, what key is pressed) in interactions chain when
Editing A Project> Project-Level Editing
55
ActivePresenter User Manual
Version 4.0
creating software tutorials. A background image can also be used for
other purposes, such as show a corporate logo throughout the
presentation, set different backgrounds for different segments/subjects
of the presentation, show a theme, etc.
Click button to edit the background image.
Background
Position
0,0,0,0
There are four parameters here:
1. x-offset from top-left corner (default=0)
2. y-offset from top-left corner (default=0)
3. Width of the background image
4. Height of the background image
Changing the width and height scales the original image.
Background
Color
Project's The part of canvas that is not occupied by the background image
settings takes this color. By default, all slides of a project has the same color
(set by the project's settings menu). But you can change the
background color of any slide. Click and select from the available
palette of colors.
Duration
5000 ms You can set the duration of each slide in milliseconds. This duration is
represented as a slide bar in Timeline.
Note that you can also set the duration of the slide on the Timeline (by
moving the red tick on slide bar).
This is only the default value to start with: If any object in a slide ends
after this time limit, ActivePresenter automatically extends that slide's
duration to display all objects.
Transition
None
This is the visual effect when the presentation enters this slide.
Select from None, Fade In, Fly In and Wipe.
Accessibility
Auto Label
Define properties that make the slide accessible by viewer with
disabilities when viewing the project output.
If this property is selected, accessibility text will be generated
automatically from the slide name and slide description.
Name
Accessibility name of the slide. Screen reader will read this text aloud
when the slide appears.
Description
This provide more information about the slide. Screen reader will read
this text aloud when the slide appears, after reading the accessibility
name.
Editing A Project> Project-Level Editing
56
ActivePresenter User Manual
Version 4.0
Inserting New Slides By Fresh Capturing
This technique is mainly used when your primary project was created using either from
PowerPoint or Images, and now you want to add complementary slides by capturing the “live”
action on screen while operating a software.
This is equivalent to launching a new Capture project, but with the difference that the newly
captured slides are inserted in the current project, rather than opening up a new project.
The new slides from this instant capture project are inserted after the current slide.
The procedure is same as launching a new Capture project.
Inserting Images As Slides
This technique is mainly used when your primary project was created using either from
PowerPoint or Capturing; and now you want to add complementary slides by inserting images as
slides.
This is equivalent to launching a new Image project, but with the difference that the newly created
slides are inserted in the current project, rather than opening up a new project.
The new slides from this instant Image project are inserted after the current slide.
The procedure is same as launching a new Image project.
Inserting Slides From Another Project
This technique is mainly used when you have launched a Blank project, or if you want to add
complementary slides in an existing project of any type.
Often the slide you want are already available in other ActivePresenter projects. All you need to do
is to copy those slides and insert them in the current project at the appropriate places.
Here is the procedure:
1. While the current project is open, open the another ('donor') project.
2. Use the Window>Tile Vertically menu option. Now ActivePresenter displays both projects
side by side.
If you prefer, you can use the Cascade or Tile Horizontally options.
3. You are going to use the Slides pane of both project. First, switch to Thumbnails tab in
both projects.
4. Now click on the desired slide from the other project and press CTRL+C (or use the
Edit>Copy menu). This places the selected slide on the clipboard.
Instead of selecting a single slide, you can select multiple slides by using SHIFT+Click and/or
CTRL+Click.
5. Now switch to the “home” project, and in its Slides pane, click on the slide after which you
want to paste the copied slides.
6. Press CTRL+V (or use the Edit>Paste menu).
This pastes the slide after the current slide in the “home” project; along with objects, background,
slide properties and all resources that are referenced by the “source” slide and its objects.
Note that the imported slides and their objects always keep their original size and position (they are
not rescaled to match the home project).
Editing A Project> Project-Level Editing
57
ActivePresenter User Manual
Version 4.0
If the donor project and the home project do not have the same canvas size and/or resolution,
some imported objects may lie outside the slide canvas. Therefore always check all imported
slides and edit them as necessary.
In a future version of ActivePresenter, three options will be provided: stretch, crop, and keep
original size.
7. Repeat steps 2-6 for other slide(s).
8. Close the 'donor' project.
Repeat this with other 'donor' projects to import more slides from them.
Inserting Slides From A PowerPoint Presentation
This technique is mainly used when your primary project was created using either from Images or
Capturing; and now you want to add complementary slides by inserting a PowerPoint
presentation.
This is equivalent to launching a new PowerPoint project, but with the difference that the newly
created slides are inserted in the current project, rather than opening up a new project.
The new slides from this instant PowerPoint project are inserted after the current slide.
The procedure is same as launching a new PowerPoint project.
Removing A Slide
To delete a slide, select it in the Slides pane (either in the Thumbnails or in the Titles tab) and
press DEL.
For deleting, you can also click on the
Delete menu option.
To delete multiple slides at a time, select those slides by using CTRL+Click and/or
SHIFT+Click, and then delete them.
button in the main toolbar, or use the Edit>
There are a number of reasons for discarding a few slides:
1. The presentation is too long.
2. Some slides repeat/paraphrase/stretch the same contents.
Remember: In the world of presentations, less is more!
3. Some slides are irrelevant for the current presentation.
But always remember that you need not throw them away on a permanent basis. Indeed, you may
find them useful on another occasion!
Here are a couple of tricks to solve this dilemma:
1. Save a backup copy of project, and then start deleting the slides. Effectively, you will be
creating two different versions of the same presentation: one full version, and a few
abridged versions.
If you want to follow this approach, it would be best to do this at the very end of the project, where
you have edited all slides. Otherwise you will end up editing the same slides for each version.
2. Create a master repository project that holds all slides on a given subject.
As you create new content, keep adding it to the master project. Reorganize the slides from time to
time.
Editing A Project> Project-Level Editing
58
ActivePresenter User Manual
Version 4.0
Whenever you need to create a new project, start by taking a copy of this master project, and then
trim it ruthlessly.
Editing Project Properties
Project properties fall in two categories:
1. Properties of the project, such as size of the canvas, total number of slides and the total run
time for the presentation, the size of the project file, the date on which the project was
created and last modified. This information is provided by ActivePresenter and is noneditable.
2. Properties that you can edit, such as the author's name, and any remarks that you may
wish to attach to the project's file (such as client name, conference detail, the type of
outputs for this project, etc.)
To see the project properties, use the Project>Project Properties... menu option.
The following window pops up:
You can do the following:
1. Enter a meaningful project name
(This may be a combination of subject and client. You should define your project-naming
Editing A Project> Project-Level Editing
59
ActivePresenter User Manual
Version 4.0
scheme beforehand)
2. Enter description for the project.
3. Click on the triangle, and from the palette widget that appears, select a color. This changes
the background color for the slides.
4. Specify the language of editing project. ActivePresenter will use the corresponding
translation of selected language to display in the output (name of elements of toolbar and
messages in Flash and HTML5 Simulations) if the language is supported in
ActivePresenter. For other languages, you can still modify the texts in output by using
Output Language Editor.
The Project Language is also important if you want to support the language which has
special layout or representation such as the right-to-left languages (Arabic, Hebrew…).
This is global setting that affects all slides, but if a slide already has a background image, it won't
be affected.
On the Author tab of this window, enter all your details.
You can also enter a password for opening the project file. Once you set the password, you can
only open the file if you enter the password.
This is useful if you have to leave the project file on a public computer where others may fiddle with
it.
Editing A Project> Project-Level Editing
60
ActivePresenter User Manual
Version 4.0
Note that this feature is not meant to provide a bullet-proof security. As with any security system,
given enough time, someone will manage to break in.
Editing A Slide
So far we have collected all the slides we want; and more importantly, discarded the ones we don't
want.
This is the right time to fine-tune each slide, by
Adding objects to the slide and editing and arranging them
Adding a narration (voice-over)
Inserting a slide background (e.g. with corporate logo, or chapter theme, etc.)
Occasionally you will realize that you still need a few slides here and there. This is natural. Just go
back to the previous step to add those slides and then return to this step.
Let us see the details.
Inserting Objects
ActivePresenter allows you to annotate the slide by adding a large variety of objects.
Appendix Objects provides the details of each type of object, and how to use it.
Arranging The Objects
After inserting the objects in a slide, you will have to arrange them in some logical manner. For
example, you may want to create a flowchart out of shapes and arrows. Or add annotations to a
captured video (see examples below).
This is achieved by moving the objects around in the canvas and placing them exactly where you
want. For example, in the examples above, I want all shapes in my flowchart to be centered on a
vertical line. I want to place a red circle around a minaret of the Taj, and a call out to point at the
Editing A Project> Editing A Slide
61
ActivePresenter User Manual
Version 4.0
dome of the Taj.
You may also have to place some objects overlapping over others (typically, all annotations
overlap on a video or image).
Although this free placement generally works, you will often need to arrange the objects accurately.
For example, to create a flow-chart.
You may also need to select multiple shapes and make their sizes uniform.
ActivePresenter offers you the following tools:
1. Align (snap) objects with each other
2. Aligning all selected objects with a reference object
3. Resizing all selected objects to the size of a reference object.
4. Changing the layers (z-order) of objects
The following sections show how this is done.
Basic Movement Of Objects
You can move objects individually or in groups.
To move an individual object, you have the following options:
1. Drag the object with mouse, and release the LMB when the object is placed properly.
2. Click on the object. Now move it by using the Arrow keys.
Pressing CTRL at the same time accelerates the movement by a factor of 10.
To move a group of objects together, you have to first form a group. For this, draw a lasso with the
mouse or CTRL+Click on all objects (if you CTRL+click on a selected object, it gets deselected).
Now move the group just like you move an individual object (see above).
Editing A Project> Editing A Slide
62
ActivePresenter User Manual
Version 4.0
Aligning Objects With Each Other (Snapping)
ActivePresenter has a snap mode for the Canvas pane.
You can toggle this mode by using the View > Snapping > Canvas snapping menu option.
When this mode is turned on, when the dragged object (or group of objects) come close to an
edge, ActivePresenter shows an orange line connecting the dragged object/group and the target
object. The dragged object/group will also make a tiny jump to align itself with this orange line.
If you drop the object/group, it aligns perfectly with the reference edge. You may also choose to
continue dragging the object/group.
In the following example, the green diamond (B) is being dragged. We will see what happens when
it comes in the vicinity of the yellow rectangle (A).
As shown below, when the diamond comes close to the rectangle, ActivePresenter shows an
orange line, and snaps the diamond to it.
Note that ActivePresenter aligns both objects by their edges. Depending on which edge is nearby,
ActivePresenter will show a horizontal line or a vertical line, or both horizontal+vertical lines.
Once the objects snap to a guiding line, you can slide the dragged object along this line. Despite
small shakes of your hand, the object will stay locked to the line.
If you are not looking for this particular alignment, just ignore this present orange line and continue
dragging. As soon as a threshold distance value is crossed, the orange line will vanish.
When the snap mode is on, you can press CTRL during the dragging operation to temporarily turn
the snap mode off.
Editing A Project> Editing A Slide
63
ActivePresenter User Manual
Version 4.0
Aligning Objects With A Reference Object
The last object selected is the reference object. This object does not move: Rather, all the other
objects move (or re-size) to align to this object. Therefore, always be careful and select the
reference object at the end.
You can click one of the currently selected objects (without holding CTRL) to set it as reference
object.
Icon
Function
The top of all objects will get aligned vertically with the top of the reference object.
Their horizontal position will not be affected.
The center of all objects will get aligned vertically with the center of the reference
object. Their horizontal position will not be affected.
The bottom of all objects will get aligned vertically with the bottom of the reference
object. Their horizontal position will not be affected.
The left side of all objects will get aligned with the left of the reference object. Their
vertical position will not be affected.
The center of all objects will get aligned with the center of the reference object.
Their vertical position will not be affected.
The right side of all objects will get aligned with the right of the reference object.
Their vertical position will not be affected.
The entire group of object will move to the center of the canvas vertically.
The relative position of the group-members will not be changed.
The entire group of object will move to the center of the canvas horizontally.
The relative position of the group-members will not be changed.
Make the horizontal spaces between selected objects equal.
(This command works only when more than two objects are selected.)
Make the horizontal spaces between selected objects equal.
(This command works only when more than two objects are selected.)
Resizing Objects To A Reference Object
The following commands also work on a group of objects (again, the last-selected object is the
reference object).
Icon
Editing A Project> Editing A Slide
Function
64
ActivePresenter User Manual
Version 4.0
The height of all other objects is adjusted to match the height of the reference object.
The width of all other objects is adjusted to match the width of the reference object.
Both height and width of all other objects are adjusted to match the height and width of
the reference object, respectively.
Setting The Z-Order Of Objects
Imagine the slide canvas to be a horizontal surface (like a table top), where all the objects are
placed one by one. When we place any object, it covers all the previously added objects if they
happen to lie under it partly or fully.
This vertical order of object-placement is called z-order (named after the z-axis, which is pointed at
the viewer in this virtual 3D world).
We can avoid overlapping of objects by spreading out the objects in the slide.
However, sometimes we actually want to place the objects with partial/full overlap; to create some
special effects. We may even apply shadows on some objects to stress that they are on top of the
other objects.
Sometimes, it is difficult to gauge which object is at the top (especially when they are not
overlapping). Just keep in mind that the Timeline always lists the objects by their order in the stack.
Editing A Project> Editing A Slide
65
ActivePresenter User Manual
Version 4.0
In the example above, the diamond is at the top of the stack, and so the Timeline puts it at the top
of the list. The Cross is at the bottom of the stack, so Timeline lists it last.
This fact will help you in assessing the z-order of objects even when they are not placed
overlapping.
You can even select the object from the Timeline itself (click on the name or on the Time Bar of the
object).
The following commands change the stacking order:
Icon
Shortcut
Function
CTRL+Home
Place the selected object at the very top of the stack.
CTRL+PageUp
Send the selected object higher by one level in the stack.
CTRL+End
Place the selected object at the very bottom of the stack.
CTRL+PageDn
Send the selected object lower by one level in the stack.
Editing A Project> Editing A Slide
66
ActivePresenter User Manual
Version 4.0
Removing Objects
To remove an object, follow this two-step procedure:
1. Select the object, by any one of the following methods:
In the Edit pane, click on its outline, or-
In the Timeline pane, click anywhere on its row.
2. Press the DEL key on the keyboard, click on the
Edit > Delete menu option.
button in the main toolbar, or use the
Editing Objects
The objects can be edited in different ways:
1. Change the physical properties
(position on screen, size, fill/outline colors, transparency, shadow, etc.)
2. Change the text inside the object
(especially text in questions, Text caption, closed caption, etc.)
See Appendix Objects for details.
Moving The Objects In Timeline
In a presentation, the timely entry and exit of each object is all-important.
Therefore you must adjust the time bar of each object very carefully, and play the slide repeatedly
to check whether the overall effect is exactly as you wanted.
Refer to the Using The Timeline appendix to know how to manipulate the objects on the Timeline.
Slide Background
Slide background is mainly used for storing the main screenshot of each step when creating
software tutorials.
The slide background can also be used to create a corporate identity on all slides (typically, in the
form of corporate logo and/or a pattern that has corporate colors).
It can also be used to set apart different groups of slides. For example, your presentation may
have multiple topics, or you may have a multi-session training program. In such a case, you can
use a different background image for each topic/session.
Find And Replace Text
To locate a word or phrase in slides (text in objects) and then replace it with another word or
phrase, do the following:
1. Click the Edit menu, then click Find to find or click Replace to find and replace the text.
You can also use the keyboard by pressing Ctrl + F and Ctrl + H for these purposes.
2. In the Find what box, enter the text you want to find and replace.
Editing A Project> Editing A Slide
67
ActivePresenter User Manual
Version 4.0
3. In the Replace with box, enter the text you want to use as the replacement.
4. In the Look in list, specify the scope to search, either Selected Slides or All Slides.
5. Do one of the following:
To search for the next occurrence of the text, click Find Next.
To replace the currently selected occurrence of the text, click Replace.
To replace all occurrences of the text, click Replace All.
To cancel a search in progress, click Close.
Removing Objects From Multiple Slides
Sometimes you realize that you have made the same mistake in multiple slides.
For example, while capturing the target application, you chose to record sound, but the final project
does not need sound, or it got recorded poorly, and now you would like to remove the sound object
from all slides.
Rather than laboriously selecting each slide and deleting the sound, you have a shortcut: Select
the Slide>Delete Objects from Slides... menu option.
Editing A Project> Editing A Slide
68
ActivePresenter User Manual
Version 4.0
A window is launched:
It has three sections, which are to be used as follows:
6. What to delete:
This section contains the master list of all objects. Select the ones you want to delete.
7. Where to delete:
In this section, identify the slides where you want this mass destruction to happen. (Be
careful! You could delete objects from good slides as well!)
In case you want to specify certain slides only, separate their numbers with comma. A hyphen
indicates range. For example, the screenshot shows the range 3-6 (slide # 3, 4, 5, and 6).
8. Additional Option:
Check this if you also want to delete objects which have been set to show over multiple
slides, normally these are background music or corporate logo....
Inserting Objects Into Multiple Slides
This is the opposite of the situation described above: You may realize that multiple slides are
lacking a particular object.
To insert an object in multiple slides at once, select the Slide>Insert Objects to Slides... menu
item.
Editing A Project> Editing A Slide
69
ActivePresenter User Manual
Version 4.0
The following window opens:
This is a two-step process:
1. The Object Type drop-down list offers all available types of objects. Select the type of
object to be inserted.
Then click the Settings... button to adjust the properties of the selected object type.
2. Select the slides in which to insert the object.
In case you want to specify certain slides only, separate their numbers with comma. A hyphen
indicates range. For example, the screenshot shows the range 3-6 (slide # 3, 4, 5, and 6).
Note that the inserted object will have its default properties in all slides. You will have to edit the
properties of the object in each slide separately.
Changing Object Style In A Batch-Operation
You can change the style of any object type.
ActivePresenter also has a batch-operation to find and replace any given object style with another.
Editing A Project> Editing A Slide
70
ActivePresenter User Manual
Version 4.0
The window has two parts:
1. Select the style to be replaced, and the style which should take its place.
You will need to define the replacement style in advance.
2. Select the slides where you want this effect.
You can select all slides, current slide or specific slides.
The check box at the bottom includes objects that are shared over multiple slides.
Changing Object Transitions In A Batch-Operation
The transitions of an object is a matter of personal taste. Therefore, you may have set the
transitions according to your taste. Now suppose your boss does not like it. How to change them
now?
Worry not! ActivePresenter helps you to change the transition effects in all objects (or only for the
selected objects) in one stroke, using a batch operation.
Use the Edit>Change Transition Effects for Multiple Objects menu option.
A window opens:
Editing A Project> Editing A Slide
71
ActivePresenter User Manual
Version 4.0
It has three sections, which are to be used as follows:
1. Select the transition effects (entry and/or exit) from the drop-down list, and set the timings
2. Select the objects to which this transition is to be applied.
The Select all check boxes at the end allow you to select and deselect all objects in each
list.
3. Select the slides where you want this effect. You can select all slides, current slide or
specific slides.
Remember that you can use this window several times to apply different settings to different sets of
objects.
Editing A Project> Editing A Slide
72
ActivePresenter User Manual
Version 4.0
Undo
If you make a mistake, you can reverse the effect of the last step by pressing CTRL+Z (or by
selecting the Edit>Undo menu option).
In fact, you can undo any number of steps by repeating this.
Note that you cannot undo a particular past step selectively (for example, you won't be able to
undo only the fourth-last step.)
Redo
If you try to Undo several steps, you are very likely to Undo a step that is actually needed. But
typically you will realize this mistake only when you see results that you didn't expect.
One option is to repeat what you did last time. But that requires too much of effort. Besides, you
may not achieve the exact same result as the last time.
So a better option is to retrace the last step that you rolled back. That's why it is called “Redo” (Redo = Do it again).
You can Redo all the steps that you just rolled back, provided that you don't do anything after that
last Undo operation: If you take a new step just after rolling back (=Undoing) some steps, then the
Redo queue is emptied.
Previewing A Slide
Now that we have inserted all objects and slide background, the slide is ready for presentation.
But the proof of the pie is in the eating. If the slide does not look good when played, we need to
edit it further.
So play the slide by pressing the spacebar or clicking on the
on editing various parts till the slide plays perfectly.
button on the Timeline pane. Go
If everything goes well, move on to the next slide.
Adding A Voice-over/Commentary (or Dubbing)
Many presentations contain a voice over (commentary by an unseen person). This technique is
mostly adopted for documentaries.
ActivePresenter has a special recording feature that allows you to add a voice over.
You can also use this feature for dubbing your presentation (adding the commentary in a different
language than the original).
A good sound track is critical for your presentation.
Audio without a sound track (or with a poor audio) would create a very bad impression. Therefore,
you must take utmost care of your sound track.
Pay special attention to these five areas:
1. Choosing a quiet and comfortable location
2. Eliminating (and preventing) any disturbing sounds
Editing A Project> Editing A Slide
73
ActivePresenter User Manual
Version 4.0
3. Selecting your recording equipment
4. Setting up your equipment correctly
5. Tips for recording
Let us see some details for each:
Choosing A Quiet And Comfortable Location
Record in a quiet location. Avoid recording in a public/shared location.
If possible, you should be alone in the recording room, with complete silence prevailing. Place a
"Silence please!" notice outside your door to let others know that you are recording.
Avoid using a large bare room, as it produces echos. Placing furniture, books and curtains in the
room absorbs the echoes. For best results, hang heavy curtains on walls also.
Eliminating (And Preventing) Any Disturbing Sounds
Most home/office areas do have ambient noises:
Noise of traffic on the road
Insects/birds
Music playing
Your colleagues/friends/family talking (or yelling) to each other or on phone
Wind noise (or air blown by an overhead AC vent)
Creaking of your chair when you move
Pets/children making a noise
Humming of your PC fan (or an overhead fan)
Normally we are not aware of these constant noises, because our brain tunes them out naturally.
However, when the same noises are heard during your presentation, your audience would be
distracted.
To check for ambient noises, leave the microphone on for a couple of minutes without speaking,
and then play back that recording. If you hear anything at all, you will have to address the source of
that noise.
Your PC may be running applications (e.g. chat clients) that pop up messages frequently, or
produce alert sounds. Turn off all such applications.
Put your mobile in Silent mode (or better, switch it off).
Do a short test recording to make sure that your audio is being recorded without any distortion.
Selecting Your Recording Equipment
Buy the best-possible microphone (look for high sensitivity figures).
USB microphones use less computer resources and record better audio than an analog
microphone.
If you are using a microphone on a stand ("goose-neck"), select the stand such that you are able to
sit with correct posture (you should not have to lean too forward or bend down to speak into the
microphone.) Wrong posture will not only spoil your voice delivery, but it will also be tiring for longEditing A Project> Editing A Slide
74
ActivePresenter User Manual
Version 4.0
duration recordings.
Use a microphone stand with a stable base that does not wobble and create noise.
Use a microphone with a wind shield (they are available in two forms: foam cover or diaphragm).
Setting Up Your Equipment Correctly
Make sure your computer table is not wobbly, and your keyboard is stable on an even surface.
Keep your keyboard as away from microphone as possible, otherwise you will end up recording the
tapping noise. Avoid hammering your keyboard when you type. Place a folded cloth under the
keyboard to soften its sound.
If the microphone is kept too near your nose, it will pick up the noise of your breathing.
If the microphone is kept too near your mouth, it will catch the puff of air whenever you speak a
fricative consonant.
General Tips For Recording
Some people prefer to record “live”: They explain even as they are operating the target application.
However, not many people can do this simultaneously. Therefore it may be best for you to record
the narration as the last operation, after you have recorded the slides and added the other objects.
Many people are at a loss for words when they are trying to find the best way to express something
(especially when you are also operating a software). They typically fill the gaps with “um...” and
“ah...”. This is extremely irritating for your audience. To avoid this problem, create an outline (plot
of your presentation story) and a script beforehand.
Recording narration for the entire slide at a time may be difficult, because you don't remember
exactly what comes next. Therefore mentally divide each slide in smaller logical parts, and then
record audio for each part separately.
Before actual recording, first conduct a few practice trials. Use loop mode and repeat the play till
you can speak without mistakes and without "um.." and "er.." sounds. (Even with best care, you
may not be able to totally avoid such sounds. Be sure to edit them out later!)
Speak loudly, as if you are addressing a small audience in a large room.
Monitor the audio level as you record (most of the green LEDs should be visible, but not the
orange/red). Adjust the sound level from time to time. Remember also that if you are recording in
multiple sessions, you will have to set up the sound level for each session.
Never play a background music while you record a narration: It is best to add the background
music separately, so that you can adjust its relative volume precisely.
If you are using paper sheets for script, ensure that they do not rustle when you turn the pages.
Splitting A Slide
Sometimes you will need to split a slide into two or mode slides.
ActivePresenter allows you to split a slide at a chosen point. You can split a given slide any
number of times.
Refer to the Using The Timeline appendix for details.
Editing A Project> Editing A Slide
75
ActivePresenter User Manual
Version 4.0
Adding Navigational Elements
You can easily add navigational buttons to slides by using mouse-click interactions:
Insert mouse-click interactions to slide
Open its Event Editor, select On Correct tab, remove all current actions and add a “Go
Forward”, “Go Backward” or “Go to Slide” action
If you want to add hot keys you can also insert and use key-stroke interaction
Advanced Editing
Making The Project Interactive
In ActivePresenter, you can make your projects interactive by using various types of Interactive
Objects. They are special objects designed to respond to user inputs in a predefined manner.
Users can interact with them using a keyboard, mouse, or other input devices.
For any of these objects, you can specify trigger conditions (e.g. “when the mouse rolls over this
shape”), and specify what actions should be taken for that trigger condition (e.g. “display the hint
message”).
You can also control the way that users interact with an interactive object by customizing its
settings:
Attempts: specify the number of times a user can interact with the object before it becomes
unresponsive.
Pause: specify whether the presentation pauses for user response.
Timeout: specify the time limit for user response.
How Interactive Objects Behave
The following chart shows the trigger conditions for each interactive object. (A trigger condition is
the user's action that causes a pre-programmed response from the object.)
Trigger conditions
Y
Y
Y
Y
Y
On Reject
Y
Y
On Accept
Y
On Rollout
Y
On Rollover
Y
On Timeout
Editing A Project> Advanced Editing
Y
Y
On incomplete
Text Box
On Incorrect
Y
On Correct
Text
Keystroke
Mouse Click
Mouse click
Objects
76
ActivePresenter User Manual
Key Stroke
Version 4.0
Y
Y
Y
Y
Mouse Hover
Drop Area
Y
Y
Y
Drop Target
Question – True/False
Y
Y
Y
Y
Question – Multiple
Choice
Y
Y
Y
Y
Question – Multiple
Response
Y
Y
Y
Y
Question – Essay
Y
Y
Y
Y
Question – Fill in Blank
Y
Y
Y
Y
Question – Fill in
Multiple Blank
Y
Y
Y
Y
Question – Sequence
Y
Y
Question – Drag-n-Drop
Y
Y
Y
Y
Y
Y
Y
Y
Y
Y
Y
Y
Y
Y
Y
In fact, for each object, you can specify multiple trigger conditions and corresponding actions.
Further, for a given trigger condition, you can define multiple actions, in a pre-defined sequence.
For example:
1. If the mouse rolls over the shape, display the hint message.
2. When the mouse rolls out of the shape, hide the hint message.
3. If the user presses CTRL+Click, (a) display a message first, and then (b) end the
presentation.
4. If the user presses SHIFT+Click, go to slide#25
The Trigger Conditions (a.k.a. Events)
The trigger conditions are explained below:
Trigger
Mouse click
Remarks
You can define specific combinations of LMB/RMB clicks and modifier
Editing A Project> Advanced Editing
77
ActivePresenter User Manual
Version 4.0
keys (SHIFT, CTRL and ALT).
For example, ALT+SHIFT+Left-click.
Keystroke
Any press of a single key of the keyboard OR hot key (e.g.
CTRL+ALT+SHIFT+P) is defined as a keystroke.
Text
You can define a text string, and optionally make it case-sensitive. If the
user enters exactly the same string, the condition is met.
On Correct
When the answer is correct.
On Incorrect
When the answer is not correct.
On Incomplete
When the answer is incomplete. For example:
The user leaves a field blank in the Text Box object and Question
objects that contain a text box (Fill in Blank, Fill in Multiple Blank,
and Essay).
The user leaves all check boxes or radio buttons unchecked in
case of True/False, Multiple Choice, or Multiple Response
Question.
The user leaves all drop targets empty (do not contain any drag
source) in Drag-n-Drop Question.
On Timeout
When the user does not respond within the specified time.
On Rollover
When the mouse rolls over the shape of the object (enters the boundary of
the shape)
On Rollout
When the mouse rolls out of the shape of the object (exits from the
boundary of the shape).
On Accept
When the user drops any accepted drag sources on the drop target.
On Reject
When the user drops any rejected drag sources on the drop target.
The Actions
In response to those trigger conditions, you can take the following actions:
Option
Continue
Remarks
The effect depends on the current state of the presentation:
If the presentation is playing, this action does not change anything.
If the presentation had paused, this action will continue playing the
Editing A Project> Advanced Editing
78
ActivePresenter User Manual
Version 4.0
presentation from the time it is paused.
But how is a presentation paused in the first place?
Well, you can pause a presentation in two ways:
Pause
Presentation
Click in the Pause check box in the Settings tab for any
interactive object. In this case, when the object is played, the
presentation will pause.
Execute the Pause Presentation action (see below).
The presentation's main stream is halted (all objects stop playing against
the Timeline) but the user can still interact with interactive objects.
The presentation is paused indefinitely, until one of the following actions is
executed: Continue Presentation, End Presentation, Go to Slide, Go to
Slide at Index, Go Forward, or Go Backward.
End
Presentation
Exit the presentation
Go to Slide
Jump to the specified slide.
Note that the link is made to a specific slide: If you move that slide to a
new position, the link will follow it, and jump to this new position. If the
target slide is deleted, the link gets dissolved automatically.
Go to Slide at
Index
Jump to any slide that is currently at the specified index.
Go Forward
Go forward by the specified number of slides.
Note that when you add, remove or shuffle slides, another slide may take
the place of the current slide. Regardless of that, this command will jump
to the nth slide in the order.
Note that the target is not a specific slide: The jump will land on any slide
that is presently n slides away from the current slide.
Go Backward
Go backward by the specified number of slides.
Note that the target is not a specific slide: The jump will land on any slide
that is presently n slides away from the current slide.
Send Email
This action launches default email client program installed on user PC;
and loads the previously configured content in the mail (including recipient
address, subject line, etc.)
Note that the email is not sent silently or automatically: The user must
manually press the send button. The user can also modify the email
content before sending.
Open Web page Open the specified URL. You can specify whether to open it in the current
window or to use a different window. (Recall that the interactive
presentations are always delivered through a browser window.)
Editing A Project> Advanced Editing
79
ActivePresenter User Manual
Execute
JavaScript
Execute the specified JavaScript.
Show Object
Show shapes, images, audio and video objects.
Version 4.0
Users can also specify whether this action is blocking or not. If this action
is blocking, subsequent actions will be blocked until the object is hidden.
Otherwise, subsequent actions will be executed right after the object is
displayed.
Hide Object
This action is used to hide any objects which are displayed by Show
Object action before they hide automatically.
Play Audio
This action is used to play audio resource. It is similar to the Show Object
non-blocking action with audio object, except it does not require an audio
object is inserted earlier.
Submit
This action send whatever users entered in the specified interactive object
to the presentation to evaluate.
Clear User Input This action clears whatever users entered in the specified interactive
object, for example:
Clears text in all text fields for Text Box and Question objects that
contain a text box.
Un-checks the radio buttons or check boxes for Question objects.
Send dropped drag sources to theirs original position.
Setting Up The Interactions
The actual interactions are set using the Event Editor.
To invoke the Event Editor for each interaction object, you can use one of following methods:
Double-click on the interaction object, or
Select the interaction object, then select the Event property in the Properties pane.
Creating Drag and Drop Interactions
Drag-and-drop is a visual and eye-catching interaction that allows user to drag an object and drop
it onto another object. A drag-n-drop interaction needs an object that can be dragged, and a place
or object to drop it. ActvePresenter calls them drag source and drop target, respectively.
Drag Source
You can turn any Image, Shape, Highlight, or Text Caption object into a drag source, except:
Objects show across multiple slides.
Objects are showed by Show Object actions.
Editing A Project> Advanced Editing
80
ActivePresenter User Manual
Version 4.0
Objects are elements of Questions, excluding Drag-n-Drop Question.
By default, a light green marker is displayed to indicate that an object is a drag source. This marker
is used only in the editor, it does not appear in any output format. You can also turn off this marker
from View > Show Drag/Drop menu.
To convert objects into drag sources
1. Select objects. Please note that you can converting multiple objects at once.
2. Change their Type in Drag-n-Drop section of the Properties pane to Drag Source.
Drag source properties
Effect: Specify the effect for selected drag sources. The effect is displayed when users drag
these objects.
Revert: Specify whether the selected drag sources are sent back to their original positions if
they are dropped outside drop targets.
Drop Target
Any Image, Shape, Highlight, or Text Caption object can be converted into a drop target, except:
Objects show across multiple slides.
Objects are showed by Show Object actions.
Objects are elements of Questions, excluding Drag-n-Drop Question.
Editing A Project> Advanced Editing
81
ActivePresenter User Manual
Version 4.0
By default, a light orange marker is displayed to indicate that an object is a drop target. This
marker is used only in the editor, it does not appear in any output format. You can also turn off this
marker from View > Show Drag/Drop menu.
To convert objects into drop targets
1. Select objects. Please note that you can converting multiple objects at once.
2. Change their Type in Drag-n-Drop section of the Properties pane to Drop Target.
Drop target properties
Effect: Specify the effect for selected drop targets. The effect is displayed when users drag
any drag source over one of these objects.
Accept Behavior: Specify how the presentation responds when users drop a drag source
onto one of selected drop targets.
o
Accept List: List of drag sources that can be dropped onto the selected drop target.
If a dropped source is accepted, it snaps to the drop target based on Snap
Behavior, and an On Accept event is triggered.
If a dropped source is rejected, it will be sent back to its original position, and an On
Reject event is triggered.
When users select this property, a button appears. Click on this button to launch the
Event Editor for the selected drop target. In the Event Editor, users can edit the
Accepted Drag Sources list, specify actions for On Accept, On Reject events…
Editing A Project> Advanced Editing
82
ActivePresenter User Manual
Version 4.0
o
Accept Audio: The short audio played when the selected drop targets accept a
dropped source. You can also define it in the On Accept tab of the drop target’s
Event Editor.
o
Reject Audio: The short audio played when the selected drop targets reject a
dropped source. You can also define it in the On Reject tab of the drop target’s
Event Editor.
Note: In case of Drop Area (a special drop target object), On Correct and On Incorrect are
triggered instead of On Accept and On Reject.
Snap Behavior: Specify properties of drag sources after they are dropped onto one of
selected drop targets.
o
Size: In percentage of drag sources’ original sizes.
o
Opacity: From 0 to 255. The higher the value, the more opaque the drag sources.
o
Position:
Absolute: The drag sources remain at the same position where users drop
them.
Anchor: The drag sources snap to an anchor in the drop target. Users can
select one of nine anchors in the dropdown list, e.g. Top Left, Top Center…
Tile: The drag sources are arranged so that they fill the drop target but do
not cover each other. Users can select one of eight tiling direction in the
dropdown list, e.g. From Top, Left To Right; From Top, Right To Left…
Drop Area
Drop Areas are drop targets that assess, score and keep track of user response. For Drop Areas,
accepted means correct, and rejected means incorrect. In other words, an On Correct or On
Incorrect event is triggered when users drop a drag source onto a Drop Area, instead of On Accept
or On Reject.
A Drop Area cannot “contain” more than one dropped source. When users drop a new accepted
drag source, it will replace the old one if any, the old one will be sent back to its original position.
Please notice that the Drop Area marker and normal drop target marker have different color.
A drop target that is not an element of a Drag-n-Drop Question will be converted to a Drop Area
automatically when users connect a drag source to it (see Drag Drop Connector section).
For more details about this type of object, see the Drop Area and the Event Editor sections in the
Appendix.
Drag-n-Drop Question
Drag-n-Drop Question is a type of Question that includes multiple drag sources, drop targets and
require users (who take the output simulation) to map them correctly.
Editing A Project> Advanced Editing
83
ActivePresenter User Manual
Version 4.0
Unlike Drop Area, Drag-n-Drop Question does not evaluate correctness of user response each
time he/she drops a drag source, but when he/she clicks the Submit button. However, the
evaluation for acceptance still takes place on each drop target every time it receives a dropped
source.
For more information about this type of object, see the Drag-n-Drop Question and the Event
Editor sections in the Appendix.
Drag Drop Connector
To map a drag source to the correct drop target, select the drag source. Drag the marker
appears at the center of the drag source to the correct drop target.
To remove a correct drag – drop map, click the connector to select then delete it (by using
hotkey, default is Delete key, or menu, toolbar).
To map an already mapped drag source to another drop target, drag the head of the
connector arrow to the new drop target.
Note:
A drop target that is not an element of a Drag-n-Drop Question will be converted to a Drop
Editing A Project> Advanced Editing
84
ActivePresenter User Manual
Version 4.0
Area automatically when users specify the correct drag source for it.
You can also define correct drag source – drop target pairs in the Event Editor of Drop
Area (the Accepted Drag Sources tab), and Drag-n-Drop Question (the Answer tab)
object.
One drag source can be mapped to multiple drop targets. When taking the output
simulation, users can drag the source to one of the targets.
Multiple drag sources can be mapped to one drop target. When taking the output
simulation:
o
If the drop target is a Drop Area: users can drag one of the sources to the Drop
Area.
o
If the drop target is an element of a Drag-n-Drop Question: users must drag all of
the sources to the drop target.
Tips for Creating Drag and Drop Interactions
If you want to assess learner response instantly when they drop a drag source, and you
need only one drop target, use Drop Area interaction. Otherwise, Drag-n-Drop Question is
suitable for your needs.
You should insert all objects before converting them to drag sources / drop targets and
mapping them. It will reduce your editing time because ActivePresenter allows editing
multiple objects at once. In case of Drag-n-Drop Question, please note that you must insert
objects (Shapes, Images) into the question by using the floating toolbar on the right of the
question.
You should rename drag sources / drop targets to meaningful names before mapping them.
It will help you to identify them easily in the Event Editor window.
In case of Drop Area, please ensure that drag sources do not start exiting before the Drop
Area pauses for leaner response. You can view and adjust their timing properties in the
Timeline pane.
If you use Shapes as drag sources / drop targets and you want to change them to other
shapes, select them then right-click and choose Change Shape from the context menu.
You don’t need to delete them and insert new shapes.
If you use Images as drag sources / drop targets, you should prepare them all then insert
once. ActivePresenter allows you to insert multiple images at once.
If you have two overlapped drop targets, when a drag source is dropped onto the
overlapped area, the drop target that has higher z-order will process the dropped source.
You should set the z-order properly to get desired results.
Making The Project Accessible
ActivePresenter allows you to make your projects accessible to anyone, regardless of disabilities.
More specifically, you can edit your projects so that viewers with disabilities can perceive,
understand, navigate, and interact with the project outputs. The project outputs can be viewed in
various ways that do not depend on a single sense or ability. For example, viewers can navigate
with a keyboard, not with a mouse only. Also, audio content should be accompanied with closed
caption for hearing impaired viewers, text description should be provided for visual content so that
screen readers can read out loud for visually impaired viewers.
Editing A Project> Advanced Editing
85
ActivePresenter User Manual
Version 4.0
In this version, HTML5 is the only output format that supports accessibility.
Tips for Creating Accessible Projects
To create accessible projects, you should always use more than one means (e.g. text, visuals, and
sounds) to convey information.
For viewers with visual impairment, add text description or audio equivalents for visual
objects. For example, provide accessibility text description for Video object, so that you
can send the information to viewers through the screen reader. For objects that contain text
such as Shape, Text Caption, you should enable the Auto Label property, the screen
reader will read the text when this object is displayed. If you choose to attach audio to the
object, don't forget to remove all accessibility text, otherwise voice from the screen
reader will interfere with the attached sound.
For users with hearing impairment, add text equivalents for audio objects. For example,
when delivering narrative audio, it is important to provide captions at the same time. You
can use Closed Caption or any other type of object that can display text, and remember to
synchronize the text with the audio using the Timeline.
For viewers with either visual or mobility impairment, ensure that viewers can interact with
the output using keyboard. For example, enable Focusable property for Mouse Click
objects, so that viewers can press the Tab key to navigate to the object, and the Enter or
Space key to activate it. You can also provide a Key Stroke object that acts as a keyboard
shortcut for each Mouse Click object.
Enable accessibility features when exporting to output formats that support accessibility.
Customizing Accessibility Text for Slides
In ActivePresenter, you can add accessibility text describing each slide for screen readers to read
aloud when the slide is displayed. Screen readers and accessibility text are useful for people with
visual impairment.
Editing A Project> Advanced Editing
86
ActivePresenter User Manual
Version 4.0
By default, ActivePresenter uses slide name and description as slide accessibility text. To provide
different text for screen readers, do the following steps:
1. Select the slide that you want to change accessibility text.
2. In the Properties panel, expand Accessibility property.
3. Deselect Auto Label property, the accessibility Name and Description are now enabled.
4. In the accessibility Name field, type the accessibility name or short description for the slide.
5. In the accessibility Description field, type text that describes the slide.
6. When the slide appears, screen readers will read aloud the accessibility name first, then the
accessibility description. If you don't want screen readers to read anything, leave both
accessibility name and description blank.
Customizing Accessibility Text for Objects
ActivePresenter also supports accessibility text for each object on a slide. By default, accessibility
text is generated automatically from the text that the object displays, or the object name if it doesn't
contain any text. Therefore, the default accessibility text is usually useless for objects that doesn't
contain text, such as video, image. In this case, you should customize the accessibility text to
provide sufficient information about the object.
Editing A Project> Advanced Editing
87
ActivePresenter User Manual
Version 4.0
1. Select the object that you want to change accessibility text.
2. In the Properties panel, expand Accessibility property.
3. Deselect Auto Label property, the accessibility Name and Description are now enabled.
4. In the accessibility Name and Description field, type the accessibility name and description
for the object.
5. When the object appears, screen readers will read aloud the accessibility name first, then
the accessibility description. If you don't want screen readers to read anything, leave both
accessibility name and description blank.
Localizing The Project
Localization is the process of adapting your project for use in a specific country, region with a
particular language, culture, and desired local look-and-feel. If you are creating a demonstration or
simulation of a certain application that supports multiple languages, you may need to localize your
project for each language. With ActivePresenter, you can do it easily thanks to the slide
backgrounds replacement and the text translation features.
Localizing Process
Before doing localization, make sure that you have finished editing the original project (usually in
English).
Editing A Project> Advanced Editing
88
ActivePresenter User Manual
Version 4.0
To localize your project, do the following steps:
1. Export texts in your project to XLIFF format.
2. Translate texts in the exported XLIFF file using any tool that supports XLIFF 1.2, e.g.
Swordfish Translation Editor.
3. Replace the original slide backgrounds with the new ones that are captured in the new
language.
4. Import the translated XLIFF file into the project that its slide backgrounds have been
replaced in step 3.
5. Test the localized version of your project, make sure that all screenshot images are
replaced, all texts are properly translated and displayed.
The next sections will describe each step in detail.
Exporting To XLIFF
XLIFF (XML Localization Interchange File Format) is an XML-based format created to standardize
the way localizable data are passed between tools during a localization process.
To export texts in your project to XLIFF format, do the following steps:
1. Click on menu Localize > Export To XLIFF.
2. In the Export To XLIFF dialog, select types of text which you want to export for translation.
3. Select option Use TMX 1.4b standard compatible tags (<bpt>, <ept>, <ph>) if your
translation tool doesn't support <g> and <x/> tag.
4. Enter the output location and filename.
5. Click OK to start exporting to XLIFF.
Editing A Project> Advanced Editing
89
ActivePresenter User Manual
Version 4.0
Replacing Slide Backgrounds
You should not localize directly in your original project, but do it in a copy of the original project. So
this section also describes the step to copy the project for completeness.
1. Create a copy of the original project for the new language:
Copy the project file in File Explorer, or use Project > Save As feature in
ActivePresenter.
If you copy it in File Explorer, make sure it is not opening in ActivePresenter. The
project copied from an opening project may be corrupt.
Give the copied project a meaningful name. It is recommended that the project
name has language code suffice, e.g. Skype_es.approj. You can also create a
folder for the new language and place the copied project there.
2. Capture new project for the new language:
Change language preferences and settings for the captured application and OS to
display the new language, if needed.
Use the same project size (width x height) as of the original project.
Use the Smart Capture profile.
Should name the new captured project a meaningful name, e.g.
Skype_es_captured.approj.
3. Open Slide Background Replacer dialog to replace slide backgrounds in the project
copied in step 1 by new ones captured in step 2:
Open the project copied in step 1 (Skype_es.approj).
Select Localize > Replace Slide Backgrounds > All Slides From Project.
If you just want to replace some slides, select them then choose Selected Slides
From Project in Localize > Replace Slide Backgrounds menu.
Browse the new project captured in step 2 (Skype_es_captured.approj).
Editing A Project> Advanced Editing
90
ActivePresenter User Manual
Version 4.0
4. In the Slide Background Replacer dialog, arrange new slides on the right in the same
order as current slides on the left:
To move a slide, drag it and drop to new position.
To copy/ cut/ paste/ delete slides, use hotkeys or right-click menu.
To undo/ redo, use hotkeys or buttons.
If you are not sure that a new slide is redundant or not, use Move To Bottom
function instead of deleting it.
If a certain step (slide) is required in the new language, but not available in the
original language, use Copy To Left function.
If you do not want to change a certain slide in the left (for example, the introduction
slide), use New Place Holder function.
5. Click OK button on the Slide Background Replacer dialog to replace slide backgrounds.
Editing A Project> Advanced Editing
91
ActivePresenter User Manual
Version 4.0
Importing From XLIFF
After translating text and replacing slide backgrounds, you need to import the XLIFF file back to the
project that its slide backgrounds are replaced. ActivePresenter will replace current texts in your
project with the corresponding texts in the translated XLIFF file.
1. Open the project that has been replaced slide backgrounds.
2. Select Localize > Import From XLIFF menu and browser the translated XLIFF file for the
project.
3. Verify imported text on each slide, adjust object position and size if necessary.
Right-To-Left Language
ActivePresenter 4.0 introduces a new property of project, Project Language which allows you to
create the content for right-to-left language whether it is supported in the user interface of
ActivePresenter or not.
The right-to-left language is fully supported in the most important features such as editing, Export
To HTML5 Simulation, Export To Video. It is also supported partially in Export To Microsoft
Word/PowerPoint/Excel…
Editing A Project> Advanced Editing
92
ActivePresenter User Manual
Version 4.0
The following screenshot shows how the right-to-left language is supported in the editor:
This screenshot shows how it looks like in the HTML5 Simulation output:
Editing A Project> Advanced Editing
93
ActivePresenter User Manual
Version 4.0
Active Window
Suppose you are creating a simple manual with ActivePresenter, for example a Microsoft Word
document shows how to delete a folder in Windows. Sometimes, you want ActivePresenter to
capture the window of file explorer, the other times, you want it to capture only the confirmation
dialog which ask you whether to delete the folder. So, how to achieve this with ActivePresenter?
ActivePresenter can automatically detect the area that you want to capture and save the
information to captured slides. That information is called Active Window. To view the Active
Window, you can select the Slide > Slide Background > View Active Window Area option.
The following screenshot shows an Active Window area (in the dotted red rectangle) in a captured
slide:
Editing A Project> Advanced Editing
94
ActivePresenter User Manual
Version 4.0
The Active Window areas detected while capturing are not always fit in a certain circumstance.
You can modify these areas by enabling the Slide > Slide Background > Edit Active Window
Area option. After the Edit Active Window Area option is enabled, you can drag and resize them
similar to manipulating a slide object.
The following screenshot shows how the content in above example displayed in the exported
output. Note that the exported area contains the Active Window area and other slide objects:
Editing A Project> Advanced Editing
95
ActivePresenter User Manual
Editing A Project> Advanced Editing
Version 4.0
96
ActivePresenter User Manual
Version 4.0
Exporting The Project
In the previous chapters, we saw how to create content and edit it. Now we have come to the
final stage of exporting the content in the desired formats (as images, videos, interactive
presentation or documents).
Depending upon the export format, an exported presentation can be viewed on standard software,
such as web browsers (e.g. Firefox, Internet Explorer), video players (e.g. VLC, The KMPlayer),
image viewers (Picasa, Irfanview, XnView, etc.), Microsoft Office/LibreOffice, etc.
Overview Of Exporting Options
ActivePresenter allows you to render the presentation in many different forms:
Format
Remarks
Images
Export all slides as images, and then use those images for any purposes
related to the presentation/training course.
Video
Use videos when interaction with audience is not needed.
HTML SlideShow
Slides are exported as images, and embedded in HTML pages; to be
viewed in a browser.
PDF Document
Slides are exported as images, and embedded in PDF format.
Microsoft Word
Slides are exported as shapes, text and images, and inserted in a
doc/docx file. Now this file can be edited further in Microsoft Word (or
LibreOffice Writer).
Microsoft Excel
Slides are exported as shapes, text and images, and inserted in a
xls/xlsx file. Now this file can be edited further in Microsoft PowerPoint
(or LibreOffice Calc).
Microsoft PowerPoint
Slides are converted into PowerPoint slides. This exported ppt/pptx file
can be edited further in Microsoft PowerPoint (or LibreOffice Impress).
HTML5 Simulation
Presentation is exported as a set of files (HTML, CSS, JavaScript…)
using HTML5 standard so it can run on most modern browsers (Internet
Explorer 9 or later, Google Chrome, Mozilla FireFox, Safari) on various
devices and platforms (Windows, MacOS, Linux, iOS, Android). The
presentation can also run on older browsers (such as Internet Explorer 7
Exporting The Project> Overview Of Exporting Options
97
ActivePresenter User Manual
Version 4.0
and 8) if Adobe Flash Player or Microsoft Silverlight plugin is installed.
Flash Simulation
Presentation is exported as a set of HTML files with Flash content; to be
viewed in a browser.
These options are explained in details in below sections.
Exporting The Project> Overview Of Exporting Options
98
ActivePresenter User Manual
Version 4.0
Exporting To Images
Typical uses of exported images are to create brochures, handouts, and posters for the training.
Images are also useful to translate the training in another format, such as PowerPoint.
General Options
These options are divided in three sections, as follows:
Rendering Options
Option
Remarks
Include Closed
Caption
If this option is selected, the images will have Closed Caption.
Include Objects
Started by Event
If this option is selected, ActivePresenter includes objects that are
triggered by events.
Include Cursor
Path
Allows you to show (or hide) the cursor path.
Note that if the image size is reduced, the captions may not be
readable. On the contrary, they will obstruct whatever little space
is left. Then it is best to drop it.
Only Export Active The exported area only includes the Active Window area and slide
Exporting The Project> Exporting To Images
99
ActivePresenter User Manual
Window Area
Version 4.0
objects which are selected to export.
Image
Parameter
Size
Options
Remarks
Range: 10% to 150% The size is relative to canvas size selected at the
(in steps of 10%)
beginning of the project (you can check this out at any
time by using the Project>project Information menu
option)
Note that ActivePresenter only works with logical size
(i.e. pixels). However, when displayed/printed, the
physical size depends on pixels and the dpi (dots-perinch) setting of the displaying printing device.
Color Depth True Colors (24 bit)
256 Colors (8 bit)
Grayscale (8 bit)
Format
JPEG
PNG
Higher color depth makes the presentation look
stunning. But it also increases the file size. When the
images are inserted in other files, that file also will
become large.
Due to their specs and compression algorithms, JPEG is
best suited for pictures while PNG is best suited for
computer-generated images (screenshots, drawings...).
Note that JPEG compression is lossy while PNG is
lossless, so PNG retains crystal clear quality, but the
downside of PNG is that it does not compress well with
pictures (very big file size) and the decoding (when
viewing) is slower than JPEG. However, screenshots
are compressed better with PNG, the file has small size
and there is no loss of quality.
Optimization None
Level
Low
These are relative compression levels. Note that the
higher the compression level, the longer it takes to
export.
Normal
Select None when testing the output.
High
Select Ultra or High when exporting the final
result.
Ultra
This option is only available if the PNG image format is
selected.
Quality
Range: 1% to 100%
The higher the quality, the larger the output file size.
This option is only available if the JPEG image format is
selected.
Output Location
Define the location where the exported images will be placed.
Exporting The Project> Exporting To Images
100
ActivePresenter User Manual
Version 4.0
SCORM Options
These are the SCORM-related options:
Parameter
Generate
SCORM
Package
Options
No
SCORM 1.2
Remarks
If your LMS supports both 1.2 and 2004 versions of SCORM,
please choose 2004 version (the latest version).
SCORM 2004
Package
Version
Specify a version that can be used to differentiate manifests with
the same identifier. For example, if you are uploading the same
project after modifying it, provide a different version number.
Identifier
Specify a name used by the LMS to identify different manifests.
(This value is generated automatically by ActivePresenter but
you can change it if needed.)
Organization
Title
Specify a title for the organization which this item belongs to.
(ActivePresenter automatically generates this value from project
name. However, you can enter a difference text.)
Item Title
Specify a title for the item. (ActivePresenter automatically
generates this value from project name. However, you can enter
a difference text.)
Exporting The Project> Exporting To Images
101
ActivePresenter User Manual
Version 4.0
Exporting To Video
Video format is suitable when the audience (or an individual student) does not have to interact with
the presentation in a self-paced manner.
The advantage of video over the image or documents formats is that the video contains all
animations, closed captions and voice.
The disadvantage of video is that it can be made in one language at a time (thanks to the Closed
Caption and audio objects it contains).
You can export in multiple video formats. The selection of a format over the others is primarily
driven by which codecs are allowed to be used in your country, thanks to the country-specific
patent laws. Other than that, there may be quality vs file size preferences or what player software
is available on the target hardware.
General Options
The options are divided into four sections:
Rendering Options
Exporting The Project> Exporting To Video
102
ActivePresenter User Manual
Option
Exported
Closed
Captions as
Soft Subtitles
(.SRT)
Version 4.0
Remarks
If you select this option, the Closed Captions will be exported as a separate
subtitle file (with srt extension). The player must have the capability to display
subtitles.
Note that this allows you to change the font size and color of the subtitles at
play time.
You can also change the srt file to display the subtitles in a different
language.
Export Closed
Caption as
Hard Subtitles
If you select this option, the Closed Captions will be hard-coded inside the
video. In this case any video player can play the video can also display
subtitles. However, the attributes of the subtitles cannot be changed at play
time.
Zoom-n-Pan
If selected, the effects of zoom-n-pan objects will be included in the exported
video.
Include Cursor Whether to render the cursor paths or not.
Path
Export Audio
This option is selected by default. Deselect this option if you want to remove
audio from the output. Since the audio data is not written to the output file so
the file size will be smaller comparing to a similar video with silence audio.
Video
Option
Video Size
Remarks
Range: 50% to 150% (in steps of 10%)
The reference is the canvas size which you specified when you created the
project. The video will be rescaled using Bicubic interpolation.
Note that the aspect ratio is fixed when you created the project; it cannot be
changed at render time.
Frame Rate
Set between 1 and 30 fps (frames per second).
Key Frame
Specify the number of frames between which we must have a key frame.
(default=3* Frame Rate)
Quality
Select in the range [1,100]
(Higher the number, better the quality and larger the file size)
Audio
Exporting The Project> Exporting To Video
103
ActivePresenter User Manual
Option
Version 4.0
Remarks
Channels
Select from mono/stereo
Bit Rate
Select from 64, 96 and 128 kbps
This option is only available for AVI, MP4, and WMV formats.
Sample Rate
Select from 11025, 22050 and 44100 Hz.
Quality
Select in the range [1,100]
(Higher the number, better the quality and larger the file size)
This option is only available for WebM format.
Output
Option
Format
Remarks
Select from AVI, MP4, WMV, WebM (HTML-5), MKV.
The following video and audio codecs are used for each container format:
Output File
AVI: MS MPEG4 v2, WMA v2
MP4: MPEG4 Simple@L1, MP3
WMV: WMV v2, WMA v2
WebM: VP8, Vorbis
MKV: Flash Screen Video, PCM 16-bit (this format using lossless
audio and video codecs so it can be used for further editing in other
programs without quality loss)
Specify the file path and name for exported video.
Exporting The Project> Exporting To Video
104
ActivePresenter User Manual
Version 4.0
Advanced Options
The following SCORM options are available:
Parameter
Generate
SCORM
Package
Options
No
SCORM1.2
Remarks
If your LMS supports both 1.2 and 2004 versions of
SCORM, please choose 2004 version (the latest version).
SCORM 2004
Package
Version
Specify a version that can be used to differentiate manifests
with the same identifier. For example, if you are uploading
the same project after modifying it, provide a different
version number.
Identifier
Specify a name used by the LMS to identify different
manifests. (This value is generated automatically by
ActivePresenter but you can change it if needed.)
Organization
Title
Specify a title for the organization which this item belongs to.
(ActivePresenter automatically generates this value from
project name. However, you can enter a difference text.)
Exporting The Project> Exporting To Video
105
ActivePresenter User Manual
Item Title
Version 4.0
Specify a title for the item. (ActivePresenter automatically
generates this value from project name. However, you can
enter a difference text.)
Exporting The Project> Exporting To Video
106
ActivePresenter User Manual
Version 4.0
Exporting To Flash Video
This has two different options: General and Advanced (SCORM).
General Options
The options are divided into four sections:
Rendering Options
Option
Exported Closed
Captions as Soft
Subtitles (.SRT)
Remarks
If you select this option, the Closed Captions will be exported as a
separate subtitle file (with srt extension). The player must have the
capability to display subtitles.
Note that this allows you to change the font size and color of the
subtitles at play time.
You can also change the srt file to display the subtitles in a different
language.
Exporting The Project> Exporting To Flash Video
107
ActivePresenter User Manual
Version 4.0
Export Closed
Caption as Hard
Subtitles
If you select this option, the Closed Captions will be hard-coded inside
the video. In this case any video player can play the video can also
display subtitles. However, the attributes of the subtitles cannot be
changed at play time.
Zoom-n-Pan
If selected, the effects of zoom-n-pan objects will be included in the
exported video.
Embedded in HTML
If you select this option, the flash will be embedded in an HTML file.
This can be viewed in a browser directly.
If you deselect this option, a stand-alone video will be created.
Include Cursor Path
Deselecting this option will hide the cursor path.
Export Audio
This option is selected by default. Deselect this option if you want to
remove audio from the output. Since the audio data is not written to the
output file so the file size will be smaller comparing to a similar video
with silence audio.
Video
Option
Video Size
Remarks
Range: 50% to 150% (in steps of 10%)
The reference is the canvas size which you specified when you created
the project. The video will be rescaled using Bicubic interpolation.
Note that the aspect ratio is fixed when you created the project; it
cannot be changed at render time.
Frame Rate
Set between 1 and 30 fps (frames per second).
Key Frame
Specify the number of frames between which we must have a key
frame (default=3* Frame Rate)
Quality
Select in the range [1,100]
(Higher the number, better the quality and larger the file size)
Audio
Option
Remarks
Channels
Select from mono/stereo
Bit Rate
Select from 64, 96 and 128 kbps
Exporting The Project> Exporting To Flash Video
108
ActivePresenter User Manual
Sample Rate
Version 4.0
Select from 11025, 22050 and 44100 Hz.
Output
Option
Output File
Remarks
Specify the file path and name for exported flash video.
Advanced Options
This tab contains SCORM-related options and video thumbnail-related options.
SCORM-related Options
Parameter
Generate SCORM
Package
Options
No
SCORM1.2
Remarks
If your LMS supports both 1.2 and 2004 versions of
SCORM, please choose 2004 version (the latest version).
SCORM
Exporting The Project> Exporting To Flash Video
109
ActivePresenter User Manual
Version 4.0
2004
Package Version
Specify a version that can be used to differentiate
manifests with the same identifier. For example, if you are
uploading the same project after modifying it, provide a
different version number.
Identifier
Specify a name used by the LMS to identify different
manifests. (This value is generated automatically by
ActivePresenter but you can change it if needed.)
Organization Title
Specify a title for the organization which this item belongs
to. (ActivePresenter automatically generates this value
from project name. However, you can enter a difference
text.)
Item Title
Specify a title for the item. (ActivePresenter automatically
generates this value from project name. However, you can
enter a difference text.)
Video Thumbnail options
This option allows you to select a thumbnail for the video, the thumbnail is displayed on the very
first screen when you open the video and before you click on the play button to start playing the
video.
Option
Remarks
None
Do not use a thumbnail. The initial screen of the FLV player will be
displayed instead.
Select a slide image
from project
Select a slide from the current project itself, which will act as a
thumbnail.
Select an image from Browse for an image file.
file
Exporting The Project> Exporting To Flash Video
110
ActivePresenter User Manual
Version 4.0
Exporting To HTML SlideShow
This has two different options: General options and Advanced (SCORM).
General Options
These options are divided in three sections, as follows:
Rendering Options
Option
Remarks
Include Closed
Caption
If this option is selected, the images will have CC.
Generate Navigation
Guide page
Create a first page which contains guideline about using hot-key to
navigate through the slides.
Include Cursor Path
Deselecting this option will hide the cursor path.
Note that if the image size is reduced, the captions may not be
readable. On the contrary, they will obstruct whatever little
space is left. Then it is best to drop it.
Generate in compact Create only one slide per Slide Group.
mode
Exporting The Project> Exporting To HTML SlideShow
111
ActivePresenter User Manual
Version 4.0
Include Objects
started by event
Includes the objects that are started by event.
Only Export Active
Window Area
The exported area only includes the Active Window area and slide
objects which are selected to export.
Image
Parameter
Size
Options
Range: 10% to 150%
(in steps of 10%)
Remarks
The size is relative to canvas size selected at the
beginning of the project (you can check this out at any
time by using the Project>Project Information menu
option)
Note that ActivePresenter only works with logical size
(i.e. pixels). However, when displayed/printed, the
physical size depends on pixels and the dpi (dots-perinch) setting of the displaying printing device.
Color Depth True Colors (24 bit)
256 Colors (8 bit)
Grayscale (8 bit)
Format
JPEG
PNG
Higher color depth makes the presentation look
stunning. But it also increases the file size. When the
images are inserted in other files, that file also will
become large.
Due to their specs and compression algorithms, JPEG
is best suited for pictures while PNG is best suited for
computer-generated images (screenshots, drawings...).
Note that JPEG compression is lossy while PNG is
lossless, so PNG retains crystal clear quality, but the
downside of PNG is that it does not compress well with
pictures (very big file size) and the decoding (when
viewing) is slower than JPEG. However, screenshots
are compressed better with PNG, the file has small size
and there is no loss of quality.
Optimization None
Level
Low
These are relative compression levels. Note that the
higher the compression level, the longer it takes to
export.
Normal
Select None when testing the output.
High
Select Ultra or High when exporting the final
result.
Ultra
This option is only available if the PNG image format is
selected.
Quality
Range: 1% to 100%
The higher the quality, the larger the output file size.
This option is only available if the JPEG image format is
Exporting The Project> Exporting To HTML SlideShow
112
ActivePresenter User Manual
Version 4.0
selected.
Output Location
Define the location where the exported contents will be placed.
Advanced Options
The following SCORM-related options are available:
SCORM-related Options
Parameter
Generate
SCORM
Package
Options
No
SCORM1.2
Remarks
If your LMS supports both 1.2 and 2004 versions of SCORM,
please choose 2004 version (the latest version).
SCORM 2004
Package
Version
Identifier
Specify a version that can be used to differentiate manifests
with the same identifier. For example, if you are uploading the
same project after modifying it, provide a different version
number.
Specify a name used by the LMS to identify different manifests.
(This value is generated automatically by ActivePresenter but
you can change it if needed.)
Exporting The Project> Exporting To HTML SlideShow
113
ActivePresenter User Manual
Version 4.0
Organization
Title
Specify a title for the organization which this item belongs to.
(ActivePresenter automatically generates this value from
project name. However, you can enter a difference text.)
Item Title
Specify a title for the item. (ActivePresenter automatically
generates this value from project name. However, you can
enter a difference text.)
Exporting The Project> Exporting To HTML SlideShow
114
ActivePresenter User Manual
Version 4.0
Exporting To Adobe PDF Document
This has three tabs: General options, Advanced options (SCORM-related), Text styles options.
General Options
The options are divided into four sections:
Rendering Options
Option
Remarks
Include Objects
Started by Event
Include Objects Started by Event
Create
Bookmarks
Bookmarks are created from slide names and each bookmark is linked to
corresponding slide image.
In other words, ActivePresenter creates bookmark links to each slide.
However, there is a little difference in Compact mode, the first bookmark
level is slide group title, the second one is slide name.
Exporting The Project> Exporting To Adobe PDF Document
115
ActivePresenter User Manual
Version 4.0
Only Export Active The exported area only includes the Active Window area and slide
Window Area
objects which are selected to export. It is usually used with the Slides per
page – Contiguous option.
Layout
Option
Remarks
Slides per page
One – Single slide per page
Two – Two slides per page (top, bottom)
Contiguous – The slides are written contiguously in a page until there is
not enough space, then it will move to the next page.
Compact – In this mode, only the screen of first slide in each group is
exported. For the following slides, ActivePresenter exports only the slide
name and slide description.
Description
This is the slide description.
None – No description exported.
Choose on which side of the slide the description has to be placed: Top,
Left, Right, or Bottom
Page orientation
Choose from landscape and portrait.
The page size is fixed (A4).
ActivePresenter also used fixed margins of 1” (2.54 cm) on all sides.
Image
Parameter
Size
Options
Remarks
Range: 10% to 150% The size is relative to canvas size selected at the
beginning of the project (you can check this out at any
(in steps of 10%)
time by using the Project>Project Information menu
option)
Note that ActivePresenter only works with logical size
(i.e. pixels). However, when displayed/printed, the
physical size depends on pixels and the dpi (dots-perinch) setting of the displaying printing device.
Color Depth
True Colors (24 bit)
256 Colors (8 bit)
Grayscale (8 bit)
Format
JPEG
PNG
Higher color depth makes the presentation look
stunning. But it also increases the file size. When the
images are inserted in other files, that file also will
become large.
Due to their specs and compression algorithms, JPEG
is best suited for pictures while PNG is best suited for
Exporting The Project> Exporting To Adobe PDF Document
116
ActivePresenter User Manual
Version 4.0
computer-generated images (screenshots, drawings...).
Note that JPEG compression is lossy while PNG is
lossless, so PNG retains crystal clear quality, but the
downside of PNG is that it does not compress well with
pictures (very big file size) and the decoding (when
viewing) is slower than JPEG. However, screenshots
are compressed better with PNG, the file has small size
and there is no loss of quality.
Optimization
Level
None
Low
These are relative compression levels. Note that the
higher the compression level, the longer it takes to
export.
Normal
Select None when testing the output.
High
Select Ultra or High when exporting the final
result.
Ultra
This option is only available if the PNG image format is
selected.
Quality
Range: 1% to 100%
The higher the quality, the larger the output file size.
This option is only available if the JPEG image format is
selected.
Output File
Specify the file path and name for the exported PDF document.
Advanced Options
The options are divided in three sections:
1. SCORM-related options
2. PDF document-related options
3. Security password for opening the PDF document.
Exporting The Project> Exporting To Adobe PDF Document
117
ActivePresenter User Manual
Version 4.0
SCORM-related Options
Parameter
Options
No
Generate
SCORM Package SCORM1.2
Remarks
If your LMS supports both 1.2 and 2004 versions of
SCORM, please choose 2004 version (the latest version).
SCORM 2004
Package Version
Specify a version that can be used to differentiate
manifests with the same identifier. For example, if you are
uploading the same project after modifying it, provide a
different version number.
Identifier
Specify a name used by the LMS to identify different
manifests. (This value is generated automatically by
ActivePresenter but you can change it if needed.)
Organization Title
Specify a title for the organization which this item belongs
to. (ActivePresenter automatically generates this value
from project name. However, you can enter a difference
text.)
Exporting The Project> Exporting To Adobe PDF Document
118
ActivePresenter User Manual
Item Title
Version 4.0
Specify a title for the item. (ActivePresenter automatically
generates this value from project name. However, you can
enter a difference text.)
PDF file-related options
Parameter
Title
Remarks
Title of the PDF document.
When you open the pdf in a viewer, this name appears in the Windows
Bar (or in the tab, in case of a tabbed pdf reader).
Subject
Subject of the document. This is one of PDF document properties which can
be seen in Document Properties in any PDF Viewer.
Keywords
Keywords defined in the PDF document.
Protection
Opening
Password
You can set a password for opening this PDF document.
Confirm
Password
Enter the password again manually (no copy-paste from the previous field).
This is to avoid the possibility that you entered a wrong password.
Text Style Options
These options control the text in the generated pdf file.
Exporting The Project> Exporting To Adobe PDF Document
119
ActivePresenter User Manual
Version 4.0
The font size, text color and line spacing are controlled for three different parts of the slides:
1. Group Title
It is printed before any slide group. Please note that the group title will only be exported in
Compact mode.
2. Slide name (As entered in the Slide Titles pane)
3. Slide Description
Exporting The Project> Exporting To Adobe PDF Document
120
ActivePresenter User Manual
Version 4.0
Exporting To Microsoft Word Document
There are two tabs:
1. General
2. Advanced
General Options
Rendering Options
Option
Remarks
Include Objects Include Objects Started by Event
Started by Event
Create Table of
Adds a TOC to the document, hyperlinked to the slides
Exporting The Project> Exporting To Microsoft Word Document
121
ActivePresenter User Manual
Version 4.0
Contents
Only Export
Active Window
Area
The exported area only includes the Active Window area and slide objects
which are selected to export. It is usually used with the Slides per page –
Contiguous option.
Layout options
Option
Remarks
Slides per page
One – Single slide per page
Two – Two slides per page (top, bottom)
Contiguous – The slides are written contiguously in a page until there is not
enough space, then it will move to the next page.
Compact – In this mode, only the screen of first slide in each group is
exported. For the following slides, ActivePresenter exports only the slide
name and slide description.
Description
Slide description.
None – No description exported.
Choose on which side of the slide the description has to be placed: Top,
Left, Right, or Bottom
Page orientation Choose from landscape and portrait.
The page size is fixed (A4).
ActivePresenter uses fixed margins of 1” (2.54 cm) on all sides.
Use Native
Objects
Use Microsoft Word auto-shapes, images, text boxes, and text for
representing slide objects. Otherwise, each object is exported as an image.
Using native objects will allow editing the shapes directly within MS Word
later once exported. Otherwise, slide objects are exported as images so it is
almost impossible to edit exported document later.
Use Template
Layout
Use the layout specified in the template. Refer to Appendix Create custom
Word template to learn more about how to create a custom layout.
Image options
Parameter
Size
Options
Remarks
Range: 10% to 150% The size is relative to canvas size selected at the
beginning of the project (you can check this out at any
(in steps of 10%)
time by using the Project>Project Information menu
option)
Note that ActivePresenter only works with logical size
Exporting The Project> Exporting To Microsoft Word Document
122
ActivePresenter User Manual
Version 4.0
(i.e. pixels). However, when displayed/printed, the
physical size depends on pixels and the dpi (dots-perinch) setting of the displaying printing device.
Color Depth True Colors (24 bit)
256 Colors (8 bit)
Higher color depth makes the presentation look stunning.
But it also increases the file size. When the images are
inserted in other files, that file also will become large.
Grayscale (8 bit)
Format
JPEG
PNG
Due to their specs and compression algorithms, JPEG is
best suited for pictures while PNG is best suited for
computer-generated images (screenshots, drawings...).
Note that JPEG compression is lossy while PNG is
lossless, so PNG retains crystal clear quality, but the
downside of PNG is that it does not compress well with
pictures (very big file size) and the decoding (when
viewing) is slower than JPEG. However, screenshots are
compressed better with PNG, the file has small size and
there is no loss of quality.
Optimization None
Level
Low
Normal
Select None when testing the output.
High
Select Ultra or High when exporting the final
result.
This option is only available if the PNG image
format is selected.
Ultra
Quality
These are relative compression levels. Note that the
higher the compression level, the longer it takes to
export.
Range: 1% to 100%
The higher the quality, the larger the output file size.
This option is only available if the JPEG image format is
selected.
Output location
Template
Location of the template file, which the doc file has to use.
Output File
Specify the file path and name of exported document.
Exporting The Project> Exporting To Microsoft Word Document
123
ActivePresenter User Manual
Version 4.0
Advanced Options
These are SCORM-related options.
Parameter
Generate
SCORM
Package
Options
No
SCORM1.2
Remarks
If your LMS supports both 1.2 and 2004 versions of
SCORM, please choose 2004 version (the latest version).
SCORM 2004
Package
Version
Identifier
Specify a version that can be used to differentiate
manifests with the same identifier. For example, if you
are uploading the same project after modifying it, provide
a different version number.
Specify a name used by the LMS to identify different
manifests. (This value is generated automatically by
ActivePresenter but you can change it if needed.)
Exporting The Project> Exporting To Microsoft Word Document
124
ActivePresenter User Manual
Version 4.0
Organization
Title
Specify a title for the organization which this item belongs
to. (ActivePresenter automatically generates this value
from project name. However, you can enter a difference
text.)
Item Title
Specify a title for the item. (ActivePresenter automatically
generates this value from project name. However, you
can enter a difference text.)
Creating Custom Word template
When exporting to MS Word Document, you can create your own Word template and let
ActivePresenter use it to create the output document.
To create a custom layout template, you must have Word 2002 (Word XP) or higher version
installed on your computer.
The steps are as follows:
1. Placement Of Contents
The following tags will be used to specify the location to place exported contents:
$SlideName1
$SlideDescription1
$SlideImage1
For example, if you want to place slide name somewhere in the template, you type $SlideName1 at
that location.
Only the usage of $SlideImage1 is different. This used to specify the location of slide content (slide
background, balloons, captions, texts, ...). You need to insert Word drawing canvas and set its
Alternative Text to $SlideImage1.
2. Styling The Contents
To set style (font name, font size, color...) for Slide Name, Slide Description, you can not set text
properties directly to the tags, instead you need to open the Styles pane and add new styles and
named them as: SlideName and SlideDescription. ActivePresenter will automatically use these
styles when writing Slide Name and Slide Description text.
After exporting, you can also change these styles easily by opening exported document and
changes appropriate styles.
Exporting The Project> Exporting To Microsoft Word Document
125
ActivePresenter User Manual
Version 4.0
Exporting To Microsoft Excel Worksheet
This has two tabs: General options and advanced options
General Options
Rendering options
Option
Include
Objects
Started by
Event
Remarks
Include Objects Started by Event
The exported area only includes the Active Window area and slide objects
Only Export
Active Window which are selected to export. It is usually used with the Slides per page –
Area
Contiguous option.
Exporting The Project> Exporting To Microsoft Excel Worksheet
126
ActivePresenter User Manual
Version 4.0
Layout options
Option
Slides per
page
Remarks
One – Single slide per page
Two – Two slides per page (top, bottom)
Contiguous – The slides are written contiguously in a page until there is not
enough space, then it will move to the next page.
Compact – In this mode, only the screen of first slide in each group is
exported. For the following slides, ActivePresenter exports only the slide name
and slide description.
Description
Slide description.
None – No description exported.
Choose on which side of the slide the description has to be placed: Top, Left,
Right, or Bottom
Page
orientation
Choose from landscape and portrait.
The page size is fixed (A4).
ActivePresenter uses fixed margins of 1” (2.54 cm) on all sides.
Use Native
Objects
Use Microsoft Excel auto-shapes, images, text boxes, and text for
representing slide objects. Otherwise, each object is exported as an image.
Using native objects will allow editing the shapes directly within MS Excel later
once exported. Otherwise, slide objects are exported as images so it is almost
impossible to edit exported document later.
Image options
Parameter
Size
Options
Remarks
Range: 10% to 150% The size is relative to canvas size selected at the
beginning of the project (you can check this out at any
(in steps of 10%)
time by using the Project>Project Information menu
option)
Note that ActivePresenter only works with logical size
(i.e. pixels). However, when displayed/printed, the
physical size depends on pixels and the dpi (dots-perinch) setting of the displaying printing device.
Color Depth
True Colors (24 bit)
Grayscale (8 bit)
Higher color depth makes the presentation look
stunning. But it also increases the file size. When the
images are inserted in other files, that file also will
become large.
JPEG
Due to their specs and compression algorithms, JPEG
256 Colors (8 bit)
Format
Exporting The Project> Exporting To Microsoft Excel Worksheet
127
ActivePresenter User Manual
PNG
Version 4.0
is best suited for pictures while PNG is best suited for
computer-generated images (screenshots,
drawings...).
Note that JPEG compression is lossy while PNG is
lossless, so PNG retains crystal clear quality, but the
downside of PNG is that it does not compress well with
pictures (very big file size) and the decoding (when
viewing) is slower than JPEG. However, screenshots
are compressed better with PNG, the file has small
size and there is no loss of quality.
Optimization
Level
None
Low
These are relative compression levels. Note that the
higher the compression level, the longer it takes to
export.
Normal
Select None when testing the output.
High
Select Ultra or High when exporting the final
result.
Ultra
This option is only available if the PNG image format is
selected.
Quality
Range: 1% to 100%
The higher the quality, the larger the output file size.
This option is only available if the JPEG image format
is selected.
Output location
Template
Location of the template file, which the file has to use.
Output File
Specify the file path and name of exported worksheet.
Exporting The Project> Exporting To Microsoft Excel Worksheet
128
ActivePresenter User Manual
Version 4.0
Advanced Options
These are SCORM-related options.
Parameter
Generate
SCORM
Package
Options
No
SCORM1.2
Remarks
If your LMS supports both 1.2 and 2004 versions of SCORM,
please choose 2004 version (the latest version).
SCORM 2004
Package
Version
Specify a version that can be used to differentiate manifests
with the same identifier. For example, if you are uploading the
same project after modifying it, provide a different version
number.
Identifier
Specify a name used by the LMS to identify different manifests.
(This value is generated automatically by ActivePresenter but
you can change it if needed.)
Organization
Specify a title for the organization which this item belongs to.
Exporting The Project> Exporting To Microsoft Excel Worksheet
129
ActivePresenter User Manual
Version 4.0
Title
(ActivePresenter automatically generates this value from
project name. However, you can enter a difference text.)
Item Title
Specify a title for the item. (ActivePresenter automatically
generates this value from project name. However, you can
enter a difference text.)
Exporting The Project> Exporting To Microsoft Excel Worksheet
130
ActivePresenter User Manual
Version 4.0
Exporting To Microsoft PowerPoint Presentation
This has two tabs: General and Advanced.
General Options
Rendering options
Option
Include
Objects
Started by
Event
Remarks
Include Objects Started by Event
Only Export The exported area only includes the Active Window area and slide objects
Active
which are selected to export.
Window Area
Exporting The Project> Exporting To Microsoft PowerPoint Presentation
131
ActivePresenter User Manual
Version 4.0
Layout options
Option
Remarks
Show slide
name
Whether to display the slide names.
Full Screen
Open the presentation in full screen initially.
Show slide
description
Whether to render the slide description.
Use Native
Objects
Use Microsoft PowerPoint auto-shapes, images, text boxes, and text for
representing slide objects. Otherwise, each object is exported as an image.
Using native objects will allow editing the shapes directly within MS
PowerPoint later once exported. Otherwise, slide objects are exported as
images so it is almost impossible to edit exported document later.
Advance
slides
Select between automatic and manual
Image options
Parameter
Size
Options
Remarks
Range: 10% to 150% The size is relative to canvas size selected at the
beginning of the project (you can check this out at any
(in steps of 10%)
time by using the Project>Project Information menu
option)
Note that ActivePresenter only works with logical size
(i.e. pixels). However, when displayed/printed, the
physical size depends on pixels and the dpi (dots-perinch) setting of the displaying printing device.
Color Depth
True Colors (24 bit)
256 Colors (8 bit)
Grayscale (8 bit)
Format
JPEG
PNG
Higher color depth makes the presentation look
stunning. But it also increases the file size. When the
images are inserted in other files, that file also will
become large.
Due to their specs and compression algorithms, JPEG
is best suited for pictures while PNG is best suited for
computer-generated images (screenshots, drawings...).
Note that JPEG compression is lossy while PNG is
lossless, so PNG retains crystal clear quality, but the
downside of PNG is that it does not compress well with
pictures (very big file size) and the decoding (when
viewing) is slower than JPEG. However, screenshots
are compressed better with PNG, the file has small size
Exporting The Project> Exporting To Microsoft PowerPoint Presentation
132
ActivePresenter User Manual
Version 4.0
and there is no loss of quality.
Optimization
Level
None
Low
These are relative compression levels. Note that the
higher the compression level, the longer it takes to
export.
Normal
Select None when testing the output.
High
Select Ultra or High when exporting the final
result.
Ultra
This option is only available if the PNG image format is
selected.
Quality
Range: 1% to 100%
The higher the quality, the larger the output file size.
This option is only available if the JPEG image format is
selected.
Output location
Template
Location of the template file, which the file has to use
Output File
Specify the file path and name of exported presentation.
Exporting The Project> Exporting To Microsoft PowerPoint Presentation
133
ActivePresenter User Manual
Version 4.0
Advanced Options
These are SCORM-related options.
Parameter
Generate
SCORM
Package
Options
No
SCORM1.2
Remarks
If your LMS supports both 1.2 and 2004 versions of SCORM,
please choose 2004 version (the latest version).
SCORM 2004
Package
Version
Specify a version that can be used to differentiate manifests
with the same identifier. For example, if you are uploading the
same project after modifying it, provide a different version
number.
Identifier
Specify a name used by the LMS to identify different
manifests. (This value is generated automatically by
ActivePresenter but you can change it if needed.)
Organization
Specify a title for the organization which this item belongs to.
(ActivePresenter automatically generates this value from
Exporting The Project> Exporting To Microsoft PowerPoint Presentation
134
ActivePresenter User Manual
Version 4.0
Title
project name. However, you can enter a difference text.)
Item Title
Specify a title for the item. (ActivePresenter automatically
generates this value from project name. However, you can
enter a difference text.)
Exporting The Project> Exporting To Microsoft PowerPoint Presentation
135
ActivePresenter User Manual
Version 4.0
Exporting To HTML5 Simulation
HTML5 Simulation is introduced in ActivePresenter 4.0. Below are its main advantages:
1. Learner/viewer can view the same content on various devices (PC, tablet, mobile…) or
platforms (Windows, MacOS, Linux, iOS, Android…).
2. The content can run on any HTML5 supported browsers such as Internet Explorer 9 (or
newer), Mozilla Firefox, Google Chrome, Apple Safari… without using plugin (Flash or
Silverlight player).
3. It can also run on old browsers (Internet Explorer 7 and 8) if the appropriate plugin (Adobe
Flash Player or Microsoft Silverlight) is installed.
Since the HTML5 Simulation encloses all capabilities of AJAX Simulation so that the Export To
AJAX Simulation is now obsoleted.
Exporting The Project> Exporting To HTML5 Simulation
136
ActivePresenter User Manual
Version 4.0
The Export To HTML5 Simulation dialog has three groups of options: General, Advanced and
Misc (Miscellaneous).
General Options
Template Options
HTML5 Simulation is an interactive presentation, which is delivered through a browser. A control
toolbar is provided at the bottom the screen, which allows the user to play/pause/stop the
presentation, hide closed captions, change volume, or jump to a particular slide.
In this context, a template is a design pattern that is applied to this toolbar to change its
appearance.
If you do not want to provide any control to the user, you can opt for No_Toolbar option.
ActivePresenter offers four default options, which can be customized further:
Black
Ocean
Exporting The Project> Exporting To HTML5 Simulation
137
ActivePresenter User Manual
Version 4.0
Silver
Standard
First, select any one of the main options and then click on the Settings... button. The Template
parameters window opens:
The window shows a preview of the layout of exported project.
This window works as follows:
1. This drop-down list offers further presets within the selected template type. The Custom
option allows you to customize all settings and save it as a preset. From now on, the newly
defined preset will be available to you from the Preset drop-down list.
2. A preview window shows the effect of your customization on the toolbar.
3. To customize the toolbar, click on any parameters listed here, and adjust its value. The
changes are reflected in the toolbar sample (2).
Exporting The Project> Exporting To HTML5 Simulation
138
ActivePresenter User Manual
Version 4.0
4. This area shows the explanation of the parameter selected above.
Operation Modes
In this section, there are four controls:
Modes
You can select what modes would be available to the users: Demonstration,
Tutorial, Practice and Test.
Recall that you can customize each object whether it can appear in each of
these modes. Thus the same presentation can behave in totally different
manner in different modes.
Total max
time
(in minutes)
This is the total time: The time taken by all objects to complete their lifecycle,
plus the time allowed for the student to answer while the presentation pauses
and waits for the answer.
Interaction
flashing
This is the speed (milliseconds) for flashing/blinking the interaction object (for
attracting viewer attention).
Generate
Index Page
Select this option to generate the HTML index page which contains the entries
to open all selected modes.
Edit Output
Language
ActivePresenter provides ready translated texts for output (name of elements of
toolbar and messages) for all supported languages. If you want to modify the
translation or add the support for your language, click Edit Output Language
button to open Output Language Editor. The Output Language option in
ActivePresenter 3.x or older is now obsoleted. That means you can not specify
the language for the output but the Project Language will be used for output.
Image Options
Parameter
Size
Options
Remarks
Range: 10% to 150% The size is relative to canvas size selected at the
beginning of the project (you can check this out at any
(in steps of 10%)
time by using the Project>Project Information menu
option)
Note that ActivePresenter only works with logical size
(i.e. pixels). However, when displayed/printed, the
physical size depends on pixels and the dpi (dots-perinch) setting of the displaying printing device.
Color Depth
True Colors (24 bit)
256 Colors (8 bit)
Grayscale (8 bit)
Format
JPEG
Higher color depth makes the presentation look
stunning. But it also increases the file size. When the
images are inserted in other files, that file also will
become large.
Due to their specs and compression algorithms, JPEG is
best suited for pictures while PNG is best suited for
Exporting The Project> Exporting To HTML5 Simulation
139
ActivePresenter User Manual
PNG
Version 4.0
computer-generated images (screenshots, drawings...).
Note that JPEG compression is lossy while PNG is
lossless, so PNG retains crystal clear quality, but the
downside of PNG is that it does not compress well with
pictures (very big file size) and the decoding (when
viewing) is slower than JPEG. However, screenshots are
compressed better with PNG, the file has small size and
there is no loss of quality.
Optimization
Level
None
Low
These are relative compression levels. Note that the
higher the compression level, the longer it takes to
export.
Normal
Select None when testing the output.
High
Select Ultra or High when exporting the final
result.
Ultra
This option is only available if the PNG image format is
selected.
Quality
Range: 1% to 100%
The higher the quality, the larger the output file size.
This option is only available if the JPEG image format is
selected.
Fallback Media Player
The audio/video in the HTML5 Simulation output still can be viewed normally on older browsers
(such as Internet Explorer 7 and 8) if the required plugin is installed. This section allows you to
choose either Adobe Flash Player or Microsoft Silverlight plugin for audio/video playback on older
browsers which do not support HTML5.
Output Location
Location
Location where the exported files will be placed.
Exporting The Project> Exporting To HTML5 Simulation
140
ActivePresenter User Manual
Version 4.0
Advanced Options
Annotation Contents
Choose between the following options:
Convert to
image
ActivePresenter will convert the annotations to images so it will be displayed
just as you see it in the ActivePresenter's Editor window. The converted output
is browser-independent.
However, its downside is the output size will be a little bigger and the
annotations lose some of HTML features like clickable hyperlinks. So we
recommend that you should not choose this feature if you have hyperlinks in
your annotation contents.
As HTML
ActivePresenter will preserve the annotation contents as HTML so some of
HTML features like clickable hyperlinks are preserved.
But please note that different web browsers may render the HTML content a
little differently.
Exporting The Project> Exporting To HTML5 Simulation
141
ActivePresenter User Manual
Version 4.0
SCORM Options
Parameter
Generate
SCORM
Package
Options
No
SCORM1.2
Remarks
If your LMS supports both 1.2 and 2004 versions of SCORM,
please choose 2004 version (the latest version).
SCORM 2004
Specify a version that can be used to differentiate manifests
with the same identifier. For example, if you are uploading the
same project after modifying it, provide a different version
number.
Package
Version
Identifier
Specify a name used by the LMS to identify different
manifests. (This value is generated automatically by
ActivePresenter but you can change it if needed.)
Organization
Title
Specify a title for the organization which this item belongs to.
(ActivePresenter automatically generates this value from
project name. However, you can enter a difference text.)
Item Title
Specify a title for the item. (ActivePresenter automatically
generates this value from project name. However, you can
enter a difference text.)
Report Options
These options let you decide how to report the results of test taken by the student.
Method
Format
Email/HTTP
address to
receive
Choose between
No Report: Do not send report
Email: Send report through email
HTTP: Send report through HTTP request
Choose between the reporting formats
XML Document
JSON (JavaScript Object Notation)
This is the HTTP URL or email address that receives the report. If the method
is HTTP, this is the address of a server side script that will process the report
data (the data is either in XML or JSON format).
For more details, see Appendix Reporting Options.
Pass Condition
This condition is used to determine the overall pass/fail result of the student when he takes a test.
Exporting The Project> Exporting To HTML5 Simulation
142
ActivePresenter User Manual
Condition
Version 4.0
Choose between
Percents of correct answers
Points gained
Number of correct answers
Due to SCORM specifications, please take following note when a SCORM
option is selected:
Minimum
value
In SCORM 1.2, the raw score submitted to LMS is a normalized value
in range 0-100.
In SCORM 2004, the raw score submitted to LMS is a normalized value
in range 0-100 if the first condition (Percents of correct answers) is
chosen. Otherwise, it is an absolute value.
Set a numerical value (no range- Free setting)
Note that if you select percentage, then this value cannot exceed 100.
Exporting The Project> Exporting To HTML5 Simulation
143
ActivePresenter User Manual
Version 4.0
Misc Options
In this tab, define how the presentation would end, and whether accessibility features are enabled.
Presentation End Behavior
The following options are offered:
Ask to restart or
close presentation
in Demonstration
and Tutorial mode
Whether asking viewers to restart or close at the end of presentation or
not. When unselected, the exported presentation will stop silently at the
last slide and the window is left open. This behavior is applicable only in
Demonstration and Tutorial modes.
Show report in
Practice and Test
mode
If this option is unselected, then the presentation will end without
presenting you with test result (applicable only for Practice and Test
modes).
Accessibility
These options allow you to enable or disable accessibility features:
Exporting The Project> Exporting To HTML5 Simulation
144
ActivePresenter User Manual
Version 4.0
Enable
accessibility text
If this option is selected, slide and object accessibility text is exported.
When a slide or an object is displayed, its accessibility text will be read out
by the screen reader.
Enable keyboard
navigation
If this option is selected, viewer can navigate between focusable objects
using the Tab key. Please note that any Key Stroke object that handles
the Tab key will not work anymore if this option is selected.
Enable visual
focus indicator
If this option is selected, an outline is displayed for the object having
focus.
Exporting The Project> Exporting To HTML5 Simulation
145
ActivePresenter User Manual
Version 4.0
Exporting To Flash Simulation
The options here are very similar to those of HTML5 simulation.
This has three options: General, Advanced and Misc (miscellaneous).
The options are explained below:
General Options
Template Options
Flash simulation is interactive presentation, which is delivered through a browser. A control toolbar
is provided at the bottom the screen, which allows the user to play/pause/stop the presentation,
hide closed captions, change volume, or jump to a particular slide.
In this context, a template is a design pattern that is applied to this toolbar to change its
appearance.
If you do not want to provide any control to the user, you can opt for No_Toolbar option.
ActivePresenter offers four default options, which can be customized further:
Black
Exporting The Project> Exporting To Flash Simulation
146
ActivePresenter User Manual
Version 4.0
Ocean
Silver
Standard
First, select any one of the main options and then click on the Settings... button. The Template
Parameters window opens:
The window does not show a preview of the project itself.
Exporting The Project> Exporting To Flash Simulation
147
ActivePresenter User Manual
Version 4.0
This window works as follows:
1. This drop-down list offers further presets within the selected template type. The Custom
option allows you to customize all settings and save it as a preset. From now on, the newly
defined preset will be available to you from the Preset drop-down list.
2. A preview window shows the effect of your customization on the toolbar.
3. To customize the toolbar, click on any parameters listed here, and adjust its value. The
changes are reflected in the toolbar sample (2).
4. This area shows the explanation of the parameter selected above.
Operation Modes
In this section, there are four controls:
Modes
You can select what modes would be available to the users:
Demonstration, Tutorial, Practice and Test.
Recall that you can customize each object whether it can appear in each
of these modes. Thus the same presentation can behave in totally different
manner in different modes.
Total max time
(in minutes)
This is the total time: The time taken by all objects to complete their
lifecycle, plus the time allowed for the student to answer while the
presentation pauses and waits for the answer.
Interaction flashing This is the speed (milliseconds) for flashing/blinking the interaction object
(for attracting viewer attention).
Generate Index
Page
Select this option to generate the HTML index page which contains the
entries to open all selected modes.
Edit Output
Language
ActivePresenter provides ready translated texts for output (name of
elements of toolbar and messages) for all supported languages. If you
want to modify the translation or add the support for your language, click
Edit Output Language button to open Output Language Editor. The
Output Language option in ActivePresenter 3.x or older is now obsoleted.
That means you can not specify the language for the output but the
Project Language will be used for output.
Flash Options
Parameter
Size
Options
Remarks
Range: 10% to 150% The size is relative to canvas size selected at the
beginning of the project (you can check this out at
(in steps of 10%)
any time by using the Project>Project Information
menu option)
Note that ActivePresenter only works with logical
size (i.e. pixels). However, when displayed/printed,
the physical size depends on pixels and the dpi
(dots-per-inch) setting of the displaying printing
Exporting The Project> Exporting To Flash Simulation
148
ActivePresenter User Manual
Version 4.0
device.
Image Color Depth True Colors (24 bit)
256 Colors (8 bit)
Grayscale (8 bit)
Higher color depth makes the presentation look
stunning. But it also increases the file size. When
the images are inserted in other files, that file also
will become large.
Frame rate
Set between 1 and 30 fps (frames per second).
Compression level Choose from-
Select the compression level you want.
None
1-8 (select a
number)
Maximum
Output Location
Location
Location where the exported files will be placed.
Exporting The Project> Exporting To Flash Simulation
149
ActivePresenter User Manual
Version 4.0
Advanced Options
These are SCORM-related options.
SCORM Options
Parameter
Options
Generate SCORM No
Package
SCORM1.2
Remarks
If your LMS supports both 1.2 and 2004 versions of
SCORM, please choose 2004 version (the latest version).
SCORM 2004
Package Version
Identifier
Specify a version that can be used to differentiate
manifests with the same identifier. For example, if you are
uploading the same project after modifying it, provide a
different version number.
Specify a name used by the LMS to identify different
manifests. (This value is generated automatically by
ActivePresenter but you can change it if needed.)
Exporting The Project> Exporting To Flash Simulation
150
ActivePresenter User Manual
Version 4.0
Organization Title
Specify a title for the organization which this item belongs
to. (ActivePresenter automatically generates this value
from project name. However, you can enter a difference
text.)
Item Title
Specify a title for the item. (ActivePresenter automatically
generates this value from project name. However, you
can enter a difference text.)
Report Options
These options let you decide how to report the results of test taken by the student.
Method
Format
Choose between
No Report: Do not send report
Email: Send report through email
HTTP: Send report through HTTP request
Choose between the reporting formats
XML Document
JSON (JavaScript Object Notation)
Email/HTTP
This is the HTTP URL or email address that receives the report. If the
address to receive method is HTTP, this is the address of a server side script that will process
the report data (the data is either in XML or JSON format).
For more details, see Appendix Reporting Options.
Pass Condition
This condition is used to determine the overall pass/fail result of the student when he takes a test.
Condition
Choose between
Percents of correct answers
Points gained
Number of correct answers
Due to SCORM specifications, please take following note when a SCORM
option is selected:
Minimum value
In SCORM 1.2, the raw score submitted to LMS is a normalized
value in range 0-100.
In SCORM 2004, the raw score submitted to LMS is a normalized
value in range 0-100 if the first condition (Percents of correct
answers) is chosen. Otherwise, it is an absolute value.
Set a numerical value (no range- Free setting)
Note that if you select percentage, then this value cannot exceed
Exporting The Project> Exporting To Flash Simulation
151
ActivePresenter User Manual
Version 4.0
100.
Misc Options
In this tab, define how the presentation would end.
The following options are offered:
Ask to restart or
close presentation
in Demonstration
and Tutorial mode
Whether asking viewers to restart or close at the end of presentation or
not. When unselected, the exported presentation will stop silently at the
last slide and the window is left open. This behavior is applicable only in
Demonstration and Tutorial modes.
Show report in
Practice and Test
mode
If this option is unselected, then the presentation will end without
presenting you with test result (applicable only for Practice and Test
modes).
Exporting The Project> Exporting To Flash Simulation
152
ActivePresenter User Manual
Version 4.0
Reporting Options
The reporting option is designed for publisher who does not have a SCORM-compliant LMS. It
provides an alternative way for publisher to collect test results from learners via HTTP or Email
protocol.
Content Of The Report
The report can be formatted in various ways but the content generally consists of the following:
Name
Presentation name (also project name).
Description
Presentation description (also project description).
Date
The local time (based on user computer date time setting) when the report
is created.
UserID
Identity of the user who takes the practice or test. When user logged in to
take practice or test, server side script should store a cookie which its
name is "userid" and value is the id of the user to the client computer. If no
"userid" named cookie is found, the user will be prompt to input his/her
identity before sending report.
TotalTime
The duration in seconds which user used to take the practice or test.
SlideCount
Number of slides in the presentation.
Taken
Number of slides which user has taken.
Correct
Number of slides which user has performed action correctly without any
help.
Wrong
Number of slides which user has performed action incorrectly or using
help.
Points
Points (mark) user has gained through the practice or test, only correct
action gains points.
MaxPoints
Maximum points which user can gain in the practice or test (by taking
correctly all slides).
Percent
Points over MaxPoints in percentage (Points/MaxPoints*100).
Result
The practice or test assessment based on pass condition.
Exporting The Project> Reporting Options
153
ActivePresenter User Manual
For human readable: passed or failed
For computer: true or false
Version 4.0
User passes the practice or test if his/her result greater than or equal the
minimum required result. The result can be points which user gained,
points gained over maximum points in percentage, or number of correct
answer.
Details
Detail result for each slide, consists of slide index, number of user
attempts for the slide, and slide result.
Report Formats
Report formats are chosen based on how they are transmitted:
Plain text or CSV for email sending
XML or JSON for HTTP sending.
Report In Plain Text
Report data is formatted in plain text for human reading.
The language can be selected when exporting. Below is an example of plain text report in English:
Here is a sample:
Presentation: Demo
Description: Project for Demonstration
Date: Fri May 25 11:28:31 GMT+0700 2012
UserID: test
Total Time: 0 h : 0 m : 30 s
Total Slides: 2
Taken Slides: 2
Total Interactions: 2
Taken Interactions: 2
Correct: 2
Points: 2 / 2
Percentage: 100%
Result: Passed - At least 80 % required
1. Slide: 1, ID: 1_4, Attempts: 1, Points: 1, Max Points: 1, Result: Correct,
Interaction Type: Text Box, Answer: demo
2. Slide: 2, ID: 2_1, Attempts: 1, Points: 1, Max Points: 1, Result: Correct,
Interaction Type: Multiple Choice, Answer: 1
Exporting The Project> Reporting Options
154
ActivePresenter User Manual
Version 4.0
Report In CSV Format
The report is formatted as CSV (Comma-Separated Values). This format is suitable for importing
into MS Excel.
Here is a sample:
"Presentation","Description","Date","UserID","Total Time","Total Slides","Taken Slides","Total
Interactions","Taken Interactions","Correct","Points","Max Points","Percentage","Result"
"Demo","Project for Demonstration","Fri May 25 11:46:11 GMT+0700
2012","test","30","2","2","2","2","2","2","2","100","Passed"
"#","Slide","ID","Attempts","Points","Max Points","Result","Interaction Type","Answer"
"1","1","1_4","1","1","1","Correct","Text Box","demo"
"2","2","2_1","1","1","1","Correct","Multiple Choice","1"
Report In XML Format
The report is formatted as XML (eXtensible Markup Language).
Here is a sample:
<?xml version="1.0" encoding="UTF-8"?>
<Content>
<Report>
<Name>Demo</Name>
<Description>Project for demonstration</Description>
<Date> Fri May 25 11:28:31 GMT+0700 2012</Date>
<UserID>test</UserID>
<TotalTime>30</TotalTime>
<SlideCount>2</SlideCount>
< TakenSlide>2</ TakenSlide>
< InteractionCount>2</ InteractionCount>
<TakenInteraction>2</TakenInteraction>
<Correct>2</Correct>
<Points>2</Points>
<MaxPoints>2</MaxPoints>
<Percent>100</Percent>
<Result>true</Result>
<Details>
<Interaction>
<SlideIndex>1</SlideIndex>
<ReportID>1_4</ReportID>
<Attempts>1</Attempts>
Exporting The Project> Reporting Options
155
ActivePresenter User Manual
Version 4.0
<Points>1</Points>
<MaxPoints>1</MaxPoints>
<Result>Correct</Result>
<Type>Text Box</Type>
<Answers>demo</Answers>
</Interaction>
<Interaction>
<SlideIndex>2</SlideIndex>
<ReportID>2_1</ReportID>
<Attempts>1</Attempts>
<Points>1</Points>
<MaxPoints>1</MaxPoints>
<Result>Correct</Result>
<Type>Multiple Choice</Type>
<Answers>1</Answers>
</Interaction>
</Details>
</Report>
</Content>
Report In JSON Format
The report is formatted in JSON (JavaScript Object Notation) format.
Here is a sample:
{
"Name":"Demo",
"Description":"Project for demonstration",
"Date":" Fri May 25 11:46:11 GMT+0700 2012",
"UserID":"test",
"TotalTime":"30",
"SlideCount":2,
"TakenSlide":2,
"InteractionCount":2,
"TakeInteraction":2,
"Correct":2,
"Points":4,
"MaxPoints":4,
"Percent":"100",
"Result":true,
"Details": [
{
"SlideIndex":1,
"ReportID":"1_4",
"Attempts":1,
"Points":1,
Exporting The Project> Reporting Options
156
ActivePresenter User Manual
Version 4.0
"MaxPoints":1,
"Result":"Correct",
"Type":"Text Box",
"Answers":"demo"
},
{
"SlideIndex":2,
"ReportID":"2_1",
"Attempts":1,
"Points":1,
"MaxPoints":1,
"Result":"Correct",
"Type":"Multiple Choice",
"Answers":1
}
]
}
Transmission Of Report
The report can be sent to a valid email or HTTP address.
In case of sending via HTTP protocol, POST method is used, where the key is "report" and the
value is the report content with format specified when exporting to HTML5 presentation.
The server-side script at the HTTP address must handle and process the report.
For example, suppose that the HTTP address is "http://atomisystems.com/reportreceiver.php". The
following is a trivial sample code in reportreceiver.php file to receive and process report:
<?php
if (isset($_POST["report"]))
{
//read report data
$report = $_POST["report"];
//process report, e.g. append to a text file here
$report_file = fopen("report.txt", "a");
if($report_file)
{
fwrite($report_file, $report);
//separate this report from others
fwrite($report_file,"\n\n---------\n\n");
fclose($report_file);
}
}
?>
Exporting The Project> Reporting Options
157
ActivePresenter User Manual
Version 4.0
Other Uses Of
ActivePresenter
So far we have seen how to use ActivePresenter for presentations of various types (images,
documents, videos and interactive learning courses with scoring facility).
But ActivePresenter can also be used for many other purposes:
1. Image editor
2. Image format converter
3. Screenshot software
4. Audio/video editor (trimming, cutting, splicing/joining, adding titles)
5. Text to speech (TTS) generator
6. Image/Audio/video format converter
ActivePresenter cannot edit the object directly like a dedicated software: You have to first insert the
object in a new/existing project, and then edit it. This main editing process is very similar to the
process flow in a dedicated software. Once you have finished editing the object, you can close the
host project without saving it.
Let us see each function in more detail:
ActivePresenter As Image Editor
You can edit and/or annotate an image with ActivePresenter.
While ActivePresenter is not as powerful as GIMP or InkScape, you can do a lot with it.
Actually ActivePresenter has a built-in Image Editor but it is not accessible directly. So you have
insert the image in a new project (or existing project) in order to access it. Once you have finished
editing the image, you can close the host project without saving.
This is a three-step process:
1. Open a project of any type, or open an existing project.
Don't worry about its parameters, because the project will not be changed in any way.
2. Insert the image in any slide. Again, don't worry about how this affects the slide: We are
not going to save the project.
3. Right-click on the image in the Canvas pane (or its time bar in the Timeline pane). From
the context menu that appears, select the Edit image... option. The Image Editor pops up
and lets you edit the image.
After editing, you can directly save the image as a file using the File > Save as... menu.
Other Uses Of ActivePresenter> ActivePresenter As Image Editor
158
ActivePresenter User Manual
Version 4.0
4. Close the project without saving.
ActivePresenter As Image Format Converter
This is a four-step process:
1. Open a project of any type, or open an existing project.
Don't worry about its parameters, because the project will not be changed in any way.
2. Insert the image in any slide. Again, don't worry about how this affects the slide: We are
not going to save the project.
3. Right-click on the image in the Canvas pane (or its time bar in the Timeline pane). From
the context menu that appears, select the Export To File... option. A dialog pops up. In its
“Save as type” drop-down list, select your desired format (png / jpeg / bmp).
4. Close the project without saving.
ActivePresenter As Screenshot Software
This is a four-step process (ActivePresenter cannot snap and save a screenshot image directly):
1. Open a project of any type, or open an existing project.
Don't worry about its parameters, because the project will not be changed in any way.
2. Take a screenshot (any window, object, whole screen or a rectangular area on screen).
When taking a screenshot in Application or region mode, be sure to select the
Insert as image to current slide check box.
ActivePresenter inserts it as an image in the current slide.
3. Right-click on the image in the Canvas pane (or its time bar in the Timeline pane). From
the context menu that appears, select the Edit image... option. The Image Editor pops up
and lets you edit the image.
After editing, you can directly save the image as a file using the File > Save as... menu.
4. Close the project without saving.
ActivePresenter As Audio Editor
This is a five-step process:
1. Open a project of any type, or open an existing project.
Don't worry about its parameters, because the project will not be changed in any way.
2. Insert the audio that is to be edited.
3. Now you can edit this track in one or more of the following:
1. Edit the track using the Range-Edit commands
2. Insert silence of any duration you want.
Other Uses Of ActivePresenter> ActivePresenter As Image Format Converter
159
ActivePresenter User Manual
Version 4.0
3. Adjust the volume of the track between any selected moments
4. Join the track with other audio tracks
4. Right-click on the
icon in the Canvas pane (or its time bar in the Timeline pane). From
the context menu that appears, select the Export To File... option.
◦
If you had split the audio track in Step-3, you can save any (or all-) of those parts
individually.
5. Close the project without saving.
ActivePresenter As TTS Generator
This is a five-step process:
1. Open a project of any type, or open an existing project.
Don't worry about its parameters, because the project will not be changed in any way.
2. Select the Annotation > Audio > Create New... menu option.
(Or click on the arrow of the
toolbar button and select Create New... option.)
3. In the Audio window that pops up, type some text (or copy from another document) in its
Text To Speech section (at bottom), and press the Generate button. This converts the text
to speech and inserts a new audio track in the slide.
4. Right-click on the
icon in the Canvas pane (or its time bar in the Timeline pane). From
the context menu that appears, select the Export To File... option.
5. Close the project without saving.
ActivePresenter As Video Editor
This is a five-step process:
1. Open a project of any type, or open an existing project.
Don't worry about its parameters, because the project will not be changed in any way.
2. Click on the
toolbar button or use the Annotation > Video menu. Select the video that
is to be edited.
3. Now you can edit this track in one or more of the following:
1. Edit the track using the Range-Edit commands
2. Freeze the frame (insert a pause) for any duration you want.
3. Adjust the volume of the track between any selected moments
4. Join the track with other video tracks
4. Right-click on the video frame in the Canvas pane (or its time bar in the Timeline pane).
From the context menu that appears, select the Export To File... option.
◦
If you had split the video track in Step-3, you can save any (or all-) of those parts
Other Uses Of ActivePresenter> ActivePresenter As TTS Generator
160
ActivePresenter User Manual
Version 4.0
individually.
5. Close the project without saving.
ActivePresenter As Format Converter
ActivePresenter can convert the formats of an image, audio or video.
In fact, whenever you edit image, audio or video (as explained above), you have the choice to save
the resultant object in a different format.
All you have to do is in the Export To File... dialog, click on the Save as type drop-down list, and
select the desired format. Then press OK.
ActivePresenter saves the file in the new format.
Other Uses Of ActivePresenter> ActivePresenter As Format Converter
161
ActivePresenter User Manual
Version 4.0
Appendices
Appendices> ActivePresenter As Format Converter
162
ActivePresenter User Manual
Version 4.0
Using ActivePresenter
Windows
In this Appendix, we will see how to use the various windows in ActivePresenter.
Using The Capture Profile Editor
The Capture Profile Editor window is launched when you launch a new profile or edit an existing
profile from the New Project window.
If you have launched a new profile, ActivePresenter allows you to copy settings from an
existing capture profile, by launching the following window.
Select “None” if you want to build a new profile from scratch.
The Capture Profile editor has five different tabs, each dealing with a specific area. The values set
in all these tabs are saved in the current profile.
The Save and Cancel buttons at the bottom are common between the five tabs. The new settings
do not take effect till you have saved the profile.
Once you create a new profile, it will be available in the Capture New project window.
The tabs are described below:
Using ActivePresenter Windows> Using The Capture Profile Editor
163
ActivePresenter User Manual
Version 4.0
The General Tab
This tab allows you to make generic choices for the capture settings.
It has three sections: Capture profile, Capture type and Automatic panning. These are explained
below:
Capture Profile
This section records the name and description for the profile.
Parameter
Remarks
Profile Name
The name must be indicative of the end-purpose of the project.
Description
Describe the end-purpose and your strategy for the project.
(Note that each different end-purpose calls for a different project-settings, and
also different approaches for capturing, annotation and interaction. The endpurpose will also affect the format of the video and/or documentation.)
Using ActivePresenter Windows> Using The Capture Profile Editor
164
ActivePresenter User Manual
Version 4.0
Capture Type
Here, choose between two main capture modes: Smart capture and FMR.
The FMR mode is like recording a movie with a fixed rate of frames per second. It does not
respond to any mouse/keyboard inputs. Therefore there are no further choices in this
mode.
If you choose the Smart capture mode, ActivePresenter offers further choices:
Option
Remarks
Automatically
use FMR for
Drag and Drop
Actions
Captures the target screen when you drag any item with LMB or RMB. The
entire dragging action will be captured in FMR mode (with a fixed frame rate).
When the drag action is over, ActivePresenter will switch back to the Smart
Capture mode.
Automatically
use FMR for
Mouse Wheel
Actions
Captures the target screen in FMR mode (with a fixed frame rate) when you
scroll the mouse-wheel up or down.
The FMR mode will last as long as you scroll the wheel. After that,
ActivePresenter will switch back to the Smart Capture mode.
Automatic Panning
This facility is useful only when your capture frame is smaller than the target application's screen,
and if you want to freely move (“pan”) that frame to any part of the screen.
But if you are anyway capturing the entire screen of the target application (or the whole desktop
screen), then this technique is not applicable.
Usually you use this feature when the target application has many controls, and you want to zoom
in to a certain part of the screen at a time, but keep your option open to move to any other part of
the screen, as required.
Option
Remarks
Using ActivePresenter Windows> Using The Capture Profile Editor
165
ActivePresenter User Manual
Version 4.0
Make Capture When this option is selected, the capture frame follows the mouse pointer
Window
around the screen.
Follow Mouse
As long as the pointer is within the capture frame, the frame does not move.
Cursor
But when the mouse pointer crosses any side of the frame, the frame starts
following it.
Panning
Speed
Set the speed (in pixel/s) at which the frame will start following your mouse
pointer.
Note that very high speeds are unsettling for the viewers, because the small
capture frame presents a blinkered view to begin with, and at high pan
speeds, the user won't realize which area of the screen you are at!
Use this facility sparingly, because the viewer will get a blinkered view of the target application,
which is often irritating. Instead of this feature, consider using the pan-n-zoom feature, which
zooms in from full-screen view to a small area, and zooms back as soon as the detail is shown.
The FMR/Audio Tab
This tab provides more choices for the Full Motion Recording (FMR) mode and audio.
Using ActivePresenter Windows> Using The Capture Profile Editor
166
ActivePresenter User Manual
Version 4.0
It contains two sections:
1. FMR basic settings
2. Audio settings
Both sections are unrelated, but placed on the same tab for convenience.
These sections are explained below:
FMR Settings
Since FMR is like videotaping the screen, it has three parameters:
Option
Video codec
Remarks
ActivePresenter offers a choice of three video codecs:
1. Flash Screen Video (lossless)
2. MPEG1 (lossy)
3. MPEG2 (lossy)
When the flash codec is selected, ActivePresenter uses the lossless algorithm
in encoding to preserve the quality. But when you select the MPEG1 or
MPEG2 codec, ActivePresenter down-samples the video data, resulting in
reduced file size but at the cost of irreversible loss of video detail.
Frame rate
A higher frame rate would increase the size of the recorded video. It may also
overload simpler computers, because the computer not only has to run all the
applications, but capture those screens in real time. In the worst case, you will
see dropped frames in the captured video.
On the other hand, a lower frame record will appear jerky. This especially
happens with rates lower than 15 frames/s. Besides, you may miss capturing
some low-duration events (something that just flashes on the screen and
vanishes).
The most commonly used range is 20-30 frames/s.
Key frames
This is the number of continuous non-key frames between key frames. When
every x frames recording video, ActivePresenter will automatically place a key frame every X
frames.
When you change the frame rate, ActivePresenter automatically adjusts this
setting so that the video will have exactly one key frame every four seconds.
But you can manually change this rate.
Key frames are full frames that video player can jump directly to, a higher
value results in a (little bit) smaller video size, but will make seeking less
accurate. Also, in case of corruption, lesser number of frames are lost
because the key frames are spaced closer.
As a compromise, the [4 - 400] range is used.
Quality
When you select one of the lossy codecs, ActivePresenter allows you to select
a quality level between 1 (min) and 100 (max). The higher the number you
Using ActivePresenter Windows> Using The Capture Profile Editor
167
ActivePresenter User Manual
Version 4.0
select, the better is the video quality and the larger is the file size.
Audio Settings
This setting contains three parameters to balance between the audio quality or storage size:
Option
Audio Codec
Remarks
ActivePresenter offers a choice of three audio codecs:
1. 16-bit PCM (lossless)
2. Vorbis (lossy)
3. MP3 (lossy)
When the 16-bit PCM is selected, ActivePresenter uses the lossless algorithm
in encoding to preserve the quality. But when you select the Vorbis or MP3
codec, ActivePresenter use the lossy algorithm in encoding, resulting in
reduced file size but at the cost of irreversible loss of audio quality.
Sample Rate
The incoming analog sound is first converted into digital form and then stored
on the disk. This digital sound is not the exact replica of the original: Some
fidelity is always lost. The fidelity of the digital sound depends on the sample
rate and bit rate: Higher the sampling and bit rate, better the fidelity.
However, higher fidelity also increases the file size, as more data needs to be
stored.
The most popular sampling rates are listed here.
Channels
Choose from Mono and Stereo. Unless you are opting for a studio-recorded
sound track, Mono is sufficient. (During playback, the sound card feeds the
same sound in left and right channels).
Stereo recording needs double the storage size as compared to Mono.
Bit Rate
This is the amount of compressed data needed to store one second of sound.
Higher the bit rate, better the audio quality and larger the file size.
This option is only available if the MP3 audio codec is selected because
ActivePresenter encodes the MP3 audio in constant bit rate mode.
Quality
ActivePresenter allows you to select a quality level between 1 (min) and 100
(max). The higher the number you select, the better is the audio quality and
the larger is the file size.
This option is only available if the Vorbis audio codec is selected because
ActivePresenter encodes the Vorbis audio in constant quality mode.
Using ActivePresenter Windows> Using The Capture Profile Editor
168
ActivePresenter User Manual
Version 4.0
The Cursor Tab
The Cursor tab controls the appearance of the captured image of the mouse pointer in the
rendered output. The main choice is whether to capture the mouse pointer at all. Indeed, if your
application is not interactive, there is no point in capturing the mouse action (it will be only
distracting the viewer), and so it is best to deselect this option.
The Restore defaults button at the bottom restores the values to their default values. This is
useful if you have experimented with the controls far too much and want to start over.
If you do select the Record Mouse Cursor option, the following sub-options are offered:
Option
Show Mouse
in Full Motion
Recording
Mode
Remarks
If you deselect this option, ActivePresenter will record the mouse cursor only
in the Smart capture mode, but not in the FMR mode.
Using ActivePresenter Windows> Using The Capture Profile Editor
169
ActivePresenter User Manual
Version 4.0
Add Mouse
Click Sound
This option is available only if you have selected the Smart capture mode.
Use Simple
Cursor Path
This option is available only if you have selected the Smart capture mode.
If you select this option, ActivePresenter inserts a simulated sound when you
click LMB, RMB or double-click LMB (ActivePresenter doesn't support a MMB
click).
By default, ActivePresenter records the actual real-time movement of the
mouse pointer.
But if you select this option, ActivePresenter will record only the locations of
the click-points (not the real-time movement path), and connect those points
with a straight line or a curved line.
Select this option if you have the habit of moving the mouse aimlessly while
you record the target application. It will reduce a lot of clutter; and you will not
need to clean up a complicated mouse path later.
Cursor Highlight
Often the target application has such a cluttered interface that it becomes very difficult to spot the
mouse pointer in it. To help the viewers, ActivePresenter provides a highlight around the mouse
pointer so that it stands out against the background.
The rest of the section is applicable only if the Highlight Cursor option is selected.
The section contains four options for the shape, size, color and opacity of the highlight. A
previewer pane shows the net effect of all these options.
The Annotation Tab
This tab controls the annotations and interactions that are automatically added during the capture
mode. (These are distinct from the annotations and interactions added during the editing of
the captured project.)
The options on this tab get activated only when you select the Smart Capture mode (in the
General tab). If you select the FMR mode, none of the options apply.
Using ActivePresenter Windows> Using The Capture Profile Editor
170
ActivePresenter User Manual
Version 4.0
The annotation tab has two main sections, one for the mouse and the other for the keyboard.
Both sections have identical options, as follows:
Option
Remarks
Annotation
To introduce an annotation (mouse/key) that is about to occur or to guide the
learners how to operate. Annotation is usually used for demonstration and
training.
Correct
Message
Correct, Incorrect and Hint message are feedback objects: ActivePresenter
presentations can provide a feedback to the viewer's action when he interacts
with the HTML5/Flash simulation (in Tutorial, Practice or Test mode; but not in
Demo).
Incorrect
Message
Hint
Message
The Correct Message is displayed if user action is correct.
Conversely, the Incorrect Message is displayed if user action is incorrect.
The Hint Message is displayed when user hovers the mouse over the interactive
object (Mouse Click, Key Stroke).
See the demo for an example of interactive objects and feedback messages.
Using ActivePresenter Windows> Using The Capture Profile Editor
171
ActivePresenter User Manual
Version 4.0
When the Use OLE Automation for Microsoft Office option is checked, ActivePresenter can get
more precise size and location of captured interactions when capturing MS Office. But sometimes
it causes MS Office working improperly (e.g. MS Excel 3D references). If this happens, just
disable this option.
For capturing other applications, ActivePresenter just ignores this option.
The Hotkeys Tab
The Hotkeys tab lets you set the keyboard shortcuts for various functions.
The Restore defaults button at the bottom restores the values to their default values. This is
useful if you have experimented with the controls far too much and want to start over.
ActivePresenter allows you to define hot keys for seven functions, as shown above. The Capture In
Advance function is similar to Manual Capture except the captured screenshot will be used as
background for next step. This function may be useful in some circumstance, for example when
you want to capture a button in normal state, not in hover state.
Sometimes the target application also needs the same hot keys. In such cases, you can disable
the Use hot keys check box or define different ones for ActivePresenter.
To change any hot key, just click inside the box, and press the new combination of keys on your
Using ActivePresenter Windows> Using The Capture Profile Editor
172
ActivePresenter User Manual
Version 4.0
keyboard. Immediately that combination appears in the box.
The new combination does not take effect till you click the Save button.
Using The Event Editor
The event editor defines the behavior for each interaction.
Each type of interaction can handle certain events (trigger conditions), by taking one or more
actions. It is the job of the Event Editor to define the actions to be taken for each event.
To launch the Event Editor window, use any of the following methods:
1. In the context menu of any interactive object, select the Event Properties option (at the
top).
2. Double-click on the main object in the main window.
(Careful! If you double-click on an element of the object, this editor will not pop up!)
3. Select the object in the main window of ActivePresenter, and then scroll down in the
Properties window. The last option is Event. This line appears blank, but when you click
on it, a
button appears. Click on this button.
In case of drop targets, you have only one option to launch the Event Editor window: edit the
Accept List property of the drop target from the Properties window.
For each type of interaction, the Event Editor will have to define different behaviors. Each aspect of
the behavior is covered by a separate tab. The structure of a given tab does not change from
object to object.
Thus the Event Manager employs a different set of tabs for each interaction.
The tabs are described below:
Tab
Defines-
Mouse Click
Defines correct mouse activities (e.g. single left-click, double left-click, rightclick, etc.; with or without modifier keys, such as SHIFT, CTRL and ALT), and
optionally score, actions to be taken for each specific activity.
Key Stroke
Defines correct hot keys, and optionally score, actions to be taken for each hot
key.
Text
Defines the reference text strings against which the user's input is to be
compared. And optionally defines score, actions to be taken for each specific
text string.
Accepted
Defines drag sources that can be dropped onto the drop target, and optionally
Drag Sources actions to be taken for each dropped source.
(for Drop
Also defines maximum number of accepted drag sources that can be dropped
Target)
onto the drop target.
Using ActivePresenter Windows> Using The Event Editor
173
ActivePresenter User Manual
Version 4.0
Accepted
Defines drag sources that can be dropped onto the drop area, and optionally
Drag Sources score, actions to be taken for each dropped source.
(for Drop
Area)
Choice (for
Multiple
Choice
Question)
The tab checks whether the user has chosen the correct option; and also
optionally responds to each option chosen (for example, display a hint
message as to why this is not the correct choice, and ask the user to try again.)
Choice (for
Multiple
Response
Question)
The tab allows the user to select multiple responses, and optionally allocate
different point for each response.
Answer (for
Drag-n-Drop
Question)
Defines correct answer for the Drag-n-Drop Question. The answer consists of
multiple drag source – drop target pairs.
Settings
Defines the behavior of the interactive presentation when the user is not
responding well. It defines the maximum allowable number of attempts,
whether to pause the presentation to wait for the user's input, and the
maximum allowed time-limit.
On Correct
Defines the action to be taken when the user gives a correct response.
On Incorrect
Defines the action to be taken when the user gives an incorrect response.
On
Incomplete
Defines the behavior of the interactive presentation when the user has not
completed his answer.
On Timeout
Defines the behavior of the interactive presentation when the user fails to
respond within the time limit defined in the Settings tab.
On Rollover
Defines the behavior of the interactive presentation when the user rolls the
mouse over the main area of the interaction.
On Rollout
Defines the behavior of the interactive presentation when the user rolls the
mouse off the main area of the interaction.
On Accept
Defines actions to be taken when the drop target accepts a drag source.
On Reject
Defines actions to be take when the drop target rejects a drag source.
Also defines overall score for the question, or partial score for each drag source
– drop target pair.
Using ActivePresenter Windows> Using The Event Editor
174
ActivePresenter User Manual
Version 4.0
The Mouse Click Tab
The Mouse click tab provides interaction and point-allocation for mouse clicks (optionally, with
modifier keys, such as SHIFT, CTRL and ALT).
The GUI works as follows:
1. The Points assigned here are common for any of the events listed below. (For this option to
work, the Score by event check box must be cleared. In that case the Points column
below is removed.)
In this example, if the user any of the combinations listed below, he will earn 5 points.
2. The Score by event check box allows you to specify different scores for different events.
(When you click in this check box, the Points column is activated in the pane below; and at
the same time the Points control at the top is disabled.)
Now you can double-click in any cell in this column, and enter any number.
In this example, if the user clicks (or double-clicks) the LMB, he will earn 4 points. If he clicks
CTRL+Left click or ALT+Right click, he will earn 3 points.
3. The Action by event check box allows you to add multiple actions for each event. (When
you click in this check box, the Actions column is activated in the pane below.)
Now you can double-click in any cell in the Actions column, and select an action from the dropdown list.
In our example, the first two events trigger two actions each:
Using ActivePresenter Windows> Using The Event Editor
175
ActivePresenter User Manual
Version 4.0
If the user left-clicks, ActivePresenter will open a website and then continue the
presentation.
If the user CTRL+Left-clicks, ActivePresenter will send an email and the end the
presentation.
4. These buttons are used to organize the entries in the bottom pane:
The
The
The
button adds a new action to the selected row.
If you had clicked in the Event column, this button adds an event.
If you had clicked in the Action column, this button adds an action within the same
event. (In this way you can associate multiple actions with a given event.)
button removes the selected row.
If you had clicked in the Event row, this button deletes the event and all its actions.
If you had clicked in the Action column, this button removes the action, but does not
affect the Event row.
and
buttons move the selected row up and down in the stack.
If you had clicked in the Event row, these buttons move the event and all its actions
together (as a set).
If you had clicked in the Action column, these buttons move the Action row, but do
not affect the Event row.
Using ActivePresenter Windows> Using The Event Editor
176
ActivePresenter User Manual
Version 4.0
The Key Stroke Tab
The Key stroke tab provides interaction and point-allocation for keyboard activities.
The tab for keyboard entries is shown below:
As can be seen above, these events are keyboard-based (either a single key or a combination of
any number of keys; but not a text string).
The GUI works as follows:
1. The Points assigned here are common for any of the events listed below. (For this option to
work, the Score by event check box must be cleared. In that case the Points column
below is removed.)
In this example, if the user presses any of the combinations listed below, he will earn 4 points.
2. The Score by event check box allows you to specify different scores for different events.
(When you click in this check box, the Points column is activated in the pane below; and at
the same time the Points control at the top is disabled.)
Now you can double-click in any cell in this column, and enter any number.
In this example, if the user presses CTRL+P, he will earn 3 points.
If he presses the Space bar, he will earn 2 points, etc.
3. The Action by event check box allows you to define a different action for each event.
(When you click in this check box, the Actions column is activated in the pane below.)
Now you can double-click in any cell in the Actions column, and select an action from the dropUsing ActivePresenter Windows> Using The Event Editor
177
ActivePresenter User Manual
Version 4.0
down list.
In this example, note that the first two events will trigger two actions each:
If the user presses CTRL+P, ActivePresenter will first display the Correct message
object, and then pause the presentation.
If the user presses CTRL+SHIFT+L, the presentation will jump forward by 10 slides
and then pause.
4. These buttons are used to organize the entries in the bottom pane:
The
The
The
button adds a new action to the selected row.
If you had clicked in the Event column, this button adds an event.
If you had clicked in the Action column, this button adds an action within the same
event. (In this way you can associate multiple actions with a given event.)
button removes the selected row.
If you had clicked in the Event row, this button deletes the event and all its actions.
If you had clicked in the Action column, this button removes the action, but does not
affect the Event row.
and
buttons move the selected row up and down in the stack.
If you had clicked in the Event row, these buttons move the event and all its actions
together (as a set).
If you had clicked in the Action column, these buttons move the Action row, but do
not affect the Event row.
Using ActivePresenter Windows> Using The Event Editor
178
ActivePresenter User Manual
Version 4.0
The Text Tab
The Text tab checks whether the user has entered the correct text string in response to a Text
Box, an essay question or a fill in the blank type question.
The GUI works as follows:
1. The Points assigned here are common for any of the events listed below. (For this option to
work, the Score by event check box must be cleared. In that case the Points column
below is removed.)
In this example, if the user enters Bangalore, Mumbai, Hanoi or London, he will earn 5 points.
If he enters anything else, he will not earn any points.
2. The Score by answer check box allows you to specify different scores for different
answers. (When you click in this check box, the Points column is activated in the pane
below; and at the same time the Points control at the top is disabled.)
Now you can double-click in any cell in the Value column, and enter any string. In this example, if
the user enters Bangalore, he will earn 5 points; and if he enters London, he will earn 4 points.
3. The Action by answer check box allows you to define a different action for each answer.
(When you click in this check box, the Actions column is activated in the pane below.)
Now you can double-click in any cell in the Actions column, and select an action from the dropdown list.
Using ActivePresenter Windows> Using The Event Editor
179
ActivePresenter User Manual
Version 4.0
Notice that our example shows three actions if the user enters Bangalore:
First, execute a specified JavaScript
Jump to slide#3, and then
Pause the presentation.
4. These buttons are used to organize the entries in the bottom pane:
The
The
The
button adds a new action to the selected row.
If you had clicked in the Event column, this button adds an event.
If you had clicked in the Action column, this button adds an action within the same
event. (In this way you can associate multiple actions with a given event.)
button removes the selected row.
If you had clicked in the Event row, this button deletes the event and all its actions.
If you had clicked in the Action column, this button removes the action, but does not
affect the Event row.
and
buttons move the selected row up and down in the stack.
If you had clicked in the Event row, these buttons move the event and all its actions
together (as a set).
If you had clicked in the Action column, these buttons move the Action row, but do
not affect the Event row.
5. Choose how the user will submit his answer:
If you select the Auto option, the answer is checked each time the text in the field is changed (i.e.
ActivePresenter checks as you type).
If you select the Press key option, you have to click in the input box and press a hot key. The user
will have to press the same hot key to submit his answer.
6.
It is your responsibility to convey to the user which hot key is defined (use a
message, for example).
If you click in this check box, the answer will be case-sensitive. So if the user enters london
(instead of London), he will not earn any points.
The Choice Tab
There are two different tabs named “Choice”: One is used in the Multiple Choice interaction, and
the other is used in the Multiple Options interaction.
This section describes them both.
For Multiple Choice Question
The Choice tab checks whether the user has chosen the correct option; and also optionally
responds to each option chosen (for example, display a hint message as to why this is not the
correct choice, and ask the user to try again.)
Note that before coming to the Event Editor, you must enter the text for all options. The Choice
Using ActivePresenter Windows> Using The Event Editor
180
ActivePresenter User Manual
Version 4.0
column reflects this text. (You cannot edit this column in the Event Manager).
The GUI works as follows:
1. Enter the points to be earned. (For this option to work, the Score by event check box must
be cleared. In that case the Points column below is removed.)
If the user selects the correct option, he earns these points.
If he selects the incorrect option, he earns no points.
2. Click on the radio button of the correct option.
In this example, Answer 1 is the correct option.
3. Sometimes, the answers are not strictly right/wrong: Even the other answers may be
partially right; but some of them may be preferable.
To handle such situation, select the Score by choice check box. This activates the Points column
in the pane below. Now, allocate different points to each option to differentiate between nonpreferable and preferable answers.
In each row, double-click in the cell in the Points column, and enter points.
4.
Apart from allocating the points, you may also want to respond to the user (e.g. You can
state why his answer is wrong, followed by the “try again!” message).
To do this, click on the Action by choice check box. Immediately the Actions column appears in
the pane below.
Now double-click in each row in this column, and from the drop-down list that appears, select an
Using ActivePresenter Windows> Using The Event Editor
181
ActivePresenter User Manual
Version 4.0
action.
You can enter multiple actions for any given choice. This example shows two actions for each
answer.
5. These buttons are used to organize the Action rows within a given answers. (You cannot
change the order of the answers, simply because the answers need not be in a particular.)
Click in the Action column first and then click on
button to add an action. (In this
way you can associate multiple actions with a given event.)
The
If a given answer contains multiple actions, the
and
buttons move the
selected actions up and down in the stack within the answer.
button removes the selected action.
For Multiple Response Question
The Choice tab allows the user to select multiple options, and optionally allocate different points
for each option.
The GUI works as follows:
1. Enter the points to be earned.
(For this option to work, the Partial score check box must be cleared. In that case the Points
column below is removed.)
To earn these points, the user has to select all the correct answers, and avoid selecting any of the
wrong answers. If he misses any of the right answers, or selects any of the incorrect answers, he
Using ActivePresenter Windows> Using The Event Editor
182
ActivePresenter User Manual
Version 4.0
will earn no points.
In other words, this is “all or nothing” strategy.
2. Place a tick against all correct answers. There may be more than one correct answers.
If the user selects these options, the action(s) defined in the On Correct tab will be executed. If he
selects the other options, the action(s) defined in the On Incorrect tab will be executed.
3. Partial scores
This strategy allows the user to earn some points for each correct answer. To achieve this, select
the Partial score option. Now the Points (1) control is disabled, and a Points column is activated
in the table below. Assign points to each answer.
Sometimes all answers are not of equal merit: You may want to give less points if
the answer is more obvious than the others.
When the user selects a correct answer, he earns the points assigned to that particular answer. As
he chooses more correct answers, these partial scores are added up.
However, if he chooses any of the wrong answers, then the whole answer is considered incorrect,
and he will lose all the partial points earned in this question.
Note that this interaction cannot have a response action per answer, because there are multiple
correct answers; and there is no way to predict which ones are attempted by the user; and which
answers are correct. Thus it is virtually impossible to set a trigger condition.
The Accepted Drag Sources Tab
There are two different tabs named “Accepted Drag Sources”: One is used in the Drop Area
interaction, and the other is used in the normal drop target object.
This section describes them both.
For Drop Target Object
This tab defines drag sources that can be dropped onto the drop target, and optionally actions to
be taken for each dropped source. It also defines maximum number of accepted drag sources that
can be dropped onto the drop target.
Using ActivePresenter Windows> Using The Event Editor
183
ActivePresenter User Manual
Version 4.0
The GUI works as follows:
1. Specify the number of drag sources that can be accepted by the drop target. If the number
is finite, you can define what happens when users drop more drag sources (that are in the
accept list specified in the second step) than this number:
Reject: The drop target does not accept the new dropped object. The dropped
object is sent back to its original position, and the On Reject event is triggered.
Replace the Last: The last dropped object is sent back to its original position, the
new dropped object is accepted. Of course, the On Accept event is triggered in this
case.
2. Specify drag sources that can be accepted by the drop target. You can select/deselect the
Accept All checkbox to select/clear all accepted drag sources.
When a non-accepted drag source is dropped, it is sent back to its original position,
and the On Reject event is triggered.
When an accepted drag source is dropped, if the number of already dropped object
is smaller than the maximum accepted objects specified in the first step, the drag
source is accepted, and the On Accept event is triggered. Otherwise, the output
simulation acts as described in the first step.
3. Specify actions to be taken when each drag source is accepted. When the user drops a
drag source and it is actually accepted (i.e. not rejected as described in the first step), these
actions are executed first, before executing the actions in the On Accept tab.
4. These buttons are used to add/remove/order the actions for each accepted drag source.
(You cannot change the order of the accepted drag sources, simply because they need not
Using ActivePresenter Windows> Using The Event Editor
184
ActivePresenter User Manual
Version 4.0
be in a particular, and they are displayed here based on their z-index.)
Click in the cell in the Actions column first and then click on the
button to add an
action. (In this way you can associate multiple actions with a given drag source.)
Select actions and click on the
If a given drag source contains multiple actions, the
selected actions up and down.
button to removes them.
and
buttons move the
For Drop Area Interaction
This tab defines drag sources that can be dropped onto the drop area, and optionally score,
actions to be taken for each dropped source.
The GUI works as follows:
1. The Points assigned here are common for any of the accepted drag sources listed below.
(For this option to work, the Score by Object check box must be cleared. In that case the
Points column below is removed.)
2. Specify drag sources that can be accepted by the drop area.
When a non-accepted drag source is dropped, it is sent back to its original position,
and the On Incorrect event is triggered.
When an accepted drag source is dropped, it will be accepted and the On Correct
Using ActivePresenter Windows> Using The Event Editor
185
ActivePresenter User Manual
Version 4.0
event is triggered. If the drop area already contains a dropped object, it will be sent
back to its original position before the new dropped object is accepted. (The drop
area behaves similar to the drop target with the settings: Max Accepted Objects: 1,
On Max Accept: Replace the Last.)
3. The Score by Object check box allows you to specify different scores for different
accepted drag source. When you select this check box, the Points column is displayed;
and at the same time the Points control at the top is disabled.
In this example, the “Hexagon” drag source is correct, but it is not good as the “Regular
Hexagon” one, so it gains lesser score.
4. The Action by Object check box allows you to add multiple actions for each accepted drag
source. When you select this check box, the Actions column is displayed. These actions
will be executed when the drag source is accepted, before executing the actions in the On
Correct tab.
In this example, a shape is displayed when the user drops the “Hexagon” to suggest that
the “Regular Hexagon” is more suitable.
5. These buttons are used to add/remove/order the actions for each accepted drag source.
(You cannot change the order of the accepted drag sources, simply because they need not
be in a particular, and they are displayed here based on their z-index.)
Click in the cell in the Actions column first and then click on the
button to add an
action. (In this way you can associate multiple actions with a given drag source.)
Select actions and click on the
If a given drag source contains multiple actions, the
selected actions up and down.
button to removes them.
and
buttons move the
The Answer Tab (for Drag-n-Drop Question)
This tab defines correct answer for the Drag-n-Drop Question. The answer consists of multiple
drag source – drop target pairs. It also defines overall score for the question, or partial score for
each drag source – drop target pair.
Using ActivePresenter Windows> Using The Event Editor
186
ActivePresenter User Manual
Version 4.0
The UI works as follows:
1. Specify the Points for the question. (For this option to work, the Partial score check box
must be cleared. In that case the Points column below is removed.)
2. Specify correct drag source – drop target pairs. The question is considered correct if all
drag sources in this list are dropped into correct drop targets.
To add a pair of drag source – drop target, click on the
empty area of the list.
To change a pair of drag source – drop target, double click on the drag source or
the drop target.
To remove drag source – drop target pairs, select them and click on the
One drag source can be mapped to multiple drop targets. When taking the output
simulation, users can drag the source to one of the targets.
Multiple drag sources can be mapped to one drop target. When taking the output
simulation, users must drag all of the sources to the drop target.
button, or double click on
button.
3. The Partial score check box allows you to specify score for each pair of drag source –
drop target. When you select this check box, the Points column is displayed; and at the
same time the Points control at the top is disabled.
When the user drops a drag source to the correct drop target, he earns the points
assigned to that particular pair. When he maps more correct drag source – drop
target pairs, the score is added up.
Using ActivePresenter Windows> Using The Event Editor
187
ActivePresenter User Manual
Version 4.0
However, if he maps a drag source – drop target pair incorrectly (the pair is not in
the list specified in the second step), then the whole answer is considered incorrect,
and the score will be zero.
4. Use the
,
button to add, remove drag source – drop target pairs.
The Settings Tab
This tab defines the behavior of the interactive presentation when the user is not responding well:
It has three sections, as shown above:
1. Attempts
Max Attempts After the user makes the predefined number of attempts, the interactive object will
be disabled: The user can't interact with it anymore.
Infinite
This check box overrides the number of attempts defined at the left.
2. Pause
Pause
presentation
to wait for
user input
This is indefinite pause: All objects stop playing as seen on the Timeline pane.
However, the user can still interact with the interactive objects. The presentation
resumes when one of the following actions is executed: Continue Presentation,
End Presentation, Go to Slide, Go to Slide at Index, Go Forward, or Go Backward.
Using ActivePresenter Windows> Using The Event Editor
188
ActivePresenter User Manual
Version 4.0
So if the author selects this option, he must define one of above actions in the On
Correct tab, and in the On Incorrect tab (for the Last attempt). In fact, when the
author inserts a new interactive object, ActivePresenter provides default actions.
After showing This time is relative to the Starting instant for the interactive object. For example, if
object xxx
xxx is 1000 ms, the presentation is paused when the interactive object is displayed
milliseconds for 1000 ms.
Just before
hiding object
Here, the presentation is paused just before the hiding transition of an object
begins. In other words, when the presentation is resumed, the first thing to happen
will be the exit of this particular object.
3. Timeout
Enable time
limit
You can disable the time limit by unchecking this check box.
Time
Timeout is defined in terms of HH:MM:SS
When timeout is active, if the user does not respond within the defined time limit,
the interactive object is disabled.
The On Correct Tab
This tab is used in all interactions except the Mouse hover interaction. It defines the action to be
taken when the user gives a correct response.
Using ActivePresenter Windows> Using The Event Editor
189
ActivePresenter User Manual
Version 4.0
The GUI works as follows:
1. The actions are listed in a stack.
They are executed in the order of appearance (top-to-bottom).
In this example,
The presentation will show the correct message#52 (ActivePresenter provides
internal reference numbers to each message. This particular message is the
Correct message for this particular interaction.)
Note that the Show Object action doesn't control the display duration of the message.
To change the display duration of the message, select the message in the Canvas
and change its duration in the Properties pane.
After that, ActivePresenter will continue the presentation. If the presentation is
playing, this action does nothing.
If the presentation had paused (because a Pause is set in an interactive object or if
an object takes the Pause Presentation action in response to a trigger event), the
Continue Presentation action will continue playing the presentation from the time it
is paused.
2. These buttons are used to organize the list of actions:
The
button adds a new entry in the pane.
The
button removes the selected entry.
The
and
buttons move the selected row up and down in the stack.
Using ActivePresenter Windows> Using The Event Editor
190
ActivePresenter User Manual
Version 4.0
The On Incorrect Tab
This tab is used in all interactions except the Mouse hover interaction. It defines the action to be
taken when the user gives an incorrect response.
The GUI works as follows:
1. The actions are listed in a stack.
The attempt is classified into various groups: It can be specific (First, Second, Third, 4th, 5th ..) or
special (All, Last...) The actions for each group are listed in a stack and executed in the order of
appearance (top-to-bottom).
If a certain attempt belongs to multiple attempt groups, the actions are executed from group to
group in this order: specific group→All→All but Last→Last→Others. For example, if maximum
attempt is 3, and user gives incorrect answer in the third attempt, the actions of the Third attempt
will be executed first, then the actions of All attempt, then the actions of the Last attempt.
In this example,
If the user gives incorrect answer in his last attempt (recall that the number of
attempts is defined in the Settings tab), then ActivePresenter will display Incorrect
message (All attempt action), then continue the presentation (Last attempt action).
In all the attempts (including the last attempt), if the user has provided an incorrect
answer, ActivePresenter will display the Incorrect message.
2. These buttons are used to organize the list of actions:
Using ActivePresenter Windows> Using The Event Editor
191
ActivePresenter User Manual
The
button adds a new entry in the pane.
The
button removes the selected entry.
The
and
Version 4.0
buttons move the selected row up and down in the stack.
The On Incomplete Tab
This tab is used in the Text Box, True/False, Multiple Choice, Multiple Response, Essay, Fill in
Blank, and Fill in Multiple Blank interactions.
It defines the behavior when the user has not completed his answer.
The GUI works as follows:
1. The actions are listed in a stack.
They are executed in the order of appearance (top-to-bottom).
In this example, if the user has provided an incomplete answer, ActivePresenter will display the
Incomplete message #54. (ActivePresenter provides internal reference numbers to each
message. This particular message is the Incomplete message for this particular interaction.)
2. These buttons are used to organize the list of actions:
The
button adds a new entry in the pane.
The
button removes the selected entry.
The
and
buttons move the selected row up and down in the stack.
Using ActivePresenter Windows> Using The Event Editor
192
ActivePresenter User Manual
Version 4.0
The On Timeout Tab
This tab is used in all interactions except the Mouse hover interaction.
It defines the behavior when the user fails to respond within the time limit defined in the Settings
tab.
The GUI works as follows:
1. The actions are listed in a stack.
They are executed in the order of appearance (top-to-bottom).
In this example, if the user has failed to respond within the time limit, ActivePresenter will continue
with the presentation. But you may choose to display a “Sorry, you have exceeded the time limit!”
message and then continue (or even end-) the presentation.
2. These buttons are used to organize the list of actions:
The
button adds a new entry in the pane.
The
button removes the selected entry.
The
and
buttons move the selected row up and down in the stack.
Using ActivePresenter Windows> Using The Event Editor
193
ActivePresenter User Manual
Version 4.0
The On Rollover Tab
This tab is used by the Mouse Click, Text Box, Key Stroke, and Mouse Hover interactions. It
defines the behavior when the user rolls the mouse over the main area of the interaction.
The GUI works as follows:
1. The actions are listed in a stack.
They are executed in the order of appearance (top-to-bottom).
In this example, the ActivePresenter will display message#87 when the user rolls his mouse on the
main box of the interaction. (ActivePresenter provides internal reference numbers to each
message.)
2. These buttons are used to organize the list of actions:
The
button adds a new entry in the pane.
The
button removes the selected entry.
The
and
buttons move the selected row up and down in the stack.
The On Rollout Tab
This tab is used by the Mouse Click, Text Box, Key Stroke, and Mouse Hover interactions. It
defines the behavior when the user rolls the mouse off the main area of the interaction.
Using ActivePresenter Windows> Using The Event Editor
194
ActivePresenter User Manual
Version 4.0
The GUI works as follows:
1. The actions are listed in a stack.
They are executed in the order of appearance (top-to-bottom).
In this example, the ActivePresenter will display message#87 when the user rolls his mouse off the
main box of the interaction. (ActivePresenter provides internal reference numbers to each
message.)
2. These buttons are used to organize the list of actions:
The
button adds a new entry in the pane.
The
button removes the selected entry.
The
and
buttons move the selected row up and down in the stack.
The On Accept Tab
This tab is used by drop target objects. It defines actions to be taken when the drop target accepts
a drag source.
Using ActivePresenter Windows> Using The Event Editor
195
ActivePresenter User Manual
Version 4.0
The GUI works the same way as other action tabs, such as the On Correct tab, the On Rollover
tab…
The On Reject Tab
This tab is used by drop target objects. It defines actions to be taken when the drop target rejects a
drag source.
Using ActivePresenter Windows> Using The Event Editor
196
ActivePresenter User Manual
Version 4.0
The GUI works the same way as other action tabs, such as the On Correct tab, the On Rollover
tab…
Using The Image Editor
Before we proceed, it is important to understand that the Image editor is meant to be a quick-anddirty raster editor. It is not designed for extensive editing of images.
The shapes you add to the image (e.g. line, polygon, etc.) are immediately merged with the
existing image. You can not select them later and change their properties (that is possible in a
vector editor like InkScape).
If you want to be able to edit the objects later, insert shapes directly on the slide, rather
than editing the image.
If you need fine control on the editing process, use a full-fledged editor like GIMP (a raster
editor) or InkScape (a vector editor), and then insert the edited image into the slide.
Using ActivePresenter Windows> Using The Image Editor
197
ActivePresenter User Manual
Version 4.0
The image editor in ActivePresenter has a minimalistic window.
The various parts of the window are as follows:
1. This is the Menu system
2. These are toolbars.
You can customize any toolbar by clicking on the
button located at the end.
You can also move the toolbars by clicking on their headers
Button
and dragging.
Effect
Lets you select a rectangle for moving, deleting or copying.
Using ActivePresenter Windows> Using The Image Editor
198
ActivePresenter User Manual
Button
Version 4.0
Effect
Toggles antialiasing. Sometimes you need to turn it off. For example, if you want to
draw a polygon and flood fill it, you need a shape with a clear border (not antialiased border).
Draw a line
Draw a polygon.
As you click at various spots, those points are added to the current polygon. On the
last point, double-click to finish the polygon-creation mode.
Draw a spline.
As you click at various spots, those points are added to the current spline. A doubleclick ends the spline-creation mode.
Pencil tool.
Draw freehand with this tool.
Airbrush tool.
Create spray with a color.
Eraser tool.
Image editor in ActivePresenter supports transparency, so when you erase an area,
it will turn transparent.
Flood fill tool.
When you click anywhere in the image, it finds contiguous area with the same color,
and then fills it with the current pen color.
Text
This tool has its own word editor window. You can create rich text with its own
attribute (color, italics, bold, underline, font size, font type, superscript, subscript,
etc.)
Autoshape
This is a drop-down list of shapes.
Blur
Blur/Obfuscate selected area.
Blur radius
Using ActivePresenter Windows> Using The Image Editor
199
ActivePresenter User Manual
Button
Version 4.0
Effect
The larger the radius, the more obfuscated the image.
Pen color.
This selects a pen color for pending or next drawing command.
Pen opacity (0=fully transparent, 255=fully opaque)
Pick pen color
After selecting this tool, click on any area, and the pen tool will assume that color
(hue and saturation) and opacity.
Fill color
Sets the color filled inside a shape.
Fill opacity (0=fully transparent, 255=fully opaque)
Pick fill color
After selecting this tool, click on any area, and the fill color tool will assume that color
(hue and saturation) and opacity.
Line width
Sets the line width for the outline of a shape, or for the pencil tool.
Line style
Sets the type of line for the outline of a shape, or for the pencil tool.
Rotate right
Rotate left
Flip horizontally
Flip vertically
Crop
Scale image
A window pops up:
Using ActivePresenter Windows> Using The Image Editor
200
ActivePresenter User Manual
Button
Version 4.0
Effect
You can specify the target width and height. (If the Width/Height ratio is not same as
original, the image will get stretched.)
Alternatively, tick in the Lock ration check box, and then specify only one of the
dimensions. ActivePresenter maintains the original aspect ratio, and rescales the
image.
The Reset button restores the original size of the image.
The quality of the rescaled image depends upon the algorithm used. ActivePresenter
offers a choice of algorithms:
Box
Bilinear
Bicubic
4th order b-spline
Catmull-Rom spline
Lanczos3
The Box algorithm is the simplest one and usually gives the lowest quality. Lanczos3
is an advanced algorithm and is commonly used in popular image editor, it usually
gives the best quality.
However, choosing the most suitable algorithm also depends on the image content,
so you can use try-and-error tactic to choose the most suitable one.
Insert image
3. This is the image to be edited.
Any changes in the image are not actually implemented till we save the image and exit.
4. The status bar shows the current state of the image editor.
Using ActivePresenter Windows> Using The Image Editor
201
ActivePresenter User Manual
Version 4.0
Using Image Resource Properties Window
This window allows you to view and edit the properties of various balloons that are available in the
Library pane.
A window pops up when you double-click on any balloon in the Library pane. The window contains
two tabs: General and Text Margin.
General Tab
The general tab has the following controls:
The controls work as follows:
1. This section contains the Name field.
This is just the name of the resource for easy remembering and handling.
You can enter any name you want, and change it at any time, without affecting any functionality.
2. The type of resource.
You can tag the image resource as slide background, object background and/or cursor. (You can
apply multiple tags to any resource.)
Later, you can use these tags to filter (shortlist) images of certain type(s).
3. Define the group and hotspot
Using ActivePresenter Windows> Using Image Resource Properties Window
202
ActivePresenter User Manual
Version 4.0
If you want to use the image for annotation during capturing, you should add multiple versions of
the image, each having its hotspot (=anchor point) in a different direction; so that ActivePresenter
can automatically select a variant that does not cross the slide canvas.
This is done by entering a new group name, or selecting an existing name from the drop-down list.
All images that have a common group name are considered interchangeable, and ActivePresenter
will automatically select the image that fits inside the canvas even when the click-spot is close to
the boundary of the slide canvas.
4. Define the cursor hotspot.
This is the hotspot position (not direction) for the cursor. The x and y dimensions are from the
origin point (x=0, y=0) of the image, which is located on the top-left corner of the shape, as shown
below:
The anchor point (=hotspot) is shown as (x,y) vis-a-vis the origin (0,0).
Using ActivePresenter Windows> Using Image Resource Properties Window
203
ActivePresenter User Manual
Version 4.0
The Text Margin Tab
The Text Margin tab has the following controls:
1. This drop-down menu has two settings for the zoom level: Actual size (100%) and fit to
window.
2. The margin between the image and the nearest text is defined here. (If the image is
surrounded by text, then the distance between the image and the text would be
automatically maintained as per these limits.)
Using ActivePresenter Windows> Using Image Resource Properties Window
204
ActivePresenter User Manual
Version 4.0
Using The Properties Window
You can change the visual and aural properties of the following annotation-type objects: Shapes,
Text Caption, Highlight, Spotlight and Feedback.
You can also change visual and aural properties of interactive objects. (Right-click the interactive
object, and from the context menu, select the Style option.)This is done with the Properties
window.
The window works as follows:
1. Select different aspects of the object by clicking on these buttons.
Using ActivePresenter Windows> Using The Properties Window
205
ActivePresenter User Manual
Version 4.0
2. This pane shows the options for the aspect selected in the left pane.
3. This area shows controls that implement the option selected above.
If you click in the Style preview check box, a small window pops up as shown. It shows a preview
result of your changes.
The Fill Section
In this section, you can customize the body of the object.
You can choose from the following options:
Option
No fill
Remarks
The object's body becomes transparent (no solid color or gradient of colors).
Solid fill
Fills the shape with a single color.
1. Click on the drop-down arrow. A color swatch appears. Select a color.
2. Move the slider to set the opacity, or enter the value directly in the input
box at right (255=fully opaque)
Gradient fill Fills the shape with a gradient of colors.
We will see how to create the following gradient:
Using ActivePresenter Windows> Using The Properties Window
206
ActivePresenter User Manual
Version 4.0
The actual controls adjusted to create this particular gradient are shown below:
The Gradient strip (3) is at the heart of the controls. It shows a “live” sample of the
gradient, and lets you make changes to it in a visual manner.
Choose between Linear and Radial gradients using the Gradient type drop-down
list (1).
In Linear, the shades vary in a straight direction.
In Radial, the shades are in concentric circles
Our example calls for Linear type gradient.
Choose the Inclination angle of the gradient using the input box/spinners (2). (The
angle is relevant for linear gradient only.) In our example, we have chosen a 45degree angle.
The triangular “stops” at the bottom of the strip show how many colors are used to
compose the gradient. This example shows four stops, which means it uses four
colors. However, observe that the two stops in the middle use the same (white)
color! (That is to ensure that the white band in the middle is of sufficient width.)
Click anywhere in the strip (3) to add a new stop at that spot.
You can click on any stop to make it active. An active stop has a red border. The
controls 5, 6 and 7 are meant to edit the properties of this active stop.
In our example, the right-most stop is active (shown with red border). The triangle
Using ActivePresenter Windows> Using The Properties Window
207
ActivePresenter User Manual
Version 4.0
shows its color (green). The Position control (5) shows 86%, meaning this stop is
at 86% of the total length. You can drag the stop with mouse. The Position box (5)
will reflect the new position of the stop.
The Color (6) shows the current color of the stop. To change the stop's color, click
on the drop-down arrow, and from the swatch that appears, select another color.
The opacity of the stop can be changed with the controls 7a (slider) and 7b (input
box).
To delete any stop, first select it and then click on the
button.
Image fill
This option fills the shape with an image.
The controls are as follows:
First, select how the shape is to be filled (1):
Tile means the image will be replicated in x- and y-axis to fill up the space.
If the image is larger than the shape, it is clipped.
Stretch means the image will be stretched in height and/or width to fill up
the available space. If the image is larger than the shape, it is rescaled to
fit the available space.
Next, select an image from either library or from your file collection (2).
You can change the opacity of this image with the Opacity slider (3), or enter the
value in the input box (255=fully opaque).
You can colorize the image (superimpose a color) by using the hue slider (4) or
enter the value in the input box.
Inherit
The style is copied from the template style supplied with ActivePresenter.
From Base
ActivePresenter comes with multiple base styles. You can switch to any of them.
Style
To change the base style, click on the Change Base style... button. The following
window pops up:
Using ActivePresenter Windows> Using The Properties Window
208
ActivePresenter User Manual
Version 4.0
Select any style and press OK.
Using your
own style
In the Select Base style window (see above), you can opt to create your own
style: Just click on the
button.
A new Properties window appears. Now set all properties and save under a new
style name. From this moment, this new style will be available.
Be careful about where you are adding this style: Style added in Project will not
be available to other projects. If you add the style in Library, it will be available to
other projects.
The Line Section
In this section, you can customize the outline of the shape.
You can select from the following options:
Option
No line
Remarks
There is no line at all.
Using ActivePresenter Windows> Using The Properties Window
209
ActivePresenter User Manual
Version 4.0
Solid line
This option lets you customize the line.
You can set the following:
Line width (1) (in pixels).
Cap type: Round/square (2)
(Note: This property matters only in an open curve, where you can see the end of
a line. At present, ActivePresenter has only closed shapes).
Join type: Round/Bevel/Miter (3)
This property changes the look-and-feel of joints. See how a call out looks
different with these joints:
Dash pattern: Solid/dot/dash/dot-dash (4)
Color of the line (5).
Opacity (6) (move slider or enter the number)
(255=fully opaque)
Using ActivePresenter Windows> Using The Properties Window
210
ActivePresenter User Manual
Version 4.0
Inherit from See the discussion in the Fill section.
the base
style
The Text Section
This section customizes the text placed in the object.
You have the following options:
Option
Remarks
Custom style
This section provides multiple formatting options for the text.
Inherit from
base style
See the discussion in the Fill section.
The Shadow Section
This section customizes the shadow of the object.
You have the following options:
Option
Remarks
No shadow
The shape has no shadow
Custom
shadow
The following options are available:
Inherit from
base style
Blur radius: The larger the radius, the more the diffused the shadow.
Angle: Angle is measured clockwise, with +ve x-axis as reference.
Distance: Distance from the main shape. Longer distance creates the
illusion that the shape is located higher from the slide.
Color: You can select any color, but a dark color is best
Opacity: move slider or enter the number
(255=fully opaque)
See the discussion in the Fill section.
Using ActivePresenter Windows> Using The Properties Window
211
ActivePresenter User Manual
Version 4.0
The Audio Section
ActivePresenter allows you to associate a sound with almost all types of objects.
For Mouse Click object, the attached sound is played when user clicks on the object.
For other types of objects, the attached sound is played when the object starts showing.
The Audio section looks like this:
The controls work as follows:
1. This is the general section.
The Name box shows the name of the audio resource.
The
and
buttons add the audio resource from Library or disk, respectively.
The
button removes the loaded resource.
The playback controls play this audio.
2. The Recording section offers a third alternative source for the audio.
Here, you can record your own audio track.
Select the Input device using the drop-down lists. (The list changes based on your hardware).
Using ActivePresenter Windows> Using The Properties Window
212
ActivePresenter User Manual
Now press the Record button
to capture the sound. Adjust the Volume control button
adjust the recording volume. When done, press the Stop button
Version 4.0
and
.
Optionally, you can calibrate the sound level before starting the recording, to make
sure that the sound level is strong enough, but there is no distortion.
To calibrate the sound level, click the Calibrate Input... button. The actual calibration is
described here.
Now proceed with the recording as explained earlier.
3. This section provides the fourth alternative source of sound: A text to speech sound of the
text that is entered in the box.
By default, ActivePresenter copies the text that is entered in the shape into this box. However, you
can edit the text or enter your own text.
To adjust the TTS settings, click on the Settings button.
The following window pops up:
Select the TTS voice (all the installed voices are displayed in the drop-down list).
Adjust the speed and volume, and check out the overall effect by clicking on the Speak
button. Repeat the cycle till you are happy, and then press the OK button to exit.
To generate the TTS audio, click the Generate button.
Using ActivePresenter Windows> Using The Properties Window
213
ActivePresenter User Manual
Version 4.0
Using The Resources Pane
The Resources Pane provides you with the images, audio clips, video clips and object styles that
are available in the Library and also in the current project.
There are two benefits of using resources from the Library:
1. ActivePresenter does not need a local copy of the resource: It simply links the object. As
you use the resource in more and more projects, the total saving in storage area become
significant.
2. If you use a resource directly from disk, ActivePresenter stores a local copy of it. If you use
the same resource at multiple places within a project, ActivePresenter will not maintain a
common copy of the object (it has no way to compare the incoming objects). As a result,
the same object will be stored multiple times. On the other hand, if the object is used from
the Library, all this storage area is freed.
The Resource pane has three tabs:
1. Images:
Provides Images from Library and current project.
2. Audio & Video: Provides audio clips and video clips from Library and current project.
3. Styles:
Provides default styles provided in ActivePresenter, and your own
customized styles from the current project.
Let us see these tabs in more details.
Using ActivePresenter Windows> Using The Resources Pane
214
ActivePresenter User Manual
Version 4.0
The Images Tab
This tab has three sections (as marked above):
1. This is the Toolbar to manage image resources. The buttons work as follows:
Button
Function
Selects to view resources either as thumbnails or as items.
Adds an image from the computer (or LAN, etc.)
Selects the resources that are unused in the current project.
Removes the resource from the Library/Project storage area.
Saves the image as a file.
Launches the Image Editor and loads the image in it.
This button triggers the Image Resource Properties dialog.
Using ActivePresenter Windows> Using The Resources Pane
215
ActivePresenter User Manual
Version 4.0
Show/hide (toggle) the Slide background type of images (visual filter)
Show/hide (toggle) the Object background type of images (visual filter)
Show/hide (toggle) the Cursor type of images (visual filter)
Show/hide (toggle) the deprecated images (balloons) in the Library (visual filter)
2. This section shows the resources (images). The currently selected image has a dark blue
border around it.
You can drag any image from here into the slide.
3. You can choose between Library resources or Project resources.
Keep in mind that initially a new project does not have any internal resources (till you add
them).
The Audio & Video Tab
This tab has three sections (as marked above):
1. This is the Toolbar to manage the audio and video resources. The buttons work as follows:
Button
Function
Selects to view resources either as thumbnails or as items.
Using ActivePresenter Windows> Using The Resources Pane
216
ActivePresenter User Manual
Version 4.0
Adds an audio/video clip from the computer (or LAN, etc.)
Selects the resources that are unused in the current project.
Removes the resource from the Library/Project storage area.
Exports (saves) the media as a file.
This button triggers the Audio/Video Resource Properties dialog.
Show/hide (toggle) the Audio type of media (visual filter)
Show/hide (toggle) the Video type of media (visual filter)
2. This section shows the resources (audio and video clips). The currently selected resource
has a dark blue border around it.
You can drag any resource from here into the slide.
3. You can choose between Library resources or Project resources.
Keep in mind that initially a new project does not have any internal resources (till you add
them).
Using ActivePresenter Windows> Using The Resources Pane
217
ActivePresenter User Manual
Version 4.0
The Style Tab
This tab has three sections (as marked above):
1. This is the Toolbar to manage the styles. The buttons work as follows:
Button
Function
Launches the Style Editor to compose a new base style.
Selects the styles that are unused in the current project.
Removes the selected style from the Library/Project storage area.
Launches the Style Editor to edit the selected style.
2. This section shows the styles. The currently selected style has a dark blue border around it.
You can drag any style from here into the slide. ActivePresenter creates a call out shape with the
selected style.
For example, in the following screenshot, we have dragged the preset style used for Hint-type
Using ActivePresenter Windows> Using The Resources Pane
218
ActivePresenter User Manual
Version 4.0
messages into the slide. This action has created a call out with the Hint style.
Now you can right-click on this call out and change it into any other shape. The new shape will
retain the style.
3. You can choose between Library styles or Project styles.
Keep in mind that initially a new project does not have any internal styles (till you add
them).
Using The Timeline
The Timeline shows all objects in a given slide against time. It also allows you to preview the slide.
In addition, the following editing tasks are possible in the Timeline pane:
1. Edit the timings (start-point and/or end-point) of the objects.
2. Split any audio/video objects at the desired instant.
3. Join selected audio/video objects
4. Split the slide into two at the desired instant.
5. Play the slide and record your commentary in real time.
(You can also use this feature to dub your presentation in different languages)
Using ActivePresenter Windows> Using The Timeline
219
ActivePresenter User Manual
Version 4.0
6. Adjust the relative volume of audio/video objects in the selected range of time
7. Freeze (pause) a video object for desired time while the other objects are played out
normally
A screenshot of the Timeline pane is shown below.
The various parts work as follows:
1. The Toolbar contains controls to play and edit the objects in the slide. We will see its
functions later.
2. The Time Ruler shows the time axis in mm:ss format.
(For duration longer than 1 hour, the display changes to hh:mm:ss format.)
The time axis starts with 0. This is the instant when the slide starts playing.
3. This is the Start marker.
4. This is the End marker.
The slice of Timeline between the start marker (3) and the end marker (4) is known as “selected
range” (often called just “range”). It is shown darkened in the Timeline pane.
A range has two main purposes:
◦
You can check out a range by playing the contents repeatedly and making small
adjustments till things become perfect.
◦
Range-Editing functions like cut range, copy range, delete range, and crop to
range work only when a range is defined first.
5. This is the playhead (the position at which ActivePresenter will play the slide). Notice that a
vertical line runs across the pane.
By default, the Timeline pane does not display the start marker (3), the end marker (4) or the
playhead (5). To create them, click anywhere on the Ruler (2). ActivePresenter creates all three at
the same spot on the Ruler.
Using ActivePresenter Windows> Using The Timeline
220
ActivePresenter User Manual
Version 4.0
Now drag the markers to any desired position to set the range.
You can click on the playhead and drag it horizontally to play the slide at different moments. This is
called “scrubbing the Timeline”. It gives you an instant rough idea about how the slide will play at
normal speed.
6. This area lists all the objects on the current slide according to their z-order.
For example, if you add a new object to the Canvas pane, it is always placed on top of the pile.
Therefore, in Timeline pane also, it is placed at the top of the list.
If you change the z-order of any object in the Canvas pane, that change is instantly reflected in the
Timeline pane.
7. This is the Time bar of an object. (Think of this as a lifeline for the object: The object is
active only for the duration of this bar.) We will see how to use the Time Bars later.
8. This is the Time bar for the entire slide.
By default, is end is automatically synchronized with the last element in the slide. (In our example,
Question5 is the last element. If you extend its bar, the slide's bar also extends automatically.)
However, you can stretch this bar. During the stretched portion of the Time bar, the canvas will
display only the slide background color, and/or the slide background image (if any).
9. This is the end-time for the slide.
The slide will end at this instant, and the next slide (if any) will start its entry transition.
10. The Visibility button controls whether to display the element in the Canvas pane.
Click on it to toggle its state (a closed eye
means the element becomes invisible.)
The best use of this control is to turn an element off to edit the overlapped element easier.
Note that this control is applicable only during editing; not during playback.
It also does not affect the output when exporting: The elements which are hidden by this button will
still display normally in the exported materials.
The
button at the top of the column is the Master Visibility Button: It toggles the visibility of all
elements at once.
11. The Lock button controls whether you can edit the element.
Click on this control to toggle its state.
A closed lock
means that the element is “locked”: You cannot edit this element. In fact, you
cannot select its shape in the Canvas pane or its Time Bar in the Timeline pane.
The
button at the top of the column is the Master Lock Button: It toggles the lock status of all
elements at once.
12. The Expand/Collapse button only available for element which contains the sub-elements
controls whether to display the sub-elements of this element.
Using ActivePresenter Windows> Using The Timeline
221
ActivePresenter User Manual
Version 4.0
The Toolbar In Timeline
The toolbar provides most of the functions in the Timeline.
Button
Shortcut
Function
Toggles between Current slide and All slides view.
The All slides display mode shows all slides on the Timeline.
This mode is useful to see the objects that span across multiple
slides.
If this is selected, the dragged object snaps to the features of
other objects and also to certain parts of the Timeline pane. See
Snapping in Timeline for more details.
If this is selected, the range will be played endlessly (in a loop).
When the playhead reaches the end of the range, it will return to
the beginning and continue playing.
Space Bar
Plays the slide once, starting from the current position of the
playhead. At the end of the play, the playhead returns to the
Start marker of the range.
While the selection is being played, the button turns to Pause
. When you click this button, the play pauses, and the button
turns to Resume
. The playhead stays at its current position.
Clicking on the Resume button starts the play from the
Playhead's current position, and the button turns to Pause
again.
After this, successive clicks on the button toggles it between
Pause
and Resume
.
Tip: Instead of clicking these buttons, it is far easier to simply
press the Space Bar to play/pause/resume.
If you click the drop-down arrow of this tool, a menu will show up
with two options:
Preview all: Select this option to preview from the first
slide to the last slide in the project which similar to
viewing the video output.
Preview from current slide: This option is similar to
Preview all, except the preview will start from the current
slide.
If you click this button while the Timeline is playing,
ActivePresenter stops playing, and the playhead stays at its
current position.
Using ActivePresenter Windows> Using The Timeline
222
ActivePresenter User Manual
Button
Version 4.0
Shortcut
Function
If you click this button when the Timeline is not playing,
then ActivePresenter removes the selection markers (3
and 4). In other words, use this button to clear the
selection range.
Records your voice even as you play the slide simultaneously.
This allows you to watch the slide's playback, and time your
voice perfectly with the action on the screen.
To stop recording, press the Stop
button.
This also allows you to dub your slide in another language.
Tip: To synchronize your voice-over perfectly, press the
button to select the loop mode. Play the range repeatedly
for a few times and practice speaking in perfect sync. Once
your timing is right, start recording.
Zooms out. Use this to see the duration for the entire slide.
Zooms in. Click this button to expand the time scale and see
more details.
Zoom all. Click this button to automatically adjust the zoom
factor to fit the entire slide's duration in the available pane width.
CTRL+SHIFT+X
Cuts the range, and places it in the clipboard.
The slide duration is shrunk by the duration of the range.
If the Time Bar of any object extends on both sides of the
range, the remainder parts on both sides of the range are
joined (spliced together).
This command is activated only when a range is defined. The
range-edit commands are explained in more details here.
CTRL+SHIFT+C
Copies the range into clipboard.
The original contents of the slide are not affected.
This command is activated only when a range is defined. The
range-edit commands are explained in more details here.
CTRL+Del
Deletes the range.
Nothing is placed in clipboard (compare with the Cut command).
This command is activated only when a range is defined. The
range-edit commands are explained in more details here.
Using ActivePresenter Windows> Using The Timeline
223
ActivePresenter User Manual
Button
Version 4.0
Shortcut
SHIFT+Del
Function
Crop to range: Everything in the slide is deleted except the
content that falls within the range.
After this command is executed, the duration of the slide is
reduced to the range.
This command is activated only when a range is defined. The
range-edit commands are explained in more details here.
Splits the selected audio/video object at the Playhead position.
The Timeline shows the latter part as a new object, which
is added to the top of the object pile.
The split parts are treated as new Project-level
resources (which appear in the Resources pane), and
can be further used in other slides within the project.
In case audio object, each split part is shown with a
separate
icon in the Canvas pane. However, all
these icons are stacked together, so you cannot tell them
apart. Only when you drag them apart can you see them
individually.
Joins the selected audio objects (or video objects).
This command is explained later.
Inserts a Freeze-frame control in the selected audio/video
track.
A Freeze-frame control does not have its own track: It is
always superimposed on an audio/video object's time
bar.
For details, refer to the Objects appendix.
Adjusts the relative volume of the selected audio/video track in
the selected range, as explained here.
Using ActivePresenter Windows> Using The Timeline
224
ActivePresenter User Manual
Button
Version 4.0
Shortcut
Function
Splits the slide at the Playhead position.
The slide is sliced vertically at the playhead position, and a new
slide is created from the second part. This newly created slide is
inserted immediately after the current slide.
Any content in the slide that is in the right side of the
playhead position is transferred to the second (new)
slide.
If the playhead position lies in the middle of a time bar of
an object, that time bar is split at the playhead position,
and the latter part is transferred to the second (new)
slide.
The Time Bar
The time bar of an object represents its existence along the time axis.
For example, the screenshot above shows that Shape 1 will appear on the canvas at 4th second
after the current slide starts playing. It will be displayed till the 10th second (which happens to be till
the end of the slide). On the other hand, the closed captions (the first object in the list) appears
for just four seconds and vanishes.
The length of a Time Bar represents the duration of the corresponding element.
The background image is an exception: It has no Time Bar in the Timeline view, because
it remains unchanged – You cannot vary its properties over time.
Position Of A Drag-n-Dropped Resource
When you drag-and-drop an audio/video/image file inside the Canvas pane, its time bar will start at
the Playhead position. Therefore, place the Playhead properly before such drag-n-drop operations.
Even if you had forgotten to do this, don't worry: Simply drag the time bar of the object to its
desired position in the Timeline.
Changing The Timing/Duration Of An Object
You can change the timing and duration of any element:
Moving just one end of a Time Bar changes the duration of that object.
◦
To change the start moment, move the left-side edge of the bar horizontally by clicking
on it and dragging the mouse.
◦
To change the end moment, move the right-side edge of the bar horizontally by clicking
Using ActivePresenter Windows> Using The Timeline
225
ActivePresenter User Manual
Version 4.0
on it and dragging the mouse.
You cannot change the duration of audio/video clips, because their duration depends on
the content.
To shift an element on the time scale without changing its duration, click anywhere in the
middle of its Time Bar and drag horizontally.
along the time axis. Drop it wherever required.
The entire Time Bar moves
You can also shift multiple elements simultaneously in such a way that their relative timing
remains undisturbed. To do this, first select multiple elements, and then drag the entire
group horizontally.
To make a group of objects, press CTRL and then go on clicking on the objects' names (6) or Time
Bars (7).
To select contiguous objects, first click on the first object, and then SHIFT+Click on the last object
to be selected. All the objects between these two objects will be selected.
To deselect any object from the group, press CTRL and click on that object.
While you drag a border, ActivePresenter provides precise timing information (in
milliseconds).
◦
For the start edge, it shows the start time.
◦
For the end edge, it shows the end time (on the Ruler) and the duration of the time bar
(next to the bar), as shown below.
You can use either value to drag the edge.
Using The Markers On Time Bar
The Time Bars of all objects contain some markers and annotation, which are useful for specific
purposes:
Transition effects
You can use the Properties pane to add transition effects to an object's
entrance/exit. These effects are visually shown with diamonds in Time Bars
of the object.
The green diamond shows the Entrance transition effect. The effect
starts at the starting-point of the object (i.e., the left edge of the
Time Bar), and ends at the diamond.
The red diamond shows the Exit transition effect. The effect starts at
the diamond and ends at the end-point of the object (i.e., the right
edge of the Time Bar).
The light blue shaded ramps at both ends signify that the object is
undergoing the transition effect during this time. (The “pure” object can be
seen only between the two diamonds).
Using ActivePresenter Windows> Using The Timeline
226
ActivePresenter User Manual
Version 4.0
You can drag both diamonds in the Timeline to adjust the durations of the
transitions.
ActivePresenter shows precise timing information and other information
about the marker, as shown below:
In this example1. Is the position (mm:ss, with a resolution of 1 millisecond) of the
green diamond (end of the entrance effect)
2. Is the gap between the start edge and the green diamond
(mm:ss, with a resolution of 1 millisecond)
This means the entrance effect will last for 500 ms (½ second)
3. Is the tooltip that shows the overview of the shape it belongs to.
You can easily see that this is Shape 1, which starts at 4s from the
start of the slide. It has a duration of 2.920 seconds. It has entrance
and exit effects, and both are set to “fade” (fade in, fade out).
You can also change the durations in the Properties pane.
To remove the effect, click on the diamond and drag it downward out of the
Time Bar. Keep dragging till the diamond turns gray, and then release the
LMB. The effect will be removed.
Audio
ActivePresenter displays the audio waveform on the time bars of all
audio/video objects, to alert you that the object has an audio attached to it,
and therefore you should be careful in placing another audio during the
same period.
If multiple audios are inserted during the same time, you have to
make sure that they do not interfere. For example, one speech and
one background music go well together; but not two speech tracks.
The relative volume of these tracks is important (The volume of the
background music must be much below the volume of the speech.)
In the following screenshot, the audio in stretch 1-2 is completely muted,
while the volume is only lowered in the 3-4 stretch.
Using ActivePresenter Windows> Using The Timeline
227
ActivePresenter User Manual
Version 4.0
As a general rule, in any given stretch of time, only one audio track should
be dominant, and the others should be lowered/silenced.
You can change the heights of time bars which contain audio by rightclicking the Timeline and selecting an option in the Waveform Bar Height
menu as shown in below screenshot:
Pause
The orange stripe shows the pause mark. When the Playhead reaches this
marker, the presentation will pause and wait for the user input.
A pause mark can be seen in the Time Bars of Interaction-type objects
only.
The placement of this mark is decided by the time you set in the Settings
tab of the Event Editor to pause the presentation. (You cannot drag this
mark in the Timeline to change its timing.)
Note that the length of the Time Bar after the pause mark is only nominal,
because you cannot predict how long the user will wait before responding.
Therefore the longer the actual pause, the longer the Time Bar actually
gets.
Freeze-frame
The Freeze-frame control is superimposed on the time bar of an
audio/video object.
In case of a video object, the yellow diamond shows the onset of
frame freeze in case of a video object, and the yellow band shows
the duration of the pause (during which the last frozen frame will be
displayed).
In case of an audio object, the yellow diamond shows the onset of
Using ActivePresenter Windows> Using The Timeline
228
ActivePresenter User Manual
Version 4.0
silence; and the yellow band shows the duration of the silence.
For details, Refer to the Objects appendix.
Object started by event
The glance sign indicates that the object is shown if an event happens. For
example, the object is selected to show in the list of actions in On Correct
tab of Event Editor.
The duration of slide does not include the durations of objects which are
started by events so the timer bars of these objects can be extended
outside the length of slide’s timer bar (the area on the left of the red vertical
line in Timeline).
Snapping In Timeline
Often you need to align different objects precisely. ActivePresenter facilitates this by providing a
snap mode. Click on the
button or the View > Snapping > Timeline snapping menu option to
toggle the snap mode on/off.
When the snap mode is on, you can temporarily disable the snapping by pressing CTRL as you
drag the element.
When the snap mode is on, as soon as a moving “snappable” element comes in the vicinity of
another “snappable” element, it will make a tiny jump to match the time stamp of the other element.
Note that this “other” element may be anywhere in the Timeline pane: Right from the Ruler
to the lowest object's time bar. (The vertical separation between the elements does not
matter at all.)
Also note that we may not be dragging the “snappable” element itself. For example, when
we drag a time bar of an object, all the “snappable” elements in the bar are moving
simultaneously. Any of these elements can snap to another snappable element.
The snap mode applies to the following elements:
In Ruler area: Playhead, start marker of the range, end marker of the range
In the Time Bars of objects: Starting edge, ending edge, all markers inside the bar
Others: beginning of slide, slide's duration as entered in the Properties pane, actual end of
slide.
When a snapping takes place, ActivePresenter shows an orange vertical line at that point of time,
to draw your attention. Now it is up to you whether to drop the dragged element there or keep
dragging.
This helps us to synchronize the dragged element precisely with some other element in the
Timeline.
The following experiment shows what happens when I drag the object's time bar from right to left..
Figure 1 highlights all elements that are snappable (The red marker in the slide's time bar marks
the original duration of the slide, and it is a snappable element too. However, the slide's actual
duration appears to extend beyond this red marker, because as soon as I dragged the object's
time bar to the right for this experiment, ActivePresenter automatically extended the slide's
duration to accommodate this object.)
Using ActivePresenter Windows> Using The Timeline
229
ActivePresenter User Manual
Version 4.0
In the subsequent figures, different elements snap together, as shown with an orange vertical line.
The object's time bar gives little jumps at these points. If you release the LMB, it will lock there.
Using The Range-Edit Commands
The Timeline pane has four Range-edit commands
defined first.
that work only when a range is
Let us understand their working with a few examples, in which we will use each command in two
different circumstances: (a) when none of the objects are selected, and (b) when some objects are
selected.
Each set has three screenshots: (1) The original objects, (2) result when none of the objects are
Using ActivePresenter Windows> Using The Timeline
230
ActivePresenter User Manual
Version 4.0
selected, and (3) result when some objects are selected.
The Cut Command
The Cut command places the cut contents on the clipboard. You can paste that content in a new
slide.
The following example shows the effect of the Cut command when no objects are selected in the
slide.
The original slide
No object selected:
The slide and all objects
are edited. The entire slice
of the range (with the parts
of objects enclosed in it) is
cut away.
Thus the slide duration is
reduced by the duration of
the range.
If an object spans on both
sides of the range, its
remaining parts are joined.
(e.g. Shape 1).
Shape 4 was deleted,
because it was completely
inside the range.
Using ActivePresenter Windows> Using The Timeline
231
ActivePresenter User Manual
Version 4.0
When some objects in the slides are selected, the command behaves differently, as shown with
the following example.
The original slide.
Here, we have two identical
sets of objects (1-6; 7-12).
Only one of the two sets is
selected to show the
difference.
At least one object
selected:
Only the selected objects
are edited. The slide itself
and unselected objects (712) are not affected at all.
For the selected objects
only: The range is folded
up and then removed. Any
object parts that lie in the
range are deleted (e.g.
Object 5 and 3. Also,
shape 4 was deleted,
because it was completely
inside the range.)
Objects/parts that follow
the range are shifted to the
left by the duration of the
range (e.g. Objects 3,2,1).
If a selected object spans
on both sides of the range,
its remaining parts are
joined (e.g. Shape 1).
Using ActivePresenter Windows> Using The Timeline
232
ActivePresenter User Manual
Version 4.0
The Delete Command
The Delete command works just like the Cut command, except for one difference: The Cut
command places the cut contents on the clipboard; whereas the Delete command does not.
The Crop Command
The crop command simply deletes everything other than what is there in the range.
The original slide.
No object selected:
Only the contents of the
range are retained, and the
rest is deleted. Thus the
slide duration is reduced to
the duration of the range.
If any object does not have
any part inside range, it is
dropped. (e.g. Shapes 6,
2).
Using ActivePresenter Windows> Using The Timeline
233
ActivePresenter User Manual
Version 4.0
When some objects in the slides are selected, the command behaves differently, as shown with
the following example.
The original slide.
Here, we have two identical
sets of objects (1-6; 7-12).
Only one of the two sets is
selected to show the
difference.
At least one object
selected:
Only the selected objects
are edited. The slide itself
and unselected objects (712) are not affected at all.
Those parts of the selected
objects that lie inside the
range are retained.
If any selected object does
not have any part inside
range, it is deleted entirely
from the slide. (e.g. Shapes
6, 2).
The Copy Command
The Copy command copies those parts of objects that fall inside the range, and puts them on
clipboard.
If no objects are selected, the Copy command checks all objects in the slide.
If any objects are selected in the slide, the Copy command checks only these selected
objects.
Using ActivePresenter Windows> Using The Timeline
234
ActivePresenter User Manual
Version 4.0
If any object does not have any part inside the range, it is not copied.
The following diagram illustrates these conditions.
Note that the lower figures show fresh slides into which the clipboard contents are pasted.
Just imagine that a slice is taken out of the original slide, and placed at Playhead position in
another slide.
If no objects are selected in the source slide, ActivePresenter will slice through all objects.
If some objects are selected, ActivePresenter will slice through only these selected objects.
Obviously, if any object has no content inside the slice, it won't be pasted.
Using The Join Command
The Join command
joins the selected objects (either audio or video).
You can join an audio object with other audio objects; and a video object with other video objects.
You cannot join an audio object with a video object.
When you select audio/video for joining, here's how ActivePresenter handles the job:
1. In the background, ActivePresenter maintains four separate lists of selected audio/video
objects:
Using ActivePresenter Windows> Using The Timeline
235
ActivePresenter User Manual
Version 4.0
a. Selected audio objects in current slide,
b. Selected video objects in current slide,
c. Selected audio objects that show over multiple slides,
d. Selected video objects that show over multiple slides.
2. Within each list, ActivePresenter sorts the objects by their Start Time in ascending order.
◦
If two or more objects (in each list) have the same Start Time, ActivePresenter sorts
them by their Z-Index in ascending order (i.e. bottom-up order in Timeline).
3. For each list that contains at least two objects, ActivePresenter joins the objects in the order
of their sorting.
4. The combined track is assigned to the first object in the list.
All the other objects in the list are deleted.
5. If any of the tracks has effects applied to it (e.g. freeze frame, silence, volume change),
they are burned in before joining it with the other resources.
6. If the source audio/video resource is logical (that is, created by any of the following
operations: Cut, Crop, Delete, Paste, Join, Split, Insert Freeze-Frame/Silence, or Adjust
Volume) and not used by any object, it will be deleted from the Resource pane. If it is a
physical resource, or is used by any object, it still shows in the Resource Pane.
In addition, the newly joined track also is added to the Resource Pane.
7. The original audio/video objects may not have identical properties (e.g. height, width,
aspect ratio, resolution, fps, bit rate). ActivePresenter solves this problem by using all
parameters of the first resource for its output.
Within a project, the resources are joined only virtually: The actual joining of the objects
takes place only when the presentation is exported (rendered), at which time
ActivePresenter converts all objects from their respective formats into the desired format
and joins them directly.
Using The Adjust Volume Control
If the slide has multiple concurrent audio tracks, you will have to ensure that only one of those
tracks is dominant at any time, and the other tracks are either muted or with lowered volumes. This
balance keeps changing: In other parts of the slide, you may have to give dominance to other
track(s).
This is where the Adjust Volume control is helpful.
When you click on the
button, the following window pops up:
Using ActivePresenter Windows> Using The Timeline
236
ActivePresenter User Manual
Version 4.0
Note that this is a relative volume scale, with a default value of 100% (=original volume). It can
adjust the volume from 0 (= mute) to 500% (= original volume x 5). You can use the Mute check
box to quickly silence the track.
The original track is not affected at all: You can revert to the original volume at any time.
If this control is used to mute a track, it does not affect the original duration of the track,
because unlike the Freeze-frame control, this control does not insert an additional period of
silence.
In short, the trick is to first set a range, and then select each of the audio/video objects and adjust
their volumes individually. Only the dominant track will retain its full volume (or it may even be
boosted), while you will lower the volume for the non-dominant tracks (or even mute them
altogether).
These adjustments would be applied within the range only.
Set another range in another part of the time axis and repeat this. This time a different track may
be dominant.
ActivePresenter displays the audio waveform proportional to its actual volume. So if you have
applied volume control within a range, or muted the track within a range, it will be displayed as
shown below:
Here, a silence is inserted in the 1-2 stretch (note the straight line in place of the audio waveform).
In the 3-4 stretch, the volume is lowered (note the signal has become weaker in that range).
In both cases, the start and end points are marked with red vertical marker lines. Note that these
markers cannot be moved within the time bar, because they actually denote the range in which the
volume is altered.
If you want to reverse the effect (i.e. make the volume normal), follow this procedure:
1. Click on the
button to turn on the snap mode
2. Click anywhere on the Ruler, which starts a new range.
Using ActivePresenter Windows> Using The Timeline
237
ActivePresenter User Manual
Version 4.0
3. Now drag it to the red mark on the left
(thanks to the snap mode, it will snap to the marker)
4. Now drag the End marker of the range to the red marker on the right.
(thanks to the snap mode, it will snap to the marker)
5. Click on the arrow in the
button, and select the Restore Original Volume option.
The effect of the Adjust Volume control is removed, and the original sound is restored.
Productivity Tips For Timeline
Most of the editing work is accomplished in the Canvas and Timeline panes. Therefore it is
important to learn some productivity tricks.
First, force yourself to use and memorize the hotkeys. Although this may look difficult at the
beginning, it will be very rewarding on long term, as you will be able to work in Timeline at much
higher speeds.
Here is a summary of hotkeys used in Timeline:
Hotkey
Function
Home
Moves the Playhead to the beginning of slide
End
Moves the Playhead to the end of slide
LeftArrow
CTRL+LeftArrow
RightArrow
CTRL+RightArrow
When no objects are selected: Moves the Playhead to the
left
When objects are selected: Moves the selected objects to
the left
Same as above, but 10 times faster. (the CTRL key is x10
accelerator)
When no objects are selected: Moves the Playhead to the
right
When objects are selected: Moves the selected objects to
the right
Same as above, but 10 times faster. (the CTRL key is x10
Using ActivePresenter Windows> Using The Timeline
238
ActivePresenter User Manual
Version 4.0
accelerator)
[
Moves the Playhead to the starting marker of the selection range
]
Moves the Playhead to the end marker of the selection range
SHIFT+[
Sets the start marker of the selection range at the Playhead
position
SHIFT+]
Sets the end marker of the selection range at the Playhead position
SHIFT+LeftArrow
CTRL+SHIFT+LeftArrow
SHIFT+RightArrow
When no objects are selected: Moves the start point of the
range to the left
When objects are selected: Reduces the selected objects'
duration
Same as above, but 10 times faster (the CTRL key is x10
accelerator)
When no objects are selected: Moves the end point of the
range to the right
When objects are selected: Increases the selected objects'
duration
CTRL+SHIFT+RightArrow Same as above, but 10 times faster (the CTRL key is x10
accelerator)
The following are Customizable hotkeys (to change their settings, use the Preferences > Hotkeys
menu).
The following are their default values:
Hotkey
Function
CTRL+SHIFT+X
Cuts the range (Range-edit command)
CTRL+SHIFT+C
Copies the range to clipboard (Range-edit command)
CTRL+DEL
Deletes the range (Range-edit command)
SHIFT + DELETE
Crops to range (Range-edit command)
Also keep in mind the following tips:
Use CTRL+Scrolling mousewheel to zoom in/out quickly
Use SHIFT+Scrolling mousewheel to scroll horizontally in the Timeline.
Using ActivePresenter Windows> Using The Timeline
239
ActivePresenter User Manual
Version 4.0
Using Calibrate Audio Input dialog
The Calibrate Audio Input dialog allows you to select appropriate level of input volume for
recording audio:
This dialog can be used in two different modes:
Manual calibration:
1. Keep the microphone in its normal position, and speak in your normal volume.
2. Click on the
button, and read a sentence into your microphone.
At the same time, move the slider to right and increase the gain till the LED bar at the right shows
yellow bars intermittently. If the bar starts showing red LEDs, move the slider a bit to the left
(otherwise the voice will be clipped).
3. When you are satisfied with the gain setting, press the
button to stop the recording.
4. Now press the
button to play your recorded voice. If the sound has any defects (e.g.
breathing noise), take care of the problem and repeat steps 1-4. (Sometimes the problem
may be in positioning of the microphone.)
Automatic calibration:
1. Press the Auto Calibrate button, and use the microphone normally.
The Auto Calibrate button turns into Stop Calibration. You can press it to stop the calibration any
time.
2. Continue speaking so that ActivePresenter can automatically optimize the gain.
After a few seconds, the button reverts to Auto Calibrate button.
This indicates that the calibration is over.
Regardless of the calibration method, the volume adjustment is accepted only when the OK button
is pressed. If you press the Cancel button, the new value will be discarded and the old value will
continue.
Using ActivePresenter Windows> Using Calibrate Audio Input dialog
240
ActivePresenter User Manual
Version 4.0
Using Output Language Editor
The Output Language Editor window is shown when you click the Edit Output Language button
in the Export To HTML5/Flash Simulation dialog. It allows you to modify the current translation of
texts in the output or add the translation for non-supported languages.
The editor provides following:
1. This displays the language of opening project. You can change the Project Language in the
Project Properties dialog.
2. The Name column displays the texts in the current user interface language of
ActivePresenter so you can know their original meanings.
3. The Value column displays the texts in the language which is set in Project Language if it is
supported. You can modify the texts in this column by double-clicking in each row.
4. The Reset button allows you to restore the original translation of texts.
The following screenshot shows how these texts are displayed in the HTML5 Simulation output:
Using ActivePresenter Windows> Using Output Language Editor
241
ActivePresenter User Manual
Using ActivePresenter Windows> Using Output Language Editor
Version 4.0
242
ActivePresenter User Manual
Version 4.0
Objects
In this appendix, you will learn the best uses of each type of object in a presentation, and also how
to control its properties.
Overview Of Objects
In ActivePresenter, the objects belong to two different categories:
Objects that are used for annotation
Objects that are used to interact with the user.
Annotation Objects
The annotation objects add value to the slide visually, but they do not interact with the user by
responding to his different actions. Thus they do not change the course of the presentation in
response to the user-inputs; such as going to a certain slide, pausing/resuming, etc.
They are as follows:
Object
Screenshot
Typical uses
Adds a screenshot of anything on the screen. This could be a website, a TV
grab, a still from a movie, etc.
The screenshot can be inserted as an object in a slide, or as background of
the slide.
Shape
Adds a shape on/around the point of interest.
ActivePresenter offers a choice of 44 shapes (rectangle, oval, arrows, cross,
diamond, call outs, etc.).
Text Caption Adds text to explain/highlight something.
Highlight
Overlays a colored semitransparent area on some part of the screen to highlight
it.
Spotlight
Overlays a dark screen on the display area, and allow only a certain area to be
fully visible. This creates an effect like we are watching a dark screen with a
search light.
Objects> Overview Of Objects
243
ActivePresenter User Manual
Version 4.0
Feedback
Adds a widget that displays the user's activity on screen (only applicable in an
interactive presentation).
Cursor Path
Manipulates the movement and clicks of the mouse to simulate that the user of
the application is using his mouse in that manner.
Zoom-n-Pan During rendering, zooms in the virtual camera on some interesting part of the
screen to show in more detail.
Closed
Caption
Closed Captions are like subtitles on a movie (text that can be read at the
bottom of the screen). It is optional: The viewer has the control whether to
display CC on his screen.
Image
Adds an image in the slide.
Audio
Adds an audio clip in a slide.
Video
Adds a video clip.
Note that the video can be re-sized to cover the whole screen or projected on a
part of the screen.
Interaction Objects
The interactive objects are designed to respond to user inputs. They not only change the course of
the presentation based on user-input, but also keep a track of user activity (for example, assess his
performance in a test).
The interactive objects are as follows:
Object
Typical uses
Mouse Click
Responds when the user clicks in a pre-defined area. Use of modifier keys
(ALT, CTRL, and SHIFT) is also allowed.
Text Box
Responds when the user enters specific text (string).
Key Stroke
Responds to an individual key on the keyboard or a hot key (such as
CTRL+SHIFT+P).
Mouse Hover Has two different types of responses:
When the user hovers his mouse over a certain area.
When the user moves his mouse away from the area.
This interaction is different from others, it does not assess correctness of user
response. Therefore, it does not have common interactive properties such as
score, pause, time limit, On Correct, On Incorrect.
Objects> Overview Of Objects
244
ActivePresenter User Manual
Version 4.0
Drop Area
Responds when the user drops a drag source onto it.
Question
ActivePresenter allows you to insert eight different types of questions
(True/False, Multiple Choice, Multiple Response, Essay, Fill in Blank, Fill in
Multiple Blank, Sequence, and Drag-n-Drop)
The question and options appear on screen, and the viewer is expected to
respond within a predefined time. ActivePresenter can be programmed to take
various different actions depending on whether the response is correct or
incorrect; or if the viewer fails to respond within the time limit.
General Properties Of Objects
In general, any object's properties can be divided into three categories:
1. Properties that define the object physically
(size, position, color, transparency, start/end time, etc.)
2. Properties that deliver the core function of the object
(each object has a unique purpose.)
3. Properties that define response to the user-action (Interaction)
(Some objects don't have interactive properties: They provide only annotations to the
presentation.)
Most of these objects are made up of multiple parts (“elements”). Each element has its own
properties.
You can tweak these properties to such as extent that the object may not be recognizable!
You can visually adjust some physical properties with mouse.
1. Most rectangular shapes have eight handles. Drag these handles to change the size and
aspect ratio of the rectangle.
2. Most rectangles have rounded corners. Slide the yellow diamond
rounding of the corners.
to change the
Different positions of the diamond results in drastic change in the shape, as shown below:
3. Double-click on any text to edit it.
Objects> General Properties Of Objects
245
ActivePresenter User Manual
Version 4.0
4. You can use the context menu to any rectangle to apply a different style (changing the
stroke and fill colors, text, shadow, etc.).
The behavioral properties are accessible only through the Properties pane, or the
Edit>Preferences menu, where you have to enter values and then check how that has changed
the behavior of the object.
In the following sections, we will take up all objects one by one and understand their properties.
Since the physical properties are similar in all objects, we will check them out first.
Property
Remarks
Name
Name of the element. This is simply a unique name generated by
ActivePresenter.
Shape
Click on the right-hand blank cell to reveal a drop-down list of twelve
shapes.
Audio/Click
Sound
This property refers to the sound associated with the object.
Boundary
For Mouse Click object, the property is named “Click Sound”, the
attached sound is played when user clicks on the object.
For others types of objects, the property is named “Audio”, the
attached sound is played when the object starts showing.
The edges of the frame that encloses the shape, measured from the top-left
corner of the canvas.
Left Left edge of the frame.
Top Top edge of the frame.
Width Width of the frame.
Height Height of the frame.
AutoFit Text
When this option is selected, the frame automatically changes its size to fit
the text.
Text margin
Minimum margin between the frame and the text around it.
Left Minimum margin on the left side.
Top Minimum margin on the top side.
Right Minimum margin on the right side.
Bottom Minimum margin on the bottom side.
Objects> General Properties Of Objects
246
ActivePresenter User Manual
Style
Version 4.0
Style is the combination of attributes of the fill, line and text.
Base Click on the right-side cell to reveal a Click to Edit button. When you click
this button, a style selector window pops up.
Fill The fill properties
Line The outline properties
Text The text properties
Start Time
The starting time of the object (vis-a-vis starting time of the slide)
Duration
The duration for which the object is to be displayed.
Set it to -1 to display the object till the end of slide.
Show In Mode
Demonstration
Tutorial
If the duration of the slide increases for any reason (e.g. you added
another object; or increased the duration of other objects), this
object's duration will be automatically increased.
If the duration of the slide decreases for any reason, the duration of
this object will be decreased automatically.
Put a click in the four check boxes.
The object will be visible in a given mode if there is a tick in its check
box.
In case of interactive object, if the object is invisible in a specific
mode except the Demonstration mode, it is still functional.
Practice
Test
Report ID
This unique reference number is used for reporting the test result. Only text
contains alphanumeric characters (A-Z. a-z, 0-9) and underscore (_) are
allowed (maximum length=250 characters)
Event
The right-hand cell appears blank. A click there reveals a Click to Edit
button. Clicking this button will launch the Event Editor.
Transition
effects
Define how the object will start showing in the presentation; and how it will
stop showing.
Entrance Type: Select from None, Fade in, Fly in, Peek in and Wipe.
Duration: Set a duration of the effect (in ms)
Direction: Select the direction for Fly in, Peek in or Wipe effect. Available
directions are From Left, From Top, From Right, From Bottom, From TopLeft, From Top-Right, From Bottom-Left, From Bottom-Right.
Objects> General Properties Of Objects
247
ActivePresenter User Manual
Version 4.0
Exit Select from None, Fade out, Fly out, Peek out and Wipe.
Duration: Set a duration of the effect (in ms)
Direction: Select the direction for Fly out, Peek out or Wipe effect. Available
directions are To Left, To Top, To Right, To Bottom, To Top-Left, To TopRight, To Bottom-Left, To Bottom-Right.
Accessibility
Define properties that make the object accessible by viewer with disabilities
when viewing the project output.
Focusable Define whether the object can receive focus when viewer navigates using
the Mouse or the Tab key. This property is available only for Mouse Click
and Mouse Hover object (Text Box is always focusable).
If this property is enabled, in HTML5_toc6281 output:
The object gains focus automatically when it is displayed, if no object
in the content has focus at that time.
When the object has focus, pressing the Enter or Space key is the
same as clicking on the object; i.e. actions for Left click event, that
are defined in the object Event Editor, will be executed.
When the object has focus, the object outline (yellow, dotted by
default) will be displayed if Enable visual focus indicator option is
selected when exporting to HTML5.
Viewer can navigate between focusable objects by pressing the Tab
key, if Enable keyboard navigation option is selected when
exporting to HTML5.
Auto Label If this property is selected, accessibility text will be generated automatically
from the text that the object displays, or the object name if it doesn't contain
any text.
Name Accessibility name of the object. Screen reader will read this text aloud
when the object appears.
Description This provide more information about the object. Screen reader will read this
text aloud when the object appears, after reading the accessibility name.
Object Styles
By default, each type of object has a separate look-and-feel (see below).
This is achieved by setting a different color, transparency, text, shadow and line thickness for each
Objects> General Properties Of Objects
248
ActivePresenter User Manual
Version 4.0
type of object.
The combination of all these attributes is called Style.
You can edit the default styles (all objects using those styles will take the new look), and create
new styles, and apply to any of the objects.
Right-click on any object, and from the context menu, select the Style option.
A Properties window pops up, which allows you to change the style of the object.
Introduction To Objects
In this section we will see the properties that are unique to each object.
Objects> Introduction To Objects
249
ActivePresenter User Manual
Version 4.0
Mouse Click
The Mouse click is an interactive object.
By default, a Mouse click object consists of three separate elements, as shown below:
You can optionally add a Hint message and a Timeout message.
The object works as follows:
When the interactive presentation is played, this object displays only the Target area element (1)
and waits for the user to click anywhere in the slide.
You can prompt the user to click in a specific area by inserting a shape with some guidance.
Change the Show in Mode property of the object to make it invisible in unchecked modes; by
default, the object is invisible in Practice and Test mode. You can also change the object's style
(Fill, Line, Text, and Shadow) to make it always invisible in all modes.
The User action must be the same as one of events defined in the Mouse Click tab of the Event
Editor, otherwise On Incorrect message is displayed.
For example, if the predefined event is CTRL+Left Click, but user clicks on the Target area without
holding down the CTRL key, he is doing it incorrectly.
Apart from this primary behavior, the object also has secondary behaviors.
To set up all behaviors of the object, double-click on the Target area. This launches Event Editor
with the object's current settings in the following tabs: Mouse click, Settings, On Correct, On
Incorrect, On Timeout, On Rollover, and On Rollout.
Note that you can make the Target area invisible (by setting the line to “None” in the Properties
pane) if you don't want to reveal the correct click area to the user. However, this is not
recommended: Use the Show In Mode property of the object. That is more flexible and useful,
especially when you want to show the object in some modes (e.g. Demonstration and Tutorial) but
hide the object in other modes (e.g. Practice and Test).
For example, suppose you want to show a world map and quiz the user about where a certain city
is. For this, place the Target area on that city, and make it invisible. Now the user can only see the
map. If the user clicks on the correct area, the object shows him the On Correct message. If he
clicks at a wrong location on the map, the object shows him the On incorrect message.
Text Box
The Text Box is an interactive object.
Objects> Introduction To Objects
250
ActivePresenter User Manual
Version 4.0
The default Text Box object consists of three separate elements, as shown below:
You can optionally add a Hint message and a Timeout message.
The object works as follows:
When the interactive presentation is played, this object displays only the Target area element (1)
and waits for the user to enter text.
If the user enters text, it appears in real time in the Target area (1).
If the entered text exceeds the area, the text is shifted so that the insertion point is always
visible. You will have to resize the area manually.
If the Submit button is enabled, the entered text is validated when the user presses the
Submit button,
If the Submit button is not set, the text is validated whenever the user presses any key. As
long as the entered text is a partial match for the reference text, ActivePresenter will wait
for the user to input more text. However, the moment the last entered character is found to
be different, it will be deemed as incorrect.
If the entered text matches the reference text, ActivePresenter displays the On Correct type
message (2).
If the entered text does not match the reference text, ActivePresenter displays the On
Incorrect type message (3).
Apart from this primary behavior, the object also has secondary behaviors.
To set up all behaviors of the object, double-click on the Target area. This launches Event Editor
with the object's current settings in the following tabs: Text, Settings, On Correct, On Incorrect, On
Incomplete, On Timeout, On Rollover, and On Rollout.
Key Stroke
The Key Stroke is an interactive object.
By default, a Key Stroke object consists of three separate elements, as shown below:
Objects> Introduction To Objects
251
ActivePresenter User Manual
Version 4.0
You can optionally add a Hint message and a Timeout message.
The object works as follows:
When the interactive presentation is played, this object displays nothing initially, and waits for the
user to enter a hot key (such as CTRL+SHIFT+P). It ignores text strings entered by the user.
(You can change the Show in Mode property to choose in which modes the Target Area (1)
should be displayed.)
If the entered hot key matches the reference, ActivePresenter displays the On Correct type
message (2).
If the entered text does not match the reference, ActivePresenter displays the On Incorrect
type message (3).
Apart from this primary behavior, the object also has secondary behaviors.
To set up all behaviors of the object, double-click on the Target area. This launches Event Editor
with the object's current settings in the following tabs: Keystroke, Settings, On Correct, On
Incorrect, On Timeout, On Rollover, and On Rollout.
Mouse Hover
The Mouse Hover is an interactive object.
It consists of two separate elements, as shown below:
Objects> Introduction To Objects
252
ActivePresenter User Manual
Version 4.0
In a rendered interactive presentation, the object functions as follows:
When the mouse rolls over the Target area (1), the object displays the Hint message (2).
Apart from this primary behavior, the object can execute any number of additional tasks as defined
in its interaction tabs. (It responds to two events: mouse rollover and rollout.)
Apart from this primary behavior, the object also has secondary behaviors.
To set up all behaviors of the object, double-click on the Target area. This launches Event Editor
with the object's current settings in the following tabs: On Rollover and On Rollout.
Drop Area
You should read Creating Drag and Drop Interactions to have basic concepts about drag and
drop before reading this section.
You can insert Drop Area from the Interaction menu, or convert it from a drop target. If it is
inserted from the menu, a correct drag source and feedback messages are also inserted
automatically. You can remove them if not needed or change their shapes and styles as.
To edit event – actions of a Drop Area object, refer to the section for the Accepted Drag Sources
tab in the Event Editor window.
Question – True/False
The True/False type Question is an interactive object.
Objects> Introduction To Objects
253
ActivePresenter User Manual
Version 4.0
By default, this object consists of seven separate elements, as shown below:
However, you have the option to add a Hint message, and three buttons: Clear, Skip and Back,
which function as follows:
Clear
Clear all user input on the question, e.g. make text fields empty, uncheck radio
button/check box.
Skip
Go to the next slide.
Back
Go to the previous slide.
Submit Get user input, evaluate, and execute suitable actions.
User can change these default behaviors by editing On Click actions of these buttons from the
Event Editor window. (Select the question, then double click the button to launch the Event Editor.)
In the rendered presentation, the object functions as follows:
Only the question (2), the True/false radio button options (3) and the Submit button (7) are
displayed.
When the user responds, the presentation compares the answer with the reference answer (which
is previously defined by the author).
If the answer is correct, the actions defined in On correct tab are taken. (which typically is
Objects> Introduction To Objects
254
ActivePresenter User Manual
Version 4.0
to display the On correct response (4))
If the answer is incorrect, the actions defined in On incorrect tab are taken. (which typically
is to display the On incorrect response (5))
If the user tries to leave the answer incomplete, the actions defined in the On incomplete
tab are executed. (which typically is to display the On incomplete response (6))
Apart from this primary behavior, the object also has secondary behaviors.
To set up all behaviors of the main object, double-click on the frame (1). This launches Event
Editor with the object's current settings in the following tabs: Settings, On Correct, On Incorrect,
On Incomplete and On Timeout.
You have to set up the behavior of each button separately. Double-click on the button to launch
Event Editor with the button's current settings in the following tabs: On Click, On Rollover, and On
Rollout.
Question – Multiple Choice
The Multiple choice type Question is an interactive object.
The default Multiple choice object consists of seven separate elements, as shown below:
However, you have the option to add/remove answers, add a Hint message, and three buttons:
Objects> Introduction To Objects
255
ActivePresenter User Manual
Version 4.0
Clear, Skip and Back, which function as follows:
Clear
Clear all user input on the question, e.g. make text fields empty, uncheck radio
button/check box.
Skip
Go to the next slide.
Back
Go to the previous slide.
Submit
Get user input, evaluate, and execute suitable actions.
User can change these default behaviors by editing On Click actions of these buttons from the
Event Editor window. (Select the question, then double click the button to launch the Event Editor.)
In the rendered presentation, the object functions as follows:
Only the question (2), the answer options (3) and the Submit button (7) are displayed. The user is
expected to select any one answer.
When the user responds, the presentation compares the answer with the reference answer (which
is previously defined by the author).
If the answer is correct, the actions defined in On correct tab are taken. (which typically is
to display the On correct response (4))
If the answer is incorrect, the actions defined in On incorrect tab are taken. (which typically
is to display the On incorrect response (5))
If the user tries to leave the answer incomplete, the actions defined in the On incomplete
tab are executed. (which typically is to display the On incomplete response (6))
Apart from this primary behavior, the object also has secondary behaviors.
To set up all behaviors of the object, double-click on the Target area. This launches Event Editor
with the object's current settings in the following tabs: Choice, Settings, On Correct, On Incorrect,
On Incomplete, and On Timeout.
You have to set up the behavior of each button separately. Double-click on the button to launch
Event Editor with the button's current settings in the following tabs: On Click, On Rollover, and On
Rollout.
Question – Multiple Response
The Multiple response type Question is an interactive object.
The default Multiple response object consists of seven separate elements, as shown below:
Objects> Introduction To Objects
256
ActivePresenter User Manual
Version 4.0
However, you have the option to add/remove answers, add a Hint message, and three buttons:
Clear, Skip and Back, which function as follows:
Clear
Clear all user input on the question, e.g. make text fields empty, uncheck radio
button/check box.
Skip
Go to the next slide.
Back
Go to the previous slide.
Submit
Get user input, evaluate, and execute suitable actions.
User can change these default behaviors by editing On Click actions of these buttons from the
Event Editor window. (Select the question, then double click the button to launch the Event Editor.)
In the rendered presentation, the object functions as follows:
Only the question (2), the answer options (3) and the Submit button (7) are displayed. The user is
expected to click one or more check boxes.
When the user responds, the presentation compares the answer with the reference answer (which
is previously defined by the author).
Objects> Introduction To Objects
257
ActivePresenter User Manual
Version 4.0
If the answer is correct, the actions defined in On correct tab are taken. (which typically is
to display the On correct response (4))
If the answer is incorrect, the actions defined in On incorrect tab are taken. (which typically
is to display the On incorrect response (5))
If the user tries to leave the answer incomplete, the actions defined in the On incomplete
tab are executed. (which typically is to display the On incomplete response (6))
Apart from this primary behavior, the object also has secondary behaviors.
To set up all behaviors of the object, double-click on the Target area. This launches Event Editor
with the object's current settings in the following tabs: Choice, Settings, On Correct, On Incorrect,
On Incomplete, and On Timeout.
You have to set up the behavior of each button separately. Double-click on the button to launch
Event Editor with the button's current settings in the following tabs: On Click, On Rollover, and On
Rollout.
Question – Essay
The Essay type Question is an interactive object.
This object should only be used for taking a survey from users, not for assessment. (We cannot
expect that a descriptive answer will match the stored model answer exactly.)
Currently, ActivePresenter doesn't support survey question explicitly, but you can create a survey
question by leaving blank the Value, On Correct and On Incorrect tabs.
By default, it consists of seven separate elements, as shown below:
Objects> Introduction To Objects
258
ActivePresenter User Manual
Version 4.0
However, you have the option to add a Hint message, and three buttons: Clear, Skip and Back,
which function as follows:
Clear
Clear all user input on the question, e.g. make text fields empty, uncheck radio
button/check box.
Skip
Go to the next slide.
Back
Go to the previous slide.
Submit
Get user input, evaluate, and execute suitable actions.
User can change these default behaviors by editing On Click actions of these buttons from the
Event Editor window. (Select the question, then double click the button to launch the Event Editor.)
In the rendered presentation, the object functions as follows:
Only the question (2), the answer options (3) and the Submit button (7) are displayed. The user is
expected to enter a descriptive text in response.
When the user responds, the presentation compares the answer with the reference answer (which
Objects> Introduction To Objects
259
ActivePresenter User Manual
Version 4.0
is previously defined by the author).
Apart from this primary behavior, the object also has secondary behaviors.
To set up all behaviors of the object, double-click on the Target area. This launches Event Editor
with the object's current settings in the following tabs: Value, Settings, On Correct, On Incorrect,
On Incomplete, and On Timeout.
You have to set up the behavior of each button separately. Double-click on the button to launch
Event Editor with the button's current settings in the following tabs: On Click, On Rollover and On
Rollout.
Question – Fill In The Blank
The Fill in the blank type Question is an interactive object.
By default, it consists of seven separate elements, as shown below:
However, you have the option to add a Hint message, and three buttons: Clear, Skip and Back,
which function as follows:
Clear
Clear all user input on the question, e.g. make text fields empty, uncheck radio
button/check box.
Objects> Introduction To Objects
260
ActivePresenter User Manual
Skip
Go to the next slide.
Back
Go to the previous slide.
Version 4.0
Submit Get user input, evaluate, and execute suitable actions.
User can change these default behaviors by editing On Click actions of these buttons from the
Event Editor window. (Select the question, then double click the button to launch the Event Editor.)
In the rendered presentation, the object functions as follows:
Only the question (2), the answer box (3) and the Submit button (7) are displayed. The user is
expected to click inside the box and enter some text.
When the user responds, the presentation compares the answer with the reference answer (which
is previously defined by the author).
If the answer is correct, the actions defined in On Correct tab are taken. (which typically is
to display the On Correct response (4))
If the answer is incorrect, the actions defined in On Incorrect tab are taken. (which typically
is to display the On Incorrect response (5))
If the user tries to leave the answer incomplete, the actions defined in the On Incomplete
tab are executed. (which typically is to display the On Incomplete response (6))
Apart from this primary behavior, the object also has secondary behaviors.
To set up all behaviors of the object, double-click on the Target area. This launches Event Editor
with the object's current settings in the following tabs: Value, Settings, On Correct, On Incorrect,
On Incomplete and On Timeout.
You have to set up the behavior of each button separately. Double-click on the button to launch
Event Editor with the button's current settings in the following tabs: On Click, On Rollover and On
Rollout.
Question – Fill In Multiple Blank
The Fill in multiple blank type Question is an interactive object.
By default, it consists of seven separate elements, as shown below:
Objects> Introduction To Objects
261
ActivePresenter User Manual
Version 4.0
However, you have the option to add/remove answers, add a Hint message, and three buttons:
Clear, Skip and Back, which function as follows:
Clear
Clear all user input on the question, e.g. make text fields empty, uncheck radio
button/check box.
Skip
Go to the next slide.
Back
Go to the previous slide.
Submit
Get user input, evaluate, and execute suitable actions.
User can change these default behaviors by editing On Click actions of these buttons from the
Event Editor window. (Select the question, then double click the button to launch the Event Editor.)
In the rendered presentation, the object functions as follows:
Only the question (2), all answer statements (3a) with their corresponding input boxes (3b) and the
Submit button (7) are displayed.
The user is expected to click in these input boxes and type his answers.
Note that although this example shows the answer boxes at the end, you can easily place
Objects> Introduction To Objects
262
ActivePresenter User Manual
Version 4.0
them in the middle of the sentences: Just type a few spaces in the middle of the answer
sentence, and then drag the input box over this blank area of the answer. Re-size the input
box size, position, text style, etc as required. When the user responds, the presentation
compares the input text strings with the reference answers (which are previously defined by
the author).
If the answer is correct, the actions defined in On Correct tab are taken. (which typically is
to display the On Correct response (4))
If the answer is incorrect, the actions defined in On Incorrect tab are taken. (which typically
is to display the On Incorrect response (5))
If the user tries to leave the answer incomplete, the actions defined in the On Incomplete
tab are executed. (which typically is to display the On Incomplete response (6))
Apart from this primary behavior, the object also has secondary behaviors.
To set up the general behaviors of the object, double-click on the Target area. This launches
Event Editor with the object's current settings in the following tabs: Settings, On Correct, On
Incorrect, On Incomplete and On Timeout.
To set up the reference text for each answer, double-click on each input box.
(Note: To reach the input box, you may have to click on the answer first, and then click on the input
box. Once the input box is selected, you can double-click on it.)
This launches Event Editor with the current settings for this specific answer. Each tab of the
Event Editor defines the object's response to a different event, as shown below: Value, On
Rollover and On Rollout.
Repeat this for each input box (for each answer).
You have to set up the behavior of each button separately. Double-click on the button to launch
Event Editor with the button's current settings in the following tabs: On Click, On Rollover and On
Rollout.
Question – Sequence
The Question-Sequence is an interactive object.
The default Question-Sequence object consists of six separate elements, as shown below:
Objects> Introduction To Objects
263
ActivePresenter User Manual
Version 4.0
However, you have the option to add/remove answers, add a Hint message, and three buttons:
Clear, Skip and Back, which function as follows:
Clear
Clear all user input on the question, e.g. make text fields empty, uncheck radio
button/check box.
Skip
Go to the next slide.
Back
Go to the previous slide.
Submit
Get user input, evaluate, and execute suitable actions.
User can change these default behaviors by editing On Click actions of these buttons from the
Event Editor window. (Select the question, then double click the button to launch the Event Editor.)
In the rendered presentation, the object functions as follows:
The question (2), all answers (3) and the buttons (6) are displayed. The answers are shuffled
randomly each time the question shows. The user is expected to drag and drop the answers so
that they have the same order as the author placed them.
Apart from this primary behavior, the object also has secondary behaviors.
To set up all behaviors of the object, double-click on the Target area. This launches Event Editor
with the object's current settings in the following tabs: Settings, On Correct, On Incorrect and On
Timeout.
You have to set up the behavior of each button separately. Double-click on the button to launch
Event Editor with the button's current settings in the following tabs: On Click, On Rollover and On
Rollout.
Objects> Introduction To Objects
264
ActivePresenter User Manual
Version 4.0
Question – Drag-n-Drop
You should read Creating Drag and Drop Interactions to have basic concepts about drag and
drop, as well as useful tips before reading this section.
As mentioned, Drag-n-Drop Question is a type of Question that includes multiple drag sources,
drop targets and require learners/viewers (who take the output simulation) to map them correctly.
To insert new shapes, images, drag source – drop target pairs, feedback messages or buttons,
select the question then click on the corresponding tools on the right side of the question.
To edit event – actions of the question, refer to the section for the Answer tab in the Event Editor
window.
You can also edit event – actions for each drop target, refer to the section for the Accepted Drag
Sources tab in the Event Editor for more details.
Objects> Introduction To Objects
265
ActivePresenter User Manual
Version 4.0
Shape
ActivePresenter offers five shape groups with many shapes in each group. You can insert any of
them.
After inserting a shape, you can do the following:
Click the text area of the shape and enter text. If the shape has no text, you can right-click
the shape then select the Edit item from the popup menu. You can also select the shape
then press F2 to start editing the text.
Drag the shape to a new position.
Drag the handles to resize the shape.
If you make the shape too small, some text may be clipped or hidden. Therefore be careful
while resizing the frame.
Drag the yellow diamond
Use the context menu and change the shape type.
Use the context menu to change the style of the shape.
Double-click on the frame of the shape to launch the Properties window and change its
properties.
Click on the Properties
button to launch the Properties window.
Now you can edit all the properties of the object in one place.
to change the dimensions/appearance of the shape.
Objects> Introduction To Objects
266
ActivePresenter User Manual
Version 4.0
Use the Properties pane in the Editor window to edit most of the properties.
Text Caption
A Text Caption object is a rectangular shape that can contain multi-line formatted text.
In fact, the Text Caption is a variant of the Shape object, where only the text is given prominence,
and the Fill and Line attributes of the shape are muted.
Therefore the discussion for shapes applies here too.
Highlight
A Highlight object is used to draw the attention of the viewers to a certain part of the screen.
Think of a Highlight as a variant of Shape object, where the text and border line are removed and
the background is made semi-transparent (50% transparency).
Therefore the discussion for shapes applies here too.
Spotlight
A Spotlight object retains the original brightness within the shape, and darkens the rest of the
screen. Thus it is able to instantly draw your attention irresistibly to even a tiny part on the screen.
A Spotlight is a more aggressive version of Highlight, where the rest of the screen is not
darkened.
Like the other objects, a spotlight too is a Shape object with special attributes. Therefore all the
discussion of the shapes applies here too. The only exception is that the Properties pane actually
shows the property of the area that lies OUTSIDE the shape (not inside it).
Feedback
The Feedback object shows the user's mouse and keyboard activity when the rendered
Objects> Introduction To Objects
267
ActivePresenter User Manual
Version 4.0
presentation is playing.
When the interactive presentation is run, any keyboard or mouse inputs provided by the user are
displayed as follows:
CTRL+P
CTRL+Left-click
This is useful in on-screen demonstration of any software, where the audience can clearly see the
actions of the presenter.
Therefore it is placed where it will not obstruct the parts of the screen where action is going on; but
at the same time it should not be placed too much away from action, because in that case your
eyes would have to constantly flit to-and-fro between the action and the indicator, which is very
tiring.
Gesture Effect
The Gesture Effect object is usually used in demonstration mode which shows how the viewer
interacts with software on the touch screen. Basically, it looks like an animated GIF image.
ActivePresenter provides fourteen gesture effect types.
Single Tap.
Double Tap.
Hold.
Two Fingers Single Tap.
Two Fingers Double Tap.
Swipe Up.
Swipe Right.
Swipe Down.
Swipe Left
Rotate Left
Rotate Right
Pinch In
Pinch Out
Fingers.
You can insert any gesture effect from the Annotation > Gesture Effects menu.
Objects> Introduction To Objects
268
ActivePresenter User Manual
Version 4.0
Cursor Path
This object represents the mouse movement and clicking.
In practice, this object gets generated in two different ways:
During the capture phase, ActivePresenter records your mouse-movements and converts
them into such paths. (The figure above shows only one segment. In real life,
ActivePresenter creates a complex path with multiple segments.)
During the edit phase, you can edit the captured path or insert a new cursor path object by
clicking on the
toolbar button or using the Annotation > Cursor path menu option.
In general, the idea is to add/delete nodes in the path, and to drag them to place them over buttons
or other clickable objects in the canvas. Optionally you can add click points, where ActivePresenter
produces the clicking sound in the rendered presentation.
Tip: When you insert a Cursor Path object, the whole object is selected so that you can move it to
another position in the canvas. If you want to change the shape of the path, you will have to select
its individual elements and drag. To do so, first click anywhere in the canvas. This deselects the
path. Now click on any element of the path and drag.
When you add a Cursor Path object, ActivePresenter inserts a Start point (1), an End point (2)
and a dotted line (3) that represents the movement path of the pointer between these two points.
The dotted circles mark the end-points (these markers are useful because you may want to turn off
the mouse pointer during some segments, in which you need a handle and a positional reference
to manipulate the path).
The line has green color at start, which changes to red at the end-point. A red arrow also shows
the direction of cursor-movement. The spacing between the dots indicate the speed of the cursor
on screen: Closely spaced dot means slower speeds. (Imagine the dots to be plotted at regular
intervals of time; so the faster the cursor moves across the screen, the farther are the dots.) If the
Objects> Introduction To Objects
269
ActivePresenter User Manual
Version 4.0
dots are too closely spaced, the line appears as solid instead of dotted.
Note that a square denotes that Point#1 is selected at present.
This is more or less a straight line. But you can add more points by clicking anywhere on the dotted
red/green line. At this moment, the pointer turns into a pencil. After inserting any point, you can
drag that point to a new position. This gives the path a new shape.
Any given path segment can be made a curve or a straight line. Just select the start-point and from
the context menu, select the Straight cursor path or Curved cursor path options (or click on the
or
buttons in the toolbar).
When you select (click on-) the start-point of a segment, ActivePresenter shows a Control point
(4) associated with the end-point. In the example above, we had clicked on point (1), so
ActivePresenter shows the control point (4), which is associated with Point (2). This control point is
always tangent to the curve. You can change the shape of the curve by moving the control point.
The following figure shows two sets of experiments:
Within each row, the diamond
is shifted more and more away from the end-point.
(See the progression between figures 1→2→3 and figures 4→5→6)
Within each column, the diamond is rotated around the end-point by 45°.
(Compare figures 1-4, 2-5 and 3-6)
Observe that1. As the yellow diamond
is moved away from the end-point, the path becomes more
curved. (Observe the progression in figures 1→2→3 and also figures 4→5→6).
2. As the diamond is turned away from the straight line connecting the start-point and the endpoint, the curve also moves away from the center line. This shift is even more pronounced
when the diamond is farther away from the end-point. (Compare figures 1-4, 2-5 and 3-6)
To replace the original pointer with other shapes, double-click on any end-point. ActivePresenter
Objects> Introduction To Objects
270
ActivePresenter User Manual
Version 4.0
pops up a cursor-selector window.
Make sure that Library option is selected at the bottom (the project is not likely to have any shape
resources). Select any shape pointer and press OK.
In the following example, we have added a few points to the original line, and also changed the
cursor for each of those interim points. When rendered, this line will keep changing the cursor
shape along the way.
Also note how graceful the movement is, thanks to use of four control points.
Now let us manipulate the same cursor movement in time.
Objects> Introduction To Objects
271
ActivePresenter User Manual
Version 4.0
The following screenshot shows the actual movement on the screen and corresponding Timeline
view.
The screenshot shows the 3rd segment with four instants 1-4 marked on both the canvas and the
Timeline.
From the Timeline, we can see that1. The purple vertical line starts the life of the segment.
2. The instant when the cursor starts moving is marked with a red vertical line.
During the 1→2 gap, the cursor is at rest (there is no movement), this is the Start Duration of the
cursor.
The green line spans the duration of cursor movement.
3. The instant when the cursor stops moving is marked with a second red vertical line.
During the 3→4 gap, the cursor is at rest (there is no movement), this is the End Duration of the
cursor.
Objects> Introduction To Objects
272
ActivePresenter User Manual
Version 4.0
4. The second purple vertical line denotes the end of the segment.
Adding A Click Point
The diamond
on the Timeline shows a click-point. This is where ActivePresenter simulates a
click by producing a “click” sound and click effect.
Any point on the cursor path can be converted into a click-point.: Just select the point by clicking
on it, and then in the Properties pane, click in the Click-point check box.
Composing A Mouse Path
Here are a few tips for composing a realistic-looking path:
1. Avoid showing mouse all the time. It is OK if the mouse vanishes from the scene for a
while.
2. Remove aimless wandering of the mouse: It is too much distracting. Replace them with
straight segments.
3. Avoid using the mouse as a presentation pointer.
Jabbing the pointer at something may be OK for live demo, but in an annotated presentation, this is
a sure sign of laziness! Instead, use shapes, zoom-n-pan or spotlight.
4. The resting periods are important in realistic depiction of the mouse-movement. In fact, they
contain the clicking points (you cannot click while the mouse is moving).
5. When you are narrating something, keep the mouse at rest.
6. Before clicking any important control, first prepare the viewer, by (a) describing which
control you are going to click, and (b) what will be the consequence of that action. That
way, he will be able to observe the action closely and correlate the happenings on the
screen.
It is a poor practice to first do something and then tell the viewer about what you did. While he
struggles to make sense of what you said, he would lose track of what you say next!
Continuation Of Cursor Path Between Slides
Normally, when you drag the end-points of a cursor path, ActivePresenter will also move
appropriate end-point in previous or next slide to ensure a smooth non-abrupt movement of the
cursor in the rendered presentation.
Let us understand this with an example: In the following figure, the end-point of the cursor path (1)
on one slide has the same coordinates as the start-point of the cursor path (2) in the next slide.
As result, when the rendered presentation transitions from the first slide to the next slide, the
Objects> Introduction To Objects
273
ActivePresenter User Manual
Version 4.0
movement of the cursor appears to be continuous (without any jerks).
If you move the end-point (or the start-point) in any one slide, ActivePresenter automatically moves
the corresponding matching point in the other slide, to again match their coordinates:
However, in rare cases, the cursor path is out of sync (e.g. when you delete a slide that is in the
middle, or delete the cursor path in that slide). This results in an abrupt movement of the mouse
cursor in the rendered presentation when the slide changes.
To avoid this, you can again “stitch together” the ends of cursor paths of adjoining slides, using the
and
buttons (or by r-clicking on the start/end point and using the context menu options).
This will snap the start/end-point of the cursor path in current slide to the appropriate end/startpoint of cursor path in previous or next slide.
Zoom-n-Pan
The zoom-n-pan object shows ActivePresenter where to zoom during playback.
This is a re-sizable rectangle that must always match its aspect ratio to the project's aspect ratio.
Let us understand this with an example:
In the following screenshot, the image of the Taj Mahal occupies the entire screen. Now imagine
you were standing on the right minaret; and therefore you would like to zoom in that minaret.
Objects> Introduction To Objects
274
ActivePresenter User Manual
Version 4.0
To do this, insert a zoom-and-pan object, and move it over the minaret. Make it small enough so
that the zoomed in view focuses there.
In the Timeline, adjust the onset and duration of the Zoom-and-pan object.
The zoom should not be too fast, otherwise it becomes nauseating.
When this slide is rendered, the camera shows the entire scene, and then zooms in and
simultaneously pans sideways to the minaret.
Note that the zoom-n-pan object has a one-way effect: When it ends, it does not restore the zoom
back to normal. So the camera will keep looking at the minaret till the slide ends.
If this were a movie (instead of an image), this would not be acceptable at all!
Objects> Introduction To Objects
275
ActivePresenter User Manual
Version 4.0
Fortunately, there is a trick: Use another zoom-n-pan object to zoom back to normal.
Re-size it to cover the entire canvas. On the Timeline, place it apart so that you have a few
seconds of close up at the minaret (the camera should not start zooming out abruptly). Set its
duration so that the zooming out is smooth and unhurried (it should not be too fast).
The combined effect of the two zoom-n-pan objects will be what you need.
Closed Caption
The closed captions (“CC”) are exactly like subtitles you see during a movie. Actually the key
term is Captions. The qualifier term “closed” means that the user (and not the author-) has the
power to display or hide the CC lines.
Objects> Introduction To Objects
276
ActivePresenter User Manual
Version 4.0
The above screenshot shows only one CC line, which typically lasts for a few seconds on screen.
A typical slide would have tens (or hundreds) of such CC lines. All of those CC lines belong to one
single CC object.
The screenshot below shows three CC lines in the Timeline pane. The duration of each line is
shown with a yellow rectangle (time bar). All of them are part of a single CC object.
A CC object is quite different from other object types:
1. Actually a CC object is a virtual entity: It is the aggregate of all CC lines that appear in a
given slide. It does not have a shape of its own.
2. All CC lines in a slide are part of a single CC object.
3. You cannot have more than one CC object in a slide. On the other hand, a slide may not
have CC object.
4. You can not change the position of the CC lines.
5. The visual attributes for all CC objects can be only set globally in the project: You cannot
set a different visual attribute for each CC object.
In other words, if you change the style of the CC on one slide, it will be applied to the CC in all
other slides of that project.
6. Usually a CC line is also converted into speech.
When converted, all lines of a CC object produce a combined single audio object.
Objects> Introduction To Objects
277
ActivePresenter User Manual
Version 4.0
To add a CC line(s) to slide, you have to launch the Closed Caption Editor from
Annotation>Closed Caption menu, or by clicking on the
button in the toolbar.
The following window is launched:
When launched, the Closed Caption Editor shows one dummy entry. Replace that with your real
entry, as described below:
1. This is the Text editor section, where each CC line highlighted in the CC stack (3) is
Objects> Introduction To Objects
278
ActivePresenter User Manual
Version 4.0
edited.
When you start, the first line of the CC Stack is already loaded in the Text Editor. Click in the text
box and enter the CC text. As you edit the line, this change is reflected “live” in the CC stack (3).
◦
Avoid long sentences and multi-line text, because your audience cannot read long
lines while they are trying to study the slide.
◦
You can create a multiple-row CC line (as shown in the screenshot above).
To create the second row, just press Enter.
ActivePresenter stores a line break as <br>. If you want to remove the line break,
delete <br>
Next, define the start time and the end time for this particular CC line.
◦
The star/end times are in milliseconds.
◦
Starting of the slide is taken as reference (t=0).
If the Change focus to text editor when selecting a caption check box is selected, whenever
you click on any line in the CC stack (3), ActivePresenter automatically shifts the focus to the Text
Editor, so that you can start editing that line straightaway. (If this check box is not selected, the
focus remains within the CC Stack.)
2. This is the TTS (Text To Speech) section.
Each CC line can be converted to speech with its own individual setting of voice, speed and
volume. Click on the Speak button to check the audio with the current settings. If you are not
satisfied, change the settings and try again. (This button is only for trying out the settings: It does
not create the TTS audio.)
◦
If the speed is too fast, the voice will sound cartoonish; and the words start merging
into each other.
◦
If the speed is too slow, it will sound like a growl. Therefore a mid-range speed is
best.
Remember: Using multiple voices (male, female) at different speeds makes the narration
interesting. You can even use a different voice for each specific purpose.
Different male/female voices are available on the Internet, some of which have American or British
accent. Select the accent that is suitable for your target audience.
3. This is the CC Stack. It contains all the CC Lines of the CC object. (A given CC object can
have multiple CC lines, some of which can occupy 2-3 rows on the screen.)
You cannot edit the CC lines here. To edit a CC line, click on it. It appears in the Text Editor (1)
and its settings appear in the TTS section (2). Now you can edit the text and the TTS settings.
4. This section contains buttons to handle the CC lines in the CC Stack.
The
button adds a new CC line. The Text Editor is automatically set to edit this line.
The
button removes the selected CC Line.
The
and
buttons move the selected CC Line up and down in the stack.
5. This is the Speech audio section.
It is for converting the composed CC into audio, and checking it out.
Initially, only the Generate Audio button is active. Click on it to convert all CC lines into an audio
track.
At this stage, the appearance of this whole section changes (as shown in figure 5a):
Objects> Introduction To Objects
279
ActivePresenter User Manual
Version 4.0
ActivePresenter activates the audio player controls; and changes the Generate Audio button to
Update Audio.
Check out the converted audio using the play
button.
◦
If everything is fine, click the OK button. A new audio object appears in the
Timeline. This object is independent of the CC object.
◦
If you are not happy with the audio, go back to the CC Stack and try editing the CC
lines.
◦
You can also press Cancel instead. The audio object will not be created. All your
recent changes in the CC lines will also be lost.
Note that all CC Lines in the CC Stack are converted together (individual lines cannot be converted
into speech).
Adjusting Closed Captions In The Slide
If you have annotated the slide with shapes and zoom-and-pan, your captions (and TTS speech)
must refer to the feature that is being highlighted at that particular moment.
However, this does not happen automatically. There may be several sync problems:
The CC may run into the subsequent scene which has no relation to what the CC is talking
about.
The converted audio may interfere with an audio embedded in the slide during capturing
phase.
The converted audio may overlap with TTS audio of other objects (shapes, for example)
The converted audio may overlap with other stand-alone audio/video objects
You will have to check the presentation for these problems and sort them out.
To synchronize the captions with your annotations, go back to the slide and look at the Timeline.
Each caption appears in the Timeline as a separate bar. Look at its relationship with the other
objects in the Timeline, and adjust the bars.
Display each caption for adequate time so that your audience can read it comfortably. So
longer captions need more display time.
If you have used TTS narration, it needs to be read fully while the corresponding feature is
still highlighted.
This is not a problem for most objects, as you can simply lengthen their bars in the Timeline. In
case of a video, you can freeze the frame for a few moments till the narration and caption play out.
After that, resume the play.
When you adjust the caption bars in the Timeline, these changes are reflected in the Closed
Caption Editor.
Let us see all this with an example:
The following screenshot shows our Taj Mahal project. It shows three bars in the Closed Caption
row, which means there are three captions.
Objects> Introduction To Objects
280
ActivePresenter User Manual
Version 4.0
The bars in Timeline were adjusted as follows:
1. The first caption introduces the Taj. Therefore it must start after a couple of seconds.
Therefore the start point of this bar was pushed back by 2 seconds.
The duration of the bar was adjusted so that the audience can read the text comfortably.
2. The intent was to zoom-n-pan to a minaret (2a), and reveal an amazing fact that the
minarets are intentionally built tilted, so that from afar, they actually look perfectly vertical.
So the zoom-n-pan (2b) takes the viewer to the minaret.
3. Once the view is zoomed in, the caption is displayed.
Since this is a longer sentence, more time is given to it.
4.
Another zoom-n-pan brings the view back to normal. This is intentionally done at a faster
pace, because we are only reverting to the full view that was already there.
After this, a small gap is allowed so that the audience can reorient itself.
5. Now the final caption begins. Adequate time is given so that the audience can read it
comfortably.
Objects> Introduction To Objects
281
ActivePresenter User Manual
Version 4.0
If you launch the Closed Caption Editor now, the adjusted timings of the captions are reflected in it.
Converting All Closed Captions To Speech
ActivePresenter provides a batch operation to convert all CC objects into speech in one stroke.
Select the Edit> Convert Closed Captions to Audio menu option.
The following window pops up:
In the top section (1), define the slides where you want this convert CC to speech.
You can do the conversion in all slides of the project, current slide or specific slides.
To limit the conversion only to specific slides, enter the comma-separated list in the input
box.
You can enter a range by separating the slide numbers with a hyphen. For example, “3-6”
means slide# 3, 4, 5 and 6.
Next, set the TTS parameters by clicking on the Settings button (2).
Objects> Introduction To Objects
282
ActivePresenter User Manual
Version 4.0
The following window appears:
Select the TTS voice, adjust the speed and volume.
To check the settings, enter a test sentence in the Preview input box, and click on the Speak
button.
If your results are not OK, change the parameters and try again. Repeat this cycle till you are
satisfied.
If your settings are too unsatisfactory, click on the Reset button and start over.
When you are satisfied, press OK to return to the main window.
In the main window, the check box at the bottom (3) extends the duration of each CC object to
match the duration of the converted speech.
This may cause sync problems:
The CC may run into the subsequent scene which has no relation to what the CC is talking
about.
The converted audio may interfere with an audio embedded in the slide during capturing
phase.
The converted audio may overlap with TTS audio of other objects (shapes, for example)
The converted audio may overlap with other stand-alone audio/video objects
You will have to check the presentation for these problems and sort them out.
Note that even if you have already converted the captions for many CC objects, you can still
launch this operation safely, without any adverse effects.
Objects> Introduction To Objects
283
ActivePresenter User Manual
Version 4.0
Miscellaneous Tips
Here are some general tips for using Closed Captions:
Always ensure correct spellings!
Use words that match the actual voice narration. Do NOT try to paraphrase.
Otherwise the audience may find it very hard to read the Closed Captions.
Use punctuation to clarify the meaning.
If a sentence ends normally, use the appropriate mark (.?!) at the end. However, a sentence that is
left unfinished should end with an ellipsis (…).
Translate foreign words in parenthesis ( ).
Use italics (or ALLCAPS) to denote a new word or heavily emphasized part in speech.
Show music or other sound effects in square brackets, such as [music], [door slams],
[crowd at the bar], or [laughter].
Use square brackets to describe any mood conveyed through voice-modulation, such as
[whispers], [shouts], [menacingly], [croons], [sobs].
Always use the appropriate word to convey the degree of intensity of an action.
For example, chuckles, smiles, laughs and guffaws are all different!
Similarly, “door closes” and “door slams” convey entirely different moods.
When the speaker is off screen, identify him/her by name.
When more than one persons are on screen, identify the speaker by name.
As a rule, show only one line of Closed Caption at a time.
An exception is when multiple people speak simultaneously: In this case, it is OK to show their
sentences together; but always maintain the correct sequence (a sentence that starts first should
be listed at the top of the Closed Caption stack).
Another exception is when one person is interrupted by another. Here, end the first (interrupted)
sentence with a dash “–“; and place the second (interrupting) sentence in the second line.
Image
You can insert an image in the ActivePresenter presentation by clicking on the
the Annotation > Image menu option).
button (or using
Depending upon the context of the presentation, images are screenshots of applications, drawings
(electrical, civil, mechanical, etc.) or photos of persons, products, places, buildings, etc.
After placing the image, you can place other annotations and explain the image (or parts of it).
Screenshot
ActivePresenter has a built-in facility to capture screenshots.
A typical application has a top level window, which in turn may have child windows that pop up to
accomplish different tasks. The windows form a hierarchical tree. A window at any level (top/child)
has objects (menus, panes, toolbars, controls, etc.). ActivePresenter allows you to take a
screenshot of any of these windows/objects, which is then inserted in the current slide of your
Objects> Introduction To Objects
284
ActivePresenter User Manual
Version 4.0
presentation.
ActivePresenter has four different ways of taking a screenshot, which can be selected by clicking
on the arrow next to the
button, or by using the Annotation > Screenshot menu option, and
then selecting a sub-option.
The screenshot modes are described below:
Capturing A Window
To capture a screenshot of the target window or any object in it, select the
ActivePresenter can capture a window at any level of the application.
Window option.
Use the mouse to select a window or its object (e.g. toolbar, pane, menus, etc.).
You can use the mouse click on the target applications normally (it does not trigger a screenshot).
As you move the mouse over different parts of the screen, ActivePresenter shows a red dotted
outline
around areas that can be captured.
Note: You will find that ActivePresenter cannot detect some objects in certain target applications.
This is because those applications have not provided MSAA interface for those controls.
ActivePresenter typically captures the whole toolbar, because it is usually the lowest level
child window.
When you find the correct area to be captured, press the PrintScrn key on your keyboard or
CTRL+Click. ActivePresenter will capture the screenshot and place the image in the current slide.
Capturing An Object
To capture a screenshot of any object in any window, select the
Object option.
As you move the mouse over different parts of the screen, ActivePresenter shows a red dotted
outline
around areas that can be captured.
Note: You will find that ActivePresenter cannot detect some objects in certain target applications.
This is because those applications have not provided MSAA interface for those controls.
Typically, ActivePresenter can capture the individual tools on any toolbar, depending on the
accessibility support level of the target application.
When you find the correct area to be captured, press the PrintScrn key on your keyboard or
CTRL+Click. ActivePresenter will capture the screenshot and place the image in the current slide.
Capturing The Full Screen
To capture a screenshot of the entire screen of your PC, select the
(Some screen-capturing applications call this “desktop” mode.)
Full Screen option.
ActivePresenter will minimize its own screen, and capture whatever is visible on your computer
screen. This may be a single application (running with its window maximized), or several windows
of different applications.
ActivePresenter will then place this image on the current slide.
Be careful: This image is very likely to be larger than your slide. If you re-size it to fit the canvas
size, the details in the image will get blurred, and the viewers may not be able to read specific
details.
Objects> Introduction To Objects
285
ActivePresenter User Manual
Version 4.0
Capturing An Application or Region
To capture a screenshot of the top-level window of the target application, or a rectangular region of
the screen, select the
Application or Region option.
A target-seeker window pops up as shown below.
(A cross-hair in the middle of this window indicates that this is a target-seeker window.)
Drag and position this window around the target part of the screen.
Re-size the window by dragging its handles (tiny squares at the corners and middle of all
sides).
The screenshot command window:
This window works as follows:
The Screenshot Usage section allows you to insert the screenshot as an image in the current
slide, and/or as a background image of a new slide that is inserted after the current slide.
The Screenshot size section allows you to set the size precisely (instead of setting the size
visually by adjusting the target-seeker window). When you set a size, the target-seeker window resizes to that specified size. The Preset sizes button allows you to select from pre-defined sizes.
The Application section provides you a drop-down list of all applications running on this PC that
have a visible window. Generally you need to take the screenshot of an application, so this list
should satisfy your needs.
The
button refreshes the drop-down list of all running applications. (If you have started a new
Objects> Introduction To Objects
286
ActivePresenter User Manual
Version 4.0
application recently, use this button to include it in the list.)
The Fit To Application button fits the window of the selected target application to the
target-seeker window's current size.
The Fit To Boundary button fits (re-sizes) the target-seeker window to the selected target
application's window.
The Wait for control allows you to take the snap after a delay (defined in milliseconds). Use this
delay to quickly interact with the target application after you, and capture its response.
To take the screenshot, click on the Take Screenshot button.
Screenshot Options
The Annotation> Screenshot menu (or the
button) also contains a few options, as
explained below. Note that the first three options work only when capturing a window at any level
(not when you are capturing a region or an object).
Capture shadow (Windows Vista or later): When an application's window is in nonmaximized state, the Windows OS casts a drop-shadow around its border.
ActivePresenter has the option to capture this shadow while taking a screenshot of the target
window.
Note that this drop-shadow is treated as part of the image, and not a shadow property of the
screenshot image that is captured. In other words, you can add one more shadow to this captured
image, with a different set of parameters (color, distance, angle, etc.)
Process rounded corners: When an application's window is in non-maximized state, the
Windows OS offers an option to display rounded corners.
ActivePresenter has the option to capture these rounded corners. If this option is turned off, the
captured image will have sharp corners.
Use opaque background: Windows Vista and later have the option to use Aero theme,
where the borders of windows appear semi-transparent. While the windows look great, they
also mess up the screenshot, because any text/images in the background will also show up
through these borders.
ActivePresenter has the option to replace this transparency in the captured screenshot with an
opaque border.
Show usage guide: Shows a yellow text box that describes how to actually capture the
screenshot when capturing windows or objects. If you are apt to forget the shortcuts, leave
this display on.
Audio
An audio object is displayed on the canvas pane as the
icon, and its Time Bar is displayed in
the Timeline. Note that the canvas icon is just a visual indicator to remind you that there is an
audio in the slide: Its placement in the canvas is not important. This icon is not visually rendered in
the final output.
In a capture type project, a new audio object is created when you narrate the operation of the
target software.
Later, during the edit phase, you can add audio objects to the slide in four different ways:
Objects> Introduction To Objects
287
ActivePresenter User Manual
Version 4.0
1. Adding A Voice-over/Commentary (or Dubbing)
2. Insert an audio file (mp3, ogg, wav, wma,...)
3. Record a new audio track
4. Convert some text to speech
The last three methods are described below.
In the Editor window of ActivePresenter, Select the Annotation > Audio > Create New... menu
option. (Or click on the arrow of the
toolbar button and select Create New... option.)
A window pops up:
This window lets you add audio in the current slide, as explained below:
1. This section allows you to add audio resources: Click on the
button to insert a resource
from the Library, or
button to insert an audio (mp3, ogg, wav, wma,...) file from the disk.
The name of the audio resource appears in the box. You can edit this name.
The
button is used to remove an existing resource, so that you can insert another resource.
The playback section allows you to play the track.
The Edit button loads the audio source in Audio Editor, where you can do basic editing.
2. This is the recording section, where you can create an audio resource by recording your
own sound. (Typically your commentary).
Objects> Introduction To Objects
288
ActivePresenter User Manual
Version 4.0
The drop-down list allows you to select the input device (which depends on the hardware you use,
Line input, Mic input, etc.).
The
button starts the recording. The
adjust the level of input sound.
button stops the recording. The
button lets you
The Calibrate Input... button lets you calibrate the input sound level, so that you do not have
either too faint a sound or a distorted sound. The calibration is explained here.
3. This section converts text to sound.
Click in the box and type any text here. Alternatively, copy text from other document or web page
and paste it here.
Now press the Generate button. The generated audio appears in the top section of the window (1).
If you want, you can adjust the TTS settings by clicking on the Settings button.
This pops up another window:
Select a TTS voice, and adjust the speed and volume. To check out the settings, enter a test
sentence in the Preview box and then click on the Speak button. The Reset button at the top
restores the default settings.
You can associate another object with the
icon: Just double-click on the icon. The window
appears again. Now select any other audio object and press OK.
Display Styles of Audio Objects
Depending on how the audio objects are created, they are displayed in three different ways:
Objects> Introduction To Objects
289
ActivePresenter User Manual
Version 4.0
1. When an audio object is inserted to the slide, an
icon is displayed in the Canvas Pane
(only during edit mode; not when the slide is being played).
The Timeline pane displays the Time bar of the object.
2. When an audio track is attached to an object (e.g. the sound track of a video), the Timeline
pane displays its Time bar.
3. When a Closed Caption is converted into audio, a separate audio object is created. The
Timeline shows a separate audio object.
In all cases, the time bar in the Timeline shows the actual audio waveform, which facilitates editing.
Properties Of Audio Object
The audio objects have the following properties:
Property
Remarks
Name
A name generated by ActivePresenter, to identify the audio object
uniquely. The name is simply “Audio_n”, where n is an incremental
counter number.
Audio
The media resource which selected object refers to. You can change it to
another resource.
Loop
If selected, the audio is played in an endless loop (when the end is
reached, the tracked starts playing from the beginning.)
Ignore Pausing
If this option is selected, even when the presentation is paused (e.g. to
wait for user's input), the track will keep playing.
Note that this control cannot ignore a pause command from toolbar of
player. In other words, if the user pauses the presentation using the
toolbar, the audio will pause.
Objects> Introduction To Objects
290
ActivePresenter User Manual
Property
Version 4.0
Remarks
Boundary
Physical placement of the
icon, measured from the top-left corner of
the canvas. Change the placement if the icon is obstructing any other
Left
element.
Top Note that this is only an indication that the slide has an audio track: During
actual rendering, this icon is not used at all.
Start Time
This is the time when the audio track starts playing. The starting moment
of the slide is taken as reference (t=0)
Duration
The duration of the audio track (in ms).
This value is non-editable (grayed out).
Show in mode
Select one or more fromDemonstration, tutorial, practice, test.
Video
To insert a video into a slide, click on the
toolbar button or use the Annotation > Video menu
and select an existing video file to insert. You can also drag an existing video file from Explorer and
drop it onto the Canvas to insert.
Typically the next step is to re-size and re-position the video frame by dragging the handles on all
sides and corners.
Objects> Introduction To Objects
291
ActivePresenter User Manual
Version 4.0
To change a video, double-click on the frame. The following dialog pops up:
Click on the
disk.
The
button to insert a resource from the Library, or
button to insert a file from the
button is used to remove an existing resource, so that you can insert another resource.
The playback controls allow you to play the video and check it out.
You can insert multiple frames in the slide and play multiple videos simultaneously.
Play two videos side by side in a before-after scenario, or
Play multiple videos side by side to compare different techniques
(e.g. bowling action, batting strokes, biking posture, running, etc.).
Properties Of Video Object
The video objects have the following properties:
Property
Name
Remarks
A name generated by ActivePresenter, to identify the audio object
uniquely. The name is simply “Video_n”, where n is an incremental
counter number.
Objects> Introduction To Objects
292
ActivePresenter User Manual
Version 4.0
Video
The media resource which selected object refers to. You can change it to
another resource.
Loop
If selected, the video is played in an endless loop (when the end is
reached, the tracked starts playing from the beginning.)
Ignore Pausing
If this option is selected, even when the presentation is paused (e.g. to
wait for user's input), the track will keep playing.
Note that this control cannot ignore a pause command from toolbar of
player. In other words, if the user pauses the presentation using the
toolbar, the video will pause.
Boundary
The boundary of frame that contains the video, measured from the top-left
corner of the canvas.
Left Left edge of the frame.
Top Top edge of the frame.
Width Width of the frame
Height Height of frame
Lock aspect ratio By unchecking this check box, you can stretch the video in width or
height.
Start Time
This is the time when the video track starts playing. The starting moment
of the slide is taken as reference (t=0)
Duration
The duration of the video track (in ms).
This value is non-editable (grayed out).
Show in mode-
Select one or more fromDemonstration, tutorial, practice, test.
Freeze-Frame
The Freeze-frame control works on both audio and video objects, as described below:
If the selected track is a video track, the effect is to pause the video for any desired period.
If the selected track is an audio track, the effect is to insert an interval of silence.
To insert a freeze-frame control in an audio/video track, click on the Ruler where you want to
pause the video. This activates the
button in the toolbar of the Timeline pane. Click on this
button (or from the context menu of the video object, use the Insert Freeze-frame command).
Objects> Introduction To Objects
293
ActivePresenter User Manual
Version 4.0
Now a yellow diamond and bar will get superimposed on the host time bar.
If you had defined a range in the previous step, the yellow bar is adjusted to this range.
However, the usual practice is to drag the diamond and the right-side edge of the yellow
band. During this drag operation, ActivePresenter shows you precise time stamp on the
Ruler (as in case of entrance/exit markers.)
Each Freeze-frame control extends the host track by its duration.
In other words, if you insert an x-second pause in an audio/video clip, its total duration will be
increased by x seconds.
You can insert any number of Freeze-frame controls in any selected track. The only
condition is that two Freeze-frame controls cannot overlap.
Keep in mind that each Freeze-frame control will further extend the host track's duration!
To remove the freeze-frame from its host track,
click on it and drag it downward out of the
Time Bar of the host track. Keep dragging till
the annotation turns gray, and then release the
LMB. The annotation (i.e., the pause) will
disappear, and the duration of the host track
will be reduced by the duration of the pause.
So why don't we simply split the track, and shift the latter part to achieve the same end-result?
Well, there are two benefits of using a Freeze-frame control: (a) It is easier to remove (to reverse
its effect), and (b) It does not create extra resources by splitting the original object.
Let us see how the Freeze-frame control affects the audio and video tracks.
Pausing A Video Track (Freezing The Scene)
When the slide is played in preview mode (or exported), the host video is paused for the duration
of the Freeze-frame control's duration. However, the other objects in the slide are played normally.
Now why should we want to do this in the first place?
Well, sometimes, a video contains a significant scene, which lasts only for a few seconds. The
scene is over even before your audience has the time to absorb the important clues. If this were a
live lecture, you would pause the video, and explain various parts of the frozen scene to your
audience. But what to do if this is a self-running video?
This is where the Freeze-frame is useful: It allows you to pause a video for the duration of its time
bar. You can extend this pause as long as you want, and add a commentary track or annotations
to analyze the frozen video frame.
In the above example, the video in Video2 object is frozen, and an audio commentary is
introduced in the paused duration. During this time, two annotation shapes are also displayed on
the screen, and two closed caption lines appear. While the video is paused, all these other objects
are played normally.
Objects> Introduction To Objects
294
ActivePresenter User Manual
Version 4.0
Note that you can insert any number of Freeze-frame controls in a video clip. This allows you to
pause the video any number of times and explain those frames to your viewers.
Pausing An Audio Track (Inserting Silence)
When a Freeze-frame control is inserted in an audio track, it inserts an interval of silence.
When the slide is played in preview mode (or exported), the host audio clip is paused for the
duration of the Freeze-frame control's duration. However, the other objects in the slide are played
normally.
Normally you would apply this effect only to a significant audio track that needs to be synchronized
with the visual part of the presentation (for example, you would not need it for a background music
track!).
A typical example is to re-sync a stand-alone commentary track with the rest of the slide by holding
it off for a few seconds.
Objects> Introduction To Objects
295
ActivePresenter User Manual
Version 4.0
Menus And Shortcuts
In this appendix the menus, toolbar buttons and default keyboard shortcuts are listed. Note that
ActivePresenter allows you to customize the keyboard shortcuts.
Project Menu
Menu option
Shortcut
Button
Create Project...
Remarks
Create a new project (select the type)
Blank Project...
Ctrl+K
Create a new blank project
New Capture...
Ctrl+N
Create a new capture project
Open Project...
Ctrl+O
Open an existing project
Save
Ctrl+S
Save the current project
Save All
Save all open projects
Save As...
Save the project under a new name
Close
Ctrl+W
Close the current project
Project Properties...
Project's properties
Project Settings...
View and edit the project's settings
Shrink project
Make the project compact
Recent Projects
List of recently opened projects
Exit
Ctrl+Q
Menus And Shortcuts> Project Menu
Close the ActivePresenter application
296
ActivePresenter User Manual
Version 4.0
Edit Menu
Menu option
Shortcut
Button
Remarks
Undo
Ctrl+Z
Reverse the last action
Redo
Ctrl+Y
Repeat the last “undone” action
Cut
Ctrl+X
Cut the selected items onto clipboard
Copy
Ctrl+C
Copy the selected items onto clipboard
Paste
Ctrl+V
Paste the contents of clipboard
Delete
DEL
Delete the selected items
Find…
Ctrl+F
Find the occurrence of text in objects in specified
slides.
Find Next
F3
Find the next occurrence of text in objects in
specified slides.
Replace…
Ctrl+H
Replace the occurrence of text by specified text.
Select All
Ctrl+A
Select all items in the pane
Display order>Bring CtrI+Home
to Front
Brings the selected object to the top of z-order
Display order>Bring CtrI+PageUp
Forward
Brings the selected object one level upward in the
z-order
Display order>Send CtrI+End
to Back
Sends the selected object to the bottom of the zorder
Display order>Send CtrI+PageDn
Backward
Sends the selected object one level downward in
the z-order
Merge Into
Convert the selected objects into background
Menus And Shortcuts> Edit Menu
297
ActivePresenter User Manual
Version 4.0
Background
Change Style for
Multiple Objects
Change the style of objects for the current slide,
selected slides or all slides
Change Transition
Effects for Multiple
Objects
Change the entrance and exit effects of objects for
the current slide, selected slides or all slides
Convert Closed
Captions to Audio
Convert closed captions to speech for the current
slide, selected slides or all slides
Preferences...
View and edit the global settings
View Menu
Menu option
Shortcut
Button
Remarks
Menu Bar
Show/hide the Menu Bar
Status Bar
Show/hide the Status Bar
Tool bars > (List)
Show/hide the individual toolbars
Slides
Show/hide the Slides pane (thumbnails/titles)
Properties
Show/hide the Properties pane
Timeline
Show/hide the Timeline pane
Resources
Show/hide the Resource pane
Show Drag/Drop
Ctrl+D
Show/hide the highlight rectangles of drag source
and drop target and the connection between them.
Snapping
Enable/disable snapping in the Canvas and
Timeline panes.
Go To
Go to first/previous/next/last/specified slide
Zoom Slide-Reset
Set to 100%
Zoom Slide-Zoom
Zoom in by one level (see levels below)
Menus And Shortcuts> View Menu
298
ActivePresenter User Manual
Version 4.0
in
Zoom Slide-Zoom
out
Zoom out by one level (see levels below)
Zoom Slide (levels)
Select a zoom level (Range: 25% - 400%)
Language
Choose the language of the GUI
(Menus and messages)
Slide Menu
Menu option
Shortcut
Button
Remarks
Blank Slide
Insert a blank slide
Slides By Capture
Inserting new slides by fresh capturing
Slides From Images
Inserting images as slides (create new slides and
insert images from disk as their background).
Slides From Project
Insert slides from another project
Slides From
PowerPoint
Insert slides from a powerpoint presentation
Insert Objects to
Slides...
Select an object of any type, and insert it in
multiple slides
Delete Objects from
Slides...
Delete objects of selected type from multiple
slides
Slide Background >
Change Slide
Background
Set a slide's background image
Slide Background >
Edit Slide
Background
Edit a slide's background image
Slide Background >
View Active Window
Area
Show/hide the Active Window area
Menus And Shortcuts> Slide Menu
299
ActivePresenter User Manual
Version 4.0
Slide Background >
Edit Active Window
Area
Enable/disable editing the Active Window area
Save Slide As
Image...
Export the current slide as an image.
Annotation Menu
Menu option
Shortcut
Button
Remarks
Shape
Insert a Shape
Text Caption
Insert a Text Caption.
Highlight
Insert a Highlight.
Spotlight
Insert a Spotlight.
Feedback
Insert a Feedback object.
Gesture Effect
Insert a Gesture Effect.
Cursor Path
Insert a Cursor Path.
Zoom-n-Pan
Insert a Zoom-n-Pan object.
Closed Caption
Insert a Closed Caption object.
Screenshot >
Window
Capture a window
Screenshot >
Object
Capture an object
Screenshot > Full
Screen
Capture the full screen
Screenshot >
Application or
Region
Capture an application or rectangular area
Menus And Shortcuts> Annotation Menu
300
ActivePresenter User Manual
Version 4.0
Screenshot >
Options > Capture
Window Shadow
Screenshot option to capture the shadow of the
target window (when not maximized)
Screenshot >
Options > Process
Rounded Corners
Screenshot option to keep rounded corners of
target window (instead of sharp corners).
Screenshot >
Options > Use
Opaque
Background
Screenshot option to use opaque borders of the
target window instead of translucent (transparent)
borders.
Screenshot >
Options > Show
Usage Guide
Screenshot option to show tooltip on how to use.
Image
Insert an Image.
Audio>From File
Insert an Audio from external audio file
Audio>Create New
Insert an Audio object for recording, TTS...
Video
Insert a Video
Interaction Menu
Menu option
Shortcut
Button
Remarks
Mouse Click
Insert a Mouse Click object.
Text Box
Insert a Text Box object.
Key Stroke
Insert a Key Stroke object.
Mouse Hover
Insert a Mouse Hover object.
Drop Area
Insert a Drop Area object.
True/False
Insert a True/False-type question object.
Menus And Shortcuts> Interaction Menu
301
ActivePresenter User Manual
Version 4.0
Multiple Choice
Insert a Multiple Choice-type question object.
Multiple Response
Insert a Multiple Response-type question object.
Essay
Insert an Essay-type question object.
Fill in Blank
Insert a Fill In The Blank-type question object.
Fill in Multiple Blank
Insert a Fill In Multiple Blank-type question object.
Sequence
Insert a Sequence-type question object.
Drag-n-Drop
Insert a Drag-n-Drop-type question object.
Export Menu
Menu option
Shortcut
Button
Remarks
Images
Export slides as individual images
Video
Export as a video (specify the output format; from
AVI, WMV, MPEG4 and WebM)
Flash Video (FLV)
Export as flash video (interactive)
HTML SlideShow
Export the slides as HTML slideshow
PDF Document
Export as a pdf file
Microsoft Word
Export as MS Word file
Microsoft Excel
Export as MS Excel file
Microsoft
PowerPoint
Export as Microsoft PowerPoint file
HTML5 Simulation
Export as HTML5 Simulation
Flash Simulation
Export as Flash Simulation
Menus And Shortcuts> Export Menu
302
ActivePresenter User Manual
Version 4.0
Localize Menu
Menu option
Shortcut
Button
Remarks
Replace Slide
Backgrounds > All
Slides
Start replacing the backgrounds of all slides in
current project by capturing new backgrounds.
Replace Slide
Backgrounds >
Selected Slides
Start replacing the backgrounds of selected slides
in current project by capturing new backgrounds.
Replace Slide
Backgrounds > All
Slides From
Project
Start replacing the backgrounds of all slides in
current project by backgrounds of slides in an
existing project.
Replace Slide
Backgrounds >
Selected Slides
From Project
Start replacing the backgrounds of all slides in
current project by backgrounds of slides in an
existing project.
Export To XLIFF
Export text in the project to XLIFF format for
translation.
Import From XLIFF
Import translated text in XLIFF format into the
project.
Window Menu
Menu option
Shortcut
Button
Remarks
Cascade
Show all open projects as a stack
Tile Horizontally
Show all open projects side by side
Tile Vertically
Show all open projects one above the other
Arrange Icons
Lines up the icons of minimized projects
(when multiple projects are opened and minimized)
Next
Select the next window in the list (see below).
Menus And Shortcuts> Localize Menu
303
ActivePresenter User Manual
Version 4.0
The selected window comes to the top.
Previous
Select the previous window in the list (see below).
The selected window comes to the top.
<List>
Provides the list of currently open windows
(projects).
Click on any entry to switch to that window.
The selected window comes to the top.
Help Menu
Menu option
Help Contents
Shortcut
Button
F1
Remarks
Launches this help file
Product Homepage
Launches a browser and takes you to the
homepage for ActivePresenter
Support Center
Launches a browser and takes you to the user
forum /FAQ
Purchase A License
To convert from Free edition to
Standard/Professional edition
Activate Product...
To activate the product
Check for
Updates...
Check for update at the website
About
ActivePresenter
Provide information about the current version
Menus And Shortcuts> Help Menu
304
ActivePresenter User Manual
Version 4.0
Customizing
ActivePresenter
You can customize the following aspects in ActivePresenter.
Changing The Language
Use the View>Language menu option. The available languages will be listed. Select the
appropriate language.
Customizing The User Interface
You can make the following changes to the user interface:
1. View/hide the toolbars
(use View>Toolbars menu option)
2. View/hide the various panes (Library, Timeline, Slides, Properties)
(use the View menu)
ActivePresenter saves the project settings when the project is closed. If you open a new project,
the settings of the last saved project will be automatically applied to it.
Customizing The Preferences
Use the Edit>Preferences... menu option.
The Preferences window pops up. It has six tabs, each serving a different area. Select the
relevant tab to change the relevant setting.
Tab
What controls are provided
General
General options applicable to the entire software.
Interaction
Parts of objects that have interactive nature are controlled from here.
Annotation
Parts of objects that have annotative nature are controlled from here.
Customizing ActivePresenter> Changing The Language
305
ActivePresenter User Manual
Version 4.0
Auto Annotation Text
ActivePresenter has the capability to generate appropriate annotation
automatically from interactions. This tab controls how those annotations
are generated.
Hot keys
Change the hot keys used for various operations.
Miscellaneous
Options that don't fit anywhere in the above tabs.
Note that some objects have multiple elements. Some of these elements are meant for annotation,
while the other elements are for interaction. Such elements are controlled by the Annotation and
Interaction tabs, respectively.
For example, a True/False type Question object has these elements:
1. A Question Label that is displayed on screen. (Annotation type element)
2. Two Answer Labels that the viewer can click to choose the answer (Annotation type
elements)
3. A Submit button that the viewer clicks (Interaction type element)
4. Various attached messages that will be displayed for various events such as: On Correct,
On Incorrect On Incomplete and On Timeout, these events are triggered automatically
when viewer interact with the question. These messages are also classified as Annotation
elements.
All these various elements form a question object as a whole. A question as a whole is also an
Interaction. Therefore, in case of a True/False type Question object, its button element and the
question itself will be controlled by the Interaction tab, and the remaining elements will be
controlled by the Annotation tab.
Customizing ActivePresenter> Customizing The Preferences
306
ActivePresenter User Manual
Version 4.0
The General Tab
The options work as follows:
Interface section
Control
Remarks
Choose your preferred
language
The drop-down menu provides the choice of available languages.
Max recently used
The spinner defines the number of recently opened projects would
Customizing ActivePresenter> Customizing The Preferences
307
ActivePresenter User Manual
projects
Version 4.0
be listed.
Note that a large number is not actually useful. Instead, cultivate the
habit of storing the project files in a hierarchical folder system, so that
you can retrieve any project fast.
Clear list button
ActivePresenter will forget the actual list of recently opened projects.
Canvas background color Use this to change the color of the canvas background. Click on the
button to see a palette of colors. Select any desired color. Please
note that this will only affect the canvas inside ActivePresenter editor,
it does not affect your projects at all. If you want to change the
default background color for all slides in a project, go to Project
menu > Project Information > Background Color.
Show disabled features
Controls whether ActivePresenter will show menu and toolbar items
for features which is not available in the edition you are using. For
example, you can choose to hide most of the items on Export menu if
you are using a Free edition.
Show UAC elevating
message on start-up
In order to be able to capture applications which were run as
Administrator, ActivePresenter will also need Administrator privilege.
On recent versions of Windows that have UAC
(http://en.wikipedia.org/wiki/User_Account_Control) enabled,
ActivePresenter will notify you on start up that it need to be elevated
to capture those applications. However, if you just need to capture
applications with normal privilege (this is the most common cases)
then you should not care about this and can safely deselect this
option to bypass the notification message.
Project section
Control
Backup project every n
minutes
Remarks
Define how frequently to back up (save) the project. In rare cases
when ActivePresenter crashes, it will allow you to recover your last
opening projects from the latest back-ups.
Please note that these are not permanent back-ups: They will be
automatically removed when you close your projects.
Default slide duration
Set a default duration for each slide (in milliseconds).
Default project location
If the total run time for all components of a slide exceeds this
value, this setting will be ignored for that slide. So this can
also be considered as the minimum duration for each slide.
This is the default folder path where all new projects will be saved.
You are allowed to change this folder when you save a new
project.
Customizing ActivePresenter> Customizing The Preferences
308
ActivePresenter User Manual
Version 4.0
Library and Configuration section
This feature is commonly used in production environment where the consistency of content
crossing multiple projects is required.
Control
Remarks
Name
Displays the name of current Library and Configuration of
ActivePresenter. From this name, you can know that whether the
required Library and Configuration is imported into ActivePresenter
to start the production.
Export
Save the current Library and Configuration of ActivePresenter to a
file. This file can be imported later into ActivePresenter, may be on
other computer.
All the audio/video/images in Library are exported.
The following settings in Configuration are exported:
Import
Settings in Interactions and Annotations tabs of the
Preferences dialog.
Settings in Auto Annotation Text tab of the Preferences
dialog.
The translation in Output Language Editor which is used in
HTML5/Flash Simulation.
The Capture Profiles.
Import the Library and Configuration of ActivePresenter from a file.
For the list of items will be imported, see the Export section.
The Interaction Tab
As described earlier, you can set properties of all the objects in the Interaction tab and the
Annotation tab.
The Interaction Tab deals with only the interactive-type parts of the objects.
Customizing ActivePresenter> Customizing The Preferences
309
ActivePresenter User Manual
Version 4.0
When you select an element from the list at left (1), its settings are shown on the right (2). These
elements have similar properties (but you can set their values independently for each type of
element).
The following properties can be edited (depending on which element is selected, some of these
options may not be shown):
Option
Autofit text
What it does
Automatically enlarges the outline of the shape till the text fits inside the
shape.
Customizing ActivePresenter> Customizing The Preferences
310
ActivePresenter User Manual
Version 4.0
Change text
Launches the Text Editor window and allows you to enter a message in rich
text format.
Change shape
Lets you change the shape for the element.
Change style
Lets you change the style of the element
(Style is the combination of attributes for line, fill, shadow and text).
Preview
Shows how the element will look with all the new settings.
Preferred size
(width, height)
Sets the default width and height.
Timing (Duration)
Sets the default timing for the element, as shown on the Timeline.
Transition effects
Allows you to select effect for entry and exit of the object in the slide (when
rendered).
Show in mode-
State whether you want to show this element in the Demonstration, Tutorial,
Practice and Test modes.
Default Action
In edit mode, when you insert any interaction object, ActivePresenter
automatically adds one action to be performed by default (see the Event
Editor). You can use this control to choose the action that will be inserted as
default.
Scoring
After the viewer has exceeded the maximum allowed attempts, the
interaction is abandoned, and the control takes the actions defined for the On
Incorrect event.
(Max attempts,
points)
Attached
message
Click sound
You can select which messages to attach with the selected element.
Correct – When the viewer's answer is correct
Incorrect – When the viewer's answer is incorrect
Incomplete – When the viewer's answer is incomplete
Hint – A helpful hint (the viewer can hover the mouse on the element
to see it)
Timeout – When the viewer does not respond within predefined time
A default sound is shown. But you can use another sound to create a clicking
sound.
The
button lets you select a sound from the library
The
button lets you delete the current selection
Customizing ActivePresenter> Customizing The Preferences
311
ActivePresenter User Manual
Question Button
Restore defaults
The
Version 4.0
button lets you play the currently selected sound.
Allows you to insert up to four different buttons with the following labels on
them:
Clear: Clear the input which viewer has entered.
Back: Go back one slide.
Skip: Skip this question and move on.
Submit: Submit answers.
Restores the “Factory-set” values.
Useful to roll back your changes.
The Annotation Tab
As described earlier, you can set properties of all the components in the Interaction tab and the
Annotation tab.
The Annotation tab deals with only the non-interactive parts of the objects.
The following options are offered (depending on which element is selected, some of these options
may not be shown):
Unlike the interaction-type elements, the annotation elements do not have common properties. In
fact, they can be divided in three distinct groups based on their properties:
Group
Elements
1
Shape, Highlight, Text Caption, Question Title, Answer Label, Correct, Incorrect, Hint,
Complete, Incomplete, Timeout
2
Image, Audio, Video, Zoom-n-Pan, Closed Caption
3
Cursor Path
Within each group, the elements have small differences in their properties.
We will describe all groups separately.
Customizing ActivePresenter> Customizing The Preferences
312
ActivePresenter User Manual
Version 4.0
Group 1 Elements
The following screenshot shows properties for Shape, which is a typical representative of Group 1
elements. The other elements in this group have lesser properties than Shape.
Elements in this group have the following properties:
Snap to default Causes the mouse pointer to automatically jump to the default interaction (if
interaction if
any).
any
Customizing ActivePresenter> Customizing The Preferences
313
ActivePresenter User Manual
Version 4.0
Generate text
from default
interaction if
any
Whether ActivePresenter should generate text for the shape based on the
default (first) interaction on current slide. For example, if there is a mouse click
interaction on current slide, the text can be generated to something like “Click on
[XXX]”..., This is called auto-annotation. Refer to the Auto-Annotation tab to
understand how it works.
AutoFit Text
Automatically enlarges the outline of the shape till the text fits inside the shape.
Change text
Launches the Text Editor window and allows you to enter a message in HTML
format.
Change shape
Lets you change the shape for the element.
Change style
Style is the combination of attributes for fill area, outline, shadow and text.
Transition
effects
Allows you to select the following:
1. The effect and duration of the entry of the object in the slide
(when rendered).
2. The effect and duration of the exit of the object in the slide
(when rendered).
Preferred size
(width, height)
Set the default width and height.
Timing
Sets the default timing for the element, as shown on the Timeline.
(duration in ms)
If the duration is set to -1, the object will be displayed till the end of the slide.
(If the duration of the slide is changed for any reason, the object's duration will
be automatically adjusted.)
Show in mode- State whether to show this element in the four modes: Demonstration, Tutorial,
Practice and Test. (Select one or more modes).
Customizing ActivePresenter> Customizing The Preferences
314
ActivePresenter User Manual
Version 4.0
Group 2 Elements
The following screenshot shows properties for Audio, which is a typical representative of Group 2
elements.
Elements in this group have the following properties:
Show in mode- State whether to show this element in the four modes: Demonstration, Tutorial,
Practice and Test. (Select one or more modes).
Sample rate
Select from 11025, 22050 and 44100 Hz.
Channels
Select from mono/stereo.
Bit rate
Select from 64, 96 and 128 kbps.
Zooming
transition
Duration: Duration of the zoom movement.
Zoom scale: How much to zoom in
Customizing ActivePresenter> Customizing The Preferences
315
ActivePresenter User Manual
Version 4.0
Group 3 Elements
The following screenshot shows properties for Cursor Path, which is a unique type of element
(placed in Group 3).
It has the following properties:
Show in mode-
State whether to show this element in the four modes: Demonstration,
Tutorial, Practice and Test. (Select one or more modes).
Cursor highlight type Select between none, circle, and square
Movement path
Cursor shape
Select between
Straight: The actual path of the mouse cursor is replaced by
straight lines between clicks.
Curved: ActivePresenter preserves the actual movement path and
represents it with a Bézier curve.
Click the Change cursor button to see other shapes. Select any shape
Customizing ActivePresenter> Customizing The Preferences
316
ActivePresenter User Manual
Version 4.0
and press OK.
Click sound
This section shows three different sounds, which correspond to the clicking
sound associated with a Left-click, a Right-click and a Left double-click.
You can use another sound to create a clicking sound.
Click effect
The
button lets you select a sound from the library
The
button lets you delete the current selection
The
button lets you play the currently selected sound.
This section show three different effects, which correspond to the clicking
effect associated with a Left-click, a Right-click and a Left double-click.
You can select none, circle, concentric circles or rectangle effect type. For
each effect other than none, you can also customize effect color, opacity
and size.
Customizing ActivePresenter> Customizing The Preferences
317
ActivePresenter User Manual
Version 4.0
The Auto-Annotation Text Tab
ActivePresenter can generate the text for annotation automatically based on what you are
interacting with while capturing.
For example, when you type your User Name into a log-in screen, ActivePresenter can create a
call out which says “Type [XXX] into User Name text box”.
You can easily customize how ActivePresenter generates the annotation text through the settings
in this tab.
With these options, you can easily control the annotation contents which are generated
automatically by ActivePresenter when capturing.
There are 3 parameters that you can use to specify dynamic content depends on the context.
Customizing ActivePresenter> Customizing The Preferences
318
ActivePresenter User Manual
Version 4.0
Every parameter has the form {$XXX}, in which XXX is the parameter name:
{$name}
This is the name of the item that you are interacting with when capturing.
For example, when you entering your name in a log-in screen, the text box
may have a name like “User Name”
{$type}
This is the type of the item that you are interacting with. The types of items
are provided by the OS. For example, you are typing in a text box, then its
type is “text box”. If you are clicking on a button then its type is “button”.
{$value}
This is what you are entering while capturing. If you are pressing a key,
the value is the key that you've pressed. If you are entering text into a text
box, then the value is the text you've entered.
Customizing ActivePresenter> Customizing The Preferences
319
ActivePresenter User Manual
Version 4.0
The Hot keys Tab
This tab contains all the hot keys used by ActivePresenter for various functions.
The GUI works as follows:
1. All the major functions of ActivePresenter are grouped functionally in a hierarchical tree.
The tree consists of nodes, like Project, Edit, View, etc. Each node contains a group of related
functions.
To open any node, click on the
contained in it.
button on the left of it. The node expands to show the options
2. Click on any option to set its hot key.
Customizing ActivePresenter> Customizing The Preferences
320
ActivePresenter User Manual
Version 4.0
3. The hot key that is currently assigned to this activity (in this case, to start a new capture
project.) is displayed here.
4. You can remove the assigned hot key.
5. To assign a new hot key to the function, first click in the input box and then press the hot
key.
In this example, we have pressed CTRL+C, which is automatically captured and displayed in the
input box. In fact, ActivePresenter detected that this hot key is currently assigned to the copy
function.
Now you have two options: Either try another hot key. (and repeat the cycle), or press the Add
button to re-assign the CTRL+C hot key to start a new capture project function. Naturally, this hot
key will no longer be assigned to the copy function.
6. If your experiments go haywire, you can always restore to the defaults by pressing this
button. All your hot key customization will be removed.
Customizing ActivePresenter> Customizing The Preferences
321
ActivePresenter User Manual
Version 4.0
The Miscellaneous Tab
This tab is a “catch-all” tab: It contains program options that could not be placed in the other tabs.
The options on this tab are as follows:
Automatic Updates
Selecting the Automatically Check for Updates option allows
ActivePresenter to contact its server to check for updates automatically.
If enabled, ActivePresenter will periodically check for updates when
started.
Customizing ActivePresenter> Customizing The Preferences
322
ActivePresenter User Manual
Connection settings
Version 4.0
In order to connect to the internet, ActivePresenter needs the connection
settings.
When you click this button, a dialog pops up and offers the following
options:
No proxy
Use system settings (default)
Manual configuration
Check with your admin and set the values.
Log section
Provides logging-related options. Logs are important for troubleshooting.
Enable logging
If you disable this option, no logs will be kept.
Log UI level
Select the log level that will be displayed. Only log messages which have
severity level that is higher or equal to the selected level will be displayed.
The other logs will be written to the log file silently.
Verbose mode
In verbose mode, more details are captured. This is better for
troubleshooting.
Log level
There are five levels:
1. Fatal error (most severe level)
2. Error
3. Warning
4. Message
5. Status
6. Information
If you select any level, the log will be kept of that level and higher levels (if
any).
For example, selecting Warning will keep a log of the top three types of
problems, but selecting Fatal error will keep log of fatal errors only.
View Log
Clicking on this button shows the log file.
The log file is automatically cleared and started over when its size reaches
2 MB.
Confirmation
Settings
These settings specify whether appropriate messages will be displayed to
seek the user's confirmation.
Warning about non-ANSI path when exporting: When you export your
project, there are some outputs that can not be opened or run properly if
the file name contains non-ANSI characters. This option specifies whether
ActivePresenter should ask you in such case or not.
Customizing ActivePresenter> Customizing The Preferences
323
ActivePresenter User Manual
Version 4.0
Show dialog when converting shape’s text to speech: Should
ActivePresenter display the dialog so you can make further changes to the
TTS settings before converting?
Extend object duration to match the duration of generated audio
Link resources with When a resource is added to the Library or a project, ActivePresenter
file size greater than creates a copy of the resource file and stores it in the Library or that
x MB
project. (That ensure that even if you rename, move or delete the original
file, the Library item will not be affected.)
But if the original file is large, storing it directly in the Library or project will
consume more disk space than necessary, severely reduce the
performance and prone to errors that might corrupt the Library or project.
In that case, ActivePresenter doesn't store the original file directly in the
Library or project but maintains its own copy of the original file and creates
a link in the Library or project which points to its own copy.
This parameter defines the threshold above which ActivePresenter will
create a link to the resource instead of storing the original file directly
inside the Library or project.
Allow pasting HTML
text copied from
other applications
HTML is a huge standard which has many tags meanwhile
ActivePresenter’s editor only support some basic tags for formatting
characters and paragraphs. Using HTML text copied from other
applications may produce incorrect result in some output such as HTML5
Simulation. Selecting this option is not recommended.
Auto-Adjust
annotation’s width
when importing
XLIFF
Select this option allows ActivePresenter to adjust the width of shape
automatically to have a best look when importing XLIFF.
Customizing ActivePresenter> Customizing The Preferences
324
ActivePresenter User Manual
Version 4.0
What's New
All changes are tagged to identify their source:
Tag
What it means
New
A new feature was introduced in the latest ActivePresenter
Modified
An existing feature was modified/enhanced in the latest ActivePresenter
Added
The earlier version of manual missed a feature/detail
Corrected Mistake in an earlier version of manual is corrected now.
In the table below, click on the page number (in the left column) to jump to the changed text.
Use your pdf-reader's Back button to return here.
Page
24, 136
What's new
New: Exporting To HTML5 Simulation. The Exporting To AJAX Simulation is
removed.
80, 173, New: Drag and Drop Interaction.
183, 186,
195, 196,
253, 265
67
New: Find and replace text.
92
New: Right-to-left language.
94
New: Active Window.
88, 90
New: Replace slide backgrounds.
80
New: Play Audio action.
221
New: Add the function to expand/collapse the view of question object in Timeline.
222
New: Add the function to preview multiple slides in Timeline.
What's New> Customizing The Preferences
325
ActivePresenter User Manual
Version 4.0
268
New: Add Gesture Effect annotations.
241
New: Using Output Language Editor.
309
New: Export/Import the Library and Configuration of ActivePresenter.
80
Modified: Enhance Show Object action (supports Audio, Video, non-blocking mode)
266
Modified: Add more shapes, lines and arrows.
228
Modified: Height of object time bars in Timeline which contain audio is adjustable.
229
Modified: Explanation of Object started by event marker in Time Bar.
50
Modified: Naming The Slides
52
Modified: Sorting The Slides
59
Modified: Editing Project Properties, The Project Language option is added.
167
Modified: FMR Settings and Audio Settings in Capture Profile Editor.
99
Modified: Exporting To Images, the Only Export Active Window Area option is
added.
102
Modified: Exporting To Video:
107
Change options related to Closed Captions.
Change the range of video quality option.
Add the audio quality option.
Add the MKV format.
Modified: Exporting To Flash Video:
Change options related to Closed Captions.
Change the range of video quality option.
112
Modified: Exporting To HTML SlideShow, the Only Export Active Window Area
option is added.
116
Modified: Exporting To Adobe PDF Document, the Only Export Active Window
Area option is added.
122
Modified: Exporting To Microsoft Word Document, the Only Export Active Window
Area option is added.
What's New> Customizing The Preferences
326
ActivePresenter User Manual
Version 4.0
126
Modified: Exporting To Microsoft Excel Worksheet, the Only Export Active Window
Area option is added.
131
Modified: Exporting To Microsoft PowerPoint Presentation, the Only Export Active
Window Area option is added.
148
Modified: Exporting To Flash Simulation:
The Generate Index Page and Edit Output Language options are added.
Pass conditions in SCORM 1.2 and SCORM 2004.
25
Modified: Feature Comparison only list the features that are different between
editions.
26
Modified: Update system requirements.
296
Modified: Add the items for new features in the following menus: Edit, View, Slide,
Annotation, Interaction, Export, and Localize.
324
Modified: Add two options in the Miscellaneous tab in the Preferences dialog:
16
Allow pasting HTML text copied from other applications.
Auto-Adjust annotation’s width when importing XLIFF.
Corrected: Capture Modes section is merged into Capture Profile section.
What's New> Customizing The Preferences
327