1
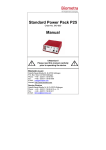
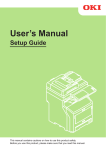
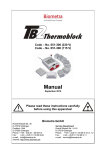
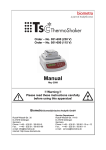
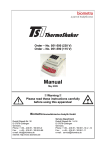
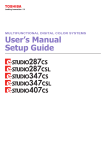
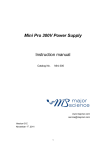
Mini Power Pack
PS300T
Instruction Manual
Model
Order No
Mini Power Pack PS300T (100 – 240 V, EU plug)
Mini Power Pack PS300T (100 – 240 V, US plug)
040-100
040-190
!! Warning !!
Please read these instructions carefully
before using this apparatus!
Biometra GmbH
Rudolf-Wissell-Str. 30
D-37079 Goettingen
Tel:
+49 (0)5 51 50 68 6-0
Fax:
+49 (0)5 51 50 68 6-66
e-mail: [email protected]
internet: http://www.biometra.de
Service Department
Rudolf-Wissell-Str. 14-16
D-37079 Goettingen
Tel.: +49 (0)5 51 50 68 6-10 or -12
Fax.: +49 (0)5 51 50 68 6-11
e-mail: [email protected]
This document describes the state at the time of publishing. It needs not necessarily agree
with future versions.
Subject to change!
Mini Power Pack PS300T Instruction Manual, 2012/05
Contents:
1
Introduction..........................................................................................................3
2
Technical Data .....................................................................................................4
3
4
5
6
7
2.1
Technical Specifications ..................................................................................4
2.2
Environmental Conditions................................................................................4
Safety Instructions ..............................................................................................5
3.1
General Warnings............................................................................................5
3.2
Safety Information ...........................................................................................6
3.3
Avoiding Electrical Shock ................................................................................6
3.4
Avoiding Damage to the Instrument.................................................................7
3.5
Equipment Operation.......................................................................................7
3.6
Definition of Symbols .......................................................................................8
Set Up ...................................................................................................................9
4.1
Packing List .....................................................................................................9
4.2
Unpack and Check ..........................................................................................9
4.3
Installation .......................................................................................................9
4.4
Electrophoresis Chamber Connection ...........................................................10
Operation............................................................................................................11
5.1
Control Interface ............................................................................................11
5.2
Start Operation ..............................................................................................12
5.3
Constant Voltage or Current Setting: .............................................................13
5.4
Timer Setting: ................................................................................................13
5.5
Stop Operation ..............................................................................................13
Trouble Shooting...............................................................................................14
6.1
Operating Problems.......................................................................................14
6.2
Encountering Problems .................................................................................15
Maintenance and Repair ...................................................................................16
7.1
Cleaning and Maintenance ............................................................................16
7.2
Servicing........................................................................................................16
7.3
Replacing the Fuse........................................................................................16
Mini Power Pack PS300T Instruction Manual, 2012/05
1
8
Service................................................................................................................17
8.1
9
Instructions for Return Shipment ...................................................................17
Equipment Decontamination Certificate..........................................................18
10
Note for Disposal of Electric/Electronic Waste............................................20
11
EC – Declaration of Conformity / EU - Konformitätserklärung .................21
12
Warranty ..........................................................................................................22
2
Mini Power Pack PS300T Instruction Manual, 2012/05
1
Introduction
The new, ultra compact Mini Power Pack PS300T requires the space of a DIN-A5 paper
sheet and has been designed for any researcher using horizontal or vertical gel
electrophoresis.
Combining small size, versatility and reliability the new Power Supply is the ideal choice for
every scientist. Providing constant voltage as well as constant current in 1 V or 1 mA steps,
the Power Supply is perfect for running both agarose and polyacrylamide gel electrophoresis
experiments.
The Mini Power Pack PS300T provides two pairs of outlets, allowing to run two mini or
standard sized gels simultaneously.
The integrated timer allows continuous or timed electrophoresis runs.
The Power Supply is constructed with robust and high-quality components paying attention
to all safety standards. This guarantees for long-life and perfect experimental results.
All conventional horizontal and vertical Biometra electrophoresis systems are compatible with
the Mini Power Pack PS300T. The device is compatible to other electrophoresis units from
other manufacturers as well, of course.
For maxi gels it is recommended to run one gel with this Power Pack; for blotting applications
the Standard Power Packs P25 and P25T shall be used.
Mini Power Pack PS300T Instruction Manual, 2012/05
3
2
Technical Data
2.1
Technical Specifications
Output Voltage
10 – 300 V / 1 V steps
Output Current
10 – 400 mA / 1 mA steps
Max. Watt
60 W
Output Type
Constant Voltage or constant Current
Control
Microprocessor controller
No. of Outlets
2 pairs
Timer
1 - 999 minutes with alarm, continuous
Safety Device
No load detection; shrouded plugs and sockets
Operation Temperature
Ambient to 40 °C
Construction material
Polycarbonate housing and aluminum bottom plates
Unit Dimension
14,0 cm x 19,1 cm x 8,4 cm
Weight
0.9 kg
Rated Voltage
100 - 240 V
2.2
Environmental Conditions
Ensure the instrument is installed and operated strictly under the following conditions:
4
•
Indoor use only
•
≤95% RH
•
75 kPa – 106 kPa
•
Altitude must not exceed 2000 meters
•
Ambient to 40°C operating temperature
•
Pollution degree: 2
•
Mains supply voltage fluctuations up to ±10% of the normal voltage
Mini Power Pack PS300T Instruction Manual, 2012/05
3
3.1
Safety Instructions
General Warnings
The Mini Power Pack PS300T has been tested and found to comply with the limits for the CE
regulation. Also, it is RoHS compliant to meet the environmental directive. These limits are
designed to provide reasonable protection against harmful interference when the instrument
is operated in a commercial environment.
This instrument used together with electrophoresis units generates, uses, and can radiate
radio frequency energy, and if not installed and used in accordance with the instruction
manual, may cause harmful interference to radio communications. Operation of this
instrument in a residential area is likely to cause harmful interference in which case the user
will be required to correct the interference at their expense.
Changes or modifications not expressly approved by the party responsible for compliance
could void the user’s authority to operate the equipment.
The use of this device unconformably to the operating instructions will dissolve any
responsibility and liability.
It is strongly recommended for the user to read the following points carefully before
operating this equipment:
1.
Read and follow the manual instructions carefully.
2.
Do not alter the equipment. Failure to follow these directions could result in personal
and/or laboratory hazards, as well as invalidate equipment warranty.
3.
Use a properly grounded electrical outlet with correct voltage and current handling
capacity.
4.
Disconnect from power supply before maintenance and servicing. Refer servicing to
qualified personnel.
5.
Never use this instrument without having the safety cover/lid of the connected
electrophoresis units correctly in position.
6.
Do not use the unit if there is any sign of damage to the external tank or cover/lid.
Replace damaged parts.
7.
Do not use in the presence of flammable or combustible material; otherwise fire or
explosion may result. This device contains components which may ignite such
materials.
8.
Refer maintenance and servicing to qualified personnel.
9.
Ensure that the system is connected to electrical service according to local and national
electrical codes. Failure to make a proper connection may create fire or shock hazard.
Mini Power Pack PS300T Instruction Manual, 2012/05
5
10. Use appropriate materials and operate correctly to avoid possible hazards of explosion,
implosion or release of toxic or flammable gases arising from overheated materials.
11. The unit shall be operated only by qualified personnel.
3.2
Safety Information
1.
Use high level of precaution against any electrical device.
2.
Before connecting the electrical supply, check to see if the supply voltage is within the
range stated at the rating label, and see to it that the device be seated firmly.
3.
Place the unit in a safe and dry location; it must NOT touch the surrounding.
4.
Follow the safety precautions for chemicals / dangerous materials.
5.
If needed, please contact qualified service representative.
3.3
Avoiding Electrical Shock
Follow the guidelines below to ensure safe operation of the unit.
The Mini Power Pack PS300T has been designed to utilize shielded wires (safety cords with
safety connectors). Do never use unshielded wires!
To avoid electrical shock:
1. In the event of solution spilling on the instrument, it must be dried out for at least 2 hours
and restored to NORMAL CONDITION before each operation.
2. Never connect or disconnect wires loading from the power jacks when the red indicator
light of power switch is on.
3. WAIT at least 5 seconds after stopping a run before handling output leads or any
connected apparatus.
4. ALWAYS make sure that your hands, work area, and instruments are clean and dry
before making any connections or operating the power supply.
5. ONLY connect the power cord to a properly grounded AC outlet.
6
Mini Power Pack PS300T Instruction Manual, 2012/05
3.4
Avoiding Damage to the Instrument
1. Do not attempt to operate the device if damage is suspected.
2. Protect this unit from physical damage, corrosive agents and extreme temperatures
(direct sunlight, etc.).
3. For proper ventilation and safety concerns, keep at least 10 cm of space behind the
instrument, and at least 5 cm of space on each side.
4. Use high level of precaution against the damages on the unit.
5. Do not operate the unit out of environmental conditions addressed above (chapter 2).
6. Prior to applying any cleaning or decontamination methods other than manufacturer’s
recommendation, users should check with the manufacturer’s instruction to see if the
proposed method will damage the equipment.
3.5
Equipment Operation
Follow the guidelines below to ensure safe operation of the unit:
1. NEVER access dangerous chemicals or other materials to prevent possible hazard of
explosion and damage.
2. Do not operate the unit connected to electrophoresis units without lids or covers to
prevent possible hazards.
3. A temporary conductivity caused by condensation might occur even though this series
is rated Pollution Degree 2 in accordance with IEC 664.
Mini Power Pack PS300T Instruction Manual, 2012/05
7
3.6
Definition of Symbols
Symbols used on the power supply is explained below.
Indicates an area where a potential shock hazard may exist.
Consult the manual to avoid possible personal injury or instrument
damage.
Indicates to refer to instruction manual!
Consult the manual to avoid incorrect handling or instrument damage.
Indicates that the instrument is fragile
Indicates disposal instruction.
DO NOT throw this unit into a municipal trash bin when this unit has
reached the end of its lifetime. To ensure utmost protection of the global
environment and minimize pollution, please recycle this unit.
8
Mini Power Pack PS300T Instruction Manual, 2012/05
4
Set Up
4.1
Packing List
•
•
•
4.2
1x Mini Power Pack PS300T
1x Manual
1x Power Cord
Unpack and Check
Your Biometra Mini Power Pack PS300T has been carefully packed to ensure its safety.
Please unpack it carefully, control the integrity of its content and inspect the device. Report
any damage immediately to BIOMETRA!
Do not operate a device which is in no proper condition.
Should you have a complaint, return the complete system in its original packing by following
the return instructions (see chapter 8.0).
!!Attention!!
Please send back the enclosed postcard along with the filled out Warranty
Certificate to Biometra in order to claim the full warranty!
Before connecting, make sure the actual voltage complies with the voltage range indicated
on the type label.
Caution:
The Mini Power Pack PS300T must be grounded!
4.3
Installation
1. The Mini Power Pack PS300T must be located in a dry and safe place.
2. Do not place an electrophoresis chamber on the power supply device.
3. The ventilation openings must not be covered by other devices, furniture or fixtures.
4. A sufficient air flow for convection cooling must be provided.
Mini Power Pack PS300T Instruction Manual, 2012/05
9
4.4
Electrophoresis Chamber Connection
The electrophoresis chamber is connected to the Mini Power Pack PS300T by safety cords.
Use exclusively electrophoresis devices with safety connectors.
Switch off the Mini Power Pack PS300T while working on
the test equipment setup.
10
Mini Power Pack PS300T Instruction Manual, 2012/05
5
Operation
5.1
Control Interface
There are six buttons and 4 LED indicators on the faceplate.
The LED’s indicates the status of the unit.
a. Setup Mode (before pressing RUN/Start)
LED light indicates your current parameter. For example, when setting a value for
Voltage, the Voltage LED will lit up.
b. Operation Mode
When starting the experiment, the LED light next to the RUN/STOP button will light up
indicating the unit to operate.
1.
– Select voltage value
2.
– Select current value
3.
– Timer button
4.
– Increase the Voltage, Current or Time
5.
– Decrease the Voltage, Current, or Time
6.
– Start or stop the unit
Mini Power Pack PS300T Instruction Manual, 2012/05
11
5.2
Start Operation
Note: To operate at constant voltage or constant current mode, adjust the other
parameter to the maximum value!
For example, to operate at constant voltage, adjust current to maximum.
1. Place the unit on a sturdy and level surface in a safe, dry place, away from laboratory
traffic.
2. Ensure that the AC power switch is OFF, and then plug the power cord into a grounded
AC outlet with appropriate voltage (100V to 240V as indicated on the rating sticker near
the AC cord on the back of the unit).
Fan
ON/OFF Switch
Main Power Socket &
Fuse Holder
Rear view
3. Power on the unit by pressing the ON/OFF switch on the back of the instrument.
4. Connect the DC output jacks from the electrophoresis instrument: insert the red
electrophoresis instrument lead (+) into the red output jack, and the black electrophoresis
instrument lead (-) into the black output jack.
12
Mini Power Pack PS300T Instruction Manual, 2012/05
5.3
Constant Voltage or Current Setting:
•
To set constant voltage, press
•
To set constant current, press
and the LED indicator should light up.
, and LED indicator should light up.
5. Adjust the output value by pressing the
or
button.
7. After adjusting your constant mode output value, switch to the other parameter and set it
to maximum.
5.4
Timer Setting:
8. After setting the current or voltage output value, press the Timer button,
and then press the
key or the
key to adjust the timer accordingly.
Note: When timer setting is “0”, it means continuous operation.
9. Press the
to the
10. Press the
5.5
key to start the run. Once the electrophoresis starts, the LED light next
button will light up.
key again to stop the unit at any time if necessary.
Stop Operation
11. When the run is completed, press the
key to terminate a timed run, and turn the
AC power OFF by the switch on the rear.
12. The programmed settings will be automatically saved into the system so the next time
you turn it on, the same settings as your previous experiment will be displayed.
Mini Power Pack PS300T Instruction Manual, 2012/05
13
6
Trouble Shooting
6.1
Operating Problems
Many operating problems may be solved by carefully reading and following the instructions in
this manual accordingly. Some suggestions for troubleshooting are given below. Should
these suggestions not resolve the problem, contact our SERVICE DEPARTMENT or your
local distributor for assistance. If troubleshooting service is required, please include a full
description of the problem.
Problem
Solution
Check if the power supply is unplugged, or
No AC power
AC power source problem.
No Display / lights
AC power cord is not Check AC power cord connections at both
connected
ends. Use the correct cords.
The fuse has blown
Replace the fuse
Repeated fuse broken Hardware failure
Contact Service Department
Electrophoresis leads Check the connections to the power supply
are not connected to and on your electrophoresis unit to make sure
the power supply or to the connection is intact; check condition of
wires in electrophoresis unit. Close the circuit
the electrophoresis
by reconnecting the cables. Press the
unit(s), or there is a
START/STOP button to restart the run.
broken circuit in the
electrophoresis cell
Operation stops
High resistance due to Correct the conditions by making sure the
tape left on a pre-cast tape is removed from the pre-cast gel, buffers
are prepared correctly, and the recommended
gel, incorrect buffer
volume of buffer is added to the
concentration, or
electrophoresis unit(s).
incorrect buffer
volumes in the
electrophoresis cell
Error message
Error message
Error message
Message
Cause
Check if the buffer concentration is
appropriate. Excessive buffer concentration
may cause over current issue. To clear the
error message, press the START/STOP
button again.
Press the START/STOP button to clear the
Over voltage
error message. Contact Service Department if
(300 V limitation
the problem persists.
reached)
(1) Check the connections
Thermal limitation
(2) If Er3 error message persists, the problem
reached
(Output voltage <10V) may be caused by internal fan failure. Contact
Service Department.
No load is detected
(1) Check the connections
(2) Check the buffer condition / buffer
level
Max. watts (60 W) of Warning message for reference
power reached
Over current
(400 mA limitation
reached)
Alarm message
14
Mini Power Pack PS300T Instruction Manual, 2012/05
6.2
Encountering Problems
1. Check the trouble shooting section.
2. Call Service Department or e-mail to [email protected].
3. If the unit must be shipped back for repair, contact Biometra Service Dapartment or your
local distributor for a Return Authorization Number (RAN) and shipping instructions. For
further information please refer to chapter 8.1 Instructions for return shipment.
Mini Power Pack PS300T Instruction Manual, 2012/05
15
7
7.1
Maintenance and Repair
Cleaning and Maintenance
Disconnect the Mini Power Pack PS300T. Use only mild, non-abrasive detergents
and a slightly moistened soft cloth. Do not use solvents, soak while cleaning or
immerse in water!
7.2
Servicing
Regular servicing is not necessary.
7.3
Replacing the Fuse
Only original spare parts are allowed. For additional fuses, contact the Biometra Service
Department.
To replace the fuse:
4. Turn off the main power switch at the rear of Power Supply and detach the power cord.
5. Open the fuse compartment located inside the Power Entry Module by inserting a small
flat blade screwdriver into the slot below the ON/OFF switch. Turn the screwdriver to
gently pry open the fuse compartment.
Not
The fuse compartment will not open with the power cord in place.
6. Pull the fuse holder out of the compartment and inspect the fuse. If the fuse is burned or
there is a break in the fuse element, replace the fuse with an identical type of fuse
(T2AH250V) as provided in the fuse holder (see figure below).
4. Place the fuse holder back into the compartment.
5. Snap the cover closed.
16
Mini Power Pack PS300T Instruction Manual, 2012/05
8
Service
Should you have any problems with this unit, please contact our service department or your
local Biometra dealer:
Biometra GmbH
Service Department
Rudolf-Wissell-Straße 14 - 16
D-37079 Goettingen
Phone: +49 (0)5 51 50 68 6 - 10 or 12
Fax: +49 (0)5 51 50 68 6 -11
e-mail: [email protected]
If you would like to send the unit back to us, please read the following return
instructions.
8.1
Instructions for Return Shipment
•
Return only defective devices. For technical problems which are not definitively
recognisable as device faults please contact the Technical Service Department at
Biometra (Tel.: +49 (0)5 51-50 88 1-10 or -12, Fax: +49 (0)5 51-50 88 1-11, e-mail:
[email protected]).
•
Please contact our service department for providing a return authorization number
(RAN). This number has to be applied clearly visible to the outer box. Returns without
the RAN will be not be accepted!
•
Important: Carefully clean all parts of the instrument from residues, and of biologically
dangerous, chemical or radioactive contaminants. If an instrument is
contaminated, Biometra will be forced to refuse to accept the device. The
sender of the repair order will be held liable for possible damages and losses
resulting from insufficient decontamination of the device.
•
Please prepare written confirmation (use the “Equipment Decontamination
Declaration” following on the next page) that the device is free of biologically dangerous,
chemical or radioactive contaminants. This confirmation must be attached to the outside
of the packaging.
•
Use the original packing or a similarly robust packing when returning the device. If not
available, contact Biometra or your local distributor.
•
Label the outside of the box with “CAUTION! SENSITIVE INSTRUMENT!” and the RAN
number sticker. Attach the Decontamination Declaration!
•
Please enclose a note which contains the following:
a) Sender’s name and address,
b) Name of a contact person for further inquiries with telephone number.
c) Precise description of the fault, which also reveals during which procedures the
fault occurred, if possible.
Mini Power Pack PS300T Instruction Manual, 2012/05
17
9
Equipment Decontamination Certificate
To enable us to comply with German law (i.e. §71 StrlSchV, §17 GefStoffV and §19 ChemG)
and to avoid exposure to hazardous materials during handling or repair, please complete this
form, prior to the equipment leaving your laboratory.
COMPANY / INSTITUTE
__________________________________________________
ADDRESS
______________________________________________________________
PHONE NO
_________________________
E-MAIL
______________________________________________________________
EQUIPMENT
FAX NO_________________________
Model
______________
Serial No
______________
______________
______________
______________
______________
______________
______________
If on loan / evaluation Start Date: __________________
Finish Date __________________
Hazardous materials used with this equipment:
__________________________________________________________________________
__________________________________________________________________________
__________________________________________________________________________
Method of cleaning / decontamination:
__________________________________________________________________________
__________________________________________________________________________
__________________________________________________________________________
The equipment has been cleaned and decontaminated:
NAME __________________________________ POSITION _______________________
(HEAD OF DIV./ DEP./ INSTITUTE / COMPANY)
SIGNED ________________________________ DATE ____________________________
PLEASE RETURN THIS FORM TO BIOMETRA GMBH OR YOUR LOCAL BIOMETRA
DISTRIBUTOR TOGETHER WITH THE EQUIPMENT.
PLEASE ATTACH THIS CERTIFICATE OUTSIDE THE PACKAGING. INSTRUMENTS
WITHOUT THIS CERTIFICATE ATTACHED WILL BE RETURNED TO SENDER.
18
Mini Power Pack PS300T Instruction Manual, 2012/05
General Information for Decontamination:
Please contact your responsible health & safety officer for details.
Use of radioactive substances:
Please contact your responsible person for details.
Use of genetically change organism or parts of those:
Please contact your responsible person for details.
Mini Power Pack PS300T Instruction Manual, 2012/05
19
10
Note for Disposal of Electric/Electronic Waste
This symbol (the crossed-out wheelie bin) means, that this product should be brought
to the return systems and/or separate systems available to end-users according to
yours country regulations, when this product has reached the end of its lifetime!
For details, please contact your local distributor!
This symbol applies only to the countries within the EEA*.
*EEA = European Economics Area, comprising all EU-members plus Norway, Iceland and
Liechtenstein.
20
Mini Power Pack PS300T Instruction Manual, 2012/05
11
EC – Declaration of Conformity /
EU - Konformitätserklärung
Goettingen, May 2012
im Sinne der EG-Richtlinie über elektrische Betriebsmittel zur Verwendung innerhalb
bestimmter Spannungsgrenzen 73/23/EWG
following the EC directive about electrical equipment for use within certain limits of voltage
73/23/EEC
und / and
im Sinne der EG-Richtlinie für die elektromagnetische Verträglichkeit 89/336/EWG.
following the EC directive about the electromagnetic compatibility 89/336/EEC.
Hiermit erklären wir, dass folgendes Power Supply,
Herewith we declare that the following Power Supply,
Typ / type:
Best.-Nr. / Order No.
Mini Power Pack PS300T
040-100, 040-190
den grundlegenden Anforderungen der
corresponds to the basic requirements of
EG-Niederspannungsrichtlinie 73/23 EWG und der
EC low voltage directive 73/23 EEC and the
EG-Richtlinie über die elektromagnetische Verträglichkeit 89/336 EWG entspricht.
EC directive about the electromagnetic compatibility 89/336/EEC.
Dr. Juergen Otte
Quality Manager
Mini Power Pack PS300T Instruction Manual, 2012/05
21
12
Warranty
This laboratory instrument is produced with the highest practical standards of materials,
workmanship, and design. The design and manufacture of parts have been conceived with
one purpose - to produce units which will give satisfactory service.
Biometra GmbH guarantees this unit to be free from defects in materials or workmanship
under normal use or service for 24 month from date of shipment.
If, during this time, this unit proves defective in materials or workmanship, Biometra GmbH
will repair or replace it free of charge if returned to us prepaid.
This guarantee does not cover damage in transit, damage caused by carelessness, misuse
or neglect, or unsatisfactory performance as a result of conditions beyond our control; or
consequential losses as a result of failure of our product.
Biometra GmbH
Rudolf-Wissell-Str. 30
D-37079 Goettingen
Tel:
+49 (0)5 51 50 68 6-0
Fax:
+49 (0)5 51 50 68 6-66
e-mail: [email protected]
internet: http://www.biometra.de
22
Service Department
Rudolf-Wissell-Str. 14-16
D-37079 Goettingen
Tel.: +49 (0)5 51 50 68 6-10 or -12
Fax.: +49 (0)5 51 50 68 8-11
e-mail: [email protected]
Mini Power Pack PS300T Instruction Manual, 2012/05