1
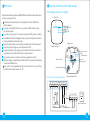
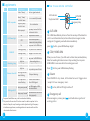
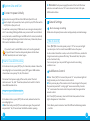
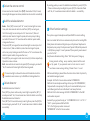
TM M1 Voice GSM Alarm System User Manual Please read before any operation Shenzhen ERAYELECTRONIC CO.LTD Address: 5th F,2 Building, An'le industrial Park, XingHua RD, Bao'an zone43,Shenzhen,China “ERAY” is registered trademark of Shenzhen ERAY ELECTRONIC CO.LTD. All rightreserved. The first editionin 2014 General Description Table of Content This Voice GSM alarm system is a multi-functional smart alarm system. Adopting advanced GSM digital signal process technology, the system support various function of digital voice, SMS, self-learning wireless coding, remote appliance control and message recognition. On-site voice or SMS alert can be sent automatically to inform you with alert-situation and places, meanwhile, six LED lights on panel show you direction too. System is reliable, stable, safe and easy-operated. 1.Features 2.System construction and usage How to use remote controller Some description is illustrated with some photos for your reference, but which may not consistent with the real goods.Our company accepts no compensation liability for any technical, editorial or omission errors in this guide and any accident or consequential damages arising from using this manual. All information provided "as is" without any warranty and may change at any time without prior notice. 3 5 Door Sensor Installation and Test 6 Infrared detector installation and test 7 3.System Use and Set It has been widely used in homes, factories, schools, shops, convenience stores, financial and banking workplace, cottages and residential area to protect your valuable assets. 2 8 4.SMS control panel remotely 15 5.Alarm reception &Remote Control 16 6 .Defense zone type and the panel parameter. 17 7 .FQA 19 1 1 Features Adopt brand new quad band GSM/GPRS industrial module and voice prompt, easy operation. 6 Wireless and 4 wired zones, every defense zone with 5 different type closeable. 2 groups timely ARM/Disarm, every timely ARM/Disarm group can choose week. 6 groups voice phone call numbers,3 groups SMS phone numbers. Embedded with multi intelligent voice prompt, exactly know incidents place and defense zone while alarm. Support 10 seconds auto recording, can playback on the alarm panel. Support remote setting via your cell phone or SMS. Support remote monitoring, announce functions. Remote control via your cell phone or SMS to Arm/Disarm etc operations. 1 group relay output, realize remote home appliance control. Wireless coding, compatible with 2262 & 1527, can pair with 50 remote control and 50 detectors. Built-in NI-HI rechargeable battery, auto switch to back-up battery and SMS alert while power cut off. 2 System construction and usage Knowledge about our panel: 1-6 ZONE LED A B C D E GSM Signal Recording LED ARM LED POWER LED F MIC Code button Panel Face pic 1 DC power socket Siren SIM card seat SIM Off Wire interface On Back-up battery switch Built-in loudspeaker Panel backside Pic 2 Wire interface connection diagram Z7 Z8 Z9 Z10 GND COM NO 12V V+ V- C NC Wire door magnetic gap sensor 2 Wire infrared detector AC 220V 5A 3 ■Supplements NO 1 Function Built-in speaker How to use remote controller Indications A short "beep" Confirm signal received "beep", "beep" two short tones Exit or successfully learned. "beep, beep, beep" three short tones Voice prompt 2 3 5 6 Recording Lamp Defense Zone LED GSM signal LED The prompt voice of all the function and status Off Panel external power is disconnected, using battery On Alarm panel at ALL ARM state Flashing quickly Alarm panel in STAY ARM state Flashing slowly Changing to the DELAY ARM Alarm panel in DISARM state Light on In recording status Light off Exit recording Light on Corresponding zone will alarm LED Light in One zone flashing Delayed alarming LED Light in Six zones flashing SIM card uninstalled or without GSM signal Blinking every second Poor GSM signal or SIM card not installed Blinking every 3 second GSM module and SIM card is working properly Two panel installation way : wall mounted and desktop. Put panel on the centre of the alarm area for a best reception to the detector. Keep far away from large metal objects and high-frequency interference appliances, avoiding reinforced concrete walls and fire doors and other barriers. 4 Stay/Home ARM Error indication Panel power is normal Off 4 LED Indicator On LED Power light ARM LED Description OUT ARM Disarm Emergency help 1 .OUT ARM Put it ARM when Nobody at home. Press the arm key all the detectors start to work.Once detector(motion infrared, door magnet, smoke and gas,etc) triggered, panel will alarm immediately. press[ ] button,panel ARM led keep bright. 2 .STAY/HOME ARM When you are at home, if you still want outdoor door,window,balcony detectors working but indoor sensors stop working.You can press HOME ARM to sure some detectors working,some not. Press [ ] button , panel ARM led keep flashing. 3 .Disarm Press DISARM to stop alarm,all the detectors won't trigger alarm (except 24-hour emergency zone). Press [ ] button, ARM or STAY lights will be off. 4 .Emergency call When emergency comes, press [ working pattern. ] and it will alarm regardless of 5 Door Sensor Installation and Test Infrared detector installation and test PIR Sensor 2.2-2.4 M A B 0 meter 10mm (pic2) a. Open the case, install the battery properly by tear down insulation material. b. Clean the installation place. c. Install the transmitter (A)on the door frame and the magnet (B ) on the door. Transmitter and magnet should be on the same level and distance between them should be within 10 mm. d. Double-sided tape or screw can be used for a firmly attachment. e. Make sure panel can receive wireless signal sent by detector in the installation place. A large quantity of metal and antenna should be avoided in the area of detector. Testing and Coding The newly-bought door sensors should be enrolled to the control panel before use.(For specified operation ,please refer to the manual of alarm system. ) Installation finished, To confirm it works properly by open your door or window with a red indicator light flashing. For more information, please refer to “Door/Windows Gap Detector User Manual” 6 2m 4m 6m 8m Fresnel Lens Walk Way Open detector case,choose work mode. When the power is on,indicator bright blue light 2 seconds (blue light:send out wireless alarm signal.Red light:battery low-vol,replacebattery).Or press code button to pair with host,then put case back. Choose install position,adjust install angle/ direction,walk test the protection area,make sure in three steps trigger alarm. Install at 2.2-2.4 meters from ground,using screws to fix bracket, put the detector on it. Notice Indoor use only Avoid sunshine,direct strong light,heat,stoves,air condition and moving objects.Don't straight at door/window or vents. Detect direction must be tangential with body moving direction(vertical 90 degrees) is the best. With pets at home,please adjust the detector to higher view,above 0-30cm from ground,in case little pet false alarm. Take care of fresnel lens,avoid dirty,scratching,falling down,crashing.In case damage inside components. For more information, please refer to “Door/Windows Gap Detector User Manual” 7 3 System Use and Set a. Connect to power initially 1 Open back cover,put SIM card into SIM seats.(See Picture 4) 2 Insert adapter into power hole, back-up battery on/off button switch ● Disconnec host power supply,then restart the host. After hear welcome voice will come out "di" once shows host switch to open GSM module status. b .General Settings to [ON] status.(See picture 3) You will hear voice prompt "Welcome to use voice gsm alarm system", start to searching GSM signal blink every second until turn into blink every 3 seconds, means GSM signal and SIM card both normal,successfully. If zone 6 light keep flashing and host restart every 20 seconds,shows SIM card not installed or didn't work. If you don't want to install SIM card or can't search signal well, but you still want it used as alarm panel,please shutter down GSM module,host won't restart again. How to Close GSM module In the disarm status, press [SET] key for 3 seconds, release it when the recording light on.2 seconds later, press [SET] again. GSM module closed when voice prompt "di ,di,di" be heard. Disconnect host power supply. After a while, restart the host. Host announce "di ,di,di" three times,shows host switch to shutter down GSM module status. How to open GSM module In the disarm status, press [SET] for 3 seconds, release it when the recording light on . ● Wait 2seconds, press [SET] 3 seconds once again, the panel will respond with " di,di" twice shows the GSM module is opening. 8 1 .Alarm message recording While alarm dial preset phone number and play already recorded message. How to record Press 【SET】for 3 seconds, panel prompt “ di” for once,record light on,remind you start to record towards MIC hole on the panel. Audio content should be concise, such as this is XXX home, residential illegal invasion here, please offer help,.”10 seconds later, the system will exit automatically. For an early end, you can press SET again when the recording indicator is on. 2 .Add Remote Control ●Enter: Press [SET] for 1 second,the panel "di " once,6 zones lights all bright,remind you start to learn remote control. ●Then press any key of the remote control to send signal to the panel, the panel respond with " coding right" means successfully. Sounds "di " once means the remote control repeat coded, change another remote control. Exit: Press [SET] once every 1 second total six times,when all zones lights disappear exit code status. Note: Alarm panel can learn at most 50 different addressing remote controls. 9 3 .Delete the remote control In learn remote control mode, Press【SET】3 seconds with “di,di” sound, 6 zones lights disappear same time,delete all remote controls successfully. By analogy, when you want to deleted zone 6 detector, press [SET] for 7 times continuously,zone 6 light on press [SET] for 3 seconds.Panel with "di ,di " sound means zone 6 detector delete successfully . 4 .Add the wireless detector Enter:Press [SET] 1 second ,with "di " sound, 6 zones lights on same time, enter learn remote control mode. Press [SET] 1 second again, the first zone light on remind you start to “learn zone 1”.(Take out detector,make it send out signal to panel,with voice prompt coding successful.If come out "di " sound means the detector repeat coded, change another one.) Then press [SET] once again,the second zone light on remind you start to learn zone 2. (Take out detector,make it send out signal to panel, with voice prompt coding successful.If come out "di " sound means the detector repeat coded, change another one.) Press [SET] key once again to enter learn zone 3,4,5,6 status respectively. Operations same as above. Exit: when enter learn zone 6 status,press [SET] once again, panel with "di,di" sound and all zones lights off,exit learning mode. If some zone light on shows the zone is still under learn status. 6 wireless zones can learn up to 50 different coding detectors. 5 .Delete detector Delete defense zone 1 detector : Press [SET] key twice continuously, zone 1 light on press the [SET] 3 seconds,panel with "di ,di "sound means zone 1 detector delete successfully. Delete defense zone 2 detector : Press [SET] for 3 times continuously, zone 2 light one press the [SET] for 3 seconds again, panel with "di ,di " sound means zone 2 detector delete successfully. 10 c . Other function settings: The system support make phone call/send SMS for remote setting. Users can realize the function via make remote phone call or sending SMS. Enter phone call remote setting:Use your cell phone or telephone to dial panel,voice prompt “enter password”,press 1234(initial password is 1234).Voice prompt “correct password”,then press #,panel remind you start to “set”. Exit phone call remote setting: Press * first then press #, hang up. During remote setting, every number pressed will be read out by panel. If you pressed once but not read or read it two times means wrong setting. Please Press * to exit. SMS remote Settings: please follow the instruction in table 1 by directly sent related massage to panel. Example : Set the first voice alarm number 13788889999. Method 1:In remote phone setting status, input 31 13788889999 #, the panel with voice prompt to tell you it is succeeded.And you can use following instructions in the sheet to set many features. Method 2: Edit a text message 1234 31 13788889999 # to the SIM card number in panel. Succeed if you get panel's reply as “1: 13788889999 2: 3: 4: 5: 6: 7: 8: 9: ”. “1234” is panel password.Default:1234 “31” is the first group number command. “13788889999” is the first alarm number. 11 Example 2: If user want to delete the first alarm number. Method 1: Input 31 # in remote phone setting status. Method 2: Text 123431# to panel. Panel will reply “1: 2: 3: 4: 5: 6: 7: 8: 9:” The first group number delete successfully. Command sheet 1(all the below command valid for the two methods) Set up voice alarm phone number Command :[3]+[1-6]+ [Phone number]+[#] Delete voice alarm phone number Preset 1-6 group voice alarm phone numbers. [ 1-6 ] indicates the 1st group to the 6th group alarm numbers. Please refer to Example 1 for the specific instruction. Remark: 1.If alarm number with extensions, please input phone number +*+extension number. Press one * will wait for 1 second and two * for 2seconds. When power cut off or power on again, system will dial 6 group alarm number, send SMS to 3 sms numbers.panel prompt defense zone 0 alarm. Delete 1-6 groups alarm phone numbers Please refer to Example 2 for the specific instruction. Command :[3]+[ 1-6 ]+ [#] Set SMS alarm number Command :[ 3 ]+ [7-9]+ [Phone number]+[ # ] For 1-3 groups SMS alarm numbers. Specific instruction refer to Example 1.When alarm send SMS to the 3 groups numbers. Delete SMS alarm number Delete 1-3 group SMS alarm numbers,refer to Example 2 Command :[ 3 ]+ [7-9]+ [#] Password modification Command :[50]+ [4 digits newpassword]+ [# ] 12 To modify the user password, the default user password is 1234.Change it before using. Delay arm time Command : [51] + [00-99 Second]+[ # ] Set the delay time for out arm. 0-99 seconds can be set, system default 00 seconds. Set time for delay alarm Command : [52] + [00-99 Second]+[ # ] Set Siren alarm time Command :[ 53 ]+ [00-20 Minutes]+[ # ] Alarm linkage on/off Command :[ 54 ]+ [0/1] +[# ] remote control siren voice prompt on/off Command :[ 55 ]+ [0/1]+[#] Date and time setting Command :[56]+ [00-99 2-digits year]+ [01-12month]+[01-31 day]+[00-23 hour]+ [00-59 minute]+[00-59 second]+[# ] panel ready to alarm time, 0-99 seconds can be set, system default 00 seconds. Set siren alarm time, 0-20 mins can be set, system default 1 min. Enable or disable alarm relay output linkage. 1 is enabled and 0 is disabled, the system default is 1. Set remote control voice prompt from siren on/off. 1 is on, 0 is off, default is 1. Set system date and time.Includes year,month,day,hour, min,second Example 3: it is Januar y 1 st of 2014 9 :00 : 00 am Method 1: In remote phone call setting status, input 56 14 01 01 09 00 00 #. Method 2: Send SMS message 1234 56 14 01 01 09 00 00 # to the panel. Set 1 st and 2 nd group timely arm/disarm time and week. Timely arm time setting Example 4: Set the first group timely arm/disarm at 22 :00 pm/07:00 am,valid from Monday to Friday of each week. Method 1: In remote phone setting status, press Command: [57-58]+ [AAAA timely arm time ] 572200070012345# Method 2: Send SMS message 1234572200070012345# +[ BBBB timely disarm time]+[week numbers] to panel. Remark: Disable timely arm/disarm,set both time to 24:00. +[ # ] 13 Set defense zone type Command: [ 60 ]+[01-06 zone number ]+[ 1-5 Type ] +[ 0/1 siren on/off ]+ [ #] Set wired zone type Command: [61 ]+[07-10 zone number]+[1-5 Type]+ [0/1 siren on/off]+ [ 0/1 NO/C]+[# ] Set 6 wireless zone type, 01-06 represents 1-6 zone number, 1-5 represents zone type: 1、NORMAL 2、STAY ARM 3、INTELLIGENT 4、EMERGENCY 5、CLOSED [0/1]represents alarming siren sound on/off, 0 disable,1 enable. Example: Set defense zone 2 as STAY arm without siren sound. Method 1: In remote phone setting status input 600220#. Method 2: Send SMS message 1234600220# to the panel. Set 4 wired defense zone type. 7-10 represents 1-4 wired alarm zone. 1-5 represents zone types: 1. NORMAL 2. STAY ARM 3. INTELLIGENT 4. EMERGENCY 5. CLOSED The first[0/1]represents the alarming zone siren sound on/off (0 disable,1 enable) The second[0/1],0 means NO (short-circuit to alarm), 1 means NC(open-circuit to alarm) Default: NO (short-circuit to alarm) for 07-10 defense zone Remark: Back to factor y setting,like clear all numbers,operation Command: password 1234,but remote control and detectors code [13]+[0000]+[#] message won't lose. Disconnect power, turn off panel batter y switch, press Reset Mandatory [SET] while power-on.panel respond with “beep....” long ringing,after 5 seconds release [SET]button. Operation: Notice:Now back to factor y set,password 1234.Delete Press[SET]to power on. all remote controls and detectors coding message. Factory reset 4 .SMS control panel remotely Syntax table 2: (Only apply for SMS remote control, setting and inquiry. Function Set audible voice on/off Alarm panel internal speaker voice prompt on/off. 1 Command:[11]+[0/1]+[#] is on, 0 is off, default is on. SMS Messaging on/off Command:[12]+[0/1]+[#] 14 Send SMS message or not. 1 is on,0 is off. Default is on Description disarm 0# Send SMS messages 12340# to panel Out arm 1# Send SMS messages 12341# to panel STAY arm 2# Send SMS messages 12342# to panel turn on relay turn off relay Siren volume adjustment Siren volume varies from 00 smallest to 99 largest, system default 99. Command: Note: Too low volume may lead to abnormal report voice. [62]+[00-99]+[#] Be Cautious! Syntax 3# Send SMS messages 12343# to panel 4# Send SMS messages 12344# to panel Send SMS messages 12346# to panel to quer y the AC power ON/OFF. Quer y phone number from 1st to 9th group. 1-6 group voice alarm numbers,7-9 group Query alarm phone number 21+[ # ] SMS number. Note: 1.voice alarm number can be SMS numbers. Send SMS to 7-9 group first while alarm,thencall 1-6 group numbers. Quer y system time (year,month,day,time) and Query time 22+[ # ] timely arm/disarm time. Query AC power status Query defense zone status 6# 23+[ # ] Quer y wireless/wired zone status (zone type , siren on/off , open or short circuit alarm) 15 Query SMS message content 80+ [ # ] Quer y customized SMS message content Note:Message content default is defense zone +defense alarm. Modify zone 1-9 message content Modify message content from zone 1 st to 9 th. 8+[1-9 zone number]+[content]+[ # ] (within six words). Modify message content in zone 10 90+[zone 10 message content]+[ # ] Modify zone 10 message content. “1234" in above table represent initial password. If you changed password,please input new one. 5 .Alarm reception &Remote Control 1.what to do when get alarm call: When alarm, dial the preset telephone numbers from 1 th to 6 th group, send SMS to 1 st -3 rd group,siren on/off accord to your setting. If one line is busy or can't get through, auto dial next number,every number call 3 times. Get alarm call auto play 10 seconds recording without input password, press cell phone/telephone digital number can control following functions: [1] key: arm [2] key: disarm [3] key: listen-in [4] key: stop listening [5] key: talk [6] key: stop talking [7] key: siren on [8] key: siren off [9] key: relay on [0] key: relay off [*] key: hang up and exit, won't dial next number on the list. If you don't press“*”or “2”, continue to dial next number. 2.Remote control Dial the host, Ring for once and system is connected automatically. 16 Voice prompt please enter the password, Enter your password (1234 factory default , input wrong remind you input again,wrong for three times,hang up automatically).Input right,voice prompt correct password, press cell phone/telephone digital number can control following functions: [1] key: arm [2] key: disarm [3] key: listen-in [4] key: stop listening [5] key: talk [6] key: stop talking [7] key: siren on [8] key: siren off [9] key: relay on [0] key: relay off [*] key: exit and hang up [#] key: Enter Remote control, make general setting refer to Sheet 1 commands.Without any operation after 20 seconds auto hang up and exit. 1.Listen-in time is 20 seconds, and for more monitoring time, press ”3”within 20 seconds. 2.when monitoring press key 5, you can start to talk. 3.while talk, press”5”within 20 ontime to talk. 6 .Defense zone type and the panel parameter. There are 6 wireless defense zone and 4 wired defense zones. Total 10 zones.Every zone with five different types. 1 .NORMAL Defense Zone: Panel only works on ARM status.No response while Disarm. 2 .STAY Defense zone(AT-HOME Defense zone): While Stay Arm, detectors in stay zone won't alarm even triggered. (for example, some user install two components, one is door magnet in the zone 1and another is infrared detector in zone 2 stay defense zone(refer to Command table 1).When stay Arm, people moving at home,the motion sensor detected it but won't alarm,if you open the door (in normal zone 1 ) will alarm immediately. 17 3 .INTELLIGENT Defense zone: if the detector in the zone triggered only once, won't alarm. But if triggered again within 30 seconds it will alarm immediately. 4 .EMERGENCY Defense zone: no matter you arm/disarm , it will alarm immediately once detector triggered. Usually pair with Smoke Detectors, Gas Detectors and emergency button, etc. 5 . CLOSED Defense zone: In this zone no matter you arm/disarm, it won't alarm even Detectors triggered. Panel parameters: Input voltage: DC9V-12V Standby currents: < 25 m A Alarm current: < 450 m A Wireless frequency: 315/433/868/915MHz, 2262/1.5-4.7M,EV1527/300K GSM Format: Support GSM850/900/1800/1900MHz (option) Backup battery: NI-HI AAA*6 DC7.2V Alarm loudness: 110dB Detailed parameters: The alarm is compatible with PT2262, PT2240 and EV1527. Encoding with PT2262, the 1.5M-4.7M resistance is recommended; Encoding with PT2262, 300K for the resistance, for data 1010 is recommended System default: Operation password 1234 Siren Volume 99 Integrated Alarming/ Linkage alarm Enable 1- 10 defense zones properties Normal zones GSM Module open Siren Sound time 1 minute Audible confirmation for remote operation open Delay alarming 0 1-10 Zone alarm Siren alarm 1-10 Zone message service Alarm in corresponding zone 18 Delay ARM 7-10 wired zones SMS Message 7 .FQA Troubleshooting 0 Short circuit alarmNO Enable Can not dial for alarm Reasons Not arm forget to preset alarm call numbers component improperly installed distance too long Coding not compatible SIM card unloaded SIM requires PIN code poor SIM card not read by panel, or GSM can't call and SMS. signal of GSM SIM card copper chip scratched forget to preset alarm call number forget to preset SMS number balance of SIM card not enough or the validity passed. Close SMS text function Methods Put it Arm Re-set numbers according to manual readjust the position recode again Install SIM card Cancel PIN code take to strong signal place Change another SIM card preset 1 st group voice number preset 1 st group SMS number pay your phone bill Open SMS text function 19 Can't remote control No record indication when alarm Password input wrong Alarm voice not recorded record again refer to manual book Coding unmatched with panel Batter y low-power Remote control not work Poor contact of Batter y pieces or corroded Unmatched with panel Infrared detector not work Siren no sound Input password or change new one or Reset Mandator y Low-power Re-code Change batter y Polish elastic plate of batter y. Contact local dealer find a matching one change batter y Siren plug/socket in short Repair or change plug/socket circuit or broken Change plug line Plug line cut off Set siren ringing time Siren closed panel receive infrared A nearby emitter is transmiting sensor,door sensor, Panel receiver failure remote control distance Standby batter y of the shortened host insufficient Find the interfering source and take it away Deliver y back to factor y. Check power supply whether connected well. No voice prompt from panel Closed the voice prompt Open voice prompt functions functions 20 21