1
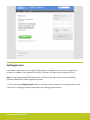
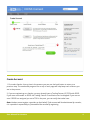
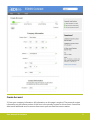
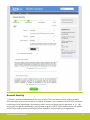
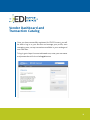
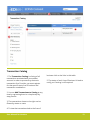
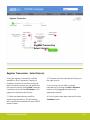
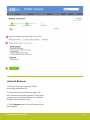
EDISS Connect
User Manual for Vendors
Table of Contents:
Welcome to EDISS Connect .......................................................1
Web Site Address/URL...................................................................2
Self-Registration ..........................................................................3
Vendor Dashboard View .........................................................11
Transaction Catalog ...................................................................13
Register A Transaction ..............................................................14
Edit Profile .................................................................................. 18
Manage Users ...........................................................................19
Managing Providers ..............................................................20
Help .............................................................................................26
Contact .......................................................................................27
Welcome to EDISS Registration
and Management
EDISS Connect is a user-friendly, online registration and electronic claim testing
system. Vendors use it to register with EDISS, add users, manage providers and to
manage a transaction catalog. The system also allows Vendors to test claim files for
electronic submission or to be granted blanket approval for all transactions.
Web Site Address/URL
https://connect.edissweb.com
User Manual for Vendors
2
Self-Registration
Information made accessible through EDISS Connect is available to users once the registration
process is complete. User registration for EDISS Connect will need to be completed online.
Note: On each page within EDISS Connect there are FAQ’s in the right column to aid in answering
questions related to the online registration process.
1. Click on the green Register Now button to create an online account for accessing online profile
information, managing providers and adding and managing transactions.
User Manual for Vendors
3
1
2
Create Account
1. First select Vendor. At any time in the process you can use the back button to return to a
previous step. The numbered progress bar on top of each page will help keep track of where you
are in the process.
2. If you are registering as a Vendor you may already have a Trading Partner ID (TPID) with EDISS.
If you are a new vendor to EDISS the Trading Partner ID verification can be skipped. If you are not
sure if EDISS has assigned you out a TPID in the past, you can verify that value here.
Note: Vendors cannot register a provider on their behalf. If the account will be administered by a vendor,
it is a provider’s responsibility to first establish the account by registering.
User Manual for Vendors
4
Create Account
3. Enter your company information. All information on this page is required. The personal contact
information on the bottom portion of this form is the primary contact for this account. You will be
able to add additional users to access the account upon successful account creation.
User Manual for Vendors
5
Account Security
1. Choose a username and password for your account. This username must be unique, between
8-20 characters and contain no spaces or special characters. Your password must be 8-20 characters
(consisting of one capital letter, one numeric value and one of these special characters: #,_,$,-,*,&)
and contain no spaces. Additionally, you will need to agree to EDISS Terms and Conditions as well as
HIPAA Terms and Conditions before you will be allowed to continue with your registration.
User Manual for Vendors
6
Account Settings
1. For Account Settings you must choose what type of vendor you are. A Billing Service or
Clearing House processes or administers transactions on a Providers behalf. If you choose Billing
Service or Clearinghouse you will continue on with additional steps of registration.
If you choose Software Vendor, you will be asked the name of your sofware and your registration
will be complete.
User Manual for Vendors
7
Account Settings
1. You will need to answer if you will be the administrator for one or more providers. Administrating
vendors assume the responsibility to manage all account information on a Providers behalf. This
may include demographic, transaction and user-related information.
In addition you can request I want blanket approval. During registration this box is checked by
default. EDISS has specific blanket approval requirements that can be found by clicking here. Once
you achieve blanket approval, submission of test files can be bypassed.
If you uncheck this box you will be required to submit test files as they apply to specific transactions
and lines of business. Once complete click Continue.
User Manual for Vendors
8
Account Settings
1. You are required to choose what software you will use to process transactions. If you use
PC-ACE Pro32, the free software provided by EDISS, you will need to accept the associated software
licensing agreement. Once complete click Continue.
User Manual for Vendors
9
Finish
1. You have successfully completed EDISS Connect registration. You can now login to EDISS
Connect and start administrating providers and managing your transaction catalog.
User Manual for Vendors
10
Vendor Dashboard and
Transaction Catalog
Once you have successfully registered for EDISS Connect, you will
be able to log in to your account and manage your profile, start
managing users, set up transactions available in your catalog and
test claim files.
To log in, go to https://connect.edissweb.com, enter your username
and password and click on the Log In button.
11
1
6
2
3
4
5
Vendor Dashboard
1. Upon successful log in you will see your
Account Home or dashboard.
2. The Manage Providers table shows a
snapshot of Providers with outstanding tasks.
You will also be able to see your role for the
provider and the status.
3. To edit your demographic and security
information click on Edit Profile to be taken to
your account details.
5. To add a transaction to your catalog of
offerings to providers click on Add Transaction.
EDISS Connect will take you through an easy-tofollow stepped process.
6. To logout of EDISS Connect, click the Logout
link on any page.
Note: The above sections of the Vendor
Dashboard are also discussed further on in the
User Guide.
4. At any point you can add, edit or remove
users that have access to your account by
clicking on Manage Users.
User Manual for Vendors
12
1
2
4
5
3
Transaction Catalog
1. The Transaction Catalog is a listing of all
transactions associated with your vendor
account. In order to process any electronic
transaction for a Provider, you must register
for that specific state, line of business and
transaction combination.
business click on the links in this table.
5. The status of each Line of Business is listed to
notify you if testing is still required.
2. You can Add Transactions to Catalog at any
time by registering them in a simple step-bystep process.
3. The transactions shown to the right can be
filtered by status or state.
4. To view the transactions tied to the lines of
User Manual for Vendors
13
1
2
3
Register Transaction
Select State(s)
4
Register Transaction - Select State(s)
Once you register a transaction it will be
available in your Transaction Catalog for
Providers to select. At any time during the
Add Transaction process you can go back to
the previous step by clicking Back. However,
if you have not yet clicked Continue on this
page your information will be lost.
2. The states you have selected will show up in
the right column.
1. Select the states where you will be
performing transactions. The left column
will show all states available for which EDISS
accepts claims.
4. Once all states have been selected click the
Continue button.
User Manual for Vendors
3. At any time, you can add or remove
transactions by clicking the Add or Remove
buttons or by dragging the state to the
appropriate column.
14
1
2
3
Line(s) of Business
1. Check all transaction types you will be
processing transactions for.
2. Check the lines of business that apply. The
lines of business will display based on the type of
transactions you indicated above. The states will
display from the previous step.
3. Click Continue when all lines of business have
been selected.
User Manual for Vendors
15
1
2
Transactions
1. Click on the checkbox under Enroll to add a
check mark to the specific claim type you will be
registering.
2. Once applicable transactions are added, click
Submit on the bottom of the page to finish
registering the transaction(s).
User Manual for Vendors
16
1
2
Register Transaction - Setup Complete
1. This transaction will now appear in your Transaction Catalog. A summary of the transactions
you’ve setup will display with the ability to print this page for your records.
2. Once you are finished you can go to Manage Transactions or Add Transactions.
User Manual for Vendors
17
1
5
2
3
4
Edit Profile
1. Clicking Security Settings will allow you to
change your password.
5. At any time you can update your company
information and save it to your profile.
2. Account setting can be set to either Blanket
Approved or Testing Required.
3. This shows the software you have selected to
use and allows you to download PC-ACE Pro32
if that is the software you are utilizing.
4. Allows you to manage the users that have
access to the account, their email addresses
and security settings.
User Manual for Vendors
18
1
2
3
Manage Users
1. This window displays the users associated
with the account.
2. The name is shown in the first column. To
view details about that user, click the name in
the list.
3. The Last Login column shows the date when
that user last logged in to the system. If the
registration is incomplete, the status displays
with the ability to resend a complete online
registration notification. You can also delete a
user from the system in this column.
User Manual for Vendors
19
Managing Providers
EDISS Connect allows you to manage processing providers that
have selected you to perform specific transaction types.
In addition, it allows a Vendor to administer a provider profile on
their behalf. Vendors can choose this role during their registration
process. Being an Administrating Vendor means that your facility
assumes responsibility and control of a provider profile and are
tasked with state, line of business and transaction registration, as
well as any user or demographic information.
To log in, go to https://connect.edissweb.com, enter your username
and password and click on the Log In button.
20
1
2
3
Manage Processing Providers
1.This is the Manage Processing Providers
page. Providers listed on this page have
selected you to process one or more electronic
transactions.
2. You have the ability to search for Providers
that have selected you to process transactions.
3. The Providers name will show up in the list
along with their NPI. To view the transactions
associated with the Provider click on their name.
User Manual for Vendors
21
1
2
3
4
5
Manage Processing Providers
1.This is the detailed transactions page for a
specific Provider.
2. This shows the Provider’s name, NPI,
Submitter ID and Tax ID or SSN.
5. If a Testing Required link is shown you can
click on the link to upload test files into the
system.
3. The status shows either forms required
or testing required. If Forms Required is
displaying the Provider must fax or mail the
proper documentation to EDISS.
4. The line of business and transaction type
the Provider selected you to perform is listed
below.
User Manual for Vendors
22
1
2
3
6
5
4
Manage Providers
1. The Manage Providers tab in the main
navigation area allows you to view and manage
all Providers that have selected you as an
administrating vendor.
2. The left navigation panel allows you to
manage transactions, view testing history
for submitted files and view forms that are
required a Provider’s registration process.
3. You have the ability to search by NPI for
Providers in the display table to the right.
User Manual for Vendors
4. You can filter the results of your search to
display only Providers with a certain status.
5. A Provider could have multiple records
depending on their NPI and state combination.
To view the transactions tied to a Provider click
on their name.
6. The status shows forms required, testing
required or if the transaction is complete and
ready to submit claims.
23
1
2
3
Manage Providers
1. After selecting the Provider you wish to view
you will see a listing of associated NPIs and
state combinations. To view the transactions
within, click on the NPI number.
2.. You have the ability to search by NPI for
Providers in the display table to the right.
3. You can filter the results of your search to
display only Providers with a specific status or
state.
User Manual for Vendors
24
1
4
2
3
5
6
7
8
Manage Transactions
1.This is the detailed transactions page for a
specific Provider.
5. The line of business is displayed below with
the ability to delete it at any time.
2. You have the ability to view the profile
of a specific Provider which includes their
demographic, security and user information.
6. Specific transaction types are listed below
the line of business with the ability to delete.
Removing and reselecting transactions can
create delays in the production process.
3. You have the ability to edit a Tax ID or SSN
associated with an NPI.
4. The status shows either forms required or
testing required. If you click on forms required
the required forms are available for download
as a PDF file.
User Manual for Vendors
7. You have the ability to modify if you and/or a
different vendor will perform the transaction.
8. If a Testing Required link is shown you can
click on the link to upload test files into the
system.
25
1
Help
1. Frequently asked questions, a Getting Started
Checklist, User Guides and Video Tutorials are
located in the Help section of the website.
User Manual for Vendors
26
Contact Information
Hours of Operation
Mon - Fri: 8:00 A.M. - 7:00 P.M. (CT)
Wed: Closed for training:
10:00 A.M. - 11:30 A.M. (CT)
Email
[email protected]
Fax (All Lines of Business)
701-277-7850
Medicare Lines of Business
Jurisdiction E (JE) Part A and B: 855-609-9960
Jurisdiction F (JF) Part A and B: 877-908-8431
All Other Lines of Business
Mailing Address
EDI Support Services
PO Box 6729
Fargo, ND 58108-6729
Phone: 800-967-7902
Fax: 701-277-7850
User Manual for Vendors
27