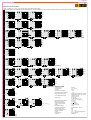
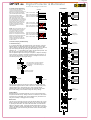
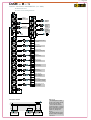
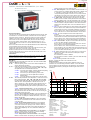
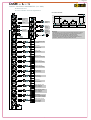
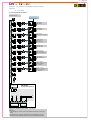
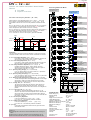
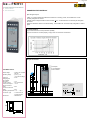
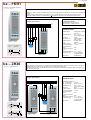
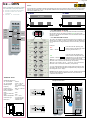
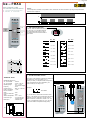
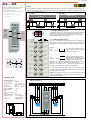
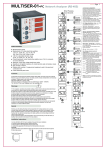
1
INDEX page VARko-112 REACTIVE POWER FACTOR CONTROLLER MULTISER-01-96 NETWORK ANALYSER MULTISER-01-96-PC (RS 485 MODBUS RTU) NETWORK ANALYSER MULTIMET-01-96 MULTIMETER & POWER METER 1 – 10 11 – 12 13 - 18 19 MULTIMET-02-96 MULTIMETER 20 MULTIMET-03-96 MULTIMETER 21 DP-01-96 DIGITAL PROTECTOR & MULTIMETER ► Current & Voltage Protection DAM – A – 72 DIGITAL UNIVERSAL AMPERMETER (True RMS) ► With Demand 21 - 25 DAM – B – 72 DIGITAL UNIVERSAL AMPERMETER (True RMS) ► With Demand ► Over Current Adjustment DAM – C – 72 DIGITAL UNIVERSAL AMPERMETER (True RMS) ► With Demand ► Over & Under Current Adjustment DAM – D – 72 DIGITAL UNIVERSAL AMPERMETER (True RMS) ► 2 Over Current Set DV – 72 – 01 DIGITAL VOLTMETER & FREQUENCYMETER ► True RMS DV – 72 – 03 DIGITAL TRIPHASE VOLTMETER & FREQUENCYMETER ► True RMS DV – 72 – 01C DIGITAL VOLTAGE & FREQUENCY MONITORING DEVICE ► True RMS DV – 72 – 03C DIGITAL VOLTAGE & FREQUENCY MONITORING DEVICE ► True RMS ► Triphase controlled 27 - 28 26 29 - 30 31 - 32 33 33 34 - 35 36 - 37 ke – FKR2 PHASE FAILURE and PHASE SEQUENCE DEVICE ► Constant Voltage Asymmetry (Phase – Neutral 40%) ► Phase Sequence ► Phase Failure ke – FKR3 PHASE FAILURE and PHASE SEQUENCE DEVICE ► Asymmetry % Adjustment ► Phase Sequence ► Phase Failure ► Delay Time Adjustment 38 ke – FKR4 40 PHASE FAILURE and PHASE SEQUENCE DEVICE ► Asymmetry % Adjustment ► Phase Sequence ► Over & Under Voltage % Adjustment ► Phase Failure ► Delay Time Adjustment ke – FKR4 (d) PHASE FAILURE and PHASE SEQUENCE DEVICE ► Asymmetry % Adjustment ► Over & Under Frequency Protection ► Over & Under Voltage Protection ► Phase Failure ► Delay Time Adjustment ► Phase Sequence ke – ADG OVER and UNDER VOLTAGE CONTROL RELAY ► Over&Under Voltage % Adjustment ► Phase Failure ► Phase Sequence ► Delay Time Adjustment 39 41 42 INDEX ke – FKR1T PHASE PROTECTION RELAY ► Phase Failure ► PTC Protection ke – FKR1 PHASE FAILURE DEVICE ► Phase Failure ke – ZR30 30 Sec. TIME RELAY page 38 43 44 45 ke – ZRXX MULTI FUNCTION TIME RELAY ► 32 Time Interval Selection ► Off – On Delay Operation Selection ► 220 Vac or 24 V ac/dc 46 ke – ZRXX (d) MULTI FUNCTION DIGITAL TIMER ► 19 different function ► Time Interval 0,1 ...... 9999 sec 0,1 ...... 9999 min ►Start Input :NPN with proximity sensor or switch ►Easy Programming 47 ke – DRN MULTI RANGE, DOUBLE TIME ADJUSTED FLASHER RELAY ► 8 Items of ON time mode and ► 8 Items of OFF time mode selection ► 220 Vac or 24 V ac/dc 48 ke – FRXX MULTI RANGE, TIME ADJUSTED FLASHER RELAY ► 16 Time interval swlwction ► 220 Vac or 24 V ac/dc ke – SS MULTI RANGE, ON and OFF ADJUSTED DIRECTION INVERSE RELAY ► 8 Items of ON (right-left) time mode and ► 8 Items of OFF time mode selection. 49 ke – SD STAR – DELTA RELAY ► T (on) : 0 – 30 sec. ► λ ----► Δ Delay time T (off) : 50 – 250 ms ► 220 Vac or 24 V ac/dc 51 ke – FTR PHOTOCELL RELAY ► 1 – 10 LUX Adjustment 52 ke – SKR LIQUID LEVEL CONTROL RELAY ► 5 – 100 KΩ Sensitivity Adj. 53 ke – HSR HYDROPHORE SEQUENCING RELAY ► ke-HSR2 : 2 Outputs ► ke-HSR3 : 3 Outputs 54 50 >>>> Page 1 VARko-112 ® Reactive Power Factor Controller 1. Forew ord All information and w arnings about 1 phase controlled reactive pow er controller, VARko-1xx*, are given in this User's Manual. Please for your pow er netw ork's and your ow n safety, read this manual carefully before commissioning the system. Please contact us for unclear points. KAEL Müh. Elektronik Tic. Ve San Ltd. Şti. 1201/1 sok. No:14R Yenişehir – İZMİR Tel: 0.232 458 60 85 (pbx) email: [email protected], w eb: w w w .kael.com.tr . 2. Warnings: 1. The connection, operation and parameter settings of device must be done by authorised technical service staff. Also, system checks must be done by this person w hen necessary. 2. Since compensation is a complex process, subscribers are advised to keep the system tracking by contracted service staff. 3. Please do not open or do not let others open the device. There are no user serviceable parts inside. 4. Before making the connections to device's terminals, please be sure that there is no voltage across the cables or terminals. Also be sure that the panel is de-energised. 5. Please do not use the device for purposes other then compensation. 6. Please fix the device to electric panel w ith apparatuses supplied. 7. Please press the buttons only by your fingers, do not press it w ith any other objects. 8. Before cleaning the device, please be sure that it is de-energised and use only dry tissue-paper to clean it. Water or any other chemicals used for cleaning may harm the device. 9. Before installing the device, please be sure that the terminal connections are made exactly the same as in the connection diagram and avoid any connection problems, such as loose connections or contact of different cables. 10.For each capacitor bank on the compensation system, please prefer contactors w ith suitable discharge resistors considering the bank pow er. 11.Please consider total currents draw n by the inductors of contactors w hile choosing the common contact line, line 'C', fuse value. When contactors w ith high inductor currents are chosen, for protecting the contact outputs of the device, auxiliary relay must be used. • : The statement VARko-1xx covers both 8 and 12 steps models of the device. Ins tallation Ins tructions : 1. A hole w ith 140 mm x 140 mm must is needed on the panel f or device installation 2. Remove the fixing apparatus before installing the device 3. Place the device in the prepared hole from the fromnt side. 4. Use the fixing apparatus to fix the device from the back side to the panel. CAUTION: Leave at least 50mm space betw een the back side of the device and the internal w all of the panel for the airing purpose Wall 140 mm Panel Hole Dimensions 140 mm 50 mm 3. Ge ne ral Inform ation Pow er controller Varko-1xx, w hich carries compensation accuracy and expectations beyond traditional devices, is developed by KAEL Elektronik to meet very high performance criterions. The most important properties of VARko-1xx that make it different f rom traditional type controllers are; 1- Fast commissioning and ease of use, 2- Instead of reaching to target cosfi value, compensating the system as much as close to real axis betw een the capacitive and inductive bound values. (Bound values can be changed by the user w hen desired), 3- Automatic C/k calculation, 4- Automatic learning and monitoring of capacitor bank pow ers (capacitor bank pow ers can be set by the user w hen desired. Device also detects any false setting and corrects it by its ow n as it operates), 5- Dynamically adjusting of normal region boundaries and capacitor sw itching on&off times w ith respect to consumed reactive/active percentage, 6- Extending capacitor bank pow er life by storing sw itching on&off times separately for each bank, 7- Automatic learning of current transformer polarities even if (k,l) is connected in reverse direction, 8- Calculating current reactive pow er value and directly sw itching on or off the most suitable group instead of sequential sw itching, 9- Making system tracking and fault detection easier w ith many hand alarms, >>>> Page 2 VARko-112 ® Reactive Power Factor Controller 3.1 Ope rating Principles When the device is energised, it checks first the voltage values. Then, it detects current transformer polarity even if connected in reverse direction. The direction of system's reactive pow er is calculated through resultant reactive pow er and resultant pow er factor. Compensation starts for pulling the system into 'normal region'. Device measures and stores all of active, inductive (+Q) and capacitive (-Q) energies. Af ter mathematical calculations, inductive and capacitive percentage values of the system are calculated continuously and the system is kept under control. Capacitor sw itching on&of f times are calculated separately for each bank. When necessary, the appropriate bank is directly sw itched if its time is up. Since the Sw itching Time Values and Normal Region Boundaries are related to consumed energies, they change betw een the max and min values proportional to percentage energies. During the operation, every capacitor bank's pow er is calculated w hen it is sw itched. Therefore, any change of the capacitor bank's pow er is detected and stored. Instead of sequential sw itching of capacitors, the most suitable bank is directly sw itched. VARko-1xx contains 7 alarms from AL01 to AL09 (2 alarms are reserved for VARko-3xx series) and 1 alarm relay output to w arn and inform the user. Alarms are; over voltage, under voltage, over current, over compensation, under compensation, system fault and over temperature. If desired, as much as alarms can disabled by the user. Device also measures the panel temperature and energises the fan relay w hen temperature exceeds adjusted fan relay limit (adjusted separately from temperature alarm). 4 different operating modes of the device exist. When the device is energised for the first time, it starts from Mod 1. The device can be restricted to Mode1 or Mode 2 if desired. Otherw ise it promotes to full automatic mode, Mode 3, after learning/setting all capacitor bank values. M OD 0 : This is the manual mode. In this mode, device does not sw itch the banks by its ow n. It is accessed by pressing dow n the set button 3 seconds in Main Menu. In this mode, both mode leds are off, 'El' text and current display value are continuously interchanged. By pressing dow n the up button, capacitors are sequentially sw itched on and by the dow n button sw itched of f. During the process, the last parameter accessed in the main menu is displayed on the display. By pressing dow n the set button, system returns to main menu. This mode is used only for testing the system. M OD 1 : When the device is energised for the first time, it start in Mode 1. Since it know s none of the capacitor bank pow ers, Normal Region is dynamically calculated through penalty boundaries, consumed inductive and capacitive energies. Capacitor sw itching is done as 'first-in-first-out'. Device tries to calculate each bank's pow er after every sw itching. When the device learns 1st bank's pow er by its ow n or it is set by Atrf (Current transformer ratio) and C-01 parameters under Advanced Menu-Cset, it skips Mode 1. M OD 2 : If the device learns 1st bank's pow er by its ow n or it is set by the user, system operatesin MODE 2. In this mode, additionally to Mode1, since the 1st bank's pow er is know n, C/k is automatically calculated. Except this, it is identical to Mode 1. When the device learns pow er values of rest of the banks by its ow n or they are set by Atrf (Current transformer ratio) and C-01, C-02 ... C-12 parameters under Advanced Menu-Cset, it skips Mode 2. M OD 3 : If the device has learned all the capacitor banks' pow ers, it operates in Mode 3. Learning process can be done fully automatically by the device or it can be done by the user by setting Atrf (Current transformer ratio) and C-01, C-02 ... C-12 parameters under Advanced Menu-Cset, just f or gaining time. Normal Region is dynamically calculated through penalty boundaries, consumed inductive and capacitive energies. Since in this mode device has all necessary information for compensation, it directly sw itches the necessary bank instead of sequentially sw itching w ith 'first-in-first-out' algorithm. Thus, in this mode, sw itching logic completely changes in a manner to find appropriate bank to keep the system Cap. in normal region and response time to changes in load dramatically decreases. This algorithm gives VARko the ability of keeping system as close as possible to real axis and adapting itself very fast to load characteristics. Once the device has advanced to Mode 3, it w ill operate in this mode even if it is de-energised and energised again in the future. (Cos Φ set) Dynamically changing normal region 3.2 M easuring Param ete rs VARko-1xx gives user the ability of monitoring the follow ing parameters; Ind. -cosΦ of Phase R -Instantaneous percentage value of system (reactive pow er / active pow er) -Current values of phase R -Voltage values of phase R -Pow er of each capacitor bank (in case of correctly setting of current transformer ratio) -Panel temperature (°C) >>>> Page 3 VARko-112 ® Reactive Power Factor Controller 4.FRONT PANEL (Dis play and LED Functions ) 1.Normal LED 2.Alarm LED 3.Mod LEDs 4.Fan is on 5. ALARM 7. CosΦ LEDs 6. Capacitor Bank LEDs 8. SET button 9. Direction buttons 1. Norm al LED 2. Alarm LED 3. M od LEDs 4. Fan Is On 5. ALARM :Indicates that compensation is in normal region. :If there is any alarm, the LED is on. When the alarm situation disappears, LED is turned off. : Indicates the operating mode of the device; Mod 0: Manual operating mode. Mod 1: Traditional operating mode. st Mod 2: C/k calculation respect to 1 banks pow er. Mod 3: Fully automatic operating mode. : When inner panel temperature exceeds set value, fan relay energizes and Fan On LED is turned on. :In the presence of any alarm, alarm relay is energized f or 1 minute, Alarm Output LED and Alarm LED are turned on together. Af ter 1 minute, relay is de-energized, Alarm Output LED is turned on. On the other hand, Alarm LED stays on till the problem disappears. 6.Capacitor Bank LEDs : It show s the sw itched on capacitor banks. 7. Cos Φ Leds : Desired values to w atch can be accessed in the Main Menu using the direction buttons. In default case, it displays Pow er Factor of phase system. When the other value is chosen, if non of buttons is pressed for 1 minute, device returns to default state. % Q P CosΦR 8. Set Button : instantaneous reactive pow er/active pow er percentage of system. :CosΦR , pow er factor of phase R : It is used to access to User Menu and Advanced Menu. Also it gives the permission of parameter changes in the menus. Short pressing (less than 1s) brings to User Menu. At pow er up time, long time press (at least 3s), devices is brought to advanced menu. 9. Dire ction Buttons : In the Main Menu, desired parameters can be accessed using these buttons. In other menus, used to brow se menus and changing parameter values in setting screen. >>>> Page 4 VARko-112 Reactive Power Factor Controller ® 5. M ENUS and BUTTON FUNCTIONS Accessing to menus of VARko-1xx using the buttons is very easy. Using the direction buttons, menus can be brow sed in tw o directions. When you reach the end of the menu, you continue to circular movement. When hold dow n the directions key, travel speed is increased and you can access to desired location faster. You can enter to desired menu level by pressing dow n the Set button. Also in the parameter adjustment menus, you can change the values by direction buttons, keep circular movement w hen you reach to limit values and can store the desired value by pressing dow n the Set button. In the User Menu, w hen no button is pressed for 1 minute, device goes back to Main Menu. In Advanced Menu, w hen no button is pressed for 4 minutes, devices resets itself 5.1 M ain Me nu % Q P CosΦR It is the default menu stage that is active during device operation. Every time the device is energized, it starts to operation by show ing the pow er factor. Pow er factor and instantaneous reactive pow er/active pow er % of the system can also be monitored separately using the direction buttons. When any of the parameters is being monitored, if non of the buttons is not pressed for 1 minute, device returns to default state, pow er factor display. The position of monitored value can be tracked from the Status LEDs. When the displayed value has no sign, this means the value is Inductive and w hen it is negative, ”-”, signed, this means value is capacitive. CosΦR : Power Factor of phase R Alarm M enu % Q P CosΦR instantaneous reactive power/active power percentage of system. 5.2 Us e r Me nu Main Menu Alarm Menu Voltage, Current Menu Capacitor Bank Menu SET Menu Main Menu To access the User Menu, press dow n the Set button for a short time in Main Menu. Direction Buttons are used to move in the menu in desired direction. To enter any submenu, use the Set Button. To change any parameter value w hile the name and the value is flashing on the screen, press the Set button. Adjust the value using the direction buttons and press again the Set button to store the value. To quit from submenus and User Menu, advance to 'quit' section at the end of the menu and press Set button on it. In User Menu, alarms (if exists any at that time), voltage and current values of each phase, capacitor bank pow ers and panel temperature are tracked. Also some set parameters can also be accessed under this menu. The contents of sub-menus and accessing them is described below . ►AL - - : This menu is displayed only w hen at least one alarm is present, otherw ise it is disabled. The alarm codes of present alarms are monitored under this menu. It is accessed by pressing the Set button. Alarm codes can be monitored using the direction buttons, if are there any other. It can be quited from the menu by pressing the Set button on 'quit' section. When all alarm conditions are disappeared, device autom atically quits this m enu. Alarm codes and detailed information can be found in ALARMS section. Voltage , Curre nt M e nu ►U-I : Phase-neutral voltage and current of phase R can monitored here. This section is access by pressing the Set button. Direction buttons are used to advance in desired direction. Phase R voltage and Phase R current are monitored sequentially. When Set button is pressed at the 'quit' section, one level up menu is accessed. To monitor current values correctly, current transformer ratio must be set in the Advanced Menu. >>>> Page 5 VARko-112 Capacitor Bank M enu CAP ►CAP : Current transformer ratio and capacitor bank pow ers can be displayed separately. This section is accessed pressing the Set button. The current transformer ratio is the first parameter of this menu. Direction button are used to move in the desired direction. From st 1 to the last bank pow er are monitored in this menu in KVAr unit. When Set button is pressed at the 'quit' section, one level up menu is accessed. This value s are change d in Advance d M enu. Clrn : Capacitor learning mode. If On is SET AtrF C - 01 C - 12 CLrn quIt ® Reactive Power Factor Controller 0500 001.0 025.0 on SET CAP selected then the capacitor v alue learning f unction is on. If Off is selected then the dev ice will learn the capacitors v alues once when the dev ice is installed f or the f irst time and will keep these v alues without changing. For some special loads it is suggested to select the Of f option. At the end of this submenu is quit option, pressing SET will take the dev ice to the upper menu. Te m perature Dis play M enu ►ISI : The temperature (ºC) inside the device housing is monitored here. Please keep in mind that, the displayed value may be 5-10 (ºC) higher than inner panel temperature. Temperature alarm and fan set values can be changed under advanced value. Se t Me nu ►SEt : The parameters to be set are under this menu. Desired parameter can be accessed by using the direction buttons. On the display, parameter name and numerical value are show n by interchanging. To change the parameter values, press the set button, using the direction buttons reach the desired value. By pressing dow n the set button, displayed value is stored and the menu is directed to interchange screen. To quit from set menu, advance to 'quit' section and press Set button on it. COSF: It is the section that Cosφ value is set in the range of ± 0.80 – 1.00. tCOn : (Max. capacitor bank sw itch on time) It can be adjusted in the range of 10-60 secs. tCOF :(Max. capacitor bank sw itch off time) It can be adjusted in the range of 10-60 secs. Device calculates the necessary tCOn/tCOff time in the range of tAlt and set value, according to total consumption. Thus, w hen not necessary, capacitor banks are not sw itched fast and w hen necessary faster compensation is achieved automatically. (Min. value of capacitor bank sw itch on&off times) It can be adjusted in the range of 2-10 s. tAlt : (Min. value of capacitor bank sw itch on&off times) It can be adjusted in the range of 2-10 s. yOn : The standart value of the direction menu is on. It can be set to off or on. If it is set to be on then the learning of the direction of the current transformer w ill be on all the time. If it is off then the device w ill learn the direction once and never try to learn it again. The off option is suggested f or some loads ( such as loads that produce export pow er). StIL : (Working mode selection) mod01, mod02 and mod03 is used to restrict the operating modes of the device. If mod01 is chosen, device operates only in this mode. If mod02 is chosen, the device operates in mod01 or mod02. If mod03 is chosen, device may choose appropriate mode. Ideally, it is advised to choose mod03. SCLr: This menu is used to clear active, inductive reactive and capacitive reactive energy counters. For example after getting electricity bills or incase of installing in a new place. qUIt : Pressing dow n the set button, the one level up menu section is reached. ►qUIt : Pressing dow n the set button, device returns to main menu. SEt SET + COSF 01.00 01.00 SET + tCOn 0060 0060 SET + tCOF 0040 0040 SET + tALt 0015 0015 SET + yOn on oFF SET + StIL 0002 0002 SET - SCLr SET CLr? quIt SET Clears all energy counters and brings the quit menu on screen quIt SET SEt SET SCLr >>>> Page 6 VARko-112 ® Reactive Power Factor Controller 5.3 ADVANCED M ENU when the device is de-energised It is the section that important and energize it while the button is pressed and keep it pressed till Capacitor Step Num ber and critical settings of the device the 'AdU' appears on the screen. De term ination M enu can be done. To avoid accidental access to this menu, it is ► CSAY : accessed by energizing the device Capacitor Step Number It is the section that used to set used Determination Menu w hile hold dow n the set button. It is capacitor step number. Capacitor step important to hold dow n the button Penalty Boundary number is set in the range of 3-8/12. Values Determination w hen the device is de-energised Menu Parameter name and capacitor step and energize it w hile the button is Current T ransformer number are show n by interchanging on and Capacitor Bank pressed and keep it pressed till Power Setting Menu the screen. the 'AdU' appears on the screen. Clearing Capacitor Using the direction keys, can be It is advised to set the capacitor step Bank Power Menu advanced in the desired direction. number to the value that you w ish to use. To enter any section, just press Alarm Set Menu + set button on it. When set button is pressed on the 'quit' section, Factory Settings Menu device resets itself and starts in normal mode. Also, w hen no key Pressing down the set button, is pressed for 4 minutes, device device returns to main menu. resets itself. In both cases, before reset, device stores the changes in its memory. Pe nalty Boundary Values Dete rm ination M e nu ► SIn : + It is the section that penalty boundary values are adjusted in terms of (reactive energy / active energy) %. It is accessed by pressing the set button. Inductive boundary (CZ-E) and capacitive boundary (CZ-C) are accessed by direction keys. Pressing dow n the set button, the one level up menu section is reached. Please do not set boundary values to higher values than the limits of your pow er distributer firm. CZ-E : It is the section that inductive penalty value is set as %. It is accessed by + pressing the set button, the value is adjusted by using the direction buttons and it is stored by pressing the set button again. It can be set in the range of 10% 50% (reactive energy / active energy). If inductive % is close to penalty limit, inductive value can be set to a low er value from here. CZ-C : It is the section that capacitive penalty value is set as %. It is accessed by pressing the set button, the value is adjusted by using the direction buttons and it is stored by pressing the set button again. It can be set in the range of 5% - 50% (reactive energy / active energy). If capacitive % is close to penalty limit, capacitive value can be set to a low er value from here. quit : Pressing dow n the set button, device returns to main menu. z Curre nt Transform er and Capacitor Bank Pow e r Se tting M enu ►CSEt : It is the section that current transformer ratio and capacitor bank pow ers are set. It is accessed by pressing the set button. Using the direction keys, it can be advanced in the desired direction. At quit section, pressing dow n the set button, the one level up menu section is reached. AtrF : When current transformer ratio is expressed as x/5, the 'X' value is displayed on the screen and this value is adjusted in the range of 5-10000 by steps of 5. It is accessed by pressing the set button and the value is adjusted using the direction buttons. It is stored by pressing the set button again. Setting this parameter is not necessary for compensation. If you w ish to see current values in terms of primer values or w ant to set capacitor bank pow ers manually, current transformer value absolu te ly set. Keeping the direction button pressed down increases advance speed. C-XX : It is the section that capacitor bank pow ers are set in KVAr unit. It can be set in the range of 0-current transformer ratio by steps of 0.1 KVAr. It is accessed by pressing the set button and the value is adjusted using the direction buttons. It is stored by pressing the set button again. Before making this adjustment, current transformer ratio m ust be set. Keeping the direction button pressed down increases advance speed. Remarks 1- Even if capacitor bank pow ers are not manually set, device learns these values by its ow n. This may take some time but compensation is continued during learning. 2- In case of setting capacitor bank pow ers, device directly jumps to mod03 w ithout any time lose. 3- In case of any w rong value setting, device learns the correct value as it operates and overw rites the user set value. Clrn : Capacitor learning mode. If On is selected then the capacitor v alue learning f unction is on If Off is selected then the dev ice will learn the capacitors v alues once when the dev ice is installed f or the f irst time and will keep these v alues without changing. For some special loads it is suggested to select the Of f option. CSEt SET If the current transformer ratio is 500/5A then input the primer current value (500) AtrF 0500 + 0500 SET + C - 01 001.0 001.0 SET - C - 12 025.0 CLrn on + oFF SET - quIt SET - CSEt >>>> Page 7 VARko-112 ® Reactive Power Factor Controller Cle aring Capacitor Bank Pow e r M e nu ►CrSt : It is the section that capacitor bank pow ers in device memory are cleared all together or separately. CALL : It is the section that all capacitor bank pow ers are reset all together. After this operation, all stored bank pow ers are cleared and learned again during bank sw itchings. Operation is approved by pressing the set button. After the process is accomplished, device jumps to quit section at the end of the menu. Rem: When device is connected to another panel or when most of the b ank powers are changed, it is advised to reset all bank powers. C-XX : Related bank pow er is cleared from device memory. During its operation, this bank pow er is learned again. The operation is approved by pressing the set button. Af ter the process is accomplished, pow er value is displayed as 0. At the quit section, end of the menu, pressing dow n the set button, the one level up menu section is reached. Rem:When a capacitor bank is changed, it is advised to make reset related bank power. It is not obligated b ecause device keeps learning b ank powers during operation. Alarm Se t M e nu ►ALr : It is the section to enable-disable the alarms of device and setting alarm values. It is accessed by pressing the set button. Using the direction buttons can be advanced in desired direction. To quit, advance to 'quit' section at the end of the menu and press Set button to jump one level up. Alarm On-Off Menu Over and Under Voltage Set Menu T emperature Alarm Set Menu Ove r and Unde r Voltage Set M enu ►UAlr :It is the section that over and under voltage alarm limits are adjusted and Capacitor Save mode is disabled/enabled. It is accessed by pressing the set button and using the direction buttons can be advanced in desired direction. To quit, advance to 'quit' section at the end of the menu and press Set button to jump one level up. UUSt : It is the section that over voltage alarm limit is adjusted. The value can be set in the range of 230 V – 270 V by steps of 1V. It is accessed by pressing the set button and using the direction buttons can be advanced in desired direction. Press set button to store new value and quit. Please b e sure that this alarm is enabled in ALCt section. Otherwise, these limits are meaningless. UAlt : It is the section that under voltage alarm limit is adjusted. The value can be set in the range of 170 V – 210 V by steps of 1V. It is accessed by pressing the set button and using the direction buttons can be advanced in desired direction. Press set button to store new value and quit. Please b e sure that this alarm is enabled in ALCt section. Otherwise, these limits are meaningless. C-SU : It is the place that Capacitor Save mode is disabled/enabled. + If capacitor save is enabled, in case of under/over voltage or missing phase alarms, all capacitor banks are sw itched + of sequentially to protect them. It is accessed by pressing the set button, On or Off state is displayed on the screen. To enable capacitor save, select On and to disable it on-off select Off. Press set button to store the change. Alarm On-Off M e nu ►ALCt : It is the section that all 9 alarms of the device are enabled/disabled all together or seperately. It is accessed by pressing the set button. Using the direction buttons can be advanced in the desired direction. To quit, advance to 'quit' section at the end of the menu and press Set button to jump one level up. AALr : It is the section that all 9 alarms of the device are enabled/disabled all together. For each alarm, alarm enable state is displayed as On or Off. To enable select On and to disable select Off and to store the change press set button. If you disabled all alarms, separate control menus of alarms w ill disappear automatically. AL-XX : It is the section that related alarm is disabled/enabled. For more detailed information about alarms, please refer to Alarm s section. It is accessed by pressing the set button, On or Off state is displayed on the screen. To enable the related alarm, select On and to disable it select Off. Pressing the set button, store the change. If you cannot see this section, prob ably all alarms are disab le in AAlr section. First enable them all. >>>> Page 8 VARko-112 ® Reactive Power Factor Controller Te m perature Alarm Set M enu ►IAlr : It is the section that Temperature Alarm, Fan Temperature and Fan enable/disable state are set. It is accessed by pressing the set button and using the direction buttons can be advanced in desired direction. Press set button at quit section to jump one level up. IUSt : It is the section that Temperature Alarm value is set. It is adjusted in the range of (Fan temperature limit + 5C) – 80C by steps of 1C. It is accessed by pressing the set button and using the direction buttons can be advanced in desired direction. Press set button to store new value and quit. Please b e sure that this alarm is enab led in ALCt section. Otherwise, these limits are meaningless. Fan : It is the section that Fan enable/disable state is set in case of exceeding set fan value. It is accessed by pressing the set button and On / Off state is displayed. To enable fan operation w hen necessary select On and to disable it select Off by direction buttons. Press set button to store change and quit. IFan : It is the section that f an operation temperature limit is set. It is adjusted in the range of 25C – (temperature alarm value(iuSt) -5C) by steps of 1C. It is accessed by pressing the set button, the value is adjusted by direction buttons and set by pressing the set button. Please be sure that fan operation when necessary is enab led in Fan section, otherwise this temperature setting is meaningless. + - on-off + - Pow er M e ter Type Selection M e nu: ►SAYC : It is the section that pow er meter type is selected. Either vectorial resultant sum(mechanical meter) mode or arithmetical seperate inductive and capacitive energy storing (electronics meter) mode can be selected. For mechanical meters 'nor' and for electronics meters 'ELEC' is displayed. Factory Settings M enu ►FbaY : It sets back all user settable parameters to factory defaults. On this section, by pressing the set button, stored values are set back to factory defaults and device turns off itself. To restart the device, please de-energize it and re-energize again. If you think that device parameters are changed incorrectly and you have difficulty to change them back to original values, you can reset them to factory defaults by using this property. Factory Defaults are; -Capacitor bank step number for VARko-112 is 12, for VARko-108 is 8 -Inductive penalty limit value (CZ-E) 20% -Capacitive penalty limit value (CZ-C) 10% -Capacitor bank sw itch-on time max. value 15s -Capacitor bank sw itch-off time max. value 10s -Capacitor bank sw itch-on&off time min. value 5s -Over voltage alarm set value (UUSt) 250V -Under voltage alarm set value (UAlt) 190V -Capacitor save mode (C-SU) OFF (no protection) -Fan enable w hen necessary (Fan) On (Fan output is active) -Temperature alarm value (IUSt) 70C -Fan on temperature (Ifan) 45C -Current transformer ratio 5/5 -Mod03 -All capacitor bank pow ers are reset to zero 6. ALARM S To fully control compensation system, to be aw are of present problems, to investigate the reasons and overcome these problems, handy and settable alarms are necessary. On the other hand, to be able to disable these alarms w hen necessary w ill prevent to panic user. VARko-1xx has the all the alarms necessary for a compensation system and more. Thus, system tracking by technical staff and diagnosis of faults become easier. Below , you w ill find explanations about the alarms of the device. To obtain more information about alarms, please refer to Alarm Set Menu section under Advanced Menu. When an alarm condition occurs, alarm code can be monitored under User Menu –> ALr section. For further inf ormation about this topic, please refer to User Menu section. When any alarm occurs related to a problem, both alarm LED and relay are energized together. Alarm LED is kept on as long as the alarm condition is continuous, how ever, alarm relay is de-energized after 1 minutes. Thus, until the technical staff resolves the problem, people around are not disturbed. When the horn connected to alarm relay is silent, this does not indicated that the prob lem is disappeared. To understand it alarm LED must be tracked. When alarm situation is continuous please call technical staff. An alarm may have more than one reasons. Therefore, when investigating the reasons of an alarm, you do not have to stop it after finding one reason. AL01 : Over Voltage (230V – 270V adjustment range) If voltage value of any phase exceeds alarm set limit value and this situation continues 5s, alarm LED is turned on and alarm relay is energized. When phase voltages goes 5V below to set limit at least 5s, alarm situation is cleared. If “C-SU” is chosen as On, in over voltage case, banks are sw itched off sequentially. If it is OFF, compensation is continued. Factory default value is “OFF”. >>>> Page 9 VARko-112 Reactive Power Factor Controller ® AL02 : Under Voltage (170V – 210V adjustment range) If voltage value of any phase goes below alarm set limit value and this situation continues 5s, alarm LED is turned on and alarm relay is energized. When phase voltages goes 5V above to set limit at least 5s, alarm situation is cleared. If “C-SU” is chosen as On, in under voltage case, banks are sw itched off sequentially. If it is OFF, compensation is continued. Factory default value is “OFF”. AL03 : Over Current(secondary current >8A, constant boundary) When any of the secondary currents of transf ormers connected to phases exceed 8A for at least 60s, alarm LED is turned on and alarm relay is energized. If current value goes below 8A at least for 60s, alarm situation is cleared. Reason: Current transformer is not proper for the system. A higher rate must be preferred. Solution: Appropriate value must be found by measuring the phase currents and current transformers must be changed w ith that value. AL04 : Over Compensation When system's over all compensation percentage exceeds set capacitive limit, alarm LED is turned on and alarm relay is energized. Until it goes below this limit, alarm condition is continued. Reason: Capacitor bank pow ers are chosen to big or improper bank pow er selection. Solution: Capacitor bank number must be increased and necessary bank pow ers must be recalculated & increased. Load must be equally distributed to each phase and the system must be made as balanced as possible. Capacitor sw itch-off time must be decreased. AL05 : Under Compensation When system's over all compensation percentage exceeds set inductive limit, alarm LED is turned on and alarm relay is energized. Until it goes below this limit, alarm condition is continued. Reason: Capacitor bank pow ers are chosen to small or improper bank pow er selection. Solution: Necessary bank pow ers must be recalculated and increased. Load must be equally distributed to each phase and the system must be made as balanced as possible. Capacitor sw itch-off time must be decreased. AL06 : System Fault When all capacitor bank pow ers are measured as 0 KVAr, this alarm is generated. Reason: 1. Capacitor banks may be connected before the current transformers, 2. Capacitor bank sw itches may be off 3. Contactor inductance supplies may be off 4. Contact phase (line) may not be connected to device Solutions: 1. Place capacitor bank connections after current transformers, 2. Check capacitors banks' sw itches 3. Check contact line connection and contact outputs of devices 4. After all controls, de-energize and re-energize the devices AL07 and AL08 are reserved for VARko-3xx series. AL09 : Over Temperature (Fan Limit + 5°C – 80°C range) When inner panel temperature exceeds set alarm value, alarm LED is on and alarm relay is energized. When temperature goes 2°C below to set value, alarm condition is cleared. Fan relay output of device is diff erent and its set value is adjusted separately. When setting temperature value, please keep in mind that, device temperature is 5-10°C higher than panel temperature. Fan Re lay Output: (25°C – Fan limit-5°C) VARko-1xx gives the user opportunity of tracking and controlling the temperature. When temperature exceeds set fan value, fan relay is energized. If you connect this output to a fan, the panel may be cooled before its temperature reaches to critical limit. If the temperature continues to increase, over temperature alarm is generated and user is w arned. The device w ill let you to adjust Fan temperature value at least 5°C less than temperature alarm value. For example, if over temperature alarm value is 55°C, fan value may be max. 50°C. >>>> Page 10 VARko-112 ® Reactive Power Factor Controller 7. COM M ISSIONING THE SYSTEM - Please read w arnings and cautions in section 2 of this user's manual Please be sure that the electric panel being used is de-energized Please be sure that compensation panel is supply voltages are taken after the current transformers in main panel Please be sure that current, voltage and contact outputs are connected exactly as show n in the connection diagram Sw itch on the sw itches of capacitor banks Energize the compensation system. If you see Err1 or Err2 message on the screen, immediately contact w ith KAEL Elektronik Ltd. Please. - VARko-1xx w ill immediately start to compensation depending on the consumed pow er. If there is no current is draw n from the system, device w ill w ait until any current is draw n. In this case, you may consider it as a good test opportunity and test your system in mod00 (manual mode) by sw itching all capacitor banks on and off. - If you choose current transformer ratio and capacitor bank pow er appropriately, in most of the cases you do not need to change any setting of the device. - Please be sure that alarm LED is off. Otherw ise, investigate the reason of alarm and solve the problem. 8. Conne ction Diagram Current Direction L1 k1 l1 L2 L3 N 2A k1 l1 L1 N Gerilim Fan Output Girişleri Voltage Inputs Alarm Output Current Transf ormers 112 NOT: VARko-108'de 9,10,11,12 kademe çıkışları yoktur.Bunun dışında bağlantı şeması VARko-112 ile aynıdır. The fuses show n in the connection diagram must be FF type and must have specified current values. Chosen current transformers' real value must not be less than draw n current and they must be X/5 Amps. It must be stated on the sw itches that are connected to supply voltage lines of the device that they w ill be used to disconnect the device from the pow er line. Before making the connections, the w arnings and cautions in section 2 must be read. 10. TECHNICAL DATA Rated Voltage(Un) : (Phase-Neutral) 220VAC, Operating Range Operating Frequency Power Consumption Measurement Inputs Power Consumption Contact Current Current Measurement Range : (0.8 – 1.1) x Un : 50 Hz : < 10 VA Protection Class Connector Protection Class Ambient Temperature Humidity Connection Ty pe Dimensions : < 1 VA : Max. 3 A /240 VAC : (As secondary current of Curr. Trf .) 0.1-6 Amp AC Display Range :(Power Factor) 0.00 – 1.00 Ind.&Cap. Min. Current Measurement Value : 50 mA Measurement Sensitiv ity : 1%+- digit Current Transf ormer Ratio : 5/5 .... 10000/5 A Max. Cap. Bank Switch On&Of f Time : 10.... 60 s Min. Cap. Bank Switch On&Of f Time : 2.... 10s Ind% Set Value : 10%... 50% (Factory set v alue=20%) Cap% Set Value : 5%... 50% (Factory set v alue=10%) Display : 4 Digits LED Display : IP 20 : IP 00 : -5°C....+50°C :15%....95% : To f ront panel tap : 144x144x40 mm >>>> Page 11 MULTISER-01-96 ® Network Analyser Enter Pressing for 3 Seconds SET ACCESSING PARAMETERS: Using the direction buttons, it is pos sible to move up and down in the menu. W hen set button is pressed down for 3 sec onds, parameter setting menu is accessed and T o set any of the parameters, first set button is pressed, then using the directions buttons, value is increased/decreased. When desired value is reached, it is stored by pres sing the set button. Using the direction buttons. Ct: Current transformer v alue : (5...10000) T he current tranformer's primary value should be entered. For example if 500/5A current isused then 500 must be entered. Ut: Voltage transformer v alue : (1...1000) If no voltage transformer is us ed, this parameter must be left as 1. denn tınE : Demand time : ( 5-60 min) Demand time parameter, determines the calculation period of demand and peak values . YOn Lrn: Current transformer polarity direction learning: ( on – oFF) If it is “ on ” then the device would learn the directin automatically. If the device monted in new panel or the polarity somehow changed then it learns the new direc tion. If off then the device would learn the direction once and never learn it again. Off pos ition is required for some loads. If there would be a problem in the surrent transformer direction then the current transformer inputs shuld be switched. SAYC tYPE : Counter type : ( nor-ELEC ) nor: Energies are calc ulated due the vectorial sun of the phases. ELEC: Energies are calculated for each phase separately. CLr: To clear demand, peak and enegy v alues: placed where the stored values like demand, peak values and energies are cleared. Values can be cleared either separately or all together, from ALL section, under this menu. In order to clear the stored values SET buttonmust be pressed. T he following parameters can be set: CLr uL-n :Clears the demand and the peak values of the phase-neutral voltages CLr A :Clears the demand and the peak values of the c urrents CLr uL-L :Clears the demand and the peak values of the ğhase-phase voltages CLr P :Clears the demand and the peak values of the active energies CLr q :Clears the demand and the peak values of the reactive energies CLr S :Clears the demand and the peak values of the apparent energies CLr hr-- :Clears the stored active, reactive and apparent energy s ums CLr ALL : Clears all mentioned values above Increase SET Decrease Increase SET Decrease Increase SET Decrease SPECIFICATIONS Increase ■ Microprocessor based ■ Measurement of 3 phase electrical quantities ( VL-N, A, CosΦ, VL-L, Hz, W, VAr, VA ΣW, ΣVAr, ΣVA, ΣWh, ΣVArh, ΣVAh) ■ 1-60 min. adjustable demand v alues (VL-N, A, CosΦ, VL-L, W, VAr, VA) ■ Correct learning of current transf ormer polarity (ev en if (k,l) is connecte in rev erse direction) ■ Setting of current and v oltage transf ormer ratios ■ Seperate or all together clearance of stored demand, peak and energy v alues ■ Easy access to menus ■ Reduces both number of measurement equipment used in the panel and connection time ■ Lowers electrical panel costs SET Decrease Increase SET Decrease SET SET Foreword clr. All information and warnings about Network Analyser MULTISER are given in this User's Manual. Please for your power network's and your own safety, read this manual carefully before commissioning the system. Please contact us for unclear points. KAEL Müh. Elektronik Tic ve San. Ltd Şti. 1201/1 sok. No:14R Yenisehir -IZMIR – TÜRKİYE Tel: +90-232-4586085, email: [email protected], web: www.kael.com.tr . Note: If no button is pressed for 4 minutes under this menu, device automatically quits programming menu. SET clr. Warnings: 1- The connection, operation and parameter settings of device must be done by authorised technical service staff. Also, system checks must be done by this person when necessary. 2- Please do not open or do not let others open the device. There are no user serviceable parts inside. 3- Before making the connections to device's terminals, please be sure that there is no voltage across the cables or terminals. Also be sure that the panel is de-energised. 4- Please fix the device to electric panel with apparatuses supplied. 5- Please press the buttons only by your fingers, do not contact anyother object with them. 6- Before cleaning the device, please be sure that it is de-energised and use only dry tissue-paper to clean it. Water or any other chemicals used for cleaning may harm the device. 7- Before commissioning the device, please be sure that the terminal connections are made exactly the same as in the connection diagram and avoid any connection problems, such as loose connections or contact of different cables. SET Exit SET Cleared General Multiser gives the ability of tracking electrical parameters for 3 phase systems such as, phase currents, phase-neutral & phase-phase voltages, frequency, power factor, active powers, reactive powers and apparent powers. It also stores consumed energies. It also gives the opportunity of tracking total, max. demand and peak values for stated quantities.Current and voltage transformer ratios can be set by the user. Using the directions buttons, desired parameters can be accessed easily. On the other hand, its displays make it possible to track values from long distance. Connection : Installation Instructions : Current Inputs L1 L2 L3 2A 2A 2A 96 mm 90 mm 71 mm k2 l2 l3 X/5 A L1 N L1 k3 X/5 A X/5 A MULTISER- 01- 96 N Auxiliary Supply 50 mm I1 L2 2A 96 mm N k1 L3 Panel Hole Dimensions 92 mm CLR Menu Voltage Inputs 1. A hole with 92mm x 92 mm must is needed on the panel for device installation 2. Remove the fixing apparatus before installing the device 3. Place the device in the prepared hole from the fromnt side. 4. Use the fixing apparatus to fix the device from the back side to the pannel. CAUTION: Leave at least 50mm space between the back side of the device and the internal wall of the pannel Wall for the airing purpose 80 mm 92 mm SET Un : 230 Vac, 50 Hz ΔUn : (0.8 – 1.1)xUn Current Direction ( NETWORK ANALYSER ) Supply Power Consumption Measurement Power Consumption Voltage Measurement Range Current Measurement Range Measurement Category Equipment Protection Class : < 6 VA : < 1 VA : (Phase-Neutral)30-300 VAC, 45-90 Hz (Phase-Phase) 30-600 VAC, 45-90 Hz : 50mA – 6 Amp. AC : CAT III : Double Insulation - class II ( ) >>>> Page 12 ® Measured Electrical Parameters Voltage ( V L-N ) L2 I2 Peak I1 PF 2 L3 PF 3 L1 U12 L2 U23 L3 U31 I2 V L-L L2 f2 L3 f3 L1 U 12 L2 U 23 L3 U 31 SET U1N L2 U2N L3 U3N A L1 I1 L2 I2 L3 I3 Max.Demand ( A ) PF 1 P.F L1 L2 PF 2 L3 PF 3 Ind.Peak (CosΦ) SET Peak ( V L-L ) L1 Max.Demand ( V L-N ) SET Resultant (CosΦ) SET f1 I3 Peak ( A ) SET Voltage ( V L-L ) Hz L1 L-N Cos Φ Peak L-L L2 Σ P.F Power Factor (CosΦ) V V SET I1 SET PF 1 L2 L3 U3N L3 Current ( A ) P.F L1 U2N A L1 I3 L3 L2 Peak ( V L-N ) SET A L1 U1N V L-L L1 U 12 L2 U 23 L3 U 31 SET PF 1 P.F L1 L2 PF 2 L3 PF 3 Cap.Peak (CosΦ) PF 1 P.F L1 SET L2 PF 2 L3 PF 3 Ind.Demand (CosΦ) Max.Demand L3 U3N L1 Max.Demand U2N L-N Peak L2 V Max. Demand U1N Peak L1 Max. Demand L-N Peak V Max. Demand (VL-N, A, CosΦ, VL-L, Hz, W, VAr, VA, ΣW, ΣVAr, ΣVA, ΣWh, ΣVArh, ΣVAh ) These parameters can be reached using the direction buttons, with the related led on and with the measured v alues f or the three phases shown simultaneously . PF 1 P.F L1 L2 PF 2 L3 PF 3 Cap.Demand (CosΦ) SET Max.Demand ( V L-L ) Frequency ( Hz ) M L3 W3 Σ Active Power SET K VAr L1 L2 M SET VAr2 c Σ cap i+c Σi + Σc Σ ind Σ Reactive Power SET K M SET VA1 L2 VA2 VA2 L3 VA3 VA3 Σ VA SET W3 Σ Aparent Power SET SET L2 W2 L3 W3 Max.Demand (Active Power) M VAr1 L2 VAr2 L3 VAr3 Ind.Peak(Reactive Power) SET L2 VA2 L3 VA3 Peak (Aparent Power) SET L2 VAr2 L3 VAr3 Cap.Peak(Reactive Power) VA1 L2 VA2 L3 VA3 M Σ VAr M Σ VAr Σ VArh (İnd.) (cap.) hr M K Σ VAh Σ Apparent Energy L3 VAr3 SET Σ Cap.Reactive Energy hr SET Σ Varhind + Σ VArh cap Σ Reactive Energy VAr L1 K VAr1 L2 VAr2 L3 VAr3 Ind. Demand(Reactive Power) SET Cap. Demand (Reactive Power) Display Range K Σ VAr Σ VArh hr hr K M VAr1 VAr2 Current Measurement Range K K L2 Rated Voltage (Un) Operating Range Frequency Supply Power Consumption Measurement Power Consumption Voltage Measurement Range Σ Wh Σ VA SET VAr L1 Max.Demand (Aparent Power) TECHNICAL DATA: Σ Active Energy Σ Ind.Reactive Energy K VA L1 Σ W M M VAr1 M VA1 K VAr L1 K VA L1 K hr W1 W L1 K VAr L1 M VA1 M L3 Peak (Active Power) K VA L1 Aparent Power W2 M i Reactive Power L2 K VAr1 Σ VAr VAr3 L3 M W2 W L1 K Max.Demand W3 Active Power L2 M W1 Max.Demand L3 W L1 K Max.Demand W2 M W1 Peak L2 K Peak W L1 Σ Max.Demand M W1 Peak K Peak M Minimum Measurement Values Measurement Sensitivity Voltage Transformer Ratio Current Transformer Ratio Display Measurement Category Equipment Protection Class Device Protection Class Connector Protection Class Ambient Temperature Humidity Connection Type Dimensions : 230 VAC : (0.8 – 1.1)xUn : 50 Hz : < 6 VA : < 1 VA : (Phase-Neutral)30-300 VAC, 45-90 Hz (Phase-Phase) 30-600 VAC, 45-90 Hz : (Secondary current) 50mA – 6 Amp. AC : 0 – 999.9 kV 0 – 999.9 M (W, VAr, VA) (Cosφ) 0.00 – 1.00 ind. & cap. : 50 mA, 30V : 1% + digit : 1 ......... 1000 : 5/5 ...... 10000/5 A : 4 Digits LED display : CAT III : Double Insulation - class II ( ) : IP20 : IP00 : -5°C....+50°C : 15% ...... 95% (without condensation) : To front panel tap : 96x96x80 mm MULTISER-01-96 >>>> Page 13 Network Analyser Enter Pressing for 3 Seconds SET ACCESSING PARAMETERS: Using the direction buttons, it is pos sible to move up and down in the menu. W hen set button is pressed down for 3 sec onds, parameter setting menu is accessed and T o set any of the parameters, first set button is pressed, then using the directions buttons, value is increased/decreased. When desired value is reached, it is stored by pres sing the set button. Using the direction buttons. Ct: Current transformer v alue : (5...10000) T he current tranformer's primary value should be entered. For example if 500/5A current isused then 500 must be entered. Ut: Voltage transformer v alue : (1...1000) If no voltage transformer is us ed, this parameter must be left as 1. denn tınE : Demand time : ( 5-60 min) Demand time parameter, determines the calculation period of demand and peak values . YOn Lrn: Current transformer polarity direction learning: ( on – oFF) If it is “ on ” then the device would learn the direction automatically. If the device monted in new panel or the polarity somehow changed then it learns the new direc tion. If off then the device would learn the direction once and never learn it again. Off pos ition is required for some loads. If there would be a problem in the surrent transformer direction then the current transformer inputs shuld be switched. SAYC tYPE : Counter type : ( nor-ELEC ) nor: Energies are calc ulated due the vectorial sum of the phases. ELEC: Energies are calculated for each phase separately. CLr: To clear demand, peak and enegy v alues: placed where the stored values like demand, peak values and energies are cleared. Values can be cleared either separately or all together, from ALL section, under this menu. In order to clear the stored values SET buttonmust be pressed. T he following parameters can be set: CLr uL-n :Clears the demand and the peak values of the phase-neutral voltages CLr A :Clears the demand and the peak values of the c urrents CLr uL-L :Clears the demand and the peak values of the ğhase-phase voltages CLr P :Clears the demand and the peak values of the active energies CLr q :Clears the demand and the peak values of the reactive energies CLr S :Clears the demand and the peak values of the apparent energies CLr hr-- :Clears the stored active, reactive and apparent energy s ums CLr ALL : Clears all mentioned values above Increase SET Decrease Increase SET Decrease Increase SET Decrease SPECIFICATIONS Increase ■ Microprocessor based ■ Measurement of 3 phase electrical quantities ( VL-N, A, CosΦ, VL-L, Hz, W, VAr, VA ΣW, ΣVAr, ΣVA, ΣWh, ΣVArh, ΣVAh) ■ 1-60 min. adjustable demand v alues (VL-N, A, CosΦ, VL-L, W, VAr, VA) ■ Correct learning of current transf ormer polarity (ev en if (k,l) is connecte in rev erse direction) ■ Setting of current and v oltage transf ormer ratios ■ Seperate or all together clearance of stored demand, peak and energy v alues ■ Easy access to menus ■ Reduces both number of measurement equipment used in the panel and connection time ■ Lowers electrical panel costs SET Decrease Increase SET Decrease SET SET Foreword clr. All information and warnings about Network Analyser MULTISER are given in this User's Manual. Please for your power network's and your own safety, read this manual carefully before commissioning the system. Please contact us for unclear points. KAEL Müh. Elektronik Tic ve San. Ltd Şti. 1201/1 sok. No:14R Yenisehir -IZMIR – TÜRKİYE Tel: +90-232-4586085, email: [email protected], web: www.kael.com.tr . Note: If no button is pressed for 4 minutes under this menu, device automatically quits programming menu. SET clr. Warnings: 1- The connection, operation and parameter settings of device must be done by authorised technical service staff. Also, system checks must be done by this person when necessary. 2- Please do not open or do not let others open the device. There are no user serviceable parts inside. 3- Before making the connections to device's terminals, please be sure that there is no voltage across the cables or terminals. Also be sure that the panel is de-energised. 4- Please fix the device to electric panel with apparatuses supplied. 5- Please press the buttons only by your fingers, do not contact anyother object with them. 6- Before cleaning the device, please be sure that it is de-energised and use only dry tissue-paper to clean it. Water or any other chemicals used for cleaning may harm the device. 7- Before commissioning the device, please be sure that the terminal connections are made exactly the same as in the connection diagram and avoid any connection problems, such as loose connections or contact of different cables. SET Exit SET Cleared General Multiser gives the ability of tracking electrical parameters for 3 phase systems such as, phase currents, phase-neutral & phase-phase voltages, frequency, power factor, active powers, reactive powers and apparent powers. It also stores consumed energies. It also gives the opportunity of tracking total, max. demand and peak values for stated quantities.Current and voltage transformer ratios can be set by the user. Using the directions buttons, desired parameters can be accessed easily. On the other hand, its displays make it possible to track values from long distance. Connection : Installation Instructions : Current Inputs L1 L2 L3 2A 2A 2A 96 mm 90 mm 71 mm k2 l2 l3 X/5 A L1 N L1 k3 X/5 A X/5 A MULTISER- 01- 96 N Auxiliary Supply 50 mm I1 L2 2A 96 mm N k1 L3 Panel Hole Dimensions 92 mm CLR Menu Voltage Inputs 1. A hole with 92mm x 92 mm must is needed on the panel for device installation 2. Remove the fixing apparatus before installing the device 3. Place the device in the prepared hole from the fromnt side. 4. Use the fixing apparatus to fix the device from the back side to the pannel. CAUTION: Leave at least 50mm space between the back side of the device and the internal wall of the pannel Wall for the airing purpose 80 mm 92 mm SET Un : 230 Vac, 50 Hz ΔUn : (0.8 – 1.1)xUn Current Direction ( NETWORK ANALYSER ) Supply Power Consumption Measurement Power Consumption Voltage Measurement Range Current Measurement Range Measurement Category Equipment Protection Class : < 6 VA : < 1 VA : (Phase-Neutral)30-300 VAC, 45-90 Hz (Phase-Phase) 30-600 VAC, 45-90 Hz : 50mA – 6 Amp. AC : CAT III : Double Insulation - class II ( ) >>>> Page 14 Measured Electrical Parameters U 3N I1 L2 I2 L3 I3 Current ( A ) P.F L1 PF 1 L2 PF 2 L3 PF 3 L1 U 12 L2 U 23 L3 U 31 f1 L2 f2 L3 f3 U 3N V L-N A L1 I1 L2 I2 L3 I3 Peak ( A ) V L-L L1 U12 L2 U23 L3 U31 SET L2 U2N L3 U3N I1 L2 I2 L3 I3 Max.Demand ( A ) P.F L1 PF 1 L2 PF 2 L3 PF 3 Ind.Peak (CosΦ) SET Peak ( V L-L ) SET U1N A L1 SET Resultant (CosΦ) SET L1 Max.Demand ( V L-N ) SET CosΦ Voltage ( V L-L ) Hz L1 L3 Σ P.F Peak L-L U 2N SET Power Factor (CosΦ) V L2 Peak ( V L-N ) SET Peak A L1 U 1N V L-L L1 U12 L2 U23 L3 U31 SET P.F L1 PF 1 L2 PF 2 L3 PF 3 Cap.Peak (CosΦ) Max.Demand L3 Voltage ( V L-N ) L1 SET Max.Demand U 2N L-N Peak L2 V Max. Demand U 1N Peak L1 Max. Demand L-N Peak V Max. Demand (VL-N, A, CosΦ, VL-L, Hz, W, VAr, VA, ΣW, ΣVAr, ΣVA, ΣWh, ΣVArh, ΣVAh ) These parameters can be reached using the direction buttons, with the related led on and with the measured v alues f or the three phases shown simultaneously . Max.Demand ( V L-L ) SET P.F L1 PF 1 L2 PF 2 L3 PF 3 Ind.Demand (CosΦ) P.F L1 PF 1 L2 PF 2 L3 PF 3 Cap.Demand (CosΦ) Frequency ( Hz ) W3 Active Power W3 Σ Active Power K VAr L1 L2 M SET VAr2 c Σ cap i+c Σ ind Σi + Σ c Σ Reactive Power SET K M VA L1 VA1 L2 VA2 Aparent Power M SET W3 Peak (Active Power) VA3 Σ Aparent Power SET SET W L1 W1 L2 W2 L3 W3 Max.Demand (Active Power) K M VAr L1 VAr1 L2 VAr2 L3 VAr3 Ind.Peak(Reactive Power) M VA1 VA2 SET L3 K Σ VA VA3 L3 W2 M i Reactive Power L2 K VAr1 Σ VAr VAr3 L3 M L3 SET Peak M W2 W L1 K SET K VAr L1 L2 VAr2 L3 VAr3 Cap.Peak(Reactive Power) K M VA L1 VA1 L2 VA2 L3 VA3 Peak (Aparent Power) K SET K M VAr1 Max.Demand L3 L2 M W1 VAr L1 VAr1 L2 VAr2 L3 VAr3 SET Ind. Demand(Reactive Power) K M VA L1 VA1 L2 VA2 L3 VA3 Max.Demand (Aparent Power) Max.Demand W2 W L1 K Max.Demand L2 Σ M W1 Peak W L1 K Max.Demand M W1 Peak K Peak M SET K VAr L1 VAr1 L2 VAr2 L3 VAr3 Cap. Demand (Reactive Power) Σ W Σ Wh hr Σ Active Energy M TECHNICAL DATA: K M Σ VAr M Σ VAr Σ VArh (İnd.) Σ VAr (cap.) hr Σ Ind.Reactive Energy M K Σ VA Σ VAh Σ Apparent Energy K Σ VArh hr hr K SET Σ Cap.Reactive Energy hr SET Σ Varhind + Σ VArh cap Σ Reactive Energy Rated Voltage (Un) Operating Range Frequency Supply Power Cons umption Measurement Power Consumption Voltage Measurement Range : : : : : : Current Measurement Range : Display Range : Minimum Measurement Values Measurement Sensitivity Voltage T ransformer Ratio Current T ransformer Ratio Display Measurement Category Equipment Protection Clas s Device Protection Class Connector Protection Clas s Ambient T emperature Humidity Connection T ype Dimensions : : : : : : : : : : : : : 230 VAC (0.8 – 1.1)xUn 50 Hz < 6 VA < 1 VA (Phase-Neutral)30-300 VAC, 45-90 Hz (Phase-Phase) 30-600 VAC, 45-90 Hz (Secondary current) 50mA – 6 Amp. AC 0 – 999.9 kV 0 – 999.9 M (W , VAr, VA) (Cosφ) 0.00 – 1.00 ind. & cap. 50 mA, 30V 1% + digit 1 ......... 1000 5/5 ...... 10000/5 A 4 Digits LED display CAT III Double Insulation - class II ( ) IP20 IP00 -5°C....+50°C 15% ...... 95% (without condensation) T o front panel tap 96x96x80 mm REGISTER TABLE PARAMETER ADRES (HEX ) (R)read (W)write NO FORMAT MULTIPLIER UNIT INSTRUCTION 1 0000 R COUNTRY CODE (TURKEY) unsigned int 1 869 2 0001 R COMPANY CODE unsigned int 1 7436 HW unsigned int 1 0x 0001 LW unsigned int 1 0x 59B2 unsigned int 1 8 3 0002 R 4 0003 R PRODUCT CODE 5 0004 R BARCODE CONTROL 6 0005 R SOFTWARE VERSION >>>> Page 15 88498 decimal unsigned int 1 0x 0220 7 0006 R/W DEVICE NUMBER HW unsigned int 1 0x FFFF - 0x 0000 8 0007 R/W LW unsigned int 1 0x FFFF - 0x 0000 INSTANTANEOUS VALUES 1 1000 R CURRENT TRANSFORMER RATIO (ATRF) unsigned int 1 ATRF 1 - 2000 2 1001 R VOLTAGE TRANSFORMER RATIO (GTRF) unsigned int 0,1 GTRF 10 - 10000 3 1002 R PHASE 1 VOLTAGE Phase-Neutral (VL1N) unsigned int 0,1 x (GTRF) VOLT ( (VL1N ) x GTRF x 0,1); ex ample:If GTRF=1 ; 2200 x ( 1 x 0,1) = 220 Volt 4 1003 R PHASE 2 VOLTAGE Phase-Neutral (VL2N ) unsigned int 0,1 x (GTRF) VOLT 5 1004 R PHASE 3 VOLTAGE Phase-Neutral (VL3N ) unsigned int 0,1 x (GTRF) VOLT 6 1005 R PHASES 1-2 VOLTAGE Phase-phase (VL12 ) unsigned int 0,1 x (GTRF) VOLT 7 1006 R PHASES 1-3 VOLTAGE Phase-phase (VL13 ) unsigned int 0,1 x (GTRF) VOLT 8 1007 R PHASES 2-3 VOLTAGE Phase-phase (VL23 ) unsigned int 0,1 x (GTRF) VOLT 9 1008 R PHASE 1 CURRENT (I1) unsigned int (ATRF) x 0,001 AMPER (I1 x ATRF x 0,001); Ex ample:If 100/5A ; 5000 x ( 20 x 0,001) = 100 A 10 1009 R PHASE 2 CURRENT (I2) unsigned int (ATRF) x 0,001 AMPER (I2 x ATRF x 0,001) 11 100A R PHASE 3 CURRENT (I3) unsigned int (ATRF) x 0,001 AMPER (I3 x ATRF x 0,001) (ATRF) x (GTRF) 12 100B R PHASE 1 ACTIVE POWER (P1) unsigned int WATT (P1 x (ATRF) x (GTRF) ) 13 100C R PHASE 2 ACTIVE POWER (P2) unsigned int (ATRF) x (GTRF) WATT (P2 x (ATRF) x (GTRF) ) 14 100D R PHASE 3 ACTIVE POWER (P3) unsigned int (ATRF) x (GTRF) WATT (P2 x (ATRF) x (GTRF) ) 15 100E R PHASE 1 REACTIVE POWER (Q1) signed int (ATRF) x (GTRF) VAR (Q1 x (ATRF) x (GTRF) ) 16 100F R PHASE 2 REACTIVE POWER (Q2) signed int (ATRF) x (GTRF) VAR (Q2 x (ATRF) x (GTRF) ) 17 1010 R PHASE 3 REACTIVE POWER (Q3) signed int (ATRF) x (GTRF) VAR (Q3 x (ATRF) x (GTRF) ) (ATRF) x (GTRF) 18 1011 R PHASE 1 APPARENT POWER (S1) unsigned int VA (S1 x (ATRF) x (GTRF) ) 19 1012 R PHASE 2 APPARENT POWER (S2) unsigned int (ATRF) x (GTRF) VA (S2 x (ATRF) x (GTRF) ) 20 1013 R PHASE 3 APPARENT POWER (S3) unsigned int (ATRF) x (GTRF) VA (S3 x (ATRF) x (GTRF) ) 21 1014 R PHASE 1 COSØ (COSØ1) signed int 0,01 - (COSØ1 x 0,01) 22 1015 R PHASE 2 COSØ (COSØ2) signed int 0,01 - (COSØ2 x 0,01) 23 1016 R PHASE 3 COSØ (COSØ3) signed int 0,01 - (COSØ3 x 0,01) 24 1017 R TOTAL COSØ (COSØ) signed int 0,01 - (COSØ x 0,01) unsigned int (ATRF) x (GTRF) WATT signed int (ATRF) x (GTRF) VAR 0,1 Hz 25 1018 R TOTAL ACTIVE POWER 26 1019 R TOTAL REACTIVE POWER VECTOR (ΣP) 27 101A R FREQUENCY (f) unsigned int 28 101B R TOTAL APPARENT POWER (ΣS) unsigned int (ATRF) x (GTRF) (ΣQ) VA 29 101C R REACTIVE POWER DIRECTION BITS unsigned int 1 - 30 101D R CURRENT TRANSFORMERS DIRECTION BITS unsigned int 1 - 31 101E TOTAL INDUCTIVE POWER (ΣQind) signed int (ATRF) x (GTRF) VAR 32 101F TOTAL CAPACITIVE POWER (ΣQkap) signed int (ATRF) x (GTRF) VAR 33 1020 TOTAL REACTIVE POWER (ΣQ) unsigned int (ATRF) x (GTRF) VAR ( (ΣP) x (ATRF) x (GTRF) ) (f x 0,1) ( (ΣS) x (ATRF) x (GTRF) ) Bit 0: Direction of phase 1 ( “1” = capacitiv e , “ 0” = inductiv e ) Bit 1: Direction of phase 2 ( “1” = capacitiv e , “ 0” = inductiv e ) Bit 2: Direction of phase 3 ( “1” = capacitiv e , “ 0” = inductiv e ) Bit 3: Direction of total reactiv e pow er ( “1” = capacitiv e , “ 0” = inductiv e ) NOT: Bit4,.......Bit15 reserv e READ “ 0” Bit 0: Current direction of phase 1 (if it is “ 1” , rev erse) Bit 1: Current direction of phase 2 (if it is “ 1” , rev erse) Bit 2: Current direction of phase 3 (if is “ 1” , rev erse) Bit 3: determination of current direction phase 1 (if it is “ 1” , determined) Bit 4: determination of current direction phase 2 (if it is “ 1”, determined) Bit 5: determination of current direction phase 3 (if it is “ 1” , determined) NOT: Bit6,.......Bit15 reserv e READ ” 0” REGISTER TABLE ADRES (HEX ) (R)read (W)write PARAMETER NO FORMAT MULTIPLIER UNIT INSTRUCTION DEMANDS 1 2000 R CURRENT TRANSFORMER RATIO (ATRF) unsigned int 1 ATRF 1 - 2000 2 2001 R VOLTAGE TRANSFORMER RATIO (GTRF) unsigned int 0,1 GTRF 10 - 10000 3 2002 R PHASE 1 VOLTAGE Phase-Neutral (VL1N ) unsigned int 0,1 x (GTRF) VOLT Demand Value 4 2003 R PHASE 2 VOLTAGE Phase-Neutral (VL2N ) unsigned int 0,1 x (GTRF) VOLT Demand Value 5 2004 R PHASE 3 VOLTAGE Phase-Neutral (VL3N ) unsigned int 0,1 x (GTRF) VOLT Demand Value 6 2005 R PHASES 1-2 VOLTAGE Phase-phase (VL12 ) unsigned int 0,1 x (GTRF) VOLT Demand Value 7 2006 R PHASES 1-3 VOLTAGE Phase-phase (VL13 ) unsigned int 0,1 x (GTRF) VOLT Demand Value 0,1 x (GTRF) VOLT Demand Value 8 2007 R PHASES 2-3 VOLTAGE Phase-phase (VL23 ) unsigned int 9 2008 R PHASE 1 CURRENT (I1) demand unsigned int (ATRF) x 0,001 AMPER Demand Value 10 2009 R PHASE 2 CURRENT (I2) demand unsigned int (ATRF) x 0,001 AMPER Demand Value 11 200A R PHASE 3 CURRENT (I3) demand unsigned int (ATRF) x 0,001 AMPER Demand Value 12 200B R PHASE 1 ACTIVE POWER (P1) demand unsigned int (ATRF) x (GTRF) WATT Demand Value 13 200C R PHASE 2 ACTIVE POWER (P2) demand unsigned int (ATRF) x (GTRF) WATT Demand Value 14 200D R PHASE 3 ACTIVE POWER (P3) demand unsigned int (ATRF) x (GTRF) WATT Demand Value 15 200E R PHASE 1 REACTIVE POWER (Q1) ind signed int (ATRF) x (GTRF) VAR Demand Value 16 200F R PHASE 2 REACTIVE POWER (Q2) ind signed int (ATRF) x (GTRF) VAR Demand Value 17 2010 R PHASE 3 REACTIVE POWER (Q3) ind signed int (ATRF) x (GTRF) VAR Demand Value 18 2011 R PHASE 1 REACTIVE POWER (Q1) cap signed int (ATRF) x (GTRF) VAR Demand Value 19 2012 R PHASE 2 REACTIVE POWER (Q2) cap signed int (ATRF) x (GTRF) VAR Demand Value 20 2013 R PHASE 3 REACTIVE POWER (Q3) cap signed int (ATRF) x (GTRF) VAR Demand Value (ATRF) x (GTRF) 21 2014 R PHASE 1 APPARENT POWER (S1) unsigned int VA Demand Value 22 2015 R PHASE 2 APPARENT POWER (S2) unsigned int (ATRF) x (GTRF) VA Demand Value 23 2016 R PHASE 3 APPARENT POWER (S3) unsigned int (ATRF) x (GTRF) VA Demand Value 24 2017 R PHASE 1 COSØ (COSØ1) ind signed int 0,01 - Demand Value 25 2018 R PHASE 2 COSØ (COSØ2) ind signed int 0,01 - Demand Value 26 2019 R PHASE 3 COSØ (COSØ3) ind signed int 0,01 - Demand Value 27 201A R PHASE 1 COSØ (COSØ1) cap signed int 0,01 - Demand Value 28 201B R PHASE 2 COSØ (COSØ2) cap signed int 0,01 - Demand Value 29 201C R PHASE 3 COSØ (COSØ3) cap signed int 0,01 - Demand Value >>>> Page 16 REGISTER TABLOSU ADRES (HEX ) (R)read (W)write PARAMETER NO FORMAT MULTIPLIER UNIT INSTRUCTION PEAK VALUES 1 3000 R CURRENT TRANSFORMER RATIO (ATRF) unsigned int 1 ATRF 1 - 2000 2 3001 R VOLTAGE TRANSFORMER RATIO (GTRF) unsigned int 0,1 GTRF 10 - 10000 3 3002 R PHASE 1 VOLTAGE Phase-Neutral (VL1N ) unsigned int 0,1 x (GTRF) VOLT Peak v alue 4 3003 R PHASE 2 VOLTAGE Phase-Neutral (VL2N ) unsigned int 0,1 x (GTRF) VOLT Peak v alue 5 3004 R PHASE 3 VOLTAGE Phase-Neutral (VL3N ) unsigned int 0,1 x (GTRF) VOLT Peak v alue 6 3005 R PHASES 1-2 VOLTAGE Phase-phase (VL12 ) unsigned int 0,1 x (GTRF) VOLT Peak v alue 7 3006 R PHASES 1-3 VOLTAGE Phase-phase (VL13 ) unsigned int 0,1 x (GTRF) VOLT Peak v alue 0,1 x (GTRF) VOLT Peak v alue 8 3007 R PHASES 2-3 VOLTAGE Phase-phase (VL23 ) unsigned int 9 3008 R PHASE 1 CURRENT (I1) peak unsigned int (ATRF) x 0,001 AMPER Peak v alue 10 3009 R PHASE 2 CURRENT (I2) peak unsigned int (ATRF) x 0,001 AMPER Peak v alue 11 300A R PHASE 3 CURRENT (I3) peak unsigned int (ATRF) x 0,001 AMPER Peak v alue 12 300B R PHASE 1 ACTIVE POWER (P1) peak unsigned int (ATRF) x (GTRF) WATT Peak v alue 13 300C R PHASE 2 ACTIVE POWER (P2) peak unsigned int (ATRF) x (GTRF) WATT Peak v alue 14 300D R PHASE 3 ACTIVE POWER (P3) peak unsigned int (ATRF) x (GTRF) WATT Peak v alue 15 300E R PHASE 1 REACTIVE POWER (Q1) ind signed int (ATRF) x (GTRF) VAR Peak v alue 16 300F R PHASE 2 REACTIVE POWER (Q2) ind signed int (ATRF) x (GTRF) VAR Peak v alue 17 3010 R PHASE 3 REACTIVE POWER (Q3) ind signed int (ATRF) x (GTRF) VAR Peak v alue 18 3011 R PHASE 1 REACTIVE POWER (Q1) cap signed int (ATRF) x (GTRF) VAR Peak v alue 19 3012 R PHASE 2 REACTIVE POWER (Q2) cap signed int (ATRF) x (GTRF) VAR Peak v alue 20 3013 R PHASE 3 REACTIVE POWER (Q3) cap signed int (ATRF) x (GTRF) VAR Peak v alue (ATRF) x (GTRF) 21 3014 R PHASE 1 APPARENT POWER (S1) unsigned int VA Peak v alue 22 3015 R PHASE 2 APPARENT POWER (S2) unsigned int (ATRF) x (GTRF) VA Peak v alue 23 3016 R PHASE 3 APPARENT POWER (S3) unsigned int (ATRF) x (GTRF) VA Peak v alue 24 3017 R PHASE 1 COSØ (COSØ1) ind signed int 0,01 - Peak v alue 25 3018 R PHASE 2 COSØ (COSØ2) ind signed int 0,01 - Peak v alue 26 3019 R PHASE 3 COSØ (COSØ3) ind signed int 0,01 - Peak v alue 27 301A R PHASE 1 COSØ (COSØ1) cap signed int 0,01 - Peak v alue 28 301B R PHASE 2 COSØ (COSØ2) cap signed int 0,01 - Peak v alue 29 301C R PHASE 3 COSØ (COSØ3) cap signed int 0,01 - Peak v alue >>>> Page 17 REGISTER TABLOSU ADRES (HEX ) (R)read (W)write PARAMETER NO FORMAT MULTIPLIER UNIT INSTRUCTION >>>> Page 18 ENERGY C OUNTERS 1 4000 R TIMER unsigned int 1 sec HIGH WORD 2 4001 R TIMER unsigned int 1 sec LOW WORD 3 4002 R ACTIVE ENERGY COUNTER unsigned int 1 GW/h GIGA WATT hour digits 4 4003 R ACTIVE ENERGY COUNTER unsigned int 1 MW/h MEGA WATT hour digits 5 4004 R ACTIVE ENERGY COUNTER unsigned int 1 KW/h KILO WATT hour digits 6 4005 R ACTIVE ENERGY COUNTER unsigned int 1 W/h WATT hour digits 7 4006 R ACTIVE ENERGY COUNTER unsigned int 1 mW/h mili WATT hour digits 8 4007 R ACTIVE ENERGY COUNTER unsigned int 1 W/s WATT second digits 9 4008 R REACTIVE (INDUCTIVE) ENERGY COUNTER unsigned int 1 GVAR/h GIGA VAR hour digits 10 4009 R REACTIVE (INDUCTIVE) ENERGY COUNTER unsigned int 1 MVAR/h MEGA VAR hour digits 11 400A R REACTIVE (INDUCTIVE) ENERGY COUNTER unsigned int 1 KVAR/h KILO VAR hour digits 12 400B R REACTIVE (INDUCTIVE) ENERGY COUNTER unsigned int 1 VAR/h 13 400C R REACTIVE (INDUCTIVE) ENERGY COUNTER unsigned int 1 mVAR/h mili VAR hour digits 14 400D R REACTIVE (INDUCTIVE) ENERGY COUNTER unsigned int 1 VAR/s 15 400E R REACTIVE (CAPACITIVE) ENERGY COUNTER unsigned int 1 GVAR/h GIGA VAR hour digits 16 400F R REACTIVE (CAPACITIVE) ENERGY COUNTER unsigned int 1 MVAR/h MEGA VAR hour digits 17 4010 R REACTIVE (CAPACITIVE) ENERGY COUNTER unsigned int 1 KVAR/h KILO VAR hour digits 18 4011 R REACTIVE (CAPACITIVE) ENERGY COUNTER unsigned int 1 VAR/h 19 4012 R REACTIVE (CAPACITIVE) ENERGY COUNTER unsigned int 1 mVAR/h mili VAR hour digits 20 4013 R REACTIVE (CAPACITIVE) ENERGY COUNTER unsigned int 1 VAR/s 21 4014 R REACTIVE ENERGY COUNTER unsigned int 1 GVAR/h GIGA VAR hour digits 22 4015 R REACTIVE ENERGY COUNTER unsigned int 1 MVAR/h MEGA VAR hour digits 23 4016 R REACTIVE ENERGY COUNTER unsigned int 1 KVAR/h KILO VAR hour digits 24 4017 R REACTIVE ENERGY COUNTER unsigned int 1 VAR/h 25 4018 R REACTIVE ENERGY COUNTER unsigned int 1 mVAR/h mili VAR hour digits 26 4019 R REACTIVE ENERGY COUNTER unsigned int 1 VAR/sn VAR second digits 27 401A R APPARENT ENERGY COUNTER unsigned int 1 GVA/h GIGA VA hour digits 28 401B R APPARENT ENERGY COUNTER unsigned int 1 MVA/h MEGA VA hour digits 29 401C R APPARENT ENERGY COUNTER unsigned int 1 KVA/h KILO VA hour digits 30 401D R APPARENT ENERGY COUNTER unsigned int 1 VA/h VA hour digits 31 401E R APPARENT ENERGY COUNTER unsigned int 1 mVA/h mili VA hour digits 32 401F R APPARENT ENERGY COUNTER unsigned int 1 VA/s VA second digits VAR hour digits VAR second digits VAR hour digits VAR second digits VAR hour digits PARAMETERS 1 5000 R/W CURRENT TRANSFORMER RATIO (ATRF) unsigned int 1 ATRF 1 - 2000 (GTRF) 10 - 10000 2 5001 R/W VOLTAGE TRANSFORMER RATIO unsigned int 0,1 GTRF 3 5002 R/W ENERGY COUNTER TYPE unsigned int 1 - 4 5003 R/W DEMAND TIME unsigned int 1 minute 5 5004 R/W AUTOMATIC CURRENT DIRECTION FUNCTION unsigned int 1 - 6 5005 R/W DEVICE ADRESS unsigned int 1 - 1 – 255 7 5006 R/W ERASING FUNCTION BITS unsigned int relating to bit if set “ 1” ,erase If bit set “ 1” w hich is related v alues w ill be erase 1 - Bit 0:If bit set then It erases phase-neutral v oltage demand and peak v alues. Bit 1:If bit set then It erases current demand and peak v alues. Bit 2:If bit set then It erases CosØ demand and peak v alues. Bit 3:If bit set then It erases phase-phase v oltage demand and peak v alues Bit 4:If bit set then It erases activ e pow er demand and peak v alues. Bit 5:If bit set then It erases reactiv e pow er demand and peak v alues. Bit 6:If bit set then It erases apparent pow er demand and peak v alues. Bit 7:All energy counters w ill be erase. Bit 8:All v alues w hich is giv en abov e w ill be erase. NOT: Bit9,.......Bit15 reserv e READ “ 0” 1 = seperately , 0 =Vector sum 5 – 60 minutes If this bit is “ 0” function is enable . If this bit is “ 1” function is disable. >>>> Page 19 MULTIMET-01-96 ® Multimeter & Power Meter SPECIFICATIONS ■ Microprocessor based ■ Measurement of 3 phase electrical quantities (VL-N, A, CosΦ, VL-L, Hz, W, VAr, VA ) ■ Correct learning of current transf ormer polarity (ev en if (k,l) is connected in rev erse direction) ■ Setting of current and v oltage transf ormer ratios ■ Easy access to menus ■ Reduces both number of measurement equipment used in the panel and connection time ■ Lowers electrical panel costs Voltage ( V L-N ) V L-N U1N L1 U2N L2 U3N L3 96x96 General Multimet giv es the ability of tracking electrical parameters f or 3 phase sy stems such as, phase currents, phase-neutral & phase-phase v oltages, f requency , power f actor, activ e powers, reactiv e powers and apparent powers. ACCESSING PARAMETERS: Using the direction buttons, it is possible to move up and down in the menu. When set button is pressed down for 3 seconds, parameter setting menu is accessed and to set any of the parameters, first set button is pressed, then using the directions buttons, value is increased/decreased. When desired value is reached, it is stored by pressing the set button. Using the direction buttons. Ct: Current transformer value : (5...10000) The current tranformer's primary value shouldbe entered. For example if 500/5A cuurent is used then 500 must be entered. Ut: Voltage transformer value : (1...1000) If no voltage transformer is used, this parameter must be left as 1. YOn Lrn: Current transformer polarity direction learning: ( on – oFF) If it is “ on ” then the device would learn the direction automatically. If the device monted in new panel or the polarity somehow changed then it learns the new direction. If off then the device would learn the direction once and never learn it again. Off position is required for some loads. If there would be a problem in the current transformer direction then the current transformer inputs shuld be switched. Note: If no button is pressed for 4 minutes under this menu, devices automatically quits programming menu. : 220 VAC : (0.8 – 1.1)xUn : 50 Hz : < 6 VA : < 1 VA : (Phase-Neutral) 30-300 VAC, 45-90 Hz (Phase-Phase) 30-600 VAC, 45-90 Hz : (Secondary current) 50mA – 6 Amp. AC : 0 – 999.9 kV 0 – 999.9 M (W, VAr, VA) (Cosφ) 0.00 – 1.00 ind. & cap. : 50 mA, 30V : 1% + digit : 1 ......... 1000 : 5/5 ...... 10000/5 A : 4 Digits LED display : IP20 : IP00 : -5°C....+50°C : 15% ...... 95% (without condensation) : To front panel tap : 96x96x80 mm Current(A) A I1 L1 I2 L2 I3 L3 (Pow er Factor) P.F PF 1 L1 PF 2 L2 PF 3 L3 Voltage(V L-L) V L-L U12 L1 U23 L2 U31 L3 Current and v oltage transf ormer ratios can be set by the user. Using the directions buttons, desired parameters can be accessed easily . On the other hand, its display s make it possible to track v alues f rom long distance. M EASURED ELECTRICAL PARAM ETERS (VL-N, A, CosΦ, VL-L, Hz, W, VAr, VA ) Using the direction buttons, abov e parameters are easily accessed step by step. Appropriate LED lights on and v alue of each phase is showed on the display at the same time instant. Frequency(Hz) Hz f1 L1 f2 L2 f3 L3 Current Measurement Range Active Power (P) M K W TECHNICAL DATA: Rated Voltage (Un) Operating Range Frequency Supply Power Consumption Measurement Power Consumption Voltage Measurement Range Display Range W1 L1 W2 L2 W3 L3 Reactive Power (Q) M K VAr VAr1 L1 Minimum Measurement Values Measurement Sensitivity Voltage Transformer Ratio Current Transformer Ratio Display Device Protection Class Connector Protection Class Ambient Temperature Humidity Connection Type Dimensions Increase SET Decrease Increase SET Decrease Increase SET Decrease SET Exit Connection : Current Inputs Voltage Inputs VAr2 L2 Apparent Power(S) M L1 L1 L2 L3 2A 2A 2A L3 k1 I1 k2 l2 K VA1 L3 k3 l3 X/5 A L2 X/5 A L1 N X/5 A MULTIMET- 01- 96 2A L2 N VAr3 L3 VA Enter Pressing for 3 Seconds SET VA2 VA3 L1 N Auxiliary Supply Un : 230 Vac, 50 Hz ΔUn : (0.8 – 1.1)xUn Current Direction ( Multimeter&Power Meter ) Supply Power Consumption Measurement Power Consumption Voltage Measurement Range Current Measurement Range Measurement Category Equipment Protection Class : < 6 VA : < 1 VA : (Phase-Neutral)30-300 VAC, 45-90 Hz (Phase-Phase) 30-600 VAC, 45-90 Hz : 50mA – 6 Amp. AC : CAT III : Double Insulation - class II ( ) >>>> Page 20 MULTIMET-02-96 SPECIFICATIONS ■ Microprocessor based ■ Measurement of 3 phase electrical quantities ( VL-N, A, CosΦ, VL-L, Hz ) ■ Correct learning of current transf ormer polarity (ev en if (k,l) is connected in rev erse direction) ■ Setting of current and v oltage transf ormer ratios ■ Easy access to menus ■ Reduces both number of measurement equipment used in the panel and connection time ■ Lowers electrical panel costs 96x96 General Multimet giv es the ability of tracking electrical parameters f or 3 phase sy stems such as, phase currents, phase-neutral & phase-phase v oltages, f requency and power f actors.Current and v oltage transf ormer ratios can be set by the user. Using the directions buttons, desired parameters can be accessed easily . On the other hand, its display s make it possible to track v alues f rom long distance. MEASURED ELECTRICAL PARAMETERS (VL-N, A, CosΦ, VL-L, Hz ) Using the direction buttons, abov e parameters are easily accessed step by step. Appropriate LED lights on and v alue of each phase is showed on the display at the same time instant. V L-N L1 L2 L3 ® Multimeter ACCESSING PARAMETERS: Using the direction buttons, it is possible to move up and down in the menu. When set button is pressed down for 3 seconds, parameter setting menu is accessed and to set any of the parameters, first set button is pressed, then using the directions buttons, value is increased/decreased. When desired value is reached, it is stored by pressing the set button. Using the direction buttons. Ct: Current transformer value : (5...10000) The current tranformer's primary value shouldbe entered. For example if 500/5A cuurent is used then 500 must be entered. Ut: Voltage transformer value : (1...1000) If no voltage transformer is used, this parameter must be left as 1. YOn Lrn: Current transformer polarity direction learning: ( on – oFF) If it is “ on ” then the device would learn the direction automatically. If the device monted in new panel or the polarity somehow changed then it learns the new direction. If off then the device would learn the direction once and never learn it again. Off position is required for some loads. If there would be a problem in the current transformer direction then the current transformer inputs shuld be switched. Note: If no button is pressed for 4 minutes under this menu, devices automatically quits programming menu. SET Decrease Increase SET Decrease Increase SET Decrease Exit U2N U3N Current Measurement Range Voltage(V L-N) Increase SET TECHNICAL DATA: Rated Voltage (Un) Operating Range Frequency Supply Power Consumption Measurement Power Consumption Voltage Measurement Range U1N : 220 VAC : (0.8 – 1.1)xUn : 50 Hz : < 6 VA : < 1 VA : (Phase-Neutral) 30-300 VAC, 45-90 Hz (Phase-Phase) 30-600 VAC, 45-90 Hz : (Secondary current) 50mA – 6 Amp. AC : 0 – 999.9 kV (Cosφ) 0.00 – 1.00 ind. & cap. : 50 mA, 30V : 1% + digit : 1 ......... 1000 : 5/5 ...... 10000/5 A : 4 Digits LED display : IP20 : IP00 : -5°C....+50°C : 15% ...... 95% (without condensation) : To front panel tap : 96x96x80 mm Display Range A L1 L2 L3 P.F L1 L2 L3 V L-L L1 L2 L3 I1 Current(A) I2 I3 PF 1 Minimum Measurement Values Measurement Sensitivity Voltage Transformer Ratio Current Transformer Ratio Display Device Protection Class Connector Protection Class Ambient Temperature Humidity Connection Type Dimensions CosΦ (Pow er Factor) PF 2 Connection : PF 3 U12 Voltage(V L-L) U23 L2 L3 2A 2A 2A L2 L3 f3 Frequency(Hz) k2 l2 k3 l3 X/5 A X/5 A MULTIMET- 02- 96 N Un : 230 Vac, 50 Hz ΔUn : (0.8 – 1.1)xUn f2 I1 X/5 A 2A f1 k1 L2 L1 N U31 N L3 Auxiliary Supply L1 Current Inputs Voltage Inputs L1 L1 Hz Enter Pressing for 3 Seconds SET Current Direction ( Multimeter ) Supply Power Consumption Measurement Power Consumption Voltage Measurement Range Current Measurement Range Measurement Category Equipment Protection Class : < 6 VA : < 1 VA : (Phase-Neutral)30-300 VAC, 45-90 Hz (Phase-Phase) 30-600 VAC, 45-90 Hz : 50mA – 6 Amp. AC : CAT III : Double Insulation - class II ( ) MULTIMET-03-96 Multimeter A SET Current transf ormer primary v alue IL1, IL2, IL3 V >>>> Page 22 Enter Pressing for 3 seconds VL1N, VL2N, VL3N VL12, VL13,VL23 Hz L1 A~ L2 A~ L3 A~ Increase A~ SET A~ Decrease TRUE RM S Reduce d Price L1 A~ L2 A~ L3 A~ L1 A~ L2 A~ L3 A~ Increase A~ SET Voltage transf ormer ratio v alues A~ Decrease SET EXIT SPECIFICATIONS -Microprocessor based -Measurement of 3 phase electrical quantities (VL-N, A, VL-L, Hz) -Setting of current and voltage transf ormer ratios -Easy Access to menu -Reduces both number of measurement equipment used in the panel and connection time. -Low er Electrical panel costs. General M e asured Voltage s L1 L2 Using the directions buttons, desired parameters can be accessed easily . L3 V 1N V V 2N V V 3N Current Measurement Range Minimum Measurement Values Measurement Sensitiv ity Voltage Transf ormer Ratio Current Transf ormer Ratio Dev ice Protection Class Connector Protection Class Ambient Temperature Humidity Connection Ty pe Dimensions : 220 VAC : (0.8 – 1.1)xUn : 50 Hz : < 6 VA : < 1 VA : (Phase-Neutral) 30-300 VAC, 45-90 Hz (Phase-Phase) 30-600 VAC, 45-90 Hz : (Secondary current)50mA – 6 Amp.ac : 50 mA, 30V : %1±1 dijit : 1 ......... 1000 : 5/5 ...... 10000/5 A : IP20 : IP00 : -5°C....+50°C : 15% ...... 95% (without condensation) : To f ront panel tap : 96x96x80 mm X/5 A V 12 X/5 A L2 L3 Current Inputs Auxiliary Supply 230 Vac, 50 Hz L2 V 23 L1 V N V 13 N V L1 L3 k3 L1 k2 X/5 A Voltages Inputs L3 V L1 L2 L3 N Current Direction L1 L2 l On the other hand, its display s make it possible to track values from long distance. V TECHNICAL DATA : Rated Voltage (Un) Operating Range Frequency Supply Power Consumption Measurement Power Consumption Voltage Measurement Range k1 Multimet gives the ability of tracking electrical parameters for 3 phase systems such as, phase currents, phase-neutral & phase-phase voltages, frequency .Current and voltage transformer ratios can be set by the user. ACCESSING PARAM ETERS: Using the direction buttons, it is possible to move up and dow n in the menu. When set button is pressed dow n for 3 seconds, parameter setting menu is accessed and to set any of the parameters, first set button is pressed, then using the directions buttons, value is increased or decreased. When desired value is reached, it is stored by pressing the set button. Using the direction buttons. Ct: Current trans form e r value : (5...10000) The current tranformer's primary value should be entered. For example if 500/5A cuurent is used then 500 must be entered. Ut: Voltage trans form e r value : (1...1000) If no voltage transformer is used, this parameter must be left as 1. >>>> Page 21 DP-01-96 Digital Protector & Multimeter ® Current & Voltage Protection 1.2 The Use Of The Alarms User can disable any alarm he does not want to use. To do that he must access the alarms f rom the menu and disable them. The disabled alarms will not af f ect the relay 's f unction (switch on or of f ). When one of the disabled alarms occurs, only the related alarm led will blink to alert the operator. The activ e alarms will keep controlling the output contacts. The thing that must be awared of is that when all alarms are disabled the sy stem will be unprotected and the output contacts will be alway s on. 1.3 The Use Of Password The dev ice has a changeable password to make an easy access to the menu. The password prev ents unauthorized people f rom changing the sy stem setting. Incase of wrong password input, the user can go through the menu and v iew the set v alues but can not change these v alues. Correct password input allows the user to go through the menu and change any adjusted v alue. The f irst use v alue is “1234”. 96 X 96 SPECIFICATIONS : ■ Microprocessor controlled, ■ 3 Phase current and v oltage control ■ Selectable three program modes; * Prg1 ; Sy stem Protection * Prg2 ; Motor Protection * Prg3 ; Full Protection ■ Two dif f erent relay outputs f or current and v oltage alarms, ■ Giv es the ability to activ ate or deactiv ate one, some or all alarms independently , The activ e alarms control the relay outputs while the inactiv e ones only turns the alarm leds on, ■ Has password protection to prev ent unauthorized people f rom changing the sy stem settings, ■ Measures the f ollowing 3 phase electrical amplitudes (VL-N, A, CosΦ, W) ■ Correct learning of polarity of the current transf ormer (ev en if (k,l) were connected in rev erse direction), ■ Giv es the ability to input current and v oltage trasf ormers' ratios, ■ Ov er & Under v oltage control, ■ Asy mmetric v oltage control (% 5 – 40 Phase-Neutral) ■ Ov er current control, ■ Under current control, ■ Asy mmetric current control (% 5 – 50 ) ■ Has the property of sudden switch of f its contacts when current or v oltage is missing, ■ Automatic-manual options, ■ Easy Access to menus, ■ Reduces the number of equipments in the panel and sav es assembling time, ■ Reduces the panel's cost. 1. Gene ral Works as taking samples f rom three current and v lotage phases and shows these electrical amplitudes on its screen. The user has the opportunity f or selecting ty pe protect a sy stem or a motor, also the user can select to reset automatically or manually . When automatic reset is selected, the sy stem will automatically switch on the contacts af ter the f ailure is ov er. When manual reset is selected, the sy stem will not switch on its contacts until the operator resets it. 1.1 Protection Programs 1.1.1 System Protection: Prog 1 Protects the sy stem it is connected to f rom ov er v oltage, under v oltage, asy mmetric v oltage and ov er current. The sudden switch of f (Iset x 1.5) is activ e. It can be used in electric distribution panels f or protection. On this mode, under current, asy metric current protections and start delay time are unf unctional. 1.1.2 Motor Protection : Prog 2 Protects a motor f rom ov er v oltage, under v oltage, asy mmetric v oltage, ov er current and asy mmetric current. The sudden switch of f (Iset x 1.5) is activ e. To av oid the ef f ects of inrush currents the dev ice has a start delay . On this mode, only under current is unf unctional. 1.1.3 Full Protection : Prog 3 Protects a sy stem f rom ov er v oltage, under v oltage, asy mmetric v oltage, ov er current, under current and asy mmetric current. The sudden switch of f (Iset x 1.5) is activ e, and the sy stem has start delay . 2. Protections: 2.1 Over Voltage Protection: The ov er v oltage limit can be set by the user between 230 and 270 v olts. When the Neutral-Phase v oltage of the protected sy stem exceeds the adjusted v alue the dev ice switches of f its output contacts af ter a proper time (t3). If the v oltage returns to normal v alue bef ore the end of the (t3) period then the switch of f does not happen. Af ter a switch of f of an ov er v oltage alarm, while automatic reset is selected, if the v oltage v alue returns to the normal v alue then switch on occurs af ter a proper period (T-on). If manual reset is selected, the switch of f will continue until the operator pushes the reset button. Pressing the set button f or 3 seconds resets the dev ice. 2.2 Under Voltage Protection: The under v oltage limit can be set by the user between 170 and 210 v olts. When the Neutral-Phase v oltage of the protected sy stem exceeds the adjusted v alue the dev ice switches of f its output contacts af ter a proper time (t3). If the v oltage returns to normal v alue bef ore the end of the (t3) period then the switch of f does not happen. Af ter a switch of f of an under v oltage alarm, while automatic reset is selected, if the v oltage v alue returns to the normal v alue then switch on occurs af ter a proper period (T-on). If manual reset is selected, the switch of f will continue until the operator pushes the reset button. Pressing the set button f or 3 seconds resets the dev ice. 2.3 Asymmetric Voltage Protection: It can be set by the user between %5 and %40. When an unbalance occurs between the phases then the dev ice switches of f the output contact af ter the t3 time. If the unbalance returns to normal v alue bef ore the end of the (t3) period then the switch of f does not happen. Af ter a switch of f of an asy mmetric v oltage alarm, while automatic reset is selected, if the v oltage v alue returns to the normal v alue then switch on occurs af ter a proper period (T-on). If manual reset is selected, the switch of f will continue until the operator pushes the reset button. Pressing the set button f or 3 seconds resets the dev ice. 2.4 Over Current Protection: The current limit can be set by the user between x 0.1 and x 1 of the current transf ormer v alue. When any current passing through any phase of the protected sy stem exceeds the adjusted v alue the dev ice switches of f its output contacts af ter a proper time (t2). If the current v alue goes ov er 1.5 times ov er the adjusted current v alue the dev ice will wait f or no delay and switches the output contacts immediately . The ov er current protection goes activ e af ter the start delay time in motor and f ull protection modes (Pgr2 and Pgr3), while in sy stem protection mode (Pgr1) no start delay time is applied then the ov er current protection starts immediately . Af ter a switch of f of an ov er current alarm, while automatic reset is selected, if the current v alue returns to the normal v alue then switch on occurs af ter a proper period (T-on). If manual reset is selected, the switch of f will continue until the operator pushes the reset button. Pressing the set button f or 3 seconds resets the dev ice. 2.5 Current Sudden Switch Off Protection: It can be set by the user between (I)s x2 and (I)s x10 of the ov er current v alue. When the current v alue exceeds the adjusted v alue within the start delay time, the dev ice switches of f its output contact immediately . This Protection is activ e in all program modes. Af ter a switch of f of a current sudden swtich of f alarm, while automatic reset is selected, if the current v alue returns to the normal v alue or to zero v alue then switch on occurs af ter a proper period (T-on). If manual reset is selected, the switch of f will continue until the operator pushes the reset button. Pressing the set button f or 3 seconds resets the dev ice. 2.6 Asymmetric Current Protection: It can be set by the user between %5 and %50. Works on motor Protection and f ull protection (Pgr2 and Pgr3) only . It controls the asy mmetric that may occur in the current of the three phases. That may occur when one of the phases' v oltage is low and the other one ishigh. That may cause asy mmetric current in the motor's bobbin. This way the motor's bobbin is protected. Furthermore it protects the motor f rom missing phase or a possible unplugged or cut wiring. Af ter a switch of f of a asy mmetric current alarm, while automatic reset is selected, if the current v alue returns to the normal v alue or to zero v alue then switch on occurs af ter a proper period (T-on). If manual reset is selected, the switch of f will continue until the operator pushes the reset button. Pressing the set button f or 3 seconds resets the dev ice. >>>> Page 23 DP-01-96 ® Digital Protector & Multimeter Current & Voltage Protection 2.7 Under Current Protection: MAIN MENU: It can be set by the user between x 0.1 and Current x 1 of the current transformer value. It works only on full protection mode (Prg2). When the current of the protected motor (Over current set value) oSEt goes below the adjusted value it switches (Over current hysteresis) hyS off its output contact after t2 delay. (Under current hysteresis) hyS It goes active after the start delay ends. (Under current set value) uSEt After a switch off of an under current 3.2Protection Program selection Decrease alarm, while automatic reset is selected, if the current value returns to the normal value or zero value then switch on occurs after a proper period (T-on). If manual reset is selected, the switch off will continue until (Over current set value) oSEt the operator pushes the reset button. (Under current hysteresis) hyS Pressing the set button for 3 seconds (Over current hysteresis) hyS resets the device. (Under current set value) uSEt NOTE: Under current protection set value with its hysteresis must not overlap with over current protection set value with its hysteresis or, the under current protection set value must not be higher than the over current protection set value. Otherwise, (LinE ovEr Eror) message will appear on the screen and the output contact will be switched off. In this case you should check the over and the under current set values. Increase S S 3.3 To Alarm Control Menu S 3.4 Current Settings Menu S 3.5 Voltage Settings Menu (Under current set value) uSEt (Under current hysteresis) hyS (Over current hysteresis) hyS (Over current set value) oSEt 3. Password Inquiry and Menu Entry 3.1 Password Inquiry If y ou push the SET button, the password inquiry menu shows up. Using the direction buttons, the authorized operator can increase or decrease the digit v alue to reach the required v alue, then pushes SET button to mov e to the next digit. Af ter inputing the last digit, pushing the SET button approv es the password. The “ - “ on the middle screen makes the digit f ollow up easier. This way the user knows how many digits he already input. Af ter the password approv al, the user gets “Accepted” or “Rejected” message on the screen f or 3 seconds. Af ter that the program main menu shows up, In case of wrong password entry , the user can mov e through the menu but can not make any changes in the program settings. 3.6 Reset Selec tion Increase S Decrease 3.7 Power-on T ime S Enter Increase S S Decrease When the set button is pushed, the password at the buttom screen puts the digit value in the digit division “-” and it slides the digit line to the left digit 3.8 Lock T ime Increase S It increases or decreases the value of the password Decrease 3.9 Lock T ime Accepted rejected Increase S Decrease Pushing the down button shows the menus under the main menu that are in order:protection program selection, alarm control menu, current setting menu, v oltage settings menu, reset settings menu, power on timing settings, password menu, f ailure lock timing settings (in the automatic mode), f ailue lock counter settings (in the automatic mode), and f actory settings. S Viewing Menus: Because the dev ice is password protected, in case of wrong password entry , the password and the f actory settings menus are not shown, the other menus are shown but not changeable. Only correct password entry shows all menus and giv es the abilitiy of changing the dev ice settigs. S Buttons Use: The user can mov e through the menus using the direction buttons (up – down). When he reaches the required settings he gains access to change the setting by pressing the SET button, the shown v alue then blinks. Uses the direction buttons to change the v alues, and pushes the SET button again to store the changes. The blinking v alues stops blinking then. The user can go to the upper menu seeking the quit command using the direction buttons and then pushing the SET button. S Exit 3.10 To Password Menu 3.11 Factory Settings >>>> Page 24 DP-01-96 ® Digital Protector & Multimeter Current & Voltage Protection 3.2 Protection Program Selection Increase S Decrease the f irst menu that comes is the protection program selection. The Program must be chosen according to the sy stem - Prog 1 Sy stem protection program, when selected Prg1 led turns on. ( check 1.1.1 section) - Prog 2 Motor protection program, when selected Prg2 led turns on. ( check 1.1.2 section) - Prog 3 Full protection program, when selected Prg1 and Prg2 leds turn on. ( check 1.1.3 section) 3.3 Alarm Control Menu S Increase S Decrease Increase S Decrease ALr/CtrL : Alarms can be activ ated or deactiv ated in this menu and it is related to the output relay . For example; the occurance of an activ ated alarm switches of f the output relay , with the related alam led blinking. If a deactiv ated alarm occures, the output relay does not switch of f the output relay , only the related alarm led blinks.f or this reason the operator must caref ully which alarms would be av tiv ated and which would be deactiv ated. In automatic mode, when the alarm count reach the limit v alue within the specif ied period, the sy stem will be locked and the related alarm led and current or v oltage led (may be both) blink. To know which alarm occurred operator should use the direction buttons to reach the related alarm (current, v oltage or may be both) and observ e the f ailure phase. Resetting The Alarm: While f unctioning in the manual mode, if an alarm occurs (an activ ated alarm) then the relay switches of f the output contact with the related alarm led blinking. To reset the dev ice the operator must push the SET button until the reset led goes of f . The thing that must be awared of is that if the opeator releases the set button bef ore the reset button turns of f accidently , the main menu entry shows on, the operator has two options then; the f irst option is to enter the password (no matter the entry is wrong or correct) the use the direction buttons to reach the quit command and press SET button, the second option is to wait f or f our minutes without pushing any button.If the related alarm led turns of f again af ter a long push of the SET button, it means that the alarm situation is still present.In automatic mode, if the alarm count reaches the limit v alue within the specif ied period, the sy stem will be blockedas it does in the manual mode. Af ter f ixing the problem, the operator must push the SET button to reset the dev ice. ALr/out: It shows the relay s' (current and v oltage relay s) behav iour af ter passing the alarm situation. I f the current and v oltage output Com Phase relay s are going to be used indiv idually the Alr/out Value Volt should set to “0000”. Nuetral The connection way is shown in current the Figure next. ALr/out value “0000” (Individual) 3.2 Protection Program selection S Decrease Increase S Decrease Increase S Decrease Increase S Decrease Increase S Decrease S Exit ALr/out value“0001” (related) Increase Nuetral Com Volt current Phase Nuetral If the current and v oltage output relay s are going to be used together, the Alr/out Value should set to “0001”and the Com terminal must not be used. Unless both of the v oltage and current f ailures f ixed the output relay s will stay in the switch of f mode. The connection way is shown in the f igure next. Uust : When the ov er v oltage alarm's (Uust) v alue is (1) it is activ e, when (0) it is not activ e. The occurance of an ov er v oltage alarm while Uust is activ ated switches of f the output relay . When Uust is deactiv ated it does not control the output relay , it only makes the related alarm led blinks. UaLt : When the under v oltage alarm's (UaLt) v alue is (1) it is activ e, when (0) it is not activ e. The occurance of an under v oltage alarm while UaLt is activ ated switches of f the output relay . When UaLt is deactiv ated it does not control the output relay , it only makes the related alarm led blinks. UaSy : When the asy mmetric v oltage alarm's (UaSy ) v alue is (1) it is activ e, when (0) it is not activ e. The occurance of an asy mmetric v oltage alarm while UaSy is activ ated switches of f the output relay . When UaSy is deactiv ated it does not control the output relay , it only makes the related alarm led blinks. Aust : When the ov er current alarm's (Aust) v alue is (1) it is activ e, when (0) it is not activ e. The occurance of an ov er current alarm while Aust is activ ated switches of f the output relay . When Aust is deactiv ated it does not control the output relay , it only makes the related alarm led blinks. AaLt : When the under current alarm's (AaLt) v alue is (1) it is activ e, when (0) it is not activ e. The occurance of an under current alarm while AaLt is activ ated switches of f the output relay . When AaLt is deactiv ated it does not control the output relay , it only makes the related alarm led blinks. When Prg1 or Prg2 is selected, the AaLt will not be shpwn on the menu. AaSy : When the asy mmetric current alarm's (AaSy ) v alue is (1) it is activ e, when (0) it is not activ e. The occurance of an asy mmetric current alarm while AaSy is activ ated switches of f the output relay . When AaSy is deactiv ated it does not control the output relay , it only makes the related alarm led blinks.When Prg1 is selected, the AaLt will not be shown on the menu. quIt : To exit the menu. >>>> Page 25 DP-01-96 3.4 Current Settings Me nu: ® Digital Protector & Multimeter Current & Voltage Protection Curr/SEt : The menu where current settings are made. The operator must push the SET button to enter this menu and can go through the menu using the direction buttons. To change a setting, he must push the SET button, change the v lue using the direction buttons and push the set button again to store the new settings. The nenu's sub parameters are as f ollows, Ct : The current transf ormer ratio. Its v alue can be input by the operator between 5/5 A and 10000/5 A. It must be entered the same as the sy stem's current transf ormer ratio. YOn Lrn: Current transformer polarity direction learning: ( on – oFF) If it is “ on ” then the dev ice would learn the direction automatically . If the dev ice monted in new panel or the polarity somehow changed then it learns the new direction. If of f then the dev ice would learn the direction once and nev er learn it again. Of f position is required f or some loads. I f there would be a problem in the surrent transf ormer direction then the current transf ormer inputs shuld be switched. oSEt : Ov er current switch of f v alue. It can be set between Ct x 0.1 and Ct x 1.when the current v alue exceeds this v alue the switch of f occures af ter t2 delay time. uSEt : Under current switch of f v alue.It can be set between Ct x 0.1 and Ct x 1.This option is only av aliable on Pgr3. when the current v alue goes below this v alue the switch of f occures af ter t2 delay time. NOTE: Under current limit must not be set higher or equal to the over current limit . Check section 2.7 hyS : Percentage Hy steresis. It can be set between 0,03 and 0,50. It is used f or oSEt and uSEt both. Cuur/USt:Excessiv e switch of f current multiplier. It can be set between oSEt x 2 and oSEt x 10. When the current v alue exceeds the adjusted v alue the switch of f occures immediatley without waiting any delay . t-1 : Start delay time. It can be set between 1 and 60 seconds.It is not used in Pgr1. It is used to prev ent the switch of f f rom occurance because of the motor's inrush current. Its v alue will be reset af ter each time the current goes to zero. Within this period, the Excessiv e current multiplier, asy mmetric current, ov er and under v oltage are activ e. Only ov er and underv oltage alarms are deactiv ated. t-2 : Ov er and under current delay . It can be set between 1 and 30 seconds. Af ter this period the switch of f occurs if ov er or under current alarms occure. Asy/Curr : Percentage asy mmetric current. It can be set between % 5 and % 50. If the unbalance between the phases' current exceeds the adjusted v alue the switch of f occures af ter t4 delay . t-4 : asy mmetric current delay . It can be set between 1 and 30 seconds. When asy mmetric current occures the switch of f occures af ter this period. quIt : To exit the menu. 3.5 Voltage Settings M enu S Increase S Decrease Increase S Decrease Increase S Decrease Increase S Decrease Increase Decrease S VoLt/SEt : The menu where v oltage settings are made. The operator must push the SET button to enter this menu and can go through the menu using the direction buttons. To change a setting, he must push the SET button, change the v lue using the direction buttons and push the set button again to store the new settings.The nenu's sub parameters are as f ollows, ut/OrAn : The v oltage transf ormer ratio. Its v alue can be input by the operator between 1 and 1000. If no transf ormer is av aliable this v alue must be set to 1. SEt/UuSt : Ov er v oltage switch of f v alue. It can be set between 230V and 270V. This parameter shows the v oltage between the phase and the nuetral. If any phase v oltage exceeds the ajdusted v alue the switch of f occures af ter t3 delay . SEt/UaLt : Under v oltage switch of f v alue. It can be set between 170V and 210V. This parameter shows the v oltage between the phase and the nuetral. If any phase v oltage exceeds the ajdusted v alue the switch of f occures af ter t3 delay . ASy/VOLt : Percentage asy mmetric v oltage. It can be set between % 5 and % 40. If the unbalance between the phases' v oltage exceeds the adjusted v alue the switch of f occures af ter t4 delay . t-3/dLy : Switch of f time f or v oltages. It can be set between 1 and 30 seconds.It is used f or both ov er under under v oltage. quIt : To exit the menu. S Increase S Decrease Increase S Decrease Increase S Decrease Increase S Decrease Increase S Decrease Increase S S Decrease Increase S Decrease Increase S Decrease Increase S 3.6 Re s et Se ttings M e nu Increase rSEt/CtrL : It can be set as 1 or 0. 0: automatik reset 1: manual reset If 0 is selected, the dev ice resets itself automatically when the f ailure ends. If 1 is selected, the reset led tırns of f . Ev en if the f ailure ends the dev ice will stay in the lock mode until SET is pushed. If the f ailure continues the dev ice can not be reset. Check section 3.3 S Decrease Decrease 3.7 Pow er-on De lay M enu t-on/dLy : While Automatic reset is selcted (rSEt/CtrL = 0), it shows the delay time that dev ice will wait to switch on its output relay when f ailure ends af ter a switch of f It can be set between 2 and 120 seconds. S Exit Increase S Decrease >>>> Page 26 DP-01-96 ® Digital Protector & Multimeter Current & Voltage Protection 3.8 Locking T ime 3.8 Lock ing Pe riod: Increase Auto/tdLy : While operating in S automatic mode, if a f ailure repeats within a specif ied period the dev ice will Decrease be locked. To reset and remov e the problem SET button must be pushed until the reset led turns of f . This option helps the operator to estimate how f requent the alarms occure.This period can be set between 1 and 60 minutes. 3.9 Lock ing Counte r: Auto/Cntr : While operating in automatic mode, within the locking period, it shows af ter how many alarms the dev ice will be locked. To reset and remov e the problem SET button must be pushed until the reset led turns of f . This option helps the operator to estimate how f requent the alarms occure.It can be set between 2 and 10, or Inf (inf init). 3.9 Locking Counts Increase S Decrease 3.10 Passw ord M enu: If the entry was made by entering the correct password, this menu will show on. If y ou want to change the current passowrd push the SET button. Your password will be ask again. Enter y ou password as it has been explained in section 3.1. Af ter entering y our password the dev ice will ask y ou to enter the new password. Af ter entering the password y ou will hav e to conf irm the password entiering it again. If y our old password is correct and the new password enteries match the message “neu pass y es” will show and the password will be changed. If y our old password is wrong or the new password entries do not match the the message “neu pass no” will show and the old password will stay av aliable. The Factory Settings that are store d in the device's m e m ory are give n be low ; Ct ( Current transformer ratio ) : 5/5 A oSEt ( Over current set value ) :4A uSEt ( Under current set value ) :2A hyS ( hysteresis ) : % 10 Cuur/USt ( Sudden sw itch of f multiplier ): (oSEt) x 3 t-1 ( Start delay time ) : 20 sn t-2 ( Over-under current delay ) : 5 sn Asy/Cuur ( Asymmetric current ) : % 25 t-4 ( Asymmetric current alarm delay ) : 2 sn Set/UuSt ( Over voltage set value ) : 240 V Set/UaLt ( Under Voltage set value ) : 195 V Asy/VOLt ( Asymmetric voltage ) : % 15 t-3 ( Voltage alarms delay ) : 5 sn Protection Program : Prog 3 (full protection) rSEt/CtrL ( reset selection ) : 0 ( automatic reset) t-on ( pow er-on time ) : 5 seconds Auto/tdLy ( Locking Period) : 10 minutes Auto/Cntr ( Locking counter ) : 5 times Alarms : All active ALr/out value :“0000” Individual relays S Old Password S “ - ” slides pressing SET button Selecting Value S Digit slides pressing SET button TECHNICAL INFORMATIONS Rated Voltage (Un) : 220Vac Operating Range Frequency Supply Power Consumption Measurement Inputs Power Consumption Voltage Measurement Range Current Measurement Range S New Password Entry (first entry) “ - ” slides pressing SET button Selecting Value New Passw ord Approve d S Digit slides pressing SET button New Password Entry (second entry) S New Passw ord Rejecte d “ - ” slides pressing SET button Selecting Value S Display Ranges : (0,8-1,1) x Un : 50 Hz : < 8VA : : : : < 1VA (Phase-Neutral ) 30 - 300 Vac, 45-90 Hz (Phase-Phase) 30 - 600 Vac, 45-90 Hz (f or seconder current) 50 mA - 6 Amp AC : 0 - 999,9 kV : 0 - 999,9 M (W) : (CosΦ) 0,00 -1,00 ind. and kac. Mimimum Measurement Values : 50 mA , 25 V Measurement Sensitiv ity : %1±1 digit Gerilim Traf osu Oranı : 1 ............1000 Akım Traf osu Oranı : 5/5..........10000/5 A Display : 4 Digit LED display Relay Contact Current : max. 3A / 240Vac Dev ice Protection Class : IP 20 Connector Protection Class : IP 00 Operating Temperature : - 5 °C .... + 50 °C Operating Humidity : %15 ...... %95 (without condensation) Connection Ty pe : To the Front Panel Tap Dimensions : 96 x 96 x 80 mm Digit slides pressing SET button 3.11 Factory Se ttings M e nu Connection : Current Inputs Voltage Inputs S L1 L2 L3 2A 2A 2A N k1 I1 k2 l2 k3 l3 Old Password S “ - “ slides pressing SET button Selecting Value S X/5 A L1 N X/5 A 2A L1 Current Direction DP- 01- 96 N Auxiliary Supply Un : 230 Vac, 50 Hz ΔUn : (0.8 – 1.1)xUn Supply Power Consumption Measurement Power Consumption Voltage Measurement Range Current Measurement Range Measurement Category Equipment Protection Class : < 6 VA : < 1 VA : (Phase-Neutral)30-300 VAC, 45-90 Hz (Phase-Phase) 30-600 VAC, 45-90 Hz : 50mA – 6 Amp. AC : CAT III : Double Insulation - class II ( ) com Password Rejected The old setting lasts X/5 A L2 volt Password approved Factory setting are restored Digit slides pressing SET button L3 Current To restore the f actory setting or to remov e any unwanted changes made beof re. When y ou reach rtrn dFLt SET if y ou press SET button the dev ice will ask f or y our password. If the password entry is correct the dev ice will reset its memory and restore the f actory settings with the message “ rtrn dFLt y ES “ showing on the screen f or 3 seconds. In case of wrong entry the f actory settings will not be restored and the message “ rtrn dFLt no “ message will appear on the screen f or 3 seconds . Output Contacts Max. 3A / 240Vac >>>> Page 27 ® DAM – A - 72 DIGITAL UNIVERSAL AMPERMETER (True RMS) ► With Demand Te chnical Data Operational Voltage (Un): 220Vac Operating range : (0,8-1,1) x Un Frequency : 50 Hz Power Consumption : < 4VA Measurement Sensitiv ity : %1 +1 digit Current Transf ormer Ratio : 5/5..........10000/5 A Display : 4 Digits Led Display Protection Class : IP 20 Terminal Protection Class: IP 00 Operation Temperature: - 5 °C .... + 50 °C Operation Humidity : %15 ...... %95 (without consensation) Installation : to the panel tap Dimensions : DA – A – 96 ( 96x96x80 mm) : DA – A – 72 ( 72x72x80 mm) Ge ne ral Inform ations The dev ice can be used in electrical panels, laboratories and test dev ices. With the assistance of a current transf ormer, it measures the AC current passing through the sy stem in terms of Amper unite. Af ter energizing the dev ice, “dA -A “ message appears on it's screen f or 2 seconds and then it starts to show the current v alue ■ The current transf ormer ratio can be adjusted between 5/5 and 10000/5 using the touch buttons on the f ront panel of the dev ice. ■ Stores the maximum demand v alue and the peak v alue on its memory and keeps these v alues ev en if the energy supply goes of f . ■ When the measured v alue of the seconder current reaches 5,1 A, “ Ov Er” message starts to f lash on the screen to warn the user that the v alue of the current exceeded the limit v alues. Button Functions : Using the direction buttons, it is possible to go through the nemu up and down. “SEt” message will appear on the screen if the set button pressed. To set one of the parameters set button must be pressed again inorder to enter that menu. The f irst parameter that can be set in the set menu is transf ormer's primer current v alue, that would f lash on the screen with the message “ CtrF” while setting. Pressing the set button and the direction buttons can increase and decrease this v alue “ between 5 and 10000”. af ter reaching the required v alue set button should be pressed to store this v alue on the dev ice. Af ter that pressing the down button leads to the demand time setting with dd-t f lashing on the screen. To make an adjustment, set button must be pushed. With the direction buttons the v alue can be adjusted “between 10 and 60 minutes”. Af ter reaching the required v alue pressing set button would store this v alue. Next what would appear in the SEt menu pressing the down direction button is qUit. Pressing the set button would exit the set menu. The next menu af ter set menu is Clr, “ can be reached by pressing down button”. To clear the maximum demand and the peak v alue set button must be pressed. Af ter the Clr menu qUit show appear. Pressing set there would return the screen to the measurement screen. While in measurement screen, pressing the up direction button shows the maximum peak current v alue occurred since the last operation done, pressing the down direction button shows the maximum demand occurred since last Clr operation done. SET Entrance to the parameters SET Current transformer value Increase SET Dec rease SET Clears the demand and peak v alues Demand time Increase SET Dec rease SET Exit SET Connection Scheme: Current direction L1 N X/5 A L1 N Auxiliary supply 230 Vac,50 Hz k1 l1 Current Transformer inputs (X / 5 A) Warning !!! - The message Err1 or Err2 on the screen means that the dev ice has got a f ailure - Can not be used without current transf ormer, a current that is higher that 5 A passing through the measurement inputs may damage the dev ice. - To clean the dev ice use dry dustcloth af ter de-energizing the dev ice >>>> Page 28 ® DAM – B - 72 DIGITAL UNIVERSAL AMPERMETER (True RMS) ► With Demand ► Over Current Adjustment General Informations The dev ice can be used in electrical panels, laboratories and test dev ices. With the assistance of a current transf ormer, it measures the AC current passing through the sy stem in terms of Amper unite. If the current exceeds the adjusted current then then alarm led starts to blink and af ter the the adjusted time delay it changes the outputs possition. When the current exceeds the adjusted ov er current v alue the dev ice starts to count f or the adjusted delay time and af ter that it opens its output contacts. Af ter energizing the dev ice, “dA -b “ message appears on it's screen f or 2 seconds and then it starts to show the current v alue. ■ The current transf ormer ratio can be adjusted between 5/5 and 10000/5 using the touch buttons on the f ront panel of the dev ice. ■ Stores the maximum demand v alue and the peak v alue on its memory and keeps these v alues ev en if the energy supply goes of f . ■ When the measured v alue of the seconder current reaches 5,1 A, “ Ov Er” message starts to f lash on the screen to warn the user that the v alue of the current exceeded the limit v alues. Fast Buttons: While in measurement screen, pressing up button shows the peak value Pressing down button shows the maximum demand value current f or start up”. In this period opening wouldn't occure ev en if the current exceeds the adjusted ov er current v alue. If this v alue is set to “0000” the the dev ice will wait f or the delay time d-t and then opens its output. ► r-t : Return time. The time required to turn back f rom an alarm situation. The dev ice waits f or that period af ter the current returns below the adjusted v alue. It can be set between 2 and 10 seconds. ► dd-t : Demand time. The time required to return back f rom an alarm. The dev ice waits f or that period af ter the current returns below the adjusted ov er current limit v alue. It can be set between 2 and 10 seconds. ► CO : The menu to adjust the output contact possition. ■ if the v alue is set to 0000 then the output in normal situation is closed contact and is alarm situation is open contact. ■ if the v alue is set to 0001 then the output in normal situation is open contact and is alarm situation is closed contact. ► LtCh : Latch function. The place to choose wether the dev ice will go out of an alarm manually or automatically ■ if the v alue is set to 0000 then the latch f unction is of f and the dev ice will go out of the alarm automatically ■ if the v alue is set to 0001 then the latch f unction is on and the dev ice wouldn't go out of the alarm unless the user presses the set button until the alarm led turns of f . If pressed, then dev ice then will go out of the alarm af ter the delay time r-t. ► tP : Sudden opening f unction. If the current goes ov er %150 of the adjusted ov er current v alue the the dev ice will open its output without any delay . ■ if 0000 then the f unction is disabled . ■ if 0001 then the f unction is enabled. ( not activ e while start delay time (Sd-t)). ► quıt : Pressing set leads to the main menu. ► quıt : Pressing set leads to the measurement screen. Button Functions : To enter the menu set button must be pressed. Within the menu, the parameters can e reached using the direction buttons. To inter the desired menu set button must be pushed again. This parameters can be adjusted using the direction buttons, pressing the set button again stores the new parameters. Main Menu : Pressing on the set button leads to the main menu. The menu contains OP, CLr, SEt and quIt in order. ► OP: Shows the opening counter “ that occures when the adjusted ov er current v alues being exceeded. I(A) ► Clr: Peak and maximum demand v alues can be cleared in this menu. To enter this menu, set button must be pressed. cALL, c-OP, c-dp and (SP) x 1,50 quIt submenus are included within this menu. ► cALL : It is used to clear all peak, maximum demand and opening counter v alues by pressing the set button. ► c-OP : It is used only to clear the opening counter v alue. ► c-dp : It is used only to clear the peak and the maximum SP demand v alues. % hYS ► quIt : To exit the submenus and return back to the main menu. ► Set : The menu that parameters can be adjusted in. to enter this menu set button must be pressed. ctrF, SP, hYS, d-t, Sd-t, r-t, dd-t, CO, LtCh, tP, and quıt submenus are included within this menu. These parameters will f lash on the screen. In order to change any of Sd-t d-t them set button must be pressed, then the screen will stop f lashing and using the direction buttons the new v alue can be applied. Re CO =0000 Pressing the set button again would store this v alue. ► ctrF : Current transformer ratio. It can be set between 5 and Re CO=0001 10000. Inorder to set the v alue, set button must be pressed then using the direction button the aimed v alue can be set. Pressing set again would store the new v alue. ► SP : Over current value set menu. It can be set between the Technical Data maximum current allowed f or the current transf ormer and Operational Voltage (Un) %10 of the that v alue. For example f or 500/5A Operating range transf ormer, it can be set between 50 and 500A. Frequency ► hYS : The percentage Hysteresis value. It can be adjusted Power Consumption between 0,03 and 0,50. When the current exceeds the Measurement Sensitiv ity adjusted ov er current v alue then an opening occures. Current Transf ormer Ratio In order to close the output contact again, the current Display must go below the adjusted ov er current v alue multiplied Contact Current by the %hYS, otherwise it will keep the output open. Protection Class ► d-t : Delay time. It can be adjusted between 1 and 30 seconds. Terminal Protection Class The opening of current exceeding adjusted current limit Operating Temperature occures af ter this delay . Operating Humidity ► Sd-t : Start delay time. It can be set btween 0 and 60 seconds. It is used to prev ent any unwanted opening while current Installation is starting f rom 0 “ especially f or motors that need high Dimentions t r-t r-t t P=0001 d-t r-t t P=0000 t t : 220Vac : (0,8-1,1) x Un : 50 Hz : < 4VA : %1 +1 digit : 5/5..........10000/5 A : 4 Digits Led Display : Max. 3A / 240Vac : IP 20 : IP 00 : - 5 °C .... + 50 °C : %15 ...... %95 (without condensation) : to the panel tap : 72x72x80 mm >>>> Page 29 ® DAM – B - 72 DIGITAL UNIVERSAL AMPERMETER (True RMS) ► With Demand ► Over Current Adjustment SET Opening counter SET Clears all Memory SET SET SET Papameters entrance SET SET Exit Clears only opening counters Clears only peak and max. demand values SET ▲ Increase SET ▼ ▲ Decrease Increase SET ▼ ▲ Decrease Decrease Decrease Decrease Decrease Decrease Decrease Contact possition 0000 – normally off 000I – normally on Increase SET ▼ ▲ Demand time 10 – 60 (minutes) Increase SET ▼ ▲ Returning time 2 – 10 (seconds) Increase SET ▼ ▲ Start delay time 1 – 60 (seconds) Increase SET ▼ ▲ Delay time 1 – 30 (seconds) Increase SET ▼ ▲ Hysteresis value 000.3 (%3) – 00.50 (%50) Increase SET ▼ ▲ Over current Adjustment value Increase SET ▼ ▲ Current transformer value 5 – 10000 A Decrease Latch fonction 0000 – Disabled (automatic) 000I – Enabled (manual) Increase SET ▼ Decrease Sudden opening function 0000 – Disabled 000I – Enabled SET Connection Scheme: Current direction L1 N X/5 A Re L1 Auxiliary supply 230 Vac,50 Hz k1 N Output Contact 3A / 240Vac l1 Current Transformer inputs (X / 5 A) Warning !!! - The message Err1 or Err2 on the screen means that the dev ice has got a f ailure - Can not be used without current transf ormer, a current that is higher that 5 A passing through the measurement inputs may damage the dev ice. - To clean the dev ice use dry dustcloth af ter de-energizing the dev ice >>>> Page 30 ® DAM – C - 72 DIGITAL UNIVERSAL AMPERMETER (True RMS) ► With Demand ► Over & Under Current Adjustment General Informations The dev ice can be used in electrical panels, laboratories and test dev ices. With the assistance of a current transf ormer, it measures the AC current passing through the sy stem in terms of Amper unite. When the current exceeds the adjusted ov er current or goes below the adjusted under current v alues the dev ice starts to count f or the adjusted delay time and af ter that it changes Re1 or Re2 outputs contact possition. Af ter energizing the dev ice, “dA -c “ message appears on it's screen f or 2 seconds and then it starts to show the current v alue. ■ The current transf ormer ratio can be adjusted between 5/5 and 10000/5 using the touch buttons on the f ront panel of the dev ice. ■ Stores the maximum demand v alue and the peak v alue on its memory and keeps these v alues ev en if the energy supply goes of f . ■ When the measured v alue of the seconder current reaches 5,1 A, “ Ov Er” message starts to f lash on the screen to warn the user that the v alue of the current exceeded the limit v alues Fast Buttons: While in measurement screen, pressing up button shows the peak value Pressing down button shows the maximum demand value adjusted current limit occures af ter this delay . ► Sd-t : Start delay time. It can be set btween 0 and 60 seconds. It is used to prev ent any unwanted opening while current is starting f rom 0 “ especially f or motors that need high current f or start up”. In this period opening wouldn't occure ev en if the current exceeds the adjusted ov er current v alue. If this v alue is set to “0000” the dev ice will wait f or the delay time d-t and then opens its output. ► r-t : Return time. The time required to turn back f rom an alarm situation. The dev ice waits f or that period af ter the current returns below the adjusted v alue. It can be set between 2 and 10 seconds. ► dd-t : Demand time. The time required to return back f rom an alarm. The dev ice waits f or that period af ter the current returns below the adjusted ov er current limit v alue. It can be set between 2 and 10 seconds. ► o-CO : The menu to adjust the ov er current output contact possition. ■ if the v alue is set to 0000 then the output in normal situation is closed contact and in ov er current alarm situation is open contact. ■ if the v alue is set to 0001 then the output in normal situation is open contact and in ov er current alarm situation is closed contact. ► u-CO : The menu to adjust the under current output contact possition. ■ if the v alue is set to 0000 then the output in normal situation is closed contact and in under current alarm situation is open contact. ■ if the v alue is set to 0001 then the output in normal situation is open contact and in ov er current alarm situation is closed contact. ► LtCh : Latch function. The place to choose wether the dev ice will go out of an alarm manually or automatically ■ if the v alue is set to 0000 then the latch f unction is of f and the dev ice will go out of the alarm automatically ■ if the v alue is set to 0001 then the latch f unction is on and the dev ice wouldn't go out of the alarm unless the user presses the set button until the alarm led turns of f . If pressed, then dev ice then will go out of the alarm af ter the delay time r-t. ► tP : Sudden opening f unction. If the current goes ov er %150 of the adjusted ov er current v alue the the dev ice will open its output without any delay . ■ if 0000 then the f unction is disabled . ■ if 0001 then the f unction is enabled. ( not activ e while start delay time (Sd-t)). ► quıt : Pressing set leads to the main menu. ► quıt : Pressing set leads to the measurement screen. Button Functions : To enter the menu set button must be pressed. Within the menu, the parameters can e reached using the direction buttons. To inter the desired menu set button must be pushed again. This parameters can be adjusted using the direction buttons, pressing the set button again stores the new parameters. Main Menu : Pressing on the set button leads to the main menu. The menu contains o-OP, u-OP, CLr, SEt and quIt in order. ► OP : Shows the opening counter “ that occures when the adjusted ov er current v alues being exceeded ► CLr : Peak and maximum demand v alues can be cleared in this menu. To enter this menu, set button must be pressed. cALL, c-OP, c-dp and quIt submenus are included within this menu. ► cALL : It is used to clear all peak, maximum demand and opening I(A) counter v alues by pressing the set button. ► c-OP : It is used only to clear the opening counter v alue. ► c-dp : It is used only to clear the peak and the maximum demand v alues. ► quIt : To exit the submenus and return back to the main menu. ► Set : The menu that parameters can be adjusted in. to enter this menu set button must be pressed. CtrF, o-SP, u-SP, hYS, od-t, ud-t, Sd-t, o-SP %hYS r-t, dd-t, o-CO, u-CO, LtCh, tP, and quıt submenus are included within this menu. These parameters will f lash on the screen. In %hYS order to change any of them set button must be pressed, then the u-SP screen will stop f lashing and using the direction buttons the new v alue can be applied. Pressing the set button again would store this v alue. Sd-t ► ctrF : Current transformer ratio. It can be set between 5 and 10000. In order to set the v alue, set button must be pressed then Re o-CO =0000 Over using the direction button the aimed v alue can be set. Pressing set Re again would store the new v alue. o-CO=0001 Over ► o-SP : Over current value set menu. It can be set between the Re u-CO =0000 Under maximum current allowed f or the current transf ormer and %10 of Re the that v alue. For example f or 500/5A transf ormer, it can be set u-CO =0001 Under between 50 and 500A. ► u-SP : Under current value set menu. It can be set between Technical Data the maximum current allowed f or the current transf ormer and %10 Operational Voltage (Un) of the that v alue. Operating range ► hYS : The percentage Hysteresis value. It can be adjusted Frequency Power Consumption between 0,03 and 0,50. When the current exceeds the adjusted Measurement Sensitivity ov er current v alue then an opening occures. Inorder to close the Current Transformer Ratio output contact again, the current must go below the adjusted ov er Display current v alue multiplied by the %hYS, otherwise it will keep the Contact Current output open. Protection Class Terminal Protection Class ► od-t : Delay time for over current alarm. It can be adjusted Operating Temperature between 1 and 30 seconds. The opening of current exceeding Operating Humidity adjusted current limit occures af ter this delay . ► ud-t : Delay time for under current alarm. It can be adjusted Installation between 1 and 30 seconds. The opening of current exceeding Dimentions od-t r-t : 220Vac : (0,8-1,1) x Un : 50 Hz : < 4VA : %1 +1 digit : 5/5..........10000/5 A : 4 Digits Led Display : Max. 3A / 240Vac : IP 20 : IP 00 : - 5 °C .... + 50 °C : %15 ...... %95 (without condensation) : to the panel tap : 72x72x80 mm ud-t r-t >>>> Page 31 ® DAM – C - 72 DIGITAL UNIVERSAL AMPERMETER (True RMS) ► With Demand ► Over & Under Current Adjustment Connection Scheme: SET Current direction L1 N X/5 A Over Opening counter Re 2 Clears all Memory SET Under Opening counter Clears only opening counters SET SET Papameters entrance SET SET Clears only peak and max. demand values SET SET Exit Exit ▲ Increase SET ▼ ▲ Decrease Increase SET ▼ ▲ Decrease Decrease Decrease Decrease Decrease Decrease Decrease Decrease Decrease Decrease Decrease Decrease SET Latch fonction 0000 – Disabled (automatic) 000I – Enabled (manual) Increase SET ▼ Contact possition (Under) 0000 – normally off 000I – normally on Increase SET ▼ ▲ Contact possition (Over) 0000 – normally off 000I – normally on Increase SET ▼ ▲ Demand time 10 – 60 (minutes) Increase SET ▼ ▲ Returning time 2 – 10 (seconds) Increase SET ▼ ▲ Start delay time 1 – 60 (seconds) Increase SET ▼ ▲ Delay time for under current 1 – 30 (seconds) Increase SET ▼ ▲ Delay time for over current 1 – 30 (seconds) Increase SET ▼ ▲ Hysteresis value 000.3 (%3) – 00.50 (%50) Increase SET ▼ ▲ Under current Adjustment value Increase SET ▼ ▲ Over current Adjustment value Increase SET ▼ ▲ Current transformer value 5 – 10000 A Sudden opening function 0000 – Disabled 000I – Enabled L1 Auxiliary supply 230 Vac,50 Hz N Under Output Contact 3A / 240Vac Re 1 Over Output Contact 3A / 240Vac k1 l1 Current Transformer inputs (X / 5 A) W arning !!! - The message Err1 or Err2 on the screen means that the device has got a failure - Can not be used without current transformer, a current that is higher that 5 A passing through the measurement inputs may damage the device. - Clean the device using dry dustcloth after de-energizing the device - o-SP and u-SP must be set as shown in the graphic below without having any intersection , otherwise Eror message will show on the screen. >>>> Page 32 ® DAM – D - 72 DIGITAL UNIVERSAL AMPERMETER (True RMS) ► 2 Over Current Set ► CO : The menu to adjust the output contact possition. ■ if the v alue is set to 0000 then the output in normal situation is closed contact and is alarm situation is open contact. ■ if the v alue is set to 0001 then the output in normal situation is open contact and is alarm situation is closed contact. ► LtCh : Latch function. The place to choose wether the dev ice will go out of an alarm manually or automatically ■ if the v alue is set to 0000 then the latch f unction is of f and the dev ice will go out of the alarm automatically ■ if the v alue is set to 0001 then the latch f unction is on and the dev ice wouldn't go out of the alarm unless the user presses the set button until the alarm led turns of f . If pressed, then dev ice then will go out of the alarm af ter the delay time r-t. ► cut : Sudden opening function. If the current goes ov er %150 of the adjusted ov er current v alue the the dev ice will open its output without any delay . ■ if 0000 then the f unction is disabled . ■ if 0001 then the f unction is enabled. ( not activ e while start delay time (Sd-t)). ► quıt : Pressing set leads to the measurement screen. General Informations The dev ice can be used in electrical panels, laboratories and test dev ices. With the assistance of a current transf ormer, it measures the AC current passing through the sy stem in terms of Amper unite. Two ov er current set ( SP1, SP2 ) with a dif f erent output contact f or each.The f irst set v alue is SP2, the higher one is SP1. When the current exceeds the adjusted f irst ov er current v alue (SP2) then the alarm1 led will start to blink and af ter the set delay time, the dev ice would change the possition of the Re2 output contact. If the current exceeds the higher ov er current v alue the dev ice opens its 1st output too. The current is called normal if it is below these two limits. Af ter energizing the dev ice, “dA -d “ message appears on it's screen f or 2 seconds and then it starts to show the current v alue.Ev en when the power supply is of f , the stored v alues will not be deleted. ■ When the measured v alue of the seconder current reaches 5,1 A, “ Ov Er” message starts to f lash on the screen to warn the user that the v alue of the current exceeded the limit v alues. Button Functions : To enter the menu set button must be pressed. Within the menu, the parameters can e reached using the direction buttons. To inter the desired menu set button must be pushed again. This parameters can be adjusted using the direction buttons, pressing the set button again stores the new parameters. I(A) Fast Buttons: While in measurement screen, pressing up button shows SP1 SP1 Pressing down button shows SP2 %hYS SP2 Parameter entrance : %hYS It can be reached pressing the set button. Set : The menu that parameters can be adjusted in. to enter this menu set button must be pressed. CtrF, SP1,d-t1, SP2, d-t2, hYS, Sd-t, r-t, CO, LtCh, cut, and quıt submenusare included within this menu. These parameters will f lash on the screen. In order to change any of them set button must be pressed, then the screen will stop Sd-t d-t2 f lashing and using the direction buttons the new v alue can be applied. Pressing the set button again would store this v alue. CO =0000 ► ctrF : Current transformer ratio. It can be set between 5 and Re1 10000. Inorder to set the v alue, set button must be pressed then Re CO=0001 1 using the direction button the aimed v alue can be set. Pressing set Re CO =0000 again would store the new v alue. 2 ► SP1 : Higher over current value set menu. It can be set Re CO =0001 between the maximum current allowed f or the current transf ormer 2 and %10 of the that v alue. For example f or 500/5A transf ormer, it can be set between 50 and 500A. ► d-t1 : Delay time for the higher over current alarm( SP1). It can be adjusted between 1 and 30 seconds. The opening of current exceeding adjusted current limit occures af ter d-t1 delay . ► SP2 : First over current value set menu. It can be set between the maximum current allowed f or the current transf ormer and %10 Technical Data of the that v alue. For example f or 500/5A transf ormer, it can be set Operational Voltage (Un) between 50 and 500A. Operating range ► d-t2 : Delay time for the first over current alarm( SP1). Frequency It can be adjusted between 1 and 30 seconds. The opening of Power Consumption current exceeding adjusted current limit occures af ter d-t2 delay . Measurement Sensitiv ity ► hYS : The percentage Hysteresis value. It can be adjusted Current Transf ormer Ratio between 0,03 and 0,50. When the current exceeds the adjusted ov er Display current v alue then an opening occures. Inorder to close the output Contact Current contact again, the current must go below the adjusted ov er current Protection Class v alue multiplied by the %hYS, otherwise it will keep the output open. Terminal Protection Class ► Sd-t : Start delay time. It can be set btween 0 and 60 seconds. Operating Temperature It is used to prev ent any unwanted opening while current is starting Operating Humidity f rom 0 “ especially f or motors that need high current f or start up”. In this period opening wouldn't occure ev en if the current exceeds Installation the adjusted ov er current v alue. Dimentions If this v alue is set to “0000” the the dev ice will wait f or the delay time d-t1 and then opens its output. ► r-t : Return time. The time required to turn back f rom an alarm situation. The dev ice waits f or that period af ter the current returns below the adjusted v alue. It can be set between 2 and 10 seconds. t d-t1 r-t r-t t t t t : : : : : : : : : : : : 220Vac (0,8-1,1) x Un 50 Hz < 4VA %1 +1 digit 5/5..........10000/5 A 4 Digits Led Display Max. 3A / 240Vac IP 20 IP 00 - 5 °C .... + 50 °C %15 ...... %95 (without condensation) : to the panel tap : 72x72x80 mm >>>> Page 33 ® DAM – D - 72 DIGITAL UNIVERSAL AMPERMETER (True RMS) ► 2 Over Current Set SET ▲ Increase Akım trafo değeri 5 – 10000 A SET ▼ ▲ Decrease Increase Higher Over Current Set Value SET ▼ ▲ Decrease Increase Delay time for SP1 1 – 30 (seconds) SET ▼ ▲ Decrease Increase First Over Current Set Value SET ▼ ▲ Decrease Increase Delay time for SP2 1 – 30 (seconds) SET ▼ ▲ Decrease Increase SET ▼ ▲ Decrease Hysteresis value 000.3 (%3) – 00.50 (%50) Increase SET ▼ ▲ Decrease Increase SET ▼ ▲ Decrease Decrease Contact possition 0000 – normally off 000I – normally on Increase SET ▼ ▲ Return time 2 – 10 (sn) Increase SET ▼ ▲ Start delay time 1 – 60 (seconds) Decrease Latch fonction 0000 – Disabled (automatic) 000I – Enabled (manual) Increase SET ▼ Decrease Sudden opening function 0000 – Disabled 000I – Enabled SET Exit Connection Scheme: Current direction L1 N X/5 A L1 N Auxiliary supply 230 Vac,50 Hz Re 2 Re 1 First over Higher over Output Contact 3A / 240Vac Output Contact 3A / 240Vac k1 l1 Current Transformer inputs (X / 5 A) Warning !!! - The message Err1 or Err2 on the screen means that the dev ice has got a f ailure - Can not be used without current transf ormer, a current that is higher that 5 A passing through the measurement inputs may damage the dev ice. - To clean the dev ice use dry dustcloth af ter de-energizing the dev ice >>>> Page 34 DV – 72 - 01 DIGITAL VOLTMETER & FREQUENCYMETER ► True RMS General Informations The dev ice measures the RMS v alue of the AC v oltage and the f requency . It shows the v oltage on the upper display and the f requency v alue on the buttom display simultaneously . Voltage can be measured within the range of 10-500 V. Frequency can be measured with in the range of 40-100 Hz Installation Instructions: ■ Read the user instructions and cautions bef ore installation. ■ Be sure that the panel y ou are installing in is not energized. ■ The dev ice is designed to be installed to the f ront panel tap, use the small f ixing apparatus to stabilize the dev ice to the f ront panel tap. ■ Do not under any case open the f ront panel of the dev ice. ■ Open the Terminals at the back side of the dev ice af ter y ou are sure that no energy is connected to the panel. Connect the dev ice as shown in the connection scheme. ■ Be sure that the terminals are connected tight to the dev ice. ■ Use a switch between the energy network and the dev ice's supply and measurement inputs in order to switch of f the dev ice if required. Use 1A FF f use between switchs and all inputs. ® DV – 72 - 03 DIGITAL TRIPHASE VOLTMETER & FREQUENCYMETER ► True RMS General Informations In triphase sy stems, the dev ice measures the RMS v alue of the AC v oltage and the f requency . It shows the v oltage on the upper display and the f requency v alue on the buttom display simultaneously . Using the button on the dev ice phase – neutral and phase – phase v oltage scan be seen. Voltage can be measured within the range of 10-500 V. NOTE : L1_N is the dev ice's supply input. For that reason the v oltage applied to L1 _N should be the rated v oltage in the sy stem. Frquency measurement must be within the rate f rquency ranges. Installation Instructions: ■ Read the user instructions and cautions bef ore installation. ■ Be sure that the panel y ou are installing in is not energized. ■ The dev ice is designed to be installed to the f ront panel tap, use the small f ixing apparatus to stabilize the dev ice to the f ront panel tap. ■ Do not under any case open the f ront panel of the dev ice. ■ Open the Terminals at the back side of the dev ice af ter y ou are sure that no energy is connected to the panel. Connect the dev ice as shown in the connection scheme. ■ Be sure that the terminals are connected tight to the dev ice. ■ Use a switch between the energy network and the dev ice's supply and measurement inputs in order to switch of f the dev ice if required. Use 1A FF f use between switchs and all inputs. DV-72-03 Dis play Functions Conne ction Sche m e : L3 L2 L1 N DV-72-01 Conne ction Sche m e : 1A 1A 1A L3 L2 L1 VX2 Measurement Input N Supply Input Technical Data Rated Voltage (Un) Operating Range Frequency Supply Power Consumption Measurement input Measurement Frequency Measurement Power Consumption Measurement Sensitiv ity Display Dev ice Protection Class Connector Protection Class Temperature Humidity Connection Ty pe Dimensions : 220 VAC : (0.8 – 1.1)xUn : 50 Hz : < 4 VA : 10 – 500 Vac : 40 / 100 Hz : : : : : : : : : <1VA 1% + digit Two lines of 3 Digits LED display IP20 IP00 -5°C....+50°C 15% ...... 95% (without condensation) To f ront panel tap 72x72x80 mm V 2N Supply Voltage 1A L V Hz N Te chnical Data VX1 V 1N Hz L2 L N V 1A Measurement Input 1A L1 Rated Voltage (Un) Operating Range Frequency Supply Power Consumption Measurement input Measurement Frequency Measurement Power Consumption Measurement Sensitiv ity Display Dev ice Protection Class Connector Protection Class Temperature Humidity Connection Ty pe Dimensions : 220 VAC ( L1-N) : (0.8 – 1.1)xUn : 50 / 60 Hz L3 : < 4 VA : 10 – 500 Vac L1 L2 V V 3N Hz V V 12 Hz : 40 / 100 Hz : <1VA (f or each phase) : 1% + digit : Two lines of 3 Digits LED display : IP20 : IP00 : -5°C....+50°C : 15% ...... 95% (without condensation) : To f ront panel tap : 72x72x80 mm L2 L3 V V 23 Hz L1 L3 V Hz Dim ensions For Hole On The Panel : 68 x 68 mm Dim ens ions For Hole On The Pane l : 68 x 68 mm Warning !!! ■ The message Er1 or Er2 on the screen means that the dev ice has got a f ailure ■ Clean the dev ice using dry dustcloth af ter de-energizing the dev ice ■ Please read and f ollow the instructions mentioned in this user manual. Warning !!! ■ The message Er1 or Er2 on the screen means that the dev ice has got a f ailure ■ Clean the dev ice using dry dustcloth af ter de-energizing the dev ice ■ Please read and f ollow the instructions mentioned in this user manual. V 13 >>>> Page 35 ® DV – 72 - 01C DIGITAL VOLTAGE & FREQUENCY MONITORING DEVICE ► True RMS Over and/or Under Frequency Protection : ( 40 – 70 Hz ) Under f requency can be adjusted be tween (u-F) = 40 Hz .......[(o-F)-0,4] Ov er f requency can be adjusted between (o-F) = [(u-F) + 0,4]..... 70 Hz. It is possible to activ ate one or two of these protections or deactiv ate them both. ■ If o-F = 55 Hz and u-F = oFF then the dev ice protects f rom ov er f requency ( if the f requency exceeds 55hz then the dev ice shows o-F on the buttom screen and opens its output contact at the end of t-2 delay ). ■ If o-F = oFF and u-F = 45 Hz then the dev ice protects f rom under f requency ( if f requency drops below 45Hz then the dev ice shows u-F on the buttom screen and opens its output contact at the end of t-2 delay ). ■ If o-F = oFF and u-F = oFF then the f requency protection is disabled. f (Hz) L1,L2,L3 Over Frequency 55 Hz(o-F) General Informations The dev ice measures the True RMS v alue of the v oltage and f requency in mono phase sy stems accurately . It is possible to observ e the v oltage v alue in the upper screen and the f requency v alue in the buttom screen simultaneously . The dev ice contains many protections as f ollowes: ■ Ov er Voltage protection. ■ Under v oltage protection: ■ Ov er f requency protection. ■ Under f requency protection. As the dev ice is beeing installed it closes its output contact if the v oltage and f requency v alues are within the adjusted ranges. In case of any prev ious mentioned f aults the the dev ice opens its output contact at the end of delay adjusted by user. When the v alues return withiin the adjusted ranges the dev ice closes its output contacts at the end of an adjusted delay . t-2 Normal Normal Under Voltage t t-1 t-3 t-1 t-3 Re t Locking Property : It can be controlled by two parameters; Locking Time and Locking Counter. If the number of openning reaches the adjusted locking counter within the adjusted locking time then the dev ice opens its output contact and locks its f unctions until the user pressed Reset button. If the locking counter is adjusted to oto then this f unction is inactiv e and the dev ice nev er locks itself L-t : Locking Time ( 001 – 060 minutes ) It is well known the the f requentely occuring f aults may damage the sy stem. For that the dev ice locks itself when the number of f aults reaches the adjusted locking number within this locking time. This way the sistem is protected and the user has the chance to inv estigate the problem. L-C : Locking Counter ( oto , 001 – 010 ) The number of the f aults allowed within the period L-t. If the number of the f aults exceeds this adjusted counter v alue then the dev ice locks itself . The user must press Reset button agter the f ault passes in order to unlock the dev ice. If L-C is set to oto then this property is inactiv e. If : L-C (Locking counter) = 2 L-t (Locking time) = 3 minutes V Over Voltage 1. Fault (o-U) Over Voltage 2. Fault Normal L1,L2,L3 Normal (u-U) t t-1 t-3 t-1 t-3 Locking Occures t Re < 3 Minutes Reset Button is pushed and locking is ended. t-2 t t-3 Re L1,L2,L3 Umin (u-U) t-3 t Parameters : The menu where protection f unctions are adjusted. To enter this menu press set button until set is shown on the nuttom screen. Parameters are as f ollow: V Over Voltage Normal Under Frequency Over&Under Voltage : (o-U) (u-U) Ov er v oltage (o-U), it can v e adjusted between Umax= (230 – 290 V). Under v oltage (u-U), it can v e adjusted between Umin=(150 – 210 V). ■ If the v oltage drops below the adjusted under v oltage limit then u-U shows on the screen and the dev ice closes it output contact af ter t-1 delay . ■ If the v oltage excceeds the adjusted ov er v oltage limit then o-U shows on the screen and the dev ice closes it output contact af ter t-1 delay . The hy steresis v alue is 6V. Umax (o-U) Normal 45 Hz (u-F) ► o-U : Over Voltage Adjustment ( 230 V – 290 V ) If the phase – phase v oltage exceeds the adjusted v alue then the dev ice opens it output contacts at the end of t – 1 delay . ► u-U : Under Voltage Adjustment ( 150 V – 210 V) If the phase – phase v oltage drops below the adjusted v alue then the dev ice opens it output contacts at the end of t – 1 delay . ► t-1 : Openning Delay (Voltage) ( 00,1 – 99,9 seconds) If any of v oltage f aults occurs, and if it lasts f or t-1 period then the dev ice opens its output contact. ► t-2 : Openning Delay (Frequency)( 00,1 – 99,9 seconds) If any of f reuqency f aults occurs, and if it lasts f or t-2 period then the dev ice opens its output contact. ► t-3 : Returning Delay (Voltage and Frequency)( 00,1 – 99,9 seconds) To close the output contact af ter openning because of both v oltage and f requency f aults, the v alues should return to the normal ranges and af ter t-3 delay the dev ice closes its output contact. ► L-t : Locking Time ( 001 – 060 minutes ) The dev ice locks itself when the number of f aults reaches the adjusted locking number within this locking time. This way the sistem is protected and the user has the chance to inv estigate the problem. ► L-C : Locking Counter ( oto , 001 – 010 ) The number of the f aults allowed within the period L-t. If the number of the f aults exceeds this adjusted counter v alue then the dev ice locks itself . The user must press Reset button agter the f ault passes in order to unlock the dev ice. If L-C is set to oto then this property is inactiv e. ► o-F : Over Frequency Adjustment It can be set between (o-F) = [(u-F) + 0,4]..... 70 Hz. If it is set to o-F = oFF then this protection is disabled. ► u-F : Under Frequency Adjustment It can be set between (u-F) = 40 Hz .......[(o-F) – 0,4] . If it is set to u-F = oFF then this protection is disabled. ► qut : Quit If Set button is pressed there then the dev ice goes back to the measurement screen. TECHNICAL DATA: Rated Voltage (Un) Operating Range Frequency Supply Pow er Consumption Measurement Pow er Consumption Voltage Measurement Frequency Measurement Measurement Sensitiv ity Measurement Catagory Display Contact Current Protection Class Connector Protection Class Temperature Humidity Connection Ty pe Dimensions : : : : : : : : : : : : : : : 220Vac (L1-N) (0,8-1,1) x Un 50 / 60 Hz < 4VA <1VA 10 – 500 Vac 40 / 100 Hz %1±1 digit CAT III 3 Digit x 2 line LED Max. 5A / 240Vac IP 20 IP 00 - 5 °C .... + 50 °C %15 ...... %95 (w ithout condensation) : To f ront panel tap : 72x72x80 mm >>>> Page 36 ® DV – 72 - 01C DIGITAL VOLTAGE & FREQUENCY MONITORING DEVICE ► True RMS Acces s ing Param ete r M e nu Press Set until Set is shown on the button screen. Factory Default values are as shown in the figure SET Increase Over Voltage 390 - 460 (V) SET Decrease Increase Under Voltage 300 - 370 (V) SET Decrease Increase Openning time (Voltage )00,1 – 99,9 sec) SET Decrease Increase SET Decrease Openning Time (Frequency ) 00,1 – 99,9 (sec) Increase Returning Time 00,5 – 99,9 (sec) SET Decrease Increase SET Decrease Increase Locking Counter [oto, (001 – 010 )] oto : Locking Disabled Locking Time 001 – 060 (minute) SET Decrease Increase Over Frequency [(u-F) + 0,4] ≤.....≤ 70 Hz SET Decrease Increase oFF:Over Frequency Disabled Under Frequency 40 Hz ≤......≤ [(o-F) – 0,4] SET Decrease oFF:Under Frequency Disabled SET Exit Output Contact 5A / 240Vac DV-72-01C Conne ction Sche m e L N 1A VX1 1A VX2 Measurement Input 1A L N Supply Voltage Dim esion of hole on the pane l : 68 x 68 mm Warning !!! ■ The message Er1 or Er2 on the screen means that the dev ice has got a f ailure ■ Clean the dev ice using dry dustcloth af ter de-energizing the dev ice ■ Read and understand the instruction on this manual and attached label. >>>> Page 37 ® DV – 72 - 03C DIGITAL VOLTAGE & FREQUENCY MONITORING DEVICE ► True RMS ► Triphase controlled Unbalanced Voltage: (unb) The phase – phase v oltage unbalance limit can be adjusted between (%5 - %20). When it exceeds the adjusted limit unb is shown on the buttom screen and the dev ice opens its output contact at the end of t – 1 delay . It is needed f or the dev ice to close its output contact again that the v oltage unbalance drops below the hy steresis percentage ( %20 ). Thus, the dev ice closes its output contact at the end of t – 2 delay . Example: In tri-phase sy stem where phase – phase v oltage is 380 V. The v oltage unbalance limit is adjusted to %15. then the openning occures at: (380-(380 x 0,15) = 323 V. In order to close the output contact again the v oltage should reach 323 + (380 x %15 x %20 ) = 334 V. (V max - V min) % un b = x 100 Hys = 380 x (% Asm) x (% 20) 380 General The dev ice measures the True RMS v alue of the v oltage and f requency in tri-phase sy stems accurately . It is possible to observ e the v oltage v alue in the upper screen and the f requency v alue in the buttom screen simultaneously . Using the buttons, phase – nuetral and phase – phase v oltages can be observ ed as shown in the f igure in the right side. The dev ice contains many protections as f ollowes: ■ Phase f ailure. ■ Phase sequence. ■ Ov er Voltage protection. ■ Under v oltage protection: ■ Unbalanced v oltage protection. ■ Ov er f requency protection. ■ Under f requency protection. As the dev ice is beeing installed it closes its output contact if the v oltage and f requency v alues are within the adjusted ranges and phase sequence is correct. In case of any prev ious mentioned f aults (except of phase f ailure where openning is sudden) the the dev ice opens its output contact at the end of delay adjusted by user. When the v alues return withiin the adjusted ranges the dev ice closes its output contacts at the end of an adjusted delay . Note: L1-N is the dev ice's power supply inputs. Thus, the applied v oltage must be the rated v oltage of the sy stem. The measured f requency also must the f requency of the sy stem. Dis play Functions L1 V V 1N + % unb Hy s Vnom Hy s - % unb Lev el Re t-3 t-1 t-3 < t-1 t-1 Hz L2 V V 2N Hz L3 V V 3N Over&Under Voltage : (o-U) (u-U) Ov er v oltage (o-U), it can v e adjusted between Umax= (390 – 460 V). Under v oltage (u-U), it can v e adjusted between Umin=(300 – 370 V). Mentioned v alues are phase – phase v oltages. If the v oltage drops below the adjusted under v oltage limit then u-U shows on the screen and the dev ice closes it output contact af ter t-1 delay . If the v oltage excceeds the adjusted ov er v oltage limit then o-U shows on the screen and the dev ice closes it output contact af ter t-1 delay . The hy steresis v alue is 6V. Hz V L1,L2,L3 Over Voltage L1 L2 V V 12 Umax (o-U) Normal Normal Umin (u-U) Hz Under Voltage L2 L3 V t-1 V 23 L3 V t-1 t t-3 Re Hz L1 t-3 V 13 Hz Phase Failure: (u-U) When at least on of the three phases L1,L2,L3 is missing u-U is shown on the buttom screen and the dev ice opens its output contact immediately . L1 L2 L3 t Locking Property : It can be controlled by two parameters; Locking Time and Locking Counter. If the number of openning reaches the adjusted locking counter within the adjusted locking time then the dev ice opens its output contact and locks its f unctions until the user pressed Reset button. If the locking counter is adjusted to oto then this f unction is inactiv e and the dev ice nev er locks itself L-t : Locking Time ( 001 – 060 minutes ) It is well known the the f requentely occuring f aults may damage the sy stem. For that the dev ice locks itself when the number of f aults reaches the adjusted locking number within this locking time. This way the sistem is protected and the user has the chance to inv estigate the problem. L-C : Locking Counter ( oto , 001 – 010 ) The number of the f aults allowed within the period L-t. If the number of the f aults exceeds this adjusted counter v alue then the dev ice locks itself . The user must press Reset button agter the f ault passes in order to unlock the dev ice. If L-C is set to oto then this property is inactiv e. Re < t-3 If : L-C (Locking counter) = 2 L-t (Locking time) = 3 minutes t-3 V Phase Sequence: (Seq) Incase of wrong phase sequence, Seq is shown on the buttom screen and the dev ice does not close its output contact. If the the sequence is corrected the dev ice closes its output contacts L1 L2 L3 L1,L2,L3 L1,L3,L2 L1,L2,L3 Over Voltage 1. Fault (o-U) Over Voltage 2. Fault Normal L1,L2,L3 Normal (u-U) L2,L3 t t-1 t-3 t-3 t-1 Locking Occures Re Re t < 3 Minutes Res et Button is pushed and locking is ended. >>>> Page 38 ® DV – 72 - 03C DIGITAL VOLTAGE & FREQUENCY MONITORING DEVICE ► True RMS ► Triphase controlled Acces s ing Param ete r M e nu Press Set until Set is shown on the button screen. Factory Default values are as shown in the figure SET Increase Over Voltage 390 - 460 (V) SET Over and/or Under Frequency Protection : ( 40 – 70 Hz ) Decrease Under f requency can be adjusted be tween (u-F) = 40 Hz .......[(o-F)-0,4] Ov er f requency can be adjusted between (o-F) = [(u-F) + 0,4]..... 70 Hz. It is possible to activ ate one or two of these protections or deactiv ate them both. ■ If o-F = 55 Hz and u-F = oFF then the dev ice protects f rom ov er f requency ( if the f requency exceeds 55hz then the dev ice shows o-F on the buttom screen and opens its output contact at the end of t-2 delay ). ■ If o-F = oFF and u-F = 45 Hz then the dev ice protects f rom under f requency ( if f requency drops below 45Hz then the dev ice shows u-F on the buttom screen and opens its output contact at the end of t-2 delay ). If o-F = oFF and u-F = oFF then the f requency protection is disabled. Increase Under Voltage 300 - 370 (V) SET Decrease Increase Unbalanced Voltage 0,05 – 0,20 (% 5 - % 20) SET Decrease Increase Openning time (Voltage )00,1 – 99,9(sn) SET f (Hz) Decrease L1,L2,L3 Over Frequency Increase 55 Hz (o-F) Normal Normal 45 Hz (u-F) Openning Time (Frequency) 00,1 – 99,9(sn) SET Decrease Under Frequency t-2 t-3 t-2 Increase t Returning Time 00,5 – 99,9 (sn) SET t-3 Decrease Re t Increase Locking Counter [oto, (001 – 010 )] oto : Locking Disabled SET Parameters : The menu where protection f unctions are adjusted. To enter this menu press set button until set is shown on the nuttom screen. Parameters are as f ollow: ► o-U : Over Voltage Adjustment ( 390 V – 460 V ) If the phase – phase v oltage exceeds the adjusted v alue then the dev ice opens it output contacts at the end of t – 1 delay . ► u-U : Under Voltage Adjustment ( 300 V – 370 V) If the phase – phase v oltage drops below the adjusted v alue then the dev ice opens it output contacts at the end of t – 1 delay . ► unb : Voltage Unbalance Adjustment ( 0,05 – 0,20 )%5 - 20 Unbalance between the phase – phase v oltages, when the unblanace exceeds the adjusted v alue then the dev ice opens it output contacts at the end of t – 1 delay . ► t-1 : Openning Delay (Voltage) ( 00,1 – 99,9 seconds) If any of v oltage f aults occurs, and if it lasts f or t-1 period then the dev ice opens its output contact. ► t-2 : Openning Delay (Frequency)( 00,1 – 99,9 seconds) If any of f reuqency f aults occurs, and if it lasts f or t-2 period then the dev ice opens its output contact. ► t-3 : Returning Delay (Voltage and Frequency)( 00,1 – 99,9 seconds) To close the output contact af ter openning because of both v oltage and f requency f aults, the v alues should return to the normal ranges and af ter t-3 delay the dev ice closes its output contact. ► L-t : Locking Time ( 001 – 060 minutes ) The dev ice locks itself when the number of f aults reaches the adjusted locking number within this locking time. This way the sistem is protected and the user has the chance to inv estigate the problem. ► L-C : Locking Counter ( oto , 001 – 010 ) The number of the f aults allowed within the period L-t. If the number of the f aults exceeds this adjusted counter v alue then the dev ice locks itself . The user must press Reset button agter the f ault passes in order to unlock the dev ice. If L-C is set to oto then this property is inactiv e. ► o-F : Over Frequency Adjustment It can be set between (o-F) = [(u-F) + 0,4]..... 70 Hz. If it is set to o-F = oFF then this protection is disabled. ► u-F : UnderFrquency Adjustment It can be set between (u-F) = 40 Hz .......[(o-F) – 0,4] . If it is set to u-F = oFF then this protection is disabled. ► qut : Quit If Set button is pressed there then the dev ice goes back to the measurement screen. Warning !!! ■ The message Er1 or Er2 on the screen means that the dev ice has got a f ailure ■ Clean the dev ice using dry dustcloth af ter de-energizing the dev ice ■ Read and understand the instruction on this manual and attached label. Decrease Increase Locking Time 001 – 060 (dk) SET Decrease Increase Over Frequency [(u-F) + 0,4] ≤.....≤ 70 Hz SET oFF:Over Frequency Disabled Decrease Increase Under Frequency 40 Hz ≤.....≤ [(o-F) – 0,4] SET oFF:Under Frequency Disabled Decrease DV-72-03C Output Contact 5A / 240Vac Conne ction Schem e: SET L3 L2 L1 N Exit 1A 1A 1A L1-N L3 L2 L1 N TECHNICAL DATA: Rated Voltage (Un) : 220Vac (L1-N) Operating Range : (0,8-1,1) x Un Frequency : 50 / 60 Hz Supply Pow er Consumption : < 4VA Voltage Measurement : 10 – 500 Vac Frequency Measurement : 40 / 100 Hz Measurement Pow er Consumption: <1VA Measurement Sensitiv ity : %1±1 digit Measurement Catagory : CAT III Display : 3 Digit x 2 line LED Contact Current : Max. 5A / 240Vac Protection Class : IP 20 Connector Protection Class : IP 00 Temperature : - 5 °C .... + 50 °C Humidity : %15 ...... %95 (w ithout condensation) Connection Ty pe : To f ront panel tap Dimensions : 72x72x80 mm Supply Voltage >>>> Page 39 ® ke – FKR2 PHASE FAILURE and PHASE SEQUENCE DEVICE ► Constant Voltage Asym m e try (Phase – Neutral 40%) ► Phase Seque nce ► Phase Failure General: In three phase systems, w hen phase sequence is correct and there is no asymmetry betw een phases, norma l LED is turned on and relay contact is energised. Protection functions of ke-FKR2 are given below . ► Phase Failure : In case of absence of at least one phase, relay immediately de-energises its contact and Error LED is turned on. L1 L2 L3 N 1-2 Error Led Normal Led t1 = 2 sec. t1 t2 < t1 t1 < t2 t2 t2 = 0,5 sec. t1 ► Phase Seque nce : In case of w rong phase order, Error LED is turned on and relay does not energise its contact. If phase order is corrected, Error LED is turned off and relay energises its contact. L1,L2,L3 L1,L3,L2 L1,L2,L3 L2,L3 L1,L2,L3 1-2 Application Are as: ■ Protection of electrical motors ■ Protection of 3 phase sy stems ► Voltage As ym m e try : Phase to neutral asymmetry is fixed 40%. If asymmetry exceeds this value, Error LED is turned on and relay contact is de-energised. To return normal state, voltage asymmetry value must be under 15% (hysteresis). (V max - V min) Asym % = x 100 Hys = 15 % 220 TECHNICAL DATA: Rated Voltage Operating Range Frequency Asy mmetry Adj. Output Contacts (1-2) Contact Current Power Consumption Dev ice Protection Class Connector Protection Class Ambient Temperature Connection Ty pe Sim ple Connection : L1 L2 L3 N : IP20 : IP00 : -5°C....+50°C : To connection rail in electrical panel : 23x82x80 mm 16 mm Dimensions : 3 Phase and 1 Neutral 220 VAC : (0.8 – 1.2)xUn (Un nominal v oltage) : 50 Hz : Phase to Neutral 40% constant : Normally Open Contact : Max. 5 A / 240 VAC : < 8 VA L1,L2,L3 : 3 x 380 V ac L1,N : 220 V ac L1 L2 L3 1 N 2 80 mm Load 23 mm 35 mm 82 mm >>>> Page 40 ke – FKR3 PHASE FAILURE and PHASE SEQUENCE DEVICE ► ► ► ► Asym m e try % Adjus tm e nt Phase Seque nce Phase Failure De lay Tim e Adjus tm ent ® General: In three phase systems, w hen phase sequence is correct and there is no asymmetry betw een phases, norma l LED is turned on and relay contact is energised. Protection functions of ke-FKR3 are given below . ► Phase Failure: In case of absence of at least one phase, relay immediately de-energises its contact and E2 LED is turned on. L1 L2 L3 N 1-2 t1 = 2 sec. t1 Asy m. Failure Phase Failure % Asy m. t2 < t1 t1 < t2 t2 t2 = 0,5 sec. t1 ► Phase Sequence : In case of w rong phase order, both of E1 and E2 LEDs are turned on at the same time and relay does not energise its contact. If phase order is corrected, both of E1 and E2 LEDs are turned off and relay energises its contact. L1,L2,L3 L1,L3,L2 L1,L2,L3 L2,L3 Normal (t) Delay Time L1,L2,L3 1-2 ► Voltage As ym m e try (as ym . %) (5-17.5 %) : Phase to phase asymmetry is adjusted using the adjustment knob in the range of (5-17.5%). If asymmetry exceeds adjusted value, LED E1 starts to flash and at the end of delay time (1-10s) E1 LED is turned on continuously and relay contact is de-energised. To return normal state, voltage asymmetry value must be under 20% of adjusted value (hysteresis). If phase – phase asymmetry value returns to normal region in a shorter time then adjusted delay time, relay does not de-energise its contact and LED E1 stops flashing. Example: Let's say that asymmetry value is set to 15% for a 3 x 380VAC. In this case, relay contact is deenergised at (380-(380x0.15))=323 V. Re-energising the contact is performed at 323+(380x15%x20%)= 334V. (20% is the hysteresis). (V max - V min) Application Are as: ■ Protection of electrical motors ■ Protection of 3 phase sy stems Asym % = Operating Range Frequency Asy mmetry Adj. Delay Time Adj. Output Contacts (1-2) Contact Current Power Consumption Dev ice Protection Class Connector Protection Class Ambient Temperature Connection Ty pe Dimensions Hys = 380 x (Asym %) x (20 %) + % Asm. Hy s Vnom - % Asm. Hy s Lev el 1-2 TECHNICAL DATA: Rated Voltage x 100 220 : 3 Phase and 1 Neutral 220 VAC : (0.8 – 1.2)xUn (Un nominal v oltage) : 50 Hz : Phase to phase 5 - 17,5% : 1 – 10 sec. : Normally Open Contact : Max. 5 A / 240 VAC : < 8 VA t t t <t Sim ple Connection : L1 L2 L3 N : IP20 L1,L2,L3 : 3 x 380 V ac L1,N : 220 V ac : IP00 : -5°C....+50°C : To connection rail in electrical panel : 23x82x80 mm L1 L2 L3 1 N 2 80 mm 16 mm Load 23 mm 35 mm 82 mm >>>> Page 41 ke – FKR4 PHASE FAILURE and PHASE SEQUENCE DEVICE ► Asym m e try % Adjus tm e nt ► Phase Seque nce ► Over&Unde r Voltage % Adjustm ent ► Phase Failure ► De lay Tim e Adjus tm ent ® General: In three phase systems, w hen phase sequence is correct and there is no asymmetry betw een phases, norma l LED is turned on and relay contact is energised. Protection functions of ke-FKR4 are given below . ► Phase Failure: In case of absence of at least one phase, relay immediately de-energises its contact and E2 LED is turned on. L1 L2 L3 N 1-2 t1 = 2 sec. t1 t2 < t1 t1 < t2 t2 t2 = 0,5 sec. t1 ► Phase Sequence : In case of w rong phase order, both of E1 and E2 LEDs are turned on at the same time and relay does not energise its contact. If phase order is corrected, both of E1 and E2 LEDs are turned off and relay energises L1,L2,L3 L1,L3,L2 L1,L2,L3 L2,L3 its contact. % Ov er Under Asy m. Failure L1,L2,L3 1-2 Phase Failure % Asy m. Normal (t) Delay Time ► Voltage As ym m e try (as ym . %) (5-17.5 %) : Phase to phase asymmetry is adjusted using the adjustment knob in the range of (5-17.5%). If asymmetry exceeds adjusted value, LED E1 starts to flash and at the end of delay time (1-10s) E1 LED is turned on continuously and relay contact is de-energised. To return normal state, voltage asymmetry value must be under 20% of adjusted value (hysteresis). If phase – phase asymmetry value returns to normal region in a shorter time then adjusted delay time, relay does not de-energise its contact and LED E1 stops flashing. Example: Let's say that asymmetry value is set to 15% for a 3 x 380VAC. In this case, relay contact is deenergised at (380-(380x0.15))=323 V. Re-energising the contact is performed at 323+(380x15%x20%)= 334V. (20% is the hysteresis). (V max - V min) Asym % = x 100 220 Hys = 380 x (Asym %) x (20 %) Application Are as: -Protection of electrical motors -Protection of 3 phase sy stems + % Asm. Hy s Vnom - % Asm. Hy s Lev el 1-2 t t <t t ► Voltage Adjustm ent Range: ± (0,5 - 0,30) Under Voltage Umin=(0.70-0.95)xUn and Over Voltage Umax=(1.05-1.30)xUn. As long as the voltage values do not exceed adjusted values, norma l LED is kept on and relay contact is TECHNICAL DATA: energised. Hysteresis is 15%. LED E2 indicates that the adjusted voltage range is exceeded. There is only one Rated Voltage : 3 Phase and 1 Neutral adjustment knob for both over and under voltage values. Operating Range Frequency Asy mmetry Adj. Ov er-Under Adj. Delay Time Adj. Output Contacts (1-2) Contact Current Power Consumption Dev ice Protection Class Connector Protection Class Ambient Temperature Connection Ty pe L1,L2,L3 Umax Un Umin Normal Under Voltage 1-2 t t L1 L2 L3 N Sim ple Connection : : IP00 : -5°C....+50°C : To connection rail in electrical panel : 23x82x80 mm L1,L2,L3 : 3 x 380 V ac L1,N : 220 V ac 80 mm Load 23 mm Over Voltage Normal : IP20 16 mm Dimensions 220 VAC : (0.8 – 1.2)xUn (Un nominal v oltage) : 50 Hz : Phase to phase 5 - 17,5% : Phase to Neutral 5 – 30% : 1 – 10 sec. : Normally Open Contact : Max. 5 A / 240 VAC : < 8 VA 35 mm 82 mm L1 L2 L3 1 N 2 >>>> Page 42 ke-FKR4 (D) Digital Phase Failure and Phase Sequence Device VL1,VL2,VL3 VL12,VL23,VL13 Phase Seque nce Control Phase Sequetion: (Seq) In case of wrong phase order , Normal LED turned of f and relay contact is not switch on. In this case if Reset button pushes seq warn display ed.if phase order is corrected , Normal LED turned on and out relay switch L2,L3 L1,L2,L3 L1,L3,L2 L1,L2,L3 L1 on. L2 L3 Ove r Voltage Prote ction Under Voltage Protection Re Unbalance d Voltage Protection Ove r Fre que ncy Protection Under Frequency Protection Latch Function TRUE RM S Dis play Function: Voltage Unbalanced: (unb) The phase-phase v oltage unbalance limit can be adjusted between(%5-%20) . When it exceeds the adjusted limit , the dev ice switched of f its out contact at the end of t-1 delay . In this case when pushing Reset button unb warn appear on the screen. For the returning normal state, asy mmetry v alues should under % 20 (hy steresis v alue). In this case at the end of t3 time Normal LED turned on and output contact switch on. If the phase-phase v oltage unbalance, return adjusted v alue shorter than t-1 time, output relay does not release its contact. Hy steresis is %20. . Example: Let's say that asy mmetry v alue is set to 15% f or a 3 x 380VAC. In this case, relay contact switch of f at (380-(380x0.15))=323 V. Switch on the contact is perf ormed at 323+(380x15%x20%)= 334V. (20% is the hy steresis). (V max - V min) % un b = V L1 L1 L2 L3 General In three phase sy stems, it measures RMS v alues of AC v oltages and sy stem f requency sensitiv ely . Using up direction button (Select) phase-neutral v oltages and phase-phase v oltages monitor sequentially ke-FKR4(D) has many f eatures. Those are; - Phase Failure - Phase Sequence - Ov er Voltage Protection - Under Voltage Protection - Voltage Unbalance (asy mmetry ) Protection - Ov er Frequency Protection - Under Frequency Protection x 100 V L2 + % unb Hy s Vnom Hy s - % unb Lev el Re t-3 t-1 t-3 < t-1 t-1 L1 L2 L3 V L3 L1 L2 L3 V L12 L1 L2 L3 When dev ice is turn on if its adjusted v oltages and f requency in its interv al and if phase sequence is correct relay switch on. If any of error occurred ( except phase f ailure and phase sequence ) at the end of adjusted time relay switch of f its contact. When sy stem return normal v alues, at the end of time out relay switch on. Over and Under Voltage : (o-U),(u-U) Under v oltage (u-U) it can adjusted between Umin= (300 – 370 V). Ov er v oltage (o-U) it can adjusted between Umax=(390 – 460 V). If the v oltage drops below the adjusted under v oltage limit, when u-U shows on the screen and dev ice switch of f its output contact end of the t-1 time Normal LED turned on .In this case when pushing Reset button u-U warn appear on its screen. If the v oltage exceed the adjusted ov er v oltage limit, Normal LED turned of f and output relay switch of f . In this case when pushing Reset button o-U warn appers on its screen. V L23 V L1 L2 L3 V L13 Select:(Up direction) when pressing continuously , screen display s f requency of sy stem. When button release dev ice continue to show v oltage. IMPORTANT: L1 - N is dev ice supply inputs. Thus,the applied L1 – N v oltage must be rated v oltage of sy stem . The measured f requency also must the f requency of the sy stem. Phase Failure: (u-U) Bef ore starting sy stem , it controls phase absence then if all phases exits Normal LED turn on and relay contact switch on. In case of missing of any L1,L2,L3 phases , Normal LED turn of f and relay switch of f its contact .In this case when pressing Reset button, u-U warn appears on display . L1 L2 L3 Re t-3 L1,L2,L3 Over Voltage Umax (o-U) Normal Normal Umin (u-U) Under Voltage t-1 < t-3 Hys = 380 x (% Asm) x (% 20) 380 L1 L2 L3 t-3 t-1 t t-3 Re LOCKING FUNCTION : (LATCH) It can be controlled by two parameters. Locking time and Locking counter. If the number of opening reaches the adjusted locking counter withing the adjusted locking time then dev ice switch of f its contact and locks its f unctions until the user pressed Reset button. If the locking counter is adjusted to oto then this f unction is disable and dev ice nev er locks itself . L-t : Locking Time ( 001 – 060 min. ) It is well know the f requently occurring f aults may damage sy stem. For that the dev ice when number of f aults reaches the adjusted locking number within this locking time. This way the sy stem is protected and user has chance to inv estigate the problem. L-C : Locking Counter ( oto , 001 – 010 piece ) The number of f aults allowed within the period L-t. If number of f aults exceeds this adjusted counter v alue dev ice locks itself . User must press Reset button then the f ault passes in order to unlock the dev ice. If L- C is set to oto then this property is disabled. t >>>> Page 43 ® ke – ADG OVER and UNDER VOLTAGE CONTROL RELAY ► Over&Unde r Voltage % Adjustm ent ► Phase Failure ► Phase Seque nce ► De lay Tim e Adjus tm ent TYPE Ke-ADG31 Ke-ADG32 Ke-ADG33 Ke-ADG34 Ke-ADG35 Ke-ADG36 Ke-ADG37 Ke-ADG38 Ke-ADG11 Ke-ADG12 Ke-ADG15 Ke-ADG16 Under Voltage Adjust. Ov er Voltage Led Under Voltage Led Ov er Voltage Adjust. Normal Led (t) Delay Time Voltage Adjustment Range % Under Voltage % (< Un) Over Voltage % (> Un) (0,70-0,95) x Un (0,85-0,97) x Un (0,70-0,95) x Un (0,85-0,97) x Un (0,70-0,95) x Un (0,85-0,97) x Un (0,70-0,95) x Un (0,85-0,97) x Un (0,70-0,95) x Un (0,85-0,97) x Un (0,70-0,95) x Un (0,85-0,97) x Un (1,05-1,30) x Un (1,03-1,15) x Un (1,05-1,30) x Un (1,03-1,15) x Un (1,05-1,30) x Un (1,03-1,15) x Un (1,05-1,30) x Un (1,03-1,15) x Un (1,05-1,30) x Un (1,03-1,15) x Un (1,05-1,30) x Un (1,03-1,15) x Un Time Delay 1-10 seconds 1-10 seconds 1-10 seconds 1-10 seconds 1-10 minutes 1-10 seconds 1-10 seconds 1-10 seconds 1-10 seconds 1-10 seconds 1-10 minutes 1-10 minutes Function Sudden Phase 3 Switch OFF Sequence Phase < 0,65xUn Control >1,35xUn 1 Phase Control compensation equipments,electrical motors,power capacitance OFF delay OFF delay OFF delay OFF delay ON delay ON delay ON delay ON delay OFF delay OFF delay ON delay ON delay General: Microprocessor controlled. Three or single phase relay is used in sy stems exposed to ov er or under v oltage, such as command, control or compensation sy stems and protects dev ices such as condensers, motors, air conditioners and compressors. It is div ided into sub-categories depending on the v oltage adjustment range, phase sequencing control, on or of f start modes. ► Phase Sequencing Control : For the models with phase sequencing control, when dev ice is energized, if the phase sequence is wrong, ov er (>Un) and under (<Un) LEDS are turned on together and phase sequence error is indicated. Meanwhile, Normal LED (Un) is turned of f and relay contact is open circuit. In case of phase sequence is correct and phase v oltages are in adjusted percentage range, the delay time f or turning the Normal LED on and energizing the relay depends on the Of f Delay or On Delay ty pe of dev ice. For f urther inf ormation please ref er to graph 1 & 2 and Delay Time Modes section of this manual. Applications Air conditioner and compressors Remote control, control equipments Air conditioner ► Sudden Switch Off : When any phase v oltage's dif f erence respect to nominal v oltage exceeds 35%, without any time delay Normal LED is turned of f and relay contact is de-energized. ► Voltage Adjustment Range : Umin= (0.70 – 0.95) x Un; Umax= (1.05-1.30)xUn When the adjusted limits are not exceeded, Normal (Un) LED is on and the relay contact is energized. Sim ple Connection : ► Delay Time Modes : There are two ty pes, one is Of f -Delay and the other is On-Delay . TECHNICAL DATA: Rated Voltage, Un 16 mm : 3 phase and 1 neutral 220 VAC Operating Range : (0,5-1,5) x Un (Un nominal v otlage) Frequency : 50 Hz Ov er and Under Voltage Adjustment Range : Please ref er to table Delay Time Adj. : Please ref er to table Sudden Switch Of f : Below Un x 0.65 and abov e Un x 1.35 Sudden Switch Of f : 500 msec Time Output Contacts : Normally Open (1-2) Contact Contact Current : max. 5A/240 VAC Power Consumption : < 8 VA Dev ice Protection Class: IP20 Connector Protection Class : IP00 Ambient Temperature : -5 °C.......+50 °C Connection Ty pe : To connection rail in electrical panel Dimensions : 23x82x80 mm L1,L2,L3 Umax Over Voltage Normal Un Normal Umin 1-2 t t ■ On Delay : If phase v oltages are in the adjusted percentage range, adjusted delay time, 1-10 min, is counted and at the end of delay time Normal LED is turned on and relay contact is energized. When adjusted ov er or under v oltage limit is exceeded, Normal LED is turned on and relay contact is de-energized immediately , without waiting any delay time. When the phase v oltages return into adjusted normal range (also considering the dif f erence), adjusted 1-10 min delay time is counted and at the end of this time, Normal LED is turned on and relay contact is re-energized. 80 mm Umax Under Voltage 82 mm t L1 L2 L3 1 N 2 Normal Umin 1-2 L1,L2,L3 : 3 x 380 V ac L1,N : 220 V ac Over Voltage Normal Un 35 mm Load Under Voltage L1,L2,L3 23 mm L1 L2 L3 N ■ Off Delay : (ref er graph 1) If phase v oltages are in the adjusted percentage range, normal LED turns on and relay contact is energized. When adjusted ov er or under v oltage limit is exceeded 1-10 sec delay time is started. During this time interv al, appropriate error LED is also on together with Normal LED and at the end of delay time, Normal LED is turned on and relay contact is de-energized. When the error condition is disappeared, Normal LED is turned on and relay contact is re-energized. t t >>>> Page 44 ® ke – FKR1T PHASE PROTECTION RELAY ► Phase Failure ► PTC Protection PHASE PROTECTION RELAY Operating Principle: If all R, S, T phase voltages are balanced and there is no missing phase; normal LED turns on and the relay energizes its contact. If phase-neutral voltage unbalance value exceeds + 20 %, normal LED turns off and relay de-energizes its contact. When the unbalance returns to normal boundary, normal LED turns on and the relay energizes its contact again. ► PTC Protection: If you have a device w ith PTC protection capability. If you do not w ant to use this property, simply short circuit the PTC connections. Sim ple Connection : PTC inputs if not used then short cut them TECHNICAL DATA: Rated Voltage Operating Range : 3 Phase and 1 Neutral 220 VAC : (0,8-1,2) x Un (Un nominal v oltage) : 50 Hz Frequency Energizing and de-energizing dif f erence : Contact Current : Power Consumption : Dev ice Protection Class : Connector Protection Class : Operating Temperature: Connection Ty pe 28 mm M ± %3 max. 5A/240 VAC < 8 VA L1,L2,L3 : 3 x 380 V ac L1,N : 220 V ac IP20 2 IP00 -5 °C.......+50 °C : To connection rail in electrical panel : 28x82x80 mm 80 mm Dimensions 3~ 35 mm 82 mm L1 L2 L3 N L1 L2 L3 Max. 5A 240 Vac N 3 1 >>>> Page 45 ® ke – FKR1 PHASE FAILURE DEVICE ► Phase Failure ► Operating Principle: If all R, S, T phase v oltages are balanced and there is no missing phase; normal LED turns on and the relay energizes its contact. If phase-neutral v oltage unbalance v alue exceeds + 20 %, normal LED turns of f and relay de-energizes its contact. When the unbalance returns to normal boundary , normal LED turns on and the relay energizes its contact again. Application Are as: Sim ple Connection : ■ Protection of electrical motors ■ Protection of 3 phase sy stems L1 L2 L3 N TECHNICAL DATA: Rated Voltage Operating Range Frequency Asy mmetry Adj. Load L1,L2,L3 : 3 x 380 V ac L1,N : 220 V ac L1 L2 L3 1 N 2 Output Contacts (1-2) Contact Current Power Consumption Dev ice Protection Class Connector Protection Class Ambient Temperature Connection Ty pe Dimensions ke – ZR30 30 Sec. TIME RELAY TECHNICAL DATA: L1 L2 L3 N K1 T1 Load 220 Vac A2 16 18 15 A3 24 Vac/dc A2 N 16 18 : IP00 : -5°C....+50°C : To connection rail in electrical panel : 23x82x80 mm When 220 Vac is f eed f rom the A1 – A2 terminals, the power led becomes on and the time starts to count. At the end of the adjusted time, on led turns on and switches on the contact of the output relay . Until the energy on the A1 and A2 terminals is cut of f , the contacts don't change their positions. When the energy is cut of f , the relay resets itself . 24 Vac 24 Vdc 15 : IP20 ► Operating Principle: Sim ple Connection : A1 : 3 Phase and 1 Neutral 220 VAC : (0.8 – 1.2)xUn (Un nominal v oltage) : 50 Hz : Phase to Neutral 20% constant : Normally Open Contact : Max. 5 A / 240 VAC : < 8 VA Operational Voltage (Un) A1 – A2 terminals : 220 Vac A3 – A2 terminals : 24 Vac or 24 Vdc Operating Range : (0.8 – 1.1)xUn (Un nominal v oltage) Frequency : 50 Hz Contact Current : Max. 5 A / 240 VAC Power Consumption : < 8 VA Dev ice Protection Class : IP20 Connector Protection Class : IP00 Ambient Temperature : -5°C....+50°C Connection Ty pe : To connection rail in electrical panel Dimensions : 23x82x80 mm >>>> Page 46 ® ke – ZRXX MULTI FUNCTION TIME RELAY ► 32 Tim e Interval Se le ction ► Off – On De lay Ope ration Se lection ► 220 Vac or 24 V ac/dc General: It is microprocessor controlled. It is possible to make 32 dif f erent time interv al selections by using the dip-switch that is located near the equipment. Also, on-of f start mode is selectable. ► OPERATIONAL MODE SELECTION: The dip-switch, numbered as 1, determines the operational mode. If it is adjusted to the on position, the equipment starts in on-delay mode (graphic 1). While in the of f position, it starts in of f -delay mode (graphic 2). GRAPHIC (2) GRAPHIC (1) 1 U 1 U OFF ON Second (t) Delay Time T Relay on T ON De lay OFF Delay ► TIME INTERVAL SELECTION: You may select the desired time interv al by using the 2,3,4,5,6 numbered switches of the dip-switch that are at the side of the equipment.The time selection table is giv en below. Min - Max Min - Max 0,1 – 1sec 0,7 – 70sec 2 3 4 5 6 2 3 4 5 6 0,1 – 10sec 0,2 – 20sec 15 2 3 4 5 6 220 Vac A2 2 3 4 5 6 18 0,9 – 90sec 1 – 100sec 15 0,5 – 50sec 2 3 4 5 6 24 Vac/dc 16 2 3 4 5 6 12 min – 20 hrs 42 sec – 70 min 2 3 4 5 6 2 3 4 5 6 6 sec – 10 min 2 3 4 5 6 9 min – 15 hrs 36 sec – 60 min 3 sec - 5 min 15 min – 25 hrs 48 sec – 80 min 2 3 4 5 6 2 3 4 5 6 9 sec - 15 min 18 min – 30 hrs 54 sec – 90 min 2 3 4 5 6 2 3 4 5 6 18 ► THE TIME ADJUSTMENT SCALER: TECHNICAL DATA: Operational Voltage (Un) A1 – A2 terminals : 220 Vac A3 – A2 terminals : 24 Vac or 24 Vdc Operating Range : (0.8 – 1.1)xUn (Un nominal v oltage) Frequency : 50 Hz Contact Current : Max. 5 A / 240 VAC Power Consumption : < 8 VA Dev ice Protection Class : IP20 Connector Protection Class : IP00 Ambient Temperature : -5°C....+50°C Connection Ty pe : To connection rail in electrical panel Dimensions : 23x82x80 mm The scaler of the adjustment potentiometer located ov er the equipment, is set f rom 0,1 to 1. When y ou select y our adjustment with the dip-switch, it can be adjusted at the range specif ied by the interv al mode, by the steps of 1%. Example 1: 2 3 4 5 6 16 mm 80 mm 35 mm 82 mm 1sn–100sn If y ou had already selected the time interv al mode abov e, in the situation of the potentiometer becoming maximum, the relay would hav e counted 100 sec; while in minimum, it would hav e counted 1 sec. You can do y our adjustment at steps of 1 sec. (The min. v alue in the table is the adjustment step period) Sim ple Connection : L1 L2 L3 24 Vac 24 Vdc N K1 T1 Example 2: 2 3 4 5 6 23 mm 4 2 3 4 5 6 2 3 4 5 6 6 min – 10 hrs 2 3 4 5 6 2 3 4 5 6 2 3 4 5 6 0,6 – 60sec 2 3 4 5 6 2 3 4 5 6 30 sec – 50 min 2 3 4 5 6 2 – 200sec 3 min – 5 hrs 24 sec – 40 min 2 3 4 5 6 2 3 4 5 6 2 3 4 5 6 2 3 4 5 6 2 3 4 5 6 2 3 4 5 6 0,4 – 40sec 16 A3 A2 0,3 – 30sec 2 min – 200 min 18 sec – 30 min 2 3 4 5 6 2 3 4 5 6 Min - Max 1 min – 100 min 2 3 4 5 6 2 3 4 5 6 0,8 – 80sec 0,1 – 5sec 2 3 4 5 6 A1 Min - Max 12 sec – 20 min 12sn–20 dk At this time interv al, though y ou can do y our adjustment in the of 12 sec. to max.1200 sec=20 minutes, by the steps of 12 sec (The min. v alue in the table is the adjustment step period). If y ou adjust the potentiometer to the 0,4 point on the scaler, the time counted by the equipment, will be calculated in the f ollowing manner. Time =0,4 x 20 min=8 minutes (The 20 minute v alue in the f ormula is the maximum v alue of the time interv al that y ou hav e selected with the dip-switch). Load N >>>> Page 47 ke-ZRXX (D) Multi Function Digital Timer Tim e Interval 0,1 ...... 9999 s ec 0,1 ...... 9999 m in 2 Relay Output 19 diffe rent function Start Input : NPN w ith proxim ity se nsor or s w itch Easy Program m ing For t1 Tim e Value Se le ction : 0,1 – 9999 After time unit selection w hen pressing dow n button one time then t1 value displays on the screen. Meanw hile turning on selected time unit LED and t1 LED Set LED flash. For changing value press SET button then numeric value,set LED and t1 LED start to flash. Using direction buttons come required time value and pressing SET to store value to memory. For t2 Tim e Unit Selection : M inute (m in), Second(s) If t2 using only in selected function device turn on its t2 settings. Otherw ise any parameter does not return related to t2. After time values selection for t1 then w hen press dow n button displays t2-S to screen, w hich is related to second time(t2) unit appears. While Set LED flashes unit LED(min or s) w here is memory related t2 LED w ith t2 time. For changing this unit press to Set button t2-S appears,set LED and unit LED flash. In this case using direction buttons proving turning on min (minute) or s( second) and repress Set stored selected time for t2. For t2 Tim e Value Selection : 0,1 – 9999 After time unit selection w hen dow n direction button press once t2`s numeric values appears. Meanw hile turning on selected time unit LED and t1 LED Set LED flash. For changing value press SET button then numeric value, set LED and t2 LED start to flash. Using direction buttons come required time value and pressing SET to store value to memory. Storing M e m ory: Press last of all dow n direction button and SAVE appears on the screen. In this case pressing Set button all data stored to memory and start w ork device according to function. If not press Set w hen device screen is SAVE all change cancel. Device continue to w ork current functions. Pressing both up and dow n buttons until Prog appears on the screen LED denotation FLASH CONTINOUS m s se t t1 t2 s ta 1 rt 2 m s se t t1 t2 s ta 1 rt 2 Advance Programming For t1 Tim e Unit Selection : M inutes (m in),Second (s ) According to selected function, device accessing to t1 unit if t2 available to t2 unit decide itself . After function selection w hen dow n button pressed t1-S displayed on screen w hich is relating to unit of first time (t1). While Set LED f lashing Unit LED w here is memory related t1 LED w ith t1 time (min or sec) turned on. For changing this unit press to Set button. t1-S appears ,Set LED and Unit LED flash. In this case using direction buttons provide turning on min(minute) or s(second) LED and repressed Set button stored selected time for t1. m s se t t1 t2 s ta 1 rt 2 m s se t t1 t2 s ta 1 rt 2 m s se t t1 t2 s ta 1 rt 2 m s se t t1 t2 s ta 1 rt 2 m s se t t1 t2 s ta 1 rt 2 m s se t t1 t2 s ta 1 rt 2 Increase Decrease m(minute) For t2 time unit selection SET SET s(second) For t1 time value input SET s(second) Increase For t2 time values input Decrease m s se t t1 t2 s ta 1 rt 2 Function Se le ction : In this section determining device w ork in w hich function. Therefore need to enter number of selected function,In this section press Set button and w hen P-.... flashing then using direction button come to related function number then press Set button to store. Decrease m(minute) For t1 time unit selection SET m s se t t1 t2 s ta 1 rt 2 For safe access parameters in this section ,pressing both up and dow n buttons during 2 sec. same time. Firstly during 1 sec P rog w ill appear then P – ... function number w ill appear and set LED start to flash. Increase Function Number SET m s se t t1 t2 s ta 1 rt 2 Device is microprocessor based. Many time relay applications collect inside. Sensitively time adjustment of classic time relays cause problems,then it is developed f ully digital. There are 19 different applications of functions selection inside. Moreover some applications need to start input. Because of this reason using w ith both NPN type proximity sensor and sw itch. TURNED OFF m s se t t1 t2 s ta 1 rt 2 General SET Store to memory then Exit. >>>> Page 48 ® ke – DRN MULTI RANGE, DOUBLE TIME ADJUSTED FLASHER RELAY ► 8 Ite m s of ON tim e m ode and ► 8 Ite m s of OFF tim e m ode se lection ► 220 Vac or 24 V ac/dc General: It is microprocessor controlled.8 dif f erent ON (operating) time interv al and 8 dif f erent OFF (stand by ) time interv al mode selection can be made by the use of the dip-switch situated near the equipment.The selection of the ON and OFF time interv als are handled one by one. ke-DRN1 ke-DRN2 ON START OFF START U U Ton OFF Delay Time Toff Ton Toff Toff Ton Toff Ton ► THE TIME INTERVAL SELECTION: The switches,numbered 1,2,3 of the dip-switch are used at the selection of the OFF time interv al, the switches numbered 4,5,6 are used at the selection of the ON time interv al.Below is the time selection table f or ON and OFF conditions. OFF ON Delay Time ► THE TIME ADJUSTMENT SCALER: ON sec sec The scale of the adjustment potentiometer located on the equipment, is set between 0,01 to 1.When y ou select y our adjustment with the dip-switch,it can be adjusted at the range specif ied by the interv al mode,by the steps of 1%. Example 1: sec sec sec sec sec sec m m m m m m m m OFF 6 sec. – 10 min. Let's select the OFF (stand by ) time interv al as abov e and adjust the v alue of the T(of f ) potentiometer to 0,7. 1 2 3 Let's select the ON (operating) time interv al as abov e and adjust the T(on) 4 5 6 potentiometer to 0,3.In this case,we can calculate the ON and OFF periods. T(off) = 0,7 x 10 minutes = 7 minutes (The 10 minutes in the f ormula is the maximum v alue of the OFF time selected by the dip-switch) T(on) = 0,3 x 60 seconds = 18 sec. (The 60 sec. in the f ormula is the maximum v alue of the ON time selected by the dip-switch) ON 0,6 sec. – 60 sec You may adjust;the OFF time with 6 second steps (the minimum v alue specif ied by the dip-switch indicates the adjustment step v alue),the ON time though,with 0,6 sec. Steps). NOTE: During the operation of the relay ,y ou may change the time interv al selections and potentiometer adjustment.In this case,it continues to ev aluate the new selections. TECHNICAL DATA: Operational Voltage (Un) A1 – A2 terminals : 220 Vac A3 – A2 terminals : 24 Vac or 24 Vdc Operating Range : (0.8 – 1.1)xUn (Un nominal v oltage) Frequency : 50 Hz Contact Current : Max. 5 A / 240 VAC Power Consumption : < 8 VA Dev ice Protection Class : IP20 Connector Protection Class : IP00 Ambient Temperature : -5°C....+50°C Connection Ty pe : To connection rail in electrical panel Dimensions : 23x82x80 mm Sim ple Connection : L1 L2 L3 24 Vac 24 Vdc 15 A1 220 Vac A2 N 16 18 K1 T1 16 mm Load 15 80 mm A3 24 Vac/dc A2 23 mm 16 18 35 mm 82 mm N >>>> Page 49 ® ke – FRXX MULTI RANGE, TIME ADJUSTED FLASHER RELAY ► 16 Tim e inte rval s w lw ction ► 220 Vac or 24 V ac/dc General: It is microprocessor controlled. It is possible to make 16 dif f erent time interv al selections by using the dip-switch that is located near the equipment. U T of f (t) Time Adj. on T T T T T T ► TIME INTERVAL SELECTION: You may select the desired time interv al by using the 1,2,3,4 numbered switches of the dip-switch that are at the side of the equipment.The time selection table is giv en below. Min - Max Min - Max 0,1 – 1sec 1 2 3 4 9 sec - 15 min 1 2 3 4 0,1 – 5sec 1 2 3 4 18 sec – 30 min 1 2 3 4 0,1 – 10sec 1 2 3 4 1 2 3 4 1 2 3 4 1 2 3 4 15 A1 1 2 3 4 220 Vac A2 16 18 1 2 3 4 36 sec – 60 min 1 2 3 4 0,3 – 30sec 3 min – 5 hrs 1 2 3 4 0,6 – 60sec 6 min – 10 hrs 1 2 3 4 1 – 100sec 9 min – 15 hrs 1 2 3 4 3 sec - 5 min 15 min – 25 hrs 1 2 3 4 6 sec – 10 min 18 min – 30 hrs 1 2 3 4 15 A3 24 Vac/dc A2 16 18 ► THE TIME ADJUSTMENT SCALER: TECHNICAL DATA: L1 L2 L3 24 Vac 24 Vdc Example : 1 2 3 4 1sn–100sn If y ou had already selected the time interv al mode abov e, in the situation of the potentiometer becoming maximum, the relay would hav e counted 100 sec; while in minimum, it would hav e counted 1 sec. You can do y our adjustment at steps of 1 sec. (The min. v alue in the table is the adjustment step period) N K1 T1 Load 80 mm 16 mm Operational Voltage (Un) A1 – A2 terminals : 220 Vac A3 – A2 terminals : 24 Vac or 24 Vdc Operating Range : (0.8 – 1.1)xUn (Un nominal v oltage) Frequency : 50 Hz Contact Current : Max. 5 A / 240 VAC Power Consumption : < 8 VA Dev ice Protection Class : IP20 Connector Protection Class : IP00 Ambient Temperature : -5°C....+50°C Connection Ty pe : To connection rail in electrical panel Dimensions : 23x82x80 mm The scaler of the adjustment potentiometer located on the equipment, can be set between 0,1 to 1. When y ou select y our adjustment with the dip-switch, it can be adjusted at the range specif ied by the interv al mode, by the steps of 1%. Sim ple Connection : 23 mm 35 mm 82 mm N >>>> Page 50 ® ke – SS MULTI RANGE, ON and OFF ADJUSTED DIRECTION INVERSE RELAY ► 8 Ite m s of ON (right-le ft) tim e m ode and ► 8 Ite m s of OFF tim e m ode se le ction. General: It is microprocessor controlled.8 dif f erent RIGHT-LEFT operational time interv al and 8 dif f erent OFF time interv al mode selection can be made by the use of the dip-switch situated near the equipment.The selection of the RIGHT-LEFTand OFF time interv als are handled one by one. ke-SS1 ke-SS2 ON START U OFF START U ► ► Ton Ton Toff Toff Toff ◄ Ton Toff Ton ◄ Ton Toff Toff OFF Delay Time Ton ► THE TIME INTERVAL SELECTION: The switches,numbered 1,2,3 of the dip-switch are used at the selection of the OFF time interv al, the switches numbered 4,5,6 are used at the selection of the RIGHT-LEFT time interv al. Below is the time selection table f or RIGHT-LEFT and OFF conditions. Right ON Delay Time Lef t ► THE TIME ADJUSTMENT SCALER: sec sec sec Example 1: sec sec OFF 6 sec. – 10 min. sec sec sec A1 15 25 18 28 m m m m m m m m 220 Vac A2 The scale of the adjustment potentiometer located on the equipment, is set between 0,01 to 1.When y ou select y our adjustment with the dip-switch,it can be adjusted at the range specif ied by the interv al mode,by the steps of 1%. Let's select the OFF (stand by ) time interv al as abov e and adjust the v alue of the T(of f ) potentiometer to 0,7. 1 2 3 Let's select the ON (operating) time interv al as abov e and adjust the T(on) 4 5 6 potentiometer to 0,3.In this case,we can calculate the ON and OFF periods. T(off) = 0,7 x 10 minutes = 7 minutes (The 10 minutes in the f ormula is the maximum v alue of the OFF time selected by the dip-switch) T(on) = 0,3 x 60 seconds = 18 sec. (The 60 sec. in the f ormula is the maximum v alue of the ON time selected by the dip-switch) ON 0,6 sec. – 60 sec You may adjust;the OFF time with 6 second steps (the minimum v alue specif ied by the dip-switch indicates the adjustment step v alue),the ON time though,with 0,6 sec. Steps). NOTE: During the operation of the relay ,y ou may change the time interv al selections and potentiometer adjustment.In this case,it continues to ev aluate the new selections. TECHNICAL DATA: Operational Voltage (Un) A1 – A2 terminals : 220 Vac Operating Range : (0.8 – 1.1)xUn (Un nominal v oltage) Frequency : 50 Hz Contact Current : Max. 3 A / 240 VAC Power Consumption : < 8 VA Dev ice Protection Class : IP20 Connector Protection Class : IP00 Ambient Temperature : -5°C....+50°C Connection Ty pe : To connection rail in electrical panel Dimensions : 23x82x80 mm Sim ple Connection : L1 L2 L3 Load 80 mm 16 mm Load 23 mm 35 mm 82 mm N >>>> Page 51 ® ke – SD STAR – DELTA RELAY ► T (on) : 0 – 30 se c. General: ----► Δ De lay tim e T (off) : 50 – 250 m s ► 220 Vac or 24 V ac/dc ► λ When 220 Vac is applied through "A1 " and " A2 " terminals, star relay is switched on and " " terminal becomes a phase output. At the end of T(on) time,star relay is switched of f and phase output f rom " " terminal lasts. It stops f or T(of f ) pass time.Then delta relay is switched on and " " terminal becomes a phase output.It keeps this position till the energy of the relay is broken. Because, the switch of f time of the contactors depends on their power,brand and age,the pass time f rom star to delta should be adjusted by the user. Operation graphic: T OFF Δ U Υ Υ T ON Ton Δ A2 Toff L L A1 A3 220 Vac 24 Vac/dc A2 Δ Υ Υ A2 Sim ple Conne ction : L1 L2 L3 F1 F2 T1 TECHNICAL DATA: Stop Operational Voltage (Un) A1 – A2 terminals : 220 Vac A3 – A2 terminals : 24 Vac or 24 Vdc Operating Range : (0.8 – 1.1)xUn (Un nominal v oltage) Frequency : 50 Hz Contact Current : Max. 3 A / 240 VAC Power Consumption : < 8 VA Dev ice Protection Class : IP20 Connector Protection Class : IP00 Ambient Temperature : -5°C....+50°C Connection Ty pe : To connection rail in electrical panel Dimensions : 23x82x80 mm Start c1 C1 C2 C3 N T1 W 16 mm V 80 mm A2 U c3 23 mm 35 mm 82 mm N N N Y Load X Z c2 Δ >>>> Page 52 ® ke – FTR PHOTOCELL RELAY ► 1 – 10 LUX Adjustm ent General : The relay is used to automatically illuminate streets, av enues, parks and shop windows when the ambient is dark and to switch of f the illumination sy stem when the ambient is lit. ► Operating Principle : The photocell sensor (PS), that contains a v ariable resistor sensitiv e to strength of illumination, must be place somewhere illuminated by sunlight but not af f ected f rom any external or relay 's own illumination sy stem. At sunset time, when the strength of light goes below adjusted lux v alue, af ter a certain time delay , relay energizes its contact. Delay time serv es to av oid any f alse decision caused by temporary illumination or headlights. At dawn time, when the strength of light goes abov e adjusted lux v alue, af ter a certain time delay , relay de-energizes its contact. ■ ke-FTR Traditional photocell relay . It has 1-10 lux light strength and 3s-5s turn on-of f time delay adjustments. ■ ke-FTR10M It has -10 lux light strength and 25s-40s turn on-of f time delay adjustments. Additionally , contains 4A f use protection in series with contact output stage and manual-auto selection switch. ke-FTR10M Ke-FTR TECHNICAL DATA: Operational Voltage (Un) L1 – N terminals : 220 Vac Operating Range : (0.8 – 1.1)xUn (Un nominal v oltage) Frequency : 50 Hz Contact Current : Max. 5 A / 240 VAC G1-G2 : Photocell sensor terminals Light Strength :1-10 lux Hy sterisis : %5-30 Turn On-Of f Delay : f or FTR : 3s Time f or FTR10M :25-40s Power Consumption : < 4 VA Dev ice Protection Class : IP20 Connector Protection Class : IP00 Ambient Temperature : -5°C....+50°C Connection Ty pe : To connection rail in electrical panel Dimensions : 28x82x80 mm L1 L2 L3 L1 80 mm N 28 mm 35 mm 82 mm L1 L2 L3 >>>> Page 53 ® ke – SKR LIQUID LEVEL CONTROL RELAY ► 5 – 100 KΩ Se nsitivity Adj. General : Three electrodes are connected to the “T”,”B” and ”E” terminals. When the liquid lev el reaches the upper lev el electrode (T) then the relay energizes its contacts to turn on the pump. When the liquid lev el reaches the buttom lev el electrode (B) then the relay de-energizes its contact and turns the pump of f . Sensitiv ity ( empedance between electrodes) can be adjusted in the range of 5-100 Kusing the knob on the f ront side of the relay . ► the upper level electrode : Top ( T) ► the buttom level electrode : Buttom ( B ) ► the earth electrode : Earth ( E) N L1 L2 L3 AUTOMATIC FUSE No water lamp K1 T1 Pump O–I ON-OFF SWITCH . T1 Hydrophore pressure switch (Shorted if hydrophore doesn't exist) TECHNICAL DATA: Operational Voltage (Un) L1 – N terminals : 220 Vac Operating Range : (0.8 – 1.1)xUn (Un nominal v oltage) Frequency : 50 Hz Sensitiv ity Contact Current Power Consumption Dev ice Protection Class Connector Protection Class Ambient Temperature Connection Ty pe : Max. 5 A / 240 VAC : < 4 VA : IP20 : IP00 : -5°C....+50°C : To connection rail in electrical panel : 28x82x80 mm 80 mm Dimensions : 5-100Kadjustable 28 mm 35 mm 82 mm Do not use f or explosive or flameable liquids. It's strictly advised to w ell examine technical data of device and fully match connection diagram. Otherw ise the device or system may be harmed.. Phase Failure Relay >>>> Page 54 ® ke – HSR General: HYDROPHORE SEQUENCING RELAY This product is dev eloped f or hy drophore pump sy stems that contain 2 or 3 to make the pumps work in sequence and with equal time periods. HSR2 is designed f or sy stems that contain 2 pumps, HSR3 is designed f or 3 pumps. ► ke -HSR2 : 2 Outputs ► ke -HSR3 : 3 Outputs ► Operation Principle HSR3 :commands the pressure switchs that are connected to the pressure tank (P1,P2,P3). The upper and buttom openning v alues are as f ollows. P1 max. ≥ P2max. ≥ P3max. P1min. > P2min. > P3min. Hy drophore sequencing relay HSR, depending on the pressure swtiches that it commands, accepts P1 to be the highest pressure switch, then P2 and then P3 to be the lowest pressure switch and though it takes pumps in sequence when the pressure in the tank decreases startting f rom the highest to the lowest . When only P1 pressure switch is on, the dev ice turns on the pump output H1 ( if already on then it takes the next one) and f or the f ollowing next 10 minutes ( as long as P1 is on it keeps this possition ) .Af ter 10 mintues if P1 is still on then the dev ice turns of f H1 and turns on H2. Same way af ter 10 minutes if P1 is still on then the dev ice turns of f H2 and turns on H3. This way the deiv ce sequences the use of the pumps and div ide the time between them. The dev ice remembers the sequence and takes alway s the f ollowing pump. When P1 is of f , the hy drophore output which is on goes of f too, and next time when P1 goes on the dev ice takes the next output (pump) . For example: if H1 was switched of f af ter P1 switch was of f , next time when P1 switch goes on the dev ice takes the nest output H2 on. If P2 switch goes on while P1 is on then the dev ice takes n the next pump that is not already on. The pumps then are shared in time the same way two by two. As long as P1 and P2 are on, the pumps will work as H1-H2, H2-H3, H3-H1 f or 10 min f or each couple. If P2 goes of f , the dev ice turns of f the pump is row and works as mentioned abov e with one pump. While P1 and P2 are on, if P3 goes on too then the dev ice takes the three pumps H1, H2 and H3 until P3 is of f . When the pressure switches go of f the dev ice turns of f the pump that is in the row sharing time between the pumps again as mentioned bef ore. If P2 goes on bef ore P1 ( P1 may be out of order) then the dev ice will start turning H1 on. Sim ple Connection : TECHNICAL DATA: Operational Voltage (Un) L1 – N terminals Operating Range P1 P2 P2 : 220 Vac : (0,8 – 1,1)x Un (Un nominal v oltage) : 50 Hz. : Out : P1 : P2 : P3 : H1,H2,H3 : Max.3 Amp/240Vac : < 5VA : IP20 : IP00 : -5°C....+50°C : To connection rail in electrical panel : 28x82x80 mm Frequency Pressure switch output 1.pressure switch input 2.pressure switch input 3.pressure switch input Pump contact outputs Contact Current Power Consumption Dev ice Protection Class Terminal Protection Class Ambient Temperature Connection Ty pe 80 mm Dimensions Pressure Switchs It's strictly advised to w ell examine technical data of device and fully match connection diagram. Do not apply any energy to the Out, P1, P2, P3 inputs otherw ise the device or system may be harmed. Pressure Switchs P1 max P2 max P3 max H3 H2 H3 N L1 28 mm 35 mm 82 mm Pressure Tank The device's w orking principle is show n in the diagram below : P1 min P2 min 10 minutes10minutes10minutes 10 minutes10 minutes10minutes P3 min H1 H2 H3 2 1 2 1 3 2 2 1 2 2 1 12 1 1 1 1 1 1 1 1 1 2 1 1 1 1 1