1
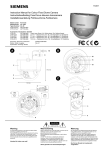
SiPass
AC5160
Installation Instructions
Building Technologies
Fire Safety & Security Products
Liefermöglichkeiten und technische Änderungen vorbehalten.
Data and design subject to change without notice. / Supply subject to availability.
© 2008 Copyright by
Bewator AB, a Siemens company
Wir behalten uns alle Rechte an diesem Dokument und an dem in ihm dargestellten Gegenstand vor. Der Empfänger erkennt diese Rechte
an und wird dieses Dokument nicht ohne unsere vorgängige schriftliche Ermächtigung ganz oder teilweise Dritten zugänglich machen oder
außerhalb des Zweckes verwenden, zu dem es ihm übergeben worden ist.
We reserve all rights in this document and in the subject thereof. By acceptance of the document the recipient acknowledges these rights
and undertakes not to publish the document nor the subject thereof in full or in part, nor to make them available to any third party without our
prior express written authorization, nor to use it for any purpose other than for which it was delivered to him.
Contents
1
Important Information.............................................................................5
2
Ordering Information ..............................................................................7
3
Scope of Delivery ....................................................................................8
4
Technical Specifications ........................................................................9
5
5.1
5.2
Standards and Guidelines....................................................................10
EU Directives ..........................................................................................10
EN 50133 ................................................................................................11
6
Description ............................................................................................12
7
7.1
7.2
7.3
AC5160 Structure ..................................................................................13
Dimensions .............................................................................................13
Mechanical Structure ..............................................................................13
Expansion Options ..................................................................................14
8
8.1
8.2
8.3
Installation .............................................................................................15
Procedure................................................................................................15
Installing Optional DRIs ..........................................................................16
AFI5100 or AFO5100 Installation............................................................16
9
9.1
9.2
9.3
9.4
9.5
9.6
9.7
9.8
9.9
Installation .............................................................................................17
Power Supply Overview..........................................................................18
Additional Power Supply .........................................................................19
Installing the Battery ...............................................................................20
PE Grounding Concept ...........................................................................20
Power Supply Connection.......................................................................21
ACC Connection .....................................................................................22
DRI Connection.......................................................................................22
AFI5100/AFO5100 Connection...............................................................22
Configuration of ACC Tamper Switch Input............................................23
10
10.1
Cables and Lines...................................................................................24
Calculation Tool for Cable Cross-Sections .............................................24
3
Siemens Building Technologies
Fire Safety & Security Products
04.2008
4
Siemens Building Technologies
Fire Safety & Security Products
04.2008
1
Important Information
Only authorized personnel may assemble and install the system.
Your attention is drawn to the fact that the contents of these Installation Instructions are not part of a
previous or existing agreement, commitment or statutory right and do not change these. All commitments on the part of Siemens are contained in the respective sales contract which also contains the
complete and solely applicable warranty conditions. These warranty conditions in the contract are
neither extended nor limited by the contents of this Manual. Should you require any further information, or should particular problems occur that are not handled in sufficient depth in these Installations
Instructions, help can be requested through your local Siemens office or representative.
Please read and comply with the following notes before assembling and installing
the unit:
z Please ensure that the controller is installed in a clean room. Please ensure that
the central control unit is protected from damaging environmental influences
such as direct sun exposure, operation-dependent vibrations, dust, etc.
z Never install the controller close to heaters and sinks. Avoid the proximity of
sources of electrical or mechanical interferences. If the controller is installed in
an enclosed space such as behind paneling or in small niches, please ensure
sufficient ventilation. Please use electrically conducting floor coverings to
minimize electrostatic charges.
z The permissible ambient temperature of the central control unit must be between
-10 and +55 °C, humidity should not exceed 75% if possible (95% for very short
periods, no condensation).
z Use a separate electrical circuit with a specially marked fuse (“red") to supply
a.c. voltage to the unit.
z Please ensure that switching off other tools or devices does not disconnect the
electrical circuit to the unit. Attach a note in the cabinet about the location of the
power supply fuse (low-voltage distributor number / mains fuse number). Please
ensure that the fuse is easy to access.
z Please ensure that the cable duct covers the cable entry opening.
z Use only shielded cables with extra-low voltage for all lines leading to the inside
of the controller. Connect the cable shielding to all connection points. Ground
cable shielding only on one side.
z The precautions applicable for C-MOS technology are to be applied to activities
involving server circuit boards and soldering.
z Never install a live circuit board.
5
Siemens Building Technologies
Fire & Security Products
04.2008
Ordering Information
2
Ordering Information
Item
Order No.
Weight (approx. kg)
AC5160 cabinet
with ACC, 2 x DRI and 24V/150 W power pack
6FL7820-8BA16
21.3
Accessories, not included in delivery scope!
RIM-010 DRI 24 V DC
6FL7820-8CA10
AFI5100
6FL7820-8CB10
AFO5100
6FL7820-8CC10
Battery 12 V/25 Ah
GBI:13013
9.6
Battery 12 V/6.5 Ah
GBI:13206
2.3
24V/150 W power pack
V24230-Z6-A1
1.2
Covers for battery poles
C24243-A100-C12
7
Siemens Building Technologies
Fire Safety & Security Products
04.2008
Scope of Delivery
3
Scope of Delivery
z Installation Instructions
1
z ACC-010 Advanced Central Contr.
1
z RIM-010 DRI 24VDC
2
z 24V/150 W power pack
1
z Enclosure base plate
1
z Enclosure shell
1
z Installation kit
1
8
Siemens Building Technologies
Fire Safety & Security Products
04.2008
Technical Specifications
4
Technical Specifications
Electric
Power supply connection
230 V AC, +10 to -15%, 50 Hz
Supply voltage
24 V DC
System, incl. battery charging current
Max. 5 A per 150 W power pack
Battery capacity
Max. 25 Ah per battery
Power consumption
ACC
Max. 10 W
DRI
Max. 25 W
AFI5100
Max. 50 W
AFO5100
Max. 10 W
Power pack
Fastener
DIN rail mount TS35
Power supply connection
Spring-loaded clips max. 1.5 mm2
Output and signal clips
Spring-loaded clips, pluggable, max. 2.5 mm2
Operating conditions
Max. permissible ambient temperature -10 to +55° C
Protection rating (EN60529)
IP30
Rel. humidity
F (< 95%)
Design
Cabinet dimensions (W x H x D) in mm 500 x 750 x 200
Color
RAL 7035, light gray
Material
Steel sheet
EN 50133
Identification class
2 with AR6181-MX
Identification class
3 with AR6182-MX
Access class
B
Environmental class
2
IP class
IP30 for AC5160,
IP65 for AR618n-MX
IK class
IK04 card reader
9
Siemens Building Technologies
Fire Safety & Security Products
04.2008
Standards and Guidelines
5
Standards and Guidelines
5.1
EU Directives
This product complies with the requirements of the European Directives
89/336/EEC “Directive of Electromagnetic Compatibility” and 2006/95/EEC “Low
Voltage Directive”. The EU declaration of conformity is available from:
Siemens Building Technologies
Fire & Security Products GmbH & Co. oHG
76181 Karlsruhe
European Directive 2004/108/EC „Electromagnetic Compatibility”
Compliance with the European Directive 2004/108/EC has been proven by testing
according to the following standards:
Emitted interference:
EN 61000-6-3
Interference resistance:
EN 50130-4
EN 55022 Class B
European Directive 2006/95/EEC „Low-Voltage Directive”
Compliance with the European Directive 2006/95/EEC has been proven by testing
according to the following standard:
Safety:
EN 60950 1
10
Siemens Building Technologies
Fire Safety & Security Products
04.2008
Standards and Guidelines
5.2
EN 50133
The product meets the requirements of the EN 50133-X.
Basic functions of the access control system according to EN 50133-1
z Processing
The comparing of information with pre-set rules to make decisions concerning
the granting or denying of access to users and/or the comparing of events with
pre-set rules to produce appropriate actions. The processing is done in the
AC5100 (ACC).
z Power supply
That part of an access control system which provides power for the operation of
the systems or any part thereof.
z Self protection
The AC5160 is tamper protected (Methods used to protect an access control
system or part thereof against deliberate interference).
z Programmability
The Controller AC5100 is the ability to receive and store pre-set rules.
z Access Point Control
An access point is the location at which access can be controlled by a door,
turnstile or other secure barrier. The access point control is in this system done
with the combination of the AC5100, the DRI (ADD5100) and the reader
AR618x-MX or AR618x-RX.
z Recognition
Done with a unique card presented to the reader AR618x-MX or AR618x-RX.
Display for the User. The display for the user are the LED's of the readers
AR618x-MX and AR618x-RX.
z Annunciation
Presentation of the information to the management or other systems. The System provides this information to the SiPass integrated PC SW (can be seen in
the SiPass integrated clients).
z Communication with other systems
Interfaces to other systems are described in the SiPass integrated User Manuals.
11
Siemens Building Technologies
Fire Safety & Security Products
04.2008
Description
6
Description
The AC5160 is a cabinet for the basic components of the SiPass access control
system. This cabinet can be expanded with additional components.
The Advanced Central Controller (ACC) is one of the basic components. It is the
central analysis unit for the access control system. This unit is connected with the
input/output boards via the field level network (FLN). The ACC is equipped with
four FLNs. TCP/IP is used to link to the SiPass Server.
The Dual Reader Interface (DRI) is a door module including all necessary inputs
and outputs.. Support of up to two card readers, door monitoring inputs (e.g. door
frame contact) and associated outputs (e.g. door latch). The FLN connects the DRI
to the ACC. The AC5160 includes 2 DRIs. Four additional DRIs can be installed
into the AC5160 cabinet.
The basic AC5160 model is equipped with a 24V/150 W power supply. If necessary, an additional power supply can be placed in the AC5160 and connected in
parallel to the existing power pack (master/slave operation).
The AC5160 can be equipped with two 12-volt batteries of a capacity up to 25 Ah
each. These are connected to and charged by the power supply. In the event of a
power failure, the system is kept online by the batteries. The Batteries are not included in the delivery scope.
The Input Point Module (AFI5100) is an input board with 32 inputs and 5 outputs.
This module also connects to the ACC via the FLN. The AFI5100 is not part of the
basic configuration.
The Output Point Module (AFO5100) is an output board especially designed for
elevator access control but can also be used for general purposes. The module
features 16 inputs and 16 outputs and is also connected to the ACC via FLN. The
AFO5100 is not part of the basic configuration.
Please refer to the corresponding user guide for a detailed description of these
modules.
The basic configuration – consisting of power supply, ACC, and two DRIs – can be
expanded by the previously mentioned components. The following configurations
are possible:
z Six DRI’s in total.
The AC5160 provides 5 installation slots for simple installation of the DRIs. This
means that one DRI needs to be installed on top of another DRI when expanding the basic configuration to the maximum of 6 DRIs.
z Additional 150 W power power supply (see chapter 5.3).
z AFI5100.
The AFI5100 (Input Point Module) can be installed on top of the ACC using the
included spacer bolts. The fully expanded configuration may not exceed the
max. output power of the power supply.
z AFO5100.
The AFO5100 (Output Point Module) can be installed on top of the ACC using
the included spacer bolts as well. The fully expanded configuration may not exceed the max. ourpur power of the power supply.
12
Siemens Building Technologies
Fire Safety & Security Products
04.2008
AC5160 Structure
7
AC5160 Structure
7.1
Dimensions
Base plate
Front of shell
Fig. 1
7.2
Side of shell
Controller enclosure
Mechanical Structure
The AC5160 cabinet consists of a two-piece sheet steel enclosure:
z Base plate
z Enclosure shell
The enclosure shell is detachable for simple installation and equipped with a tamper contact to detect unauthorized access to the cabinet.
The power supply is mounted on the base plate by a DIN rail mount. One ACC and
two DRI boards are also installed on the base plate.
Further installation slots are available for three additional DRIs. Two DRIs can be
installed on top of each other when using the included spacer bolts.
An AFO5100 or an AFI5100 can be installed on top of the ACC as well.
The DIN rail mount is generously dimensioned and thus can accommodate an additional 150 W power supply.
The cabinet is prepared for max. two 12 V/25 Ah batteries.
13
Siemens Building Technologies
Fire Safety & Security Products
04.2008
AC5160 Structure
7.3
Expansion Options
Possible configurations at max. power consumption of the components:
Power pack(s)
DRIs
AFI5100
AFO5100
1
2
0
1
1
2
1
0
1
4
0
0
2
6
0
0
2
6
0
1
2
6
1
0
When making configurations, the max. power consumption of the system (readers,
door locks) must be taken into account.
Fig. 2
Installation plate
14
Siemens Building Technologies
Fire Safety & Security Products
04.2008
Installation
8
Installation
8.1
Procedure
Follow these steps to install the unit and check off items you finished:
Determine installation location for controller. Pay close attention to the cable
entry points.
Unpack the AC5160.
Remove enclosure shell from the base plate. The enclosure shell is attached
to the base plate with a screw.
Mark drill holes for the base plate.
Drill 6 plug holes (Ø 8 mm) for the base plate and insert plugs.
Screw in both upper screws until only approx. 10 mm are visible.
Attach base plate to both upper screws.
Screw in the two lower and center screws to fasten the base plate and
then tighten all 6 screws.
Insert cable.
Strip the insulation from the peripheral cable and attach the cable ties to
the indicated positions to ease the strain on the cables.
Place sheath wires of shielding on grounding screws.
Place peripheral cables directly on components.
Strip power cable (230 V) and connect to power supply (see section 9.5
“Power Supply”).
Connect ground.
Check wiring.
Connect cover contact to ACC.
Insert battery and connect to the power supply.
Turn on system.
Connect PC to TCP/IP interface of ACC.
Configure ACC.
Connect FLN components of FLN bus to a PC by using a RS232/485
converter.
Configure FNL components with the ‘FLN Configurator’ program.
Start up the system.
Check all system functions. If necessary, analyse and eliminate errors
(troubleshooting).
Place installation instructions, inventory list, configuration and structure
plans into the controller.
Carry out acceptance procedure.
Close cabinet and attach seal.
15
Siemens Building Technologies
Fire Safety & Security Products
04.2008
Installation
8.2
Installing Optional DRIs
The AC5160 is already equipped with two DRIs. Three optional installation slots for
additional DRIs are available. To install an additional DRI, screw four spacer bolts
to the corresponding installation slot. Fasten the DRI to the spacer bolt of the installation slot.
If you would like to stack two DRIs, use four additional spacer bolts to attach the
lower DRI. Then attach the second DRI with screws.
8.3
AFI5100 or AFO5100 Installation
The AFI5100 or the AFO5100 can be installed on top of the ACC. Remove the
screws used to attach the ACC to the base plate and replace these with the corresponding spacer bolts. Remove the AFI5100 or the AFO5100 from the package
and screw to the spacer bolts.
16
Siemens Building Technologies
Fire Safety & Security Products
04.2008
Installation
9
Installation
WARNING
Risk of explosion when improperly replacing battery! Only use original replacement parts or those recommended by the manufacturer. Used batteries are
hazardous waste and have to be disposed accordingly!
Only an authorized electrician may connect the system to the 230 V power supply. Disconnect the 230
V power supply from the unit using the intended disconnecting device when replacing the power pack
and when working on 230 V parts.
Also clamp off the battery at its connection poles!
17
Siemens Building Technologies
Fire Safety & Security Products
04.2008
Installation
9.1
Power Supply Overview
In case of several parallel connected power
supplies, always use an external fuse between 12
and 20 A.
2
5
1
To loads
Slave1: X8/7
Slave1: X8/2
Slave2: X8/7
Slave2: X8/2
1 9 8 7 6 5 4 3 2 1
0
X8
+B
+BI-begr
9 8 7 6 5 4 3 2 1
X11
+24V
+24V
+24V
+24V
+24V
0V
0V
0V
NC
NC
SA
SA
F
F
BS
NS
S
Slave1: X11/6
Slave2:X11/7
3
Interference
Rest
Power OK (gn)
Battery malfunction (yl)
Sensor malfunction (yl)
Slave
Master
4
1
2
X1
3
4
5
PE
L
L
N
N
1 Battery temperature sensor Siemens Matsushita
NTC K164/4,7k/K B57164-K472-K
PE / FPE
L
N
2 Maintenance-free lead-gel batteries 2 x 12 V
3 Battery fuse F2 for output X8/10
T6,3AH250V 5 x 20
4 Mains fuse F1 T4AL250V 5 x 20
5 Batterie with external fuse
Fig. 3
Power supply
18
Siemens Building Technologies
Fire Safety & Security Products
04.2008
Installation
9.2
Additional Power Supply
The basic configuration with one ACC and two DRIs includes one power supply
with a capacity of 150 W. If this should not be sufficient for additional DRIs, an additional 150 W power supply has to be installed. The system then can provide an
output power of 300 W in total.
Load
- UB
+UB
Battery
malfunction
Mains
malfunction
1
NTC
-
+
4k7
X11/9
8
6
5
4
3
2
1
X8/10
9
8
7
6
5
4
3
2
1
X11/9
8
}
}
NC
7
Curre
Sensor malfunc
BN
nt
Distr.
NTC
tion
NC
+24 V
0V
7
6
5
4
+B
F2
T6,3A
3
2
1 X8/10
8
7
6
5
+24 V
4
3
2
1
0V
+B
F2
T6,3A
+B
+B
3
2
PE L1 L1 N N
9
Curre
Sensor B N
Malfunc
nt
Distr. NTC
tin
PE L1 L1 N N
1
Protect battery with external fuse: min. 12 A, max. 20 A
2
Power supply: 24 V/150 W, V24230-Z6-A1 set to slave
3
Power supply: 24 V/150 W, V24230-Z6-A1 set to master
Fig. 4
Additional power supply
In case of parallel power supply connections, an external protection fuse is necessary for the battery connection that matches the conductor cross-section:
For example:
Protect line with 4 mm2 with a max. of 12 A.
Protect line with 6 mm2 with a max. of 20 A.
The lines to the connections + battery, - battery, +UB and - UB should be at least
2.5 mm².
External loads have to be protected with a fuse that matches the conductor crosssection.
For example, a line with a cross-section of 2.5 mm² can be protected with
max. 20A.
19
Siemens Building Technologies
Fire Safety & Security Products
04.2008
Installation
9.3
Installing the Battery
Install the battery and then connect the battery to the power supply. The battery
connection wires are not included with the controller.
Note the following when installing the battery:
z In case of a parallel connection of two power supplies, the battery wire has to be
protected with an external fuse.
z The fuse may not exceed the max. value of the total current of 12 A.
z Be very careful when connecting the batteries. Ensure poles are assigned cor-
rectly! Only use battery types intended for this application.
z Attach the battery pole covers before assembling the enclosure shell.^
To power pack
rt
+
bl
sw
Battery 1
12 V / 25 Ah
Fig. 5
9.4
+
Battery 2
12 V / 25 Ah
Installing and connecting battery
PE Grounding Concept
The AC5160 is a protection class 1 device.
The measures and actions required by protection class 1 devices specify that the
PE is to be connected to the mains cable. With the AC5160, the PE is firmly attached to the grounding terminal. The PE is connected with the device via the
grounding terminal. On the other side of the grounding terminal, a green-yellow line
leads to the power pack.
This ensures proper protection is provided (protecting health and life).
20
Siemens Building Technologies
Fire Safety & Security Products
04.2008
Installation
9.5
Power Supply Connection
Strain relief
Fig. 6
Power supply connection, mains cable strain relief
WARNING
The EC Conformity is invalid if the mains power line (230 V) is not equipped with
a strain relief clamp.
z Insert the mains power supply lines to the battery from the bottom into the cen-
tral controller unit.
z Attach all cables and lines using cable ties at the provided cable entries to relief
the strain.
z Remove the sheath of the cable one centimeter behind the cable tie.
z Connect the cable leads to the corresponding terminals of the power supply
without too much slack: black to L, blue to N. Protect both cables by tying both
with a cable tie approx. 1 cm in front of the connection terminals (reason: If a
cable breaks, contact with metal parts has to be prevented).
The green-yellow lead is attached to the grounding terminal on the rail mount.
From there a cable leads to the PE connection of the power supply.
21
Siemens Building Technologies
Fire Safety & Security Products
04.2008
Installation
9.6
ACC Connection
The following have to be connected to the ACC:
z 24 V power supply
z Ethernet TCP/IP cable (pin designation: 10/100)
z Tamper contact (pin designation: tamper)
z FLN devices to one or several FLN inputs (Beginning with FLN 4)
A detailed description of the connections is listed in the ACC installation and user
manual (document number: A24205-A335-B243).
9.7
DRI Connection
The following have to be connected to the DRI:
z 24 V power supply
z FLN connection to ACC
z One or more card readers
z Door monitoringcontacts
z Door latch
A detailed description of the connections is listed in the DRI installation and user
manual (document number: A24205-A335-B246).
9.8
AFI5100/AFO5100 Connection
A detailed description of connecting the AFI5100 and AFO5100 is listed in the following documents:
z IPM User Manual (document number: A24205-A335-B245)
z OPM User Manual (document number: A24205-A335-B244)
22
Siemens Building Technologies
Fire Safety & Security Products
04.2008
Installation
9.9
Configuration of ACC Tamper Switch Input
Create alarm class
Follow these steps to create the new alarm classes:
1.
Choose menu “system / alarm classes”.
2.
Enter a unique name.
3.
Choose type: “Controller“.
4.
Choose in <Alarm Handling> the option “Requires Acknowledging“.
5.
Choose alarm priority and alarm sound.
6.
Activate in <Alarm Options> “Restorable Alarm“.
7.
Add in <Current Defined Alarm Status> an alarm:
– Choose in the field <Status> the event “Switch tamper active“.
– Add in <Status Description> a unique status description, e.g. “The housing
tamper is triggered“
– Choose in <Alarm/Restore> “Alarm“
– If required choose in <Symbol Name> a symbol for display a plan or create
a special symbol.
8.
Add in <Current Defined Alarm Status> one more entry:
– Choose in the field <Status> the event “Tamper Switch inactive“.
– Add in <Status Description> > a unique status description.
– Choose in <Alarm/Restore> “Restore“
– If required choose in <Symbol Name> a symbol for display a plan or create
a special symbol.
9.
Save alarm class.
Î
The minimal configuration of alarm class is done.
Assign alarm class
Follow these steps to assign an alarm class to a tamper switch input of the device
housing:
1. Choose menu “System authority / Components / ACC controller”
2. Choose the device which is connected to the tamper switch.
3. Choose and save in <Alarm Class> the alarm class created in the steps above.
23
Siemens Building Technologies
Fire Safety & Security Products
04.2008
Cables and Lines
10
Cables and Lines
10.1
Calculation Tool for Cable Cross-Sections
If remote SiPass components are to be connected to the ACC, the following calculation tool might be
helpful.
Use a shielded weak-current cable type IY (St)Y for all bus lines. The crosssections of the leads have to be chosen by considering the following criteria:
power consumption of the connected system components/modules
z Line length
z Intermittently needed switching current (e.g. relay exits)
However, a min. diameter of 0.6 mm per lead is required.
The supply voltage in all system components/modules may not fall below 18 V DC.
With a min. permissible battery voltage of 21 V, this yields a max. voltage drop of
3V DC pertaining to the entire line length.
(Caution: Total length = line to and back).
Resistance values for the conductor cross-section calculation:
Line length = 100 m
Wire Ø 0.6 mm (0.28 mm2) ⇒ 6.5 Ohm
Wire Ø 0.8 mm (0.56 mm2) ⇒ 3.6 Ohm
Calculation formulae
Voltage drop with applied current
U =
L⋅I
χ⋅A
L = Line length of line leading to unit and
back
in meters
I = Current in ampere
Conductor cross-section with applied current
and 0.5 V voltage drop along line:
χ = spec. conduct. value for copper
= 56
m
Ω ⋅ mm 2
2
A = Lead cross-section in mm
U = Voltage in V
A=
L⋅I
L⋅I
=
= ....... mm 2
χ ⋅ U 56 ⋅ 0 .5
24
Siemens Building Technologies
Fire Safety & Security Products
04.2008
25
Siemens Building Technologies
Fire Safety & Security Products
04.2008
26
Siemens Building Technologies
Fire Safety & Security Products
04.2008
Issued by
© 2008 Copyright by
Bewator AB, a Siemens company
Bewator AB
SE-171 24 Solna
Sweden
Data and design subject to change without notice.
Supply subject to availability.
www.buildingtechnologies.siemens.com
Document no.
A24205-A335-B219
Edition
04.2008