1
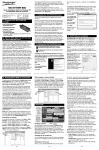
Hauppauge!
®
WinTV
Quick Installation Guide for
Windows XP, Windows Me,
Windows2000, Windows98SE
Note: The full WinTV Installation manual in PDF format, is located on the WinTV
Installation CD-ROM in the Manual directory.
WinTV board
connectors
Sound card
LineIn
After the Setup program is complete, the WinTV2000 icon will be on your Windows
desktop. You’ll also have the WinTV-Radio icon on WinTV models equipped with radio.
The WinTV2000 TV application
FM radio connector
(on some models)
To run the WinTV2000 application for watching TV and for recording videos, double click
the WinTV2000 icon.
TV Connector
for antenna or Cable TV input
Audio output (LineOut)
Always-on-top
Channel up
S-Video or composite video input
(S-Video only on some models)
WinTV board 878 based
Sound cable for connection
between the WinTV board and
your sound card
Video source select
Audio Input (LineIn)
WinTV
Remote control (IR)
receiver socket
(on models with remote control)
Composite to S-Video
adapter (on some models)
Sound
card
Speaker
cable
Pref
Preferences
menu
Remove toolbars
"no toolbar" mode
Channel down
Close
WinTV
Minimize
Channel surf
Menu
Setup Menu
Previous channel
WinTV for Windows
Installation CD-ROM with:
Step 4: Installing the WinTV under Windows XP
WinTV2000 application with
SoftPVR™
When the Found New Hardware
Wizard appears, Insert the WinTV
Installation CD-ROM in your
PC’s CD-ROM drive and make sure
Install the software automatically (Recommended) is
checked.
WinTV- Scheduler
WinTV Radio application
(for use on models
equipped with FM radio)
Remote control transmitter
Remote Control application
(for use on models equipped with
Remote Control)
WinTV Installation and User manual
with 2 AAA batteries (on some models)
Then click NEXT.
Remote control receiver with
velcro dot fastener (on some models)
CFG
Configure
Snapshot
Double click on
each "thumbnail" to
see image full size.
Click and hold your
right mouse button
to see image
options.
Remove toolbars
Click your right mouse button in the
TV window to remove toolbars.
Freeze
video
Snapshot viewer
window
Snap
Snapshot
Button
Click your right mouse
button here to see the
channel selector
with FM radio)
The manufacturer of your
PC supplies instructions
on removing the PC
cover.
Remove the cover.
Step 2: Install the WinTV board
When the Hardware Installation
dialog box opens, click Continue
Anyway.
Click Finish.
Locate a free PCI slot (a short
white slot).
Live TV
Record
open the record
controls
Replace the computer cover.
Step 3: Connect the WinTV cables
Plug your TV antenna or Cable TV
cable into the WinTV’s TV
Connector.
The audio from the WinTV is routed to
your PC’s sound card for amplification
and mixing. To connect to the sound
card, plug one end of the supplied
Sound cable into WinTV’s Audio
output (LineOut) connector. Plug
the other end of this cable into the
LineIn connector on your sound card.
The S-Video input and Audio
input can be used to connect to a
VCR, camcorder, camera, DVD player
or satellite TV receiver. If your video
device has a yellow composite connec-
tor instead of S-Video, use the supplied
Composite to S-Video adapter.
If you have a WinTV with FM radio, plug
the supplied Radio aerial cable into
the FM radio connector. This may
not be necessary if your TV aerial or
cable network supplies an FM signal.
If you have a WinTV with remote control, plug the Remote Control
receiver into the the Remote control receiver (IR) socket. Use the
Velcro dot to position the Remote
Receiver where it will be able to receive
infra-red commands from the Remote
Transmitter.
Page 1
Movies: here is where you configure the video and audio settings for SoftPVR.
You can set the movie record directory (DVCR Record File Path), the
MPEG Quality settings, and the Audio setings.
Snap Shot: set the size of captured images plus single or two field captures.
Audio: your audio settings are configured here.
Color: adjust the color of your TV picture here.
When running WinTV for the first time, you will need to scan for your TV channels. If you
are using Cable TV, in the Broadcast/Cable box select Cable (or Cable HRC).
Otherwise select Antenna.
To hide the WinTV toolbar:
Choose the Video Format for your geographic region:
North America uses NTSC M
Europe uses PAL B/G
the U.K. uses PAL I
in South America, either PAL M or PAL N is used
Setting up the channels
After you have scanned for channels, you can add channel names and fine tune for better reception. To do this, click the Menu button on WinTV2000, then click Suite Manager.
You can also click and hold your right mouse button, then click SuiteManager.
Plug the WinTV board into the
PCI slot, and screw the
WinTV’s metal cover plate to
the PC.
View: these are the settings for the On Screen Display of the TV channel and
Audio Volume, where you can enable Close Captions, plus controls for the
Toolbar mode (Title mode), NoToolbar mode (No Title) and Full Screen (TV
mode).
Scanning for channels
Then click Start to start the channel scan.
Unscrew and remove the
metal cover plate which covers the back of the empty slot.
View: for setting the TV window
size
Click the Pref button to open the Preferences menu. You will have tabs for:
One Touch
Record
RC: Software remote control
Switch off the computer.
Configuration: duplicate configuration menus for color,
audio, MPEG settings, etc.
Pref button
Note: If WinTV2000 deos not have the TV / Pause / record buttons: The
WinTV setup must be run from the primary CD-ROM in your system. If you do not see the
TV / Pause / Record buttons, re-run setup with the WinTV Installation CD in your
primary CD-ROM drive.
Step 1: Prepare the computer
Suite Manager: configure the
TV tuner (scanning, naming, fine tuning, etc.), setting up 'favorite channel
lists' and set an external
A/V source to a TV channel.
Click again to restore toolbars.
Current TV channel
or video source
Radio aerial (on models equipped
WinTV Utilities
Menu button
Click the Menu button to open the TV
Setup menu. Here is the main control for
TV channels, and duplicate controls for
other functions:
Full screen TV
Contents of the WinTV package
A convenient way to use Always-on-Top is
to make the TV window in the no-title mode
small, and to make the TV window in the
title mode larger. Then you can switch very
quick from a small window to a larger one
simply by clicking the right mouse button.
Simply click your right mouse button in the WinTV’s video window for the no-title
mode. To restore the toolbars (the title mode), once again click your right mouse
button in the WinTV’s video window. You can set the size of the window differently
in each mode.
To allow WinTV to display TV full screen:
Click on the Pref button in WinTV2000 (or click on Display / Preferences in
WinTV32), then click TV mode, and check the box which says “Allow resolution
change”. When you click the Full screen TV button on either WinTV32 or
WinTV2000, Windows will change your screen resolution to either 640x480 and TV
will appear full screen.
When finished watching TV full screen, click your right mouse button to return to
“TV-in-a-window” mode.
Click on the desired channel, then Edit. Change the ChannelName to the name of the station, change the description or fine tune. Then click OK.
After the video driver is installed, the Found
New Hardware Wizard will detect the WinTV audio driver.
Click Next, then Continue anyway and then Finish to complete the audio driver installation.
Step 5: WinTV Software installation
After the driver install completes, Setup
can be run from the WinTV Installation
CD-ROM.
Click the Start button, then Run and
then the driver letter of your CD-ROM drive
(for example: D:\), then Setup.EXE
Selecting an External Video source (VCR, DVD player, satellite TV box)
Click the green Video source select button to select TV, Composite and S-Video sources.
The video sources will use the TV standard chosen when you scanned for your TV channels (NTSC or PAL).
Rescanning for channels
Click the Menu button and click on Suite Manager and then Auto scan. Make sure you
select cable or antenna in Broadcast / cable. Chose the correct Video format for your
region and then click Scan.
Live TV
mode
Record
mode
Displaying TV full screen
When you click the Full screen TV button, TV will appear full screen. When finished watching TV full screen, click your right mouse button in the TV window.
Choose your language.
If you see video with a black box around it, click the Pref button then click TV mode tab.
Check the box which says "Allow resolution change".
Uncheck any applications you do not want
to install.
"Always-on-Top" mode:
Click Install to install the WinTV applications.
With Always on Top, the WinTV window can always be visible on your Windows desktop. To turn on Always-on-Top, simply click the Always-on-top button. It will turn green. To
turn off Always on Top, click this button again.
Page 2
Recording MPEG video with SoftPVR™
Page 3
SoftPVR uses your PC’s processor to compress your TV recordings into a size
much smaller than the original video. This compression process runs at the same
time as the recording, called ‘real time compression’. SoftPVR has two recording
formats: MPEG-1 or DivX. You can set the formats by clicking the Pref button on
WinTV2000. and then clicking the Movies tab.
Note: The following functions are not currently enabled with SoftPVR: the OTP
and Pause buttons, plus the Fast Forward and Rewind functions.
Note: a Pentium III 750MHz minimum is recommended for best SoftPVR operation
with MPEG. For recording DivX, a 1.5GHz Pentium or faster is recommended.
Page 4
To start recording, either click the OTR (One Touch Record) button or the red Record
button on WinTV2000. You can also start a recording by using WinTV Scheduler.
To stop recording, click Stop. To close the recording controls, click the TV button.
If you click OTR more than once, a record timer will be set and the record
timer will be set 15 minutes for each time the OTR button is clicked. For example, if
you click the OTR button 3 times,
WinTV will record for 30 minutes.
-
Time to Begin Program
-
Time to End Program
-
Program Period: one time, daily, weekly
Running the WinTV Radio program
-
Date to Begin Program: todays date is the default. Change this if you want to
schedule on another date.
Source selection: leave set at WinTV2000 to bring up the WinTV at the requested time and on the requested channel.
To launch the WinTV radio application,
click the Radio button on the WinTV2000
application. You can also launch the
WinTV radio application by running it from
the ProgramFiles/WinTV directory.
-
Channel selection: chose one of your scanned channels.
Using the WinTV-radio Buttons
-
Recording options: click on Record to File to record your show. You can
also name your file to record, in the dialog box below.
-
Recording settings
Click the PREF button (Preferences
menu), then the Movies tab to get to
the Record settings menus.
In DVCR Record Path, set the
directory for your recordings.
WinTV Radio (on some models)
Recording controls
Record Button: Clicking the Record button will automatically generate a file
name and start recording. Everytime you record a file, a new file is automatically created and the file name is displayed in the record window. The first file
name will be _dvcr001.mpg. The second file will be _dvcr002.mpg and so on.
-
Note: Before installing the IR Remote for WinTV, make sure that the WinTV application
works properly when using your mouse or keyboard.
-
The Counter displays the length of your recording in hours:minutes:seconds
-
If you had started recording with the OTR button, and had clicked it more
than once, the total time for the recording will also be displayed.
You can also click OTR after a record has been started, and the record timer
will be set.
Click the Stop button to stop your recording. The recorded audio/video file is then
saved to disk using the automatically assigned file name. The Time counter is reset to
00:00:00 after the recording is saved.
Play Button: Clicking the Play button will playback from disk the last video
file created. With SoftPVR, you can only Play and Pause your videos.
-
Turn off your computer. Plug the sub-mini
jack at the end of the IR Receiver cable
into the Remote control (IR) receiver
socket of the WinTV-PVR.
If you have problems with audio when playing back your recordings:
-
If you had installed the WinTV
applications, the IR software should automatically run, and you will see the WinTV
Remote icon in the Device Tray.
Also, the message Error MainConcept MPEG
Audio Connection can be
fixed in the same way.
2.
0 - 9 buttons: channel numbers.
Sometimes problems are due
to the sound card not being
setup to record audio from its
'Line-in' socket. To enable
audio recording, open the
Recording Control panel by
clicking Start / Run and then
SNDVOL32 / REC. This will open
the Recording Control panel.
Make sure that 'Line-in' is
enabled (this is sometimes called 'Line' or 'Aux').
WinTV-Scheduler
WinTV-Scheduler allows you to schedule the recording of TV shows. WinTVScheduler, once it is set, can be closed, and the WinTV application will “wake up” at
the desired time and tuned to the desired channel.
After installation, WinTV-Scheduler can be found on your desktop. WinTV-Scheduler
can also be run by clicking Start/Programs/Hauppauge WinTV/Scheduler.
WinTV-Scheduler works by using the Windows Task Scheduler to launch WinTV
at the chosen time. WinTV-Scheduler sets up a command line in Task Scheduler to
run WinTV2000, specifying a TV channel and a length of time to record. At the scheduled time, WinTV2000 will open, and the record menu will roll down and start recording.
CD: Starts your systems Audio CD-Player for playing back Audio-CD´s.
TV: Closes the radio application and starts the WinTV application.
Problem: WinTV2000 with a black screen (no video)
The default WinTV video mode is Allow Overlay, but this may give a black
screen with some VGA cards. Primary.exe, a program which is found in the
WinTV directory on your hard disk, can be used to set WinTV’s video mode. To
change this setting, run Primary.exe and then select Force Primary. The Force
Primary setting works with almost all VGA cards.
Installing WinTV for Windows98, Windows Me,
Windows2000
Application
on/off
2
Audio mute
Remote control when watching live
TV
Full button: makes WinTV go full screen.
Clicking the Full button again brings WinTV
into a window.
After Windows in booted, the Add New Hardware Wizard will appear.
When you see the Windows will search ... dialog box, insert the WinTV
Installation CD-ROM into your CD-ROM drive.
Select CD-ROM drive and click NEXT.
Play
Fast
rewind
Skip
back
Record button: opens the SoftPVR tray.
Menu
3
Once the Hauppauge WinTV video driver has been detected, click NEXT.
Channel
up/dn
4
You will see a number of files being copied to your hard disk drive.
5
Click FINISH.
6
After the Hauppauge WinTV video driver has been installed, the Hauppauge
WinTV audio driver will be automatically installed
Stop
Fast
forward
Skip
ahead
Pause
0-9
“Quick
Skip”
buttons
Remote control when playing video
recordings
Skip ahead button: skips ahead in the
video 30 seconds per click. Holding the skip
ahead button will autorepeat, and advances
the video about 5 minutes per 10 seconds the
button is depressed.
Skip back button: skips back 30 seconds
per click. pressing and holding the Skip back button makes the video go back about 5
minutes for 10 seconds the button is depressed.
Note: If the driver is not found or if there are any other problems encountered while
installing the driver, you may cancel this step entirely and install the drivers manually.
Double click on My Computer (on your windows background, usually in the upper left
hand corner of your screen) click the Right mouse button on the WinTV-USB
Installation CD-ROM drive and select Open on the pop up menu. Double click on
the folder called WDM then double click on the file Wdm98-XP.EXE and follow the onscreen instructions.
Note: After rebooting your PC, you may be asked to insert your Windows98 CD ROM.
Be sure to use the exact version of Windows 98 that is installed on your system. If you
are using Windows98SE, do not use a Windows98 Gold CD-ROM.
System and Direct Draw check for Windows98SE and Me
After all files are copied, the Hauppauge WinTV System Inspection utility will be
run.
Check for the message Your Hauppauge WinTV hardware and software drivers appear ... . If not, refer to the Quick Troubleshooting section.
Go button: brings up the WinTV task list. Allows you to start WinTV2000, WinTV32 or
WinTV-radio.
Click on Close.
Menu button: brings up the Windows Task list. Use the left and right arrows to change
to other Widnows tasks.
Check if the message GOOD NEWS! We detect ... appears.
Now the Hauppauge WinTV DirectDraw Inspection utility will be run.
Green power button: will turn off the WinTV application
Click on Close (and save details).
0 - 9 Quick Skip buttons: When playing back a recording, the “1” button will skip to
10%, the “2” button 20%, etc. of the length of the recording.
If you do not see this message, then your VGA card does not have an updated Direct
Draw driver. Most VGA card manufacturers provide updated drivers for Windows.
To set up a scheduled recording, run WinTV-Scheduler and click on the Add
Program. The items that need to be set for each event are:
Page 5
Online installation tips and software updates can be found at:
http://www.hauppauge.com/pages/support/support_pci_878.html
Our FAQ can be found at:
http://www.hauppauge.com/pages/faq/support_faq_pci.html
Sometimes there is an interrupt conflict between WinTV board and another device
in your PC. Move WinTV to another PCI slot. You might need to reinstall the
WinTV driver after moving WinTV. Run HCWCLEAR first (found on your WinTV
Installation CD-ROM) before reinstalling the WinTV driver.
Click NEXT. Select Search for the best driver for your device (Recommended).
Click NEXT.
Record
Quick Troubleshooting Guide
Problem: Initialization error message when running WinTV2000
1-10: Preset 1 - 10
1
Volume
up/dn
Ctrl P Image print
Problem: Pause button gives an error message
Place the IR Receiver on your desktop so
that the infrared light from the IR Remote
transmitter can reach the IR Receiver.
Turn on your computer.
Make sure the Mixer Line - Record Source is set to either Stereo Mix or
Mono Mix. In WinTV2000, click Pref / Movies / Audio Record Source.
Go button
Ctrl M Mute audio
Page Up Volume Up
Scan: Searches for new stations until you click on Stop. Click the RIGHT mouse button
anywhere on the WinTV-radio window to set the Scan mode.
OFF: Closes the radio application.
To install the IR Remote receiver:
-
Page Down Volume Down
Mono: Force mono reception. Default is stereo audio.
If you need to restart the remote control, run IR32.EXE from the C:\Program
Files\WinTV directory.
-
1.
Mute: Turn off the sound
The WinTV’s remote control software is installed automatically during the installation of
the WinTV applications. You will see the WinTV Remote icon in the Windows
Device Tray. The installation will add a shortcut to IR.EXE to the Startup group, so that
IR.EXE is loaded every time after Windows has booted.
File Button: Clicking the File button opens the File menu. The last file
recorded is listed in the File name box. You can Rename your recorded video
file, Play a video file previously recorded, Delete recorded video files.
If you find that there is audio while watching live TV, but no audio while playing your
video recordings, there are two things to check:
Mem: Sets an FM radio channel preset. To assign the current station to a preset, click
on Mem and then on one of the Preset buttons (1-10).
Min: Minimizes the WinTV-radio window.
Note: the IR remote control is found only on some WinTV models.
Ctrl F Image freeze
Ctrl T Full screen TV
Seek: Search for the next active FM radio channel.
The IR Remote Control (on some models)
Ctrl C Copy image (clipboard)
- channel down
Tune: Fine tune the current radio channel.
WinTV-Scheduler also works with the following on-line Electronic Program Guides:
TitanTV in North America, TVTV in Europe and iEPG in Japan.
While recording:
Live video continues to play in the WinTV window. If you are recording DivX
videos, the TV screen might become jerky of your processor is not fast enough
to record and play live vide at the same time.
+ channel up
Volume: The audio volume is adjusted by setting the Windows LineIn volume.
Once these are set, click Set Program. You can add more Events, clicking Set Program
after each event is set. When you are finished click Close. The WinTV program does not
have to be running for the Schedular to work. If WinTV is not running, it takes about 10
seconds to start WinTV and to start the recording of TV.
In Quality Level, you can set the
format of your recordings. You can
set MPEG or DivX record formats.
Keyboard shortcuts
Currently, SoftPVR cannot support Pause mode. Only the Hauppauge WinTV-PVR
products, with HardPVR, can operate in Pause mode.
Problem: No live TV audio from your PC’s Left & Right speaker
Make sure you have plugged the Sound cable into the Audio Output jack
of the WinTV board, and not the Audio Input jack.
In the Volume Control setting (under Programs / Accessories /
Entertainment / Volume Control), be sure that the LINE-IN section is not
on Mute (sometimes this is a PCs default) and that the volume is up.
After making sure your PC’s audio mixer LineIn setting is not muted, and at a reasonable volume level, you can verify that the WinTV card is working by connecting
self-amplified speakers directly to the Audio Output jack (LineOut) on the WinTV
board.
On the WinTV2000 application, click the Pref button, then select the Audio tab.
Make sure that the Audio Mixer list shows "Line-in". Make sure that MUTE is
not checked, and that the volume is up.
Problem: Incompatible motherboards
Not all older motherboards completely support the WinTV. We recommend the
use of a motherboard with an Intel chipset. We have software updates on our web
site which will fix problems found with several VIA and SIS-based motherboards.
Many motherboards have had BIOS upgrades to fix various problems. Our technical support department maintains a list of problems/solutions.
Please see http://www.hauppauge.com/html/sw_wcst.htm in the Tips
section or http://www.hauppauge.com/html/faq.htm.
Problem: Poor TV Reception or Not detecting all channels:
Poor TV reception is generally the result of an weak TV signal. When using a 'rooftop' antenna, an aerial booster may be required if there is poor TV reception. If
you find that some or all of the channels have not been detected, you can insert channels manually.
If you are connecting to a satellite TV receiver, cable box or DVD
player, the best video quality comes if you use the S-Video or Composite
video input on WinTV instead of the TV connector. S-Video and Composite
video have better quality than the RF video used with the TV connector.
Also, in some areas using cable TV, a format called Cable HRC is used. If so, try
rescanning (see step 8) but use CABLE (HRC) instead of cable in the
Broadcast/Cable box.
Problem: Installing WinTV on Windows95, Windows NT systems
Our website has special drivers for use under Windows 95 and WindowsNT.
© 2002-2005 Hauppauge Computer Works, Inc. QI-WINTV-V3.9e-ENG 2/21/05
Page 6
Page 7
Page 8