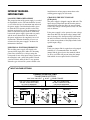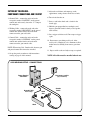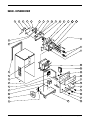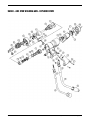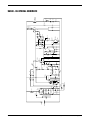
1
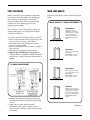
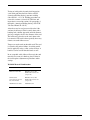
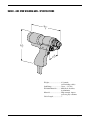
UA500
Solid State – Arc
Stud Welding System
Owner’s Manual
UA 500
Arc Stud Welding System
Owner’s Manual
• Installation
• Operation
• Maintenance
MIDWEST FASTENERS, INC.
450 Richard Street
Miamisburg, OH 45342
Phone: (800) 852-8352
Fax:
(937) 866-4174
©2010 Midwest Fasteners, Inc. All rights reserved. Printed in U.S.A.
1
©2010 MIDWEST FASTENERS, INC. — UA500 Stud Welding System
TABLE OF CONTENTS
GENERAL
Warranty ...........................................................................................2
Safety Precautions............................................................................3
INTRODUCTION
What is ARC Stud Welding .............................................................5
SETUP & OPERATION
Supplying Power ..............................................................................6
Connections and Startup ..................................................................7
Control Settings ...............................................................................8
Weld Gun Setup ...............................................................................9
First Test Welds ..............................................................................12
Weld joint Quality .........................................................................12
MAINTENANCE
Preventive Maintenance .................................................................14
Troubleshooting .............................................................................14
PARTS & SPECIFICATIONS
UA500 Welder Specifications ........................................................16
Weld Gun Specifications ...............................................................17
UA500 Welder Exploded View & Parts List ................................18
Weld Gun Exploded View & Parts List .........................................20
UA500 Electrical Schematic ..........................................................22
Notes ..............................................................................................23
FOREWORD: Your new stud welding equipment is carefully constructed of the finest components and materials available. Used properly, this equipment
will give you years of profitable, efficient Service. The system incorporates the latest in engineering advances for completely reliable welding of mild steel,
stainless steel. . The
assembled unit is completely performance checked. The welder is delivered to you in functional electromechanical condition.
A careful study o
WARRANTY: All parts used in the assembly of your MIDWEST FASTENERS UA500 Arc Welding System are fully guaranteed for ninety (90) days from
factory shipment date. Under this warranty, MIDWEST FASTENERS reserves the right to repair or replace, at its option, defects in material or workmanship
which occur during the warranty period. Notice of any claim for warranty repair must be furnished to MIDWEST FASTENERS within ten (10) days after
the defect is discovered. MIDWEST FASTENERS does not assume liability for shipping, or liability for any labor or material related to use of this system,
unless such costs are expressly authorized in writing by MIDWEST FASTENERS.
MIDWEST FASTENERS, I
or use not in accordance to the operating instructions furnished by the manufacturer, or for reasons beyond its control. The manufacturer does not assume
any liab
This warranty is valid only when welding with welding studs purchased from or approved by MIDWEST FASTENERS.
2
©2010 MIDWEST FASTENERS, INC. — UA500 Stud Welding System
WELDING SAFETY PRECAUTIONS
AND WARNINGS
DO NOT weld if movement is confined or if there is
danger of falling. Wear a safety harness if working
above floor level. Shut unit down and remove weld
stud from the stud weld gun when not in use.
INSTALLATION AND SERVICING SAFETY
Improperly installed or improperly grounded
equipment is a hazard. Always have qualified
personnel perform the installation, trouble-shooting,
and maintenance. Do not perform any electrical
work unless you are qualified to do the work. Be
sure the system is properly grounded.
Maintain this unit according to the manual.
Disconnect input power before servicing this
equipment and use lockout tags. Significant DC
voltage can still exist in this equipment after removal
or shut down of the input power. Turn off all
equipment when not in use.
ELECTRICAL SHOCK HAZARD
Contact with live electrical parts and ground can
cause severe injury or death. DO NOT weld in damp
areas or while equipment or clothing are damp or
wet. Do not touch the stud if you are in contact
with the work, ground, or another electrode from a
different machine. Don’t stand directly on metal or
the earth; stand on dry boards, insulating mats or an
insulating platform.
Before turning on power, be sure you are wearing
appropriate protective clothing:
- high-topped, heavy rubber-soled shoes
- long (gauntlet style), dry, flameproof, hole-free
insulated gloves
- heavy, long-sleeve, cuffless shirt
- heavy, cuffless trousers and
- a welding helmet or cap.
GENERAL WELDING JOB SAFETY
Use this equipment only for its intended purpose.
Use well-maintained equipment. Replace worn or
damaged cables or parts immediately; bare wiring
can kill. Do not drape cables over your body. Keep
all panels and covers securely in place. Do not
overload electrical wiring, be sure power supply
system is properly sized, rated and protected to
handle the unit. Don’t connect multiple guns or work
cables to a single weld output terminal. Follow rated
duty cycle and allow overheated equipment adequate
cooling periods. Do not block or filter airflow to
unit.
3
ELECTROMAGNETIC FIELDS AND RFI
Electric and magnetic fields may be dangerous.
Welder operators having pacemakers should consult
their physician before welding. EMF may interfere
with some pacemakers. Exposure to EMF may have
other health effects which are unknown. Connect the
work cable to the work piece as close as possible to
the area being welded. Keep welding power source
and cables as far away from your body as possible.
Electromagnetic energy can interfere with sensitive
electronic equipment such as computers and
computer-driven equipment such as robots.
FUMES HAZARDS
Welding produces fumes and gases. Breathing these
fumes and gases can be hazardous to your health,
particularly in confined spaces. Do not breath fumes
and gases. Always ventilate confined spaces or use
approved air-supplied respirator. Don’t weld on
coated metals such as galvanized, lead or cadmium
plated steel, unless the coating is removed from the
weld area. Don’t weld near degreasing, cleaning or
spraying operations.
FIRE SAFETY AND BURN PREVENTION
(ARC RAYS CAN BURN EYES AND SKIN)
Always wear safety glasses with side shields in any
work area. Even if wearing a welding helmet, face
shields and goggles are also required. Wear goggles
over safety glasses when chipping, wire brushing or
grinding slag. Chipped slag may be hot and can fly
far. Bystanders should also wear goggles over safety
glasses. Use protective non-flammable screens or
barriers to protect others from flash and glare.
Warn bystanders not to watch the arc and not to
expose themselves to the rays of the electric-arc or
hot metal.
Welding on closed containers, such as tanks, drums
or pipes, can cause them to blow up. Do not weld
where flying sparks can strike flammable material.
Remove all combustible materials a minimum
of 35 ft. away from the welding arc or cover the
materials with a protective nonflammable covering.
Hot sparks or hot metal can fall through cracks
or crevices in floors or wall openings and cause a
©2010 MIDWEST FASTENERS, INC. — UA500 Stud Welding System
hidden smoldering fire or fires on the floor below.
Make certain that such openings are protected from
hot sparks and metal. Be aware that welding on a
ceiling, floor, bulkhead or partition can cause fire on
the hidden side.
Have appropriate fire extinguishing equipment
handy such as a garden hose, water pail, sand bucket
or portable fire extinguisher. Be sure you are trained
for proper use. After completing operations, inspect
the work area to make certain there are no hot sparks
or hot metal which could cause a later fire. Use fire
watchers when necessary.
EYE
PROTECTION
HEARING
PROTECTION
NOISE CAN DAMAGE HEARING
Noise from some processes or equipment can
damage hearing. Therefore wear approved ear
protection.
ADDITIONAL SAFETY INFORMATION
The following organizations can provide detailed
information on safe practices for electric arc
welding:
PROTECTIVE
CLOTHING
American Welding Society
550 NW LeJuene Road, Miami, FL 33126,
305-443-9353, www. aws.org
HIGH VOLTAGE
National Fire Protection Association
1 Battery March Park, Quincy, MA 02269-9101
617-770-3000, www.nfpa.org and www.sparky.org
Canadian Standards Association
178 Rexdale Blvd, Rexdale, Ontario, CAN M9W 1R3
800-463-6727, www.csa-international.org)
FIRE HAZARD
American National Standards Institute
11 W 42nd Street, New York, NY 10036-8002
212-642-4900, www.ansi.org
U.S. Government Printing Office
Superintendent of Documents
P.O. Box 371954, Pittsburgh, PA 15250
312-353-2220, www.osha.gov
4
©2010 MIDWEST FASTENERS, INC. — UA500 Stud Welding System
WHAT IS ARC STUD WELDING
Stud welding is a welding process where a “stud” (or
similar metal part) is instantaneously end-joined to
a metal workpiece. This process involves the same
basic principles and metallurgical aspects as any
other welding process.
The equipment required to stud weld is composed
of a direct current power supply, a controller, a
weld gun and cables to tie the system components
together. In most systems the power supply and
controller are combined into one unit called the
“Welder.”
The ARC stud welding process produces weld power
through one of three standard DC welding power
sources. These are Transformer-Rectifier type,
Motor/ Generator type, or Storage Battery type. A
ceramic ferrule is required in ARC stud welding to
maintain the proper atmosphere in the weld area.
ARC stud welding is generally used for studs over
1/4" in diameter or where heavier base metals are
involved.
“ARC” STUD WELDING PROCESS
1.
Stud is placed against workpiece and weld
gun trigger depressed
2.
Stud is lifted by weld gun and "initiating
arc" is drawn
3.
Weld gun forces stud into molten metal
4.
Weld solidifies and ferrule is removed
UA500 STUD WELDING SYSTEM
(P/N: OEUA-500)
Power Supply/Controller
OEUA-500-00
Weld Gun
0
UA50
OX.
APPR
TINGS
SET
TIM
E
CU
RR
EN
T
R
POWE
ON
E
TIV
GA
NE
L
RO
NT
CO
IVE
SIT
PO
Combo
Cable
Set
067-0011-00-I
ARES-100-50
Ground
Cable
ARGC-100-25
The stud welding process is as follows. The stud
is placed in the collet of the “Weld Gun” and then
positioned against the workpiece. The weld gun
trigger is depressed and through operation of the
stud welding controller and the design of the stud,
an arc is drawn which melts the base of the stud
and a proportionate area of the workpiece. The
stud is then forced (or "plunged") by the weld gun
into the molten pool and held in place until the
metals resolidify. This high quality fusion weld is
completed in milliseconds.
5
©2010 MIDWEST FASTENERS, INC. — UA500 Stud Welding System
SETTING UP THE WELDER SUPPLYING POWER
installation site or how proper connections to the
welding power supply are to be made.
CHANGING THE INPUT VOLTAGE
(If Required)
The power supply is shipped setup for 460 volts. The
input voltage jumper links provided on the primary
terminal board permit the unit to be operated from
various line voltages and frequencies: 208, 230, 460
volts at 60 hertz.
LOCATING THE POWER SUPPLY
The proper location of the power supply is essential
for dependable service. The unit should be located
so as to allow for free air movement into and out of
the power supply. Consideration should be given
to allow the least exposure possible to dust, dirt,
moisture and corrosive vapors. A minimum of 18
inches of unrestricted space must be maintained
between the power supply’s front and rear panels
and the nearest obstruction. The underside of
the power supply must be completely free of all
obstructions. Attention should be given to ease
of removal of the power supply’s enclosure for
maintenance functions.
If the power supply is to be operated at some voltage
other than 460 volts, the input voltage jumper links
must be changed. See the input voltage label inside
the unit's back door (reference diagram below) for
the various arrangements of the jumper links for the
specific input voltage.
NOTE:
If only one jumper link is required on each grouped
terminals, it is recommended that -the unused
jumper links be placed across the terminals which
are to be used. This will prevent losing the jumper
links which are not required for this connection.
ELECTRICAL INPUT REQUIREMENTS
This welding power supply is designed to be
operated from single-phase, 60hz, AC Incoming
power lines (which have a voltage rating that
corresponds to one of the input voltages shown on
the nameplate) and a solid earth ground. Consult
your local electric utility if there is any question
about the type of electrical system available at the
INPUT VOLTAGE SETTINGS
POWER /CONTROL UNIT
TRANSFORMER RECTIFIER
208 / 230 / 460 VOLT
60 HZ
SINGLE PHASE
460 VOLT OPERATION
50 AMP FUSETRON FUSES
OR CIRCUIT BREAKER
208 / 230 VOLT OPERATION
100 AMP FUSETRON FUSES
OR CIRCUIT BREAKER
TRANSFORMER TERMINAL BOARD JUMPER BAR INSTALLATION
208 VOLT
5
230 VOLT
5
2
L1
3
7
L2
6
6
3
5
4
1
2
L1
GND.
GND.
L2
2
L1
4
460 VOLT
3
4
4
GND.
7
L2
6
1
7
6
1
©2010 MIDWEST FASTENERS, INC. — UA500 Stud Welding System
SETTING UP THE WELDER COMPONENT CONNECTIONS AND STARTUP
5. Adjust the weld timer and amperage to the
approximate settings shown on the face of unit.
6. Turn circuit breaker on.
1. Ground Cable - connect the male end to the
receptacle marked “POSITIVE” on the power/
control unit and securely fasten the “C” clamp to
the workpiece.
7. Insert a stud in the chuck and a ferrule in the
ferrule grip.
8. Hold the gun perpendicular to workpiece and
depress gun until ferrule is firmly sealed against
work surface.
2. Welding Cable - connect the male end to the
receptacle marked “NEGATIVE” on the power/
control unit and the female end to the male
connector on the gun weld cable.
9. Press trigger to initiate weld. Do not press trigger
again.
3. Control Cable - connect the male end to the
receptacle marked “CONTROL” on the power/
control unit and the female end to the male
connector on the gun control cable.
10. Do not move gun during weld cycle. After
weld cycle is completed, wait a moment to allow
molten metal to solidify, then remove gun from
stud.
NOTE: When using 50 ft. Combo cable between gun
and power/control unit it must be uncoiled.
11. Inspect weld results and adjust setup as required.
4. Set up the gun in accordance with instructions
starting on page 9 of this manual.
NOTE: All cables must be uncoiled when in use.
ARC WELDING SETUP - CONNECTIONS
Power Supply/
Controller
Disconnect switch
(By Customer)
0
UA50
E
TIV
GA
NE
L
RO
NT
CO
IVE
SIT
PO
Ground Cable
with clamp
Weld
Gun
Combo
Cable
Work
7
©2010 MIDWEST FASTENERS, INC. — UA500 Stud Welding System
SETTING UP THE WELDER CONTROL SETTINGS
Current - Weld current adjustment may be made
by means of the current control on the front panel,
adjustable from 100 amps to 900 amps.
The control settings establish the weld cycle
parameters. Understanding the effect of each control
will aid in quick and efficient setup for the first weld.
Time - The weld timer on the front panel regulates
the duration of the weld current.
Polarity Selection (Cables) - On straight polarity,
which is normally used, the ground is positive. To
reverse polarity, simply reverse the weld / ground
cables on the front of the unit.
ON/OFF Power Switch - When the circuit breaker,
located on the front of the unit, is turned “ON”,
the unit is energized and the pilot light will light.
The circuit breaker provides protection to the
components in the unit. Should an overload occur,
the circuit breaker will “trip.” This in turn shuts the
unit off. The circuit breaker is a manual reset type;
therefore, if it should “trip.”, it must be reset. FU1 is
a 4 amp delay type fuse which protects the control
circuit. FU2 and FU3 are 10 amp delay type fuses
which protect the sustaining arc circuit.
The welders controls should be set initially as shown
on the "Approximate Settings" chart on the front
panel (sample diagram below) in accordance with
the diameter of arc stud being welded.
WELDER CONTROLS
UA-500
ULTRA ARC
APPROXIMATE
SETTINGS
STUD
INCHES
TIME
SEC.
CURRENT
%
1/4
.25
40
5/16
.30
45
3/8
.33
60
1/2
.55
85
0.3
0.4
0.5
50
ON
60
30
70
0.2
80
20
0.6
10
0.1
TIME
8
40
90
POWER
ON
OFF
CURRENT
©2010 MIDWEST FASTENERS, INC. — UA500 Stud Welding System
SETTING UP THE WELDER WELD GUN SETUP
REMOVING
A CHUCK
Following the previous instructions, the weld gun
should now be properly connected to the welding
system. The weld gun needs to be properly set up
and adjusted for the stud to be welded.
A different, and correctly sized, chuck and ferrule
grip are needed for each different stud diameter and
style that will be welded. The appropriate chuck is
inserted into the tapered chuck adaptor. The ferrule
grip is inserted in the hole in the foot and secured
with the locking screws to hold it in place.
CHUCK REMOVAL & INSTALLATION
To install a chuck, position the chuck into the front
of the chuck adapter. Tap lightly on the end to
seat the chuck into the adapter. It is not necessary
to pound on the end of the chuck. This will only
damage the chuck itself.
FOOT & LEG SET UP
The foot comes in 3 different sizes (small, medium
and large) and 2 different configurations (closed
and split). Typically, a split foot is only used when
welding headed anchors and shear connectors. The
standard gun ships with a small foot and 9” legs.
The heavy duty gun ships with a medium foot and
14” legs.
FOOT & LEG COMPONENTS
INSTALLING A CHUCK
The foot is installed on the ends of the legs.
Unscrew the flat head screws from the ends of the
legs. Place the trim washers on the flat head screws
and place the screws through the adjustment slots in
the foot. Reattach the screws to the legs.
There is also a depth stop inside of the chuck.
The depth stop should be adjusted so that you are
retaining a good portion of the stud you are setting
up to weld. Typically, this is one third to one half of
the length of the stud you are welding.
To remove the chuck, insert the short, tapered end
of the chuck ejector key into one of the holes in the
side of the chuck adapter. You may have to move the
rubber bellows to clearly see the holes in the side of
the chuck adapter (under rubber boot). Rotate the
chuck key either clockwise or counter clockwise and
the chuck will pop out of the chuck adapter.
9
©2010 MIDWEST FASTENERS, INC. — UA500 Stud Welding System
Insert the legs into the gun body leg retainers. Line
up the flat on the leg with the set screw. The set
screw will bite into the flat region and hold the leg
securely. Tighten the set screws in the side of the
legs. If the set screw bites into the round portion of
the leg, it will damage the leg so it doesn’t inset into
the gun body leg retainer any more.
FERRULE GRIP / SPARK SHIELD REMOVAL
& INSTALLATION
There are three set screws (two on a gas foot) that
retain the ferrule grip or spark shield in the foot.
Loosen all three set screws. Push the grip or spark
shield into the foot. The grip is sometimes a tight
fit so press it firmly into the foot so it seats against
the back stop. The two side holes in the ferrule
grip should line up with the set screws in the foot.
Tighten the set screws to retain the ferrule grip. It is
not necessary to make these extremely tight.
When a spark shield is being used, it is not necessary to
align the spark shield with the set screws in the foot.
PLUNGE ADJUSTMENT
Plunge Settings When Using Ferrules
Plunge controls the amount of stud that is melted
during the arc time. Too much plunge and the fillet
will overfill the ferrule or create excessive splatter
when using a spark shield. Too little plunge and
there may be incomplete fillet formation. There
should be approximately 1/8 of an inch of stud
protruding past the end of the ferrule. A bit less for
smaller studs, a bit more for larger studs.
Stud Diameter
.25-.625
.75 and up
Plunge
.125
.188
To adjust the plunge, loosen the leg set screws in the
gun body. Move the foot towards the gun or away
from the gun to increase or decrease plunge. The
plunge measurements are from the end of the stud
and do not include the flux load.
PLUNGE ADJUSTMENT
FOOT ALIGNMENT
Alignment of the foot is very important, if the foot
is not aligned properly it can create bad welds in the
form of hang-ups. Place a stud into the chuck and
a ferrule into the ferrule grip. The stud should sit
perfectly in the center of the ferrule. If it does not,
loosen the flat head screws on the legs holding the
foot. Position the foot so the stud is perfectly aligned
in the ferrule. Retighten the flat head screws.
FOOT ALIGNMENT
Note: These are instructions for standard ferrules.
For reduced fillet ferrules (only recommended for
very specific applications) decrease the amount of
plunge by half.
10
©2010 MIDWEST FASTENERS, INC. — UA500 Stud Welding System
Plunge Settings For Arc or Gas Arc Stud Welding
For Short Arc or Gas Short Arc the stud should
protrude past the end of the spark shield by about
0.04” or 1mm. This is about the same as the flange
thickness on flanged style studs. For standard time
duration Gas Arc the plunge should be set at about
2 flange thicknesses or 2mm.
ADJUSTING GUN LIFT
The lift controls the arc length and thus is one factor
in controlling the heat of the welding process. "Lift"
should be set as shown below depending on the
diameter of the stud to be welded.
Adjusting Lift
To adjust lift, remove the slotted screw holding the
rear cap in place. Put the rear cap aside. Loosen
the nylon tipped set screw that holds the adjustable
core in place. To increase lift, turn the adjustable
core screw counter clockwise. To decrease lift,
turn the adjustable core screw clockwise. Each
half turn is .025”.
“ARC” STUD WELDING PROCESS
Single phase equipment:
1/8” lift for most applications.
Three phase equipment :
1/16” lift for studs up to 5/16” diameter
3/32” lift for studs 5/16” to 1/2” diameter
1/8” lift for studs over 1/2” diameter
Measuring Lift
It is straight forward to measure lift. For safety from
accidental activation, always disconnect the weld
cable from the power supply before making any gun
adjustments or performing any service on the gun.
To measure gun lift, hold a scale against some fixed
part of the tool. The front cover or the foot will
work well. Press the trigger so the tool activates the
lift mechanism. Now measure again. The lift is the
difference between the two measurements.
MEASURING LIFT
After properly setting the lift, retighten the nylon
tipped set screw to keep the adjustable core in place.
Replace the rear cap and tighten the rear cap screw.
It is important that the rear cap is in place as the
prevents dirt and other contaminants from entering
the gun and fouling the lift mechanism.
WELD GUN FUNCTIONS
The weld gun automates the stud welding process. It
performs several key function:
1. It holds the stud.
2. It holds the ferrule, spark shield or gas delivery
system.
3. It strikes the arc.
4. Establishes the arc length (lift distance).
5. Via the power supply, the gun controls the arc
time.
6. Controls the rate of plunge of the stud into the
base metal.
11
©2010 MIDWEST FASTENERS, INC. — UA500 Stud Welding System
FIRST TEST WELDS
WELD JOINT QUALITY
Before you begin to weld anytime it is important
to review the set up. By making sure that the gun
and welder are set up properly, you will have
the best welding results. 95% of all stud welding
problems are due to improper gun set up or
improper power settings.
Inspect the weld quality visually, reference diagram
below.
WELD QUALITY - VISUAL REFERENCE
Once you have set up as described previously, the
actual welding process is straight forward. Begin
your first test welds by:
1. Place the stud to be welding into the weld chuck.
2. Place a ferrule into the ferrule grip (this step is not
necessary if you are using a spark shield).
3. Position the end of the stud onto the location
where you want it welded.
4. Press the gun downward so the ferrule is sitting on
the base metal.
5. Pull the trigger to begin the weld sequence.
6. Hold the gun still during the arcing process.
7. After the weld has completed continue to hold the
gun still for 1 second to allow the molten metal to
solidify.
GOOD WELD
Weld fillet evenly
distributed around base
of stud. Fillet has a shiny
surface and smooth
serrations around edge.
Stud burn-off of 1/8" or
more.
HOT WELD
Low, concave fillet with
shiny surface.
SOLUTION: Decrease
time, current, or both.
PLUNGE ADJUSTMENT
COLD WELD
Fillet complete but with
gray, grainy surface and a
few stringers.
SOLUTION: Decrease
time, current, or both.
8. Remove the weld gun by lifting straight up off
the welded stud. Remove the ferrule by breaking
it away.
9. Inspect the test weld and make further
adjustments to the controls and gun setups as
necessary until satisfactory welds are being made
consistently.
12
HANG-UP
Ferrule so far off-center
from weld end of stud that
stud catches on edge of
ferrule and is not driven
into pool of molten metal.
SOLUTION: Realign
ferrule.
Continues >
©2010 MIDWEST FASTENERS, INC. — UA500 Stud Welding System
Testing of weld quality beyond visual inspection
varies with stud characteristics. Refer to AWS
(American Welding Society) structure welding
code AWS d.1 - rev. 1-76. Welding procedures are
covered in sections 4.28 and 4.29. Weld test and
inspection is covered in section 4.30, paragraphs 1
through 4. (American Welding Society, 2501 N.W.
7th street. Miami, FL 33125.)
A bend test may be used to test weld results if the
stud may be destroyed. This is usually done with a
bending tool (a hollow pipe with an inside diameter
just large enough to fit over the diameter of the stud.
The bend tool is placed over the stud, down to the
base material. The stud is then repeatedly bent away
from its axis until failure occurs.
Torque test maybe used on threaded studs. The stud
is twisted to the point of failure. A twisting tensile
load is applied by using a collar, washer and nut. A
bend lest can be used on threaded studs as well.
In an acceptable weld, failure will occur in the stud
material or tear out of a thin base plate. Failure in
the weld requires adjustment of procedure and/or
settings.
Weldable Material Combinations
13
Base Material
Stud Materials
Mild steel 1006-1022
Mild Steel 1010, 1020
Stainless Steel series 300
(except 303)
Stainless Steel
series 300 (except 303)
405, 410 and 430
Mild Steel 1010, 1020
Stainless Steel series 300
(except 303)
Aluminum series 5000
Aluminum 5356
©2010 MIDWEST FASTENERS, INC. — UA500 Stud Welding System
PREVENTIVE MAINTENANCE
TROUBLESHOOTING
Your MIDWEST FASTENERS welder is designed
for long service with minimal care. Ordinary
common sense maintenance will keep it operating
efficiently. The following are a few tips on
preventive maintenance.
When troubleshooting the UA500, the following
precautions must be observed.
1. Treat the cables with respect. Avoid sharp
bends or kinks which may break the cables.
DO NOT use the cables as a “ towline” to
drag or lift the controller. Avoid damaging or
straining the cables where they enter the gun or
controller.
2. Louvers on the sides of the controller should
be free from obstructions at all times to prevent
overheating.
3. Keep the controller and gun clean and dry, free
of grease, water, dust and dirt. Do not lubricate
any part of your weld gun.
4. The weld gun is for welding studs only. Do not
use the weld gun as a multipurpose tool (i.e.,
Hammer—banging studs to test welds or break
ferrules, Scraper—removing rust, scale or weld
splatter, etc.).
5. We recommend that the transformer and rectifier be cleaned occasionally by blowing out
with low velocity stream of compressed air so
that maximum cooling will be accomplished.
This should be done periodically, depending
upon the location of the unit and the amount of
dust and dirt in the atmosphere. The case cover
should be removed and a clean, dry air stream
should be used for this operation.
1. Power must be TURNED OFF!
HIGH VOLTAGE
NOTE: Dangerous voltage levels can still be
present in the controller—even after power is
disconnected.
Before attempting any inspection or work on
the inside of the unit, open the branch circuit or
main disconnect switch or remove the circuit
fuses. Turning off the unit does not remove
voltage from the power terminals inside the
unit. This can only be done by opening the
primary circuit.
2. The use of a volt/ohmmeter is recommended to
verify where any voltage may, or may not, be
present.
3. The use of a continuity tester (or trouble
shooting light) can be used for continuity
checking (disconnected) cables only.
The troubleshooting chart on the following page
can assist in locating and fixing problems with
the UA500.
Continues >
14
©2010 MIDWEST FASTENERS, INC. — UA500 Stud Welding System
TROUBLESHOOTING CHART
PROBLEM
1. Gun lifts but stud does
not weld.
2. Gun does not lift.
3. Power supply buzzes
loudly or blows main
fuses when powered on.
4. Circuit breaker trips
when welding or
triggering gun.
5. Circuit breaker trips.
6. Unit does not operate
at all.
15
POSSIBLE CAUSE
CORRECTIVE ACTION
A. Support-arc fuse(s) blown.
Test and replace if defective.
B. Loose or broken wiring on
support-Arc module or main
rectifier.
Check wiring and secure if
necessary.
C. Open support-arc choke.
Test and replace if defective.
D. Defective PC board.
Test and repair or replace.
A. Control circuit fuse blown.
Test and replace if defective.
B. Open control cable or gun coil.
Check and repair or replace.
C. Defective PC board.
Test and repair or replace.
D. Improper gun lift adjustment.
Readjust gun lift.
A. Jumper links on main transformer
connected improperly.
Re-link jumpers properly for incoming
voltage (see decal inside rear door).
B. Shorted SCR on main rectifier.
Test and replace if defective.
C. Defective main transformer.
Test and replace if defective.
A. Unit is overheated.
Make sure fan is operating, Allow
unit to cool. Reduce weld rate.
B. Excessive gun free-air triggering.
Avoid repeated gun free-air triggering.
A. Defective thermostat in main
transformer or main rectifier.
Test and replace if defective.
B. Defective main rectifier.
Test and replace if defective.
C. Gun not lifting.
Check gun setup and gun lift and
readjust as required.
A. Blown incoming line fuses.
Test and replace if defective.
B. Jumper links on main transformer
connected improperly.
Re-link jumpers properly for incoming
voltage (see decal inside rear door).
©2010 MIDWEST FASTENERS, INC. — UA500 Stud Welding System
UA500 - SPECIFICATIONS
00
UA5
41"
.
ROX
APPTINGS
SET
T IM
E
CU
RR
EN
T
ER
POWN
O
E
TIV
GA
NE
L
RO
NT
CO
IVE
SIT
PO
16"
16"
Power Requirement.......... 208 / 230 VAC, 60 Hz, 100 Amp
or 460 VAC, 60 Hz, 50 Amp
Pin/Stud Range ................ 10 GA. – 1/2" dia.
Weldable Materials .......... Mild Steel, Stainless,
& Aluminum
Weld Rate* ....................... 14/minute (max.) for 1/4" dia. studs
5/minute (max.) for 1/ 2" dia. studs
(* Dependent on stud size.)
Weld Voltage .................... 900 Amps at 40 VDC
Cables............................... 25' Ground Cable with "C" Clamp
50' Combo Cable Set
16
©2010 MIDWEST FASTENERS, INC. — UA500 Stud Welding System
UA500 - ARC STUD WELDING GUN - SPECIFICATIONS
1
8–
"
2
6 –1 "
2
3"
2 –4
Weight .............................. 4.5 pounds
(not including cables)
Stud Range ....................... 10 GA. – 1/2" dia.
Weldable Materials .......... Mild Steel, Stainless,
& Aluminum
Material ............................ High strength, impact
resistant, poly carbonate
Cable Length .................... 7'
17
©2010 MIDWEST FASTENERS, INC. — UA500 Stud Welding System
UA500 - EXPLODED VIEW
41
40
39
38
37
36
35
34
33
32
31
30
29
28
27
26
A
1
E
2
B
C
D
25
24
B
D
M
F
I
E
23
22
3
21
4
UA
00
-5ARC
20
A
TR
UL
5
6
19
18
C
7
17
8
16
9
15
10
14
11
18
12
13
©2010 MIDWEST FASTENERS, INC. — UA500 Stud Welding System
UA500 - PARTS LIST
Item Qt’y.
1
2
3
4
5
6
7
8
9
10
11
12
13
14
15
16
17
18
19
20
21
19
1
2
1
1
1
1
1
1
2
2
1
1
1
1
1
1
1
2
1
1
1
Part No.
050-3001-54
050-3001-53
050-3002-33
050-1001-62
050-3002-32
050-3001-04
050-3001-88
050-3002-38
~~
050-3002-36
050-3002-45
050-3002-35
050-3002-34
060-3068-00
060-3115-00
060-3068-00
050-3001-12
050-1002-87
050-1004-78
050-3001-11
050-3001-87
Description
Fuse, 4 Amp
Fuse, 10 Amp
Handle
Decal
Cover
Cooling Fan
Potentiometer, Time
Coil Choke
Wheel Cotter Pin
Wheel
Axle
Chassis
Front Panel
Camlok Receptacle, Positive
Control Receptacle
Camlok Receptacle, Negative
Output Decal
Control Knob
Power Indicator Light
Front Panel Decal
Potentiometer, Current
Item Qt’y.
22
23
24
25
26
27
28
29
30
31
32
33
34
35
36
37
38
39
40
41
1
1
1
2
1
8
2
1
2
1
1
1
1
1
1
2
1
1
4
1
Part No.
050-3002-40
050-3001-42
050-3001-80
050-3002-02
050-3002-44
050-3001-05
050-3001-65
050-3002-42
050-3002-43
050-3002-46
050-3002-16
050-3001-67
050-3002-11
050-3001-52
050-3001-66
050-3002-37
050-3001-78
050-3002-23
050-3002-22
050-3001-01
Description
Circuit breaker
Transformer
Terminal Strip
Weld SCR
Weld Bridge Jump Bar
Plastic Standoff
Mounting Bracket/Heat Sink
Thermostat
Weld Bridge Heat Sink
Potentiometer
Capacitor, Commutation
PC Board Mounting Bracket
Resistor
Fuse Holder
Arc Rectifier Bracket
SCR, Support Arc
Terminal Strip, Support Arc
PC Board
PC Board Standoff
Wiring Harness, UA500
©2010 MIDWEST FASTENERS, INC. — UA500 Stud Welding System
UA500 - ARC STUD WELDING GUN - EXPLODED VIEW
20
©2010 MIDWEST FASTENERS, INC. — UA500 Stud Welding System
UA500 - ARC STUD WELDING GUN - PARTS LIST
Item Qt’y.
1
2
3
4
5
6
7a
7b
7c
8
9
10
11
12
13
14
15
16
17
18
19
20
21
2
1
1
2
1
2
1
1
1
1
1
1
1
1
1
1
1
1
1
1
1
1
Part No.
196-IM04-01
196-IM04-02
196-IM04-03
196-IM04-04
196-IM04-05
196-IM04-06
196-IM04-07
196-IM04-08
196-IM04-09
196-IM04-10
196-IM04-11
196-IM04-12
196-IM04-13
196-IM04-14
196-IM04-15
196-IM04-16
196-IM04-17
196-IM04-18
196-IM04-19
196-IM04-20
196-IM04-21
196-IM04-22
Description
Item Qt’y.
Front Cover Jam Nut
Chuck Adapter
Dust Bellows
Nylon Bushing
Front Cover
Cable Clamp Adapter Screw
Plunge Dampener - Soft (OPT)
Plunge Dampener - Med. (OPT)
Plunge Dampener - Hard (OPT)
Cable Clamp Adapter
Internal Weld Cable
Internal Weld Cable Lock Washer
Internal Weld Cable Screw
Lifting Rod
Main Spring
Lift Release
Moveable Core Bearing Retainer
Lift Bearing
Lift Bearing Spring
Moveable Core Shaft
Shaft Retainer
Shaft Spring Seat
21
22
23
24
25
26
27
28
29
30
31
32
33
34
35
36
37
38
39
40
41
42
1
1
2
1
1
1
2
1
1
1
1
1
1
1
1
1
2
1
1
1
1
1
Part No.
196-IM04-23
196-IM04-24
196-IM04-25
196-IM04-26
196-IM04-27
196-IM04-28
196-IM04-29
196-IM04-30
196-IM04-31
196-IM04-32
196-IM04-33
196-IM04-34
196-IM04-35
196-IM04-36
196-IM04-37
196-IM04-38
196-IM04-39
196-IM04-40
196-IM04-42
196-IM04-41
196-IM04-43
196-IM04-49
Description
Core Return Spring
Gun Body
Leg Set Screw
Front Coil Yoke
Gun Coil
Rear Coil Yoke
Rear Coil Yoke Set Screws
Adjustable Core
Rear Cap
Rear Cap Screw
Trigger Switch Ass’y.
Weld Cable Anchor Plate
Anchor Plate Screw
Anchor Plate Kep Nut
Handle Cover
Handle Cover Upper Screw
Handle Cover Lower Screw
Weld Cable Strain Relief
External Weld Cable Ass’y.
Male Weld Cable Connector
Control Cable Strain Relief
Control Cable Ass’y.
©2010 MIDWEST FASTENERS, INC. — UA500 Stud Welding System
WORK
GUN
C1
R24
FU2
10A
P.L.
Q103
D8
D6
PL2-1
R103
FU3
10A
T1
144V
D7
PL2-4
PL2-7
PL2-5
Q104
T
T1
45V
PL1-4
T
Q101
PL2-6
PL1-7
D4 D5
D2 D3
T.O.L.XFMR
T.O.L.RECT
R104
T1
130V
D10
D9
D18
PL1-8
R102
PL1-10
Q102
R2
R1
R9
R26
R5
R25
R4
D19
R6
V1
PL
1-12
PL1-6
C2
R27
R105
D12
C3
ZD1
R10
R8
R7
D11
RR1-2
RR1-1
D1
RR2-1
C4
C5
V2
R11
5106
PL2
-12
PL2
-10
R13
R28
R12
R14
GS
Q1
C101
PL2-11
PL2-4
R15
PL2-2
Q2
R108
PL2-3
PL1-11
R16
R18
D13
L101
FU1- 4A
R101
PL
C7
TRIGGER
C8
R21
RR3-2
R19
D16
PL2-8
D14
R17
RR1
RR3-1
C9
RR3
C10
R27
D15
RR3-2
22
R20
PL1-3
R24
R23
D17
PL1-2
R67
CIRCUIT
BREAKER
UA500 - ELECTRICAL SCHEMATIC
©2010 MIDWEST FASTENERS, INC. — UA500 Stud Welding System
NOTES
23
©2010 MIDWEST FASTENERS, INC. — UA500 Stud Welding System
24
©2010 MIDWEST FASTENERS, INC. — UA500 Stud Welding System
450 Richard Street • Miamisburg, OH 45342
www.midwestfasteners.com • Fax: (937) 866-4174
(800) 852-8352
04/10