1
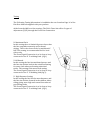
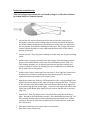
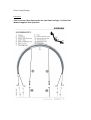
Chaos Setup/Tuning Overview This Overview Chart Supersedes the one found on Page 11 of the User Manual supplied with your kite Tuning The Following Tuning Information is in addition the one found on Page 16 of the Kite User Manual supplied with your product. Aside from the A&B rear line settings. The 2016 Chaos kite offers 3 types of adjustment (X,Y,Z) through the Front Line Connection. X: Maximum Slack. In this setting there is limited depower throw but the kite responds extremely well to board edging. This is the closest in feel to traditional C kite. This setting is recommended for Pro level riders only. The Front Pigtail Connection is to be loop to loop connected to the ‘X’ V webbing Link. (Zig 1) Y: All Round. In this setting the kite has medium depower and the kite sits further back in the window allowing for more slack when performing unhooked tricks. This setting is the most used setting. The Front Pigtail Connection is to be loop to loop connected to the ‘Y’ V Webbing Link (Zig 1). Z: High Depower Setting. In this setting the kite has the most depower, and the kite sits further forward in the window when riding giving more high end control but reduced pop during tricks. The Front Pigtail Connection is to be loop to loop connected to the ‘Y’ V webbing Link. (Zig 1) Downwind Launch Set Up This Set Up Page Supersedes the one found on Page 13 of the User Manual provided with your Control System. • Lay the bar 30 meters downwind of the kite so that the wing tips are facing the control bar (the leading edge of the kite should be facing into the wind). When setting the bar up downwind of the kite, you must turn the bar upside down before walking the lines out. The orange side of the control system should be on the right and the black side of the control system on the left. • Layout out the C-‐Port Tag lines, making sure that they are in good working order. • Walk out the steering (outside) lines and using a larks head knot, attach them to the middle knots on the rear line attachment points. (FIG 1-‐3). This setting assumes you’ve already checked and properly tuned your control system to ensure all 4 Zlying lines are completely even when the bar is sheeted in to full power. • Walk out the Centre Lines until you reach the C-‐Port Tag Line Connection. At this point continue to walk out the lines but keep the C-‐Port lines separated and to the inside of the Centre Lines. • Attach the centre line with the 1X Designation to the corresponding Front Pigtail Connector based on the side you wish to Zlag out the kite. Connect to the left side of the kite (same side of the kite as the Red Rear Pigtail) if you want to Zlag the kite to the right. Connect to the right side (same side of the kite as the Black Rear Pigtail) if you want to Zlag the kite to the left. (Fig 4-‐6) • Attach the C-‐Port Tag Lines to the C-‐Port Kite line using the larkshead knot. Attach to the middle knot on the C-‐Port Attachment points (Zig 7-‐9). This setting assumes that you have already properly tuned your control system to ensure all 4 lines are completely even when the bar is sheeted in to full power. • • The lines should not cross each other or be twisted. Your kite is now ready to Zly. Upwind Launch Set Up This Set Up Page Supersedes the one found on Page 14 of the User Manual provided with your control system. • Lay the bar 30 meters upwind of the kite. The leading edge will be pointed toward the bar and into the wind. The wing tips of the kite will be facing away from the bar. The control bar should be right side up. The orange side of the control system on the left and the black side of the control system on the right. • Layout out the C-‐Port Tag lines upwind of the kite making sure that they are in good working order. • Walk out the steering (outside) lines and place them parallel to each other on the ground about 4 feet apart near the kite (remember, red-‐sheathed lines on the left and black-‐sheathed lines on the right). Place the steering lines far apart, so the kite will lie between them. • • Walk out the Centre Lines until you reach the C-‐Port Tag Line Connection. At this point continue to walk out the lines but keep the C-‐Port lines separated and to the inside of the Centre Lines. • Place the kite leading edge down so the wing tips of the kite are pointing downwind and are near the ends of our steering lines. • Make sure the kite is still secured with sand or sand bags. • From the outside of the kite attach the the centre Line with the 1X Designation to the corresponding front Pigtail connector based on the side you wish to Zlag out the kite. Connect to the Left side of the kite (same side of the bridle as the Red Rear Pigtail) if you want to Zlag the kite to the right. Connect to the right side (same side of the bridle as the Black Rear Pigtail) if you want to Zlag the kite to the left. (FIG 4-‐6). • From outside of the kite, attach the steering lines to the corresponding back bridles on the wing tips. Using larks head knots, attach the steering lines to the middle knot on the back bridles. Give each knot a tug to secure. This setting assumes you’ve already checked and properly tuned your control system to ensure all 4 Zlying lines are completely even when the bar is sheeted in to full power. • Attach the C-‐Port Tag Lines to the C-‐Port Kite line using the larkshead knot. Attach to the middle knot on the C-‐Port Attachment points (Zig 7-‐9). This setting assumes that you have already properly tuned your control system to ensure all 4 lines are completely even when the bar is sheeted in to full power. • Again, double check to make sure that your lines do not cross each other, and are not twisted. • Your kite is now ready to Zly.