1
Copyright © 2006 Netropa Corp. || http://www.intellinav.com
Intellinav One
All rights reserved.
User’s Manual
Part number#IN-KIG01
Table of Contents
1
Using Shortcuts . . . . . . . . . . . . . . . . . . . . . . . . . . .22
Managing Your Favorites List . . . . . . . . . . . . . . . . . . .23
Setting Your Options . . . . . . . . . . . . . . . . . . . . . . . . .24
Display Options . . . . . . . . . . . . . . . . . . . . . . . . . .24
Route Options . . . . . . . . . . . . . . . . . . . . . . . . . . .26
Speed Alert . . . . . . . . . . . . . . . . . . . . . . . . . . . . . .27
Localization . . . . . . . . . . . . . . . . . . . . . . . . . . . . . .28
System Settings . . . . . . . . . . . . . . . . . . . . . . . . . . . . .29
Screen Calibration . . . . . . . . . . . . . . . . . . . . . . . . .29
User Preferences . . . . . . . . . . . . . . . . . . . . . . . . . .29
Volume . . . . . . . . . . . . . . . . . . . . . . . . . . . . . . . . .30
Power . . . . . . . . . . . . . . . . . . . . . . . . . . . . . . . . . .30
Backlight . . . . . . . . . . . . . . . . . . . . . . . . . . . . . . . .31
Date Time . . . . . . . . . . . . . . . . . . . . . . . . . . . . . . .31
System Info . . . . . . . . . . . . . . . . . . . . . . . . . . . . . .32
Factory Reset . . . . . . . . . . . . . . . . . . . . . . . . . .32
GPS Reset . . . . . . . . . . . . . . . . . . . . . . . . . . . . .32
MP3 Playback . . . . . . . . . . . . . . . . . . . . . . . . . . . . . .34
Playback Controls . . . . . . . . . . . . . . . . . . . . . . . . .34
Shuffle Mode . . . . . . . . . . . . . . . . . . . . . . . . . . . .35
Repeat Mode . . . . . . . . . . . . . . . . . . . . . . . . . . . .35
Playback Volume . . . . . . . . . . . . . . . . . . . . . . . . . .35
Photo Viewer . . . . . . . . . . . . . . . . . . . . . . . . . . . . . . .36
Full Screen Mode . . . . . . . . . . . . . . . . . . . . . . . . .37
Magnification . . . . . . . . . . . . . . . . . . . . . . . . . . . .37
Orientation . . . . . . . . . . . . . . . . . . . . . . . . . . . . . .37
Slide Show . . . . . . . . . . . . . . . . . . . . . . . . . . . . . .38
Safety and Regulation . . . . . . . . . . . . . . . . . . . . . . . .39
Software License Agreement . . . . . . . . . . . . . . . . . . .40
Limited Warranty . . . . . . . . . . . . . . . . . . . . . . . . . . . .44
Caring for your device . . . . . . . . . . . . . . . . . . . . . . . .45
Important Information . . . . . . . . . . . . . . . . . . . . . . . .46
System Specifications . . . . . . . . . . . . . . . . . . . . . . . .48
Intellinav One User’s Manual
Getting Started . . . . . . . . . . . . . . . . . . . . . . . . . . . . . .3
Basic Operation . . . . . . . . . . . . . . . . . . . . . . . . . . .4
Mounting the Intellinav System . . . . . . . . . . . . . . . .5
Starting Intellinav . . . . . . . . . . . . . . . . . . . . . . . . . . . . .6
Getting GPS Signal . . . . . . . . . . . . . . . . . . . . . . . . .6
Car Cursor . . . . . . . . . . . . . . . . . . . . . . . . . . . . . . . .6
GPS Information . . . . . . . . . . . . . . . . . . . . . . . . . . .6
Entering Data on the Intellinav System . . . . . . . . . .7
Moving Through the Screens . . . . . . . . . . . . . . . . .7
Resetting the Intellinav System . . . . . . . . . . . . . . . .7
Working with the Map . . . . . . . . . . . . . . . . . . . . . . . . .8
Map View . . . . . . . . . . . . . . . . . . . . . . . . . . . . . . . .8
Maneuver Detail . . . . . . . . . . . . . . . . . . . . . . . . . . .8
Panning the Map . . . . . . . . . . . . . . . . . . . . . . . . . .8
Route List . . . . . . . . . . . . . . . . . . . . . . . . . . . . . . . .9
Location Information . . . . . . . . . . . . . . . . . . . . . . . .9
POI Information . . . . . . . . . . . . . . . . . . . . . . . . . .10
Planning Your Route . . . . . . . . . . . . . . . . . . . . . . . . .11
Setting a Single Destination . . . . . . . . . . . . . . . . .11
Using an Address as a Destination . . . . . . . . . .11
Using an Intersection as a Destination . . . . . . .13
Using a Point of Interest (POI) as a Destination .15
Using a Favorite Destination as a Destination . .17
Using a Recent Destination as a Destination . .17
Using a City Center as a Destination . . . . . . . .18
Detours, Avoid Roads, and Stopovers . . . . . . .20
Setting an Itinerary . . . . . . . . . . . . . . . . . . . . . . . .22
2
User's Manual
Getting Started
Congratulations on your purchase of the Intellinav
system. Your Intellinav system can guide you to the
destination of your choice using signals from Global
Positioning Satellites (GPS) orbiting the earth.
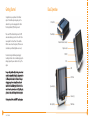
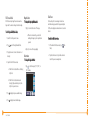
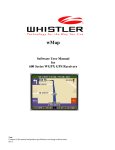
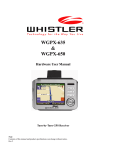
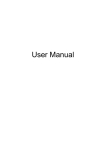
SD Card Slot
Power Button
Intellinav One User’s Manual
There are 24 GPS satellites orbiting the earth. A GPS
device can calculate your position on the earth if it can
receive signals from at least three of these satellites.
When it receives at least four signals, a GPS device can
also calculate your altitude (height above sea level).
Basic Operation
External Antenna Connector
Earphone Jack
USB Port
You can start using the Intellinav system simply by
mounting the holder on the car's windshield, plug in the
charger, and press the power button on the top of the
system.
DC In
LED
For your safety and the safety of others, please do not
operate the system while driving. It is dangerous to do
so. When you want to enter an address or change a
setting, please pull over and park the car in a safe
area first. You should always pay full attention to the
road and use the system only as an aid, by taking only
glances at a time, and listening to the voice prompts.
LCD Panel
Speaker (rear)
Volume (+/-)
An inexperienced driver should NOT use the system.
Reset (bottom)
3
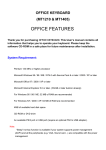
Main Menu
4
User's Manual
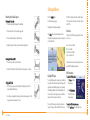
Starting Intellinav
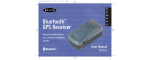
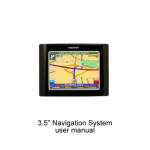
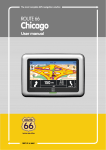
Mounting the Intellinav System
Mounting the Suction Cup
1. Press the suction cup firmly against the windshield.
Press the POWER button.
The Intellinav screen appears.
first GPS fix is obtained, thereafter, it should normally
take no more than 30 seconds to 1 minute to obtain a
valid GPS fix.
Tap Navigate. A warning screen appears.
Car Cursor
2. Press down the lever to fix the suction cup in place.
4. Adjust the angles of the arms to achieve the best viewing position.
The status of the GPS signal is represented in the car
cursor color:
Intellinav One User’s Manual
3. Press in the circular buttons to unlock the arms.
Tap I Agree after you have read and agreed to the
warning. The map view appears and you are ready to set
your first destination!
Green: 4 or more satellites
Yellow: 3 satellites
Red: less than 3 satellites
Gray: no satellite at all
Mounting the Cradle and GPS
1. Press the lever to lock or unlock the cradle.
Only when the car cursor is green will you be receive
accurate GPS tracking and navigation.
2. Insert the GPS unit bottom in first, and then lock it using the lever on the top.
GPS Information
Getting GPS Signal
Charging the GPS unit
1. Prior to first use, please use the wall charger to fully charge the unit for 4-6
hours until battery LED is green.
2. In vehicle, you may plug the car charger to provide continuous power. On a full
charge, the unit can operate up to 5 hours.
To use the Intellinav system to guide you to a destination,
the system's GPS antenna must receive GPS signals. GPS
signals can be obstructed by ceilings, trees, and nearby
tall buildings. Signals can also be obstructed by the roof
of your vehicle. For best results, position your Intellinav
system where it has a clear view of the sky.
The very first time turning on the system may take as
long as 15 minutes to obtain a valid GPS fix. Once the
5
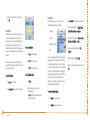
To view the GPS information:
1. Tap Menu. The Main
Menu appears.
2. Tap GPS Information.
The GPS Information
screen appears.
To close the GPS Information screen:
1. Tap the Back-Arrow in the upper right corner.
6
User's Manual
Working with the Map
Entering Data on the Intellinav System
Moving Through the Screens
The Intellinav system doesn't have a keyboard. Instead,
you tap the screen to enter data. When you are entering
data, a screen containing the Letters of the alphabet
appears:
The Intellinav system shows you one screen at a time.
Each time you tap a button, a new screen appears.
Resetting the Intellinav System
As you tap the buttons on the keyboard, the list at the
top of the screen scrolls to show the next item that
matches the Letters you've tapped.
You should never have to reset the Intellinav System
under normal circumstances. However, in the event that
a problem cannot be corrected, you may reset the
Intellinav System by pressing the Reset button on the
bottom of the unit, using a pen or paper clip.
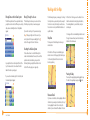
Map View
The map view on the Intellinav system shows your
current location.
At the bottom of the map you see the estimate of how
much time remains before arriving at your destination,
the remaining distance to your destination, and your
current speed.
On the upper left is an arrow indicating the direction and
the type of maneuver ahead, as well as the remaining
distance to the next maneuver
Intellinav One User’s Manual
If you want to return to go to the previous screen, tap
the
in the upper right corner of the screen. If you
want to go back to the map view directly, tap the
button on the upper left corner of the screen.
The Intellinav system gives you many ways of looking at
the map. You can see your current position, view any of
the turns on a route, and the map to view other areas.
You can zoom in and out, and find information about
specific locations.
At the bottom of the map is a scale indicating your
current zoom level. On the upper right is the compass.
On the center right and left are zoom in and out
buttons, respectively.
.
Panning the Map
If you need to enter numbers, tap the 1-2-3 button, and
the numeric keyboard appears:
You can pan the map by tapping and dragging the map.
To return to the regular map view, press the X button.
Maneuver Detail
If you have set a destination, the map displays additional
information. As you navigate to a destination, the top of
the map displays the name of the next street, the
direction of your next turn and the distance to the turn.
7
8
User's Manual
Location Information
If you have set a destination, you can view a list of the
maneuvers that make up your route.
You can find location information about any point on the
map by pressing firmly on the map for one second. A
screen appears giving you the opportunity to set the
location as the Start or the Destination, and save the
location to your Favorites list, or view information.
To view the route list:
manual). You can also get additional information about
the current location, including latitude and longitude.
POI Information
To view information about a POI on the map, tap on the
icon on the map. The POI(S) screen will appear.
Intellinav One User’s Manual
Route List
From the Information screen you have several options:
Set Start Location
Set Stopover (with an
existing route)
1. Tap Menu. The Main Menu appears.
Set Destination
2. Tap Destination. The Destination Option screen
appears.
Save This Location
3. Tap Route List.
Information
4. Tapping an item on the list and then tapping Show
will display the detail directions for that turn.
9
Setting the location as a
starting point is useful if you
are trying to find the
distance between two locations. Setting the location as
your destination is a quick way to set a destination.
Saving the location adds the location to your Favorites
list (you'll learn more about Favorites later in this
10
User's Manual
Planning Your Route
You can set a destination with the Intellinav system many
different ways. Once you have set a destination, you can
add a detour or a stopover.
Setting a Single Destination
You can set your destination the following ways:
Address
Intersection
Point of Interest (POI)
Favorites
Recent
City Center
When you have found your destination, you have several
options:
Nav
Fav
Show
2. Tap Destination. The Set Destination screen
appears.
Fav adds the destination to your Favorites list. Your
Favorites list is a list of locations that you can add
destinations to. You can also enter a name for a
destination and delete destinations from the list.
3. Tap Address. The Input Method screen appears.
Show displays the location on the panning map without
calculating a route. You can also use it to manually set a
starting point.
Using an Address as a Destination
There are two ways to enter the address: by selecting
the street first, or by selecting the city first. If you use
Street First and too many records match, you will be
asked to use City First.
NOTE: You will be prompted for the street name first,
then the house number.
To Enter an Address as a Destination Using Street
First:
1. Tap Menu. The main menu appears.
Nav calculates the route
11
8. Select the address that matches the location you
want to go to and tap Nav. The map appears, and
the guidance directions begin.
To Enter an Address as a Destination Using City First:
4. If you need to change the region:
Intellinav One User’s Manual
The Intellinav system also offers an Itinerary feature,
where you can enter up to 100 destinations and use the
Itinerary screen to re-order addresses as you like.
from your current location (or the location you set as a
starting point) to the destination.
1. Tap Menu. The main menu appears.
a. Tap Change State. The Enter State Name
screen appears.
b. Tap the Letters to enter the name of the
region or State, or tap the name in the list.
c. Tap OK when you have selected the region
or State. You will return to the Input Method
screen.
5. Tap Street First. The Enter Street Name screen
appears.
6. Tap the Letters to enter the name of the street. Tap
OK when you have selected the street. The Enter
House Number screen appears.
7. Tap the Numbers or Letters A-D to enter the
house number. Tap OK. The Select Address screen
appears.
2. Tap Destination. The Set Destination screen
appears.
3. Tap Address. The Input Method screen appears.
4. If you need to change the region or State:
a. Tap Change State. The Enter State Name
screen appears.
b. Tap the Letters to enter the name of the
region or State, or tap the name in the list.
c. Tap OK when you have selected the region.
You will return to the Input Method screen.
5. Tap City First. The Enter City Name screen
appears.
6. Tap the Letters to enter the name of the City. Tap
12
User's Manual
OK when you have selected the City. The Enter
Street Name screen appears.
3. Tap Intersection. The Input Method screen
appears.
8. Select the intersection that matches the location
you want to go to and tap Nav. The map appears,
and the guidance directions begin.
To enter an intersection as a destination using City
First:
4. If you need to change the region or State:
8. Tap the Numbers or Letters A-D to enter the
house number. Tap OK. The Select Address screen
appears.
9. Select the address that matches the location you
want to go to and tap Nav. The map appears, and
the guidance directions begin.
b. Tap the Letters to enter the name of the
region, or tap the name of the region.
Using an Intersection as a Destination
To enter an intersection as a destination using Street
First:
1. Tap Menu. The main menu appears.
13
7. Tap the Letters to enter the name of the street. Tap
OK when you have selected the street. The Enter
2nd Street Name screen appears.
1. Tap Menu. The main menu appears.
a. Tap Change State. The Enter State Name
screen appears.
c. Tap OK when you have selected the region.
You return to the Input Method screen.
There are two ways to enter the intersection: by
selecting the street first, or by selecting the city first. If
you use Street First and too many records match, you
will be asked to use City First.
6. Tap the Letters to enter the name of the city. Tap
OK when you have selected the city. The Enter
Street screen appears.
Intellinav One User’s Manual
7. Tap the Letters to enter the name of the street.
Tap OK when you have selected the street. The
Enter House Number screen appears.
2. Tap Destination. The Set Destination screen
appears.
5. Tap Street First. The Enter Street Name screen
appears.
6. Tap the Letters to enter the name of the street.
Tap OK when you have selected the street. The
Enter 2nd Street Name screen appears.
7. Tap the Letters to enter the name of the second
street. Tap OK when you have selected the street.
The Select Address screen appears.
2. Tap Destination. The Set Destination screen
appears.
3. Tap Intersection. The Input Method screen
appears.
8. Tap the Letters to enter the name of the second
street. Tap OK when you have selected the street.
The Select Address screen appears.
9. Select the intersection that matches the location
you want to go to and tap Nav. The map appears,
and the guidance directions begin.
4. If you need to change the region:
a. Tap Change State. The Enter State Name
screen appears.
b. Tap the Letters to enter the name of the
region, or tap the name of the region.
c. Tap OK when you have selected the region.
You return to the Input Method screen.
5. Tap City First. The Enter City Name screen
appears.
14
User's Manual
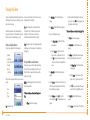
Using a Point of Interest (POI) as a
Destination
The four methods of selecting a specific point of
interest include two for nearby POIs and two for all
POIs in a region.
To select a nearby POI as a
destination:
1. Tap Menu. The main
menu appears.
2. Tap Destination. The
Set Destination screen
appears.
3. Tap POI. The Points of
Interest screen appears.
15
To select from all POIs in a region:
1. Tap Menu. The main menu appears.
NOTE: If you choose Restaurant, tap the letters to enter
a type of restaurant. If you choose Hotel, there is no
subcategory screen. Go to the next step.
5. Tap a Subcategory. The POI Options screen
appears.
To select a nearby POI from an alphabetical list:
a. Tap Alphabetical. The Enter POI Name
screen appears.
b. Tap the Letters to enter the name of the
POI. Tap OK when you have selected the
POI. The POI Select screen appears,
displaying the address of the POI.
c. Tap Nav. The map appears, and the
guidance directions begin.
2. Tap Destination. The Set Destination screen
appears.
Intellinav One User’s Manual
There are many points of interest that you can select as
a destination. Generally, you choose a category and
then choose one of four methods of selecting the
specific point of interest. Sometimes you must first select
a subcategory (such as Museum within the category of
Attractions) before you can choose a selection method.
4. Tap a Category. Usually a subcategory screen
appears.
3. Tap POI. The Points of Interest screen appears.
To select a nearby POI by distance:
a. Tap By Distance. The POI List screen
appears, listing the closest POIs first.
b. Tap the POI that you want to go to and tap
Nav. You may need to scroll down the list by
tapping the scroll bar. The map appears,
and the guidance directions begin.
4. Tap a Category. Usually a subcategory screen
appears.
NOTE: If you chose Restaurant, tap the Letters to enter
a type of restaurant. If you chose Hotel, there is no
subcategory screen. Go to the next step.
5. Tap a Subcategory. The POI Options screen
appears.
To select a POI from an alphabetical list:
1. Tap List All. The Enter POI Name screen appears.
2. Tap the Letters to enter the name of the POI. Tap
OK when you have selected the POI. The POI
Select screen appears.
16
User's Manual
3. Tap Nav. The map appears, and the guidance
directions begin.
To select a POI by city:
To Select a Favorite as a Destination:
1. Tap Menu. The main menu appears.
2. Tap Destination. The Set Destination screen
appears.
3. Tap Favorites. The Favorites screen appears.
2. Tap the Letters to enter the name of the city and
tap OK. The Enter POI Name screen appears.
3. Tap the Letters to enter the name of the POI and
tap OK. The POI Select screen appears.
4. Tap Nav. The map appears, and the guidance
directions begin.
4. Tap on the favorite you want to use as a
destination and tap Nav. The map appears, and
the guidance directions begin.
1. Tap Menu. The main menu appears.
2. Tap Destination. The Set Destination screen
appears.
To do this you select a City Center as a destination.
As with selecting a Point of Interest, there are several
methods of selecting a city center: two for nearby city
centers and one for all city centers in a region.
Intellinav One User’s Manual
1. Tap By City. The Enter City Name screen appears.
To select a destination from your list of recent
destinations:
To select a nearby City Center as a destination:
3. Tap Recent. The Recent screen appears.
1. Tap Menu. The main menu appears.
4. Tap on the recent destination you want to go to
and tap Nav. The map appears, and the guidance
directions begin.
2. Tap Destination. The Set Destination screen
appears.
3. Tap City Center. The City Center screen appears.
Using a Favorite Destination as a
Destination
Favorite destinations are locations you add to a list on
the Intellinav system. You can add locations to your
Favorites list as you set a destination, from the POI(S)
screen, and from the Location Information screen. You
can then easily select one of these locations as a
destination.
17
Using a Recent Destination as a
Destination
Recent destinations are locations you have navigated to
recently. You can easily select one of these locations as a
destination. Managing your recent destinations list is
covered later in this section.
Using a City Center as a Destination
Sometimes you may want to use the Intellinav system to
get to a city, but not to a specific location within the city.
To select from an alphabetical list:
a. Tap Alphabetical. The Enter City Name
screen appears.
18
User's Manual
b. Tap the Letters to enter the name of the city.
Tap OK when you have selected the city.
The City Center screen appears.
Avoid Road
NOTE: you cannot create a detour if you do not have a
current destination
b. Tap the Letters to enter the name of the city.
Tap OK when you have selected the city.
The City Center screen appears.
To set a detour:
Once you have set a destination you can look at the list
of streets and determine if you need to mark one or
more as unavailable. If you mark a section as unavailable
the Intellinav system will calculate a new route that
avoids the section you marked.
To select by distance:
a. Tap By Distance. The City List screen
appears, listing the closest city centers first.
c. Tap Nav. The map appears, and the
guidance directions begin.
To select from all City Centers in a region:
1. Tap Menu. The main menu appears.
2. Tap Destination. The Set Destination screen
appears.
3. Tap City Center. The City Center screen appears.
To select a city center in a region or State:
19
1. Tap Menu. The main menu appears.
2. Tap Destination. The Destination Options screen
appears.
NOTE: You cannot avoid a road if you do not have a
current destination.
To avoid roads in the route list:
Detours, Avoid Roads, and Stopovers
b. Tap the city that you want to go to and tap
Nav. You may need to scroll down the list by
tapping the scroll bar. The map appears, and
the guidance directions begin.
Intellinav One User’s Manual
c. Tap Nav. The map appears, and the
guidance directions begin.
Detour
a. Tap List All. The Enter City Name screen
appears.
The Detour feature will allow you to bypass a certain
portion of the route starting at your present position,
while avoid road allows you to bypass the entire road.
Stopovers are stops you add to a trip to make prior to
reaching your destination.
3. Tap Detour. The Detour screen appears.
4. Select from three distance options to bypass. A
new route is calculated automatically.
To clear a detour:
1. Tap Menu. The main menu appears.
2. Tap Destination. The Destination Options screen
appears.
3. Tap Detour. The Detour screen appears.
4. Tap Reset.
1. Tap Menu. The main menu appears.
2. Tap Destination. The Destination Options screen
appears.
3. Tap Avoid Road. The Avoid Road screen appears.
4. Mark any segments that you do not want included:
a. Tap on a route instruction to highlight it.
b. Tap Avoid. A do-not-enter symbol appears.
5. When you have finished marking segments, tap
Nav. Your route is recalculated, the map appears
and the guidance directions begin.
20
User's Manual
To cancel a stopover:
Setting an Itinerary
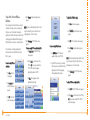
Using Shortcuts
1. Tap Menu. The main menu appears.
The Itinerary feature allows you to set multiple
destinations. You can add, remove, or re-order
destinations according to your needs.
The shortcut feature provides you quick access to some
of the most important destinations while you're on the
road, including:
Stopovers
Once you have set a destination you can add a
stopover. Adding a stopover does not cancel your
original destination. Once you reach your stopover, you
will be prompted to continue to the destination.
To create a stopover:
1. Press Menu. The main menu appears.
2. Tap Destination. The Destination Options screen
appears.
3. Tap Stopover. The Set Destination screen appears.
To set the Itinerary:
Home
3. Tap Clear Route. A confirmation message appears
asking if you want to continue to your next
destination.
1. Tap Menu. The main menu appears.
ATM
2. Tap Itinerary. The Itinerary screen appears.
Gas
4. Tap Yes. The map appears and navigation
continues.
3. Tap Add to add new destinations from Favorites,
Recent or POI list, or enter a new address as
destination.
Hospital
4. Tap Del to remove a destination from the Itinerary.
Restaurant
5. Tap Go! to start navigating from the first item on
the Itinerary.
Tourist Information
To Re-order the Itinerary:
1. Tap Move Up or Move
Down.
Intellinav One User’s Manual
2. Tap Destination. The Destination Options screen
appears.
Parking
By tapping any of the POI
categories, you will see a list
of the nearest POIs sorted by
distance.
4. Set your stopover destination using any of the
methods explained earlier in this section.
21
22
User's Manual
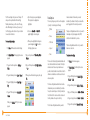
Managing Your Favorites List
Setting Your Options
You can edit the destinations you add to your favorites
list to give them descriptive names. You can also remove
destinations from your favorites list.
You can set many different options to customize the
Intellinav system and make it work your way. These
options include:
Display Options
To manage your favorites list:
To delete a destination from your favorites list:
Speed Alert
Localization
a. Tap on the favorite you want to delete.
b. Tap Del. The favorite is removed from the
list.
c. ap OK to close the Favorites screen.
To edit a favorite:
Display Options
The display options give you control over the
appearance of the map. You can change the following:
The day/night setting controls the background of the
screen. If you choose auto, the Intellinav system will
automatically switch to a darker version of your color
scheme soon after sunset, to reduce the glare in the
vehicle. You can also choose to use either the day or
night setting at all times.
Orientation
Guidance
a. Tap on the favorite you want to edit.
Day/Night
b. Tap Edit. The Edit Favorites screen appears.
POI Icons
c. Enter a descriptive name for this favorite.
Color
d. Tap OK when you are done.
3D View
23
There are two guidance settings, which control whether
or not the maneuver detail screen appears when you
near your next maneuver. If you use the auto setting, the
maneuver detail screen appears.
Intellinav One User’s Manual
Route Options
1. Tap Menu. The main menu appears.
2. Tap Favorites. The Favorites screen appears.
There are two orientation settings. Heading turns the
map as you drive so that you are always moving toward
the top of the screen. North keeps the map oriented with
North at the top of the map, like a traditional paper map.
There are three options for displaying POI icons. If you
choose default, the most commonly displayed
categories of POI icons will appear on the map at zoom
levels of 1000 ft and closer. If you choose off, no POI
icons are displayed. If you choose custom, you can
choose which categories of POI icons you want
displayed.
The color settings control the background color of the
map. You can choose from four different colors.
24
User's Manual
a. Tap on the categories you want displayed.
The categories to be displayed are
highlighted.
b. You can use Select All and Clear All to
quickly highlight or clear categories.
Method
To set your display settings:
c. When you have highlighted the categories
you want displayed, tap OK. You return to
the Display Options screen.
Toll Roads
1. Tap Menu. The Menu button and then Settings.
2. Tap Display Options. The Display Options screen
appears.
7. Tap your Color preference: Yellow, Grey, White, or
Fuchsia.
3. Tap your Orientation preference: Heading or
North.
8. Tap your 3D View preference: 2D, High, Medium,
or Low.
4. Tap your Guidance preference: Auto or Manual.
9. When you have finished choosing your options, tap
OK.
5. Tap your Day/Night preference: Auto, Night, or
Day.
6. Tap your POI Icons preference: Default, Off, or
Custom.
When you tap Custom the POI Options screen
appears.
25
Route Options
The route options give you control over the navigation
of your trip. You can change the following:
Ferries
include or exclude toll roads when your route is
calculated. If you include toll roads, those roads will be
used if appropriate for the method you selected.
The carpool setting indicates whether or not you want to
include carpool or high occupancy vehicle (HOV)
restrictions in the calculation of your route.
Carpool
The turns setting indicates whether or not you want to
make more or less turns.
Turns
To set your route settings:
There are four method settings. Quickest calculates the
route that should take the least amount of time. Major
calculates a route that uses major roads whenever
possible. Shortest calculates the route that is shortest in
distance. Local calculates a route that uses local roads
whenever possible.
Intellinav One User’s Manual
The 3D view settings control your view of the map. Off
shows you the map in traditional 2D mode. High,
Medium, and Low show you a 3D version of the map,
with a different angle for each value. If you use any of
the 3D settings you will not be able to tap on a location
to view location information.
1. Tap Menu. The main menu appears.
2. Tap Route Options. The Route Options screen
appears.
3. Tap your Method preference: Quickest, Major,
Shortest, or Local.
The ferries setting indicates whether ferries should be
included when your route is calculated. If you include
ferries, the route will take you to the ferry terminal, but
the total time for the route does not take into account
the ferry schedule or time spent on the ferry.
5. Tap your Toll Roads preference: Include or Exclude.
The toll roads setting indicates whether you want to
7. Tap your Turns preference: Reduced or Normal.
4. Tap your Ferries preference: Include or Exclude.
6. Tap your Carpool preference: Include or Exclude.
26
User's Manual
8. When you have finished choosing your options,
tap OK.
Localization
The localization options give you control over the
settings affected by your location, including:
Speed Alert
Auto speed alert is based on road class and may not
necessarily reflect the actual speed limit. Please use this
feature only as a reference
To set the speed alert:
Time Zone
Daylight Savings Time
To set auto speed alert:
Units
a. Tap Auto. A warning appears.
b. Tap OK to close the warning.
c. Tap OK. You return to the map.
To set a fixed speed alert:
1. Tap Menu and then Settings.
a. Tap Fixed.
2. Tap Speed Alert. The Speed Alert screen appears.
b. Enter the speed you want to use as a
maximum speed.
c. Tap OK after reading the warning message.
You return to the map.
There are six language settings. When you change the
language, all of the screen names and controls will be in
the selected language. There are six time zone settings,
for all areas of the United States. There are two daylightsavings options, to determine whether or not daylight
savings time is currently in effect at your location. There
are two settings for units, which determine how the
distance to your location is expressed. You can choose
between Mi (miles) or KM (kilometers).
4. Tap your Language preference: English, French,
Spanish, Chinese, Korean or Japanese.
Intellinav One User’s Manual
You can use the speed alert feature to warn you if your
vehicle is exceeding the speed limit. There are two
speed alert options: auto speed alert and fixed speed
alert. Auto speed alert uses the type of road to
determine the probable speed limit. Fixed speed alert
lets you enter a speed and will warn you if that speed is
exceeded.
Language
3. Tap Localization. The Localization screen appears.
5. Tap your Time Zone preference: Eastern, Central,
Mountain, Pacific, Alaska or Hawaii.
6. Tap your Daylight Saving preference: DST or
Standard.
7. Tap your Units preference: Mi or KM.
8. When you have finished choosing your options, tap
OK.
To set your localization settings:
1. Tap Menu. Menu screen appears.
2. Tap Settings. Settings screen appears.
27
28
User's Manual
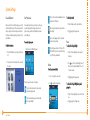
System Settings
User Preferences
When you first turn on the Intellinav system, you will be
asked to calibrate the system. This process ensures that
when you tap the screen the item tapped is activated.
You can also recalibrate by tapping on System, Sys Info,
and Calibration.
You can adjust the settings of your device to suit the way
you work. Adjusting certain settings, such as those for
system volume, power LED, and backlight may increase
your standby time.
To access the System panel:
Tap to set the touch screen backlight level and
enable its auto off function.
1. Tap the "Enable sounds for taps" check box.
Tap to change the system date, time, and time
zone settings.
Tap to set the language option for the system
menus and voice prompts.
To calibrate the screen:
1. Tap System on the Main Menu panel.
1. From the Main Menu, tap on System and then Sys
Info.
2. Tap the center of the black dot as it moves around
the screen.
Tap to displays your device's OS Version, GPS
F/W, and SW Code Version. Options for factory
reset, GPS reset, and calibration
Volume
To set the system sound level:
1. Tap - /+ to adjust the volume level.
There are six preference icons on this panel.
Tap to set the volume level for system sounds
and enable tapping sound.
Tap to view the battery power level and enable
the hot keys backlight.
29
To enable tap sounds:
2. Tap
to apply the changes made.
2. Tap
to apply the changes made.
Intellinav One User’s Manual
Screen Calibration
Power
To enable the hot keys backlight:
1. Tap the "Hot keys backlight on when pressed"
check box.
2. Tap / to set the hot keys backlight's auto-off
function. Options include backlight off after 5, 10,
15 and 20 seconds.
3. Tap
to apply the changes made.
To enable the hot keys backlight when power is
plugged in:
1. Tap the "Hot keys backlight on when AC-in" check
box.
2. Tap
to apply the changes made.
30
User's Manual
Backlight
Date Time
To set the screen backlight level:
To set the date:
Note: The "Automatically adjust clock for daylight
saving changes" will be displayed under the Time Zone
setting menu if the daylight saving system is adopted.
2. Tap
2. Tap on / to set the
Year, Month and Day.
to apply the changes made.
3. Tap
to apply the changes made.
To set the Time:
1. Tap on Time
2. Tap on
To set the screen backlight auto-off function:
1. Tap
/
under the Battery and AC Power settings.
2. Tap
to apply the changes made.
4. Select 24 Hours to show 24-hour clock
to apply the changes made.
3. Tap Factory Reset and then Yes to confirm.
System Info
You may have to perform a reset if the device freezes
(i.e., device no longer responds to the buttons on the
screen). A soft reset allows your device to get a fresh
start, similar to rebooting a computer. This will restart
your device and adjust memory allocation. All records
and entries are retained after a soft reset. GPS settings
are also retained.
Factory Reset
To perform a soft reset:
1. Hold the device securely, and then press the soft
reset button
on the bottom of your device.
To set the Time Zone:
1. Tap on Time Zone
To load the factory default setting
2. Tap on / to select the Time Zone that is
application to you.
If you still encounter problems even after soft resetting
the device, loading the factory default settings may
correct the problems. These default settings have been
selected to optimize your device's performance.
3. Tap
31
to set the Hour and minute.
3. Select AM or PM
5. Tap
a. Options for Battery includes: Never, after 10
or 15 seconds, and for AC Power includes:
Never, after 1, 2 or 3 minutes.
/
to apply the changes made.
2. Tap System Info in the System panel.
Intellinav One User’s Manual
1. Tap -/+ to adjust the screen backlight level.
1. Tap on Date.
1. Tap System on the Main Menu panel.
4. After the Factory Reset, reconfigure your device's
user preferences.
GPS Reset
In the following circumstances, the TTFF (Time To First
Fix) values of your device may be longer than usual:
After a long period of inactivity.
If the current GPS fix position is more than 500km,
or more than 12 hours apart, from the previous
position.
o This is due to the nature of the GPS
algorithm and rotational velocity between
the satellites and planet Earth, and is
deemed normal. To correct this, perform a
GPS reset. This will update the GPS
database, which contains information about
the GPS satellites that the unit needs to
function in navigation mode.
32
User's Manual
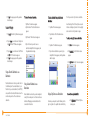
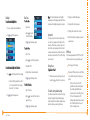
MP3 Playback
To Reset the GPS:
1. Close the navigation program, if it is currently
running, by tapping on Menu in the map display,
and then Exit in the navigation Menu screen.
3. Tap System Info on the System panel.
4. Tap GPS Reset and then Yes to confirm.
5. The GPS Reset process will take about a minute to
complete.
4. Tap Up-One-Level
button to return to the
root directory.
To open the MP3 Player:
5. The selected file will
automatically be played.
Files in the same
directory will also be played, provided the repeat
function is disabled.
1. Tap MP3 on the Main
Menu panel. The MP3
player appears.
To open MP3 files for playback:
1. Tap the Folder button to open the file browser.
The program will automatically scan the device
SD/MMC card for supported digital files. Only
sub-directories containing compatible music files
will be displayed.
2. Search for the file(s) you want to play by tapping
/ to scroll through all available files.
3. Tap a file to start playback of the selected file.
a. When the file is located in the root directory,
tap the file for playback.
b. When the file is located inside a subdirectory, tap the sub-directory icon, then
tap a file for playback.
33
Intellinav One User’s Manual
2. Tap System on the Main Menu panel.
you can use a computer to load MP3 onto an SD card
and then load that sd card into the SD card slot located
at the side of the unit.
Playback Controls
The icons in the MP3 player
let you control the playback
mode.
To control file playback:
Keys
Descriptions
Tap to pause or resume playback.
Tap to stop playback.
Tap to skip backward to the previous track. If
the current file is the first track in the list, the
last track will be played.
Tap to skip forward to the next available track.
If the current file is the last track in the list, then
the first track will be played.
34
User's Manual
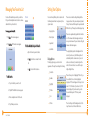
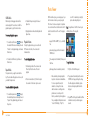
Photo Viewer
Shuffle Mode
Each directory containing supported music files is
considered a playlist. You can choose to shuffle the
playback sequence to play files in random order.
3. Tapping Random icon will automatically disable the
Repeat mode.
1. To enable the Shuffle mode, tap
(Random).
An enabled Shuffle mode is indicated by the word
"Random" on the playback display, and a fade-out
Random icon.
Playback Volume
2. To disable the Shuffle mode, tap the fade-out
Random icon.
To control the playback volume:
Repeat Mode
The repeat mode lets you play the current track in a
loop. The same track will be played over and over, until
you disable the Repeat mode.
To enable or disable the Repeat mode:
1. To enable the Repeat mode, tap
(Repeat).
An enabled Repeat mode is indicated by the word
"Repeat" in the playback display, and a fade-out
Repeat icon.
35
To adjust the playback volume, you can use either the
MP3 volume control slider, or the volume control
hardware buttons.
1. Hold and drag the slider of the volume level bar.
This will only affect the volume of the track
playback.
2. Press the volume buttons (-/+). This will also adjust
the sound level for the device's system sounds.
With the Intellinav system, you can keep images of your
favorite moments as mobile as you are by using the
Photo Viewer. You can use a computer to load pictures
onto an sd card and then load that sd card into the SD
card slot located at the side of the unit. The program
features:
June 24" for a sub-directory consisting of
pictures taken during that period.
Note: The performance of the Photo Viewer may be
affected by the size of the image files.
Intellinav One User’s Manual
To rearrange the playback sequence:
2. To disable the Repeat mode, tap the fade-out
Repeat icon.
Support for JPEG and BMP (1-, 4-, 8-, and 24-bit)
files.
Auto-scanning of supported files in the device's
SD/MMC card.
Three viewing modes: Thumbnail, Full Screen, and
Slide Show.
Album support based on sub-directory contents.
o Each sub-directory containing compatible
image files is treated as an individual album.
For a more organized file search, it is
advisable to sort image files into subdirectories based on something, such as a
particular event or a certain period. To
illustrate, a sub-directory containing pictures
from your daughter's birthday can be named
"Cassie's 10th Birthday"; or "May 11 to
To open Photo Viewer:
1. Tap Photo on the Main Menu panel.
2. The program will automatically scan the device's
SD/MMC card for supported image files. Image
files will be displayed as thumbnails; only subdirectories containing compatible files will be
displayed.
3. Tap / to scroll through all available files. When
a thumbnail is selected, a red border appears
around it.
36
User's Manual
Full Screen Mode
Magnification
Slide Show
In Full Screen mode, image files can be viewed in a
larger scale. You can also change its orientation angle.
To change the image magnification level:
You have the option to view images in a slide show
much like viewing a presentation. Images are adjusted
to fit the entire display area and are shown in a 3-second
interval.
1. Tap (-) to zoom into the center of the image.
To view images in Full Screen mode:
2. Tap
/
a. When in a zoomed-in state, you can hold
and drag the image to pan it in any direction
you want.
to scroll through all available files.
2. Tap (+) to zoom out the image display.
3. Tap Up-One-Level to return to the device's root
directory.
Orientation
To change the image orientation:
Intellinav One User’s Manual
1. Search for the file you want to view.
To enable the Slide Show mode:
1. In Thumbnail or Full Screen mode, tap
Show).
(Slide
2. Tap the touch screen to stop the slide show and
return to the previous viewing mode.
4. Open the file in Full Screen mode.
a. When the file is located in the root directory,
tap the file.
1. Tap
to rotate the image 90°, 180°, 270°, or
360° clockwise.
b. When the file is located inside a subdirectory, tap the sub-directory icon, then
tap the file you want to view.
5. Tap
to display the previous available image.
6. Tap
to display the next available image.
37
38
User's Manual
Safety and Regulation
FCC Declaration of Conformity
Tested to comply with FCC standards for home or office
use
Reorient or relocate the receiving antenna.
Increase the separation between the equipment
and external receiver.
Connect the equipment into an outlet on a circuit
difference from that to which the receiver is
connected.
Consult the dealer or an experienced radio or
television technician for help.
CE Marking
This equipment complies with the requirement for CE
marking when used in a residential, commercial, or light
industrial environment
39
Canada
Radio interference regulation class B compliance
This class B digital apparatus meets all compliances of
the Canadian Interference Causing Equipment
Regulations.
The mapping and navigation software ("Software") and
map data ("Data") is provided for your personal, internal
use only and not for resale. It is protected by copyright,
and is subject to the following terms and conditions
which are agreed to by you, on the one hand, and
Netropa ("LICENSEE"). If you do not agree to the terms
of this agreement, promptly exit the program. Your
rights under this License will terminate automatically
without notice if you fail to comply with any term(s) of
the License.
registrations are owned by the USPS: United States
Postal Service, USPS, and ZIP+4.
Intellinav One User’s Manual
This equipment complies with Part 15 of the U.S Federal
Communications Commission (FCC) Rules. Operation of
this device may not cause harmful interference, and this
device must accept any interference received, including
interference that may cause undesired operation. If this
occurs the user is encouraged to try and correct the
interference by one or more of the following measures:
Software License Agreement
© 2006 NAVTEQ
All rights reserved
The Data for areas of Canada includes information taken
with permission from Canadian authorities, including: ©
Her Majesty the Queen in Right of Canada, © Queen's
Printer for Ontario, © Canada Post Corporation,
GeoBase® .
NAVTEQ holds a non-exclusive license from the United
States Postal Service® to publish and sell ZIP+4®
information.
©United States Postal Service® 2006. Prices are not
established, controlled or approved by the United States
Postal Service®. The following trademarks and
40
User's Manual
TERMS AND CONDITIONS
Personal Use Only
You agree to use this Data together with the Intellinav
system for the solely personal, non-commercial purposes
for which you were licensed, and not for service bureau,
time-sharing or other similar purposes. Accordingly, but
subject to the restrictions set forth in the following
paragraphs, you may copy this Data only as necessary
for your personal use to (i) view it, and (ii) save it,
provided that you do not remove any copyright notices
that appear and do not modify the Data in any way. You
41
agree not to otherwise reproduce copy, modify,
decompile, disassemble or reverse engineer any portion
of this Data, and may not transfer or distribute it in any
form, for any purpose, except to the extent permitted by
mandatory laws.
Restrictions
Except where you have been specifically licensed to do
so by LICENSEE, and without limiting the preceding
paragraph, you may not (a) use this Data with any
products, systems, or applications installed or otherwise
connected to or in communication with vehicles, capable
of vehicle navigation, positioning, dispatch, real time
route guidance, fleet management or similar
applications; or (b) with or in communication with any
positioning devices or any mobile or wireless-connected
electronic or computer devices, including without
limitation cellular phones, palmtop and handheld
computers, pagers, and personal digital assistants or
PDAs.
Warning
The Data may contain inaccurate or incomplete
information due to the passage of time, changing
circumstances, sources used and the nature of collecting
comprehensive geographic data, any of which may lead
to incorrect results.
No Warranty
This Data is provided to you "as is," and you agree to
use it at your own risk. LICENSEE and its licensors
(and their licensors and suppliers) make no guarantee,
representation or warranty of any kind, express or
implied, arising by law or otherwise, including but not
limited to, content, quality, accuracy, completeness,
effectiveness, reliability, fitness for a particular purpose,
usefulness, use or results to be obtained from this
Data, or that the Data or server will be uninterrupted or
error-free.
Disclaimer of Warranty: LICENSEE AND ITS LICENSORS
(INCLUDING THEIR LICENSORS AND SUPPLIERS)
DISCLAIM ANY WARRANTIES, EXPRESS OR IMPLIED,
OF QUALITY, PERFORMANCE, MERCHANTABILITY,
FITNESS FOR A PARTICULAR PURPOSE OR NONINFRINGEMENT. Some States, Territories and Countries
do not allow certain warranty exclusions, so to that
extent the above exclusion may not apply to you.
Disclaimer of Liability
LICENSEE AND ITS LICENSORS (INCLUDING THEIR
LICENSORS AND SUPPLIERS) SHALL NOT BE LIABLE
TO YOU: IN RESPECT OF ANY CLAIM, DEMAND OR
ACTION, IRRESPECTIVE OF THE NATURE OF THE
CAUSE OF THE CLAIM, DEMAND OR ACTION
ALLEGING ANY LOSS, INJURY OR DAMAGES,
DIRECT OR INDIRECT, WHICH MAY RESULT FROM
THE USE OR POSSESSION OF THE INFORMATION;
OR FOR ANY LOSS OF PROFIT, REVENUE,
CONTRACTS OR SAVINGS, OR ANY OTHER DIRECT,
INDIRECT, INCIDENTAL, SPECIAL OR
CONSEQUENTIAL DAMAGES ARISING OUT OF
YOUR USE OF OR INABILITY TO USE THIS
INFORMATION, ANY DEFECT IN THE INFORMATION,
OR THE BREACH OF THESE TERMS OR
CONDITIONS, WHETHER IN AN ACTION IN
CONTRACT OR TORT OR BASED ON A WARRANTY,
EVEN IF LICENSEE OR ITS LICENSORS HAVE BEEN
ADVISED OF THE POSSIBILITY OF SUCH DAMAGES.
Some States, Territories and Countries do not allow
certain liability exclusions or damages limitations, so to
that extent the above may not apply to you.
Intellinav One User’s Manual
License Grant
You may use one copy of the enclosed Software and
Data on a single computer, with a single CPU, and a
Windows CE device. You may not network the Software
and/or Data or otherwise use it on more than one
computer or mobile computer at the same time. You
may use Software and Data to provide you with
navigation, position and route guidance information.
You may make one copy of the Software and Data solely
for backup or archival purposes. You may not copy or
share or make any other use of the backup copy, except
use to reinstall your active copy if it becomes erased,
corrupted or disabled. The backup copy must include
all copyright information contained in the original. You
may not copy the written materials accompanying the
Software.
Export Control
You agree not to export from anywhere any part of the
Data provided to you or any direct product thereof
except in compliance with, and with all licenses and
approvals required under, applicable export laws, rules
and regulations.
Entire Agreement
These terms and conditions constitute the entire
42
User's Manual
Limited Warranty 1 year parts and labor
Governing Law
The above terms and conditions shall be governed by
the laws of the State of Illinois [insert "Netherlands"
where European NAVTEQ Data is used], without giving
effect to (i) its conflict of laws provisions, or (ii) the United
Nations Convention for Contracts for the International
Sale of Goods, which is explicitly excluded. You agree
to submit to the jurisdiction of Illinois [insert "The
Netherlands" where European NAVTEQ Data is used] for
any and all disputes, claims and actions arising from or in
connection with the Data provided to you hereunder.
Government End Users
If the NAVTEQ Data is being acquired by or on behalf of
the United States government or any other entity
seeking or applying rights similar to those customarily
claimed by the United States government, the NAVTEQ
Data is a "commercial item" as that term is defined at 48
C.F.R. ("FAR") 2.101, is licensed in accordance with the
End-User Terms under which this NAVTEQ Data was
43
provided, and each copy of the NAVTEQ Data delivered
or otherwise furnished shall be marked and embedded
as appropriate with the following "Notice of Use," and
shall be treated in accordance with such Notice:
Notice of Use
Contractor (Manufacturer/ Supplier) Name: NAVTEQ
Contractor (Manufacturer/Supplier) Address: 222
Merchandise Mart Plaza, Suite 900, Chicago, Illinois
60654
This Data is a commercial item as defined in FAR 2.101
and is subject to the End-User Terms under which this
NAVTEQ Data was provided.
© 2006 NAVTEQ - All rights reserved.
If the Contracting Officer, federal government agency,
or any federal official refuses to use the legend
provided herein, the Contracting Officer, federal
government agency, or any federal official must notify
NAVTEQ prior to seeking additional or alternative
rights in the NAVTEQ Data.
Netropa (the Company) warrants to the original retail
purchaser of this product that should this product or any
part thereof, under normal use and condition, be proven
defective in material or workmanship within one year
from the date of original purchase, such defects will be
repaired or replaced with new or reconditioned parts
without charge for the parts and repair labor, provided
that transportation charges are prepaid. The sales
receipt is your proof of the date of purchase. This
warranty only extends to you, the original retailer
purchaser. It is not transferable.
All exchanged parts and products replaced under this
warranty will become property of the Company. This
limited warranty only extends to product purchased from
the Company and the authorized dealers and resellers.
This warranty does not apply if the product or part
thereof, which in the opinion of the Company, has been
damaged or rendered defective through alteration,
improper installation, mishandling, misuse, neglect,
accident, or by removal or defacement of the factory
serial number/bar code label(s). The opinion of the
Company with respect to this matter shall be final.
THE EXTEND OF THE COMPANY'S LIABLITY UNDER
THIS WARRANTY IS LIMITED TO THE REPAIR OR
REPLACEMENT PROVIDED ABOVE AND, IN NO
EVENT, SHALL THE COMPANY'S LIABILITY EXCEED
THE PURCHASE PRICE PAID BY THE RETAIL
PURCHASER FOR THE PRODUCT. THIS WARRANTY IS
IN LIEU OF ALL OTHER EXPRESS WARRANTIES OR
LIABILITIES. ANY IMPLIED WARRANTIES, INCLUDING
ANY IMPLIED WARRANTY OF MERCHANTABILITY,
SHALL BE LIMITED TO THE DURATION OF THIS
WRITTEN WARRANTY. ANY ACTION FOR BREACH OF
ANY WARRANTY HEREUNDER, INCLUDING ANY
IMPLIED WARRANTY OF MERCHANTABILITY, MUST BE
BROUGHT WITHIN A PERIOD OF 24 MONTHS FROM
THE DATE OF ORIGINAL PURCHASE. IN NO CASE
SHALL THE COMPANY BE LIABLE FOR ANY
CONSEQUENTIAL OR INCIDENTAL DAMAGES FOR
BREACH OF THIS OR ANY OTHER WARRANTY,
EXPRESS OR IMPLIED, WHATSOEVER.
Intellinav One User’s Manual
agreement between LICENSEE (and its licensors,
including their licensors and suppliers) and you
pertaining to the subject matter hereof, and supersedes
in their entirety any and all written or oral agreements
previously existing between us with respect to such
subject matter.
No person or representative is authorized to assume for
the Company any liability other than expressed herein in
connection with the sale of this product. Some states do
not allow limitations on how long an implied warranty
lasts or the exclusion or limitation of incidental or
consequential damage so the above limitations or
exclusions may not apply to you. This Warranty gives
you specific legal rights and you may also have other
rights which vary from state to state.
44
User's Manual
Caring for your device
Please use only the power adapter included in the box
and connects to the voltage requirement indicated on
the rear panel of the product. Use of any other types of
chargers will result in malfunction of the device and void
all warranties.
To prevent fire or electric shock, never expose the device
to any types of liquid
Do not block any ventilation openings or use in
extreme weather conditions, such as dusty, sandy, wet
or humid. When in use, please install in accordance
with the user manual
Do not attempt to service the unit. Any modification,
tempering and/ or change to the device not expressly
approved by Netropa Corp. or its authorized parities will
void all warranties in entirety.
Do not attempt to clean the device with the power on.
Use a clean, moistened, lint-free cloth to wipe the
exterior of the device. Use water or eyeglass cleaner if
necessary and gently wipe the touch screen.
45
When unattended, do not leave the device in the vehicle
that is subjected to direct sunlight for an extensive
period of time. The overheating of unit and/or battery
may cause malfunctioning of the device.
Keep the device away from excessive moisture and
extreme temperatures.
When connecting the device to the car adaptor, please
make sure the input voltage of the adaptor is identical
with the car voltage.
This device uses a rechargeable lithium ion battery. To
reduce the risk of fire or burns, do not disassemble,
crush, puncture, short external contacts, or dispose of in
fire or water.
In some instances during playback, a few bright or dark
flecks may appear on the TFT LCD screen. This is a
normal phenomenon in active matrix display technology,
and not a malfunction.
When using Intellinav One, please make sure you are
operating the device in compliance with all local, state,
and federal regulations. It is the sole responsibility of the
driver of the vehicle to operate the vehicle in a safe
manner and not become distracted by Intellinav. User
should not operate the controls of Intellinav while you
are driving. Netropa shall not be liable for any accident.
Warning: When used in a vehicle, it is the sole
responsibility of the driver of the Intellinav system to
place and secure the device where it will not interfere
with the vehicle's operation controls and/or safety
devices. The driver should mount the device where it
does not obstruct the driver's view of the road or cause
any damage or personal injury in the event of an
accident. The mounting accessory included in the
package is not warranted against collision damage or
the consequences thereof.
Do not mount where driver's field of vision is blocked.
Do not mount over airbag panels or in the field of
airbag deployment.
Do not place unsecured on the vehicle dash.
Netropa shall not be liable for any environmental
conditions that may influence the operation of your
Intellinav One.
An inexperience driver shall not use the Intellinav
system.
Intellinav One User’s Manual
Do not use and/ or charge this device near water or
moisture. Never touch or handle any power sources with
wet hands.
Important Information
The Global Positioning System (GPS) is operated by the
United States government, which is solely responsible
for the accuracy and availability of GPS. The system is
subject to changes that could affect accuracy and
availability of your device.
The utmost preparation is given to this manual. With
constant improvements and upgrades, Netropa cannot
guarantee for all contents to be most current and
entirely up-to-date. Information contain in this guide is
subject to change without notice and we shall not be
liable for technical and/or editorial errors of this guide.
Map data:
The manufacturer/ supplier of the data is NAVTEQ
North America, LLC, 222 Merchandise Mart Plaza, Suite
900, Chicago, Illinois 60654.
NOTICE TO DRIVERS IN CALIFORNIA AND
MINNESOTA: State law from these states prohibits
drivers of any motor vehicle from placing, displaying,
46
User's Manual
System Specifications
California Vehicle Code Section 26708(a)
Minnesota Statutes 2005, Section 169.71
The Intellinav One has the following specifications:
Host Start: 1 sec., average
SiRF Star III GPS chipset
Warm Start: 38 sec., average
SAMSUNG S3C2410 (ARM920T) 266Mhz CPU
Cold Start: 42 sec., average
64 MB NAND flash + 64 MB SDRAM onboard
210+ g Weight
3.6-inch 16.7M Colors TFT LCD with touch panel
Dimensions: 120x89x33 mm
Intellinav One User’s Manual
affixing and or applying any objects such as suction
mounts on the windshields. Other dashboard or friction
mounting options should be used. Intellinav does not
take any responsibility for any fines, penalties, or
damages that may be incurred as a result of disregarding
this notice.
SD memory slot for map data, MP3, or photos
Build-in 1 watt speaker
GPS antenna with external antenna connector
USB 1.1 connector
WinCE.NET 4.2+ OS Kernel
Up to 5 hours Battery Life (Rechargeable Internal
Lithium- polymer battery 1700 mA )
MP3 Player
Photo Viewer
47
48
User's Manual
Netropa Corporation
1499 Huntington Dr. Suite 305
South Pasadena, CA 91030
Office (626) 403-2866
http://www.intellinav.com