1
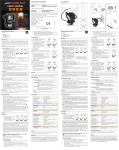
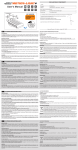
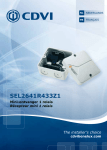
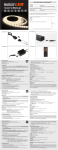
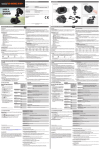
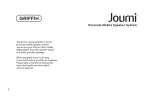
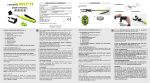
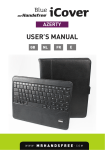
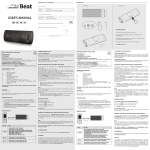
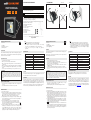
DECLARATION OF CONFORMITY
We, the undersigned
USER’S MANUAL
GB
NL
FR
Company:
Address:
ILLUSTRATIONS
Illustration II
Illustration III
Illustration I
TE-GROUP nv
Kapelsestraat 61, 2950 Kapellen - BELGIUM
2
1
3
declare, that the following equipment:
D
Product Name:
Product Type:
Quintezz LED 10W Floodlight
LED Floodlight
complies
are specified in the directive
Conformswith
withthe
theessential
followingrequirements,
requirements: which
2006/95/EC
2004/108/EC and 2006/95/EC on the approximation of the laws on the Member
States relating to electromagnetic compatibility.
The product has been tested against the followings standards and specifications,
applying versions valid in June, 2014:
EN 55015:2006+A1:2007+A2:2009
EN 61547:2009
EN 61000-3-2:2006+A1:2009+A2:2009
EN 61000-3-3:2008
EN 60598-2-5:1998
EN 60598-1:2008+A11:2009
EN 62031:2008
EN 62493:2010
Joseph Van Oosterum, CEO TE-Group, June 2014
----------------------- Manual/LED 10W Floodlight/08-14/V01--------------------Copyright©Quintezz
QUINTEZZ LED SENSOR FLOODLIGHT
See Illustration I
GB
1) Floodlight
2) Wiring cable + connector
3) Mounting bracket
INTRODUCTION
Your QUINTEZZ LED Floodlight is a unique indoor or outdoor lighting system for
your home or business. A 10W LED light is installed which can be adjusted thanks
to the bracket located at the backside
SAFETY PRECAUTIONS
•
•
•
•
•
•
Do not install when it is raining
Make sure you switch off the power before installation
Make sure that the power wiring comes from a circuit with a suitable fuse or
circuit breaker
Make sure that there are no objects within a range of 80 cm from the Floodlight
Do not remove the Floodlight head assembly from the base, so as to avoid any
rotation
The unit can only be installed horizontally, not vertically as shown on illustration II.
IMPORTANT
Some countries may require installation of this product by a qualified electrician.
Please check the laws and requirements in your country. If the house wiring
is of aluminum, consult with an electrician about proper wiring methods.
Before proceeding the installation, TURN OFF THE POWER TO THE LIGHTING
CIRCUIT AT THE CIRCUIT BREAKER OR FUSE BOX TO AVOID ELECTRICAL
SHOCKS.
CHOOSE A MOUNTING LOCATION
•
•
For the best results, fix the Floodlight on a solid surface at a height between
2.0 ~ 2.3 m.
For outdoor installation: a location under eaves is preferable
WIRING INSTRUCTION
1) Switch off the power source
2) Remove the mounting bracket from the Floodlight. Drill the wall and screw
the bracket onto the wall using suitable wall plugs and screws (not included).
Check that the bracket is securely fitted onto the wall. See illustration III.
Note: at this stage, do NOT re-attach the Floodlight to the bracket.
3) Strip approximately 6-8 mm insulating part of the power cable and original
wire (if needed). Before connection make sure that the wiring box gasket is
firmly seated in its original place.
4) Connect the BROWN wire (live wire +) to the terminal block “L” mark.
Connect the BLUE wire (Neutral wire) to the terminal block “N” mark.
Connect the YELLOW/GREEN wire (earthing wire) to the terminal block
mark. (in case there is an earthing wire).
5) Re-attach the Floodlight to the bracket and secure the cable to the wall using
suitable clips (not included). Ensure that the cable is not touching the body
of the Floodlight and that there is sufficient slack in the cable to allow the
Floodlight to be titled and adjusted as required which should be done by
grasping the metal body of the Floodlight and determining its position.
Note:
• Should be installed by an electrician or experienced person
• Avoid installation on objects that can move/shrink/expand …
• When light does not turn on: make sure you made a correct “wiring
connection”, check the load and make sure there is 100~230V power.
•
Consult your local service agent concerning safety, protections,
regulations, …
QUINTEZZ LED SENSOR FLOODLIGHT
Zie illustratie I
NL
1)Floodlight
2) Bedradingskabel + connector
3)Bevestigingsbeugel
Nota:
• Moet worden geïnstalleerd door een elektricien of een ervaren persoon
• Vermijd installatie op objecten die kunnen bewegen / krimpen / uitzetten...
• Indien de Floodlight niet aan gaat: zorg ervoor dat u een juiste bekabeling
hebt uitgevoerd, de stroomlading correct is en het voltage 100-230V bedraagt.
• Raadpleeg uw plaatselijke service-agent met betrekking tot veiligheid,
bescherming, reglementen, ...
INLEIDING
SPECIFICATIONS
Power requirement
85 ~240 V / 50~60 Hz
Lighting Load
Max. 10W LED
Standby Current
0,45 Watt
Operating Current
0,10 Watt
Power Cord Requirement
H05RN-F, 3G, 1.0 mm²
Waterproof
IP65
Temperature
-20° C to + 40°C
Mounting height
2,0 ~2.3 M, 1.8 to 2 M Wall Mount
Adjustable Angle
Vertical 180 °
SUPPORT
For all product related questions, please contact: [email protected] or check
our website www.quintezz.com for more information.
GUARANTEE
Copyright © Quintezz. Quintezz® is a registered trademark of TE-Group NV. The
Quintezz® brand stands for superior quality products and excellent customer service. Therefore Quintezz® warrants this product to be free from defects in materials
and workmanship for a period of two (2) years from the original purchase date of the
product. The terms of this guarantee and the extent of responsibility of Quintezz®
under this warranty can be downloaded from the website: www.quintezz.com.
UW QUINTEZZ LED Floodlight is een uniek indoor of outdoor verlichtingssysteem
voor uw huis of bedrijf.
Standaard werd een 10W LED-licht geïnstalleerd, welke kan ingesteld worden
dankzij de beugel aan de achterkant.
 VEILIGHEID
• Installeer het apparaat niet als het regent.
• Schakel de stroom uit voordat u de installatie aanvangt.
• Zorg ervoor dat de bedrading afkomstig is van een stroomcircuit met een
geschikte zekering of een stroomonderbreker.
• Zorg ervoor dat er zich geen objecten binnen een bereik van 80 cm van de
Floodlight bevinden.
• Verwijder nooit de hoofdunit van de basis. Dit om elke rotatie te voorkomen.
• Het toestel kan alleen horizontaal worden geïnstalleerd, niet verticaal zoals in
illustratie II.
BELANGRIJK
Sommige landen vereisen dat de installatie van dit product door een erkend
elektricien gebeurt. Controleer de wetten en voorschriften hierover in uw land.
Als de bedrading in uw huis van aluminium is, dient u met een elektricien de
correcte aansluitingsmethoden te bespreken. In elk geval dient u de stroom
van het verlichtingscircuit aan de zekeringkast of stroomonderbreker uit te
schakelen om elektrische schokken te voorkomen.
KIES EEN MONTAGE-LOCATIE
• Voor de beste resultaten bevestigt u de Floodlight best op een stevige
ondergrond en op een hoogte tussen 2,0 ~ 2,3 m.
• Voor buitenopstelling: een locatie onder de dakrand geniet de voorkeur.
BEDRADINGSINSTRUCTIES
1) Schakel de stroom uit.
2) Verwijder de bevestigingsbeugel van de Floodlight. Boor de wand en schroef
de beugel op de wand met geschikte pluggen en schroeven (niet meegeleverd).
Controleer of de beugel stevig gemonteerd staat op de muur. Zie illustratie III.
Opmerking: in dit stadium nooit de Floodlight opnieuw aan de beugel bevestigen.
3) Verwijder ongeveer 6-8 mm isolatiegedeelte van de stroomkabel en originele
draad (indien nodig). Voor aansluiting checkt u dat de aansluitdoos stevig in zijn
oorspronkelijke plaats bevindt.
4) Verbind de BRUINE draad (fasedraad +) met het klemmenblok met de “L” markering.
Verbind de BLAUWE draad (0 draad) met het klemmenblok met de “N” markering.
Verbind de GEEL/GROENE draad (aardedraad) met het klemmenblok met de
markering. (in het geval deze aanwezig is).
5) Bevestig de Floodlight opnieuw aan de beugel en zet de kabel vast aan de
muur met behulp van geschikte klemmen (niet inbegrepen). Zorg ervoor dat de
kabel de Floodlight niet raakt en dat er voldoende speling is om de Floodlight
te kunnen instellen, dit door de metalen behuizing van de Floodlight vast te
nemen en de positie te bepalen.
SPECIFICATIES
Stroomvereisten
85 ~240 V / 50~60 Hz
Verlichtingsbelasting
Max. 10W LED
Normaal verbruik
0,45 Watt
Standby verbruik
0,10 Watt
Netsnoer vereisten
H05RN-F, 3G, 1.0 mm²
Waterproof
IP65
Temperatuur
-20° C to + 40°C
Montagehoogte
2,0 ~2.3 M, 1.8 tot 2 M muurbevestiging
Draaibare hoek
Verticaal 180 °
KLANTENONDERSTEUNING
Voor alle vragen in verband met het product kunt u contact opnemen met
[email protected] of kijk op www.quintezz.com voor meer informatie.
GARANTIE
Copyright © Quintezz. Quintezz® is een gedeponeerd handelsmerk van TE-Group
NV. Het merk Quintezz® staat voor producten van superieure kwaliteit en een
uitstekende klantenservice. Daarom garandeert Quintezz® dat dit product vrij is
van materiaal- en fabricagefouten gedurende een periode van twee (2) jaar na de
oorspronkelijke aankoopdatum van het product. De voorwaarden van deze garantie
en de omvang van de verantwoordelijkheid van Quintezz® onder deze garantie kunt
u downloaden vanaf de website: www.quintezz.com.