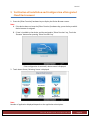
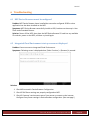
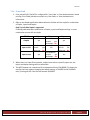
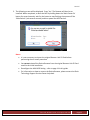
1
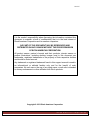
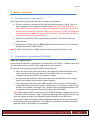
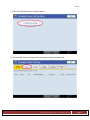
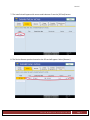
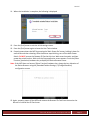
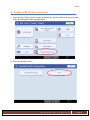
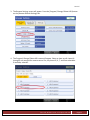
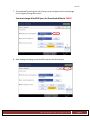
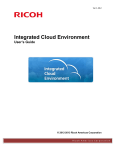
Ver 1.6 Integrated Cloud Environment Installation and Configuration Guide © 2011 Ricoh Americas Corporation Ricoh Americas Corporation Ver 1.6 It is the reader's responsibility when discussing the information contained this document to maintain a level of confidentiality that is in the best interest of Ricoh Americas Corporation and its member companies. NO PART OF THIS DOCUMENT MAY BE REPRODUCED AND DISTRIBUTED IN ANY FASHION WITHOUT THE PRIOR PERMISSION OF RICOH AMERICAS CORPORATION. All product names, partner’s brands and their products, domain names or product illustrations, including desktop images used in this document are trademarks, registered trademarks or the property of their respective holders and should be noted as such. Any trademark or registered trademark found in this support manual is used in an informational or editorial fashion only and for the benefit of such companies. No such use or the use of any trade name, or web site is intended to convey endorsement or other affiliation with Ricoh products. Copyright © 2012 Ricoh Americas Corporation Ricoh Americas Corporation Ver 1.6 Table of Contents Table of Contents ............................................................................................................................... 1 1. Integrated Cloud Environment .................................................................................................... 3 2 Before you begin ......................................................................................................................... 4 2.1 Verify installation requirements ........................................................................................... 4 2.2 Obtaining the Organizational ID (ORGID) ............................................................................. 4 3 4 5 6 Install Ricoh Device Browser ....................................................................................................... 5 Configure Ricoh Device Browser ............................................................................................... 10 Verification of Installation and Configuration of Integrated Cloud Environment ..................... 16 Troubleshooting ........................................................................................................................ 18 6.1 MFP Device Browser cannot be configured ........................................................................ 18 6.2 Integrated Cloud Environment start up screen not displayed ............................................ 18 6.2.1 Configuring the MFP to support a Proxy Server ......................................................... 19 7 Appendix .................................................................................................................................... 20 7.1 Integrated Cloud Environment Platform Limitations .......................................................... 20 7.1.1 MFP Browser and Java application compatibility limitations ..................................... 20 7.1.2 MFP Browser limitations ............................................................................................. 20 7.2 Integrated Cloud Environment Application Limitations ..................................................... 21 7.2.1 Scan to Box .................................................................................................................. 21 7.2.2 Scan to Evernote ......................................................................................................... 21 7.2.3 Scan to Googledocs ..................................................................................................... 22 7.2.4 Scan to Email ............................................................................................................... 22 7.2.5 Scan Business Card Scan Receipt ................................................................................ 22 7.2.6 Print Cloud .................................................................................................................. 23 7.3 Device Browser Un‐installation ........................................................................................... 24 8 Notes: ........................................................................................................................................ 26 Ricoh Americas Corporation Page 1 Ver 1.6 This page intentionally left blank to allow for duplex printing. Ricoh Americas Corporation Page 2 Ver 1.6 1. Integrated Cloud Environment This guide explains how to install and configure Integrated Cloud Environment Applications on Ricoh MFPs. This document assumes that you have familiarity with network configuration, including setting IP addresses, and working with DNS and DHCP servers, and proxy servers. You must also have Ricoh Device Browser software ready to install on a supported MFP. For technical assistance during any phase of an installation, please contact the Ricoh Technology Support Services Center help desk during their standard business hours (M‐F From 8AM‐8PM ET excluding US holidays) by calling the appropriate telephone numbers below. Technology Support Services Center (NOTE: RICOH ID WITH PRODUCT TRAINING ASSOCIATION REQUIRED FOR ACCESS) RICOH DIRECT 888‐424‐1573 800‐57‐RICOH (577‐4264) ALL DEALERS 888‐RICOH‐66 (888‐742‐6466) Ricoh Americas Corporation Page 3 Ver 1.6 2 Before you begin 2.1 Verify installation requirements Ensure that you have everything required to complete the installation: • SD Card containing an unused version of the Ricoh Device Browser (Type B, Type D, or Type E depending on the specific Ricoh MFP model. (Refer to the TSRC web site for Browser/MFP model information. To locate this information, once logged into the TSRC website, go to > Solutions > and under “Work‐flow Enhancement” select “ICE (Integrated Cloud Environment)”). Note: The Browser Type B requires custom firmware available on the TSRC site, at the location listed above. • Network‐connected Ricoh MFP supported by this solution. The network must have Internet access. • Organization ID [Obtain this from MDC (Media distribution Center)] See “2.2 Obtaining the Organizational ID (ORGID)” below. Note: The MFP JAVA SDK option is NOT required for these Ricoh Device Browser Units. 2.2 Obtaining the Organizational ID (ORGID) Obtain the “Organization ID” As part of the MFP Browser’s configuration, a unique value, the “ORGID,” is added to the end of the URL used to connect the MFP to the Integrated Cloud Environment. The process of obtaining and using the ORGID is outlined below: 1. When the Sales person places the order for the Integration Cloud Environment, they will include the name and email address of the support technician (or Support Manager) that will be involved in the customer’s install. 2. An email with the customer’s ORGID will be sent from the Media Distribution Center (MDC) to the support technician (or Support Manager). 3. The support technician will use this ORGID number at the customer’s site during the Integrated Cloud Environment Browser’s configuration. If the customer already has the Browser Unit installed, the Browser Unit’s version will be confirmed and updated, and configured with the Integrated Cloud Environment’s URL with ORGID. Note: Obtaining the ORGID is required as part of the MFP’s Browser configuration (refer to “3 Install Ricoh Device Browser” page 12). Before using Integrated Cloud Environment, you must also register (activate) the Integrated Cloud Environment to the MFP. Once successfully configured and registered the Integrated Cloud Environment will have access to the appropriate cloud applications. The registration procedure is provided on the next page and is part of the Browser Unit installation. Ricoh Americas Corporation Page 4 Ver 1.6 3 Install Ricoh Device Browser IMPORTANT! Integrated Cloud Environment registration: Registering the Integrated Cloud Environment to the customer’s MFP is required before Integrated Cloud Environment can be used by the customer. In order to register the Integrated Cloud Environment to the customer’s MFP you MUST have access to the MFP’s Serial Number. For this reason, since the MFP which will have Integrated Cloud Environment installed to is now chosen, registration can be performed. Note: With the MFP’s Serial Number confirmed registration can be performed at any time prior to using the product. However, it is recommended to perform registration at this time. The registration process is provided below: A. Send an email to the MDC (Media Distribution Center). The Email should contain the customer’s name, and your contact information, and either of the following: the MFP’s ‘Configuration Page’ or ‘Unit Number (Serial number)’. The MDC’s Email Address is: ricoh‐psmdc@ricoh‐usa.com B. Registration, activates Integrated Cloud Environment, and will be completed within an hour. If you have a “rush” situation, you should add that information to the email. With registration completed, you can now begin the Browser Unit Installation: 1 Ensure the MFP is properly powered‐down and the main switch is “Off.” 2. Insert the MFP Browser SD Card into the service slot (generally, Slot 2.) of the MFP. 3. Power ON the MFP by switching the main switch “On.” 4. Press the [User Tools/ Counter/ Inquiry] hardware key, the following screen will appear. Press the [Extended Feature Settings] button. Ricoh Americas Corporation Page 5 Ver 1.6 5 Press the [Extended Feature Settings] button. 6. The Extended Feature Settings screen will appear. Select the [Install] tab. Ricoh Americas Corporation Page 6 Ver 1.6 7. The Install tab will appear with source media buttons. Press the [SD Card] button. 8. The Device Browser product located on the SD card will appear. Select [Browser]. Ricoh Americas Corporation Page 7 Ver 1.6 9. Select [Machine HDD] as the installation destination. Then, press the [Next] button. 10. Information on the Device Browser product will appear. Confirm the information and then press the [OK] button. Ricoh Americas Corporation Page 8 Ver 1.6 11. When the installation is complete, the following is displayed. 12. Press the [Exit] button to exit the initial settings screen. 13. Press the [Exit] button again to leave the User Tools window. 14. Properly power down the MFP by pressing the ‘Main Power On’ button, holding it down for several seconds then releasing. After the button stops blinking, turn off the Main Power Switch. DO NOT remove the Browser SD Card at this time. Wait several seconds, and then power the switch back on. Wait until the Copy application screen appears. Press the [Other Function] (see below) hardware key to display the Device Browser screen. Note: If the MFP does not have an [Other Function] hardware key, change the key allocation of the Device Browser using the [Extended Feature Settings] > [Change Allocation] configuration screen. 15. Again, properly power off the MFP and remove the Browser SD Card from the service slot. Be sure to reinstall the SD Card cover. Ricoh Americas Corporation Page 9 Ver 1.6 4 Configure Ricoh Device Browser 1. Press the [User Tools/ Counter/ Inquiry] hardware key, and the following screen will appear. Press the [Extended Feature Settings] button. 2. Press the [Browser] button Ricoh Americas Corporation Page 10 Ver 1.6 3. The Browser Settings screen will appear. Press the [Program/ Change/ Delete URL] button on the [Browser Default Settings] tab. 4. The Program/ Change/ Delete URL screen will appear. Select an item to edit. Items #1 through 4 are reserved for remote control. So, only items #5, 6, 7, and 8 are selectable. If available, select #5. Ricoh Americas Corporation Page 11 Ver 1.6 5. The Program/ Change URL screen will appear. Press the [Change] button and specify the URL Name and the URL respectively, and then press the [Exit] button. Enter URL Name: Integrated Cloud Environment Enter URL: https://ramp.ricoh‐cloud.com/RAMP/cloud/deviceindex.jsp?orgid=ORGID Note: A. Replace ORGID with the organization ID obtained from the MDC [Media Distribution Center]. See section, “Obtaining the Organizational ID (ORGID) on page 4 of this guide B. IMPORTANT! Registration is required before the Integrated Cloud Environment can be accessed from the MFP. See the “Note” provided in the section, “Obtaining the Organizational ID (ORGID)” bottom of page 4, and “Install Ricoh Device Browser” top of page 5 in this guide. 6. When completed, press the [Next] page button. Shown by the arrow in the above illustration, and continue to the next page. Ricoh Americas Corporation Page 12 Ver 1.6 7. The download file settings for pull‐printing can be configured on the second page of the Program/Change URL screen. You must change Max HDD Space for Downloaded files to ‘50000’ 8. After making the change, press the [OK], and then the [Exit] button. Ricoh Americas Corporation Page 13 9. Ver 1.6 To specify the default URL, press the [Default URL] button on the Browser Default Settings tab. 10. The list of the URLs registered with the Device Browser will appear. Select the URL to use as the default URL. 11. When completed, press the [OK] button and continue to the next page. Ricoh Americas Corporation Page 14 Ver 1.6 12. Select the [Temporary File Management] tab CONFIRM the settings shown in the illustration below, change as necessary. When completed press [Exit] until you fully exit User’s Tools. IMPORTANT! DO NOT CHANGE ‘User Temporary Files’ to ‘On.’ This completes the Integrated Cloud Environment installation process. The next section will allow you to confirm the install/configuration, and troubleshoot if necessary. The “Note” below, provides the settings necessary to make the Integrated Cloud Environment the default function on the MFP. This is optional and is your customer’s choice. Note: It is possible to display the Device Browser screen by default on the operation panel of the device. If you want to do so, select the Device Browser from [System Settings] > [Function Priority]. Ricoh Americas Corporation Page 15 Ver 1.6 5 Verification of Installation and Configuration of Integrated Cloud Environment 1. Press the [Other Function] hardware key to display the Device Browser screen. Note: A. If the device does not have the [Other Function] hardware key, press the key to which device browser is assigned. B. If Java is installed on the device and also assigned to ‘Other Function’ key, Touch the ‘Browser’ button after pressing ‘Other Function’ key’ If the configuration is successful, above screen is displayed. 2. Touch above Screen, following Screen is displayed Note: Number of application displayed depends on the application subscription. Ricoh Americas Corporation Page 16 Ver 1.6 3. After touching startup screen, if following screen is displayed, contact MDC. 4. Touch on Application image to access application screen. Note: A. If the device ID is not registered, (refer to “Install Ricoh Device Browser,” page 5) the message above is displayed, otherwise the application screen is displayed. B. Contact MDC for device ID registration confirmation. Refer to the Integrated Cloud Environment application’s user’s manual to verify that all applications are functioning properly. Ricoh Americas Corporation Page 17 Ver 1.6 6 Troubleshooting 6.1 MFP Device Browser cannot be configured Problem: MFP Device Browser shows installed but cannot be configured. DOSS or other application has also been installed on the MFP. Symptoms: MFP Device Browser successfully installs to HDD, but does not show up in User Tools under Extended Feature. Solution: Power off the MFP, then place the MFP Device Browser SD card into any available SD card slot, power on the MFP, and then try install again. 6.2 Integrated Cloud Environment start up screen not displayed Problem: Cannot connect to Integrated Cloud Environment. Symptoms: Following screen is displayed when [Other Function] ‐> [Browser] is pressed. Solution: 1. Check URL entered in Device Browser Configuration. 2. Check if DNS Server settings are properly configured on MFP. 3. Check if Customer’s environment uses a Proxy server to connect to the Internet, Configure Proxy Server settings in Device Browser configuration. (See next page.) Ricoh Americas Corporation Page 18 Ver 1.6 6.2.1 Configuring the MFP to support a Proxy Server As indicated on the previous page, one probable cause of receiving a “Could not connect to the requested URL or the URL could not be found” error is that the customer is using a Proxy Server to connect their network to the Internet, and the MFP has not been configured to use it. The Proxy Server's details should located on the site survey and/or be available at the time of installation. The steps below outline the steps in configuring the MFP to use a Proxy Server. 1. Press the [User Tools] button > then [Extended Feature Settings] > then [Browser] when you click on the [Use Proxy Server] button, select [On] as shown above. 2. Enter the Proxy Server details as provided by the customer. Note that there is a second page of configuration settings. When completed, press [Exit] until you return to the MFP’s main display. Then test the connection by starting Integrated Cloud Environment. Ricoh Americas Corporation Page 19 Ver 1.6 7 Appendix 7.1 Integrated Cloud Environment Platform Limitations 7.1.1 MFP Browser and Java application compatibility limitations 1. Aficio MP 2550/3350 locks up after coming out of sleep mode. Description: When energy saver timer is set to 1 Min, device locks up when user presses main power on button to wake up the device. This problem is intermittent. Work around: Increase the Energy Saver timer to 5 mins or higher. 2. NSI Auto Store Unified client Java application stops when device comes out of Energy Saver mode. Description: NSI Auto Store application Stops after device comes out of Energy Saver mode. Work around: NSI Auto Store is not recommended to be installed along with MFP Browser. 7.1.2 MFP Browser limitations 1. While Scanning from Integrated Cloud Environment applications, the user is not able to switch to other applications (such as: Copy, Document Server, etc). 2. The MFP Browser’s default download file size is 3MB, for proper operation of ‘Print Cloud’ this value needs to be set to 50MB. 3. The MFP Browser supports up to 50MB download file size for printing applications, if the file size is greater than 50MB in Print Cloud, the print job will fail to print. Ricoh Americas Corporation Page 20 Ver 1.6 7.2 Integrated Cloud Environment Application Limitations 7.2.1 Scan to Box 1. If a File exists in the User’s Box account under the ‘Scan2BoxNet’ folder, which has the same name as the one entered in Scan Settings screen, Box will consider this as new version of same file once it is uploaded. 2. OCR, and uploading a file to an external service, will be run as a background job on the application server. There is no feedback displayed to the user on the MFP panel with regards to the completion status or a failure. During the scan operation on the MFP, the user gets notification only regarding the transfer of the scan image from the MFP, to the application server. 3. Refer to the Box service details online for “File Size and Storage” limitations for Free and Premium accounts. If file size limits are reached, the document will fail to upload to the Box account. 7.2.2 Scan to Evernote 1. During the scan operation on the MFP the user receives notification only regarding the state of the transfer of the scanned image from the MFP to the application server. There is no feedback displayed to the user on the MFP panel regarding the transfer status of the file to the Evernote service. 2. The system will not retry if there is a failure to connect to the external service while uploading files, for example if the external service is down. 3. Refer to the Evernote service details online for “File Size and Storage” limitations for Free and Premium account. If the file size limits are reached, the document will fail to upload to the Evernote account. Ricoh Americas Corporation Page 21 Ver 1.6 7.2.3 Scan to Googledocs 1. OCR, and uploading a file to an external service will be run as a background job on the application server. There is no feedback displayed to the user on the MFP panel with regards to the completion status or a failure. During the scan operation on the MFP, the user gets notification only regarding the transfer of the scan image from the MFP, to the application server. 2. GoogleDocs has specific size limitations for the Word and Excel File formats. • Word File Cannot be larger than 1MB • Excel File Cannot be larger than 20 MB, need to be under 400000 cells and 256 Columns per sheet • PDF files have a limit of 1GB • Considering above size limit, using OCR Word/Excel format is not recommended. 7.2.4 Scan to Email 1. OCR, and uploading a file to an external service will be run as a background job on the application server. There is no feedback displayed to the user on the MFP panel with regards to the completion status or a failure. During the scan operation on the MFP, the user gets notification only regarding the transfer of the scan image from the MFP, to the application server. 7.2.5 Scan Business Card Scan Receipt 1. When sending an email to the Business Card and Receipt Processing service (Powered By Shoeboxed) the email is run as a background job on the application server. There is no feedback displayed to the user on the MFP panel with regards to completion status or failure. During the scan operation on the MFP, the user gets status notification only regarding the transfer of the scanned image from the MFP to the application server. However, there is notification from the Business Card and the Receipt Processing service once the document is received and processed. Ricoh Americas Corporation Page 22 Ver 1.6 7.2.6 Print Cloud 1. Print jobs will fail if the MFP is configured for ‘User Code’ or ‘User Authentication’ based printing. Print Cloud jobs do not contain any ‘User Code’ or ‘User Authentication’ information. 2. Refer to the Staple specification below when the finisher will not staple for combination of Staple, Layout and Duplex. Only Top Left Side Staple is supported. Following table describes combination of Staple, Layout and Duplex settings. In some combination printer will not staple. STAPLE 1 layout simplex yes Print direction open to left Portrait: yes Landscape: No open to top yes 2 layout Print direction Portrait: yes Landscape: No 4 layout yes No Print direction Portrait: Yes Landscape: No Print direction Portrait: yes Landscape: No Yes 3. When there is a Paper Size mismatch, and the user selects a specific paper size; the layout and duplex settings will not take effect. 4. The MFP Browser has a maximum file size download limit of 50,000KB. [To obtain the max file size limit requires changing the default setting, of 30,00KB to the 50,000KB max.] Printing will fail if the file size exceeds 50,000KB. Ricoh Americas Corporation Page 23 Ver 1.6 7.3 Device Browser Uninstallation Should it ever become necessary to un‐install the Device Browser, proceed as provided below. 1. With the MFP powered on, go to: ‘User Tools’ > ‘Extended Feature’ > ‘Extended Feature Settings.” The screen will appear as below. 2. Click on the ‘Uninstall’ tab, and press the “Browser” Extended Feature Ricoh Americas Corporation Page 24 Ver 1.6 3. The following screen will be displayed. Press ‘Yes.’ The Browser will then be un‐ installed. When completed, re‐boot the MFP by holding down the ‘Main Power On’ button for several seconds, wait for the button to stop flashing, then power off the ‘Main Switch’ (wait several seconds) and then power the MFP back on. Notes: • It is not necessary to reinsert the original Browser Unit SD Card before performing the un‐install procedure. • You can not reinstall the Device Browser from the original Browser Unit SD Card used for the initial installation. • Reconfigure the MAX HDD Setting – refer to page 14 in this guide. • For information on how to recover the Device Browser, please contact the Ricoh Technology Support Services Center help desk. Ricoh Americas Corporation Page 25 8 Ver 1.6 Notes: Please use this section (and the following page) to add any notes that can be used for your future reference. Ricoh Americas Corporation Page 26