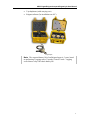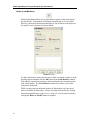
1
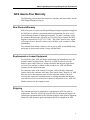
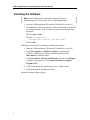
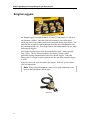
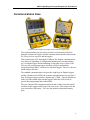
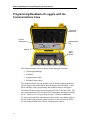
ADS® Enigma®/Enigma-Compact/ Enigma-hyQ User Manual November 2010 QR 775017 A2 ADS LLC 4940 Research Drive Huntsville, Alabama 35805 Telephone: (800) 430-3366 / Fax: (800) 430-6633 www.adsenv.com ADS Enigma/Enigma-Compact/Enigma-hyQ User Manual Copyright © 2010 ADS® LLC. All rights reserved. ADS® is a registered trademark of ADS LLC. Enigma® is a registered trademark of Primayer Limited. Microsoft®, Windows®, Windows Media®, and Windows Vista® are registered trademarks of Microsoft Corporation. Google Maps™ is a trademark of Google Inc. All other brand and product names are trademarks or registered trademarks of their respective holders. Notice of Proprietary Information The information contained herein represents the latest information available at the time of publication. ADS reserves the right to make any changes or modifications to the content of this document, without notice, to reflect the latest changes to the equipment. No part of this document may be reproduced in any form without the written consent of ADS. CAUTION: This product contains Lithium batteries. Please read Appendix C: Important Notice – Air Transporting the Enigma on page 88 before air-transporting loggers. ii ADS Enigma/Enigma-Compact/Enigma-hyQ User Manual Table of Contents Chapter 1 Introduction………………………………………………………………. 1 System Components.....................................................................................2 Technical Support ........................................................................................4 ADS Hassle-Free Warranty .........................................................................5 New Product Warranty ..........................................................................5 Replacement or Loaner Equipment .......................................................5 Shipping .................................................................................................5 Product Returns ......................................................................................6 Chapter 2 Software Installation……………………………………………………..7 Installing the Software .................................................................................8 Chapter 3 Hardware Overview………………………………………………………9 Enigma Loggers .........................................................................................10 Communications Case ...............................................................................11 Programming/Readback of Loggers with the Communications Case .......12 Programming........................................................................................13 Readback ..............................................................................................14 Chapter 4 Software Description…………………………………………………...15 Main Screen ...............................................................................................16 Main Menu .................................................................................................17 File Menu .............................................................................................17 View Menu...........................................................................................20 Communications Menu ........................................................................23 Tools Menu ..........................................................................................25 Help Menu ...........................................................................................26 Toolbar Buttons .........................................................................................27 Folders Button ......................................................................................27 Search Button .......................................................................................27 Up Button .............................................................................................30 Refresh Button .....................................................................................30 Program Button ....................................................................................31 Readback Button ..................................................................................37 Results Button ......................................................................................38 Analysis Button ....................................................................................43 Epochs Button ......................................................................................61 Sound Button .......................................................................................63 iii ADS Enigma/Enigma-Compact/Enigma-hyQ User Manual Network Button ....................................................................................65 Print Button ..........................................................................................72 Help Button ..........................................................................................73 Website Button.....................................................................................73 Chapter 5 Velocity Measurement………………………………………………… 75 Chapter 6 Battery Replacement…………………………………………………...79 Chapter 7 Principles of Leak Noise Correlation………………………………..81 Leak Noise ...........................................................................................81 Leak Location ......................................................................................81 Positioning Errors ................................................................................82 Problems with Trunk Mains and Plastic Pipes ....................................83 Appendices…………………………………………………………………………….85 Appendix A: Maximum Deployment Distances ....................................................86 Appendix B: Sharing Enigma Data........................................................................87 Appendix C: Important Notice – Air Transporting the Enigma ............................88 Index…………………………………………………………………………………….89 iv ADS Enigma/Enigma-Compact/Enigma-hyQ User Manual CHAPTER 1 Introduction The ADS® Enigma® is a compact, easy-to-deploy leak detection and location system designed for use with buried water pipes. Using the latest advances in digital acoustic technology, it combines noise logging (leak detection) and leak noise correlation (location) into a single, simple operation. Actual sound is recorded by a network of Enigma loggers, typically deployed on valves or hydrants overnight. After the recorded sound files are downloaded from the loggers, the software subjects the files to a sophisticated analysis process and displays any noise source locations. For more information on the leak correlation principle, refer to Chapter 7, Principles of Leak Noise Correlation on page 81. The Enigma includes the following system features: Multi-point correlation Easy-to-read analyses Simple deployment Multiple leak identification through a single operation It also provides the following logging features: Small size – fits into majority of underground locations Long-term power capability (loggers powered for minimum of 5 years) Magnetic attachment Fully submersible (IP68) Another version of the Enigma employs a hydrophone. Hydrophones offer greater sensitivity than standard accelerometers and provide narrow band filtering. A special hydrophone package, the Enigma-hyQ, also is available that has been optimized for leak detection in large diameter, non-metallic pipes and over longer distances. The Enigma-hyQ includes the EnigmaCompact (which includes 3 loggers) and a set of 3 hydrophones. 1 ADS Enigma/Enigma-Compact/Enigma-hyQ User Manual System Components The Enigma system consists of the following components: 2 to 8 loggers Communications case (and USB lead) Enigma software (for installation on a PC) Enigma The Enigma-Compact system consists of the following components: 3 loggers Communications case (and USB lead) Enigma software (for installation on a PC) Enigma-Compact The Enigma-hyQ system consists of the following components: 2 3 loggers Communications case (and USB lead) ADS Enigma/Enigma-Compact/Enigma-hyQ User Manual 3 hydrophones (with carrying case) Enigma software (for installation on a PC) Enigma-hyQ Note: The expected battery life of an Enigma logger is 5 years, based on performing 1 logging run (of 3 epochs) 5 times a week. Logging several times a day will reduce battery life. 3 ADS Enigma/Enigma-Compact/Enigma-hyQ User Manual Technical Support The ADS Support Center provides comprehensive technical support to assist customers in configuration and operation of the Enigma system. Contact customer support by email at [email protected] or by phone at (877) 237-9585. 4 ADS Enigma/Enigma-Compact/Enigma-hyQ User Manual ADS Hassle-Free Warranty The following sections detail the hassle-free warranty and return policy for the ADS Enigma/Enigma-Compact. New Product Warranty ADS will repair or replace any Enigma/Enigma-Compact equipment (supplied by ADS) that is defective in materials and/or workmanship for up to two (2) years following the date of shipment from ADS. To make a warranty claim, the customer should simply call ADS at (256) 430-3366 or contact the ADS Support Center toll-free at (877) 237-9585. The ADS Client Services Agent will assign a Return Materials Authorization (RMA) to the customer’s claim immediately. The customer shall return a defective unit or part to ADS for troubleshooting and repair or replacement within 10 days with the RMA. Replacement or Loaner Equipment For a defective part, ADS will ship a replacement part immediately once the customer makes an initial claim. However, if ADS does not receive the defective part within 30 days or testing concludes that the part experienced excessive wear and tear or abuse for the period of use, ADS will bill the customer for the replacement part. For a defective unit, at the customer’s request, ADS will ship a temporary (loaner) unit to the customer at the time of the initial claim. However, if ADS does not receive the temporary unit from the customer within 15 days of receiving the repaired or replacement unit or testing concludes that the unit experienced excessive wear and tear or abuse for the period of use, ADS will bill the customer for the temporary unit. Shipping The customer must pay to ship defective equipment to ADS for repair or replacement. However, ADS will incur the costs for shipping the repaired or replacement equipment back to the customer using the same priority shipment procured by the customer upon returning the defective equipment to ADS. 5 ADS Enigma/Enigma-Compact/Enigma-hyQ User Manual Product Returns If the customer is not satisfied with the performance of the Enigma/EnigmaCompact, the customer may return the equipment within 30 days for a full refund, provided the condition of the equipment is in the same condition as sold, except for expected or normal wear and tear for the period of use. 6 ADS Enigma/Enigma-Compact/Enigma-hyQ User Manual CHAPTER 2 Software Installation To run the Enigma software, the user’s PC must have Microsoft® Windows® XP, Windows 2000, Windows Vista®, or Windows 7 and meet the following minimum software and hardware requirements: Microsoft Windows Media® Player 9 Pentium II 500 or equivalent CPU 512 Mb RAM 50Mb available hard disk space Available USB port Exceeding the minimum specifications will enhance operation and performance of the Enigma. Note: ADS does not provide technical support for issues concerning the operating system on the user’s PC. 7 ADS Enigma/Enigma-Compact/Enigma-hyQ User Manual Installing the Software Note: Avoid running other applications during the software installation process. If necessary, close all other applications. 1. Insert the ADS installation CD into the CD-ROM drive on the PC. 2. The installation CD has an AutoPlay feature that should cause the CD to run automatically. If the CD does not run, perform the following procedure: Click Start > Run. Enter [CD-ROM drive designation]:\website_cd\index.html. Click OK. Following is an alternative method for installing the software: 1. Insert the ADS installation CD into the CD-ROM drive on the PC. 2. Using My Computer or Windows Explorer, navigate to the website_cd folder on the CD drive and then double-click the index.html file inside the folder. 3. Click Information, Software and Manuals, and then click Enigma to display a pop-up menu. Click Download Software, Enigma, Enigma for PC. 4. Click Yes to initiate the installation process, or No to cancel. 5. Proceed through the installation wizard. Restart the computer upon request. 8 ADS Enigma/Enigma-Compact/Enigma-hyQ User Manual CHAPTER 3 Hardware Overview The Enigma system consists of the following hardware: Logger set (each logger has a built-in accelerometer or connection for a hydrophone) Hydrophone set (required for hydrophone loggers only) Communications case This chapter provides a brief description of the system hardware and general instructions for using the communications case to program and readback the loggers. 9 ADS Enigma/Enigma-Compact/Enigma-hyQ User Manual Enigma Loggers Loggers (accelerometers) An Enigma logger is an approximately 4.3-inch (11-cm) long by 2.4-inch (6cm) diameter cylinder. One end of the unit contains a powerful magnet, which provides secure contact with ferrous materials during deployment. The other end has an optical window through which the unit communicates with the communications case. Each logger has an individual number for use when deploying the loggers. Each logger receives power from an internal battery pack, which typically lasts 5 years. The PC software indicates low battery voltage (when applicable) during communication activities with the loggers. When the battery pack in a logger requires replacement, the user must return the logger to ADS. When necessary, the user can replace the magnet. However, please contact ADS for instructions. Note: When using a hydrophone, make sure a good connection exists between the hydrophone and the pipe. Hydrophone 10 ADS Enigma/Enigma-Compact/Enigma-hyQ User Manual Communications Case Enigma case with 8 loggers (left); Enigma-Compact case with 3 loggers (right) The communications case provides a protective environment in which to transport and store the loggers and the communications interface between the PC (using the host software) and the loggers. When connected to a PC through the USB port, the Enigma communications case allows for uploading of configuration information (recording settings, etc.) to Enigma loggers and downloading of data after recovery from a site. The case also can program loggers based on a default configuration (programmed from the PC) and retrieve data from loggers. However, the case cannot analyze the data. The standard communications case provides eight bays for Enigma loggers and has 2 buttons and 8 LEDS; the compact communications case provides 3 bays for Enigma loggers and has 2 buttons and 3 LEDS. Optical transducers in the lid of the station align with the loggers (when the lid is closed) to provide the programming and readback link. The case contains USB communication leads and a cloth to keep the optical windows on the loggers and the top of the case clean. These items are in the case stored above the battery. The case also includes a disposable battery pack. 11 ADS Enigma/Enigma-Compact/Enigma-hyQ User Manual Programming/Readback of Loggers with the Communications Case Case Optical Windows (8) Program Button (green) Readback Button (red) LEDs (8) Logger Optical Window Inside top of transport case showing optical windows, LEDs, and buttons The communications case provides the following logger functions: Default programming Readback Program status check Readback status check The communications case can program a set of default logging parameters into the loggers and readback data from the loggers after recording. It also allows checking of the programming and readback status of the loggers. The factory default settings initiate logging at 02:00, 03:00, and 04:00. The user sets the parameters by which the case will program the loggers through the PC. Refer to Case Programming on page 23 for more information. To ensure successful data communication between the case and the loggers, the tops of the loggers and the optical windows on the case must be clean. Use the cloth provided in the case for cleaning these surfaces. 12 ADS Enigma/Enigma-Compact/Enigma-hyQ User Manual Note: Hydrophone loggers cannot be inserted into the case with hydrophones connected. Reconnect the hydrophone to the logger after programming and before the first epoch. The following table provides instructions and descriptions for the controls involving programming and readback: Control Use/Indication Description Green Button Short Press Reports status of last case programming operation Green Button Long Press Starts programming sequence Red Button Short Press Reports status of last case readback operation Red Button Long Press Starts readback sequence LEDs (8) On Indicates success of appropriate programming/ readback LEDs (8) Flash Indicates logger is detected but failed to program/readback LEDs (8) Off Indicates no logger is detected Note: The Enigma–Compact has 3 loggers and LEDs. Programming Program the loggers using the case in the following way: 1. Make sure the loggers to be programmed are in the case. 2. Press and hold the green button for about 1 second. Check for the “walking LEDs” and fast beeping, and then close the case. The beeping should slow down to about 1 beep per second after approximately 8 seconds. This indicates that the case is programming the loggers. 3. After hearing a long beep, open the case. 4. Verify whether the LED for each logger is on, indicating successful programming. Please note that logger status is displayed for only 8 seconds. To re-display status information, follow the instructions in the following section, Checking Status - Programming. If the case fails to program a particular logger, clean the top of the logger and the appropriate optical window in the top of the case and then repeat the programming procedure. 13 ADS Enigma/Enigma-Compact/Enigma-hyQ User Manual Checking Status - Programming Briefly press the green button. LED Indication On Logger programming was a success. Flashing Logger was detected, but failed programming Off Logger was not detected Readback Readback data from the loggers into the case in the following way: 1. Press the red button until the system begins beeping fast. 2. Close the case. Short beeps indicate that readback is in process. 3. After hearing a long beep, indicating the readback process is complete, open the case. 4. Check for a solid LED for each logger to verify readback success. A flashing LED indicates a failure to readback. Logger status displays for only 8 seconds. To re-display the status information, follow the instructions in the following section, Checking Status - Readback. If readback fails, repeat the readback process. Once the readback process is successful and complete, use the PC to retrieve the information stored in the case. Reprogram and redeploy the loggers as required. Checking Status - Readback Briefly press the red button. 14 LED Indication On Logger readback was a success. Flashing Logger was detected, but readback failed. Off Logger was not detected. ADS Enigma/Enigma-Compact/Enigma-hyQ User Manual CHAPTER 4 Software Description This chapter contains reference and functional information for the various components of the Enigma software, including the main screen, main menu, submenus, and toolbar. 15 ADS Enigma/Enigma-Compact/Enigma-hyQ User Manual Main Screen Enigma software main screen The main screen contains the main menus, a toolbar, a folder section, and a viewing window. 16 ADS Enigma/Enigma-Compact/Enigma-hyQ User Manual Main Menu The main menu contains five menus: File, View, Communications, Tools, and Help. File Menu File menu The File menu contains the following options: New Open Close Save Save As Print Preview Print Exit New The New menu contains the Enigma Folder option: Enigma Folder Selecting this option displays the New Enigma Folder wizard. 17 ADS Enigma/Enigma-Compact/Enigma-hyQ User Manual New Enigma Folder wizard (Select Folder Type window) From this location, you can select either an Enigma Folder that contains configuration and network files or an Empty Folder that contains no information files. Selecting the folder type and the Next button displays the Select Folder Location window. Select Folder Location window From this window, you can navigate to the location to create the new folder. As you click through folders on the left side of the window, the current path displays in the fields on the right side of the window. The location of the new 18 ADS Enigma/Enigma-Compact/Enigma-hyQ User Manual folder is saved to the logger during the programming sequence so that data read from the loggers can be saved to this predefined location. After making entries down to the second level, you can click on the Auto Fill button to prefill subsequent entries. Where similar entries already exist, the auto fill option adds a bracketed number. Open The Open menu contains the Open Enigma Folder option. Open Enigma Folder Selecting this option opens an Enigma folder. Enigma folders are identified by the Enigma folder icon . To open an Enigma folder, click on the Enigma folder required and then select File > Open > Open Enigma Folder. You also can open an Enigma folder by selecting the folder and then pressing Ctrl-O on the keyboard or by double-clicking on the Enigma folder. Close This option closes the currently selected file. Save This option saves the currently selected file. Save As This option saves the currently selected file with the option of saving the file under another name and/or to different location. Print Preview This option shows a preview of the content that will be sent to the printer when the print option is selected. Print Refer to Print Button on page 72 for more information. 19 ADS Enigma/Enigma-Compact/Enigma-hyQ User Manual Exit This option closes and exits the Enigma software. View Menu View menu The View menu contains the following options: Directory Settings Network Setting Directory Settings Selecting this option displays the Enigma Options wizard for defining the default database directory and data readback directories. The default prefix and postfix information also can be set through this option. 1. Select View > Directory Settings to display the Enigma Options wizard Database Directory Location window. 2. Enter or click on the Browse button to locate the appropriate directory location for the Enigma Database Directory. 3. Enter or click on the Browse button to locate the appropriate directory location for the Enigma Readback Directory. Note: Click on the Restore Default button for either field to restore the corresponding settings to the original default settings. 4. (optional) To set the prefix and postfix settings, click on the Next button. The Directory labels screen allows you to define various directory labels. To change a prefix or postfix, enter the desired text in the appropriate boxes. You also can set each field using the following through the following Enumerator types: None Numeric Character Date 20 ADS Enigma/Enigma-Compact/Enigma-hyQ User Manual Directory labels window 5. Click on the Finish button Network Settings Selecting this option opens the Network Settings Wizard for setting the network configuration file and a map file, if required. Both settings will be associated with the current sound file. However, before opening the Network Settings options, you must open an Enigma Database file. 21 ADS Enigma/Enigma-Compact/Enigma-hyQ User Manual Network Settings Wizard Network Configuration File Select the network configuration file by navigating through the directory in the top part of the window. The selected file displays in the Network Configuration File field. Map File Set the network map file from this section. This file is a BMP image file typically representing a map or an aerial photo that will serve as the background to the map view. To replace a previously selected file, click on the Change Map File button. If the Local Copy checkbox is selected, Enigma will copy and use the selected map file. If the checkbox is not selected, the software will link to the original map file. After making the required selections, click on the Finish button to confirm the settings. 22 ADS Enigma/Enigma-Compact/Enigma-hyQ User Manual Communications Menu Communications menu The Communications menu contains the following options: Logger Programming Case Programming Logger Readback Case Readback Logger Programming Selecting this option launches the Program Wizard for programming the loggers. Refer to the Program Button section on page 31 for more detailed information. Case Programming Selecting this option launches the Case Configuration Wizard for programming a default setting into the communications case to program loggers using the case without a PC. The case can store only one configuration at a time. The first window of the wizard window displays once the communications progress bar disappears. 23 ADS Enigma/Enigma-Compact/Enigma-hyQ User Manual Case Configuration Wizard (Program Wizard window) Refer to the Program Button section on page 31 for more detailed information. Click on the Program button to program the default settings into the case. Logger Readback Selecting this option initiates the readback of data from the loggers in the case through the USB port on the PC. For more detailed information, refer to the Readback Button section on page 37. Case Readback Selecting this option initiates the readback of logger data stored in the case (previously readback from the loggers). For more information, refer to the Readback Button section on page 37. 24 ADS Enigma/Enigma-Compact/Enigma-hyQ User Manual Tools Menu Tools menu The Tools menu includes three options: Pipe Data Entry Velocity Measurement Maximum Time Delay Pipe Data Entry To accomplish meaningful leak correlations, you must enter pipe data for each section of pipe. Two methods are available for entering pipe data: Manual (Analysis Screen) Network Schematic Manual Selecting the manual method opens the analysis screen for entering pipe data for each section or sections between loggers. See Pipework on page 48 for more information. Network Schematic Selecting the network schematic method opens the Network screen providing an alternate method for entering pipe information. See Network Button on page 65 for more information. Velocity Measurement Selecting this option displays the Velocity Measurement Wizard for calculating the velocity of sound in the network. To calculate leaks through a correlation process, it is important to know the velocity of sound in the pipe and network. The software allows the use of default values and manually 25 ADS Enigma/Enigma-Compact/Enigma-hyQ User Manual entered values. However, for greater accuracy, calculate the actual velocity using data collected from 3 loggers. The Enigma-Compact is optimized with 3 loggers for calculating velocity to improve the accuracy of leak detection. For more information, refer to Velocity Measurement on page 75. Maximum Time Delay Selecting Maximum Time Delay provides the option settings for controlling the analysis and displays the currently selected maximum time delay. Note: If the maximum time delay is set to 500 ms, data between 500 and 1500 ms will not be available. However, when using an hydrophone, for example, ADS recommends setting the value to 1500 to check for peaks. Help Menu The Help menu includes two options: 26 Enigma Help Manual Selecting this option opens the electronic version of this manual. About Enigma Selecting this option displays the About dialog identifying the current software version and providing contact and customer support information. ADS Enigma/Enigma-Compact/Enigma-hyQ User Manual Toolbar Buttons The toolbar buttons display at the top of the program window. Folders Button Clicking on the folders button displays the folder window. This window shows a standard windows folder tree for navigating through the structure to view and select items. Hide the folder window by clicking on the x at the top right corner of the folder window. Enigma Folders window Search Button Clicking on the search button opens the Search Criteria window on the left side of the screen. This window has several options for entering search criteria and locations. Close the Search Criteria window by clicking on the x at the top right corner of the search window. 27 ADS Enigma/Enigma-Compact/Enigma-hyQ User Manual Search Criteria window Search Criteria Specify the search item or part of the item for which you are searching in the All or part of the folder name field. Select All Folders or an Enigma Folder from the Type of Folder drop-down list. Browse Folders Clicking on the Browse Folders button opens the browse view for designating the directory location in which to conduct the search. 28 ADS Enigma/Enigma-Compact/Enigma-hyQ User Manual Search Criteria browser window When Modified This feature allows you to refine the search parameters by choosing the time period for which to conduct the search. Select one of the following options: Within the last week Within the last month Within the last year Specify dates Choosing the Specify dates option requires that you select Modified date, Created date, or Accessed date and then specify the exact date range for the search. Search Criteria window – Specify dates options 29 ADS Enigma/Enigma-Compact/Enigma-hyQ User Manual Clicking on the from and to drop-down arrows opens a date selection dialog. Date selection dialog The current date is shown in a red box; the selected date is shown in a blue square. Click on the required date to set the date parameter. Click on the arrows at the top of the date selection dialog to scroll through the months. Clicking on the Today line at the bottom of the dialog selects the current date. Search Buttons Three search buttons are available at the bottom of the search window. Search Buttons The Cancel button cancels a search, the Stop button discontinues the current search, and the Search button initiates the search based on the selected parameters. Up Button Clicking on the up button selects the next item up in the folder tree hierarchy. Refresh Button Clicking on the refresh button refreshes the tree structure in the folder window. 30 ADS Enigma/Enigma-Compact/Enigma-hyQ User Manual Program Button Clicking on the program button displays the Enigma Program Wizard window (once a connection is established) through which you can program the loggers directly from the PC. This method involves using the case solely as an interface. Enigma Program Wizard Epoch Times This part of the wizard allows you to select the required epochs. Epoch 1 is required; Epochs 2 and 3 are optional. To use one or both of the remaining epochs, select the checkbox adjacent to the epoch. Two types of logging are available: Timed Logging Begins at a specific time Delayed Logging Begins after a time delay 31 ADS Enigma/Enigma-Compact/Enigma-hyQ User Manual Timed Logging To set the time for Epoch 1, select the hour portion of the Time field and then designate the desired hour using the corresponding up and down arrows. Repeat this process for the minute portion of the Time field. To set the times for epochs 2 and 3, select the appropriate cycle (from 2 to 60 minutes) from the corresponding Interval drop-down list. By default, the epoch times are 02:00, 03:00, and 04:00 at 60-second intervals. Note: Confirm that all epoch times are set for the same day; they must not cross a midnight boundary. Delayed Logging To set the time delay before Epoch 1, select the hour portion of the Time field and designate the desired hour using the corresponding up and down arrows. Repeat this process for the minute portion of the Time field. To set the delays between Epochs 1 and 2 and between Epochs 2 and 3, select the appropriate cycle time (from 2 to 60 minutes) from the corresponding Interval drop-down list. By default, epochs are 60 seconds in duration with 5-minute delays. Current Time This field displays the current PC time in real-time. Selecting the Set to PC Clock checkbox will synchronize the loggers’ clocks with the PC clock during programming. To set the loggers’ clocks to another date, deselect the Set to PC Clock checkbox, click on the drop-down arrow to display the date selection dialog, and then choose the desired day. To change the time, click on the time display and enter the appropriate time. 32 ADS Enigma/Enigma-Compact/Enigma-hyQ User Manual Define Data Store Select Data Store window Use the Select Data Store screen to designate the location to which to save the logged data once it is retrieved. The file location information may be entered manually or pre-filled by clicking on the navigation tree. (This feature is useful when revisiting a previously surveyed site.) If you select a folder containing tests for a specific zone or area, you can click on the Auto Fill button to create another test that will be given another phase number and the current date. 33 ADS Enigma/Enigma-Compact/Enigma-hyQ User Manual Program This initiates programming of either the loggers or the communications case. Programming involves verifying the synchronization of the loggers’ clocks. Programming loggers A confirmation dialog box displays the number of loggers found. Click OK to continue programming. If the number of loggers displayed is not correct, clean the optical windows on both the case and the loggers and then restart the programming sequence. When programming is complete, the dialog will communicate success. The following screen confirms that the case contained 4 loggers that were programmed successfully. 34 ADS Enigma/Enigma-Compact/Enigma-hyQ User Manual Program completed The programming results display on the main screen. 35 ADS Enigma/Enigma-Compact/Enigma-hyQ User Manual Programming confirmation and results This screen confirms the loggers that were programmed and provides details of the epochs that were set up. Notice that the example shows a full set of 8 loggers. The results should reflect the number of loggers used. Cancel Clicking on this button closes the program wizard and terminates programming. Help Clicking on this button opens the help file. 36 ADS Enigma/Enigma-Compact/Enigma-hyQ User Manual Readback Button Clicking on the readback button initiates data collection from the loggers. Readback includes the following stages: Establishing communication with the loggers Selecting the data storage location (manual selection) Reading back data from the loggers Enigma Readback – progress of establishing communications A confirmation dialog box displays showing the number of loggers to be read back. Click OK to continue readback. If the number of loggers displayed is incorrect, clean the optical windows on the case and loggers and then restart the readback sequence. 37 ADS Enigma/Enigma-Compact/Enigma-hyQ User Manual Enigma Readback Wizard (Select Data Store window) From this location, you can select the location to which to save the readback data. The file location information may be entered manually or pre-filled by navigating to the appropriate location on the tree. (This is useful when revisiting a site surveyed previously.) If you select a folder containing tests for a specific zone or area, you can click on the Auto Fill button to create another test (which will be given another phase number and the current date). A confirmation dialog displays the number of loggers read back successfully. Click OK to continue. When readback is complete, the data displays on the file tree and the Results window appears. Results Button Clicking on the results button initiates correlation calculations involving the logger data stored on the PC. A progress bar shows the status of the data calculations. 38 ADS Enigma/Enigma-Compact/Enigma-hyQ User Manual Results – Main Display The number of results depends on the number of loggers used. This example involves 8 loggers. If only 3 loggers had been used, the results of only 3 results would be available. Data analysis may require a significant amount of time based on the amount of data and the speed of the PC. The progress displays in the data window. As the analysis occurs, the matching results display as thumbnails. You may select the analysis screen while data is undergoing processing to evaluate the correlation function between a pair of loggers in detail. The top of the data window shows the area name and the key for the Critical Noise Values. Correlation Thumbnail Example Correlation thumbnail example Each data result shows the logger numbers that were matched (top left and top right) and the correlation function of the analysis. Double-clicking on the data opens the analysis screen with the selected logger pair’s data. 39 ADS Enigma/Enigma-Compact/Enigma-hyQ User Manual Normalize Checkbox Selecting the Normalize Charts checkbox enables the normalize function that equalizes the height of each correlation thumbnail. Correlation thumbnail Correlation thumbnail normalized Sort Drop-down List The option selected from this list determines the method by which the software will sort the thumbnail results. Selecting Peak sorts the thumbnail results based on the quality of the correlation peak (i.e., in order of the sharpest peaks, typically the best indication of a leak position); selecting Time sorts the results based on the peaks closest to the earliest time. The following screen represents a leak analysis with the sort function enabled. It shows the best correlation peaks in decreasing order, starting with the correlation at the top left on the screen. 40 ADS Enigma/Enigma-Compact/Enigma-hyQ User Manual Leak analysis with the thumbnail results sorted based on the peaks Confidence Checkbox Selecting this checkbox colors the background of the correlation thumbnails based on the degree of confidence that the correlation peak represents a leak. The software indicates confidence based on the presence of the peak in all epochs, the consistency in the approximate shape of the peaks, and the peaks sharing the same position on all epochs. Following are descriptions of the background colors: Red This color indicates that the software is very confident that the correlation is due to a leak. Yellow This color indicates that the software may have identified a possible leak, but it is not confident. This limited confidence typically exists when the peak is not present on all epochs, is not the same on all epochs, or is in a different position on different epochs. When a yellow background exists, view the epoch display to determine whether a leak has caused the peak or, for example, customer water usage is the source of consumption. Blue This color indicates the software has not identified any indication of a leak. Sort and Confidence The following screen shows an ideal sort and confidence display where the leaks are in order and the red thumbnails are at the top left of the screen. 41 ADS Enigma/Enigma-Compact/Enigma-hyQ User Manual Sort and confidence display Instances may occur where sort and confidence processing indicates a lack of consistency in the ordering of thumbnails with red and yellow backgrounds. When this occurs, examine the three epochs of the correlations to identify a potential reason that the colors may be out of order. Lack of consistency in thumbnail ordering 42 ADS Enigma/Enigma-Compact/Enigma-hyQ User Manual Disable Correlations may be disabled and excluded from the analysis. To disable a correlation, right-click on the correlation and then select the Disable option. The software moves disabled correlations to the end of the main display and excludes them from the calculations. To turn off the disable function for a particular correlation, right-click on the correlation and deselect Disable. The software will return the correlation to the correct position on the main screen and remove the gray color. Main screen showing a disabled correlation in the lower right (gray) Analysis Button Clicking on the analysis button opens the Analysis screen displaying the correlation function and various tools for further analysis in leak position identification. Notes: Do not use accelerometer and hydrophone loggers together. dB values do not display when using a hydrophone logger. If you set the maximum time delay to 500 ms, data between 500 and 1500 ms will not be available for viewing. However, when using hydrophones, ADS recommends setting the value to 1500 to check for peaks. 43 ADS Enigma/Enigma-Compact/Enigma-hyQ User Manual Analysis Toolbar The top line of the display identifies the two loggers that were analyzed for the results and includes several options. The two loggers that were analyzed to generate the correlation display in blue and red. To change the current loggers, select the desired loggers from the corresponding drop-down menus. Analysis toolbar The top part of the screen displays the Correlation Analysis and peaks that have been identified. The content below is a graphical representation of the loggers and the pipe network that exists between the two selected loggers. Below the Correlation display is the dB/frequency graph. Notice that the leak position calculation cannot be performed until the pipe details have been added. Correlation display The critical noise values display (in dB) below the time delay graph. 44 ADS Enigma/Enigma-Compact/Enigma-hyQ User Manual Noise Suppression This option applies noise suppression to a correlation. To use this option, select the Noise Suppression checkbox and then click and drag the cursor over the time delay range chosen for suppression. Before noise suppression Noise suppression during drag-and-drop selection 45 ADS Enigma/Enigma-Compact/Enigma-hyQ User Manual Post noise suppression To turn off noise suppression, deselect the Noise Suppression checkbox. Epochs The three checkboxes associated with Epochs determine whether individual epochs display or are hidden from view. Selecting the checkbox for an epoch displays the corresponding epoch. Hidden epochs are not used in correlation calculations. Critical Noise Value The critical noise value is defined as the lowest noise level recorded during the logging period (i.e., the lowest consistent value of noise in dB). This important parameter indicates the noise level when no other random noise, such as traffic noise, is added to the leak noise. It is caused only by leak noise. Therefore, comparing the critical noise values between loggers clearly indicates relative logger position. The higher the critical value, the closer the logger is to a leak. Correlation Zoom Zoom in to a specific section of the correlation display by setting a start and finish point for the zoom. Click and hold the left mouse button at the desired starting position. Without releasing the mouse button, drag it to the right-hand limit of the desired section and then release the button to zoom the selected section. 46 ADS Enigma/Enigma-Compact/Enigma-hyQ User Manual Zoomed section of display showing the zoomed section of pipe dB / Frequency display When the display is set to show coherence, it is shown on the right side of the graph in green. Correlation Function Tools The following correlation function tool buttons are available: Find Peak Zoom Out Pipework Filters Leaks 47 ADS Enigma/Enigma-Compact/Enigma-hyQ User Manual Find Peak Clicking on this button moves the cursor on the correlation display to the peak value, as determined by the software. You also can move the cursor by clicking on the cursor marker and then dragging it to the left or right using the mouse. The time delay figure for the cursor position displays above the cursor marker. Move the cursor in shorter, more precise segments using the left and right cursor keys. Zoom Out Clicking on this button zooms out the correlation display to the maximum zoom. Pipework Note: In Network Mode, you can modify or delete, but not insert, pipes. This button displays the Pipe Details window for manually entering pipe details, modifying existing pipe sections, and deleting pipe sections. The correct pipe details must be entered before the position of a leak can be accurately measured or a full leak analysis can be performed. This involves designating and characterizing the existing sections of pipe between the loggers. Individual sections of pipe may exhibit different materials or diameters. Blank Pipe Details window 48 ADS Enigma/Enigma-Compact/Enigma-hyQ User Manual Add a section of pipe in the following way: Note: Pipes must be added in the correct order, from the left logger to the right logger. 1. Click on the Insert button. The New Pipe Span Details window displays. New Pipe Span Details window 2. Select the type of material from which the pipe is made from the Material drop-down list. The following figure shows the available materials. Available pipe types (materials) 3. Enter the Length of the pipe. 4. Enter the Diameter of the pipe. 49 ADS Enigma/Enigma-Compact/Enigma-hyQ User Manual New Pipe Span Details window populated 5. If a velocity value is required, select the User Defined Velocity checkbox and enter the appropriate Velocity. 6. Click on the Insert button to add the pipe to the network. New pipe section added on Pipe Details window 7. If more than one type of pipe exists between the two loggers, add the next section of pipe by repeating steps 2 through 6. Repeat these steps for each additional section as necessary. 50 ADS Enigma/Enigma-Compact/Enigma-hyQ User Manual 8. Click on the OK button to initiate the process of adding the pipes to the network. Delete a section of pipe in the following way: 1. Click on the pipe section to delete in the Pipe Details window. 2. Click on the Delete button. 3. Click on the OK button to confirm the changes. Modify a section of pipe in the following way: 1. Click on the pipe section to modify in the Pipe Details window. 2. Click on the Modify button. 3. Make the changes to the pipe details as required. 4. Click on the OK button to confirm the changes. Filters Clicking on this button displays the Analysis Options and Filter Settings window used for setting the filters corresponding to leak investigation. The Filters window includes two tabs: Filters Narrow Band Filtering Analysis Options and Filter Settings window showing tabs 51 ADS Enigma/Enigma-Compact/Enigma-hyQ User Manual Filters tab Analysis Options and Filter Settings (Filters tab) Note: The default values for hydrophones are different than those shown in the image. Therefore, when using the hydrophones, ADS does not recommend using Auto Filter. The Analysis Options and Filter Settings dialog allows you to select various filters and options to manage the leak detection process. The filters are band pass filters. You can select up to three. You also can enter filters by dragging and dropping over the frequency display. After selecting the required filter settings and options, click on the Apply button to apply the settings to the correlation. Auto Filter Auto Filter attempts to select the optimum filter settings. This mode often can provide very good results. However, certain situations may require manual control of filtering. ADS does not recommend using Auto Filter with hydrophones. Select the Auto Filter checkbox and then click on the Apply button to apply auto filtering to the correlation display. It may take some time to complete. When the process is complete, the dialog box will show the filters selected automatically by the software. When necessary, cancel auto filtering and change the filter values manually. 52 ADS Enigma/Enigma-Compact/Enigma-hyQ User Manual Filters 1 to 3 This feature allows you to select up to 3 filter bands manually. This can be done either by clicking the filter box and manually entering the filter frequency required or by dragging and dropping on the frequency spectrum display. Restore Default Filters Selecting this button restores the default settings. Spectral Equalizer Selecting this feature evenly distributes the power across the frequency spectrum to provide a more equal weighting at every frequency. This is often a very effective tool for improving correlations. Peak Enhancer Selecting this option can enhance the peak values on the graph. It is designed for use only with plastic pipes. Advanced Clicking on this button displays the advanced filter options. Set the options as required, and then click Apply to employ the settings. Select Back to return to the main filter window. 53 ADS Enigma/Enigma-Compact/Enigma-hyQ User Manual Advanced Options on Filters tab Advanced Options This section includes several advanced filtering options. Equalize Auto Filter Selecting this option applies the Spectral Equalizer while the Auto filter is processing data (rather than afterwards). Occasionally, this filter can improve the correlation result. Using this option may increase the operational time. Refine Auto Filter Selecting this employs the refined auto filter. However, pursuing better results through the implementation of this feature will require extended processing times. Center Correlation Suppression Selecting this option suppresses any peak that may appear at the center of the correlation. 54 ADS Enigma/Enigma-Compact/Enigma-hyQ User Manual Center Correlation Suppression Width Center correlation peaks occur due to unwanted noise that is common to both loggers. Designate the number of milliseconds of correlation data to remove from the center of the correlation. Display Coherence Selecting this option adds a third green trace to the frequency display. The coherence shows the similarity between the two logger recordings at each frequency. Where the coherence is higher, select the filters to use these frequencies. Display Blue Spectrum This turns on and off the trace from the left logger. Display Red Spectrum This turns on and off the trace from the right logger. Narrow Band Filtering This section enables you to manage the Narrow Band Filters. The top of the window displays the frequency setting for each filter. Narrow Band Filtering (Filters tab) Changing a Filter First, select (highlight) the Low/High settings on the table corresponding to the filter you want to change. This displays the settings in the Low and High fields below the table. Edit the settings in the fields as required, and then click on the Update button to finalize the change. 55 ADS Enigma/Enigma-Compact/Enigma-hyQ User Manual Low and High fields reflect selected (highlighted) filter Adding a Filter Enter the high and low settings for the new filter in the High and Low fields below the table, and then click on the Add button. The new filter settings display on the table. Deleting a Filter Select the filter on the table for removal, and then click on the Delete button. The selected filter settings disappear from view. Restoring Defaults Click on the Restore Defaults button to return the filters to the default settings and number of filters. This eliminates all changes made by the user. Cancel Selecting this button cancels the application of filters. Apply Selecting this button applies the selected filter parameters to the correlation data. Applying the filter parameters can take some time, depending on the quantity of data and the speed of the PC. Narrow Band Filter tab The Narrow Band Filter allows the use of several band filters. 56 ADS Enigma/Enigma-Compact/Enigma-hyQ User Manual Narrow Band Filtering tab When an epoch is open, click on the Run button to apply the narrow band filters. Throughout processing, the filtering results will display on the right hand side and the section of the epoch currently under analysis will be highlighted on the left. Once processing is complete, the filter settings display in the Filter tab and are available for modification (if required). Double-click the filter results on the right to load the data onto the main screen for further analysis. Results Change the settings for the Narrow Band Filters using the Advanced button on the Filters tab. 57 ADS Enigma/Enigma-Compact/Enigma-hyQ User Manual Auto Velocity at Out of Bracket If, during the analysis, a peak displays close to a logger position, but should display at the end, use the Out-of-Bracket function to compensate for the inaccurate velocity of sound in the pipe. Note: Use this function only when a known out-of-bracket condition exists. To obtain an accurate result using this function, the value entered for the distance between the sensors must be correct. The following example uses the default velocity and displays the peak just inside the limit of the left end of the pipe. Access and implement the Out-of-Bracket function by right-clicking in the correlation. 58 ADS Enigma/Enigma-Compact/Enigma-hyQ User Manual Once re-correlation is complete, the peak moves to the end of the pipe and the calculation changes the default value to a calculated value. 59 ADS Enigma/Enigma-Compact/Enigma-hyQ User Manual Leaks (Leak Markers) Selecting this button allows you to mark leaks or points of interest found on the pipe model. Leak markers will display automatically in Network Mode. However, please note that leak markers that are out of bracket will display on the analysis screen, but not in Network Mode. Leak Markers window To add a leak marker, make sure the cursor on the correlation window is in the desired position and then click the OK button in the Leak Markers window. This adds the current leak position to the list and marks the correlation graph with a leak symbol. The Leak Markers window also allows you to enter some notes on the leak. While you may enter an unlimited number of leak markers, only one set of notes is available for all markers. Delete or modify leak markers by clicking on the leak symbol above a pipe (cursor changes to a hand symbol) and then clicking the Delete or Modify button as required. 60 ADS Enigma/Enigma-Compact/Enigma-hyQ User Manual Epochs Button Selecting this button displays the Epoch screen that displays 2- and 3dimensional views of the correlation functions produced in each epoch. Viewing the epochs is beneficial to determining whether a correlation peak represents a leak (present in all epochs) or non-leak noise, possibly from customer water usage (not present in all epochs). Epochs representation and graphs This display includes the following functions and features: Time Delay Chart Rotation Chart Height Epoch Spacing Combined Correlation Individual Epochs 61 ADS Enigma/Enigma-Compact/Enigma-hyQ User Manual Time Delay This field displays the time delay at the cursor location. The marker above the Epochs on the left side of the display and the triangle under the lower edge of the 3-dimensional display indicate the location of the cursor. Move the cursor by dragging the cursor located above the epoch on the left side of the screen with the mouse or by using the left and right cursor keys (for limited, minimal movement). Chart Rotation Moving the corresponding cursor alters the orientation of the 3-dimensional display to enhance visual analysis. Chart Height Moving the corresponding cursor alters the vertical scale of the 3-dimensional display to enhance visual analysis. Epoch Spacing Moving the corresponding cursor alters the spacing between the epochs on the 3-dimensional display to enhance visual analysis. Combined Correlation This graph shows the result of combining the epochs. Individual Epochs This shows each individual epoch, the date and time of the record, and the numbers of the loggers in the analysis pair. The checkbox above each graph allows for hiding or displaying each individual epoch and for selecting which epochs to use in the combined correlation. 62 ADS Enigma/Enigma-Compact/Enigma-hyQ User Manual Sound Button Clicking on this button opens the sound window. The sound window shows the sound displays of the logger recordings. Sound Display The display includes the following features: Control buttons Volume control Info displays Logger number Critical Noise Value Sound graph Click on a sound graph to select which sound to play. 63 ADS Enigma/Enigma-Compact/Enigma-hyQ User Manual Control Buttons The control buttons manage the playback of sound through the PC speaker or headphones (when applicable). Sound control buttons Play/Pause Selecting this button plays the sound through the PC sound system (i.e., speakers or headphones). Stop Selecting this button terminates playback of the current sound. Backward Selecting this button moves the sound cursor back 10 seconds and continues playback from the new position. Forward Selecting this button moves the sound cursor forward 10 seconds and continues playback from the new position. Slower Selecting this button reduces the playback speed when the faster option is in use. Faster Selecting this button increases the playback speed. Volume Control Volume control Sliding this control adjusts the playback volume. Please note that the software and hardware sound controls also may be used to set the desired volume on the PC. 64 ADS Enigma/Enigma-Compact/Enigma-hyQ User Manual Info Displays Information displays Logger Number This represents the number of the logger, which also displays on the top of the logger. Critical Noise Value This represents the critical nose value. The key to the values and colors is available at the top of the window. Sound Graph This is a graphical representation of the sound recorded by the logger. Network Button Clicking on the Network button displays the Network screen. This screen allows the user to develop a graphical representation of the pipe network showing pipe lengths and logger locations. It includes two tabs: Network Maps The Network screen can be used to copy pipe data into the database and as an alternate method for entering pipe data (instead of through the Analysis screen). Entering pipe data in the Analysis screen does not create the pipe network on the Network screen. Both the Network Screen and Manual entry modes are available; however, both cannot be used simultaneously. Select the mode from the Tools > Pipe Data Entry menu. A check () displays beside the currently selected mode. Switch between modes as required. When the manual (via Analysis) mode is active, the network background displays in blue. The network screen option enables the user to draw the network as required and enter pipe data for the individual sections. This adds the pipe information to the database and creates an illustration of the pipe network. When drawing 65 ADS Enigma/Enigma-Compact/Enigma-hyQ User Manual the network to add pipe data, enter all pipe lengths to ensure that accurate pipe details will be used in the Analysis screen. Network screen Loggers with data have a thick blue border; loggers without data have a thin grey border. Network Window – Tools The menu on the left side of the screen includes the following tools. Selecting a specific tool displays the corresponding content on the right. Select Use this tool to select an item on the network display. For example, select loggers and drag them to a specific location on a run. Pipe Use this to add a new pipe. After clicking on the tool, click and hold on the starting location of the pipe on the grid, move (while holding down on the mouse button) the cursor to the final location, and then release the button. While drawing the pipe, the pipe displays as a dotted line. When the mouse button is released, the pipe displays as a solid line. Continue to add new pipes while it is in this mode. A round node displays at each end of the pipe. 66 ADS Enigma/Enigma-Compact/Enigma-hyQ User Manual Text Use this tool to add text entries onto the network diagram. Noise Use this tool to place a manual noise point on the network. For example, use it to mark the location of a known source of noise in an area by placing the noise source onto the pipe location and adding a comment defining the source. Pipe Join Use this tool to create a pipe join. Properties Select this checkbox to open the properties display on the right side of the window. Zoom In Use this option to zoom in on the display. Zoom Out Use this option to zoom out from the map. Delete Use this option to delete an item selected on the display. The Delete key on a keyboard also may be used to delete a selected item. The software solicits a confirmation before permanently deleting an item. Snap to Grid Use this tool to display/remove a grid and snap items on the display to the grid intersections (when applicable). 67 ADS Enigma/Enigma-Compact/Enigma-hyQ User Manual Background Use this option to implement a user bitmap or JPG, such as a map, as the background display. Show Notes Select this checkbox to display user notes with an object on the network screen. Enter the notes for display by selecting the object on the screen and entering the text in the Notes field on the Properties tab. Show Labels Select this checkbox to display the labels on the network screen corresponding to the logger names, pipe lengths, pipe joins, and other network details. Correlate Select this checkbox to view a correlation analysis of two selected loggers on the display. 68 ADS Enigma/Enigma-Compact/Enigma-hyQ User Manual Correlation Tab Clicking on the Correlation tab displays the correlations. If the correlations do not display, click on the Refresh button to refresh the display. Doubleclicking a correlation displays the full analysis on the left side of the screen. Displaying correlations at right Map Tab Clicking on this tab using a computer connected to the Internet launches Google Maps™ for the map background. Map tab Position the map on the screen as required. 69 ADS Enigma/Enigma-Compact/Enigma-hyQ User Manual Search Use the features in this section to locate the correct map upon which to overlay the network. Address/Postcode Enter the address for the Google search. Country Enter the country in which to search. Map Type Select the type of map required for the overlay from the drop-down menu. Search Click on this button to initiate the search for the map based on the selections and information provided. Map This section displays limited map information. Coordinates The values in this field represent the coordinates at the center of the map displayed. Map Elements Select this checkbox to list the elements on the map and locations of those elements. Viewing elements on the map To add an element onto the map, select the Map Elements checkbox and select the Show checkbox corresponding to the desired element on the table. The software will add the element to the coordinates at the center of the screen. Drag the element to the desired location. To remove an element from the map, set the coordinates to (0,0). All 70 ADS Enigma/Enigma-Compact/Enigma-hyQ User Manual noise sources also will display on the map. If an element exists off the screen, click on the Locate button corresponding to the element to orient the display so that the element serves as the central item on the display. Any leak markers identified through correlation analysis will also display on the map. The estimated locations for these are determined based on the pipe details entered. Home Location Use this option to set (Set) a home location and to reorient the map to (Go To) that position when necessary. 71 ADS Enigma/Enigma-Compact/Enigma-hyQ User Manual Print Button Clicking on the Print button displays the print window. Print report window 72 ADS Enigma/Enigma-Compact/Enigma-hyQ User Manual The print window shows the currently selected data with some buttons at the top. Display/hide the dB values (Critical Noise Values) on the report by selecting/deselecting the Critical Noise Values checkbox. Print Screen - Buttons The print buttons and checkbox provide the following functions: Icon Function Save Page Setup Print Print Preview Copy Export to Word Shows/hides the Critical Noise Values (dB) on the report Help Button This button opens an electronic version of this manual. Website Button This button launches the Water Loss Control Products page on the ADS website, provided an internet connection is available. 73 ADS Enigma/Enigma-Compact/Enigma-hyQ User Manual 74 ADS Enigma/Enigma-Compact/Enigma-hyQ User Manual CHAPTER 5 Velocity Measurement Using three loggers to calculate the velocity of sound in the network ensures more accurate leak position detection. However, before measuring velocity, make sure the correct pipe information has been entered. 1. Select Tools > Velocity Measurement to launch the Velocity Measurement Wizard. Velocity Measurement Wizard (Select Loggers window) 2. Select the loggers to use to calculate velocity from the Logger Locations drop-down lists A, B, and C. The example above uses loggers 0A1, 0A2 and 0A4. 3. Click on the Next button. 75 ADS Enigma/Enigma-Compact/Enigma-hyQ User Manual Confirm pipe lengths window 4. Verify that the distances are correct. If no distances have been entered, you will receive a warning and be required to exit the wizard. (Enter pipe details between the appropriate loggers using the pipe data entry screen.) 5. Click Next to continue. 76 ADS Enigma/Enigma-Compact/Enigma-hyQ User Manual Mark Noise Source window 6. Move the cursors to the peak values by clicking on the Go To Peak buttons or by clicking and dragging the individual cursors. 7. Click Next. 77 ADS Enigma/Enigma-Compact/Enigma-hyQ User Manual Measured Velocity Results window If the selected peak values are valid, the calculated velocity and a revised (improved) leak position will display. Use the velocity value in the Analysis screen by clicking on the question displayed and entering the logger numbers. 78 ADS Enigma/Enigma-Compact/Enigma-hyQ User Manual CHAPTER 6 Battery Replacement The communications case is powered by a disposable battery pack with a typical battery life of approximately 5 years. The PC software provides a low battery voltage indicator available during communication with the case or loggers for checking the status. When necessary, users may replace the battery pack in the Enigma communications case. New battery packs are available through ADS. Note: To maintain the IP68 integrity of the loggers, the user may not replace the batteries in the individual loggers. Logger battery replacement must be performed by ADS. Please contact ADS for more information. Replacing the battery pack in the communications case involves a very simple procedure performed in the following way: 1. Lift up and remove the foam panel to expose the battery pack. Battery pack seated in the Enigma communications case 2. Disconnect the battery connector and lift up the battery (secured with Velcro) from the communications case. 3. Insert the new battery unit (secure with Velcro) and connect the battery connector (the connector will only fit one way). 4. Replace the foam panel. 5. Dispose of the old battery according to local battery disposal regulations. 79 ADS Enigma/Enigma-Compact/Enigma-hyQ User Manual 80 ADS Enigma/Enigma-Compact/Enigma-hyQ User Manual CHAPTER 7 Principles of Leak Noise Correlation Note: ADS strongly recommends that all users read this section, even those with prior experience in correlation techniques. Leak Noise The loss of water through a leak in a pipe creates a source of noise. This noise, which travels from the leak in both directions (upstream and downstream), is used to determine the location (or source) of the leak. Leak Location Leak noise correlation occurs by comparing the noise detected at two different points in the pipeline. Noise travels from the leak in both directions along the pipe at a constant velocity (depending on a variety of factors). Therefore, if the leak exists at a location that is equidistant between two loggers, these loggers will detect the noise at the same time. Conversely, if the leak exists a location that is not equidistant between the loggers, the loggers will detect the same noise, but at different times. The correlation software can measure this difference in time. For example, based on the following diagram, consider that loggers are located on valves A and B (convenient access points for underground pipes) and that the location of the leak is closer to A. By the time a particular noise from the leak has reached A, the same noise heading towards B has only travelled as far as X. The distance from X to B causes a delay in time (t). The correlation software detects the delay t 81 ADS Enigma/Enigma-Compact/Enigma-hyQ User Manual between the arrival of the noise at A and at B. Assume the velocity of sound is V, and the distance between the loggers is D. If the distance from X to B = V * t, then D = (2 * L) + (V * t). Rearranging this equation provides the distance from the logger that is closer to the leak location (L): L= D − (V * t ) 2 Based on the velocity of the sound (calculated from the pipe diameter and material) and the distance between the loggers, the correlation software can calculate and display the location of the leak as the direct distance from the logger located closer to the leak. Positioning Errors This detection system operates effectively only when the leak exists at a location between the two loggers. Several scenarios can hinder effective operation. Leak Beyond Loggers If the leak is located outside the span of pipe between the loggers, the correlation software will ignore the transit time from the leak to the nearest logger, giving the impression that the leak exists at the exact location of the logger closest to the leak (referred to as out-of-bracket). Under this condition, the user must move one of the loggers to locate the leak position. Leak on Connecting Pipe If a leak exists in a pipe connecting to the pipe undergoing testing, the noise will appear to spread from the connection point of the two pipes, falsely indicating a leak at that point. This requires moving one logger to the connecting pipe (to ensure the leak falls between the loggers) to accurately locate the leak. The user must have a thorough knowledge of the entire pipe network layout to ensure that the loggers are taking measurements on the correct section of pipe and to eliminate the possibility of leaks on branch pipes producing false readings. 82 ADS Enigma/Enigma-Compact/Enigma-hyQ User Manual Noise Sources Close to Loggers Loggers located directly over or very close to a leak may not be able to accurately locate the source of the leak noise. When this occurs, move the affected logger further away from the source of noise. Problems with Trunk Mains and Plastic Pipes It may be difficult to obtain satisfactory correlation when examining trunk mains or long lengths of plastic pipe. The nature of such pipes causes predominately low frequency leak noise, as high frequencies attenuate rapidly. 83 ADS Enigma/Enigma-Compact/Enigma-hyQ User Manual 84 ADS Enigma/Enigma-Compact/Enigma-hyQ User Manual Appendices The following appendices provide information about the maximum allowable distances between loggers in pipes, sharing Enigma data, and transporting Enigma systems by air. 85 ADS Enigma/Enigma-Compact/Enigma-hyQ User Manual Appendix A: Maximum Deployment Distances The maximum permissible distance between deployed loggers varies according to the pipe material. Refer to the following table to determine the maximum distances. Do not exceed these distances. Pipe Material Maximum range Asbestos Cement 4593 feet (1400 m) Cast Iron 5906 feet (1800 m) Concrete 5577 feet (1700 m) Copper 5906 feet (1800 m) Ductile Iron 5906 feet (1800 m) Ductile Iron (concrete-lined) 5906 feet (1800 m) Galvanised Iron 5906 feet (1800 m) HDPE (high-density poly) 1640 feet (500 m) Lead 3281 feet (1000 m) MDPE (mid-density poly) 1640 feet (500 m) PVC 1640 feet (500 m) Steel 5906 feet (1800 m) Note: Please note that these are only maximum distances. The actual distance the leak noise travels varies based on the pressure, pipe diameter, wall thickness, and amount/frequency of noise generated by the leak. Therefore, ADS provides no guarantee that the leak noise will actually travel the maximum distance referenced in the table above. 86 ADS Enigma/Enigma-Compact/Enigma-hyQ User Manual Appendix B: Sharing Enigma Data Enigma deployment and correlation analysis data may be shared among other user PCs, if required. Share the data by copying the data folders from one PC to another using a typical Windows file manager and any suitable transfer media (e.g., memory sticks). 87 ADS Enigma/Enigma-Compact/Enigma-hyQ User Manual Appendix C: Important Notice – Air Transporting the Enigma IATA Hazardous Goods Regulation This product is powered by a battery containing either lithium C-cells or Dcells. Air-freighting of products containing these lithium cells is governed by IATA (International Air Transport Association) regulation UN/ID number 3091 entitled ‘Lithium batteries contained in equipment.’ This regulation clearly states that this equipment is classified as Hazardous Goods, Class 9. It can be transported by air only if it is packed specifically as instructed in UN/ID number 3091; this defines the necessary packing requirements specified in Packing Instruction 912 and labeling requirements specified in Miscellaneous. Enigma transported from ADS via air-transport All new or newly repaired/recalibrated Enigma equipment leaving ADS and transported by air are packed according to UN/ID number 3091. If the product(s) is to be transported to a second destination, it must be declared as hazardous to the freighting agent and include the information contained in the section entitled ‘IATA Hazardous Goods Regulation’ above. Enigma to be transported to ADS via air-transport To transport this product by air, all batteries and SIM cards (if applicable) must first be removed. The Enigma then can be transported without being declared hazardous. Dispose of removed batteries in accordance with local waste regulations. ADS will equip the product with new batteries. Keep the SIM card (if applicable) for re-installation. To airfreight these products or to obtain further information about airfreighting regulations, please contact ADS: ADS Customer Support (877) 237-9585 [email protected] 88 ADS Enigma/Enigma-Compact User Manual Index A ADS Website, 73 Advanced Filter Options, 53, 54 Center Correlation Suppression, 54 Display Blue Spectrum, 55 Display Coherence, 55 Equalize Auto Filter, 54 Refine Auto Filter, 54 Air Transportation Notice, 88 Analysis, 43 Correlation Function Tools, 47 Toolbar, 44 Analysis Button, 43 Analysis Toolbar, 44 Epochs, 46 Noise Suppression, 45 Auto Filter, 52 Auto Velocity at Out of Bracket, 58 B Battery Power, 10 Battery Replacement, 79 Buttons, 27 ADS Website, 73 Analysis, 43 Epochs, 61 Folders, 27 Help, 73 Network, 65 Print, 72 Program, 31 Programming, 13 Readback, 13, 37 Refresh, 30 Results, 38 Search, 27 Sound, 63 Toolbar, 27 Up, 30 C Case. See Communications Case Center Correlation Suppression, 54 Width of Suppression, 55 Close, 19 Communications Case, 11 Programming, 12, 23 Programming Loggers, 13 Readback, 12, 24 Readback Loggers, 14 Communications Menu, 23 Case Programming, 23 Case Readback, 24 Logger Programming, 23 Logger Readback, 24 Compact System, 2, 11, 26 Components, 2 Correlation, 43, 68, 69 Principles, 81 Tools, 47 Zoom, 46 Correlation Function Tools, 47 Filters, 51 Find Peak, 48 Leaks, 60 Pipework, 48 Zoom Out, 48 Critical Noise Value, 46, 65 D Data Sharing with Other PCs, 87 Define Data Source, 33 Delayed Logging, 32 Deployment Distances (Maximum), 86 Directory Settings, 20 Directory Labels, 20 Display Coherence, 55 E Engima Folder, 17 Open, 19 Epoch Times, 31 Epochs, 46, 62 Chart Height, 62 Chart Rotation, 62 Combined Correlation, 62 Epoch Spacing, 62 Individual Epochs, 62 Time Delay, 62 89 ADS Enigma/Enigma-Compact/Enigma-hyQ User Manual Epochs Button, 61 Exit, 20 F Features, 1 File Menu, 17 Close, 19 Exit, 20 New, 17 Open, 19 Print, 19 Print Preview, 19 Save, 19 Save As, 19 Filters, 51 Advanced Options, 53, 54 Narrow Band Filtering, 55 Peak Enhancer, 53 Spectral Equalizer, 53 Find Peak, 48 Folders Button, 27 H Hardware Overview, 9 Hardware Requirements (Minimum), 7 Help Button, 73 Help Menu, 26 Hydrophone, 1, 10, 11, 13 I Info Displays, 65 Installing Software, 8 L Leak Beyond Loggers, 82 Markers, 60 On Connecting Pipe, 82 Positioning Errors, 82 Leak Markers, 60 Leak Noise Correlation, 81 Location, 81 Noise, 81 Positioning Errors, 82 LEDs, 13 Lithium Batteries, 88 Loggers, 10 Programming, 12, 23 Programming with Communications Case, 13 Readback, 12, 24 Readback with Communications Case, 14 90 M Main Menu, 17 Communications Menu, 23 File Menu, 17 Help Menu, 26 Tools Menu, 25 View Menu, 20 Main Screen, 16 Manual, 73 Map File, 22 Change, 22 Maps, 69 Maximum Deployment Distances, 86 Maximum Time Delay, 26 N Narrow Band Filtering, 55, 56 Network Button, 65 Network Configuration File, 22 Network Settings, 21 Map File, 22 Network Configuration File, 22 Network Window Correlation Tab, 69 Map Tab, 69 Network Window Tools, 66 Background, 68 Correlate, 68 Delete, 67 Noise, 67 Pipe, 66 Pipe Join, 67 Properties, 67 Select, 66 Show Labels, 68 Show Notes, 68 Snap to Grid, 67 Text, 67 Zoom In, 67 Zoom Out, 67 New, 17 Noise Sources Close to Loggers, 83 Noise Suppression, 45 O Open, 19 Out of Bracket, 58 Overview Hardware, 9 System, 1 ADS Enigma/Enigma-Compact User Manual P Peak Enhancer, 53 Pipe Data Entry, 25 Manual, 25 Network Schematic, 25 Pipework, 48 Positioning Errors, 82 Leak Beyond Loggers, 82 Leak on Connecting Pipe, 82 Noise Sources Close to Loggers, 83 Power, 10 Principles of Leak Noise Correlation, 81 Print, 19 Print Button, 72 Print Preview, 19 Print Screen Buttons, 73 Problems with Trunk Mains and Plastic Pipes, 83 Program Button, 31 Programming, 31 Communications Case, 12, 13, 23, 34 Controls, 13 Epoch Times, 31 Loggers, 12, 13, 23, 34 Results, 36 Status, 14 R Readback Communications Case, 12, 14, 24 Controls, 13 Logger, 24 Loggers, 12, 14 Status, 14 Readback Button, 37 Refresh Button, 30 Results Button, 38 Returns, 6 S Save, 19 Save As, 19 Search Button, 27 Search Criteria, 28 Sharing Data, 87 Software, 15 Description, 15 Installation, 8 Main Menu, 17 Main Screen, 16 Minimum Requirements, 7 Toolbar Buttons, 27 Sound Control Buttons, 64 Critical Noise Value, 65 Info Displays, 65 Logger Number, 65 Sound Graph, 65 Velocity, 75 Volume Control, 64 Sound Button, 63 Sound Control Buttons, 64 Backward, 64 Faster Playback Speed, 64 Forward, 64 Pause, 64 Play, 64 Slower Playback Speed, 64 Stop, 64 Sound Graph, 65 Spectral Equalizer, 53 Status Programming, 14 Readback, 14 System Overview, 1 T Technical Support, 4 Timed Logging, 32 Toolbar Buttons, 27 ADS Website, 73 Analysis, 43 Epochs, 61 Folders, 27 Help, 73 Network, 65 Print, 72 Program, 31 Readback, 37 Refresh, 30 Results, 38 Search, 27 Sound, 63 Up, 30 Tools Correlation Function, 47 Network Window, 66 Tools Menu, 25 Maximum Time Delay, 26 Pipe Data Entry, 25 Velocity Measurement, 25 Trunk Mains and Plastic Pipes, 83 U Up Button, 30 91 ADS Enigma/Enigma-Compact/Enigma-hyQ User Manual V Velocity Measurement, 25, 75 Velocity of Sound, 75 View Menu, 20 Directory Settings, 20 Network Settings, 21 Volume Control, 64 92 W Warranty, 5 Website Button, 73 Z Zoom, 46, 67 Zoom Out, 48