1
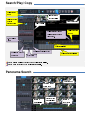
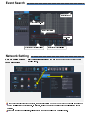
Easy Manual
Start
Log-in
Select the user, enter the password, and then click OK.
A log-in screen is not displayed when automatic log-in function is
selected.
Initial password for ADMIN is 1234.
Main Screen Toolbox & Control
Current Date & Time
Backup Device
Connection Status
Network Connection Status
Screen Switch
Activity Status
Main status and control of the recorder are composed as shown in figure below.
HDD Connection Status
Easy Copy
Screen Magnifier(zoom)
Split Screen/
Sequential switching
Log-off
Audio Output Channel
Recorder Main
Menu Setting
Search/Play/Copy
PTZ Camera Control
Emergency Recording
Main Activity Record (log)
Leave Toolbox
Basic Screen
Screen Control
Left Click:
When selecting a camera screen/channel
Right Click: DVR quick menu is activated.
Double Click: Maximizes the selected camera
screen/channel full screen
Search/Play/ Copy
1 Select Search
Mode
Playback screen
and time display
2 select the date
that has
Search screen exit
recorded data
Play Control
3 select the data
1 Select Start/End Time at
by hour
Calendar search on Time
Line to copy.
2. Copy folder
name
4 Minutes selection
4 Select the channel to Copy
3 Select the port of
USB to copy
5 Playback seconds selection
5 Copy Start
Perform Search & Play according to the explanation in yellow.
Perform Copy according to the explanation in purple.
Panorama Search
Panorama End
Panorama Search
Screen Time
Panorama
Channel Select
Panorama Time
Interval Select
Panorama
Page Change
Event Search
Event Search End
Event Screen Pre-View
Search Time Setting
Re-search
Event Search Condition Select
Event Search Channel Select
Network Setting
Network Setting through
Automatic Setting
Select Automatic IP address item as ON in the same order as shown with the arrow
of below figure.
When the recorder is connected to a router, the automatic setting mode may or may not work properly depending on
the compatibility with the router in use. In this case, setting the network connection with manual settings might be
required.
In the case of using manual settings, please refer to the user manual and the manual of router.
Recorder
IP Address
Check
Easy Trouble Diagnosis
DVR Trouble Instructions
[In the case the power of DVR is not turning on]
1. Check whether or not a power switch of DVR is set up as ‘ON’.
2. Check the connection status between DVR and DC 12V adapter for main body.
3. When there is no problem in the connection status, check whether the LED of DC 12V adapter for main body
turns green or not.
4. When the LED of DC 12V adapter for main body does not turn green, please inquire to the service center.
5. When the LED of DC 12V adapter for main body turns green, remove all devices connected to DVR and check
after only connecting DC 12V adapter for main body.
6. When the power of DVR still is not turned on after above inspection, please inquire to ‘Service Center’.
[In the case no screen is displayed after the power of DVR is turned on]
1. Check the connection status between DVR and monitor.
2. Check the abnormality of connection cable.
3. Check the resolution supported by the monitor connected to DVR.
VGA Cable Connection: 1024x768 / 1280x1024
Digital Cable Connection: 720p / 1080p
4. Initial factory forwarding resolution of DVR is set up as 1024x768.
5. In case of using a monitor that does not support 1024x768, connect the monitor that supports 1024x768 first
and then change the output resolution of DVR.
Please refer to the user manual on how to change the output resolution.
6. When the screen is still not displayed after above inspection, please inquire to ‘Service Center’.
[In the case the power of DVR is turned on but it is turned on and off repetitively]
1. Check the connection between DVR and DC 12V adapter for main body.
Check whether or not the connection between DC 12V adapter and DVR is loose or connection of AC code for
DC 12V adapter is loose.
2. In case there is no problem with the adapter connection, remove all devices connected to DVR and check the
status after only connecting DC 12V adapter to main body.
3. When similar symptoms still appear after above inspection, please inquire to ‘Service Center ’.
[In the case the screen is displayed with VGA cable connection but not with digital cable connection]
1. Check the abnormality of connection cable.
2. Check the output resolution of DVR.
The use of 720p / 1080p resolution is recommended in case of digital cable connection.
3. After digital cable connection, check to see if the power of DVR is ‘ON’.
4. When the screen is still not displayed after above inspection, please inquire to ‘Service Center’.
[In the case the camera image is not displayed]
1.
2.
3.
4.
Check the connection status between the camera and DVR.
Check the power connection status of camera.
If there is a camera with normal image display, check the status after changing the connection channel of DVR.
When the camera image is still not displayed after above inspection, please inquire to ‘Service Center ’.
[In the case the mouse does not function]
1. Check the connection status between the mouse and DVR.
2. Check after connecting it to a USB port excluding the USB port to which the mouse is currently connected.
3. Please inquire to ‘Service Center’ when the mouse functions after connecting to different USB port.
[In the case the displayed time is not the current time when turning ON/OFF the DVR]
1. Please inquire to ‘Service Center’ as the life cycle of battery within DVR has expired.
[In the case of no audio output]
1. The audio function needs to be set up by entering the setting menu of the camera.
2. When the audio output still cannot be conducted after above inspection, please inquire to ‘Service Center ’.
[In the case of no recording]
1. Check whether or not a hard disk is normally displayed in System – Admin - Information menu of the DVR.
2. When the hard disk is not normally displayed in Information menu, please inquire to ‘Service Center ’.
[In the case of no motion detection]
1. The motion setting needs to be completed after entering the motion setting menu.
2. Check the domain and sensitivity setting of the motion setting menu.
The motion sensitivity lowers with the decrease in number. Ex) Sensitivity 1: Insensitive / Sensitivity 10: Sensitive
3. When you have a difficulty with the setting menu of camera, please inquire to ‘Service Center ’.
4. When the motion setting is normal, the recording condition shall be set up as the motion recording in Record –
Schedule menu of DVR.
Initial factory forwarding is set up to conduct continuous recording.
5. Please refer to ‘User Manual’ for detailed setting of recording conditions.
[In the case of backup failure]
1. Check the status of the memory stick.
2. Check the current memory stick on a PC.
The system of DVR is composed of the base different from PC thus it may function differently than PC.
3. Check by using other memory sticks.
4. Check Start Time/ End Time of copy.
5. Check the location of USB port connected with a memory stick.
6. Please refer to ‘User Manual’ for detailed usage of Copy menu.
7. When there is no problem in copy procedure but no copy is performed, please inquire to ‘Service Center ’.
[In the case of malfunction in cooling fan]
1. Please inquire to ‘Service Center’ after turning the power of the DVR OFF.
[In the case of firmware upgrade failure]
1. Check the status of a memory stick.
2. Check the location of firmware upgrade file..
All firmware’s should be located in A ‘dvr ’ folder in the memory stick.
3. Please refer to ‘User Manual’ for detailed usage of firmware upgrade menu.
4. In the case of firmware upgrade failure, please inquire to ‘Service Center ’.