1
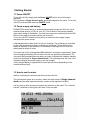
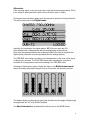
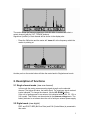
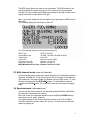
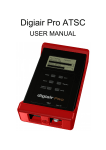
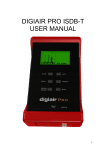
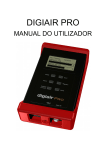
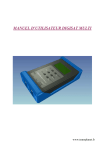
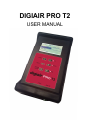
DIGIAIR PRO T2
USER MANUAL
DIGIAIR PRO T2 – Description................................................................................2
1 GETTING STARTED…………………………………………………………………....3
1.1 POWER ON/OFF.................................................................................................3
1.2 POWER SUPPLY AND BATTERY......................................................................3
1.3 HOW TO USE THE METER................................................................................3
ATTENUATOR……………………………………………………………….4
2 DESCRIPTION OF THE FUNCTIONS...................................................................5
2.1 SINGLE CHANNEL MODE...................................................................................5
2.2 DIGITAL-MODE…………………………………………………………………………6
2.3 MULTI CHANNEL MODE......................................................................................6
2.4 SPECTRUM MODE...............................................................................................6
3 MENU……………………………………………………………………………………….7
3.1 BEEPER…………..................................................................................................7
3.2 ANTENNA VOLTAGE............................................................................................7
3.3 SETUP…………….................................................................................................7
1. LCD......................................................................................................7
2. BEEPER VOLUME…………………………………………………………7
3.CHANNEL LIST….…….........................................................................7
4.CHANNEL GROUPS.………………………………………………………8
5. AUTO POWER OFF.............................................................................8
6. SPEC MODE………………………………………………………………..8
7. LANGUAGE…………………………………………………………………8
8. DB-UNITS………………………………………………...…………………8
3.4 ATTENUATOR……………………..........................................................................8
TECHNICAL SPECIFICATION ...................................................................................9
DIGIAIR PRO T2 - DESCRIPTION
Emitor´s DIGIAIR ProT2 is developed in Sweden for exact alignment and adjustment
of terrestrial antennas for DVB-T and DVB-T2.
This is made for both analog (dBuV) and digital DVB-T/T2– COFDM.
DIGIAIR Pro T2 is microprocessor controlled, making it very reliable and accurate.
Signalstrength is presented on the LCD-display. In analog mode it shows a single
channel or six channels at the same time. You can also choose to view the signal in
spectrum mode.
In digital mode it displays the BER (bit error rate) and C/N (Carrier/Noise). Readout of
UCB (uncorrected bits) and CB (corrected blocks) is also easy to do.
Furthermore DIGIAIR Pro present pitchtones (the higher tone the stronger signal) on
a loudspeaker.
DIGIAIR Pro T2 is very sensitive and can detect even the weakest signals.
DIGIAIR Pro T2 can feed Voltage (0/5/12/24 Volt) to external active antennas this
feature is short-circuit protected by an automatic fuse.
DIGIAIR Pro T2 is charged via an external DC power-source of 10 -15 volt.
The DIGIAIR PRO T2 operates with 8xAA rechargeable batteries. The unit will works
for at least 2 hours with fully charged batteries.
2
1 Getting Started
1.1 Power ON/OFF
To turn the unit ON, simply push the Power ON/OFF button (the unit is battery
operated).
The unit starts in Single channel mode, showing the signal on the meter. To turn the
unit OFF, push and hold down the ON/OFF button.
1.2 Power supply and battery
DIGIAIR PRO can be fed by an external power-supply through the VDC port, by an
external power-source (10-18v dc, max 1A). This is useful in case that the battery
goes empty during an installation. Connect the power-source and hold down the ON
button for a couple of seconds (until the unit turns On).
To turn the unit OFF when the unit is fed by an external power-supply, simply
disconnect the power-source.
A discharged battery takes about 14 hours to recharge. The recharging is controlled
by the units microprocessor and is indicated on the display. Please notice that to
obtain full capacity of new batteries it is necessary to recharge and run down the
battery-pack a couple of times.
The meter has 8 x AA rechargeable NiMe batteries in the battery-compartment. Apart
from recharging the battery the unit does not need any particular maintenance. The
unit should be recharged when the battery is empty (indicated with a battery-indicator
symbol on the display in Single channel mode). It is preferably done with one of the
enclosed chargers (the power-supply or the car-charger).
A fully charged battery is operational for more than two hours (depending on the
external antenna load).
1.3 How to use the meter
Start by connecting the antenna and then turn the meter On.
The userinterface works as a “revolver” where the meter starts in Single channelmode (and the latest channel selected), readout of the signallevel in dBuV.
It is very easy to point an antenna towards a transmitter in this mode. The “maxhold
function” (small bar in the big bar) will make it very accurate.
3
Attenuator
If the incoming signal is very strong (the bar in the thermometerscale reaches 100%)
it can easily be attenuated with a push on the OK button (about -20dB).
Press down the mode button again when the antenna is pointed in the right direction.
This will put the meter in the Digital-mode.
Hopefully, but not always, the digital readout; BER (bit error rate) and C/N
(Carrier/Noise) will correspond well with the analog setting of the antenna.
Quite often the antenna needs to be re-directed a little bit in order to maximize the
digital-values (which are of more importance then the analog readout).
The PRE-BER value (before correction in the demodulator) is the most useful signal
for aligning the antenna. The POST-BER value (after demodulator corrections)
increases in correspondence with the increasing of the PRE-BER value.
Pressing the Mode button again will take the meter to the Multichannel-mode
where the analog (dB) signal strength of up to 30 channels can be easily readout.
The display shows six channels on each page and there are five pages. Step through
the pages with the “UP” and “DOWN” buttons.
The Spectrum-mode is accessed with another push on the MODE button
4
The meter shows the frequency spectrum of 48-860 MHz. A marker can select a
certain channel (with the “UP”, “DOWN” buttons).
Signallevel (in dBuV) of that channel will be shown in the display also.
-
Press the OK-button and the meter will “zoom in” at the frequency which the
marker is pointing at.
Another push on the mode button will take the meter back to Singlechannel-mode
2. Description of functions
2.1 Single channel-mode (view one channel)
In this mode the meter measure analog signal strength on the selected
channel. The higher dB value, the better signal. The maximum signal received
is also indicated. To change the channel, use the UP /DOWN buttons.
If the unit is feeding power to an antenna it is indicated with the 0V, 5V, 12V or
24V symbol. This function can be selected in the Antenna voltagemenu. The
battery indicator is not shown when the unit is fed by an external power-supply
2.2 Digital-mode (view digital)
PRE- and POST- BER (Bit Error Rate) and C/N (Carrier/Noise) is presented in
this mode.
5
The BER should be as low (less errors) as possible. The SNR should be as
high as possible (the signal coming out of the noise as much as possible).
In order not to be confusing both digital bars should be as high as they can be.
Signal-level shall increase from left to right.
More, very useful, digital info can be readout when pushing the “OK” button in
this mode.
The following display will be shown on the LCD
CH = The selected channel (measured at) and frequency.
DVB-T type:
Demodulation type
Transmission:
Guard ratio:
Hi-priority code rate:
Low-priority code rate
MER (Modulation Error Rate)
DVB-T or DVB-T2
16 QAM , 64 QAM, 256 QAM or QPSK
1K to 32K
Between 1/4,and 19/256
Between: 1/2 and 7/8
Between 1/2 and 7/8
Between 10 dB and >31dB
2.3 Multi channel-mode (view six channels)
In this mode the meter measure the signal strength of six individually selected
channels. DIGIAIR Pro T2 can be set up with five such pages of six channels
(5x6 channels). The page number is indicated in the top-right corner. To scroll
through the pages use the UP/DOWN buttons. To show/hide the channel
numbers use the OK button. The max-peak values are reset when changing
page.
2.4 Spectrum-mode (view spectrum)
In this mode the meter shows all the channels between 45 MHz to 860 MHz.
One pixel-line represents one channel.
Move the cursor (the animated dotted line) with the UP and DOWN buttons
and place it over a “peak” (channel).
The signal-strength of the chosen channel is shown in the LCD (in dBuV).
Press the OK-button and the meter will “zoom in” at the frequency which the
marker is pointing at.
6
3. Menu
The following menu is shown on the display when pressing down the MENU button:
This is the main menu. Use the “UP”/”DOWN” buttons to scroll up and down in the
menu system. Use the “OK” button to enable the selected function.
3.1 Beeper
Choose Beeper On/Off in the main menu to turn the beeper (pitch tone) On or
Off. It is only audible in Single channel mode. The idea is to help finding the
strongest signal on the selected channel by listening to the highest pitch of the
tone.
3.2 Antenna voltage
Choose Antenna voltage in the main menu and select 0V,5V,12V or 24V to
be fed to the ANTENNA port. The power to the antenna port is changed
immediately when the “OK” button is pushed even if you are in the main menu
mode.
CAUTION! Do not connect the antenna to the antenna port before the correct
voltage is chosen. If the antenna should be fed with 5 Volt and You
accidentally choose 12 Volt instead, it may damage the antenna. The chosen
Voltage output to the antenna port is indicated on the LCD in Single channel
mode.
The unit will turn off the antenna-voltage output if a short-circuit occur.
3.3 Setup
1. LCD
- Contrast
Set the contrast of the LCD-display. Lighter or Darker
- Backlite
Set the backlite of the LCD-display On or Off.
2. Beeper volume
Set the volume of the Beeper with a value from 1 (low) to 5 (high).
3. Channel list
Chose the region/channelplan where the meter will be used.
7
4. Channel groups
In this mode You can select the channels to be stored in DIGIAIR
Pro´s memory. The stored channels are presented in Multi
channel mode.
Set up the five pages with the channels of Your choice. Do like this:
A) The top value in the first bar (most to the left) is flashing when
entering this setup. Step with the “UP”/”DOWN”-buttons to the
channel You want to change.
Press the “MODE”-button to open up the memory position.
- The channel nr will start to flash faster.
- Set the new channel with the “UP”/”DOWN”-buttons.
- Press the “MODE” button and the new channel is locked at this
position (memory saved).
- The channel nr will flash in normal pace.
B) - Chose the next channel to change by highlighting it with the
“UP”/”DOWN” buttons.
- Press the “MODE”-button to open up the memory position.
- The channel nr will start to flash faster.
- Set the new channel with the “UP”/”DOWN”-buttons.
- Press the “MODE” button and the new channel is locked at this
position (memory saved).
- The channel nr will flash in normal pace.
C) - Repeat step B until all wanted channels have been
memorized.
- Press the “OK” button and the complete setting will be stored.
5. Auto power off
Set the meter for automatic switch Off after 1, 5, 10 or 30 minutes.
Or chose to have the meter always On (until manual switch Off).
6. Spec mode
Chose between stepping in the Channel raster (CH) or in the
Frequency raster (MHz).
7. Language
Select the Menu-language of Your choice. Chose between: English,
Portugese, German, Spanish, Polish and Italiano.
8. dB Units
Select the dB-unit of Your choice. Chose between dBuV, dBm and
dBmV.
3.4 Attenuator
Turn On the attenuator with the Ok-button.
8
Technical specification:
Input frequency:
Input level:
Attenuator:
Input impedance:
Short circuit protection:
48-860 MHz.
30-80 dBuV.
On/Off (approx -20 dB).
75 Ohm, F-connector.
Automatic fuse on antennainput.
DVB-T type:
Measuring method:
in digital:
DVB-T or DVB-T2
in analog:
One bar showing dBuV in
high resolution or six bars
showing strength of six
channels.
Spectrum display with
zoom-in function.
Pitch tone indication from
beeper.
Signal-level readout:
Digital:
Analog:
Power out:
Power supply/charger:
Display:
Power consumption:
Battery:
Weight:
Dimensions:
Accessories:
Three bars showing:
- PRE-BER (Bit Error Rate
before demod. correction).
- POST-BER (Bit Error Rate
after demod. correction).
- C/N (Carrier/Noise).
- MER (Modulation Error
Rate).
BER, C/N and MER values.
dBuV with maxhold-function.
0V, 5V,12V and 24V.
10 -15V DC (Centerpin+).
Back-lighted 128x64 Pixels
LCD.
500mA.
8x AA rechargeable batteries
of 1200mA each.
0.3 kg.
185 x 115 x 50 mm.
Power 12V DC, 1A
Rubber-case.
Car charger.
9