1
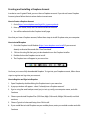
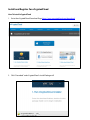
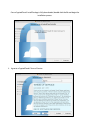
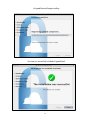
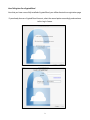
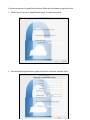
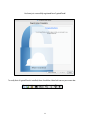
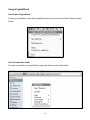
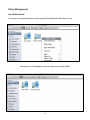
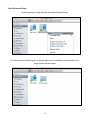
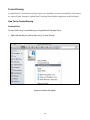
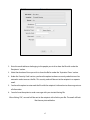
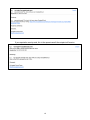
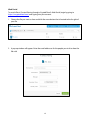
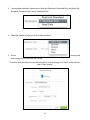
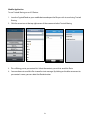
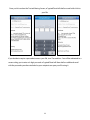
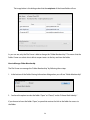
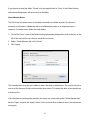
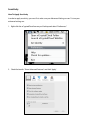
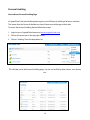
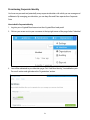
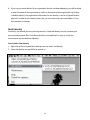
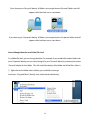
Mac OSX User Manual 1 Creating and Installing a Dropbox Account ...................................................................................... 3 How to Create a Dropbox Account .................................................................................................................................................. 3 How to Install Dropbox ....................................................................................................................................................................... 3 How to Register and Sign into Dropbox ........................................................................................................................................ 3 Install and Register for nCryptedCloud ....................................................................................... 5 How To Install nCryptedCloud .......................................................................................................................................................... 5 How To Register For nCryptedCloud .............................................................................................................................................. 9 Using nCrypted Cloud .................................................................................................................... 12 How To Open nCryptedCloud .......................................................................................................................................................... 12 How To Create A New Folder .......................................................................................................................................................... 12 Policy Management ...................................................................................................................... 14 How To Make Private ......................................................................................................................................................................... 14 How To Remove Privacy ................................................................................................................................................................... 15 Trusted Sharing ............................................................................................................................. 16 How To Use Trusted Sharing ........................................................................................................................................................... 16 Desktop Client ........................................................................................................................................................................................ 16 Web Portal .............................................................................................................................................................................................. 19 Mobile Application .............................................................................................................................................................................. 21 Collaboration ................................................................................................................................ 23 How to Share Securely ....................................................................................................................................................................... 23 How to View “Shared With” ............................................................................................................................................................. 25 How to Manage Folder Membership ............................................................................................................................................ 26 How to Revoke Access ........................................................................................................................................................................ 27 Sensitivity ..................................................................................................................................... 28 How To Apply Sensitivity ................................................................................................................................................................ 28 Personal Auditing .......................................................................................................................... 30 How to Access Personal Auditing Page ....................................................................................................................................... 30 Provisioning Corporate Identity ..................................................................................................... 31 How to Add a Corporate Identity .................................................................................................................................................. 31 Multi-‐Identity ................................................................................................................................ 33 How to Select Your Identity ............................................................................................................................................................. 33 How to Change Identities on a Folder/File Level .................................................................................................................... 34 Icon Glossary ............................................................................................................................... 35 2 Creating and Installing a Dropbox Account In order to use nCrypted Cloud, you must have a Dropbox account. If you do not have a Dropbox Account, please follow the instructions below to create one. How to Create a Dropbox Account 1. Go to (https://www.dropbox.com/login?lhs_type=anywhere) 2. Enter your Name, Email, and Password to create an account 3. You will be redirected to the Dropbox Install page Now that you have a Dropbox account, follow these steps to install Dropbox onto your computer. How to Install Dropbox 1. Go to the Dropbox Install Website (https://www.dropbox.com/install) if you were not already re-directed there and click “Free Download” 2. Click on the .dmg file that you just downloaded to run the Dropbox Installer 3. Double-click on the Dropbox icon to install 4. The Dropbox icon will appear in your menu bar You have just successfully downloaded Dropbox. To sign into your Dropbox account, follow these steps to register and sign into your account. How to Register and Sign into Dropbox 1. Open Dropbox by double clicking the Dropbox icon in your menu bar 2. A pop up window will appear-- select “I already have a Dropbox account” 3. Sign in using the email and password you just set up, verify your computer name, and click Continue 4. Choose your desired Dropbox Plan (2GB: free, 00gb $10/month; 200gb: $20/month) and click continue 5. Choose Typical or Advanced Setup, then Click Install 6. If you would like to Install Dropbox on your mobile phone, enter your mobile number and click Continue 3 7. Continue through the Dropbox Tour and click Finish Confirm that Dropbox is installed by right-clicking the Dropbox icon Now that you have registered for a Dropbox account and installed the software, you can now download and register for nCryptedCloud by following these instructions. 4 Install and Register for nCryptedCloud How To Install nCryptedCloud 1. Go to the nCryptedCloud Download Page: https://www.ncryptedcloud.com/download/ 2. Click “Download” and nCryptedCloud’s Install Package will 5 Once nCryptedCloud’s Install Package is fully downloaded, double-click the file and begin the installation process. 3. Agree to nCryptedCloud’s Terms of Service 6 4. Choose an Install Destination 5. Sign in and select “Install Software” 7 nCryptedCloud will begin installing You have just successfully installed nCryptedCloud! 8 How To Register For nCryptedCloud Now that you have successfully installed nCryptedCloud, you will be directed to a registration page. If you already have an nCryptedCloud Account, select the second option accordingly and continue to the Log In Screen. 9 If you do not have an nCryptedCloud Account, follow the steps below to register for one. 1. Select “I don’t have an nCryptedCloud account” to create an account. 2. Enter the following information, agree to the Terms of Service, and click “Next”. 10 You have just successfully registered for nCryptedCloud! To verify that nCryptedCloud is installed, there should be a blue lock icon on your menu bar. 11 Using nCryptedCloud How To Open nCryptedCloud To open nCryptedCloud, select the nCryptedCloud icon in your menu bar and click “Open nCrypted Cloud”. How To Create A New Folder To create a new folder in nCryptedCloud, simply right click and select ‘New Folder’ 12 When you create a new folder in nCryptedCloud, you are automatically prompted to make that folder Private. A blue lock icon will appear at the top right corner of the Private Folder. 13 Policy Management How To Make Private To make an existing folder private, simply right click the folder and select ‘Make Private’. A blue lock icon should appear on the top right corner of that folder. 14 How To Remove Privacy To remove privacy, simply right click and select “Remove Privacy” The blue lock icon will no longer be at the top right corner of the folder, indicating that it is no longer private and encrypted. 15 Trusted Sharing nCryptedCloud's Trusted Sharing Feature gives you the ability to share encrypted files with anyone on a one-off basis through nCryptedCloud’s Desktop Client, Mobile Application, and Web Portal. How To Use Trusted Sharing Desktop Client To share a file using Trusted Sharing on nCryptedCloud’s Desktop Client 1. Right-click the file you wish to share using “Trusted Sharing”. A pop-up window will appear. 16 2. Enter the email addresses belonging to the people you wish to share the file with under the ‘Recipients’ section. 3. Select the duration of time you wish to share the file for under the ‘Expiration Timer’ section. 4. Under the ‘Security Code’ section, you have the option to choose a security code that must be entered in order to access the file. This security code will be sent to the recipient in a separate email. 5. You have the option to watermark the file with the recipient’s information to discourage misuse of information. 6. You also have the option to send a message with your trusted sharing file. After clicking “OK”, an email will be sent to the recipient with a link to your file. The email will look like the one pictured below: 17 If you required a security code, this is the separate email the recipient will receive: 18 Web Portal To send a file via Trusted Sharing through nCryptedCloud’s Web Portal, begin by going to https://ncryptedcloud.com/ and signing into your account. 1. Choose the file you want to share and click the arrow button that is located to the far right of your file. 2. A pop-up window will appear. Enter the email addresses for the people you wish to share the file with. 19 3. You can choose between 3 permissions: Read and Download, Download Only, and Read Only. By default, the permission is set to ‘Download Only’ 4. Select the amount of time you wish to share the file for. 5. Enter a and message if you wish, then click “Share” security code To confirm that your file was successfully shared via Trusted Sharing, the “Share” button will turn into a “Done” button. 20 Mobile Application To use Trusted Sharing on an iOS Device: 1. Launch nCryptedCloud on your mobile device and open the file you wish to send using Trusted Sharing 2. Click the arrow icon at the top right corner of the screen and select Trusted Sharing 3. This will bring you to you contact list. Select the contacts you wish to send this file to. 4. You can choose to send this file via email or text message. By clicking on the blue arrow next to you contact’s name, you can select the file destination. 21 Once you hit send on the Trusted Sharing Screen, nCryptedCloud will draft an email with a link to your file. If you decide to require a passcode to access your file, turn ‘Passcode’ on. You will be redirected to a screen asking you to enter a 4-digit passcode. nCryptedCloud will then draft an additional email with the passcode you chose included so your recipient can open your file using it. 22 Collaboration nCrypted Cloud is the easiest and most secure collaboration solution across security boundaries. Through The Patent Pending Key Management system, users from different organizations can securely collaborate as well as control access to encrypted data shared among the collaborators. Late Binding Technology gives users the ability to revoke access to shared data, even if the collaborator has physical possession of that data. This allows users to easily enter and exit the collaboration effort without having to worry about data security. How to Share Securely The Shared Securely feature is available when working on a desktop client. It allows users to securely share encrypted files. 1. Right click the folder you want shared securely and select "Share Securely" 2. A blue lock icon with a silhouette of a person will appear on the folder and all the files within. This icon signifies that the folder can be shared. You can do the same for any additional folders you wish to create. 23 3. To add people to share the folder with, right click and select "Share This Folder.” You will be redirected to the Dropbox page. 4. Enter the email addresses of the people with whom you would like to share the folder and click “Share Folder”. The collaborators you entered will receive a Dropbox and email notification to join this shared folder. 24 How to View “Shared With” After you’ve shared a folder, it’s easy to keep track the people with whom it was shared. 1. Right click the shared folder and select “Shared With” 2. A dialogue box will appear with a list of all the people with whom the folder is shared. By right clicking the shared folder and selecting "Shared With,” a dialogue box will appear with a list of all the people with whom the folder is shared. The image below is the dialogue box the Folder Owner will see. 25 The image below is the dialogue box that the recipients of the shared folder will see. As you can see, only the File Owner is able to change the “Folder Membership.” This means that the Folder Owner can select who is able to request access to the key and view the folder. How to Manage Folder Membership The File Owner can manage the “Folder Membership” by following these steps: 1. In the bottom of the Folder Sharing Information dialogue box you will see “Folder Membership” 2. You have the option to make the folder “Open” or “Closed,” and to “Enforce Work Identity.” If you choose to leave the folder “Open,” anyone that receives the link to the folder has access to the folder. 26 If you choose to make the folder “Closed,” only the people listed as “Users” in the Folder Sharing Information dialogue box will have access to the folder. How to Revoke Access The File Owner can revoke access to the data contained in the folder anytime. This feature is extremely useful when a collaborator leaves a collaboration group, or an employee leaves a company. To revoke access, follow the steps below: 1. On the File Owner’s view of the Folder Sharing Information dialogue box, click on the box to the left of the name of the user who you would like to remove. 2. Under “Folder Membership” click “Closed” 3. Click “Apply” This function takes away the user’s ability to access the data on all platforms. The system will refuse access to this data even if that user burned the data onto a CD, emailed the data, or put the data on a memory stick. If this function was performed by accident, the owner can simply change the “Folder Membership” back to “Open” and click the “Apply” button. The user would then be able to access the information once again. 27 Sensitivity How To Apply Sensitivity In order to apply sensitivity, you must first make sure your Advanced Settings are on. To turn your advanced settings on: 1. Right-click the nCryptedCloud Icon on you Desktop and select “Preferences” 2. Check the box for “Show Advanced Features” and click ‘Apply’ 28 Now that your advanced settings are turned on, you can adjust your sensitivity settings. To apply sensitivity to a folder, right-click the folder and select nCryptedCloud, then Sensitivity. You will have the option to make the folder, Medium, High, or Top Secret Sensitivity. The applied sensitivity settings are easily distinguishable on the folder view. 29 Personal Auditing How to Access Personal Auditing Page nCryptedCloud’s Personal Auditing feature gives users full forensic auditing of all access activities. This means that the Owner of the data can view all accesses and changes to that data. To access the Personal Auditing feature follow these steps: 1. Login to your nCryptedCloud account at www.ncryptedcloud.com 2. Click on the arrow icon in the top-right corner. 3. Click on “Auditing” from the drop-down list. This will take you to the Personal Auditing page. You can sort or filter by date, actions, user, device, etc. 30 Provisioning Corporate Identity You have one personal and potentially many corporate identities with which you can manage and collaborate. By managing your identities, you can keep Personal Data separate from Corporate Data. How to Add a Corporate Identity 1. Log into your nCryptedCloud account on the nCryptedCloud web portal 2. Click on your arrow next to your username at the top right corner of the page. Select “Identities” 3. You will be redirected to your Identities page. Click “Add New Identity”, located below your ‘Personal’ section and right above the ‘Organization’ section. 31 4. A dialog box should appear, and you will be asked to enter a new email address and an identity nickname 5. nCryptedCloud will detect that your email is connected to an organization. a. If the organization is already approved, you will receive an email from nCryptedCloud to verify your email address. Once you verify, you will have successfully added a corporate identity. If you are using an email you already registered to nCryptedCloud, you will not need to verify your email address a second time. 32 b. If you using an email address for an organization that has not been added yet, you will be asked to enter the name of the organization as well as a description of that organization. By clicking “Add New Identity’, the organization information for this identity is sent to nCryptedCloud for approval. In order for this identity to be used, you must also verify your email address, if you have not done so already. Multi-‐Identity Previously, we showed you how you can provision a Corporate Identity to easily separate your personal and corporate files. Once these identities are established, it is easy to switch the ownership of any data between identities. How to Select Your Identity 1. Right click on the nCryptedCloud desktop icon and select “Set Identity” 2. Select the identity you would like to operate as. 33 If you choose your ‘Personal’ identity, all folders you encrypt become ‘Personal’ folders and will appear with a blue lock icon as seen below. If you choose your ‘Corporate’ identity, all folders you encrypt become ‘Corporate’ folders and will appear with a briefcase icon as seen above. How to Change Identities on a Folder/File Level On a folder file level, you can change identities. For example, if you accidentally made a folder with your ‘Corporate’ identity you can easily change it to your ‘Personal’ identity by selecting the correct ‘Personal’ identity for that folder. This will switch the identity of the folder and all the files within it. 1) Right click on the folder whose identity you would like to change. Scroll over “nCryptedCloud”, Identity, then select the desired identity 34 Icon Glossary Private File & Folder Shared Folder (Dropbox Icon) Shared Securely Icon Corporate Identity Top Secret Sensitivity HIGH Sensitivity (Full Red Thermometer) (3/4 ORANGE Thermometer) MEDIUM Sensitivity LOW Sensitivity (1/2 YELLOW Thermometer) (1/4 GREEN Thermometer) 35