1
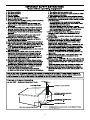
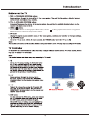
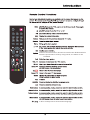
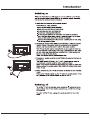
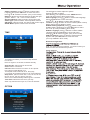
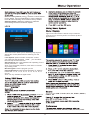
5
Menu Fuction
Menu Operation
11
Application
File Share
11
11
11
12
12
13
13
13
14
14
14
Base Installation
15
Precautions
Read all of the instructions before operating the set.
Keep these instructions well for future use.
Product
Do not block or cover the ventilation openings on the
back cover.
Do not push objects of any kind into this unit through
the cabinet slots as they could touch the current
carrying parts or short-circuit parts, resulting in fire,
electric shock, or damage to the unit.
Do not attempt to open the cabinet as this may cause
damage. There are no parts inside you can service by
yourself. Refer all servicing to qualified personnel.
Do not touch the screen surface with fingers as this
may scratch or mar the TV screen.
Do not impact the TV screen with hard pressure as
this may damage the TV screen severely.
The appliance is not intended for use by young children
or infirm persons without supervision. Young children
should be supervised to ensure that they do not play
with the appliance.
Power and Plug
Unplug the set under the following conditions:
- If the set will not be used for a long period of time.
- If the power cord or the power outlet/plug is damaged.
- Follow the instructions to install and adjust the
product. Adjust those controls that are covered in this
operating instructions as improper adjustment of other
controls may result in damage. If this happens, unplug
the set and refer to the service personnel.
- If the set is subject to impact or has been dropped to
have the cabinet damaged.
Where the mains plug or an appliance coupler is
used as disconnect device, the disconnect device
shall remain readily operable.
(* Where an all-pole mains switch is used as the
disconnect device, the switch shall remain readily
operable.)
Power Cord and Signal Cable
Do not allow anything to rest on or roll over the power
cord and the signal cable.
Protect the power cord and the signal cable from being
trampled.
Do not overload the power cord or the power outlet.
Do not expose the power cord and the signal cable to
moisture.
Keep the set away from direct sunlight.
Apparatus shall not be exposed to dripping or splashing
and no objects filled with liquids, such as vases, shall be
placed on the apparatus.
Do not use the set near dust place.
Cleaning
Dust the set by wiping the screen and the cabinet with
a soft, clean cloth or some special liquid cleaner.
Do not apply excessive force to the screen when
cleaning.
Do not use water or other chemical cleaner to clean the
screen as this may damage the surface of the TV
screen.
Hanging the TV Set on the Wall
Warning: This operation requires two people.
To ensure a safe installation, observe the following safety
notes:
Check that the wall can support the weight of the TV
set and wall mount assembly.
Follow the mounting instructions provided with the wall
mount.
The TV set must be installed on a vertical wall.
Make sure to use only screws suitable for the material
of the wall.
Make sure that the TV set cables are placed so that
there is not danger of tripping over them.
All other safety instructions about our TV sets are also
applicable here.
Important Information
If a television is not positioned in a sufficiently stable
location, it can be potentially hazardous due to falling.
Many injuries, particularly to children, can be avoided
by taking simple precautions such as:
Using cabinets or stands recommended by the
manufacturer of the television.
Only using furniture that can safely support the
television.
Ensuring the television is not overhanging the edge of
the supporting furniture.
Not placing the television on tall furniture (for
example, cupboards or bookcases) without anchoring
both the furniture and the television to a suitable
support.
Not standing the televisions on cloth or other
materials placed between the television and
supporting furniture.
Educating children about the dangers of climbing on
furniture to reach the television or its controls.
Note:
Graphics contained within this publication are
Do not place the set on an unstable cart, stand, or table. presentation only.
Place the set on a place that allows good ventilation.
WARNING: the batteries should not be exposed
Do not use the set near damp, and cold areas. Protect
to excessive heat such as sunshine, fire or the
the set from overheating.
like.
Use Environment
Press MENU button to bring up the NAV menu, select
MENU button to return to the previous menu.
to bring up the main menu. Long press
SPDIF
SPDIF socket (output) at the back
Use a digital coaxial cable to connect your TV to a compatible audio receiver.
HDMI 1/HDMI 2/HDMI 3(MHL) sockets(input)
(MHL)
AUDIO OUT mini socket(output)
AUDIO
OUT
This socket can be used to connect voice box.
AUDIO OUT adapter cable with audio L & R sockets, and be used to obtain sound.
Note:The VGA is same as the PC,audio input sockets are shared by AV
audio input sockets.
Mute
Source
Shortcut to Freeze off/on,and the record function DISK and PVR.
Note:the speed will be slow by using U disk, it is better to use
hard disk.
(In DTV mode,Turns on or off the audio description function)
In DTV mode,press to select audio language.
F
The TV set with Wi-Fi module.
Menu Function
The following instructions will introduce how to access
and operate the main menu of the TV. Please note that
some function might be unavailable in certain input
source.
PICTURE
PICTURE
Picture Mode Normal
Menu Operation
Color Temperature
1. Press MENU on remote control or TV set to enter
the main menu.
2. Press the LEFT/ RIGHT buttons to select CHANNEL,
PICTURE, SOUND, TIME, OPTION, LOCK.
3. For a certain selected menu, press UP/DOWN
buttons to select the item you need. then press OK
button to enter it. Press UP/DOWN/RIGHT/LEFT
buttons to adjust.
4. To return the previous menu, press MENU button.
To close the menu ,press EXIT button.
Channel
CHANNEL
Auto Tuning
DTV Manual Tuning
ATV Manual Tuning
Country Algeria
Program Edit
Signal Information
Software Update(OAD)
The CHANNEL menu allows you to select all the
settings required to be able to search for and store
all the channels you can receive. You also may edit
those channels.
Auto Tuning: searches and stores the active channel
automatically.
DTV Manual Tuning: manually searches and stores
the channel in digital mode that have not been stored
after automatic tuning.
ATV Manual Tuning: manually searches and stores
the channel in analog mode that have not been stored
after automatic tuning.
Country Algeria: This Item showed that DTV selection
search state.
Program Edit: Delete, Rename, Move, or Skip a channel.
Signal Information:Press the OK button to display some
signal information on current digital channel, such as signal
strength, Freq.(KHz), etc..
Software Update(OAD):On/Off.
Aspect Ratio
Noise Reduction
Dynamic Contrast
Screen
The PICTURE menu allows you to adjust each option
to obtain the best picture setting according to your
preference. The type of program of you are watching
and the ambient lighting.
Picture Mode Normal: selects a suitable picture effect.
options include User, Vivid, Normal, Mild.
selects the User, you might adjust Contrast, Brightness,
Tint, Sharpness, Color and BackLight .
Note: Tint is only available in NTSC.
Color Temperature: adjusts the color temperature of
the picture. options include Normal, Cool and Warm.
Cool is for a more blue palette of picture colors;
Warm is for a more red palette of picture colors; Normal
is between the two.
Aspect Ratio: selects the picture size, this options include:
Auto, 4:3, 16:9, Just scan.
Note: Just scan mode for HDMI and PC source modes.
Noise Reduction: options include: Off, Low, Middle,
High, Auto.
Note: it is available in DTV, ATV, AV and HDMI modes.
Dynamic Contrast: options include: Off and On.
Screen: adjusts the picture in PC mode.
SOUND
SOUND
Sound Mode Normal
Audio Language
Balance
Surround Sound
Audio Type
AD Switch
SPDIF Mode
The SOUND menu allows you to adjust each option for
your listening pleasure.
Sound Mode Normal: options include: User, Normal, Music,
Movie, News.
◄
◄
◄
◄
The OPTION is used to adjust the system.
Press / button to adjust.
After finishing your adjustment, Press MENU button to
save and return back to the previous menu.
OSD Language: press / button to select OSD Language,
then press OK button to enter sub-menu.
Press / / ◄ / ► button to select OSD Language.
Location: press / button to select Location (Home or Shop
Mode) ,then press OK button to select .
Subtitle Hearing Impaired: press / button to select
Subtitle Hearing Impaired, then press OK button to select
On or Off. (It is only available in DTV mode.)
Subtitle Language: press / button to select Subtitle
Language,then press OK button to enter sub-menu.
Press / /◄ / ► button to select. (Only in DTV mode)
PVR File System: press / button to select PVR File
System, then press OK button to enter sub-menu.
(It is only available in DTV mode.)
◄
◄
◄
◄
◄
◄
◄
◄
◄
◄
◄
◄
Audio Language: press / button to select Audio
Language, then press OK button to enter sub-menu.
Press / /◄ / ►button to select. (Only in DTV mode)
Balance: adjusts the volume between the left and right
speaker. Sets to “50”in the normal condition.
Surround Sound: options include: Off and Surround.
Audio Type: options include: Visual Impaired, Normal.
AD Switch: options include: On and Off, AD volume adjust.
SPDIF Mode: options include: Auto and PCM.
◄
◄
◄
◄
TIME
TIME
Auto Sync On
Network Configuration:
Clock 03:47
Off Time
Note: For wired network connection, you need to insert your
Ethernet cable into the Ethernet port first.
Sleep Timer
Time Zone
Wired Network:
The TIME menu allows you to set the sleep timeand
turn off time.
Note: No signal for 15 minutes, automatic standby.
Auto Sync On: options include: On and Off.
Clock: sets the current time.
Off Time: selects a time to turn off the TV at a specific
time. options include Minute, Hour .
The Repeat mode include Off, Once, Every Day,
If you select Off, the Minute and Hour can not be adjusted.
Sleep Timer: options include: Off, 10 min, 20 min, 30 min,
60 min, 90 min, 120 min, 180 min, 240 min.
Note: it turns off automatically without signal in 15 minute.
Time Zone: selects the time zone you stay.
Note: only sets the Auto Sync on, it can be selected.
Wi - Fi Network:
OPTION
OPTION
OSD Language English
Location
Subtitle Hearing Impaired
Subtitle Language
PVR File System
Network Configuration
Restore Factory Default
Software Update
10
◄
◄
Restore Factory Defaut: press / button to select Restore
Factory Defaul, then press OK button to enter a dialogue.
Press ◄ button selecting Yes to Restore Factory Default.
Software Update: Update the software by USB with
downloading software and Network Update.
LOCK
LOCK
Figures and illustrations below are provided for
reference only and may differ from actual product
appearance.
Lock system Off
Set Password
Block Program
Parental Guidance
System
Application
Source
Preferences
The LOCK menu allows you to effectively stop anyone
without the correct password from watching TV. this
function
Lock System: options include: On and Off. At first,
you need input the password “0000”, you can select
the next step and the next item.
Set Password: sets a new password for operating TV. the
default password is “0000”.
Note: If you forget the password, enter 0812 to override
any existing codes.
Block Program: lock the program you set.
Parental Guidance: limits the age watching TV. Options
include Off, 4, 5, 6, 7, 8, 9, 10, 11, 12, 13, 14, 15, 16, 17
and 18.
Note: It is only available in digital mode.
Multimedia
Web Browser
Golive
YouTube
Wireless Display
Twitter
Picasa
Facebook
File share
(See Above photo)
Picture:
smart TV
Multimedia
This includes DVB-T, DVB-C,ATV, PC, HDMI 1, HDMI 2,
HDMI 3, AV.
Picture
CHANNEL,PICTURE,SOUND,TIME,OPTION,LOCK.
11
.
Return
Application
Audio
Application.
Application
Application ( see Above photo ).
12
Web Browser
Web
QJY
File Share
By connecting the TV and a device (computer,
smart phone, pad, etc.) to the same local network,
you can enjoy the music, videos and pictures shared
by the device on the TV.
Note: Some devices may not be supported, and not
all models have this function.
Wireless Display
Wireless display technology can realize the notebook
with the TV set, projector display terminal wireless
connection, not a machine connecting line.Put the
notebook display content, such as video, games,
pictures, play wireless transmission to the TV.
Special Function
File Share
Application
Before you plug the USB device to TV, make sure you
have backed up the data in the device to avoid the
unusual performance make your important data loss.
We recommend that you use a USB device with at
Least 1Gb free space and a disk speed faster than
5.0M/sec.
It can’t use PC to share
material with TV.
13
Because the TV with
a built-in WiFi function, use the OPTION
settingsmenu in Wi-Fi Network connect,
14
Base Installation
To fix the double support base on the unit by
screws, the installation is completed.
72-KD27PB-E089B
15