1
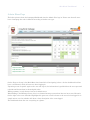
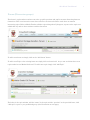
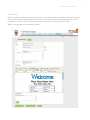
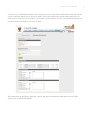
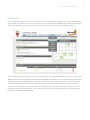
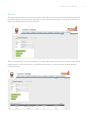
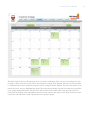
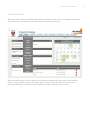
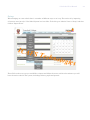
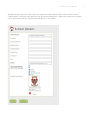
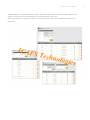
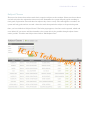
User Manual
iNet School
Multi Level Management System
i-Net School User Manual
Table of Contents
Admin HomePage .......................................................................................................................................................... 3 Admin Main Menu ......................................................................................................................................................... 4 My Profile ......................................................................................................................................................................... 5 Forum (Discussion groups) ........................................................................................................................................ 7 My School ........................................................................................................................................................................ 10 Forms ............................................................................................................................................................................... 10 Newsletter ...................................................................................................................................................................... 11 Documents ..................................................................................................................................................................... 12 My Classes ...................................................................................................................................................................... 14 Marks ............................................................................................................................................................................... 14 Moderations .................................................................................................................................................................. 17 Quiz .................................................................................................................................................................................. 19 Reports ............................................................................................................................................................................ 21 Roll Call ........................................................................................................................................................................... 22 SMS ................................................................................................................................................................................... 23 Calendar .......................................................................................................................................................................... 24 ICAF
S Tech
Message System ............................................................................................................................................................ 27 Admin Menu Bar .......................................................................................................................................................... 31 Setup: ............................................................................................................................................................................... 32 Registration Classes: .................................................................................................................................................. 37 Subject Classes: ............................................................................................................................................................ 38 Extra Murals: ................................................................................................................................................................. 40 nologi
es
Search: ............................................................................................................................................................................. 41 Users: ............................................................................................................................................................................... 42 2
i-Net School User Manual
Admin HomePage
The below picture shows the homepage/Dashboard after the Admin User logs in. Please note that all users
have a homepage but each is different according to his/her user type.
Sam
[email protected]
[email protected]
[email protected]
On the Page at the top is the Main Menu bar from which all navigating is done. On the dashboard itself we
have a noticeboard, which all users see when logging in.
Upcoming events is specific again to the user who logs in, the information is grabbed from the users personal
calendar and shows them in chronological order.
Billing summary is only shown of course for Admin users.
Below Billing is the Message Center, this is an internal message system that does not incur costs like sms’s.
On the right is the users calendar. Highlighted in green are events relevant to the user who has logged in. A
simple mouse over the calendar will show a short description of the event logged.
The dashboard shows the user everything at a glance.
3
i-Net School User Manual
Admin Main Menu
Sam
This is used to navigate the i-Net School System. This Bar is constant throughout the system, so navigation is
made easy from anywhere in the system.
ICAF
S Tech
nologi
es
4
i-Net School User Manual
My Profile
Sam
From The Main Menu we can push on “My Profile”, the above screen will appear, here the user can upload
his/her personal details, making sure the system is always current. There are three tabs in the “My Profile”
page, “Personal and Login”, “Medical” and “Preferences”. Please see screenshots below.
5
i-Net School User Manual
Sam
ICAF
S Tech
nologi
Sam
es
6
i-Net School User Manual
Forum (Discussion groups)
The forum is a place where teachers can write up quick questions and pupils can start discussing between
themselves. This is an interactive area where all users can interact between each other on common
interesting topics. Below a Maths Teacher added a topic asking about Pythagorus, 4 posts on the topic were
added that day and 13 other students read the discussion.
Sam
To add a new forum we simply click on the “Add forum” button.
To add a new Topic to the existing forum we simply click on forum itself. As you can see below there are 2
topics under forum “Maths Grade 12x” To Add a new topic simply click “Add Topic”
Sam
The below is the topic window, add the “name” of the topic and the “question” in the provided boxes, click
“add topic” to post to your predefined group. (See illustration on next page)
7
i-Net School User Manual
Sam
ICAF
S Tech
nologi
es
To add a Post to an already created forum we click on the topic we want to post to, then click on the “Add
Post” button. A text box will appear in which to write your post, then click the “save” button.
Sam
8
i-Net School User Manual
Sam
9
i-Net School User Manual
My School
Under “My School” on the main menu there are three buttons, Forms, Newsletter and Documents.
Sam
ICAF
S Tech
nologi
es
Forms
is an online form creation and submission system. Its uses range from holiday requests, permission slips or
simply to notify parents about something that the school wants them to acknowledge receipt of.
Sam
Sam
Sam
Each school can create their own forms and change them accordingly whenever necessary.
10
i-Net School User Manual
Newsletter
This is an online newsletter creation and sending tool. School can create a community newsletter to go out
weekly with relevant information about the school, events that took place and upcoming events etc. the
newsletter can be sent only to the school community but also can be sent to outside emails.
Below is a screenshot of the newsletter system.
Sam
11
i-Net School User Manual
Documents
is a place where each user has their own virtual hard drive. User can store documents here therefore giving
them access to those documents from anywhere, at anytime, unlike if they saved their documents on a
specific laptop or desktop. The system also lets you share the documents with predefined people/ or groups.
Sam
ICAF
S Tech
nologi
es
After clicking on documents from Main Menu above, the below page is what appears. It shows the “My
Documents” / “Shared Documents” drop down box of the logged in user, this user has one folder called test
where she saves all past tests she has created into “My documents”
Sam
12
i-Net School User Manual
In order to get to “Shared Documents” click on the drop down box and choose “Shared Documents” The below
screen is what will appear. Go to “Directory Name” and create a folder, then choose what permissions you
want to give to what users. For instance you can allow certain teachers to access your Shared Documents but
not allow them to edit them or visa versa or both.
Sam
The permissions for sharing are granular, a person can share each different folder with whoever he/she
wants, there is unlimited flexibility.
13
i-Net School User Manual
My Classes
In my classes the following can be found: marks system, moderations, online quiz system, reports, roll call,
timetable viewer, and a link to the billing system
ICAF
S Tech
nologi
es
Marks
this is used as a grade book for the teachers for all tests that are done in class. The teachers should add a
test that they are going to give to their class. This system then automatically sends a message to the test
recipients as well as the test recipient’s parents. The system also puts the test information up on the
recipients and the recipients parents calendar.
14
i-Net School User Manual
To add a test go to marks then at the top click “Add Test”.
A new window will appear asking for the details of the test being given, see below. Once this is filled, push
save and the test will appear in the list of tests. Each teacher has a list of tests he/she has given. Tests are
saved in the system with the marks.
15
i-Net School User Manual
Once the test has been done by the pupils and marked by the teachers, the marks need to be entered into the
system. Go back to “Marks” and look for the test that was given. In our case the test was Hamlet Acts 1-3.
ICAF
S Tech
nologi
es
To enter the test marks click on Test marks next to the relevant test. The “Add Marks” page will open with a
list of pupils that took the test. The teacher then adds in their mark, a percentage is calculated by the
system, lastly the teacher adds in a comment per child. Then pushes save. The marks are now in the system.
16
i-Net School User Manual
Moderations
this is where the teachers will go at the end of each term to finalize the averages. The system will work out
all averages. The teacher must then go in and make any last minute adjustments before marks are finalized.
Please note that the system will automatically calculate averages of tests entered into the system.
Click on moderations, then filter to the correct subject class that needs moderations, for instance grade 12B
English. The below screen appears, showing all the English tests taken so far in term 4 for this specific class.
You’ll notice next to each name there is a list of 2 tests and the percentage each pupil received on that test,
under the column term mark is the average the pupils received. The teacher now must either accept the
marks or moderate them, this will then become the pupil’s term mark which will show up on his report. To
change the mark the teacher simply clicks on the box with the term mark and changes it, the teacher must
then add in a comment and push save.
17
i-Net School User Manual
ICAF
S Tech
nologi
es
18
i-Net School User Manual
Quiz
is a feature that is 100% online. It is a place where teachers can create quizzes/tests online through
multiple-choice questions. The quizzes are saved online in a repository for all other teachers to use. Quizzes
are a great way of getting learners to open their books and study. The Quiz option is also great for learners
to exercise or practice before an test or exam. The Quiz is checked online, teachers do not have to check and
the marks are automatically added, in other words the teachers do not have to do any work, just send the
quiz to their respective classes. Below is a screenshot of the Quiz main page with the repository. Again
please note a teachers will only see quizzes that are relevant to them and their classes, in other words an
English teacher will not see Science quizzes, only English quizzes.
19
i-Net School User Manual
How does a teacher give a quiz to their class? Very simple, find the Quiz you would like to give to your class,
once you have found it click on the “Publish” button The below screen will appear.
ICAF
S Tech
nologi
es
Give the Quiz a title. The person logged in in the screenshot is admin; therefore the assigned teacher does
not show up, it will be up to the admin person to assign the correct teacher. This is handy for when teachers
are sick, the admin person or teacher from home will be able to assign a quiz for the children to do during
the class. The Choose subject class from the drop down, Publish date is the date the Quiz will be ready to be
taken by the children and deadline date is when the test needs to be taken by, after this it is no longer
accessible. Count towards marks means that it will be part of the term report or not, if so which term? Then
Click “Publish” and the test goes out to the relevant class/students. Please also note that the Quiz will also
show up on the students and their parent’s calendar as well as in their message system.
Quizzes can also be edited deleted or viewed by clicking on the relevant buttons in the quiz main page.
20
i-Net School User Manual
Reports
The reports button takes you to the reports page, which allows for a few types of reports. These reports are
for student marks, both for real-time averages as well as past term/final reports. Using the built in filter a
reports can be generated for specific students.
This is a great help for teachers, headmasters etc. that want to know exactly what is going on with specific
children during a term and not have to wait till the end of term, or worse request the marks from the
relevant teachers.
21
i-Net School User Manual
Roll Call
or registration: this part of the system is used to make sure a report of students that miss days of school is
recorded. Roll call can be done at the beginning of every day or at the beginning of every lesson.
After roll call is performed a message is sent out to parents automatically informing them of their child
being absent from school. Performing roll call is quick and easy. Push on “Add Roll Call”
ICAF
S Tech
nologi
es
The below screen is what will appear. Choose grade, then registration class. Then click on the child not
present and push save. This is then saved into the system.
22
i-Net School User Manual
SMS
The SMS system is based on information in the database, it works exactly like the calendar and message
system, therefore all groups whether they are classes etc. will work in the “SMS” system, no need to create
anything new. To get to the SMS system click on the “SMS” button on the main menu.
You will then get to the below screen in which you will need to “Create SMS”
Once you have clicked on “Create SMS” The below screen will show up. Choose the group or individuals you
want to send to, write your message in the provided box and then push send.
23
i-Net School User Manual
Calendar
The calendar system is very much like the SMS system as well as the Message System. It works with the
same groups, once you know how to send a message you will know how to send a SMS as well as create a
calendar Event. The system works of predefined groups as well as custom created groups.
To get to the calendar please go to the main Menu and click on Calendar. You can either “View Events” or
“Add Events” Lest first View Events.
ICAF
S Tech
nologi
es
Please note that the Calendar is also on the Homepage in small on the right hand side as default. Clicking
on it will also take you through to the View events page in the system.
24
i-Net School User Manual
The Above Page is the View Events page, here it is shown in “Monthly View”, the user can change the view
as week or day as well as list view, this is done using the “Change View” Button. The user can also navigate
to a different day, week or month in the past or future using the “Filter“ Button. To go into the specific event
please click on it, they are highlighted in green. The pencil Icon will show up only for people who created the
even, giving them permission to edit the event. The red X is used to delete and event, but again only the
person who created the event and admin can delete events. On the next page we will show you how to create
a specific event and share it with a specific person or group of people.
25
i-Net School User Manual
To add an event click “Ad Event” from the main menu. The below screen appears. To Share an event type
in the name of the individuals or groups, under that click in the text box to add a description of the event.
Please remember that you can add attachments to calendar events as well as to messages. This mean that if
you want to add a small movie or document or worksheet etc. you can do this and all people you share the
event with will receive the attachment. If you have saved documents on the i-Net School shared “documents”
section, you will also be able to attach them to your calendar event and messages. Below the text box is the
usual calendar drop down boxes, “Event type” date the event will take place as well as if the event is a
weekly, or once off event. Once these are all filled click “save” and the event goes out to all participants.
ICAF
S Tech
nologi
es
26
i-Net School User Manual
Message System
is like email but closed to the outside world, this mean more security, and no spam. Only the school
community, parents, teachers and pupils can communicate with each other through the system. It looks and
works like an email system though. To enter the message system you can either click on the message system
on the homepage, or go to the Main Menu Bar and click on “Messages”, the below page will open. This page
from left to right will show you your folders in which you can filter messages to, then the header of the
message. To read the message you simply click once on the message.
27
i-Net School User Manual
The message will then open in the box on far right, see below screen shot.
ICAF
S Tech
nologi
es
To delete a message you can either click on the red X or mark a number of different messages then push the
“select action” drop down box and delete all messages selected. You can also use the “Select Action” drop
down box to move messages between folders and more.
28
i-Net School User Manual
Creating a message is very easy. Click on the “Create Message” button, add the individuals or groups that
you are sending the message to. Add the subject as well as any attachments you want to send, remember
this works exactly like the calendar. Write in the text box provided your message and push the “Send”
button, your message has now been sent. The recipients of your message will receive an email notification
that they have a new message in their i-Net School mailbox.
29
i-Net School User Manual
To Create different Folders in the message system, go to the “Custom folders” box and enter the name of the
folder you would like to create, then push the “Create” Button, the new folder will appear. Please note that
folders can be deleted but only if there is no messages in the folder. If there are messages in the folder the
red X will not appear.
ICAF
S Tech
nologi
es
30
i-Net School User Manual
Admin Menu Bar
This is the menu in which all backend administration takes place. This is the core of whatever needs to be
done. Please note 1-2 people from each school will have limited access to this.
When moving the mouse over the “Admin” button the menu automatically drops down, please note this
button is only accessible to people with admin rights. Nobody else sees this button or has access to it.
In the upcoming Pages we will go through each button in order of setting up a new school.
31
i-Net School User Manual
32
Setup:
When bringing on a new school there is a number of different ways to set it up. The easiest is by importing
all current users into the i-Net School System in a few clicks. To do this go to “Admin” then to “Setup” and then
click on “Import Users”
ICAF
S Tech
nologi
es
Then Click on the user type you would like to import and follow the screen, within a few minutes you will
have the entire school in the system, including teachers, pupils and parents.
i-Net School User Manual
The Next step is to make sure all permissions your school wants is given to the different Users. The default
set by the system does not necessarily abide by your schools policy, so best to go through this and change
anything needed, this can also be at anytime in the future and as school policy changes. Got to “Admin”,
“Setup” then “Permission Groups”
33
i-Net School User Manual
Next choose the User you would like to change permissions for click on edit, a new screen will appear, here
you simply click on the permissions you would like to grant the user
ICAF
S Tech
The below picture shows an excerpt of the permissions page.
nologi
es
34
i-Net School User Manual
Now That we have all users in the system, lets update the schools details. Please Got to “Admin” then to
“School Details”. The below page appears, fill in all required information. Update the schools logo and make
sure to allow for the “House “ system and profile photo’s to be enabled.
35
i-Net School User Manual
Adding Subjects, Classrooms and New Users. The below shows pictures of how to add a subject to the
school, as well as how to add classrooms to the school and any new users.
Please note that this is done once, unless a school adds a new subjects to its offering or builds a new
classroom.
ICAF
S Tech
nologi
es
36
i-Net School User Manual
Registration Classes:
Now that we have all our users in the system, all our classrooms, all the subjects we offer, it’s now time to
divide the pupils into their respective registrations classes. The registration class is the first class the pupils
assemble in during the morning, here roll call is performed, then all pupils split up and go to their respective
subject classes to start their learning day.
Adding Registration classes is simple, click the “Add Registration Class” The below page will open up,
Create a name for the registration class, choose the teacher that will perform the roll call each morning,
choose the classroom and the grade, then all available pupils will appear in box on left hand side, move the
relevant pupils using the arrows to the “Pupils Assigned” box, push “Save” once you are finished.
37
i-Net School User Manual
Subject Classes:
These are the classes that teachers teach their respective subjects to the students. Please note these classes
are built only after the registration classes are built. Remember the system will grab pupils according to
their grade, registration class and then the subjects they chose to study. The same applies to teachers, the
system will only grab teachers to teach a class that teach that particular subject to the particular grade.
Once you have clicked on “Subject Classes” The below page appears, class lists can be exported, edited and
even deleted. If you want to add the timetable to the system this is also possible through subject classes
under “periods”. To add a new Subject class click on “Add Subject Class”
ICAF
S Tech
nologi
es
38
i-Net School User Manual
Fill in all the correct information of what Subject you are building, again like in Registration classes, the
system will slowly refine the pupils that are available for the specific subject, You will need to then choose
the relevant student and using the arrows move them to the “Pupils Assigned” box, lastly click “Save”. The
system will then ask if you want to add the details to a timetable if not just ignore, the subject class is now
created.
Once all this has been completed the system is now up and running and ready to use.
39
i-Net School User Manual
Extra Murals:
If the school offers sports, the extra murals system can help in organizing this and tracking who takes part
in extra murals, it works exactly like adding a subject class.
ICAF
S Tech
nologi
es
40
i-Net School User Manual
Search:
The search is a useful tool especially if you are looking for a specific user. You will be able to see everything
about the user including marks, timetable, personal details as well as all educational details. Please look at
the screen shots below to understand what the search can do for you. More features are available through
the search.
41
i-Net School User Manual
Users:
There are 5 main users, Admin, Staff, Teachers, Pupils, and Parents, please note that they are the basis of
any user but the system can create any mix of any of these users, The system will also create new users if
need be. In each user there is information that is particular to him/her. The below screenshots show
information of a teacher. The information can be edited accordingly.
ICAF
S Tech
nologi
es
42