1
COMP Superscalar
User Manual
Application execution guide
Version: 1.3
November 3, 2015
This manual provides information about how to execute COMPSs applications, how
to retrieve the results and the logs of an execution and it provides an overview of the
COMPSs tools usage. It is highly recommended to test the examples described in this
manual with a working COMPSs installation. For this purpose we provide a COMPSs
Virtual Machine available at http://compss.bsc.es/ .
For information about the installation process please refer to the COMPSs Installation
Guide available at http://compss.bsc.es/ .
For further information about the application development please refer to the COMPSs
User Manual: Application development guide available at http://compss.bsc.es/ .
For an extensive list of COMPSs application examples (codes, execution commands,
results, logs, etc.) please refer to the COMPSs Sample Applications guide at http:
//compss.bsc.es/ .
i
Contents
1 COMP Superscalar (COMPSs)
1
2 Executing COMPSs applications
2.1 Prerequisites . . . . . . . . . . . . . . . . . . . . . . . .
2.2 Runcompss command . . . . . . . . . . . . . . . . . . .
2.3 Running a COMPSs application . . . . . . . . . . . . .
2.3.1 Running Java applications . . . . . . . . . . . .
2.3.2 Running Python applications . . . . . . . . . .
2.3.3 Running C/C++ applications . . . . . . . . . .
2.4 Additional configurations . . . . . . . . . . . . . . . . .
2.4.1 Resources file . . . . . . . . . . . . . . . . . . .
2.4.2 Project file . . . . . . . . . . . . . . . . . . . . .
2.5 Configuration examples . . . . . . . . . . . . . . . . . .
2.5.1 Services configuration . . . . . . . . . . . . . . .
2.5.2 Cluster and grid configuration (static resources)
2.5.3 Shared Disks configuration example . . . . . . .
2.5.4 Cloud configuration (dynamic resources) . . . .
2.5.4.1 Cloud connectors: Amazon EC2 . . . .
2.5.4.2 Cloud connectors: rOCCI . . . . . . .
.
.
.
.
.
.
.
.
.
.
.
.
.
.
.
.
.
.
.
.
.
.
.
.
.
.
.
.
.
.
.
.
.
.
.
.
.
.
.
.
.
.
.
.
.
.
.
.
.
.
.
.
.
.
.
.
.
.
.
.
.
.
.
.
.
.
.
.
.
.
.
.
.
.
.
.
.
.
.
.
.
.
.
.
.
.
.
.
.
.
.
.
.
.
.
.
.
.
.
.
.
.
.
.
.
.
.
.
.
.
.
.
.
.
.
.
.
.
.
.
.
.
.
.
.
.
.
.
.
.
.
.
.
.
.
.
.
.
.
.
.
.
.
.
.
.
.
.
.
.
.
.
.
.
.
.
.
.
.
.
.
.
.
.
.
.
.
.
.
.
.
.
.
.
.
.
2
2
2
3
3
4
4
5
5
6
7
7
8
9
10
13
14
3 Results and logs
15
3.1 Results . . . . . . . . . . . . . . . . . . . . . . . . . . . . . . . . . . . . . . 15
3.2 Logs . . . . . . . . . . . . . . . . . . . . . . . . . . . . . . . . . . . . . . . 16
4 COMPSs Tools
4.1 Application graph . . . . . . . . . .
4.2 COMPSs Monitor . . . . . . . . . .
4.2.1 Service configuration . . . .
4.2.2 Usage . . . . . . . . . . . .
4.2.3 Graphical Interface features
4.3 Application tracing . . . . . . . . .
4.3.1 Trace Command . . . . . .
4.3.2 Trace Configurations . . . .
4.3.3 Trace examples . . . . . . .
4.4 COMPSs IDE . . . . . . . . . . . .
.
.
.
.
.
.
.
.
.
.
.
.
.
.
.
.
.
.
.
.
.
.
.
.
.
.
.
.
.
.
.
.
.
.
.
.
.
.
.
.
5 Common Issues
5.1 How to debug . . . . . . . . . . . . . . . .
5.2 Tasks are not executed . . . . . . . . . . .
5.3 Jobs fail . . . . . . . . . . . . . . . . . . .
5.4 Compilation error: @Method not found . .
5.5 Jobs failed on method reflection . . . . . .
5.6 Jobs failed on reflect target invocation null
ii
.
.
.
.
.
.
.
.
.
.
.
.
.
.
.
.
.
.
.
.
.
.
.
.
.
.
.
.
.
.
.
.
.
.
.
.
.
.
.
.
.
.
.
.
.
.
.
.
.
.
. . . . .
. . . . .
. . . . .
. . . . .
. . . . .
pointer
.
.
.
.
.
.
.
.
.
.
.
.
.
.
.
.
.
.
.
.
.
.
.
.
.
.
.
.
.
.
.
.
.
.
.
.
.
.
.
.
.
.
.
.
.
.
.
.
.
.
.
.
.
.
.
.
.
.
.
.
.
.
.
.
.
.
.
.
.
.
.
.
.
.
.
.
.
.
.
.
.
.
.
.
.
.
.
.
.
.
.
.
.
.
.
.
.
.
.
.
.
.
.
.
.
.
.
.
.
.
.
.
.
.
.
.
.
.
.
.
.
.
.
.
.
.
.
.
.
.
.
.
.
.
.
.
.
.
.
.
.
.
.
.
.
.
.
.
.
.
.
.
.
.
.
.
.
.
.
.
.
.
.
.
.
.
.
.
.
.
.
.
.
.
.
.
.
.
.
.
.
.
.
.
.
.
.
.
.
.
.
.
.
.
.
.
.
.
.
.
.
.
19
19
19
20
20
22
23
23
24
24
25
.
.
.
.
.
.
27
27
27
27
28
29
30
List of Figures
1
2
3
4
5
6
7
8
9
10
11
12
13
14
15
16
17
Execution of a Java COMPSs application. . . . . . . . . . . . . . . . . . .
Execution of a Python COMPSs application. . . . . . . . . . . . . . . . . .
Execution of a C++ COMPSs application. . . . . . . . . . . . . . . . . . .
Output generated by the execution of the Simple Java application with
COMPSs . . . . . . . . . . . . . . . . . . . . . . . . . . . . . . . . . . . . .
Sequential execution of the Hello java application . . . . . . . . . . . . . .
COMPSs execution of the Hello java application . . . . . . . . . . . . . . .
Structure of the logs folder for the Simple java application in off mode . .
Structure of the logs folder for the Simple java application in info mode . .
runtime.log generated by the execution of the Simple java application . . .
resources.log generated by the execution of the Simple java application . .
Structure of the logs folder for the Simple java application in debug mode
The dependency graph of the SparseLU application . . . . . . . . . . . . .
COMPSs Monitor start command . . . . . . . . . . . . . . . . . . . . . . .
COMPSs monitoring interface . . . . . . . . . . . . . . . . . . . . . . . . .
Execution of the Simple Java application with the monitoring flag enabled
Logs generated by the Simple java application with the monitoring flag
enabled . . . . . . . . . . . . . . . . . . . . . . . . . . . . . . . . . . . . .
Examples of complex traces . . . . . . . . . . . . . . . . . . . . . . . . . .
iii
4
4
5
15
15
16
16
17
17
18
18
19
20
21
21
22
26
List of Tables
1
2
3
4
5
6
7
Configuration of resources.xml file, tag < CloudP rovider > .
Configuration of project.xml file, tag < Cloud > . . . . . . .
Configuration of project.xml file, tag < P rovider > . . . . .
Properties of the Amazon EC2 connector. . . . . . . . . . .
rOCCI extensions in the project.xml file. . . . . . . . . . . .
Configuration of the < provider > .xml templates file. . . .
Available paraver configurations for COMPSs Applications .
iv
.
.
.
.
.
.
.
.
.
.
.
.
.
.
.
.
.
.
.
.
.
.
.
.
.
.
.
.
.
.
.
.
.
.
.
.
.
.
.
.
.
.
.
.
.
.
.
.
.
.
.
.
.
.
.
.
11
12
12
13
14
14
25
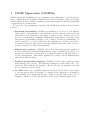
1
COMP Superscalar (COMPSs)
COMP Superscalar (COMPSs) is a programming model which aims to ease the development of applications for distributed infrastructures, such as Clusters, Grids and Clouds.
COMP Superscalar also features a runtime system that exploits the inherent parallelism
of applications at execution time.
For the sake of programming productivity, the COMPSs model has four key characteristics:
• Sequential programming: COMPSs programmers do not need to deal with the
typical duties of parallelization and distribution, such as thread creation and synchronization, data distribution, messaging or fault tolerance. Instead, the model
is based on sequential programming, which makes it appealing to users that either
lack parallel programming expertise or are looking for better programmability. A
task is a method or a service called from the application code that is intended to
be spawned asynchronously and possibly run in parallel with other tasks on a set of
resources, instead of locally and sequentially.
• Infrastructure unaware: COMPSs offers a model that abstracts the application
from the underlying distributed infrastructure. Hence, COMPSs programs do not
include any detail that could tie them to a particular platform, like deployment or
resource management. This makes applications portable between infrastructures
with diverse characteristics.
• Standard programming languages: COMPSs is based on the popular programming language Java, but also offers language bindings for Python and C/C++ applications. This facilitates the learning of the model, since programmers can reuse
most of their previous knowledge.
• No APIs: In the case of COMPSs applications in Java, the model does not require
to use any special API call, pragma or construct in the application; everything is
pure standard Java syntax and libraries. With regard the Python and C/C++
bindings, a small set of API calls should be used on the COMPSs applications.
1
2
Executing COMPSs applications
2.1
Prerequisites
Prerequisites vary depending on the application’s code language: for Java applications
the users need to have a jar archive containing all the application classes, for Python
applications there are no requirements and for C/C++ applications the code must have
been previously compiled by using the buildapp command.
For further information about how to develop COMPSs applications please refer to the
COMPSs User Manual: Application development guide available at the http://compss.
bsc.es/ webpage.
2.2
Runcompss command
COMPSs applications are executed using the runcompss command:
compss@bsc :~ $ runcompss [ options ] a p pl i c a t i o n _ n a m e [ a p p l i c a t i o n _ a r g u m e n t s ]
The application name must be the fully qualified name of the application in Java, the
path to the .py file containing the main program in Python and the path to the master
binary in C/C++.
The application arguments are the ones passed as command line to main application.
This parameter can be empty.
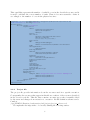
The runcompss command allows the users to customize a COMPSs execution by specifying different options. For clarity purposes, parameters are grouped in Runtime configuration, Tools enablers and Advanced options.
compss@bsc :~ $ runcompss -h
Runtime configuration options :
-- project = < path >
Path to the project XML file
Default : / opt / COMPSs / Runtime / configuration /
xml / projects / project . xml
-- resources = < path >
Path to the resources XML file
Default : / opt / COMPSs / Runtime / configuration /
xml / resources / resources . xml
-- lang = < name >
Language of the application ( java / c / python )
Default : java
-- log_level = < level > , -- debug , -d
Tools enablers :
-- graph = < bool > , -- graph , -g
Set the debug level : off | info | debug
Default : off
Generation of the complete graph ( true / false )
When no value is provided it is set to true
Default : false
-- tracing = < bool > , -- tracing , -t
Generation of traces ( true / false )
When no value is provided it is set to true
Default : false
-- monitoring = < int > , -- monitoring , -m
Period between monitoring samples
( milliseconds )
When no value is provided it is set to 2000
2
Default : 0
Advanced options :
-- comm = < path >
Class that implements the adaptor for
comm unicatio ns
Default : i n t e g r a t e d t o o l k i t . nio . master .
NIOAdaptor
-- library_path = < path >
Non - standard directories to search for
libraries ( e . g . Java JVM library , Python
library , C binding library )
Default : .
-- classpath = < path >
Path for the application classes / modules
Default : current working directory .
-- task_count = < int >
Only for C / Python Bindings .
Maximum number of different functions / methods
invoked from the application that have been
selected as tasks
Default : 50
-- uuid = < int >
Preset an application UUID
Default : Automatic random generation
-- P y O b j e c t _ s e r i a l i z e = < bool >
Only for Python Binding .
Enable the object serialization to string
when possible ( true / false ) .
Default : false
2.3
Running a COMPSs application
Before running COMPSs applications the application files must be in the CLASSPATH.
Thus, when launching a COMPSs application, users can manually pre-set the CLASSPATH environment variable or can add the –classpath option to the runcompss command.
The next three sections provide specific information for launching COMPSs applications developed in different code languages (Java, Python and C/C++). For clarity purposes we will use the Simple application (developed in Java, Python and C++) available
in the COMPSs Virtual Machine or at https://compss.bsc.es/projects/bar webpage.
This application takes an integer as input parameter and increases it by one unit using a
task. For further details about the codes please refer to the Sample Applications document
available at http://compss.bsc.es .
2.3.1
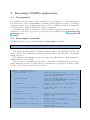
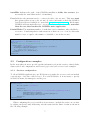
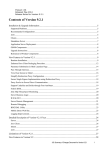
Running Java applications
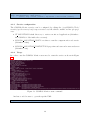
A Java COMPSs application can be launched through the following command:
compss@bsc :~ $ cd worksp ace_jav a / simple / jar /
compss@bsc :~/ w orkspace _java / simple / jar$ runcompss simple . Simple < initial_number >
In this first execution we use the default value of the –classpath option to automatically
add the jar file to the classpath (by executing runcompss in the directory which contains
the jar file). However, we can explicitly do this by exporting the CLASSPATH variable
or by providing the –classpath value. Next, we provide two more ways to perform the
same execution:
3
Figure 1: Execution of a Java COMPSs application.
compss@bsc :~ $ export CLASSPATH = $CLASSPATH :
/ home / compss / works pace_jav a / simple / jar / simple . jar
compss@bsc :~ $ runcompss simple . Simple < initial_number >
compss@bsc :~ $ runcompss -- classpath =/ home / compss / workspa ce_java / simple / jar / simple . jar
simple . Simple < initial_number >
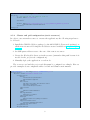
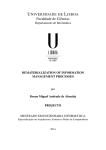
2.3.2
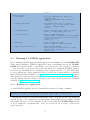
Running Python applications
To launch a COMPSs Python application users have to provide the –lang=python option
to the runcompss command.
compss@bsc :~ $ cd w o r k sp a c e _ p y t h o n / simple /
compss@bsc :~/ w o r k s p a c e _ p y t h o n / simple$ runcompss -- lang = python simple . py < initial_number >
Figure 2: Execution of a Python COMPSs application.
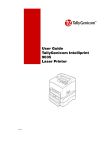
2.3.3
Running C/C++ applications
To launch a COMPSs C/C++ application users have to compile the C/C++ application
by means of the buildapp command. For further information please refer to the COMPSs
User Manual: Application development guide document available at http://compss.bsc.
es . Once complied, the –lang=c option must be provided to the runcompss command.
4
compss@bsc :~ $ cd workspace_c / simple /
compss@bsc :~/ workspace_c / simple$ runcompss -- lang = c simple < initial_number >
Figure 3: Execution of a C++ COMPSs application.
2.4
Additional configurations
The COMPSs runtime has two configuration files: resources.xml and project.xml . These
files contain information about the execution environment and are completely independent
from the application.
For each execution users can load the default configuration files or specify their custom
configurations by using, respectively, the −−resources =< absolute path to resources.xml >
and the −−project =< absolute path to project.xml > in the runcompss command. The
default files are located in the /opt/COMPSs/Runtime/configuration/xml/ path. Users
can manually edit these files or can use the Eclipse IDE tool developed for COMPSs. For
further information about the Eclipse IDE please refer to Section 4.4.
Next sections describe in detail the resources.xml and the project.xml files, explaining
the available options.
2.4.1
Resources file
The resources file provides information about all the available resources that can be used
for an execution. This file should normally be managed by the system administrators. Its
full definition schema can be found at
/opt/COMPSs/Runtime/configuration/xml/resources/resource schema.xsd.
It contains one entry per available resource defining its name, its capabilities and its
requirements. Administrators can define several resource capabilities (see example in the
next listing) but we would like to underline the importance of Processor CoreCount.
5
This capability represents the number of available cores in the described resource and it
is used to schedule the correct number of tasks. Thus, it becomes essential to define it
accordingly to the number of cores in the physical resource.
compss@bsc: ~$ cat / opt / COMPSs / Runtime / configuration / xml / resources / resources . xml
<? xml version = " 1.0 " encoding = " UTF -8 " ? >
< ResourceList >
< Resource Name = " localhost " >
< Capabilities >
< Host >
< TaskCount >0 </ TaskCount >
< Queue > short </ Queue >
< Queue / >
</ Host >
< Processor >
< Architecture > IA32 </ Architecture >
< Speed > 3.0 </ Speed >
< CoreCount > 4 < /CoreCount >
</ Processor >
< OS >
< OSType > Linux </ OSType >
< M a x P r o c e s s e s P e r U s e r > 32 </ M a x P r o c e s s e s P e r U s e r >
</ OS >
< StorageE lement >
< Size >8 </ Size >
</ Storag eElement >
< Memory >
< PhysicalSize >4 </ PhysicalSize >
< VirtualSize >8 </ VirtualSize >
</ Memory >
< ApplicationSoftware >
< Software > Java </ Software >
</ A p p l i c a t i o n S o f t w a r e >
< Service / >
< VO / >
< Cluster / >
< FileSystem / >
< NetworkA daptor / >
< JobPolicy / >
< AccessControlPolicy />
</ Capabilities >
< Requirements / >
< Adaptors >
< Adaptor name = " i n t e g r a t e d t o o l k i t . nio . master . NIOAdaptor " >
< MinPort > 43001 </ MinPort >
< MaxPort > 43002 </ MaxPort >
</ Adaptor >
</ Adaptors >
</ Resource >
</ ResourceList >
2.4.2
Project file
The project file provides information about the resources used in a specific execution.
Consequently, the resources that appear in this file are a subset of the resources described
in the resources.xml file. This file, that contains one entry per worker, is usually edited
by the users and changes from execution to execution. Its full definition schema can be
found at
/opt/COMPSs/Runtime/configuration/xml/projects/project schema.xsd.
We emphasize the importance of correctly defining the following entries:
6
installDir Indicates the path of the COMPSs installation inside the resource (not
necessarily the same than in the local machine).
User Indicates the username used to connect via ssh to the resource. This user must
have passwordless access to the resource (for more information check the COMPSs
Installation Manual available at our website http://compss.bsc.es). If left empty
COMPSs will automatically try to access the resource with the same username
than the one that lauches the COMPSs main application.
LimitOfTasks The maximum number of tasks that can be simultaneously scheduled to
a resource. Considering that a task can use more than one core of a node, this value
must be lower or equal to the number of available cores in the resource.
compss@bsc: ~$ cat / opt / COMPSs / Runtime / configuration / xml / projects / project . xml
<? xml version = " 1.0 " encoding = " UTF -8 " ? >
< Project >
<! -- Description for any physical node -- >
< Worker Name = " localhost " >
< InstallDir > /opt/COM P Ss/Runtime/scripts/system/ < /InstallDir >
< WorkingDir >/ tmp / </ WorkingDir >
<! − − < U ser > user < /U ser > −− >
< LimitOf T asks > 4 < /LimitOf T asks >
</ Worker >
</ Project >
2.5
Configuration examples
In the next subsections we provide specific information about the services, shared disks,
cluster and cloud configurations and several project.xml and resources.xml examples.
2.5.1
Services configuration
To allow COMPSs applications to use WebServices as tasks, the resources.xml can include
a special type of resource called Service. For each WebService it is necessary to specify
its wsdl, its name, its namespace and its port.
<? xml version = " 1.0 " encoding = " UTF -8 " ? >
< ResourceList >
< Resource Name = " localhost " >
...
</ Resource >
< Service wsdl = " http: // bscgrid05 . bsc . es:20390 / hmmerobj / hmmerobj ? wsdl " >
< Name > HmmerObjects </ Name >
< Namespace > http: // hmmerobj . worker </ Namespace >
< Port > H m m e r O b j e c t s P o r t </ Port >
</ Service >
</ ResourceList >
When configuring the project.xml file it is necessary to include the service as a worker
by adding an special entry indicating only the name and the limit of tasks as shown in
the following example:
7
<? xml version = " 1.0 " encoding = " UTF -8 " ? >
< Project >
<! -- Description for any physical node -- >
< Worker Name = " localhost " >
...
</ Worker >
< Worker Name = " http: // bscgrid05 . bsc . es:20390 / hmmerobj / hmmerobj ? wsdl " >
< LimitOfTasks >3 </ LimitOfTasks >
</ Worker >
</ Project >
2.5.2
Cluster and grid configuration (static resources)
In order to use external resources to execute the applications, the following steps have to
be followed:
1. Install the COMPSs Worker package (or the full COMPSs Framework package) on
all the new resources following the Installation manual available at http://compss.
bsc.es .
2. Set SSH passwordless access to the rest of the remote resources.
3. Create the WorkingDir directory in the resource (remember this path because it is
needed for the project.xml configuration).
4. Manually deploy the application on each node.
The resources.xml and the project.xml files must be configured accordingly. Here we
provide examples about configuration files for Grid and Cluster environments.
<? xml version = " 1.0 " encoding = " UTF -8 " standalone = " yes " ? >
< ResourceList >
< Resource Name = " hostname1 . domain . es " >
< Capabilities >
< Host >
< TaskCount >0 </ TaskCount >
< Queue > Short </ Queue >
</ Host >
< Processor >
< Architecture > x86_64 </ Architecture >
< Speed > 2.5 </ Speed >
< CoreCount >4 </ CoreCount >
</ Processor >
< OS >
< OSType > Linux </ OSType >
</ OS >
< Storage Element >
< Size > 250.0 </ Size >
</ Storag eElemen t >
< Memory >
< PhysicalSize > 4.0 </ PhysicalSize >
</ Memory >
< ApplicationSoftware >
< Software > BLAST </ Software >
</ A p p l i c a t i o n S o f t w a r e >
</ Capabilities >
< Requirements / >
8
< Adaptors >
< Adaptor name = " i n t e g r a t e d t o o l k i t . nio . master . NIOAdaptor " >
< MinPort > 43001 </ MinPort >
< MaxPort > 43002 </ MaxPort >
</ Adaptor >
</ Adaptors >
</ Resource >
< Resource Name = " hostname2 . domain . es " >
...
</ Resource >
</ ResourceList >
<? xml version = " 1.0 " encoding = " UTF -8 " standalone = " yes " ? >
< Project >
< Worker Name = " hostname1 . domain . es " >
< InstallDir >/ opt / COMPSs / Runtime / scripts / system / </ InstallDir >
< WorkingDir >/ home / user / </ WorkingDir >
< User > user </ User >
< LimitOfTasks >2 </ LimitOfTasks >
</ Worker >
< Worker Name = " hostname2 . domain . es " >
...
</ Worker >
</ Project >
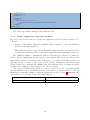
2.5.3
Shared Disks configuration example
Configuring shared disks might reduce the amount of data transfers improving the application performance. To configure a shared disk the users must edit the resources.xml
indicating how the shared disk is hosted in the master node and how the shared disk is
mounted in each worker.
To indicate a shared disk hosted in the master node the resources.xml file must include
a Disk tag describing the disk and the mount point. The following example states that in
the master node there is a shared disk labelled sharedDisk0 mounted on the /sharedDisk
directory.
<? xml version = " 1.0 " encoding = " UTF -8 " ? >
< ResourceList >
< Disk Name = " sharedDisk0 " >
< MountPoint >/ sharedDisk </ MountPoint >
</ Disk >
< ResourceList >
On the other side, to declare that a worker has a shared disk mounted the resources.xml
file must include a Disk tag inside the specific worker indicating its name (defined in the
master Disk tag) and its mount point inside the worker. In the following example the
sharedDisk0 is mounted on the resource hostname1.domain.es under the path /home/user/mySharedDisk/ .
< Resource Name = " hostname1 . domain . es " >
< Capabilities >
...
9
</ Capabilities >
< Requirements / >
< Adaptors >
...
</ Adaptors >
< Disks >
< Disk Name = " sharedDisk0 " >
< MountPoint >/ home / user / mySharedDisk </ MountPoint >
</ Disk >
</ Disks >
</ Resource >
The Disks tag can have multiple disk children nodes.
2.5.4
Cloud configuration (dynamic resources)
In order to use cloud resources to execute the applications, the following steps have to be
followed:
1. Prepare cloud images with the COMPSs Worker package or the full COMPSs
Framework package installed.
2. The application will be deployed automatically during execution but the users need
to set up the configuration files to specify the application files that must be deployed.
The COMPSs runtime communicates with a cloud manager by means of connectors.
Each connector implements the interaction of the runtime with a given provider’s API,
supporting four basic operations: ask for the price of a certain VM in the provider, get
the time needed to create a VM, create a new VM and terminate a VM. This design
allows connectors to abstract the runtime from the particular API of each provider and
facilitates the addition of new connectors for other providers.
The resources.xml file must contain one or more < CloudP rovider > tags that include
the information about a particular provider, associated to a given connector. The tag
must have an attribute name to uniquely identify the provider. Table 1 summarizes the
information to be specified by the user inside this tag.
Server
Connector
Endpoint of the provider’s server
Class that implements the connector
10
ImageList
Multiple entries of VM templates
• Image
• VM image
– Architecture
– Architeture of the VM image
– OSType
– Operative System installed in
the VM image
– ApplicationSoftware
– Multiple entries of software
installed in the VM image
∗ Software
∗ Software installed in the
VM image
– SharedDisks
– Multiple entries of shared
disks mounted in the VM image
∗ Disk
∗ Disk description
– Adaptors
– Multiple entries of adaptors
available at the VM image
∗ Adaptor
∗ Adaptor name and specific properties
InstanceTypes
Multiple entries of resource templates
• Resource
• Instance type offered by the
provider
– Capabilities
– Hardware details of instance
type
∗ Processor
∗ Architecture and number
of available cores
∗ Size in GB of the storage
∗ PhysicalSize, in GB of
the available RAM
∗ StorageElement
∗ Memory
Table 1: Configuration of resources.xml file, tag <
CloudP rovider >
The project.xml complements the information about a provider listed in the resources.xml
file. This file can contain a < Cloud > tag where to specify a list of providers, each with
a < P rovider > tag, whose name attribute must match one of the providers in the resources.xml file. Thus, the project.xml file must contain a subset of the providers specified
in the resources.xml file. Table 3 summarizes the information that users need to specify
inside the < Cloud > tag and Table 2 summarizes the information that users need to
specify inside the < P rovider > tag of the project.xml file.
11
InitialVMs
Number of VM to be created at the beginning of the application
minVMCount
Minimum number of VMs available in
the computation
maxVMCount
Maximum number of VMs available in
the computation
Provider
Multiple entries of Cloud providers
Table 2: Configuration of project.xml file, tag < Cloud >
LimitOfVMs
Property
Maximum number of VMs allowed by the provider
Multiple entries of provider-specific properties
• Name
• Name of the property
• Value
• Value of the property
ImageList
Multiple entries of VM images available at the
provider
• Image
• VM image
– InstallDir
– Path of the COMPSs worker scripts in
the image
– WorkingDir
– COMPSs working directory in the deployed instances
– User
– Account username
– Package
– Multiple entries of local packages that
have to be deployed in new instances
∗ Source
∗ Target
∗ InstalledSoftware
InstanceTypes
• Resource
∗ Local path of the package
∗ Path where to deploy the package in
the new instance
∗ List of software included in the
package
List of resource types that are available in the
provider
• Resource description
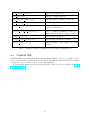
Table 3: Configuration of project.xml file, tag <
P rovider >
The next sections provide a description of each of the currently available connectors.
12
2.5.4.1
Cloud connectors: Amazon EC2
The COMPSs runtime features a connector to interact with the Amazon Elastic Compute
Cloud (EC2).
Amazon EC2 offers a well-defined pricing system for VM rental. A total of 8 pricing
zones are established, corresponding to 8 different locations of Amazon datacenters around
the globe. Besides, inside each zone, several per-hour prices exist for VM instances with
different capabilities. The EC2 connector stores the prices of standard on-demand VM
instance types (t1.micro, m1.small, m1.medium, m1.large and m1.xlarge) for each zone.
Spot instances are not currently supported by the connector.
When the COMPSs runtime chooses to create a VM in the Amazon public Cloud, the
EC2 connector receives the information about the requested characteristics of the new
VM, namely the number of cores, memory, disk and architecture (32/64 bits). According
to that information, the connector tries to find the VM instance type in Amazon that
better matches those characteristics and then requests the creation of a new VM instance
of that type.
Once an EC2 VM is created, a whole hour slot is paid in advance; for that reason,
the connector keeps the VM alive at least during such period, saving it for later use if
necessary. When the task load decreases and a VM is no longer used, the connector puts
it aside if the hour slot has not expired yet, instead of terminating it. After that, if the
task load increases again and the EC2 connector requests a VM, first the set of saved VMs
is examined in order to find a VM that is compatible with the requested characteristics.
If one is found, the VM is reused and becomes eligible again for the execution of tasks;
hence, the cost and time to create a new VM are not paid. A VM is only destroyed when
the end of its hour slot is approaching and it is still in saved state.
Table 4 summarizes the provider-specific properties that must be defined in the project.xml
file for the Amazon EC2 connector.
Placement
Location of the amazon datacentre to use
Access Key Id
Identifier of the access key of the Amazon EC2 account
Secret Key Id
Identifier of the secret key of the Amazon EC2 account
Key host location
Path to the SSH key in the local host, used to connect
to the VMs
KeyPair name
Name of the key pair to use
SecurityGroup name
Name of the security group to use
Table 4: Properties of the Amazon EC2 connector.
13
2.5.4.2
Cloud connectors: rOCCI
The connector uses the rOCCI binary client1 (version newer or equal than 4.2.5) which
has to be installed in the node where the COMPSs main application is executed.
This connector needs additional files providing details about the resource templates
available on each provider. This file is located under < COM P Ss IN ST ALL DIR >
/conf iguration/xml/templates path. Additionally, the user must define the virtual images flavors and instance types offered by each provider; thus, when the runtime decides
the creation of a VM, the connector selects the appropriate image and resource template
according to the requirements (in terms of CPU, memory, disk, etc) by invoking the rOCCI
client through Mixins (heritable classes that override and extend the base templates).
Table 5 contains the rOCCI specific properties that must be defined under the Provider
tag in the project.xml file and Table 5 contains the specific properties that must be defined
under the Instance tag.
Provider
ca-path
Path to CA certificates directory
user-cred
Path of the VOMS proxy
auth
Authentication method, x509 only supported
owner
Optional. Used by the VENUS-C Job Manager (PMES)
jobname
Table 5: rOCCI extensions in the project.xml file.
Instance
Multiple entries of resource templates.
Type
Name of the resource template. It has to be the same name
than in the previous files
CPU
Number of cores
Memory
Size in GB of the available RAM
Disk
Size in GB of the storage
Price
Cost per hour of the instance
Table 6: Configuration of the < provider > .xml templates file.
1
https://appdb.egi.eu/store/software/rocci.cli
14
3
Results and logs
3.1
Results
When executing a COMPSs application we consider different type of results:
• Application Output: Output generated by the application.
• Application Files: Files used or generated by the application.
• Tasks Output: Output generated by the tasks invoked from the application.
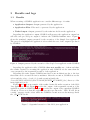
Regarding the application output, COMPSs will preserve the application output but
will add some pre and post output to indicate the COMPSs Runtime state. Figure 4
shows the standard output generated by the execution of the Simple Java application.
The green box highlights the application stdout while the rest of the output is produced
by COMPSs.
Figure 4: Output generated by the execution of the Simple Java application with COMPSs
Regarding the application files, COMPSs does not modify any of them and thus,
the results obtained by executing the application with COMPSs are the same than the
ones generated by the sequential execution of the application.
Regarding the tasks output, COMPSs introduces some modifications due to the fact
that tasks can be executed in remote machines. After the execution, COMPSs stores the
stdout and the stderr of each job (a task execution) inside the
/home/$U SER/.COM P Ss/$AP P N AM E/$EXEC N U M BER/jobs/ directory of the
main application node.
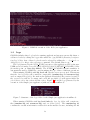
Figures 5 and 6 show an example of the results obtained from the execution of the Hello
Java application. While Figure 5 provides the output of the sequential execution of the
application (without COMPSs), Figure 6 provides the output of the equivalent COMPSs
execution. Please note that the sequential execution produces the ” Hello World! (from
a task) ” message in the stdout while the COMPSs execution stores the message inside
the job1 N EW.out file.
Figure 5: Sequential execution of the Hello java application
15
Figure 6: COMPSs execution of the Hello java application
3.2
Logs
COMPSs includes three log levels for running applications but users can modify them or
add more levels by editing the logger files under the /opt/COMPSs/Runtime/configuration/log/ folder. Any of these log levels can be selected by adding the − − log level =<
debug|inf o|of f > flag to the runcompss command. The default value is off.
The logs generated by the N U M EXEC execution of the application APP by the user
USER are stored under /home/$U SER/.COM P Ss/$AP P/$EXEC N U M BER/ folder
(from this point on: base log folder). The EXEC N U M BER execution number is
automatically used by COMPSs to prevent mixing the logs of data of different executions.
When running COMPSs with log level off only the errors are reported. This means
that the base log folder will contain two empty files (runtime.log and resources.log)
and one empty folder (jobs). If somehow the application has failed, the runtime.log and/or
the resources.log will not be empty and a new file per failed job will appear inside the
jobs folder to store the stdout and the stderr. Figure 7 shows the logs generated by the
execution of the Simple java application (without errors) in off mode.
Figure 7: Structure of the logs folder for the Simple java application in off mode
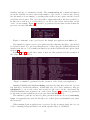
When running COMPSs with log level info the base log folder will contain two
files (runtime.log and resources.log) and one folder (jobs). The runtime.log file
contains the execution information retrieved from the master resource, including the file
16
transfers and the job submission details. The resources.log file contains information
about the available resources such as the number of processors of each resource (slots),
the information about running or pending tasks in the resource queue and the created
and destroyed resources. The jobs folder will be empty unless there has been a failed job.
In this case it will store, for each failed job, one file for the stdout and another for the
stderr. As an example, Figure 8 shows the logs generated by the same execution than the
previous case but with info mode.
Figure 8: Structure of the logs folder for the Simple java application in info mode
The runtime.log and resources.log are quite large files, thus they should be only checked
by advanced users. For an easier interpretation of these files the COMPSs Framework
includes a monitor tool. For further information about the COMPSs Monitor please check
Section 4.2.
Figures 9 and 10 provide the content of these two files generated by the execution of
the Simple java application.
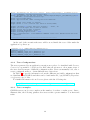
Figure 9: runtime.log generated by the execution of the Simple java application
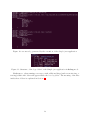
Running COMPSs with log level debug generates the same files as the info log level
but with more detailed information. Additionally, the jobs folder contains two files per
submitted job; one for the stdout and another for the stderr. In the other hand, the
COMPSs Runtime state is printed out on the stdout. Figure 11 shows the logs generated
by the same execution than the previous cases but with debug mode.
The runtime.log and the resources.log files generated in this mode can be extremely
large. Consequently, the users should take care of their quota and manually erase these
files if needed.
When running Python applications a pycompss.log file is written inside the base log
folder containing debug information about the specific calls to PyCOMPSs.
17
Figure 10: resources.log generated by the execution of the Simple java application
Figure 11: Structure of the logs folder for the Simple java application in debug mode
Furthermore, when running runcompss with additional flags (such as monitoring or
tracing) additional folders will appear inside the base log folder. The meaning of the files
inside these folders is explained in Section 4.
18
4
4.1
COMPSs Tools
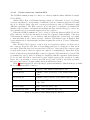
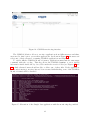
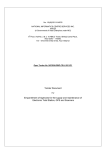
Application graph
At the end of the application execution a dependency graph can be generated representing
the order of execution of each type of task and their dependencies. To allow the final graph
generation the -g flag has to be passed to the runcompss command; the graph file is written
in the base log f older/monitor/complete graph.dot at the end of the execution.
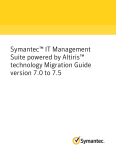
Figure 12 shows a dependency graph example of a SparseLU java application. The
graph can be visualized by running the following command:
compss@bsc :~ $ gengraph ~/. COMPSs / sparseLU . arrays . SparseLU_01 / monitor / comp lete_gra ph . dot
Figure 12: The dependency graph of the SparseLU application
4.2
COMPSs Monitor
The COMPSs Framework includes a Web graphical interface that can be used to monitor
the execution of COMPSs applications. COMPSs Monitor is installed as a service and
can be easily managed by running any of the following commands:
19
compss@bsc :~ $ sudo service compss - monitor usage
Usage : / usr / sbin / service compss - monitor
{ start | stop | reload | restart | try - restart | force - reload | status }
4.2.1
Service configuration
The COMPSs Monitor service can be configured by editing the /opt/COMPSs/Tools/
monitor/apache-tomcat/conf/compss-monitor.conf file which contains one line per property:
• IT M ON IT OR Default directory to retrieve monitored applications (defaults to
the .COMPSs folder inside the root user).
• COM P Ss M ON IT OR P ORT Port where to run the compss-monitor web service
(defaults to 8080).
• COM P Ss M ON IT OR T IM EOU T Web page timeout between browser and server
(defaults to 20s).
4.2.2
Usage
In order to use the COMPSs Monitor users need to start the service as shown in Figure
13.
Figure 13: COMPSs Monitor start command
And use a web browser to open the specific URL:
compss@bsc :~ $ firefox http :// localhost :8080/ compss - monitor &
20
Figure 14: COMPSs monitoring interface
The COMPSs Monitor allows to monitor applications from different users and thus,
users need to first login to access their applications. As shown in Figure 14, the users can
select any of their executed or running COMPSs applications and display it.
To enable all the COMPSs Monitor features, applications must run the runcompss
command with the -m flag. This flag allows the COMPSs Runtime to store special
information inside inside the log base folder under the monitor folder (see Figures 15 and
16). Only advanced users should modify or delete any of these files. If the application
that a user is trying to monitor has not been executed with this flag, some of the COMPSs
Monitor features will be disabled.
Figure 15: Execution of the Simple Java application with the monitoring flag enabled
21
Figure 16: Logs generated by the Simple java application with the monitoring flag enabled
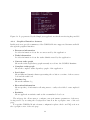
4.2.3
Graphical Interface features
In this section we provide a summary of the COMPSs Monitor supported features available
through the graphical interface:
• Resources information
Provides information about the resources used by the application
• Tasks information
Provides information about the tasks definition used by the application
• Current tasks graph
Shows the tasks dependency graph currently stored into the COMPSs Runtime
• Complete tasks graph
Shows the complete tasks dependecy graph of the application
• Load chart
Shows different dynamic charts representing the evolution over time of the resources
load and the tasks load
• Runtime log
Shows the runtime log
• Execution Information
Shows specific job information allowing users to easily select failed or uncompleted
jobs
• Statistics
Shows application statistics such as the accumulated cloud cost.
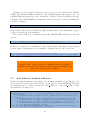
The webpage also allows users to configure some performance parameters of the monitoring service by accessing the Configuration button at the top-right corner of the web
page.
For specific COMPSs Monitor feature configuration please check our FAQ section at
the top-right corner of the web page.
22
Attention: To enable all the COMPSs Monitor features applications
must run with the −m flag.
4.3
Application tracing
COMPSs Runtime can generate a post-execution trace of the execution of the application.
This trace is useful for performance analysis and diagnosis.
A trace file may contain different events to determine the COMPSs master state, the
task execution state or the file-transfers. The current release does not support file-transfers
informations.
During the execution of the application, an XML file is created in the worker nodes
to keep track of these events. At the end of the execution, all the XML files are merged
to get a final trace file.
In this manual we only provide information about how to obtain a trace and about
the available Paraver (the tool used to analyze the traces) configurations. For further
information about the application instrumentation or the trace visualization please check
the COMPSs Tracing Manual available at http://compss.bsc.es .
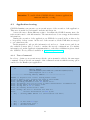
4.3.1
Trace Command
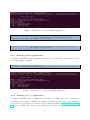
In order to obtain a post-execution trace file the option -t must be added to the runcompss
command. Next we provide an example of the command execution with the tracing option
enabled for the Hmmer java application.
compss@bsc :~ $ runcompss -t -- classpath =/ home / compss / workspa ce_java / hmmerobj / jar / hmmerobj .
jar
hmmerobj . HMMPfam
/ sharedDisk / Hmmer / smart . HMMs . bin / sharedDisk / Hmmer /256 seq
/ home / compss / out . txt 2 8 -A 222
- - - - - - - - - - - - - - - - - Executing hmmerobj . HMMPfam - - - - - - - - - - - - - - - - - - - - - - - - - WARNING : IT Properties file is null . Setting default values
Welcome to Extrae 3.1.1 rc ( revision 3360 based on extrae / trunk )
Extrae : Warning ! EXTRAE_HOME has not been defined !.
Extrae : Generating intermediate files for Paraver traces .
Extrae : Intermediate files will be stored in / home / compss / workspa ce_java / hmmerobj / jar
Extrae : Tracing buffer can hold 500000 events
Extrae : Tracing mode is set to : Detail .
Extrae : Successfully initiated with 1 tasks
Extrae : Warning ! API tries to initialize more than once
Extrae :
Previous initi alizati on was done by API
[
API ]
-
Starting COMPSs Runtime v1 .3 ( build 20151016 -1931. rnull )
API ]
API ]
API ]
-
No more tasks for app 1
Getting Result Files 1
Execution Finished
...
...
...
[
[
[
23
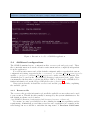
Extrae : Intermediate raw trace file created : / home / compss / worksp ace_jav a / hmmerobj / jar /
set -0/ TRACE@bsc . 0 0 0 0 0 3 1 6 3 7 0 0 0 0 0 0 0 0 0 0 0 0 . mpit
Extrae : Intermediate raw sym file created : / home / compss / w orkspace _java / hmmerobj / jar / set
-0/ TRACE@bsc . 0 0 0 0 0 3 1 6 3 7 0 0 0 0 0 0 0 0 0 0 0 0 . sym
Extrae : Deallocating memory .
Extrae : Application has ended . Tracing has been terminated .
merger : Output trace format is : Paraver
merger : Extrae 3.1.1 rc ( revision 3360 based on extrae / trunk )
mpi2prv : Checking for target directory existance ... exists , ok !
mpi2prv : Selected output trace format is Paraver
mpi2prv : Stored trace format is Paraver
mpi2prv : Parsing intermediate files
mpi2prv : Removing temporal files ... done
mpi2prv : Co n gr at ul a ti on s ! ./ trace / hmmerobj . H M M P f a m _ c o m p s s _ t r a c e _ 1 4 4 0 1 5 1 1 1 4 . prv has been
generated .
------------------------------------------------------------
At the end of the execution the trace will be stored inside the trace folder under the
application log directory.
compss@bsc :~ $ cd . COMPSs / hmmerobj . HMMPfam / trace /
compss@bsc :~ $ ls -1
hmmerobj . H M M P f a m _ c o m p s s _ t r a c e _ 1 4 4 4 9 2 2 0 7 7 . pcf
hmmerobj . H M M P f a m _ c o m p s s _ t r a c e _ 1 4 4 4 9 2 2 0 7 7 . prv
hmmerobj . H M M P f a m _ c o m p s s _ t r a c e _ 1 4 4 4 9 2 2 0 7 7 . row
4.3.2
Trace Configurations
The traces generated by an application execution are ready to be visualized with Paraver.
Paraver is a powerful tool developed by BSC that allows users to show many views of
the trace data by means of different configuration files. Users can manually load, edit or
create configuration files to obtain different trace data views.
In Table 7 we provide information about the different pre-build configurations that
we distribute with COMPSs and that can be found under the /opt/COMPSs/Dependencies/paraver/cfgs/ folder.
For further information about Paraver please visit the following site:
http://www.bsc.es/computer-sciences/performance-tools/paraver
4.3.3
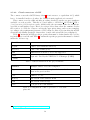
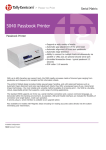
Trace examples
COMPSs traces can be very complex as the number of workers or tasks grows. Just to
illustrate this, the following pictures show traces with a greater number of workers and
tasks.
24
2dp runtime state.cf g
2D plot of runtime state
2dp tasks.cf g
2D plot of tasks duration
3dh duration runtime.cf g
3D Histogram of runtime execution
3dh duration tasks.cf g
3D Histogram of tasks duration
compss runtime.cf g
Shows COMPSs Runtime events (at
master and workers)
compss tasks and runtime.cf g
Shows COMPSs Runtime events (at
master and workers) and tasks execution
compss tasks.cf g
Shows tasks execution
compss tasks numbers.cf g
Shows tasks execution by task id
compss transf ers.cf g
Shows transfer time spent by each
worker
Table 7: Available paraver configurations for COMPSs Applications
4.4
COMPSs IDE
COMPSs IDE is an Integrated Development Environment to develop, compile, deploy
and execute COMPSs applications. It is available through the Eclipse Market as a plugin
and provides an even easier way to work with COMPSs.
For further information please check the COMPSs IDE User Guide available at: http:
//compss.bsc.es .
25
Figure 17: Examples of complex traces
26
5
Common Issues
This section provides answers for the most common issues of the execution of COMPSs
applications. For specific issues not covered in this section, please do not hesitate to
contact us at:
[email protected]
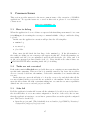
5.1
How to debug
When the application does not behave as expected the first thing users must do is to run
it in debug mode executing the runcompss command withthe -d flag to enable the debug
log level.
In this case the application execution will produce the following files:
• runtime.log
• resources.log
• jobs folder
First, users should check the last lines of the runtime.log. If the file-transfers or
the tasks are failing an error message will appear in this file. If the file-transfers are
successfully and the jobs are submitted, users should check the jobs folder and look
at the error messages produced inside each job. Users should notice that if there are
RESU BM IT T ED files something inside the job is failing.
5.2
Tasks are not executed
If the tasks remain in Blocked state probably there are no existing resources matching the
specific task constraints. This error can be potentially caused by two facts: the resources
are not correctly loaded into the runtime, or the task constraints do not match with any
resource.
In the first case, users should take a look at the resouces.log and check that all the
resources defined in the project.xml file are available to the runtime. In the second case
users should re-define the task constraints taking into account the resources capabilities
defined into the resources.xml and project.xml files.
5.3
Jobs fail
If all the application’s tasks fail because all the submitted jobs fail, it is probably due to
the fact that there is a resource miss-configuration. In most of the cases, the resource
that the application is trying to access has no passwordless access through the configured
user. This can be checked by:
• Open the project.xml. (The default file is stored under /opt/COMPSs/ Runtime/configuration/xml/projects/project.xml
27
• For each resource annotate its name and the value inside the User tag. Remember
that if there is no User tag COMPSs will try to connect this resource with the same
username than the one that launches the main application.
• For each annotated resourceName - user please try ssh user@resourceName. If the
connection asks for a password then there is an error in the configuration of the ssh
access in the resource.
The problem can be solved running the following commands:
compss@bsc :~ $ scp ~/. ssh / id_dsa . pub u s e r @ r e s o u r c e N a m e :./ mydsa . pub
compss@bsc :~ $ ssh u s e r @ r e s o u r c e N a m e " cat mydsa . pub >> ~/. ssh / au t ho ri ze d _k ey s ; rm ./ mydsa .
pub "
These commands are a quick solution, for further details please check the Additional
Configuration section inside the COMPSs Installation Manual available at our website
http://compss.bsc.es.
5.4
Compilation error: @Method not found
When trying to compile Java applications users can get some of the following compilation
errors:
error : package i n t e g r a t e d t o o l k i t . types . annotations does not exist
import i n t e g r a t e d t o o l k i t . types . annotations . Constraints ;
^
error : package i n t e g r a t e d t o o l k i t . types . annotations does not exist
import i n t e g r a t e d t o o l k i t . types . annotations . Method ;
^
error : package i n t e g r a t e d t o o l k i t . types . annotations does not exist
import i n t e g r a t e d t o o l k i t . types . annotations . Parameter ;
^
error : package i n t e g r a t e d t o o l k i t . types . annotations . Parameter does not exist
import i n t e g r a t e d t o o l k i t . types . annotations . Parameter . Direction ;
^
error : package i n t e g r a t e d t o o l k i t . types . annotations . Parameter does not exist
import i n t e g r a t e d t o o l k i t . types . annotations . Parameter . Type ;
^
error : cannot find symbol
@Parameter ( type = Type . FILE , direction = Direction . INOUT )
^
symbol :
class Parameter
location : interface A PP LI CA T IO N_ I tf
error : cannot find symbol
@Constraints ( p r o c e s s o r C o r e C o u n t = 2)
^
symbol :
class Constraints
location : interface A PP LI CA T IO N_ I tf
error : cannot find symbol
@Method ( decla ringCla ss = " application . A p pl ic at i on Im pl " )
^
symbol :
class Method
location : interface A PP LI CA T IO N_ I tf
28
All these errors are raised because the compss-engine.jar is not listed in the CLASSPATH. The default COMPSs installation automatically inserts this package into the
CLASSPATH but it may have been overwritten or deleted. Please check that your environment variable CLASSPATH containts the compss-engine.jar location by running the
following command:
$ echo $CLASSPATH | grep compss - engine
If the result of the previous command is empty it means that you are missing the compssengine.jar package in your classpath.
The easiest solution is to manually export the CLASSPATH variable into the user
session:
$ export CLASSPATH = $CLASSPATH :/ opt / COMPSs / Runtime / compss - engine . jar
However, you will need to remember to export this variable every time you log out and
back in again. Consequently, we recommend to add this export to the .bashrc file:
$ echo " # COMPSs variables for Java compilation " >> ~/. bashrc
$ echo " export CLASSPATH = $CLASSPATH :/ opt / COMPSs / Runtime / compss - engine . jar " >> ~/. bashrc
Attention: The compss-engine.jar is installed inside the COMPSs
installation directory. If you have performed a custom installation, the
path of the package may be different.
5.5
Jobs failed on method reflection
When executing an application the main code gets stuck executing a task. Taking a look
at the runtime.log users can check that the job associated to the task has failed (and all
its resubmissions too). Then, opening the jobX N EW.out or the jobX N EW.err files
users find the following error:
[ ERROR | i n t e g r a t e d t o o l k i t . Worker | Executor ] Can not get method by reflection
i n t e g r a t e d t o o l k i t . nio . worker . executors . E x e c u t o r $ J o b E x e c u t i o n E x c e p t i o n : Can not get method
by reflection
at i n t e g r a t e d t o o l k i t . nio . worker . executors . JavaExecutor . executeTask ( JavaExecutor .
java :142)
at i n t e g r a t e d t o o l k i t . nio . worker . executors . Executor . execute ( Executor . java :42)
at i n t e g r a t e d t o o l k i t . nio . worker . JobLauncher . executeTask ( JobLauncher . java :46)
at i n t e g r a t e d t o o l k i t . nio . worker . JobLauncher . pr oc es s Re qu es t s ( JobLauncher . java :34)
at i n t e g r a t e d t o o l k i t . util . R e q u e s t D i s p a t c h e r . run ( R e q u e s t D i s p a t c h e r . java :46)
at java . lang . Thread . run ( Thread . java :745)
Caused by : java . lang . N o S u c h M e t h o d E x c e p t i o n : simple . Simple . increment ( java . lang . String )
at java . lang . Class . getMethod ( Class . java :1678)
29
at i n t e g r a t e d t o o l k i t . nio . worker . executors . JavaExecutor . executeTask ( JavaExecutor .
java :140)
... 5 more
This error is due to the fact that COMPSs cannot find one of the tasks declared in
the Java Interface. Commonly this is triggered by one of the following errors:
• The declaringClass of the tasks in the Java Interface has not been correctly defined.
• The parameters of the tasks in the Java Interface do not match the task call.
• The tasks have not been defined as public.
5.6
Jobs failed on reflect target invocation null pointer
When executing an application the main code gets stuck executing a task. Taking a look
at the runtime.log users can check that the job associated to the task has failed (and all
its resubmissions too). Then, opening the jobX N EW.out or the jobX N EW.err files
users find the following error:
[ ERROR | i n t e g r a t e d t o o l k i t . Worker | Executor ]
java . lang . reflect . I n v o c a t i o n T a r g e t E x c e p t i o n
at sun . reflect . N a t i v e M e t h o d A c c e s s o r I m p l . invoke0 ( Native Method )
at sun . reflect . N a t i v e M e t h o d A c c e s s o r I m p l . invoke ( N a t i v e M e t h o d A c c e s s o r I m p l . java :57)
at sun . reflect . D e l e g a t i n g M e t h o d A c c e s s o r I m p l . invoke ( D e l e g a t i n g M e t h o d A c c e s s o r I m p l .
java :43)
at java . lang . reflect . Method . invoke ( Method . java :606)
at i n t e g r a t e d t o o l k i t . nio . worker . executors . JavaExecutor . executeTask ( JavaExecutor .
java :154)
at i n t e g r a t e d t o o l k i t . nio . worker . executors . Executor . execute ( Executor . java :42)
at i n t e g r a t e d t o o l k i t . nio . worker . JobLauncher . executeTask ( JobLauncher . java :46)
at i n t e g r a t e d t o o l k i t . nio . worker . JobLauncher . pr oc es s Re qu es t s ( JobLauncher . java :34)
at i n t e g r a t e d t o o l k i t . util . R e q u e s t D i s p a t c h e r . run ( R e q u e s t D i s p a t c h e r . java :46)
at java . lang . Thread . run ( Thread . java :745)
Caused by : java . lang . N u l l P o i n t e r E x c e p t i o n
at simple . Ll . printY ( Ll . java :25)
at simple . Simple . task ( Simple . java :72)
... 10 more
This cause of this error is that the Java object accessed by the task has not been
correctly transferred and one or more of its fields is null. The transfer failure is normally
caused because the transferred object is not serializable.
Users should check that all the object parameters in the task are either implementing
the serializable interface or following the java beans model (by implementing an empty
constructor and getters and setters for each attribute).
30
Please find more details on the COMPSs framework at
http://compss.bsc.es
31