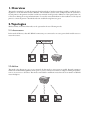
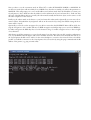
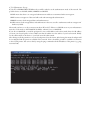
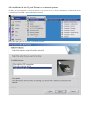
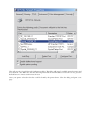
1
Networking Basics
&
Crystal Printer
Network Installation Guidelines
1. Overview
This guide is intended to provide the necessary basic knowledge of wireless networking needed to enable the Crystal printer to work with wireless LAN (WLAN). The document is based on the assumption that the reader has a
Crystal printer at his premises and has read the user manual. It will provide a definition of the typical terms one
comes across during the set-up and maintenance of a wireless network. Furthermore the installation of the Crystal
printer as a network printer is described and some troubleshooting hints are given.
2.Topologies
Wireless LANs (Local Area Networks) can be operated in the two following modes.
2.1 Infrastructure
In this mode all devices, that offer WLAN connectivity, are connected to an access point which enables access to
network resources.
2.2 Ad-Hoc
This mode is also known as a peer to peer network. In this mode no access point is needed. Personal computers
and devices with WLAN capabilities create point to point connections between two adapter enabling all workstations to act as servers to all others. This mode is intended for small home networks with a low number of WLAN
network adapters.
3. Definitions
This sections describes the terms a user might come across during the set-up of a wireless network.
3.1 Network Addresses
Network adapters and personal computers have to be uniquely identifiable in order to be accessible in a network.
Therefore each device uses a combination of the MAC address and the IP address to identify itself in a network.
3.1.1 MAC Address
The MAC (Media Access Control) address is a six byte long address which is attached to most network adapters.
This address is designed to be globally unique and is hardwired in the hardware of the network adapter. The MAC
address of a WLAN adapter can be found on a label attached to the adapter.
3.1.2 IP Address
An IP address (Internet Protocol address) is a unique number, similar in concept to a telephone number, used by
personal computers and other network devices to refer to each other when sending information through the Internet. Unlike the MAC address the IP address is a software address that can be changed as often as the user likes.
An IP address is four bytes long address, usually represented as four dot separated numbers like 192.168.1.1. The
IP address of a network adapter is either set statically by the user or is provided by a DHCP server.
3.2 SSID (Service Set Identifier)
In wireless LAN networks the SSID is a label attached to every packet that is transmitted in a network. In order
to receive packets or access other computers a network adapter has to know this SSID. In other words on every
device that is connected to a dedicated wireless network, the same SSID has to be set on every device.
3.3 Authentication
Since transmissions are made over a radio link in WLAN networking, the connection is susceptible to eavesdropping. Therefore two ways of authentication were foreseen in the IEEE 802.11 standards.
3.3.1 WEP (Wired Equivalent Privacy)
This way of authentication was designed to provide a way of secure communication equivalent to that of a wired
network hence the name Wired Equivalent Privacy (WEP). The encryption system uses four user-entered keys
with a length of five (or ten) characters. The five character key is used for 64bit encryption. If a safer type of encryption is needed, the user can switch to 128bit encryption which uses ten character long keys. The same four
keys have to be entered on every device that wants to access the network. Unfortunately the WEP standard has
some shortcomings which make it possible to still continue eavesdropping if one has the proper equipment.
3.3.2 WPA (Wi-Fi Protected Access)
To overcome the flaws of WEP, the WPA standard was created. This method uses a longer key and a protocol that
dynamically changes the key during the transmission which makes it much harder to eavesdrop on the network.
WPA is not supported by the Crystal Printer WLAN adapter.
3.4 Channels
Wireless networks use a radio link to transmit packets. Depending on the country the wireless network is set up
in, there are up to 13 channels representing specific radio frequencies. Every adapter has to use the same channel
in order to communicate in the same network.
3.5 DHCP (Dynamic Host Configuration Protocol)
DHCP is a protocol that enables network devices to automatically retrieve an IP address from a DHCP server. A
DHCP server knows a pool of IP addresses that he can assign to the network devices that request an IP address.
3.6 Subnet Mask
The subnet mask is a bit mask which defines how much of an IP address belongs to the private subnetwork and
what belongs to the host network. For example the IP address 192.168.1.25 in the subnetwork 255.255.255.0 is
split into the host network address 192.168.1 and subnetwork address 25. In order to enable two network devices
to communicate with each other they have to share the same host network address.
3.7 Network Devices
Networks consist of numerous devices which have to be connected to each other. This happens with the help of a
network device. There are different types of network devices which will be described in the following.
3.7.1 Hub
A hub is a device that combines all the connected network devices into one network segment. In other words
packets that are transmitted through a hub will be forwarded to every connected network device and not just to
the device that is to be addressed. Nowadays hubs have mainly been replaced by switches.
3.7.2 Switch
A switch is an intelligent hub that remembers the MAC addresses of the connected interfaces and can therefore
forward packets with a certain destination to that destination without having to send them to all connected interfaces.
3.7.3 Access Point
A wireless access point is a device that connects WLAN adapters in a wireless network. Often an access point is
connected to a wired network and provides access to this network to the WLAN adapters.
3.7.4 Router
While hubs and switches connect devices to local networks, routers connect different networks. In other words
routers are devices that make a network seem like a single IP address to other networks. This is done through a
process called NAT.
3.8 NAT (Network Address Translation)
Network Address Translation was introduced to overcome a shortage of IP addresses. It is a technique which rewrites source and/or destination IP addresses in packets when they pass through a router or a firewall. This feature
is mostly used to allow multiple hosts in a private network to access the internet.
Normally every host that wants to access the internet has to have a registered IP address. Unfortunately IP adresses
are of limited quantity. NAT makes it possible to have multiple hosts in a private network (for example in the
private IP range 192.168.x.x or 10.x.x.x) which are connected to a router which is the interface to the internet.
The router modifies the packets in a way that the remote host that should be accessed only sees the external IP
address of the router. Answers are sent to the router which modifies the packets and relays them to the host in the
private network that sent the actual request.
4. Installation of a Crystal Network Printer
4.1 What is needed to install the Crystal Network Printer?
To use your Crystal printer as a wireless network printer, you need to have the following items:
• PC connected to wireless network either via access point (infrastructure topology) or via WLAN adapter
(ad-hoc topology)
• USB WLAN adapter for the Crystal printer
• Companion Suite installed on your PC
4.2 Basic steps of installation
• Install the Wireless drivers on the PC
• Setup the network parameters on the PC (IP address, mask)
• Setup all parameters on the Crystal Printer
• Verify the basic function with a ping command (see below)
• Install the Crystal Network Printer driver at all PCs which will shall access the Crystal Printer
4.3 Installation of the WLAN Function on the PC
The first step to enable the WLAN capabilities of your Crystal printer is to connect the PC to a wireless network.
Install your WLAN USB adapter according to the installation manual of the manufacturer or activate the WLAN
driver if you have a PC / Laptop with built in WLAN support. Verify that the WLAN is working correctly. Most
adapters have a LED that starts flashing during start-up and is lit constantly to indicate that the adapter is ready
to work.
4.4 Set-up of Network Parameters
Choose an IP address and a subnet mask for the WLAN adapter. Take care that this parameters match to the
Crystal Printer IP address range.
4.5 Set-up of WLAN on the Crystal Printer
The next step is to set up the WLAN parameters on your Crystal printer. First of all connect your USB WLAN
adapter to the USB connector on the right hand side of the device. Wait until the LED on the connector is either
flashing or lit constantly.
4.5.1 Network Scan
Go to Menu 911 which will issue a scan for available wireless networks. If any networks are found they will be
displayed. Select the correct network which sets the SSID to the correct name on the Crystal printer and the
network mode will be set to the correct mode (ad-hoc or infrastructure). If encryption is enabled in the network
the user will be asked to enter the four WEP keys of the network. The network scan facilitates the set-up process
in such a way that the user has only to set the IP address and subnet mask in Menu 916 and Menu 917. If no
network is found, the scan is not possible or you want to change the network settings, follow the next steps to set
up the wireless network.
4.5.2 Ad-Hoc Set-up
If you choose AD-HOC mode, you will be asked to choose the WLAN channel of your network. Enter the channel you want your network to work on.
As a next step you have to set the SSID of the network in Menu 913. This should be set to the SSID of your
wireless home network. Take care of capital letters ! If you do not yet have a wireless network set up, just set the
SSID to the name you want your network to have.
Next you have to set the connection mode in Menu 915 to either AUTOMATIC (DHCP) or MANUAL. In
an ad-hoc network there will most likely be no DHCP server, therefore normally you will set this parameter to
MANUAL. This will prompt you to enter an IP address and a subnet mask. Enter the IP address you want your
Crystal printer to have. Make sure that the address is in the subnetwork of your local network i.e. make sure that
the parts of the IP address that are covered by the subnet mask (usually the first three bytes) are the same as on all
the other computers on the network.
Finally set the subnet mask on the device to your local network’s subnet mask. Optionally you can enter a hostname in Menu 918 which the Crystal printer will use in the network. If you keep the default settings the hostname will be “crystal”.
Optionally you can also set the encryption for your ad-hoc network in the SECURITY Menu (Menu 914). Setting the encryption to 64 or 128bit will turn on WEP encryption and will prompt you to enter four WEP keys.
For 64bit encryption the WEP keys has to be five characters long, for 128bit encryption it has to have a length
of 13 characters.
After having set all the parameters on your Crystal printer, leave the menu. On your PC open the configuration
tool of your WLAN network adapter and scan for available networks. The ad-hoc network SSID that was set on
the Crystal printer should now be visible. Set the network adapter to connect to this network. Now it should be
possible to establish a connection to the Crystal printer. You can test this by using the ping command with the IP
address of the printer (e.g. ping 192.168.1.10).
4.5.3 Infrastructure Set-up
If you choose INFRASTRUCTURE mode you will be asked to set the authentication mode of the network. The
possible choices are NONE, OPEN, SHARED and BOTH.
NONE means that there is no encrypted authentication and data is transmitted without encryption.
OPEN activates encryption of data and still works with unencrypted authentication.
SHARED activates both encrypted data and authentication.
BOTH activates both encrypted data and authentication but tries as well to authenticate without encryption if
the first try failed.
Afterwards you have to set the connection mode in Menu 915. If there is a DHCP server in your infrastructure
network, set the mode to AUTOMATIC (DHCP), otherwise set it to MANUAL.
If you choose MANUAL, you will be prompted to enter an IP address and a subnet mask. Enter the IP address
you want your Crystal printer to have. Make sure that the address is in the subnet of your local network. Finally
set the subnet mask on the device to your local network’s subnet mask.
After having set all the parameters on your Crystal printer, leave the menu. After leaving the menu the adapter will
be reconfigured and the printer is available in the network. Now it should be possible to establish a connection
to the Crystal printer. You can test this by using the ping command with the IP address of the printer (e.g. ping
192.168.1.10).
4.6 Installation of the Crystal Printer as a network printer
To add your Crystal printer as a network printer to the system, move to Start > Programs >Companion Suite
> Companion Suite IH > Add or Remove a device.
In the new dialog choose “Install a network printer”.
This will open the Network Printer Configuration dialog which will show you all the Crystal network printers the
application could find on the network. Normally there should only be one but if there are more than one printer
in the list you can find the correct one by comparing the MAC address indicated on the screen to the one listed
on the USB WLAN adapter.
Once you selected the correct printer from the list of printers that are shown to you, click on the Install Selected Printer button. This will finalise the installation and the Crystal printer will be added to your installed
printers.
You can print a test page or print documents from your application programs.
5.Troubleshooting
5.1 General Information
5.1.1 Print Network Report
A summary of the network settings can be printed out with the help of Menu 95. On this reports the user can
find out which networking components are enabled and which networking modes are set.
5.1.2 Restore factory default WLAN settings
If it is necessary to restore the default settings of the wireless network configuration, the user can do so by using
the Menu 919.
5.2 Changing the printer’s IP address
If you change the IP address of your Crystal printer, the device will shutdown the network adapter and restart it
with the new network parameters. Therefore the connection will be lost for about five to ten seconds. After this
period you should be able to access the printer again with a ping command.
To make sure that the new IP address is set in the device one has to exit the wireless LAN menu. This initiates the
reboot of the WLAN USB adapter.
The second step is getting the PC network printer driver to communicate again with the Crystal printer. To
achieve this open the Windows printer menu Start > Settings > Printers. Select your network printer and
right-click on it. Choose the properties menu and in there choose the Ports tab. Normally the Crystal Network
Port should be selected, if not select it now and click on the Configure Port button.
This will open the Crystal Network Configuration dialog. This dialog will scan for available network printers and
show them in a list. Make sure that the network printer with the new IP address is listed. If it is not, press the
Refresh button to initiate another network scan.
Once your printer is listed in this list it will be found by the printer driver. Close the dialog and print a test
page.
5.3 Simultaneous connection of USB and LAN
It is possible to have the Crystal printer connected to your PCs via USB and LAN simultaneously. However the
same printer will be installed as two printers on your system: once as a USB printer and once as a network printer.
If you start print jobs on the network printer and the USB printer simultaneously, there will be a conflict because
only one driver can access the printer. The print job that will be started first, will be printed. The other one will
show the following dialog as the printer is busy.
If you wait until the printer is finished and then click on the Continue button, the pending print job will start.