1
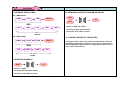
About Safety
Do not bend or excessively twist the cord or place heavy
objects on top of it. Excessive bending or twisting the
cord or placing heavy objects on the cord may cause the
wires inside to short circuit thus causing a fire hazard.
LED Electronic Sign
User Guide Manual
(Ver 1.1)
Do not touch plug or outlet with wet hands because
touching the plug or outlet with wet or damp hands may
cause electrical shock.
Plug securely into outlet so that it does not shake or
wiggle loose. Loose plugs can overheat and cause an
electrical fire.
Do not open, take apart or modify any part of the Sign.
Opening or modifying this Sign in any way is dangerous
and can result in short circuits that can cause bodily
harm or even death.
If you detect smoke or smell anything unusual,
immediately stop using the Electric Sign, turn off the
power, unplug the Sign and then call the service center.
Continuing to use the Sign after detecting smoke or an
unusual smell is dangerous and it can result in fire.
Handle with care while transferring or carrying the Sign.
Dropping the unit causes damage and it may not work
properly.
While installing the Sign, be sure to fasten it securely.
Unsecured Sign can fall causing injury and bodily harm.
Finest LED Signs
4352 NFederal Hwy.
Fort Lauderdale FL 33308
Escape from installing the Sign near the severe vibration
and a magnet or magnetic sources which will make it
inoperable.
Tel : 954-771-5488
Fax : 954-267-0551
E-mail : [email protected]
URL : http://finestledsigns.com
Do not disassemble or carelessly open the IR Remote
Control. Disassembling will cause unexpected problem
on it.
Copyrights © 2007 Finest Services Inc. All Rights Reserved
Table of Contents
Features of LED Sign
Users can freely adjust the size of letters and characters.
Before Using LED Sign
Features of LED Sign
Remote Control Button Names and Functions
How To Input Data Using the Remote Control
4
5
7
Users can set up Sign by following basic steps 1-6 or by
expanding and adding features during each step.
Brighter than normal Signs.
Sign is waterproof and completely safe for outdoor use.
Basic User’s Manual
How to Enter Basic Ads Info.
9
Sign has a unique Silicon waterproof treatment.
Offers automatic On/Off feature.
How To Use Manu Functions
Can be programmed to display the date and time.
Menu Table
Add Contents
Modify Contents
Insert Contents
Index Contents
Delete Contents
Stop Watch
Password
Set Timer
Setting Up
Manager
11
12
17
18
19
20
21
22
23
24
25
Kinds of Effects
26
Copyrights © 2007 Finest Services Inc. All rights reserved.
Sign has a built-in timer chip used to display the time and date of
various activities and functions using various graphic effects.
It can also indicate current and future events to enhance your
advertising.
Choose up to 20 extra effects.
Sing is capable of displaying approximately one hundred
different and distinctive results.
Remote Control
Buttons
Functions
Buttons
Functions
1. Power
Turns Sign On/Off
25. Icon
Used to input stop icon
2. Color Tone
Change color tone of characters and letters
26. Foreign Characters
Used to enters foreign languages.
3. Expand
Control the size of characters and letters
4. Korean Alphabet
Used to enter Korean Language
5. English (Capital)
Used to enter English Capital Letter
6. Delete
Used to delete previously entered message
7. Speed
Used to control the speed of message
8. Light
Controls illumination
9. Copy
Used to copy previously entered letter
10. Demo
Used to show the results of various input
11. Special
Used to enter special letters r characters
12. Action
Used to display animation
13. Menu
Enhances the control function of Sign
14. Attribute
Used to change the size and other attributes
15. Character/Language
Used to enter /change letters (i.e. A to B)
8
16. Lower Case English
Used to enter lower case English letters
9
10
23
22
17. Number
Used to enter Number
11
12
25
24
18. Space
Used to enter a space between words
26
26
26
19. Effect
Used to select various effects from the Menu
20. Confirm (OK)
Used to confirm various functions and actions
21. ESC
Used to cancel
22. Centering / Justifying
Used to center a line of characters
23. Neon
Used to add a neon effect
24. Symbol
Used to input symbols and special characters
Copyrights © 2007 Finest Services Inc. All rights reserved.
1
13
2
3
14
15
4
5
16
17
6
19
18
7
20
7
19
21
26
Input Data
I. ENTERING CHARACTERS
III. ENTERING A PRINTED DIAGRAM OR FIGURE
Ex) “MSG SALES”
5 MNO
7 STU
SPE
SPACE
3 GHI
OK
ICON
“MSG”
7 STU
1 ABC
4 JKL
2 DEF
7 STU
¾ Select a “SPE” OR “ICON”
¾ Pressing desired symbol button
¾ Press the “OK” button to select
“SALES”
Ex) “NEW YORK”
5 MNO
IV. CHANGE FEATURE OF CHARACTER
2 DEF
SPACE
8 VWX
“NEW”
9 YZ
5 MNO
6 PQR
4 JKL
“YORK”
II. ENTERING SYMBOLS
SYM
OK
¾ Select a “SYM”
¾ Pressing desired symbol button
¾ Press the “OK” button to select
Copyrights © 2007 Finest Services Inc. All rights reserved.
To change a letter, letter color, border and letter effect, select the
appropriate letter key by moving the cursor left or right and then
use the appropriate button keys to change affects such as tone of
color, size or letter and etc.
How To Enter Ads
Begin by pressing the “Menu” button on the Remote Control.
After the effect is stored, the message “ Hold Time” appears.
When “Add Contents” menu appears, press “OK” button.
Select the number of seconds to display the effect and then press
the “OK” button to store the effect in the memory.
When “Add Messages” menu appears, press “OK” button.
Enter the desired message.
After completing message, press “OK” button.
Select the desired effect when the “Select Insertion Effect”
appears.
After selecting Insertion Effect, press the Up/Down button to
preview the effect that you entered earlier. Use the “OK” button to
enter your selection.
From the preview condition, press the Up/Down button to see the
effect change little by little . Press the Left/Right button to see
changes in speed.
After deciding on the desired results, press “OK” button to store
the effect.
After storing the effect, the “Select Preservation Effect” message
appears and disappears.
Use the Up/Down button to select a preview the “Preservation
Effect” message.
From the previous viewing condition, press “Up/Down” button to
see the direction/effects change little by little. Pressing Left/Right
to preview changes the speed.
After deciding on the selection, press the “OK” button to store the
effect in memory.
Copyrights © 2007 Finest Services Inc. All rights reserved.
When the message, Select Release Effect” appears, use the
Up/Down button to select an effect.
Select a display effect and then press the “OK” button to preview
results.
When the preview condition appears, press button Up/Down to
see the effect change little by little. Press the Left/Right button to
change the speed.
After previewing and deciding on the display effect, press the
“OK” button. The “Connection X” message displays. If you want to
connect a prior sentence to the current sentence, press Up/Down
button. Use “O” to connect and “X” to store.
When “Add Contents” message displays, press “ESC” button.
Message effect is stored and displayed on the Sign.
Add Contents
Menu Table
1.
Add Contents
①
Add Message
⑥
Display Time
②
Add Picture
⑦
Add D-day
③
Add Video
⑧
Add D-time
④
Add Image
⑨
Add Temperature
⑤
Display Date
⑩
Add Event
2.
Modify Contents
3.
Insert Contents
4.
Index Contents
5.
Delete Contents
①
Delete Option
6.
Stop Watch
7.
Password
8.
Set Timer
9.
10.
1. Add Single Message
Press “Menu” button on Remote Control.
When message “Add Contents” appears, Press the “OK”
button.
When message “Add Single Message” appears, Press the
“OK” button, then the cursor on the left side blinks.
After entering your message, save it by pressing the “OK”
button. The “Select Insertion Effect” appear / disappears.
The “Automatic” appears. Press the Up/Down button to select
one of 11 options as insertion effects.
②
Delete All
①
Set Time
③
Set Timer On
②
Set Date
④
Set Timer Off
After viewing the effects entered, press the Up/Down button to
preview the effect and then use the Up/Down button to see the
effects change little by little or press the Left/Right button to
see the speed change. If you decide to keep these effects then
press the “OK” button to keep them. After keeping your
selection and you want to cancel it, press the “ESC” button to
go back to the previous step.
To enter “NEON” effects to previous entries, press the
“NEON” button and the effect will appear. Pressing “Up/Down”
button continuously displays different “NEON” effects.
After setting the effect, the “ Select Preservation Effect”
message appears and disappears.
Setting Up
①
Preservation X
④
Password X
②
Sound O
⑤
Brightness
③
Direction Horz
Manager (Not used)
Copyrights © 2007 Finest Services Inc. All rights reserved.
When the “Select Preservation Effect” selection disappear, the
message for adding “Drama” to the effect appears. Select
“Drama” using the “Up/Down” button to add one of 7 effects.
After viewing the effect entered, press the button “Up/Down”
button to preview the effect and then use the “Up/Down” button
to see the effects change little by little or press the “Left/Right”
button to see the speed change. If you decide to
keep these effects then press the “OK” button to keep them.
2. Add Dual Message
Press “Menu” button on Remote Control.
When message “Add Contents” appears, Press the “OK”
button.
After keeping your selection and you want to cancel, press the
“ESC” button to go back to the previous step.
When message “Add Dual Message” appears, Press the “OK”
button.
After the effect is set, the message “ Hold Time” appears. You
can select the number of seconds the effect appears from 01 to
99 seconds. Lower numbers equal faster display times.
Refer to the procedure of “Add Message” for next steps.
To set the display time, press the “OK” button to store the
setting.
When the “Select Release Effect” message appears and
disappears, select the desired choice from among 8 effects by
pressing the “Left/Right” button.
3. Add Picture
Press “Menu” button on Remote Control.
When message “Add Contents” appears, Press the “OK”
button.
When message “Add Picture” appears, Press the “OK” button.
If you select the display effects, you can preview it, From this
position you press “Up/Down” button to see the effects change
little by little. Press “Left/Right” button to see changes in speed.
After previewing and deciding on the display effect, press the
“OK” button, the “Connection X” message appears. The
previous message does not disappear, it remains on the screen
and from this point a new effect can be selected and use
“ Connection O” to add the new effect to the existing sentence.
After deciding on the display effect, the message “it’s stored”
appears and disappears. The “Add Message” step is completed
and so “Add Message” appears again.
To continue adding sentence, simply repeat the previous steps.
To cancel adding message, press the “ESC” button.
Copyrights © 2007 Finest Services Inc. All rights reserved.
Refer to the procedure of “Add Message” for next steps.
4. Add Video / Add Image
Press “Menu” button on Remote Control.
When message “Add Contents” appears, Press the “OK”
button.
When message “Add Video” or “Add Image” appears, Press
the “OK” button.
Refer to the procedure of “Add Message” for next steps.
5. Display Date
Press “Menu” button on Remote Control.
When message “Add Contents” appears, Press the “OK”
button.
When message “Display Date” appears, Press the “OK” button.
Refer to the procedure of “Add Message” for next steps.
6. Display Time
Press “Menu” button on Remote Control.
When message “Add Contents” appears, Press the “OK”
button.
When message “Display Time” appears, Press the “OK”
button.
Refer to the procedure of “Add Message” for next steps.
7. Add DD-day / DD-time
Before you select or set “D-day” and “D-time”, check date and
time is correct at “Display Day” and “Display Time”.
Press “Menu” button on Remote Control.
When message “Add Contents” appears, Press the “OK”
button.
When message “Add D-day” or “Add D-time” appears, Press
the “OK” button.
When “2007/03/03” message appears, use the “Left/Right”
buttons to change to the Year/Month/Day positions and then
press “Up/Down” buttons to change the Year/Month/Day.
Copyrights © 2007 Finest Services Inc. All rights reserved.
After Designating the Year/Month/Day, press the “OK” button
and the “D-day” message appears.
Press the “OK” button again and then enter “D-day Message”
appears. Enter the D-day message and press “OK” button.
8. Add Event
Press “Menu” button on Remote Control.
When message “Add Contents” appears, Press the “OK”
button.
When message “Add Event” appears, Press the “OK” button.
Refer to the procedure of “Add Message” for next steps.
Modify Contents
The menu “ Modify Contents” is to amend any stored Message, Date,
Hour, D-day, Event and others.
Insert Contents
If you have existing messages or stored contents, use this menu to
add new message or/and contents.
Press “Menu” button on Remote Control.
Press “Menu” button on the Remote Control.
The “ Add Contents” message appears, Using “Up/Down”
buttons to select “ Modify Contents” and then press the “OK”
button.
The “ Add Contents” message appears. Using the “Up/Down”
button and select “ Insert Contents” then press the “ OK”
button.
The messages and others stored previously are indicated.
Previous message stored (sentence/date/others) are indicated.
Use “Up/Down” button to select the contents you wish to
correct/modify and then press the “OK” button.
Use “Up/Down” button to select the contents you wish to
correct/amend and then press the “OK” button.
After amending the contents, press the “OK” button. To
maintenance the previous effects, use the “ Adding Content”
method.
To add new message between messages labeled A and B, from
the B press the “OK” button.
The method for entering additional message is identical to the
“Add Contents” method outlined earlier.
Copyrights © 2007 Finest Services Inc. All rights reserved.
Index Contents
Use this function to display and confirm a list of stored messages.
Press “Menu” button on the Remote Control.
The “ Add Contents” message appears. Using the “Up/Down”
button and select “ Index Contents” then press the “ OK”
button. The “01:Message Content” appears
Use the “Up/Down” button to inspect the list of content, Press
the “OK” button to display. Use “01: O” to display content or
“01:X” not to display content.
Delete Contents
Use this function to delete all or part of sentences, dates, times
already store.
WARNING !! : Deleted contents cannot be recovered, therefore
confirm you really want to delete the selected contents before
selecting the delete function.
1. Delete Option
Press the “Menu” button on the Remote Control.
The “ Add Contents” message appears. Using the “Up/Down”
button and select “Delete Contents” then press the “ OK”
button.
The “ Delete Contents” message appears, Press the “OK”
button then “01: Message” appears.
Press the “Up/Down” buttons to select message and after
select message want to delete, press “OK” button and then
your selection will be disappear.
2. Delete All
Press the “Menu” button on the Remote Control.
The “ Add Contents” message appears. Using the “Up/Down”
button and select “Delete Contents” then press the “ OK”
button.
After the “Delete Option” message appear, use the “Up/Down”
button to Delete All. Immediately press the “OK” button, the
“Delete ? (OK/ESC)” message appears. From there press the
“OK” button and a message appears confirming the deletion is
completed confirming all the messages have bee eliminated.
Copyrights © 2007 Finest Services Inc. All rights reserved.
Stop Watch
Use this function to set the timer 1/100 second.
Password
Use this function to prevent others from making changes to your
Sign.
Press the “Menu” button on the Remote Control.
Press the “Menu” button on the Remote Control.
The “ Add Contents” message appears. Using the “Up/Down”
button and select “Stop Watch” then press the “ OK” button.
After selecting, press the “OK” button, then the “Increment
Mode” and “Decrement Mode” appear.
Use the “Up/Down” buttons to select the “Increment Mode” or
“Decrement Mode”. Press the “OK” button and the Stop Watch
displays.
The “ Add Contents” message appears. Using the “Up/Down”
button and select “Password” then press the “ OK” button.
When password message appears. Using the “Up/Down”
buttons, select “Password” then press the “OK” button.
When the password message appear, enter your own select 4
digit PIN number.
After entering PIN number, confirm PIN message appears,
enter the exact same PIN.
A message appears, “New password is stored”
Copyrights © 2007 Finest Services Inc. All rights reserved.
Set Timer
This function indicates “Date / Hour” and to set the timer “On/Off”.
1. Set Time
Press the “Menu” button on the Remote Control.
The “ Add Contents” message appears. Using the “Up/Down”
button and select “Set Time” then press the “ OK” button.
Setting Up
The following functions of LED Sign can be set up to come On/Off :
Reservation, Sound, Direction Horz, Password and Brightness.
Use the same method identical to set the time.
By using these functions, user can turn the sign as needed.
Press the “Menu” button on the Remote Control.
The “ Set Time” message appear, immediately press the ”OK”
button and present time appears, for example “AM 10:20”.
Use the “Left/Right” buttons to select AM or PM, Hours and
Minute by using “Up/Down” to change the Hour / Minute to the
time setting preferred.
After set the time, press “OK” button and “ I stored present
time” message appears.
2. Set Date
Press the “Menu” button on the Remote Control.
The “ Add Contents” message appears. Using the “Up/Down”
button and select “Set Time” then press the “ OK” button.
When the “Set Time” message appears, use the “Up/Down”
button to select “Set Date” and press “OK” button.
The “ Add Contents” message appears. Using the “Up/Down”
button and select “Setting Up” then press the “ OK” button
and “Reservation X” appears.
Use the “Up/Down” buttons to select : Reservation, Sound,
Direction Horz, Password, Brightness. Press the “OK” button
and the corresponding function changes to “O/X”.
When option selection / setting is complete, press cancel
button.
Reservation : use this to set the Reservation Timer On/Off
(O : Activation, X : Cancellation)
Sound : Use this to set the Button Sound On/Off.
(O : Activation / X : Cancellation)
Direction Horz : Use this to set the Direction of Message.
A message will appear with the current date, for example
“07/03/03”. Use the “Left/Right” button to move to the
Year/Month/Date and use “Up/Down” buttons to select and
change it.
After set the date, press “OK” button and “ I stored present
date” message appears.
3. Set Timer On/Off
Use the same method identical to set the time. By using these
functions, user can turn the sign as needed.
Copyrights © 2007 Finest Services Inc. All rights reserved.
Password : Use this option to set the Password, so no one
can change your setup ( O : Activation / X : Cancellation).
Brightness : Use this function to set the brightness subject to
the time of day/ night and weather the Sign is inside or Outside.
(O : Activation / X : Cancellation)
Manager
Only manufacturer can set up this function of LED Sign. User
will not be able to make changes to the LED Sign.
Kinds of Effect
1. Insertion Effect
a.
Automatic : Without extra effort, user can automatic enter,
maintain and display effect.
b.
Drama : Results of various animation.
c.
Scroll : Scroll Up/Down/Left/Right in order.
d.
Gathering : Merge lines Left/Right/Up/Down/Diagonal.
e.
Hurricane : Rotation Function.
f.
Tornado : Twisting effects.
g.
Lens : Can display messages in multiple directions expanding
and contracting.
h.
Appearing : Can display different messages in multiple forms.
i.
Hue Groups : Can combine/separate colors individually or in
groups.
j.
Beam / Light : Functions like a laser beam.
k.
Wave : Displays entire messages using a wire effect.
2. Maintain Effect
a.
Drama : Results of various animation.
Copyrights © 2007 Finest Services Inc. All rights reserved.
b.
Opposite of Color : Messages’ color display opposite effect.
c.
Shaking : Shakes message / characters to the Left, Right,
Above, Lower and Diagonal.
d.
Hurricane : Rotation Function.
e.
Tornado : Twisting effects.
f.
Lens : Can display messages in multiple directions expanding
and contracting.
No Effect : Can have message with no effect.
g.
3. Release Effect
a.
Scroll : Scroll Up/Down/Left/Right in order.
b.
Drama : Results of various animation.
c.
Hurricane : Rotation Function.
d.
Tornado : Twisting effects.
e.
Dividing : Divides various shape into Up, Down, Left and Right.
f.
Lens : Can display messages in multiple directions expanding
and contracting.
g.
Erase : Can erase message comes in multiple directions.
h.
Hue Groups : Can combine/separate colors individually or in
groups.
Copyrights © 2007 Finest Services Inc. All rights reserved.