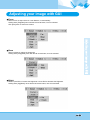
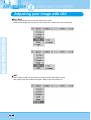
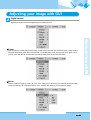
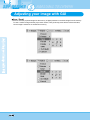
1
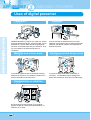
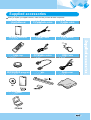
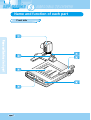
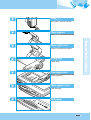
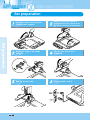
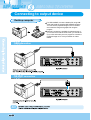
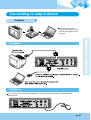
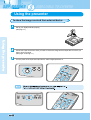
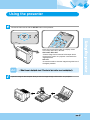
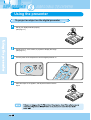
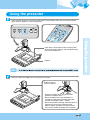
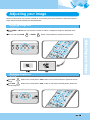
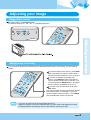
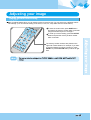
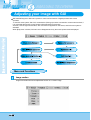
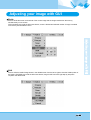
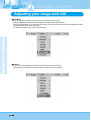
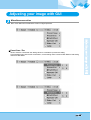
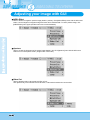
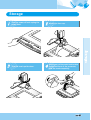
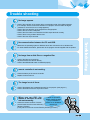
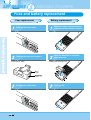
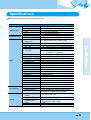
www.touchboards.com 205 Westwood Ave.Long Branch, NJ 07740 1-866-942-6273 [email protected]
Special features
Thank you for purchasing this product.
This product is a high resolution video presenter that can project all kinds of data on a PC monitor, a TV, or a
projector with simple manipulations.
12X professional zoom lens and 3X digital zoom
(can be used for the materials with sizes from A4 to film)
By adopting 12X super optic angle zoom lens, it is possible to
shoot all materials from the size of a film to A4 size.
Adopted 850,000 pixels CCD
By adopting 1/3 inch PS type CCD, high resolution and excellent
color reappearance are realized.
Can control USB and RS-232
By using USB, it is possible to view or store the image in a PC and
control the functions of the set. Also it is possible to control the
set by using RS-232C port.
Output modes from SVGA to XGA
It supports various output modes from SVGA to XGA that it can be
connected to all kinds of projectors.
Remote controller is a standard feature
Remote controller is supplied as a standard feature for the product
so that it can be manipulated from a distance. Thus it is very
convenient during a conference.
TV output mode
By adopting TV output mode, monitoring and conference data can
be recorded through VTR.
Features
Various image control
Digital features on your Digital Presenter provide useful and
various image controls including:
- Negative/Positive image conversion
- Brightness and Red/Blue color control
- Image rotation
- Image save/recall
- Image freeze
- Image divide
Input source selection
You can quickly switch between your computer presentation and
your document presentation with the INT/EXT button on the
control panel or on the remote controller.
Custom user settings
To avoid any interruption of presentation to reset the digital
presenter, you can preset up to 4 customized settings in the
memory and simply recall it during the presentation.
Support to GUI menu system
SDP-900DXR support to GUI menu system to control various
function of digital presenter with mouse operation.
Contents
Product features and structure
Safety precautions..................................................................5
Uses of digital presenter ........................................................6
Supplied accessories .............................................................7
Names and functions of each part ........................................8
Front side............................................................................8
Main control panel ............................................................10
Terminals at the back .......................................................11
On the remote controller ...................................................12
Operation methods
Set preparation......................................................................14
Connecting to output device ...............................................15
TV, PC Monitor or Projector..............................................15
Desktop computer.............................................................16
Computer ..........................................................................17
PS/2 Mouse ......................................................................17
Using the presenter ..............................................................18
To show the image received from external device ...........18
To project an object on the digital presenter.....................20
Adjusting your image ...........................................................23
Adjusting your image with GUI............................................28
Image section ..................................................................28
Digital section ...................................................................31
Miscellaneous section.......................................................35
Exit section .......................................................................37
Changing your image with Draw ........................................38
Before requesting service
Storage...................................................................................41
Trouble shooting...................................................................43
Fuse and battery replacement .............................................44
Specifications........................................................................45
Safety precautions
Follow these safety instructions when setting up
and using your Digital Presenter:
1. Do not place the presenter on an unstable cart,
stand, or table
2. Do not use the presenter near water or sources of
heat.
3. Use the type of power source indicated on the
presenter. If you are not sure of the power
available, consult your dealer or power company.
4. Place the presenter near a wall outlet where the
plug can be easily unplugged.
5. Take the following precautions for the plug.
Failure to comply with these precautions could
result in sparks or fire:
Do not insert the plug into an outlet with dust
present. Insert the plug firmly into the outlet.
6. Do not overload wall outlets, extension cords, or
integral convenience receptacles. This can cause
fire or electric shock.
7. Do not place the presenter where the cord can be
walked on. It may result in fraying or damage to
the plug.
8. Unplug the presenter from the wall outlet before
cleaning. Use a damp cloth for cleaning. Do not
use liquid or aerosol cleaners.
9. Do not block the slots and openings in the
presenter case. They provide ventilation and
prevent the presenter from overheating. Do not put
the presenter on a sofa, rug, or other soft surface
or in a built-in installation, unless proper ventilation
is provided.
10. Never push objects of any kind through cabinet
slots. Never spill liquid of any kind into the
presenter.
11. Except as specifically explained in this User's
Manual, do not attempt to service this product
yourself. Refer all servicing to qualified service
personnel. Opening or removing covers may
expose you to dangerous voltages and other
hazards.
12. Unplug the presenter during lightning storms or
when it will not be used for extended periods.
13. Do not place the presenter and remote controller
on top of heat-producing equipment or in a
heated place, such as a car.
14. Unplug the presenter from the wall outlet and
refer servicing to qualified service personnel
under the following conditions:
• When the power cord or plug is damaged or
frayed.
• If liquid has been spilled into the presenter, or it
has been exposed to rain or water.
• If it does not operate normally when you follow
the operating instructions, or if it exhibits a
distinct change in performance, indicating a
need for service.
• If it has been dropped or the cabinet has been
damaged.
FCC Compliance Statement
This equipment has been tested and found to comply with the limits for a class A digital device, pursuant
to part 15 of the FCC Rules. These limits are designed to provide reasonable protection against harmful
interference when the equipment is operated in a commercial environment. This equipment generates,
uses, and can radiate radio frequency energy and, if not installed and used in accordance with the
instruction manual, may cause harmful interference to radio communications.
Operation of this equipment in a residential area is likely to cause harmful interference in which case the
user will be required to correct the interference at his own expense.
Uses of digital presenter
Conference
Detailed information in a report, form, table, etc. as well
as a three dimensional object, such as a model, can be
projected on a screen clearly that all the participants
can focus on the same topic during a conference. Thus
it is very helpful for an effective progress of a
conference.
Education
It can be used as an audiovisual tool for printed
materials, such as text books, as well as audiovisual
materials, educational materials, and especially for
students' art works.
Medicine and science areas
Advertisement and design areas
It is possible to present various visual data including
slides and X-ray film etc. at a medical conference or a
doctors' association in the order of file.
It is useful in design area where visualization is
necessary. It is possible to project catalogs and
slides, thus the effect of a job can be checked easily.
Demonstration or exhibition
By connecting to a large projector, it can produce
dynamic images at a new product demonstration, an
exhibition, or an event.
Supplied accessories
When you unpack your Digital Presenter, make sure that you have all these components.
User's Manual
C-Composite cable
S-video cable
Remote controller
Power cable
PS/2 Mouse
Lens cap
PC Monitor cable
USB Cable
SDP-900DXR program
etc.
Dust cover
Option
Name and function of each part
Front side
Lens
Can rotate to the front and back.
Main support
Main lock button
Press to move the main support.
Lamp unit
(Upper lamp)
Document plate
(built-in light box)
Main control panel
(see next page)
IR Sensor
Name and function of each part
Main control panel
The buttons on the main control panel can be found in the remote controller. These buttons perform the same
functions.
POWER
MODE
Use this to turn the power on or off.
Use this to select the desired resolution for the
video output device(PC monitor, projector)
connected to this product.
FREEZE
Use this to freeze the image.
INT / EXT
AWC
Use this to control the color automatically.
Use this to select internal or external image
INT: to view the image on this product.
EXT: to view the VGA output from another device
such as a PC monitor or a projector by
connecting it to this product.
ZOOM
Use this to control the size of an object
projected on the screen.
LAMP
Use this to turn the upper lamp or light box
on or off.
APERTURE
Use this to control the sharpness of the output
image.
ROTATE
Use this to rotate the image.
AF
Use this adjust the focus automatically.
IRIS
Use this to control the brightness of the
image by using the iris.
Name and function of each part
Terminals at the back
POWER INPUT TERMINAL
MOUSE
Use this to connect the power cable. (100 - 240V,
free voltage)
Use this to connect PS/2 Mouse. (See page 17.)
VGA VIDEO INPUT 1,2
Connect this to the VGA output terminal of
another device by supplied PC cable.
When external input menu is selected, the image
is shown through the VGA out terminal.
VGA VIDEO OUTPUT 1,2
Connect this to the RGB input terminal of a PC
monitor or a projector by supplied PC cable.
RS-232C: COMPUTER CONNECTION
TERMINAL
Use this to connect RS-232C cable.
USB: COMPUTER CONNECTION
TERMINAL
Use this to connect USB cable when transmitting
image by USB port.
S-VIDEO OUTPUT
This is the video output terminal connecting to a
TV that has S-video input terminal.
LCD OUTPUT
This is the video output terminal connecting to a
LCD monitor.
TV OUTPUT
Connect this to the TV input terminal.
Connect this to view the image projected on the
TV screen.
Even when the external input menu is selected,
only the image on the main unit is displayed on
TV output terminal.
Name and function of each part
On the remote controller
POWER
ROTATE
Turns power on or off.
Use this to rotate the image by 90˚, 180˚, 270˚,
0˚.
INT/EXT
Allows to choose the signal input to be displayed.
WIDE/TELE
NEGA/POSI
• Enlarges the image size.
• Reduces the image size.
Switches for negative or positive film.
IRIS+ / IRISTurns the upper lamps and/or lightbox on or off.
• Opens iris to increase the brightness.
• Closes iris to decrease the brightness.
FOCUS
EXIT
Allows to focus an object.
F: Used to focus an object which is in the far
distance.
N: Used to focus an object being close.
Stops current function and return to the normal
mode.
LAMP
NTSC/PAL
Switches Video output mode to NTSC or PAL.
RED/BLUE/AWC
Adjusts the image color.
R +/-: Adjusts the red color.
B +/-: Adjusts the blue color.
AWC: Adjusts color automatically.
PRESET
• Saves the customized user setting values.
• Activates the preset user settings.
SAVE/RECALL
AF
Use this to adjust the focus automatically.
• Saves the projected image into the memory of
this unit.
• Recalls the image from the memory.
APERTURE
Controls the sharpness of the output image.
FREEZE
Keeps the current image on the screen.
MODE
Allows to choose the resolution of the VGA output
device connected to the Digital Presenter.
XGA(1024x768), SVGA(800x600)
DIVIDE
Divides the screen to show both of the current
image and the image recalled from the memory
simultaneously on one screen or to see all the
images in the memory(Up to 8 frames) on one
screen.
SHIFT
Shifts the recalled image shown in the divided
screen from the left to right to show the hidden
portion of the image.
Set preparation
Press the main lock button and
raise the main support
Raise the lamp unit until it is
convenient for use, and set it to
the center of the document plate.
Adjust the angle of the lamps
properly.
Turn the lens area to face
downward.
Remove the lens cap.
Plug the power cord in.
Connecting to output device
TV, PC Monitor or Projector
Connect a TV, PC monitor or Projector to this
presenter to display the projected image using the AV
cables, S-video cable or PC monitor cable.
Connection
Connecting to output device
Desktop computer
For SDP-900DXR, connect a desktop PC using USB
cable and install the supplied SDP-900DXR program.
You can see the projected image on the PC monitor
and control the image as a graphic file using the
program.
RS-232C connection is available for advanced user. If
you connect a PC with RS-232C cable, you should set
up your PC and make your own program to control the
projected image on PC. Ask your dealer for further
details.
USB connection
RS-232C connection
Connecting to output device
Computer
If you connect computer
through VGA IN port, you can
receive video signal from the
computer.
Connection
PS/2 Mouse
If you connect PS/2 mouse through MOUSE port, you can control various function of digital presenter.
(See page 28.)
Using the presenter
To show the image received from external device
Set up your digital presenter properly.
(See page 14.)
Connect the input device from which you want to receive the image and the output device in which you
want to show the image.
(See pages 15 through 17.)
Turn the power of the input and output device, and the digital presenter on.
Using the presenter
Choose the video source with the INT/EXT button of the presenter.
• Each time you press the button, the display shows
EXT1 OUT, EXT2 OUT, INT OUT.
• EXT1 OUT, EXT2 OUT
View the image from an external VGA output device
through a PC monitor or a projector connected to the
digital presenter.
• INT OUT
Choose this mode to show the image through the lens of
the digital presenter.
Open the image on the computer. Now you see the image through a PC monitor or a projector.
Using the presenter
To project an object on the digital presenter
Set up your digital presenter properly.
(See page 14.)
Connect to a TV, a PC monitor, a projector to display the image.
(See page 15.)
Turn the power of the output device and the digital presenter on.
Place the object on the lightbox, and adjust the head to face the
object.
Using the presenter
Select a proper lighting source with the LAMP button of the presenter. Each time you press the button,
upper lamps on, lightbox on, then all lighting off.
Upper lamp. Use the upper lamps to project paper
document and other material, and use lightbox lamp
to project transparencies.
Lightbox
Remove or attach the adapter lens according to the objected.
Rotate the lens to
remove or attach it.
• Remove the adaptor lens in the camera mode.
(possible focal length: 60cm ~ ∞)
• Attach the adaptor lens to view a material or a
document or a film placed on the document plate.
(Possible focal length: 200mm ~ 360mm)
• Beyond the possible focal length mentioned above, it
might be out of focus. So pay attention to the
distance between the object to be viewed and the
main unit and whether the adaptor lens is attached.
Using the presenter
Focus on the object.
• Auto focus control: Press AF
• Manual focus control: press [Focus F] or [Focus N] to adjust.
You see the image on the TV, the PC monitor or the projector.
• To use versatile image control features, see pages 23 through 27.
Adjusting your image
Use the control buttons on the remote controller or on the control panel of the presenter to adjust the projected
image. Some of the main features are described below:
Adjusting image size
Press WIDE or TELE button on the remote controller to reduce or enlarge the image size displayed on the
screen.
You can also use ZOOM
or ZOOM
button of the presenter to achieve the same result.
Adjusting brightness
Press IRIS
image.
button on the control panel or IRIS + button on the remote controller to lighten the overall
Press IRIS
overall image.
button on the control panel or IRIS - button on the remote controller panel to darken the
Adjusting your image
Adjusting image color
For automatic color adjustment, press AWC button.
If you want fine level adjustment, press BLUE + / - or RED + / - button on the remote controller button to
increase or decrease blue or red color factor manually.
Hint:
To obtain the best result, put the camera lens facing
the white paper and press AWC button.
Positive and negative switching
Press NEGA/POSI button.
Each time you press the button, POSI or
NEGA appears alternately on the screen.
Set to POSI to see normal object and set
to NEGA to see negative film.
Image sharpness control
Press APERTURE button to control the sharpness of the output image of this product.
- APERTURE ON: For a material mostly with words.
- APERTURE OFF: For a material with many pictures or colors.
Adjusting your image
Image rotate control
For image rotation, press ROTATE button.
To rotate the image by 90˚, 180˚, 270˚, 0˚, press ROTATE button
Saving image in memory
You can save the image up to 8 frames into your digital presenter's memory. After saving, you will be able to
recall it.
To save the image into the memory, press SAVE
button and specify the memory location within 3
seconds using the number keys from 1 through 8.
If you want to recall the saved image from
memory, press RECALL button and press the
memory location number wihin 3 seconds. If you
press and hold down RECALL button, all images
saved in memory are displayed one by one.
If you want to exit from the recall mode, press
EXIT button.
The memory location numbers are printed on the right
side of these buttons. For example, if you want to
save the image into memory location 7, press SAVE
then press AF button printed 7 at right side.
• If you turn the power off, all the saved images will be lost.
• Digital zoom picture is not saved, therefore when you press SAVE under Digital zoom mode,
the digital presenter automatically returns to the maximum optical zoom state.
Adjusting your image
Screen 2 divide and image shift
You can see both the image of an object currently projected and the image saved in memory simultaneously on
one screen.
Press DIVIDE button and press the memory
location number within 3 seconds to recall the
image you want to see.
To cancel this mode and return to normal mode,
press EXIT button.
The digital zoom is not available in DIVIDE mode,
therefore when you select DIVIDE mode under
digital zoom mode, the digital presenter
automatically returns the right live picture to the
maximum optical zoom state.
You can see the
image of an object
currently projected
at right side.
The recalled image from memory appears
at left side. Press SHIFT button to shift the
image from right to left. Each time you
press the button, a third of the image will
be moved from right to left.
3x3 Multi-Screen
You can see all the images saved in memory simultaneously on one screen and choose one to display it.
Press DIVIDE button for 2 seconds or more, then
all the images saved in memory are displayed on
the screen.
To cancel this mode and return to normal mode,
press EXIT button.
When you want to see one of them, press the
number button to recall it.
For example, if you want to see the image in
memory location 3, press BLUE + button and
the image is displayed on the screen.
Adjusting your image
Saving custom user setting
After you adjust feature value, you can save the value for next time use. You can save up to 4 different custom
user settings. (You can save the setting on the Zoom, Focus, Iris, Lamp state and Color level buttons.)
To save the current value, press SAVE button
and specify the memory location within 3 seconds
using the number keys from 1 through 4.
To recall your custom setting, press the ACTIVE
button and press the memory location number
within 3 seconds.
The memory location numbers are printed on the
right side of these buttons, For example, if you want
to save the feature into memory location 4, press
SAVE then press FOCUS N button printed 4 at right
side.
Adjusting your image with GUI
SDP-900DXR support to GUI menu system to control various function of digital presenter with mouse
operation.
To use GUI menu system, first of all, mouse device (PS/2 type) must be connected to mouse control terminal, if
it is connected with success, mouse pointer will be appeared on the screen.
And then, click the right mouse button, GUI main menu is appeared on the screen, and GUI menu system is
activated.
When [Exit] menu is clicked, GUI main menu disappears and only the mouse pointer remains displayed.
Menu and Functions
Image section
Image menu deals with various adjustment function of on-screen image.
Adjusting your image with GUI
Focus
Allow to focus an object in the far / near distance, or automatically.
Holding down [Far]/[Near] menu with the left mouse button, focus is activated.
Click [Auto] menu to auto focus function.
Zoom
Allow to enlarge or reduce the image size.
Holding down [Tele]/[Wide] menu with the left mouse button, zoom is activated.
Bright
Allow to open IRIS to increase the brightness or close IRIS to decrease the brightness.
Holding down [Up]/[Down] menu with the left mouse button, lens iris is activated.
Adjusting your image with GUI
Red / Blue
Allow to adjust image color through the red/blue gain control
Holding down [Up]/[Down] menu with the left mouse button, red/blue gain control is activated.
AWC
Allow to adjust image color automatically through automatic white balance control
Click [AWC] menu with the left mouse button, AWC function is executed once.
Adjusting your image with GUI
Digital section
Digital menu deals with various digital image processing function.
Freeze
Allow to keep the current image on the screen. Click[Freeze] menu with the left mouse button, freeze mode is
activated and [Freeze] menu turns checked state. To release freeze mode, click [freeze] menu again or click
[Cancel] menu with the left mouse button (and then [Freeze] menu turns unchecked state).
Rotate
Allow to rotate the image by 0˚(Off), 90°, 180°, 270°. Click [0°/90°/180°/270°] menu with the left mouse button,
image is rotated by user’s request and menu turns checked state following current status of image.
Adjusting your image with GUI
Save / Recall
Allow to save the projected image into the memory of digital presenter or recall the image from the memory.
To save / recall the image with the proper save number, Click [numbers] menu with the left mouse button,
current image is saved into or recalled from memory.
Adjusting your image with GUI
Divide
Allow to divide the screen to show both of the current image and the image recalled from the memory
simultaneously on one screen.
Click [numbers] menu with the left mouse button, screen is divided and selected number of image is recalled
from memory and activated in menu.
Shift
Allow to shift the recalled image shown in the divided screen from the left to right to show the hidden portion of
the image. Click[Shift] menu with the left mouse button, image is shift from left to right step by step each
request in the divide mode.
Adjusting your image with GUI
3x3 Multi
Allow to see all the images in the memory (up to 8 frames) on one screen.
Click [3x3 Multi] menu with the left mouse button, 9 divide mode is activated and
GUI menu disappeared. If you click the image number on screen, select image will be expanded to full screen
and GUI menu is appeared on the screen.
To Release 3x3 Multi mode, click the center image.
Cancel
Allow to stop current image processing function and return to normal mode.
Click [Cancel] menu with the left mouse button, all digital function is released.
Adjusting your image with GUI
Miscellaneous section
Misc menu deals with miscellaneous function of digital presenter.
Preset Save / Exe
Allow to save the customized user setting values or to activate the preset user setting.
Click [numbers] menu with the left mouse button, current setting value is saved to flash ROM or load setting
value from flash ROM.
Adjusting your image with GUI
NEGA Effect
Allow to switch for negative / positive image (default : positive). Click [NEGA Effect] menu with the left mouse
button, current image turns negative image and menu turns checked state. To return positive image, click
[NEGA Effect] menu again (and then menu turns unchecked state).
Aperture
Allow to control the sharpness of the output image (default : On) Click [Aperture] menu with the left mouse
button to turn on/off aperture mode. (Image mode / Text mode)
Video Out
Allow to switches video output mode to NTSC or PAL.
Click [NTSC/PAL] menu with the left mouse button, video mode is switched to current value.
Adjusting your image with GUI
Lamp
Allow to turn the upper lamps or lightbox on or off.
Click [All off/Upper/Lower] menu with the left mouse button, lamp mode is switched to current value.
Exit section
GUI main menu disappears and only the mouse pointer remains displayed.
Tips : Drag and Drop Function
GDI main menu can take any position of screen using Drag and Drop.
First of all, click the moving point of main menu, and then drag and drop to any position of screen what you
want.
1. Click the moving point image
2. Drag the GUI main menu
3. Drop the GDI menu
Changing your image with Draw
SDP-900DXR supports to GUI Drawing system to draw straight lines, freehand lines, rectangular on the screen
with mouse operation.
To use GUI Drawing system, first of all, GUI menu system and [Freeze] or [Recall] function must be activated.
Then Draw menu is now being activated. (See page 28)
When [Draw] menu is clicked, GUI Draw toolbar is appeared on the screen and GUI main menu disappeared.
[1] Exit Button
[5] Line Width Selection
[2] Tool Selection
[3] Foreground / Background Color Panel
[4] Foreground / Background Color Palette
Changing your image with Draw
Exit Button
Use the Exit button (
full screen.
) to exit GUI Drawing system to normal mode, or clear all the user’s images on the
Tool Selection
Use the Line Width Selection to set the line width to between 1 and 4 pixels.
Drawing the single line
To draw a Single line, Click the single line icon and then,
1) Position the cursor on the screen where you want the line to start.
2) Press and hold the left/right mouse button.
3) Drag the cursor.
4) To end the line, release the mouse button. SDP-900DXR creates the line.
Drawing the rectangular
To create a rectangular, Click the rectangular icon and then,
1) Place the cursor at a corner of the area you want to select.
2) Click and drag the mouse until the selection is the size you want.
3) Release the mouse button.
Drawing the freehand line
To create a freehand line, Click the freehand line icon and then,
1) Position the cursor on the image where you want the line to begin.
2) Press and hold the left/right mouse button.
3) Drag the cursor on the path you want the line to take.
4) Release the mouse button.
Eraser Tool
1) Click the Eraser tool icon and then the cursor changes to the erasing rectangular.
2) Move the cursor over the line and click to delete the line.
Changing your image with Draw
Foreground / Background Color Panel
There are two active colors in GUI Drawing System, the foreground (left mouse click) and
background(right mouse click) colors.
You can change the brush colors by selecting new foreground and background solid colors using the Color
Palette.
Foreground / Background Color Palette
Use the Color Palette to select the colors that you want to draw the line.
Move the cursor over the available colors panel. Left-click to select a foreground color, Right-click to select
a background color. The two boxes above the Color Panel display the respective colors.
There are six colors to be selected, red, yellow, green, cyan, blue and magenta.
Line Width Selection
Use the Line Width Selection to set the line width to between 1 and 4 pixels.
Storage
Turn the power off and unplug the
power cord.
Attach the lens cap.
Turn the head upside down.
While you pull the main lock button
toward the front of the presenter,
fold the head completely.
Fold the lamps on both sides completely.
Trouble shooting
No image appears
- Check if the resolution of the output device corresponds to that of the digital presenter.
(For example, when the maximum resolution of a projector is SVGA and if the digital
presenter is set to XGA, then no image appears.)
- Check if the input selection of the output device is appropriate.
- Check if the iris control is adequate.
- Check if the VGA cable is connected to the VGA output terminal correctly.
- Check if there is any problem with the fuse.
- Check if the lens cap is removed.
No communication between the PC and USB.
- Make sure the operating system is Windows 98 or later. It doesn't work on Windows 95.
- For other detailed information, please refer to the program manual supplied with the product.
No image from a slide film or a negative film.
- Check if the light box is turned on.
- Adjust the lens to face the film directly.
- Check if the NEGA/POSI button is selected properly.
remote controller is not working.
- Check the battery of the remote controller.
Replace it with a new one.
The image is out of focus.
- Check if the adaptor lens is attached properly for the purpose. (See page 21.)
- Check if the distance from the object is too short.
When you use GUI, the
mouse is not seen or does
not work normally.
If there are problems,
please contact the store
you purchased the
product or our distributor
nearest you.
- Check the contact condition of mouse
port and make sure it's mouse offered by
Samsung Techwin.
(It may not work if it's not mouse offered by Samsung Techwin.)
Fuse and battery replacement
Fuse replacement
Battery replacement
Take out the fuse holder .
Open the battery compartment lid
at the back of the remote controller.
Take out the fuse and replace it.
Insert the batteries so that their
with a new one.
• Fuse type:2A, 250V
Put the fuse holder back.
• Battery type:AAA type 1.5V
Close the lid.
Specifications
Note: Spscifications are subject to change without notice.
Specifications
Lens
Shooting Area
Optical system
Zoom
Focus
Iris
Upper
Illumination system
Lower
Pick-up Device/
Effective pixel
Frame rate
Sync system
VGA output
Video output
Video
PC connection
White Balance
Positive / Negative
Freeze
Input terminals
Output terminals
NTSC / PAL
Remote controller
GUI(Graphic User Interface)
Input selection
On-screen display
Image freeze
Image save
Image recall
Image divide
Image rotation
Image transfer to computer
Preset function
USB
RS-232C
Application software
Operating temperature/
Humidity
Power
General
Dimensions(mm)
Weight
Accessories
Description
F=1.5(Wide)~2.1(Tele) f=5.2~66.5, 12x power zoom
Max: 298 x 217mm, Min: 21 x 16mm
Powered (12X), Digital(3X)
Powered (Auto Foces/Manual)
Auto (with fine level adjustment)
Attach to the side arm of the main unit
Light box (built-in main unit)
1/3" 850,000 pixels PS CCD / 1034(H) x 779(V)
15 frame/sec
Internal sync.
1024 x 768(XGA) RGB color, 800 x 600(SVGA) RGB color.
C-Video VBS 1.0Vp-p / 75Ω (unbalance)
S-Video Y: 1.0Vp-p / 75Ω (unbalance)
C: 0.286Vp-p / 75Ω (unbalance)
Manual / Auto (one touch type)
Selectable
built-in
VGA:2
VIDEO:1, VGA:2, USB:1, RS-232C:1, S-Video:1, LCD:1
Selectable
Supplied
Supplied
3 channels (Internal: 1, External: 2)
Available
Available
Available (8 frames)
Available (8 frames)
Available (2divide of 9 divide)
Available
Available (USB: full, 1/4, 1/16 mode)
Up to 4 user settings
built-in
SET control
Viewer (for Windows 98, 98SE, ME, 2000 Professional,
XP & Mac OS X), TWAIN Driver (for windows)
+5˚C ~ +35˚C, 30% ~ 90%
AC 100V ~ 240V Free Voltage, 50/60Hz, 50W
In-use: 676(W) x 580(H) x 558(D)
Storage: 533(W) x 167(H) x 582(D)
11.5kg
Remote controller, Cables, etc.
Memo
HEAD OFFICE : SAMSUNG TECHWIN CO., LTD
145-3 Sangdaewon 1-Dong, Jungwon-Gu, Sungnam, Kyungki-Do,Korea 462-121
TEL : 82-31-740-8137~8141
FAX : 82-31-740-8145
U.S.A OFFICE : SAMSUNG OPTO-ELECTRONICS AMERICA, INC.
40 Seaview Drive, Secaucus N.J.07094, U.S.A
TEL : 201-902-0347
FAX : 201-902-9342
www.samsungpresenter.com
www.samsungtechwin.com
P/No.: 6806-0400-01B