1
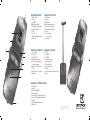
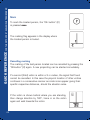
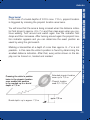
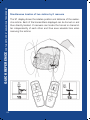
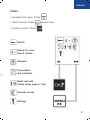
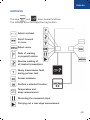
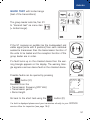
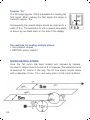
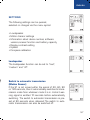
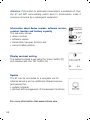
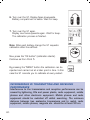
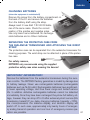
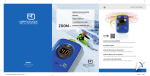
Lawinen-Verschütteten-Suchgerät
Avalache Transceiver
Appareil de rechereche de victimes d’avalanche
Loccalizzatore A.R.V.A.
Aparato de búsqueda de víctimas de avalanchas
Gebrauchsanleitung
Manual
Mode d'emploi
Istruzioni per l'uso
Instrucciones de uso
www.ortovox.com
SCAN
FIND
8
7
BEDIENUNGSELEMENTE
OPERATING INSTRUCTIONS
1
2
3
4
5
6
7
8
ON/OFF - Schalter
Taste OK
Taste MENU
Batteriefach (Rückseite)
Entriegelungs-Taste zum Öffnen
Sende-Kontroll-Leuchten
Display
Sensoren
(Update; Hintergrundbeleuchtung)
9 Lautsprecher
1
2
3
4
5
6
7
8
ELEMENTS DE COMMANDE
ELEMENTOS DE CONTROL
1
2
3
4
5
1
2
3
4
ON/OFF switch
Button OK
MENU button
Battery compartment (on rear)
Release botton to open unit
Transmission monitoring lights
Display
2 sensors: update;
1 sensor: backlight
9 Loudspeaker
6
5
9
6
1
2
6
7
8
9
Touches ON/OFF
Touche de OK
Touche MENU
Compartiment piles (au dos)
Touche s de déverrouillage pour
l’ouverture de l’appareil
Voyants de contrôle d’émission
Ecran
Capteurs (mise à jour, éclairage)
Haut-parleur
5
6
7
8
9
ON/OFF
Tecla para OK
Tecla MENÚ
Compartimento de pilas
(en la parte posterior)
Tecla de desbloqueo
Luces control - emisión
Pantalla
Sensores (actualización, iluminación de fondo)
Altavoz
3
COMPONENTI E COMANDI OPERATIVI
4
1
2
3
4
5
6
7
8
9
Tasto ON/OFF
Tasto di OK
Tasto di apertura MENU
Vano batteria (retro)
Tasto di bloccaggio del sistema di apertura
Spie di controllo della modalità di trasmissione
Display
Sensori (update, retroilluminazione)
Altoparlante
Änderungen vorbehalten 08/2009
Subject to alteration 08/2009
www.ortovox.com
CONTENT
Scanning the avalanche track for
transmitters and locating each
signal quickly and exactly are the
decisive advantages of the ORTOVOX
avalanche transceiver S1. An immediate search with an avalanche
transceiver and a rescue using avalanche shovels and a probe that is
carried out by the tour participants
themselves offers the best chance
of survival for an avalanche victim.
When third party help has to be called to the scene it usually arrives too
late! Pay attention to the avalanche
report and select safe routes.
Always take the avalanche transceiver S1 with you together with
the necessary ORTOVOX SAFETY
PRODUCTS such as an avalanche
shovel and a probe. Read the S1
operating instructions carefully and
practice both the handling of your
avalanche transceiver S1 and avalanche search procedures.
Information on ORTOVOX products
and safety notices can be found
on the ORTOVOX website at
www.ortovox.com
Contact us by e-mail at
[email protected]
ORTOVOX wishes you wonderful,
safe tours!
Operating elements
01
Technical data
36
EU Declaration of
Conformity
36
QUICK REFERENCE
37
Coarse search, refining
location and pinpoint
location
40
Exdended operating
instructions
46
MENUE
47
Daily function test
50
Locating several
avalanche victims
52
Acoustic emergency
reception
56
Interference
60
Battery change
61
Warranty
62
Service
63
Index of key words
64
Service addresses
164
www.ortovox.com
Current avalanche warning
service information!
EU DECLARATION OF CONFORMITY
TECHNICAL DATA
Manufacturer:
X-log Elektronik GmbH
Responsible person:
Johann Nowotny,
Bahnhofstr. 95,
D-82166 Gräfelfing
declares that the product:
Type: ORTOVOX
Model: S1
Intended Purpose:
Searching for avalanche victims
when used as intended satisfies the
basic requirements in accordance
with Article 3 of the R&TTE guidelines, Directive 1999/5/EC, and
that the following standards have
been applied:
1. Health
(Article 3.1.a of the R&TTE guidelines)
ETS 300 718 issue: 05/01
2. Safety
(Article 3.1.a of the R&TTE guidelines)
ETS 300 718 issue: 05/01
3. Electromagnetic compatibility
(Article 3.1.b of the R&TTE guidelines)
ETSI EN 300 718-1
issue: 05/01
4. Efficient use of the radio
frequency spectrum
(Article 3.2 of the R&TTE guidelines)
ETSI EN 300 718-2
issue: 05/01
5. Electromagnetic compatibility
and radio spectrum matters
(Article 3.3.e of the R&TTE
guidelines)
ETSI EN 300 718-3
issue 2004/02
DEVICE DESIGNATION: ORTOVOX S1
FUNCTION: digital with acoustic emergency operation
CASING: ergonomic, waterproof, impact-resistant
DIMENSIONS: 120 x 80 x 30 mm (closed);
215 x 80 x 30 mm (open)
FREQUENCY
Transmitting: 457 kHz
The S1 can receive signals from any standard
avalanche transceiver with no limitations
DIGITAL RECEPTION RANGE: up to 60 m
SEARCH STRIP WIDTH: up to 50 m
TEMPERATURE RANGE: -20° C to +45° C
IF THE TRANSCEIVER GETS WET, DO NOT USE DIRECT
HEAT, I.E. SUCH AS A HAIR DRYER; TO DRY IT OUT. HEAT
APPLIED IN SUCH A DIRECT MANNER MAY PERMANENTLY DAMAGE THE DEVICE BEYOND REPAIR.
POWER SUPPLY:
3 alkaline AAA Mignon 1.5 V LR 03 batteries
OPERATING TIME
TRANSMITTING: about 250 hours
RECEIVING: about 15 hours
WEIGHT: approximately 245 g incl. batteries,
carrying case approximately 120g
SELECTABLE; ADDITIONAL FUNCTIONS
• Infrared interface
Gräfelfing, 09/07/2009
• Compass
(City/date of the Declaration of Conformity)
• Inclinometer: 0 – 60°
p. p. Andrea Reintges
• Thermometer: -20° to +45°C
(name)
The ORTOVOX S1 surpasses the high requirements of European standard EN 300 718.
INFORMATION FOR THE USER:
Changes or modifications to this device not approved by ORTOVOX can void the users authority to operate the equipment.
FCC ID KF5ORTOVOXS1
This device complies with Part 15 of the FCC Rules. Operation is subject to the following two conditions:
(1) the device may not cause harmful interference and (2) the device must accept any interference received, including
interference that may cause undesired operation. This equipment has been tested and found to comply with the limits for
an intentional radiator pursuant to part 15 of the FCC Rules. These limits are designed to provide reasonable protection
against harmful interference in a residential installation. This equipment generates, uses, and can radiate radio frequency energy and if not installed and used in accordance with the instructions may cause harmful interference to radio communications. However, there is no guarantee that interference will not occur in a particular installation. If this equipment
does cause harmful interference to radio or television reception, which can be determined by turning the equipment off
and on, the user is encouraged to try to correct the interference by one or more of the following measures:
• Reorient or relocate the receiving antenna.
• Increase the separation between the equipment and receiver.
• Connect the equipment into an outlet on a circuit different from that to which the receiver is connected.
• Consult the dealer or an experienced radio/TV technician for help.
WEARING THE PROTECTIVE CASE
Hold the shoulder strap on the protective
case by the silver-coloured application
and place this over your head and shoulder. Pull the free end of the strap around
your back and connect to the case using
the snap buckle.
SWITCH ON AND OFF
SWITCH ON
Turn ON/OFF switch (1) clockwise 90°.
The transmission monitoring lights (6)
are now flashing. When the battery capacity is between 99 and 75%,
3 short acoustic signals are emitted; between 74 and 50% battery
capacity, 2 short acoustic signals are emitted; between 49 and 25%
battery capacity, 1 short acoustic signal is emitted and if the battery
capacity is less than 25%, a continuous alarm signal is emitted. If the
equipment selt-test was not able to be completed positively, a warning
signal is emitted at regular intervals.
FOR THE ORTOVOX S1 AVALANCHE TRANSCEIVER
ng
for
on
enment
off
QUICK REFERENCE FOR THE ORTOVOX S1 AVALANCHE TRANSCEIVER
QUICK REFERENCE
nt.
ENGLISH
SWITCH OFF
Turn ON/OFF switch counter
clockwise 90°.
37
FOR THE ORTOVOX S1 AVALANCHE TRANSCEIVER
QUICK REFERENCE
TO OPEN
Take the S1 from its protective
case, press the release
button (5) on the left
side and then open
the S1 unit.
TRANSCEIVER SELF-TEST AND
TRANSMISSION MODE
When the device is opened up, once the S1 has been switched ON the
transceiver self-test can be watched on the display. Symbols for transmission, reseption, additional functions and battery capacity are confirmed with ticks. The sensors on the S1 for measuring temperature,
slope and the earth’s magnetism are calibrated.
Close S1 after a positive transceiver self-test. This switches the S1 to
transmission mode.
If an error function or fault is detected, the warning triangle appears.
ERROR MESSAGE
During the self-test the transmit and receive functions, the sensors and
the battery capacity are tested. An error message is shown on the display with the warning triangle next to the checked function; in addition 5
warning signals sound. An error message can be triggered by the imme38
ENGLISH
What the most important error messages mean:
E0001: transmitter
E0004: magnetic sensors
E0002: receiver
E0008: slope sensors
E0003: transmitter and receiver
The S1will now transmit and the transmission indication lights on the
side (6) will flash.
RECEIVE = SEARCH
Press the release button (5)
on the left side of the
beacon and open the
S1. The search
situation will be
displayed automatically
on the screen (7).
FOR THE ORTOVOX S1 AVALANCHE TRANSCEIVER
If one of the above or another error message is displayed, then carry
out the self-test again in the open in surroundings without interference. When doing so, it is essential to make sure that no other transmitters are nearby. Switch off all sources of interference (mobile phones, wireless devices etc.) or move them well away.
If the malfunction is displayed again, then send this avalanche transceiver to the ORTOVOX service department.
People wearing a heart pacemaker are recommended to wear the S1
on the right side of their body. It is essential to observe the pacemaker manufacturer's instructions!
QUICK REFERENCE
diate proximity to another transmitting avalanche transceiver, mobile
phone, wireless device, large metal parts or strong magnetic field.
ORTOVOX recommends switching off mobile
phones and radio equipment when locating!
39
FOR THE ORTOVOX S1 AVALANCHE TRANSCEIVER
QUICK REFERENCE
COARSE SEARCH:
Turn the S1 left and right through an angle of approx. 30°
during the COARSE SEARCH (= search for the first signal)
and tilt it moderately up and down. This compensates for
particularly unfavourable positions of the transmitting
antenna and the signal can be picked up even earlier. If
there is no transmission signal being received then the
screen will automatically display instructions to carry out
a coarse search. Search the avalanche track in search
strips of 50 m !
REFINING LOCATION:
Hold the S1 in a horizontal (flat) position during the
search!
At approximately 60 m distance from the victim the
victim symbol will appear on the display screen (7) with
the digital measurement (i.e 55).
The searcher aims the vertical line to the middle of the
victim symbol and then moves towards the victim. The
acoustic signal from the loudspeaker will sound faster
as the distance reduces and thus confirm
the measurement result.
If the S1 again has to determine the initial
signal, the instruction to pivot the S1 appears on the display.
The distance to the victim is now 20 m. Two further victims are shown at distances of 25 m and 30 m by a
small icon. The nearest victim (large icon) at a distance
of about 20 m remains targeted. When there are several people searching, each of the signals displayed can
be targeted and simultaneously located by the other
searchers.
40
DEUTSCH
ENGLISH
The searcher is approaching the victim: the distance is
2m, the circle becomes smaller and the arrows are pointing to the center of the circle.
The searcher is moving away from the victim.
The circle becomes larger, the arrows are pointing outwards as the distance increases. The previously achieved, closer position is stored and is referenced by the
inner, lighter circle shown on the screen.
The searcher is once again approaching the victim. The
circle is becoming smaller, the arrows are pointing to the
center and the distance to the victim is reducing.
FOR THE ORTOVOX S1 AVALANCHE TRANSCEIVER
The patented circular illustration with tendency indication
on the S1 makes pinpoint location considerably easier,
faster, and more precise. The process of pinpoint location
begins automatically at a distance of 3m. The searcher is
approaching the victim: the arrows show towards the center of the circle (tendency indication). The closer he comes
to the victim the faster the acoustic signal sounds.
Hold the S1 steady in front of you. Do not turn the S1
during pinpoint location!
QUICK REFERENCE
PINPOINT LOCATION WITH TENDENCY INDICATION:
The victim has been located at a depth of 0.3 m.
No smaller numbers and no smaller circles are visible.
41
FOR THE ORTOVOX S1 AVALANCHE TRANSCEIVER
QUICK REFERENCE
Mark
To mark the located person, the “OK- button” (2)
is pressed once.
The marking flag appears in the display where
the located person is buried.
Cancelling marking
The marking of the last person located can be cancelled by pressing the
“OK-button” (2) again. A new pinpointing can be started immediately.
If a second (third) victim is within a 3 m radius, the signal first found
cannot be cancelled. In this case the pinpoint location of other victims
continues in a consecutive manner as circle icons appear giving their
specific respective distances, should the situation arise.
If the victim is shown behind where you are standing,
then change direction by 180°, home in on the victim
again and walk towards the victim.
42
ENGLISH
Marking a transmitter at a depth of more than approx. 6 – 7 m is not
possible - in this case the victim's position is found by determining the
smallest distance indication. After that, every victim shown on the display can be homed on, located and marked.
Crossing the victim’s position
twice in the pinpoint location
area enables the position
to be marked up to a burial
depth of 7,0 m
Extended pinpoint location
area: up to 7,0 m
Pinpoint location
area:0,1– 3,0 m
FOR THE ORTOVOX S1 AVALANCHE TRANSCEIVER
You will know that the area is being crossed when the distance indicator first drops to approx. 4 to 7 m and then rises again when you continue walking. Turn around and watch again how the indicator first
drops and then increases. After turning around again the pinpoint location indicator appears and you can determine the exact position as
usual by using the grid search.
QUICK REFERENCE
Deep burial
In the case of a burial depths of 3.0 to max. 7.0 m, pinpoint location
is triggered by crossing the pinpoint location area twice.
up to 7,0 m
Burial depth: up to approx. 7,0 m
43
FOR THE ORTOVOX S1 AVALANCHE TRANSCEIVER
QUICK REFERENCE
44
Simultaneous location of two victims by 2 rescuers
The S1 display shows the relative position and distance of the avalanche victims. Each of the transmitters displayed can be homed on and
thus directly located. 2 rescuers can locate the homed on transmitter independently of each other and thus save valuable time when
rescuing the victims.
DEUTSCH
ENGLISH
Average time needed to free a person from a snow depth of approximately 1m:
Avalanche transceiver + shovel
25 minutes
Only avalanche transceiver, hands, ski, snowboard
1–2 hours
Illustration: Dominique Stumpert
Avalanche transceiver, probe + shovel
11 minutes
The illustration shows the
effect of useful equipment in
rescuing an avalanche victim
from a depth of 1m.
EVERY MEMBER OF THE GROUP SHOULD HAVE
THE FOLLOWING BASIC EQUIPMENT:
Avalanche transceiver
Mere possession of an avalanche transceiver does not suffice. Each member
of the group must be familiar with his device and practise with it regularly.
(See www.ortovox.com for practice opportunities).
Avalanche shovel
Rescuing avalanche victims is only possible with a shovel.
Avalanche probe
A probe is required for fastest possible precise location with the pinpoint
search procedure.
First-aid kit
For administration of first-aid to the injured
Bivouac sack
Protects against hypothermia and can be used as a transport aid.
Supplemental equipment for added safety
Mobile phone for organizing professional help
KURZANLEITUNG für das LVS-Gerät ORTOVOX S1
You should check the EMERGENCY EQUIPMENT on the day before the
tour to ensure that it is complete and functional (e.g. avalanche transceivers).
Each member of the group has an avalanche transceiver on their person
and a shovel and probe in the backpack.
Decision-making strategies are necessary when planning a tour.
For more information contact the avalanche warning services and
Alpine organisations in your country.
45
EXTENDED OPERATING INSTRUCTIONS
FOR THE AVALANCHE TRANSCEIVER ORTOVOX S1
TRANSMISSION AND AUTOMATIC SAFETY SWITCHBACK
FOR TRANSMIT (MOTION SENSOR):
If the S1 is motionless for 90 seconds while open then the transmission mode will be automatically activated from every function depending on the setting selected. In the event of a subsequent avalanche
the S1 switches to transmission after 90 seconds (factory setting;
time can be set at 30, 60 and 120 seconds via the “settings” menu).
COURSE SEARCH (= search for first signal):
Move through the presumed search area in strips with a width of 50 m
while ensuring 25 m distance from the side edge of the avalanche.
Several searchers:
The distance between
searchers is 50 m.
46
ENGLISH
MENU
• Accessing the menu: Press
• Select function: Press
several times
• Confirm function: Press
Search
Search for more
than 3 victims
Compass
Temperature
and inclination
Quick test with
limited range (approx. 5 m)
Acoustic search
Settings
47
STATUS DISPLAY
If the S1 detects 4 or more victims (=multiple burials), the "4+" icon
appears on the status line of the display
The searcher is
requested to select the
function from the menu.
Warning in case of
low battery
Warning in case of fault
Warning: Automatic
transmission switch
over is switched off.
48
ENGLISH
SOFTKEYS
The keys
and
have several functions.
The softkeys show the respective key function:
Adjust contrast
Scroll forward
in menu
Select menu
Note of marking
in pinpoint location
Remove marking of
all located transmitters
Query transmission fault
during partner test
Access submenu
Confirm a selected function
Temperature and
slope measurement
Recording the measured slope
Carrying out a new slope measurement
49
The S1 allows the temperature
and the slope angle to be measured.
Measuring the slope:
The tolerance of the slope sensors at 30° (degrees)
can be up to +-5°. The determined measurement can
be kept by pressing the "OK" button (2). A new measurement can be taken by pressing the “OK” button (2)
again.
DAILY FUNCTION TEST BEFORE STARTING A TOUR!
Checking the receivers:
• All participants set their S1 to ‘RECEIVE’.
• A group member (preferably the group leader) sets his/her S1
to ‘TRANSMIT’.
• If all group members have acoustic and optical reception then
the group members’ receivers are working, as is the transmitter of
the group leader.
• The group leader now moves away from the group until no group
member is still receiving a signal.
• The group members see the increase in distance of the group
leader on their displays and can thus test the reception range
of their S1.
Checking the transmitters:
• The group leader opens his S1 (=reception position). The group
members close their S1 (transmission position) and pass the group
leader's receiver ONE BY ONE at a distance of 20 m.
At the same time, the pinpoint location is tested approaching under 3 m !
50
ENGLISH
QUICK TEST with limited range
(test of the transmitters)
The group leader sets his/her S1
to “transmit test” via menu item
(= limited range).
If the S1 receives an audible (via the loudspeaker) and
visible signal (circle with 2 persons) from each individual
avalanche transceiver then the transmission function of
the units to be tested and the reception function of the
group leader are in order.
If a fault turns up on the checked device then the warning triangle appears on the display. The warning triangle signals a serious device fault on the checked device.
Possible faults can be queried by pressing
the
-button (2).
Deviation from the
• Transmission frequency (457 kHz)
• Transmission period
• Period length
Go back to the short test using the
-button (2).
If a fault is displayed please send your transceiver directly to your ORTOVOX
service office for inspection (see page 164).
51
LOCATING SEVERAL AVALANCHE VICTIMS
(SIGNAL SEPARATION):
The S1 separates the signals automatically.
I Once the pinpoint location of the first victim is finished,
this signal can be marked by pressing the “OK-button”
(2). Instead of the victim symbol, a flag now appears
where the victim is buried. At the same time the symbol
for the next nearest victim is enlarged.
This marking can be cancelled by pressing the "OK" button (2) to check
the pinpoint location again if necessary. (This is not possible if several
victims are transmitting within a 3 m radius.)
It is necessary to have a short pause between the signals. It may take
slightly longer to be able to separate three or more signals due to
signal overlap. The receiver needs adequate time to differentiate between each additional transmitted signal.Thus it is practically impossible to separate more than 3-4 signals within a reasonable time
and to show them on the display. The S1 therefore automatically reduces its range until the number of signals has been reduced to a quantity that can be displayed in a reasonable time.
IMPORTANT NOTES REGARDING SIGNAL SEPARATION:
Thank you for purchasing the Ortovox S1 employing the most innovative
technology amongst today's avalanche beacons. You will find its unique
visual representation and the advanced signal separation technology very
helpful while searching for one or even more buried persons. Nonetheless,
we want to draw your attention to some important aspects of search,
especially in multiple-burial scenarios, and their physical background:
In real avalanche accidents, frequently two or more persons are buried
with their beacons transmitting at the same time. Sometimes, and unpredictably, two or even more beacons are transmitting their impulses exact52
ENGLISH
ly simultaneously for a longer period of time. The transmitted signals of two
analog beacons with long pulse durations or digital beacons transmitting
simultaneously overlap and mix up. Frequently they can no longer be separated for physical reasons. In such an overlap state, a single transmitter's
signal cannot be measured, neither using analog nor digital technology.
Unfortunately, such an overlap state can continue for 30 or more seconds
in some cases. It is necessary to wait until two overlapping impulses are
drifting apart. Using the Ortovox S1, you can solve this physically determined problem applying the following three search strategies:
1. Switch to the 4+-Mode and use micro search stripes with
a width of at most 5 m or 16 ft (cf. p.54)
2. Use the Ortovox sector search strategy (cf. p.55).
You can combine this strategy with the 4+-mode.
3. Switch to the acoustic search mode (cf. p.56)
Advice: If the number of buried persons is not known or unsure, for safety
reasons it is required to use one of the aforementioned methods to detect
and locate potential further buried persons.
For detailed information please visit our website at www.ortovox.com
Select “4+” mode to locate more than 3 transmitters
Access the menu
with the key and select the function
When several transmission signals interfere with one
another, a location procedure is not possible. Therefore
the stop sign appears for a few seconds. Wait until stop
hand disappears and then continue to locate!
When there are more than 3 to 4 transmission signals,
you will see “4+” top left. Access this function with the
“menu” button (3).
53
Function "4+"
The full range (approx. 50m) is available for locating the
first signal. After marking the first signal the range is
limited to approx. 5m.
Consequently the search strips should be reduced to a
width of 5 m. The restriction to a 5 m search strip width
is shown by two black bars on the side of the display.
Two methods for locating multiple victims:
• micro-search stripes
• ORTOVOX sector method
MICRO-SEARCH-STRIPS
Once the 1st victim has been located and rescued by helpers,
the search stripes have to be set at 5 m intervals. The avalanche area
is searched for victims in this way. The S1 now scans circular areas
with a diameter of max. 10 m and every victim in this circle is shown.
54
ENGLISH
ORTOVOX-SECTOR-METHOD
1st sector: Once the 1st victim has been located and rescued by
helpers the surrounding area is searched by sectors.
2nd sector: approaching from left.
3rd sector: approaching from right.
4th sector: approaching from underneath.
Before each approach in a new sector, the “4+ mode” must be restarted via the menu.
Caution:
It is, of course, possible to get a bearing on signals that have already
been located. The searcher should then concentrate on signals that
have not yet been marked in the avalanche area.
55
ACOUSTIC EMERGENCY RECEPTION (SAFETY SETTING)
Receiver
Transmitter
Increase
Volume
Deacrease
The ORTOVOX safety emergency reception allows an acoustic search even
when the batteries have almost completely run out. When a battery change
has been delayed (remaining capacity less than 10 %), sensors and display
are automatically switched off, as the minimum current supply is no longer
reached. Now only an acoustic reception is available.
Switching "acoustic emergency reception" on and off
The acoustic emergency reception can (also for training purposes) be switched
on at any time by simultaneously pressing the buttons "OK" (2) and "menu" (3)
for at least 5 seconds or using the menu heading "Acoustic location".
Switching off the acoustic emergency reception:
Close the S1 and open it again or hold down both the "OK" (2) and "menu" (3)
buttons again at the same time for at least 5 seconds. If the battery capacity is very low the S1 is automatically switched to the highest possible reception level for emergency acoustic reception. The ‘OK‘ button is used to reduce
the signal. The ‘menu’ button is used to increase the volume level. After initial reception the loudspeaker will sound the transmission signal. TURN
the S1 in order to determine the direction with the strongest reception. Now the searcher will move in this direction for 5 m, reducing the volume if necessary. Then the searcher once again
turns the S1 to the direction with the highest volume and
again moves 5 m in this direction. The volume increases
as the searcher moves closer to the avalanche victim. During the pinpointing phase (= lowest reception level) do not turn or tip the S1. Now
mark the point in the longitudinal direction –
with the loudest signal. A search is also
+
made for the loudest signal to the right and
left of this point. The avalanche victim is
located at the point with the loudest signal.
56
ENGLISH
SETTINGS
The following settings can be queried,
selected or changed via the menu symbol
• Loudspeaker
• Motion Sensor settings
• Information about device number, software
version,receiver function and battery capacity
• Display contrast setting
• Update
• Compass calibration
Loudspeaker
The loudspeaker function can be set to “loud”,
“medium” and “off”.
Switch to automatic transmission
(Motion Sensor)
If the S1 is not moved within the period of 30, 60, 90
or 120 seconds, then it automatically switches to transmission mode from whatever mode it is in. A short warning signal is emitted 10 seconds before automatically
switching. The switch to automatic transmission is preset at 90 seconds when delivered.The switch to automatic transmission can also be switched off.
57
Attention: If the switch to automatic transmission is switched off, then
the S1 will NOT automatically switch back to transmission mode if
someone is buried by a subsequent avalanche!
Information about device number, software version,
receiver function and battery capacity
The sub-menu shows
• device number
• software version
• transmitter/receiver function and
• current battery status
Display contrast setting
The desired contrast is set using the “menu” button (3)
and retained with the “OK” button (2).
Update
The S1 can be connected to a computer via it's
infrared sensors and an additional infrared scanner
(accessorie) for:
• update/upgrade
• printout and management of transceiver's functions
For more information click www.ortovox.com
58
ENGLISH
COMPASS CALIBRATION
To display the direction as fast as possible the ORTOVOX S1 uses an electronic compass. We recommend "calibrating" the compass before the
start of every winter season and after changing the battery. Any compass
discrepancy occurring is compensated by calibration. For calibration purposes, use only a flat surface without metal parts. The distance from electricity conducting leads or metal parts, particularly magnetic objects (loudspeakers) should be at least 2m.
Method of procedure
1. Place the S1 on a flat, horizontal surface
without metal parts (display faces upwards).
2. Select the "Settings" symbol from the "MENU".
3. Select the calibration symbol.
4. Press the "OK button", wait for approximately
2 seconds until calibration starts.
5. Turn the S1 in a horizontal position slowly
(5 - 10 seconds) once around its own axis (360°).
Wait for beep.
59
6. Turn over the S1. Display faces downwards.
Battery compartment is visible. Wait for beep.
7. Turn over the S1 again.
Display now faces upwards again. Wait for beep.
The calibration process is finished.
Note: After each battery change the S1 requests
calibration after the self-test.
Now press the "OK button" (calibration starts).
Continue as from Point 5.
By pressing the "MENU" button the calibration can be
rejected and carried out at a later point in time. In this
case the S1 reminds you to calibrate at every restart.
INTERFERENCE IN TRANSMITTING AND RECEIVING
PERFORMANCE
Interference to the transmission and reception performance can be
caused by lightening, lifts and power plants, radio equipment, mobile
phones and other electronic equipment. Mobile phones and radio
equipment should be switched off whilst searching. The minimum
distance between two avalanche transceivers and to metal, radio
equipment, mobile phones, magnets etc. should be at least 50 cm.
60
ENGLISH
CHANGING BATTERIES
(when the equipment is switched off)
Remove the screw from the battery compartment on
the back of the S1 and remove the batteries
from the battery shaft using the strap.
Always insert 3 new AAA 1.5V LR 03 batteries of the same make. Check the correct
positon of the positive and negative poles.
Use only brand name batteries. No rechargerable batteries and no lithium batteries.
SEPARATING THE PROTECTIVE CASE FROM
THE AVALANCHE TRANSCEIVER AND ATTACHING THE WRIST
STRAP
The protective case can be separated from the avalanche transceiver for
cleaning purposes. The wrist strap can be attached in place of the protective case.
For safety reasons,
ORTOVOX only recommends using the supplied
protective safety case when wearing the beacon!
IMPORTANT INFORMATION!
Remove the batteries from the avalanche transceiver during the summer months. The ORTOVOX factory guarantee is invalid by damage due
to battery leakage. Never use rechargeable batteries (rechargeable
batteries such as Ni-Cd cells). Rechargeable batteries have significantly lower operating voltage, and thus lower range and limited service
life. In addition defective rechargeable batteries cannot be detected
immediately. Once they have been recharged they show full battery voltage, however they can drop off to 0 after extremely short service (life
threatening hazard!).If you delay changing batteries (capacity <10%),
the micro-processor, the distance display, and direction display will
switch off. In such case, approximately only twenty hours of emergency analog transmit operation and one hour of emergency receive operation are possible.
61
STORAGE
After the tour take off the S1 and store it in its switched off status in
a well-ventilated dry location. Most often, the well-designed casing prevents condensation for the most part. To ensure that the device will
function for several years we recommend a gentle drying of the carrying system and the avalanche transceiver, itself. If your transceiver gets
wet, do not use direct heat, i.e. hair dryer, to dry it out. Heat applied
in such a direct manner may cause permanent damage. Protect the
avalanche transceiver from excessive moisture or excessive heat. Protect the batteries from cold temperatures.
WARRANTY
When purchasing a new ORTOVOX Avalanche Transceiver, on presentation of the filled out warranty card (see instructions for use) and dealer
invoice we grant the 5-year ORTOVOX guarantee from the date of purchase, but no longer than 6 years from the date of manufacture.
The number IV/14 on the seal in the battery compartment means,
for example: ORTOVOX guarantee valid until 4th quarter 2014; the
appliance was manufactured 5 years earlier in the 4th quarter 2009.
The seal also gives a reminder of the recommended transceiver test in
the 4th quarter 2014.
As part of the ORTOVOX guarantee, faulty parts are repaired free of
charge or the avalanche transceiver is replaced by a beacon of the
same design. Damage caused by improper handling and natural wear
is excluded. In the case of damage due to battery leakage, the
ORTOVOX guarantee is voided. Batteries are excluded from the guarantee. Any further warranty and consequential damage are expressly
excluded. Enforced guarantees do not extend the guarantee obligation
nor does a new guarantee period begin.
Warranty expiry date
IV/14 (= 4th quarter 2014)
Recommended appliance test:
2014
62
ENGLISH
SERVICE
The ORTOVOX S1 is a rescue device. Its perfect operation might be
crucial for life. To ensure your unit is functioning properly, send the
device for factory inspection according to the dates shown on the
test seal.
Please use our inspection service in the summer months, so that
your device will be ready for operation when winter starts.
For repair or factory inspection please send the avalanche
transceiver directly to our service center (see page 164).
IMPORTANT INFORMATION!
Avalanche transceivers are designed to support the assistance offered by companions in the event of avalanche burial! Your
presence in areas where avalanche hazards exist is fraught with
potential risk; only remain in such areas in the company of experienced participants. Effective use of an avalanche transceiver
requires appropriate training and constant practice. Wear your avalanche transceiver close to your body under your outer clothing.
ORTOVOX strongly recommends that you carefully read the operating instructions provided with the avalanche transceiver. Always
take a shovel and a probe when you go off-piste in areas where avalanche hazards exist, and never tour alone. Give due consideration
to worldwide, current Please check the avalanche reports prior to
planning your off-piste activities at: www.ortovox.com
Before you travel in an area where an avalanche hazard exists,
ensure that all avalanche transceivers are functioning properly
and that all batteries are in good operating condition.
The S1 fulfils the highest safety requirements and is characterized by its clear and uniquely simple illustration of the search
situation on the graphic display!
63
INDEX
A
Acoustic emergency reception
(Safety setting)
56
Acoustic search
47, 56
Automatic transmission switch
(motion sensor)
46, 57
B
Battery
Battery capacity
Battery change
Button menu
Button OK
36
38, 58
61
47
47
C
Coarse search
40, 46
Compass
36, 47
Conformity (EU declaration)
36
D
Daily function test
Deep burial
Device number
Display contrast setting
64
47, 50
43
58
58
E
Extended operating instructions 46
Error
38
F
Frequency
36
G
Guarantee Card
66
I
Inclinometer
Infrared-sensors
Interference
47, 50
58
60
L
Loudspeaker
57
M
Marking
Marking (cancelling)
Menu
Multiple victims
(„4+-Mode“)
Micro-search strips
54
54
O
Open
Operating elements
Operating time „transmit“
Operating time „receive“
38
01
36
36
42
42
47
ENGLISH
P
Protective case
Printout and management
of functions
Pinpoint location
Q
Quick reference
Quick test
R
Range
Receive/search
Receiver function
Rechargeable battery
Refining location
61
58
41
37
47, 51
36
39
58
61
40
S
Search
39
Search strip width
36, 40, 46
Sector method
55
Selectable, additional functions 36,47
Self test
38
Service
63
Service Center
164
Settings
47, 57
Signal separation
52
Signal overlap
52
Softkey
49
Software Version
58
Status display
STOP sign
Storage
Switch OFF
Switch ON
48
53
62
37
37
T
Technical data
Thermometer
36,
Transmission Indication lights
Transmission (and automatic
safety switchback for transmit)
U
Update
Upgrade
W
Warning triangle
Warranty
Wrist strap
36
47
37
46
58
58
38, 48
62
61
65
GUARANTEE CARD
Name
City, State, Zip
E-mail
Telephone
Model ORTOVOX S1
Serial number
(inside of battery compartment lid)
Purchased at
Address
City, State
Please provide below a detailed explanation and description of your unit`s faulty performance!!!!
In case of service please fill out this card and send it
to the responsible ORTOVOX service center (see page 164).
www.ortovox.com
✃
IMPORTANT!
Please hold in
safe keeping