1
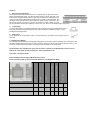
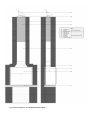
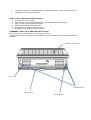
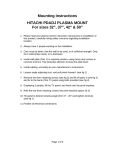
BUILT–IN GAS BRAAI
MODELS: 750, 1000
INSTALLATION INSTRUCTIONS & USER MANUAL
Actual product may differ slightly from the picture above
Megamaster products and factories comply with the Quality Management System standards required by all
major retailers in South Africa.
Features
1. Stainless Steel Gas Braai
The Stainless Steel Gas Braai features an “H” shaped cast iron gas burner with a
battery operated piezo igniter. The drip tray below is easy to move and clean. The
braai comes complete with lava rocks to give a more natural feel and flavour to the
meat. The user manual also features a handy how to guide t us the gas braai. The
gas braai comes complete with a gas regulator an hose for easy connection to 9kg
gas cylinder. By law if you wish to connect your braai to a bigger cylinder you must
get an LPGSASA certified gas installer to connect it for you. This is an LPGSASA approved product.
2. Light Fitting
A ceramic light fitting is included with the braai. It is mounted on the left hand side of the braai in
the holes provided, electrical wiring must be provided during the installation process. It uses
standard bayonet light bulbs.
3. Potjie Hook
The Potjie hook can accommodate a No ¼ to No 3 Potjie pot. It is located in the top right corner of
the braai.
4. Rotating Cowl & Base
The rotating cowl and base are included with this product and is used to prevent rainwater from entering the flue.
All bases supplied are used as “bolt-on’ bases, meaning that they must be fasten to the brickwork chimney. The
customer can drill holes into the base as he sees fit and necessary to mount the base.
Optional Extras are available from your nearest retailer or directly form Megamaster. Please visit our
website for a full range of braai accessories - www.megamaster.co.za
Flue Pipes - 45 Degree Bends
Depth
Height
Flue Gather Height
Flue Gather Depth
A
B
C
D
E
H
I
750 Standard Built-in Braai
760
510
810
300
200
300
230
1000 Standard Built-in Braai
1010
510
810
300
250
400
230
Model & Size
Flue Size
Width
Sizes and Measurements (Ignore Measurements J & K)
Use the following table to construct the brickwork for your Megamaster Braai.
Fig.1 Typical installation of a Megamaster Built-In Braai
This product has a 15 year limited warranty (1 year warranty on the gas unit), which
extends to the overall construction and workmanship of the product. Rust, paint
discoloration, various parts and incorrect installation are not covered by this warranty. To
protect your interest, be sure to employ a reputable and competent body to do the
installation. Points to keep in mind are:
Refer to Fig. 1
1. Construct brick support walls for the unit to your personal desired height. Concrete lintels can
be used for the base support. You may drill a hole at the rear or bottom (right hand side) for a
gas pipe connection to be made.
2. Position the unit and cover the back, sides and top with insulation, before unit is bricked in. Any
type of fire-glass wool or ceiling insulation can be used. Not included with this product.
3. To allow for expansion, ensure a gap of 20mm between back and sides of the body of the unit
and the brickwork.
4. Also make provision for electrical wiring for the light fitting on the left side of the braai in the
holes provided.
5. Chimney height with a minimum of 2.0m is critical for a proper draw. It is recommended that
one steel flue pipe be installed. The remainder of the chimney may be constructed from
brickwork. You may choose to use more than one flue pipe.
6. The inner dimensions of the chimney must not be less than the flue outlet opening on the top of
the unit. Example 230mm X 400mm.
7. Steel flue linings will provide a smooth surface for better draw and protect the brickwork against
heat corrosion.
8. Use standard flashing material and procedure to waterproof the roof around the chimney. Not
supplied with this product.
9. The flue can be offset to avoid obstructions, providing sufficient support to prevent sagging. 45
Degree bends are available at Megamaster Retailers.
10. A rotating cowl is necessary to prevent down drafts on windy days and will prevent rain from
entering the chimney. The chimney and the cowl must be 100 % level and the gap between
the lowest part of the cowl and the chimney must be minimal. A “bolt-on base" is supplied with
the unit. (Not included in contractors models).
11. After installation, all exposed parts of the chimney and rotating cowl can be painted with good
quality heat resistant black enamel paint.
12. The rotating cowl axle must be greased regularly to avoid rust. The unit is supplied with 2 x
stainless steel ball bearing to allow the cowl to rotate freely. Slide these two bearing into the
hollow round tube of the base.
13. The brass knob supplied can be fitted by fastening the screw supplied from behind the door
panel into the hole on the rear of the knob.
For further information of installation and other installation options please feel free to download
the full installation manual from our website.www.megamaster.co.za
NB: This is a mild steel product and the warranty does not extend to rust or paint discolouration.
Megamaster will not accept any claims against rust occurrence after installation has taken place,
regardless of the date of installation. Owners are advised to take the necessary precautions to protect their
product against rust by regularly checking the installation and repainting areas were necessary. Coastal
residences are advised to take extra precaution against rust in humid and coastal regions.
MEGAMASTER GAS BRAAI (970mm and 720mm)
Remove all components from the packaging and assemble.
Connect the regulator to the gas cylinder (anti-clockwise).
Do not adjust any setting on the regulator under any circumstances.
Place the stones on the mesh to cover the burner completely.
How to light the braai:
1. Make sure that the gas valve on the braai is in a horizontal position.
2. Open the gas cylinder and listen for any leakages. Repair if necessary.
3. Press the piezo igniter. A constant clicking sound will be heard. Press the button continuously
and then open the gas valve (anti-clockwise) until the burner ignites.
4. Only one burner is now lit. To light the second burner on the 970mm unit, open the second gas
valve (anti-clockwise).
5. This gas valve is also used to adjust the flame size on the burner.
6. Replace top grills after they have been washed and brushed with cooking oil.
7. Wait approximately 10 minutes and your braai will be ready for use.
PLEASE NOTE:
The two bigger holes (approx. 50 mm in diameter) are the air intake pipes of the burner.
If the air pipes catch fire with a roaring sound, turn off the gas immediately. Wait 5 seconds and repeat
the lighting process.
DO'S AND DONT'S
1. Never desert your braai when the gas valves are open.
2. Make sure the regulator tip has a rubber seal in the front before connecting it to the gas
cylinder.
3. The regulator is adjusted for your specific braai. Should the need occur to replace it, please
contact the manufacturer for information.
4. Close the gas cylinder after use.
MAINTENANCE
1. Steel wool and scouring powder (Vim) or fine sandpaper are used to clean the stainless steel
braai.
2. Oven cleaner is recommended to clean the top grill after a braai.
3. To clean the stones (after approx. 20 braais) they need to be removed from the braai and
brushed with a steel brush. New stones can be added from time to time. Chips of hard brick
can be used for this purpose.
Burner maintenance:
The burners need to be cleaned after approximately 100 braais:
• Remove burners
• Brush them with a steel brush
• Tap them lightly with hammer and shake to remove any oxidation.
After 300 braais, follow the steps described above and then drill open the holes very slowly with a 2,8
mm metal drill after the burner has been soaked in water.
Please contact the manufacturer if you have any problems or need any information.
The braai can also be delivered to the factory for a full service.
PROBLEMS THAT MAY OCCUR
1. If your braai does not function as expected:
2. Are there too many stones in the braai? Should be covered by a single layer.
3. Is there enough gas?
4. Is there an obstruction in the gas supply?
5. If the flame burns yellow instead of blue, your burner needs a service.
6. After a prolonged period of not using your braai a spider web may be the result of a weak
flame.
7. The igniter is fitted with a penlight battery. To replace the battery, simply unscrew the front of
the igniter and remove the old battery.
HOW TO LIGHT THE BRAAI IF IGNITOR FAILS:
1. Close the gas valve on braai.
2. Open the tap on gas bottle and listen for any gas leakage. Repair if necessary.
3. Light a candle or use a special gas lighter.
4. Hold the flame 75mm above the burner.
5. Now open the gas valve on the front table.
6. The gas burns in small blue flames of 4 rows.
REMEMBER - FIRST THE FLAME AND THEN THE GAS.
Gas consumption for normal braai: 1/2 kg per hour per burner.
Camping fitting to bull-nose adaptors are available from the manufacturer for the use with smaller gas
cylinders.
Stainless Steel Grid
Air Vent
Gas Ball Valve
Grease Tray
Piezo Igniter