1
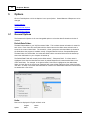
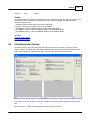
Response Manual
Copyright © 2003 Vericom
Vericom Computers, Inc.
Response User Manual
by Michael Pangerl
The contents of this manual can also be found in Help of the
Response program.
Response Manual
Copyright © 2003 Vericom
All rights reserved. No parts of this work may be reproduced in any form or by any means - graphic, electronic, or
mechanical, including photocopying, recording, taping, or information storage and retrieval systems - without the
written permission of the publisher.
Products that are referred to in this document may be either trademarks and/or registered trademarks of the
respective owners. The publisher and the author make no claim to these trademarks.
While every precaution has been taken in the preparation of this document, the publisher and the author assume no
responsibility for errors or omissions, or for damages resulting from the use of information contained in this
document or from the use of programs and source code that may accompany it. In no event shall the publisher and
the author be liable for any loss of profit or any other commercial damage caused or alleged to have been caused
directly or indirectly by this document.
Printed: July 2012 in Rogers, MN
4
Response Manual
Table of Contents
Foreword
0
Part I Table of Contents
6
Part II About Vericom
8
Part III Installation
10
Part IV Introduction
12
Part V Options
14
1 General
...................................................................................................................................
Options
14
2 Client/Instructor
...................................................................................................................................
Options
15
3 Scenario
...................................................................................................................................
Editor Options
16
Part VI Reports
19
1 Opening
...................................................................................................................................
Reports
20
2 Print Previewing
...................................................................................................................................
Reports
20
3 Printing
...................................................................................................................................
Reports
22
4 Exporting
...................................................................................................................................
Reports
22
Part VII Modes
24
1 Practice
...................................................................................................................................
Mode
24
2 Training
...................................................................................................................................
Mode
24
Part VIII Using Response
27
1 Using...................................................................................................................................
Response, General
27
2 Using...................................................................................................................................
Response, Detailed
29
3 Wheel
...................................................................................................................................
info
29
4 Keyboard
...................................................................................................................................
Commands
30
Part IX Troubleshooting
32
Part X Contracts
35
1 License
...................................................................................................................................
Agreement
35
2 Service
...................................................................................................................................
Contract
37
Index
40
Copyright © 2003 Vericom
Table of Contents
Part
I
6
1
Response Manual
Table of Contents
Installation
Introduction
Using Response
Reports
Options
Troubleshooting
AboutVericom Com puters,Inc.
License Agreem ent
Service Contract
www.vericomcomputers.com
[email protected]
Vericom Computers, Inc.
14320 James Road, Suite 200
Rogers, MN 55374
ph: 763-428-1381
fax: 763-428-4856
Copyright © 2003 Vericom
About Vericom
Part
II
8
2
Response Manual
About Vericom
Vericom has been manufacturing brake testing computers since 1986. Our VC series of on-board
accelerometer computers are used by traffic accident investigation and reconstructionists and other
automotive experts around the world for 25 years.
We manufacture and sell on board vehicle dynamometers and stationary reaction timers. The VC4000
provides vehicle brake testing and acceleration or performance testing to a variety of applications
including Drag Racing, Traffic Accident Investigation, Engineering, Bus Testing, and Rail Car Testing to
name a few.
The VC4000 is an automotive Brake Meter, Performance Analyst, Dynamometer, Transit Brake Meter,
accelerometer and more all in one. The VC4000 measures the G-Force 100 times per second. The
VC4000 accurately measures average G-Force and precisely calculates speed, time and distance for
any type of vehicle. With a sample rate of 100hertz, the VC4000 is incredibly accurate, within 1%. It is
easy to operate, completely portable, extremely accurate and very reliable.
The VC4000 is the most modern instrument available for traffic accident investigation and reconstruction
in the world. It is used by the experts at Northwestern University Traffic Institute and at the University of
Florida Institute of Police Technology and Management (IPTM), and thousands of other experts.
It is also the most accurate and repeatable device for measuring vehicle performance and improving
driving skills. It has been used by magazines, television, individuals and professionals since 1986 when
it won the SEMA Best New Performance Product award.
Our reaction timer software Response is revolutionary software giving occupational therapists and others
a way to test clients in the office before doing on the road tests. The software can be used by anyone
who needs to test perception and reaction time.
When the office testing is successful, the instructor can use our VC4000 mobile reaction timer to test in
a vehicle. See our web site for more information on the VC4000.
www.vericomcomputers.com
[email protected]
Vericom Computers, Inc.
14320 James Road, Suite 200
Rogers, MN 55374
ph: 763-428-1381
fax: 763-428-4856
Copyright © 2003 Vericom
Installation
Part
III
10
3
Response Manual
Installation
System Requirements:
Windows XP/Vista/Windows 7/Windows 8
Gaming steering wheel hardware installed or USB 1.1 port for Vericom's hardware.
20MB hard drive space
1GB RAM
Windows Media Player installed (for motion video)
Intel or AMD 1GHz or faster processor
CD-ROM drive
Installation:
1. Close all Windows applications.
2. Insert Response installation CD into your CD or DVD drive (or unzip the file downloaded from our
web site.)
3. If setup doesn't automatically start, then from the Start menu, choose Run.
4. In the Run dialog, type d:\setup.exe, where d is the letter of your CD or DVD drive. Press Enter.
(or run the Setup.exe program from the .zip file.)
5. The installation program will guide you through the short installation process.
6. Once installation is complete select Start, Programs, Vericom Computers, Response to run the
program.
Copyright © 2003 Vericom
Introduction
Part
IV
12
4
Response Manual
Introduction
Welcome to Response™
Response is software for testing individuals Perception and Reaction Time. It uses input from the
steering wheel and pedals found on gaming steering wheel packages. The system gives a
demonstration of driving a vehicle and reacting to light stimuli on the computer screen. It is designed to
be used in an office environment in front of a computer monitor with the steering wheel mounted in front
of the client and the pedals setting on the floor in front of the client.
Each test is recorded automatically and placed into a file for reporting.
Copyright © 2003 Vericom
Options
Part
V
14
5
Response Manual
Options
Click on Tools/Options or click the Options icon to open Options. Several features of Response can be
changed.
General Options
Client/Instructor Options
Scenario Editor Options
5.1
General Options
The General tab of Options is for user changeable options such as the data file location and units of
measure.
Default Data Folder:
The data folder defaults to your "My Documents" folder. This is where the test information is stored for
each client. Each client will have a folder with the clients name as the folder name and each test is
stored in the current clients folder. The scenario's, clients, instructors and other folders are located in
the folder where the program is installed, usually <ProgramFilesDir>\Vericom Computers\Response.
The data folder, the clients folder, the instructors folder and the scenarios folder should be backed up
when other information on your computer is backed up.
The Default Data Folder will normally be the folder named "...\Response Data". If a client name is
highlighted, then when the New Session button is pushed Response will create another folder in the
client name folder. For example, in the picture below if John Doe is highlighted as the default data
folder, and John Doe is the client name, Response will create a folder called John Doe inside the folder
John Doe. So keep in mind that new folders will be created in the default data folder when new sessions
are started with a new client.
Units:
Data can be displayed in English or Metric units.
Speed
English
MPH
Metric
KPH
Copyright © 2003 Vericom
Options
Distance
Feet
15
Meters
Pedals:
If the steering wheel is working but the Pedals are not try switching the button to the other driver. It is not
necessary to load the drivers that came with the steering wheel and pedals, the default ones that
Windows uses work well.
Standard: Uses Microsoft drivers for the wheel and pedals.
Logitech: Uses Logitech drivers for the wheel and pedals.
ThrustMaster: Uses ThrustMaster Wheel and Windows default drivers
ThrustMaster Option B: Uses ThrustMaster Wheel and ThrustMaster drivers
ThrustMaster Option C: Uses ThrustMaster Wheel and ThrustMaster drivers
See Also
Client/Instructor Options
Scenario Editor Options
5.2
Client/Instructor Options
The editors let you type in the clients information and the instructors information. When the clients
name is typed in, a folder by that name will be created and the data from the tests will be stored in that
folder. When reports are needed for this client, open the folder and choose the test series.
For example, if the clients name is John Doe, a folder will be created named <data folder location>\John
Doe.
Click the browse... buttons to open previously stored clients or instructors.
Copyright © 2003 Vericom
16
Response Manual
The instructors name will be printed on reports.
See Also
General Options
Scenario Editor Options
5.3
Scenario Editor Options
The scenario editor is for changing how the reaction time lights are triggered, if a video is played and
other aspects of the test.
Run Conditions:
The Min and Max Speed determine the range the speed must be before the Stimulus will activate. The
video will only run when the minimum speed is reached. The Hold Time determines how long the speed
must be within the range before the stimulus will activate. The Media can be set to default or no media.
If no media is selected, only four large lights will show in the middle of the screen with no movie playing
during the test.
Stimulus:
The delay time can be preset to a specific time, random time with a minimum and maximum delay, no
delay or the stimulus can come on at an exact video frame number. The stimulus check boxes
determine which lights are going to display during the test. Check the check box next to each type of
stimulus you want to use. Hard Brake would be with the brake pedal all the way down, Light Brake is
with the pedal partially depressed. Left Turn and Right Turn is for steering input only with no brakes.
Brake Left and Brake Right are for steering and hard braking at the same time.
Response Conditions:
Here you can set the minimum and maximum percentage of brake input and steering wheel input. The
Copyright © 2003 Vericom
Options
17
hold time determines how long the brake must be held to be considered valid. Light Brake and Hard
Brake Min% and Max% should not overlap or an incorrect response may occur.
Scenario Information:
Select from predefined scenario's or create your own. After changes are made, they will be saved to the
currently selected Scenario Name if OK is pressed and you may open it at any time. To save a file with
a new name, type in the name in the Scenario Name field then click OK. The Scenario Folder shows
where the scenario information is stored.
General Parameters:
The Pass or Fail time for each test can be set. The default is 1.500 seconds and can be changed to
suit your tests. When the time to respond is greater than the pass or fail time, the display will show
"Slow Reaction" and the report will show "Slow Reaction" and have a red dot for the test. If the response
time is less than the pass or fail time, the display will show "Pass" and the report will show "PASS" and
have a green dot for the test.
To have the video slow down and speed up with throttle speed, check the check box for Speed
Adjusted Video. Slower computers may want to leave this unchecked. If this is unchecked the video
will run at constant speed of 50mph regardless of the speed indicated on the speedometer.
The Speedometer Display checkbox is for displaying the speedometer under the stimulus lights. If the
checkbox is unchecked, the speed will not be displayed on the screen.
Run Stop Conditions:
The maximum run time is how long the test will run for. If no reaction is recorded before the run time a
"No Reaction" is recorded in the report. The maximum run time should be longer than the stimulus max
time so the user has time to react if the stimulus appears at the max stimulus time.
The response can stop on any reaction or only the correct reaction. If All Responses is selected then
the reaction timer will stop when any input is detected, even wrong reactions. If Correct Responses
Only is selected, the reaction timer will only stop when the correct response is detected.
See Also
General Options
Client/Instructor Options
Copyright © 2003 Vericom
Reports
Part
VI
Reports
6
19
Reports
Each test set is recorded to a folder under the clients name with files stored as the clients ID plus the
date and time the test was started. For example the folder name is John Doe and the test set is
RUN123456-090503-1520'15.rtd. The default name for each test is "RUN" then the client ID, then the
month, day, year, then hour, minute, " ' " and seconds it was recorded. To view a test set, open the
report from the File menu then select View/Report from the menu, see Opening Report.
Each report shows the following:
Scenario Name: The name of the scenario used.
Stimulus: Which lights came on.
Reaction: Clients response to the stimulus. Usually this will be the same as the stimulus unless "All
Responses" was turned on.
Gas Off Time: The time from the light stimulus to the clients foot lifting off the gas pedal.
Transition Time: The movement time from when the clients foot came off the gas pedal to when the
brake pedal was activated. The brake pedal activation for transition time is set to 5%. Reaction time is
not always Gas off time + Transition time. If it takes the client 0.05 seconds to depress the brake pedal
from 5% to 95% then the reaction time will be 0.05 seconds longer than the Gas off time + Transition
time.
Reaction Time: The time from the light stimulus to the correct reaction if "Correct Responses Only"
was checked in Options/Scenario, or the time from the light stimulus to any response if "All Responses"
was checked in Options/Scenario.
Reaction Distance: The distance traveled during the reaction time. The greater the speed when the
stimulus lights came on, the greater the distance will be.
Pass / Fail: Shows if the reaction time was a passing time or not. The Pass / Fail time is set in
Options/Scenario. The green light indicates a passing time and a red light indicates the reaction time
was slower than the Pass / Fail Time.
Deleted: Click in the checkbox to temporarily delete the test from the session. The test will always
appear in the list but it will be excluded from the calculations if the checkbox has an "X" in it. The
instructor would use this to eliminate data he feels was beyond the control of the client.
Averages: The average for the column with times of 0.00 omitted. WR = Wrong Reaction percentage,
Passed = Pass percentage.
Copyright © 2003 Vericom
20
Response Manual
See Also
Print Previewing Reports
Opening Reports
Printing Reports
Exporting Reports
6.1
Opening Reports
To open a report after a test has been conducted, click on the report icon or select View/Report from the
menu. If another report is needed, click on the open folder icon in the report window.
If a test has not been conducted since starting the program, click on the Open Session icon or select
Open Session... from the File menu. Browse to the session file and click open or double click on the file
name.
The last 5 sessions opened are on the bottom of the File menu. Click on the session to view it or to add
to it.
Once a session is open, click on the report icon or select View/Report from the menu.
6.2
Print Previewing Reports
Once a report is chosen click on the print preview icon. The report will be displayed just as it is going to
be printed. Reports can be saved and reopened right from the print preview window. To save a report,
click the disk icon. To reopen a saved report, click the open folder icon. Click the printer icon to print to
the currently selected printer. To change printers, click the printer setup icon. Click the forward or back
arrows to show different pages. Click the Close button when finished viewing the print preview.
Copyright © 2003 Vericom
Reports
Copyright © 2003 Vericom
21
22
6.3
Response Manual
Printing Reports
Once a report is chosen click on the print icon and the report will be printed to the selected printer. To
change printers, click the printer setup icon. It will print just as it is shown in print preview.
6.4
Exporting Reports
The report can be exported to four different file formats. .QRP (QuickReport), .CSV (MS Excel), .TXT
(text) and HTML (internet browser). QuickReport is only for opening a report again from the report print
preview window.
To export a report, first open a report, see Opening Reports. Then, click on the Print Preview button.
Now click on the Save Report button
.
Choose the folder to save to, choose the file name and choose the type of file. Then click the Save
button and it will be saved to the chosen format.
Copyright © 2003 Vericom
Modes
Part
VII
24
7
Response Manual
Modes
There are two optional modes for training puposes:
The practice mode is used to practice before saving any data to a report.
The training mode is used to familiarize the client with the controls.
Practice Mode
Training Mode
7.1
Practice Mode
The practice mode is used to practice before saving any data to a report. To use the practice mode,
click on Tools on the menu and select Practice Mode. A check mark will appear next to Practice
Mode in the menu. "Response - practice Mode" will show in the banner at the top of the window.
Click the New Session button then the Run button to start the practice mode. The lights will come on
according to what is defined in the Scenario Editor Options.
When in practice mode, the program will display reaction times but not save them to a report file.
The speed will increase when gas pedal is pressed down and decrease when the pedal is let up.
When you feel the client has adequately familiarized themselves to the controls, click the End Session
button.
To start a new session to record reaction times, make sure all Options are set, click on Tools on the
menu and uncheck practice Mode, then click the New Session button.
7.2
Training Mode
The training mode is used to familiarize the client with the controls. To use the training mode, click on
the New Session button, then click Tools on the menu and select Training Mode. A check mark will
appear next to Training Mode in the menu.
When training mode is on, it will display "Training Mode" in the message box under the speedometer.
Click the Run button to start the training mode.
When in training mode, the program will not turn on the lights automatically or record reaction times.
Copyright © 2003 Vericom
Modes
25
The lights will turn on when the client turns the wheel or presses on the brake pedal. For example, the
left turn light will turn on when the wheel is turned left past the minimum turn % as defined in the
Scenario Editor Options, or both red lights will turn on when the brake pedal is pushed past the
minimum Hard Brake % as defined in the Scenario Editor.
The speed will increase when gas pedal is pressed down and decrease when the pedal is let up.
When you feel the client has adequately familiarized themselves to the controls, click the Cancel button,
then the End Session button.
To start a new session to record reaction times, make sure all Options are set, then click the New
Session button.
Copyright © 2003 Vericom
Using Response
Part
VIII
Using Response
8
27
Using Response
Using Response, General
Using Response, Detailed
Keyboard Commands
8.1
Using Response, General
Before testing the client, set up any optional settings in the program such as instructor information,
client information and scenario settings. The options from the previous test will be used if no settings
are changed. The factory defaults will be used if you have never modified the settings.
Mount the steering wheel in front of the computer screen and place the pedals on the floor. Place the
client in front of the steering wheel with the steering wheel and pedals at a comfortable distance. Press
the New Session button to begin a new test series. All tests are automatically saved to disk for
reporting. If no steering wheel is present the program will use the keyboard for reactions. See Keyboard
commands.
Instruct the client what the meaning of the lights are and how to react to them (see below). It may be a
Copyright © 2003 Vericom
28
Response Manual
good idea to use the Training Mode for a new client. When the client is ready, press the Run button or
button number 3 on the steering wheel. The scene will change as time runs. When the light or lights
show the client should respond accordingly.
There are four simulated lights on the screen that the client watches. When the lights turn red or yellow,
the client turns the wheel in the direction of the yellow lights or hits the brake pedal or both. When Light
Brake is displayed the user should apply the brake pedal about 1/2 way down.
Hard Brake:
Light Brake:
Left Turn no brakes:
Right Turn no brakes:
Hard Brake and Left turn:
Hard Brake and Right turn:
Copyright © 2003 Vericom
Using Response
29
When the test session is complete click the End Session button. Then click the Report icon to view the
complete report of the session.
See Using Response, Detailed for step by step instructions.
8.2
Using Response, Detailed
Mount the steering wheel in front of the computer screen and place the pedals on the floor. Place the
client in front of the steering wheel with the steering wheel and pedals at a comfortable distance. Press
the New Session button to begin a new test series. Choose a file name or accept the default. All tests
are automatically saved to disk for reporting. See Options for how to change the client name.
Test the client as many times as necessary. Each test is saved in the report for each client. Typically
the test sequence will be:
A new client who has not used the software before should use the Training Mode before testing for
reaction time.
Training Mode:
1. Click the New Session button
2. Open the Tools menu and click Training Mode.
3. Sit the client in front of the wheel and instruct them on how to use the pedals and steering wheel.
4. Click the Run button.
5. Have the client move the steering wheel and press the pedals to familiarize themselves with the
controls.
6. Press the End Session button to end the Training Mode.
Testing Mode:
1. Set the client name and instructor name using Client/Instructor Options.
2. Set the Scenario Editor Options.
3. Click the New Session button.
4. Click the Run button.
5. The client depresses the gas pedal to accelerate to about 45 mph.
6. When the light stimulus appears the client responds with the steering wheel and/or the brake pedal.
7. Each test concludes when the reaction time displays.
8. Repeat steps 4 through 7 until testing is complete.
9. End the session by clicking on the End Session button.
10. Press the View Report button to show the report.
The test will not start if the minimum speed is not reached. See Scenario Editor Options for details.
Once the minimum speed is reached, the video will start and the lights will come on at a random time.
See also Using Response, Overview.
8.3
Wheel info
The steering wheel and pedals can be tested by selecting Wheel and Pedal info from the Tools menu. If
the wheel and pedals do not work here, see Troubleshooting.
Copyright © 2003 Vericom
30
8.4
Response Manual
Keyboard Commands
If no steering wheel is present when the program starts, the program will use the keyboard instead of the
steering wheel. The keyboard commands are:
Up Arrow ( ) = Light Brake
Down Arrow ( ) = Hard Brake
Left Arrow ( ) = Left turn
Right Arrow ( ) = Right turn.
When the Run button is pressed the throttle is set to 50 mph or kph and the run starts immediately.
Copyright © 2003 Vericom
Troubleshooting
Part
IX
32
9
Response Manual
Troubleshooting
Problem
Program won't
start
Solution
Steering wheel software not installed or steering wheel not plugged into computer on
version 1.00. Version 1.01 and later use the keyboard if no steering wheel is present.
Video doesn't
play
Microsoft Windows Media Player not installed. Install it from the Windows CD or
download the latest from their web site.
Video is jerky
If the "Speed Adjusted Video" check box is checked in Options the program tries to
adjust the playback rate based on the throttle position. If it is a problem, uncheck the
check box and the video will run at a constant rate regardless of throttle position.
Hard brake does The brake pedal is not going to the minimum percentage when pushed all the way
not work
down. Click on the Scenario tab of Options and set the hard brake min % to 85, and
set the light brake max % to 85.
Wheel and
pedals do not
work.
1. If only the Pedals do not work, click on "Options" and change the Pedals radio
button to the other option. Microsoft and some controllers use different axes for the
pedals.
2. Another joystick is already installed on the computer. Even if the previous joystick
is not physically connected to the computer, the software may still be active. You
must set the wheel to the Preferred device in Windows XP or set the wheel controller
ID to 1 in other versions of Windows. Use the Control Panel, Game Controllers to
change the wheel and other joystick options.
In XP open the control panel, double click on Game Controllers, click the Advanced
button and change the Preferred device to the wheel you want to use with the
program.
In other versions of windows open the control panel, double click on Gaming options,
click the Controller IDs tab, click the wheel you want to use with Response, click the
Change... button and change the ID to 1.
3. They are not calibrated. With the Logitech systems you simply need to unplug the
USB cable and while not touching the wheel or pedals, re-plug it back into the
computer. With the Genius system you need to calibrate it using the method
provided in the supplement sent in the box. Basically you have to use the Windows
control panel, game controllers and calibrate it like a joystick by making the cursor
go around the box.
Error writing to
User must have administrative privileges to write to the Windows folder.
Response.ini file.
The words "Red The speed went below the minimum speed as defined in Options/Scenario. Or a
Light" appear.
response occurred before the stimulus lights appeared.
Error: "Program
has performed an
Copyright © 2003 Vericom
Troubleshooting
33
illegal operation
and will be shut
down" when
program starts.
If you still have problems refer to the web site for updated Frequently Asked Questions. Also, the web
site has information on options for technical support.
www.vericomcomputers.com/Support/Response_Support.htm
Copyright © 2003 Vericom
Contracts
Part
X
Contracts
10
35
Contracts
License Agreement
Service Contract
10.1
License Agreement
IF YOU DO NOT AGREE WITH THESE TERMS AND CONDITIONS, DO NOT
INSTALL THE SOFTWARE AND RETURN THIS ENTIRE PACKAGE WITHIN 30
DAYS OF YOUR RECEIPT FOR A FULL REFUND.
Vericom Computers, Inc. ("Vericom") and its suppliers provide computer software
products contained on the CD in the package or as a download (the "Software") and the
associated documentation contained in the package or download (the
"Documentation") and license their use under the terms set forth herein. You assume
responsibility for the selection of the Software to achieve your intended results, and for
the installation, use and result obtained from the Software. Do not use the Software in
any case where significant damage or injury to persons, property or business may
happen if an error occurs.
LICENSE
1. You are granted a personal, non-transferable and non-exclusive license to use one
copy of the Software on a single personal computer and to use the Documentation
under the terms stated in this Agreement. Title and ownership of the Software and
Documentation remain in Vericom or its suppliers.
2. You, your employees, and/or agents may not distribute or otherwise make the
Software or Documentation available to any third party.
3. You may not assign, sublicense or transfer this license and may not decompile,
reverse engineer, modify, or copy the Software or Documentation for any purpose,
except you may copy the Software into machine readable or printed form for backup
purposes in support of your use of the Software on a single personal computer. You may
combine the Software with other computer software. Any portion of the Software
merged into or used in conjunction with other computer software will continue to be the
property of Vericom or its suppliers and subject to the terms and conditions of this
Agreement.
4. The Software and Documentation are copyrighted by Vericom and/or its suppliers.
You agree to respect and not to remove or conceal from view any copyright, trademark
or confidentiality notices appearing on the Software or Documentation, and to
reproduce any such copyright, trademark or confidentiality notices on all copies of the
Software and Documentation or any portion thereof made by you as permitted
hereunder and on all portions contained in or merged into other computer software
products and documentation.
Copyright © 2003 Vericom
36
Response Manual
5. When you purchase the Program, you will receive a unique registration code, or Key.
You may not publish or distribute this Key by any means without direct authorization from
us. If you do, your license to use the Program is automatically terminated, you must
remove the Program from your computer(s), and you may be liable for legal damages.
YOU MAY NOT USE, COPY, MODIFY, OR TRANSFER THE SOFTWARE OR
DOCUMENTATION, OR ANY COPY, MODIFICATION OR MERGED PORTION, IN
WHOLE OR IN PART, EXCEPT AS EXPRESSLY PROVIDED FOR IN THIS LICENSE.
IF YOU TRANSFER POSSESSION OF ANY COPY, MODIFICATION OR MERGED
PORTION OF THE SOFTWARE OR DOCUMENTATION TO ANOTHER PARTY, YOUR
LICENSE IS AUTOMATICALLY TERMINATED.
TERM
This license is effective until terminated. You may terminate it at any time by destroying
the Software and Documentation with all copies, modifications and merged portions in
any form. It will also terminate upon conditions set forth elsewhere in this Agreement if
you fail to comply with any term or condition of this Agreement. You agree upon such
termination to destroy the Software and Documentation together with all copies,
modifications and merged portions in any form.
LIMITED WARRANTY
For thirty (30) days from your date of purchase, Vericom warrants that (i) the Software
will substantially conform to the applicable user documentation and (ii) the media on
which the Software is distributed and the user documentation (if any) are free from
defects in materials and workmanship. Vericom will, at its option, refund the amount you
paid for the Software or provide you with corrected items at no charge provided that the
defective item(s) is returned to Vericom within thirty (30) days from the date of
purchase. Any misuse or unauthorized modification of the Software will void this limited
warranty.
Except as specifically provided herein, Vericom makes no warranty, representation,
promise or guarantee, either express or implied, statutory or otherwise, with respect to
the Software, Documentation or related technical support, including their quality,
performance, merchantability or fitness for a particular purchase.
The warranty and remedies set forth herein are exclusive and in lieu of all others, oral or
written, express or implied. No Vericom dealer, distributor, agent or employee is
authorized to make any modification or addition to this warranty. This warranty gives you
specific legal rights, and you may also have other rights which vary from state to state.
LIMITATION OF LIABILITY
Because computer software is inherently complex and may not be completely free of
errors, it is your responsibility to verify your work and to make backup copies, and
Vericom will not be responsible for your failure to do so.
In no event will Vericom be liable for indirect, special, incidental, tort, economic, cover,
or consequential damages arising out of the use of or inability to use Vericom products
Copyright © 2003 Vericom
Contracts
37
or services, including, without limitation, damages or costs relating to the loss of profits,
business, goodwill, data, or computer programs, even if advised of the possibility of
such damages. In no case shall Vericom's liability for money damages exceed the
amount paid by you for the Software out of which such claim arose. The foregoing
limitations shall not apply to claims relating to death or personal injury which arise out of
products deemed to be consumer goods under applicable law.
Some states or provinces do not allow the exclusion or limitation of implied warranties
or limitation of liability for incidental or consequential damages, so the above exclusion
or limitation may not apply to you.
U.S. GOVERNMENT RESTRICTED RIGHTS
If the Software and Documentation (collectively the "Software") are acquired on behalf
of a unit or agency of the United States Government this provision applies.
For units of the Department of Defense (DoD), this Software is supplied only with
"Restricted Rights" as that term is defined in the DoD Supplement to the Federal
Acquisition Regulations, 52.227-7013(c)(1)(ii) and:
Use, duplication or disclosure by the Government is subject to restrictions as set forth in
subparagraph (c)(1)(ii) of the Rights in Technical Data and Computer Software clause
at DFARS 52.227-7013. Contractor: Vericom Computers, Inc., 14320 James Road –
Suite 200, Rogers, MN 55374.
Government personnel using this Software, other than under a DoD contract or GSA
Schedule, are hereby on notice that use of this Software is subject to restricted rights
which are the same as or similar to those specified above.
GENERAL
This Agreement will be governed by the laws of the Commonwealth of Minnesota. This
product includes cryptographic software and has received a classification from the
Bureau of Export Administration, US Department of Commerce and may be exported to
appropriate countries and end-users under authorization NLR. It is the responsibility of
the exporter to adhere to the Export Administration Regulations and the conditions of
such encryption exports.
10.2
Service Contract
Vericom Support Program Service Agreement
Vericom sells a support program which gives our customers unlimited support and free upgrades for one
year. See our web site for prices.
Vericom Computers Incorporated ("Vericom") and the person ("Customer") ordering the Vericom Support
Program ("Support Program") hereby agree that the following terms and conditions shall govern the
delivery of support services by Vericom to Customer under the Support Program with respect to
applicable registered Vericom products ("Products "). Subject to Customer's termination right as set
forth in Section 4 below, ordering the Support Program indicates Customer's acceptance of the terms
Copyright © 2003 Vericom
38
Response Manual
and conditions contained in this Service Agreement. This Service Agreement is effective upon receipt
and acceptance of Customer's order by Vericom ("Commencement Date").
1. Services. Vericom will provide Customer the support services ("Support Services ") described at
www.vericomcomputers.com/Support/Response_Support (the "Support Site"). Such
descriptions, as may be amended from time to time, are deemed to be part of this Service
Agreement.
2. Restrictions. Vericom may limit or terminate the Support Services to, or may elect not to renew
the Service Agreement of, any Customer who uses the Support Services in an excessive,
abusive or fraudulent manner. Support Services will be provided to a single registered user only.
Resale, assignment or transfer of support rights is strictly prohibited, and will be grounds for
termination or non-renewal of the Service Agreement. The Support Program is not available to
consultants, technical support agents, software developers or other parties using Vericom
Product Expert and Vericom Solution Expert support on behalf of multiple clients or users.
Vericom will only provide Support Services for Products that are properly registered with
Vericom.
3. Exclusions. Vericom shall not be required to provide any Support Services relating to problems
or issues arising out of or from (i) Customer's use of the Products in a manner for which they
were not designed, (ii) damage to the media on which the Products are provided or to the
computer on which the Products are installed, (iii) Customer's negligence, misuse or
modification of the Products, or (iv) versions of Products other than the most recent version (e.
g., 5.x) and one version back (e.g., 4.x), provided that Vericom shall also not be required to
provide any Support Services for Products that are no longer listed on the Support Site as
supported products.
4. Term and Termination. Absent early termination for the reasons stated herein, this Service
Agreement shall have a term of one year from the Commencement Date. The Service
Agreement shall terminate immediately upon nonpayment of the fees for the Support Services
ordered. Vericom reserves the right to cancel this Service Agreement at any time or change the
fees, terms, conditions, support features, procedures, pricing and support availability upon thirty
(30) days notice. Customer may, by giving fifteen (15) days written notice to Vericom, terminate
the Agreement on the effective date of any such change. In the absence of such notice of
termination, the change will be deemed accepted by Customer. Upon cancellation or
termination, Vericom will prorate and refund any excess fees paid by Customer based on the
Commencement Date and the date of cancellation or termination. If Customer is not satisfied
with the Support Program for any reason, including these terms and conditions, a full refund of
the annual fee may be requested within the first thirty (30) days after the Commencement Date.
Refund requests and other notices must be sent in writing to: Vericom Support Program,
Vericom Computers Incorporated, 14320 James Road – Suite 200, Rogers, MN 55374.
5. Warranty and Disclaimer. Vericom will use reasonable commercial efforts to provide the Support
Services under this Service Agreement in a professional manner, but Vericom cannot guarantee
that every question or problem raised by Customer will be resolved. Nothing in this Service
Agreement shall be construed as expanding or adding to the warranty for the Products set forth
in the End User License Agreement that accompanies such Products. EXCEPT FOR THIS
EXPRESS LIMITED WARRANTY, AND FOR ANY WARRANTY, CONDITION,
REPRESENTATION OR TERM TO THE EXTENT TO WHICH THE SAME CANNOT OR MAY
NOT BE EXCLUDED OR LIMITED BY LAW APPLICABLE TO CUSTOMER IN ITS
JURISDICTION, VERICOM MAKES, AND CUSTOMER RECEIVES, NO WARRANTIES OR
CONDITIONS OF ANY KIND, EXPRESS, IMPLIED OR STATUTORY, RELATED TO OR
ARISING IN ANY WAY OUT OF THIS SERVICE AGREEMENT OR THE PROVISION OF
MATERIALS OR SERVICES UNDER THIS SERVICE AGREEMENT. VERICOM
SPECIFICALLY DISCLAIMS ANY IMPLIED WARRANTY OF MERCHANTABILITY OR FITNESS
FOR A PARTICULAR PURPOSE.
6. LIMITATION OF LIABILITY. VERICOM'S LIABILITY UNDER THIS SERVICE AGREEMENT IS
LIMITED TO THE AMOUNTS PAID BY CUSTOMER FOR THE SUPPORT SERVICES
Copyright © 2003 Vericom
Contracts
7.
8.
39
ORDERED BY CUSTOMER. IN NO EVENT SHALL VERICOM HAVE ANY LIABILITY FOR
ANY SPECIAL, PUNITIVE, INDIRECT, OR CONSEQUENTIAL DAMAGES, INCLUDING,
WITHOUT LIMITATION, DAMAGES FOR LOST PROFITS, LOSS OF DATA, COSTS OF
PROCUREMENT OF SUBSTITUTE GOODS OR SERVICES, LOSS OF USE OF EQUIPMENT
OR FACILITIES, OR INTERRUPTION OF BUSINESS, ARISING IN ANY WAY OUT OF THIS
SERVICE AGREEMENT UNDER ANY THEORY OF LIABILITY, WHETHER OR NOT VERICOM
HAS BEEN ADVISED OF THE POSSIBILITY OF SUCH DAMAGES. THESE LIMITATIONS
SHALL APPLY NOTWITHSTANDING THE FAILURE OF THE ESSENTIAL PURPOSE OF ANY
LIMITED REMEDY.
Additions. Any additional services added to this Service Agreement by written notice to
Customer will be governed by the terms of this Service Agreement.
General. This Service Agreement may not be transferred by Customer. This Service Agreement
supersedes all other written and oral proposals, purchase orders, prior agreements, and other
communications between Customer and Vericom concerning the subject matter of this Service
Agreement and constitutes the entire agreement between Vericom and Customer regarding
provision of Support Services. This Service Agreement shall be governed by the laws of the
State of Minnesota without reference to conflict of law principles. The state and federal courts
located in Hennepin County, Minnesota shall have exclusive jurisdiction over all disputes relating
to this Service Agreement.
Copyright © 2003 Vericom
40
Response Manual
Training Mode
24
Troubleshooting
32
Index
-U-
-AAbout Vericom
Using Response
27
Using Response Detailed
8
-C-
-W-
Contract
License agreement
35
Service contract
37
Contracts
35
Wheel info
29
29
-IInstallation
Introduction
10
12
-KKeyboard Commands
30
-OOptions
14
Client and Instructor editors
General
14
Scenarios
16
15
-PPractice Mode
24
-RReports
19
Opening
20
Print Preview
20
Printing
22
-TTable of Contents
6
Copyright © 2003 Vericom
Vericom Computers, Inc.
14320 James Rd
Suite 200
Rogers, MN 55374
www.vericomcomputers.com