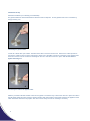
1
µl Spectrophotometer
USER MANUAL
Version 4.0/21/03/11
PO Box 188
Saffron Walden
CB10 9BA
United Kingdom
Tel: +44 (0) 131 2080522
[email protected]
www.picodrop.com
All product and brand names used in the document are trademarks or registered trademarks of their respective holders.
Copyright © 2011 Picodrop Ltd. Registered in England no.05505772
Table of Contents
Page Number
Safety Warnings and Precautions
3
Potential Safety Hazards
4
Instrumentation Overview
6
On Receipt of Your Instrument
7
Instrument Setup
8
Connection and Loading Software
10
Setting the IP Addresses in a Windows Vista Systems & Windows 7
11
Logging in to software
14
General Use
15
File navigation using the Project Selector page
16
Exporting Data
18
Nucleic Acid Measurements
19
Direct Protein Measurements
22
Indirect Protein Measurements – Bradford /Lowry/Unknown
25
General UV/Vis mode
27
Microarray mode
29
General Software Features
32
Printing
35
Maintenance
38
Trouble Shooting
39
Fibre Optic Cable Handing and Limits of Warranty
40
2
Safety Warnings and Precautions
Please read this section before operating the spectrophotometer. Operators of this instrument must be trained in both
general laboratory safety practices and the specific safety requirements of the spectrophotometer. If the equipment is
used in a manner not specified by the manufacturer, the protection provided by the equipment may be impaired.
All functions performed within the context of preparing, performing and completing a run should be done with caution
and care, and with general respect both to the instrumentation and to associated chemicals, samples and other
devices.
Ensure that anyone involved with the operation of the instrument is instructed in both general practices for laboratories
and specific safety practices for this instrument.
Always place the instrument in a location where, if necessary, the mains power supply can be disconnected
immediately.
Symbols and Conventions
The following chart is an illustrated glossary of the symbols that are used in this manual.
CAUTION This symbol indicates a potential risk and alerts you to proceed
with caution
CAUTION This symbol indicates the presence of high voltage and warns the
user to proceed with caution
3
Potential Safety Hazards
Electrical
Standard electrical safety precautions should be applied.
Ensure that the proper voltage is supplied before turning the instrument on for the first time.
The device must be connected to a grounded socket.
Do not touch any switches or outlets with wet hands.
Switch the instrument off at the mains supply before disconnecting the AC power cord.
Unplug the instrument prior to cleaning up any major liquid spills and prior to servicing any of the electrical or internal
components.
Only qualified personnel should perform electrical servicing.
Hazardous Substances
You must observe the relevant safety regulations when handling pathogenic material, radioactive substances or other
substances hazardous to health.
Operating Environment
Please ensure that the ventilation slots of the device remain free to vent at all times. A space of at least 10cm should
be left around the spectrophotometer.
The ambient temperature should be between 10°C and 30°C, the humidity between 0% and 95%.
4
Solvent Compatibility
The Picodrop Spectrophotometer unit is compatible with the following solvents:
Please note that the UVpette Tips should not be used with concentrated solutions of Phenol and Chloroform.
Acetic Acid (dilute)
Acetone
Acetonitrile
Benzene
Butanol
Carbon Tetrachloride
Chloroform
DMSO
Ethanol
Ether
HCl (dilute)
Hexane
HNO3 (dilute)
Isopropanol
Methanol
N-Propanol
Sodium Hydroxide
Sodium Hydroxide
Sodium Hypochlorite (bleach),
Toluene,
INCOMPATIBLE SOLVENT: Hydrofluoric Acid and derivatives
5
Instrument Overview
®
The Picodrop is a microlitre spectrophotometer that provides the user with the facility to recover their sample after
measurements have been taken. It is a full spectrum (230 – 850nm) spectrophotometer which allows for
measurements of common laboratory samples, such as DNA, RNA and protein, in small volumes, with a high degree of
accuracy and precision.
Samples are contained within patented UVpette™ pipette tips. There is no possibility for cross contamination or carry
over on a sample platform. Precious samples can be handled within a sterile environment and are completely
recoverable.
A 2.5µl sample is drawn up directly into the UVpette™ using a P10 pipette. The pipette is placed into the holder, which
positions the tip through a light beam, emitted from a fibre optic cable connected to the tip holder. The light source is a
pulsed xenon lamp and the light path through the tip is 0.9mm.
A spectrophotometer analyses the light after it passes through the sample, via a 1-dimensional CCD array detector
contained within a second fibre optic cable, on the opposite side of the holder. The instrument is controlled using
Picodrop software run from a PC/laptop. The user can choose to see the data in real-time, or read and store the data in
a tab-delimited Microsoft Excel format.
ONLY USE PIPETTE TIPS MANUFACTURED BY PICODROP LIMITED
Consumable re-order details:
Ref# PET01
Ref# CUV01
Ref# UVTIPB
Ref# UVTIPG
Ref# PCAL01-GLP
Ref# P3600L-10
Ref# F144802
6
Interchangeable P10 pipette tip block with lenses/fibres
Interchangeable 10mm Cuvette block with lenses/fibres
P10 UVpette pipette 96 boxed tips, UV transparent to 230nm
P10 UVpette pipette tips 2,000 loose bagged, UV transparent to 230nm
PicoCal UV/Vis 260nm Calibration Standard fluid, 750ul tube
Excel Electronic Pipette 0.5-10ul with adapter for use with Picodrop
Manual Gilson Pipetman Pipette 0.5-10ul with adapter for use with Picodrop
On Receipt of Your Instrument
List of items included with your Picodrop Spectrophotometer:
Picodrop Spectrophotometer Unit
Pipette Holder with pipette guide collar
1.5mm Allen Key (for maintenance)
Pipette (Optional)
Box of 96 UVpette tips
Ethernet Cable
2 Fibre Optic Cables with Connectors
12V Power Cable and Transformer
Software Disk
User Manual
Site
The spectrophotometer should be placed on a rigid, flat, clean surface. Make sure that the instrument is completely
stable.
Adequate ventilation is important. Make sure there is sufficient space so that the rear and side air slots are not covered
and to allow cooling air to circulate freely around the instrument.
There should be no paper under the device as this may block the ventilation path. The unit should always have at least
10cm distance to the next wall or neighbouring instrument.
Picodrop Ltd spectrophotometer instrumentation is developed for operation in laboratories in which there is normal
ambient temperature and no explosive atmosphere. The ambient temperature should be between 10°C and 30°C, the
humidity between 0% and 95%.
Connect to the electricity and check that the LED light on the front of the unit is illuminated. For best results allow unit
to „warm-up‟ for 10 minutes before measuring samples, this allows the lamp to stabilise. Note the unit can be left
connected and switched on all the time. This will not damage the unit and only uses power to illuminate the LED. The
flash lamp is not operating unless a sample measurement is made.
7
Instrument Set Up
Hardware installation (If not already pre-assembled)
The pipette holder has been dismantled and disconnected for shipment. Fix the pipette holder to its round base by
simply screwing it on.
Assembling the pipette holder.
Locate the 2 Silver fibre optic cables. The fibres have SMA connectors at each end. Remove the rubber protectors.
Connect the cables to the front of the instrument to either one of the SMA connectors at the base of the pipette holder.
Push the connector into the socket and hand-tighten the nut to hold the connector in place. Do not use tools to
tighten the fixing nut.
Connecting the cable to the pipette holder.
Slide the provided „PIPETTE GUIDE‟ collar onto the pipette. The easiest way to attach the collar is to place the collar in
the tall pipette holder and then insert the pipette until the collar has located on the pipette. Remove the pipette and the
collar will remain attached to the pipette. The collar can be easily removed for cleaning if necessary.
8
Fully Assembled Picodrop
9
Connection and Loading Software
Picodrop uses an external switch-mode power supply that will accept any mains voltage from 100 to 240V AC at 47 to
63Hz. If the correct mains plug has not been supplied an alternative lead or plug may be fitted. If in doubt consult a
qualified electrician.
Use only the power supply module supplied, other makes, although similar, may damage the unit or cause erratic
performance. Connect the jack plug from the power supply module to the jack socket on the rear of the Picodrop. Then
switch on the supply.
The LED on the front of the unit should be illuminated. If it does not, check all connections are made correctly and that
the supply is switched on at the mains switch.
Connect the instrument to a suitable PC using the short Ethernet cable supplied.
Power input (12V DC)
Ethernet port
Note: The instrument should be connected directly to the Ethernet port, other configurations are not supported.
To install the Picodrop software, insert the CD ROM supplied in the CD Drive of the computer. The disc should autorun,
if it does not please go to Windows Explorer, right click on the Picodrop disk and select Autoplay. Once the software is
installed it is necessary to setup the Ethernet connection following the steps described on the next page.
Minimum specification for the PC
Microsoft® Windows® XP Service Pack 2, Vista® or Windows® 7
512Mb RAM
2.8GHz Pentium® 4 or 1.6GHz Core Solo or Core Duo
A Microsoft® DirectX® 9 compatible graphics card with at least 64Mb of on-board RAM, e.g. Nvidia GeForce 5900 or
better
200Mb of free disc space.
One Ethernet port
If downloading software from the Internet, please click on the „Setup‟ file. The software will install automatically, leaving
a shortcut on the desktop to the Picodrop interface.
10
Setting the IP Addresses in a Windows Vista Systems & Windows 7
Open the Control Panel by pressing the Start button and then selecting Control Panel
Now select “Network and Sharing” then select “manage network connections” from the menu on the left, you may need
to consult the manual for your computer system to find out which controller to use.
Double click on the wired Ethernet connection shown in the „Local Area Connection‟
11
You will then usually be asked to confirm a restricted system action by the Windows UAC (User Access Control), then
Select “Continue” to allow configuration of the network adapter.
NOTE: It may be necessary to disable other networks if there is an IP address conflict – this can easily be done in the
screen above by right-clicking on each network in turn and selecting the „Disable‟ option. Any disabled network can be
„switched back on‟ by carrying out the same procedure and selecting the „Enable‟ option.
Select “Internet Protocol Version 4 (TCP/IPv4)” ensuring that the checkbox to the left of the item remains checked.
Now click on “Properties”.
12
Enter the values as below and click OK to save changes. Make sure that there are no other network adapters active,
you may need to consult your system‟s user manual to achieve this.
Technical Data – For Reference Only
The spectrometer has the IP address of 192.168.1.200
Your wired Ethernet parameters are as follows;
IP address : 192.168.1.nnn (any number from 2-254 except 200 is valid)
Subnet mask : 255.255.255.0
Default gateway: 192.168.1.1
DNS: 192.168.1.1
If you experience any issues with connection please contact your local Picodrop representative who will be able to
assist.
Instrument Start Up
Once the installation has been completed successfully, double clicking the desktop icon will allow login as a guest or
administrator.
IMPORTANT: IT IS IMPORTANT TO ALLOW THE UNIT TO WARM-UP FOR 10 MINUTES BEFORE USE. THIS
WARM UP TIME ALLOWS THE LAMP TO STABILISE AND ENSURES CONSISTENT LIGHT INTENSITY
13
Logging in to the Software
On starting the software you will be shown a „Login‟ box. The default login username is „guest‟ and the password is left
blank. Simply clicking „OK‟ will allow entry to the software as a standard user.
If multiple users will be operating the instrument then the system administrator should set up accounts for each user.
To login as system administrator use the following:
username „admin‟
password „password‟
The „Administrator‟ can reset the above password and create/edit/delete other standard user accounts.
In the Administration page the user can choose „Settings‟ from the menu and change the tolerance on blanking (not
recommended to change) and also the default number of measurements possible for all users before forced to re-blank
(default is 10, maximum recommended is 20).
14
General Use
Correct Pipetting Procedure:
Vortex sample briefly (5-20secs)
Spin down samples briefly (10-15secs in a microfuge).
Using a P10 pipette and a UVpette™ tip, pipette your sample. A minimum volume of 2.5ul is recommended. To
minimise solution on the outside of the tip, avoid submerging the tip too far below the sample meniscus. If necessary,
Wipe off excess liquid from outside of tip with a dry lint-free tissue, this is particularly important if using viscous
protein solutions. Be careful not to touch the bottom of the tip as the sample may be drawn out by the tissue.
Do not place UVpette tips or your sample too close to heaters or the fan of the PC as heating the tips or sample
may result in a rapid contraction in volume once the tip is placed the cooler pipette holder. This sample contraction will
result in a space or bubble being visible at the bottom of the tip. This space may interfere with sample measurement if
allowed to rise more than 2mm up the tip. It is preferable that the sample, tip and pipette holder are allowed to
equilibrate to room temperature for 5 minutes before commencing measurement.
The detection point of the tip is 1.5mm from the end of the tip so it is best procedure to try not to submerge the tip more
than 1mm into your solutions, otherwise tip wiping may be necessary.
It is optional whether you decide to use the same tip for both blank and sample or a different tip each time. The special
ultra-low retention tips will ensure zero carryover of blank to your sample and so using the same tip is a safe operation.
Using different tips for blank and sample will also provide results which meet the published specification but does
however introduce an additional variable which may become significant with very low concentration samples i.e.
<10ul/ng DNA
Recommended pipetting procedure
15
File navigation using the Project Selector page
The Picodrop software is structured in a simply project based format. To get started follow these steps >
1.
Create a „Project’ folder by clicking on „New‟ button shown under the heading „project‟ on right side of the
Project Selector window. Type in a name for your folder.
2.
Click on your new project folder shown in folder tree on left side of Project Selector window.
3.
Choose the mode you want to use from the options listed for e.g. dsDNA, ssDNA, RNA, Direct Protein
4.
Start measuring your samples clicking on „New‟ shown at the top right side of the Project selector window
under the heading „Sample‟.
Note that if logging in with individual user accounts the user will only be able to view their project folders. Thereby
providing security against unauthorised access to test results or accidental deletion by other users.
NOTE: All graphs and tables displayed within the software take the actual path length of 0.9mm and calculate the
equivalent 10mm absorbance value. It is the calculated 10mm absorbance value that is displayed on the Y-Axis and in
table and reports.
16
Opening an existing sample result and graph:
The project Selector window can be accessed at any time and by simply clicking on a project folder the user can view a
list of sample results. By clicking on any sample line the original graph and detailed data report will be displayed.
17
Exporting Data
To export detailed test results in an MS Excel format firstly highlight the line or lines to be exported. Use shift+arrow
keys to select multiple lines.
Example Excel spreadsheet detailing test results
The data export includes the UV/Vis absorbance values for each sample at each 5nm wavelength interval. Also
included are the calculated values for concentration, sample name, ID and date stamp.
18
Nucleic Acid Measurements
Select the relevant nucleic acid mode (dsDNA, ssDNA, RNA, Protein, UV/Vis) from within your project folder in
the „Project Selector‟ window and click the button „New‟ under the heading Sample. A new window will open
which displays a graph and table.
Pipette 2.5ul of „Blank‟ solution into a tip and place the tip and pipette into the plastic pipette holder.
Click the button marked „Blank‟. The software will attempt to blank the spectrophotometer and set the
baseline to zero at 260nm. A rapid clicking noise will be head for several seconds and the LED on the front of
the unit will turn orange.
If the unit has not warmed up or if there is residue/dust on the lens then the blanking may fail and a message
requesting that you „re-blank‟, will be displayed. If this occurs simply try blanking again and if the procure
continues to fail try following the lens cleaning protocol.
Example of graph window
awaiting the „blank‟ solution
and message indicating that the
„Blanking‟ was unsuccessful.
19
Once the Picodrop has been successfully „Blanked‟ then the red „Measure‟ button will change to green
signifying that you can commence measuring your samples.
Insert the pipette with sample and press the „Measure‟ button.
After a few seconds the concentration (in ng/ul) will appear in the bottom right hand window , the spectrum will
be plotted and details displayed in the table below the graph
It is not necessary to „save‟ the results as all results are automatically saved to your user project folders.
Example results using 260nm wavelength standard
20
Measuring Nucleic Acid Concentration:
The "absorbance" of a chemical is a product of its (concentration) x (optical path length) x (extinction coefficient, E).
Nucleic acids have a peak absorbance in the ultraviolet range at about 260 nm. When the spectrophotometer has a
path length of 1 cm, absorbance = "optical density" (O.D.), and O.D. = E x concentration.
-1
-1
Extinction coefficients vary with the type of nucleic acid. Double stranded DNA (dsDNA) has an E = 20 g cm L).
-1
-1
Depending on the reference you read, the E for single stranded DNA (ssDNA) is 20 or 30 g cm L, while E for RNA is
-1
-1
25 g cm L. Extinction coefficients can be used to estimate the concentration of a sample dissolved in a known
aqueous volume, or to calculate the number of grams or moles of nucleic acid according to the following formulas:
Determining Concentrations:
A260 O.D. =1 Unit for dsDNA = 50 µg/ml = 50 ng/ul
A260 O.D. =1 Unit for ssDNA = 33µg/ml = 33 ng/ul
A260 O.D. =1 Unit for RNA = 40 µg/ml = 40 ng/ul
The A320 is used to subtract absorbance due to particles in suspension.
21
Direct Protein Measurements
Select the „Direct Protein‟ mode from within your project folder in the „Project Selector‟ window and click the
button „New‟ under the heading Sample. A new window will open which displays a graph and table.
Choose the relevant factor dependent on sample by clicking on the drop down list at the bottom of the graph
window. The options listed are detailed below:
Sample Types:
ABS is a general reference setting based on a 0.1% (1 mg/ml) protein solution producing an Absorbance at 280 nm of
1.0 A (where the path length is 10 mm).
Bovine Serum Albumin reference. Unknown (sample) protein concentrations are calculated using the mass extinction
coefficient of 6.7 at 280 nm for a 1% (10 mg/ml) BSA solution.
IgG reference. Unknown (sample) protein concentrations are calculated using the mass extinction coefficient of 13.7 at
280 nm for a 1% (10 mg/ml) IgG solution.
Lysozyme reference. Unknown (sample) protein concentrations are calculated using the mass extinction coefficient of
26.4 at 280 nm for a 1% (10 mg/ml) Lysozyme solution.
-1
-1
User-entered mass extinction coefficient (L g cm ) for a 10 mg/ml (1%) solution of the respective reference
protein.
Pipette 2.5ul of „Blank‟ solution into a tip and place the tip and pipette into the plastic pipette holder.
Click the button marked „Blank‟. The software will attempt to blank the spectrophotometer and set the
baseline to zero at 280nm. A rapid clicking noise will be head for several seconds and the LED on the front of
the unit will turn orange.
If the unit has not warmed up or if there is residue/dust on the lens then the blanking may fail and a message
requesting that you „re-blank‟ will be displayed. If this occurs simply try blanking again and if the procure
continues to fail try following the lens cleaning protocol.
Once the Picodrop has been successfully „Blanked‟ then the red „Measure‟ button will change to green
signifying that you can commence measuring your samples.
Insert the pipette with sample and press the „Measure‟ button.
After a few seconds the concentration (in mg/ml) will appear in the bottom right hand window , the spectrum
will be plotted and details displayed in the table below the graph
It is not necessary to „save‟ the results as all results are automatically saved to your user project folders.
22
Example of BSA measurement
Note: When using viscous samples, it is important to ensure that the sample does not adhere to the outside of the tip.
Simply wiping the outside of the tip with a piece of clean dry tissue will normally avoid this potential problem.
23
Molar Extinction Coefficients vs. Absorbance for 1% Solutions
Application of a molar extinction coefficient in the calculation yields an expression of concentration in terms of molarity:
Given the standard equation:
A = εcl
(where ε is the extinction coefficient, c the concentration and l the path length), and that Abs is unit less, the units
defining ε will determine the units of c.
-1
-1
If a molar extinction coefficient (having units Lmol cm ) is known and used to convert Abs into concentration, the
obtained molar concentration can be converted using the equation:
concentration (mg/mL)
= concentration (g/L)
= molarity (mol/L) x molecular weight (g/mol)
Examples:
Proteins and Protein Mixtures with Unknown Extinction Coefficients
If no extinction coefficient information exists for a protein or protein mixture of interest, and a rough estimate of protein
concentration is required for a solution that has no other interfering substances, assume εpercent = 10. Most protein
extinction coefficients (εpercent) range from 4.0 to 24. Therefore, although any given protein can vary significantly the
average for a mixture of many different proteins likely will be approximately 10.
Our software will convert Absorbance at 280nm into mg/ml of protein using the formula:-
24
Indirect Protein Measurements – Bradford/Lowry/Unknown
NOTE: Typing results into a calibration curve is „administrator-only‟ function
Select the „Indirect Protein‟ mode from within your project folder in the „Project Selector‟ window and click the
button „New‟ under the heading Sample. A new window will open displaying the „Calibration Explorer‟ table.
Choose the relevant calibration curve you want to use from the list or press „New‟ to setup a new calibration
curve.
Once you have chosen your standard from the „Calibration Explorer‟ list follow the standard Picodrop
procedure. Firstly, blanking the Picodrop using a tip containing your blanking buffer and then measuring your
unknown samples.
Calibration Explorer
To set up a new standard in the Calibration Standards Recorder box follow these steps:
1.
2.
3.
4.
5.
6.
7.
8.
25
Choose name for your calibration curve standard
Choose the wavelength used for measurement or choose from preset wavelengths (Bradford 590nm or
Lowry 700nm) or choose „Other‟ and enter your required „background‟ normalization wavelength and peak
measurement wavelength.
Place a tip with your „blank‟ reagent in to the Picodrop and press the „Blank‟ button
To begin recording the concentrations of your known standards firstly choose „Add‟. Enter the known
concentration of your standard in the pop-up box and place the pipette tip containing your standard into
the Picodrop.
Press „Get‟, this will instruct the Picodrop to measure the absorbance of your standard. The absorbance
versus concentration will be plotted in a graph in the lower part of the window.
Up to 5 replicates of the same standard can be measured and the average value will be plotted. To
measure further replicates simply choose the replicate number from the „Replicate‟ drop down box and
repeat the „Get‟ procedure. Note: it is important that the correct line is highlighted in the ‘Standards
Concentration Recorder’ before changing the replicate number.
To move on to measuring the second known standard repeat steps 4 to 6 above.
A minimum of 2 standards are necessary to draw a linear regression or Polynomial standard line/curve.
Setting up a new Calibration curve
Display of calibration standards linear regression
In-direct measurement detection range depends on the assay, here are some examples using the UVpette tip.
Note that if you use the 10mm cuvette option then the lower limit will decrease to 5X the detection sensitivity
i.e. 20ug/ml from regular Bradford assay.:
Regular Bradford sample range 100-500 ug/ml: ± 25 ug/ml
Mini Bradford sample range 15-50 ug/ml: ± 4 ug/ml
Lowry sample range 0.2-1.0 mg/ml ± 0.01 mg/ml
26
General UV/Vis Measurements
The UV/Vis mode displays the entire spectrum split into 2 modes –UV 230-360nm and Visible 380-850nm
Select the required „UV/Vis‟ mode from within your project folder in the „Project Selector‟ window and click the
button „New‟ under the heading Sample. A new window will open which displays a graph and table.
Pipette 2.5ul of „Blank‟ solution into a tip and place the tip and pipette into the plastic pipette holder.
Click the button marked „Blank‟. The software will attempt to blank the spectrophotometer and set the
baseline to zero at normalization wavelength (if set). A rapid clicking noise will be head for several seconds
and the LED on the front of the unit will turn orange.
If the unit has not warmed up or if there is residue/dust on the lens then the blanking may fail and a message
requesting that you „re-blank‟ will be displayed. If this occurs simply try blanking again and if the procure continues to
fail try following the lens cleaning protocol.
The UV/Vis mode is designed to report the ABSORBANCE at 2 chosen wavelengths. There are 2 ways to choose your
desired wavelengths: NOTE WAVELENGTHS MUST BE CHOSEN BEFORE PRESSING „MEASURE‟ otherwise no
data will be reported in the table.
1)
2)
27
Click on the button „Pointer‟ shown at the bottom of the page and choose „Cursor‟ then move the crossed lines
to the wavelength of interest and „right click‟ or press „enter‟. Repeat this procedure to choose the second
wavelength of interest.
The 2 wavelengths of interest may also be entered directly by choosing „Edit‟ from the options listed when
clicking on the „pointer‟ button. Clicking „Edit‟ will display 3 boxes the top 2 boxes allow for the input of 2
wavelengths of interest which be reported on in the report table. The lower box allows the user to set a
„Normalization‟ wavelength. This is an optional setting and if set the absorbance value at this wavelength will
be deducted from all the absorbance values across the spectrum. i.e. the „Normalization‟ wavelength
absorbance value is used as the baseline.
Measuring Cell Cultures
The UV/Vis mode displays the entire spectrum split into 2 modes – Extended UV 220-360nm and Standard 380850nm. The standard range covers the required 600nm wavelength. One cursor is normally fixed at the frequently used
wavelength for monitoring cell suspensions (600nm) while the second cursor can be set to any other wavelength of
interest.
Sample Homogeneity:
The user must be sure to homogeneously suspend the cells when sampling for “absorbance” measurements and it is
important to read the sample immediately to avoid significant cell settling. Vigorous mixing may be required when
measuring concentrated samples.
If the cell suspension is particularly turbid then the Picodrop may not accept the blanking step and as such it may be
necessary to reduce the sensitivity of the instrument through the Admin>Settings (see Troubleshooting Section)
28
Microarray Dye Measurements
Select the „Microarray‟ mode from within your project folder in the „Project Selector‟ window and click the
button „New‟ under the heading Sample. A new window will open which displays a graph and table.
Pipette 2.5ul of „Blank‟ solution into a tip and place the tip and pipette into the plastic pipette holder.
Click the button marked „Blank‟. The software will attempt to blank the spectrophotometer and set the
baseline to zero at normalization wavelength (if set). A rapid clicking noise will be head for several seconds
and the LED on the front of the unit will turn orange.
If the unit has not warmed up or if there is residue/dust on the lens then the blanking may fail and a message
requesting that you „re-blank‟ will be displayed. If this occurs simply try blanking again and if the procure continues to
fail try following the lens cleaning protocol.
The Microarray mode is designed to report the ABSORBANCE, DYE CONCENTRATION (pmol/ul ) and RATIO
DYE/BASE at 2 chosen wavelengths defined by the 2 dyes you have chosen to measure. To choose your dyes go to
„Select Dye‟ shown at the bottom of the screen. Clicking on the tab will display a list of preset dyes to choose from for
both dye 1 and dye 2. Additional dyes can be added by clicking on „Editor‟.
NOTE: WAVELENGTHS MUST BE CHOSEN BEFORE PRESSING „MEASURE‟ otherwise no data will be reported.
Additional information displayed in this mode includes:
1.
2.
3.
4.
5.
29
Nucleic acid concentration (ng/ul)
Nucleic Acid purity 260/280 ratio
Concentration of each dye (C)
Absorbance for each dye (A)
Ratio of dye:base (R)
Calculating the Labelling Efficiency and Concentration of Nucleic Acid
The relative efficiency of a labelling reaction can be evaluated by calculating the approximate ratio of bases to dye
molecules. This ratio can be determined, as described below, by measuring the absorbance of the nucleic acid at 260
nm and the absorbance of the dye at its absorbance maximum ( max). The calculations are based on the BeerLambert law:
A = E × path length (cm) × concentration (M)
-1
-1
where E is the extinction coefficient in cm M . The absorbance measurements can also be used to determine the
concentration of nucleic acid in the sample. Optimal labelling for hybridization to microarrays is 1 dye for every ~12–20
bases. Higher levels of labelling interfere with hybridization.
Measuring the Base:Dye Ratio
Measure the absorbance of the nucleic acid–dye conjugate at 260 nm (A260) and at the max for the dye (Adye).
Measure the background absorbance at 260 nm and max, using buffer alone, and subtract these numbers from the
raw absorbance values for the sample.
• To perform these measurements, the nucleic acid–dye conjugate should be at a concentration of at least 5ug/mL.
Depending on the dye used and the degree of labelling, a higher concentration may be required.
Correct for the contribution of the dye to the A260 reading
Most fluorescent dyes absorb light at 260 nm as well as at their max . To obtain an accurate absorbance
measurement for the nucleic acid, it is therefore necessary to account for the dye absorbance using a correction factor
provided by the manufacturer (CF260) and the following equation:
Abase = A260 – (Adye × CF260)
Calculate the ratio of bases to dye molecules. Use the following equation:
base:dye = (Abase × Edye ) / (Adye × Ebase)
where Edye is the extinction coefficient for the fluorescent dye and Ebase is the average extinction coefficient for a
base in double stranded Nucleic acid (dsDNA or ssDNA or RNA) Note that since the calculation is a ratio, the path
length has cancelled out of the equation.
dsDNA Ebase=6600
ssDNA Ebase=8919
RNA
Ebase=8250
MWbase=330
MWbase=330
MWbase=340
Measuring the Concentration of Nucleic Acid
The absorbance values A260 and Adye may also be used to measure the concentration of nucleic acid in the sample
([N.A.]). In order to obtain an accurate measurement for a dye-labelled nucleic acid, a dye-corrected absorbance value
(Abase ) must be used. In addition, for concentration measurements, the path length (in cm) is required. The path
length of the UVpette tip is 0.9mm but all values are multiplied to display values equivalent to a standard 10mm
cuvette.
[N.A.] (mg/mL) = (Abase × MWbase) / (E base × path length)
30
31
General Software Features
Graph overlays:
It is possible to superimpose graphs for up to 7 samples onto the same graph window by simply clicking on the sample
displayed in the table under the graph. Overlays can be removed by clicking on „Clear overlays‟, shown at the bottom of
the graph window.
Pipette or Cuvette Mode:
It is possible to use Picodrop with either the holder for UVpette tips or the alternative standard 10mm cuvette holder.
The sample containment mode defaults to „Pipette‟ but can be changed to „Cuvette‟ by clicking on the button marked
„Pipette mode‟ shown at the bottom of the screen.
32
Pointer or Cursor option:
The software defaults to „Pointer‟ which allows the user to move the mouse arrow to any point on the graph and view
the absorbance and wavelength displayed on the right of the graph, indicated as X and Y. The „Pointer‟ mode also
enables the „Zoom‟ function. To zoom in to an area of interest move the pointer to a position on the graph then click
the left mouse button and hold down whilst moving the pointer to another position. A rectangle will be drawn.
Releasing the left mouse button will activate the zoom magnification. To reset the zoom to normal click on „Reset
Zoom‟, shown at the bottom of the graph window.
Example „Zoom‟ using „Pointer‟ selected. Multiple overlays can be easily differentiated
Alternatively, „Cursor‟ can be chosen from the drop-down menu at the bottom of the graph window. When „Cursor‟ is
chosen the mouse will move along the graph only and display the relevant absorbance and wavelength to the right of
the graph.
33
Example using „Cursor‟ cross-hairs
34
Printing
Results can be printed by any printer configured for use on the host PC; this includes PDF and other document
converters that can be viewed as printers too.
A single result can be printed complete with the scan and set-up data appended, or multiple results can be selected
and printed in a tabulated format.
In addition an optional label printer is available for printing directly on to sticky labels that can then be stuck in log
books or on sample containers. The label size is 62 x 100mm.
Printer
Label Layout (not to scale)
Printing of individual results together with the graph and measurement details can be achieved from the „Project
Selector‟ page. Choose the project in which your results of interest have been saved and click on the line to highlight
the specific test(s) you need to print. Then simply press the „PRINT‟ button shown in the menu on the right side of the
screen. Multiple results can be selected using shift and click methods to enable printing of a tabulated version of the
results (without the graph).
35
The Printing Control Panel is then opened allowing the selection of paper or label printing; labels can only be printed
subject to connection of the optional label printer. From here it is also possible to see a Print Preview on the screen for
verification before printing; to save wasted paper it is good practice to preview your printout whenever settings have
been changed or a new printer installed/selected.
After selecting the relevant print function (Paper or Label) the Printer Selector screen is opened to allow selection of the
appropriate printer. This will show all printers installed on the host PC, and the currently connected printer should be
selected for paper printing. If the optional Label printer is connected and installed the Brother QL-570 option should be
selected.
With the correct printer selected, clicking the Print button should start the printing process. For details of the other
options available and printer troubleshooting refer to the help files on the PC and the specific instructions supplied with
the printer selected.
36
Example printout
37
Maintenance
Cleaning:
Picodrop spectrophotometers are designed to require a minimum amount of maintenance by the user. They can be
cleaned using water or a mild laboratory-cleaning agent e.g. ethanol or general lab cleaner
The instrument should not come into contact with aggressive solutions. Ensure that no liquid enters the
spectrophotometers. For safety reasons, the device must be switched off and disconnected from the power supply prior
to cleaning.
„Quick Clean‟ procedure for sample holder:
In the event that sample leaks from a pipette tip or dust reduces the light transfer through the pipette holder simply
unscrew the silver cable fibres from each side of the silver pipette holder (no tools required – silver screws should be
only hand tight). Unscrew the circular base from the tube section. Unscrew the single screw on the tube to release the
main tube from the bottom tip holder. Either soak the holder in hot water with detergent for 30mins and air or drip dry or
alternatively simply wash with an ethanol or similar solvent. Reassemble and re-test instrument.
If this quick-clean procedure does not improve the results please follow the „Service Clean‟ procedure described on the
following page.
Important: Please note that as the lenses get dirty with use then the stability will
decrease and this will accentuate any background noise and small variations
between tips.
To check the light intensity passing through the lenses please login as 'admin' using
the password 'password' and then blank and measure the blank. In the top left
corner of the screen, above graph, some numbers are quoted for intensity at
different wavelengths. One of these numbers is described as 'power band=' , the
number displayed should be between 2 and 9. The higher the number, the weaker
the intensity; so cleaning would be recommended for any value above 6. The value
displayed as ‘S260=’ relates to the 260nm energy level , this should be between
4,500 and 7,000 counts. When the S260 level falls below 4,500, the instrument is still
useable but the noise will be higher.
Please note the latest software is required for this test so please download from
website. www.picodrop.com
38
Trouble Shooting
Trouble Blanking? = „Blank Inconsistent‟ message
If the readings during the blanking stop being linear over the range or there are individual readings outside the 5% limit
then the blanking step will be rejected and the user asked to re-blank. Changing these values is not recommended
although for some non-homogenous samples (e.g. cell cultures, In-direct Proteins and some high absorbance saline
microarray buffers) it may be advantageous to reduce the sensitivity of the unit. To reduce the sensitivity, log in as
„Admin‟ and choose the link „settings‟ in the top menu. Change both the values shown by default as 1.05 to a higher
value such as 1.07. The default is 5% so this is why „linearity‟ and „outlier removal‟ are set to 1.05.
If you continue to obtain unexpected or erroneous results you should remove the pipette from the holder and
immediately inspect the tip to check that the sufficient sample remains in the tip. The liquid column should be at least
2mm in height and should be continuous from the end of the tip - i.e. no air gap at the bottom*. Leakage from the tip
can occur if the tip is not securely attached to the pipette of if the end of the pipette tip is pushed against the side of the
pipette holder when placing the tip in the location hole.
Re-sample and check the liquid column in the tip both before and after sampling.
If this is satisfactory and the result is still not good, increase the sample volume to say 3ul and do the visual checks
before and after measurement.
If results are not satisfactory follow the ‘Quick Clean’ procedure detailed on the previous page.
If the results are still not good, then the following „Service Clean‟ procedure should be adopted as detailed below:
Service Clean Procedure
Detach the Silver fibres by unscrewing from each side of the silver pipette holder.
Use the '1.5mm Allen' key (as supplied) to loosen the 2 fibres by turning the two sunken screws in
the front of the bottom of part of the pipette holder and then unscrew the two fibres away from the
holder – and attach the LENS EXTRACTION TOOL (pictured to right – purchased separately) to
each lens in place of the fibre and pull firmly on the lens extraction tool to pull out lenses.
Important: if the fibres do not come away from the holder easily please seek assistance from
Picodrop service team ([email protected]). DO NOT PULL ON THE FIBRE OPTIC CABLES
Check whether either lens, at the end of each cable, is wet. This happens when excess sample is
picked up on the outside of the tips.
Wash each lens with pure water and dry with tissue.
Use a cotton tip soaked in acetone to clean and dry the lenses.
Remove the round base from the holder by unscrewing.
Thoroughly rinse the metal base unit in pure water and then allow to air dry.
Re-assemble unit and repeat tests as detailed above.
Connection Lost - message
This message tells the user that the spectrometer has crashed. Disconnecting the power from the spectrometer and
reconnecting it should solve the problem. There is no need to shut down or restart the software and your data should
remain intact.
*unless using the electronic pipette which does introduce a 1mm air gap after the sample
39
Fibre Optic Cable Handing and Limits of Warranty
Scope: The intent of this note is to define the recommended handling practices for fibre optic cables supplied by
Picodrop Ltd. and to comment on warranty issues.
Section 1: Handling Guidelines
A) Strength and Proof Testing:
Do not proof test!
Strength or „proof‟ testing is done by the fibre manufacturers. It is a carefully controlled process because it has
been found that the more one stresses fibre near its strength limit, reduces it overall life time expectation to
continue to resist failures. Therefore, it is specifically recommended that no fibre be proof tested or strength
tested except for sample testing in order to gather nominal strength statistics. Any overall proof or strength
testing is one at the risk of damaging the fibre. Specifically, proof testing a fibre at or below its bend radius
minimum or in any way uncontrolled or unapproved by Picodrop Ltd. will void the warranty.
B) Bend Radius:
Do not bend the fibre past the minimum bend radius!
The rule of thumb regarding bend radius is that the Minimum bending radius for a particular fibre is 300x the
cladding diameter (assuming the cladding is also glass).
C) Twisting:
Do not coil or twist the cable when spooling, un-spooling, coiling or uncoiling. Cables must be
handled in a ‘hand over hand’ fashion at all times.
Fibre cables should not be handled like rope and coiled or uncoiled by twisting or untwisting one loop at a
time. Fibre should always be handled in a „hand over hand‟ fashion making coils or unrolling coils by moving
the fibre in a circle, one hand over the other. To do otherwise is to induce a twisting stress in the cable and
hence in the fibre within the cable. Very high stresses can be achieved if a cable is uncoiled incorrectly and
damage or weakening can be the result and this type of handling will void the warranty.
D) Pulling:
Do not pull fibre cables by their end fittings! And, be careful of pulling in general, unless your specific
cable has been rated to withstand this stress.
Fibres are usually very strong in direct tension, relative to the cross section, but when fibres are small it is very
easy to break them.
E)
40
Other Handling Comments:
Optical fibre is not wire or rope and can’t be handled as such.
Any fibre optic cable, constructed with quality techniques and materials, should survive as long as care is
taken when handling it. The most precarious moments in a fibre cables life occur during inspection, testing
and installation. It is very easy to exceed the bend radius guideline, especially when working with large core
cables and performing these tasks.