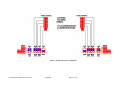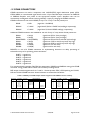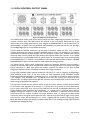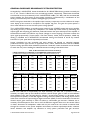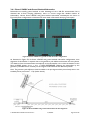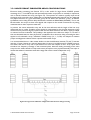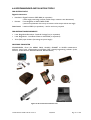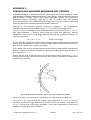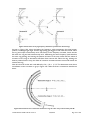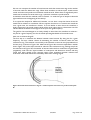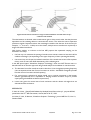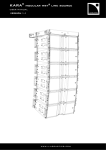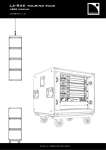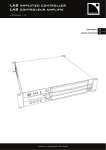
1
Version 4 June 2005 V-DOSC OPERATOR MANUAL L-ACOUSTICS V-DOSC Manual Version 4 6/29/2005 Page 2 of 158 FOREWORD This manual is intended for Qualified V-DOSC Technicians and Certified V-DOSC Engineers who are responsible for the installation and operation of the V-DOSC sound reinforcement system. It is also intended to provide interested sound engineers, designers, consultants and installers with information regarding the fundamental principles of Wavefront Sculpture Technology and how these principles are embodied within V-DOSC. Specifications, installation procedures and general guidelines for sound design and system operation are also discussed in this document. MANUAL ORGANIZATION The Introduction gives a brief presentation of V-DOSC and explains why specialized training is necessary to work with the system Chapter 1 presents the fundamentals of Wavefront Sculpture Technology and introduces the elements of the V-DOSC system standard Chapter 2 describes V-DOSC array performance and coverage prediction Chapter 3 discusses sound design issues Chapter 4 gives detailed procedures for rigging and stacking V-DOSC Chapter 5 describes system operation including preset selection, tuning and operation Chapter 6 lists recommended installation and maintenance tools Chapter 7 provides V-DOSC system specifications Appendices elaborate on a number of technical aspects and provide additional theoretical details L-ACOUSTICS V-DOSC Manual Version 4 6/29/2005 Page 3 of 158 AUTHOR’S NOTE: Paradigm shifts don’t occur very often in the sound reinforcement industry∗ – especially when a small, relatively-unknown (at the time!) French loudspeaker company is responsible for them. Today’s V-DOSC is very different from the V-DOSC of 1992. Constant improvements have been made to the loudspeaker itself and its components – providing improved performance and durability while maintaining full backwards compatibility. The latest Version 7 preset release provides smoother mid/high response, optimized low end and sub/low processing with a simplified subwoofer time alignment procedure. Better overall utilization of system power resources is the result along with increased SPL output. With the V7 release, many have perceived V-DOSC as a new loudspeaker and with the new sub/low modifications, as a new system. To complement the V7 preset release, the number of supported DSP platforms was also increased to benefit from recent advances in DSP technology. SOUNDVISION modeling software has allowed for more accurate performance prediction than ever and the introduction of new system accessories has provided added flexibility. As for the rigging system, this in itself was a radical innovation in its day and even now provides speed and flexibility that captive rigging systems can’t equal. That’s what new – what’s old is that V-DOSC remains the reference that other line arrays are compared to and has become a modern day classic. But V-DOSC is not just a speaker, it is a standard system and through the V-DOSC Network, a worldwide service - including highly-trained technicians (over 1,500 people have been through V-DOSC and dV-DOSC training as of this writing). V-DOSC is a mature, proven system that will continue to benefit from ongoing evolution and improvements with a strong emphasis on technical support through training, modeling, project support and R&D. In closing, it has been an honor and a pleasure to work with V-DOSC over the years and a few thank you’s are in order: Dr. Christian Heil, Professer Marcel Urban, Joel Perret, Herve Le Gall, the L-ACOUSTICS® R&D team (Christophe Pignon, Christophe Combet, Jacques Spillman) and the L-ACOUSTICS Technical Support team (Bernie Broderick, Cedric Montresor and Dave Brooks). All V-DOSC Network Partners, V-DOSC Trainers, CVEs and QVTs around the world. You’re too numerous to thank individually but my sincere thanks for your hard work and support over the years. Paul D. Bauman June 2005 Hmm…. What’s next? ….. ∗ For those interested, “The Tipping Point” by Malcolm Gladwell is a book that describes how trends spread. Makes for a good bus read… L-ACOUSTICS V-DOSC Manual Version 4 6/29/2005 Page 4 of 158 TABLE OF CONTENTS TABLE OF CONTENTS........................................................................................................................... 5 LIST OF FIGURES.................................................................................................................................... 8 LIST OF TABLES ....................................................................................................................................10 INTRODUCTION .................................................................................................................................. 11 WAVEFRONT SCULPTURE TECHNOLOGY FUNDAMENTALS ........................................................ 11 THE SOUND REINFORCEMENT PROBLEM .............................................................................. 11 WAVEFRONT SCULPTURE TECHNOLOGY BACKGROUND.................................................. 12 V-DOSC: THE SOLUTION ........................................................................................................... 14 V-DOSC TRAINING AND QUALIFICATIONS ..................................................................................... 18 QUALIFIED V-DOSC TECHNICIAN (QVT) .............................................................................. 18 CERTIFIED V-DOSC ENGINEER (CVE)..................................................................................... 18 1. THE V-DOSC SYSTEM STANDARD ............................................................................................... 19 1.1 V-DOSC SYSTEM COMPONENTS ............................................................................................... 23 LOUDSPEAKER ENCLOSURES ................................................................................................... 23 RIGGING ACCESSORIES.............................................................................................................. 24 SUBWOOFER ENCLOSURES....................................................................................................... 26 SUBWOOFER RIGGING ACCESSORIES..................................................................................... 26 AMPLIFICATION.......................................................................................................................... 27 AMPLIFIER RACKS ....................................................................................................................... 27 SIGNAL DISTRIBUTION AND CABLING................................................................................... 29 LOUDSPEAKER CABLING ........................................................................................................... 31 1.2 V-DOSC SPECIFICATIONS ........................................................................................................... 33 1.3 V-DOSC RIGGING SYSTEM.......................................................................................................... 34 1.4 SB218 SUBWOOFER SPECIFICATIONS....................................................................................... 35 1.5 SB218 RIGGING SYSTEM............................................................................................................. 37 1.6 POWERING V-DOSC .................................................................................................................... 38 1.7 V-DOSC AMP PANELS.................................................................................................................. 40 1.8 V-DOSC AMPLIFIER RACKs.......................................................................................................... 43 1.9 COMB CONNECTORS................................................................................................................. 45 1.10 CO24 CONTROL OUTPUT PANEL............................................................................................ 49 1.11 MD24 MULTI DISTRO PANEL................................................................................................... 50 1.12 CO6 CONTROL OUTPUT PANEL.............................................................................................. 50 1.13 APPROVED DIGITAL SIGNAL PROCESSORS............................................................................. 51 1.14 OEM FACTORY PRESETS........................................................................................................... 51 1.15 V-DOSC PRESETS ....................................................................................................................... 52 LO/HI PRESETS ............................................................................................................................. 53 3-WAY STEREO PRESETS............................................................................................................ 53 3WX PRESET.............................................................................................................. 53 3W INFRA PRESET .................................................................................................... 53 4-WAY PRESETS ........................................................................................................................... 54 SUBWOOFER TIME ALIGNMENT RECOMMENDATIONS ................................. 54 L-ACOUSTICS V-DOSC Manual Version 4 6/29/2005 Page 5 of 158 SUB/LOW GAIN SCALING PROCEDURES ............................................................ 54 SUBWOOFER PRESETS (DELAY ARC, LCR) ......................................................... 54 INFRA PRESET........................................................................................................... 55 4W PRESET................................................................................................................. 55 X PRESET ................................................................................................................... 56 X AUX PRESET.......................................................................................................... 56 5-WAY PRESETS ........................................................................................................................... 57 5W INFRA PRESET .................................................................................................... 57 5W X PRESET............................................................................................................. 57 GENERAL GUIDELINES REGARDING SYSTEM PROTECTION ............................................... 58 XTA DP224 V-DOSC PRESETS ........................................................................................................... 59 XTA DP226 V-DOSC PRESETS ........................................................................................................... 60 LAKE CONTOUR V-DOSC PRESETS.................................................................................................. 61 BSS FDS 366 V-DOSC PRESETS ......................................................................................................... 62 2. V-DOSC COVERAGE MODELING ................................................................................................... 63 2.1 COVERAGE IN THE HORIZONTAL PLANE ................................................................................. 63 2.2 COVERAGE IN THE VERTICAL PLANE ........................................................................................ 64 Flat V-DOSC Array........................................................................................................................ 64 Curved V-DOSC Array.................................................................................................................. 64 Constant Curvature V-DOSC Array............................................................................................. 65 Variable Curvature V-DOSC Array .............................................................................................. 66 2.3 V-DOSC COVERAGE MODELING USING ARRAY 2004............................................................... 66 CUTVIEW SHEETS........................................................................................................................ 67 V-ARRAY1, V-ARRAY2 Input Data .............................................................................................. 67 Optimization Procedure................................................................................................................ 69 Output Data................................................................................................................................... 70 dV-ARRAY1, dV-ARRAY2 Input Data.......................................................................................... 72 dV-DOSC PICK POINT UTILITY ................................................................................................. 72 H-ISOCONT SHEET............................................................................................................................ 74 Input Data ...................................................................................................................................... 74 Optimization Procedure................................................................................................................ 74 Output Data................................................................................................................................... 74 2.4 V-DOSC COVERAGE MODELING USING SOUNDVISION ......................................................... 76 SOUNDVISION EXAMPLES ........................................................................................................ 80 SOUNDVISION STADIUM EXAMPLE ........................................................................................ 80 SOUNDVISION ARENA EXAMPLE............................................................................................. 82 3. SOUND DESIGN ............................................................................................................................... 85 3.1 STACKED OR FLOWN? ................................................................................................................ 85 Stacking Guidelines ....................................................................................................................... 86 Flying Guidelines ............................................................................................................................ 87 3.2 ACHIEVING OPTIMUM COVERAGE............................................................................................ 88 3.2.1 THE LEFT/RIGHT CONFIGURATION........................................................................................ 88 Tradeoffs Between Intelligibility and Stereo Imaging ................................................................. 88 3.2.2 LEFT/CENTRE/RIGHT (LCR) CONFIGURATIONs..................................................................... 89 3.3 MULTIPLE ARRAY CONCEPTS .................................................................................................... 90 3.4 SUBWOOFERS.............................................................................................................................. 92 3.4.1 Flown V-DOSC and Ground Stacked Subwoofers.............................................................. 93 3.4.2 Physically Coupled Subwoofers............................................................................................ 95 3.4.3 Hybrid Flown/Stacked Subwoofers ..................................................................................... 96 L-ACOUSTICS V-DOSC Manual Version 4 6/29/2005 Page 6 of 158 3.5 SUBWOOFER ARRAYING TECHNIQUES..................................................................................... 97 3.5.1 LEFT/RIGHT CONFIGURATIONS ...................................................................................... 97 3.5.2 CENTRAL LINE ARRAY WITH ELECTRONIC DELAY PROCESSING............................. 99 3.5.3 LEFT/CENTRE/RIGHT CONFIGURATIONS .................................................................... 100 3.5.4 LARGE FORMAT SUBWOOFER ARRAY CONFIGURATIONS ...................................... 102 3.6 COMPLEMENTARY FILL SYSTEMS ........................................................................................... 105 3.6.1 FRONT FILL........................................................................................................................ 105 3.6.2 OFFSTAGE FILL...................................................................................................................106 3.6.3 DELAY SYSTEMS............................................................................................................... 107 4. INSTALLATION PROCEDURES .................................................................................................... 109 4.1 STACKED SYSTEM ..................................................................................................................... 109 4.2 FLOWN SYSTEM ........................................................................................................................ 112 5. V-DOSC SYSTEM OPERATION..................................................................................................... 123 5.1 SYSTEM TONAL BALANCE ........................................................................................................ 123 5.2 MEASUREMENT PROCEDURES ............................................................................................... 125 Measurement Instruments.......................................................................................................... 125 Measurement Tips ....................................................................................................................... 126 Step-By-Step Tuning Procedure................................................................................................. 127 6. MAINTENANCE AND INSTALLATION TOOLS .......................................................................... 129 6.1 Recommended Maintenance Procedures ................................................................................... 129 6.2 Recommended Maintenance Tools............................................................................................. 129 6.3 Spare Parts ................................................................................................................................. 130 6.4 Recommended Installation Tools ................................................................................................ 131 7. SPECIFICATIONS ........................................................................................................................... 132 7.1 V-DOSC ENCLOSURE SPECIFICATIONS................................................................................... 132 7.2 SB218 SUBWOOFER SPECIFICATIONS..................................................................................... 134 7.3 RIGGING STRUCTURES ............................................................................................................ 135 V-DOSC BUMP2 Bumper ........................................................................................................... 135 SB218 BUMPSUB Rigging Bar ................................................................................................... 136 7.4 CO24, MD24 Line Assignment Summary .................................................................................... 137 7.5 CO24 Control Output Panel Line Assignments ........................................................................... 138 7.6 MD24 Multi Distro Panel Line Assignments................................................................................ 140 APPENDIX 1: Why Do Separated Sound Sources Interfere?.......................................................... 142 APPENDIX 2: Further Explanations Regarding WST Criteria ........................................................ 142 APPENDIX 3: How Does V-DOSC Behave With Respect To WST Criteria................................... 148 APPENDIX 4: How Does the DOSC Waveguide Work? .................................................................. 149 APPENDIX 5: The Border Between Fresnel And Fraunhofer Regions ........................................... 150 APPENDIX 6: Pattern Control of a Constant Curvature Array ...................................................... 152 APPENDIX 7: WST Criteria Number 5 ............................................................................................. 153 APPENDIX 8: Angle Strap Calibration .............................................................................................. 154 APPENDIX 9: V-DOSC Rigging Certification .................................................................................... 155 L-ACOUSTICS V-DOSC Manual Version 4 6/29/2005 Page 7 of 158 LIST OF FIGURES Figure 1: Wavefront interference versus a sculptured V-DOSC wavefront.................................................... 12 Figure 2: Wavefront Sculpture Technology Conditions 1 and 2 Illustrated.................................................... 13 Figure 3: Coplanar Symmetry of V-DOSC ..................................................................................................... 15 Figure 4: Cylindrical versus spherical wave propagation................................................................................ 16 Figure 5: V-DOSC Array ................................................................................................................................ 17 Figure 6: V-DOSC System Block Diagram ..................................................................................................... 20 Figure 7: LR System Configuration ................................................................................................................. 21 Figure 8: LR System Plus Offstage Fill Configuration..................................................................................... 22 Figure 9: V-DOSC system loudspeakers plus accessories.............................................................................. 23 Figure 10: V-DOSC Rigging Accessories ......................................................................................................... 25 Figure 11: V-DOSC Subwoofer Options......................................................................................................... 26 Figure 12: Subwoofer Rigging Accessories ...................................................................................................... 26 Figure 13: L-ACOUSTICS LA48a Power Amplifier......................................................................................... 27 Figure 14: Amplifier Rack Options and Accessories........................................................................................ 28 Figure 15: Signal distribution and cabling......................................................................................................... 30 Figure 16: Loudspeaker cabling options .......................................................................................................... 32 Figure 17: V-DOSC Enclosure - Front and Rear Views................................................................................... 33 Figure 18: V-DOSC BUMP2............................................................................................................................ 34 Figure 19: BUMPDELTA ................................................................................................................................. 35 Figure 20: SB218 Subwoofer – Front and Rear Views .................................................................................... 36 Figure 21: BUMPSUB SB218 Flying Bar .......................................................................................................... 37 Figure 22: V-DOSC PADO4a Amplifier Rack Panel........................................................................................ 40 Figure 23: V-DOSC PADO2a Amplifier Rack Panel........................................................................................ 40 Figure 24: PADO4a amp rack wiring............................................................................................................... 41 Figure 25: PADO2a amp rack wiring............................................................................................................... 42 Figure 26: L-ACOUSTICS Amplifier Rack RK124a loaded with 4 x L-ACOUSTICS LA48a amplifiers........... 43 Figure 27: L-ACOUSTICS Amplifier Rack Options......................................................................................... 44 Figure 28: L-ACOUSTICS RK122a amplifier rack channel assignments and cabling....................................... 46 Figure 29: L-ACOUSTICS RK124a amplifier rack channel assignments and cabling....................................... 46 Figure 30: L-ACOUSTICS RK122a amp rack channel assignments for 2-way, 3-way stereo presets ............ 47 Figure 31: L-ACOUSTICS RK124a amp rack channel assignments for 2-way, 3-way stereo presets ............ 48 Figure 32: CO24 Control Output Panel.......................................................................................................... 49 Figure 33: MD24 Multi Distro Panel................................................................................................................ 50 Figure 34: CO6 Control Output Panel............................................................................................................ 50 Figure 35: Spectral balance for SUB/LOW versus MID/HI Sections ............................................................... 53 Figure 36: Spectral balance for SUB/LOW versus MID/HI Sections (V6 presets and earlier)......................... 53 Figure 37: Infra preset time alignment procedure........................................................................................... 55 Figure 38: 4W preset time alignment procedure ............................................................................................ 55 Figure 39: X preset time alignment procedure ............................................................................................... 56 Figure 40: X AUX preset time alignment procedure...................................................................................... 56 Figure 41: 5W Infra preset time alignment procedure .................................................................................... 57 Figure 42: 5W X preset time alignment procedure ........................................................................................ 57 Figure 43a: Horizontal V-DOSC isocontour averaged from 630 Hz - 16 kHz ............................................... 63 Figure 43b: Horizontal V-DOSC isocontour averaged from 32 Hz - 630 Hz ................................................. 63 Figure 44: Constant Curvature Array Examples. ............................................................................................ 65 Figure 45: Defining Cutview Dimensions ........................................................................................................ 67 Figure 46: Parameters for the ROOM DIM Utility Sheet in ARRAY ............................................................... 68 Figure 47 (a): Cutview showing non-constant enclosure site angle impact spacing........................................ 69 Figure 47 (b): Cutview showing constant enclosure site angle impact spacing ............................................... 69 Figure 47 (c): Plan view representation of non-constant (a) versus constant spacing (b) arrays .................... 69 Figure 48: ARRAY 2004 Geometric Data for V-DOSC................................................................................... 71 Figure 49: ARRAY 2004 Geometric Data for dV-DOSC................................................................................. 73 Figure 50: ARRAY 2004 spreadsheet calculation example .............................................................................. 75 L-ACOUSTICS V-DOSC Manual Version 4 6/29/2005 Page 8 of 158 Figure 51: SOUNDVISION Geometric Data for V-DOSC ............................................................................. 77 Figure 52: Plan view SPL mappings at octave band frequencies for 12 V-DOSC ........................................... 78 Figure 53: Impact coverage and SPL mappings for 12 V-DOSC ..................................................................... 79 Figure 54a: Stadium example - rear perspective view of full system impact coverage ................................... 80 Figure 54b: Stadium example - plan view of full system impact coverage ...................................................... 80 Figure 55: Stadium example - rear perspective view of 1-10 kHz SPL Mappings ........................................... 81 Figure 56: Arena example -rigging plot ........................................................................................................... 82 Figure 57: Arena example - plan view of full system impact coverage............................................................ 82 Figure 58: Arena example - rear perspective view of full system impact coverage ........................................ 83 Figure 59a: Arena example - rear perspective view of full system SPL map (1-10 kHz) ................................ 83 Figure 59b: Arena example – plan view of 1-10 kHz SPL mappings ............................................................... 84 Figure 60: Illustration of Stacking Guidelines................................................................................................... 86 Figure 61: Stacked system example................................................................................................................. 86 Figure 62: Illustration of flying guidelines......................................................................................................... 87 Figure 63: Flown V-DOSC System .................................................................................................................. 87 Figure 64: Tradeoffs between intelligibility versus stereo imaging.................................................................. 89 Figure 65: LCR Configurations ........................................................................................................................ 89 Figure 66: Generic rigging plot for a V-DOSC system with main L/R FOH and LL/RR offstage fill arrays...... 90 Figure 67: Rigging plot for a L/R V-DOSC + flown SB218 system with LL/RR dV-DOSC offstage fill. .......... 91 Figure 68: Stereo dV-DOSC offstage fill system. ........... 91 Figure 69: Flown V-DOSC and ground stacked subwoofer configurations .................................................... 93 Figure 70: Flown V-DOSC and ground stacked subwoofer time alignment ................................................... 93 Figure 71: Time alignment location for flown V-DOSC, ground stacked L/R subwoofers ............................. 94 Figure 72: Physically coupled subwoofer configurations ................................................................................. 95 Figure 73: Hybrid flown/stacked subwoofer configurations............................................................................ 96 Figure 74: Hybrid flown/stacked subwoofer example .................................................................................... 96 Figure 75: L/R Subwoofer arraying techniques................................................................................................ 98 Figure 76: Centre subwoofer line array (a) without and (b) with electronic delay processing....................... 99 Figure 77: Electronic delay processing examples using a 4- or 6-channel DSP............................................. 100 Figure 78: LCR Subwoofer arraying techniques ............................................................................................ 101 Figure 79: Large format subwoofer configuration with electronic delay processing .................................... 102 Figure 80: Geometric coordinates for the SUB ARC utility spreadsheet in ARRAY2004 ............................. 103 Figure 81: Large format arena configuration – 4 delay taps .......................................................................... 103 Figure 82: Large format open air festival configuration ................................................................................. 104 Figure 83: Large format stadium configuration ............................................................................................ 104 Figure 84: Stereo infill and distributed front fill options ................................................................................ 105 Figure 85: Flown offstage fill system options................................................................................................. 106 Figure 86: Stacked offstage fill system options .............................................................................................. 106 Figure 87: SOUNDVISION simulation for a LL/L/R/RR V-DOSC FOH system with 4 delay positions ........ 107 Figure 88: Flown and stacked delay systems ................................................................................................. 108 Figure 89: Stacked dV-DOSC delay system .................................................................................................. 108 Figure 90: Flown V-DOSC delay system ....................................................................................................... 108 Figure 91: Stacked V-DOSC offstage fill system............................................................................................ 111 Figure 92: SOUNDVISION mechanical data................................................................................................. 112 Figure 93: SOUNDVISION installation report data ...................................................................................... 113 Figure 94: ARRAY 2004 installation data ....................................................................................................... 113 Figure 95: Photo sequence showing the steps involved in flying V-DOSC ................................................... 119 Figure 96: Recommended Installation Tools ................................................................................................. 131 Figure 97: V-DOSC Enclosure – Line Drawing ............................................................................................. 133 Figure 98: SB218 Subwoofer – Line Drawing................................................................................................ 134 Figure 99: V-DOSC Flying Bumper – Line Drawing...................................................................................... 135 Figure 100: SB218 Flying Bar – Line Drawing ............................................................................................... 136 Figure 101: The Interference Problem.......................................................................................................... 142 Figure 102: Comb filtering due to path length differences between sources ............................................... 143 Figure 103: Destructive interference ring for a line array at observation point M........................................ 144 L-ACOUSTICS V-DOSC Manual Version 4 6/29/2005 Page 9 of 158 Figure 104: The effect of varying frequency and listener position M on Fresnel rings .................................. 145 Figure 105: Destructive and constructive interference rings for a line array at observation point M........... 145 Figure 106: Constructive interference rings for a condensed point source line array. ................................. 146 Figure 107: Destructive interference rings out of beamwidth for condensed and standard line arrays ...... 147 Figure 108: Front view of V-DOSC array and vertically stacked DOSC waveguides ................................... 148 Figure 109: Horn Generated Wavefronts...................................................................................................... 149 Figure 110: DOSC Waveguide – Internal Section ........................................................................................ 149 Figure 111: Illustration of the Fresnel and Fraunhofer regions...................................................................... 150 Figure 112: Illustration of dborder and Dv for a flat 12 enclosure array....................................................... 151 Figure 113: Illustration of the variation of vertical coverage angle with frequency ...................................... 152 Figure 114: Angle strap calibration ............................................................................................................... 154 LIST OF TABLES Table 1: L-ACOUSTICS LA48a power amplifier ratings ................................................................................. 38 Table 2: Load and Power Ratings for V-DOSC ............................................................................................... 39 Table 3: PADO4a COMB Wiring Chart .......................................................................................................... 41 Table 4: PADO4a Internal Amp Rack Wiring Chart........................................................................................ 41 Table 5: PADO2a COMB Wiring Chart .......................................................................................................... 42 Table 6: PADO2a Internal Amp Rack Wiring Chart........................................................................................ 42 Table 7: V-DOSC preset DSP output channel assignment and COMB connector summary ......................... 45 Table 8: 2-way, 3-way stereo preset DSP output channel assignment and COMB connector summary....... 47 Table 9: SUB / LOW OPERATING BANDWIDTH SUMMARY ..................................................................... 52 Table 10: Recommended Limiter Threshold Settings ..................................................................................... 58 Table 11: XTA DP224 Presets ........................................................................................................................ 59 Table 12: XTA DP226 Presets ........................................................................................................................ 60 Table 13: Lake Contour Presets...................................................................................................................... 61 Table 14: BSS FDS 366 Presets ....................................................................................................................... 62 Table 15: Angle Strap Values ......................................................................................................................... 110 Table 16: Weights for flown V-DOSC system............................................................................................... 136 Table 17: Whirlwind W6 MASS Connector Input/Output Line Assignments................................................ 137 Table 18a: CO24 W6 Pin Assignments.......................................................................................................... 138 Table 18b: CO24 W6 Socket Assignments ................................................................................................... 139 Table 19a: MD24 W6 Pin Assignments ......................................................................................................... 140 Table 19b: MD24 W6 Socket Assignments ................................................................................................... 141 Table 20: Border (in m) Between Cylindrical (Fresnel) and Spherical (Fraunhofer) Zones.......................... 151 Table 21: Dv - Vertical Coverage Angle in the Farfield Region ..................................................................... 151 Table 22: WST Criteria Number 5................................................................................................................ 153 L-ACOUSTICS V-DOSC Manual Version 4 6/29/2005 Page 10 of 158 INTRODUCTION The V-DOSC sound reinforcement system is different. We hope this manual will help you to appreciate why and to understand the basic theoretical principles behind how V-DOSC works. Understanding the concepts behind V-DOSC and Wavefront Sculpture Technology is just as important as the many operational details related in this manual – the more you understand the big picture, the more effectively you will use V-DOSC. V-DOSC is a complete system approach – starting from the basic scientific question of how to effectively couple sound sources then including aspects of performance prediction, sound design, system installation, rigging, cabling, signal distribution, digital signal processing and system tuning. This turnkey system approach allows for accurate and predictable results, however, in order to achieve the best results you need to understand the theoretical concepts behind how the system works and adopt a methodical approach to sound design and installation. For these reasons, specialized training is necessary to obtain the best results with the system. Some people think that working with V-DOSC is complicated but once you understand the procedures involved, you save time and - more importantly - obtain better, more predictable results. Apart from sound quality and the system design approach, there are many other benefits to V-DOSC. Many readers are already aware of these – if not, hopefully they will become apparent throughout the course of this manual. WAVEFRONT SCULPTURE TECHNOLOGY FUNDAMENTALS THE SOUND REINFORCEMENT PROBLEM The first task of sound engineers and audio consultants is to design sound reinforcement systems for a given audience area. Performance expectations in terms of sound quality, sound pressure level (SPL) and coverage consistency have progressively increased over the years while at the same time the size of the audience has grown, inevitably leading to an increase in the number of loudspeakers. In the past, conventional horn-loaded trapezoidal loudspeakers were typically assembled in fan-shaped arrays according to the nominal horizontal coverage angle of each enclosure in an attempt to reduce coverage overlap that causes chaotic interference. With this type of arrangement, the optimum clarity available in one direction could only be provided by the individual enclosure facing in this direction. Attempts at “flattening the array” to achieve greater throw and higher SPLs resulted in severe interference in an uncontrolled way, affecting coverage, pattern control, intelligibility and overall sound quality. Even when arrayed according to specification (always an ''optimum'' compromise since the polar response of individual horns varies with frequency), the sound waves radiated by individual horn-loaded loudspeakers do not couple coherently thus the conventional system approach is fundamentally flawed (see Appendix 1). Furthermore, the chaotic sound fields created by interfering sound sources waste acoustic energy, thus requiring more power than a single, coherent source would in order to obtain the same SPL. As an illustration of this, imagine throwing some pebbles into a pool of water. If one pebble is thrown into the water, a circular wave will expand concentrically from the point where it entered. If a handful of pebbles are thrown into the water, we observe the equivalent of a chaotic wavefront. If we throw in a single larger stone, having total size and weight equal to the handful of pebbles, then we again see a coherent circular wave as for the case of the single pebble — only now with a much larger amplitude. If all of the individual pebbles could be glued together, this would provide the same effect as the larger stone... This illustrates the thinking behind V-DOSC: if we can build a single sound source from a number of individual speakers that can be separated for transport and handling, then we have achieved our goal, i.e., to create a modular sound reinforcement system where the individual loudspeaker enclosures couple correctly when arrayed together so that the system behaves as the equivalent of a coherent line source array. This was the initial specification at the outset of the V-DOSC R&D program - to design a single sound source that was completely modular, predictable and adjustable. L-ACOUSTICS V-DOSC Manual Version 4 6/29/2005 Page 11 of 158 Figure 1: Wavefront interference for a conventional sound reinforcement system compared to a sculptured V-DOSC wavefront WAVEFRONT SCULPTURE TECHNOLOGY BACKGROUND As early as 1988, a preliminary system named "Incremental" had proven the feasibility of Wavefront Sculpture Technology. From this experimental concept, further theoretical research was conducted by Professor Marcel Urban and Dr. Christian Heil and findings were published in 1992 (“Sound Fields Radiated by Multiple Sound Source Arrays”, AES #3269). The theory that was developed defines the acoustic coupling conditions for effectively arraying individual sound sources. Relevant parameters include: wavelength, the shape and surface area of each source, the curvature of the wavefront radiated by each source and the source separation. WST coupling conditions can be summarized as follows: An assembly of individual sound sources arrayed with regular separation between the sources on a plane or curved, continuous surface is equivalent to a single sound source having the same dimensions as the total assembly if, and only if, one of the two following conditions is fulfilled: 1) Shape: The combined surface area of the wavefronts radiated by the individual sources of the array fills at least 80% of the target radiating surface area (see also Condition 3) 2) Frequency: The source separation, defined as the distance between acoustic centers of the individual sources, is smaller than half the wavelength at all frequencies over the bandwidth of operation (generally, this criteria is satisfied at lower frequencies since wavelengths are sufficiently large) These two conditions form the basis of Wavefront Sculpture Technology (WST). L-ACOUSTICS V-DOSC Manual Version 4 6/29/2005 Page 12 of 158 Figure 2: Wavefront Sculpture Technology Conditions 1 and 2 Illustrated Additional conditions were published in the Audio Engineering Society journal paper ''Wavefront Sculpture Technology'', JAES Vol. 51, No. 10, October 2003. The first two WST conditions were rederived (based on an intuitive approach using Fresnel analysis) and in addition it was shown that: 3) Deviation from the ideal, target wavefront (flat or curved) radiated by individual sources of the array must be less than a quarter wavelength at the highest operating frequency (this corresponds to less than 5 mm of variation at 16 kHz) 4) For curved arrays, enclosure site angles should vary in inverse proportion to the listener distance (geometrically this is equivalent to shaping variable curvature arrays to provide equal spacing of individual enclosure site angle impacts on the audience listening plane) 5) Limits exist concerning the vertical height of each enclosure, the minimum allowed listener distance and the angles that are allowed between enclosures. The key to satisfying WST conditions at higher frequencies is a proprietary L-ACOUSTICS waveguide that is used to load a conventional compression driver. This DOSC® waveguide was invented by Dr. Christian Heil and is patented world-wide (see Appendix 4). DOSC stands for ”Diffuseur d’Onde Sonore Cylindrique” – in English this means Cylindrical Sound Wave Generator (note: the “V” in VDOSC refers to the V-shaped acoustic lens configuration employed for the mid section). Essentially, the DOSC waveguide permits fulfillment of the 1st and 3rd WST conditions at higher frequencies. L-ACOUSTICS V-DOSC Manual Version 4 6/29/2005 Page 13 of 158 V-DOSC: THE SOLUTION V-DOSC is the first loudspeaker system designed based on the principles of WST and can be considered as the first modern generation line source array. It should be stressed that there is a big difference between a line source array (such as V-DOSC, dV-DOSC, KUDO or ARCS) and other line arrays on the market today. Whether a line array correctly behaves as a line source array depends on the extent to which the 5 WST conditions outlined in ''Wavefront Sculpture Technology'', JAES Vol. 51, No. 10, October 2003 are satisfied. This may seem like semantics, but there are scientific and technical reasons why V-DOSC works (not marketing reasons!). V-DOSC was designed as a system consisting of identical, vertically-arrayed loudspeakers that satisfy WST conditions for angles of 0° to 5.5° between adjacent enclosures. Individual components are physically arranged within each enclosure so as to meet WST conditions, frequency band-byfrequency band, when the enclosures are arrayed together. Each enclosure radiates a flat, isophase (constant phase) wavefront, allowing the overall assembly to coherently couple as a single extended line source. Since the angle of separation between adjacent enclosures is adjustable, the radiated wavefront can be focussed by physically shaping the array. By satisfying WST criteria over the entire audio bandwidth, the engineer or designer is provided with a "single" loudspeaker with well-defined coverage and wavefront shape, thus allowing the geometrical distribution of energy to be precisely installed to match the geometry of the audience seating area. The internationally-patented1 DOSC waveguide is the core technology in V-DOSC that allows the first and third WST conditions to be satisfied for frequencies higher than 1.3 kHz, i.e., the wavefronts generated by individual DOSC waveguides are planar and their combined surface area accounts for at least 80% of the target radiating surface area provided the angle between adjacent enclosures is less than 5.5 degrees. For traditional horn-loaded systems, coherent summation is not possible at higher frequencies since the wavelengths become progressively smaller than the physical separation between the acoustic centres of horn and driver assemblies. Neither of the first two WST criteria can be satisfied and, as a result, interference occurs throughout most of the high frequency range (see Appendix 1). By comparison, a V-DOSC array is a full-spectrum, coherent loudspeaker system - even for the highest frequencies. As with any speaker system, interference occurs, however for V-DOSC the main difference is that within the defined coverage region the interference is constructive while outside it is destructive (see Appendix 2). For more details on how V-DOSC satisfies WST criteria, please refer to Appendix 3. For further information on the DOSC waveguide, please see Appendix 4. V-DOSC enclosures are vertically arrayed in two or four characteristic "J"-shaped columns. Since enclosures of the array couple coherently, the enclosures are physically smaller and fewer cabinets are required in comparison with conventional systems. This makes V-DOSC very cost-effective for touring sound applications where transport space and handling time means money. These properties also make V-DOSC highly effective for fixed installation where compact size combined with predictable coverage is important. One of the key benefits of WST is the predictability of the radiated wavefront's shape. Horizontally, the entire V-DOSC array has the same coverage as a single enclosure (90°). Vertically, the coverage is equal to the sum of the angles used between individual enclosures of the array. Given this predictability, vertical coverage can be quickly optimized to match the audience geometry using either L-ACOUSTICS ARRAY or SOUNDVISION software. These convenient, user-friendly software programs help the operator determine how to focus the wavefront so that tonal balance and sound pressure levels are evenly distributed throughout the audience (WST rule #4). Using either of these programs, array design can be conveniently performed and installation parameters determined on a case-by-case basis to optimize coverage for each venue according to the audience geometry. 1 The DOSC waveguide is registered under European patent n°0331566 and North American patent n°5163167. Please see Appendix 4 for a description of the DOSC waveguide. L-ACOUSTICS V-DOSC Manual Version 4 6/29/2005 Page 14 of 158 The configuration of transducers in V-DOSC is symmetrical with respect to the plane of propagation of the radiated wavefront, i.e., the plane bisecting the horizontal coverage angle. High frequency transducers loaded by DOSC waveguides are located in the middle, mid frequency transducers are on both sides of the high section, and low frequency transducers are laterally positioned on both ends. Such a configuration is described as having coplanar symmetry. Coplanar symmetry is the cylindrical domain equivalent of the coaxial arrangement* for individual sound sources. Essentially, coplanar symmetry provides even coverage at any listening angle over a VDOSC array’s 90° horizontal coverage pattern, eliminating off-axis cancellations and polar lobing effects at crossover frequencies. Coplanar symmetry produces a stable, symmetric horizontal coverage pattern allowing simple, easy-to-use software tools to be used for horizontal coverage prediction. Psychoacoustically, coplanar symmetry is largely responsible for the exceptional stereo imaging properties that are characteristic of V-DOSC. Other practical benefits of the coplanar symmetric configuration include the fact that there is no need to fly mirror-imaged L/R arrays plus rigging issues are further simplified since the enclosure’s centre of gravity is also symmetric. Figure 3: Coplanar Symmetry of V-DOSC * Distributed sound reinforcement using coaxial loudspeaker technology is L-ACOUSTICS’ other approach to sound reinforcement. Either we respect WST criteria to obtain coherent coupling between individual sources and create a single coherent line source (as for V-DOSC, dV-DOSC, KUDO, ARCS) or we separate individual, coherent sources (MTD or XT coaxial loudspeakers) in a manner so that desired audience coverage is achieved while the effects of audible interference are reduced. For more details on the benefits of coaxial loudspeaker technology and distributed sound design techniques, please refer to the MTD or XT User Manuals (available for download on: www.lacoustics.com). L-ACOUSTICS V-DOSC Manual Version 4 6/29/2005 Page 15 of 158 Apart from coverage precision and predictability, another significant benefit of V-DOSC is the fact that the system effectively extends the nearfield region at higher frequencies (the nearfield is defined as the region where cylindrical wavefront propagation applies and the farfield is the region where spherical wavefront propagation occurs – see Appendix 5 for further details). As pictured in Figure 4, cylindrical wave propagation results in a 3 dB reduction in SPL with doubling of distance as opposed to the 6 dB reduction that is typical of conventional systems that radiate spherical wavefronts. Figure 4: Cylindrical versus spherical wave propagation Due to it’s ability to generate cylindrical wavefronts, V-DOSC has different attenuation properties than conventional systems and should not be evaluated in terms of the classical "$ / kilowatt"-ratio. Comparing SPL predictions according to standard calculations is also not meaningful since V-DOSC produces a combination of cylindrical and spherical wavefront propagation that must be evaluated using specific calculations. Aside: Conventional modeling techniques cannot accurately simulate WST-based systems such as ARCS, KUDO, dV-DOSC or V-DOSC. For WST-based products, L-ACOUSTICS has worked with the developers of EASE and CATT to integrate proprietary SOUNDVISION modeling techniques into these industry-standard room acoustics modeling programs. When curved V-DOSC arrays are employed there is a combination of cylindrical and spherical propagation. This combined propagation, together with the actual shape of the audience allows the wavefront to be focused so that tonal balance and sound pressure levels are evenly distributed throughout the listening area. Although pure cylindrical wave propagation is not always in effect, 3 dB reduction with doubling of distance can still be obtained along with extension of the nearfield if WST Condition 4 is respected - this is an important aspect of WST and the reason why correct focus of VDOSC on the audience is so important. Psychoacoustically, nearfield extension allows one to walk a considerable distance from a V-DOSC system with only a small difference in SPL due to the system’s unconventional attenuation rate. Effectively, more of the audience experiences nearfield listening, enjoying higher fidelity, improved L-ACOUSTICS V-DOSC Manual Version 4 6/29/2005 Page 16 of 158 stereo imaging and exceptional clarity. Subjectively, the loudspeakers seem much closer than they are physically and the sound is ''in your face''. This helps to improve image localization towards the action on stage - not the loudspeaker arrays. Practically, nearfield extension also means that extreme sound pressure levels are not required close to the system in order to obtain acceptable SPLs further back in the venue - this is a highly desirable property that results in reduced potential for hearing loss for both audiences and engineers alike. Nearfield extension, combined with the precision and predictability of V-DOSC coverage is also effective in “pushing back” the critical distance in highly reverberant spaces (critical distance is defined as the distance in a venue where the energy of the direct sound coming from the system is equal to the reverberant energy coming from the room). In many situations, it is extremely important to keep energy off the roof, for example in arenas or covered outdoor amphitheatres (sheds). If we can excite less of the reverberant energy in the room and focus more energy on the audience, we can effectively move back the critical distance in a given room while offering more of the audience a nearfield listening experience. Given the well-defined vertical coverage of V-DOSC, the benefits of WST become immediately obvious in comparison with conventional systems when working in difficult, reverberant rooms. Finally, another benefit of WST is the high degree of SPL rejection obtained outside of the defined coverage pattern. Nominally higher than 20 dB, this permits the installation of a V-DOSC system behind or above microphones with exceptionally high feedback immunity. Monitor engineers also enjoy working with V-DOSC FOH systems since there is very little backwave on stage - even at lower frequencies (for larger arrays of up to 16 enclosures, vertical pattern control is obtained down to as low as 80 Hz). High SPL rejection outside of the defined coverage region also makes V-DOSC an excellent solution in situations where environmental noise control is an issue, for example, in situations where outdoor venues are located close to residential areas. The accuracy, flexibility and predictability inherent in the V-DOSC approach to sound reinforcement has opened up many new horizons for sound design. Figure 5: V-DOSC Array L-ACOUSTICS V-DOSC Manual Version 4 6/29/2005 Page 17 of 158 V-DOSC TRAINING AND QUALIFICATIONS V-DOSC is an innovative design based on a new approach to sound reinforcement that can provide predictable results to the extent that no other existing system can. However, achieving the desired result requires following a methodical procedure which may at first seem unusual to some sound designers and engineers. Hopefully, most of you will embrace this technology and approach V-DOSC with an open mind, excited by the possibilities that such a system allows. However, it can be “hard to teach an old dog new tricks”. For those of you in this category, the first step to take is to forget your experience with other systems and overcome your biases. Try to accept the fact that THIS SYSTEM BEHAVES DIFFERENTLY! Once you understand the procedures involved in working with V-DOSC, you will save time and - more importantly - obtain better, more predictable results.V-DOSC cannot be left in the hands of someone who has no experience with the system even if that person has great skills and experience with respect to other systems. A V-DOSC operator needs specialized training and there are two levels of qualification: QUALIFIED V-DOSC TECHNICIAN (QVT) The tasks of a “Qualified V-DOSC Technician” are: equipment preparation, array design using ARRAY or SOUNDVISION software (based on room dimensions that are either measured on-site or determined from architectural drawings), system installation (rigging, assembly, cabling, system focus, preset selection and drive rack configuration), system testing/tuning and assisting the FOH mix engineer. The QVT is a sound technician with demonstrated ability who has been chosen for his or her technical expertise by a given V-DOSC Network Partner. To be considered a Qualified V-DOSC Technician, the candidate must meet the following criteria: ♦ Participated in a 3 day V-DOSC training session on theory and rigging ♦ Recommended by a recognized CVE (see below) or an official V-DOSC Network representative CERTIFIED V-DOSC ENGINEER (CVE) The higher level of qualification is ''Certified V-DOSC Engineer'' or CVE. In addition to satisfying the mission statement for QVTs, the CVE has further expertise in the areas of: sound design and system measurement as well as extensive real world experience with V-DOSC. The CVE has a complete theoretical understanding of all WST-based systems (including V-DOSC, ARCS, KUDO, dV-DOSC) with a full grasp of the operating theories and principles behind all systems. Other requirements include: demonstrated fluency in ARRAY and SOUNDVISION software; use of advanced measurement tools (SMAART, WinMLS, MLSSA or equivalent) for system alignment and tuning; full understanding of the finer points of system focus – for example: tensioning ratchet straps using digital inclinometers, angle strap calibration; familiar with all preset libraries and software for all supported DSP units; familiar with room measurement procedures using laser rangefinders and inclinometers. The CVE is capable of recommending, endorsing and supervising QVTs during their apprenticeship period towards becoming a full CVE. In some cases, CVEs may also conduct V-DOSC training sessions provided that they have been factory-certified as a V-DOSC Trainer. To be included in the official list that is distributed to members of the V-DOSC Network, the CVE candidate must meet the following criteria: ♦ Participated in a 3 day V-DOSC training session on theory and rigging ♦ Recommended by a recognized CVE or an official V-DOSC Network representative ♦ Known and certified by an official representative of L-ACOUSTICS The Qualified V-DOSC Technician and Certified V-DOSC Engineer are important representatives of the V-DOSC Network. While the V-DOSC Network provides V-DOSC on a rental basis, it is the QVT or CVE who accompanies the system at each installation to ensure that system performance is optimal. We hope that you will carefully follow the guidelines presented in this manual - it is in everyone’s best interest that V-DOSC is deployed correctly and optimally in the field. L-ACOUSTICS V-DOSC Manual Version 4 6/29/2005 Page 18 of 158 1. THE V-DOSC SYSTEM STANDARD V-DOSC is a complete, self-contained FOH sound reinforcement system consisting of V-DOSC enclosures and accessories, rigging hardware, SB218 subwoofers, approved digital signal processors with OEM factory presets, L-ACOUSTICS LA48a power amplifiers, power amplifier racks, PADO2a or PADO4a panels, CO6 or CO24 signal distribution panels, loudspeaker and signal distribution cables. V-DOSC system elements have been carefully selected by L-ACOUSTICS for their specific quality and long term reliability. The benefits of a system standard include: Cross rental compatibility between V-DOSC Network Partners High standards of quality control Consistent system performance worldwide Reduced procurement time (no need to build panels, racks, etc) Long term, common experience shared by QVTs and CVEs Enhanced end user confidence (artist, FOH engineer, production) The V-DOSC system standard does not include chain motors, mains distribution or external handling gear, nor does it include upstream signal mixing and processing equipment. In general, the V-DOSC system is capable of producing sound from a line-level signal in any concert situation. System block diagrams are presented below to provide an overview of system connection and signal flow. This is followed by an identification of the individual elements of the system and more detailed descriptions in Sections 1.2 through 1.7. Please note that specific multi-conductor connector selection for system drive remains open for the user to define although L-ACOUSTICS does offer a specific connector type that is supplied with turnkey systems. L-ACOUSTICS recognizes the fact that multi-conductor snakes and connectors represent a significant investment and many users already have their own internal standard that they must adhere to. Therefore, this part of the system standard remains flexible. System elements that must remain standard in order to ensure compatibility include: digital signal processors; OEM factory presets; channel assignments for signal distribution; power amplifiers; and power amplifier rack panels. General block diagram representations of V-DOSC system components, cabling and signal flow are given below in Figures 6-8. Please refer to these block diagrams for a system overview. NOTE: V-DOSC systems that do not comply with the system standard are considered non-approved by LACOUSTICS. For the case of non-standard systems, L-ACOUSTICS does not accept responsibility for misuse or misoperation and in some cases warranty coverage may be considered void. L-ACOUSTICS strongly encourages all users to comply with the recommended standard as closely as possible in order to maintain approved status. L-ACOUSTICS V-DOSC Manual Version 4 6/29/2005 Page 19 of 158 Figure 6: V-DOSC System Block Diagram L-ACOUSTICS V-DOSC Manual Version 4 6/29/2005 Page 20 of 158 Figure 7: Example LR System Configuration L-ACOUSTICS V-DOSC Manual Version 4 6/29/2005 Page 21 of 158 Figure 8: Example LR System Plus Offstage Fill Configuration (additional distributed front fill or stereo infill system recommended) L-ACOUSTICS V-DOSC Manual Version 4 6/29/2005 Page 22 of 158 1.1 V-DOSC SYSTEM COMPONENTS LOUDSPEAKER ENCLOSURES (1) V-DOSC Full-range active 3-way loudspeaker enclosure, meeting WST criteria, with coplanar symmetric arrangement of loudspeaker components. Includes removable front dolly (not shown) (2) DOSC-COV Protective cover for V-DOSC enclosures (comes in pairs). Constructed of rugged cordura material and padded for extra protection (3) dV-DOSC Active 2-way loudspeaker enclosure, meeting WST criteria, with coplanar symmetric arrangement of loudspeaker components. Used with V-DOSC for down-fill, up-fill/long-throw, offstage fill, stereo in-fill or distributed front fill. Note: for full details, see the dV-DOSC user manual (available for download on: www.l-acoustics.com) (4) FLIGHT-dV Flight case for transport of three dV-DOSC enclosures V-DOSC DOSCOVx2 dV-DOSC FLIGHT-dV Figure 9: V-DOSC system loudspeakers plus accessories L-ACOUSTICS V-DOSC Manual Version 4 6/29/2005 Page 23 of 158 RIGGING ACCESSORIES (5) BUMP2 Flying bumper for rigging a V-DOSC array up to 16 enclosures deep. Can also be inverted and used as an adjustable base for stacking a V-DOSC array (6) BUMPDELTA Delta plate used to attach two motors to BUMP2, allowing for pan adjustment of a flown VDOSC array (7) ANGLE STRAPS Used to provide spacing between V-DOSC enclosures when stacked or flown. Values: 0.75° or 5.5°; 1.3°; 2°; 3°; 4° (Part Codes: BUMP24; BUMP251; BUMP25; BUMP26; BUMP27) (8) SPACER Used with ANGLE STRAPS to provide the desired spacing between V-DOSC enclosures when stacked or flown (Part Codes; SPAC251=1.3°; SPAC25=2°; SPAC26=3°; SPAC27=4°; SPAC28 =5.5° for use with corresponding BUMPxx) (9) CHARIOT Transportation chariot for 2 x BUMP2, 2 x BUMPSUB, ANGLE straps, ratchet straps, screwjacks, shackles and other rigging accessories (10) dV-BUMP Flying bumper for rigging dV-DOSC and/or dV-SUB. When combined with V-DOSC BUMP2, can be used for rigging dV-DOSC on top of V-DOSC or for stacking dV-DOSC. (11) dV-DOWN Pair of rigging adapters for installing dV-DOSC underneath V-DOSC for down-fill applications ANGLE STRAPS BUMP2 BUMPDELTA L-ACOUSTICS V-DOSC Manual Version 4 SPACER 6/29/2005 Page 24 of 158 CHARIOT dV-DOWN dV-BUMP Figure 10: V-DOSC Rigging Accessories L-ACOUSTICS V-DOSC Manual Version 4 6/29/2005 Page 25 of 158 SUBWOOFER ENCLOSURES (12) SB218 Front-loaded, bass-reflex, dual 18’’ subwoofer for high level, extended bandwidth. Optional removable front dolly (not shown) recommended for touring applications. (13) SUBCOV Protective cover for SB218 enclosures (comes in pairs) (14) dV-SUB Dual-vented bandpass-loaded, triple 15” subwoofer for high level, low frequency extension. Optional removable front dolly (not shown) recommended for touring applications. (15) dV-SUBCOV Protective cover for dV-SUB enclosures (comes in pairs) SB218 dV-SUB SUB COV dVSUB COV Figure 11: V-DOSC Subwoofer Options SUBWOOFER RIGGING ACCESSORIES (16) BUMPSUB Flying bar for rigging up to eight SB218 enclosures deep in a vertical line array (17) dV-BUMP2 Flying bumper for rigging up to six dV-SUB enclosures deep in a vertical line array (also an alternative to dV-BUMP for rigging dV-DOSC and/or dV-SUB) BUMPSUB dV-BUMP2 Figure 12: Subwoofer Rigging Accessories L-ACOUSTICS V-DOSC Manual Version 4 6/29/2005 Page 26 of 158 AMPLIFICATION (18) L-ACOUSTICS LA48a Compact, light weight two-channel power amplifier (2 rack units, 10 kg), 1300 watts per channel into 8 ohms, 2300 watts per channel into 4 ohms. Figure 13: L-ACOUSTICS LA48a Power Amplifier Note: for full details see the LA48a user manual (available for download on: www.l-acoustics.com) AMPLIFIER RACKS (19) RK12U 12 rack unit amplifier rack (empty). Light-weight aluminum space frame construction, internal shock mounting, standard rack rails, provision for rear support of amplifiers, transparent lexan doors that store inside the rack, high impact resistance polyethylene cover (no external case required). Recessed Aeroquip flytrack sections for flown applications. (20) RK122a RK12U supplied with PADO2a, PADOSEC, 2U drawer, 2U blank panel, rear support kit for 2 L-ACOUSTICS LA48a power amplifiers (LA48a power amplifiers not included). (21) RK124a RK12U supplied with PADO4a, PADOSEC, rear support kit for 4 L-ACOUSTICS LA48a power amplifiers (LA48a power amplifiers not included). (22) PADO2a AMP PANEL Amplifier panel supplied with RK122a suitable for 2 amplifier rack configuration. Single 8 pin female CA-COM connector for loudspeaker connection (in parallel with 4x Speakon connectors), two male 19 pin CA-COM connectors for signal distribution (input/through), COMB connector (for selecting 2-way, 3-way or subwoofer operating modes); 4x male XLR and 4x Speakon fanouts on the internal side (for connecting to amplifier inputs and outputs). Note: PADO stands for PATCH DOSC (23) PADO4a AMP PANEL Amplifier panel supplied with RK124a suitable for 4 amplifier rack configuration. Dual 8 pin female CA-COM connectors for loudspeaker connection, two male 19 pin CA-COM connectors for signal distribution (input/through), 2x COMB connectors (for selecting 2-way, 3way or subwoofer operating modes); 2 pairs of 4x male XLR and 4x Speakon fanouts on the internal side (for connecting to amplifier inputs and outputs). (24) COMB CONNECTOR Routes desired input lines from the male 19 pin CA-COM connector to the appropriate amplifier inputs allowing RK122a or RK124a amplifier racks to be configured in 2-way (dVDOSC, ARCS), 3-way (V-DOSC, KUDO) or subwoofer (SB218) operating modes (COMB connectors: D2WAY, D3WAY and DSUB, respectively). Additional COMB connectors are available for use with 2- or 3-way format systems (D2WA, D2WB, D2WSTEREO, D3WA, D3WB, DSUBA, DSUBB) and a COMB connector kit for subwoofer array signal processing or for powering passive enclosures (DSUBTK). (25) PADOSEC Mains distribution panel, 32 amp connector, 5x AC receptacles L-ACOUSTICS V-DOSC Manual Version 4 6/29/2005 Page 27 of 158 PADOSEC RK12U PADO2a COMB CONNECTOR RK122a PADO4a RK124a Figure 14: Amplifier Rack Options and Accessories L-ACOUSTICS V-DOSC Manual Version 4 6/29/2005 Page 28 of 158 SIGNAL DISTRIBUTION AND CABLING (26) CO6 CONTROL OUTPUT PANEL Control Output Panel for use with a single 2 in x 6 out (or 3 x 6) digital signal processor (DSP) to create a compact, modular drive rack or for mounting in RK12U amplifier racks along with amplifiers and a DSP unit for standalone master rack applications. DSP outputs are connected to the 6x female XLR patch bay on the rear side of the CO6 panel and then assigned to the front panel 19-pin CACOM connector to provide a 6 channel multi-conductor return snake system when used with DOM30 Cross Link cables. (27) CO24 CONTROL OUTPUT PANEL Control Output Panel for use with four 2 in x 6 out (or 3 x 6) DSPs to create a system drive rack: 1x 84 pin MASS connector; 4x 19 pin male CA-COM connectors; 24x female XLR inputs on the internal side; 1x male/female 4-pin XLR pair for amplifier remote control/monitoring. Used for connecting DSP outputs and amplifier remote control/monitoring to MC28100 MULTI return snake lines. (28) MD24 MULTI DISTRO PANEL Stage distribution panel with 1x 84 pin MASS connector (for connection of MULTI return snake from FOH), 4x 19 pin male CA-COM (for distribution of Left-Left, Left, Right, Right-Right signal lines), 1x male/female 4-pin XLR pair (for distribution of amplifier remote control). (29) MC28100 MULTI-CONDUCTOR CABLE 24 pair multi-conductor return snake, 100 m (325 ft) length, fitted with 84 pin MASS connectors at each end (used for connecting CONTROL OUTPUT panel, typically located at FOH, to MULTI DISTRO panel for signal distribution to the amplifier racks) (30) PCMCIA CARDS Contain OEM factory preset data for programming DSP units (PCM224V, PCM226V and PCM366V for XTA DP224, DP226 and BSS 366, respectively). Other approved DSPs are programmed via computer download of preset data (Lake Contour, BSS Soundweb). (31) DOM2 AMP LINK CABLE 6 pair multi-conductor cable, 2 m (6.5 ft) length, with 2x female 19 pin bayonet CA-COM connectors (for distributing signal from CO6 or MULTI DISTRO panels to amplifier racks and for linking AMP RACKS) (32) DOM30 CROSS LINK CABLE 6 pair multi-conductor cable, 30 m (100 ft) length, with 2x female 19 pin bayonet CA-COM connectors (for cross-stage connection from MULTI DISTRO panel to amplifier racks or for use as a return snake for smaller system configurations) (33) DOMP ADAPTER 19 pin male/male CA-COM adapter (for connecting two AMP LINK or CROSS LINK cables when longer lengths are required) (34) DOMM LINK BREAKOUT Multipair cable adapter with 1x female 19 pin CA-COM connector at one end, 6x male XLR connectors at the other (used as a LINK cable breakout for patching and testing purposes) (35) DOMF LINK-BREAKOUT Multipair cable adapter with 1x female 19 pin CA-COM connector at one end, 6x female XLR connectors at the other (used as a LINK cable breakout for patching and testing purposes). Note: Parts nomenclature is as follows: DOM = DOSC Modulation DOMP = DOSC Modulation Prolongateur (French for extender) L-ACOUSTICS V-DOSC Manual Version 4 6/29/2005 Page 29 of 158 MD24 MULTI DISTRO CO24 CONTROL OUTPUT CO6 CONTROL OUTPUT MC28100 MULTI DOM2 AMP LINK DOM30 CROSS LINK DOMF LINK BREAKOUT DOMM LINK BREAKOUT PCMCIA CARD DOMP LINK EXTEND Figure 15: Signal distribution and cabling L-ACOUSTICS V-DOSC Manual Version 4 6/29/2005 Page 30 of 158 LOUDSPEAKER CABLING (36) DO.7 V-CABLE V-DOSC loudspeaker cable, 8 conductor, 4 mm2 conductor cross-section, 0.7 m (2 ft) length, equipped with male/female CA-COM connectors (for parallel connection of V-DOSC enclosures) (37) DO7 V-CABLE V-DOSC loudspeaker cable, 8 conductor, 4 mm2 conductor cross-section, 7 m (20 ft) length, equipped with male/female CA-COM connectors (for connecting V-DOSC enclosures to PADO2a or PADO4a) (38) DO25 V-CABLE V-DOSC loudspeaker cable, 8 conductor, 4 mm2 conductor cross-section, 25 m (80 ft) length, equipped with male/female CA-COM connectors (for connecting V-DOSC enclosures to PADO2a or PADO4a) (39) DOSUB SUB CABLE Subwoofer loudspeaker cable, 5 m (16 ft) length, with male 8 pin CA-COM connector and four NL4 Speakon connectors (for connecting 4 x subwoofers to PADO2a or PADO4a). (40) DO10P EXTENSION CABLE Extension cable,10 m length for use with DOSUB, DO7, DO2W or DO3W cables (41) SP.7 F-LINK CABLE 2-way fill loudspeaker link cable, 4 conductor, 4 mm2 conductor cross-section, 0.7 m (2 ft) length, equipped with 2x NL4 Speakon connectors (for paralleling 2-way fill enclosures) (42) SP7 F-CABLE 2-way fill loudspeaker cable, 4 conductor, 4 mm2 conductor cross-section, 7 m (20 ft) length, equipped with 2x NL4 Speakon connectors (for connecting dV-DOSC or other 2-way fill enclosures to PADO2a or to PADO4a using DO2W and CC4FP) (43) SP25 F-CABLE 2-way fill loudspeaker cable, 4 conductor, 4 mm2 conductor cross-section, 25 m (80 ft) length, equipped with 2x NL4 Speakon connectors (for connecting dV-DOSC or other 2-way fill enclosures to PADO2a or to PADO4a using DO2W and CC4FP) (44) DOFILL CA-COM (8 pin male line receptacle) to 2x NL4 Speakon connectors (3 m length) for use with DO7 or DO25 cables, PADO2a or PADO4a and 2-WAY, 2W(A), 2W(B) or 2W STEREO COMB connectors for powering 2-way enclosures. (45) DO3WFILL CA-COM (8 pin male line receptacle) to 3x NL4 Speakon connectors (3 m length) for use with DO7 or DO25 cables, PADO2a or PADO4a and 3W(A) or 3W(B) COMB connectors for powering 2-way enclosures plus subwoofers. (46) DO2W CA-COM (8 pin male - barrel plus coupling ring) to 2x NL4 Speakon connectors (3 m length) for use with PADO2a or PADO4a and 2-WAY, 2W(A), 2W(B) or 2W STEREO COMB connectors for powering 2-way enclosures. (47) DO3W CA-COM (8 pin male - barrel plus coupling ring) to 3x NL4 Speakon connectors (3 m length) for use with PADO2a or PADO4a and 3W(A) or 3W(B) COMB connectors for powering 2-way enclosures plus subwoofers. (48) CC4FP Female/female 4 conductor Speakon barrel adapter L-ACOUSTICS V-DOSC Manual Version 4 6/29/2005 Page 31 of 158 DO.7 V-DOSC LINK CABLE DO7 V-CABLE DO25 V-CABLE DOSUB CABLE DO10P EXTENSION SP.7 SP7 SP25 DOFILL DO3WFILL DO2W DO3W CC4FP Figure 16: Loudspeaker cabling options L-ACOUSTICS V-DOSC Manual Version 4 6/29/2005 Page 32 of 158 1.2 V-DOSC SPECIFICATIONS Dimension (WxHxD): 1300mm x 434mm x 565mm (51.2" x 17.1" x 22.2") Weight: 108 kg (238 lbs) + 9,5 kg (21 lbs) with dolly Figure 17: V-DOSC Enclosure - Front and Rear Views V-DOSC is an active full range 3-way loudspeaker enclosure that satisfies WST conditions when vertically arrayed. Each V-DOSC enclosure contains two direct radiating, bass reflex-loaded 15-inch low frequency transducers, four bass reflex-loaded 7-inch midrange frequency transducers that are mounted in a V-shaped acoustic lens configuration and two 1.4'' exit, titanium diaphragm compression drivers that are coupled to individual, vertically-aligned DOSC waveguides. As a full range system, the frequency response is 50 Hz to 18 kHz with less than ± 3 dB variation and the usable bandwidth is 40 Hz to 20 kHz (-10 dB). The DOSC waveguide employed in V-DOSC generates a flat, isophase wavefront for the high frequency section. When vertically-arrayed, multiple loudspeakers function according to the principles of Wavefront Sculpture Technology with either the separation between acoustic centers of individual sound sources less than the size of half the wavelength at the highest frequency of their operating bandwidth (low and mid sections) or the sum of the individual areas of the isophasic radiating elements is greater than 80 percent of the target radiating area (high section). All components of a VDOSC array are symmetrically arranged with respect to a plane vertically bisecting the array (coplanar symmetry) and provide 90-degree horizontal coverage (-6 dB points) independent of the number of vertically arrayed enclosures. Crossover points are 200 Hz between low and midrange sections and 1.3 kHz between midrange and high sections with 24 dB per octave Linkwitz-Riley characteristics. Long term RMS power handling is 2 x 375 Wrms, 600 Wrms and 200 Wrms for low, midrange and high sections, respectively. Low frequency transducers are powered individually at a nominal 8-ohm impedance, midrange frequency transducers are connected in series/parallel for an overall nominal 8-ohm impedance and high frequency transducers are connected in series with a nominal 16-ohm impedance. All components are weather-resistant and connection to the loudspeaker is made via two parallel 8-pin connectors. Although V-DOSC is a 3-way design, the enclosure is powered by 4 amplifier channels. Enclosures are connected to amplifier racks using V-CABLEs (7 m or 25 m length, as required) that are equipped with 8 pin Cannon CA-COM connectors of the bayonet-locking type. Each V-DOSC enclosure is L-ACOUSTICS V-DOSC Manual Version 4 6/29/2005 Page 33 of 158 provided with two connector sockets for direct connection and for paralleling of up to three enclosures (using DO.7 V-CABLEs). The rectangular shape of the enclosure allows for easy stacking, transport and handling. A front mounted dolly board is provided for protection and transportation. Stacking runners located on the bottom of the cabinet act as skid pads to protect the cabinet finish and mate with stacking runner recesses on the top of the enclosure for enhanced stability when stacking. Cabinet dimensions are 130 cm (51.2-in) wide, 43.4 cm (17.1-in) high, 56.5 cm (22.2-in) deep and were designed to allow for efficient truck packing for a variety of trailers of standard size. Enclosure weight is 108 kg (238.1 lbs) and cabinet construction consists of 15 mm (0.59-in), 30 mm (1.18-in) Baltic birch plywood with internal steel bracing and joints that are sealed, screwed and rabbeted. The finish is maroon-gray, high-resilient paint and the front of the enclosure is protected by a black epoxy-coated, 1.5 mm (0.06in) thick steel grille that is covered with 10 mm (0.4-in) thick acoustically-transparent open cell foam. Flying a V-DOSC array is easy, fast and secure. The V-DOSC enclosure features a unique rigging system where built-in flying hardware extends from cabinet-to-cabinet to the hanging points on the BUMP2 flying structure in a train-like fashion. Two recessed Aeroquip flytrack sections are mounted on both sides of the enclosure and two rear-mounted rotating legs allow up to 16 V-DOSC to be assembled in a vertical column. Angle straps are attached between enclosures using the side flytrack sections to provide up to a maximum of 5.5 degrees between enclosures at 0.75 degree angular resolution. Cabinets are physically connected while lined up on the floor and the complete array is flown all at once (in comparison with other systems where cabinets are flown row-by-row). The only external parts needed are ANGLE STRAPS and SPACER blocks – these accessories are used to adjust the angle between enclosures in the array (see Chapter 4 for details on flying and stacking V-DOSC). V-DOSC is used with an approved digital signal processor with OEM factory presets for active 3-way, 4-way or 5-way operation in conjunction with additional SB218 or dV-SUB subwoofer enclosures. 1.3 V-DOSC RIGGING SYSTEM Dimension (WxHxD): 1262mm x 140mm x 1100mm (49-5/8" x 5-4/8" x 43-3/8") Weight: 61.5 kg (135.6 lbs) Figure 18: V-DOSC BUMP2 The BUMP2 flying structure consists of a rectangular steel main frame with heavy duty cross bracing and comes supplied with the following rigging accessories: 3x 22 mm shackles (CA MAN22), 1x steel sling (0.65 m), 4x screwjacks (MC_DOPIED), 2x ratchet straps (16 metre length), 2x BUMPER angle straps (BUMP23) and 2x U-PINS (MC_DOAXE). The two rotating legs located on the bumper along with U-shaped locking pins are used to attach the first V-DOSC enclosure of the array when either flying or stacking. Two side-mounted Aeroquip flytrack sections allow for attachment of the first VDOSC enclosure to BUMP2 using the BUMPER angle strap. When rigged, the BUMP2 is hung from two points spaced by 1.05 m (43 ¼”) - one front and one rear. The center of gravity of the whole array is exactly vertical from the line joining these two points. Motors can be attached to the central hole locations on the bumper or for additional safety factor when flying larger arrays, the two outer hole locations (front and rear) can be used for bridling using 4 steel slings (2 front, 2 rear), 8 shackles and 2 pear rings. L-ACOUSTICS V-DOSC Manual Version 4 6/29/2005 Page 34 of 158 A unique feature of the V-DOSC rigging system is the fact that the relative action of the front and rear chain motors can be used to adjust the vertical site angle of the entire array. The rear rotating legs of the entire assembly provide the mechanical connection and bear the majority of the load while the angle straps determine the angle between adjacent V-DOSC enclosures. As the array is tilted upwards, the overall centre of gravity shifts forwards and the load distribution progressively shifts from the rear rotating legs to the angle straps. As a result, the maximum upward tilt angle is approximately 5 degrees. NOTE: Exact mechanical load conditions depend on the size, shape and site angle of the array. Always refer to the mechanical data provided in ARRAY or SOUNDVISION software to verify that safe rigging conditions apply with respect to load distribution. NOTE: A single BUMP2 can safely fly an array of up to 16 V-DOSC enclosures, 15 V-DOSC + 3 dV-DOSC or 14 V-DOSC + 6 dV-DOSC. Recommended chain motor ratings for each rigging point are as follows: 0.5T motor per point for a 4-enclosure array; 1.0T motor per point for a 5- to 10-enclosure array; 2.0T motor per point for an 11- to 16-enclosure array. BUMP2 can also be used for stacking V-DOSC. In this case, the BUMP2 is inverted (upside down) and the first enclosure of the array is stacked on the bumper. Since the depth of the BUMP2 is larger than that of a single enclosure, this allows for better front-to-rear stability for the stacked array. Screwjacks can be attached at the corners of BUMP2 and used to tilt the BUMP2, and hence the whole array upwards (2 screwjacks at the front) or downwards (2 screwjacks at the rear). In this manner, the site angle of the array can be adjusted to match coverage requirements. When stacking, angles between adjacent enclosures cannot be obtained by gravity and spacers are employed in addition to angle straps. Alternatively, rear ratchet straps can be employed to provide the correct angle between enclosures in conjunction with the angle straps. NOTE: For safety reasons, a stacked array should not exceed more than 6 V-DOSC enclosures high. The DELTA PLATE rigging accessory is available to allow for pan adjustment of flown V-DOSC arrays. The relative action of the 2 rear motors controls the rotation of the array as shown in the figure below: Figure 19: BUMPDELTA 1.4 SB218 SUBWOOFER SPECIFICATIONS L-ACOUSTICS V-DOSC Manual Version 4 6/29/2005 Page 35 of 158 Dimension (WxHxD): 1300mm x 550mm x 700mm (51.2" x 21.7" x 27.6") Weight: 106 kg (234 lbs) Figure 20: SB218 Subwoofer – Front and Rear Views With the addition of SB218 subwoofers, the low frequency response of the V-DOSC system is extended down to 25 Hz. The SB218 subwoofer enclosure has been specifically designed to complement V-DOSC and all OEM factory presets are optimized for the SB218. The SB218 contains two 18-inch transducers, front-loaded in an optimally-tuned and vented enclosure. Power handling is 1100 Wrms continuous program (4400 Wpeak) at a nominal 4 ohm impedance. Connection is made via Speakon NL4 connector and DOSUB cables are used to connect to amplifier racks (one SB218 per LA48a amplifier channel). Usable frequency response is 28 to 140 Hz (+/- 3 dB) with -10 dB response at 25 Hz referenced to the average level of the usable response. The SB218 features critically-damped tuning characteristics with an enclosure tuning frequency of 32 Hz. The central, large-area port enhances large-signal dynamic capability while minimizing nonlinearity due to port turbulence effects. The 18-inch transducers employed in the SB218 have a 4.5 inch diameter edgewound copper ribbon voice coil, 9 mm peak excursion capability, weatherproof cone body, diecast aluminum frame, massive vented magnet structure and utilize advanced high temperature adhesives in their assembly. Loudspeaker components feature low thermal power compression, long term reliability and low distortion output. The SB218 is constructed of 24 mm baltic birch and is internally braced with steel corner plates and joints that are sealed, screwed and rabbeted in order to remain free of vibration at extreme sound pressure levels. Dimensions are 550 mm (21.7 in) high, 1300 mm (51.2 in) wide and 700 mm (27.6 in) deep and enclosure weight is 115 kg (233.7 lbs). The finish is brown gray (RAL8019) structured polyurethane paint and the front of the enclosure is protected by a black powder-coated, 1.5 mm thick steel grill grille covered with 10 mm (0.4-in) thick acoustically-transparent open cell foam. The SB218 has two recessed flytrack sections mounted on both sides for rigging purposes. An accessory flying bar is available that allows for rigging of arrays up to 8 enclosures deep with greater than 5:1 safety factor. Six recessed handles are located on the sides of the enclosure and a front mounted dolly board attaches to the enclosure using two locking pins and two front baffle-mounted dolly locator studs. L-ACOUSTICS V-DOSC Manual Version 4 6/29/2005 Page 36 of 158 1.5 SB218 RIGGING SYSTEM The SB218 BUMPSUB rigging system consists of one steel bar, four 22 mm shackles and two chains incorporating Aeroquip double stud fittings. The Aeroquip fittings are connected to the flytrack sections located on each side of the SB218 (two per loudspeaker on each side = 4 total per SB218). The BUMPSUB flying bar is rated for up to 8 subwoofer enclosures at a 5:1 safety factor. Note: It is recommended to preattach shackles and fittings to the chains prior to flying. Lay the chain out flat and remove any twists. Shackles and double stud fittings are then attached every 13 chain links, i.e., with a separation of 11 open chain links between each shackle as shown in the figure below. Figure 21: BUMPSUB SB218 Flying Bar L-ACOUSTICS V-DOSC Manual Version 4 6/29/2005 Page 37 of 158 1.6 POWERING V-DOSC The L-ACOUSTICS LA48a power amplifier is specified for use with V-DOSC. For full technical details please see the LA48a user manual (available for download on: www.l-acoustics.com). A brief summary of important specifications follows: INPUT SENSITIVITY 2.30 Vrms (+9.5 dBu) GAIN 32 dB (specified amplifier gain for V-DOSC) Table 1: L-ACOUSTICS LA48a power amplifier ratings MLS SWITCH SETTING LOAD CONFIGURATION -5 dB -4 dB -2 dB 0 dB 16 ohms Stereo (2 channel) 220 260 410 650 8 ohms Stereo (2 channel) 430 520 820 1300 4 ohms Stereo (2 channel) 830 1000 1600 2300 2.7 ohms Stereo (2 channel) 1380 1665 2130 2700 2 ohms Stereo (2 channel) 1660 2000 2400 2900 When powering V-DOSC, two amplifier channels power the low section (since 15'' components are wired separately internally), one channel powers the mid section and one channel powers the high section. If we consider half an RK124a amplifier rack loaded with 4 x LA48a amplifiers (numbered 1-4 from top to bottom), nominal impedance loads and amplifier channel assignments when powering a single V-DOSC cabinet are: 1 x 16 ohms for the high-frequency channel 1 x 8 ohms for the mid-frequency channel (Amplifier #1 – Channel A) (Amplifier #2 – Channel A) 2 x 8 ohms for both low-frequency channels (Amplifiers #3, #4 – Channel A) When powering subwoofers, one SB218 is powered per amplifier channel at a 4 ohm load. Multiple cabinet impedance loads and power ratings are summarized in Table 2. Fully equipped, the L-ACOUSTICS RK124a rack contains 4 L-ACOUSTICS LA48a amplifiers and can power 1+1, 2+2, or 3+3 V-DOSC, 4+4 SB218 subwoofers, 6+6 dV-DOSC or 6+6 ARCS. When powering V-DOSC, 2 enclosures in parallel is the optimum load while 3 is more cost-effective. Powering 3+3 V-DOSC enclosures is safe for the amplifiers, but does not provide the same standard of sonic quality due to reduced headroom - particularly for the mid and high sections (see Table 2 below). Powering 4+4 V-DOSC in parallel is not recommended for normal operation but it is possible to do so in emergency situations. L-ACOUSTICS V-DOSC Manual Version 4 6/29/2005 Page 38 of 158 Table 2: Load and Power Ratings for V-DOSC V-DOSC ENCLOSURE RATINGS ONE V-DOSC TWO V-DOSC THREE V-DOSC FOUR V-DOSC (NOT RECOMMENDED) LOAD RMS PEAK REC'D LOAD RMS PEAK REC'D LOAD RMS PEAK REC'D LOAD RMS PEAK REC'D LOW 8 375 1500 750 4 750 3000 1500 2.7 1125 4500 2250 2.0 1500 6000 3000 MID 8 600 2400 1200 4 1200 4800 2400 2.7 1800 7200 3600 2.0 2400 9600 4800 16 200 800 800 8 400 1600 1600 5.3 600 2400 2400 4.0 800 3200 3200 SECTION HIGH V-DOSC LOW SECTION AMPLIFIER V-DOSC MID SECTION AMPLIFIER V-DOSC HI SECTION AMPLIFIER REC'D POWER OUTPUT REC'D POWER OUTPUT REC'D POWER OUTPUT LOAD REC'D (ohms) POWER 2 3000 LA 48a 2900 LOAD REC'D (ohms) POWER 2 4800 (0 dB) 2.7 2250 2700 1500 2300 2.7 3600 - - REC'D (ohms) POWER 2 - 2.7 - 4 3200 LA 48a 2700 (0 dB) 4 2400 (0 dB) 5.3 2900 LOAD do not use (0 dB) 4 LA 48a 2300 (0 dB) 5.3 - - 2300 (0 dB) 5.3 2400 1800 (0 dB) 8 750 1300 8 1200 (0 dB) 16 - - 1300 8 1600 (0 dB) 16 - - 1300 (0 dB) 16 800 650 (0 dB) Note: L-ACOUSTICS recommends that LA48a Channel A/B MLS switches are in the 0 dB position and Channel A/B CLIP LIMITERS are enabled (rear panel switch=IN) at all times. As standard, the L-ACOUSTICS LA48a power amplifier has 32 dB gain. L-ACOUSTICS V-DOSC Manual Version 4 6/29/2005 Page 39 of 158 1.7 V-DOSC AMP PANELS Figure 22: V-DOSC PADO4a Amplifier Rack Panel The PADO4a amp panel allows for connection of loudspeakers, input signal and output signal loop through and is suitable for use with 4 LA48a power amplifiers. The panel has 2 x female 8-pin CACOM connectors for loudspeaker connection; 2 x male 19-pin CA-COM connectors for input signal connection and jumping to subsequent amp racks; 2 x 37 pin D-SUB connectors for attaching COMB connectors that are used to configure the amplifier rack for 2-WAY, 3-WAY or SUB operating modes. Internally, two sets of 4x male XLR fanouts connect the input signal from the COMB connector on PADO4a to the amplifier inputs and two sets of 4x NL4 Speakon line connectors connect the A and B channel amplifier outputs to the two front panel 8-pin female CA-COM connectors. For the 19-pin CA-COM connectors, line 1 is reserved for subwoofer drive; lines 2, 3 and 4 are for VDOSC low, mid and high, respectively; lines 5 and 6 are assigned to 2-way fill (low and high, respectively). Figure 23: V-DOSC PADO2a Amplifier Rack Panel The V-DOSC PADO2a amp panel is suitable for use with 2 LA48a power amplifiers and allows for connection of loudspeakers, input signal and output signal loop through. The panel has a single female 8 pin CA-COM connector for loudspeaker connection that is in parallel with 4 x Speakon NL4 connectors; 2 x male 19-pin CA-COM connectors for input signal connection and jumping to subsequent amp racks; 1 x 37 pin D-SUB connector for COMB connector attachment that allows the user to reconfigure the amplifier rack for 2-WAY, 3-WAY or SUB operating modes. In 3-WAY mode, V-DOSC enclosures are connected via the 8-pin CA-COM connector using DO7 or DO25 cables. In SUB mode, SB218 enclosures can be connected via the four individual NL4 Speakon connectors (using SP7 or SP25 cables) or via the 8-pin CA-COM connector (using DOSUB and optional DO10P cables). In 2-WAY mode, dV-DOSC or ARCS enclosures can be connected via the lower 2 x Speakon NL4 connectors (using SP7 or SP25 cables) or, alternatively, via the 8-pin CACOM connector (using DO2W cables directly or DO7 / DO25 cables plus DOFILL adapter). L-ACOUSTICS V-DOSC Manual Version 4 6/29/2005 Page 40 of 158 Table 3: PADO4a COMB Wiring Chart Table 4: PADO4a Internal Amp Rack Wiring Chart Figure 24: PADO4a amp rack wiring L-ACOUSTICS V-DOSC Manual Version 4 6/29/2005 Page 41 of 158 Table 5: PADO2a COMB Wiring Chart Table 6: PADO2a Internal Amp Rack Wiring Chart Figure 25: PADO2a amp rack wiring L-ACOUSTICS V-DOSC Manual Version 4 6/29/2005 Page 42 of 158 1.8 V-DOSC AMPLIFIER RACKS Figure 26: L-ACOUSTICS Amplifier Rack RK124a loaded with 4 x L-ACOUSTICS LA48a amplifiers The L-ACOUSTICS amplifier rack RK12U is 12 rack units high and can be loaded with up to 4 LACOUSTICS LA48a amplifiers and the PADO4a amp rack panel. Overall external dimensions are 77 cm high (including casters) x 61 cm wide x 58 cm deep (30.3 x 26.4 x 22.9 inches). Clearance from the front rack rail to the front of the rack is 9.5 cm (3.7 in). Clearance from the rear rack rail to the rear of the rack is 6 cm (2.4 in). The depth from front to rear rack rails is 42.5 cm (16.7 in) and the depth from front rack rail to the rear support points for the LA48a amplifier is 39 cm (15.35 in). Due to the switched mode power supply technology employed in the L-ACOUSTICS LA48a, the rack weighs only 98 kg (216 lbs) when loaded with 4x LA48a amplifiers. Using the COMB connectors located on the PADO4a amp panel, the rack can be configured so that A and B channels are independent. Depending on how the rack is to be configured 2-WAY, 3-WAY or SUB COMB connectors are selected. Essentially, the COMB connectors route the desired input lines from the 19 pin CA-COM connector to the appropriate amplifier inputs for A and B channels, respectively. Using separate COMB connectors for both channels, it is possible to assign the A channels and B channels independently. When fully-loaded (with 4 x LA48a plus PADO4a) the RK124a rack can power up to 6 x V-DOSC, 8 x SB218 subwoofers or 12 x dV-DOSC. In terms of construction, the amplifier rack is made of a lightweight aluminum space frame with heavy duty bracing, internal shock mounting, standard rack rails and provision for rear support of amplifiers. Clear, polycarbonate (lexan) front and rear doors allow the user to quickly see how racks are configured and can be conveniently stored inside the rack during use (note: for ventilation purposes, front and rear doors must always be removed during operation). A high impact resistance polyethylene cover provides protection for the rack during transport so that no external case is required. Four recessed Aeroquip flytrack sections are mounted on both sides of the amplifier rack for flown applications. Recesses in the top cover of the amplifier rack allows racks to be stacked on top of each other with the casters still attached. It is also possible to remove the casters on one amplifier rack, place it on top of a second amp rack and then mechanically bolt the two racks together. Overall the L-ACOUSTICS RK12U amplifier rack provides an extremely efficient package in terms of power versus size and weight while at the same time maintaining flexibility for smaller scale and distributed system applications. L-ACOUSTICS V-DOSC Manual Version 4 6/29/2005 Page 43 of 158 4 x LA48a plus PADO4a 4 x LA48a plus 2 x PADO2a Master Rack Slave Rack Figure 27: L-ACOUSTICS Amplifier Rack Options: (a) 4x LA48a plus PADO4a; (b) 4x LA48a plus 2x PADO2a; (c) Master Rack with DSP, CO6 Control Output, 2x LA48a, PADO2a; (d) Slave Rack with 2x LA48a, PADO2a L-ACOUSTICS V-DOSC Manual Version 4 6/29/2005 Page 44 of 158 1.9 COMB CONNECTORS COMB connectors are used in conjunction with L-ACOUSTICS signal distribution panels (CO6, CO24, MD24) to route desired signal lines from the 19-pin CA-COM input connectors on PADO2a or PADO4a amplifier rack panels to the appropriate amplifier inputs. Amplifier racks can be conveniently reconfigured without rewiring internally - simply by changing the COMB connector. COMB connectors for use with V-DOSC (4-way+2 or 5-way+1 format presets) are: DSUB = SUB (signal line 1 for SB218) D3WAY = 3-WAY (signal lines 2/3/4 for V-DOSC low/mid/high, respectively) D2WAY = 2-WAY (signal lines 5/6 for dV-DOSC mid/high, respectively) Additional COMB connectors are available for use with 2-way or 3-way stereo format presets are: D2WA D2WB D2WSTEREO D3WA D3WB DSUBA DSUBB = 2W(A) = 2W(B) = 2W(STEREO) = 3W(A) = 3W(B) = SUB(A) = SUB(B) (signal lines 2/3 for 2-way low/high) (signal lines 5/6 for 2-way low/high) (signal lines 2/3 and 5/6 for stereo2-way low/high) (signal lines 1/2/3 for sub/2-way low/2-way high) (signal lines 4/5/6 for sub/2-way low/2-way high) (signal line 1 for sub drive) (signal line 4 for sub drive) DSUBTK is a set of 6 COMB connectors for implementing electronic arc delay processing of subwoofer arrays or for powering passive enclosures: SUB T1 = signal line 1 SUB T2 = signal line 2 SUB T3 = signal line 3 SUB T4 = signal line 4 SUB T5 = signal line 5 SUB T6 = signal line 6 For complete details regarding CA-COM line assignments, PADO2a and PADO4a wiring plus COMB connector wiring, please refer to Tables 3 and 5 in the preceding section. DSP output channel assignments for 4+2 and 5+1 format presets, CO6 / CO24 patching and 3-WAY, SUB and 2-WAY COMB connector channel selection are summarized as follows: Table 7: V-DOSC preset DSP output channel assignment and COMB connector summary DSP OUTPUT 4+2 FORMAT CO6 / CO24 CHANNEL PRESET INPUT 1 SUB (A) 1 2 LO (A) 2 V-DOSC LO 2 LO (A) 2 V-DOSC LO 3 MID (A) 3 V-DOSC MID 3 MID (A) 3 V-DOSC MID V-DOSC HI 4 HI (A) 4 V-DOSC HI 5 6 FULL (A) SUB (B) 4 HI (A) 4 5 6 2W LO (B) 2W HI (B) 5 6 COMB CONNECTOR 3-WAY SUB 2-WAY SB218 dV-DOSC LO dV-DOSC HI AUX SUB DRIVE + 2-WAY FILL DSP OUTPUT 5+1 FORMAT CO6 / CO24 CHANNEL PRESET INPUT 1 SUB (A) 1 COMB CONNECTOR 3-WAY SUB SB218 AUX SUB DRIVE DSP OUTPUT 5+1 FORMAT CO6 / CO24 COMB CONNECTOR CHANNEL PRESET INPUT 3-WAY 1 LO (A) 2 V-DOSC LO 2 MID (A) 3 V-DOSC MID 2 LO (A) 2 V-DOSC LO 3 HI (A) 4 V-DOSC HI 3 MID (A) 3 V-DOSC MID 4 2W LO (A) 5 dV-DOSC LO 4 HI (A) 4 V-DOSC HI 5 6 2W HI (A) SUB (B) 6 1 dV-DOSC HI 5 6 FULL (A) SUB (B) 1 L-ACOUSTICS V-DOSC Manual Version 4 SUB SB218 2-WAY DSP OUTPUT 5+1 FORMAT CO6 / CO24 CHANNEL PRESET INPUT 1 SUB (A) 6/29/2005 COMB CONNECTOR 3-WAY SUB SB218 Page 45 of 158 Operating modes, amplifier rack channel assignments and cabling plus loudspeaker enclosure combinations for the L-ACOUSTICS RK122a amplifier rack (PADO2a plus 2 x LA48a) are as follows: V-DOSC HI V-DOSC LO SUB SUB 2W HI 2W HI V-DOSC MID V-DOSC LO SUB SUB 2W LO 2W LO 3-WAY SUB 2-WAY DO7 or DO25 DOSUB or DO10P + DOSUB (DO10P+) DO2W or DO7(or 25) + DOFILL or DO2W + CC4FB + SP7 / 3 V-DOSC 4 SB218 (or dV-SUB) 6 dV-DOSC / ARCS / XT Figure 28: L-ACOUSTICS RK122a amplifier rack channel assignments and cabling for V-DOSC presets Operating modes, amplifier rack channel assignments and cabling plus loudspeaker enclosure combinations for the L-ACOUSTICS RK124a amplifier rack (PADO4a plus 4 x LA48a) are as follows: V-DOSC HI V-DOSC HI SUB SUB 2W HI 2W HI V-DOSC MID V-DOSC MID SUB SUB 2W LO 2W LO V-DOSC LO V-DOSC LO SUB SUB 2W HI 2W HI V-DOSC LO V-DOSC LO SUB SUB 2W LO 2W LO 3-WAY 3-WAY SUB SUB 2-WAY 2-WAY DO7 or DO25 DO7 or DO25 (DO10P +) DOSUB (DO10P +) DOSUB 3 V-DOSC 3 V-DOSC 4 SUBS 4 SUBS (DO10P+) DO2W or DO7(or 25) + DOFILL or DO2W + CC4FB + SP7 / 25 (DO10P+) DO2W or DO7(or 25) + DOFILL or DO2W + CC4FB + SP7 / 6 dV-DOSC / ARCS / XT 6 dV-DOSC / ARCS / XT Figure 29: L- L-ACOUSTICS RK124a amplifier rack channel assignments and cabling for V-DOSC presets L-ACOUSTICS V-DOSC Manual Version 4 6/29/2005 Page 46 of 158 To power 2-way fill enclosures or 3-way stereo dV-DOSC, ARCS or XT systems using PADO2a and PADO4a amplifier panels, additional COMB connectors can be employed: 2W(A), 2W(B), 3W(A), 3W(B), SUB(A), SUB(B) or 2W STEREO. DSP output channel assignments for 2-way stereo and 3-way stereo format presets, CO6 / CO24 patching and COMB connector channel selection are summarized as follows: Table 8: 2-way and 3-way stereo preset DSP output channel assignment and COMB connector summary DSP OUTPUT 2W STEREO 3W STEREO CO6 / CO24 CHANNEL PRESET PRESET INPUT SUB (A) SUB(A) 1 SUB (A) 1 COMB CONNECTOR CHANNEL SELECTION 2W (A) SUB (B) 2W (B) 2W STEREO 3W (A) 2 LO (A) LO (A) 2 LO (A) LO (A) LO (A) 3 HI (A) HI (A) 3 HI (A) HI (A) HI (A) SUB (B) 4 LO (B) HI (B) 5 6 4 5 6 LO (B) HI (B) 3W (B) SUB (A) SUB (B) SUB (B) LO (B) HI (B) LO (B) HI (B) LO (B) HI (B) This signal distribution scheme allows for logical patching between digital signal processor outputs and CO6 or CO24 inputs for 2-way stereo and 3-way stereo format presets, i.e., channels are patched 1:1, 2:2, 3:3 etc. This helps eliminate potential sources of error due to mispatching and, in addition, it is not necessary to repatch DSP outputs when changing between stereo 2-way and 3-way presets. Operating modes, amplifier rack channel assignments and cabling plus loudspeaker enclosure combinations for the L-ACOUSTICS RK122a amplifier rack (PADO2a plus 2 x LA48a) are as follows: 2-WAY STEREO PRESETS RK122 1 2 3 4 5 6 RK122 RK122 LO (A) HI (A) HI (A) HI (B) HI (A) HI (A) HI (B) HI (B) LO (B) HI (B) LO (A) LO (B) LO (A) LO (A) LO (B) LO (B) 2W ST 2W (A) 2W (B) (DO10P+) DO2W or DO7(or 25) + DOFILL or DO2W + CC4FB + SP7 / SP25 (DO10P+) DO2W or DO7(or 25) + DOFILL or DO2W + CC4FB + SP7 / SP25 (DO10P+) DO2W or DO7(or 25) + DOFILL or DO2W + CC4FB + SP7 / SP25 3+3 dV-DOSC / ARCS / XT 3+3 dV-DOSC / ARCS / XT 3+3 dV-DOSC / ARCS / XT 3-WAY STEREO PRESETS RK122 1 2 3 4 5 6 SUB (A) LO (A) HI (A) SUB (B) LO (B) HI (B) RK122 RK122 RK122 HI (A) SUB (A) HI (B) SUB (B) SUB (A) SUB (A) SUB (B) SUB (B) LO (A) SUB (A) LO (B) SUB (B) SUB (A) SUB (A) SUB (B) SUB (B) 3W (A) 3W (B) SUB (A) SUB (B) (DO10P+) DO3W or DO7(or 25) + DO3WFILL (DO10P+) DO3W or DO7(or 25) + DO3WFILL (DO10P+) DOSUB (DO10P+) DOSUB 3 dV-DOSC / ARCS / XT 2 SUBS 3 dV-DOSC / ARCS / XT 2 SUBS 4 SUBS 4 SUBS Figure 30: L-ACOUSTICS RK122a amplifier rack channel assignments and cabling for 2-way and 3-way stereo presets L-ACOUSTICS V-DOSC Manual Version 4 6/29/2005 Page 47 of 158 Operating modes, amplifier rack channel assignments and cabling plus loudspeaker enclosure combinations for the L-ACOUSTICS RK124a amplifier rack (PADO4a plus 4 x LA48a) are as follows: 2-WAY STEREO PRESETS RK124 RK124 HI (A) HI (A) HI (A) HI (B) LO (A) LO (A) LO (A) LO (B) HI (B) HI (B) HI (A) HI (B) LO (B) LO (B) LO (A) LO (B) 2W ST 2W ST 2W (A) 2W (B) (DO10P+) DO2W (DO10P+) DO2W or or DO7(or 25) + DOFILL DO7(or 25) + DOFILL or or DO2W + CC4FB + SP7 / 25DO2W + CC4FB + SP7 / 25 (DO10P+) DO2W or DO7(or 25) + DOFILL or DO2W + CC4FB + SP7 / 25 3+3 dV-DOSC / ARCS / XT 3+3 dV-DOSC / ARCS / XT 3+3 dV-DOSC / ARCS / XT 3+3 dV-DOSC / ARCS / XT (DO10P+) DO2W or DO7(or 25) + DOFILL or DO2W + CC4FB + SP7 / 25 3-WAY STEREO PRESETS RK124 RK124 HI (A) HI (B) SUB (A) SUB (B) LO (A) LO (B) SUB (A) SUB (B) SUB (A) SUB (B) SUB (A) SUB (B) SUB (A) SUB (B) SUB (A) SUB (B) 3W (A) 3W (B) SUB (A) SUB (B) (DO10P+) DO3W (DO10P+) DO3W or or DO7(or 25) + DO3WFILL DO7(or 25) + DO3WFILL or or DO3W + CC4FB + SP7 / 25DO3W + CC4FB + SP7 / 25 3 dV-DOSC / ARCS / XT 2 SUB (DO10P +) DOSUB (DO10P +) DOSUB 4 SUBS 4 SUBS 3 dV-DOSC / ARCS / XT 2 SUB Figure 31: L-ACOUSTICS RK124a amplifier rack channel assignments and cabling for 2-way and 3-way stereo presets L-ACOUSTICS V-DOSC Manual Version 4 6/29/2005 Page 48 of 158 1.10 CO24 CONTROL OUTPUT PANEL Figure 32: CO24 Control Output Panel The CO24 control output panel can be used in conjunction with 4 digital signal processors to create a compact, modular drive rack. DSP outputs are patched to the 24 x female XLR patch bay on the internal side of the CO24 panel and are then assigned to MC28100 MULTI return snake lines. For added flexibility, all MULTI lines are paralleled with individual front panel Left-Left (A), Left (B), Right (C) and Right-Right (D) 19-pin CA-COM connectors. These individual CA-COM connectors can be used in situations where the drive rack is located onstage (eliminating the need for a MULTI DISTRO panel) or when it is desirable to run separate drive snakes to remotely-located amplifier racks. For example, in some cases, amplifier racks may be located at delay towers behind the FOH location and separate snake runs required, or for smaller club/theatre shows, two DOM30 Cross Link cables can be run for left and right arrays instead of using the MC28100 MULTI. In addition, the availability of individual CA-COM connectors allows a DOMM LINK BREAKOUT cable to be connected to these outputs for testing purposes. The CO24 control output panel configuration allows for maximum flexibility while providing a scaleable architecture that can be used for small, medium and large systems. Let’s consider the largest system application in detail since small and medium systems will adhere to the same channel assignment standards and are considered as subsets of the large scale setup. A large scale V-DOSC system typically consists of: Left-Left (L-L), Left (L), Right (R) and Right-Right (R-R) V-DOSC arrays. Each of the four arrays can have associated 2-way dV-DOSC downfill enclosures and SB218 subwoofers. Therefore, each L-L, L, R and R-R array requires 6 drive channels: 3 for V-DOSC, 2 for dV-DOSC and 1 for SB218s. Since there are 4 arrays, this requires 24 drive channels total. The 84 pin Whirlwind MASS W6 connector accomodates these 24 drive channels (72 lines) leaving 14 additional lines available. It is important to have discrete drive for all four arrays for several reasons: (a) Discrete drive allows for the relative time alignment of all 4 arrays, i.e., typically the L array will act as a time reference for the L-L array while the R array acts as a time reference for the R-R; (b) Different-sized arrays will require different band attenuation and equalization, i.e., typically the L-L and R-R arrays used for offstage coverage are smaller in terms of the number of enclosures; (c) Discrete drive for all four arrays allows for the creation of stereo over larger audience areas, i.e., using the console's matrix outputs the stereo left signal can be applied to the L and R-R arrays while stereo right can be sent to the R and L-L arrays. De-correlating the L-L versus L signals (and R-R versus R) by applying stereo feeds also helps to reduce the effects of audible interference in the coverage overlap region between main FOH and offstage fill arrays. L-ACOUSTICS V-DOSC Manual Version 4 6/29/2005 Page 49 of 158 1.11 MD24 MULTI DISTRO PANEL Figure 33: MD24 Multi Distro Panel As seen in the system block diagram of Figure 6, the MD24 Multi Distro panel is used onstage for distribution of MC28100 MULTI return snake lines that originate from the CO24 Control Output panel located at FOH. The MD24 panel can be packaged separately and located either stage left or right (depending on physical constraints regarding snake runs) or, alternatively, can be mounted in the amplifier rack that is first in line for patching purposes. A DOM2 AMP LINK cable is run from the Multi Distro panel to the appropriate 19 pin CA-COM connector of the first amplifier, e.g., B lines for FOH left if the amplifier rack is located stage right. AMP LINK cables are then used to connect subsequent stage right amplifiers so that all receive B lines (including subwoofer and 2-way amplifier racks which are configured using SUB and 2-WAY COMB connectors, respectively). A CROSS LINK cable is then used to distribute C lines for FOH right from the MD24 Multi Distro panel cross stage to the stage left amplifiers. These racks are connected in the same way using AMP LINK cables and similar connections are performed for the A and D lines to accommodate Left-Left and Right-Right arrays, as necessary. Separating signal distribution lines to individual L-L, L, R and R-R arrays is also an effective way to avoid potential ground loop problems. 1.12 CO6 CONTROL OUTPUT PANEL The CO6 Control Output panel is a scaled down 6 channel version of the 24 channel CO24 panel that is suitable for 2-way or 3-way stereo FOH or fill / delay system applications. CO6 is intended for use with a 2 in x 6 out (or 3 x 6) Digital Signal Processor (DSP) for the creation of a compact, modular drive rack or for standalone master amplifier rack packaging. DSP outputs are connected to the 6x female XLR patch bay on the rear side of the CO6 panel and these outputs are in turn assigned to the front panel 19-pin CACOM connector. This provides a 6 channel multicore return snake system when used with a standard 30 metre DOM30 (Cross Link) cable. For longer cable runs, multiple DOM30 cables can be extended using the DOMP adapter (19-pin male-male CACOM adapter). The CO6 Control Output panel allows for maximum flexibility while providing a scaleable architecture that can be used for small, medium and even large system applications since it is compatible with the dV-DOSC and V-DOSC signal distribution strategy and cabling/connector standards. Figure 34: CO6 Control Output Panel L-ACOUSTICS V-DOSC Manual Version 4 6/29/2005 Page 50 of 158 1.13 APPROVED DIGITAL SIGNAL PROCESSORS Digital signal processing units supported by L-ACOUSTICS for V-DOSC include: XTA DP224, XTA DP226 (or DP6i = fixed install version of the DP226), BSS FDS 366 (Omnidrive Compact Plus), BSS Soundweb and Lake Contour. OEM factory presets for these DSP units are distributed via PCMCIA Card (excluding XTA DP6i, BSS Soundweb and Lake Contour – OEM presets for these units are downloaded via computer) and are available from L-ACOUSTICS France, L-ACOUSTICS US, L-ACOUSTICS UK or your local distributor. Preset libraries and upgrades can also be downloaded from www.l-acoustics.com. Since the XTA DP226 is a 2 input x 6 output unit, the DP224 is 2 x 4, the Lake Contour is 2 x 6 and the BSS 366 is 3 x 6, exact internal wiring of your FOH drive rack and DSP output channel assignments will vary depending on the selected processor and the application. Carefully consider your flexibility requirements before selecting the number and type of DSP units to specify. For full details on the operational and technical aspects of these DSP units, please refer to their respective user manuals (www.lake.com.au, www.xta.co.uk, www.bss.co.uk ). NOTE: ALWAYS REFER TO THE PRESET DESCRIPTION SHEET FOR YOUR DSP WHEN SELECTING PRESETS AND CONFIGURING YOUR DRIVE RACK. 1.14 OEM FACTORY PRESETS OEM factory presets are intended to serve as a reference for all Qualified V-DOSC Technicians and Certified V-DOSC Engineers. According to L-ACOUSTICS company policy, key parameters are software-protected and preset data or passwords are not communicated in order to preserve quality control, confidentiality and to maintain the integrity of presets as part of the V-DOSC standard. A lot of engineering and real-world testing goes into determining optimum V-DOSC presets – detailed polar measurements and weighted spatial averaging are used to determine component equalization, crossover points and time alignment delays, for example. As a result, V-DOSC presets give the user an optimum starting point – system tuning should be done using band attenuation, subwoofer time alignment and system equalization using input parametric filters – not by altering presets - for the following reason: Without proper instrumentation and spatial averaging, adjustments made at one location (e.g. the mix position) are not optimum at all other locations within the defined coverage pattern of the system. When made by ear, such adjustments are often misguided – the user may be in a local room mode (low frequency pressure maximum or minimum) and/or may be hearing a cancellation or addition due to crossover misalignment that sounds good at that specific location but what about all others? Meanwhile, a better result could have been achieved while preserving the power response of the system (and satisfying WST conditions) by using the correct OEM factory preset and a simple equalization or output channel gain adjustment or correct time alignment of subwoofers or … The bottom line is that making sure that V-DOSC is used properly is in everyone’s best interest and it is up to the Qualified V-DOSC Technician and Certified V-DOSC Engineer to maintain quality control standards. Quality control starts with a good sound design concept then includes detailed coverage simulation using ARRAY or SOUNDVISION to determine installation parameters, accurate installation, correct preset selection and a solid methodology for system tuning. Restricting access to presets is in no way meant to restrict the creative process – on the contrary, the overall systems approach is intended to enhance it by ensuring quality control and repeatability. L-ACOUSTICS V-DOSC Manual Version 4 6/29/2005 Page 51 of 158 1.15 V-DOSC PRESETS Preset selection depends on many parameters including the V-DOSC array plus subwoofer configuration, musical program and personal taste of the sound engineer. In general, ''LO'' presets are the "smoothest" while ''HI'' presets are "brighter" (LO and HI refer to differences in the amount of HF shelving equalization applied to the high section). When used standalone (without subwoofers), two types of stereo 3-way presets are available (X and INFRA). There are four basic operating modes when V-DOSC is used with SB218 subwoofers as a 4-way system (X, XAUX, INFRA, 4W) and for extra impact, dV-SUB subwoofers can be added to create a 5-way system (X, INFRA modes). A summary of operating bandwidths for the various presets is given in Table 9. Individual presets are discussed in the following section along with further details concerning LO/HI equalization, subwoofer time alignment techniques and sub/low gain scaling procedures. Table 9: SUB / LOW OPERATING BANDWIDTH SUMMARY 3-WAY PRESETS PRESET V-DOSC LOW 3W INFRA 60 – 200 Hz + LF shelving eq 3WX 30 – 200 Hz + LF shelving eq 4-WAY PRESETS PRESET SB218 V-DOSC LOW INFRA 27 – 60 Hz 60 – 200 Hz + LF shelving eq 4W 27 – 80 Hz 80 – 200 Hz X 27 – 200 Hz 30 – 200 Hz + LF shelving eq X AUX 27 – 80 Hz (inverted) 30 – 200 Hz + LF shelving eq 5-WAY PRESETS (FLOWN dV-SUBs) PRESET SB218 dV-SUB V-DOSC LOW 5W INFRA 27 – 60 Hz 60 – 200 Hz 60 – 200 Hz + LF shelving eq 5W X 27 – 80 Hz (inverted) 30 – 200 Hz 30 – 200 Hz + LF shelving eq L-ACOUSTICS V-DOSC Manual Version 4 6/29/2005 Page 52 of 158 LO/HI PRESETS V-DOSC presets come in pairs (LO = smooth, HI = bright) and there is a 3 dB difference in HF shelving eq between LO and HI presets. In addition to the HF shelving eq difference, for V-DOSC V7 LO presets, the mid/high section output gains have been scaled up by 2 dB in order to: provide a flatter overall response curve for classical music and speech reinforcement; maximize A-weighted SPL output; obtain a better utilization of available power resources; optimize LO and HI presets for their target applications, i.e., LO = speech, classical music or proximity use and HI = rock / electronic music, long throw applications. Figure 35: Spectral balance for SUB/LOW versus MID/HI Sections Note: For LO presets, to obtain the spectral balance that was provided in V6 presets (and earlier), simply reduce the mid/high section output gains by 2 dB (to -5 dB / -5 dB) Figure 36: Spectral balance for SUB/LOW versus MID/HI Sections (V6 presets and earlier) 3-WAY STEREO PRESETS 3WX PRESET The 3WX preset features a 30 Hz high pass filter for the V-DOSC low section combined with optimized low frequency shelving equalization. With the 3WX preset, significant LF energy can be obtained from V-DOSC itself and for some applications (classical music or speech reinforcement), VDOSC can be used without additional subwoofers. For larger systems, there is the added benefit of improved low frequency pattern control since the larger the V-DOSC array, the lower in frequency that pattern control extends. The 3WX preset is intended for standalone applications without subwoofers or for AUX SUB drive using the SB218 DELAY ARC 80 Hz or SB218 LCR 80 Hz presets (subs with inverted polarity). 3W INFRA PRESET The 3W INFRA preset features a 60 Hz HPF for the V-DOSC low section along with optimized low section shelving equalization. Compared with the 3WX preset, 60 Hz high pass filtering provides additional over-excursion protection for the V-DOSC low section. The 3W INFRA preset is intended for standalone applications without subwoofers or for AUX SUB drive using the SB218 DELAY ARC 60 Hz or SB218 LCR 60 Hz presets (subs with positive polarity). L-ACOUSTICS V-DOSC Manual Version 4 6/29/2005 Page 53 of 158 4-WAY PRESETS SUBWOOFER TIME ALIGNMENT RECOMMENDATIONS As of the Version 7 preset library release, sub/low sections have been “pre-aligned” for 4-way and 5way presets in a closely coupled measurement configuration, i.e., ground plane measurements were conducted on a stack of 3 V-DOSC + 2 SB218 and all sub channel delays were pre-aligned for this configuration to obtain optimum summation. Therefore, when V-DOSC is flown and subs are ground stacked, all that is required is to measure the geometric physical path difference (at your reference point of choice) and add this to the standard pre-aligned sub delay. If using Bushnell Rangefinders to measure the path difference, the accuracy corresponds to +/- 1 meter so the geometric starting point can be varied by +/- 3 msec to verify optimum summation. Pre-alignment allows for quick and easy subwoofer time alignment for those who don’t have the measurement gear required to measure impulse responses. If you have the ability to measure impulse response, refer to the following figures for individual presets as a reference for time alignment. Basically, when you look at the separate impulse responses for sub and low sections, there is a “sine wave” signature that needs to be aligned. SUB/LOW GAIN SCALING PROCEDURES The Version 7 preset release has been optimized for a 1.5 : 1 cabinet ratio of V-DOSC : SB218 (for example, 3:2, 6:4, 9:6, 12:8, 15:10). As a starting point, output channel gains for a 3:2 V-DOSC:SB218 cabinet ratio are as follows (HI presets): BAND / PRESET SUB X X AUX INFRA 4W +4 dB +6 dB +6 dB +6 dB LOW 0 dB 0 dB +2 dB +2 dB MID -5 dB -5 dB -5 dB -5 dB HIGH -5 dB -5 dB -5 dB -5 dB Recommended gain scaling procedures for different cabinet ratios are summarized as follows: 2:1 V-DOSC:SB218 ratio scale subwoofer gain by +2 dB (or low section by -2 dB) 1.5:1 V-DOSC:SB218 ratio standard gains 1:1 V-DOSC:SB218 ratio scale low gain by +4 dB Following this gain scaling procedure according to cabinet ratio will provide a consistent sub/low spectral contour for all 4-way presets. The mid and high sections should then be scaled up or down equally according to the size of the array in order to compensate for low frequency coupling effects and to provide the overall desired tonal balance (see also Chapter 5 re: tuning). SUBWOOFER PRESETS (DELAY ARC, LCR) For large format configurations, a useful technique for processing a central ground-stacked horizontal line array of subwoofers is to use delay processing to electronically arc the subwoofer array. Two presets are provided with 60 Hz (SB218 = INFRA mode) and 80 Hz (SB218 = 4W or X AUX mode) crossover points. Another useful technique is to create a Left/Centre/Right (LCR) array of subwoofers where each block has the same number of subwoofers. For the case of the LCR sub array, L/R arrays can be oriented at 45 degrees offstage and instead of a single buildup between L/R arrays (as for L/R split stacks), with an LCR array there are two ''mini buildups'' between L/C and C/R that help to smooth out the centre build up that is obtained with L/R configurations. Two presets are provided with 60 Hz (SB218 = INFRA mode) and 80 Hz (SB218 = 4W or X AUX mode) crossover points and channel assignments that are suitable for implementing LCR sub arrays. L-ACOUSTICS V-DOSC Manual Version 4 6/29/2005 Page 54 of 158 INFRA PRESET The INFRA preset features a 60 Hz crossover between SB218 subwoofers and the V-DOSC low section. Main benefits obtained using the INFRA preset include: improved low frequency impact from the flown V-DOSC array, simplified time alignment since wavelengths are longer, and possible subjective preference for the subwoofers when run from 60 Hz on down since they become more of a delocalized effect. In addition, power resource simulations have shown that the INFRA preset provides an excellent repartition of resources between sub, low and high sections. The INFRA preset is intended for ground stacked subwoofer + flown V-DOSC configurations (physically separated). AUX SUB drive can be implemented using Input B / Output 6 or by using SB218 DELAY ARC 60 Hz or SB218 LCR 60 Hz presets (subs with positive polarity). INFRA PRESET: Align SB218 peak 1/dip1/peak 2 with V-DOSC low section Figure 37: Infra preset time alignment procedure 4W PRESET The 4W preset features an 80 Hz crossover between SB218 subwoofers and the V-DOSC low section. 4W presets provide a flatter overall response contour that is considered more suitable for classical music or speech reinforcement. Although the 80 Hz HPF for the V-DOSC low section does not fully utilize V-DOSC low end resources, subjectively, the low end can sound “tighter” due to the 80 Hz crossover point (but this is a matter of personal taste and program material). Venue acoustics can also be a factor in selecting between INFRA and 4W presets – in difficult, reverberant rooms, experimentation between these two presets is suggested. The 4W preset is intended for ground stacked subwoofer + flown V-DOSC configurations (physically separated). AUX SUB drive can be implemented using Input B / Output 6 or by using the SB218 DELAY ARC 80 Hz or SB218 LCR 80 Hz presets (subs with positive polarity). 4W PRESET: Align SB218 dip1/peak 2 with V-DOSC low section Figure 38: 4W preset time alignment procedure L-ACOUSTICS V-DOSC Manual Version 4 6/29/2005 Page 55 of 158 X PRESET The X preset features the same operating bandwidth for SB218 subwoofers and the V-DOSC low section (SB218 = 25-200 Hz, V-DOSC low = 30-200 Hz). X presets take full advantage of the available power resources of the V-DOSC low section and are intended for closely coupled applications where SB218 subwoofers are installed in close physical proximity to V-DOSC (flown beside or stacked directly underneath as an extension of the system). The X preset optimizes the overall sub/low output of the system and provides the best repartition of resources between sub, low and high sections. The X preset is intended for closely coupled subwoofer + V-DOSC configurations (minimum physical separation). AUX SUB drive can be implemented using Input B / Output 6 (see also X AUX below) or by using the SB218 DELAY ARC 80 Hz or SB218 LCR 80 Hz presets (subs with negative polarity). X PRESET: Align SB218 dip1/peak 2 with V-DOSC low section Figure 39: X preset time alignment procedure X AUX PRESET The X AUX preset extends the V-DOSC low section down to 30 Hz while ground stacked SB218s are run from 25-80 Hz with negative polarity to account for the phase shift due to the overlap in operating bandwidths (SB218 = 25-80 Hz with negative polarity, V-DOSC low = 30-200 Hz). The X AUX preset takes full advantage of V-DOSC low section resources and can be implemented using Input B / Output 6 for the standard X preset. Note: for 4+2 configurations (V-DOSC + ARCS or dV-DOSC), separate X AUX presets are provided for XTA and LAKE digital signal processors to allow for aux sub drive. The X AUX preset is intended for applications where SB218 subwoofers are ground stacked and physically separate from the flown V-DOSC. AUX SUB drive can also be implemented using the SB218 DELAY ARC 80 Hz or SB218 LCR 80 Hz presets (subs with negative polarity). X AUX PRESET: Align SB218 peak1/dip2 with V-DOSC low section (SB218: –ve polarity) Figure 40: X AUX preset time alignment procedure L-ACOUSTICS V-DOSC Manual Version 4 6/29/2005 Page 56 of 158 5-WAY PRESETS To enhance low end impact of the flown V-DOSC system, dV-SUB subwoofers can be flown beside V-DOSC (with minimum physical separation) and used in conjunction with ground-stacked SB218 subwoofers to create a 5-way system. The dV-SUBs are run over the same operating bandwidth as the V-DOSC low section and two preset types exist (X, INFRA). 5W INFRA PRESET The 5W INFRA preset features identical operating bandwidths for the V-DOSC low section and dVSUBs (60 – 200 Hz) while ground stacked SB218s are crossed over at 60 Hz in INFRA mode (25-60 Hz). Given the optimized V-DOSC LF shelving eq plus the additional contribution of the dV-SUBs, the impact of the flown system is significantly enhanced. The 5W INFRA preset is intended for configurations where SB218s are ground stacked and dV-SUBs are flown beside V-DOSC in a closely coupled configuration. For the 5W INFRA preset, AUX SUB drive can be implemented using the SB218 DELAY ARC 60 Hz or SB218 LCR 60 Hz presets (subs with positive polarity). 5W INFRA PRESET: Align SB218 peak1/dip2/peak2 with dV-SUB + V-DOSC low section Figure 41: 5W Infra preset time alignment procedure 5W X PRESET The 5W X preset features identical operating bandwidths for the V-DOSC low section and dV-SUBs (30 – 200 Hz) while ground stacked SB218s are run from 25-80 Hz with negative polarity to account for the phase shift due to the overlap in operating bandwidths. Given the optimized V-DOSC LF shelving equalization plus the additional contribution of flown dV-SUBs, the sub/low output of the flown system is maximized. The 5W X preset is intended for configurations where SB218s are ground stacked and dV-SUBs are flown beside V-DOSC in a closely coupled configuration. For the 5W X preset, AUX SUB drive can be implemented using the SB218 DELAY ARC 80 Hz or SB218 LCR 80 Hz presets (subs with negative polarity). 5W X: Align SB218 dip1/peak1/dip2 with dV-SUB+V-DOSC low section (SB218: -ve polarity) Figure 42: 5W X preset time alignment procedure L-ACOUSTICS V-DOSC Manual Version 4 6/29/2005 Page 57 of 158 GENERAL GUIDELINES REGARDING SYSTEM PROTECTION As supplied by L-ACOUSTICS, limiter thresholds for all V-DOSC OEM factory presets are initially set at +9, +8, +9 and +9 dBu for sub, low, mid and high sections, respectively. These limiter thresholds are matched to the input sensitivity of the L-ACOUSTICS LA48a (+9.5 dBu) and the recommended power handling for each section so that system protection is performed by a combination of the limiting circuits of both power amplifier and digital signal processor. NOTE: Setting limit thresholds to the amplifier input sensitivity is important since this calibrates the output meter display of the crossover to correspond to the amplifier clip point. This gives the system operator a direct visual indication as to how hard the system is being operated. The L-ACOUSTICS LA48a is an excellent power match for the V-DOSC system and power amplifier clip limiting circuitry is sonically very transparent. The LA48a clip limiter works by monitoring the output signal and comparing the distortion produced between the input and output of the amplifier. If the distortion exceeds 1% THD for any reason (voltage or current clipping), the limiter reduces the input signal proportionally (2 msec attack, 150 msec release). Under normal operation, LA48a clip limiting is inaudible and L-ACOUSTICS recommends leaving the Channel A and B clip limiters switched ''on'' (rear panel button depressed) at all times. Limiter thresholds are user accessible and exact settings will depend on individual engineer preferences and the type of music or application which, in turn, determines how hard the V-DOSC system is being operated. When additional protection is desirable, limiter thresholds can be lowered to match the rms power handling for individual sections according to the tables below: Table 10: Recommended Limiter Threshold Settings LIMITER THRESHOLDS CALIBRATED TO RECOMMENDED POWER AMPLIFICATION (2 x RMS Power Handling for Sub/Low/Mid and 4 x RMS = Peak Power Handling for Hi) ENCLOSURE NOM LOAD RMS POWER PEAK POWER REC'D POWER EQUIV Vrms dBu EQUIV LIMITER MODEL (ohms) (W) (W) (W) (volts) (32 dB gain) SETTING * SB218 4 1100 4400 2200 93.8 9.62 9 dBu V-DOSC LO 8 375 1500 750 77.5 7.95 8 dBu V-DOSC MID 8 600 2400 1200 98.0 10.00 9 dBu V-DOSC HI 16 300 1200 1200 138.6 13.01 9 dBU * AMP CLIP IS AT 9.5 dBu LIMITER THRESHOLDS CALIBRATED TO RMS POWER HANDLING ENCLOSURE NOM LOAD RMS POWER PEAK POWER RMS POWER MODEL (ohms) (W) (W) (W) EQUIV Vrms dBu EQUIV (volts) (32 dB gain) LIMITER SETTING SB218 4 1100 4400 1100 66.3 6.61 6 dBu V-DOSC LO 8 375 1500 375 54.8 4.94 5 dBu V-DOSC MID 8 600 2400 600 69.3 6.99 7 dBu V-DOSC HI 16 300 1200 300 69.3 6.99 7 dBU NOTE: The LA48 has a comparatively low input sensitivity (9.5 dBu) and, in practice, it can be necessary to equally scale up the individual crossover channel output gains in order to have sufficient drive capability (note: this has been done for Version 7 preset library release). It is far better to use the output drive capability of the DSP digital-to-analog converters (DACs) and analog output section rather than overdrive the input analog-to-digital converters (ADCs) so do not be afraid to increase the channel output gains uniformly in order to achieve a comfortable gain structure. Whether this is necessary will also depend on how ''hot or cold'' the FOH mix engineer likes to run his console. When in doubt, disconnect all loudspeaker cables and run pink noise from the console at nominal level through the crossover to the power amplifiers and examine crossover input/output levels, crossover limiter indicators and amplifier clip indicators to verify system protection and gain structure. L-ACOUSTICS V-DOSC Manual Version 4 6/29/2005 Page 58 of 158 XTA DP224 V-DOSC PRESETS PRESET NAME PGM TYPE MEM OUT 1 (Source) OUT 2 (Source) OUT 3 (Source) OUT 4 (Source) V-DOSC i LO V-DOSC i HI V-DOSC 4W LO V-DOSC 4W HI V-DOSC X LO V-DOSC X HI 4-way (A) 4-way (A) 4-way (A) 4-way (A) 4-way (A) 4-way (A) 10 11 12 13 14 15 SB218 (A) SB218 (A) SB218 (A) SB218 (A) SB218 (A) SB218 (A) V-DOSC LO (A) V-DOSC LO (A) V-DOSC LO (A) V-DOSC LO (A) V-DOSC LO (A) V-DOSC LO (A) V-DOSC MID (A) V-DOSC MID (A) V-DOSC MID (A) V-DOSC MID (A) V-DOSC MID (A) V-DOSC MID (A) V-DOSC HI (A) V-DOSC HI (A) V-DOSC HI (A) V-DOSC HI (A) V-DOSC HI (A) V-DOSC HI (A) 3-way (A) + 1 (B) 3-way (A) + 1 (B) 3-way (A) + 1 (B) 3-way (A) + 1 (B) 16 17 18 19 V-DOSC LO (A) V-DOSC LO (A) V-DOSC LO (A) V-DOSC LO (A) V-DOSC MID (A) V-DOSC MID (A) V-DOSC MID (A) V-DOSC MID (A) V-DOSC HI (A) V-DOSC HI (A) V-DOSC HI (A) V-DOSC HI (A) SB218 (B) SB218 (B) SB218 (B) SB218 (B) 2-way stereo 2-way stereo 2-way stereo 2-way stereo 20 21 22 23 dV-DOSC LO (A) dV-DOSC LO (A) dV-DOSC LO (A) dV-DOSC LO (A) dV-DOSC HI (A) dV-DOSC HI (A) dV-DOSC HI (A) dV-DOSC HI (A) dV-DOSC LO (B) dV-DOSC LO (B) dV-DOSC LO (B) dV-DOSC LO (B) dV-DOSC HI (B) dV-DOSC HI (B) dV-DOSC HI (B) dV-DOSC HI (B) dV-DOSC 3W 80 dV-SUB LO dV-DOSC 3W 80 dV-SUB HI dV-DOSC 3W 120 dV-SUB LO dV-DOSC 3W 120 dV-SUB HI 3-way (A) + 1 (B) 3-way (A) + 1 (B) 3-way (A) + 1 (B) 3-way (A) + 1 (B) 24 25 26 27 dV-SUB (A) dV-SUB (A) dV-SUB (A) dV-SUB (A) dV-DOSC LO (A) dV-DOSC LO (A) dV-DOSC LO (A) dV-DOSC LO (A) dV-DOSC HI (A) dV-DOSC HI (A) dV-DOSC HI (A) dV-DOSC HI (A) dV-SUB (B) dV-SUB (B) dV-SUB (B) dV-SUB (B) dV 3W SB118 LO dV 3W SB118 HI dV 3WX SB118 LO dV 3WX SB118 HI 3-way (A) + 1 (B) 3-way (A) + 1 (B) 3-way (A) + 1 (B) 3-way (A) + 1 (B) 28 29 30 31 SB118 (A) SB118 (A) SB118 (A) SB118 (A) dV-DOSC LO (A) dV-DOSC LO (A) dV-DOSC LO (A) dV-DOSC LO (A) dV-DOSC HI (A) dV-DOSC HI (A) dV-DOSC HI (A) dV-DOSC HI (A) SB118 (B) SB118 (B) SB118 (B) SB118 (B) dV 3W SB218 LO dV 3W SB218 HI dV 3WX SB218 LO dV 3WX SB218 HI 3-way (A) + 1 (B) 3-way (A) + 1 (B) 3-way (A) + 1 (B) 3-way (A) + 1 (B) 32 33 34 35 SB218 (A) SB218 (A) SB218 (A) SB218 (A) dV-DOSC LO (A) dV-DOSC LO (A) dV-DOSC LO (A) dV-DOSC LO (A) dV-DOSC HI (A) dV-DOSC HI (A) dV-DOSC HI (A) dV-DOSC HI (A) SB218 (B) SB218 (B) SB218 (B) SB218 (B) 2-way stereo 2-way stereo 36 37 ARCS LOW (A) ARCS LOW (A) ARCS HI (A) ARCS HI (A) ARCS LOW (B) ARCS LOW (B) ARCS HI (B) ARCS HI (B) 3-way (A) + 1 (B) 3-way (A) + 1 (B) 3-way (A) + 1 (B) 3-way (A) + 1 (B) 3-way (A) + 1 (B) 3-way (A) + 1 (B) 38 39 40 41 42 43 SB118 (A) SB118 (A) SB218 (A) SB218 (A) dV-SUB (A) dV-SUB (A) ARCS LOW (A) ARCS LOW (A) ARCS LOW (A) ARCS LOW (A) ARCS LOW (A) ARCS LOW (A) ARCS HI (A) ARCS HI (A) ARCS HI (A) ARCS HI (A) ARCS HI (A) ARCS HI (A) SB118 (B) SB118 (B) SB218 (B) SB218 (B) dV-SUB (B) dV-SUB (B) 2-way stereo 2-way stereo 44 45 112XT LOW (A) 115XT LOW (A) 112XT HI (A) 115XT HI (A) 112XT LOW (B) 115XT LOW (B) 112XT HI (B) 115XT HI (B) 4-way (A) 4-way (A) 2-way mono sub 2-way mono sub 46 47 48 49 SB218 DELAY 1 (A) SB218 DELAY 1 (A) SB218 (A+B) SB218 (A+B) SB218 DELAY 2 (A) SB218 DELAY 2 (A) SB218 (A) SB218 (A) SB218 DELAY 3 (A) SB218 DELAY 3 (A) MONO (A+B) MONO (A+B) SB218 DELAY 4 (A) SB218 DELAY 4 (A) SB218 (B) SB218 (B) V-DOSC i AUX LO V-DOSC i AUX HI V-DOSC X AUX LO V-DOSC X AUX HI dV-DOSC 2W 80 LO dV-DOSC 2W 80 HI dV-DOSC 2W 100 LO dV-DOSC 2W 100 HI ARCS 2W LO ARCS 2W HI ARCS 3W SB118 LO ARCS 3W SB118 HI ARCS 3W SB218 LO ARCS 3W SB218 HI ARCS 3W dV-SUB LO ARCS 3W dV-SUB HI 112XT FILL 115XT FILL SB218 DELAY ARC 60 HZ SB218 DELAY ARC 80 HZ SB218 LCR 60 Hz SB218 LCR 80 Hz Table 11: XTA DP224 Presets L-ACOUSTICS V-DOSC Manual Version 4 6/29/2005 Page 59 of 158 XTA DP226 V-DOSC PRESETS PRESET NAME V-DOSC 3W i LO V-DOSC 3W i HI V-DOSC 3WX LO V-DOSC 3WX HI PGM TYPE 3-way stereo 3-way stereo 3-way stereo 3-way stereo MEM 10 11 12 13 OUT 1 (Source) V-DOSC LO (A) V-DOSC LO (A) V-DOSC LO (A) V-DOSC LO (A) OUT 2 (Source) V-DOSC MID (A) V-DOSC MID (A) V-DOSC MID (A) V-DOSC MID (A) OUT 3 (Source) V-DOSC HI (A) V-DOSC HI (A) V-DOSC HI (A) V-DOSC HI (A) OUT 4 (Source) V-DOSC LO (B) V-DOSC LO (B) V-DOSC LO (B) V-DOSC LO (B) OUT 5 (Source) V-DOSC MID (B) V-DOSC MID (B) V-DOSC MID (B) V-DOSC MID (B) OUT 6 (Source) V-DOSC HI (B) V-DOSC HI (B) V-DOSC HI (B) V-DOSC HI (B) V-DOSC i LO V-DOSC i HI V-DOSC 4W LO V-DOSC 4W HI V-DOSC X LO V-DOSC X HI 5-way (A) + 1 (B) 5-way (A) + 1 (B) 5-way (A) + 1 (B) 5-way (A) + 1 (B) 5-way (A) + 1 (B) 5-way (A) + 1 (B) 14 15 16 17 18 19 SB218 (A) SB218 (A) SB218 (A) SB218 (A) SB218 (A) SB218 (A) V-DOSC LO (A) V-DOSC LO (A) V-DOSC LO (A) V-DOSC LO (A) V-DOSC LO (A) V-DOSC LO (A) V-DOSC MID (A) V-DOSC MID (A) V-DOSC MID (A) V-DOSC MID (A) V-DOSC MID (A) V-DOSC MID (A) V-DOSC HI (A) V-DOSC HI (A) V-DOSC HI (A) V-DOSC HI (A) V-DOSC HI (A) V-DOSC HI (A) FULL (A) FULL (A) FULL (A) FULL (A) FULL (A) FULL (A) SB218 (B) SB218 (B) SB218 (B) SB218 (B) SB218 (B) SB218 (B) V-DOSC i + dV LO V-DOSC i + dV HI V-DOSC 4W + dV LO V-DOSC 4W + dV HI V-DOSC X + dV LO V-DOSC X + dV HI 4-way (A) + 2 (B) 4-way (A) + 2 (B) 4-way (A) + 2 (B) 4-way (A) + 2 (B) 4-way (A) + 2 (B) 4-way (A) + 2 (B) 20 21 22 23 24 25 SB218 (A) SB218 (A) SB218 (A) SB218 (A) SB218 (A) SB218 (A) V-DOSC LO (A) V-DOSC LO (A) V-DOSC LO (A) V-DOSC LO (A) V-DOSC LO (A) V-DOSC LO (A) V-DOSC MID (A) V-DOSC MID (A) V-DOSC MID (A) V-DOSC MID (A) V-DOSC MID (A) V-DOSC MID (A) V-DOSC HI (A) V-DOSC HI (A) V-DOSC HI (A) V-DOSC HI (A) V-DOSC HI (A) V-DOSC HI (A) dV-DOSC LO (B) dV-DOSC LO (B) dV-DOSC LO (B) dV-DOSC LO (B) dV-DOSC LO (B) dV-DOSC LO (B) dV-DOSC HI (B) dV-DOSC HI (B) dV-DOSC HI (B) dV-DOSC HI (B) dV-DOSC HI (B) dV-DOSC HI (B) V-DOSC i AUX + dV LO V-DOSC i AUX + dV HI V-DOSC X AUX + dV LO V-DOSC X AUX + dV HI 5-way (A) + 1 (B) 5-way (A) + 1 (B) 5-way (A) + 1 (B) 5-way (A) + 1 (B) 26 27 28 29 V-DOSC LO (A) V-DOSC LO (A) V-DOSC LO (A) V-DOSC LO (A) V-DOSC MID (A) V-DOSC MID (A) V-DOSC MID (A) V-DOSC MID (A) V-DOSC HI (A) V-DOSC HI (A) V-DOSC HI (A) V-DOSC HI (A) dV-DOSC LO (A) dV-DOSC LO (A) dV-DOSC LO (A) dV-DOSC LO (A) dV-DOSC HI (A) dV-DOSC HI (A) dV-DOSC HI (A) dV-DOSC HI (A) SB218 (B) SB218 (B) SB218 (B) SB218 (B) V-DOSC i + ARCS LO V-DOSC i + ARCS HI V-DOSC 4W + ARCS LO V-DOSC 4W + ARCS HI V-DOSC X + ARCS LO V-DOSC X + ARCS HI 4-way (A) + 2 (B) 4-way (A) + 2 (B) 4-way (A) + 2 (B) 4-way (A) + 2 (B) 4-way (A) + 2 (B) 4-way (A) + 2 (B) 30 31 32 33 34 35 SB218 (A) SB218 (A) SB218 (A) SB218 (A) SB218 (A) SB218 (A) V-DOSC LO (A) V-DOSC LO (A) V-DOSC LO (A) V-DOSC LO (A) V-DOSC LO (A) V-DOSC LO (A) V-DOSC MID (A) V-DOSC MID (A) V-DOSC MID (A) V-DOSC MID (A) V-DOSC MID (A) V-DOSC MID (A) V-DOSC HI (A) V-DOSC HI (A) V-DOSC HI (A) V-DOSC HI (A) V-DOSC HI (A) V-DOSC HI (A) ARCS LO (B) ARCS LO (B) ARCS LO (B) ARCS LO (B) ARCS LO (B) ARCS LO (B) ARCS HI (B) ARCS HI (B) ARCS HI (B) ARCS HI (B) ARCS HI (B) ARCS HI (B) V-DOSC i AUX + ARCS LO V-DOSC i AUX + ARCS HI V-DOSC X AUX + ARCS LO V-DOSC X AUX + ARCS HI 5-way (A) + 1 (B) 5-way (A) + 1 (B) 5-way (A) + 1 (B) 5-way (A) + 1 (B) 36 37 38 39 V-DOSC LO (A) V-DOSC LO (A) V-DOSC LO (A) V-DOSC LO (A) V-DOSC MID (A) V-DOSC MID (A) V-DOSC MID (A) V-DOSC MID (A) V-DOSC HI (A) V-DOSC HI (A) V-DOSC HI (A) V-DOSC HI (A) ARCS LO (A) ARCS LO (A) ARCS LO (A) ARCS LO (A) ARCS HI (A) ARCS HI (A) ARCS HI (A) ARCS HI (A) SB218 (B) SB218 (B) SB218 (B) SB218 (B) V-DOSC+dV-SUB+SB218 i LO V-DOSC+dV-SUB+SB218 i HI V-DOSC+dV-SUB+SB218 X LO V-DOSC+dV-SUB+SB218 X HI 5-way (A) + 1 (B) 5-way (A) + 1 (B) 5-way (A) + 1 (B) 5-way (A) + 1 (B) 40 41 42 43 SB218 (A) SB218 (A) SB218 (A) SB218 (A) dV-SUB (A) dV-SUB (A) dV-SUB (A) dV-SUB (A) V-DOSC LO (A) V-DOSC LO (A) V-DOSC LO (A) V-DOSC LO (A) V-DOSC MID (A) V-DOSC MID (A) V-DOSC MID (A) V-DOSC MID (A) V-DOSC HI (A) V-DOSC HI (A) V-DOSC HI (A) V-DOSC HI (A) SB218 (B) SB218 (B) SB218 (B) SB218 (B) 6-way (A) 6-way (A) 2-way stereo+mono 2-way stereo+mono 44 45 46 47 SB218 (A) SB218 (A) SB218 (A) SB218 (A) SB218 (A) SB218 (A) FULLRANGE (A) FULLRANGE (A) SB218 (A) SB218 (A) SB218 (B) SB218 (B) SB218 (A) SB218 (A) FULLRANGE (B) FULLRANGE (B) SB218 (A) SB218 (A) SB218 MONO (A+B) SB218 MONO (A+B) SB218 (A) SB218 (A) MONO (A+B) MONO (A+B) SB218 DELAY ARC 60 HZ SB218 DELAY ARC 80 HZ SB218 LCR 60 Hz + FILL SB218 LCR 80 Hz + FILL Table 12: XTA DP226 Presets L-ACOUSTICS V-DOSC Manual Version 4 6/29/2005 Page 60 of 158 LAKE CONTOUR V-DOSC PRESETS OUT 1 (Source) OUT 2 (Source) OUT 3 (Source) OUT 4 (Source) OUT 5 (Source) V-DOSC LO (A) V-DOSC LO (A) V-DOSC LO (A) V-DOSC LO (A) V-DOSC LO (A) V-DOSC LO (A) V-DOSC MID (A) V-DOSC MID (A) V-DOSC MID (A) V-DOSC MID (A) V-DOSC MID (A) V-DOSC MID (A) V-DOSC HI (A) V-DOSC HI (A) V-DOSC HI (A) V-DOSC HI (A) V-DOSC HI (A) V-DOSC HI (A) V-DOSC LO (B) V-DOSC LO (B) V-DOSC LO (B) V-DOSC LO (B) V-DOSC LO (B) V-DOSC LO (B) V-DOSC MID (B) V-DOSC MID (B) V-DOSC MID (B) V-DOSC MID (B) V-DOSC MID (B) V-DOSC MID (B) 4-WAY MODULES V-DOSC i LO V-DOSC i HI V-DOSC 4W LO V-DOSC 4W HI V-DOSC X LO V-DOSC X HI SB218 (A) SB218 (A) SB218 (A) SB218 (A) SB218 (A) SB218 (A) V-DOSC LO (A) V-DOSC LO (A) V-DOSC LO (A) V-DOSC LO (A) V-DOSC LO (A) V-DOSC LO (A) V-DOSC MID (A) V-DOSC MID (A) V-DOSC MID (A) V-DOSC MID (A) V-DOSC MID (A) V-DOSC MID (A) V-DOSC HI (A) V-DOSC HI (A) V-DOSC HI (A) V-DOSC HI (A) V-DOSC HI (A) V-DOSC HI (A) 4+2 MODULES V-DOSC X + dV LO V-DOSC X + dV HI SB218 (A) SB218 (A) V-DOSC LO (A) V-DOSC LO (A) V-DOSC MID (A) V-DOSC MID (A) V-DOSC HI (A) V-DOSC HI (A) 3-WAY MODULES (continued) V-DOSC 3W i LO V-DOSC 3W i HI V-DOSC 3W 80 Hz LO V-DOSC 3W 80 Hz HI V-DOSC 3WX LO V-DOSC 3WX HI +2 MODULES (OUTPUTS 5/6) AUX ARCS 2W LO ARCS 2W HI 112XT FILL 112XT FRONT 115XT FILL 115XT FRONT 115XT HiQ FILL 115XT HiQ FRONT dV-DOSC 2W 80 LO dV-DOSC 2W 80 HI dV-DOSC 2W 100 LO dV-DOSC 2W 100 HI 5+1 MODULES V-DOSC i LO V-DOSC i HI V-DOSC 4W LO V-DOSC 4W HI V-DOSC X LO V-DOSC X HI V-DOSC i AUX + dV LO V-DOSC i AUX + dV HI V-DOSC 4W AUX + dV LO V-DOSC 4W AUX + dV HI V-DOSC X AUX + dV LO V-DOSC X AUX + dV HI V-DOSC i AUX + ARCS LO V-DOSC i AUX + ARCS HI V-DOSC X AUX + ARCS LO V-DOSC X AUX + ARCS HI V-DOSC+dV-SUB+SB218 i LO V-DOSC+dV-SUB+SB218 i HI V-DOSC+dV-SUB+SB218 X LO V-DOSC+dV-SUB+SB218 X HI FULL (B) ARCS LO (B) ARCS LO (B) 112XT LO (B) 112XT LO (B) 115XT LO (B) 115XT LO (B) 115XT HiQ LO (B) 115XT HiQ LO (B) dV-DOSC LO (B) dV-DOSC LO (B) dV-DOSC LO (B) dV-DOSC LO (B) SB218 (A) SB218 (A) SB218 (A) SB218 (A) SB218 (A) SB218 (A) V-DOSC LO (A) V-DOSC LO (A) V-DOSC LO (A) V-DOSC LO (A) V-DOSC LO (A) V-DOSC LO (A) V-DOSC LO (A) V-DOSC LO (A) V-DOSC LO (A) V-DOSC LO (A) SB218 (A) SB218 (A) SB218 (A) SB218 (A) V-DOSC LO (A) V-DOSC LO (A) V-DOSC LO (A) V-DOSC LO (A) V-DOSC LO (A) V-DOSC LO (A) V-DOSC MID (A) V-DOSC MID (A) V-DOSC MID (A) V-DOSC MID (A) V-DOSC MID (A) V-DOSC MID (A) V-DOSC MID (A) V-DOSC MID (A) V-DOSC MID (A) V-DOSC MID (A) dV-SUB (A) dV-SUB (A) dV-SUB (A) dV-SUB (A) V-DOSC MID (A) V-DOSC MID (A) V-DOSC MID (A) V-DOSC MID (A) V-DOSC MID (A) V-DOSC MID (A) V-DOSC HI (A) V-DOSC HI (A) V-DOSC HI (A) V-DOSC HI (A) V-DOSC HI (A) V-DOSC HI (A) V-DOSC HI (A) V-DOSC HI (A) V-DOSC HI (A) V-DOSC HI (A) V-DOSC LO (A) V-DOSC LO (A) V-DOSC LO (A) V-DOSC LO (A) V-DOSC HI (A) V-DOSC HI (A) V-DOSC HI (A) V-DOSC HI (A) V-DOSC HI (A) V-DOSC HI (A) dV-DOSC LO (A) dV-DOSC LO (A) dV-DOSC LO (A) dV-DOSC LO (A) dV-DOSC LO (A) dV-DOSC LO (A) ARCS LO (A) ARCS LO (A) ARCS LO (A) ARCS LO (A) V-DOSC MID (A) V-DOSC MID (A) V-DOSC MID (A) V-DOSC MID (A) FULL (A) FULL (A) FULL (A) FULL (A) FULL (A) FULL (A) dV-DOSC HI (A) dV-DOSC HI (A) dV-DOSC HI (A) dV-DOSC HI (A) dV-DOSC HI (A) dV-DOSC HI (A) ARCS HI (A) ARCS HI (A) ARCS HI (A) ARCS HI (A) V-DOSC HI (A) V-DOSC HI (A) V-DOSC HI (A) V-DOSC HI (A) SB218 (A) SB218 (A) SB218 (A) SB218 (A) SB218 (A) SB218 (A) SB218 (A) SB218 (A) SB218 (A) SB218 (A) 6 WAY MODULES SB218 DELAY ARC 60 HZ SB218 DELAY ARC 80 HZ Table 13: Lake Contour Presets L-ACOUSTICS V-DOSC Manual Version 4 dV-DOSC LO (B) dV-DOSC LO (B) 6/29/2005 Page 61 of 158 BSS FDS 366 V-DOSC PRESETS PRESET NAME USER PGM TYPE 3(A)+3(B) Mem 1 OUT 1 (Source) OUT 2 (Source) OUT 3 (Source) OUT 4 (Source) OUT 5 (Source) OUT 6 (Source) V 3W i LO V 3W i HI V 3WX LO V 3WX HI 3(A)+3(B) 3(A)+3(B) 3(A)+3(B) 3(A)+3(B) 2 3 4 5 V-DOSC LO (A) V-DOSC LO (A) V-DOSC LO (A) V-DOSC LO (A) V-DOSC MID (A) V-DOSC MID (A) V-DOSC MID (A) V-DOSC MID (A) V-DOSC HI (A) V-DOSC HI (A) V-DOSC HI (A) V-DOSC HI (A) V-DOSC LO (B) V-DOSC LO (B) V-DOSC LO (B) V-DOSC LO (B) V-DOSC MID (B) V-DOSC MID (B) V-DOSC MID (B) V-DOSC MID (B) V-DOSC HI (B) V-DOSC HI (B) V-DOSC HI (B) V-DOSC HI (B) V i LO V i HI V 4W LO V 4W HI V X LO V X HI 5(A)+1(B) 5(A)+1(B) 5(A)+1(B) 5(A)+1(B) 5(A)+1(B) 5(A)+1(B) 6 7 8 9 10 11 SB218 (A) SB218 (A) SB218 (A) SB218 (A) SB218 (A) SB218 (A) V-DOSC LO (A) V-DOSC LO (A) V-DOSC LO (A) V-DOSC LO (A) V-DOSC LO (A) V-DOSC LO (A) V-DOSC MID (A) V-DOSC MID (A) V-DOSC MID (A) V-DOSC MID (A) V-DOSC MID (A) V-DOSC MID (A) V-DOSC HI (A) V-DOSC HI (A) V-DOSC HI (A) V-DOSC HI (A) V-DOSC HI (A) V-DOSC HI (A) FULL (A) FULL (A) FULL (A) FULL (A) FULL (A) FULL (A) SB218 (B) SB218 (B) SB218 (B) SB218 (B) SB218 (B) SB218 (B) V i dV LO V i dV HI V 4W dV LO V 4W dV HI V X dV LO V X dV HI V XAUX dV L V XAUX dV H 4(A)+2(A) 4(A)+2(A) 4(A)+2(A) 4(A)+2(A) 4(A)+2(A) 4(A)+2(A) 1(C)+3(A)+2(A) 1(C)+3(A)+2(A) 12 13 14 15 16 17 18 19 SB218 (A) SB218 (A) SB218 (A) SB218 (A) SB218 (A) SB218 (A) SB218 (C) SB218 (C) V-DOSC LO (A) V-DOSC LO (A) V-DOSC LO (A) V-DOSC LO (A) V-DOSC LO (A) V-DOSC LO (A) V-DOSC LO (A) V-DOSC LO (A) V-DOSC MID (A) V-DOSC MID (A) V-DOSC MID (A) V-DOSC MID (A) V-DOSC MID (A) V-DOSC MID (A) V-DOSC MID (A) V-DOSC MID (A) V-DOSC HI (A) V-DOSC HI (A) V-DOSC HI (A) V-DOSC HI (A) V-DOSC HI (A) V-DOSC HI (A) V-DOSC HI (A) V-DOSC HI (A) dV-DOSC LO (A) dV-DOSC LO (A) dV-DOSC LO (A) dV-DOSC LO (A) dV-DOSC LO (A) dV-DOSC LO (A) dV-DOSC LO (A) dV-DOSC LO (A) dV-DOSC HI (A) dV-DOSC HI (A) dV-DOSC HI (A) dV-DOSC HI (A) dV-DOSC HI (A) dV-DOSC HI (A) dV-DOSC HI (A) dV-DOSC HI (A) V i ARC L V i ARC H V 4W ARC L V 4W ARC H V X ARC L V X ARC H V XAUX A L V XAUX A H 4(A)+2(B) 4(A)+2(B) 4(A)+2(B) 4(A)+2(B) 4(A)+2(B) 4(A)+2(B) 1(C)+3(A)+2(B) 1(C)+3(A)+2(B) 20 21 22 23 24 25 26 27 SB218 (A) SB218 (A) SB218 (A) SB218 (A) SB218 (A) SB218 (A) SB218 (A) SB218 (A) V-DOSC LO (A) V-DOSC LO (A) V-DOSC LO (A) V-DOSC LO (A) V-DOSC LO (A) V-DOSC LO (A) V-DOSC LO (A) V-DOSC LO (A) V-DOSC MID (A) V-DOSC MID (A) V-DOSC MID (A) V-DOSC MID (A) V-DOSC MID (A) V-DOSC MID (A) V-DOSC MID (A) V-DOSC MID (A) V-DOSC HI (A) V-DOSC HI (A) V-DOSC HI (A) V-DOSC HI (A) V-DOSC HI (A) V-DOSC HI (A) V-DOSC HI (A) V-DOSC HI (A) ARCS LO (B) ARCS LO (B) ARCS LO (B) ARCS LO (B) ARCS LO (B) ARCS LO (B) ARCS LO (B) ARCS LO (B) ARCS HI (B) ARCS HI (B) ARCS HI (B) ARCS HI (B) ARCS HI (B) ARCS HI (B) ARCS HI (B) ARCS HI (B) V DVS SB i L V DVS SB i H V DVS SB X L V DVS SB X H 5(A)+1(B) 5(A)+1(B) 5(A)+1(B) 5(A)+1(B) 28 29 30 31 SB218 (A) SB218 (A) SB218 (A) SB218 (A) dV-SUB (A) dV-SUB (A) dV-SUB (A) dV-SUB (A) V-DOSC LO (A) V-DOSC LO (A) V-DOSC LO (A) V-DOSC LO (A) V-DOSC MID (A) V-DOSC MID (A) V-DOSC MID (A) V-DOSC MID (A) V-DOSC HI (A) V-DOSC HI (A) V-DOSC HI (A) V-DOSC HI (A) SB218 (B) SB218 (B) SB218 (B) SB218 (B) DV 2W 80 LO DV 2W 80 HI DV 2W 100 L DV 2W 100 H 3(A)+3(B) 3(A)+3(B) 3(A)+3(B) 3(A)+3(B) 32 33 34 35 FULL (A) FULL (A) FULL (A) FULL (A) dV-DOSC LO (A) dV-DOSC LO (A) dV-DOSC LO (A) dV-DOSC LO (A) dV-DOSC HI (A) dV-DOSC HI (A) dV-DOSC HI (A) dV-DOSC HI (A) FULL (B) FULL (B) FULL (B) FULL (B) dV-DOSC LO (B) dV-DOSC LO (B) dV-DOSC LO (B) dV-DOSC LO (B) dV-DOSC HI (B) dV-DOSC HI (B) dV-DOSC HI (B) dV-DOSC HI (B) DV 3W 80 L DV 3W 80 H DV 3W 120 L DV 3W 120 H 3(A)+3(B) 3(A)+3(B) 3(A)+3(B) 3(A)+3(B) 36 37 38 39 dV-SUB (A) dV-SUB (A) dV-SUB (A) dV-SUB (A) dV-DOSC LO (A) dV-DOSC LO (A) dV-DOSC LO (A) dV-DOSC LO (A) dV-DOSC HI (A) dV-DOSC HI (A) dV-DOSC HI (A) dV-DOSC HI (A) dV-SUB (B) dV-SUB (B) dV-SUB (B) dV-SUB (B) dV-DOSC LO (B) dV-DOSC LO (B) dV-DOSC LO (B) dV-DOSC LO (B) dV-DOSC HI (B) dV-DOSC HI (B) dV-DOSC HI (B) dV-DOSC HI (B) DV 3W 118 L DV 3W 118 H DV 3X 118 L DV 3X 118 H 3(A)+3(B) 3(A)+3(B) 3(A)+3(B) 3(A)+3(B) 40 41 42 43 SB118 (A) SB118 (A) SB118 (A) SB118 (A) dV-DOSC LO (A) dV-DOSC LO (A) dV-DOSC LO (A) dV-DOSC LO (A) dV-DOSC HI (A) dV-DOSC HI (A) dV-DOSC HI (A) dV-DOSC HI (A) SB118 (B) SB118 (B) SB118 (B) SB118 (B) dV-DOSC LO (B) dV-DOSC LO (B) dV-DOSC LO (B) dV-DOSC LO (B) dV-DOSC HI (B) dV-DOSC HI (B) dV-DOSC HI (B) dV-DOSC HI (B) DV 3W 218 L DV 3W 218 H DV 3X 218 L DV 3X 218 H 5(A)+1(B) 5(A)+1(B) 5(A)+1(B) 5(A)+1(B) 44 45 46 47 SB218 (A) SB218 (A) SB218 (A) SB218 (A) dV-DOSC LO (A) dV-DOSC LO (A) dV-DOSC LO (A) dV-DOSC LO (A) dV-DOSC HI (A) dV-DOSC HI (A) dV-DOSC HI (A) dV-DOSC HI (A) SB218 (B) SB218 (B) SB218 (B) SB218 (B) dV-DOSC LO (B) dV-DOSC LO (B) dV-DOSC LO (B) dV-DOSC LO (B) dV-DOSC HI (B) dV-DOSC HI (B) dV-DOSC HI (B) dV-DOSC HI (B) ARCS 2W LO ARCS 2W HI 3(A)+3(B) 3(A)+3(B) 48 49 FULL (A) FULL (A) ARCS LOW (A) ARCS LOW (A) ARCS HI (A) ARCS HI (A) FULL (B) FULL (B) ARCS LOW (B) ARCS LOW (B) ARCS HI (B) ARCS HI (B) A 3W 118 LO A 3W 118 HI A 3W 218 LO A 3W 218 HI A 3W DVS LO A 3W DVS HI 3(A)+3(B) 3(A)+3(B) 3(A)+3(B) 3(A)+3(B) 3(A)+3(B) 3(A)+3(B) 50 51 52 53 54 55 SB118 (A) SB118 (A) SB218 (A) SB218 (A) dV-SUB (A) dV-SUB (A) ARCS LOW (A) ARCS LOW (A) ARCS LOW (A) ARCS LOW (A) ARCS LOW (A) ARCS LOW (A) ARCS HI (A) ARCS HI (A) ARCS HI (A) ARCS HI (A) ARCS HI (A) ARCS HI (A) SB118 (B) SB118 (B) SB218 (B) SB218 (B) dV-SUB (B) dV-SUB (B) ARCS LOW (B) ARCS LOW (B) ARCS LOW (B) ARCS LOW (B) ARCS LOW (B) ARCS LOW (B) ARCS HI (B) ARCS HI (B) ARCS HI (B) ARCS HI (B) ARCS HI (B) ARCS HI (B) 6-way (A) 6-way (A) 2(A)+2(B)+2(C) 2(A)+2(B)+2(C) 56 57 58 59 SB218 (A) SB218 (A) SB218 (A) SB218 (A) SB218 (A) SB218 (A) FULLRANGE (A) FULLRANGE (A) SB218 (A) SB218 (A) SB218 (B) SB218 (B) SB218 (A) SB218 (A) FULLRANGE (B) FULLRANGE (B) SB218 (A) SB218 (A) SB218 MONO (A+B) SB218 MONO (A+B) SB218 (A) SB218 (A) MONO (A+B) MONO (A+B) 218 DEL 60 218 DEL 80 218 LCR 60 218 LCR 80 Table 14: BSS FDS 366 Presets L-ACOUSTICS V-DOSC Manual Version 4 6/29/2005 Page 62 of 158 2. V-DOSC COVERAGE MODELING V-DOSC can be modelled using L-ACOUSTICS proprietary SOUNDVISION or ARRAY2004 software. Alternatively, custom DLLs for V-DOSC and dV-DOSC modeling are available for CATTAcoustics or EASE room acoustics modeling sofware. 2.1 COVERAGE IN THE HORIZONTAL PLANE V-DOSC has a coverage angle of 90° in the horizontal plane from 630 to 12.5k Hz with -6 dB points at +/- 45° off-axis. Horizontal coverage is independent of both the number of arrayed V-DOSC enclosures and the vertical configuration of the array. Due to the coplanar symmetric arrangement of components, the horizontal coverage pattern is symmetrical with respect to the 0° axis. Note: Although coverage angles are by definition determined by the -6 dB points, for most sound design applications the -3 dB coverage angle is more representative of the effective coverage of a system. For a VDOSC array of arbitrary size and shape, the –3 dB coverage angle is 70° from 630 to 12.5 kHz. This 70° coverage angle also defines the recommended limit for the relative angle between V-DOSC arrays, for example, when main L/R FOH V-DOSC arrays are oriented at zero degrees, offstage LL/RR arrays can be oriented at up to 70° relative to the main L/R arrays while maintaining a 6-7 metre separation between arrays in order to maximize overall system coverage while reducing the audible effects of interference (see also 3.1 Multiple Array Concepts). For sound design purposes, the horizontal coverage of V-DOSC is represented by using an isobaric (constant sound pressure) curve or isocontour that is obtained by taking the average of individual 1/3 octave polar plots over a 630 to 12.5k Hz bandwidth and then re-formatting the information on a linear scale. Unlike a standard polar plot, which corresponds to the SPL versus angle referenced to the on-axis level at a given frequency, the isocontour is more useful for practical coverage prediction. Note: The 630 – 12.5k Hz bandwidth is selected for the calculation of the V-DOSC isocontour since the horizontal coverage is stable over this frequency range due to the system’s coplanar symmetry. In addition, this bandwidth is representative of the perceived intelligibility and clarity of the system. The horizontal projection of the isocontour can then be used to predict the effective coverage of a VDOSC array in the horizontal plane. By overlaying or projecting the isocontour on a plan view of the venue, the sound designer can adjust the azimuth angle or panning of each array to get the best coverage results for a given audience layout. Other sound design issues that can be examined using the isocontour include: optimizing stereo imaging (represented by the amount of overlap between FOH L/R isocontours); front fill, stereo infill or offstage fill requirements; avoiding wall reflections. As seen in Figure 43a, at lower frequencies the isocontour becomes more omnidirectional although there is still pattern control maintained in the forward direction and approximately 20 dB of SPL rejection behind the array. For simulation purposes, horizontal isocontour data is provided in the H-ISOCONT sheet in ARRAY 2004. For further details on how to use this data in sound design please see Section 2.3. Figure 43a: Horizontal V-DOSC isocontour averaged from 630 Hz - 16 kHz L-ACOUSTICS V-DOSC Manual Version 4 Figure 43b: Horizontal V-DOSC isocontour averaged from 32 Hz - 630 Hz 6/29/2005 Page 63 of 158 2.2 COVERAGE IN THE VERTICAL PLANE Flat V-DOSC Array Flying or stacking V-DOSC enclosures with no angular spacing between enclosures produces a flat array that behaves acoustically as a continuous, isophasic line source that radiates a cylindrical wavefront. The cylindrical wavefront expands in the horizontal dimension only and is defined by the section of a vertical cylinder over a given distance. The height of this section corresponds to the height of the array (defined by the top wall of the top enclosure and the bottom wall of the bottom enclosure) and the coverage angle corresponds to the -6 dB horizontal coverage angle of V-DOSC (try to visualize a 90° cheese wedge or a piece of cake…) According to Fresnel analysis, a cylindrical wavefront is radiated by a line source array over a certain distance and then transforms into a spherical wavefront. In spherical mode, the wavefront expands in two dimensions, thus producing a SPL attenuation of 6 dB with doubling of distance. In cylindrical mode, the wavefront expands linearly with distance in the horizontal plane only, thus producing only 3 dB of attenuation when doubling the distance. The boundary between cylindrical and spherical wavefront propagation regions depends on the frequency and length of the line source (see Appendices 5 and 6 for more details). Since V-DOSC is, in essence, more efficient at projecting HF energy than LF, the net result is that for large distances, the tonal balance is progressively tilted by a HF enhancement. For longer throw distances, this tilt in tonal balance is offset by air absorption in open air situations and by both building material absorption and air absorption indoors, resulting in spectrally-balanced sound over the largest area possible. This is an important benefit of V-DOSC and WST since both SPL and tonal balance are more even with distance. Since the flat array configuration maximizes energy and intelligibility with distance, it should be used for long throw applications or in reverberant rooms. It is also common to use a flat array section at the top of a variable curvature array for improved throw in arena and stadium installations. In some cases, the upper enclosures of flown V-DOSC arrays are ratchet strapped together in order to provide such a flat long throw section. Curved V-DOSC Array A curved V-DOSC array (stacked or flown) is obtained by using angle straps to provide the desired angle between enclosures. To maintain the correct angles between enclosures, spacer blocks can be inserted between adjacent enclosures or, alternatively, rear ratchet straps can be used. If the angle between two adjacent V-DOSC enclosures is smaller than 5.5°, WST criteria are satisfied and the array behaves like a continuous, curved radiating ribbon. If the angle between enclosures exceeds 5.5°, WST criteria are no longer valid over the entire audio frequency range. Practically, a larger angle produces neither desirable nor predictable results - enclosures radiate individually and the benefits of collective coupling are lost (this is why angle straps are available only up to 5.5°). There are two types of curved V-DOSC array: constant curvature and variable curvature. For the first case, the angle between all adjacent enclosures is constant while for the second case, it varies within the defined range of 0° to 5.5°. L-ACOUSTICS V-DOSC Manual Version 2.00 29/06/05 V-DOSC MANUAL V4 0605.doc 64/158 Constant Curvature V-DOSC Array The constant curvature array is the simplest type of curved V-DOSC array. The vertical coverage angle is nominally (N-1) x A° where N is the number of enclosures in the array and A° is the constant angle between adjacent enclosures. For example, a constant curvature array of 8 V-DOSC enclosures can provide a maximum vertical coverage angle of (8-1) x 5.5° = 38.5° while still satisfying WST criteria. Figure 44 shows the influence of array curvature on the A-weighted and unweighted SPL for three different constant curvature arrays. (Note: this example is for the purpose of illustrating WST concepts - 2.5 and 2.14 degree angles are not available as standard angle strap values). 7.5 deg 15 deg 8 x 2.14 deg 15 deg Figure 44: Constant Curvature Array Examples. Comparing the two 4 enclosure arrays in Fig 44 (90° x 7.5° versus 90° x 15°), the same unweighted SPL will be observed at 30 m since both arrays contain the same number of 15” loudspeaker components and the unweighted SPL is largely determined by the amount of low frequency energy. However, a 3 dB increase in the A-weighted SPL will be observed for the 90° x 7.5° array since the same amount of mid/high energy is focused over half the vertical angle (i.e., 7.5° versus 15°). Comparing the two 90° x 15° coverage arrays (4 versus 8 enclosures), for the 8 enclosure array there will be a 6 dB increase in the unweighted SPL (since there are twice as many 15” loudspeaker components) and a 3 dB increase in the A weighted SPL (since twice as much mid/high energy is focused over the same solid angle). Finally, when comparing the 4 enclosure 90° x 7.5° array versus the 8 enclosure 90° x 15° array, it is interesting to note that it is possible to obtain the same A-weighted SPL using half the number of VDOSC enclosures. By focusing half the amount of mid/high energy (4 enclosures versus 8) over half the vertical angle (i.e., 7.5° versus 15°) the same A-weighted SPL is observed at 30 m for both arrays. Note: Since a constant curvature array radiates the same amount of energy in all directions over its nominal vertical coverage angle of (N-1) x A°, this type of array is of practical use only when the entire audience is sitting at the same distance from the array. However, in most venues, a V-DOSC array will have to cover an audience sitting at varying distances from the system and a constant curvature array would produce excessive SPLs in the first rows compared to the furthest rows (even if the vertical coverage angle is correctly matched to the audience geometry). Therefore, a constant curvature array is generally not useful for most applications. If this configuration is used, the gain of the amplifiers powering the high frequency section of the lower V-DOSC enclosures may need to be progressively reduced (however, such attenuation results in a global loss of energy). L-ACOUSTICS V-DOSC Manual Version 4 6/29/2005 Page 65 of 158 Variable Curvature V-DOSC Array Since individual V-DOSC enclosures radiate a flat, isophasic wavefront it is possible to focus energy in a given direction and increase the SPL by reducing the angles between enclosures. Conversely, by increasing the angle between enclosures (up to a maximum of 5.5°) it is possible to lower the SPL in another direction. This is the basic principle that allows energy to be distributed uniformly throughout the audience and variable curvature arrays are used to adapt both the coverage of the system and the SPL distribution to match the specific audience geometry according to WST Condition #4. Shaping the VERTICAL ISOCONTOUR is the key to Wavefront Sculpture Technology. SOUNDVISION and ARRAY 2004 simulation programs allow the designer to shape the vertical isocontour of a V-DOSC array. The following sections give more complete details on variable curvature array design. 2.3 V-DOSC COVERAGE MODELING USING ARRAY 2004 L-ACOUSTICS has developed a fast, easy-to-use prediction spreadsheet named ARRAY 2004 that operates under Microsoft Excel. ARRAY 2004 can predict coverage for flat, constant curvature or variable curvature V-DOSC arrays. The first four worksheets represent vertical cut views (section elevations) of the audience in the XZ plane and show a pseudo-3D representation of the intersection of the site angles for each enclosure with the audience (these intersections are termed enclosure site angle impacts). The direction of each enclosure is calculated according to the user-input angles. All angles are referenced with respect to the site angle of the top enclosure which should be aimed at the rearmost part of the audience. Cutview sheets are used to shape the vertical isocontour of either V-DOSC or dV-DOSC arrays to match the audience area. Note: Cutview sheets V-ARRAY1 and V-ARRAY are used to simulate V-DOSC arrays (including dV-DOSC upfill and/or downfill enclosures) while Cutview sheets dV-ARRAY1 and dV-ARRAY2 are used for dV-DOSC. The H-ISOCONT sheet displays the horizontal isocontour (see Section 2.1) of all defined arrays projected onto a plan view of the audience area in the XY plane. The SUB ARC sheet is used to calculate delay taps based on the physical configuration of a given subwoofer array for electronic arc processing (see Section 3.4) The MTD XT SPACING sheet can be used to help calculate optimum spacing for a given throw distance for distributed sound reinforcement using MTD or XT coaxial loudspeakers. The ROOM DIM sheet can be used to help calculate XZ cutview parameters based on room measurements. Room dimension calculation utilities are also available in the V-ARRAY1, V-ARRAY2, dV-ARRAY1 and dV-ARRAY2 sheets. In general, all input data should be entered into the cells in black. Results are displayed in red. Note: In order to run ARRAY, Macro Security should be set at “medium” in Excel, i.e., from the main menu bar select: Tools / Macro / Security / Security Level = Medium Note: A complete description of ARRAY2004 is beyond the scope of this manual. For further information, participation in a V-DOSC Training Seminar is recommended. L-ACOUSTICS V-DOSC Manual Version 4 6/29/2005 Page 66 of 158 CUTVIEW SHEETS Four cutview sheets are available: V-ARRAY1, V-ARRAY2, dV-ARRAY1, dV-ARRAY2. Cutview sheets V-ARRAY1 and V-ARRAY2 are used to simulate V-DOSC arrays (including dV-DOSC downfill or upfill enclosures) while dV-ARRAY1 and dV-ARRAY2 are used for simulating dV-DOSC. V-ARRAY1, V-ARRAY2 Input Data In AUDIENCE GEOMETRY cells, the designer enters the distances and elevations that define the audience area according to a section view along the main zero degree axis of the system (Cutview 1). The origin of the x-axis is referenced to the top rear corner of the top enclosure and the origin of the z-axis is at floor level, i.e., the x-axis is distance or range along the desired array axis and the z-axis is elevation above floor level. A second cutview can also be specified at an off-axis angle within the coverage pattern of the array (Cutview 2). Typically the second cutview is taken at 45° offstage (corresponding to the -6 dB coverage angle of V-DOSC) in order to confirm coverage throughout all parts of the audience. The ear height relative to floor level should be entered in the “listening level” cell (1.2 metres for a seated audience, 1.8 metres for standing). Figure 45: Defining Cutview Dimensions Although detailed blueprints are not necessarily required, the more information that can be obtained on a venue for defining the audience geometry, the better. Typically, plan and section views are available for most venues upon request. In situations where such documentation is not available, there are a number of options: use a tape measure or laser range-finder (such as the Leica Disto Basic or Hilti PD22) on site to perform dimensional measurements. Alternatively, L-ACOUSTICS has had good results with the Bushnell Yardage Pro 600 for field measurements. Apart from being useful for defining room geometry, this tool can also be used for determining delay time settings during system tuning, for locating laser beams during array trim and angle adjustment (and on the golf course on days off!). In some cases, tribune or balcony elevations can be determined by measuring individual step depth/height and then counting the number of steps to calculate the section depth/elevation. The ROOM DIM sheet is provided in ARRAY 2004 to assist in calculating cutview data from on site measurements. Room dimension calculation utilities are also available in the V-ARRAY1, V-ARRAY2, dV-ARRAY1 and dV-ARRAY2 sheets. (see Figure 46 for details). L-ACOUSTICS V-DOSC Manual Version 4 6/29/2005 Page 67 of 158 Note: The calculation of elevation Z2 is susceptible to errors in distance measurements and should always be verified with a tape measure or laser rangefinder whenever possible. Combined distance/angle measurements are typically more accurate than distance only measurements when calculating Z2. Figure 46: Parameters for the ROOM DIM Utility Sheet in ARRAY XZ cells can be used to enter additional room features such as balcony profiles, stage/proscenium details, FOH mix position, etc. In V-DOSC V-ARRAY1 or V-ARRAY2 cells, the designer enters the number of V-DOSC enclosures (16 maximum), the offset distance (in the x dimension), elevation of the bumper and the autofocus adjust angle. Normally, ARRAY 2004 automatically focuses the top V-DOSC enclosure to the rear of the audience geometry defined in Cutview 1. Autofocus adjust can be used to adjust the overall focus of the array and DOES NOT CORRESPOND TO THE TILT ANGLE OF THE V-DOSC BUMPER. For safety reasons, the maximum upward tilt angle for the array (given by Site #1 to next) is approximately 5 degrees. Results of detailed mechanical load calculations are displayed in the MECHANICAL DATA cells in ARRAY 2004 software to determine exact array tilt angle limits. NOTE: Always refer to the MECHANICAL DATA cells in ARRAY 2004 to verify that safe rigging conditions apply with respect to load distribution. The designer then chooses the angular spacing between enclosures from the available values in the pull down menu (0.75°, 1.3°, 2°, 3°, 4°, 5.5°). The red lines show the aiming directions of all enclosures, where each line is aligned with the bottom of its respective enclosure. Note that the displayed top block corresponds to the V-DOSC bumper, not the first enclosure of the V-DOSC array. dV-DOSC downfill or upfill enclosures can be conveniently simulated in V-ARRAY1 or V-ARRAY2 sheets using the available cells. Note: For dV-DOSC downfill simulation, autofocus adjust angle = 0 degrees corresponds to the first dVDOSC enclosure as tightly wrapped to the bottom V-DOSC (i.e., a relative site angle of 3.75 degrees). For dV-DOSC upfill simulation, an autofocus adjust angle of zero degrees corresponds to the first dV-DOSC enclosure as parallel to the site angle of the top V-DOSC. To obtain the 0 degree relative angle, the 3.75 degree hole on dV-ANGLEP1 must be used ruring installation. For upfill purposes, the 5.5 or 7.5 degree holes can also be selected on dV-ANGLEP1. When using 5.5 or 7.5 degree holes, set autofocus adjust = 1.75 degrees or 3.75 degrees, respectively. This is necessary to compensate for the 3.75 degree trapezoidal angle of the first dV-DOSC enclosure. L-ACOUSTICS V-DOSC Manual Version 4 6/29/2005 Page 68 of 158 Optimization Procedure After entering all input data (as described above), press the SCALING button to display the defined audience geometry and vertical coverage of the system. The cutview display shows the intersection of individual V-DOSC enclosure site angles with the audience (square blocks = site angle impacts) and represents the dispersion of SPL over the audience. In accordance with WST Condition #4, the best results are achieved when enclosure site angle impacts have equal spacing between them. In this case, the SPL decreases by 3 dB when doubling the distance (see Figure 47 for details). 20 18 16 14 12 10 8 6 4 2 0 -5 0 5 10 15 20 25 30 35 40 45 50 55 60 65 70 75 Figure 47 (a): Cutview showing non-constant enclosure site angle impact spacing for an 8 enclosure constant curvature V-DOSC array (3 degrees between all enclosures) 20 18 16 14 12 10 8 6 4 2 0 -5 0 5 10 15 20 25 30 35 40 45 50 55 60 65 70 75 Figure 47 (b): Cutview showing constant enclosure site angle impact spacing for an 8 enclosure variable curvature V-DOSC array (interenclosure angles = 0.75, 0.75, 0.75, 1.3, 2, 3, 5 degrees) Figure 47 (c): Plan view representation of non-constant (a) versus constant spacing (b) arrays L-ACOUSTICS V-DOSC Manual Version 4 6/29/2005 Page 69 of 158 Typically, optimum coverage is obtained iteratively by varying the height of the array and the enclosure angles (#1 to next, #2 to next, etc). The designer manually performs the optimization by visually referring to the spacing between impacts after making changes to the array. Once equal spacing has been achieved, the designer has successfully optimized the performance of the system by shaping the array’s vertical isocontour to match the audience geometry. Angle strap values, bottom enclosure elevation, site angles for top and bottom enclosures and trim height parameters are then recorded and used for installation of the system (see Output Data). Note: There is a difference between nominal angles for flown versus stacked arrays. When V-DOSC enclosures are stacked, the rear corners of cabinets are touching (due to gravity) and when flown there is a small gap. This difference (approx 1 cm over the depth of the cabinet) corresponds to an additional 1 degree for stacked versus flown systems. Therefore, to simulate stacked system coverage users should enter: 1.75, 2.3, 3.0, 4.0, 5.0, (do not use) instead of 0.75, 1.3, 2.0, 3.0, 4.0, 5.5. Output Data In the columns adjacent to where angle strap values are entered, the site angles (i.e., what you would measure if you put a digital inclinometer on each enclosure) and the wavepath (throw distance) for each enclosure are tabulated. Note: The site angle for enclosure #1 is essentially equal to the V-DOSC bumper site angle since the first enclosure is attached to the BUMP2 with minimum separation (within physical tolerance limits) using the BUMP angle strap. When the system is pointing down (negative site angle for #1) the top enclosure will close against the bumper - normally this is indicated by a negative 2-Angle Stress value in MECHANICAL DATA cells. When pointing upwards, there will be a small gap between the top V-DOSC enclosure and the bumper and therefore a difference between site angle #1 and the BUMP2 site angle. For this reason, always attach a laser and/or remote digital inclinometer to the top of V-DOSC enclosure #1, not the VDOSC bumper, in order to accurately measure the true focus of the top enclosure. Also tabulated are continuous A-weighted SPL estimates throughout the coverage of the array on an enclosure-by-enclosure basis. These dBA estimates are derived using a Fresnel-type calculation (see Appendix 2) using a 2 kHz reference frequency for a +4 dBu nominal input signal level (17 dB of headroom remains). Since the dBA calculation considers discrete V-DOSC enclosures (not sections of the continuous radiating line source) the resolution of this calculation is not sufficient for the user to attempt to design for constant dBA throughout the audience area. Users are advised to refer to the visual spacing between audience impacts and use the dBA estimates as a guideline only. In ARRAY GEOMETRICAL DATA cells, the physical dimensions of the array are displayed including: the Overall Depth of the Array (in the x dimension), the Overall Height of the Array (in the z dimension), and the Bottom Enclosure Elevation (rear corner of the bottom enclosure, referenced to floor level). The bottom enclosure elevation is used as a reference for installing the system and the Depth/Height information is useful to determine if the array will physically fit in a given space (scaffold bay, clearance to proscenium wall etc). Please see Figure 48 for further details. ACOUSTICAL PREDICTION data gives the unweighted SPL of the array at a user-selected distance (enter the distance in the black cell). This calculation is based on a 200 Hz reference frequency and correlates well with the unweighted SPL (as opposed to the A-weighted enclosure-by-enclosure SPL estimate). The peak unweighted SPL for a single array as well as an estimate of the peak unweighted SPL for 2 arrays is also given. Note: unweighted SPL estimates do not include additional contributions due to subwoofers. L-ACOUSTICS V-DOSC Manual Version 4 6/29/2005 Page 70 of 158 Figure 48: ARRAY 2004 Geometric Data for V-DOSC The Nominal Vertical Coverage Angle of the array is calculated as the sum of the entered interenclosure angles. This coverage becomes effective at F1 and for all frequencies higher than F1, the vertical coverage angle is less than this nominal vertical coverage angle. Above F2, the vertical coverage angle perfectly matches the nominal value. Some beaming (vertical coverage narrowing) may occur at F3, especially when the array is of constant curvature type. Further theoretical details related to the calculation of F1, F2 and F3 are given in Appendix 6. Finally, MECHANICAL DATA gives an estimate as to the rear versus front motor and rear rotating leg versus BUMP angle strap load distribution. These load distributions depend on the size and shape of the array as well as the array site angle (equal to Site #1) which, in turn, affect the location of the centre of gravity. L-ACOUSTICS V-DOSC Manual Version 4 6/29/2005 Page 71 of 158 Important things to note: 1) ARRAY WEIGHT includes V-DOSC enclosures, the V-DOSC BUMP2 bumper and angle strap weights only. Loudspeaker cables, steels and motor weights are not included. 2) Calculation of the REAR LOAD is within 20% error. When the rear motor load goes to zero, Maximum Site Angle is displayed. 3) Calculation of the FRONT LOAD is within 20% error. When the front motor load goes to zero, Minimum Site Angle is displayed. 4) 2-LEG STRESS refers to the stress on the V-DOSC BUMP2 bumper’s rotating legs and is accurate within 20% error. NOTE: the effect of rear ratchet straps is not taken into account. 5) 2-ANGLE STRESS refers to the stress on the top enclosure’s BUMP angle straps and is accurate within 20% error. If the angle strap load rating is exceeded there is a WARNING indication. Note: the effect of additional rear ratchet strapping is not taken into account. IF YOU ARE APPROACHING A WARNING INDICATION DO NOT OVERTIGHTEN RATCHET STRAPS UNDER ANY CIRCUMSTANCES. USE SPACER BLOCKS INSTEAD. For more details on ratchet strap issues, please refer to Section 4.2. dV-ARRAY1, dV-ARRAY2 Input Data Input data and the optimization procedures for dV-ARRAY1 and dV-ARRAY2 worksheets are the same as for V-ARRAY1 and V-ARRAY2 except for the following differences: 1) geometric data and XZ origins are different due to the front pivoting rigging system (see figure 49); 2) up to 24 dV-DOSC can be simulated; 3) mechanical data refers to the stress on rear and front pins for the top enclosure to dV-BUMP attachment (not including dV-SUB); 4) a pick point calculation utility is included for single point hangs; 5) angular spacing between enclosures is chosen from the following available values: 0°, 2°, 3.75°, 5.5°, 7.5° for dV-ANGLEP1 or 1°, 3°, 4.5°, 6.5° for dV-ANGLEP2. Note: The site angle for dV-DOSC enclosure #1 is equal to the dV-BUMP site angle provided that a 3.75° angle bar is used at the rear to connect enclosure #1 to the bumper. The 3.75° angle should be used to attach the top dV-DOSC to dV-BUMP – this allows a laser and/or remote digital inclinometer to be mounted on the dV-BUMP to measure the focus of the top enclosure. dV-DOSC PICK POINT UTILITY A pick point calculation utility is also included for single point dV-DOSC array hangs. Pick point holes are numbered 0 to 16 from front-to-rear on dV-BUMP. Hole 0 corresponds to the downstage motor point, holes 1-8 correspond to pick points on the central spreader bar and holes 9-16 correspond to pick points on the rear extension bar. The user varies the pick point number (from 0 to 16) and the bumper elevation while attempting to minimize the ‘’Site Angle Deviation wrt Target’’ value so that this value is as close to zero as possible. The user can then determine the appropriate pick point and whether the dV-BUMP extension bar is required or not. Note: Always verify the actual, obtained array tilt angle using an inclinometer during installation. If a 3.75 degree angle is used between the top dV-DOSC and dV-BUMP, then the angle of dV-BUMP corresponds to ‘Site #1 to Next’’ for the selected pick point. For further details on modelling dV-DOSC using ARRAY2004, please refer to the dV-DOSC User Manual. L-ACOUSTICS V-DOSC Manual Version 4 6/29/2005 Page 72 of 158 Figure 49: ARRAY 2004 Geometric Data for dV-DOSC L-ACOUSTICS V-DOSC Manual Version 4 6/29/2005 Page 73 of 158 H-ISOCONT SHEET The H-ISOCONT sheet is used to check horizontal coverage by mapping a projection of the horizontal isocontour of the defined V-DOSC and dV-DOSC arrays onto the user-defined audience area. By matching horizontal coverage to the audience area, H-ISOCONT can be used to check array placement / aiming and stereo imaging, as well as to determine whether offstage fill, front fill or center cluster arrays are required. Two audience areas can be defined and the coverage of up to four arrays displayed (4 x V-DOSC, 4 x dV-DOSC). Calculation assumptions include: 3 dB SPL reduction with doubling of distance (i.e., arrays have been designed for constant impact spacing using their respective Cutview sheets); anechoic or reflection-free conditions (direct sound only). Input Data Just as for cutview sheets, input data cells are in black and results are displayed in red. To define a plan view of the audience area, the user inputs x (range) and y (distance off-centre) coordinates in the Contour 1 and Contour 2 cells. A mirror image drawing scheme is used (so that only half the room needs to be defined) and after coordinates are entered, the display of the audience area is updated when the SCALING button is pressed. It is only necessary to define Contour 1, however, Contour 2 is useful to represent balconies, stage thrusts, proscenium opening, FOH location etc. When V-DOSC and dV-DOSC arrays are defined (in V-ARRAY1,2 and dV-ARRAY1,2 Cutview sheets respectively), they are automatically displayed in the H-ISOCONT sheet with the x location of each array referenced to the defined Offset Distance taken from each arrays' respective Cutview sheet. The parameter ''Isocontour at Distance (m)'' refers to the throw distance for the top enclosure of the respective array and is given relative to the defined Offset Distance. The user then enters the ''Console Output Signal (dBu)'' for each array, i.e., output level of the mixing desk (0 VU = +4 dBu) and the Continuous A-weighted SPL is tabulated, corresponding to the SPL that would be obtained along the isocontour for each array. The Console Output Signal can be increased until the amount of headroom available in the system goes to zero and the user has an indication as to the peak A-weighted SPL that will be available along the isocontour. Further increases in the Console Output Signal will produce a CLIP indication reflecting amplifier clip. The user can also define the y coordinates for each array (off-center distance) and the azimuth angle in degrees (i.e., aiming or panning angle of the array). Note: to simulate a centre cluster, simply set ''Y location'' equal to zero. Optimization Procedure Typically, the optimization procedure begins by using the V-ARRAY1, V-ARRAY2, dV-ARRAY1 or dVARRAY2 cutview sheets to determine the number of array enclosures, inter-enclosure angles, etc. HISOCONT is then used for adjustment of array separation and azimuth panning angles to ensure adequate audience coverage and stereo imaging at a desired A-weighted SPL in order to match coverage to the audience area. In some cases, when horizontal coverage is an important design issue, simulation can start with the H-ISOCONT sheet first in order to predetermine the 0 and 45 degree axes prior to more detailed cutview simulation. Output Data Output data is directly displayed as the projection of the horizontal isocontour on the defined audience area. The A-weighted SPL and amount of headroom in the system are given for each array. Note that the displayed isocontour for each array is terminated in a line that is referenced to where coverage starts for the bottom enclosure. Therefore, H-ISOCONT gives a direct indication as to the areas where coverage is lacking and offstage fill, center fill or delay clusters are required. The overlap between L, R arrays illustrates which portions of the audience will experience stereo imaging. Note: It is not possible to simulate the transition between dV-DOSC to V-DOSC isocontours in ARRAY 2004 when dV-DOSC is used for downfill or upfill in conjunction with V-DOSC. In order to simulate this transition, SOUNDVISION is recommended. L-ACOUSTICS V-DOSC Manual Version 4 6/29/2005 Page 74 of 158 CUTVIEW SHEET HORIZONTAL ISOCONTOUR SHEET Figure 50: ARRAY 2004 spreadsheet calculation example L-ACOUSTICS V-DOSC Manual Version 4 6/29/2005 Page 75 of 158 2.4 V-DOSC COVERAGE MODELING USING SOUNDVISION L-ACOUSTICS SOUNDVISION is a proprietary 3D software program dedicated to the modeling of the entire L-ACOUSTICS product line - including V-DOSC, dV-DOSC, KUDO, ARCS, XT and MTD enclosures. Designed with a convenient, intuitive graphical user interface, SOUNDVISION allows for the calculation of sound pressure level (SPL) and coverage mapping for complex sound system or venue configurations. Room geometry and loudspeaker locations are defined in 3D and simplified operating modes allow the user to work in 2D to rapidly enter data. According to user preference, either horizontal (plan) or vertical (cut) views can be selected to enter room coordinates or to define loudspeaker placement/aiming. SPL plus coverage mapping are then based on direct sound calculations over the defined audience geometry. SOUNDVISION features a user-friendly interface with multiple toolboxes that allow for convenient entry of room and loudspeaker data while at the same time displaying coverage or mapping results along with 2D Cutview, Target and Source Cutview information. All toolboxes can be displayed simultaneously, providing the user with a complete control interface that allows for rapid system optimization. Using sophisticated modeling algorithms, SOUNDVISION offers several levels of support. Due to its speed and ease-of-use, “Impact” mode is well-suited to the needs of touring sound engineers and touring sound companies. More detailed information is available in “SPL Mapping” mode, providing an invaluable tool for the audio consultant or sound designer. For the installer, the physical properties provided in “Mechanical Data” mode provide useful practical information for fixed installation applications. Impact mode coverage is based on the -6 dB directivity over a 1-10 kHz operating bandwidth (at 5 degree angular resolution) and allows for immediate visualization of system coverage and SPL distribution. Optimum SPL contours are highlighted within the displayed -6 dB coverage pattern (filled circles corresponding to the -3 dB coverage pattern) in order to facilitate the implementation of multiple source installations. For offstage LL/RR V-DOSC or dV-DOSC arrays (or distributed sound reinforcement design using coaxial loudspeakers), the goal is to align the filled circles in order to have even coverage. Note: V-DOSC geometric data is different in SOUNDVISION versus ARRAY 2004. In order to have consistent coordinate references for all L-ACOUSTICS products, the convention adopted for SOUNDVISION is that X=0 and bumper elevation coordinates are referenced to the front of the top V-DOSC and site angles are referenced to the centre of each enclosure. Please see figure 51 for details. For dV-DOSC, figure 49 still applies. Mapping mode provides a color-coded representation of the SPL distribution over the defined room geometry and allows for visualization of the coverage of individual loudspeakers as well as the interference between multiple loudspeakers. In mapping mode, the user can select individual 1/3 octave bandwidths, unweighted or A-weighted SPL, or any frequency range between 100 – 10k Hz. Typically the 1-10 kHz bandwidth SPL mapping is considered to provide a good representation of system performance since this frequency bandwidth is primarily responsible for perceived system intelligibility and clarity. To illustrate the V-DOSC coverage, Figure 52 shows SPL mappings at octave band frequencies for an array of 12 V-DOSC enclosures (angles top-to-bottom = 4,4,4,4,4,4,4,4,4,4,3). For this example, the V-DOSC array is perpendicular to a target plan having dimensions of 35 x 100 metres at a 30 metre throw distance (imagine the V-DOSC array firing at a large wall). Coverage is seen to be stable and well-defined above 1 kHz while becoming progressively more omnidirectional at lower frequencies. Figure 53 shows impact mode coverage and band-averaged SPL mappings for the array of 12 V-DOSC enclosures pictured in Fig. 52. Impact coverage provides a good representation of the octave band mappings seen in Fig. 52 for frequencies higher than 2 kHz. For this reason, impact mode is L-ACOUSTICS V-DOSC Manual Version 4 6/29/2005 Page 76 of 158 considered to provide a good indication as to the overall coverage of the array in terms of clarity and intelligibility. It is also interesting to compare the A-weighted, unweighted and 1-10 kHz SPL mappings of Figure 53 with the individual octave band mappings of Figure 52. The 1-10 kHz SPL mapping is seen to provide a good representation of the overall coverage of the array and also corresponds well with the coverage predicted in impact mode. The A-weighted SPL average provides a more strict representation of system coverage since there is more emphasis on higher frequencies while the unweighted mapping is more omnidirectional due to the inclusion of lower frequency information in the average. Note: For color versions of SOUNDVISION figures see the V-DOSC manual PDF file available for download on www.l-acoustics.com Note: A complete description of SOUNDVISION is beyond the scope of this manual. Please refer to the SOUNDVISION help file and for further information, participation in a V-DOSC or SOUNDVISION Training Seminar is recommended. Figure 51: SOUNDVISION Geometric Data for V-DOSC L-ACOUSTICS V-DOSC Manual Version 4 6/29/2005 Page 77 of 158 250 Hz 4 kHz 500 Hz 6.3 kHz 1 kHz 8 kHz 2 kHz 10 kHz Figure 52: Plan view SPL mappings at octave band frequencies for 12 V-DOSC (30 metre throw distance, enclosures perpendicular to target plane) L-ACOUSTICS V-DOSC Manual Version 2.00 29/06/05 V-DOSC MANUAL V4 0605.doc 78/158 Impact Coverage Unweighted SPL Map A Weighted SPL Map 1-10 kHz SPL Map Figure 53: Impact coverage and SPL mappings (unweighted, A-weighted, 1-10 kHz bandwidth) for 12 V-DOSC (30 metre throw distance, enclosures perpendicular to target plane) L-ACOUSTICS V-DOSC Manual Version 2.00 29/06/05 V-DOSC MANUAL V4 0605.doc 79/158 SOUNDVISION EXAMPLES A full description of SOUNDVISION is beyond the scope of this manual, however, two examples are presented in the following before turning to a more general description of V-DOSC sound design. SOUNDVISION STADIUM EXAMPLE The following SOUNDVISION example (Amsterdam Arena, NL) shows the coverage of different elements of a stadium system consisting of: four main arrays (15 V-DOSC + 3 dV-DOSC); four distributed front fill arrays (3 dV-DOSC); one centre cluster (6 dV-DOSC); eight distributed balcony fill arrays (6 dV-DOSC). LLL LL L C R RR 15 6 8 15 6 12 6 6 15 6 12 15 6 8 RRR DEL1 DEL2 DEL3 DEL4 DEL5 DEL6 DEL7 DEL8 6 6 6 6 6 6 6 6 60 78 46 V-DOSC dV-DOSC SB218 Figure 54a: Stadium example - rear perspective view of full system impact coverage Figure 54b: Stadium example - plan view of full system impact coverage L-ACOUSTICS V-DOSC Manual Version 4 6/29/2005 Page 80 of 158 FULL SYSTEM FOH + OFFSTAGE FILL: LL, L, R, RR FOH SYSTEM: L, R BALCONY FILL SYSTEM: 8 x 6 dV-DOSC OFFSTAGE FILL SYSTEM: LL, RR FRONT FILL SYSTEM: 4 x 3 dV-DOSC Figure 55: Stadium example - rear perspective view of 1-10 kHz SPL Mappings L-ACOUSTICS V-DOSC Manual Version 2.00 29/06/05 V-DOSC MANUAL V4 0605.doc 81/158 SOUNDVISION ARENA EXAMPLE The following SOUNDVISION example (Palais Omnisport de Paris Bercy – POPB – Paris, France) shows the coverage of different elements of an arena system consisting of: two main arrays (15 VDOSC + 3 dV-DOSC); two offstage fill arrays (12 dV-DOSC); eight distributed front fill enclosures (112XT). Figure 56: Arena example -rigging plot Figure 57: Arena example - plan view of full system impact coverage L-ACOUSTICS V-DOSC Manual Version 2.00 29/06/05 V-DOSC MANUAL V4 0605.doc 82/158 Figure 58: Arena example - rear perspective view of full system impact coverage Figure 59a: Arena example - rear perspective view of full system SPL map (1-10 kHz) L-ACOUSTICS V-DOSC Manual Version 2.00 29/06/05 V-DOSC MANUAL V4 0605.doc 83/158 Full System dV-DOSC Offstage LL/RR FOH L/R 112XT Front Fill System Figure 59b: Arena example – plan view of 1-10 kHz SPL mappings L-ACOUSTICS V-DOSC Manual Version 2.00 29/06/05 V-DOSC MANUAL V4 0605.doc 84/158 3. SOUND DESIGN 3.1 STACKED OR FLOWN? Although flown systems are generally preferred, there are good arguments to support both solutions and, in some cases, the choice is dictated by the venue itself, i.e., sometimes it isn’t possible to fly the system since rigging points are not available or weight restrictions apply. Stacked Systems improve image localization for the audience since the perceived sound image is lowered to stage level. This is beneficial in small venues and stacking also offers more low frequency energy due to enhanced ground coupling. Since V-DOSC has less SPL attenuation from front-to-rear of the audience than traditional systems, this allows a stacked system to project further and provide better underbalcony penetration in theatres and clubs, for example. In addition, for geometric reasons a stacked system can provide more extended vertical coverage than a flown system - this can be seen using ARRAY 2004 or SOUNDVISION and is simply related to the geometry of the audience to be covered. For example, distributed field level stacked systems are an excellent solution for stadium sound reinforcement – fewer enclosures are required to obtain the necessary audience coverage vertically and, as an additional benefit, the subjective image is lowered to field level. Stacking is a good solution for applications where up to 6 V-DOSC enclosures can optimize audience coverage, low frequency response and image localization. Flown Systems are the best solution to achieve uniform sound pressure level and even tonal balance over the audience provided that the number of arrayed enclosures is sufficient to provide the necessary front-to-rear coverage and that WST Condition 4 is respected (i.e., inter-enclosure angles are selected to obtain equal spacing between enclosure site angle impacts over the audience). Flying is also an excellent solution for sightline problems that commonly occur. Typically, the system trim height should be selected to provide a 4:1 ratio between the throw distances to the furthest and closest members of the audience. Such a trim height tends to make it easier to satisfy WST Condition 4 and thus obtain optimum SPL distribution. Offstage coverage is another consideration when selecting array trim height – in general, the best results are obtained when the top V-DOSC enclosure has a zero degree site angle and is flown at the same height as the highest audience elevation. For flown systems, additional speakers are typically necessary to cover downfill, center fill, front fill or offstage fill requirements. Good candidates include dV-DOSC, ARCS, KUDO or additional V-DOSC arrays (see Multiple Arrays). Other distributed front fill or stereo infill enclosures include: L-ACOUSTICS MTD108a, MTD112b, MTD115b, 112XT, 115XT or 115XT HiQ loudspeakers. Hybrid Stacked/Flown Systems are a good solution for theatrical installations where the flown system provides balcony (circle) and upper balcony (upper circle) coverage and the stacked system provides floor (orchestra level) coverage. Most theatres have significant vertical coverage requirements due to a relatively short throw distance of 20-35 metres combined with a high audience elevation of 12-15 metres in the upper circle. In addition, many theatres have rigging points with weight load restrictions that limit the number of loudspeakers that can be flown. For these reasons, the hybrid stacked/flown sound design approach is practical in reducing the number of enclosures required and at the same time this sound design approach can help improve image localization (especially with the addition of centre cluster, front fill and underbalcony delay systems combined with judicious time alignment and relative level adjustment between all elements of the sound design). Note: For hybrid stacked/flown systems, the trim height of the flown system should be selected so that the bottom V-DOSC cabinet has a zero degree site angle and is at the same height as the listening level for the first row of the balcony audience. This helps avoid reflections from the balcony face while providing more even off-axis coverage for the first row of the balcony. L-ACOUSTICS V-DOSC Manual Version 2.00 29/06/05 V-DOSC MANUAL V4 0605.doc 85/158 Stacking Guidelines The stacking system is rated for a maximum of 6 V-DOSC enclosures - always use angle straps between enclosures For stacked systems, the well-defined vertical coverage of V-DOSC allows little margin for error. Whether the audience is standing or seated is an important consideration and the system should be stacked on a riser of suitable height (or on top of subwoofers) so that the system is higher than the listening level of the first row of the audience. In addition, the entire array should be tilted downwards (by adjusting rear BUMP2 screwjacks) to obtain better high frequency penetration into the audience. If the bottom of the array is too low, the first rows receive too much SPL and audience members directly in front of the system will shadow the following rows acoustically. An additional technique to avoid build up for the closest members of the audience is to install the system further upstage – the initial distance-attenuation loss to the first few rows will help provide better SPL distribution throughout the entire audience without the need to attenuate the mid or high sections of lower enclosures (which will affect the overall output of the system). To summarize, the bottom of the stacked array should be higher than the audience (more than 2 m or 6.5 ft above floor level), with the lowest enclosure tilted downwards as necessary. For more details on stacking procedures, please refer to Section 4.1. Note: When simulating stacked system coverage in ARRAY2004 or SOUNDVISION, account for the one degree difference in angle strap values for stacked versus flown systems (see Section 2). Figure 60: Illustration of Stacking Guidelines Figure 61: Stacked system example (Puy du Fou, France) L-ACOUSTICS V-DOSC Manual Version 4 6/29/2005 Page 86 of 158 Flying Guidelines The rigging system is rated for a maximum of 16 V-DOSC or 15 V-DOSC + 3 dV-DOSC Particular attention must be paid to the height at which the array is flown when predicting the vertical coverage in ARRAY 2004 or SOUNDVISION. Typically, system trim height should be selected to provide a 4:1 ratio between the throw distances to the furthest and closest members of the audience and, as a rough guideline, the elevation of a 12 enclosure arena system is typically between 11-15 m (36-50 ft), depending on the exact geometry of the audience. When simulating system coverage using ARRAY 2004 or SOUNDVISION, the goal is to select inter-enclosure angles so that equal spacing is obtained between enclosure site angle impacts over the audience geometry (WST Condition 4). Note: inter-enclosure angles should not be selected by considering the on-axis cutview only – always consider the audience coverage off the main axis, especially from 35° to 45° on the offstage side. It is important to check that you are not lacking in offstage coverage and require additional fill systems (see Multiple Arrays). It is also common to have two sections of the audience area that have different slopes, for example, the transition between floor level and the tribune in arenas. In this case, coverage of the areas at the transition between the two slopes should be examined carefully and angles selected accordingly. Finally, to effectively complete any V-DOSC installation - stacked or flown - during the actual installation, it is important to verify that the parameters calculated in ARRAY 2004 or SOUNDVISION have been implemented correctly. Tools that are useful for this purpose are described in Chapter 6.4. Detailed flying and system focussing procedures are described in Section 4.2. Figure 62: Illustration of flying guidelines Figure 63: Flown V-DOSC System (Coldplay World Tour 2001-2002- sound design T Smith) L-ACOUSTICS V-DOSC Manual Version 4 6/29/2005 Page 87 of 158 3.2 ACHIEVING OPTIMUM COVERAGE ARRAY 2004 or SOUNDVISION are convenient simulation tools for optimizing the coverage for a complete system consisting of multiple V-DOSC arrays and complementary fill systems. Parameters for each array such as spatial coordinates, azimuth angle (i.e., horizontal panning), number of enclosures and inter-enclosure angles are entered by the sound designer and individual elements of the sound design are optimized with respect to the vertical cutview geometry of the audience in accordance with WST Condition 4. In the horizontal plane, the displayed isocontours (ARRAY2004) or impact coverage (SOUNDVISION) should overlap to a certain extent and cover the majority of the audience. For the amount of overlap see below for a discussion of the tradeoffs between stereo perception versus intelligibility. The remaining uncovered areas should be covered with fill speakers such as dV-DOSC, ARCS, KUDO or additional V-DOSC arrays. Additional distributed front fill or stereo infill systems using L-ACOUSTICS MTD108a, MTD112b, MTD115b, 112XT, 115XT or 115XT HiQ loudspeakers are also highly effective in complementing V-DOSC system coverage. 3.2.1 THE LEFT/RIGHT CONFIGURATION Although not the best technical solution, the left/right configuration meets both visual and practical criteria and is most commonly used. V-DOSC is a dramatic improvement over conventional systems but, by nature, the stereo imaging of any left/right system is limited for a large part of the audience and there are compromises with respect to the consistency of tonal balance in the horizontal plane. The biggest problem for any left/right system is non-uniformity of tonal balance horizontally. Typically, an excess of low frequency energy builds up in the middle, accompanied by reduced intelligibility. The net result is that the system sounds bass-heavy or “thick” in the middle, “harsher or more aggressive” when directly on-axis with one side of the system, and “thin” offstage. These effects are due to the path length difference interference effects that are inherent in any left/right system which, in turn, produce frequency- and position-dependent peaks and dips. Tradeoffs Between Intelligibility and Stereo Imaging The left/right configuration has the advantage of being able to reproduce effects of spatialization and localization. The area over which these effects is audible depends on the separation of the two arrays and the orientation of the left array with respect to the right array, defined by the intersection of the isocontours for both arrays. The more the arrays are rotated or panned onstage (“toed in”), the greater the area over which stereo imaging is experienced. The less they are rotated onstage and the more they are aimed offstage, the less stereo imaging is audible. Typically, for concert applications L/R arrays are separated 15-20 meters and used at zero degrees or panned 2-5 degrees offstage. Experience has shown that this provides the best tradeoff between stereo imaging, evenness of horizontal coverage and reduction of the potential for build up of low frequency and upper mid bass energy in the centre. Note: Use of the delta plate rigging accessory provides a convenient way to vary the panning angles of flown L/R systems and adjust the amount of overlap and stereo imaging. There are also tradeoffs with respect to intelligibility when aiming arrays. Psychoacoustically, improved intelligibility is obtained when the isocontours of both arrays do not overlap too much. Provided that audience coverage is correct, intelligibility is optimal when only one array radiates on a given audience area. If two arrays are to cover a common area, intelligibility losses result when the distance separating the two arrays becomes too great. A standard distance of 20 m (65 ft) is acceptable, however, if greater separation is specified, one should avoid rotating the arrays onstage too much - this emphasizes arrival time differences between the arrays, thus degrading intelligibilty. The decision whether to emphasize intelligibility or stereo imaging mainly depends on the application. For music applications, more overlap is desired and for speech reinforcement less is more appropriate. L-ACOUSTICS V-DOSC Manual Version 4 6/29/2005 Page 88 of 158 Optimizing coverage and intelligibility Optimizing stereo imaging Figure 64: Tradeoffs between intelligibility versus stereo imaging 3.2.2 LEFT/CENTRE/RIGHT (LCR) CONFIGURATIONS Although it can be sometimes difficult to negotiate the centre position (from a visual standpoint), LCR systems offer more flexibility in optimizing audience coverage with the potential for improved intelligibility, more even horizontal tonal balance and better image localization compared with standard LR configurations. For more details, the interested reader is referred to “Mixing Left-CentreRight, Managing Shed Sound – the evolution of PA Methodology Solutions, including LCR” by Robert Scovill (Live Sound International, Nov/Dec 2002). When using the LCR configuration for live music applications, three V-DOSC arrays can be installed with the C array at 0 degrees and the L/R arrays panned offstage up to 20 degrees (for speech reinforcement, L/R arrays can be panned offstage up to 70 degrees to optimize coverage and intelligibility). For theatrical sound reinforcement, the 120 degree coverage of dV-DOSC is well-suited to centre cluster applications since there is a good match between C system coverage and overall L/R coverage for the typical 12-15 metre L/R array separation that occurs in theatres. Note: As Scovill points out, mixing console choice is a key element for making the LCR configuration work, i.e., the console must be capable of generating an LCR mix suitable for live music sound reinforcement. (Console requirements for theatrical sound reinforcement are different since the centre cluster is typically used for speech reinforcement and the L/R arrays for music) 75 20 65 55 45 10 35 25 15 5 0 -40 -30 -20 -10-5 0 10 20 30 40 50 60 70 80 90 100 110 -10 0 10 20 30 -15 -25 -35 -10 -45 -55 -65 -75 -20 LCR System (3 x V-DOSC arrays) for outdoor amphitheature (shed) sound reinforcement (after Scovill) LCR System (C= dV-DOSC, LR= V-DOSC arrays) for theatrical sound reinforcement Figure 65: LCR Configurations L-ACOUSTICS V-DOSC Manual Version 4 6/29/2005 Page 89 of 158 3.3 MULTIPLE ARRAY CONCEPTS When the horizontal coverage of a V-DOSC array (90° nominal, 70° effective) is insufficient, it is not recommended to place a second array directly beside the first one (see Appendix 1 for further details). The correct approach is to utilize a second array which is focused on another portion of the audience (typically at 45° - 70° relative to the first array) and spaced at least 6-7 meters (approximately 20 ft) from the first array. Figure 66: Generic rigging plot for a V-DOSC system consisting of main L/R FOH and LL/RR offstage fill arrays Given this separation, interference only occurs in the low frequency range and there are no audible intelligibility losses for the following reasons: 1) the first octave-wide comb filtering cancellation is shifted lower in frequency outside the V-DOSC low section’s operating bandwidth, for example, 24 Hz for two arrays of the same size, spaced 7 metres; 2) low frequency cancellations from 50-200 Hz tend to be masked or “filled in” by room reverberation; and 3) the ear cannot resolve tightly-spaced comb filtering notches at higher frequencies throughout the overlap region of the two arrays. In addition, by focussing main and offstage fill arrays at different panning angles, audible comb filtering interaction is lessened since the overlap region between the two arrays is reduced. In some situations, more overlap may be desirable and cross-panning arrays will help provide stereo to a greater portion of the audience while de-correlating the signals between adjacent arrays to further reduce audible interference effects, i.e., arrays can be run in cross-panned stereo and fed as follows: L-L (right program signal), L (left program signal), R (right program) and R-R (left program). The main L/R FOH arrays are normally physically larger than the LL/RR offstage fill arrays and act as the reference for time alignment. Typically, a measurement microphone is located in the overlap region of the L and LL arrays and the LL array is delayed with respect to the L array (same for the RR versus the R array). To geometrically improve time alignment in the overlap region between the main and offstage arrays, the location of the offstage array should follow the arc of a circle with the radius of the circle at upstage center as shown in Figure 67. Note: This sound design approach is similar to distributed sound reinforcement using coaxial loudspeakers, i.e., separating V-DOSC arrays in a manner so that desired audience coverage is achieved while the effects of audible interference are reduced. For more details on the benefits of coaxial loudspeaker technology and distributed sound design techniques, please refer to the MTD or XT User Manuals available for download on: www.l-acoustics.com L-ACOUSTICS V-DOSC Manual Version 4 6/29/2005 Page 90 of 158 Figure 67: Rigging plot for a L/R V-DOSC + flown SB218 FOH system with LL/RR dV-DOSC offstage fill (dimensions in metres). See figure 60 for a “reduced footprint” version of this rigging plot. Experience has shown that this is a very flexible approach that can cover any type of audience and an additional advantage of multiple arrays is improved resistance to wind effects in open-air situations. Beyond the basic solution of coverage problems, multiple source arrays open up many possibilities for creating a spatial soundscape, thus providing a powerful tool for sound design and creativity (see the example below). Figure 68: Stereo dV-DOSC offstage fill system. Left/right program signal is applied to arrays as follows: LLL (left); LL (right); L (left); R (right); RR (left); RRR (right) L-ACOUSTICS V-DOSC Manual Version 4 6/29/2005 Page 91 of 158 3.4 SUBWOOFERS Although V-DOSC is capable of radiating frequencies down to 40 Hz with good vertical directivity control (the low frequency directivity control limit depends on the size of the array), SB218 subwoofers are normally added to the system to extend the frequency response down to 27 Hz and increase the overall unweighted SPL. Techniques for maximizing the combined response of low and sub sections are discussed in the following along with subwoofer arraying techniques and overall sound design recommendations. For additional information, please refer to Section 1.15 for details on sub/low preset processing. General Guidelines for the Use of Subwoofers The number of subwoofers required depends on 3 parameters: Number of V-DOSC Enclosures: the standard subwoofer ratio is 1.5 V-DOSC : 1 SB218 (for example: 3:2, 6:4, 9:6, 12:8, 15:10) Type of Program Material: the standard ratio is recommended for most rock and pop applications. For intense heavy metal or rap a 1:1 ratio is desirable; a 2:1 ratio can be acceptable for some applications (e.g., corporate/special events); and in some cases, V-DOSC can be used without subwoofers (e.g., classical music or speech reinforcement). Type of Installation: For open air applications, the recommended quantities remain standard when subwoofers are ground stacked. When subwoofers are flown, additional ground stacked subwoofers may be required (see below – hybrid flown/stacked subwoofers). In terms of processing, two cases can be considered depending on FOH mix engineer preference and the intended purpose of the subwoofers. For some applications, subwoofers are used as an effect and are not driven with the same signal as the V-DOSC system (separate auxiliary send). The other option is to use subwoofers as a low frequency extension of the V-DOSC array and drive subs with the same signal (4-way mode). All presets (4W, INFRA, X, X AUX) will function with aux sub drive or in 4-way mode, however, the user should be aware of the operating bandwidths and select the preset that is most appropriate for the installed configuration and application. Please refer to Table 9 for a summary of sub/low preset processing and the following for a discussion of preset selection issues. Subwoofers as a Low Frequency Extension In this case, subwoofers are driven in 4-way mode with the same signal that is sent to the V-DOSC array. All 4+2 presets are optimized for this type of system drive (input A / outputs 1,2,3,4 = SB218, V-DOSC LOW, MID, HIGH, respectively) and the same channel assignments apply to 5+1 format presets when the system is operated in 4-way mode. Subwoofers as an Effect In this case, subwoofers are driven using a separate aux send that is different from the signal sent to the V-DOSC array. All 5+1 format presets allow for aux sub drive using input B / output 6. Note: Additional 5+1 presets are provided for Lake Contour and XTA 226 that allow for driving 2way enclosures (ARCS and dV-DOSC) in conjunction with V-DOSC and aux sub drive. For these presets, channel assignments are different: Input A / outputs 1-5 = V-DOSC LOW, MID, HI, dVDOSC LOW, dV-DOSC HI, respectively, and input B / output 6 = SB218. This type of preset is not required for BSS 366 since the input source for the SB218 can be selected independently (i.e., 4+2 format presets can also be used for aux sub drive). Please refer to the preset setup sheets in Tables 11-14 when patching your signal distribution system. L-ACOUSTICS V-DOSC Manual Version 4 6/29/2005 Page 92 of 158 3.4.1 Flown V-DOSC and Ground Stacked Subwoofers Subwoofers are usually ground stacked to take advantage of the 6 dB SPL enhancement that is obtained due to floor coupling (effectively, there is a mirror image that doubles number of subwoofers). Various flown V-DOSC and ground stacked subwoofer combinations are shown in Figure 69 (these configurations are discussed in more detail in Subwoofer Arraying Techniques). Central Subwoofer Line Array Left/Right Subwoofer Configuration LCR Configuration Figure 69: Flown V-DOSC and ground stacked subwoofer configurations As illustrated in Figure 70, for flown V-DOSC and ground stacked subwoofer configurations, time alignment of subwoofers is required due to the geometric path difference between the two systems. The distance from the measurement microphone to the subwoofers is dSUB while the distance to the flown V-DOSC system: dV-DOSC = dSUB + PATH DIFFERENCE. Delaying the subwoofers by the geometric path difference is necessary to time align the subwoofers at the reference position. Note: The geometric path difference should be added to the pre-alignment delay that already exists in the standard presets (see Section 1.15 for further details). Figure 70: Flown V-DOSC and ground stacked subwoofer time alignment L-ACOUSTICS V-DOSC Manual Version 4 6/29/2005 Page 93 of 158 Selection of the time alignment reference location is always a compromise since the geometric path difference will vary with position. Time aligning at a distance where the SPL from the ground stacked subwoofers equals the SPL from the V-DOSC low section is recommended as an optimum compromise. Horizontally, the reference position should be on-axis or in between the V-DOSC and subwoofer arrays. Time aligning in the middle is not recommended in order to help reduce centre build up and one side of the system should be time aligned at a time (FOH L as shown in Fig 71). Figure 71: Recommended time alignment reference location for flown V-DOSC, ground stacked L/R subwoofers For ground stacked LCR subwoofer arrays, it is recommended that the L subwoofer array is delayed with respect C array with the microphone on axis to the L array. Following this, the flown V-DOSC array should be time aligned with respect to the L array using the techniques outlined in Figure 71. When subwoofers are ground stacked and physically separated from the flown V-DOSC arrays, the preferred preset options are: INFRA, 4W or X AUX. For INFRA and 4W presets, crossover points between sub and low sections are 60 Hz and 80 Hz, respectively. Complementary crossover filtering for these presets helps to avoid phase problems due to overlapping sub and low section operating bandwidths so that subwoofers can be operated with positive polarity whether the system is driven in 4-way mode or with aux sub drive. The 4W preset is not recommended for high SPL applications since less low frequency energy is radiated by the flown V-DOSC system (due to the 80 Hz high pass filter). In order to benefit from the available resources of the V-DOSC low section, the INFRA preset is recommended. An additional benefit of the INFRA preset is that time alignment is more forgiving for a greater part of the audience (due to the longer wavelengths at 60 Hz) and, subjectively, the subs become more of a delocalized effect due to the lower crossover point. If more low frequency energy is desired from the flown V-DOSC system, X AUX presets can be used. For the X AUX preset, the V-DOSC low section is high pass filtered 30 Hz and SB218s are operated from 25-80 Hz with negative polarity to account for the phase shift that occurs due to the overlap in the operating bandwidths (i.e., the 24 dB per octave low pass filter for the SB218 generates a phase shift of 180°). The X AUX preset takes full advantage of V-DOSC low section resources and can be implemented using Input B / Output 6 for the standard X preset. V-DOSC 3W or 3WX presets can also be used in conjunction with additional aux sub drive presets for flown V-DOSC and ground stacked subwoofer configurations. This approach is particularly useful when implementing delay processed subwoofer arrays, LCR subwoofer arrays or for larger subwoofer array configurations where it is desirable to dedicate a DSP unit to subwoofer drive for additional control and flexibility. The 3WX preset features a 30 Hz high pass filter for the V-DOSC low section combined with optimized low frequency shelving equalization and aux sub drive can be performed using SB218 DELAY ARC 80 Hz or SB218 LCR 80 Hz presets (subs with negative polarity).The 3W INFRA preset features a 60 Hz HPF for the V-DOSC low section and SB218 DELAY ARC 60 Hz or SB218 LCR 60 Hz presets are recommended for aux sub drive (subs with positive polarity). L-ACOUSTICS V-DOSC Manual Version 4 6/29/2005 Page 94 of 158 3.4.2 Physically Coupled Subwoofers When subwoofers are physically coupled with the V-DOSC array (flown offstage or stacked underneath with minimum physical separation) the preferred preset options are: X, INFRA or 4W. For these configurations, the system is normally operated in 4-way mode with the input signal for the subwoofers identical to that of the V-DOSC array. The X preset is recommended since SB218 subwoofers and the V-DOSC low section have the same operating bandwidth (30-200 Hz) and using identical crossover points help to avoid phase shift cancellation problems (note: additional equalization for the subwoofer section performed in the X preset provides an effective 120 Hz low pass filter for the subwoofers – see Fig. 40). Subwoofers stacked as a vertical extension Flown subwoofers Figure 72: Physically coupled subwoofer configurations Optimum coupling between subwoofer and V-DOSC arrays is achieved by keeping the SB218 array physically close to the V-DOSC array. Two configurations are possible: 1) Fly the SB218 array on the offstage side, less than 3 metres from the V-DOSC array, axis-to-axis The benefits of flown subwoofers include: • Improved low frequency summation, impact and throw. • Improved time alignment since the physical path length difference problem of ground stacked subwoofers versus flown V-DOSC is no longer an issue. Overall, this improves low frequency summation and coherency. • Elimination of local low frequency buildup for the audience down front in the first few rows. Adding several ground stacked subwoofers per side or a centre position will provide sufficient low end impact for the first 15-20 metres (see Section 3.4.3). • Cleaner staging and better audience sightlines. 2) Stack the SB218 array directly underneath or beside (offstage) the V-DOSC array • When subs are stacked in a column underneath the V-DOSC array with minimum physical separation, extended vertical pattern control is obtained at very low frequencies • Improved coupling is obtained since there is almost no discontinuity in low frequency radiation from the top of the array to the ground • This configuration is recommended for flat, open air applications since extended vertical pattern control and coherent coupling provides improved throw at lower frequencies. NOTE: For the X preset, subwoofers sound different than most sound engineers would expect due to the 27-200 Hz operating bandwidth. Listening to the system band-by-band can be misleading, however, the collective performance of all speakers should produce incomparable low frequency far field projection. L-ACOUSTICS V-DOSC Manual Version 4 6/29/2005 Page 95 of 158 3.4.3 Hybrid Flown/Stacked Subwoofers Flown SB218 with ground stacked centre SB218 line array Flown dV-SUB with ground stacked L/R SB218 arrays Figure 73: Hybrid flown/stacked subwoofer configurations As seen in Figure 73, SB218 or dV-SUB enclosures can be flown beside L/R V-DOSC arrays as a low frequency extension of the system and additional ground stacked subwoofers added to provide sufficient low end impact for the first 15-20 metres. As discussed in Section 3.4.2, flown subwoofers provide improved low frequency summation, impact and throw along with the important benefit of improved time alignment throughout the audience. Typically, flown SB218s are operated in X mode while ground stacked SB218s are processed in X AUX mode. For flown dV-SUB / ground stacked SB218 configurations, dedicated X and INFRA presets are available (see Section 1.15). Figure 73 shows two options for the ground stacked subwoofers – in both cases, SB218 enclosures are standing vertically (on their side). This orientation is beneficial for two reasons: 1) all of the central ports are aligned horizontally - this provides optimum port coupling plus low frequency output at the port tuning frequency (approx 30 Hz); 2) when oriented in this manner, the SB218 is at a convenient height to serve as a stacking platform for front fill or stereo in fill enclosures. As an alternative to the central line configuration, individual SB218s can also be spaced apart and used as part of a distributed front fill system (see Fig 78f). A central line array of SB218s will radiate omnidirectionally (into half space) vertically - this is of interest for indoor venues in order to obtain low frequency impact throughout the tribune section of the audience. Horizontal coverage of the central line array can be improved with additional electronic delay processing (see Section 3.5.2) and overall, flown L/R plus ground stacked subwoofers form an LCR configuration with the potential for improved low frequency coverage in the horizontal plane. The stacked L/R subwoofer configuration shown in Figure 73 proves a convenient location for stereo infill enclosures (for example, dV-DOSC or ARCS). Provided that the separation between the stacked L/R subwoofer arrays is approximately 4.5-6 metres, they will also act as a centre channel in conjunction with the flown L/R subwoofers to create an LCR configuration with the accompanying benefits of more even horizontal coverage (see 3.5.2). As a time alignment reference (for FOH L, for example), the measurement microphone should be located between the flown L and stacked L subwoofers and at a distance where the energy from the flown and stacked subwoofers is identical. Such a time alignment reference provides the most even horizontal coverage combined with a smooth transition between flown versus ground stacked subwoofers with distance. Figure 74: Hybrid flown/stacked subwoofer example : L/R = 14 V-DOSC + 3 dV-DOSC (per side); flown dV-SUB (6 per side); ground stacked SB218 (6 per side); LL/RR = 4 V-DOSC + 6 dV-DOSC (per side); stereo infill = 2 dV-DOSC (per side); distributed front fill = 4 dV-DOSC (Bjork, POPB Paris 2003 – sound design M Malki) L-ACOUSTICS V-DOSC Manual Version 4 6/29/2005 Page 96 of 158 3.5 SUBWOOFER ARRAYING TECHNIQUES 3.5.1 LEFT/RIGHT CONFIGURATIONS Any L/R subwoofer array will have problems with the so-called “power alley” effect, i.e., a build up of low frequency energy in the centre accompanied by uneven low frequency response and impact offaxis in the horizontal plane. This is easy to understand using Fresnel analysis, i.e., in the centre, the distance to L/R arrays is identical so that signals arrive in phase and sum while destructive or constructive interference can occur off-axis, depending on listener position and the frequency of interest. For example, if on-axis to the L array and a series of Fresnel rings is drawn, the R array could fall in a destructive ring and cause cancellation (see Appendix 2 for more on Fresnel). In general, L/R subwoofer arrays are only desirable for long, narrow audiences where the centre build up effect is less of a problem (since the venue is narrow and we don’t mind focusing energy up the middle). Past attempts at reducing the power alley effect for L/R arrays have included complementary comb filtering applied to the left and right signal feeds for the subwoofer arrays (see: “Use of Stereo Synthesis to Reduce Subjective/Objective Interference Effects: The Perception of Comb Filtering”, Augspurger et. al. AES preprint 2862, New York 1989). The main limitations of this approach are reported to be changes in timbre and a potential loss of overall energy. The preferred option is either an LCR configuration or electronic delay processed systems (see Sections 3.5.2 and 3.5.3). Despite the fundamental limitations of L/R subwoofer arrays, some recommendations and basic guidelines are made in the following. Figures 75 (a), (b), (c) and (d) show techniques for optimizing low frequency tonal balance over the audience while 75(e) shows a non-recommended configuration. In Figure 75 (a), ground stacked L/R subwoofers are arranged in a block with minimum frontal surface area and are physically separate from the flown V-DOSC arrays (either INFRA, 4W or X AUX presets are recommended). When subwoofers are configured in the manner (i.e., with minimum front surface area or in a vertical column as in Fig 75b) there is reduced center build up and fewer horizontal lobing problems compared with the results obtained using two L/R horizontal subwoofer line arrays as shown in Fig. 75 (e). Basically, interference effects between two omnidirectional sources (Figs. 75 a, b) are less dramatic than between two directive sources (Fig 75 e). Fig 75(b) has the added advantage of effectively extending the length of the V-DOSC array at low frequencies for improved low frequency pattern control and throw in outdoor open air applications (X preset recommended). In Figure 75(c), the L/R subwoofer arrays are configured in an L-wrap around the stage corner in an attempt to direct low frequency energy offstage and reduce centre build up. Physically curved L/R subwoofer arrays as shown in Fig. 75(d) are a variation on this configuration. Figure 75(e) shows a non-recommended configuration since two L/R horizontal subwoofer line arrays emphasize the center build up problem. In this case, the individual L/R arrays are more directive in the horizontal plane than the configuration of Figs 75 (a) and (b) so that center build up is greater and there are more pronounced horizontal lobing effects. However, this configuration can be used if electronic delay processing is applied to the individual columns of the L/R arrays in order to obtain the equivalent performance of Fig 75(d). L-ACOUSTICS V-DOSC Manual Version 4 6/29/2005 Page 97 of 158 (a) L/R subwoofer array blocks (b) L/R column line arrays (c) L-Wrap L/R subwoofer arrays (d) Curved L/R subwoofer arrays (e) L/R horizontal line arrays Figure 75: L/R Subwoofer arraying techniques L-ACOUSTICS V-DOSC Manual Version 4 6/29/2005 Page 98 of 158 3.5.2 CENTRAL LINE ARRAY WITH ELECTRONIC DELAY PROCESSING A central ground stacked line array optimizes low frequency SPL output since all subwoofers couple acoustically and the mirror image ground plane effect doubles the number of subs. Given the same number of subwoofers, the overall SPL obtained by ground stacking in this manner is higher than any other configuration. An additional advantage of the centre line array is that the vertical directivity is omnidirectional - this is useful for venues where there is an audience tribune. Since the subwoofers are physically separate from the flown V-DOSC arrays they are normally driven via aux send in either INFRA, X AUX or 4W mode (although the system can also be operated in 4-way mode). Limitations of the central ground stacked line array configuration are as follows: Tonal balance has an exaggerated low frequency contour for the closest members of the audience (integrating distributed front fill loudspeakers or a stereo infill system with the central line array of subwoofers can help offset this). Increased amount of low frequency energy behind the central line array which can cause feedback problems on stage Unless electronic delay processing is applied, the horizontal directivity will narrow (the extent of narrowing depends on the length of the central line array) Potential for reduced throw due to audience absorption (this problem is likely to occur with any ground stacked configuration). A good technique for controlling the directivity of a central ground-stacked horizontal line array is to use delay processing to electronically arc the array. Electronic delay processing in this manner will decouple sections of the array so that tonal balance is improved up close while at the same time low frequency coverage is smoother throughout the audience in the horizontal plane. The optimum arc radius is typically equal to half the length of the central line array - delay taps are calculated geometrically based on this arc radius and the physical distance to the centre of a given subwoofer group off the center line reference. (b) Delay processed horizontal line array (a) Horizontal line array Figure 76: Centre subwoofer line array (a) without and (b) with electronic delay processing To implement electronic delay processing, a 4- or 6-channel DSP is dedicated to subwoofer drive and the SB218 DELAY ARC 80 Hz preset (subs with negative polarity) used in conjunction with the 3WX preset for V-DOSC. Alternatively, the SB218 DELAY ARC 60 Hz preset can be used with the 3W INFRA preset (subs with positive polarity). SB218s are circuited in blocks of four symmetrically about the centre axis and powered by half of an RK124 amplifier rack. The appropriate delay tap can be selected using the DSUBTK comb connector kit (set of 6 COMB connectors for T1-T6). An EXCEL spreadsheet tool to perform delay and offset calculations is available in ARRAY2004 (SUB ARC). Several examples are given in Figure 77 and further details on the SUBARC sheet are provided in Section 3.5.4. L-ACOUSTICS V-DOSC Manual Version 4 6/29/2005 Page 99 of 158 HORIZONTAL SB218 (16 TOTAL) T4 T4 T3 T3 T2 T2 T1 T1 T1 T1 T2 T2 HORIZONTAL SB218 (24 TOTAL) T3 T3 T1 = 0 msec T2 = 1.167 msec T3 = 3.036 msec T4 = 5.495 msec VERTICAL SB218 (8 TOTAL) T4 T3 T2 T1 T1 T2 T3 T4 T4 T4 T6 T6 T5 T5 T4 T4 T3 T3 T2 T2 T1 T1 T1 T1 T2 T2 T3 T3 T4 T4 T5 T5 T6 T6 T1 = 0 msec T2 = 0.761 msec T3 = 2.052 msec T4 = 3.863 msec T5 = 6.088 msec T6 = 8.634 msec VERTICAL SB218 (12 TOTAL) T6 T5 T4 T3 T2 T1 T1 T2 T3 T4 T5 T6 T1 = 0 msec T2 = 0.493 msec T3 = 1.282 msec T4 = 2.320 msec T1 = 0 msec T2 = 0.322 msec T3 = 0.867 msec T4 = 1.632 msec T5 = 2.572 msec T6 = 3.649 msec Figure 77: Electronic delay processing examples using a 4- or 6-channel DSP 3.5.3 LEFT/CENTRE/RIGHT CONFIGURATIONS LCR subwoofer arrays are of interest for many of the same reasons as LCR V-DOSC arrays (see Section 3.2.2). When properly time aligned, the LCR configuration can provide more even low frequency impact and horizontal coverage combined with reduced centre build up in comparison with L/R subwoofer arrays. In effect, LCR subwoofer arrays act as an approximation to an electronic delay processed horizontal line array of subwoofers as discussed in Section 3.5.2. Figure 78(a) shows a ground stacked LCR configuration. In this case, time alignment should be performed in multiple steps: (i) time align L with respect to C with the measurement microphone onaxis to L at a distance where the SPL from C and L arrays is identical; (ii) time align V-DOSC FOH L with respect to L with the measurement microphone located between FOH L and ground stacked L subwoofers at a distance where the SPL from the low section of the flown system equals the SPL from the ground stacked subwoofers; (iii) duplicate the time alignment settings for R subwoofers and FOH R; (iv) if applicable, time align LL and RR to L and R, respectively, using a measurement location in a representative location where the coverage of the main and off-stage fill systems overlap. Figure 78(b) shows a hybrid ground stacked LR / flown C configuration. In this case, a stereo infill system (using ARCS or dV-DOSC, for example) can be combined with the ground stacked LR subwoofer arrays and a centre cluster fill system could be integrated with C subwoofer array. Time alignment should be performed in multiple steps: (i) time align L with respect to C with the measurement microphone in between L and C at a distance where the SPL from C and L arrays is identical; (ii) time align V-DOSC FOH L with respect to L with the measurement microphone located between FOH L and ground stacked L subwoofers at a distance where the SPL from the low section of the flown system equals the SPL from the ground stacked subwoofers; (iii) duplicate the time alignment settings for R subwoofers and FOH R; (iv) if applicable, time align LL and RR to L and R, respectively, using a measurement location in a representative location where the coverage of the main and off-stage fill systems overlap. Figures 78 (c-f) show various hybrid flown LR / ground stacked C configurations. Figure 78 (c) shows a central ground stacked C position, (d) shows a L/R ground stacked C position which also functions as part of a stereo infill system; (e) shows a central subwoofer line array with electronic delay processing; (f) shows a distributed ground stack subwoofer configuration which can also be used with electronic delay processing. For all of these configurations, a time alignment procedure similar to what is recommended for figure 78 (c) should be employed. L-ACOUSTICS V-DOSC Manual Version 4 6/29/2005 Page 100 of 158 (a) Ground stacked LCR (b) Ground stacked L/R, Flown C (c) Flown L/R, ground stacked C (e) Flown L/R, centre line array with electronic delay processing (d) Flown L/R, stereo infill C (f) Flown L/R, distributed ground stacked subwoofers Figure 78: LCR Subwoofer arraying techniques L-ACOUSTICS V-DOSC Manual Version 4 6/29/2005 Page 101 of 158 3.5.4 LARGE FORMAT SUBWOOFER ARRAY CONFIGURATIONS Electronic delay processing (see Section 3.5.2) is also useful for large format V-DOSC systems consisting of LL, L, R and RR arrays with associated subwoofer arrays (flown or stacked) in conjunction with a central horizontal line array (see Figure 79). The optimum arc radius is typically equal to half the length of the central line array. Delay taps are calculated geometrically based on this arc radius and the physical distance of a given subwoofer group off the center line reference (y-axis). An EXCEL spreadsheet tool to help perform delay calculations is available in ARRAY2004 (SUB ARC). The LL and RR subwoofer line arrays are then time aligned with respect to the central horizontal line by taking measurements on their respective main axes. In practice, the center subwoofer array acts as the time reference and the length of the line array determines the arc radius. Predelay can be applied to compensate for the physical placement of the centre line array and time align the system with the instrument backline, kick drum, monitor sidefills or monitor front line as desired. This predelay is also applied to the relative arc delays T2, T3 and T4 that are calculated based on their physical XY coordinates. Once electronic delay processing has been applied to all subwoofer arrays, individual V-DOSC arrays (LL, L, R, RR) are delayed to maintain proper time alignment relative to their respective subwoofer arrays. It is recommended that arc radii remain shallow so that the difference between T3 and T4 remains less than 15 msec. Steeper arc radii will decorrelate LL versus L (and RR versus R) V-DOSC arrays to the extent that the LL array will be perceived as an echo with respect to the L array. Apart from smoother low frequency coverage in the horizontal plane, electronic delay processing of the main arrays has the added benefit of improved stereo perception since psychoacoustically this helps to localize the audience’s attention towards the stage and not the nearest loudspeaker array. Figure 79: Large format subwoofer configuration with electronic delay processing L-ACOUSTICS V-DOSC Manual Version 4 6/29/2005 Page 102 of 158 Figure 80: Geometric coordinates for the SUB ARC utility spreadsheet in ARRAY2004 Figure 81: Large format arena configuration – 4 delay taps (Rammstein World Tour 2004/5, Black Box Music) L-ACOUSTICS V-DOSC Manual Version 4 6/29/2005 Page 103 of 158 Figure 82: Large format open air festival configuration (Festival of Humanity, France, Potar Hurlant) Figure 83: Large format stadium configuration (Red Hot Chili Peppers 2004 European Tour, Rat Sound) L-ACOUSTICS V-DOSC Manual Version 4 6/29/2005 Page 104 of 158 3.6 COMPLEMENTARY FILL SYSTEMS For flown V-DOSC configurations, additional speakers are typically necessary to cover center fill, front fill or offstage fill requirements and delay systems may be required for large format festival or stadium sound reinforcement. Apart from providing added coverage, an important sound design consideration for complementary fill systems is audience image localization - especially for theatrical applicatons where the addition of centre cluster, front fill and underbalcony delay systems can help focus audience attention to the action onstage. Note: All L-ACOUSTICS loudspeakers and OEM factory presets are specifically designed to have a compatible sonic signature. For this reason, L-ACOUSTICS enclosures provide the best complementary fill system solutions and are recommended for use with V-DOSC. 3.6.1 FRONT FILL In many cases, dV-DOSC downfill enclosures and/or a flown centre cluster using ARCS (inverted), KUDO (110 degree K-LOUVER setting) or dV-DOSC will provide adequate coverage for the closest members of the audience, however, image localization and coverage can be further enhanced with the addition of a dedicated front fill system. Front fill can be provided via stacked stereo infill systems using dV-DOSC, ARCS or KUDO loudspeakers. Alternatively, a distributed approach can be adopted using dV-DOSC or MTD, XT coaxial enclosures (see the MTD XT SPACING worksheet in ARRAY 2004 for a utility that calculates optimum distributed front fill enclosure spacing based on throw distance). Wherever possible, front fill systems should be physically located close to subwoofers in order to provide closest members of the audience with some mid/high information (to help offset the exaggerated LF contour when located directly in front of the subwoofer stacks). Distributed dV-DOSC front fill dV-DOSC stereo infill, ARCS centre fill ARCS stereo infill integrated with ground stacked split centre subwoofer position Distributed dV-DOSC front fill integrated with distributed ground stacked subwoofers Distributed 112XT front fill ARCS stereo infill plus offstage fill Figure 84: Stereo infill and distributed front fill options L-ACOUSTICS V-DOSC Manual Version 4 6/29/2005 Page 105 of 158 3.6.2 OFFSTAGE FILL Good candidates for offstage fill include dV-DOSC, ARCS, KUDO or additional V-DOSC arrays. Selection between these options will depend on throw distance and vertical coverage requirements and the guidelines outlined in multiple arrays should be followed (Section 3.3). For offstage fill, the same principles for flown versus stacked systems apply (Section 3.2) and hybrid flown/stacked offstage fill systems can also be effective. In some cases, a distributed approach can be adopted using tripodmounted MTD or XT coaxial enclosures to provide offstage plus rear fill coverage. dV-DOSC offstage fill ARCS offstage fill KUDO offstage fill V-DOSC + dV-DOSC offstage fill Figure 85: Flown offstage fill system options As discussed in Section 3.1, stacked systems improve image localization for the audience by lowering the perceived image to stage level and, geometrically, a stacked system can provide more extended vertical coverage than a flown system. For these reasons, stacked offstage fill systems or a hybrid flown/stacked approach can be of interest for arena sound reinforcement - particularly for many of the newer generation basketball arenas that are narrow with high vertical coverage requirements. Fewer enclosures are required to obtain the necessary audience coverage vertically and there is less audience shadowing since people are seated on a tribune gradient. As an additional benefit for stacked offstage fill systems, the subjective image is lowered to stage level. dV-DOSC offstage fill ARCS offstage fill KUDO offstage fill Distributed XT offstage/rear fill Figure 86: Stacked offstage fill system options L-ACOUSTICS V-DOSC Manual Version 4 6/29/2005 Page 106 of 158 3.6.3 DELAY SYSTEMS The excellent long throw capability of V-DOSC often eliminates the need for a delay system and allows the FOH mix position to be located at distances of up to 65 metres for improved audience sightlines. However, factors such physical obstacles, wind, sound wave refraction due to temperature and humidity gradients or very large distances (>120 m) may create the need for a delay system. Good delay system candidates include V-DOSC, dV-DOSC or KUDO and typically a 4 array FOH system (LL, L, R, RR) in conjunction with 3-4 delay positions located at approximately 80-100 metres will provide coverage up to 150 metres or more. The exact number of delay rings and delay positions per ring will depend on the overall throw distance and horizontal coverage requirements. Time alignment and tuning of delay systems in open-air situations is not straightforward since the correct delay time setting is typically valid over a limited area and there are also the effects of wind, temperature and humidity to consider. Despite these variables, there are a few guidelines that should be followed when installing delay systems: 1) Distributed delays should be positioned along an arc of constant radius (centered at the stage) in order to geometrically optimize time alignment throughout the coverage region of the delay system. 2) Delay systems should be focused to provide approximately 10-20 meters overlap with main system coverage in order to optimize the transition between the main system and the delay. For example, main L/R V-DOSC arrays can be focused to provide coverage up to 120 metres and delay positions installed at 90 metres and focused to provide coverage from 100-150 metres. 3) Time alignment of delays should be performed at a measurement point located on the axis of the delayed source and the reference source. If the delay time is set so that the two sound waves arrive at the same time on-axis, the reference source will be slightly ahead of the delayed source at off-axis locations, providing proper image localization towards the stage (see also 1). 4) Over-delaying up to 15 ms is acceptable due to the Haas precedence effect, greater than 15 ms is not acceptable since the delayed sound will be perceived as an echo with respect to the main signal. 5) For speech reinforcement, it may be necessary to under-delay in order to optimize the off-axis intelligibility and clarity for the audience seated behind the delay system (i.e., towards the stage). 6) Time domain-based measurement equipment is essential for setting delay times (for example, MLSSA or WinMLS). Bushnell Yardage Pro rangefinder binoculars can provide a good starting point by simply measuring the distance from the delay location to the reference source. Figure 87 shows an outdoor festival system example for an audience area of 150 metres deep by 200 metres wide. The main L/R system consists of 16 V-DOSC per side and there are 12 V-DOSC for the LL/RR arrays. Four delay positions of 9 V-DOSC each are located on a circular radius 80 metres from the stage. The main L/R system is focused to 120 meters, LL/RR are focused to 110 metres and delay system coverage is from 100-150 meters. Figure 87: SOUNDVISION simulation for a LL/L/R/RR V-DOSC FOH system with 4 delay positions L-ACOUSTICS V-DOSC Manual Version 4 6/29/2005 Page 107 of 158 Figure 88: Flown and stacked delay systems (sound design - D. Tramontani, A. Francais, resp.) Figure 89: Stacked dV-DOSC delay system (Dream Concert 2002, sound design - Ki Sun Choi, Seoul Sound) Figure 90: Flown V-DOSC delay system (Radiohead, Oxford 2003, sound design - F. Bernard) L-ACOUSTICS V-DOSC Manual Version 4 6/29/2005 Page 108 of 158 4. INSTALLATION PROCEDURES In the following sections, detailed installation procedures for stacking and flying V-DOSC are presented. Please follow these procedures carefully and at all times remain safety-conscious. In addition: • Only users with sufficient rigging knowledge should attempt to install any L-ACOUSTICS loudspeaker system intended for overhead suspension. • Users should be familiar with the rigging techniques and safety considerations outlined in this manual prior to installation. • The V-DOSC rigging system is designed to comply with European Community regulations (please see the CE conformity declarations in the appendix for specific recommendations). • Some countries require higher safety factors and specific rigging approvals. It is the responsibility of the user to ensure that any overhead suspension installation of LACOUSTICS systems is made in accordance with all applicable local or state regulations. • L-ACOUSTICS is not responsible for any rigging equipment or accessories that are not manufactured by L-ACOUSTICS. 4.1 STACKED SYSTEM For stability reasons, the maximum number of V-DOSC enclosures that can be stacked is 6 (total weight including the bumper is 709 kg or 1563 lbs). The V-DOSC BUMP2 bumper is used as a stacking platform and four corner screwjacks allow for tilt adjustment of the stacked system. Prior to stacking, the strength of the supporting floor should be carefully examined to determine if the load can be supported (if necessary, sheets of plywood or steel plates can be placed under individual screwjack feet to help distribute the load). Once the location for the stacked array has been determined, the BUMP2 is placed in the desired location and oriented upside down so that the two rotating legs on the BUMP2 are free to swing upwards. To install the corner screwjacks, lower the height adjustment blocks to the minimum position. Mount the screwjacks on the corners of BUMP2 by sliding the blocks into the locating slots on BUMP2 and then lower the screwjacks. Note: For greater stability when tilting the stacked system downwards, the front pair of screwjacks can be omitted and the front of BUMP2 laid directly on the stacking surface. Conversely, when tilting the system upwards, rear screwjacks can be omitted. Set the BUMP2 azimuth angle to provide the desired amount of array rotation on- or off-stage. If front screwjacks are employed, raise the bumper at least 8 cm off the floor by rotating the screwjack wheels (CW = up, CCW = down). This clearance is necessary to prevent screwjack wheels from physically interfering with the dolly locator studs of the bottom V-DOSC enclosure. Referring to the installation parameters determined using ARRAY2004 or SOUNDVISION, adjust the screwjacks to provide the required tilt angle for the bumper (and therefore the bottom V-DOSC enclosure). NOTE: A digital inclinometer is highly recommended for performing angle measurements. For stability reasons, the maximum bumper tilt angle is 12 degrees so that the centre of gravity of the stacked array remains within the physical footprint of the BUMP2. The lowest V-DOSC enclosure is placed on the bumper with the two rotating legs oriented upwards (as a reference for cabinet orientation, stacking runners on the cabinet should be on the bottom and the rear V-DOSC logo in the correct orientation). Adjust the front-to-back position of the enclosure by aligning the Aeroquip flytrack sections of the enclosure with the bumper. Mechanically connect the first enclosure to the bumper by lifting the BUMP2 rotating legs up and locking them into the rear VDOSC rails using U pins. Attach two BUMP angle straps to secure the bottom V-DOSC and verify the tilt angle for the enclosure using a digital inclinometer (use the stacking runner recess on top of the cabinet for alignment of the measurement tool). Perform additional tilt adjustment using the bumper screwjacks if necessary. L-ACOUSTICS V-DOSC Manual Version 4 6/29/2005 Page 109 of 158 A second V-DOSC enclosure is then stacked on top of the first and mechanically connected using the rotating legs and U pins in the same way. With reference to the installation parameters calculated in ARRAY or SOUNDVISION, angle straps are connected between the two enclosures and two spacer blocks are then inserted between the enclosures on the sides to set the correct tilt angle for the second enclosure. Never use a single spacer block in the center of the cabinets – the wood thickness is only 15 mm at this point and the overall weight of the stacked system could cause damage to the bottom enclosures. Verify the tilt angle for the second enclosure using a digital inclinometer and fine tune the angle by adjusting spacer block positioning, if necessary. NOTE: Since the rear edges of the cabinets are touching when enclosures are stacked, this introduces an additional 1degree for angle straps when cabinets are stacked versus flown. Angle strap values for flown and stacked systems are tabulated below: Table 15: Angle Strap Values ANGLE COLOUR CODE Gold Yellow White Red Blue Green ANGLE STRAP LABEL BUMP 0.75 / 5.5 1.3 2 3 4 NOMINAL FLOWN ANGLE 1.6 0.75 / 5.5 1.3 2 3 4 NOMINAL STACKED ANGLE N/A 1.75 / do not use 2.3 3 4 5 Angle strap values should be selected by taking this 1 degree difference into account for stacked versus flown. For example, if ARRAY 2004 or SOUNDVISION simulations indicate that a 4 degree angle is required between enclosures 1 and 2, select a 3 degree angle strap for the actual installation. Angle differences can also arise due to tolerance variations in enclosure construction and spacer block placement. Use a digital inclinometer to determine the effect of these tolerance variations and minimize their impact. The same procedure is followed for all other enclosures of the array until stacking is completed. NOTE: it is easier to place spacer blocks between enclosures as the array is built instead of inserting them afterwards. The correct site angle for the entire array is obtained by fine adjustment of the BUMP2 screwjacks. Focus can be checked by sight - looking from the rear of the array through the small space between the top enclosure and the second one, the lower wall of the top enclosure should be aligned so as to aim towards the rearmost seats of the audience. Alternatively, from the highest section of the audience area, if you can see the top of the upper V-DOSC enclosure, you are out of the coverage pattern. Focus can also be performed by placing a laser on the upper wall of the top enclosure and a visual check should be made with respect to the lower wall of the bottom enclosure of the array to ensure that closest members of the audience are covered. Connection of the array to the amplifier racks can be performed as soon as stacking is complete. To avoid confusion, connect cables to the amplifier racks first and parallel jumpers between V-DOSC enclosures last – this way, reversal of cable sex is avoided (i.e., the output of the rack is female, which can be confusing to the average stagehand). Remember to parallel 3 V-DOSC enclosures maximum. When unstacking the array, first remove all loudspeaker cabling. As V-DOSC enclosures are unstacked, remove the spacer blocks first since this makes it easier to remove the U pins when disconnecting the rotating legs. Dolley boards can be attached and enclosures directly unstacked onto their wheels. L-ACOUSTICS V-DOSC Manual Version 4 6/29/2005 Page 110 of 158 SAFETY RULES NO MORE THAN 6 V-DOSC ENCLOSURES SHOULD BE STACKED ON ONE BUMP2. ALWAYS ATTACH ROTATING LEGS AND ANGLE STRAPS BETWEEN ENCLOSURES. Test the strength of the supporting floor and, if necessary, use plywood sheets or steel plates under individual screwjack feet in order to help distribute the load. The maximum downward or upward tilt angle of the bumper is 12 degrees. When stacking on scaffold platforms, install 2 rear screwjacks only (for downwards tilt) and ratchet strap the BUMP2 to the platform for improved stability (see Figure 91) Figure 91: Stacked V-DOSC offstage fill system (Radiohead, Oxford 2003, sound design - F. Bernard) L-ACOUSTICS V-DOSC Manual Version 4 6/29/2005 Page 111 of 158 4.2 FLOWN SYSTEM Rigging a V-DOSC array is fast and easy, with significantly reduced handling time compared to conventional systems. Please refer to the photo sequence in Figure 94 with respect to the following description of flying procedures. Preliminary Preparations All installation data for rigging the array (i.e., bottom enclosure elevation, inter-enclosure angles, top and bottom enclosure site angles) has been calculated using ARRAY 2004 or SOUNDVISION and mechanical data checked to ensure safe rigging conditions (see Figs 92-94). Two independent rigging points are available with a spacing of 1.05 meters (43 ¼”) and the desired onstage rotation angle for the array. Alternatively, three points can be used along with a swivel shackle for connecting the delta plate to the rear BUMP2 point – this allows for pan adjustment of the flown array (see Fig. 19). Rigging points should be equipped with 0.5T chain motors for a 4-enclosure array, 1.0T motors for a 5- to 10-enclosure array, 2.0T motors for an 11- to 16-enclosure array. Access is available beneath the rigging points, i.e., a flat surface where it is possible to roll VDOSC enclosures into position – preferably from behind the installation location but it is also possible to fly the system with enclosures lined up perpendicular to the rigging points (eg. from the floor along the front of a stage). REAR FRONT MOTOR MOTOR REAR FRONT LOAD LOAD (rotating legs) (angle straps) Figure 92: SOUNDVISION mechanical data L-ACOUSTICS V-DOSC Manual Version 4 6/29/2005 Page 112 of 158 Figure 93: SOUNDVISION installation report data Figure 94: ARRAY 2004 installation data L-ACOUSTICS V-DOSC Manual Version 4 6/29/2005 Page 113 of 158 The first step is to line up the enclosures at the rigging location (while they are still face down on their dollies). As a reference for cabinet orientation, enclosure stacking runners will be oriented upwards and rear jack plate V-DOSC logos will be upside down once the array is flown (see Fig 95 a). Enclosures are mechanically connected together using the rotating legs and U pins. Use the locking safety pins to secure all U pins in place. (see Figs 95 b-e) Place the BUMP2 bumper at the top of the array. The bumper is mechanically connected to the top cabinet in the same way that the cabinets are joined together, i.e., by rotating BUMP2 legs into position on the top enclosure and securing them using U pins. (see Fig 95 f-g) Connect the top enclosure to BUMP2 using two BUMP angle straps on the side flytrack sections to secure the top enclosure to the bumper (NOTE: the site angle for the top enclosure is set by angling BUMP2 during the final step of array angle adjustment). (see Fig 95 h) Referring to the angle strap values that have been pre-determined using ARRAY 2004 or SOUNDVISION, proceed to connect one end of all angle straps to the flytrack sections on both sides of all enclosures of the array. Available angle straps values are: 0.75, 1.3, 2, 3 and 4 degrees - by moving a 0 degree angle strap one hole location closer, 5.5 degrees is obtained. Although exact flytrack hole location is not critical (since the length of the angle strap bar controls the angle between enclosures), as a reference you can position angle strap double stud fittings so that the shackle is located in flytrack hole location 3 from the end. Orient angle straps so that the ring end of the fitting is facing to the left (down once cabinets are flown) and the fitting is located at the left side of the flytrack (bottom of the flytrack section once flown) in flytrack hole position 3 from the end. Note: If angle straps are connected with the text out it is convenient to perform a last minute check to confirm that all values are correct. In addition, when the array is flown, all angle strap labels will be visible from the rear - this is useful as a check and makes for a cleaner installation. (see Fig 95 i) Connect all enclosures to the amplifier racks using V-CABLEs and V-LINK jumpers between enclosures for parallel operation (NOTE: it is best to connect cables from amp racks to the cabinets first and jumpers last in order to avoid cable reversal). Longer cables can be routed over the BUMP2 or secured with a spanset. For additional strain relief, velcro straps or tape can be used to secure cables to the U pins on every other V-DOSC enclosure. (see Fig 95 j-l) Route two ratchet straps through the U pins of the bottom enclosure and over the bumper. Orient the ratchet strap so that the ratchet handle is accessible (see Figs 95 m-n). Note: as an alternative to ratchet straps, spacer blocks can be employed. (see Figs 95 i-iv). As a general rule, ratchet straps are acceptable when the system is pointing downwards, spacer blocks should be used when the system is pointing upwards. Remove all dolly pins. As the array is flown, cabinets will automatically lift off the dollies (see Fig 95o). Conduct a final inspection to make sure all cabling is correct, correct angle straps are in place and securely seated in the flytrack, all U pins are fully inserted and all U pin safeties are locked in place. Attach the rear chain motor to the rear BUMP2 fly point using a shackle. (See Fig 95 p) Do not connect the front chain motor yet – this can be done once the first few cabinets are flown. Note: For added safety factor when flying large arrays, bridling should be employed. For bridling, 2 steel slings are attached to the outer points on the bumper using shackles then joined using a pear ring for attachment to the motor (requires 2 steel slings, 4 shackles, 1 pear ring per point). With three people available, one person runs the chain motors while the other two attach angle straps (and insert spacer blocks) as the array is lifted. Stagehands can be assigned the tasks of steadying the array from behind, providing necessary cable slack, and removing/stacking dolly boards. L-ACOUSTICS V-DOSC Manual Version 4 6/29/2005 Page 114 of 158 With one person on either side of the array, raise the rear chain motor. Enclosures of the array will bend automatically since they are connected by the rear pivoting legs and dolly boards automatically detach as the cabinets lift off (see Fig 95 q). When the first enclosure leaves the ground, stop raising the array. Lower the front motor and connect the front rigging point on the BUMP2 to the chain motor (see Fig 95 r). Note: A 1 m (3 ft) steel extension (stinger) is required for the front (downstage) motor attachment point in order to prevent the motor chain bag from hanging down in front of the array. Raise the front motor to the same height as the rear motor to level BUMP2 and the top V-DOSC enclosure. Attach a laser and/or remote inclinometer on top of the first V-DOSC enclosure – use the enclosure as a reference for attaching these measurement instruments, not the bumper. Note: When installed and focussed, if the system is oriented downwards, the top V-DOSC enclosure will tend to close against BUMP2. When the system is pointing upwards, there will be a small gap between the top V-DOSC enclosure and BUMP2 due to mechanical tolerances. Always refer to the top V-DOSC enclosure as a site angle reference – not the BUMP2 bumper. Continue to lift the array. The two people on either side of the array then use the side handles to lift the second V-DOSC enclosure up towards the first enclosure, allowing them to connect the angle straps from the first enclosure to the second enclosure. (see Fig 95 s,t). Note: If the rear motor is raised higher than the front motor while flying the system, the cabinets will tend to close automatically, making it easier to attach angle straps. This is acceptable for smaller systems – for larger arrays it is recommended to fly the system flat so that the load distribution between front and rear motors is equal. As a reference, attach angle straps from flytrack hole 3 to hole 3 between cabinets to provide the correct inter-enclosure angles. When using the 0.75 degree angle strap to obtain 5.5 degrees, attach the straps from flytrack hole 3 to 2. Always make sure you have a solid physical mating between the double stud fitting and the flytrack - do not hold the plunger out - simply place the fitting into the flytrack then slide the fitting into positon and listen for a loud ''click''. Physically shake the angle strap to ensure that a secure physical connection has been obtained. Optional: Spacer blocks can be inserted on each side by attaching the hook and safety on the bungee cord between cabinet handles then pushing the spacer backwards (towards the rear of the enclosures) so that they are tightly wedged in between the boxes and all slack is taken out of the angle straps. (see Fig 95 aa-dd). Note: Ratchet straps or spacer blocks are required since as enclosures are added to the array, the weight of the array tends to flatten the site angles of individual enclosures. Spacer blocks maintain the same interenclosure angles whether the system is oriented upwards or downwards. The array is progressively raised and this procedure is repeated until all angle straps (and spacer blocks) have been connected to all enclosures. Note: Up to 8 dolly boards can be stacked using the technique shown in Fig 95 u. It is a good idea for someone to guide the array from behind as the system is flown (rotating legs on the bottom cabinet are useful as handles for this purpose). Pay particular attention to steady the bottom enclosure as it lifts off since it will tend to flip forwards. (see Fig 95 v). L-ACOUSTICS V-DOSC Manual Version 4 6/29/2005 Page 115 of 158 (a) (b) (c) (d) (e) (f) (g) (h) L-ACOUSTICS V-DOSC Manual Version 4 6/29/2005 Page 116 of 158 (i) (j) (k) (l) (m) (n) (o) (p) L-ACOUSTICS V-DOSC Manual Version 4 6/29/2005 Page 117 of 158 (r) (q) (s) (t) (u) (v) (w) (x) L-ACOUSTICS V-DOSC Manual Version 4 6/29/2005 Page 118 of 158 (z) (y) (aa) (bb) (cc) (dd) Figure 95: Photo sequence showing the steps involved in flying V-DOSC L-ACOUSTICS V-DOSC Manual Version 4 6/29/2005 Page 119 of 158 Ratchet Strap Adjustments Before taking the system to trim, raise the array above the ground to tension the rear ratchet straps (See Fig 95 w,x). Mounting a remote digital inclinometer on the top enclosure and using a handheld digital inclinometer for the bottom enclosure is the most accurate technique for matching the actual installation to the ARRAY 2004 or SOUNDVISION simulation. Essentially, we want to adjust the ratchet straps so that the installed array has the correct top and bottom enclosure site angles in order to obtain the correct overall vertical coverage angle (Cell P36 in ARRAY 2004). ♦ With reference to the remote inclinometer readout, adjust front and rear motors to pre-tilt the array so that the top enclosure is angled according to the calculated site angle (-1.5 degrees for the example in Figs 93 and 94). Pretilting is important so that ratchet straps are tensioned while the array is in its’ final focus orientation and the centre of gravity for the array is correct. ♦ Using a handheld inclinometer on the bottom enclosure, tension ratchet straps so that the bottom enclosure site angle is equal to Site Angle #N as calculated in ARRAY 2004 or SOUNDVISION where N= the number of enclosures (-28.65 degrees for the example in Figs 93 and 94). This procedure will provide the correct vertical coverage angle for the system (27.15 degrees for the example in Figs 93 and 94). ♦ When the system is flown to the actual trim height, Site Angle #1 will have to be readjusted using the remote inclinometer readout or with reference to the top cabinet laser (see below) since chain motors typically do not run at exactly the same speed if the relative load distribution between them is different (i.e., if the system is pointing upwards or downwards). Note: DO NOT OVERTIGHTEN RATCHET STRAPS, especially if the array is tilted upwards. In general, the goal is to simply take the slack out of the angle straps. Overtightening ratchet straps can increase the angle between enclosures up to 1 additional degree per cabinet by closing the gap at the rear of the enclosures (similar to what happens for a stacked system due to gravity). Important things to note concerning the use of ratchet straps: Tightly ratcheting flown arrays is not recommended for the following reasons: ♦ Tight ratcheting can increase the angle between flown enclosures up to an additional 1 degree (i.e., a 4 degree angle strap can produce 5 degrees, etc) ♦ This increase in angle can be non-constant vertically along the array and is difficult to predict or control (typically the bottom enclosures are affected first) ♦ A 5.5 degree angle strap can be modified to a 6.5 degree value with tight ratcheting and WST criteria will not be satisfied ♦ When ratchet straps are overtightened and the array is excessively tilted upwards, physical damage can result to the flytrack and/or angle strap fittings ♦ L-ACOUSTICS has developed a spacer block to eliminate the need for use of ratchet straps, (specifically for the case of arrays with upwards tilt) Moderately ratcheting flown arrays IS recommended for the following reasons: ♦ Ratchet straps introduce a continuously variable ''tweak factor'' that allows for fine tuning of coverage down front and greater angle strap resolution when used correctly in conjunction with top and bottom inclinometers. ♦ When the array is pointing downwards, the centre of gravity shifts backwards and the top VDOSC enclosures tend to close naturally, forming a flat long throw section (this is desirable for flat audience, open air festival situations). For larger 12-16 enclosure arrays, even though 0.75 degree angle straps are used for the first 6-8 enclosures, the actual obtained angles will L-ACOUSTICS V-DOSC Manual Version 2.00 29/06/05 V-DOSC MANUAL V4 0605.doc 120/158 be close to zero (with no ratchet) when the system is flown and focussed downwards. Moderate ratcheting then introduces the possibility of continuously variable angles between 0 to 0.75 degrees and the progression is monotonic as a function of height. For example, if a 16 enclosure array is pointing 4 degrees down and 0.75 degree straps are used for the first 8 enclosures (combined with moderate ratcheting), actual values on the order of 0, 0, 0.25, 0.25, 0.5, 0.5,0.75, 0.75 will be obtained for enclosures 1-8. This provides better spacing of enclosure impact zones over the audience in flat open air situations. ♦ When the array is pointing upwards, the centre of gravity shifts forwards and V-DOSC enclosures tend to open naturally, providing the nominal angle values (0.75, 1.3, 2.0, 3.0, 4.0 and 5.5). Therefore, for a V-DOSC array with upwards tilt, very little ratchet strap tension is required. Typically, the bottom 2-3 enclosures will need to open up slightly and spacer blocks can be used for this purpose (or moderate ratcheting). To summarize, the most precise way to work with ratchet straps is to have a remote inclinometer on top of the array to measure Site Angle #1 and a handheld digital inclinometer to measure the bottom enclosure site angle. Fly the array using the angle strap values calculated in ARRAY 2004 or SOUNDVISION and raise the array above ground level at a height where the ratchet strap handle is accessible. While referring to the remote inclinometer, adjust the front/rear motors to give the correct Site #1 angle. Allow the array to settle then measure the site angle of the bottom enclosure. Adjust the tension of the ratchet strap until the site angle of the bottom enclosure agrees with the value determined in ARRAY 2004 or SOUNDVISION. At this point, the vertical coverage of the array is correct. Next, raise the array to the calculated bumper elevation (or bottom enclosure elevation). Since front and rear chain motors can run at different speeds, once you are at trim, you must reset the focus angle of the array using either the remote inclinometer or by referring to a laser mounted on the top enclosure. Repeat this process to ensure that the vertical coverage and focus of Left and Right arrays are exactly matched. Trim and Site Angle Adjustments After the ratchet straps have been tensioned there are only two adjustments left: trim height of the array and the site angle of the top enclosure which is performed by the relative action of the front and rear chain-motors. Due to different geometric coordinates in ARRAY2004 and SOUNDVISION, the trim and site angle adjustment procedures are different. ARRAY2004 installation data (see Figs 48 and 94): The rear motor is used to set the elevation of the array and the front motor controls the site angle. A tape measure should be attached at the upper rear corner of the top V-DOSC enclosure (bumper elevation = 10.0 m in Fig 94) or lower rear corner of the bottom V-DOSC enclosure (bottom element elevation=4.78 m in Fig 94). Once the proper height has been set, the rear motor is turned off and the front motor used to adjust the site angle of the top V-DOSC enclosure (-1.5 degrees in Fig 94 - see also below). SOUNDVISION installation data (see Figs 51 and 93): The front motor is used to set the elevation of the array and the rear motor controls the site angle. A tape measure should be attached at the upper front corner of the top V-DOSC enclosure (elevation = 10.0 m in Fig 93) or lower front corner of the bottom V-DOSC enclosure (bottom element elevation=4.73 m in Fig 93). Once the proper height has been set, the front motor is turned off and the rear motor used to adjust the site angle of the top V-DOSC enclosure (-1.5 degrees in Fig 93 - see also below) NOTE: For larger arrays (12-16 V-DOSC), always fly the system without tilt initially. Applying tilt before the array is entirely flown can produce too much stress on angle strap fittings – especially if excessive upwards tilt is applied. Always refer to the mechanical data provided in ARRAY 2004 or SOUNDVISION to confirm that rigging limits are not exceeded L-ACOUSTICS V-DOSC Manual Version 4 6/29/2005 Page 121 of 158 Depending on the tools available, there are a number of possible techniques for trimming and angling the array. For trim height measurement, one end of a tape measure can be attached using some duct tape. The tape measure is used to raise the array to the proper height (based on the geometrical data which was pre-calculated using ARRAY2004 or SOUNDVISION – see above) and can be pulled loose afterwards. Under dark conditions (indoors), a laser pointer or laser level can be attached to the top of the upper V-DOSC enclosure. Trim angle adjustments are then given by the focus of the laser on the audience - no walking to the back of the venue is required although laser glasses or a set of binoculars can be useful in locating the laser beam). Coverage up close can be checked by attaching the laser device to the lower wall of the bottom enclosure or visually looking for the bottom wall of the bottom V-DOSC enclosure to see where coverage starts. As described above, mounting a remote digital inclinometer on the top enclosure and using a handheld digital inclinometer is very useful for tensioning ratchet straps and verifying that the overall vertical coverage angle of the array matches what was simulated in ARRAY 2004. Once the system is flown to trim, the tilt of the array can be set using the remote inclinometer and setting the tilt = Site Angle #1 (-1.5 degrees in Figs. 93 and 94). It is important to perform this final adjustment once the array is at the correct trim height since chain motors typically do not run at exactly the same speed if the front and rear load distribution is different. Alternatively, under dark conditions (indoors), a small flashlight can be attached at the junction between the top and second enclosures. The final trim angle adjustment is checked from the rearmost seats of the audience: when the light can be seen through the gap separating the first and the second enclosures, the angle of the array is correct. Under daylight conditions (outdoors), the trim angle can be visually checked from the rearmost audience section (flashlight not required). If the gap between the top and second enclosures is clearly visible then the focus is correct. Note: Bushnell Rangefinder glasses can be useful for checking gaps between cabinets at long distances. Coverage up close can be visually verified to ensure that the top wall of the bottom enclosure is in line with the desired aiming angle for the closest members of the audience. For final angle adjustments, a pair of radios is useful while one person walks the venue and visually inspects the array while a second person operates the site angle adjustment motor (front motor for ARRAY2004, rear motor for SOUNDVISION). For all of the above alternatives, several pieces of string or light rope can be run from the floor, over the BUMP2 and to the Maglite, laser device or remote inclinometer in order to pull the instrument free and lower it after measurements have been performed. If a DELTA PLATE is used, on- or off-stage rotation of the entire array can also be adjusted. Three motors are used in this case, and a rotating shackle connects the DELTA PLATE to the BUMP2. With reference to ARRAY2004 installation data, the two rear motors control the height of the array and the relative action between them controls the rotation. As before, the front motor controls the tilt angle. Use these techniques to verify L and R arrays are matched (plus L-L vs R-R arrays, if installed). Rigging Amplifier Racks In some cases, it is desirable to rig amplifier racks behind the V-DOSC array. Shorter speaker cable runs have the advantage of lower cable resistance resulting in more effective signal transfer since there is less energy dissipated as heat in the cable. Reduced cable runs can also improve damping factor and potential frequency-dependent losses due to the skin effect (in extreme situations). L-ACOUSTICS V-DOSC Manual Version 4 6/29/2005 Page 122 of 158 SAFETY RULES CAUTION: THE RIGGING SYSTEM IS RATED FOR A MAXIMUM OF 16 V-DOSC, 15 VDOSC + 3 dV-DOSC or 14 V-DOSC + 6 dV-DOSC. All rigging should be performed by certified, trained personnel. Proper chain motor installation and operation is absolutely necessary under all circumstances. L-ACOUSTICS recommends the use of safeties at all times. Chain motor ratings for each fly point are as follows: 0.5T motor per point for a 4-enclosure array; 1.0T motor per point for a 5- to 10-enclosure array; 2.0T motor per point for a 11- to 16-enclosure array. For additional safety factor when flying 11-16 enclosure arrays, a bridled hang from the front and rear corner rigging points should be performed using two steel slings, four shackles and one pear ring (front and rear). Always refer to the MECHANICAL DATA in ARRAY 2004 or SOUNDVISION to ensure that safe rigging conditions apply before installation. Ensure that the immediate area is clear of people and obstacles whenever raising or lowering the array. Announce (in a loud voice) whenever the array is being moved to get people’s attention. Always look up while moving the array to be sure that movement remains unimpeded and to check cable tension. Once flown to trim and correctly angled, remove the motor control cables so that the array cannot be tampered with by unauthorized people. Always cover motors with plastic in outdoor installations where motors may be exposed to rain. Do not overtighten ratchet straps, especially if the array is tilted upwards. 5. V-DOSC SYSTEM OPERATION WARNING: The V-DOSC system is capable of producing high sound pressure levels. Hearing loss or damage can occur with prolonged exposure to high SPLs. Please operate your system responsibly at all times. An SPL meter on the mix console is highly recommended as a reference. Prior to describing system operation and tuning procedures, subjective criteria and system setup objectives are first considered. 5.1 SYSTEM TONAL BALANCE V-DOSC and dV-DOSC presets have been specifically engineered to provide an excellent starting point for system tuning. Frequency response is flat between 300 Hz - 4 kHz and from 40 – 160 Hz, a 10 dB low frequency contour is built into the preset. At higher frequencies, the response is either flat (LO presets) or has additional high frequency shelving (HI presets). It is always a good idea to set the ratios between mid/high, low and sub sections using the output channel gains of the DSP before proceeding to perform detailed measurements and equalization. Output gain scaling sets the tonal balance of the system by compensating for the size of the array (low end coupling) and the V-DOSC:SB218 cabinet ratio (low/sub coupling). In general, as the array size doubles, the low end increases by 6 dB and the mid/high response by 3 dB so the low frequency contour for V-DOSC (without subwoofers) scales as follows: 1 V-DOSC (10 dB); 2 VDOSC (13 dB), 4 V-DOSC (16 dB), 8 V-DOSC (19 dB), 16 V-DOSC (22 dB). As a result, for larger V-DOSC arrays (12-16 enclosures) the mid and high sections can both be increased by 3-6 dB (or the low section attenuated) to compensate for the enhanced low end coupling that occurs. Output gain scaling should also be performed to compensate for the V-DOSC:SB218 cabinet ratio. Standard output gains apply to a 3:2 V-DOSC:SB218 ratio; for a 2:1 ratio, subwoofer gain should be scaled +2 dB; for a 1:1 ratio, the low section output gain should be scaled +4 dB (see Section 1.15 for further details). L-ACOUSTICS V-DOSC Manual Version 4 6/29/2005 Page 123 of 158 The desired overall tonal balance depends on both the music program material and the target SPL. For typical rock concerts, sound pressure levels are 102-105 dBA continuous (A weighted) and 125-130 dB SPL (peak unweighted). The only harmless way to reach such levels is to increase the sub/low contour since significant increases in the A-weighted SPL would eventually become painful for the audience (and possibly illegal). In general, sub/low and high frequency tonal balance contours result in a more mix-friendly system for modern music – however, the influence such a system contour has on your board tapes is a another topic for discussion. To a large extent, tonal balance contours are a matter of subjective taste and personal preference that is related to where the FOH engineer prefers to set his mix balance – on the channel strip or on the main PA. Some engineers prefer a built-in low end bump in the PA, others prefer a flat system and using the “warmth of the channel strip” on the console. For program material with lower overall SPL requirements (e.g., speech and classical music), changing a traditionally ‘flat’ tonal balance by boosting the low end is not desirable since peak levels occur only during very short musical transients and the Leq is much lower – typically 95 dBA, or less. In addition, a prominent bass response would not be accepted from an artistic point of view by most classical music conductors or performers and the audience. In order to obtain nominally flat response for speech or classical music sound reinforcement, mid/high ratios will have to be scaled up by approximately 6-8 dB and/or the low/sub output gains attenuated (depending on the size of the array). At the opposite end of the spectrum, for heavy metal shows sub/low contours (below 100 Hz) tend to be 30 dB higher than the nominal mid/high response. Due to it’s coplanar symmetric design, V-DOSC has very stable frequency response throughout it’s coverage region and equalization adjustments made at the mix position translate well throughout the audience. When properly installed and focussed, room-related effects above 300 Hz are minimized and consistent system performance from venue-to-venue effectively allows VDOSC to serve as an accurate reference monitor for the FOH engineer. At lower frequencies, array coupling and room-related effects will typically require equalization in the 120-300 Hz range and it is important to “walk the room” and/or perform spatial averaging measurements to ensure that system equalization adjustments are valid throughout the coverage region of a given array. Due to system phase coherency, small equalization adjustments are highly audible, i.e., you can hear the system respond to eq as well as to adjustments on the mixing console. If you find that it is necessary to apply excessive amounts of equalization to the system above 300 Hz, it is advised to double check the system installation (angle strap selection, ratchet strap tensioning, system focus and whether FOH L/R arrays are correctly matched). In addition, a common problem with FOH engineers who are unfamiliar with V-DOSC is the tendency to over-equalize the mid section since they are unaccustomed to the nearfield listening experience over this frequency bandwidth. The CVE or QVT accompanying the V-DOSC system should attempt to dissuade over-equalization and educate the guest engineer whenever possible. A better solution is not to equalize the mid band but to simply reduce the level of vocals etc in the mix. Several strategically-placed parametric notches can be highly effective in compensating for room reverberation modes and for better resolution, it is recommended that the parametric filters available on the inputs of the digital signal processor are used for system eq. In a festival situation, an effective approach is to perform system equalization using the input parametric filters then turn the system over to the guest FOH engineer with house graphic eqs set flat. Typically, guest engineers are more comfortable with a graphic eq for quick adjustments on the fly and after each act, the graphic can be reset for the next engineer. System predelay is commonly used to improve the combined integration of the main FOH system with the sound coming from onstage. In some cases, alignment with the instrument backline (guitar amplifier stacks, kick drum) is effective and the distance can be determined geometrically (think Fresnel!). In other cases, time alignment with the drum monitor, sidefill monitors or the monitor front line may prove more effective. Generally, the loudest thing on stage makes for a good time alignment reference. In smaller venues, where monitor system energy reflects off the back wall and ceiling in addition to the direct sound generated by the band, system predelay is not L-ACOUSTICS V-DOSC Manual Version 4 6/29/2005 Page 124 of 158 as straightforward and the best results are obtained subjectively. Predelay can be applied before or after performing the detailed measurements outlined in the following section – just be sure that the correct relative delay is also applied to subwoofers, fill systems and downfill systems. Finally, many users have reported good results when using program compression/limiting on the main mix, i.e., before the digital processor inputs. Using a high quality compressor/limiter (eg SSL, dbx 160S, XTA SIDD or other high quality equivalent) and a moderate amount compression, e.g. 1-2 dB with a 1.5:1 to 2:1 ratio, allows the mix to ''sit better on the system'' and prevents transients from ''jumping out of the mix''. In addition, calibrating limiter threshold to the digital processor clip point provides an additional level of system protection by preventing digital clipping of the processor inputs. Program compression/limiting before the processor inputs also provides another level of control when dealing with ''over zealous'' guest engineers in a festival situation… 5.2 MEASUREMENT PROCEDURES Tuning and equalizing V-DOSC is relatively straightforward, i.e., given the prediction tools and sound design concepts outlined in Chapters 2 and 3, the precise installation procedures described in Chapter 4 and dedicated OEM factory presets, an excellent starting point for system tuning is immediately obtained upon installation. Generally speaking, little equalization is required and one third octave real time analysis (RTA) can be sufficient for measurements. Alternatively, MLSSA, WinMLS, TDS, SMAART or Spectrafoo analysis can be used to obtain higher resolution and for time alignment measurements. When properly installed and focussed, system coverage should be very homogeneous and 3 measurement locations are sufficient for performing a systems check: one in the near audience area, one at the mix position and one towards the rear of the coverage pattern. It should be verified that the global shape of the frequency responses at these locations is similar before proceeding to perform detailed equalization. Measurement Instruments Equalization adjustments can be performed using a real time analyzer (RTA), however, more sophisticated measurement tools such as MLSSA, WinMLS, TDS, SMAART or SpectraFOO allow the user to obtain better results (provided these instruments are properly used, of course). Compared with RTA measurements, improved frequency and time domain resolution can be obtained and time windowing is useful for eliminating room reflections from measurements – i.e., in general, the goal is to eq the system so that the direct sound is as flat as possible for the mid/high section while obtaining the desired sub/low spectral contour. In addition, impulse response measurements that can be performed using MLSSA, WinMLS or TDS are highly recommended for time alignment of subwoofers (see Section 1.15 for guidelines) and time aligning delay plus fill systems (in terms of accuracy and the time required for performing measurements). It is often useful to perform room measurements throughout a given array’s coverage region (9-12 measurement locations) then perform a weighted spatial average to determine a spatially averaged response curve. The spatially averaged frequency response is then inverted and used as a target for adjusting the system equalizer (which is swept electronically using the measurement instrument and adjusted to meet the target curve). Alternatively, the system equalizer can be swept electronically while it is initally flat. Multiplying the flat eq curve by the spatially averaged curve then allows you to adjust the equalizer while directly monitoring the effect on the spatiallyaveraged response. These techniques can be used for fixed installations (where system equalizers are remotely located) or for touring applications – the advantage is that eq adjustments can be performed “offline” and it is not necessary to make excessive noise during the system eq process (which can be disruptive to other people working on the installation). Note: For 5+1 format presets (V-DOSC INFRA, X, 4W), fullrange ouput 5 (input A) can be used to monitor the effects of input parametric equalization which is used for system eq. L-ACOUSTICS V-DOSC Manual Version 4 6/29/2005 Page 125 of 158 More sophisticated measurement instruments can also provide additional information related to room acoustics that can be useful for the tuning process – for example, RT60 at various frequencies and waterfall plots that help identify low frequency resonances for a given room. Measurement Tips Performing accurate measurements and interpreting them correctly requires being aware of a few potential problems. Here are some typical ones: Measure one source at a time. Measuring two sources radiating the same signal simultaneously will display interference cancellations which occur due to path length differences (unless the microphone is exactly equi-distant from both sources). Place the microphone on the floor. When the measurement microphone is mounted on a stand or near reflecting surfaces, the frequency response will show a cancellation in the lowmid frequencies due to the path difference between the direct signal and the reflected signal (which arrives a few milliseconds later). The resulting frequency response cancellations are not due to the system and should not be equalized. More sophisticated measurement systems such as MLSSA, WinMLS and TDS allow the user to apply a time window to remove such reflections from the measurement, however, this can be at the expense of low frequency resolution (depending on the length of the time window). When placing the microphone on the floor, if the floor is absorbent (e.g., thick carpet or grass in open-air situations) the measured response may display a high-frequency loss – in this case, a sheet of plywood can be useful for reducing this effect on your measurements. Time aligning the “sine wave characteristics" of the sub and low section impulse responses provides the best sub/low summation results (see Section 1.15). Measurement systems such as MLSSA or WinMLS are recommended for this purpose since they measure the impulse response directly in the time domain and it is possible to obtain a clean impulse response even in highly reverberant indoor environments. Equalizing subwoofers is difficult since measurements taken at a single location can be misleading. Indoors, there are room modes to consider and you may be located in a pressure null or maximum depending on the location and the frequency. Be sure to verify the effect of your adjustments throughout the audience by walking the room and performing spatial averaging. Watch out for wind effects and be sure that measurements are stable and repeatable at high frequencies. L-ACOUSTICS V-DOSC Manual Version 4 6/29/2005 Page 126 of 158 Step-By-Step Tuning Procedure In general terms, installation and tuning proceeds as follows: Room Dimensions⇒ ARRAY or SOUNDVISION⇒ Sound Design⇒ Installation Parameters System Install ⇒ System Focus Preset Selection ⇒ FOH Drive Rack/CO24 Channel Assignment ⇒ Configure Amp Racks System Check ⇒ Coverage Check ⇒ Time Align ⇒ Balance ⇒ Tune 1) With reference to the installation parameters calculated in ARRAY or SOUNDVISION, install the system and perform trim and site angle adjustments according to the procedures outlined in Section 4.2. 2) Configure your signal distribution system by selecting the appropriate preset for your configuration and refer to the Preset Setup sheets (tables 11-14) while patching your signal distribution system. Configure COMB connectors for all amplifiers racks accordingly (and remember the old saying: “amps on last, amps off first”). 3) Send pink noise to each array (one array at a time, band by band) and spin up amplifier channels individually and sequentially in pairs. For all bands, turn up amp channel 1 to make sure it’s working and then amp channel 2 to confirm that there is acoustic summation with channel 1. Then turn down amp channel 1 to confirm that 2 is working. Then turn up amp channel 3 to check acoustic summation with channel 2, etc. Repeat the process (i.e., 1; 1 and 2; 2; 2 and 3; 3; 3 and 4 etc) until you have checked all amp channels and all bands for each array. If you encounter a polarity problem, use a polarity checker to isolate the problem. 4) Verify coverage by running low level pink noise through the system (excluding subwoofers) and walking the room. Check the coverage down front and at the back of the venue. Perform any required trim and angle adjustments if necessary. 5) Using your measurement system, at the mix position, compare Left versus Right polarity and frequency response, channel by channel, as a final system check. All responses should be identical within 1 dB, except for the high band where larger deviations are acceptable (2 to 3 dB). Beware of wind effects which can affect HF measurement stability and repeatability. 6) Typically, the subwoofers act as an overall time reference for the complete system so the next step is to time align the subwoofers to the main arrays. If a time domain measurement system (WinMLS, MLSSA, TDS) is not available, use a laser rangefinder to measure the geometric difference between the main array and the subs (at your reference point of choice). Adjust the subwoofer delay by adding the geometrically-determined delay to the pre-aligned subwoofer delay that is included in the OEM preset as a starting point. ♦ Place a microphone on the floor (at your reference point of choice) on-axis or equidistant between the left V-DOSC and left subwoofer arrays (alternatively, time alignment measurements can be conducted on FOH R). For LCR subwoofer arrays, refer to Section 3.5.3 for recommendations concerning measurement microphone locations for time alignment ♦ Mute the highs and mids ♦ Individually feed the low channel of the main L arrays then the L subwoofers with pink noise and adjust the crossover output levels to obtain the same measured level (and/or change the measurement microphone reference distance to obtain the same measured level) ♦ Invert the sub polarity from it’s OEM starting point 4W, INFRA or X presets: change from +ve to –ve X AUX preset: change from –ve to +ve ♦ Feed L subs and L lows with pink noise and fine tune the delay adjustment by up to +/- 3 msec (from the geometric + pre-aligned delay) to obtain maximum cancellation L-ACOUSTICS V-DOSC Manual Version 4 6/29/2005 Page 127 of 158 ♦ Change the polarity of the subs back to the normal values and confirm that maximum summation is obtained 4W, INFRA or X presets: subs = +ve polarity X AUX preset: subs = -ve polarity ♦ Apply the same delay to FOH R subs (or FOH L if measurements carried out on FOH R) Note: Alternatively, if a time domain measurement system is available, follow the guidelines outlined in Section 1.15 to time align the “sine wave signature” of the sub and low channel impulse responses. 7) Check the overall tonal balance of one side. Select the desired preset (LO or HI shelving eq) and perform band attenuation using DSP output gains to achieve the desired tonal balance. Note: For larger arrays (12-16 enclosures), mid and high output gains can be increased by 3-6 dB to compensate for increased low end coupling. Simple attenuation is generally all that is necessary – do not reach for the graphic equalizer first! Keep in mind that the best frequency response is not necessarily a flat line from 20 to 20k Hz (see the above discussion on tonal balance). 8) Duplicate settings for the other side and verify that both sides are the same by measuring the Left and Right frequency responses at the mix position. 9) Measure FOH Left (or Right) frequency response at a number of representative locations throughout the coverage region (9-12 measurement locations). Store the results and perform a spatial average. Note: Be careful of wind effects and make sure that the measured HF response above 8 kHz is stable and repeatable. 10) Compare all measurements to see if there is good correspondence (i.e., system coverage is acceptable) then perform system equalization based on the spatial average of all measurement locations. If a given measurement location is in close agreement with the spatial average, re-place the microphone at this location and use this as a reference for conducting system eq. Another useful approach: invert the spatially-averaged measurement curve then use this as a target while electrically sweeping the equalizer. Alternatively, sweep the system equalizer while it is initally flat then multiply by the spatially averaged curve. This allows you to adjust the equalizer while monitoring the effect on the spatially-averaged response. 11) Duplicate eq settings for the other side of the system (if FOH L/R DSPs are not stereo linked). Verify the effects of equalization by repeating steps 8-9. 12) Adjust the subwoofer level according to subjective taste and finalize EQ adjustments focussing on the 120-300 Hz region. 14) Predelay the entire system to the desired time reference. For example, if the drum monitor is the loudest element on stage, use a system with time delay measurement capability to measure the time delay of the drum monitor with respect to the main system. Otherwise base system predelay on the geometrically-determined delay. 15) Repeat the eq procedure for fill systems (LL, RR offstage arrays, front fill, centre cluster, etc) 16) Time align fill systems to the main L, R arrays by locating a measurement mic in the transition region where the coverage patterns overlap. 17) Listen to a variety of familiar, well-recorded program material 18) Walk the room and attenuate fill arrays relative to the main L, R system as required 19) Compare program reproduced by the system versus a pair of high quality reference headphones monitoring the output of the console.. Voice the system with a good quality vocal microphone. 20) Verify tuning throughout the audience by walking the room and perform final adjustments using the analyzer between your ears! L-ACOUSTICS V-DOSC Manual Version 4 6/29/2005 Page 128 of 158 6. MAINTENANCE AND INSTALLATION TOOLS 6.1 RECOMMENDED MAINTENANCE PROCEDURES Regular maintenance procedures (monthly) include: component sweep (using sine wave generator or other suitable test system) and polarity check to ensure that all components are in good working order tighten all ANGLE strap shackles and inspect all double stud fittings cable continuity test (MULTI, AMP LINK, CROSS LINK, LINK-BREAKOUT, LINK EXTEND, V-CABLE, V-LINK, F-CABLE, F-LINK, SUB cables) clean power amplifier filters verify crossover presets are correct and up to date Periodic maintenance procedures (every 6-12 months) include: tighten dolly locator pins and all external fasteners on V-DOSC and SB218 enclosures tighten high frequency diaphragm mounting fasteners inspect all rigging components for wear and replace as necessary (i.e., rotating legs, rotating leg pins, U pins, rotating leg covers, flytrack sections, angle strap fittings) inspect wiring harnesses, internal connections for all panels Occasional (as necessary) maintenance procedures include: refoam grilles repaint cabinets replace stacking runners replace protective covers for rotating legs 6.2 Recommended Maintenance Tools APPLICATION V-DOSC SERVICE TOOLS V-DOSC SERVICE TOOLS (USA only) As Required #2 Phillips screwdriver #2 Phillips screwdriver LF Speaker Mount 5 mm hex key 3/16 allen head socket driver (hex key) LF Speaker Terminals #13 wrench #13 wrench MF Speaker Mount 4 mm hex key 5/32 allen head socket driver (hex key) HF Diaphragm Mount 4 mm hex key 4 mm allen head socket driver (hex key) DOSC Waveguide Mount Bolt 10 mm socket 5/16 in SAE socket on 4 inch extension Fly Track and Rotating Leg Cover 4 mm hex key 6/32 allen head socket driver (hex key) Fly Track Mount Nut 10 mm socket 7/16 in wrench Rotating Leg Housing Mount Bolt 5 mm 3/16 allen head socket driver (hex key) Rotating Leg Mount Bolt 12 mm hex key 12 mm allen head socket driver (hex key) Rotating Leg Mount Nut 22 mm wrench ½ in wrench Dolley Locator Pin Mount 6 mm hex key 6 mm allen head socket driver (hex key) Castor Mount Bolt 13 mm socket ½ in SAE Socket on 2 in extension Miscellaneous Tools : adjustable pliers, rubber mallet, sidecutters, wire stripper, soldering iron, digital voltmeter (DVM), breakout cables for speaker testing (CA COM to banana leads) L-ACOUSTICS V-DOSC Manual Version 4 6/29/2005 Page 129 of 158 6.3 SPARE PARTS Speakers HF driver (complete) HF diaphragm 7” midrange speaker (complete) 15'' speaker (complete) 15'' speaker (recone kit) 18” speaker (220 mm magnet complete) 18” speaker (220 mm magnet recone kit) 18” speaker (260 mm magnet recone kit - old style) HP BC21 HS BC21 HP FO71 HP PH151 HS PH151 HP BE181 HS BE182 HS BE181 Connectors Female Panel Mount Speaker Connector (8 conductor) CC 8B EF Male Panel Mount Speaker Connector (8 conductor) CC 8B EM Female Speaker Connector – Line (8 conductor) CC 8B FF Male Speaker Connector – Line (8 conductor) CC 8B FM Male Extension Cable Connector – Line (8 conductor) CC 8B FPM Female Extension Cable Connector – Line (8 conductor) CC 8B FPF Male Panel Mount Link Connector (19 conductor) CC 19B EM Female Link Connector – Line (19 conductor) CC 19B FF Speakon Connector – Line (4 conductor) CC 4 F Speakon Connector – Panel Mount (4 conductor) CC 4 ER COMB Connector (25 pin) CC 25SUBDM COMB Connector (37 pin) CC 37SUBDM DKIT upgrade kit for 1 x COMB Connector DKIT Accessories Locking Pin (4.5 mm diameter: for U Pins) Lanyard for CA GOUP45 Locking Pin (6 mm diameter: for dolly board) Lanyard for CA GOUP6 Cabinet handle Dolley board caster Magnet for rotating leg U-Pin Left Balancier Cover (plastic) Right Balancier Cover (plastic) Bumper shackle ANGLE strap shackle ANGLE strap fitting SB218 Grille Foam SB218 Front Grille V-DOSC Grille Foam V-DOSC Front Grille Neoprene glue for grille foam attachment Brown paint (packaged by 10 kg) Dust filter clips for LA48a Dust filters for LA48a Rear support kit for LA48a amplifier L-ACOUSTICS V-DOSC Manual Version 4 CA GOUP45 CA_EL45 CA GOUP6 CA_EL6 CA POIG CA ROL CD AIMAN MC DOAXF-2 MP_DORAIL_G MP_DORAIL_D CA MAN22 CA MAN81 CA PION3 CM SUB218 99 MC GRSUB218 CM DOSC 99 MC GRDOSC CD COLNEO CD TEXTURE APCLIP APFILT APSUP 6/29/2005 Page 130 of 158 6.4 RECOMMENDED INSTALLATION TOOLS FOR SYSTEM FOCUS Digital Inclinometers Handheld : Digital Protractor PRO 3600 (or equivalent) (check single point hangs, tension ratchet straps, measure room dimensions) Remote: Laser Levels Lucas Anglestar or Rieker RAD2-70-B2 (mount on top/bottom of the array to tension ratchet straps and set site angle) Laserline XPRO (or equivalent) – one for each array required FOR DISTANCE MEASUREMENTS Laser Rangefinder Binoculars - Bushnell Yardage Pro (or equivalent) Laser Rangefinder - Leica Disto Classic or Hilti PD22 (or equivalent) 20 m (50 ft) tape measure (for setting array trim height) PORTABLE COMPUTER SOUNDVISION, Excel (for ARRAY 2004), WinMLS, SMAART or MLSSA measurement software, sound card, measurement mic/preamp, DSP control/programming software (Lake Contour, XTA Audiocore, BSS Soundbench2, BSS Soundweb) Figure 96: Recommended Installation Tools L-ACOUSTICS V-DOSC Manual Version 4 6/29/2005 Page 131 of 158 7. SPECIFICATIONS 7.1 V-DOSC ENCLOSURE SPECIFICATIONS The specifications for one individual V-DOSC enclosure are given below. These individual enclosure specifications are not relevant to V-DOSC system performance since overall system behavior is the net result of the complex acoustical coupling between all enclosures of the array. Frequency response Power rating (pink noise) LF MF HF 50 - 18k Hz (+/-3 dB) (3WX preset) 40 – 20k Hz (-10 dB) 2 x 375 Wrms 2 x 1500 Wpeak 600 Wrms 2400 Wpeak 200 Wrms 800 Wpeak Impedance 2 x 8 ohms 8 ohms 16 ohms Horizontal Coverage Angle 90° (-6 dB points, symmetrical about main axis) 70° (-3 dB points, symmetrical about main axis) Vertical Coverage Angle defined by the array System Data 1 enclosure 2 enclosures 4 enclosures Continuous SPL Continuous SPL (flat array) (maximum curvature) 134 dB 134 dB 140 dB 139 dB (5 degrees vertical coverage) 146 dB 143 dB (15 degrees vertical coverage) LF MF HF 2 x 15'' weather-resistant loudspeaker (3'' voice coil, bass-reflex) 4 x 7'' weather-resistant loudspeaker (kevlar cone, bass-reflex) 2 x 1.4" compression driver mounted on 2 x DOSC waveguides Material Baltic birch plywood. Sealed, screwed and rabbeted angles, internally braced cabinet construction Finish Maroon-gray Grill Black epoxy coated perforated steel with acoustically transparent foam Features Integrated flying hardware and handles Dimension (WxHxD): 1300 mm x 434 mm x 565 mm (51.2" x 17.1" x 22.2") Weight: 108 kg (238 lbs) + 9,5 kg (21 lbs) for dolly L-ACOUSTICS V-DOSC Manual Version 4 6/29/2005 Page 132 of 158 Figure 97: V-DOSC Enclosure – Line Drawing L-ACOUSTICS V-DOSC Manual Version 4 6/29/2005 Page 133 of 158 7.2 SB218 SUBWOOFER SPECIFICATIONS Frequency Response Usable Bandwidth 28 Hz - 140 Hz (+/- 3 dB) 25 Hz - 200 Hz Sensitivity (2.83 V at 1m) 100.5 dB SPL (28-200 Hz) Power rating 68 Vrms 1100 Wrms 4400 Wpeak (long term pink noise with 6 dB crest factor) SPL Output 1 enclosure 2 enclosures 4 enclosures 130 dB (continuous) 136 dB (continuous) 142 dB (continuous) Impedance 4 ohms Components Material Finish Grill 2 x 18" cone bass-reflex, 4.5" edgewound copper voice coil Baltic birch plywood. Sealed, screwed cabinet construction Maroon-gray Black epoxy perforated steel with acoustically transparent foam Features Integrated flying hardware, handles Dimension (WxHxD): 1300 mm x 550 mm x 700 mm (51.2" x 21.7" x 27.6") Weight: 106 kg (233 lbs) + 9,5 kg (21 lbs) for dolly 136 dB (peak) 142 dB (peak) 148 dB (peak) Figure 98: SB218 Subwoofer – Line Drawing L-ACOUSTICS V-DOSC Manual Version 4 6/29/2005 Page 134 of 158 7.3 RIGGING STRUCTURES V-DOSC BUMP2 Bumper Dimension (WxHxD): 1262 mm x 140 mm x 1100 mm (49-5/8" x 5-4/8" x 43-3/8") Weight: 61.5 kg (135.6 lbs) Figure 99: V-DOSC Flying Bumper – Line Drawing L-ACOUSTICS V-DOSC Manual Version 4 6/29/2005 Page 135 of 158 Table 16: Weights for flown V-DOSC system Number of Cabinet Bumper TOTAL TOTAL V-DOSC Weight Weight Weight Weight Cabinets (kg) (kg) (kg) (lbs) 4 432 61 493 1087 5 540 61 601 1325 6 648 61 709 1563 7 756 61 817 1801 8 864 61 925 2039 9 972 61 1033 2277 10 1080 61 1141 2515 11 1188 61 1249 2754 12 1296 61 1357 2992 13 1404 61 1465 3230 14 1512 61 1573 3468 15 1620 61 1681 3706 16 1728 61 1789 3944 SB218 BUMPSUB Rigging Bar Dimension (WxHxD): 1420 mm x 140 mm x 40 mm (55-7/8" x 5-4/8" x 1-5/8") Weight: 12 kg (26.5 lbs) Figure 100: SB218 Flying Bar – Line Drawing L-ACOUSTICS V-DOSC Manual Version 4 6/29/2005 Page 136 of 158 7.4 CO24, MD24 Line Assignment Summary Table 17: Whirlwind W6 MASS Connector Input/Output Line Assignments WHIRLWIND PAIR NUMBER 1 2 3 4 5 6 7 8 9 10 11 12 13 14 15 16 17 18 19 20 21 22 23 24 25 26 27 28 W6 OUTPUT (CO24) W6 PINS XLR ||CACOM ASSIGNMENT W6 SOCKETS XLR ||CACOM ASSIGNMENT WHIRLWIND PAIR NUMBER A4 || A (ABC) 1 2 3 4 5 6 7 8 9 10 11 12 13 14 15 16 17 18 19 20 21 22 23 24 C4 || C (ABC) A3 || A (DEF) C3 || C (DEF) A2 || A (GHJ) C2 || C (GHJ) A1 || A (KLM) C1 || C (KLM) A6 || A (NPR) C6 || C (NPR) A5 || A (STU) C5 || C (STU) B4 || B (ABC) D4 || D (ABC) B3 || B (DEF) D3 || D (DEF) B2 || B (GHJ) D2 || D (GHJ) B1 || B (KLM) D1 || D (KLM) B6 || B (NPR) D6 || D (NPR) B5 || B (STU) D5 || D (STU) REMOTE OUT (M) 25 26 27 28 REMOTE IN (F) REMOTE OUT (M) REMOTE IN (F) W6 INPUT (MD24) W6 PINS CACOM ASSIGNMENT W6 SOCKETS CACOM ASSIGNMENT A (ABC) C (ABC) A (DEF) C (DEF) A (GHJ) C (GHJ) A (KLM) C (KLM) A (NPR) C (NPR) A (STU) C (STU) B (ABC) D (ABC) B (DEF) D (DEF) B (GHJ) D (GHJ) B (KLM) D (KLM) B (NPR) D (NPR) B (STU) D (STU) REMOTE IN (F) REMOTE OUT (M) REMOTE IN (F) REMOTE OUT (M) NOTE: NOTE: REMOTE OUT = 4 pin MALE XLR on front panel (return signal from amplifiers to computer) REMOTE OUT = 4 pin MALE XLR on front panel (control signal from computer to amplifiers) REMOTE IN = 4 pin FEMALE XLR on front panel (control signal from computer to amplifiers) REMOTE IN = 4 pin FEMALE XLR on front panel (return signal from amplifiers to computer) L-ACOUSTICS V-DOSC Manual Version 4 6/29/2005 Page 137 of 158 7.5 CO24 Control Output Panel Line Assignments Table 18a: CO24 W6 Pin Assignments W6 PIN # 42 41 40 39 38 37 36 35 34 33 32 22 31 30 29 28 27 26 25 24 23 21 20 19 18 17 16 15 14 13 12 11 4 10 9 8 7 W6 COLOR CODE BLACK RED GND BLACK GREEN GND BLACK YELLOW GND BLACK ORANGE GND RED GREEN GND RED YELLOW GND RED ORANGE GND GREEN BLUE GND GREEN BROWN GND WHITE BLUE GND WHITE BROWN GND BLUE YELLOW GND BLUE 6 ORANGE 5 GND 3 BROWN 2 ORANGE 1 GND XLR # XLR PIN CACOM CHANNEL CACOM PIN PROCESSOR CHANNEL LOUDSPEAKER ARRAY A4 A4 A4 A3 A3 A3 A2 A2 A2 A1 A1 A1 A6 A6 A6 A5 A5 A5 B4 B4 B4 B3 B3 B3 B2 B2 B2 B1 B1 B1 B6 B6 B6 B5 B5 B5 REMOTE OUT REMOTE OUT 3 2 1 3 2 1 3 2 1 3 2 1 3 2 1 3 2 1 3 2 1 3 2 1 3 2 1 3 2 1 3 2 1 3 2 1 M 4pin XLR #1 M 4pin XLR #2 A A A A A A A A A A A A A A A A A A B B B B B B B B B B B B B B B B B B C B A F E D J H G M L K R P N U T S C B A F E D J H G M L K R P N U T S HF HF HF MID MID MID LF LF LF SUB SUB SUB 2-WAY FILL HF 2-WAY FILL HF 2-WAY FILL HF 2-WAY FILL LF 2-WAY FILL LF 2-WAY FILL LF HF HF HF MID MID MID LF LF LF SUB SUB SUB 2-WAY FILL HF 2-WAY FILL HF 2-WAY FILL HF 2-WAY FILL LF 2-WAY FILL LF 2-WAY FILL LF LEFT-LEFT LEFT-LEFT LEFT-LEFT LEFT-LEFT LEFT-LEFT LEFT-LEFT LEFT-LEFT LEFT-LEFT LEFT-LEFT LEFT-LEFT LEFT-LEFT LEFT-LEFT LEFT-LEFT LEFT-LEFT LEFT-LEFT LEFT-LEFT LEFT-LEFT LEFT-LEFT LEFT LEFT LEFT LEFT LEFT LEFT LEFT LEFT LEFT LEFT LEFT LEFT LEFT LEFT LEFT LEFT LEFT LEFT REMOTE OUT REMOTE OUT M 4pin XLR #3 M 4pin XLR #4 L-ACOUSTICS V-DOSC Manual Version 4 6/29/2005 Page 138 of 158 Table 18b: CO24 W6 Socket Assignments W6 Socket # 42 41 40 39 38 37 36 35 34 33 32 22 31 30 29 28 27 26 25 24 23 21 20 19 18 17 16 15 14 13 12 11 4 10 9 8 7 W6 COLOR CODE BLACK WHITE GND BLACK BLUE GND BLACK BROWN GND RED WHITE GND RED BLUE GND RED BROWN GND GREEN WHITE GND GREEN YELLOW GND GREEN ORANGE GND WHITE YELLOW GND WHITE ORANGE GND BLUE BROWN GND BROWN 6 YELLOW 5 GND 3 ORANGE 2 YELLOW 1 GND XLR # XLR PIN CACOM CHANNEL CACOM PIN PROCESSOR CHANNEL LOUDSPEAKER ARRAY C4 C4 C4 C3 C3 C3 C2 C2 C2 C1 C1 C1 C6 C6 C6 C5 C5 C5 D4 D4 D4 D3 D3 D3 D2 D2 D2 D1 D1 D1 D6 D6 D6 D5 D5 D5 REMOTE IN REMOTE IN 3 2 1 3 2 1 3 2 1 3 2 1 3 2 1 3 2 1 3 2 1 3 2 1 3 2 1 3 2 1 3 2 1 3 2 1 F 4pin XLR #1 F 4pin XLR #2 C C C C C C C C C C C C C C C C C C D D D D D D D D D D D D D D D D D D C B A F E D J H G M L K R P N U T S C B A F E D J H G M L K R P N U T S HF HF HF MID MID MID LF LF LF SUB SUB SUB 2-WAY FILL HF 2-WAY FILL HF 2-WAY FILL HF 2-WAY FILL LF 2-WAY FILL LF 2-WAY FILL LF HF HF HF MID MID MID LF LF LF SUB SUB SUB 2-WAY FILL HF 2-WAY FILL HF 2-WAY FILL HF 2-WAY FILL LF 2-WAY FILL LF 2-WAY FILL LF RIGHT RIGHT RIGHT RIGHT RIGHT RIGHT RIGHT RIGHT RIGHT RIGHT RIGHT RIGHT RIGHT RIGHT RIGHT RIGHT RIGHT RIGHT RIGHT-RIGHT RIGHT-RIGHT RIGHT-RIGHT RIGHT-RIGHT RIGHT-RIGHT RIGHT-RIGHT RIGHT-RIGHT RIGHT-RIGHT RIGHT-RIGHT RIGHT-RIGHT RIGHT-RIGHT RIGHT-RIGHT RIGHT-RIGHT RIGHT-RIGHT RIGHT-RIGHT RIGHT-RIGHT RIGHT-RIGHT RIGHT-RIGHT REMOTE IN REMOTE IN F 4pin XLR #3 F 4pin XLR #4 L-ACOUSTICS V-DOSC Manual Version 4 6/29/2005 Page 139 of 158 7.6 MD24 Multi Distro Panel Line Assignments Table 19a: MD24 W6 Pin Assignments W6 PIN # 42 41 40 39 38 37 36 35 34 33 32 22 31 30 29 28 27 26 25 24 23 21 20 19 18 17 16 15 14 13 12 11 4 10 9 8 7 W6 COLOR CODE BLACK WHITE GND BLACK BLUE GND BLACK BROWN GND RED WHITE GND RED BLUE GND RED BROWN GND GREEN WHITE GND GREEN YELLOW GND GREEN ORANGE GND WHITE YELLOW GND WHITE ORANGE GND BLUE BROWN GND BROWN 6 YELLOW 5 GND 3 ORANGE 2 YELLOW 1 GND CACOM CHANNEL CACOM PIN PROCESSOR CHANNEL LOUDSPEAKER ARRAY C C C C C C C C C C C C C C C C C C D D D D D D D D D D D D D D D D D D REMOTE OUT REMOTE OUT C B A F E D J H G M L K R P N U T S C B A F E D J H G M L K R P N U T S M 4pin XLR #1 M 4pin XLR #2 HF HF HF MID MID MID LF LF LF SUB SUB SUB 2-WAY FILL HF 2-WAY FILL HF 2-WAY FILL HF 2-WAY FILL LF 2-WAY FILL LF 2-WAY FILL LF HF HF HF MID MID MID LF LF LF SUB SUB SUB 2-WAY FILL HF 2-WAY FILL HF 2-WAY FILL HF 2-WAY FILL LF 2-WAY FILL LF 2-WAY FILL LF RIGHT RIGHT RIGHT RIGHT RIGHT RIGHT RIGHT RIGHT RIGHT RIGHT RIGHT RIGHT RIGHT RIGHT RIGHT RIGHT RIGHT RIGHT RIGHT-RIGHT RIGHT-RIGHT RIGHT-RIGHT RIGHT-RIGHT RIGHT-RIGHT RIGHT-RIGHT RIGHT-RIGHT RIGHT-RIGHT RIGHT-RIGHT RIGHT-RIGHT RIGHT-RIGHT RIGHT-RIGHT RIGHT-RIGHT RIGHT-RIGHT RIGHT-RIGHT RIGHT-RIGHT RIGHT-RIGHT RIGHT-RIGHT REMOTE OUT REMOTE OUT M 4pin XLR #3 M 4pin XLR #4 L-ACOUSTICS V-DOSC Manual Version 4 6/29/2005 Page 140 of 158 Table 19b: MD24 W6 Socket Assignments W6 Socket # 42 41 40 39 38 37 36 35 34 33 32 22 31 30 29 28 27 26 25 24 23 21 20 19 18 17 16 15 14 13 12 11 4 10 9 8 7 W6 COLOR CODE BLACK RED GND BLACK GREEN GND BLACK YELLOW GND BLACK ORANGE GND RED GREEN GND RED YELLOW GND RED ORANGE GND GREEN BLUE GND GREEN BROWN GND WHITE BLUE GND WHITE BROWN GND BLUE YELLOW GND BLUE CACOM CHANNEL CACOM PIN PROCESSOR CHANNEL A A A A A A A A A A A A A A A A A A B B B B B B B B B B B B B B B B B B REMOTE IN HF HF HF MID MID MID LF LF LF SUB SUB SUB 2-WAY FILL HF 2-WAY FILL HF 2-WAY FILL HF 2-WAY FILL LF 2-WAY FILL LF 2-WAY FILL LF HF HF HF MID MID MID LF LF LF SUB SUB SUB 2-WAY FILL HF 2-WAY FILL HF 2-WAY FILL HF 2-WAY FILL LF 2-WAY FILL LF 2-WAY FILL LF 6 ORANGE REMOTE IN C B A F E D J H G M L K R P N U T S C B A F E D J H G M L K R P N U T S F 4pin XLR #1 F 4pin XLR #2 5 GND 3 BROWN REMOTE IN 2 ORANGE REMOTE IN 1 GND L-ACOUSTICS V-DOSC Manual Version 4 LOUDSPEAKE R ARRAY LEFT-LEFT LEFT-LEFT LEFT-LEFT LEFT-LEFT LEFT-LEFT LEFT-LEFT LEFT-LEFT LEFT-LEFT LEFT-LEFT LEFT-LEFT LEFT-LEFT LEFT-LEFT LEFT-LEFT LEFT-LEFT LEFT-LEFT LEFT-LEFT LEFT-LEFT LEFT-LEFT LEFT LEFT LEFT LEFT LEFT LEFT LEFT LEFT LEFT LEFT LEFT LEFT LEFT LEFT LEFT LEFT LEFT LEFT F 4pin XLR #3 F 4pin XLR #4 6/29/2005 Page 141 of 158 APPENDIX 1: WHY DO SEPARATED SOUND SOURCES INTERFERE? When two sources are physically separated, the different arrival times of the wavefronts radiated by the individual sources cause frequency- and position-dependent constructive and destructive interference. Figure 101: The Interference Problem If P1 is the sound pressure produced by S1 at point M, and P2 the pressure produced by S2 at point M, the complex sound pressure Pm resulting from the addition of the two speakers at point M is calculated as: Pm = P1 e d 2 jπf t − 1 c + P2 e d 2 jπf t − 2 c If both sources radiate the same pressure P and the real part of the complex sound pressure at M is considered at time t=t1=d1/c, the expression simplifies to: δd Pm = P 1 + cos 2πf c where the path length difference d2-d1 = δd. From the simplified expression, it is seen that the second source causes a frequency dependent phase shift given by: δϑ = 2π f δd/c. When δϑ=(2n + 1)π, where n=0,1,2,3…= integer, pressure cancellations occur, since cos(2n +1)π = -1. As a result, pressure cancellation occurs for frequencies that satisfy the condition: 2f δd/c = 2n + 1 where n is an integer. L-ACOUSTICS V-DOSC Manual Version 4 6/29/2005 Page 142 of 158 For example when δd = 0.33 m (i.e. δt = 1 msec), cancellations occur at 500 Hz, 1500 Hz, 2500 Hz, ... producing what is termed comb filtering. The biggest problem with comb filtering is the fact that these cancellations are not consistent with frequency since the time difference changes depending on the observer location M. Figure 102: Comb filtering due to path length differences between sources As discussed in Section 3.3, the principles of 2 source interference can be used in sound design when considering multiple V-DOSC arrays since, in effect, the main and offstage V-DOSC arrays act as 2 coherent sound sources. When a separation of 6-8 metres is maintained between the 2 V-DOSC arrays, this shifts the first octave-wide cancellation seen in Figure 102 (fo) down to approximately 15-25 Hz and this cancellation becomes inaudible since it is shifted below the operating bandwidth of the V-DOSC low section. The second and third nulls (3fo, 5fo) tend to be filled in or masked by room reverberation. Higher frequency cancellations (7fo and higher) are too tightly spaced for the ear to resolve, plus focussing the aiming axes of the two arrays at different angles helps to minimize the area over which this comb filtering interaction takes place. L-ACOUSTICS V-DOSC Manual Version 4 6/29/2005 Page 143 of 158 APPENDIX 2: FURTHER EXPLANATIONS REGARDING WST CRITERIA A detailed formulation of Wavefront Sculpture Technology Criteria was developed in “Sound Fields Radiated by Multiple Sound Source Arrays”, AES preprint n°3269 (presented at the 92nd AES convention in Vienna, March 1992). Further theoretical research was developed in ''Wavefront Sculpture Technology'', JAES Vol. 51, No. 10, October 2003. The following explanation provides a more intuitive description of WST criteria with the intention of describing where the ideas for the research that finally led to WST came from. Returning to the interference problem introduced in Appendix 1, the time/frequency relationship can be expressed in a different way, i.e., in the distance/wavelength domain. Since λ = c / f (i.e., wavelength = speed of sound divided by the frequency) and δd = c δt (i.e., path length difference = speed of sound times the arrival time difference), pressure cancellations occur when the path length difference between two wavefronts arriving at an observation point M is: δd = (2n + 1) λ/2 where n is an integer. We can therefore conclude that discrete sound sources produce a totally incoherent wavefront (due to comb filtering effects) as soon as the path length difference between the sources to a given point M is greater than λ/2 (half a wavelength). Let’s consider a line array or column of discrete sound sources providing almost equal pressure levels at M. We want to find the conditions for constructive coupling of the sound sources for a given frequency f = c / λ. Assume that the time of the first arrival at M of this multiple source wavefront is ti = di / c where it is seen in Figure 103 that the first arrival is due to source i (physically the closest source to the listener position M). Figure 103: Destructive interference ring for a line array at observation point M. If a circle of radius di is centered at M, it intersects source i. Recalling the condition that δd = (2n + 1) λ/2, a second circle can be drawn with a radius of di + λ/2, i.e., n = 0 in the expression for the path length difference. If adjacent sources are inside the ring defined by (di, di + λ/2) then they do not cause cancellation – they couple constructively. If sources are outside the ring they may cause cancellation. L-ACOUSTICS V-DOSC Manual Version 4 6/29/2005 Page 144 of 158 Figure 104: The effect of varying frequency and listener position M on Fresnel rings As seen in Figure 104, when decreasing the frequency while maintaining the same listener position, wavelengths get larger and the ring spacing gets bigger so that more sources fall within the ring and couple constructively at M. Conversely, as the frequency increases, fewer sources fall within the ring and add constructively at M. Maintaining the same frequency (and therefore the same ring spacing) and moving the position M closer to the array means that the radius of curvature of the rings is decreased, therefore fewer sources fall within the ring. Moving the listener position further away, the radius of curvature increases and more sources fall within the constructive ring. Now let’s draw all circles with radii defined by: δd = (2n + 1) λ/2. The destructive areas where cancellation occurs are shown in gray in Figure 105. White areas are constructive interference zones. Figure 105: Destructive and constructive interference rings for a line array at observation point M. L-ACOUSTICS V-DOSC Manual Version 4 6/29/2005 Page 145 of 158 We can now compare the number of sound sources inside the constructive rings to the number of sources inside the destructive rings. When these numbers are almost equal, sound sources cancel each other and produce an incoherent wavefront at M. When there are significantly more sound sources within the constructive rings, a coherent wavefront is produced at M. It should be noted that this method is due to Fresnel – he used this type of analysis to describe light interference at the beginning of the century! If we repeat this analysis for different M locations, we can draw a map that shows where the sound field is coherent or incoherent. When it appears that there is no constructive wavefront over a given area, the wavefront is chaotic. If we can define an area where the wavefront is highly constructive, the sound pressure level will be much higher than in a destructive area. We can thus define the effective coverage of the array for this given frequency. The goal for the sound designer is to clearly identify an area where the wavefront is coherent not just for a given frequency, but for the whole operating bandwidth of the sound source. How can we achieve this goal? The first step is to minimize the distance between sound sources. By doing this for a given frequency, we have a better chance of maximizing the number of sources within the first constructive ring. This situation is more likely to be achieved on the main axis (perpendicular to the line array), as shown in Figure 106. Note that in Figure 106, the source separation is smaller than in Figure 105 so that more sources lie within the first constructive ring. Moving away from the main axis as in Figure 107, the number of sources within the first constructive ring decreases progessively, until there are equal numbers of constructive and destructive sources and they cancel each other outside of the coverage region. Clear separation between coherent and incoherent wave-fields defines the consistency of the main coverage region. Figure 106: Constructive interference rings for a condensed point source line array at observation point M. L-ACOUSTICS V-DOSC Manual Version 4 6/29/2005 Page 146 of 158 Figure 107: Destructive interference rings out of beamwidth for two kinds of line arrays : condensed and standard. The ideal situation is achieved when sound sources get so close to each other that they become equivalent to a flat radiating ribbon or continuous line source. This solves the source separation problem at higher frequencies where the wavelength is smaller than the size of the drivers (for example, λ = 2 cm at f= 16 kHz) since the chaotic, multiple source wavefront is replaced by a single well-defined wavefront. With further analysis, it is shown in the first AES preprint that optimized coupling can be achieved in two ways: the first way is to minimize the spacing of sound source acoustic centers to less than half the smallest wavelength (corresponding to the upper frequency of their operating bandwidth) the second way is to shape the radiated wavefront of the sound sources into a flat isophasic ribbon, with no more than 20% discontinuity of the radiating area. In the AES journal paper ''Wavefront Sculpture Technology'', these two WST Criteria were rederived based on an intuitive approach using Fresnel analysis and in addition it was shown that: ♦ The deviation from a flat wavefront must be less than λ/4 at the highest operating frequency (this corresponds to less than 5 mm of curvature at 16 kHz - the DOSC waveguide provides less than 4 mm of curvature at this frequency). ♦ For curved arrays, enclosure tilt angles should vary in inverse proportion to the listener distance (geometrically this is equivalent to shaping variable curvature arrays to provide equal spacing of individual enclosure impact zones) ♦ Limits exist given the vertical size of each enclosure and the relative tilt angles that are allowed between enclosures. REFERENCES: C. Heil, M. Urban, “Sound Fields Radiated by Multiple Sound Source Arrays”, preprint #3269, presented at the 92nd AES Convention, Vienna, March 24-27, 1992 M. Urban, C. Heil, P. Bauman, ''Wavefront Sculpture Technology'', Journal AES Vol. 51, No. 10, October 2003 L-ACOUSTICS V-DOSC Manual Version 4 6/29/2005 Page 147 of 158 APPENDIX 3: HOW DOES V-DOSC BEHAVE WITH RESPECT TO WST CRITERIA The second Wavefront Sculpture Technology criterion: STEP < smallest λ/2 over the frequency range of operation is fulfilled by a V-DOSC array at low and mid frequencies. With reference to Figure 108, The 15" speakers are separated by no more than 0,75 m and the crossover frequency is 200Hz, corresponding to λ/2 = 0.85 m. The 7" speakers are separated by no more than 0.17 m and the crossover frequency is 1300Hz, corresponding to λ/2 = 0.13 m. Figure 108: Front view of V-DOSC array and vertically stacked DOSC waveguides We have to fulfill the first WST criterion at higher frequencies, since it is not possible to satisfy the second criteria as wavelengths are too small to have the acoustic centres of high frequency compression drivers with less than λ/2 separation over the entire HF bandwidth (1.3-18 kHz). This is achieved by mounting a DOSC waveguide on the exit of each driver – this shapes the wavefront into a rectangular, constant phase source. Arraying DOSC waveguides and drivers then creates a flat isophasic ribbon that fulfills the first WST criterion, i.e., the overall radiating area is more the 80% of the target area provided that the angle is less than 5 degrees between enclosures. L-ACOUSTICS V-DOSC Manual Version 4 6/29/2005 Page 148 of 158 APPENDIX 4: HOW DOES THE DOSC WAVEGUIDE WORK? The DOSC waveguide is the result of careful analysis of the wave path from the exit of a compression driver, through the waveguide and the resulting wavefront shape at the exit of the device. Figure 109: Horn Generated Wavefronts With respect to Figure 109, the wavefront emerging from a horn is the result of constant time arrivals for all possible wave paths radiated by the driver exit. The two examples shown in Figure 109 produce more or less curved wavefronts that obviously cannot meet the first WST criterion. Figure 110: DOSC Waveguide – Internal Section By comparison, the DOSC waveguide acts as a time alignment plug, delaying the arrival times of every possible wave path to be the same value at the rectangular exit of the device. The internal plug is a truncated conical piece that looks like a "tomahawk". This plug and its outer housing are precisely constructed according to specific ratios between depth, height and cone angle in order to produce a flat constant phase wavefront. Tight manufacturing tolerances are obtained through the use of computer aided design and manufacturing (CAD/CAM) techniques in the fabrication of the DOSC waveguide. As shown in the AES preprint entitled ''Wavefront Sculpture Technology'', the deviation from a flat wavefront must be less than λ/4 at the highest operating frequency - this corresponds to less than 5 mm of curvature at 16 kHz and experiments have shown that the DOSC waveguide provides less than 4 mm of curvature at this frequency. DOSC waveguide technology is patented on an international basis. (n°0331566 in Europe, n°5163167 in North America). L-ACOUSTICS V-DOSC Manual Version 4 6/29/2005 Page 149 of 158 APPENDIX 5: THE BORDER BETWEEN FRESNEL AND FRAUNHOFER REGIONS This appendix summarizes theory presented in “Sound Fields Radiated by Multiple Sound Source Arrays”, AES preprint n°3269 (presented at the 92nd AES convention in Vienna, March 1992). Let's assume that the V-DOSC array is flat and radiates a cylindrical wavefront. The emerging wave will progressively expand to a spherical wave at a certain distance, which depends on both the frequency and the height of the array. Figure 111: Illustration of the Fresnel and Fraunhofer regions The border between CYLINDRICAL (near field = Fresnel) and SPHERICAL (far field = Fraunhofer) zones can be expressed as: 3 2 1 dborder = 2 H F 1− 3HF 2 where: H = height of the array (in m) F = frequency expressed in kilohertz dborder = extension of the cylindrical soundfield with respect to the source (in m) In the Fresnel region, the wavefront is cylindrical and expands only in the horizontal dimension (nominally 90° for V-DOSC). The height of the wavefront is equal to the height of the array. In the Fraunhofer region, the wavefront is spherical and expands in both horizontal & vertical dimensions. The horizontal coverage angle is nominally 90° and the vertical coverage angle is −1 0.6 D V = 2 sin 3HF where Dv is the vertical coverage angle angle in (°). The two following tables display data for dborder and Dv, with respect to the number of arrayed V-DOSC enclosures: L-ACOUSTICS V-DOSC Manual Version 4 6/29/2005 Page 150 of 158 Table 20: Border (in m) Between Cylindrical (Fresnel) and Spherical (Fraunhofer) Zones Freq (Hz) 63 125 250 500 1k 2k 4k 8k 16k 2 Enclosures H=0.9 m dborder (m) 4 Enclosures H=1.8 m dborder (m) 8 Enclosures H=3.6 m dborder (m) No cylindrical No cylindrical No cylindrical 0 1 2 5 10 19 No cylindrical No cylindrical 1 2 5 10 19 39 78 No cylindrical 2 5 10 19 39 78 156 311 12 Enclosures H=5.4m dborder (m) 1 5 11 22 44 87 175 350 700 Table 21: Dv - Vertical Coverage Angle in the Farfield Region Freq 2 Enclosures H=0.9 m Dv (deg) (Hz) 63 125 250 500 1k 2k 4k 8k 16k 125 53 26 13 6.4 3.2 1.6 4 Enclosures H=1.8 m Dv (deg) 125 53 26 13 6.4 3.2 1.6 0.8 8 Enclosures H=3.6 m Dv (deg) 124 53 26 13 6.4 3.2 1.6 0.8 0.4 12 Enclosures H=5.4m Dv (deg) 72 34 17 8.5 4.2 2.1 1.1 0.5 0.3 At 1 kHz a flat V-DOSC array of 8 enclosures (H=3.6 m) radiates a wavefront that is cylindrical over a distance of 19 m. Beyond this distance, the wavefront becomes spherical, and the coverage angle is 6° (i.e., the wavefront at 1 kHz is defined by the height of the array up to 19m and broadens by +/-3° starting at dborder = 19 m). For a person located less than 19m from the sound source, frequencies below 1kHz are radiated in spherical mode with an attenuation rate of 6 dB per doubling of distance. All frequencies higher than 1kHz propagate in cylindrical mode with an attenuation rate of 3 dB per doubling of distance. Figure 112: Illustration of dborder and Dv for a flat 12 enclosure array L-ACOUSTICS V-DOSC Manual Version 4 6/29/2005 Page 151 of 158 APPENDIX 6: PATTERN CONTROL OF A CONSTANT CURVATURE ARRAY In practice, the vertical coverage angle is controlled for frequencies greater than frequency F1 where: F1 = 444 NA N sin 2 and N is the number of enclosures, A is the constant angle between enclosures in degrees. At F1, the vertical coverage angle is equal to the nominal value for the array, i.e., (N-1) x A degrees. At higher frequencies, the coverage decreases to a value which is approximately equal to 2/3 of N x A. This defines the minimum vertical coverage angle and is termed the "beaming" frequency F3. The vertical coverage angle then increases back to the nominal value at F2, defined by: 1.77 x10⁵ F2 = AN2 For frequencies higher than F2, the vertical coverage angle is constant. For example, a constant curvature array of 8 V-DOSC with 4° between all enclosures provides constant 28° vertical coverage above F2 = 794 Hz, with narrower coverage at F2 = 427 Hz and with a broadening of coverage below F1=230 Hz that is subject to the laws of diffraction govern ing spherical wave propagation. Figure 113: Illustration of the variation of vertical coverage angle with frequency L-ACOUSTICS V-DOSC Manual Version 4 6/29/2005 Page 152 of 158 APPENDIX 7: WST Criteria Number 5 In the AES Journal paper ''Wavefront Sculpture Technology'', Vol. 51, No. 10, October 2003 it is shown that the maximum angle allowed between enclosures is given by the following expression: α 1 STEP 180 = − max 24 ARF STEP d min π According to WST Condition 1, the Active Radiating Factor (ARF) should be higher than 80%. The STEP distance is the separation between acoustic centres and dmin is the minimum distance to the closest members of the audience. For front-loaded systems such as V-DOSC or dV-DOSC it is basically the size of the component that determines the vertical height of the enclosure and, in turn, the separation between acoustic centres. Taking the nominal component diameters for 8”, 12”, 15” and 18” speakers and adding two thicknesses of wood for the top and bottom enclosure walls therefore determines the STEP distances given in the table below. ARF is set to 80% since this is the limit for satisfying WST Condition 1 and the maximum angles are calculated for two minimum listener distances: dmin = 10 or 20 metres. Table 22: WST Criteria Number 5 COMPONENT 18'' 15'' 12'' 8'' Nominal Diameter (mm) 460 380 300 205 Enclosure Height (m) 0,496 0,416 0,336 0,241 Max Interelement Angle Max Interelement Angle (degrees) (degrees) 3,2 4,6 4,8 6,0 7,0 7,9 11,0 11,7 dmin = 10 m dmin = 20 m For front-loaded 15” systems such as V-DOSC, it is seen that the maximum allowed angle is 4.8 degrees for dmin = 10 m and 6.0 degrees for dmin = 20 m. This explains why the maximum ANGLE STRAP value for V-DOSC is 5.5 degrees. For front-loaded 8” systems (dV-DOSC) it is seen that the maximum allowed angle is 11 degrees for dmin = 10 m and 11.7 degrees for dmin = 20 m. Although the maximum value for dVDOSC may seem conservative at 7.5 degrees, this value corresponds to a minimum listener distance of 3 metres, allowing listeners to be closer to the system for downfill or shorter throw applications. L-ACOUSTICS V-DOSC Manual Version 4 6/29/2005 Page 153 of 158 APPENDIX 8: ANGLE STRAP CALIBRATION The figure below provides the information necessary to construct a fixture for calibrating angle straps. Individual fly track sections can be laid out according to the indicated double stud fitting plunger-plunger spacing to provide a fast test jig for checking angle strap values and labeling. When testing angle straps, they should fit the test jig with a tolerance variation of +1 mm to +2 mm. Note: For full details on angle strap calibration issues refer to “Technical Bulletin TB0402 Angle Straps” Figure 114: Angle strap calibration L-ACOUSTICS V-DOSC Manual Version 4 6/29/2005 Page 154 of 158 APPENDIX 9: V-DOSC Rigging Certification L-ACOUSTICS V-DOSC Manual Version 2.00 29/06/05 V-DOSC MANUAL V4 0605.doc 155/158 L-ACOUSTICS V-DOSC Manual Version 4 6/29/2005 Page 156 of 158 L-ACOUSTICS V-DOSC Manual Version 4 6/29/2005 Page 157 of 158 L-ACOUSTICS V-DOSC Manual Version 4 6/29/2005 Page 158 of 158