1
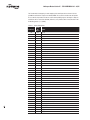
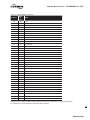
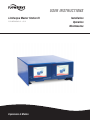
USER INSTRUCTIONS
Limitorque Master Station III
FCD LMENIM5001-01 – 05/12
Experience In Motion
Installation
Operation
Maintenance
Limitorque Master Station III FCD LMENIM5001-01 – 05/12
Contents
1.Introduction
2. Function Flowchart
3. Quick Startup
4.Connections
5. System Status
6. System Control
7. Email Configuration
8. System Configuration
9.Diagnostics
10. File Manager
11. Troubleshooting Guide
2
5
9
12
13
18
21
24
28
53
56
60
Limitorque Master Station III FCD LMENIM5001-01 – 05/12
Figures
Figure 1.1 - Introduction
Figure 1.2 - Enter User Name
Figure 1.3 - Login
Figure 1.4 - Main Menu
Figure 2.1 - Function Flowchart
Figure 4.1 - Master Station Rear Panel Connections
Figure 4.2 - DCS Port Connection
Figure 4.3 - Master Station Front Panel Connections
Figure 4.4 - Debug Port Connection
Figure 4.5 - Modbus Redundant Loop Topology
Figure 5.1 - The Main Menu Screen
Figure 5.2 - System Status
Figure 5.3 - Network Status
Figure 5.4 - MOV Status
Figure 5.5 - MSIII Status
Figure 6.1 - Main Menu
Figure 6.2 - System Control
Figure 6.3 - MOV Control
Figure 6.4 - Emergency Shutdown
Figure 6.5 - Emergency Shutdown in Progress
Figure 6.6 - Emergency Shutdown Termination
Figure 7.1 - Main Menu
Figure 7.2 - Email Notification Screen
Figure 7.3 - SMTP Address
Figure 7.4 - SMTP Configuration without Password
Figure 7.5 - SMTP Configuration with Password
Figure 7.6 - Email Notification Screen
Figure 7.7 - Add Email Listener
Figure 7.8 - Alarm Selections
Figure 8.1 - Main Menu
Figure 8.2 - System Configuration
Figure 8.3 - System Information
Figure 8.4 - Version
Figure 8.5 - Language Menu
Figure 8.6 - Clock
Figure 8.7 - Time Zone
Figure 8.8 - Screen Saver
Figure 8.9 - Configure Hot Standby
Figure 8.10 - Configuration Transfer Lockout
Figure 8.11 - Tag List
Figure 8.12 - User Administration
Figure 8.13 - DCS Configuration
Figure 8.14 - Serial Port Configuration
Figure 8.15 - Configure Ethernet Port
Figure 8.16 - Configure DCS Data Table
Figure 8.17 - FC-02 Read Input Status
Figure 8.18 - Modbus Holding Registers
Figure 8.19 - FC-03 Sample Data Table
6
6
6
7
10-11
13
14
15
15
17
18
19
19
20
20
21
22
22
22
23
23
24
25
25
25
26
26
26
27
28
29
29
30
30
31
31
31
32
32
33
33
33
34
35
35
35
38
39
3
flowserve.com
Limitorque Master Station III FCD LMENIM5001-01 – 05/12
Figure 8.20 - Modbus Coils
Figure 8.21 - FC-05/15 Sample Data Table
Figure 8.22 - Modbus Holding Registers-One Per MOV
Figure 8.23 - Modbus Holding Registers-Two Per MOV
Figure 8.24 - FC-06/16 Sample Data Table
Figure 8.25 - MOV Network Configuration
Figure 8.26 - Active MOVs
Figure 8.27 - Polling Priority-Active MOVs
Figure 8.28 - Configure Files
Figure 8.29 - Load Configuration from File
Figure 8.30 - Save as Default
Figure 8.31 - Restore Factory Defaults
Figure 9.1 - Main Menu
Figure 9.2 - Diagnostics
Figure 9.3 - Event Log
Figure 9.4 - Comm/FC Logger
Figure 9.5 - Polling Statistics
Figure 10.1 - Main Menu
Figure 10.2 - File Manager
Figure 10.3 - Import Config File
Figure 10.4 - Export Config File
Figure 10.5 - Export Event Log
Figure 10.6 - Import Tag File
Figure 10.7 - Update Software
Figure 11.1 - Surge Protection Access
Figure 11.2 - Main AC Power Input Module
Figure 11.3 - Removing Main AC Input Power Module
Figure 11.4 - AC Surge Protector
Figure 11.5 - Removing Fuse Holder
Figure 11.6 - AC Fuse Holder
Figure 11.7 - Network Surge Protector
Figure 11.8 - Removing Network Surge Protector
42
42
44
45
45
50
50
50
51
51
52
52
53
54
54
55
55
56
57
57
57
58
58
59
62
62
63
63
63
64
64
64
Tables
4
Table 4.1 - Network Channel B Connection
Table 4.2 - Network Channel A Connection
Table 8.1 - Status Bit Definitions
Table 8.2 - Function Code -02 Example Message Breakdown
Table 8.3 - Function Code -03 Example Message Breakdown
Table 8.4 - Register Definitions
Table 8.5 - DDC-100 Coil Assignments, Modbus 05 Command Usage for Digital Outputs
Table 8.6 - Function Code -05 Example Message Breakdown
Table 8.7 - Function Code -15 Example Message Breakdown
Table 8.8 - Function Code -06 First Command Message Breakdown
Table 8.9 - Function Code -06 Second Command Message Breakdown
Table 8.10 - Function Code -06 Message Breakdown
Table 8.11 - Function Code -16 Message Breakdown
Table 8.12 - Valid Command Register Operations
Table 8.13 - Valid Argument Register Operations
14
14
36-37
38
39
40-42
43
43
44
46
46
47
47
48
49
Limitorque Master Station III FCD LMENIM5001-01 – 05/12
1
Introduction
1.1 Overview
The next-generation master station is designed and manufactured by Flowserve Limitorque specifically for use with the Limitorque line of (Modbus) electric actuators. The Master Station III (MSIII)
acts as a single-source controller for up to 250 actuators with full redundancy, e-mail alert notification, and multi-lingual support.
The Master Station III is a plug-and-play solution that provides complete control, monitoring, and
diagnostics of Limitorque electric actuators through a simple touch-panel display serving as a Human
Machine Interface (HMI).
1.2 User Role Overview
The Master Station requires users to login. Four user role levels are configurable for each user: View,
Control, Configure, and Administrator. Each role includes the rights of the lesser roles (i.e., Control
includes View’s rights, and Configure includes Control’s rights and View’s rights).
VIEW: the user can view the network status and the activity log. No control or configuration
functionality is available.
CONTROL: in addition to View rights, the user has the ability to control MOVs.
CONFIGURE: in addition to Control rights, the user has the ability to configure the Master Station and
the Network.
ADMINISTRATOR: in addition to Configure rights, the user has the ability to add or delete users, as
well as modify user settings.
5
These roles can be changed by the Administrator user. See Section 8.2.4, User Administration for
details.
flowserve.com
Limitorque Master Station III FCD LMENIM5001-01 – 05/12
1.3 Login
When the Master Station completes the boot process, it loads the Introduction screen (Figure 1.1).
Figure 1.1 - Introduction
Touching any part of the screen will load the Enter User Name screen (Figure 1.2).
NOTE: If the screen is blank and the green LED is illuminated the unit is in screen saver mode, touch
the display to exit the screen saver mode.
Figure 1.2 - Enter User Name
Once the user name has been entered, the Enter Password screen will be displayed (Figure 1.3).
NOTE: Each user name must have a unique password.
Figure 1.3 - Login
6
Limitorque Master Station III FCD LMENIM5001-01 – 05/12
Passwords and user names are set via the User Administration menu, under System Configuration.
The correct password entry for the respective user name will advance the screen to the Main Menu
(Figure 1.4).
In the event that passwords are lost or forgotten, please contact your Limitorque service coordinator
at (434) 528-4400.
1.4 Main Menu
Once logged in, the user will see the Main Menu (Figure 1.4).
Figure 1.4 - Main Menu
From here, the menu options are displayed based on the current user role. Each button represents a
separate logical section of the Master Station:
SYSTEM STATUS (ALL USERS): View information related to the network status, status of the Master
Station, and MOV status.
SYSTEM CONTROL (CONTROL, CONFIGURE, AND ADMINISTRATOR): Access to MOV control and
emergency shutdown functions.
EMAIL CONFIGURATION (CONFIGURE AND ADMINISTRATOR): View and change settings related to
email alerts.
SYSTEM CONFIGURATION (CONFIGURE AND ADMINISTRATOR): Configure the main functions of
the Master Station. User Administration functions in this section are accessible only to Administrator
users.
DIAGNOSTICS (CONFIGURE AND ADMINISTRATOR): Activate event logging, communication data
analysis, or polling statistics.
FILE MANAGER (CONFIGURE AND ADMINISTRATOR): Import or export configuration files, export an
event log, import a tag file, or update the Master Station software.
7
flowserve.com
Limitorque Master Station III FCD LMENIM5001-01 – 05/12
1.5 Technical Data
1.
Power supply: 100-240 VAC 50/60HZ or 24 VDC maximum current is 1.5A.
2.
Operating temperature: 0-60°C (32-140°F)
3.Enclosure: Desktop/Shelf housing (standard), 19” rack mountable (optional), NEMA 4/4X wallmountable (optional), or mounted in a stand-alone cabinet (optional). Standard dimensions are
16” (w) x 8.25” (h) x 18.5” (d)
4.Human machine interface: 5.6” diagonal, 640x480 resolution, lighted, TFT color graphic LCD.
Supports multiple languages: English, Spanish, Italian, German, and French.
5.
Electromagnetic Compatibility (EMC) Compliance:
a. Emissions/Immunity – EN 61326-1:2006
b. Harmonics – EN 61000-3-2
c. Flicker – EN 61000-3-3
6.
Communication protocol – MSIII to Field Units: Modbus RTU
7.
Communication protocol – MSIII to Host System: Modbus RTU or Modbus TCP/IP
8.
Network topology – Bi-directional redundant loop or multi-drop/daisy chain
9.
Physical layer – MSIII to field units: EIA-485 (RS-485)
10. Physical layer – MSIII to Host System: TIA-232 (RS-232) / EIA-485 (RS-485) / Ethernet
11. Unit redundancy options: MSIII module redundancy, isolated power connections (standard)
12. Communications Rate – MSIII to field units: 19.2 Kbaud max (Serial)
Host System to MSIII: 115.2 Kbaud max (Serial)
Host System to MSIII: 100 Mbits per second max (Ethernet)
Maximum recommended host system polling rate:
125 register reads / 500 ms
44 register writes / 500 ms
13. Network Topology
8
Network Topology
(kbit/s)
Max. Segment Length
(Belden 3074F with
no repeaters, meters)
Max. Cable Length
(kilometers)
Multi-drop/Daisy Chain
(with 24 field units)
1200
30
Redundant Loop
(with 240 field units)
1200
289.2
Limitorque Master Station III FCD LMENIM5001-01 – 05/12
2
Function Flowchart
The following flowchart graphics illustrate the functions of the Master Station III.
9
flowserve.com
Limitorque Master Station III FCD LMENIM5001-01 – 05/12
Figure 2.1 - Function Flowchart
10
Limitorque Master Station III FCD LMENIM5001-01 – 05/12
Figure 2.1 - Function Flowchart (continued)
11
flowserve.com
Limitorque Master Station III FCD LMENIM5001-01 – 05/12
3
Quick Startup
3.1 Master Station Quick Startup Instructions
1. Connect earth ground (#14AWG minimum) wiring, MOV network cables (Belden
#3074F/#9841/#3107), and power cable.
2. Apply power to the Master Station.
3. Wait for the Master Station to display the start-up screen.
4. Touch the screen, then enter user name “FLOW”. Select Enter.
5. Enter password “100” when prompted. Select Enter.
6. Next select “System Configuration” then “Redundant Configuration”.
7. Select current mode to “Active”, startup mode to “Active”, and redundancy mode to desired setting.
8. Next select the “back” button and in the “System Configuration” select “User Administration”.
9. Set up user accounts per Section 8.
10. Select “MOV Network Config” and set up per Section 8.
11. Select “DCS Configuration” and set up per Section 8.
For remote DCS control, the three primary registers of interest are:
- 46001: Register for HS Status (Read Only): 0=idle, 1=standby, 2=hot
- 46002: Register for Host System to toggle (Write Only): 3=toggle state
- 46191: Register for Internal Program Execution Heartbeat/Watchdog (Read Only):
Updates every scan, 8-bit integer
12
12. Further adjustments may be made by following the procedures outlined in this manual.
Limitorque Master Station III FCD LMENIM5001-01 – 05/12
4
Connections
4.1 Master Station Rear Panel Connections
Figure 4.1 - Master Station Rear Panel Connections
1
8
7
2
3
4
6
5
9
1. Ethernet Ports, RJ-45 connectors. One port is designated for MNET (Modbus Ethernet TCP/
IP). The other port is for the webserver. Either port may be used for either function as they are
connected to the same CPU.
2. Main DCS Port. DB-9 Female connector. Port may be RS-232 or RS-422 or RS-485. Each electrical
standard uses a different wiring convention.
13
flowserve.com
Limitorque Master Station III FCD LMENIM5001-01 – 05/12
Figure 4.2 - DCS Port Connection
RS 232
RS 485
RS 422
DB-9
DSR
6
DTR
4
RTS
7
RXD
2
1
8
RXD+
DCD
TXRXD+
TXD+
CTS
TXRXD-
TXD-
GND
GND
TXD
3
GND
5
9
RXD-
N/C
3. Auxiliary 24 VDC power connection for Main.
4. Main power switch and connector for 120 – 240 VAC.
5. Electrostatic Ground. A good quality earth ground MUST be attached to the Master Station. An
effective local, low-impedance earth ground (less than 5 ohms) is required.
6. Hot Standby unit main power switch and connector for 120 – 240 VAC.
7. Auxiliary 24 VDC power connection for Hot Standby.
8. Hot Standby DCS Port. DB-9 Female connector. Port may be RS-232 or RS-422 or RS-485. Each
electrical standard uses a different wiring convention.
9. Network Connections- Channel A and B. Connections for the network wiring for channels A and B.
See Tables 4.1 and 4.2 below for connection details.
NOTE: Each module (Main or Hot Standby) can support up to two of the three power inputs (Main
120-240 VAC, Optional 120-240 VAC, 24 VDC).
Table 4.1 - Network Channel B Connection
Connector
MX/QX
UEC-3-DDC
DATA-A2 (+)
13
TB4 D-S
DATA-A2* (-)
14
TB4 D-S*
Shield
N/C
Table 4.2 - Network Channel A Connection
14
Connector
MX/QX
UEC-3-DDC
DATA-A1 (+)
5
TB3 D-M
DATA-A1* (-)
4
TB3 D-M*
Shield
3
Limitorque Master Station III FCD LMENIM5001-01 – 05/12
4.2 Master Station Front Panel Connections
Figure 4.3 - Master Station Front Panel Connections
2
4
5
7
1
3
6
8
1. Ethernet Port, RJ-45 connector. Can be used for MNET (Modbus Ethernet TCP/IP) or for the
webserver.
2. Hot Standby Ethernet Port, RJ-45 connector. Can be used for MNET (Modbus Ethernet TCP/IP) or
for the webserver.
3. USB Ports.
4. Hot Standby USB Ports.
5. Printer / Debug Port. DB-9 Female connector. RS-232 port. Used for Master Station diagnostics.
Figure 4.4 - Debug Port Connection
RS 232
DB-9
DSR
6
DTR
4
RTS
7
RXD
2
DCD
1
CTS
8
TXD
3
GND
5
9
15
N/C
flowserve.com
Limitorque Master Station III FCD LMENIM5001-01 – 05/12
6. Hot Standby Printer / Debug Port. DB-9 Female connector. RS-232 port. Used for Master Station
diagnostics.
7. VGA Port. Used for connecting a monitor to the Master Station Main unit.
8. Hot Standby VGA Port. Used for connecting a monitor to the Master Station Hot Standby unit.
4.3 Master Station Wiring Requirements
The network cable connects the field units to the host controller or Master Station. Belden 3074F,
3105A, or 9841 shielded, twisted-pair cable should be used. The use of other cables may result in a
reduction of internodal distances or increased error rate, and is the user’s responsibility.
BELDEN 3074F SPECIFICATIONS
• Total cable length between repeaters or nodes with repeaters: up to 19.2 kbps: 4000’(1.2 km)
For loop mode, this is the total length between operating field units. If a field unit loses power, the
relays internal to the field unit connect the A1 Channel to the A2 Channel, which effectively doubles
the length of the cable (assuming a single field unit fails). To ensure operation within specifications
in the event of power failure to field units, this consideration must be added. Example: To ensure
operation within specification when any two consecutive field units lose power, the maximum length
of cable up to 19.2 bkps should not exceed 4000’ (1.2 km) per every four field units. See Section
3.1.2.3, Network Cable Connection to Host Controller or Master Station.
Key Specifications
• Resistance/1000 ft = 18 AWG (7 x 26) 6.92 ohms each conductor (13.84 ohms for the pair)
• Capacitance/ft = 14 pF (conductor-to-conductor)
• Capacitance/ft = 14 pF (conductor-to-shield)
BELDEN 3105A SPECIFICATIONS
• Total cable length between repeaters or nodes with repeaters: up to 19.2 kbps: 4000’ (1.2 km)
For loop mode, this is the total length between operating field units. If a field unit loses power, the
relays internal to the field unit connect the A1 Channel to the A2 Channel, which effectively doubles
the length of the cable (assuming a single field unit fails). To ensure operation within specifications
in the event of power failure to field units, this consideration must be added. Example: To ensure
operation within specification when any two consecutive field units lose power, the maximum length
of cable up to 19.2 bkps should not exceed 4000’ (1.2 km) per every four field units. See Section
3.1.2.3, Network Cable Connection to Host Controller or Master Station.
Key Specifications
• Resistance/1000 ft = 22 AWG (7 x 30) 14.7 ohms each conductor (29.4 ohms for the pair)
• Capacitance/ft = 11.0 pF (conductor-to-conductor)
• Capacitance/ft = 20.0 pF (conductor-to-shield)
BELDEN 9841 SPECIFICATIONS
• Total cable length between repeaters or nodes with repeaters: up to 19.2 kbps: 3500’ (1 km)
16
For loop mode, this is the total length between operating field units. If a field unit loses power, the
relays internal to the field unit connect the A1 Channel to the A2 Channel, which effectively doubles
the length of the cable (assuming a single field unit fails). To ensure operation within specifications in
the event of power failure to field units, this consideration must be added. Example: To ensure operation within specification when any two consecutive field units lose power, the maximum length of
Limitorque Master Station III FCD LMENIM5001-01 – 05/12
cable up to 19.2 bkps should not exceed 3500’ (1 km) per every four field units. See Section 3.1.2.3,
Network Cable Connection to Host Controller or Master Station.
Key Specifications
• Resistance/1000 ft = 24 AWG (7 x 32) 24 ohms each conductor (48 ohms for the pair)
• Capacitance/ft = 12.8 pF (conductor-to-conductor)
• Capacitance/ft = 23 pF (conductor-to-shield)
4.4 Master Station Network Topologies
Figure 4.5 - Modbus Redundant Loop Topology
MASTER STATION III
Channel A
Legend
Channel B
MOV
5
4
13
14
- Motor-operated valve
- Data A1
- Data A1*
- Data A2
- Data A2*
- Shield
N/C
- No connection
Data terminal is positive with respect to
data* terminal
Diagnostic Note:
Polarity and level of the network’s data connection
can be checked by measuring voltage between data
and data* terminals. This voltage should be greater
than +200 mV DC with network controller (host)
network ports disconnected. Data terminal is
positive with respect to data* terminal.
Earth Ground Note:
If low impedance earth ground is not available at each
actuator, contact engineering for alternative earth
ground surge protection strategies.
3
A1* 4
A1 5
N/C
Data
1
Data* 2
Ground 3
Host
(Network
controller)
RS-485
PORT 1
14
13
A2*
A2
MOV-3
See Note 5
MOV-2
See Note 5
MOV-1
See Note 5
3
A1* 4
A1 5
3
A1* 4
A1 5
14
13
N/C
A2*
A2
14
13
N/C
N/C
A2*
A2
Earth ground
(See Note 4)
Network port A
RS-485
PORT 2
MOV-250
See Note 5
Network port B
N/ C
Data
1
Data* 2
Ground 3
3
A1* 4
3
A1* 4
A1 5
A1 5
14
13
A2*
A2
MOV-248
See Note 5
MOV-249
See Note 5
N/C
14
13
A2*
A2
3
A1* 4
A1 5
N/C
14
13
A2*
A2
Earth ground
(See Note 4)
Notes:
1) Belden 3074F, 3105A, or 9841 shielded cable is recommended.
2) Correct polarity for field unit and network controller
connection is necessary for proper operation.
3) Connections shown are typical. The number of
MOVs shown may not indicate true system size.
4)
Earth ground: ground rod
5)
Earth ground: ground rod or lug in
actuator if actuator is grounded.
17
flowserve.com
Limitorque Master Station III FCD LMENIM5001-01 – 05/12
5
System Status
5.1 Main Menu
Upon successful login as a user assigned to any role level, the System Status button on the Main
Menu screen will be present. Simply touching the System Status button will advance the HMI display
to the System Status screen (Figure 5.2). By selecting Exit, the user will end the session and log out.
Figure 5.1 - The Main Menu screen
18
Limitorque Master Station III FCD LMENIM5001-01 – 05/12
5.2 System Status
The System Status main screen (Figure 5.2) allows the user to view the overall status of the MOV
network and Master Station.
Figure 5.2 - System Status
5.2.1 Network Status
The Network Status screen presents an overview of the entire field unit network, up to 25 activated
MOVs per page. Only those MOVs that have been activated will be displayed. See MOV Network
Config in System Configuration screen to activate desired MOVs.
Figure 5.3 - Network Status
The numeric buttons represent addressed MOVs, while the A and B bars represent associated
MOV communication channels A&B. The MOVs and their respective communication channels are
constantly being monitored and will display green if OK and red if faulted. The user can advance to
the MOV Status screen by either touching an addressed MOV or touching the Back button to return to
System Status screen, and then selecting MOV Status.
19
flowserve.com
Limitorque Master Station III FCD LMENIM5001-01 – 05/12
5.2.2 MOV Status
The MOV Status screen reveals the actual MOV network address, tag name, unit type, and position. In
addition, it shows the status of the MOV communication channels and the Modbus holding registers
that have been selected to be mapped to the PLC/DCS data table. See Section 8.2.6.3 Configure Data
Table for register content details.
Figure 5.4 - MOV Status
5.2.3 MSIII Status
The MSIII Status screen provides Master Station status of the following functional components:
1. CPU Module temperature
2. Available memory for logging data
3. CPU Module up-time
4. Last login time
5. Last configuration change time
Figure 5.5 - MSIII Status
20
Limitorque Master Station III FCD LMENIM5001-01 – 05/12
6
System Control
6.1 Main Menu
Upon successful login as a user assigned to a Control, Configure, or Administrator role, the System
Control button on the Main Menu (Figure 6.1) will be present. Simply touching the System Control
button will advance the HMI display to the System Control screen (Figure 6.2). By selecting Exit, the
user will end the session and log out.
Figure 6.1 - Main Menu
6.2 System Control
The System Control screen (Figure 6.2) allows for the selection of either MOV Control or Emergency
Shutdown, over the network.
21
flowserve.com
Limitorque Master Station III FCD LMENIM5001-01 – 05/12
Figure 6.2 - System Control
6.2.1 MOV Control
The MOV Control screen (Figure 6.3) allows for a selected MOV to be opened, stopped, closed, or
moved to a set position (such as 38% open). As shown in Figure 6.3, if the torque register is selected
(see Section 8.2.6.3.2), the MOV Control screen displays the torque reading during MOV operation
for the latest generation smart actuators. MOV control relays can also be energized from this screen if
the relays are configured for network network control within the MOV.
Figure 6.3 - MOV Control
6.2.2 Emergency Shutdown
Should it be necessary to initiate an Emergency Shutdown of the networked MOVs, this can be
accomplished by accessing the Emergency Shutdown screen (Figure 6.4) from the Main Menu.
Figure 6.4 - Emergency Shutdown
22
Limitorque Master Station III FCD LMENIM5001-01 – 05/12
Two options are available: Initiate Emergency Shutdown and Clear Emergency Shutdown. Once an
emergency shutdown has completed and is no longer necessary, the emergency shutdown state can
be cleared by pressing the Clear Emergency Shutdown button.
When an emergency shutdown is initiated, the Emergency Shutdown in Progress screen will be
displayed (Figure 6.5).
Figure 6.5 - Emergency Shutdown in Progress
When an emergency shutdown is cleared, the Emergency Shutdown Termination in Progress screen
will be displayed (Figure 6.6) until the procedure is complete.
Figure 6.6 - Emergency Shutdown Termination
23
flowserve.com
Limitorque Master Station III FCD LMENIM5001-01 – 05/12
7
Email Configuration
7.1 Main Menu
Upon successful login as a user assigned to either Configure or Administrator role level, the
System Configuration button on the Main Menu screen will be present. Simply touching the Email
Configuration button will advance the HMI display to the Email Notification Screen (Figure 7.2). By
selecting Exit, the user will end the session and log out.
Figure 7.1 - Main Menu
7.2 Email Configuration
24
The Email Configuration allows the user to setup and maintain email notification alerts for network
faults, DCS port faults, ESD activity, HOT/STANDBY changes, and/or MOV alarms. Each email
entry can be independently configured for any/all alarm events. In the event of an alarm, any email
addresses configured for that particular fault will be sent a notification email that a fault has occurred.
Limitorque Master Station III FCD LMENIM5001-01 – 05/12
Figure 7.2 - Email Notification Screen
7.2.1 SMTP Configuration
NOTE: SMTP Email Setup must be completed before email addresses can be added to the mailing list.
Email notification is enabled by setting up a SMTP server and valid email account in the Master
Station III. This can be done either with an accessible private SMTP server and email account or by
creating a new email address with Gmail (service provided by Google) and utilizing their public SMTP
server.
To set up the email account first enter the SMTP host by selecting the button left of the “Configure”
button.
Figure 7.3 - SMTP Address
Once the SMTP host has been configured, select the “Configure” button to finish setting up the
outgoing email. Depending on the type of connection the user specifies, the account login may be
configured with or without a password as shown in Figures 7.4 and 7.5. The connection type can also
be configured with or without SSL.
Figure 7.4 - SMTP Configuration without Password
25
flowserve.com
Limitorque Master Station III FCD LMENIM5001-01 – 05/12
Figure 7.5 - SMTP Configuration with Password
Once the SMTP Host Address and SMTP Email Account have been configured, the IP address of the
Master Station III must be set in the Email Notification Screen. Set the Primary and Secondary DNS
addresses by selecting the octet fields.
Figure 7.6 - Email Notification Screen
7.2.2 Alarm Listener Configuration
Once the SMTP configuration has been completed, alarm listeners can be added to the email notification system so that email alerts are sent when any of the following network events occur: Network
Fault, DCS Port Fault, Emergency Shutdown, Hot Standby Change, or MOV Alerts. Any or all of the
Master Station III events can be selected for each individual listener.
To add an event listener, click the “Add” button on the Email Notification Screen and enter the desired
email address as shown in Figure 7.7.
Figure 7.7 - Add Email Listener
26
Limitorque Master Station III FCD LMENIM5001-01 – 05/12
After entering desired email address, the Master Station will send a confirmation email to the
address. Check the email account to verify that the email address was entered correctly.
Following the email verification, the Master Station returns to the Email Notification screen where the
email address can be selected and alerts added to the selected email. Click on the desired notifications for the email address. Selections are highlighted in green as seen in Figure 7.8.
Figure 7.8 - Alarm Selections
27
flowserve.com
Limitorque Master Station III FCD LMENIM5001-01 – 05/12
8
System Configuration
8.1 Main Menu
Upon successful login as a user assigned to either Configure or Administrator role level, the
System Configuration button on the Main Menu screen will be present. Simply touching the System
Configuration button will advance the HMI display to the System Configuration screen (Figure 8.2).
By selecting Exit, the user will end the session and log out.
Figure 8.1 - Main Menu
8.2 System Configuration
The System Configuration main menu allows the user to view/configure eight distinct areas within the
Master Station:
28
System Information: provides current firmware version and access to settings for language, clock
and screensaver.
Redundant Config: provides access to setting the unit’s current mode, startup mode, and
redundancy mode.
Limitorque Master Station III FCD LMENIM5001-01 – 05/12
Change MOV Tags: allows for customizing MOV tag names for each addressed unit.
User Administration: present when logged in as Administrator, it permits the addition/deletion of
users and their respective roles.
DCS Configuration: enables communication settings to the Host device.
MOV Network Config: enables user to select active MOVs for the RS-485 field network.
Configure Files: enables user to load, save, or restore a system configuration.
Figure 8.2 - System Configuration
8.2.1 System Information
The System Information menu (Figure 8.3) allows the user to view the Master Station’s currently
loaded firmware version. In addition, the menu provides means for setting the system clock, screen
saver, and language parameters.
Figure 8.3 - System Information
29
flowserve.com
Limitorque Master Station III FCD LMENIM5001-01 – 05/12
8.2.1.1 Version
The Version screen (Figure 8.4) displays the Master Station’s currently loaded firmware version.
Figure 8.4 - Version
8.2.1.2 Language
The Language menu (Figure 8.5) allows the user to set the unit’s display language by selecting the
desired language button.
Figure 8.5 - Language Menu
8.2.1.3 Clock
The Clock menu (Figure 8.6) allows the user to set the unit’s clock parameters including the current
time and enabling/disabling the use of a time server to retrieve the current time. If the time server
option is enabled, the IP address field will become editable and can be used to indicate the desired
server IP.
30
Limitorque Master Station III FCD LMENIM5001-01 – 05/12
Figure 8.6 - Clock
Additionally, the Master Station Clock can be set to the correct local time zone by selecting the Time
Zone button in the Clock screen. The time zone is configured by selecting the region and locale in
which the Master Station is located.
Figure 8.7 - Time Zone
8.2.1.4 Screen Saver
The Screen Saver menu (Figure 8.8) allows the user to set the unit’s screen saver parameters. The
screen saver can be set to activate between one minute and 15 minutes after the last screen use.
Alternatively, the screen saver can be disabled entirely.
Figure 8.8 - Screen Saver
31
flowserve.com
Limitorque Master Station III FCD LMENIM5001-01 – 05/12
8.2.2 Redundant Configuration
The Configure Hot Standby screen (Figure 8.9) enables the user to configure the Master Station for Hot
Standby operation. The current mode and startup mode can be set to Active, Standby, or Disabled. In
addition, if two modules are present, redundancy should be enabled to allow for Hot/Standby swapping.
NOTE: If redundancy is disabled, Standby is not a valid option.
Figure 8.9 - Configure Hot Standby
When the Redundant Configuration is enabled and changes are saved in the Active unit, the two redundant
units perform a configuration file transfer. During the configuration file sync, all user operation is disabled
until the synchronization is finished. Once the Active unit is finished sending the files, operation is
restored. The Standby unit operation is restored shortly after.
Figure 8.10 - Configuration Transfer Lockout
8.2.3 Change MOV Tags
This view enables the user to set or modify MOV tag names. Simply select the desired addressed MOV tag
name box and a keypad will appear.
32
Limitorque Master Station III FCD LMENIM5001-01 – 05/12
Figure 8.11 - Tag List
8.2.4 User Administration
The User Administration screen (Figure 8.12) is accessible when the user is logged in as an Administrator
(see User Rights Overview in Section 1). It permits the addition or deletion of individual users, as well as
the assignment of user passwords and roles within the Master Station.
Figure 8.12 - User Administration
8.2.5 DCS Configuration
The DCS Configuration screen (Figure 8.13) allows the user to configure communication port parameters
in order to successfully link the Master Station to the control system’s Host device (DCS/PLC/etc.).
Furthermore, data registry mapping is accomplished by selecting the Configure Data Table button.
Figure 8.13 - DCS Configuration
33
flowserve.com
Limitorque Master Station III FCD LMENIM5001-01 – 05/12
8.2.6.1 Serial Port
The DCS serial port on the rear of the Master Station III unit is configured via the Serial Port screen
(Figure 8.14). Simply select appropriate settings for desired application, then save.
Settings available for DCS communication include: baud rate, parity, electrical standard, DCS address,
timeout, RTS ON delay, and RTS OFF delay. Serial connection requires null modem cable/adapter.
Figure 8.14 - Serial Port Configuration
Baud: Communication rate in bits per second.
Parity: Error checking option for serial communication.
Timeout: Defines the maximum acceptable response delay time from the MODBUS Slaves after
request sent by Master.
RTS ON Delay: Delay the timing to start sending the message after the RTS (Request To Send) signal
turns ON.
RTS OFF Delay: Delay the timing to turn OFF the RTS (Request To Send) signal after the message
sent to the external device is completed.
Electrical: Serial standard interface.
These values are dependent upon the message reply length as well as the poll rate.
8.2.6.2 Ethernet Port
The Ethernet port assigned to the control system’s Host device, is configured via the Configure
Ethernet Port screen (Figure 8.15) to communicate via Modbus TCP/IP. Simply set the desired IP
address, mask, gateway, and Hot Standby IP address (if applicable) and then save entries. Please
note that each Master Station processing unit must be configured with a unique IP address, mask,
gateway, and Hot Standby IP address (if Hot Standby is installed).
Touching each octet on the configuration screen will allow the user to enter the address.
34
Limitorque Master Station III FCD LMENIM5001-01 – 05/12
Figure 8.15 - Configure Ethernet Port
NOTE: Use port 4502 for Modbus communications.
8.2.6.3 Configure Data Table
The Master Station data table is configurable for the Modbus Function codes 02, 03, 05/15, 06/16.
The Modbus function code 01 has a fixed data table and does not permit user alteration. The data
tables are edited by using the Configure DCS Data Table menu (Figure 8.16).
Figure 8.16 - Configure DCS Data Table
8.2.6.3.1 Modbus FC 02 Read Input Status
Touching the “Modbus FC 02 Read Input Status” button will take the user to the FC 02 Read Input
Status Screen (Figure 8.17) for selection of desired input status bits from field unit holding registers
9-13.
Figure 8.17 - FC-02 Read Input Status
35
Selecting the “Next” button will advance the screen from registers 9 through 13.
flowserve.com
Limitorque Master Station III FCD LMENIM5001-01 – 05/12
The Function Code -02 mapping is a static mapping of the total input table as shown in Table 8.1
per MOV. A total of 80 bits represent an individual MOV. The use of this function code will provide
the user with the input status bits that are used to develop holding registers 9 through 13. Only the
enabled bits will be returned as valid data (otherwise, zeros). Address affect is accounted for in MS
III decoding process (i.e., 10,000).
Table 8.1 - Status Bit Definitions
36
Bit Number
Modbus
Bit
Address
MX/DDC
129
128
Opened
130
129
Closed
131
130
Stopped in mid-travel
132
131
Opening
133
132
Closing
134
133
Valve jammed
135
134
Not in remote
136
135
Combined fault
137
136
Over-temperature fault
138
137
Actuator failing to de-energize
139
138
Channel A fault
140
139
Channel B fault
141
140
Open torque switch fault
142
141
Close torque switch fault
143
142
Valve operated manually fault
144
143
Phase error
145
144
Open inhibit active
146
145
Close inhibit active
147
146
Not used
148
147
Not used
149
148
One or more phases is missing
150
149
Reverse phase sequence is occurring
151
150
ESD conflict
152
151
Inhibit conflict
153
152
Use in local/stop (input must be set for CSE and enabled)
154
153
Not used
155
154
Network emergency shutdown (ESD) is active
156
155
Local emergency shutdown is active
157
156
Field unit microprocessor has reset since the last poll
158
157
MX in stop move
159
158
Opening in local mode
160
159
Closing in local mode
161
160
Close contactor (interlocked)
162
161
Open contactor (interlocked)
163
162
S1 or R1 (opt)
164
163
S2 or R2 (opt)
165
164
R3 (opt)
166
165
R4 (opt)
167
166
R5 (opt)
Limitorque Master Station III FCD LMENIM5001-01 – 05/12
Table 8.1 - Status Bit Definitions (continued)
Bit Number
Modbus
Bit
Address
MX/DDC
168
167
R6 (opt)
169
168
R7 (opt)
170
169
Network relay
171
170
R8 (opt)
Not used
172
171
173-176
172-175
177
176
Remote switch
178
177
Thermal overload
179
178
Open torque switch
180
179
Open limit switch
181
180
Close torque switch
182
181
Close limit switch
183
182
Not used
184
183
Not used
185
184
User Input 0
186
185
User Input 1
187
186
User Input 2
188
187
Remote stop input
189
188
Remote open input
190
189
Remote close input
191
190
Not used
192
191
Not used
193
192
Analog board 1 present
194
193
Analog board 2 present
195
194
Analog Input #1 lost
196
195
Analog Input #2 lost
197
196
Network Channels A/B timed out
198
197
Relay board R5-R8 present
199
198
DDC board present
200
199
Relay board R1-R4 and RM present
201
200
FF board present
202
201
PB PA board present
203
202
CLE assigned for input 2
204
203
DNET board present
205
204
Lost Phase Input
206
205
Phase Reverse Input
207
206
Not used
208
207
PB DP board present
Mov series (0=1, A=9)
From DCS, user must address the Master Station III and poll according to the FC-02 data table. See the following example
of a request/response exchange between the DCS and the Master Station III.
37
flowserve.com
Limitorque Master Station III FCD LMENIM5001-01 – 05/12
Example of read inputs command
Poll Master Station for 16 inputs starting at input 81 (i.e., field unit #2)
Query: 01020050001079D7
Response: 0102020408BABE
Table 8.2 - Function Code -02 Example Message Breakdown
Query
Response
01
MSIII Unit Address
01
MSIII Unit Address
02
Function
02
Function
00
Starting Address Hi
02
Byte Count
50
Starting Address Lo
041
Data (Inputs 10088 - 10081; MOV2)
00
No. of Points Hi
08
Data (Inputs 10096 - 10089; MOV2)
10
No. of Points Lo
BABE
79D7
2
Error Check (CRC)
Error Check (CRC)
NOTE 1: 04h equals 0000 0100 (actuator stopped in mid-travel input bit is ON)
NOTE 2: 08h equals 0000 1000 (actuator Channel B fault input bit is ON)
8.2.6.3.2 Modbus FC 03 Read Holding Registers
Touching the “Modbus FC 03 Read Holding Registers” button will take the user to the Modbus Holding
Registers screen (Figure 8.18) for selection of desired field unit holding registers 3-15. Note that registers 8 and
9 are always included in the data table.
Figure 8.18 - Modbus Holding Registers
Selecting the “Next” button will advance the screen to the following sample data table screen:
38
Limitorque Master Station III FCD LMENIM5001-01 – 05/12
Figure 8.19 - FC-03 Sample Data Table
NOTE: Data table shown with only registers 8 and 9 (Position and Status) selected.
This function code is used to read the binary contents of holding registers. This function code is
typically used during the network polling cycle. A network poll must consist of field unit registers 9
(Status) and 10 (Fault) at a minimum. Holding register 8 should also be polled when the actuator is
configured for the analog feedback option or position control. See Table 8.4 for a complete listing of
the holding registers.
Example of read multiple registers command
Poll Master Station for 2 registers starting at register 27 (i.e., field unit #14)
Query: 0103001A0002E5CC
Response: 010304003200445BCF
Table 8.3 - Function Code -03 Example Message Breakdown
Query
Response
01
MSIII Unit Address
01
MSIII Unit Address
03
Function
03
Function
00
Starting Address Hi
04
Byte Count
1A
Starting Address Lo
00
Data Hi (Register 40027; MOV14)
00
No. of Points Hi
321
Data Lo (Register 40027; MOV14)
02
No. of Points Lo
00
Data Hi (Register 40028; MOV14)
Error Check (CRC)
442
Data Lo (Register 40028; MOV14)
E5CC
5BCF
Error Check (CRC)
NOTE 1: 0032h equals 50 decimal (actuator Analog Input 1 in percent format)
NOTE 2: 0044h equals 68 decimal or 0000 0000 0100 0100 (actuator stopped between limits in local
mode)
39
flowserve.com
Limitorque Master Station III FCD LMENIM5001-01 – 05/12
Table 8.4 - Register Definitions
Register #
Description
1
Command
2
Argument
3
Analog Output 1
4
Analog Output 2
5
Analog Input
6
Analog Input 7
Analog Input
8
Position
9
Status Register
Meaning
Registers 1 and 2 are write-only registers used for Modbus
Function Code 06
Registers 1 and 2 are write-only registers used for Modbus
Function Code 06
Position (APT) Value (Default 0-100)1
Torque (ATT)5 Value (Default 0-100)1
Main Power (Volts)
Analog Input 1 (Default 0-100)1 User 4-20 mA / 0-20 mA Input
Analog Input 2 (Default 0-100)1 User 4-20 mA / 0-20 mA Input
Valve Position, Scaled Value (Default 0-100)1
16 Bits of field unit status:
Bit 0 Opened
Bit 1 Closed
Bit 2 Stopped in Mid-Travel
Bit 3 Opening
Bit 4 Closing
Bit 5 Valve jammed
Bit 6 Not in Remote
Bit 7 Combined fault3
Bit 8 Over temperature fault
Bit 9 Future Implementation
Bit 10 Network Channel A fault 4 (Terminals 5 and 4)
Bit 11 Network Channel B fault 4 (Terminals 13 and 14)
Bit 12 Open torque switch fault
Bit 13 Close torque switch fault
Bit 14 Valve-operated manually fault
Bit 15 Phase error
2
NOTE 1: Default value is scaled 0-100 of span. Changes made to “Analog Scale” affect analog registers (3, 4, 6, 7, 8)
and “move-to” commands. (0-100, 0-255, 0-4095)
NOTE 2: MX/DDC actuators shipped after 2nd QTR, 1999, have the following definition of Register 9 Bit 6. When this
bit has a value of 1 or true, the actuator is in LOCAL or STOP (unavailable for network control). The actuator
selector switch in REMOTE (available for network control) is indicated by Register 12 Bit 0 having a value of 1
or true.
IMPORTANT: Verify host program when installing an MX/DDC actuator shipped after 2nd QTR, 1999, on a network
commissioned before 2nd QTR, 1999, for proper indication of selector switch values. Failure to verify proper selector
switch indication at the host may cause unsafe conditions at the facility.
MX/DDC actuators shipped prior to 2nd QTR, 1999, have the following definition for Register 9 Bit 6. When this bit has
a value of 1 or true, the actuator selector switch is in LOCAL mode. This bit does not indicate STOP or REMOTE. The
actuator selector switch in REMOTE (available for network control) is indicated by Register 12 Bit 0 having a value of 1
or true. Register 9 Bit 6 value 0 (zero) or false AND Register 12 Bit 0 value 0 (zero) or false indicates selector switch is
in the STOP position.
NOTE 3: Combined Fault bit is high when Bit 5 or 8 or 9 or 15 or (Bits 10 and 11) is high.
NOTE 4: Channel A is physical connection A1. Channel B is physical connection A2.
40
NOTE 5: The ATT feature will calculate the percent of torque seen with respect to the configured unit torque setting.This
percent torque value will be reflected in modbus register 3, when configured for Analog Out 1, and modbus
register 4, when configured for Analog Out 2. Example: If the unit torque setting is 75%, the modbus register
will be populated with a percent torque value scaled from 0% to 75% of the unit-rated torque.
Limitorque Master Station III FCD LMENIM5001-01 – 05/12
Table 8.4 - Register Definitions (continued)
Register #
Description
10
Fault Register
11
Digital Outputs
12
Digital Inputs 1
13
Digital Inputs 2
Meaning
16 Bits of field status
Bit 0 Open inhibit active
Bit 1 Close inhibit active
Bit 2 Not Used
Bit 3 Not Used
Bit 4 One or more phases are missing
Bit 5 Reverse phase sequence is occurring
Bit 6 ESD conflict
Bit 7 Inhibit conflict
Bit 8 CSE in local/stop (input must be set for CSE and enabled)
Bit 9 Not Used
Bit 10 Network emergency shutdown is active
Bit 11 Local PB emergency shutdown is active
Bit 12 Field unit microprocessor has reset since the last poll
Bit 13 MX in stop mode
Bit 14 Opening in local mode
Bit 15 Closing in local mode
Value of 16 Digital Outputs
Bit 0 Close contactor (Interlocked)
Bit 1 Open contactor (Interlocked)
Bit 2 S1 or R1 (Opt)
Bit 3 S2 or R2 (Opt)
Bit 4 R3 (Opt)
Bit 5 R4 (Opt)
Bit 6 R5 (Opt)
Bit 7 R6 (Opt)
Bit 8 R7 (Opt)
Bit 9 Network Relay
Bit 10 R8 (Opt)
Bit 11 Not Used
BIT 12-15 MOV Series (MX = 1, MXa = 9, QX = 6, UEC-3 = 0, UEX = 10)
Value of 16 Digital Inputs
Bit 0 Remote Switch
Bit 1 Thermal Overload
Bit 2 Open Torque Switch
Bit 3 Open Limit Switch
Bit 4 Close Torque Switch
Bit 5 Close Limit Switch
Bit 6 Not Used
Bit 7 Not Used
Bit 8 User Input 0 (Default=ESD), Terminal 30
Bit 9 User Input 1 (Default=Open Inhibit), Terminal 34
Bit 10 User Input 2 (Default=Close Inhibit), Terminal 35
Bit 11 Remote Stop Input, Terminal 26
Bit 12 Remote Open Input, Terminal 25
Bit 13 Remote Close Input, Terminal 27
Bits 14-15 Not Used
Value of 16 Digital Inputs
Bit 0 Analog board 1 present
Bit 1 Analog board 2 present
Bit 2 Analog Input 1 lost
Bit 3 Analog Input 2 lost
Bit 4 Network Channels A/B timed out
Bit 5 Relay board R5-R8 present
Bit 6 DDC board present
Bit 7 Relay board R1-R4 and RM present
flowserve.com
41
Limitorque Master Station III FCD LMENIM5001-01 – 05/12
Table 8.4 - Register Definitions (continued)
Register #
21
22
23
24-44
45-47
48
49
50
51
52
53
54
55
56
Description
Field Unit Holding Register Field Unit Holding Register Field Unit Holding Register Reserved
Not Named
TP_START_POSITION
TP_STOP_POSITION
TP_SAMPLE
TP_MID_T_HIGH
TP_MID_T_POS
TP_MID_T_AV_VAL TP_STOP_VAL
TP_BEFORE_ MID_T_HIGH
TP_AFTER_ MID_T_HIGH
Meaning
Special Applications Only
Special Applications Only
Special Applications Only
Special Applications Only
Special Applications Only
Special Applications Only
Special Applications Only
Special Applications Only
Special Torque Applications Only
Special Applications Only
Special Torque Applications Only
Special Applications Only
Special Torque Applications Only
Special Torque Applications Only
Note 1: Range is +90°C to -55°C. High byte 00 indicates positive (+) and 01 indicates negative (-). Low byte indicates temperature
value.
Example: 0x0019 = +25°C
0x011E = -30°C
From DCS, user must address the Master Station III and poll according to the table given in the FC -03 configuration.
Address affect is accounted for in the MSIII decoding process (i.e., 40,000).
8.2.6.3.3 Modbus FC 05/15 Force Coils
Touching the “Modbus FC 05/15 Force Coils” button will take the user to the Modbus Coils screen
(Figure 8.20) for selection of desired field unit coils. Note that the Open and Close Contactor coils are
always included in the data table.
Figure 8.20 - Modbus Coils
Selecting the “Next” button will advance the screen to the sample data table screen shown below:
Figure 8.21 - FC-05/15 Sample Data Table
42
NOTE: Table shown with Open and
Close Contactors, S1/R1 and S2/R2
Coils selected.
Limitorque Master Station III FCD LMENIM5001-01 – 05/12
Function code -05 is used to force a single coil. Forcing the individual coil either ON (1) or OFF (0) will
energize or de-energize a coil (digital output). Coil 1 in the field unit closes the actuator and Coil 2 opens
the actuator. If the actuator is opening or closing, changing the status of coil 1 or 2 from a value of 1 to 0
will stop the actuator (the coil will automatically be set to zero when the actuator reaches the full open or
full close position).
For function code -15 it should be noted that the coils are operated from the lowest coil number to the
highest. Forcing coil 1 or 2 OFF (0) is considered a stop command, sending a 15 command to force two
coils starting with coil 1, with coil 1 ON and coil 2 OFF, would result in the unit stopping, since coil 2
is forced OFF after coil 1 is forced ON. To prevent inadvertent Stop commands from being issued, it is
recommended to force one coil at a time.
Available digital outputs are listed in Table 8.5. Force-coil commands should be issued only once for
the desired field unit control. Repeated issuance of an acknowledged command will degrade network
performance.
NOTE: See LMENIM2329, Installation and Operation and Maintenance Manual for MX/DDC-100 Field Unit
to configure AS and AR Relays for DDC control.
Table 8.5 - DDC-100 Coil Assignments, Modbus 05 Command Usage for Digital Outputs
Coil Number
Bit Number
Function
100 Close/Stop
201 Open/Stop
3
02
S1 or R1 (Opt) Latched
4
03
S2 or R2 (Opt) Latched
5
04
R3 (Opt) Latched
6
05
R4 (Opt) Latched
7
06
R5 (Opt) Latched
8
07
R6 (Opt) Latched
9
08
R7 (Opt) Latched
10
09
R8 (Opt) Latched
The normal response to the (05) command is an echo of the command.
From DCS, user must address the Master Station III and poll according to the table given in the FC -05
configuration. See the following example of a request/response exchange between the DCS and MSIII.
Example of force coil command
Force coil 17 of Master Station ON (This will close the valve controlled by field unit 5)
Query: 01050010FF008DFF
Response: 01050010FF008DFF
Table 8.6 - Function Code -05 Example Message Breakdown
Query
Response
01
MSIII Unit Address
01
MSIII Unit Address
05
Function
05
Function
00
Coil Address Hi
00
Coil Address Hi
101
Coil Address Lo
10
Coil Address Lo
FF
Force Data Hi
FF
Force Data Hi
002
Force Data Lo
00
Force Data Lo
8DFF
Error Check (CRC)
8DFF
Error Check (CRC)
43
NOTE 1: 0010h equals coil address 0001 0001b (field unit 5, coil 1)
NOTE 2: FF00h requests the coil to be ON (0000h requests the coil to be OFF)
flowserve.com
Limitorque Master Station III FCD LMENIM5001-01 – 05/12
Example of force multiple coils command
Force coil 2 of field unit 23 ON. This will CLOSE the valve controlled by field unit 23. Additionally, force coil 1 of field
unit 24 ON. This will OPEN the valve controlled by field unit 24.
Query: 010F002D000201033290
Response: 010F002D00024403
Table 8.7 - Function Code -15 Example Message Breakdown
Query
Response
01
MSIII Unit Address
01
MSIII Unit Address
0F
Function
0F
Function
00
Coil Address Hi
00
Coil Address Hi
2D
Coil Address Lo
2D
Coil Address Lo
00
Quantity of Coils Hi
00
Quantity of Coils Hi
02
Quantity of Coils Lo
02
Quantity of Coils Lo
01
Byte Count
4403
Error Check (CRC)
03
Force Data Lo
3290
Error Check (CRC)
NOTE 1: 002D00020103h equals coil addresses 00101101b (field unit 23, coil 2) and 00101110b (field unit 24, coil 1)
8.2.6.3.4 Modbus FC 06/16 Preset Registers
Touching the “Modbus FC 06/16 Preset Registers” button will take the user to the Modbus Holding Registers screen
(Figure 8.22) for configuration of desired number of holding registers to be written per MOV. The 06 command presets
a value into a single-holding register (Figure 8.22), while the 16 command presets a value into a block of multiple
holding registers (Figure 8.23). The data table for these function codes permit either one or two write registers per
field unit.
Figure 8.22 - Modbus Holding Registers-One Per MOV
44
Limitorque Master Station III FCD LMENIM5001-01 – 05/12
Figure 8.23 - Modbus Holding Registers-Two Per MOV
Selecting the “Next” button will advance the screen to a sample data table screen as shown below. Please note that a
unique data table is created starting at register 45001. Specific field unit registry convention is as follows: DCS Command
Write Register = [(MOV address –1) * (selected number of registers per MOV)] + 45001. Address affect is accounted for
in MSIII decoding process (i.e., 40,000).
Figure 8.24 - FC-06/16 Sample Data Table
These function codes are typically used to command Limitorque Modbus field units by writing values directly into
command/argument registers. A predetermined value may be used to open/stop/close the actuator, move the actuator to a
preset position, activate/deactivate network ESD, reset the field unit, etc. See the following example of a request/response
exchange between the DCS and MSIII.
45
flowserve.com
Limitorque Master Station III FCD LMENIM5001-01 – 05/12
Write register commands should be issued only once for the desired field unit control. Repeated
issuance of an acknowledged command will degrade network performance.
Example of a single register write command
Field Unit Command. Start a network ESD operation to field unit number 101. This corresponds to
writing the value 1280 to register 45201.
Query: 0106145005008F7B
Response: 0106145005008F7B
Table 8.8 - Function Code -06 First Command Message Breakdown
Query
Response
01
MSIII Unit Address
01
MSIII Unit Address
06
Function
06
Function
14
Register Address Hi
14
Register Address Hi
501
Register Address Lo
50
Register Address Lo
05
Force Data Hi
05
Force Data Hi
00
Force Data Lo
00
Force Data Lo
2
8F7B
Error Check (CRC)
8F7B
Error Check (CRC)
NOTE 1: 1450h equals register address 45201 (field unit 101 command register)
NOTE 2: 0500h requests the register to be preset with 1280d (start network ESD)
Example of a two-command write to a single register
“Move-To” Command. Move an actuator at address 45 to 42% open by first writing the value of 42 to
register 45090. After receiving a response, write the value of 6656 to register 45089. The actuator will
then move to a position of 42% open. First Command:
Query: 010613E2002AACA7
Response: 010613E2002AACA7
Table 8.9 - Function Code -06 Second Command Message Breakdown
Query
Response
01
MSIII Unit Address
01
MSIII Unit Address
06
Function
06
Function
13
Register Address Hi
13
Register Address Hi
E2
Register Address Lo
E2
Register Address Lo
00
Force Data Hi
00
Force Data Hi
2A
Force Data Lo
2A
Force Data Lo
1
2
ACA7
Error Check (CRC)
ACA7
Error Check (CRC)
NOTE 1: 13E2h equals register address 45090 (field unit 45 argument register)
NOTE 2: 002Ah equals 42d
46
Limitorque Master Station III FCD LMENIM5001-01 – 05/12
Second Command:
Query: 010613E11A00D618
Response: 010613E11A00D618
Table 8.10 - Function Code -06 Message Breakdown
Query
Response
01
MSIII Unit Address
01
MSIII Unit Address
06
Function
06
Function
13
Register Address Hi
13
Register Address Hi
E2
Register Address Lo
E2
Register Address Lo
1A
Force Data Hi
1A
Force Data Hi
00
Force Data Lo
1
2
D618
00
Error Check (CRC)
D618
Force Data Lo
Error Check (CRC)
NOTE 1: 13E1h equals register address 45089 (field unit 45 command register)
NOTE 2: 1A00h equals 6656d
Example of multiple register write command
Write the command to close an actuator (actuator CLOSE) to field units 50, 51, and 52. This corresponds to writing
the value 768 into command registers 45050, 45051, and 45052.
Query: 011013B90003060300030003006ABB
Response: 011003B900035569
Table 8.11- Function Code -16 Message Breakdown
Query
Response
01
MSIII Unit Address
01
MSIII Unit Address
10
Function
10
Function
13
Starting Address Hi
13
Starting Address Hi
B9
Starting Address Lo
B9
Starting Address Lo
00
Number of Registers Hi
00
Number of Registers Hi
03
Number of Registers Lo
03
Number of Registers Lo
06
Byte Count
03
Preset Data Hi (MOV 50)
002
Preset Data Lo (MOV 50)
03
Preset Data Hi (MOV 51)
00
Preset Data Lo (MOV 51)
03
Preset Data Hi (MOV 52)
00
Preset Data Lo (MOV 52)
1
6ABB
5569
Error Check (CRC)
Error Check (CRC)
NOTE 1: 13B9h equals register address 45050 (field unit 50 command register)
NOTE 2: 0300h requests the register to be preset with 768d (Field unit CLOSE)
See Tables 8.12 and 8.13 for valid register operations. For further reference, see DDC (Modbus) Field Unit Installation
and Maintenance manual LMENIM2329.
47
flowserve.com
Limitorque Master Station III FCD LMENIM5001-01 – 05/12
Table 8.12 - Valid Command Register Operations
Host Commands to Field Unit Register 1
Null Command
Open
Stop
Close
Reset Field Unit
Start Network ESD
Stop Network ESD
Engage Relay #1
Engage Relay #2
Engage Relay #3
Engage Relay #4
Engage Relay #5
Engage Relay #6
Engage Relay #7
Disengage Relay #1
Disengage Relay #2
Disengage Relay #3
Disengage Relay #4
Disengage Relay #5
Disengage Relay #6
Disengage Relay #7
Move-To (Enable)1
Engage Relay #8
Disengage Relay #8
Value (Decimal)
0
256
512
768
1024
1280
1536
2304
2560
2816
3072
3328
3584
3840
4352
4608
4864
5120
5376
5632
5888
6656
6912
7168
Function
No action
Open actuator
Stop actuator
Close actuator
Reset processor
ESD initiate
ESD terminate
S1 or R1 (opt)
S2 or R2 (opt)
R3 (opt)
R4 (opt)
R5 (opt)
R6 (opt)
R7 (opt)
S1 or R1 (opt)
S2 or R2 (opt)
R3 (opt)
R4 (opt)
R5 (opt)
R6 (opt)
R7 (opt)
Initiates “move-to”
R8 (opt)
R8 (opt)
Note 1: This is a two-step command. A valid value must be written to Register 2 before issuing this command.
Other registers may also be preset to control or change other functions but care must always be taken to properly
change these values. An improper value written to a register can cause undesirable actions from the DDC-100 Field Unit.
NOTE: Null Command–The field unit takes no action when this command is received. This command is typically used by
a Host to reset the Host output register when required.
From DCS, user must address the Master Station III and poll according to the table given in the FC-06/16 configuration.
48
Limitorque Master Station III FCD LMENIM5001-01 – 05/12
This command allows a Host to issue the “move-to” command with a single write utilizing the
Modbus function code 06. Register 1 will be used to complete this command.
Rules for utilizing this command:
• Field unit scaling must be configured for 0-100.
• To use the hexadecimal method of determining a single write “move-to” command, 0x4B is always
placed into the Hi Byte of Register 1. The desired position value is always placed into the Lo Byte of
Register 1.
• To move the actuator to a position of 50%, place the value 0x4B in the high byte and the value of
0x32 (50 decimal) into the low byte.
Example:
Hex format: 0x4B32
To use the decimal method of determining a single write “move-to” command, add the desired
position value to 19200.
Example:
Desired position: 50%
19200 + 50 = 19250
“19200 + Value” (Position Value for units capable of commands accepting 1 write “move-to”)
Table 8.13 - Valid Argument Register OperationsValu
Values
Function
0 – 100
Desired Valve Position
8.2.7 MOV Network Config
The MOV Network Config screen (Figure 8.25) provides access to communication parameters essential for connecting the Master Station to all assigned field units. By selecting the Next button, the
screen will advance to Active MOVs display (Figure 8.26) to allow user to activate desired addressed
field units to be networked. After completion of MOV activation, simply select the Poll Priority tab to
advance to the Polling Priority view (Figure 8.27). This screen enables the user to set the poll cycle
interval for each activated MOV. After the MOV network has been configured, please save the settings
under the System Configuration screen (Figure 8.28).
49
flowserve.com
Limitorque Master Station III FCD LMENIM5001-01 – 05/12
Figure 8.25 - MOV Network Configuration
For a baud rate of 4800, use the following initial values: Timeout - 200ms, Prop delay - 25 ms, and
RTS On delay - 25 ms. These values should be adjusted to best fit the network’s configuration.
For a baud rate of 9600, use the following initial values: Timeout – 200 ms, Prop delay - 20 ms, and
RTS On Delay – 20 ms. These values should be adjusted to best fit the network’s configuration.
For a baud rate of 19200, use the following initial values: Timeout – 200 ms, Prop delay - 15 ms, and
RTS On Delay – 15 ms. These values should be adjusted to best fit the network’s configuration.
Figure 8.26 - Active MOVs
Figure 8.27 - Polling Priority-Active MOVs
50
In order to optimize the network efficiency, lower priority MOVs can be set to be polled at a user
defined cycle.
Limitorque Master Station III FCD LMENIM5001-01 – 05/12
8.2.8 Configure Files
The Configure Files screen (Figure 8.28) permits the user to load the Master Station configuration
from a file (Figure 8.29), either previously saved in the device’s memory or from an external USB
drive.
Figure 8.28 - Configure Files
Selecting Load Config File will advance the display to the following screen:
Figure 8.29 - Load Configuration from File
Select the desired configuration file and hit the “Open” button. This will change the Master Station’s
configuration according to the selected file.
In addition, the current configuration can be saved as the default settings (Figure 8.30) or the Master
Station’s current configuration can be returned to the factory default settings (Figure 8.31).
51
flowserve.com
Limitorque Master Station III FCD LMENIM5001-01 – 05/12
To save the current configuration as the default, select the “Save as Default” button and confirm.
Figure 8.30 - Save as Default
To return to the original configuration settings the Master Station started with, select the “Restore
Factory Defaults” button and confirm.
Figure 8.31 - Restore Factory Defaults
52
Limitorque Master Station III FCD LMENIM5001-01 – 05/12
9
Diagnostics
9.1 Main Menu
Upon successful login as a user assigned to either Configure or Administrator role level, the
Diagnostics button on the Main Menu screen will be present (Figure 9.1). Simply touching the
Diagnostics button will advance the HMI display to the Diagnostics screen (Figure 9.2). By selecting
Exit, the user will end the session and log out.
Figure 9.1 - Main Menu
9.2 Diagnostics
The Diagnostics screen (Figure 9.2) provides the user with accessibility to three core areas of MOV
network data collection. The user may select the Event Log, Communication/Function Code Logger,
or Polling Statistics tab to acquire data related to the respective diagnostic feature.
53
flowserve.com
Limitorque Master Station III FCD LMENIM5001-01 – 05/12
Figure 9.2 - Diagnostics
9.2.1 Event Log
The Event Log screen (Figure 9.3) allows the user to display the last 20 events that occurred. Each
event is related to changes in login Information, configuration, network status, or MOV polling
activity. Every entry is defined, numbered, and time-stamped in order to maintain the logged data.
Figure 9.3 - Event Log
9.2.2 Comm/FC Logger
The Comm/FC Logger (Figure 9.4) captures Modbus requests and responses to/from the DCS
and MOVs (channel A & B). Additionally, the Logger screen shows configuration changes related
to channel A and/or B, Ethernet, and DCS port activity, as well as individual function codes. The
channels can be selected individually to filter activity being displayed.
NOTE: The Comm/FC logger is designed for local diagnostic purposes only. While the Comm/FC
logger is active, communication from the DCS/host device to the Master Station III is subject to
reduced performance.
54
Limitorque Master Station III FCD LMENIM5001-01 – 05/12
Figure 9.4 - Comm/FC Logger
9.2.3 Polling Statistics
The Polling Statistics screen (Figure 9.5) allows the user to view the polling history of each activated
MOV on the network. This diagnostic feature reveals the total number of polls, errors encountered,
and error rate (%) during a user-defined time frame.
Figure 9.5 - Polling Statistics
55
flowserve.com
Limitorque Master Station III FCD LMENIM5001-01 – 05/12
10
File Manager
10.1 Main Menu
Upon successful login as a user assigned to either Configure or Administrator role level, the File
Manager button on the Main Menu screen will be present (Figure 10.1). Simply touching the File
Manager button will advance the HMI display to the File Manager screen (Figure 10.2). By selecting
Exit, the user will end the session and log out.
Figure 10.1 - Main Menu
10.2 File Manager
The File Manager screen (Figure 10.2) allows the user to import/export the Master Station configuration file, export the event log, and import the MOV name files. In addition, the user can update the
unit’s software version via this menu.
56
Limitorque Master Station III FCD LMENIM5001-01 – 05/12
Figure 10.2 - File Manager
10.2.1 Import Config File
The Import Config File screen (Figure 10.3) allows the user to access the file chooser and select a
configuration file to be copied to the default directory for the Config File archives.
Figure 10.3 - Import Config File
10.2.2 Export Config File
The Export Configuration screen (Figure 10.4) enables the user to access the file chooser and save
the current configuration to a user-defined location.
Figure 10.4 - Export Config File
57
flowserve.com
Limitorque Master Station III FCD LMENIM5001-01 – 05/12
10.2.3 Export Event Log
The Export Event Log screen (Figure 10.5) permits the saving of diagnostic events. Each event is
related to changes in log-in Information, configuration, network status, or MOV status polling activity.
In addition, all captured events are defined, numbered, and time-stamped in order to maintain the
logged data.
Figure 10.5 - Export Event Log
10.2.4 Import Tag File
The Import Tag File screen (Figure 10.6) allows the user to access the file chooser and select a MOV
tag name file to be copied to the default directory for the tag name file archives.
Figure 10.6 - Import Tag File
58
Limitorque Master Station III FCD LMENIM5001-01 – 05/12
10.2.5 Import Software Update
The Import Software Update screen (Figure 10.7) allows the user to access the file chooser and select
a software update file to be copied to the default directory for the Master Station device software file
archives.
Figure 10.7 - Update Software
59
flowserve.com
Limitorque Master Station III FCD LMENIM5001-01 – 05/12
11
Troubleshooting Guide
11.1 Front Panel Indicators
There are three LEDs on the front of the Master Station that provide a visual reference of the overall
health of the Master Station and MOV network. These LEDs are described as follows:
A. Network Alarm - A red LED indicates a field network communication fault.
B. MOV Alarm - A red LED indicates a MOV device alarm is present.
C. Power – A green LED indicates that the unit has power.
11.2 Network Status Screen
The Network Status screen provides a visual reference of the overall health of the MOV network.
See Section 5 for instructions on viewing the MOV and communication channel status. MOV faults
can be examined by clicking on the desired box. Communication channel faults can be examined
and corrected by reviewing log files (see Section 9), verifying correct configuration parameters (see
Section 8), and checking wiring connections and/or network surge protection module on rear of unit.
11.3 Blank Display
60
A blank display can be the result of the activated screen saver feature. If setting adjustments are
required, please see Section 8. Additionally, the lack of AC/DC power to the Master Station will also
cause a blank screen. After verifying power is available to the unit, disconnect the power and check
the power fuse on the rear of the unit. If it is good, remove the power surge protection module and
check for continuity.
Limitorque Master Station III FCD LMENIM5001-01 – 05/12
11.4 Error Messages
Problem Saving File – Media Error (Full, Write Protected, Corrupted)
No USB Device Selected - Configuration save attempted without a USB device inserted in a USB port,
and selected.
Error Adding User - Duplicate User entry
Error Saving To Config File - Media Error (Full, Write Protected, Corrupted)
11.5 Network Communication
11.5.1 DCS communication via RS-232/422/485
Unable to establish comm’s with the DCS
a. Confirm null modem cable connection, if using RS-232
b. Verify DCS address setting
c. Verify baud rate, handshaking, start bit settings
d. Check host system settings
e. Test the cable, replace if defective
11.5.2 DCS communication via Modbus TCP/IP
Unable to establish comm’s with the DCS
a. Confirm IP address settings
b. In command mode, ping the MSIII, if no response, verify the MSIII and the host are on
the same network
c. Verify Ethernet path from host to the MSIII
11.5.3 MSIII communication to the MOV network
Unable to establish comm’s with the MOV’s
a. Confirm proper cable connections on the first MOV in the loop and the MSIII. RS-485
is polarity sensitive
b. Confirm RS-485 baud rate settings match MOV baud rate settings
c. Confirm MSIII is configured for Modbus RTU mode
d. Verify timing settings (timeout, prop delay, RTS on delay)
61
flowserve.com
Limitorque Master Station III FCD LMENIM5001-01 – 05/12
11.6 Surge Protection
Figure 11.1 - Surge Protection Access
AC Fuse Protection
AC Surge Protection
(behind panel)
Network Surge Protection
(behind panel)
11.6.1 AC Surge Protection
It is recommended to replace the surge protector if a known primary AC power surge has occurred.
For a Hot Standby unit, please ensure that both main AC surge protectors are replaced. Follow the
below procedure to ensure proper replacement.
Figure 11.2 - Main AC Power Input Module
Remove two screws on the main AC power input module and then remove the module from the
chassis.
62
Limitorque Master Station III FCD LMENIM5001-01 – 05/12
Figure 11.3 - Removing Main AC Input Power Module
Locate the AC surge protector, unplug wiring connector on both sides of the protector, and remove it
from the cable assembly.
Figure 11.4 - AC Surge Protector
Install replacement protector by following above procedures in reverse order.
11.6.2 AC Fuse Protection
Release clip on bottom of the fuse holder and gently remove holder from main AC power input
module.
Figure 11.5 - Removing Fuse Holder
63
flowserve.com
Limitorque Master Station III FCD LMENIM5001-01 – 05/12
Figure 11.6 - AC Fuse Holder
Check each of the two fuses, located in the holder, for continuity. Replace if necessary and reinstall
the holder into the module.
11.6.3 Network Surge Protection
The network surge protector is a three-stage device for protection of the RS-485 data lines. Loss of
communication on either channel A or B could result in a faulty surge protector. Please see below
traces to verify proper operation of the protector.
Figure 11.7 - Network Surge Protector
If faulty, please replace device by removing the two outer screws and then the assembly. Replace with
a new protector assembly.
Figure 11.8 - Removing Network Surge Protector
64
Limitorque Master Station III FCD LMENIM5001-01 – 05/12
This page intentionally left blank.
65
flowserve.com
Limitorque Master Station III FCD LMENIM5001-01 – 05/12
This page intentionally left blank.
66
Limitorque Master Station III FCD LMENIM5001-01 – 05/12
This page intentionally left blank.
67
flowserve.com
Flowserve Corporation
Flow Control
United States
Flowserve Limitorque
5114 Woodall Road
P.O. Box 11318
Lynchburg, VA 24506-1318
Phone: 434-528-4400
Facsimile: 434-845-9736
England
Flowserve Limitorque
Euro House
Abex Road
Newbury
Berkshire, RG14 5EY
United Kingdom
Phone: 44-1-635-46999
Facsimile: 44-1-635-36034
To find your local Flowserve Limitorque representative:
Visit www.flowserve.com/limitorque or call 1-434-528-4400
FCD LMENIM5001-01 05/12 Printed in USA.
Flowserve Corporation has established industry leadership in the design and manufacture of its products. When properly selected, this Flowserve product is designed to perform its intended
function safely during its useful life. However, the purchaser or user of Flowserve products should be aware that Flowserve products might be used in numerous applications under a
wide variety of industrial service conditions. Although Flowserve can (and often does) provide general guidelines, it cannot provide specific data and warnings for all possible applications.
The purchaser/user must therefore assume the ultimate responsibility for the proper sizing and selection, installation, operation, and maintenance of Flowserve products. The purchaser/
user should read and understand the Installation Operation Maintenance (IOM) instructions included with the product, and train its employees and contractors in the safe use of Flowserve
products in connection with the specific application.
While the information and specifications contained in this literature are believed to be accurate, they are supplied for informative purposes only and should not be considered certified or as
a guarantee of satisfactory results by reliance thereon. Nothing contained herein is to be construed as a warranty or guarantee, express or implied, regarding any matter with respect to this
product. Because Flowserve is continually improving and upgrading its product design, the specifications, dimensions and information contained herein are subject to change without notice.
Should any question arise concerning these provisions, the purchaser/user should contact Flowserve Corporation at any one of its worldwide operations or offices.
© 2012 Flowserve Corporation, Irving, Texas, USA. Flowserve is a registered trademark of Flowserve Corporation.
flowserve.com
Japan
Limitorque – Nippon Gear Co., Ltd.
NOF Bldg. 9th Floor
1-11-11, Kita-Saiwai, Nishi-Ku
Yokohama (220-0004)
Japan
Phone: 81-45-326-2065
Facsimile: 81-45-320-5962
Singapore
Flowserve Limitorque
12, Tuas Avenue 20
Singapore 638824
Phone: 65-6868-4628
Facsimile: 65-6862-4940
China
Limitorque Beijing, Pte., Ltd.
RM A1/A2
22/F, East Area, Hanwei Plaza
No. 7 Guanghua Road, Chaoyang District
Beijing 100004, Peoples Republic of China
Phone: 86-10-5921-0606
Facsimile: 86-10-6561-2702
India
Flowserve Limitorque, Ltd.
Plot No 4
Export Promotional Industrial Park
Whitefield, Bangalore 560066
India
Phone: 91-80-40146200
Facsimile: 91-80-28410286