Transcript
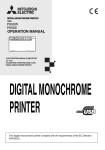
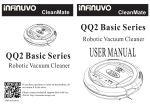
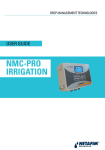
MODEL NO.:HOVO650 WITH UV STERILIZATION AND WATER TANK Metapo Inc. h t t p : / / w w w. i n f i n u v o . c o m h t t p : / / w w w. m e t a p o . c o m Safety Instructions 1 Product Features 2 Product Illustrations 3-7 Main unit and accessories 3 Main Unit and Dust Bin 4 Charging Station and Virtual Blocker 5 Remote Control Unit 6 Unit Display Panel 7 13.4” (340mm) 3.54” (90mm) 6.6 Lbs (3. 0Kgs) Product Operations Power voltage Battery 2000mAH 8-11 Battery Charging Methods 8 Cleaner Operations 9 Schedule Cleaning Time 10 Cleaner Operations 11 Virtual Blocker Usage 11 AC Adapter Specification Input 100—240V 50/60Hz 0.8A Output 24.0V/1.0A Dust bin capacity 0.4Liters Charging type Product Maintenance Cleaning mode 12-13 Clean Side Brushes 12 Clean Dust Bin and Filters 12 Clean Sensors 13 How to Install &Uninstall Mopping Pad 13 3 - 4 hours Main Unit Button Type 14-16 Troubleshooting Error Codes Chart 14 Replaceable Modules 15 Battery Installation and Replacement 16 Unit Usage Limitation 16 Product Specification 17 17 Safety Battery Installation and Replacement Before using this product, please read the following safety instructions and follow all normal safety precautions. A. Remove two screws from battery cover with screw driver Read this user manual thoroughly and carefully before using this product. B. Open the battery cover. Save this user manual. C. Take out the battery using the 2 strip holder on its sides Follow these precautions to reduce the risk of injury or damage. D. Disconnect the wire connector that connects the battery and unit. Only a certified technician can disassemble and/or repair the product. E. Put a new battery into battery slot with 2 strip holders face up non-authorized F. Reconnect the wire between the battery and unit correctly. G.Make sure the wire connector is stored on the cavity. Do not use product near any flammables. Do not clean while product is charging. H.Put the battery cover back and make sure side brush is not stuck in. Do not over bend or put large weight on the power cord. This product is for indoor use and clean dry surface floor only. I. Lock back battery cover with screws. Note: Only use factory authorized batteries Before use, remove damagable objects (glass, textiles, papers, etc.) Unit Usage Limitation Do not place this product where it is easy to drop off(tables, chairs, etc ). that can get caught in the cleaner's brush or vacuum intake. The cleaner unit can ONLY be used at residential houses indoor and dry floor. It will clean the debris,dirt, dust, and pet hairs off the floor, and work well on hardwood, tile, linoleum, Before charge battery, make sure that the adapter and outlet are properly connected and low-pile (up to 0.5 inches) carpet. in right sequence to avoid sparks. To avoid injury; inform all people in the house that the unit is doing cleaning. Use this product in temperatures between 0°C and 40°C (32°F and 104°F). Remove battery from unit before recycle or scrap unit. Disconnect AC adapter before removing the battery. The battery should be properly disposed. NOTE: Do not allow children to operate this product unless they are supervised by an adult 1 16 2 This product will adjust its suction power according to the different floor types.It will clean the floor more effectively and also save power consumption. Front Wheel Module Vacuum Guard User Friendly Design Easy operation Voice message guidance and touch screen operations. Just touch CLEAN key to start cleaning floor. Wash Dust Bin Empty and wash dust bin with water regularly for cleaning effectiveness. Four Cleaning Modes The cleaner will clean and vacuum the floor automatically and adjust its cleaning routine based on its environment. The cleaner will spend more time to clean dirty areas. The cleaner will clean the edge and corner of walls. You can schedule the cleaner to start cleaning at pre-defined time. 15 2 Error Codes Chart Main unit and acceccories Error code will show on display panel if there is a problem with the cleaner Unit Self Charging Base Remove hair and debris from the cleaner's left wheel. Push it in and out and check if the wheel can turn freely. Remove hair and debris from the cleaner's right wheel. Push it in and out and check if the wheel can turn freely. Left wheel error Right wheel error E03 included) Virtual Blocker (battery not included) AC Adapter Cleaning Brush Tool Not in use Water Tank Trailing Bar With 2 Mopping Pad Place cleaner on the floor Unit is lifted up Cliff sensor fail Clean the cliff sensor with a cotton swabs Bumper sensor fail Check bumper can move freely and is free from any debris Left brush error Remove and clean left brush Right brush error Remove and clean right brush 8 Spare Side Brushes 9 HEPA Filter User Manual 10 2 收音 音乐 电影 下一曲 上一曲 音 量- Unit is stuck INTELLGENTCLEANER E10 Turn on power switch while charging battery Power switch is off 1 2 3 4 5 6 7 8 9 Check any issue on two wheels rotation speed E12 Wheels issue E15 Vacuum motor error Check any air flow from air outlet at cleaner back end L0 Battery power is low Recharge battery manually 8888 battery power is very low Recharge battery manually Clean dust bin and vacuum intake Dustbin full Note: If the error condition is not resolved, do the following: 1. Restart the cleaner by switching off and on power switch. 2. If restarting doesn't work, remove battery for more than 10 minutes to reset system. 3. If it is still not working, then contact your local service center for repair. 14 3 Clean Sensors Main Unit and Dust Bin Receiver Wipe the sensor window and auto charging sensors with cleaning tool or a soft dry cloth. Clean charging contacts on self charging base. Clean vacuum intake and dust sensor as shown in figure below. A Front Wheel B C How to assemble the water tank trailing bar Water injection hole Right Side Brush 1 4 Vacuum Intake 5 UV Light 2 Right Wheel Module Left Wheel Module Bottom Cover 1 4 2 5 3 6 Mopping Pad 6 Water tank Water outlet A 3 Body joint holes C B 1.Open the water injection hole cover , fill up water through injection hole , stick the mop to the right place ( diagram 1,2,3 below). a. Fill up water and seal cover before install water tank trailing bar to the cleaner. b. When install trailing bar to the cleaner bottom, the trailing bar body should not have water on it . c. Make sure mopping pad does not have too much water to avoid moving wheels slip. Air flow outlet Power Switch and Socket 2.Aim at the relevant holes and install the trailing bar on the cleaner bottom (diagram 4 below). 3 2 1 4 13 4 Product Maintenance Clean Side Brushes Charging Station and Virtual Blocker A. Check side brushes for damage or foreign object on the brush. C. er Remove the screws of the side brushes Replace brushes with new ones Use screws to lock the new brushes in place ChargingContacts Contacts Clean dust bin and filter Note: After taking out dust bin, check if there is foreign object stuck or block the vacuum passage and clean it if necessary. A. Press “PUSH” to open the dust bin cover. B. Take out the dust bin. C. Separate HEPA filter from dust bin. er D. Pull out dust bin top cover and take out primary filter. F. Wash dust bin with water. Clean filters with cleaning brush tool, or vacuum it. Note: 1. Clean dust bin module when “ ” and " ! " icons are flashing on the display panel. 2. You can clean HEPA filter or replace it with new filter after one year of usage or if it is too dirty. 2.Do not place HEPA and primary filters directly in the sun. unit. Note: Dust bin and filters (including HEPA and filter) could be replaced if needed. Installing virtual blocker battery blocker. Install two D type batteries into the virtual blocker as shown; Note:Take out the batteries if you won't use virtual blocker for long period of time. 12 5 Product Operations Remote Control Unit Auto Cleaning Mode The cleaner will clean the area and adjust its cleaning routine according to its environment. Note: Press CLEAN on cleaner or remote to start auto cleaning mode Spot Cleaning Mode 收音 电影 音乐 下一曲 上一曲 音 量- Place cleaner near dirty area. Press SPOT to start cleaning and press CLEAN to stop. Note: Spot cleaning makes the cleaner spend more time cleaning a dirty area. Spot cleaning mode will stop once the area is clean. Edge Cleaning When the cleaner detects an obstacle, it will use its side brushes to clean the sides Note: Place cleaner against a wall. Use the remote control to wirelessly control the cleaner unit. Make sure the unit is switched Press EDGE on remote unit to start edge cleaning mode; press CLEAN to stop. on before using the remote. Point the remote towards the unit and press button to control Virtual Blocker unit operation. Virtual Blocker creates an invisible barrier that the cleaner will not cross. The Virtual Blocker can be used to confine the cleaner in a room (put it outside the door way) or prevent it from going towards Install one coin type battery into remote control unit. Do not use remote near self charging base or virtual blocker. fragile objects. Virtual Blocker can block an opening of up to 4m (13 ft) After batteries are installed, turn on the power switch. Put the virtual blocker where you want it to work. When using virtual blocker, put “ ”side of virtual blocker towards blocker. 6 11 Product Operations Unit Display Panel Illustration You can schedule the cleaner to do cleaning at pre-defined time every day. There is no real time clock setting function. You can set schedule cleaning time hh:mm hours and minutes (delay time) from current time on your clock. Time delay can be set up to 24 hours. For example, it is 9:00AM on your clock, you set 6:30 delay time on the cleaner, and the cleaner will start cleaning after 6 hours and 30 minutes which is 3:30PM. The cleaner will start cleaning at 3:30PM every day until unit power switch is turned off. When scheduling ensure that robot vacuum cleaner automatic delay start is set at least 4hours ahead to allow sufficient time for battery full charge. Once the scheduled cleaning cycle is over, and robot vacuum cleaner has had a full charge(i.e. LED display screen shows “full”)you can press “clean”button on the LED display screen or “clean” button on the remote controller to start robot vacuum cleaner for another cycle of cleaning in Display Illustration numeric display: Shows timer, unit status, battery charging status, and error codes. display: Shows an error has occurred. between scheduled cleaning cycles. display: Flashes constantly when dust bin is full or when vacuum intake is blocked. How to set cleaning delay time (hh:mm)? Control Button On cleaner unit A.Press “ ” to enter scheduling mode, the hours on “88:88” on LED display will flash. B.Press “ ” and “ C.Press “ ” to move from hours to minutes. ” and “ E.Press “ ” to finish scheduling. ” for 5 seconds in scheduling mode and delay time will be erased. On remote control unit B.Press this button to switch between hour and minute in scheduling mode. ” to wake up cleaner unit, then press “ ”,the hours on “88:88” on LED display will flash. B.Press “ ” button to to increase or decrease hours. D.Press “ E.Press “ ” or “ ed mode; pressing this button to cha ” to increase or decrease minutes. F. To cancel scheduling, keep pressing “ C.Press “ to complete following operations: ”to increase or decrease hours. D.Press “ A.Press “ Clean: Press Spot: Press to complete following operations: ” to move from from hours to minutes. ” button to increase or decrease minutes. ” to finish scheduling. B. When cleaner is in selected mode press this button to make cleaner start spot cleaning Home: Press to complete following operations: F. To cancel scheduling, set hours and minutes on LED display to “00:00” in scheduling mode. B. When cleaner is in selected mode, pressing“ 10 Product Operations ”to return the cleaner to self charging base. 7 Product Operations Battery Charging Methods Note: When battery is low, display panel will show "Lo". Remove water tank mopping Place self charging base pad (if it is installed) from unit to ensure unit can do docking correctly. Note: Put self charging base against the wall and remove obstacles about 3 ft at two sides and about 6 ft in front. Turn on the Power Switch at the side of cleaner, then display will flash. (If the unit does not receive a command for 20 seconds, it will go into Sleep mode.) Note: A. Please keep the power switch on. If not , it will not operate. B. If power switch is turned off; scheduling data will be erased. Caution: Before charging the cleaner, please make sure the power switch is turned on; Press CLEAN on the cleaner unit or remote control unit to start cleaning. Note: If cleaner is in sleeping mode, press CLEAN button to wake up the cleaner. Then press CLEAN for a second time, the cleaner starts cleaning automatically. otherwise, the cleaner can not be charged. Changing modes Manual Charge Battery A.Plug adapter power cord to unit power socket first and plug AC adapter to wall outlet next. B.Connect charging base with AC adapter to wall outlet to power on, “Press HOME button on cleaner unit or remote control to make cleaner return to charging base.” Changing modes while unit is cleaning A.Press PLAN, CLEAN, or HOME on cleaner or CLEAN on remote control to pause the current mode. B.Select new mode you wish to use. Note: When cleaner is paused, press CLEAN on cleaner or remote to resume cleaning. Sleep mode To make cleaner go into sleep mode: A.Cleaner will go into sleep mode if it does not receive any commands for 20 seconds. B.Otherwise, press CLEAN on cleaner for 3 seconds Note: Turn off the power switch if you are not using the cleaner for a long period of time. A. Turn on power switch before start to charge cleaner battery. cleaner D. Before first time use, let the cleaner do cleaning until battery is used up. cleaner F. If the cleaner is not used for long time ,please turn the power switch off. G.Do not operate cleaner while it is charging The cleaner will automatically return to self charging base when cleaning is done or battery is low. Please keep self-charging base plug in; otherwise, cleaner will not find the base to do auto battery charging. 8 9