1
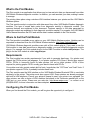
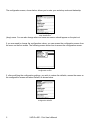
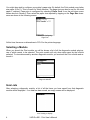
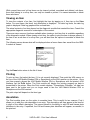
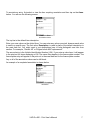
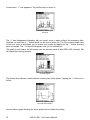
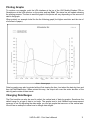
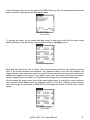
VAD Mobile Wireless
Print User's Manual
Version 1.0
Table of Contents
What Is the Print Module....................................................................................... 1
Where to Get the Print Module ............................................................................. 1
Requirements ....................................................................................................... 1
Configuring the Print Module ................................................................................ 1
Selecting a Module ............................................................................................... 4
Item Lists .............................................................................................................. 4
Viewing an Item .................................................................................................... 6
Printing.................................................................................................................. 6
Annotation............................................................................................................. 6
Deleting................................................................................................................. 8
Data Logs ............................................................................................................. 8
Viewing a Data Log............................................................................................... 8
Printing Graphs ................................................................................................... 11
Changing Data Ranges....................................................................................... 11
Support for the Print Module ............................................................................... 15
VAD Pro-901 - Print User's Manual
ii
What Is the Print Module
The Print module is an application that allows you to view and print data you have saved from other
VAD Mobile Wireless diagnostic modules. In addition, you can annotate your data, making it easier
to manage.
The printing takes place using a wireless IrDA interface between your printer and the VAD Mobile
Wireless system.
The Print module works in conjunction with data saved from other VAD Mobile Wireless diagnostic
modules. The type of saved data varies from diagnostic module to diagnostic module. The
common features are explained in this document. Features specific to the data generated by
diagnostic module are explained in that diagnostic module's manual. For example, the VAD Mobile
User's Manual describes the ECU and vehicle data it makes available to the Print module.
Where to Get the Print Module
The Print module is available as an option on your VAD Mobile Wireless system. Updates can be
requested for download from the VAD Mobile Wireless website, http://www.vadmobile.com/.
VAD Mobile Wireless diagnostic modules come with a Print module plug-in. If you want to use the
Print module to view data saved from a diagnostic module, you must install the diagnostic module
plug-in. For example, the Print module plug-in for the OBD-II module is called obd2-print.prc. The
plug-in for the VAG module is called vag-print.prc.
Requirements
The Print module has certain requirements if you wish to generate hard-copy. You printer must
support the PCL5e printer job language. If you printer supports PCL6 then it should also support
PCL5e. PCL5e is commonly found on laser printers, but not on inkjet printers. HPGL is also
required for printing graphs. HPGL usually goes hand-in-hand with PCL5e.
Your printer must also contain certain built-in fonts, In particular, the “CG Times” and “Arial” fonts. If
your printer supports PCL5e, it probably includes these fonts.
The Print module uses the IrDA interface on the VAD Mobile Wireless Bluetooth PDA to send data
wirelessly to the printer. The printer must also support IrDA. Some printers are already equipped
with built-in IrDA interfaces. Consult your printer's manual to see if your printer is so equipped. For
other printers, we offer a choice of IrDA modules that attach to the Centronics parallel port or the
USB port on your printer. Please see our web site, http://www.vadpro.com/ , or contact us at
(604)598-8520, for more information on these adapters.
Configuring the Print Module
When you first launch the Print module, you will be given the opportunity to configure it.
VAD Pro-901 - Print User's Manual
1
The configuration screen, shown below, allows you to enter your workshop code and dealership
Screen 1: Configuring
shop identification
(shop) name. You can also change what tool name and version should appear on the print-out.
If you ever need to change the configuration values, you can access the configuration screen from
the menu on the first screen. The following screen shows how to access the configuration screen.
Screen 2: Accessing the
configuration screen
If, after modifying the configuration settings, you wish to restore the defaults, access the menu on
the configuration screen and select Default, as shown below.
Screen 3: Restoring
configuration defaults
2
VAD Pro-901 - Print User's Manual
You might also wish to configure your printer's paper size. By default, the Print module uses Letter
size paper (8.5x11). This is correct for North America. The page size can also be set for A4 sized
paper if required. Paper size is configured by selecting Printer Conf. from the pull-down menu
shown above in Screen 2.Then select the paper size required by tapping on the Page Size downarrow as shown in the following screen.
Screen 4: Configuring
Page Size
At this time, there are no alternatives to PCL5 for the printer language.
Selecting a Module
When you launch the Print module you will be shown a list of all the diagnostic module plug-ins,
one of which needs to be selected. The print module will only show data saved by the module
selected. To view data saved by another diagnostic module, you must exit the Print module and relaunch it.
Screen 5: Selecting a
Diagnostic Module
Item Lists
After selecting a diagnostic module, a list of all the items you have saved from that diagnostic
module will be displayed. If no data has been saved, an empty screen will be displayed:
Screen 6: No saved DTC
sets. Nothing to display.
4
VAD Pro-901 - Print User's Manual
A more interesting screen appears when saved data is present. The following screen shows data
saved from the VAG module. Specifically, DTC sets resulting from two “Collection Services”,
“Check DTCs – complete system” scans on different vehicles and one individual engine ECU.
Screen 7: List of DTC sets
- two full vehicle scans and
one individual ECU
The next screen shows a variety of data saved from the OBD-II module.
Screen 8: Various data
from the OBD-II module
In the screen from the VAG module, notice that some items have a box with a plus sign in front of
the description. These items are “roll-up” items and contain sub-items. To view the contents of a
“roll-up” item, tap on the item description. In the case of the VAG module, the “roll-up” item is a
complete vehicle DTC scan that contains DTC lists for multiple ECUs. Tapping on the “roll-up” item
will show the individual ECUs that make up the complete vehicle scan. This is illustrated below.
Screen 9: A “roll-up”
item unrolled
VAD Pro-901 - Print User's Manual
5
While normal items and roll-up items can be viewed, printed, annotated and deleted, sub-items,
those that belong to a roll-up item, can only be viewed or printed. You cannot annotate or delete
these sub-items.
Viewing an Item
To view the contents of an item, first highlight the item by tapping on it, then tap on the View
button. For most items, the item's text description is displayed. For data log items, the data log
graph is displayed. Data log graphs will be covered later.
The actual contents of an item depend on the diagnostic module that created the item. Consult the
appropriate diagnostic manual for a description of the content.
There are some common functions available when viewing a text item that is available regardless
of the diagnostic module. When viewing a text item, the option to print the item is always present. If
the item is not a sub-item of a roll-up item, you will also have the options to annotate or delete the
item.
The following screen shows what will be displayed when a freeze frame item saved from the OBDII module is viewed.
Screen 10: View
Item options
Tap the Done button return to the list of items.
Printing
To print an item, first select the item, if it is not currently displayed. Then point the IrDA sensor on
the top of the VAD Mobile Wireless PDA or Smartphone at the IrDA receiver on the printer. Once
you have properly aligned the VAD Mobile Wireless PDA or Smartphone with the printer's IrDA
interface, tap the Print button. The Print module will display the printing progress as data is
transmitted to the printer. When the Print module displays “Transmission Complete,” all data has
been sent to the printer and you no longer need to aim the VAD Mobile Wireless PDA or
Smartphone at the IrDA receiver.
The print output will depend on the item type.
Annotation
The Print module gives you the option to annotate items. This is useful for two reasons. First it
allows you to add your own description to an entry. This description will then appear in the item list
in place of the default description. The second benefit is the ability to add VIN and license plate
identifiers to the entry. If specified, the VIN and license plate identifiers will appear, as needed, in
the print-out.
6
VAD Pro-901 - Print User's Manual
To annotate an entry, first select or view the item requiring annotation and then tap on the Anno.
button. You will see the following screen:
Screen 11: Blank
annotation screen
The top line is the default item description.
Enter your new values on the dotted lines. You can enter any values you wish, however each value
is used in a specific way. The first value, Description, is used in place of the default description in
the main item list. You might want to put descriptions here to help distinguish one item from
another. For example, “Steve's A6” or “Engine before MAF replacement.”
The second entry is the Vehicle Identification Number (VIN). If you enter a value here, it will appear
in the print-out for items displaying a VIN. The same thing applies to the license plate number. The
license plate entry will appear in the print-out in the area reserved for the license plate number.
Any or all of the annotation values can be left blank.
An example of a completed annotation is shown below.
Screen 12: Completed
annotation
VAD Pro-901 - Print User's Manual
7
Deleting
If you no longer wish to save an item, it may be deleted by selecting or viewing the item and then
tapping the Delete button. The Print module will first prompt you for confirmation as shown below.
After tapping OK it will delete the one or more Memo Pad records containing the item.
Screen 13: Delete
confirmation.
Data Logs
In addition to viewing and printed saved text data, the Print module lets you view and print graphs
from your saved data logs. Data logs appear like other items in the item list. The data log items can
be annotated, deleted and viewed just like text items. The following screen shows a list of various
data logs.
Screen 14: List of
data logs
Viewing a Data Log
The procedure to view a data log is like viewing any other item. Select the item by tapping on it,
and then tap the View button. However, you will not see a text representation of the data. You will
see an actual graph of the data.
8
VAD Pro-901 - Print User's Manual
The best way to explain how to manipulate data log graphs is through a simple example. In the
following screen, we have selected “A6 Acceleration Test,” which is a data log made by the VAG
module.
Screen 15: Data log graph
By default, all readings from a data log are displayed. In this case there are four readings: “Engine
Speed”, “Engine Load”, “Spec. Boost” and “Actual Boost”. Since the data log covers 733 seconds
(12 minutes, 13 seconds), the graph becomes hard to read. To make things clearer, we will first
restrict the data to just the engine speed and the boost readings and then we will zoom in on a
shorter period of time.
In the following screen we have removed the Engine Load trace from the graph by tapping on its
name.
Screen 16: Graph showing
only three traces
The next step is to select a shorter time period. We do this by sweeping out a time region. The
following screen shows a swept region near the middle of the graph.
Screen 17: Sweeping out
a time period
VAD Pro-901 - Print User's Manual
9
A new button, “+”, has appeared. Tap on this button to zoom in.
Screen 18: Zooming in
one level
The “+” has disappeared indicating that we cannot zoom in again without first sweeping data.
However, we now have a “-” button which can be used to zoom out. The Print module keeps track
of how you zoom in and allows you to reverse your zooms by tapping on the “-” button as many
times as needed. The “-” button will disappear once you full zoomed-out.
This graph is a bit clearer, but still covers over two minutes worth of data (230 to 364 seconds). We
will repeat the zooming process.
Screen 19: Sweeping out
a smaller region
The screen above shows a short selection covering two boost spikes. Tapping the “+” will zoom in
further.
Screen 20: Zoom showing
two turbo boost spikes
Now we have a graph showing two boost spikes that is suitable for printing.
10
VAD Pro-901 - Print User's Manual
Printing Graphs
To continue our example, point the IrDA interface at the top of the VAD Mobile Wireless PDA or
Smartphone at the IrDA receiver on the printer and tap Print. The status bar will update showing
the printing process. The time to send the graph to the printer will vary depending on the amount of
data in the graph.
When printed, our example looks like the the following graph (but higher resolution and the size of
a full sheet of paper).
Print 1: Printed graph
Data log graphs may also be printed without first viewing the item. Just select the data log item and
then tap the Print button. When printed this way, the output will cover the entire duration of the
data log and contain all data traces.
Changing Data Ranges
The Print module can also be used to adjust the vertical axis of data log graphs. Sometimes the
default range for a type of data is too large. The graphs tend to look flattened and measurement
accuracy is lost. By adjusting the data range, you can get graphs that use more of the vertical axis.
We will use an example to show how to change data ranges.
VAD Pro-901 - Print User's Manual
11
In the following screen, we see the graph of an OBD-II data log. We have already limited the graph
traces to just the engine speed and the vehicle speed.
Screen 21: Graph with
flattened data
To enlarge the traces, we will narrow the data range for each trace such that the graph range
better matches the real data range. The first step is to tap on the Range button.
Screen 22: Graph range
Each data type shows two sets of values. One is the measured minimum and maximum and the
other is the current minimum and maximum. The measured values come from the smallest and
largest values for that data type found in the log file. The current values are the values used for the
smallest and largest y-axis values in the graph. In this case, the current values are the defaults
values originally found in the data log. They are much too large for the measured data range.
We will enlarge the engine speed and vehicle speed graph traces by making the current minimum
and maximum values better match the measured values. In this case, we'll leave the minimums
alone and change the maximums to 6000 RPM for the engine speed and 100 km/h for the vehicle
speed.
Screen 23: Adjusted
graph ranges
VAD Pro-901 - Print User's Manual
13
We save the new values by tapping OK. The new values will be stored in the data log itself. The
next time you view this data log, you will use these values.
Screen 24: Graph with
adjusted ranges
Our graph now uses more the vertical axis, giving us a more detailed view of the changes over
time. When printed, this graph looks like the following.
Print 2: Printed graph with adjusted ranges
14
VAD Pro-901 - Print User's Manual
Support for the Print Module
If you have any questions or need assistance with the Print module, please feel free to contact
Versatile Automotive Diagnostics directly at [email protected]. You can also find answers to
your questions at the VAD web site: http://www.vadpro.com/. Versatile Automotive Diagnostics can
be reached at 604-598-8520.
VAD Pro-901 - Print User's Manual
15