1
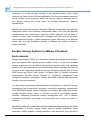
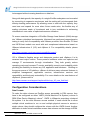
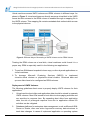
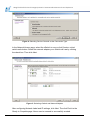
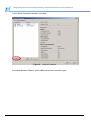
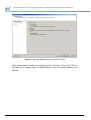
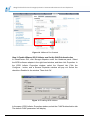
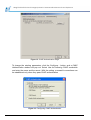
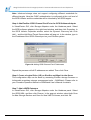
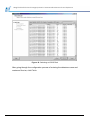
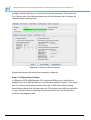
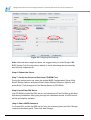
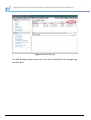
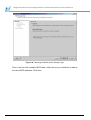
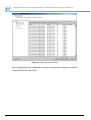
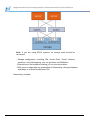
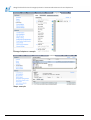
Using EonStor iSCSI-host
Storage Systems in
VMware Infrastructure 3
and vSphere 4
Application Note
Abstract
This application note explains the configure details of using Infortrend EonStor
iSCSI-host storage systems in VMware Infrastructure 3 and vSphere 4 to deliver
a data center featuring high efficiency, flexibility and availability.
Using EonStor iSCSI-host Storage Systems in VMware Infrastructure 3 and vSphere 4
VMware Virtualization
The concept of virtualization originated in 1960s but was not applied to the x86
architecture until 1990s. Since 1980s, x86 servers have been widely adopted in IT
environment because they are much cheaper than mainframe computers. This
distributed system of computing reduces TCO but gives birth to other challenges,
such as low infrastructure utilization, increasing physical infrastructure costs,
increasing IT management costs, insufficient failover and disaster protection, and
etc. Virtualization is found an effective way to deal with these challenges.
In VMware’s virtualization technology, ESX Server is the foundation of virtualized
environments.
Figure 1. VMware ESX Server
Installed on an x86 or x64-based server, VMware ESX Server provides a
virtualization layer on the host OS to consolidate all hardware resources, including
processors, memories, storage and networking, and apply them to virtual
2
Using EonStor iSCSI-host Storage Systems in VMware Infrastructure 3 and vSphere 4
machines (i.e. virtual servers) running on the physical server. Each virtual
machine can have its own OS and applications. By sharing hardware resources
across multiple virtual machines, users can improve resource utilization and in
turn greatly reduce the costs spent on building datacenter’s physical
infrastructure.
Besides the optimized resource utilization, VMware virtualization also reduces
deployment efforts and simplifies management tasks. Free from the physical
considerations and requirements, deploying virtual machines can be done in
minutes or hours. After the deployment, managers can easily monitor the entire
virtual datacenter through a unified management pane. When any of the physical
device fails, the high availability features of VMware can ensure continuous
system operation.
EonStor Storage Systems in VMware Virtualized
Environments
Storage Area Network (SAN) is an architecture brining all storage resources into a
pool and making them shared among multiple hosts. It is the most suitable
storage architecture for virtualized environments because when the operating
systems (OS) and applications are moved around virtual machines, the data do
not have to be copied and moved accordingly. Infortrend provides both FC-host
RAID arrays and iSCSI RAID arrays to support SAN in VMware virtualized
environments. EonStor arrays’ features of centralized management and
configuration platform, redundancy designs, and smart scalability can bring many
benefits to the environments.
In a data center implemented with numerous storage systems, a powerful storage
management tool is absolutely necessary. Infortrend’s proprietary management
suite, SANWatch, allows system managers to configure, administer and monitor
multiple EonStor arrays locally or remotely through a user-friendly graphic
interface. Integrating Infortrend’s storage management tool into a VMware
virtualized environment can make the infrastructure more robust and easier to
maintain.
Besides the software complement, the fault-tolerant hardware modules and RAID
functionalities of EonStor arrays further improve system availability. When
controllers, power supplies, cooling modules or hard drives fail, they can all be
3
Using EonStor iSCSI-host Storage Systems in VMware Infrastructure 3 and vSphere 4
hot-swapped without causing downtime or data loss.
Along with data growth, the capacity of a single EonStor subsystem can be scaled
by connecting to expansion enclosures, and the scaling will not downgrade their
industry-leading performance. By allowing users to start with the capacity they
need now and expand for more when future needs arise, the flexible way of
scaling minimizes waste of investment and in turn contributes to enhancing
virtualization’s core value of optimized resource utilization.
To ensure seamless integration of EonStor Storage Area Network (SAN) storage
into VMware virtualized environments, Infortrend has performed comprehensive
testing to verify its full compatibility with VMware products. Now EonStor FC-host
and iSCSI-host models can work with and complement datacenters based on
VMware Infrastructure 3 (VI3) and vSphere 4. For compatibility details, please
refer to:
http://www.vmware.com/resources/compatibility/search.
VI3 is VMware’s flagship server and datacenter product and vSphere 4 is its
renamed next major version. These powerful software suites can optimize and
manage IT environments through virtualization. They both greatly reduce
operating costs and increase IT service availability, security and scalability while
providing the flexibility to choose any OS, application and hardware. Building on
the proven power of VI3 platform, vSphere 4 delivers many enhanced features in
simplified management, application services, infrastructure services and
compatibility and third-party extensibility. For more details on the new features of
vSphere 4, please refer to
http://www.vmware.com/support/vsphere4/doc/vsp_40_new_feat.html.
Configuration Considerations
Data Formats
To make the data volumes on EonStor arrays accessible to ESX servers, they
have to be configured as either VMFS (Virtual Machine File System) volume or
RDM (Raw Device Mapping) volume1. VMFS is VMware’s proprietary clustered
file system. It is the most common access method. If users would like to allow
multiple virtual machines to run on and multiple physical servers to access a
single volume, they should configure the volume with the VMFS format. Another
alternative to make virtual machines access data volumes on the storage is RDM.
1
Maximum size of an RDM volume in 2TB.
4
Using EonStor iSCSI-host Storage Systems in VMware Infrastructure 3 and vSphere 4
Virtual machines access VMFS volumes and RDM volumes in different ways. As
shown in Figure 3, virtual machines can directly access a virtual disk in the VMFS
format but their access to the RDM volume is enabled through a mapping file in
the VMFS volume. This mapping file contains metadata that redirects disk access
to the physical devices.
Figure 2. Different Ways of Accessing a VMFS Volume and an RDM Volume
Treating the RDM volume as a local disk, virtual machines could format it in a
proper way. RDM is especially useful in the following two applications:
1. To perform SAN-based snapshot/volume copy or other layered applications on
virtual machines.
2. To leverage Microsoft Clustering Services (MSCS) to implement
virtual-to-virtual clusters or physical-to-virtual clusters. Clustered data and
quorum disks have to be configured as RDM volumes.
Deployment of VMFS Volumes
The following guidelines direct users to properly deploy VMFS volumes for their
applications.
1. Virtual machine boot disks and application data should be stored in separate
VMFS volumes. Most I/Os issued to boot disks involves paging activities and
are sensitive to response time. By separating boot disks from application
data, the risk of prolonged response time due to application related I/O
activities can be mitigated.
2. Database platforms for enterprise data management, such as Microsoft SQL
Server or Oracle, often use active logs and/or recovery data structures to
track data changes. In cases of unplanned application or operating system
5
Using EonStor iSCSI-host Storage Systems in VMware Infrastructure 3 and vSphere 4
3.
4.
disruptions, these active logs or recovery data structures are critical in
ensuring system recovery and data consistency. Therefore, all virtual
machines supporting such database platforms should be provided with an
independent VMFS volume for storing active log files and recovery data
structures. Furthermore, if the files or structures are mirrored, the source and
the target should be stored in separate VMFS volumes.
Application data, including database files, should be stored in a separate
VMware file system. Furthermore, this file system should not contain any
structures that are critical for application and/or database recovery.
It is recommended that the VMFS volumes are no more than about 80% full.
This ensures that administrators would not suddenly run out of space to
accommodate user data and VMware snapshots for virtual machines.
RAID Level
EonStor storage arrays allow users to protect their data volumes with various RAID
levels, including RAID 1, RAID 3, RAID 10, RAID 5 and RAID 6. Data volumes in
the same storage array can be protected with different RAID levels. The following
are general guidelines for you to configure RAID levels for your data volumes in an
VMware virtualized environment.
1.
2.
3.
4.
5.
6.
Virtual machine boot volumes are generally subject to low I/O rates. The boot
volumes can be configured with RAID 5 protection.
For most applications, RAID 5 is a proper level to protect virtual disks with.
However, if the application involves extensive logging, such as financial
applications, RAID 10 may be a better option.
Infrastructure servers, such as Domain Name System (DNS), perform most of
their activities utilizing CPU and RAM, and therefore are often subject to low
I/O rates. If users use virtual machines as infrastructure servers, it is proper to
provide them with RAID 5-protected volumes as storage space.
Log devices for databases should be RAID 10-protected volumes.
Furthermore, if databases or application logs are mirrored, the source and the
target should be located on separate sets of disks (in VMFS format, if
applicable).
The virtual machines that generate high workloads of small-blocked, random
Read I/O, such as Microsoft Exchange, should be allocated RAID
10-protected volumes for better performance.
Large file servers with vast majority of the storage consumed by static files can
be provided with RAID 5-protected volumes since the I/O rates are expected
to be low.
6
Using EonStor iSCSI-host Storage Systems in VMware Infrastructure 3 and vSphere 4
Example Configuration Steps
Using EonStor iSCSI-host Storage in VMware Infrastructure 3
The below example explains how to make EonStor iSCSI-host storage available
to ESX servers using VMware software iSCSI Initiator.
Step 1. Configure a Service Console Connection
In the VirtualCenter GUI, select Configuration tab from the top menu and then
click Networking under the Hardware panel. Click Add Networking in the
right-hand window.
Figure 3. Selecting Add Networking
In the Add Network Wizard, select Service Console as the connection type, and
click Next.
7
Using EonStor iSCSI-host Storage Systems in VMware Infrastructure 3 and vSphere 4
Figure 4. Selecting Service Console as the Connection Type
In the Network Access page, select the vSwitch to use or click Create a virtual
switch radio button. Select the network adapter your vSwitch will use by clicking
the check box. Then click Next.
Figure 5. Selecting vSwitch and Network Adpater
After configuring Network Label and IP settings, click Next. The click Finish in the
Ready to Complete page. Now a service console is successfully created.
8
Using EonStor iSCSI-host Storage Systems in VMware Infrastructure 3 and vSphere 4
Figure 6. Service Console Created
Step 2: Add an iSCSI VMkernel Port to the vSwitch
In the VirtualCenter GUI, select Configuration tab from the top menu and then
click Networking under the Hardware panel. Click Properties for the vSwitch you
set to use for iSCSI traffic in the right-hand window.
Figure 7. Accessing vSwitch Properties
9
Using EonStor iSCSI-host Storage Systems in VMware Infrastructure 3 and vSphere 4
In the vSwith Properties window, click Add….
Figure 8.
vSwitch Properties
In the Add Network Wizard, select VMkernel as the connection type.
10
Using EonStor iSCSI-host Storage Systems in VMware Infrastructure 3 and vSphere 4
Figure 9. Selecting VMkernel as the Connection Type
After setting Network Label and configuring IPs, click Next. Then click Finish in
the Ready to Complete page. A VMkernel port is now successfully added to the
vSwitch.
11
Using EonStor iSCSI-host Storage Systems in VMware Infrastructure 3 and vSphere 4
Figure 10. VMkernel Port Created
Step 3. Enable VMware iSCSI Initiator and Set Up CHAP Authentication
In VirtualCenter GUI, click Storage Adapters under the Hardware panel. Select
the iSCSI software adapter in the right-hand window, and then click Properties. In
the iSCSI Initiator Properties window, select the General tab. Click the
Configure… button, and a General Properties window will pop out. Select the
check box Enabled in the window. Then click OK.
Figure 11. Enabling iSCSI Initiator
In the same iSCSI Initiator Properties window, select the CHAP Authentication tab.
The default CHAP parameters will display.
12
Using EonStor iSCSI-host Storage Systems in VMware Infrastructure 3 and vSphere 4
Figure 12. CHAP Authentication Page
To change the existing parameters, click the Configure… button, and a CHAP
Authentication window will pop out. Select Use the following CHAP credentials
and enter the name and the secret. With the setting, successful connections can
be established only when they pass CHAP authentication
Figure 13. Configuring CHAP Authentication
13
Using EonStor iSCSI-host Storage Systems in VMware Infrastructure 3 and vSphere 4
Note: Infortrend storage does not support configuring different credentials for
different targets. Here the CHAP authentication is configured at the root level of
the iSCSI initiator and the credentials will be inherited by all iSCSI targets.
Step 4. Add EonStor iSCSI Channel Port IPs to the iSCSI Software Adapter
In VirtualCenter GUI, click Storage Adapters under the Hardware panel. Select
the iSCSI software adapter in the right-hand window, and then click Properties. In
the iSCSI Initiator Properties window, select the Dynamic Discovery tab. Click
Add… and the Add Send Target Server widow will pop out. In the window, type in
the IP address of the iSCSI channel port on your EonStor system.
Figure 14. Adding iSCSI Channel Port IP Addresses
Repeat the process until all IP addresses are added. Then click Close.
Step 6. Create a Logical Drive (LD) on EonStor and Map It to the Server
This configuration step can be done by accessing EonStor storage firmware or
Infortrend’s proprietary storage management suite – SANWatch. Please refer to
your Firmware Operation Manual or SANWatch User’s Manual for details.
Step 7. Add a VMFS Datastore
In VirtualCenter GUI, click Storage Adapters under the Hardware panel. Select
the iSCSI HBA, and then click Rescan. In the pop-out window, select both Scan
for New Storage Devices and Scan for New VMFS Volumes, and click OK.
14
Using EonStor iSCSI-host Storage Systems in VMware Infrastructure 3 and vSphere 4
Figure 15. Rescanning Storage
In VirtualCenter GUI, click Storage under the Hardware panel. Then click Add
Storage….
Figure 16. Adding Storage
The Add Storage window will pop out. First select Disk/LUN as the storage type,
and click Next.
15
Using EonStor iSCSI-host Storage Systems in VMware Infrastructure 3 and vSphere 4
Figure 17. Selecting Disk/LUN as the Storage Type
Then in the list of all available iSCSI disks, select the one you would like to add as
the new VMFS datastore. Click Next.
16
Using EonStor iSCSI-host Storage Systems in VMware Infrastructure 3 and vSphere 4
Figure 18. Selecting an iSCSI Disk
After going through the configuration process of entering the datastore name and
maximum file size, click Finish.
17
Using EonStor iSCSI-host Storage Systems in VMware Infrastructure 3 and vSphere 4
Figure 19. Finishing Datastore Creation Process
Then a new VMFS datastore will be created.
Using EonStor iSCSI-host Storage in VMware vSphere 4
The below example explains how to make ESX servers boot from and leverage
EonStor iSCSI-host storage using QLogic hardware iSCSI Initiator.
Note: Booting from SAN means to install the operating system on one or more
LUNs in the SAN storage and make servers boot from them. In a boot from SAN
environment, you can enjoy easier server replacement, simplified backup and
improved management. To configure VMware ESX servers to boot from SAN,
your have to install the iSCSI Host Bus Adapter (HBA) approved by both
VMware’s compatibility guide and Infortend’s Qualified Vendor List (QVL).
Infortrend currently supports only using QLogic iSCSI HBA to boot ESX servers
from SAN in vSphere 4 environments.
Step 1. Create Logical Drives (LD) on EonStor and Map Them to the Server
This configuration step can be done by accessing EonStor storage firmware or
Infortrend’s proprietary storage management suite – SANWatch. Please refer to
18
Using EonStor iSCSI-host Storage Systems in VMware Infrastructure 3 and vSphere 4
your Firmware Operation Manual or SANWatch User’s Manual for details.
Step 2. Add EonStor iSCSI Channel Port IPs
In SANsurfer iSCSI HBA Manager GUI, select the HBA port you mapped the LD to
in the left-hand system tree pane. Then select the Target Settings tab in the
icon beside the target IP list. In the pop-out
right-hand panel and click the
window, enter the IP address of the iSCSI channel port, and click OK. Then the IP
address will appear in the target IP list.
Figure 20. Adding a Target IP Address
Repeat the process until all IP addresses are added.
Step 3. Configure CHAP Settings
In SANsurfer iSCSI HBA Manager GUI, select the HBA port you would like to
configure CHAP authentication on in the left-hand system tree pane. Then select
the Target Settings tab in the right-hand panel and click the Configure
Authentication button.
Step 4. Configure Network Settings
In SANsurfer iSCSI HBA Manager GUI, select the HBA port you would like to
19
Using EonStor iSCSI-host Storage Systems in VMware Infrastructure 3 and vSphere 4
configure network settings on in the left-hand system tree pane. Then select the
Port Options tab in the right-hand panel and click the Network tab. Configure all
required network settings here.
Figure 21. Configuring Network Settings
Repeat the process until all ports are properly configured.
Step 5. Configure Boot Settings
In SANsurfer iSCSI HBA Manager GUI, select the HBA port you would like to
establish boot from SAN access on in the left-hand system tree pane. Then select
the Port Options tab and then click the Boot tab. In BIOS Boot Mode Setting,
select Manual Mode from the drop-down list. Then specify the LUN you would like
to use as the boot disk by selecting Primary Boot Device IP and Primary Boot
LUN from the dropdown lists.
20
Using EonStor iSCSI-host Storage Systems in VMware Infrastructure 3 and vSphere 4
Figure 22. Configuring Boot Settings
Note: After the above steps are done, we suggest that you enter QLogic HBA
BIOS (press Ctrl+Q during server reboot) to check all settings are successfully
and correctly implemented.
Step 6. Reboot the Server
Step 7. Set Up the Server to Boot from CD-ROM First
During the server power up, enter the system BIOS Configuration/ Setup Utility.
Select Startup Options and press Enter. Select Startup Sequence Options and
press Enter. Then change the First Startup Device to [CD-ROM].
Step 8. Install the ESX Server
Use CD-ROM to install the ESX server and choose the LD on EonStor as the boot
disk during installation. After going through the installation wizard, the ESX server
will be successfully installed.
Step 9. Add a VMFS Datastore
In vCenter GUI, select the ESX server from the inventory panel and click Storage
under the Hardware panel. Then click Add Storage….
21
Using EonStor iSCSI-host Storage Systems in VMware Infrastructure 3 and vSphere 4
Figure 23. Adding Storage
The Add Storage window will pop out. First select Disk/LUN as the storage type,
and click Next.
22
Using EonStor iSCSI-host Storage Systems in VMware Infrastructure 3 and vSphere 4
Figure 24. Selecting Disk/LUN as the Storage Type
Then in the list of all available iSCSI disks, select the one you would like to add as
the new VMFS datastore. Click Next.
23
Using EonStor iSCSI-host Storage Systems in VMware Infrastructure 3 and vSphere 4
Figure 25. Selecting an iSCSI Disk
After going through the configuration process of entering the datastore name and
maximum file size, click Finish.
24
Using EonStor iSCSI-host Storage Systems in VMware Infrastructure 3 and vSphere 4
Figure 26. Finishing Datastore Creation Process
Then a new VMFS datastore will be created.
Basic Troubleshooting and FAQ
1.
What information should I prepare when I need your help to do
troubleshooting?
Please provide the following information
- ESX server version (for example, ESX4.0, ESX3.5)
- Storage model, its firmware version and event logs
- Topology of your ESX server, switch and storage as shown below
25
Using EonStor iSCSI-host Storage Systems in VMware Infrastructure 3 and vSphere 4
Note: If you are using ESVA systems, all storage ports should be
connected.
- Storage configuration, including LDs, Virtual Pools, Virtual Volumes
partitions, and LUN mapping; you can get them via SANWatch
- Descriptions of the behaviors making you run into the problem
- ESX server configuration by screenshots of Networking, Storage Adapters
and Maps in vCenter/VirtualCenter GUI
Networking: example
26
Using EonStor iSCSI-host Storage Systems in VMware Infrastructure 3 and vSphere 4
Storage Adapters: example
Maps: example
27
Using EonStor iSCSI-host Storage Systems in VMware Infrastructure 3 and vSphere 4
- ESX server event logs; you can get them from vCenter/VirtualCenter GUI.
Click Administration on the top menu and select Export System Logs from
the drop-down menu.
2.
Why can’t I see the VMFS data volume I created before?
Please first check whether you can see the physical storage device you used
to create the VMFS data volume in vCenter/VirtualCenter GUI. If not, please
check whether your cables are correctly connected and storage LUN
mapping is properly configured. Then execute Rescan in the Storage
28
Using EonStor iSCSI-host Storage Systems in VMware Infrastructure 3 and vSphere 4
Adapters screen.
If the problem is still not solved, please prepare the information mentioned in
question 1 and contact us for further troubleshooting.
29
Using EonStor iSCSI-host Storage Systems in VMware Infrastructure 3 and vSphere 4
3.
What are the storage configuration limitations in a VMware virtualized
environment?
Please check
http://www.vmware.com/pdf/vsphere4/r40/vsp_40_config_max.pdf for details.
4.
How can I make data paths successfully failover when redundant controllers
failover?
If you are using ESX 4.0 with EonStor storage arrays installed with firmware
ver.3.64 or later, system would automatically handle this without any manual
configuration. However, if you are using ESX 3.x, please add a footnote for
redundant controller storage following the steps in the application note:
http://www.infortrend.com/doc/appNote/APP_VMware_footnote_1117.pdf.
5.
Can virtual machines be migrated to a different data volume without
interruptions?
Yes, virtual machines can be migrated online to another data volume. Please
check the following links for details:
http://www.vmware.com/products/vi/storage_vmotion.html
http://blogs.vmware.com/vi/2008/06/storage-vmotion.html
6.
If I would like to implement multipathing, is there any special settings I should
do on my storage? Should I install EonPath?
No, there is no special settings for storage. You can just follow general
multipathing configurations. Moreover, since VMware supports native
multipathing functions, you need not install other drivers, including EonPath,
for multipathing implementatio
Copyright © 2009 Infortrend Technology, Inc. All rights reserved. Infortrend, ESVA, EonStor and EonPath are trademarks or registered trademarks
of Infortrend. All other marks and names mentioned herein may be trademarks of their respective owners. The information contained herein is
subject to change without notice. The content provided as is, without express or implied warranties of any kind.
EonStor_AN005_100909_V1.0.1