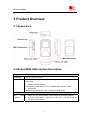
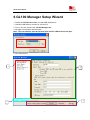
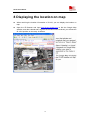
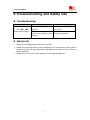
1
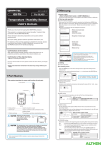
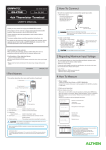
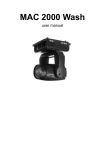
GL100 User Manual
GL100 A-GPS Locator
User Manual
0
GL100 User Manual
CONTENTS
1 Introduction .................................................................................................................... 2
2 Main Functions............................................................................................................... 2
2.1 A-GPS Scenario...............................................................................................................2
2.2 Alarm Scenario.................................................................................................................2
3 Parameters..................................................................................................................... 3
4 GL100 Start-up............................................................................................................... 4
4.1 Accessories.......................................................................................................................4
4.2 Charging the battery........................................................................................................4
4.3 Install SIM Card................................................................................................................4
5 Product Overview........................................................................................................... 5
5.1 Appearance.......................................................................................................................5
5.2 Button/MINI USB interface Description ........................................................................5
5.3 Two three-color LEDs Description.................................................................................6
6 GL100 Manager Setup Wizard....................................................................................... 7
7 Device Operation ........................................................................................................... 9
7.1 Turn on/ Turn off...............................................................................................................9
7.2 Select Operating Mode ...................................................................................................9
8 Displaying the location on map .................................................................................... 10
9 Troubleshooting and Safety info................................................................................... 11
1
GL100 User Manual
1 Introduction
GL100 is a powerful A-GPS Locator with mini size, light weight, anti-water and superior
sensitive receiving ability, fast TTFF which works on GSM frequencies 850/900/1800/1900.
GL100 is designed for many applications such as pets or human body, the specific target
to be tracked, the management for specific purpose and target.
2 Main Functions
•
•
•
•
•
•
A-GPS Position
Fixed time reporting
Emergency Alarm
Geo-fencing Alarm
Remote Control Alarm
Lower power Alarm
2.1 A-GPS Scenario
•
TTFF(Time To First Fix)
If the device is used in A-GPS network, the TTFF will less than 12 seconds. The
TTFF of the GPS (no A-GPS network) is 42 seconds (average).
•
Track
The monitor center can inquire the device to send back the location information. And
the device can send its location initiatively or periodically.
2.2 Alarm Scenario
•
Geo-fencing alarm
The device provides Geo-fence features that can be used for territory management,
prohibited locations, and more. The device will automatically send alarm message to
the monitor center if the person carrying it enters and/or leaves the predefined areas.
•
Remote control alarm
The monitor center requires the device to send back its location periodically (e.g.
pre-set 1 minute), if the device can not send back its location, the device will
considered to be in abnormal status.
•
Low power alarm
The message of low power notification will be sent before the battery dies out.
2
GL100 User Manual
3 Parameters
Technical Specifications
Quad-Band:GSM850/900/1800/1900MHz
Compliant to GSM phase 2/2+
Class 4 (2W @ 900MHz)
Class 1 (1W @ 1800/1900MHz
Max out RF power: 33.0dBm±2dBm
Dynamic input range: -15 ~ -102dBm
Receiving delicacy: Class П RBER≤2%(-102dBm)
Stability of frequency: Superior to 2.5ppm
Max frequency error: ±0.1ppm
RMS Phase error: ≤5deg
GPS Chipset: SiRF Star III
Frequency: L1, 1575.42 MHz
Channels: 20 channel all-in-view tracking
Reacquisition: 0.1 sec., average
Hot start: 1 sec., average
Warm start: 38 sec., average
Cold start: 42 sec., average
Altitude Limit: 18,000 meters (60,000 feet) max
Velocity Limit: 515 meters/second (1000 knots) max
Dimension: 66mm*36mm*20mm
Weight: 76g
Battery Backup
Backup batteries: 1300mAh
Batteries standby time: 160 hours
Environment
Operating temperature range: -10°C to +50°C
Storage temperature range: -30°C to + 60°C
Relative humidity: 10% to 95%
Atmospheric pressure: 86kPa~106kPa
Ambient noise: ≤ 60dB (A)
Interface Specifications
One Mini USB connecter to PC
LED indicate: Power / GSM network / GPS
2 keys: Power on/Function
3
GL100 User Manual
4 GL100 Start-up
4.1 Accessories
1.GL100 Locator
2.Mini USB cable
3.AC power adapter
4.2 Charging the battery
z Please connect AC power adapter with GL100 for battery charging.
z Insert the AC power adapter into the power.
z During charging, the red LED 2 is blinking slowly. When the charge is completed, the
green LED 2 is lighting.
z You can also charge the battery by USB cable which connects GL100 with the PC.
z Charging about 3 hours.
Note: Before your first time using the GL100, please full charge the battery.
4.3 Install SIM Card
z
z
z
z
Use a screwdriver to twist the two screws on the side of GL100
Then remove the screws and SIM cover
Insert the SIM card into the SIM cover according to the direction shown
Finally, take the SIM cover into the SIM slot and tighten screws
4
GL100 User Manual
5 Product Overview
5.1 Appearance
5.2 Button/MINI USB interface Description
Button Function description
Power Key
Turn on / Turn off GL100
Function Key
Use this Key to switch the two operating modes: Geofence mode or
SOS mode
• Geofence mode (default)
Press the Key twice within 2 sec. to ON/OFF the Geofence mode.
• SOS mode
Keep pressing the key for 3 sec. to enter the SOS mode
MINI USB interface description
Mini
USB
interface
•
•
Plug in the AC power adapter to this interface for charging battery.
By using USB cable to connect GL100 to PC, you can setup its
functions from software.
5
GL100 User Manual
5.3 Two three-color LEDs Description
There are two three-color LEDs in GL100. Each LED shows red, green and blue 3 colors
for indicating different state of GL100. In order to be easier to understand the 6 lights, we
call them Red LED 1, Green LED 1, Blue LED 1 and Red LED 2, Green LED 2, Blue
LED 2.
• Red LED 1 ——Power LED
State
Meaning
Turn on
•
•
•
GL100 is turned on or turned off.
When the GL100 terminal receives the
effective protocol commands.
Green LED 1——GSM LED
State
Meaning
Blinking quickly
•
Not register to a GSM network
Blinking slowly
•
Register to a GSM network
Constant lighting
•
SIM card have PIN lock
•
Blue LED 1——GPS LED
State
Meaning
• Search GPS signal and fix location
Red LED 2——Low power & Charging LED
Blinking quickly
•
State
Meaning
Constant lighting
•
The battery power is low
• During charging
Green LED 2——Charging completed LED
Blinking slowly
•
State
Meaning
•
Blue LED 2——Function Operation LED
Constant lighting
•
When battery charging is completed
Operating Mode
State
Meaning
Geofence Mode
Constant lighting less
than 2 sec., and then
turned off immediately.
•
Turn on or turn off the Geofence Mode
success.
Constant lighting for 2
sec., and then turned
off.
•
Turn on or turn off the Geofence Mode
fail.
Constant lighting for 3
sec., and then turned
off.
•
Enter the SOS Mode
SOS
Mode
6
GL100 User Manual
6 GL100 Manager Setup Wizard
1. Double click“Pl2303 drive.exe” to install USB-Serial driver.
1. Use Mini USB cable to connect GL100 and PC.
2. Turn on GL100. Double click “GL100 Manager.exe”,
3. Set right Com Number and Baud rate.
Note: The Com Number must be identical with Prolific USB-to-Serial com port.
4. The main window
1
2
4
3
7
GL100 User Manual
Illuminate:
1. The zone of function list
Display the functions list. If one of the options is selected, the option parameters will be
displayed in the right frame.
2. The zone of function setting
The zone of function setting is used to set and view the parameters of the function.
If you want to download the function parameters, the check box “Enable download this
function” should be selected.
3. The state display zone
Display the state of operation and suggestion. Include: the serial port open state; the
download state; the operation result. You can also get this information by select “Prompt
Info”.
4. The zone of operation
There are six buttons in the zone of operation (the COM buttons will display if the serial
port is error)
[COM] :If you set an error COM port in the startup pop-up window, the com button will
display in the zone of operation. You can change the serial port after click it.
[Import Config]:Imports the setting from the local configuration.
[Export Config]:Exports the parameters from software. Backup the parameters.
[Upload]:Read and display the parameters of the terminal.
[DownLoad]:Download the parameters to the terminal.
Notice: you must select the “Enable Download This Function” selection before you click
the “Download” button.
[Exit]:Exit the software.
Note:For more information, please refer to document “GL100 Manager User Guide”
8
GL100 User Manual
7 Device Operation
7.1 Turn on/ Turn off
•
Turn on: Press the Power key at least 3 seconds and release to turn on the GL100. At
this time, Red LED 1 will light on for 2~3 seconds. Then Green LED 1 starts to blink
quickly to search the GSM network. After the GSM network is registered, it turns to be
slowly.
•
Turn off: Press the Power key at least 3 seconds; Red LED 1 will light on for 2~3
seconds and then turn off, it indicates that the GL100 is turned off.
7.2 Select Operating Mode
•
First, user should configure the GL100 terminal though “GL100 Manager.exe” to
realize the A-GPS position, fixed time reporting and SOS alarm functions etc.
•
Press the Function Key twice within 2 sec. to ON/OFF the Geofence mode. When
Geofence mode is ON, GL100 will open GPS module and get position information
every fixed “Fix interval”, and then send the gathered position information to remote
server every fixed “Send interval”.
Note: “Fix interval” and “Send interval” will be preset by users.
•
Press the key for 3 sec. to enter the SOS mode. Here Blue LED 1 will blink quickly for
searching signal and fixing location. When the GPS signal is acquired and location is
fixed, the Blue LED 1 will light less than 2 minutes, and turned off. GL100 will send the
current position information to remote server immediately. If GL100 can not acquire
the GPS signal within in 2 minutes, the Blue LED 1 will be turned off directly.
9
GL100 User Manual
8 Displaying the location on map
z
z
When receiving the location information of GL100, you can display the location on
map.
Open the IE Browser and input http://maps.google.com to link the Google Map
website, enter the Latitude and Longitude information which received, you will see the
GL100’s position on the map. As follows:
10
GL100 User Manual
9 Troubleshooting and Safety info
z Troubleshooting
Trouble
Reason
After GL100 is turned
The SIM
inserted.
on, the RED LED 1
flashes quickly always.
Solution
card
is
not
Please insert the SIM card
into GL100.
The signal is too weak;
GL100 can’t register to the
network.
Please move GL100 into a
stronger signal place.
z Safety info
¾
¾
¾
Please do not disassemble the device by yourself.
Please do not put the device on the overheating or too humid place, avoid exposure
to direct sunlight. Too high temperature will damage the device or even cause the
battery explosion.
Please do not use GL100 on the airplane or near medical equipment.
11