1
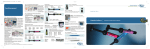
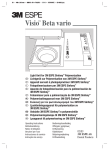
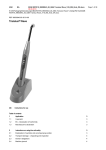
39271 User Manual.qxd
3/14/02
11:50 AM
Page 1
Sinfony
™
[ after ]
Indirect Lab Composite
[ before ]
3M ESPE Dental Lab Technical Hotline: 1-800-216-9502
3M ESPE Web site: www.3MESPE.com
Dental Products
3M Center
Building 275-2SE-03
St. Paul, MN 55144-1000
USA
1
| Section Name
Dental Products
3M Canada
Post Office Box 5757
London, Ontario N6A 4T1
Canada
1 800 265-1840 ext. 6229
Minimum 10%
Post-Consumer Fiber
User Manual
3M, ESPE, Clinpro,
Pop-on, RelyX, Rocatec,
Scotchbond, Sinfony,
Sof-Lex and Visio are
trademarks of 3M or
3M ESPE AG.
FiberKor is a trademark
of Pentron.
Vectris is a trademark
of Ivoclar Williams.
Connect is a trademark
of KerrLab.
Printed in U.S.A.
© 3M 2002
70-2009-3400-1
Section Name
|
2
39271 User Manual.qxd
| Sinfony
™
3/14/02
11:50 AM
Page 3
Indirect Lab Composite User Manual
SECTION 1
Index
Case Selection
SECTION
PAGE
1. Case Selection
1
2. Preparation
2
3. Laboratory Communication Recommendations 3
i
| Index
4. Model Work
3
5. Equipment
4
6. Materials
9
7. Finishing and Polishing
13
8. Cementation Recommendations
14
9. Maintenance
16
10. Miscellaneous
16
3/14/02
11:50 AM
Page 5
| Sinfony
™
Indirect Lab Composite User Manual
1. Case Selection
When, where and why to use 3M ESPE Sinfony™ Indirect Lab Composite
Sinfony indirect lab composite is the micro-hybrid composite developed for laboratories and designed
to build and layer like porcelain. Excellent for inlays/onlays, veneers, and full crowns, Sinfony indirect
lab composite has been proven in tests to be as strong or stronger than other popular brands and to
possess inherent advantages in flexibility, impact strength and color stability. Sinfony indirect lab
composite is less brittle than other composites and its significantly lower flexural modulus gives
it the ability to absorb occlusal trauma. In addition, Sinfony indirect lab composite is easy to use.
Any technician familiar with manipulating porcelain or wax can perform with Sinfony indirect lab
composite—virtually right away. Sinfony indirect lab composite is the clear choice for dental
laboratories concerned with performance and esthetics.
This user manual will familiarize you with basic procedures for using the Sinfony indirect lab
composite master system, from case selection to cementation to finishing.
PRECAUTION!
Sinfony Indirect Lab Composite contains methacrylates. A small percentage of the population is known
to have an allergic response to acrylate resins. To reduce the risk of allergic response, minimize exposure
to these materials. In particular, exposure to uncured resin should be avoided. Use of protective gloves
and a no-touch technique is recommended.
Indications
•
Inlays/onlays
•
Full coverage crowns
• Veneers
•
Sinfony indirect lab composite fused to metal
•
Fiber reinforced bridges/retainers
Contraindications
•
Unsupported bridges with no rigid substructures
•
Cannot be used as an implant abutment or fixture interface
Patient Considerations
The clinician’s decision to prescribe Sinfony indirect lab composite should be based upon
optimal clinical needs of the patient. A professional assessment of oral health, perifunctional habits,
biocompatibilities and patient concerns and demands should all be factored into this decision.
Case Selection | 1
Diecut tab
39271 User Manual.qxd
3/14/02
11:50 AM
Page 7
Diecut tab
39271 User Manual.qxd
SECTION 2
Preparation
3/14/02
11:50 AM
Page 9
| Sinfony
™
Indirect Lab Composite User Manual
2. Preparation
Preparation Guide
To guarantee clinical success, the following minimum material thickness is recommended.
Anterior Veneer Preparation:
1.5 mm incisal reduction
Diecut tab
39271 User Manual.qxd
1.5 mm facial reduction
1.0 mm gingival facial reduction
Rounded internal line angles
Anterior
Premolar Inlay Preparation:
Butt joint margin
1.5 – 2.0 mm isthmus width
1.5 mm minimum depth at bottom of the fissure
Rounded internal line angles
Premolar
Molar Onlay Preparation:
1.5 – 2.0 mm isthmus width
1.5 mm minimum depth at bottom of the fissure
Rounded internal line angles
Butt joint margin
1.5 – 2.0 mm minimum layer thickness for cusp preparation
Molar
Full Crown Preparation:
1.5 – 2.0 mm occlusal / incisal reduction
1.5 mm axial reduction
1.0 mm shoulder reduction with butt joint
Full Crown
Preparation
|2
Diecut tab
39271 User Manual.qxd
3/14/02
11:50 AM
Page 11
SECTIONS 3 & 4
Laboratory Communication
Recommendations
Model Work
3/14/02
11:51 AM
Page 13
| Sinfony
™
Indirect Lab Composite User Manual
3. Laboratory Communication
Recommendations
To insure the highest quality restoration we recommend the doctor provide the following information.
•
Final accurate impression
•
Occlusal record
•
Opposing model or impression
•
Diagnostic tools when appropriate
•
Detailed written prescription with:
- Shade
- Translucency
Diecut tab
39271 User Manual.qxd
- Color mapping
- Characterization
4. Model Work
Types of models acceptable
• Any
Type 4 or 5 die stone is acceptable.
Use of die isolation
To begin model preparation, identify the margins and block out undercuts with wax, if necessary.
Use 3M ESPE die isolation liquid to coat all areas of the model that will come into contact with
Sinfony indirect lab composite material to prevent adhesion to the die and adjacent teeth. Recap
the container as soon as you are done to prevent evaporation or spillage.
Block-out materials and techniques
•
Use standard block-out procedures
•
Wax
Laboratory Communication Recommendations
Model Work
3
3/14/02
11:51 AM
Page 15
Diecut tab
39271 User Manual.qxd
SECTION 5
Equipment
3/14/02
11:51 AM
Page 17
| Sinfony
™
Indirect Lab Composite User Manual
5. Equipment
3M ESPE Visio™ Alfa Light Curing Unit
The Visio Alfa light curing unit is used for initial
prepolymerization of the composite buildup.
Installation
Connect the Visio Alfa unit to the 110v electrical source.
Press the power switch to turn on the unit. This only starts the
fan. There is a proximity switch close to the light exit. As the
buildup is moved toward the light source, the lamp in the unit
switches on for 5 seconds.
The orange filter prevents operator eye fatigue. The filter can
be tilted and adjusted as required.
Visio Alfa light curing unit for prepolymerization
of Sinfony indirect lab composite
Safety
CAUTION!
Read these precautions carefully before connecting and installing unit. As with all technical equipment,
this unit will only function properly and safely if these general safety regulations and the specific safety
regulations found with the unit are followed.
1. This unit must only be operated as described in the following instructions. 3M ESPE disclaims all
liability for damages caused by using this unit for any other purpose.
2. Before installing this unit, ensure that the electrical voltage quoted on the rating plate coincides with
your outlet voltage. Incorrect voltage may cause overheating and failure of the unit.
3. When light curing the restoration, view the restoration through the orange filter. Looking at the light
source directly may cause eye damage.
4. Moving the unit from cold to warm surroundings may cause condensation to appear, creating
dangerous conditions. The unit must not be operated until it has reached the ambient temperature.
5. Before replacing the lamp, the unit must be switched off and unplugged from the outlet.
6. To prevent electrical shocks, do not insert objects into this unit. Exception: the correct replacement
of components as described in these operating instructions.
7. When replacing the components as described in these operating instructions, only use original
3M ESPE components. 3M ESPE disclaims all liability for damages caused by the use of
components produced by other manufacturers.
8. If for any reason it is assumed that safety aspects have been adversely affected, the unit must not
be used and clearly marked to ensure that third parties cannot operate it inadvertently. For example,
safety may have been adversely affected if the unit no longer functions properly or if damage is visible.
Contact the 3M ESPE Dental Lab Technical Hotline 1-800-216-9502 for repair or return information.
9. Keep solvents, flammable liquids and heat sources away from this unit as they will damage its
plastic housing.
10. When cleaning the unit, turn the unit off, unplug it from the outlet and ensure that no cleaning agent
leaks inside the unit as this may cause it to short-circuit or malfunction dangerously.
11. The housing of the unit may only be opened, and repairs carried out, by a qualified specialist.
Example: Repairs to all Sinfony indirect lab composite processing equipment should be carried
out by qualified service technicians— please call the 3M ESPE Dental Lab Technical Hotline
1-800-216 -9502.
Equipment | 4
Diecut tab
39271 User Manual.qxd
| Sinfony
™
3/14/02
11:51 AM
Page 19
Indirect Lab Composite User Manual
Sinfony™ Indirect Lab Composite User Manual
|
Repair
Operation
As you move your hand toward the unit to cure the
composite, the proximity switch automatically turns the
light on for 5 seconds to set the added composite. The
restoration should be held about 0.5–1 cm from the light.
Replacing the orange filter
and manipulation slab
Please call the 3M ESPE Dental Lab Technical Hotline 1-800-216-9502 for repairs. Refer to
product warranty for specific warranty information. In order to be eligible for warranty service
during the two-year warranty period, you must have returned the warranty card when product
was originally purchased.
Orange
filter
To obtain service, send your product to: For service in the U.S. send to: 3M Health Care
Service Center, 3M ESPE Dental Products, Suite 200 Bldg. 502-1W-01, 3350 Granada Avenue N,
Oakdale, MN 55128. For service in Canada send to: 3M Canada Company, Service Support Centre,
80 Enterprise Drive South, London, Ontario, N6N 1C2.
Delivery rod with
plastic sleeve
The orange filter and black manipulation slab can be
replaced if required (due to damage or contamination,
etc.). To do so, first turn off unit and unplug from outlet.
Then, pull the orange filter out of its hinged holder. Raise
the front edge of the slab and once the overlapping section
has been released, pull the slab out of its holder.
Light exit
Manipulation slab
Power switch
Replacing the ellipsoid lamp
Limitation of Liability: Except where prohibited by law, 3M ESPE will not be liable for any
loss or damage arising from this 3M ESPE product, whether direct, indirect, special, incidental
or consequential, regardless of legal theory asserted, including warranty, contract, negligence,
or strict liability.
3M ESPE Visio™ Beta Vario Light Curing Unit
Installation
WARNING!
Diecut tab
Lamp is hot. Leave the unit fan running to allow the lamp to cool before switching it off and unplugging.
CAUTION!
Diecut tab
39271 User Manual.qxd
Fill pump with oil before operation. The Visio Beta Vario
unit with vacuum pump must not be operated until the
pump has reached room temperature (approximately
68°F). If the temperature is too low, the pump will not
function properly.
Slide the cover of the orange filter
forward to detach it.
Pull the lamp holder upward.
Press the lamp cover downward,
turn it slightly counterclockwise,
pull it upward and remove. Pull
the ellipsoid lamp out of the
holder and replace with a new
lamp. To reassemble the unit,
proceed in the reverse order.
Cleaning and replacing the delivery rod
1. Contamination or damage to the delivery rod impairs the lighting effect considerably. Therefore,
the delivery rod should be checked regularly. Before checking or replacing, turn off unit and unplug
from outlet.
Slip the vacuum pump hose (marked “suction” or
“appliance”) over the nozzle on the back of the Visio
Beta Vario unit. Insert the electrical plug of the vacuum
pump into the upper socket on the back of the Visio
Beta Vario unit also.
Visio Beta Vario light curing unit for final
curing of Sinfony indirect lab composite under
light and vacuum
Plug the electrical cable into the back of the Visio Beta Vario unit and into the electrical supply. Press
the black “ON/OFF” button to activate the unit. This only starts the fan and not the lights or vacuum
pump. As the unit powers up a “1”, then “Pu”, then “0” will appear briefly in this order on the control
panel. This checks the control functions of the unit. DO NOT press the “START ” button while the three
messages are being displayed (approximately 4 seconds), otherwise the vacuum pump will start to run
for 99 minutes.
Safety
2. Unscrew the delivery rod from the plastic sleeve and clean it with a soft cloth.
CAUTION!
3. If the delivery rod is damaged, replace it.
Read these precautions carefully before connecting and installing unit. As with all technical equipment,
this unit will only function properly and safely if these general safety regulations and the specific safety
regulations found with the unit are followed.
1. This unit must only be operated as described in the following instructions. 3M ESPE disclaims all
liability for damages caused by using this unit for any other purpose.
5 | Equipment
Equipment | 6
39271 User Manual.qxd
| Sinfony
™
3/14/02
11:51 AM
Page 21
Indirect Lab Composite User Manual
Sinfony™ Indirect Lab Composite User Manual
Safety (continued)
|
Range of applications
Sinfony™ Indirect Lab Composite
3. Moving the unit from cold to warm surroundings may cause condensation to appear, creating
dangerous conditions. The unit must not be operated until it has reached the ambient temperature.
4. Before replacing the lamp, the unit must be switched off and unplugged from the outlet.
5. To prevent electrical shocks, do not insert objects into this unit. Exception: the correct replacement
of components as described in the operating instructions found with the unit.
6. When replacing the components as described in the operating instructions found with the unit, only
use original 3M ESPE components. 3M ESPE disclaims all liability for damages caused by the use
of components produced by other manufacturers.
7. If for any reason it is assumed that safety aspects have been adversely affected, the unit must not
be used and clearly marked to ensure that third parties cannot operate it inadvertently. For example,
safety may have been adversely affected if the unit no longer functions properly or if damage is visible.
Contact the 3M ESPE Dental Lab Technical Hotline 1-800-216-9502 for repair or return information.
Diecut tab
8. Keep solvents, flammable liquids and heat sources away from this unit as they will damage its
plastic housing.
9. When cleaning the unit, turn the unit off, unplug it from the outlet and ensure that no cleaning agent
leaks inside the unit as this may cause it to short-circuit or malfunction dangerously.
10. The housing of the unit may only be opened, and repairs carried out, by a qualified specialist.
Example: Repairs to all Sinfony indirect lab composite processing equipment should be carried
out by qualified service technicians—please call the 3M ESPE Dental Lab Technical Hotline
1-800-216-9502.
Final polymerization of Sinfony indirect lab composite. (Main program, P1)
Polymerization of Sinfony Indirect Lab Composite Opaquer on extensive restorations and specifically
for polymerizing pink Sinfony indirect lab composite opaquer. (Program P1)
Intermediate polymerization of Sinfony indirect lab composite materials to enable them to be trimmed
sooner. (Program P2)
CAUTION!
To ensure complete curing, the Sinfony indirect lab composite must be fully polymerized with the main
program P1 (1 minute light, 14 minutes light and vacuum).
Switching the unit ON
Press the power switch (ON/OFF)
(The error messages are displayed for 4 seconds during which the “START ” button must not be
pressed. A “0” is then displayed.)
Diecut tab
2. Before installing this unit, ensure that the electrical voltage quoted on the rating plate coincides with
your outlet voltage. Incorrect voltage may cause overheating and failure of the unit.
Opening the polymerization chamber (the unit must be ON first)
Press the “LID” button.
(The polymerization chamber lid flips open.)
Starting the main program (P1)
Lower the lid of the polymerization chamber to close it and press the “START ” button.
(The time display begins at 15 minutes and shows the time to run thereafter. On reaching the “0,” the
unit switches off automatically and the lid flips up.)
Operation— Program Selection
Selecting a program
Program selector
3 error displays
Timer display
Polymerization
chamber
“Start” button
“Lid” button
With the lid open, press the desired program P1–P4, place work/restorations in chamber, close the lid,
then press the “START ” button.
If the program selected is not started within 10 seconds, the unit will automatically default to the main
program (P1).
Starting a program
Close the lid of the polymerization chamber. Press the “START ” button.
(The time display indicates the time to run for the programs.)
Terminating a program
Power switch
The Visio™ Beta Vario unit switches off automatically at the end of each program.
Product Description
7 | Equipment
Final Cure: P1:
1 min. light, 14 min. light and vacuum
Partial Cure (shade evaluation): P2:
7 min. light, 10 sec. light and vacuum
Program P3: (see FAQs on page 16)
1 min. light, 1 min. vacuum and light
Program P4: (see FAQs on page 16)
4 min. light, 4 min. vacuum and light
(The lid of the polymerization chamber flips open and the unit returns automatically to the main
program. The time display shows “0.” To start another program, repeat the steps indicated above
beginning with “Selecting a program.”)
Equipment
|8
39271 User Manual.qxd
| Sinfony
™
3/14/02
11:52 AM
Page 23
Indirect Lab Composite User Manual
Repair
Please call the 3M ESPE Dental Lab Technical Hotline 1-800-216-9502 for repairs. Refer to
product warranty for specific warranty information. In order to be eligible for warranty service
during the two-year warranty period, you must have returned the warranty card when product
was originally purchased.
To obtain service, send your product to: For service in the U.S. send to: 3M Health Care
Service Center, 3M ESPE Dental Products, Suite 200 Bldg. 502-1W-01, 3350 Granada Avenue N,
Oakdale, MN 55128. For service in Canada send to: 3M Canada Company, Service Support Centre,
80 Enterprise Drive South, London, Ontario, N6N 1C2.
Limitation of Liability: Except where prohibited by law, 3M ESPE will not be liable for any
loss or damage arising from this 3M ESPE product, whether direct, indirect, special, incidental
or consequential, regardless of legal theory asserted, including warranty, contract, negligence,
or strict liability.
Diecut tab
Watch the Sinfony Instructional Video (found underneath the opaquer shades in
the Sinfony Indirect Lab Composite Master Kit) for a hands-on demonstration on
working with Sinfony™ Indirect Lab Composite. If you do not have the video, call
the 3M ESPE Dental Lab Technical Hotline for your copy 1-800-216-9502.
SECTION 6
Materials
9
| Section Name
3/14/02
11:52 AM
Page 25
| Sinfony
™
Indirect Lab Composite User Manual
6. Materials
Frameworks to receive Sinfony indirect lab composite materials should be designed with the same
considerations, i.e., thickness, use of rounded features, and connector cross-section, as frameworks
for porcelain fused to metal.
3M ESPE Rocatec™ Jr. Bonding System is the recommended system. It bonds the composite to metal,
ceramic and composite with micro-mechanical and chemical bonding, with no separation of materials.
No mechanical retention is required.
Application
Opaquer
•
Use shade combination chart to select the opaquer shade.
•
Dispense equal amounts of powder and liquid into the well of a ceramic mixing tray and mix them
with a plastic spatula. Mixing time: 45 seconds. This is a creamy consistency if it is 1:1 and should
be applied in thin layers for polymerization effectiveness.
•
The opaquer liquid is sensitive to light, close the bottle immediately after use.
•
Crop the bristles of a clean brush and use it to apply a thin, masking coat of opaquer. The working
time is 5 minutes at a room temperature of 73.4°F.
•
Coat framework with one thin layer of Sinfony indirect lab composite opaquer, making sure that
metal (grey) does not show through. With opaquer and light, cure each surface for two 5-second
exposures or cycles with a Visio™ Alfa unit. Alternatively, coat the entire framework with opaquer
and polymerize it with Program 1 of a Visio™ Beta Vario unit.
•
Check that the entire surface of the facing has been cured (e.g., with the tip of a wooden brush
handle), if necessary, light cure again. At this stage, do not touch or wipe the surface of the opaquer
with your fingers. This will adversely affect the chemical bond with the composite.
•
Once the surface to be veneered has been coated fully and the opaquer has been polymerized, begin
building up immediately. The polymerized opaqued-surface should not be left without addition of
Sinfony indirect lab composite for more than 1 to 2 hours.
Diecut tab
39271 User Manual.qxd
Notes (✔)
✔
Frameworks treated with the Rocatec bonding system and coated with 3M ESPE-Sil should be
allowed to dry for 5 minutes before being coated with Sinfony indirect lab composite opaquer.
✔
The opaquer can be dispensed in the amount required—the optimum mixing ratio is 1:1 by weight.
Insufficient powder prolongs the setting time and excessive powder accelerates the setting time.
✔
When dispensing the opaquer liquid, hold the bottle upright with its opening downwards and wait
a few seconds. This ensures that uniform drops are dispensed.
✔
If the opaquer is mixed on a flat surface, the solution evaporates faster, which adversely affects the
properties of the product. Use a palette with wells for best results.
✔
Do not use coated pads or a metal spatula as the abrasion impairs the properties of the opaquer.
✔
The dual-curing opaquer also cures in shaded zones created by mechanical retentions.
✔
Cleaning: Clean the brush with acetone or alcohol immediately after use and before the opaquer
sets. The Sinfony Indirect Lab Composite Master Kit includes an empty vessel for this purpose. The
brush can be re-used. Soak polymerized opaquer or brushes to remove any cured materials on them.
Materials
| 10
| Sinfony
™
3/14/02
11:52 AM
Page 27
Indirect Lab Composite User Manual
Notes (✔) (continued)
To create special effects on the facing, dispense magic intensive shade materials onto a glass slab and
use an instrument to mix them into the dentin or apply individually in very thin layers (max. 0.5 mm).
To ensure complete and rapid opaque cure, hold the opaqued unit as near to the light as possible
without touching it.
•
✔
When polymerizing the opaquer in the Visio™ Beta Vario unit, only use Program 2. Polymerizing
in a vacuum with the main program will eliminate the smear layer and impair the chemical bond
with the composite.
• When
•
Pick up minute amounts of intensive-opaquer on a brush tip and incorporate them into the mixed
opaquer as necessary until the desired shade has been achieved. Apply to the appropriate areas on
the framework.
•
Mixtures with minimal amounts of intensive-opaquer should be polymerized for 10 seconds.
Mixtures with larger amounts of intensive-opaquer should be polymerized for 30 seconds (6 cycles)
per facing in a Visio™ Alfa unit or in a Visio Beta Vario unit using Program 2.
•
Intensive-Opaquer IO 1 pink with opaquer liquid is perfect for masking retentions on chrome cobalt
appliances. IO 1 pink should be polymerized in a Visio Beta Vario unit using Program 2.
Building up the Tooth Contours
•
Tooth contours should be built up successively, directly from the dispenser, with a brush or
instrument of choice in layers up to 1 mm in thickness.
•
Thicker sections, such as bridge pontics should be applied in several layers and each layer
polymerized individually (using the Visio Alfa unit).
Notes (✔)
✔
✔
If the opaquer surface is allowed to remain in air for longer periods, the bond with Sinfony indirect
lab composite material will be impaired due to contamination and the reactive constituents will dry
out.
The higher pigment content in intensive opaquers reduces the light penetration. The polymerization
time should be prolonged for mixtures containing intensive-opaquer (Intensive-Opaquer IO 2–IO 5
cannot be light cured without opaquer liquid).
✔
Polymerizing IO 1 pink is a Visio Beta Vario unit with Program 2 prevents streaks in the
denture acrylic.
✔
The Sinfony indirect lab composite materials are sensitive to light, the dispensers must always
be closed immediately after use.
✔
Wherever possible, facings should be built up without interruptions to ensure optimum bonding
and prevent contamination from airborne dust particles.
Opaque-Dentin
•
The opaque-dentin materials are compatible with all Sinfony indirect lab composite materials. Due
to their higher opacity and to ensure that these materials are fully cured, it is especially important
that they are not applied in layers of more than 1 mm.
11 | Materials
|
Magic Intensive Shades
✔
Intensive-Opaquer
Diecut tab
Sinfony™ Indirect Lab Composite User Manual
creating standard mixtures, the dispensing aid can be used to allot the desired amounts
of various shades. The dispensing aid or aids are the pistol grips and white little bands that are
attached to the tube for “better handling and click-dispensing.”
•
“Gingiva” magic shade (I 9) is especially indicated for imitating gingiva.
Notes (✔)
✔
As the layers of Sinfony indirect lab composite material increase, the magic shades must be exposed
longer to the light during polymerization with the Visio™ Alfa unit.
✔
Shade modifiers can be inlayed or applied to the surface as necessary.
Finishing
•
Do not trim the facing with rotary instruments until it has been polymerized fully in a Visio™ Beta
Vario unit. Always use a suction unit when adjusting Sinfony indirect lab composite restorations.
•
Recommended procedure using the instruments from the finishing set:
First contour the facing with the cross-cut burs. Then smooth it with brown, followed by green,
rubber polishers. The green polishers are especially indicated for the metal junctions. Use the white
buff without polish to pre-polish all surfaces. The interdental spaces should also be pre-polished with
the bristle brush and Opal High-luster polishing paste. Use the small wool buff and Opal polishing
paste to create a high shine.
•
Clean the restoration under running water with a medium stiff brush or use an ultrasonic cleaner.
Do not use a steam cleaner as this may result in marginal gaps or cause the facing to split off.
Notes (✔)
✔
The facing must not be less than 0.8 mm thick to maintain esthetics of the restoration, Occlusal
facings of less than 1 mm are contraindicated.
✔
The Sinfony Indirect Lab Composite Master Kit includes a finishing set with Hager & Meisinger
(order no. 2581) finishing and polishing instruments and Opal High-luster polishing paste
(Renfert, order no. 520) for finishing Sinfony indirect lab composite restorations optimally.
These products can be re-ordered directly from their manufacturers.
✔
The technique described creates an excellent high luster.
✔
The different thermal expansion values of metal and composite may stress the bond if a steam
cleaner is used.
Repairs
A defective laminate veneer can be repaired in the mouth with filling composite and bonding agent.
Repairs may be performed intra-orally, if necessary, by using most direct fill composite materials.
Materials | 12
Diecut tab
39271 User Manual.qxd
39271 User Manual.qxd
| Sinfony
™
3/14/02
11:52 AM
Page 29
Indirect Lab Composite User Manual
Diecut tab
Polymerization of Sinfony
Indirect Lab Composite Restorations
•
Each individual layer should be polymerized for 5 seconds with a Visio™ Alfa unit.
•
Final polymerization is carried out in a Visio™ Beta Vario unit as follows: Remove the restoration
from the model, place restoration into glass curing chamber, close lid, press Program 1 (a 15-minute
light and vacuum cure). Place only the restoration in the Visio Beta Vario unit; not the model.
Notes (✔)
✔
Intermediate polymerization leaves a “tacky” layer (residual monomer layer) on the composite which
is required for bonding to the next layer. This residual monomer layer must not be removed prior to
final processing.
✔
The yellow photoinitiator is consumed during light curing so that the Sinfony indirect lab composite
restoration achieves the desired translucency.
✔
If the shade needs to be checked while building up, the material can be partially cured with an
additional Program 2 in a Visio Beta Vario unit so that the shade is easier to evaluate. This procedure
does not adversely affect the bond with the material applied later. The shade cannot be evaluated
properly until the material has been polymerized fully for 15 minutes (Program 1) with the Visio
Beta Vario unit.
✔
Applying excessively thick layers (in excess of 1 mm) without sufficient intermediate polymerization,
Alfa causes internal stress which may result in the facing splitting off or the creation/formation of
marginal gaps.
✔
Severe contamination in the polymerization chamber of the Visio Beta Vario unit can be removed by
soaking it in alcohol overnight with the lid closed, and wiping it off with a cloth.
13 | Materials
SECTION 7
Finishing and Polishing
3/14/02
11:52 AM
Page 31
| Sinfony
™
Indirect Lab Composite User Manual
7. Finishing and Polishing
Instrumentation
Procedure
Once the final curing process is complete, return the restoration to the die and verify fit for final
finishing. Occlusal anatomy can be emphasized with pointed carbides or diamonds. Do not carve
overly deep grooves. Smooth adjusted areas with the soft brown and green rubber polishers provided.
Use the white buff wheel without polish to pre-polish all surfaces. The inter-dental spaces or occlusals
should be pre-polished using the Opal High-luster polishing paste and bristle brush. Use the wool buff
dry to create a final high shine.
For a full crown buildup, the technician should follow a similar procedure as just completed with the
inlay/onlay procedure. Sinfony indirect lab composites are used in various combinations as required.
Laboratory Additions and Repairs —After final processing
To make repairs or add material, simply roughen the surface with the bur, wipe with alcohol to clean,
apply a thin coat of 3M ESPE Sinfony Indirect Lab Composite Activator and remove excess with a
non-fluffy cloth. Add the buildup, then light-cure. Finish and polish as usual.
Diecut tab
39271 User Manual.qxd
Finishing and Polishing | 14
3/14/02
11:52 AM
Page 33
Diecut tab
39271 User Manual.qxd
SECTION 8
Cementation
Recommendations
3/14/02
11:52 AM
Page 35
| Sinfony
™
Indirect Lab Composite User Manual
8. Cementation Recommendations
Composite Inlays/Onlays Cementation
For final cementation of composite inlays and onlays. Trial fit restorations to insure an accurate fit and
complete seating.
Step 1– Etchant
• Apply
3M ESPE Scotchbond™ Etchant to enamel and dentin—wait 15 seconds.
•
Rinse for 10 seconds.
•
Blot excess water leaving tooth moist*
*
NOTE: A 3M ESPE mini-sponge (#7522S) or a moist cotton pellet may be used for blotting.
Step 2 – Adhesive
• Apply
•
2 consecutive coats of 3M ESPE Single Bond Dental Adhesive to enamel and dentin.
Dry gently for 2–5 seconds.
NOTE: Avoid excess adhesive on all prepared surfaces and line angles.
Step 3 – Light-Cure
•
Light-cure for 10 seconds.
Step 4 – Bonding Surface Preparation
•
Roughen the bonding surfaces of indirect composite inlays/onlays with a diamond bur; air abrasion
further improves bond.
• Apply
•
3M ESPE RelyX™ Ceramic Primer (#2721) to roughened surfaces.
Dry for 5 seconds to evaporate the ethanol.
Step 5 –Apply Cement
•
Dispense 3M ESPE RelyX™ ARC Adhesive Resin Cement onto a mixing pad and mix for 10 seconds.
• Apply
a thin layer of cement onto the preparation.
Step 6 – Placement /Light-Cure
•
Slowly seat the inlay/onlay restoration.
•
Remove excess cement approximately 3–5 minutes after seating. Optional: If excess cement is
removed immediately after seating, light-cure margins for 40 seconds after cleanup.
Step 7 – Finish and Polish
•
Finish occlusal surface using an appropriate finishing instrument.
•
Finish proximal surfaces with 3M ESPE Sof-Lex™ Pop-on™ Extra Thin Discs and Sof-Lex™ Finishing
and Polishing Strips.
Cementation Recommendations | 15
Diecut tab
39271 User Manual.qxd
39271 User Manual.qxd
| Sinfony
™
3/14/02
11:52 AM
Page 37
Indirect Lab Composite User Manual
Crown and Bridge Cementation
Indications: For final cementation of Resin crowns, PFM crowns and bridges, crowns with minimal
tooth structure, Maryland bridges (resin bond bridges). In cases where core material is present,
roughen the core material and apply all solutions indicated for enamel and dentin.
Step 1– Etchant
• Apply
*
3M ESPE Scotchbond™ Etchant to enamel and dentin—wait 15 seconds.
•
Rinse for 10 seconds.
•
Blot excess water leaving tooth moist*
NOTE: A 3M ESPE mini-sponge (#7522S) or a moist cotton pellet may be used for blotting.
Step 2 – Adhesive
• Apply
•
2 consecutive coats of 3M ESPE Single Bond Dental Adhesive to enamel and dentin.
Dry gently for 2–5 seconds.
NOTE: Avoid excess adhesive on all prepared surfaces and line angles.
Step 3 – Light-Cure
•
Light-cure for 10 seconds per bonding surface.
Step 4 – Bonding Surface Preparation
•
Roughen the bonding surfaces of indirect composite crowns with a diamond bur; air abrasion further
improves bond.
• Apply
•
3M ESPE RelyX™ Ceramic Primer (#2721) to bonding surface of the restoration.
Dry for 5 seconds.
Step 5 –Apply Cement
•
Dispense 3M ESPE RelyX™ ARC Adhesive Resin Cement onto a mixing pad and mix for 10 seconds.
• Apply
a thin layer of cement to the bonding surface of the restoration.
Diecut tab
Step 6 – Placement / Light-Cure
•
Slowly seat the restoration.
•
Remove excess cement approximately 3–5 minutes after seating. Optional: If excess cement is
removed immediately after seating, light-cure margins for 40 seconds after cleanup or allow to
self-cure for 10 minutes.
NOTE: For porcelain and pre-cured composite crowns, margins must be light-cured for 40 seconds to insure high
immediate strengths.
Step 7 – Finish and Polish
SECTIONS 9 & 10
Maintenance
•
Finish occlusal surface using an appropriate finishing instrument.
•
Finish proximal surfaces with 3M ESPE Sof-Lex Pop-on Extra Thin Discs and Sof-Lex Finishing
and Polishing Strips.
16 | Cementation Recommendations
™
™
™
Miscellaneous
| Sinfony
™
Indirect Lab Composite User Manual
9. Maintenance
Care (doctor/hygienist)
If using a prophy paste for cleaning, use one with low abrasion such as 3M ESPE Clinpro™ Prophy Paste.
Care (patient)
The restoration should be cleaned with a soft toothbrush and non-abrasive dentifrice. Removable
restorations must not be immersed in denture tablet cleansers. Aggressive cleaning solutions may harm
the surface.
Medical storage (lab)
Do not store Sinfony indirect lab composite pastes and opaquer above 77°F. If larger amounts
of opaquer powder and liquid are stored, keep them in a cool place (below 73.4°F).
10. Miscellaneous
Frequently Asked Questions
Q. Do we need 3M ESPE equipment to process Sinfony indirect lab composite restorations?
A. In order to achieve optimal results, the recommended 3M ESPE products and equipment must be
used. Any alterative methods, equipment or products may result in substandard or unacceptable
results.
Q. How does Sinfony indirect lab composite compare with other major composites?
A. Sinfony indirect lab composite fares as well and in most cases better than the leading indirect
composite competitors.*
Q. Can Sinfony indirect lab composite be used on fiber reinforced substrate materials such as
FiberKor™ framework, Vectris™ framework and Connect™ framework?
A. Yes. Sinfony indirect lab composite works on all fiber reinforced substrates.
Q. When and why would you use programs P3 and P4 in the Visio Beta Vario light curing unit?
A. Program P3 is used for intermediate polymerization of Sinfony facing materials to enable
them to be trimmed sooner. Program P4 is used for polymerization of other cold-light curing
dental materials at wavelengths of 400–500 nm.
*
Studies available in Sinfony Indirect Lab Composite Clinical Data Sheet. Call the 3M ESPE Dental Lab Technical
Hotline 1-800-216-9502 to receive the literature.
Maintenance 17
Miscellaneous