1
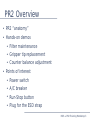
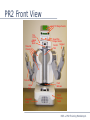
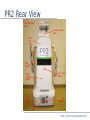
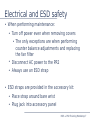
PR2 Maintenance
ROS + PR2 Training Workshop
PR2 Maintenance Overview
●
PR2 overview
●
Review electrical and ESD safety
●
Review PR2 power system
●
PR2 accessory kit
●
PR2 tool kit
●
Hands on demos
●
See support.willowgarage.com to order
replacement parts
ROS + PR2 Training Workshop 2
PR2 Overview
●
PR2 “anatomy”
●
Hands-on demos
●
●
Filter maintenance
●
Gripper tip replacement
●
Counter balance adjustment
Points of interest
●
Power switch
●
A/C breaker
●
Run-Stop button
●
Plug for the ESD strap
ROS + PR2 Training Workshop 3
PR2 Front View
Head Tilt Stage Panels
Shoulde
rCovers
Top
Front
Panel
Laser
Sled
Head Pan
Stage Panels
Center Gripper
Trim
Fore Arm
Upper
Arm
Base Skirt
Front
Front
Bellows
Front
Bottom
Panel
ROS + PR2 Training Workshop 4
PR2 Side View
Head Tilt Stage
Panels
Head Pan
Stage Panels
Grippe
r
Laser
Sled
Top
Front
Panel
Rear Top
Panel
Shoulde
r Covers
Rear
Bellows
Fore Arm
Upper
Arm
Hokuyo
Front
Bottom
Panel
Base Skirt
Front
Rear
Bottom
Panel
Left
Body
Trim
Front
Bellow
s
Base
Skirt
Rear
ROS + PR2 Training Workshop 5
PR2 Rear View
Head Tilt Stage
Panel
Head Pan Stage
Panel
Rear
Top
Panel
Rear
Bellows
Run – Stop
Button
Rear
Bottom
Panel
Base
Skirt
Rear
DC
Breaker
Fan
Filter
ROS + PR2 Training Workshop 6
Electrical and ESD safety
●
When performing maintenance:
●
Turn off power even when removing covers
The only exceptions are when performing
counter balance adjustments and replacing
the fan filter
Disconnect AC power to the PR2
●
●
●
●
Always use an ESD strap
ESD straps are provided in the accessory kit:
●
Place strap around bare wrist
●
Plug jack into accessory panel
ROS + PR2 Training Workshop 7
PR2 Power System
PR2 internal power precautions and safety features:
●
●
●
●
Battery power is “live” within the robot, even
when the power is off
The power board controls all the power to the
PR2 systems and is accessible/controllable via
the ROS pr2_power_node
There are as many as 7 levels of protection but
you cannot assume they will prevent damage or
injury
Always turn off the PR2 power when performing
maintenance except when specifically required
to complete a procedure such as the counter
balance adjustment
ROS + PR2 Training Workshop 8
PR2 Power Requirements
Wall power:
●
The PR2 can only be plugged into a dedicated
15A minimum circuit
●
Only use the supplied power cord
●
Only use the supplied self plug-in cord
●
See support.willowgarage.com for ordering
replacement cords
Battery runtime
●
Approximately 2 hours stationary, less when
moving
ROS + PR2 Training Workshop 9
PR2 Accessory Kit
15 FT power cord 68-06167
Self plug-in cord 68-06153
Joystick 68-02985
Hard drive bay keys 68-03337
Wireless run-stop 68-01059
Gripper tips box:
Sensor fingertips 68-03840
(x5) (use only with
boots!)
Fingertip boots 68-03347
(x20)
USB joystick cable 68-03533
Small Checkerboard 68-03823
Fan filters 68-02802 (x5)
ESD strap 68-03024
Base station recovery DVD
User manual
ROS + PR2 Training Workshop10
PR2 Tool Kit (1)
Counter balance adjustment rod 10mm hex 68-07034
Counter balance adjustment tube
68-07147
Ratchet head bits:
1.5mm 68-07040
2.5mm 68-07042
Driver bits:
1.5mm
2.0mm
2.5mm
2.5mm
3.0mm
4.0mm
5.0mm
1/4 sq. male to 1/4 hex male 68-07075
1/4 sq. drive to 1/4 hex female 68-07077
3/8 sq. drive to 1/4 hex female 68-07078
10mm 3/8 drive socket 68-07079
13mm 1/4 drive socket 68-07085
13mm 3/8 drive socket 68-07086
68-07062
68-07063
68-07064
ball end 68-07059
68-07065
68-07066
68-07067
16mm 3/8 drive socket 68-07142
Needle nose pliers 68-07112
Diagonal Cutter 68-07146
Zip-ties 68-07150
ROS + PR2 Training Workshop11
PR2 Tool Kit (2)
7/32 1/4 drive socket 68-07090
1/4 drive flex joint, 68-07141
3/8 drive short extension, 68-07116
1/4 drive ratchet wrench, 68-07138
3/8 drive wobble extension, 68-07118
3/8 drive ratchet wrench, 68-07139
1/4 drive quick release extension,
68-07140
Needle Nose pliers, 68-07112
Mountz wrench and driver tools:
Fixed 0.34Nm wrench, with 1.5mm right
angle Allen, 68-07025
Fixed 0.68Nm wrench, 68-07028
Fixed 2.0Nm wrench, 68-07029
1/4 hex ratchet head, 68-07033 (for use
with 0.68 ans 2.0 Nm wrenches)
0.20 – 1.20 Nm torque tool, 68-07014
(small)
1 – 6 Nm Torque tool, 68-07015 (large)
Titan250I 5.6 – 28 Nm Torque wrench,
ROS + PR2 Training Workshop12
Using Torque Tools
Small and large driver
Special stack-ups
See support.willowgarage.com:
PR2 Toolkit: Setting Torque Driver
Blue Adjustment
Nob – Small
Torque Driver
Adjustment
Red Adjustment
Nob – Large
Torque Driver
Rotate
0.34 Nm
1.36 Nm (1.4)
Rotate to
adjust torque
11.0 Nm
ROS + PR2 Training Workshop13
Using Loctite
●
●
●
Use Loctite to retain
fasteners and keep
them from vibrating
loose
Only a small
“patch” of Loctite
is needed.
There is no need to
clean the old Loctite
The fresh Loctite will
integrate with the old
Old Loctite.
ROS + PR2 Training Workshop14
Today's Demos
Video of gripper tip
replacement
Live demo of fan filter
repair/replacement
Hands-on demo of
counterbalance
adjustment
See support.willowgarage.com for all maintenance procedures
ROS + PR2 Training Workshop15
Gripper Tip R/R Video
Turn off power
Wear ESD strap
Always cover sensors with boots
Replace boots as soon as they show signs of damage
Willow Garage will not replace damaged sensor tips
See support.willowgarage.com for replacements
Fig 6
Fig 7
Fig 10
ROS + PR2 Training Workshop16
Fan Filter Demo
Clean regularly every 1-4 weeks
Clogged filter will cause fan speed to increase
(noisy robot)
Vacuuming filter is not recommended since this
may tear the filter
Maintenance:
Remove the filter cover plate
Wash and dry filter
Having the fan on helps when placing the filter
Re-install the cover plate
ROS + PR2 Training Workshop17
Counter Balance Review
Overview: PR2 counter balance (CB) holds
up the weight of the arms using a spring
and pulley system
Goal: The CB should balance the arm so
that almost no torque is required to
maintain position of the arm
Performance: A well adjusted counter
balance will maximize the performance of
the PR2 arm controllers
ROS + PR2 Training Workshop18
CB Adjustment Overview
With time, the springs of the CB system can start to
sag or give. To maintain performance, you will have
to adjust the mechanism.
Fig 1
Right
● Secondary spring can be
Secondary Spring
stiffened or loosened
● Clockwise (CW) turns
increases force on arm
● “Arm gimbal shaft” controls
Arm Gimbal Shaft
level arm length of CB spring
force
● Counterclockwise (CCW)
increases force on arm
ROS + PR2 Training Workshop19
CB Adjustment Demo
●
Demonstrate checking and adjusting the
counterbalance on the PR2
●
●
We will demonstrate up front
You will adjust your own counterbalance with
help from Willow Garage engineers and
technicians
Notes:
Safety first
You need two people to adjust the mechanism
Observe ESD protocol (wrist strap)
Watch for pinch points
ROS + PR2 Training Workshop20
CB Check Program
●
We use a counterbalance adjustment/check
program to adjust the counterbalance.
●
●
The program moves the arm of the robot and
measures the torque on each joint
It uses training data to recommend
adjustments to for a minimum torque setting
●
The program is an iterative solver, in some
cases more than one iteration is required
You will run the check program and determine
your required adjustment.
ROS + PR2 Training Workshop21
CB Check Program Install
Counterbalance adjustment program is
unreleased.
●
●
You will have to install it from wg-ros-pkg
trunk and build it
Tutorial:
ros.org/wiki/qualification/Tutorials
Follow tutorial instructions to install and build
●
●
Important: Do not start the CB adjustment
program until instructed to do so
ROS + PR2 Training Workshop22
CB Adjustment Demo
Observe safety and ESD protocols.
Remove top covers, Doc6
Fig 1
Fig 1
Fig 2
Fig 3
Fig 4
ROS + PR2 Training Workshop23
CB Adjustment Demo
Observe safety and
ESD protocols.
Remove shoulder
covers, Doc16
Fig 6
Fig 7
Fig 5
Fig 11
ROS + PR2 Training Workshop24
CB Adjustment Demo
Adjust counter balance, Doc5
Re-run the Check program and adjust the CB if needed,
Doc5
Fig 6
Re-install the covers, Doc6
Fig 5
Guide tube
ROS + PR2 Training Workshop25
CB Adjustment Procedure
Check CB with adjustment program
Clear out 2m space around your robot
Turn robot off (sudo pr2-shutdown)
Remove covers
Ask your Willow Garage helper for questions
Adjust CB
Make adjustments check tool recommends
Turn robot on
Check CB with adjustment program
Turn robot off
Reinstall covers
ROS + PR2 Training Workshop26
Remember!
Safety First
support.willowgarage.com
Always wear an ESD wrist strap
Don't be afraid to ask questions
ROS + PR2 Training Workshop27
Questions?????
ROS + PR2 Training Workshop28