1
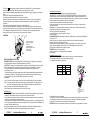
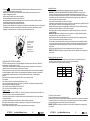
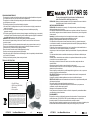
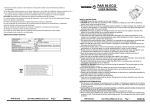
KIT PAR 56
LIMPIEZA Y MANTENIMIENTO
El instalador debe asegurar que instalaciones de seguridad y de máquinas son inspeccionados por un
perito en la extension de una inspección inicial cada cuatro años por lo menos.
El instalador debe asegurar que instalaciones de seguridad y de máquinas son inspeccionados por un
técnico una vez por año.
Durante la inspección, los puntos siguientes deben ser observados:
1) Todos tornillos con los cuales el aparato o partes del aparato están montados, deben ser atornillados
fijamente y no deben estar corroídos.
2) No debe haber deformaciones en la caja, fijaciones y el sitio de instalación (techo, abajamiento,
trussing).
3) Los cables de conexión eléctricos no deben haber deterioros, fatiga de material (por ejemplo
cables porosos) o depósitos. Otras instrucciones dependente del sitio de instalación y el uso
deben que ser observadas por el instalador competente y problemas de seguridad deben ser
eliminados.
PELIGRO Desconecte la unidad de la red antes de comenzar su mantenimiento
Recomendamos una limpieza frecuente de la unidad. Use un paño libre de hilo. Nunca use
alcoholes o disolvente.
El interior del dispositivo debe ser limpiado al menos anualmente con u aspirador.
No hay elementos de control para el usuario en el interior excepto la lámpara. El mantenimiento
y reparación deben ser llevadas a acabo por un distribuidor autorizado.
Diríjase a la sección “Instalando/Sustituyendo lámparas”
Utilice siempre repuestos originales
Si el cable de red se daña, debe ser sustituido por un distribuidor autorizado para evitar riesgos
Para cualquier cuestión consulte a su distribuidor.
ESPECIFICACIONES TECNICAS
Alimentación:
Consumo de potencia,
Dimensiones (L x An x Al);
Peso;
Lámpara
Max. Temperatura ambiente t a:
Max. Temperatura del chasis t B:
Distancia mínima:
Max. 230-240V/AC, 50Hz
Max. 300W
205 x 205 x 250 mm
1.0 kg
Max.230-240V/300W PAR56 Base: GX16d
25°C
140°C
2m
- 1 Foco PAR 56
- 1 Lámpara PAR 56 (230V/300W)
- 1 Portafiltros
- 4 Filtros de gel de color
Este símbolo en su equipo o embalaje, indica que el presente producto
no puede ser tratado como residuos domésticos normales, sino que deben
entregarse en el correspondiente punto de recogida de equipos electrónicos
y eléctricos. Asegurándose de que este producto es desechado
correctamente, Ud. está ayudando a prevenir las consecuencias negativas
para el medio ambiente y la salud humana que podrían derivarse de la
incorrecta manipulación de este producto. EL reciclaje de materiales
ayuda a conservar las reservas naturales. Para recibir más información,
sobre el reciclaje de este producto, contacte con su ayuntamiento, su
punto de recogida más cercano o el distribuidor donde adquirió el producto.
KIT PAR 56
User Manual/Manual de uso
For your own safety, please read this user manual carefully
before you initially start-up.
CAUTION! Keep this device away from rain and moisture! Unplug mains lead before opening the
housing!
SAFETY INSTRUCTIONS
CAUTION! Be careful with your operations. With a dangerous voltage you can suffer a dangerous
electric shock when touching the wires!
This device has left our premises in absolutely perfect condition. In order to maintain this condition and
to ensure a safe operation, it is absolutely necessary for the user to follow the safety instructions and
warning notes written in this user manual.
Important: Damages caused by the disregard of this user manual are not subject to warranty. The
dealer will not accept liability for any resulting defects or problems.
Keep away from heaters and other heating sources!
If the device has been exposed to drastic temperature fluctuation (e.g. after transportation), do not
switch it on immediately. The arising condensation water might damage your device. Leave the device
switched off until it has reached room temperature.
This device falls under protection-class I, therefore it is essential that the yellow/green conductor gets
connected to earth. The electric connection must be carried out by a qualified employee.
Make sure that the power-cord is never crimped or damaged by sharp edges. Check the device and
the power-cord from time to time.
If the external flexible cable or cord of this luminaire is damaged, it shall be exclusively replaced by the
manufacturer or his service agent or a similar qualified person in order to avoid a hazard.
shields, lenses or ultraviolet screens shall be changed if they have become visibly damaged to such an
extent that their effectiveness is impaired, for example by cracks or deep scratches.
Never let the power-cord come into contact with other cables! Handle the power-cord and all
connections with the mains with particular caution!
Make sure that the available voltage is not higher than stated in this manual.
Always disconnect from the mains, when the device is not in use or before cleaning it. Only handle the
power-cord by the plug. Never pull out the plug by tugging the power-cord.
During the initial start-up some smoke or smell may arise. This is a normal process and does not
necessarily mean that the device is defective.
DANGER OF BURNING! Never touch the device during the operation! The housing heats up to the
housing temperature TB.
Don’t switch the device on and off in short intervals as this would reduce the lamp’s life.
HEALTH HAZARD! Never look directly into the light source, as sensitive persons may suffer an
epileptic shock (especially meant for epileptics)!
Always disconnect from the mains, when the device is not in user or before cleaning it.
Please note that damages caused by manual modifications on the device or unauthorized operation by
unqualified persons are not subject to warranty.
Keep away children and amateurs from the device!
There are no serviceable parts inside the device. Maintenance and service operations are only to be
carried out by authorized dealers.
OPERATING DETERMINATIONS
This device is a lighting effect for creating decorative effects. this fixture is only allowed to be operated
with an alternation current of max. 230V-240/50Hz 500W and was designed for indoor use only.
Do not shake the device. Avoid brute force when installing or operation the device.
When choosing the installation-spot, please make sure that the device is not exposed to extreme heat,
moisture or dust. There should not be any cables lying around. You endanger your own and the safety
of others!
-8-
KIT PAR 56
User Manual/Manual de uso
-1-
The symbol ---M determines the minimum distance from lighted objects. The minimum distance
between light-output and the illuminated surface must be more than 0.5 meters.
Make sure that the area below the installation place is blocked when rigging, derigging or servicing the
fixture.
Always fix the fixture with an appropriate safety-rope.
The maximum ambient temperature Ta must never be exceeded.
Operate the device only after having become familiar with its functions. Do not permit operation by
persons not qualified for operating the device. Most damages are the result of unprofessional
operation!
Please use the original packaging if the device is to be transported.
Please consider that unauthorized modifications on the device are forbidden due to safety reasons!
If this device will be operated in any way different to the one described in this manual, the product may
suffer damages and the guarantee becomes void. Furthermore, any other operation may lead to
dangers like short-circuit, burns, electric shock, lamp explosion, crash etc.
OVERVIEW
(1)Colour filter trammel
(2)Clip-to-hold clamps
(3)Housing
(4)Mounting-bracket
(5)Mounting bracket screws
(6)Fixation ring
(7)Protective grid
INSTALLING/REPLACING THE LAMP
DANGER TO LIFE! Only install the lamp with the device switched off! Unplug from mains before!
During the operation, the lamp reaches temperatures of up to 600°C
CAUTION! The lamp has to be replaced when it is damaged or thermally deformed due to the heat!
Before replacing the lamp, unplug mains lead and let the lamp cool down (approx. 5 minutes).
During the installation do not touch the glass-bulbs bare-handed! Please follow the lamp
manufacturer’s notes!
Do not install lamps with a higher wattage! Lamps with a higher wattage generate temperatures the
device was not designed for. Damages caused by non-observance are not subject to warranty.
For the installation, you need one 230 PAR 56 lamp with up to max. 300W
Procedure:
Procedimiento de instalación
El proyector deber ser instalado fuera de zonas de paso de personas.
IMPORTANTE EL “VOLADO” DE EQUIPOS REQUEIRE EXPERIENCIA, incluyendo (aunque no
necesariamente) cálculo de límites de carga, materiales usados e inspecciones periódicas. Si no
cumple estas cualificaciones no trate de instalarlo usted mismo, consulte a un experto. La instalación
deficiente puede provocar accidentes a personas y propiedades.
El proyector debe ser instalado fuera del alcance de la gente.
Si debe ser bajado del techo, debe usarse un sistema de truss El proyector no debe ser fijado
libremente en la sala.
Precaución: Los proyectores pueden causar severos daños al caer. Si tiene dudas respecto a
la seguridad de la instalación. NO instale el proyector.
Antes de colgar la unidad, asegúrese que
el punto de fijación es capas de soportar 10 veces el
peso de la unidad.
PELIGRO DE FUEGO Cuando instale el dispositivo, asegúrese que no hay elementos inflamables
a menos de 0.5 m.
Monte el proyector con el asa de montaje al sistema de truss con la sujección adecuada.
El agujero del asa tiene un diámetro de 13 mm
Utilice siempre un cable de seguridad que pueda soportar hasta 10 veces el peso de la unidad.
Utilice cables de seguridad con mosquetón. Pase el cable alrededor del asa y del truss.
Ajuste el grado de inclinación de la unidad con el asa.
PELIGRO Antes de poner en marcha la
unidad por primera vez, la instalación debe ser aprobada
por un experto.
Instalación/Conexión a la red
PELIGRO. La conexión eléctrica debe ser llevada a cabo por un electricista cualificado
Para conectar el dispositivo a la red, debe instalar una clavija
La ocupación de los cables es la siguiente:
Cable
Marrón
Azul
Pin
Internacional
Fase L
Neutro N
Amar./Verde Tierra
Step 1: Move the color filter trammel on the front of the housing by pushing the clip-to-hold damps.
Step 2: If replacing the lamp, Remove the fixation ring by pressing it together. Turn the housing side
down, then the lamp falls out. Remove the old lamp from the lamp socket by pulling them.
Step 3: Insert the new 230V/300W PAR56 lamp into the spot.
Step 4: Replace the color filter trammel onto the front of the housing.
Installing/Rigging
DANGER TO LIFE! Please consider the EN 60598-2-17 and the respective national norms during the
installation! The installation must only be carried out by an authorized dealer!
The installation of the projector has to be built and constructed in a way that it can hold 10 times the
weight for 1 hour without any harming deformation.
The installation must always be secured with a secondary safety attachment, e.g. an appropriate catch
net. This secondary safety attachment must be constructed in a way that no part of the installation can
fall down if the main attachment fails.
When rigging, derigging or servicing the fixture staying in the area below the installation place, on
bridges, under high working places and other endangered areas is forbidden.
KIT PAR 56
User Manual/Manual de uso
-2-
1. TRUSS
2. CABLE DE SEGURIDAD
3. MOSQUETON
4. AGUJERO DE FIJACION
5. GARRA
El cable de tierra debe ser conectado
Si el dispositivo va a ser conectado directamente a la red eléctrica, debe instalarse un desconectador
con una apertura mínima de 3 mm en cada polo para ser incluido en la instalación permanente.
En general los efectos de luz no se conectan a un sistema dimmer.
PELIGRO Antes de poner en marcha la unidad por vez primera, debe ser aprobada por un experto.
KIT PAR 56
User Manual/Manual de uso
-7-
El símbolo ---M determina la distancia mínima al objeto iluminado. La distancia entre el foco de luz
y el objeto iluminado no debe ser superior a 0.5 m.
Asegúrese que el área bajo la zona de instalación está bloqueada al paso durante el proceso de
colgado, descolgado de la unidad.
Asegure siempre la unidad con un cable de seguridad.
La máxima temperatura ambiente no debe exceder de T
Maneje la unidad sólo después de familiarizarse con sus funciones. No permita su manejo a personas
no cualificadas. Muchas averías son causadas por ello.
Utilice el embalaje original para transportar el dispositivo.
Considere que las modificaciones no autorizadas en el dispositivo, están prohibidas por motivos de seguridad.
Si el dispositivo se maneja de manera diferente a la descrita en este manual, puede dañarse y anular
la garantía, ya que puede provocar, cortocircuitos, fuego, descargas eléctricas, etc.
a
(1) Porta filtro de color
(2)Clip de sujección
(3) Carcasa
(4) Asa de montaje
(5) Tornillo del asa
(6) Aro de fijación
(7) Rejilla protectora
INSTALANDO/SUSTITUYENDO LA LAMPARA
PELIGRO. Instale la lámpara sólo con la unidad apagada. Desconecte antes el cable de red. Durante su
funcionamiento, la lámpara alcanza los 600ºC.
PRECAUCION La lámpara ha de ser sustituida cuando esté dañada o deformada por el calor. Antes de
sustituirla, desconecte la red y deje que se enfrie (aprox. 5 minutos).
Durante la instalación no toque con los dedos el cristal de la lámpara. Sigua las instrucciones del fabricante
No instale lámparas de superior potencia, estas lámparas general temperaturas para las que la unidad no
ha sido diseñada. Los daños causados por la no observancia de estas normas, no están sujetas a
garantía.
Para la instalación necesita una lámpara 230V PAR 56 con un máximo de 300W
Procedimiento
Paso 1: Mueva el filtro de color del frontal pulsando sobre el clip.
Paso 2: Si cambia la lámpara. Quite el clip de presión, gire el chasis y la lámpara se desprenderá. Quite la
lámpara antigua del portalámparas estirando.
Paso 3: Inserte una nueva lámpara 230V 300W PAR 56
Paso 4: Vuelva a colocar el portafiltros en el frontal.
Colgando la unidad
PELIGRO Considere la norma EN 60598-2-17 y las respectivas normas nacionales durante la instalación, la
cual debe ser llevada a cabo por un distribuidor autorizado.
La instalación del proyector de ser construida de tal manera que pueda soportar 10 veces su peso durante
1 hora sin deformarse.
La instalación siempre debe ser reforzada con un segundo sistema de seguridad.
Este segundo sistema debe ser construido de manera que no forme parte de la instalación principal
de manera que actúe si falla en anterior.
Cuando cuelgue, descuelgue o repare la unidad, está prohibido permanecer bajo ella.
KIT PAR 56
User Manual/Manual de uso
-6-
Installing/Procedure:
The projector should be installed outside areas where persons may walk by or be seated.
IMPORTANT! OVERHEAD RIGGING REQUIRES EXTENSIVE EXPERIENCE, including (but not
limited to) calculation working load limits, installation material being used, and periodic safety
inspection of all installation material and the projector. If you lack these qualifications, do not attempt
the installation yourself, but instead use a professional structural rigger. Improper installation can
result in bodily injury or damage to property.
The projector has to be installed out of the reach of people.
If the projector shall be lowered from the ceiling or high joists, professional trussing systems have to be
used. The projector must never be fixed swinging freely in the room.
Caution: Projectors may cause severe injuries when crashing down! If you have doubts concerning
the safety of a possible installation, do NOT install the projector!
Before rigging make sure that the installation area can hold a minimum point load of 10 times the
projector’s weight.
DANGER OF FIRE! When installing the device, make sure there is no highly-inflammable material
(decoration articles, etc.) within a distance of min. 0.5 M.
Mount the projector with the mounting-bracket to your trussing system using an appropriate clamp.
The hole in the mounting bracket has a diameter of 13 mm.
For overhead use, always install a safety-rope that can hold at least 10 times the weight of the fixture.
You must only use safety-ropes with screw-on carabines. Pull the safety-rope through the hole in the
mounting-bracket and over the trussing system etc. Insert the end in the carabine and tighten the
safety screw.
Adjust the desired inclination-angle via the mounting-bracket and fix the fixation screws.
DANGER TO LIFE! Before taking into operation for the first time, the installation has to be approved
by an expert!
Installing /Connection with the mains
DANGER TO LIFE! The electric connection must only be carried out by a qualified electrician!
In order to connect the device to the mains, you have to install a power-plug.
The occupation of the connection-cables is as follows:
Cable
Brown
Blue
Pin
International
Live
L
Neutral N
Yellow/Green Earth
The earth has to be connected!
Connect the device to the mains with the power-plug.
If the device will be directly connected with the local power supply network, a disconnection switch with
a minimum opening of 3 mm at every pole has to be included in the permanent electrical installation.
In general, lighting effects should not be connected to dimming-packs.
DANGER TO LIFE! Before taking into operation for the first time, the installation has to be approved
by an expert!
KIT PAR 56
User Manual/Manual de uso
-3-
CLEANING AND MAINTENANCE
The operator has to make sure that safety-relating and machine-technical installations are inspected
by an expert after every tour year in the course of an acceptance test.
The operator has to make sure that safety-relating and machine-technical installations are inspected
by a skilled person once a year.
The following points have to be considered during the inspection:
1)All screws used for installing the devices or parts of the device have to be tightly connected and
must not be corroded.
2)There must not be any deformations on housings, fixations and installation spots(ceiling,
suspension. trussing).
3)The electric power supply cables must not show any damages, material fatigue (e.g. porous cables)
or sediments. Further instructions depending on the installation spot and usage have to be adhered
by a skilled installer and any safety problems have to be removed.
DANGER TO LIFE! Disconnect from mains before starting maintenance operation!
We recommend a frequent cleaning of the device. Please use a moist, lint-free cloth. Never use
alcohol or solvents!
The interior of the device should be cleaned at least annually using a vacuum-cleaner or an air-jet.
There are no serviceable parts inside the device except for the lamp. Maintenance and service
operations are only to be carried out by authorized dealers.
Please refer to the instructions under “Installing/Replacing the lamp”.
Should you need any spare parts, please use genuine parts.
If the power supply cable of this device becomes damaged, it has to be replaced by authorized dealers
only in order to avoid hazards.
Should you have further questions, please contact your dealer.
TECHNICAL SPECIFICATIONS
Power supply:
Power consumption,
Dimensions (L x W x H);
Weight;
Fitting lamp
Maximum ambient temperature t a
Maximum housing temperature tB:
Minimum distance:
Max. 230-240V/AC, 50Hz
Max. 300W
205 x 205 x 250 mm
1.0 kg
Max.230-240V/300W PAR56 Base: GX16d
25°C
90°C
0.5m
PRECAUCION. Mantenga la unidad apartada de la lluvia y la humedad. Desconecte el cable de
alimentación antes de abrir la cubierta de la unidad.
INSTRUCCIONES DE SEGURIDAD
PRECAUCION. Sea cuidadoso con su manejo. Con voltajes elevados, puede sufrir descargas
eléctricas peligrosas al tocar los cables.
Este dispositivo ha abandonado nuestras instalaciones en perfectas condiciones. Para preservar
esta condición, asegúrese de usar la unidad de acuerdo a la instrucciones y avisos de seguridad
de este manual.
Importante: Los daños causados por la no observancia de este manual, no están sujetas a
garantía. El fabricante no acepta ninguna responsabilidad por este hecho.
Mantenga la unidad apartada de calefactores u otras fuentes de calor.
Si el dispositivo ha sido expuesto a bruscas fluctuaciones de calor (p.e. durante el transporte)
no lo encienda de inmediato. La condensación podría dañar la unidad. Dejelo apagado hasta que
alcance la temperatura ambiente.
El dispositivo se encuentra bajo protección clase I, así es esencial que el cable amarillo/verde se
conecte a tierra. La conexión debe ser realizada por un electricista.
Asegúrese que el cable no está pinzado o dañado por bordes afilados. Compruebe periódicamente
el cable.
Si el cable está dañado, debe ser sustituido exclusivamente por el fabricante o distribuidor para
evitar riesgos.
Pantallas, lentes o cristales deben ser sustituidos si se aprecian visiblemente daños que afectan
a la emisión de luz como rayaduras o golpes.
Nunca deje que el cable de red entre en contacto con otros cables, maneje este cable con
especial cuidado.
Asegúrese que la tensión de red no supera lo descrito en este manual
Desconecte siempre de la red si no va a usar el dispositivo o para limpiarlo. Maneje el cable
desde la clavija, nunca de tirones.
Durante la puesta en marcha inicial, es posible la aparición de algo de humo u olor, es un proceso
normal y no significa un mal funcionamiento.
PELIGRO DE FUEGO Nunca toque el dispositivo mientras está en marcha. La temperatura del
chasis llaga a alcanzar T
No apague y encienda la unidad repetidamente, se reduce la vida útil de la lámpara.
RIESGO A LA SALUD Nunca mire directamente a una fuente de luz, una persona sensible puede
sufrir ataques de epilepsia.
Desconecte siempre la red antes de limpiarla o terminar su uso.
Los daños causados por la modificación del dispositivo sin autorización o por personas no
cualificadas, no están cubiertas por la garantía.
Mantenga a los niños apartados de la unidad
No hay elementos de control para el usuario en el interior. La reparación y mantenimiento deben
ser realizadas por técnicos autorizados.
FUNCIONAMIENTO
El dispositivo es un efecto de iluminación para crear efectos decorativos. Solo puede operar con
corriente alterna max. 230-240V!50 Hz 500W y ha sido diseñada para su uso en interiores.
No sacuda la unidad. Evite la fuerza bruta cuando instale o manipule la unidad.
Cuando elija el lugar de instalación, asegúrese que no está expuesto a calor extremo, humedad o polvo.
No deben haber cables arrollados alrededor. Puede ponerse en riesgo usted y a los demás.
This symbol on the product or on its packaging indicates that this product
shall not be trated as household waste. Instead it shall be handed over to
the applicable collection point for the recycling of electrical an electronic
equipment. By ensuring this product is disposed of correctly, you will help
prevent potential negative consequences for the environment and human
health, which could otherwise be caused by inappropriate waste handling
of this product. The recycling of amterials will help to conserve natural
resources. For more detailed information sabout recycling of this product,
please contact your local city office, your household waste disposal service
or the shop where you purchased the product.
User Manual/Manual de uso
Por su propia seguridad, lea este manual cuidadosamente
antes de encender la unidad por primera vez.
B
- 1 Foco PAR 56 spot
- 1 PAR 56 lamp (230V/300W)
- 1 Filter holder
- 4 Colour gel filter
KIT PAR 56
KIT PAR 56
-4-
KIT PAR 56
User Manual/Manual de uso
-5-