1
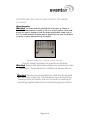
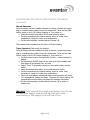
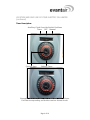
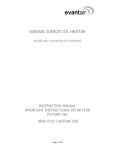
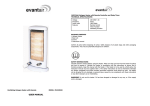
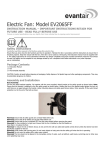
2000Watt 11 FIN OIL HEATER
WITH TIMER
MODEL NO: EV1911OH
INSTRUCTION MANUAL
IMPORTANT INSTRUCTIONS RETAIN FOR
FUTURE USE
READ FULLY BEFORE USE
Page 1 of 10
SAFETY INSTRUCTIONS
Carefully read this manual in full before using this
heater.
Ensure that you know how the heater functions and how to operate it.
Maintain the heater in accordance with the instructions to ensure that it
functions properly.
Keep this manual with the heater. If the heater is to be used by a third party,
this instruction manual must be supplied with it.
The safety instructions do not by themselves eliminate any danger completely
and proper accident prevention measures must always be used.
No liability can be accepted for any damage caused by non -compliance with
these instructions or any other improper use or mishandling.
WARNING! Do not use this heater if it has been damaged in any way
or if the supply cord is damaged. Return it immediately to the
retailer. Heaters should be checked annually for electrical safety in
order to limit the risk of electric shock or fire.
PACKAGE CONTENTS
1 x 2000watt 11 Fin Oil Heater with Timer
1 x Set Wheel Assembly
I x Instruction Manual
CAUTION. Confirm all parts before disposing of packaging. Safely
dispose of all plastic bags and other packaging components. They
may be potentially dangerous to children.
Page 2 of 10
LOCATION AND SAFE USE OF YOUR
ELECTRIC OIL HEATER
Environment
Use the heater only as directed. This heater is designed for domestic use
only.
Do not immerse any part of this appliance or supply cord in water. Do not use
with wet hands or use in any damp situations.
This appliance is designed for inside use only. Do not use outdoors.
Do not use near curtains or other combustible materials.
Do not use near a hot gas or electrical burner.
This heater must not be located directly below or in front of a socket outlet.
This appliance must not be used in locations where flammable vapour or
explosive dust is likely to exist.
This heater must not be used in the immediate surroundings of any bath,
shower or swimming pool or used in any other damp area where contact with
water may create an electrical hazard.
Controls.
The heater has the following control functions.
Selector Switch:
0 Off
1 LOW HEAT
2 MED HEAT
3 HIGH HEAT
Thermostat:
Set to control the room temperature.
Timer:
Auto – Off – Manual Override Switch
24 hour Timer
48 x 30 Minute Time Interval
Page 3 of 10
LOCATION AND SAFE USE OF YOUR ELECTRIC OIL HEATER
(continued)
Wheel Assembly.
Warning! The heater must be operated the correct way up. Failure to
install the wheel assembly correctly or use in an upright position (thermostat
at top) will result in damage to both the heater and possibly create a risk of
fire. The wheel assembly brackets must be attached to the outer fin positions
(as shown in photo example below) for stability.
(Example photo only – Number of Fins may vary)
Correct wheel assembly for smaller oil heaters.
Warning! Ensure the wheel assemblies are mounted on the
“outermost” fin positions for stability as shown above.
Warning! Ensure correct installation with the thermostat
and controls at the top. The elements are located in the
lower portion of heater and are covered by heating oil.
Installing upside down will severely damage the heater.
Page 4 of 10
LOCATION AND SAFE USE OF YOUR ELECTRIC OIL HEATER
(continued)
Manual Operation.
Once the heater has been installed correctly in position, connect the supply
plug to a suitable power outlet. Ensure the thermostat, Timer and any heat
control switch is set to ‘Off’ before plugging in. Turn power on.
Select the desired heat setting on the heat selection switch.
Set the thermostat to the desired setting, lower for cooler room
temperature, higher for hotter room temperature.
Set the timer auxiliary override switch to Manual (I).
The indicator lamp indicates that the power is ON and heating.
Timer Operation (Refer photo for function).
Once the heater has been installed correctly in position, connect the supply
plug to a suitable power outlet. Ensure the thermostat, Timer and any heat
control switch is set to ‘Off’ before plugging in. Turn power on.
Set the current time on the time clock (24 hour – rotate clockwise to
adjust).
Set the desired ON/OFF times on the time clock (pull outwards each
Red button at the selected ‘turn on’ time.
Select “Timer” (Left position) setting on the auxiliary timer override
switch.
Select the desired heat setting on the heat selection switch.
Set the thermostat to the desired setting, lower for cooler room
temperature, higher for hotter room temperature.
When the timer passes the selected time points the heater will switch
‘On’ automatically, heating will begin. The timer will switch heating ‘Off’
automatically once the timer has passed the selected time points.
Set the timer auxiliary override switch to Manual (I) to return to
manual use.
Warning! Fully unwind the supply cord before use. Do not
use with the supply cord wound up, this will cause
overheating of the supply cord and risk of fire.
Page 5 of 10
LOCATION AND SAFE USE OF YOUR ELECTRIC OIL HEATER
(continued)
Timer Description:
Auxiliary Clock Override Switch Positions
Timer OFF Manual
Current time
24Hour Timer.
Example: Timer set to turn “ON” at 8am and “OFF” at 1pm.
Pull the corresponding red buttons out as shown above.
Page 6 of 10
LOCATION AND SAFE USE OF YOUR ELECTRIC OIL HEATER
(continued)
Caution: First Time Use!
For first time use there may be a small amount of smell, this is
normal.
Warning! Remember to switch the heater to “OFF” at the end of use
and disconnect from the mains supply, do not leave on unattended.
There may be a risk of fire.
Warning! Do not cover this heater. Do not use other than as
directed. Do not place clothing or similar over this heater, as it will
overheat. Use a suitable drying rack. Do not knock over.
In order to avoid overheating, do not cover the heater.
IMPORTANT SAFETY INFORMATION
When using electric appliances always observe safety regulations where
applicable to reduce the risk of fire, electric shock and personal injury.
Always check that the power supply corresponds to the voltage on the rating
plate.
Warning! This electric heater must be connected to a suitable 230-240 V ~
50Hz power supply. If using an extension cord, ensure that the extension
cord is of a suitable 10-amp power rating. Fully unwind the supply cord when
in use as a coiled cord may overheat.
Warning! If the supply cord is damaged it must be replaced by the
manufacturer or its service agent or a similarly qualified person in order to
avoid a hazard.
Warning! Always unplug from mains supply when not in use. Do not abuse
or damage the power cord. Fully unwind the cord before use as a coiled cord
may overheat.
Page 7 of 10
IMPORTANT SAFETY INFORMATION (continued)
Warning! Caution. Be aware of the danger to young children of any electrical
appliance. Keep out of reach of young children.
This appliance is not intended for use by young children or infirm persons.
Young children must be supervised to ensure that they do not play with the
appliance.
Warning! Do not immerse appliance in water or other liquid. Do not use this
heater in the immediate surroundings of a bath, a shower or a swimming
pool. Do not immerse any part of this appliance or supply cord in water. Do
not use with wet hands or use in any damp situations.
Warning! This appliance is designed for inside use only.
Warning! Do not use near curtains or other combustible materials. Do not
use outdoors. Do not use near a hot gas or electrical burner.
Warning! This heater must not be located directly below or in front of a
socket outlet.
Warning! This appliance must not be used in locations where flammable
vapour or explosive dust is likely to exist.
Warning! This appliance is a class 1 appliance and must be connected to
earth.
Warning! Do not cover this heater. Always leave a gap around the heater.
Warning! Always inspect your heater before use. Do not use this appliance if
it has been damaged, dropped, left outdoors or dropped in water.
Warning! Do not attempt to service this heater yourself. Return it to a
qualified service agent for repair. This appliance requires no maintenance.
Store in a safe place
When not in use store your appliance and all its accessories and
instruction manual in a safe and dry place.
Page 8 of 10
CLEANING AND MAINTENANCE
Before cleaning.
When not in use or before cleaning, always disconnect the heater from the
mains supply.
Cleaning.
Wipe the outer surface with a damp cloth, dry with a dry towel.
Do not let dust build up on the outer casing.
Damage check.
Always check that the heater is in good working order before use.
Service
Do not attempt to service this heater. There are no user serviceable parts. If
it is faulty in any way, return it to the retailer immediately.
Oil Leak
WARNING! This heater is filled with a precise quantity of special oil. Repairs
requiring opening of the oil container are only to be made by the
manufacturer or his service agent who should be contacted if there is an oil
leakage.
Caution! Regulations concerning the disposal of oil when scrapping
the appliance have to be followed.
Safety Check
This heater should be checked annually by a suitably qualified person to
ensure its safety and suitability for use.
TECHNICAL SPECIFICATIONS
230-240V ~ 50Hz
2000 Watts
Page 9 of 10
Guarantee Card
This product is guaranteed against faulty materials and workmanship for a
period of 24 months from the date of purchase. The obligation to the
purchaser under this warranty is limited to servicing the unit and replacing
defective parts when the product is returned freight prepaid to the retailer.
This warranty becomes void if the product has been tampered with, damaged
by accident, damaged in any other way by improper use or has been
purchased second hand. All production orders have quality inspections. In
the unlikely event of a deficiency, please contact the retailer from whom this
product was purchased.
WARRANTY FOR APPLIANCES USED COMMERCIALLY LIMITED TO 90 DAYS
Type of Appliance:
Model No.:
Purchase date:
Product Purchased From:
Your Name:
Address:
Phone Number:
IMPORTANT!
Please retain this warranty card along with your purchase receipt. Please do
not post to the retailer or importer. If service is required, both of these
documents are to be returned with the appliance to your retailer, otherwise a
fee may be charged.
Page 10 of 10