1
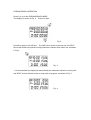
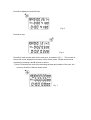
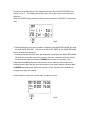
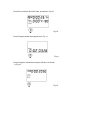
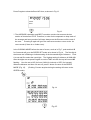
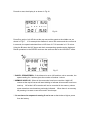
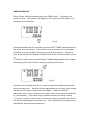
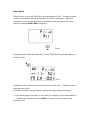
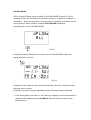
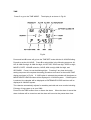
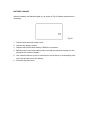
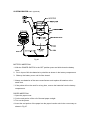
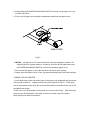
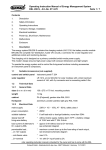
Ultrak 4 9 9
INSTRUCTION MANUAL
FEATURES:
B
A
D
C
FIG. 1
CHRONOGRAPH
•
2000 memories
•
Segregated memory (capability to memorize LAP times of different races)
•
User Selectable LAP/SPLIT or LAP/SPEED display
•
Average and best lap time display
•
Automatic release of LAP time after 10 seconds to allow progress monitoring.
•
Data can be printed by printer (optional) at operation or selectively by race later
•
Data can be uploaded to computer through upload cable with software (cable and
software optional)
TIMER
•
Dual timers which start one after another for use in training programs.
•
Can be used as ordinary countdown timer if 2nd timer is not set
CLOCK
•
Hour, minute, seconds, month, date, day and alarm
12/24 hour and month/date or date/month display user selectable
CHRONOGRAPH OPERATION
Press C to go to the CHRONOGRAPH MODE.
The display as shown in Fig. 2.
Press A to start.
Fig. 2
Press B to get the 1st LAP time.
The LAP time is shown at the top row, the SPLIT
time at the middle row and the running total time is shown at the lower row, as shown
in Fig.3.
Fig. 3.
** 10 seconds later the display will automatically be released to show the running LAP
and SPLIT times to allow the user to keep track of progress, as shown in Fig. 4.
Fig. 4
Press B to display the 2nd LAP time.
Fig. 5.
Press A to stop.
Fig. 6.
Press B to reset and be ready for the next race, as shown in Fig. 7.
The counter at
the top left corner displays the memory left for further races. Further races can be
recorded by pressing A and B buttons as above.
** Since 5 memories are used for memorizing the date and number of the race, the
memory left will be 1993 as shown below.
Fig. 7.
Press D to recall data stored. The display which we call the RACE RECORD is as
shown in Fig. 8.
The display shows the date in which the race was recorded and
MCH-001
(MSP for SPEED mode) stands for the first race recorded in LAP/SPLIT mode at that
date.
Fig.8
**Pressing B button when the stopwatch is displaying the RACE RECORDS will show
the next RACE RECORD
(if there is) and the LAP TIMES in this RACE RECORD
can be recalled by pressing D.
** Pressing and hold A button when the stopwatch is displaying the RACE RECORDS
will clear the memories in that race record ( when the contents in this race record
are cleared the display will show CLEARED and sounds a long beep, if A is
released before ED appears the memories will not be cleared ) and continuously
holding A button after this will clear the memories of all races (display will show ALL
CLEARED and display will return to as shown in Fig.2. Memories are available for
storage when they are cleared.
Press D again to recall the 1st LAP data, as shown in Fig.9.
Fig.9.
Press D to recall the 2nd LAP data, as shown in Fig.10.
Fig.10.
Press D again shows the stopped time, Fig. 11.
Fig.11.
Press D again to show the average LAP time, as shown
in Fig.12.
Fig.12.
Press D again to show the Best LAP time, as shown in Fig.13.
Fig.13.
** The AVERAGE calculation and BEST record do not take into account the last
section of time before STOP. Therefore, in order for the stopwatch to keep track of
the average and best records of all Laps, always use the B button until the end of
the race.
Pressing D again will go to the next race records or return to the 1st
race records (if there is no further race).
In the CHRONO MODE before the start of a race, such as in Fig.7, push and hold B
for 2 seconds will go to the SPEED SET mode as is shown in Fig.14.
The first digit in
the lowest row is flashing to indicate setting of the thousandth digit of distance.
A to set and B to select the next digits.
Push
The highest setting for distance is 9999.999.
After the digits are set press B again to set the TIME unit with the top left corner HR
flashing.
Use A to set to HR (for /hour), MIN (for /minute) or SEC (for /second).
When the distance and time unit are set, press C button to return to the SPEED
MODE (Fig. 15).
(Pushing C button anytime during the setting will return to the
SPEED mode).
Fig.14.
Fig.15.
Press A to start, the display is as shown in Fig.16.
Fig.16.
Press B to get the 1st LAP time at the top row and the speed at the middle row, as
shown in Fig.17.
If for example the distance is set to 200 meters and time unit set is
in seconds, the speed calculated from a LAP time of 17.09 seconds is 11.70 m/sec.
Using the B button the LAP times and their corresponding speeds can be displayed.
Recall operations in the SPEED mode are the same as that in the LAP/SPLIT mode.
Fig.17.
** BASE 3 STROKE/FREQ-- if the distance is set to 180 and time unit to seconds, the
speed reading for 3 strokes gives the number of strokes / minute.
** MEMORY USED UP-- When all the memories have been used the 4 digit LAP
counter at the top left corner will start blinking to indicate all memories have been
used up.
All further LAP memories will not be recorded in the memory unless
some memories are cleared as previously indicated.
When there is no memory
left pressing A to start a race will sound 3 short beeps.
** Do not leave the stopwatch running if not in use as that drains a higher power
from the battery.
TIMER OPERATION
Press C button until the stopwatch goes to the TIMER mode.
shown in Fig.18.
The display is as
The top row is the display for the 1st timer and the middle row is
the display for the 2nd timer.
Fig.18.
Press and hold B button for 2 seconds to go into the SET TIMER mode with the hour
digit of the 1st timer blinking.
Press A button to set to desired hour for countdown.
Press B to go to the first digit in minutes and press A to set minutes.
Similarly by
using B and A buttons the desired countdown times for the 1st and 2nd timers can be
set.
**Pressing C button once any time during this TIMER setting sequence will complete
the setting and the timer is ready to start upon pressing the A button.
Fig.19.
Press A to start countdown with the “1 ” at the top right corner blinking and the timer
setting counting down.
When the 1st timer approaches zero, the timer gives 4 beeps
and the 2nd timer starts counting down immediately.
When the 2nd timer
approaches zero, it gives 2 beeps and the 4 digit counter at the lowest row advances
by 1 automatically.
At any time during countdown pressing A will stop counting.
** If only the 1st timer is set the timer is used as an ordinary countdown timer and will
give 5 times 4 beeps when the set time is up. The 4 digit counter also advances by 1
automatically when the timer reaches zero.
PRINT MODE
Press C button to go to the PRINT ALL mode as shown in Fig.20.
Pressing A button
will print all recorded memories to the printer (if printer is connected).
When the
stopwatch is in the process of printing, an indicator moves from right to left. When
printing is complete PRINT END is displayed.
Fig.20.
Pressing B at the PRINT ALL mode will go to the PRINT RACE mode with display as
shown in Fig.21.
Fig.21.
Pressing A in this mode will only print the memories in this race.
Press B to select
particular race to print.
Pressing C any time during this printing process will stop printing immediately.
** If the chronograph is not reset (i.e. still running or stopped), it will not be possible to
upload and the display will show PRINT 0, there will not be any action upon
pressing A or B.
UPLOAD MODE
In Fig. 20 press D button once will switch to UPLOAD MODE as shown in Fig.22.
Pressing A button will UPLOAD ALL recorded memories to computer (if computer is
connected).
When the stopwatch is in the process of uploading, an indicator moves
from right to left. When upload is complete UPLOAD END is displayed.
press D button to return to PRINT MODE.
Fig.22.
Pressing B at the UPLOAD ALL mode will go to the UPLOAD RACE mode with
display as shown in Fig.23.
Fig. 23.
Pressing A in this mode will only upload the memories in this race. Press B to select
particular race to upload.
Pressing C any time during this uploading process will stop printing immediately.
** If the chronograph is not reset (i.e. still running or stopped), it will not be possible to
upload and the display will show UPLOAD 0, there will not be any action upon
pressing A or B.
TIME
Press C to go to the TIME MODE.
The display is as shown in Fig.24.
Fig.24.
Press and hold B button will go into the TIME SET mode with the AL HOUR blinking.
Press A to set the AL HOUR.
Press B to select digits in the following sequence: AL
HR, AL MIN first digit, AL MIN 2nd digit, AL OFF/ON, YEAR last digit, YEAR 1st digit,
MONTH, DATE, 12/24HR selection, HOUR, MIN 1st digit, MIN 2nd digit, and
SECONDS.
Press A to set the blinking digits. Pressing C any time during this
setting sequence will complete the setting procedure and return to the normal TIME
display as shown in Fig.24.
If 12HR option is selected the calendar will be shown as
MONTH/DATE/YEAR and time will be displayed in 12 HOUR system.
If 24HR option
is selected, the calendar will be displayed as DATE/MONTH/YEAR and time will be
displayed in 24HOUR system.
The calendar automatically adjusts for weekday and odd and even months including
February of leap years up to year 2089.
Press D in the TIME mode to arm or disarm the alarm.
When the alarm is armed the
alarm indicator will be turned on and the alarm will sound at the preset alarm time.
CARE OF YOUR STOPWATCH
*WATER-RESISTANCE
The stopwatch is designed to withstand accidental contact with water such as
splashes or rain, but it is not designed for use in water.
Do not operate the buttons
when the stopwatch is wet.
*TEMPERATURE
Do not leave your stopwatch under direct sunlight or in very high temperatures for a
long time, or the display may become black.
Do not leave your stopwatch in very low
temperature as this may cause a slight time loss or gain and the change of digits
becomes slow.
In both cases the above conditions will be corrected when the
stopwatch returns to normal temperature.
*SHOCKS
Be careful not to drop your stopwatch or hit it against hard surfaces as it may cause
mechanical damages.
*STATIC ELECTRICITY
The integrated circuit in your stopwatch can be affected by static electricity.
static electricity is very strong a permanent damage can occur.
If the
Be careful of the
screen of the TV set and the wearing of clothing made of synthetic materials in dry
weather; in such cases a very strong static electricity can be generated.
*MAGNETISM
Not affected.
*CHEMICALS
Do not expose your stopwatch to solvents such as gasoline and alcohol, spray of
cosmetics, cleaners, paints etc as they may cause damage to the stopwatch.
BATTERY CHANGE
When the battery low indicator lights up, as shown in Fig.25, battery replacement is
necessary.
Fig.25.
1. Unscrew and remove the back cover.
2. Unscrew the battery contact.
3. Replace with fresh Lithium battery CR2032 or equivalent.
4. Before putting in the fresh battery make sure that the triangular contact is in the
triangular slot under the battery.
5. Use a small metal tool (such as a tweezers or screw driver) to momentarily short
circuit the AC pad next to the battery.
6. Re-screw the back cover.
SYSTEM PRINTER 499-P (Optional)
Fig.26.
BATTERY INSERTION
1. With the POWER SWITCH in the OFF position press and slide down the battery
cover.
2. Put in 4 pcs of AA size batteries in polarities as shown in the battery compartment.
3. Slide up the battery cover until it clicks closed.
** Always use batteries of the same manufacturer and replace all batteries at the
same time,
** If the printer will not be used for a long time, remove the batteries from the battery
compartment.
PAPER INSERTION
1. Open the paper cover.
2. Cut the end portion of the roll of thermal paper straight.
3. Turn on the printer.
4. Insert the end portion of the paper into the paper insertion slot in the correct way as
shown in Fig.27.
5. Keep pressing the PAPER ADVANCING SWITCH until the end of paper is 2-3 cm
out from the printer.
6. Put the roll of paper into the paper compartment and close the paper cover.
Fig.27.
** NEVER
pull paper from the reverse direction, this may damage the printer. For
replacing the roll of paper before it is used up, first tear off the paper and press
the PAPER ADVANCING SWITCH until all the remaining paper is out.
** Do not touch the paper on the right side as it may cause poor printing.
** Always store the paper rolls in a cool, dry place and keep away from direct sunlight.
CONNECTION TO PRINTER
1. Insert both plugs of the connecting cord to the printer and stopwatch with the power
of the printer turned off.
Always hold the plug as illustrated in Fig.28.
Either plug
can be inserted into either jack. Be sure that both jacks are inserted all the way in the
stopwatch and printer.
2. After use, turn off the power of the printer, then remove the plugs.
After removing
the plug from the stopwatch, remember to insert the rubber cap to the jack to
keep it away from dust and moisture.
Fig.28.
OPERATION
IMMEDIATE PRINT-OUT
1. Switch the stopwatch to ‘PRINT ALL’ mode as shown in Fig. 20.
2. Connecting the stopwatch to the printer, slide the power switch to ON, the paper
will advance by 1 line.
3. Slide the PRINT MODE SWITCH to the TOP position. Only the SPLIT or SPEED
(depending on whether the stopwatch is in CHRONO or SPEED mode) will be
printed. If this switch is slid to the DOWN position, both LAP and SPLIT or LAP and
SPEED will be printed. (In SPEED mode, if B is pressed while the previous record
is still being printed, that SPEED record cannot be printed in real time. The
memories still record the full data for recall or upload).
4. Press button A of the stopwatch to start the race. The YEAR, MONTH and DATE,
START together with the CHRONO mode will be printed, as shown in Fig.29(a) and
29(b). The M at Fig.29b means that the time unit in the SPEED distance setting is
minutes (H for hour and S for seconds).
5. Press A button to stop. The print-out is as shown in Fig.30.
2001 8 20
START
Fig. 29(a)
2001
8 20
START
Fig. 29(b)
/S/0:00’29 35
Fig.30.
LAP/SPLIT
LAP/SPEED
Remarks:
•
Do not pull out the paper when the printer is not in operation.
•
Do not print if there is no paper in the printer.
•
Keep the printer from high moisture or dusty environment.
•
Do not subject the printer to violent shocks.
•
Do not put the printer under direct sunlight or near high temperature.
The case
may be deformed or damaged.
•
Do not wipe the case with a cloth moisturized with chemicals.
This may discolor
or deteriorate the printer.
•
Keep the jack away from moisture.
•
Remember to turn off the power switch if the printer is not in operation to avoid
battery consumption.
•
Replace the batteries when the printing slows down, getting poor, light or messy
print-outs, paper not advanced normally or
•
cannot be printed.