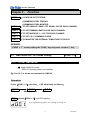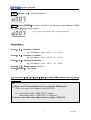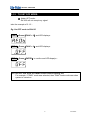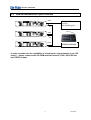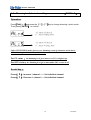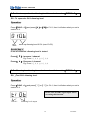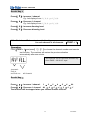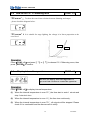
1
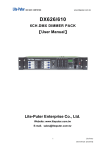
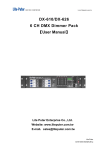
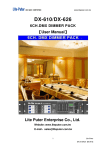
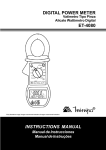
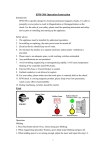
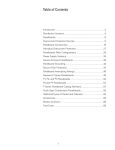
ISO 9001 CERTIFIED
DX-625
DMX 6CH. Dimmer Pack
【User Manual】
Lite-Puter Enterprise Co., Ltd.
Website: www.liteputer.com.tw
E-mail: [email protected]
ISO 9001 CERTIFIED
INDEX
THE REGULATION OF SAFE UASGE:..............................2
CHAPTER 1. INTRODUCTION
1-1 Features of DX-625 ...................................................................3
1-2 Notice before using....................................................................3
1-3 Specification ..............................................................................3
CHAPTER 2. INSTALLATION
2-1 Front Panel ................................................................................4
2-2 Rear Panel.................................................................................4
CHAPTER 3.
3-1
3-2
3-3
3-4
3-5
3-6
3-7
3-8
3-9
FUNCTION
DMX / ANALOG / OFF mode setting ....................................... 5
3-1-1 To set DMX mode ........................................................ 5
3-1-2 To set ANALOG mode ................................................. 7
3-1-3 To set OFF mode......................................................... 8
How to connect over 2 PCs of DX-625 .................................. 9
Dimming / Switch mode setting ...............................................10
Warm up 0-10%.......................................................................11
How to supervise the dimming level for each channel. ............12
Dimming level testing for each channel or all channels ...........12
Fade in and Fade out automatically testing
for each channel or all channels ..............................................13
How to set C2 / C3 dimming level............................................14
Display internal temperature....................................................14
QUALITY CERTIFICATION
. ........................................................................................................15
1
Lite-Puter
ISO 9001 CERTIFIED
The regulations of safe usage:
To ensure the normal and perfect working of DX-625,
as to the load capacity, please refer to our suggestions as
below:
(1). Maximum output of individual channel is 20A:
For the moments testing. (About 10 minutes.)
(2). Output of individual channel ≦16A:
For several hours. (It’s used for a theater or a stage.)
(3). Output of individual channel ≦12A
Continue working for the whole years.
(It's used for hotels or restaurants.)
(4). Individual channel must be set dimming or switching
function before the load switch ( circuit breaker) turns on.
The non-dimming lamp may be damaged in dimming function.
Please refer section 3-3.
2
Lite-Puter
ISO 9001 CERTIFIED
Chapter 1.
1-1
Introduction
Features of DX-625
Each channel auto-detected the phase of electric power individually.
It’s not necessary to consider the phase of electric power.:
No matter 1Ø1W, 1Ø3W, 3Ø3W, 3Ø4W, each phase can be applied to any channel
without the problem if connecting phases. Please note that the voltage through the loads
must be the same to the AC voltage.
Auto-tracking of electric power frequency: from 45 to 63 Hz.
SSR (Solid State Relay) inside: easy for maintenance.
All channels or individual channel can be set as on/ off or dimming function.
Warm-up set: the warm-up level 0-10% can be set to all channels or individual channel.
Can choose C2 (Square) or C3 (Linear) dimming curve.
Self-test function: fade-in/ fade-out test and bright level output test for all channels or
individual channel.
LED indicators: it displays the working situation of each channel and inner
temperature, ..etc.
Temperature control and heat-sink system: the power will be switched off automatically
when over heat.
1-2
Notice before using
Make sure that ch.1—ch.6 is connected with AC power, especially the channel 1 because
it is not only the inspective point of power phrase and also the power source of the main
control board.
1-3
Specification
Power
Output Maximal
DMX signal input/ output
DMX signal connector
Analog signal input
Analog connector
Dimension
Rack size
Weight
AC100-240V, 45-63Hz, 1Ø2W, 1Ø3W, 3Ø3W, 3Ø4W
20A for each channel
(Please refer to the user manual)
DMX512/ 1990
XLR 5PIN
DC 0-10V
DIN 8PIN
482(W) x 88(H) x 300(D) mm
19” 2U rack mountable
7.2Kg
DIN 8 PIN CONNECTOR START ADDRESS:
3
Lite-Puter
ISO 9001 CERTIFIED
Chapter 2.
2-1
Installation
FRONT PANEL:
6
5
2
1
DX-625
11
10
9
8
7
4
3
(1)
ON/OFF SWITCH
(7)
CONFIRMATION KEY
(2)
DMX SIGNAL OUT
(8)
FUNCTION KEY.
(3)
DMX SIGNAL IN
(9)
FUNCTION KEY.
(4)
ADJUSTABLE KEY.
(10) HIGH SPEED BREAKER( CH4-CH6)
(5)
INDICATOR
(11) HIGH SPEED BREAKER( CH1-CH3)
(6)
LED DISPLAY
2-2
REAR PANEL:
CH-1 must be given AC
power because it provides the
working electric power to the
DX-625
AC INPUT 100~240VAC
45~63HZ
AC OUTPUT 20A MAX PER CH.
(1)
AC POWER INPUT/OUTPUT TERMINAL
(2)
ANALOG SIGNAL INPUT 0-10VDC
(3)
4
FAN
Lite-Puter
ISO 9001 CERTIFIED
Chapter 3 .
Function
FUNC + 1:(1)FADE IN/ OUT TESTING.
(2)DIMMING LEVEL TESTING.
(3)DIMMING LEVEL MONITOR
FUNC + 2:TO SET ANALOG / DMX / OFF SIGNAL IN FOR EACH CHANNEL.
FUNC + 3:TO SET DIMMING /SWITCH FOR EACH CHANNEL.
FUNC + 4:TO SET WARM UP 1—10% FOR EACH CHANNEL.
FUNC + 5:TO SET C2 / C3 DIMMING CURVE.
FUNC + 6:TO MONITOR THE INTERNAL TEMPATURE OF DX-625.
REMARK:
“ FUNC + 1 ” means holding the “FUNC” key and press “number 1” key.
3-1
3-1-1
DMX /ANALOG / OFF mode setting
【FUNC + 2】
TO SET DMX MODE:
※ Under ANALOG mode:
DMX 512 dimming signal is acceptable
Eg: Set Ch .7 to be the start address for DMX IN.
Operation:
Press 【FUNC + 2】each time, LED will display as follows:
d.0.0.1.
A.E.0.6.
.0.F.F.
DMX mode
ANALOG mode
OFF mode
STEP 1:Press【FUNC + 2】and LED displays:
4 gree glimmering points are waiting for being set.
5
Lite-Puter
ISO 9001 CERTIFIED
STEP 2:Press【5】,and LED displays:
STEP 3:Press【ENTER】to confirm,and Ch .7 will be set the start address for DMX
IN. (start address of DMX signal)。
1 green point will glimmer when setting is finished.
Assist key:
Press【 4】: Increase 1 channel
eg: Led display from d 0 0 1 to d 0 0 2.
Press【 w】: Decrease 1 channel
eg: Led display from d 0 0 2 to d 0 0 1.
Press【 5】: Increase 6 channels.
eg: Led display from d 0 0 1 to d 0 07.
Press【 6】: Restore back to d 0 0 1.
Press【ENTER】: To confirm.
You can press【4】【w】【5】【6】to modify DMX Address directly under
DMX mode.
PS.
(1):There are 512 start addresses to be set under DMX mode.
(There are series 6 ch. output to each DX-625).
Eg: start address d001: DMX CH.1-6 output.
start address d0013: DMX CH.13-19 output.
(2):Users can set the same address for over 2pcs of DX-625.
6
Lite-Puter
ISO 9001 CERTIFIED
3-1-2
TO SET ANALOG MODE:
※ Under ANALOG mode:
Only ANALOG signal is acceptable and DMX output does not work.
take the example of 3-1-1:
Eg: Set ANALOG IN mode to DX-625.
STEP 1:Press【FUNC + 2】,and LED displays:
STEP 2:Press【FUNC + 2】,and LED displays:
STEP 3:Press【ENTER】to confirm and LED displays:
7
Lite-Puter
ISO 9001 CERTIFIED
3-1-3
TO SET OFF MODE:
※ Under OFF mode:
DX-625 will not accept any signal.
take the example of 3-1-2:
Eg: Set OFF mode to DX-625.
STEP 1:Press【FUNC + 2】and LED displays:
STEP 2:Press【FUNC + 2】and LED displays:
STEP 3:Press【ENTER】to confirm and LED dispalys:
PS. DX-625 will show the mode chosen before turning off.
For example, if "DMX" mode was selected, then "DMX" mode continues when
system is turned on.
8
Lite-Puter
ISO 9001 CERTIFIED
3-2
How to connect over 2 pcs of DX-625
OUT
DX-625
IN
DX-625
PIN2 and PIN3 are
parallel.
200 OHM register
OUT
IN
OUT
DX-625
DMX CONSOLE
IN
In order to make sure the realiability of long distance signal transfer (over 100
meter ),please connect with 200 OHM terminal resistor ( PIN2, PIN3) ON the
last DX-625 output.
9
Lite-Puter
ISO 9001 CERTIFIED
3-3
Dimming/ switch mode setting
【FUNC + 3】
Operation:
Press【FUNC + 3】and press the 【5】、【6】key to change dimming / switch mode.
Then press【ENTER】 to confirm .
AL: means all channels.
d: means dimming mode.
AL: means all channels.
d: means switching mode.
Under SWITCHING mode: there are no dimming/ warm up functions and it shows
OFF ( dimming level 0 %) / FL( 100 %) only.
For FL status: the dimming level given must over 51% to light it up.
For OFF status:the dimming level given must under 20% to turn it off.
Assist key:
Press【 4】: Increase 1 channel ------ Set individual channel
Press【 w】: Decrease 1 channel ----- Set individual channel
10
Lite-Puter
ISO 9001 CERTIFIED
3-4
Warm up 0-10%
【FUNC + 4】
EG: Warm up 6.0% for channel 1.
Operation:
Press【FUNC + 4】and press【w】、【4】to channel,then press【5】、【6】
to adjust the warm up value. Press【ENTER】to confirm.
STEP 1:Press【FUNC + 4】and LED displays:
All channles
Dimmer-warm up value( 0 ~ 10.0%)
STEP 2:Press【4】and LED display:
CH. 1
STEP 3:Press【5】to adjust the warm up value to 6%.
Warm up value
Assist key:
Press【 4】: Increase 1 channel
Press【 w】: Decrease 1 channel
Press【 5】: Increase warm up value
Press【 6】: Decrease warm up value
11
Lite-Puter
ISO 9001 CERTIFIED
3-5
How to supervise the dimming level for each channel
【FUNC + 1】
EG.: To supervise CH.1 dimming level
Operation:
Press【FUNC + 1】,and press【w】or【4】to CH.1, then it will show what you set in
section 3-4.
CH.1
warm up dimming level 6.0% (max.10.0%)
Assist key:
If one of channels’ dimming level is tested.
Press【 4】: Increase 1 channel
Eg. From 0 1.0.0 to 0 2.0.0
Press【 w】: Decrease 1 channel
Eg. From 0 2.0.0 to 0 1.0.0
3-6
Dimming level testing for each channel or all channels.【FUNC + 1】
EG.:Test CH.1 dimming level.
Operation:
Press【FUNC + 1】and press【w】or【4】to Ch.1, then it will show what you set in
section 3-4.
Please turn off DMX signal input before
executing this function.
Test ch.1
Dimming level output
12
Lite-Puter
ISO 9001 CERTIFIED
Assist key:
Press【 4】: Increase 1 channel
Eg. Led displays from 0 1.0.0 to 0 2.0.0
Press【 w】: Decrease 1 channel
Eg. Led displays from 0 2.0.0 to 0 1.0.0
Press【 5】: Increase dimming level.
Press【 6】: Decrease dimming level.
3-7
Fade in and Fade out automatical testing
for each channel or all channels 【FUNC + 1】
Operation:
Press【FUNC + 1】and press【w】、【4】to choose the channel number and execute
test function. The machine will restore the previous situation
automatically after one minute.
This function will be cancelled automatically
when DMX / ANALOG input.
Automatic
Fade in
and Fade out
All channels
Assist key:
Press【 4】: Increase 1 channel.
1 → 2 → 3 → 4 → 5 → 6 → AL
Press【 w】: Decrease 1 channel. AL → 6 → 5 → 4 → 3 → 2 → 1
The function will be stopped when you choose another function.
13
Lite-Puter
ISO 9001 CERTIFIED
3-8
How to set C2 / C3 dimming level
【FUNC + 5】
“C2 curve”: To show the exact linear relation between dimming and output
, please check the diagram below.
“C3 curve”: It is suitable for stage lighting, the voltage is in linear proportion to the
corol level.
C2
C3
Operation:
Press【FUNC + 5】and press【w】or【4】to choose C2 / C3dimming curve, then
press【ENTER】to confirm.
3-9
Display internal temperature
【FUNC + 6】
DX-625 can display internal temperature to
prevent from overheat to control the operation.
Operation:
Press【FUNC + 6】to display internal temperature.
(1) When the internal temperature is over 37℃,the fans start to work 1 minute and
stop 1 minute in turn.
(2) When the internel temperature is over 41℃,the fans turn continously.
(3) When the internal temperature is over 75℃, all outputs will be stopped. Please
check if it is overloaded and the dimmer rack is stuffy.
14
Lite-Puter
ISO 9001 CERTIFIED
Quality certification
Each DX-625 must be detailed specificated before shipping.
LITE PUTER offers 2 years guaranty for repairment free of
charge under normal usage.
Transportation fee will be charged for repairment by
engerineer service in your place.
Spare parts cost will be charged for the machine over 2
years.
The repaired machine sent back must keep everything
complete, the change of its CPU or PCB inside is prohibited.
DX-625 [EUM-B]
15
Lite-Puter