1
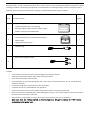
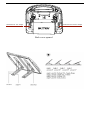
13 Watt PORTABLE
SOLAR POWER KIT
User’s Manual
Thank you for purchasing a Sunforce Portable Solar Power Kit. Please read these instructions carefully and thoroughly before
using the product. Your new Portable Solar Power Kit is a state-of-the art device which was developed according to the latest
technology standards. This manual gives important recommendations for installing and usage as well as remedies in case of
problems. Read carefully and mind the safety and usage recommendations at the end of the manual.
Serial
Description of parts
Quantity
Folding Solar Charger
1
•
13 Watt Amorphous solar cell technology
•
Adjustable Support Panel to Maximize Power Output
•
Capable to charge 12V and 24V battery
1
Battery Power Pack
2
•
12V/7Ah maintenance free sealed lead acid battery
•
Input & output
•
Integrated Charge Controller
1
12Volt DC Plug
3
1
Quick connect Alligator clamps
4
1
CAUTION
•
Please read the instructions carefully and thoroughly before using the product.
•
Always disconnect power adapter cables before moving the system.
•
Never assume that power is disconnected.
•
Clean the surface of solar panel periodically with a soft cloth for insured performance. Do not use any abrasive
solvents or materials.
•
For optimal charge leave uninterrupted for three sunny days.
•
A 150 Watt inverter is recommended for this application.
•
Connect the external inverter (not included) to the Inverter output of the battery Power Pack.
•
Batteries can produce flammable gases. Avoid making sparks, using fire or any flame. Make sure that the area where
the Power Pack will be used is ventilated.
•
Batteries store a large amount of energy. Never short circuit a battery under any circumstances.
•
Make sure that the voltage switch on the Folding Solar Charger is turned to “12V” before
connecting to the power unit.
OPERATION
Folding solar charger
•
Flip the supports open.
•
Pick location of set up – choose location with greatest sunlight throughout the day.
•
Place the Folding Solar Charger at a position that can have direct contact with sunlight, and face the solar cell to the
sun.
•
Tilt the Folding Solar Charger at a proper angle for maximum sun exposure. Angle can be same as your local latitude.
Angle of the Folding Solar Charger can be adjusted by moving the supports to different positions.
•
The blue LED will flash whenever the solar cell is generating electricity.
•
Connect the main cable of the Portable Solar Power Pack to the “Solar” input located on the back of the power unit.
The charger will subsequently charge the built-in battery of the power pack.
•
This Portable Solar Power Panel can also be used independently to charge an external battery. Simply attach battery
clamp lead wire (Serial # 4) to the main cable, and connect the battery clamp/male CLA to the battery / 12 Volt
outlet.
•
Please note that it is recommended to disconnect the Portable Solar Power Kit from your 12 Volt outlet or battery
when starting your car engine. Electrical surges from the engine, when starting and running, may damage your Power
Pack.
•
Rubber covers are provided to keep the Power Pack protected from the elements and to ensure safe use of this output.
•
•
The Power Pack houses a built-in charge controller.
Please make sure that the Power Pack is not in use while your vehicle is in use.
Installation:
Installation through the 12 Volt Outlet:
Plug the 12 Volt Male adapter into the female 12 Volt Outlet found in vehicle. Make sure both ends are secure and aligned
correctly.
Installation to Battery by Alligator Clamps:
Connect the alligator clamps correctly by matching the red clamp which is Positive (+) to the Positive (+) terminal on your
battery. Connect the black Clamp which is Negative (-) to the Negative (-) Terminal on your battery. Failure to follow these
suggestions may cause damage to the battery that may cause bodily harm. For optimal charging power ensure, the panel (solar
cell up) is directly facing the sun.
Power Pack:
•
The Power Pack is an independent source that supplies power to your applications. It consists of a built-in battery, a
charge controller, and two inputs & outputs.
•
Use the Folding Solar Charger to charge the internal battery. It takes approximately three sunny days to fully charge
the battery.
•
Insure that the voltage switch on the folding solar charger is set to “12V” before connecting to the power pack.
•
Switch on the power pack.
•
When the battery is charging the LED charge indicator will be illuminated.
charging the LED will go off.
Once the Power Pack is completed
•
When the system is appropriately set up, the “Working” LED will remain illuminated,If the battery is empty, and
therefore does not have sufficient power to support applications the “Working” LED will go off.
Once this happens
please be sure to stop any running application, and charge the battery using the Folding Solar Charger.
•
The Power Pack has two outputs:
12V DC plug:
To supply power to any device that can be powered through a 12 Volt unit, such as laptops, mobile phones, video games etc…
* Connect these applications to 12Volt DC socket only.
Inverter:
•
An external inverter (not included) can be connected to this output, in order to enable power to run AC (110V or 220V)
applications. Such as small TV, electric fan….
Please note that total power output of the AC application is
recommended to be below 100W.
* Insure that the inverter is disconnected from the 12 Volt DC output. Failure to follow these
suggestions may
cause damage to the internal charge controller.
•
USB output: Can be used to support electronic and portable devices.
•
Additional batteries may be attached via the “Output to DC applications” input located on the back of the power pack.
This feature can be used to connect an external battery (12V battery only). This will in essence increase the amperage
of the total battery capacity of the 7Ah battery. Increased battery capacity can help extend the period of time you
operate your applications.
•
Fuse Replacement:
There are two fuses (10A car fuse) within the power pack to prevent accidental short-circuiting from damaging the power
pack. The fuses are located in the 12V DC adapter.
1. Remove the 10 screws located on the power pack panel.
2. Remove cover.
3. Replace fuse with 10 Ah.
4. Replace cover and secure it with screws.
•
Battery Replacement:
Internal 12V/7Ah battery must be replaced once every two years under normal working condition, or if the battery is
over-discharged.
1. Remove the 10 screws located on the power pack panel.
2. Remove cover.
3. Remove the battery and disconnect it from the sleeve connector
4. Replace battery with a 12V/7Ah and attach the sleeve connector. Make sure to connect
with correct polarity (Red for positive & Black for negative)
5. Replace cover and secure it with screws.
10Ah Fuse for 12V output
10Ah Fuse for Inverter output
Back cover opened
Warranty
This product is covered by a 1 year limited warranty.
Sunforce Products Inc warrants to the original purchaser that
this product is free from defects in materials and workmanship for the period of one year from date of purchase.
Power output is warranted for five years from date of purchase.
To obtain warranty service please contact Sunforce Products for further instruction, at
1-888-478-6435 or email [email protected].
Proof of purchase including date, and an explanation of
complaint is required for warranty service.
For more information or technical support
1-888-478-6435
www.sunforceproducts.com
[email protected]
Made in China